Microsoft
®
Visual Basic
®
2008
Acknowledgments ...xi
Introduction
...
xxvii
Chapter 1: Welcome to Visual Basic 2008 ... 1
Chapter 2: The Microsoft .NET Framework ... 25
Chapter 3: Writing Software ... 37
Chapter 4: Controlling the Flow ... 87
Chapter 5: Working with Data Structures ... 133
Chapter 6: Extensible Application Markup Language (XAML) ... 185
Chapter 7: Building Windows Applications ... 211
Chapter 8: Displaying Dialog Boxes ... 257
Chapter 9: Creating Menus ... 301
Chapter 10: Debugging and Error Handling ... 325
Chapter 11: Building Objects ... 363
Chapter 12: Advanced Object-Oriented Techniques ... 403
Chapter 13: Building Class Libraries ... 439
Chapter 14: Creating Windows Forms User Controls ... 457
Chapter 15: Programming Custom Graphics ... 485
Chapter 16: Accessing Databases... 535
Chapter 17: Database Programming with SQL Server and ADO.NET ... 555
Chapter 18: ASP.NET ... 617
Chapter 19: Web Projects ... 653
Chapter 20: Visual Basic 2008 and XML ... 677
Chapter 21: Distributed Computing with Windows
Communication Foundation ... 717
Chapter 22: Building a Sequential Workflow Using the Windows
Workflow Foundation ... 737
Chapter 23: Building Mobile Applications ... 755
Chapter 24: Deploying Your Application ... 775
Chapter 25: Where to Now? ... 793
Appendix C: An Introduction to Code Security and SSL ... 835
Appendix D: An Introduction to Windows CardSpace ... 841
Appendix E: .NET Framework Differences ... 849
Microsoft
®
Visual Basic
®
2008
Thearon Willis
and
Bryan Newsome
Published by
Wiley Publishing, Inc.
10475 Crosspoint Boulevard Indianapolis, IN 46256
www.wiley.com
Copyright © 2008 by Wiley Publishing, Inc., Indianapolis, Indiana Published simultaneously in Canada
ISBN: 978-0-470-19134-7
Manufactured in the United States of America 10 9 8 7 6 5 4 3 2 1
Library of Congress Cataloging-in-Publication Data
Willis, Thearon.
Beginning Microsoft Visual basic 2008 / Thearon Willis and Bryan Newsome. p. cm.
Includes index.
ISBN 978-0-470-19134-7 (paper/website)
1. Microsoft Visual BASIC 2. BASIC (Computer program language) I. Newsome, Bryan, 1971- II. Title.
QA76.73.B3W45556 2008 005.2'762—dc22
2008004982
No part of this publication may be reproduced, stored in a retrieval system or transmitted in any form or by any means, electronic, mechanical, photocopying, recording, scanning or otherwise, except as permitted under Sections 107 or 108 of the 1976 United States Copyright Act, without either the prior written permission of the Publisher, or authorization through payment of the appropriate per-copy fee to the Copyright Clearance Center, 222 Rosewood Drive, Danvers, MA 01923, (978) 750-8400, fax (978) 646-8600. Requests to the Publisher for permission should be addressed to the Legal Department, Wiley Publishing, Inc., 10475 Crosspoint Blvd., Indianapolis, IN 46256, (317) 572-3447, fax (317) 572-4355, or online at www.wiley.com/go/permissions. Limit of Liability/Disclaimer of Warranty: The publisher and the author make no representations or warranties with respect to the accuracy or completeness of the contents of this work and specifically disclaim all war-ranties, including without limitation warranties of fitness for a particular purpose. No warranty may be cre-ated or extended by sales or promotional materials. The advice and strategies contained herein may not be suitable for every situation. This work is sold with the understanding that the publisher is not engaged in rendering legal, accounting, or other professional services. If professional assistance is required, the services of a competent professional person should be sought. Neither the publisher nor the author shall be liable for damages arising herefrom. The fact that an organization or Website is referred to in this work as a citation and/or a potential source of further information does not mean that the author or the publisher endorses the information the organization or Website may provide or recommendations it may make. Further, readers should be aware that Internet Websites listed in this work may have changed or disappeared between when this work was written and when it is read.
For general information on our other products and services please contact our Customer Care Department within the United States at (800) 762-2974, outside the United States at (317) 572-3993 or fax (317) 572-4002.
— Thearon
To Jennifer and Katelyn.
Thearon Willis currently works as a senior developer and builds Windows applications and add - ins for Microsoft Office products using Microsoft Visual Basic 2008. Over the years, Thearon has worked on a variety of systems from mainframe to client - server development.
Acquisitions Editor
Katie Mohr
Development Editors
Sara Shlaer Sydney Jones
Technical Editor
Mark Lavoie
Production Editor
Kathryn Duggan
Copy Editor
Travis Henderson
Editorial Manager
Mary Beth Wakefield
Production Manager
Tim Tate
Vice President and Executive Group Publisher
Richard Swadley
Vice President and Executive Publisher
Joseph B. Wikert
Project Coordinator, Cover
Lynsey Stanford
Proofreader
Jeremy Bagai, Word One New York Editing & Proofreading
Indexer
First and foremost I want to thank God for giving me the wisdom and knowledge to share with others and for the many talents that he has blessed me with. I would also like to thank Katie Mohr for giving me the opportunity to write this book and Sara Shlaer and Sydney Jones for their hard work in editing. Also thanks to all the other people at Wiley who work so hard to bring this book to market. I ’ d be remiss if I didn ’ t thank my good friend and co - author Bryan Newsome; thanks for your hard work and dedication.
— Thearon So many people put so much effort into publishing this work. Thank you all; this would not be possible without your hard work and dedication. Special thanks to Katie Mohr, Sara Shlaer, Sydney Jones, and Mark Lavoie for making my work readable and technically sound. It was a pleasure to work with you all over the past months. Thank you Thearon; you were a terrific mentor for me and the reason I ever had the opportunity to write.
Acknowledgments xi
Introduction xxvii
Chapter 1: Welcome to Visual Basic 2008
1
Event-Driven Programming
2
Installing Visual Basic 2008
3
The Visual Basic 2008 IDE
7
The Profile Setup Page
7
The Menu
8
The Toolbars
9
Creating a Simple Application
10
The Toolbox
14
Modified Hungarian Notation
18
The Code Editor
19
Using the Help System
23
Summary
24
Exercise
24
Chapter 2: The Microsoft .NET Framework
25
Microsoft’s Reliance on Windows
25
MSN 1.0
26
The .NET Vision
27
This Sounds like Java
28
Where Now?
29
Writing Software for Windows
29
The .NET Framework Classes
30
Executing Code
31
Common Language Runtime
32
Code Loading and Execution
33
Application Isolation
33
Security
33
Interoperation
34
Exception Handling
34
Chapter 3: Writing Software
37
Information and Data
37
Algorithms
38
What Is a Programming Language?
39
Working with Variables
39
Comments and Whitespace
42
Comments
42
Whitespace
44
Data Types
44
Working with Numbers
45
Common Integer Math Operations
45
Integer Math Shorthand
48
Working with Strings
52
Using Dates
61
Boolean
68
Storing Variables
69
Binary
69
Bits and Bytes
70
Representing Values
70
Converting Values
72
Methods
73
Why Use Methods?
74
Methods You’ve Already Seen
75
Building a Method
78
Choosing Method Names
81
Scope
82
Summary
84
Exercises
85
Chapter 4: Controlling the Flow
87
Making Decisions
87
The If Statement
88
The Else Statement
90
Allowing Multiple Alternatives with ElseIf
91
Nested If Statements
92
Single-Line If Statement
92
Comparison Operators
93
Select Case
105
Case-Insensitive Select Case
108
Multiple Selections
112
The Case Else Statement
113
Different Data Types with Select Case
114
Loops
114
The For . . . Next Loop
115
The For Each . . . Next Loop
120
The Do . . . Loop Loops
121
Nested Loops
127
Quitting Early
128
Infinite Loops
131
Summary 132
Exercises 132
Chapter 5: Working with Data Structures
133
Understanding Arrays
133
Defining and Using Arrays
134
Using For Each . . . Next
137
Passing Arrays as Parameters
139
Sorting Arrays
142
Going Backwards
143
Initializing Arrays with Values
144
Understanding Enumerations
145
Using Enumerations
145
Determining the State
150
Setting Invalid Values
152
Understanding Constants
153
Using Constants
153
Different Constant Types
155
Structures 155
Building Structures
156
Adding Properties to Structures
159
Working with ArrayLists
160
Using an ArrayList
160
Deleting from an ArrayList
164
Showing Items in the ArrayList
167
Working with Collections
168
Creating CustomerCollection
169
Building Lookup Tables with Hashtable
172
Using Hashtables
172
Cleaning Up: Remove, RemoveAt, and Clear
176
Case Sensitivity
178
Advanced Array Manipulation
180
Dynamic Arrays
180
Using Preserve
182
Summary 183
Exercises 184
Chapter 6: Extensible Application Markup Language (XAML)
185
What Is XAML?
185
XAML Syntax
187
Windows Presentation Foundation
190
Creating a Rich WPF User Interface
191
Using WPF Common Controls
197
Wiring Up Events
205
Summary 209
Exercise
209
Chapter 7: Building Windows Applications
211
Responding to Events
211
Setting Up a Button Event
212
Building a Simple Application
219
Building the Form
219
Counting Characters
223
Counting Words
226
Creating More Complex Applications
232
The Text Editor Project
232
Creating the Toolbar
233
Creating the Status Bar
238
Creating an Edit Box
240
Clearing the Edit Box
242
Responding to Toolbar Buttons
244
Using Multiple Forms
251
The About Dialog Box
251
Chapter 8: Displaying Dialog Boxes
257
The MessageBox Dialog Box
257
Available Icons for MessageBox
258
Available Buttons for MessageBox
259
Setting the Default Button
259
Miscellaneous Options
260
The Show Method Syntax
260
Example Message Boxes
262
The OpenDialog Control
265
The OpenFileDialog Control
265
The Properties of OpenFileDialog
266
The Methods of OpenFileDialog
267
Using the OpenFileDialog Control
268
The SaveDialog Control
273
The Properties of SaveFileDialog
273
The Methods of SaveFileDialog
274
Using the SaveFileDialog Control
274
The FontDialog Control
278
The Properties of FontDialog
278
The Methods of FontDialog
279
Using the FontDialog Control
279
The ColorDialog Control
282
The Properties of ColorDialog
283
Using the ColorDialog Control
284
The PrintDialog Control
285
The Properties of PrintDialog
286
Using the PrintDialog Control
286
The PrintDocument Class
287
Printing a Document
287
The FolderBrowserDialog Control
294
The Properties of FolderBrowserDialog
295
Using the FolderBrowserDialog Control
295
Summary 298
Exercises 299
Chapter 9: Creating Menus
301
Understanding Menu Features
301
Images
302
Access Keys
302
Check Marks
302
The Properties Window
303
Creating Menus
304
Designing the Menus
304
Adding Toolbars and Controls
306
Coding Menus
308
Coding the View Menu and Toolbars
312
Testing Your Code
314
Context Menus
316
Creating Context Menus
317
Enabling and Disabling Menu Items and Toolbar Buttons
320
Summary 324
Exercise
324
Chapter 10: Debugging and Error Handling
325
Major Error Types
326
Syntax Errors
326
Execution Errors
329
Logic Errors
329
Debugging 331
Creating a Sample Project
331
Setting Breakpoints
347
Debugging Using the Watch Window
354
Debugging with the Locals Window
356
Error Handling
358
Using Structured Error Handling
359
Summary 361
Exercises 362
Chapter 11: Building Objects
363
Understanding Objects
363
Encapsulation
365
Methods and Properties
365
Events
365
Visibility
366
What Is a Class?
367
Building Classes
367
Designing an Object
369
State
370
Behavior
370
Storing State
371
Real Properties
374
Read/Write Properties
377
The IsMoving Method
380
Constructors 382
Inheritance 384
Adding New Methods and Properties
385
Adding a GetPowerToWeightRatio Method
387
Changing Defaults
389
Polymorphism: Scary Word, Simple Concept
391
Overriding More Methods
392
Inheriting from the Object Class
394
Objects and Structures
395
The Framework Classes
396
Namespaces
396
The Imports Statement
398
Creating Your Own Namespace
399
Inheritance in the .NET Framework
401
Summary 402
Exercises 402
Chapter 12: Advanced Object-Oriented Techniques
403
Building a Favorites Viewer
403
Internet Shortcuts and Favorites
404
Using Classes
407
Scanning Favorites
413
Viewing Favorites
420
An Alternative Favorite Viewer
422
Building a Favorites Tray
422
Displaying Favorites
424
Using Shared Properties and Methods
428
Using Shared Procedures
428
Using Shared Methods
433
Understanding Object-Oriented Programming and Memory Management
434
Garbage Collection
435
Releasing Resources
436
Defragmentation and Compaction
437
Chapter 13: Building Class Libraries
439
Understanding Class Libraries
440
Creating a Class Library
440
Building a Class Library for Favorites Viewer
442
A Multitiered Application
445
Using Strong Names
446
Signing Assemblies
447
Assembly Versions
449
Registering Assemblies
449
Gacutil Utility
450
Why Is My Assembly Not Visible in the References Dialog Box?
450
Designing Class Libraries
452
Using Third-Party Class Libraries
453
Viewing Classes with the Object Browser
454
Summary 455
Exercise
455
Chapter 14: Creating Windows Forms User Controls
457
Windows Forms Controls
458
Creating and Testing a User Control
458
Exposing Properties from User Controls
462
Adding Properties
462
Exposing Methods from User Controls
464
Exposing Events from User Controls
465
Design Time or RunTime
470
Creating a Command Link Control
472
Building the Command Link Control
473
Using the Command Link Control
481
Summary 484
Exercise
484
Chapter 15: Programming Custom Graphics
485
Building a Simple Paint Program
485
Creating a Project with User Controls
486
How Drawing Programs Work
486
The GraphicsItem Class
488
Screen and Client Coordinates
490
Listening to the Mouse and Drawing GraphicsCircle Objects
491
Optimized Drawing
497
Choosing Colors
498
Responding to Clicks
504
Dealing with Two Colors
507
Indicating the Assigned Buttons
509
Using Advanced Colors
516
Using Different Tools
520
Implementing Hollow Circle
521
Working with Images
525
Drawing Images
526
Scaling Images
528
Preserving the Aspect Ratio
530
More Graphics Methods
533
Summary 533
Chapter 16: Accessing Databases
535
What Is a Database?
535
Microsoft Access Objects
536
Tables
536
Queries
536
The SQL SELECT Statement
537
Queries in Access
539
Creating a Customer Query
539
Data Access Components
543
DataSet
544
DataGridView
544
BindingSource
545
BindingNavigator 545
TableAdapter
545
Data Binding
546
Summary 552
Exercises 553
Chapter 17: Database Programming with SQL Server and ADO.NET
555
ADO.NET
556
ADO.NET Data Namespaces
557
The SqlConnection Class
558
SqlCommand
560
SqlDataAdapter 562
The ADO.NET Classes in Action
570
Examining a DataSet Example
570
Data Binding
578
BindingContext and CurrencyManager
579
Binding Controls
580
LINQ to SQL
610
Summary 614
Exercises 615
Chapter 18: ASP.NET
617
Thin-Client Architecture
618
Web Forms versus Windows Forms
619
Windows Forms Advantages
619
Web Forms Advantages
619
Web Applications: The Basic Pieces
620
Web Servers
620
Browsers
620
HyperText Markup Language
620
VBScript and JavaScript
621
Cascading Style Sheets
621
Active Server Pages
621
Benefits of ASP.NET Web Pages
622
Special Web Site Files
622
Development
622
Controls: The Toolbox
623
Building Web Applications
623
Creating a Web Form for Client- and Server-Side Processing
623
Web Site Locations with VS 2008
628
Performing Data Entry and Validation
630
Designing the Site’s Look and Feel
635
Using the GridView to Build a Data-Driven Web Form
645
Summary 651
Exercises 651
Chapter 19: Web Projects
653
Web Site Authentication
653
Windows Authentication
654
Web Site Administration Tool (
WAT
) 654
Login Controls
662
Summary 675
Exercises 675
Chapter 20: Visual Basic 2008 and XML
677
Understanding XML
677
What Does XML Look Like?
678
XML for Visual Basic Newcomers
680
The Address Book Project
681
Creating the Project
681
The SerializableData Class
682
Loading the XML File
688
Changing the Data
691
Sending E-mail
692
Creating a List of Addresses
694
Ignoring Members
698
Loading Addresses
701
Adding New Addresses
702
Navigating Addresses
704
Deleting Addresses
705
Integrating with the Address Book Application
707
Demonstrating the Principle of Integration
708
Reading the Address Book from Another Application
709
Summary 714
Exercises 715
Chapter 21: Distributed Computing with Windows
Communication Foundation
717
What Is a Web Service?
717
How Does a Web Service Work?
718
SOAP
719
Building a Web Service
721
A Web Services Demonstration
721
Adding More Methods
724
Understanding WCF Services
726
WCF services
726
Chapter 22: Building a Sequential Workflow Using the Windows
Workflow Foundation
737
Visual Studio Workflow Templates
739
Workflow Foundation Components
740
Sequential Workflow Activities
740
Creating a Sequential Worklow
741
Property Tax Listing Form Workflow
744
Summary 753
Exercises 753
Chapter 23: Building Mobile Applications
755
Understanding the Environment
755
Common Language Runtime
756
ActiveSync and Windows Mobile Device Center
756
Common Types in the Compact Framework
758
The Compact Framework Classes
759
Building a Pocket PC Game
761
Summary 773
Exercise
773
Chapter 24: Deploying Your Application
775
What Is Deployment?
775
ClickOnce Deployment
776
XCOPY Deployment
781
Creating a Visual Studio 2008 Setup Application
781
User Interface Editor
785
Deploying Different Solutions
788
Private Assemblies
789
Shared Assemblies
789
Deploying Desktop Applications
790
Deploying Web Applications
790
Deploying XML Web Services
790
Useful Tools
791
Chapter 25: Where to Now?
793
Online Resources
794
P2P.Wrox.com
794
Microsoft Resources
794
Other Resources
795
Offline Resources (Books)
795
Professional Visual Basic 2008
795
Visual Basic 2008 Programmer’s Reference
796
Appendix A: Exercise Solutions
797
Appendix B: Using the Microsoft Solutions Framework
827
Appendix C: An Introduction to Code Security and SSL
835
Appendix D: An Introduction to Windows CardSpace
841
Appendix E: .NET Framework Differences
849
Visual Basic 2008 is Microsoft ’ s latest version of the highly popular Visual Basic .NET programming language, one of the many languages supported in Visual Studio 2008. Visual Basic 2008 ’ s strength lies in its ease of use and the speed at which you can create Windows Forms applications, WPF Windows applications, web applications, WPF Browser applications, mobile device applications, and web services. In this book, we introduce you to programming with Visual Basic 2008 and show you how to create these types of applications and services. Along the way you ’ ll also learn about object - oriented techniques and learn how to create your own business objects and Windows controls.
Microsoft .NET Framework provides Visual Basic 2008 programmers with the capability to create full object - oriented programs, just like the ones created using C# or C++. The .NET Framework provides a set of base classes that are common to all programming languages in Visual Studio 2008, which provides you with the same capability to create object - oriented programs as a programmer using C# or C++. This book will give you a thorough grounding in the basics of programming using Visual Basic 2008; from there the world is your oyster.
Who Is This Book For?
This book is designed to teach you how to write useful programs in Visual Basic 2008 as quickly and easily as possible.
There are two kinds of beginners for whom this book is ideal:
You ’ re a beginner to programming and you ’ ve chosen Visual Basic 2008 as the place to start. That ’ s a great choice! Visual Basic 2008 is not only easy to learn, it ’ s also fun to use and very powerful.
You can program in another language but you ’ re a beginner to .NET programming. Again, you ’ ve made a great choice! Whether you ’ ve come from Fortran or Visual Basic 6, you ’ ll find that this book quickly gets you up to speed on what you need to know to get the most from Visual Basic 2008.
What Does This Book Cover?
Visual Basic 2008 offers a great deal of functionality in both tools and language. No one book could ever cover Visual Basic 2008 in its entirety — you would need a library of books. What this book aims to do is to get you started as quickly and easily as possible. It shows you the roadmap, so to speak, of what there is and where to go. Once we ’ ve taught you the basics of creating working applications (creating the windows and controls, how your code should handle unexpected events, what object - oriented
❑
programming is, how to use it in your applications, and so on), we ’ ll show you some of the areas you might want to try your hand at next. To this end, the book is organized as follows:
Chapters 1 through 9 provide an introduction to Visual Studio 2008 and Windows programming.
Chapter 6 provides an introduction to XAML and Windows Presentation Foundation (WPF) programming.
Chapter 10 provides an introduction to application debugging and error handling. Chapters 11 through 13 provide an introduction to object - oriented programming and building objects.
Chapter 14 provides an introduction to creating Windows Forms user controls. Chapter 15 provides an introduction to graphics in Windows applications.
Chapters 16 and 17 provide an introduction to programming with databases and covers Access, SQL Server, ADO.NET and LINQ.
Chapters 18 and 19 provide an introduction to ASP.NET and show you how to write applications for the Web.
Chapter 20 provides a brief introduction to XML, a powerful tool for integrating your applications — regardless of the language they were written in.
Chapter 21 introduces you to web services and the Windows Communication Foundation (WCF).
Chapter 22 introduces you to sequential workflows using the Windows Workflow Foundation (WF).
Chapter 23 introduces you to building applications for mobile devices using the Compact Framework classes.
Chapter 24 introduces you to deploying applications using ClickOnce technology. Chapter 25 provides some insight on where to go next in your journey to learn about Visual Basic 2008.
Appendix A provides the answers to chapter exercises. Appendix B introduces the Microsoft Solution Framework. Appendix C provides some background on security. Appendix D provides insight into Windows CardSpace.
Appendix E compares the differences between the latest versions of the .NET Framework.
What Do I Need to Run V isual Basic 2008?
Apart from a willingness to learn, all you ’ ll need for the first 13 chapters are a PC running Windows Vista (preferred), Windows XP (Home or Professional Edition), or Windows Server 2003; Internet Explorer; and of course, one of the following:
Microsoft Visual Basic 2008 Express
Microsoft Visual Basic 2008 Profession Edition Microsoft Visual Basic 2008 Team System
As the later chapters cover more advanced subject areas, you will need other software to get the most out of them. Also note that Visual Basic 2008 Express does not support creating web applications, mobile applications, or deployment projects.
Chapter 14 requires Microsoft Visual Basic 2008 Professional Edition or above in order to create Windows Forms User Controls.
Chapter 16 requires Microsoft Access 2000.
For Chapter 17 , you will need to have access to SQL Server 2005, SQL Server 2005 Express Edition, or SQL Server 2008.
Don ’ t worry if you don ’ t have these products yet and want to wait a while before you purchase them. You should still find that you get a lot out of this book.
Conventions
We ’ ve used a number of different styles of text and layout in this book to help differentiate between the different kinds of information. Here are examples of the styles we used and an explanation of what they mean.
Try It Out
How Do They Work?
1.
Each step has a number.2.
Follow the steps in sequence.How It Works
If there ’ s more that you need to understand about what ’ s going on as you complete the steps, you will find a subsequent “ How It Works ” section that explains what ’ s going on behind the scenes.
Background information, asides, and references appear in text like this.
❑
❑
❑
❑
❑
Code has several styles. If it ’ s a word that we ’ re talking about in the text — for example, when
discussing a For ... Next loop, it ’ s in this font . If it ’ s a block of code that can be typed as a program and run, it looks like this:
Private Sub btnAdd_Click(ByVal sender As System.Object, _ ByVal e As System.EventArgs) Handles btnAdd.Click Dim n As Integer
n = 27
MessageBox.Show(n) End Sub
Sometimes you ’ ll see code in a mixture of styles, like this:
Private Sub btnAdd_Click(ByVal sender As System.Object, _ ByVal e As System.EventArgs) Handles btnAdd.Click Dim n As Integer
n = 27 n = n + 2
MessageBox.Show(n) End Sub
In cases like this, the code with a white background is code that Visual Studio 2008 has automatically generated (in a Try It Out) or code you are already familiar with (in a How It Works); the lines highlighted in gray show a change or a new addition to the code.
Source Code
As you work through the examples in this book, you may choose either to type in all the code manually or to use the source code files that accompany the book. All of the source code used in this book is available for download at www.wrox.com . When at the site, locate the book ’ s title (either by using the Search box or by using one of the title lists) and click the Download Code link on the book ’ s detail page to obtain all the source code for the book.
Because many books have similar titles, you may find it easiest to search by ISBN; this book ’ s ISBN is 978 - 0 - 470 - 19134 - 7.
After you have downloaded the code, decompress it with your favorite compression tool. Alternately, you can go to the main Wrox code download page at www.wrox.com/dynamic/books/download.aspx to see the code available for this book and all other Wrox books.
Errata
We make every effort to ensure that there are no errors in the text or in the code. However, no one is perfect, and mistakes do occur. If you find an error in one of our books, like a spelling mistake or faulty piece of code, we would be very grateful for your feedback. By sending in errata you may save another reader hours of frustration and at the same time you will be helping us provide even higher
To find the errata page for this book, go to www.wrox.com and locate the title using the Search box or one of the title lists. Then, on the book details page, click the Book Errata link. On this page you can view all errata that have been submitted for this book and posted by Wrox editors. A complete book list including links to each book ’ s errata is also available at www.wrox.com/misc-pages/booklist.shtml . If you don ’ t spot your error on the Book Errata page, go to www.wrox.com/contact/techsupport .shtml and complete the form there to send us the error you have found. We ’ ll check the information and, if appropriate, post a message to the book ’ s errata page and fix the problem in subsequent editions of the book.
p2p.wrox.com
For author and peer discussion, join the P2P forums at p2p.wrox.com . The forums are a web - based system for you to post messages relating to Wrox books and related technologies and interact with other readers and technology users. The forums offer a subscription feature to e - mail you topics of interest of your choosing when new posts are made to the forums. Wrox authors, editors, other industry experts, and your fellow readers are present on these forums.
At p2p.wrox.com you will find a number of different forums that will help you not only as you read this book, but also as you develop your own applications. To join the forums, just follow these steps:
1.
Go to p2p.wrox.com and click the Register link.2.
Read the terms of use and click Agree.3.
Complete the required information to join as well as any optional information you wish to provide and click Submit.4.
You will receive an e - mail with information describing how to verify your account and complete the joining process.You can read messages in the forums without joining P2P but in order to post your own messages, you must join.
1
Welcome to
V isual Basic 2008
This is an exciting time to enter the world of programming with Visual Basic 2008 and Windows Vista. Windows Vista represents the first Windows operating system upgrade since Windows XP was first released in 2002. A lot has changed in the Windows user interface and Visual Basic 2008 makes it easy to write professional - looking Windows applications as well as web applications and web services. Haven ’ t upgraded to Windows Vista yet? No worries, Visual Basic 2008 also allows you to write professional - looking applications for Windows XP as well.
The goal of this book is to help you use the Visual Basic 2008 programming language, even if you have never programmed before. You will start slowly and build on what you have learned in subsequent chapters. So take a deep breath, let it out slowly, and tell yourself you can do this. No sweat! No kidding!
Programming a computer is a lot like teaching a child to tie his shoes. Until you find the correct way of giving the instructions, not much is accomplished. Visual Basic 2008 is a language you can use to tell your computer how to do things. But, like a child, the computer will understand only if you explain things very clearly. If you have never programmed before, this sounds like an arduous task, and sometimes it can be. However, Visual Basic 2008 gives you an easy - to - use language to explain some complex tasks. Although it never hurts to have an understanding of what is happening at the lowest levels, Visual Basic 2008 frees the programmer from having to deal with the mundane complexities of writing Windows applications. You are free to concentrate on solving real problems.
Visual Basic 2008 can also be used to create web applications and web services as well as mobile applications that can run on Pocket PCs or SmartPhones. However, you will begin by focusing on Windows applications before extending your boundaries to other platforms.
This chapter covers the following topics:
❑ Event - driven programming
❑ The installation of Visual Basic 2008
❑ A tour of the Visual Basic 2008 Integrated Development Environment (IDE)
❑ How to create a simple Windows program
❑ How to use the integrated Help system
Event - Driven Programming
A Windows program is quite different from yesteryear ’ s MS - DOS program. A DOS program follows a relatively strict path from beginning to end. Although this does not necessarily limit the functionality of the program, it does limit the road the user has to take to get to it. A DOS program is like walking down a hallway; to get to the end you have to walk down the hallway, passing any obstacles that you may encounter. A DOS program would only let you open certain doors along your stroll.
Windows, on the other hand, opened up the world of event - driven programming . Events in this context include clicking a button, resizing a window, or changing an entry in a text box. The code that you write responds to these events. In terms of the hallway analogy: In a Windows program, to get to the end of the hall, you just click the end of the hall. The hallway can be ignored. If you get to the end and realize that is not where you wanted to be, you can just set off for the new destination without returning to your starting point. The program reacts to your movements and takes the necessary actions to complete your desired tasks.
Another big advantage in a Windows program is the abstraction of the hardware ; which means that Windows takes care of communicating with the hardware for you. You do not need to know the inner workings of every laser printer on the market just to create output. You do not need to study the schematics for graphics cards to write your game. Windows wraps up this functionality by providing generic routines that communicate with the drivers written by hardware manufacturers. This is probably the main reason that Windows has been so successful. The generic routines are referred to as the
Windows application programming interface (API), and the classes in the .NET Framework take care of communicating with those APIs.
Before Visual Basic 1.0 was introduced to the world in 1991, developers had to be well versed in C and C++ programming, as well as the building blocks of the Windows system itself, the Windows API. This complexity meant that only dedicated and properly trained individuals were capable of turning out software that could run on Windows. Visual Basic changed all of that, and it has been estimated that there are now as many lines of production code written in Visual Basic as in any other language. Visual Basic changed the face of Windows programming by removing the complex burden of
Visual Basic has also been extensible from the very beginning. Third - party vendors quickly saw the market for reusable modules to aid developers. These modules, or controls , were originally referred to as VBXs (named after their file extension). Prior to Visual Basic 5.0, if you did not like the way a button behaved, you could either buy or create your own, but those controls had to be written in C or C++. Database access utilities were some of the first controls available. Version 5 of Visual Basic introduced the concept of ActiveX , which allowed developers to create their own ActiveX controls .
When Microsoft introduced Visual Basic 3.0, the programming world changed significantly. Now you could build database applications directly accessible to users (so - called front - end applications ) completely with Visual Basic. There was no need to rely on third - party controls. Microsoft accomplished this task with the introduction of Data Access Objects (DAO), which allowed programmers to manipulate data with the same ease as manipulating the user interface.
Versions 4.0 and 5.0 extended the capabilities of Version 3.0 to allow developers to target the new Windows 95 platform. They also made it easier for developers to write code, which could then be manipulated to make it usable to other language developers. Version 6.0 provided a new way to access databases with the integration of ActiveX Data Objects (ADO). The ADO feature was developed by Microsoft to aid web developers using Active Server Pages (ASP) to access databases. All of the improvements to Visual Basic over the years have ensured its dominant place in the programming world — it helps developers write robust and maintainable applications in record time.
With the release of Visual Basic .NET in February 2002, most of the restrictions that used to exist have been obliterated. In the past, Visual Basic was criticized and maligned as a “ toy ” language, because it did not provide all of the features of more sophisticated languages such as C++ and Java. Now, Microsoft has removed these restrictions and made Visual Basic .NET a very powerful development tool. This trend has continued with the release of Visual Basic 2003, Visual Basic 2005, and the latest release, Visual Basic 2008. Each new release of the Visual Basic .NET programming language brings about many new trends, features, and improvements, making it a great choice for programmers of all levels.
Installing V isual Basic 2008
You may own Visual Basic 2008 in one of the following forms:
❑ As part of Visual Studio 2008, a suite of tools and languages that also includes C# (pronounced
C - sharp ) and Visual C++. The Visual Studio 2008 product line includes Visual Studio Professional Edition or Visual Studio Tools Team Editions. The Team Edition versions come with progressively more tools for building and managing the development of larger, enterprise wide applications.
❑ As Visual Basic 2008 Express Edition, which includes the Visual Basic 2008 language, and a reduced set of the tools and features that are available with Visual Studio 2008.
Both of these products enable you to create your own applications for the Windows platform.
The installation procedure is straightforward. In fact, the Visual Studio Installer is smart enough to figure out exactly what your computer requires to make it work.
default installation options for most environments. So, regardless of which edition you are installing, the installation process should be smooth when accepting the default installation options.
1.
The Visual Studio 2008 DVD has an auto-run feature, but if the Setup screen does not appear after inserting the DVD, you need to run Setup.exe from the root directory of the DVD. To do this, click the Windows Start menu at the bottom left of your screen and then select the Run start menu item or browse to the Setup program on the DVD. In the Run dialog box, you can click the Browse button to locate the setup.exe program on your DVD. Then click the OK button in the Run dialog box to start the setup program. After the setup program initializes, you will see the initial screen as shown in Figure 1-1.2.
The dialog box shown in Figure 1-1 shows the order in which the installation will occur. To function properly, Visual Studio 2008 requires various updates to be installed depending on the operating system that you have (for example, Service Pack 2 on Windows XP). The setup program will automatically inform you of these updates if they are not installed. You should install those updates first and then return to the Visual Studio 2008 setup program. The individual updates required are different from the service releases listed as the third option in Figure 1-1. Step 1 of the setup program will install Visual Studio 2008 so click the Install Visual Studio 2008 link shown in Figure 1-1.3.
The next step in the installation process asks you if you want to send the setup information from the installation of Visual Studio 2008 to Microsoft. This is a good idea to help streamline the installation process of future editions of Visual Studio, and no personal information will be sent. You can click the Next button at this screen after you have selected or cleared the check box indicating whether or not you want this information sent.Try It Out
Installing Visual Basic 2008
4.
The third step in the installation process is the license agreement. Read the license agreement and then select the option button indicating your acceptance of the licensing terms. Then click the Next button to continue.5.
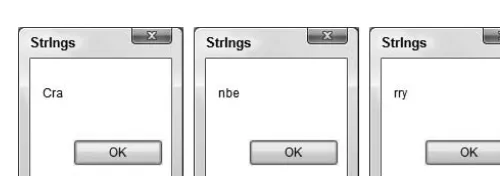
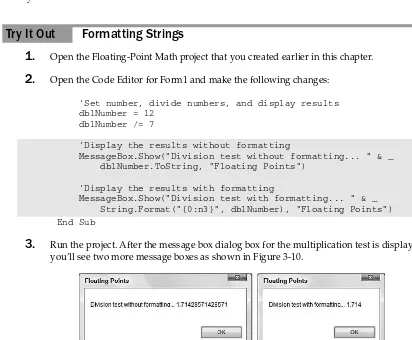
As with most setup programs, you are presented with a choice of options to be installed as shown in Figure 1-2. The default installation installs the recommended product features as determined by Microsoft. You have the option to choose the default installation, a fullinstallation, or to customize the installation. When choosing the custom installation feature, you will be presented with a dialog box allowing you to choose the languages and features of each language to be installed. If disk space allows, it is recommended that you choose a full installation. However, if you choose to customize the installation and omit some features from being installed, you can always install those features later by rerunning the setup program. After choosing your installation option, click the Install button to have those features installed.
Figure 1-2
7.
Once the installation has been completed, you will be presented with a dialog box informing you of the status of the installation. Here you can see any problems that the setup program encountered. At this point you are encouraged to update your computer with the latest secu-rity patches and a link is provided in the notes to Windows Update. When you have finished reviewing the setup status, click the Finish button to move on to the next step.8.
If you chose to have your setup information sent to Microsoft, the next step will be a dialog box sending the setup information. This dialog box requires no action on your part and it will automatically close when finished. The next dialog box is the one shown earlier in Figure 1-1 with the option to install the production documentation enabled. Click the Install Product Documentation link to install the MSDN library.9.
The first step in installing the MSDN library is choosing whether to send the setup informa-tion to Microsoft. Make the appropriate choice and then click the Next button to continue. Again, it is recommended to send this information to help streamline future MSDN library installations.10.
Next, read and accept the license agreement. After you click the option button to accept the license agreement, click the Next button to continue.11.
Like the installation of Visual Studio 2008, the MSDN library installation provides you with the options to choose the installation that best suits your needs, as shown in Figure 1-3. If you chose to install the complete Visual Studio 2008 product set then you’ll most likely want to choose the full installation of the MSDN library. After making your installation option choice, click the Install button to begin the installation.If you have the spare hard drive space, it is a very good idea to install the full documentation. That way you have access to the full library, which will be important if you choose a limited set of options during the install and later add more features.
12.
After the MSDN documentation has been installed, you are presented with a dialog box informing you of the status of the installation. Click the Finish button to be returned to the initial setup screen again. The Check for Service Releases option is now available.It is a good idea to select Service Releases to check for updates. Microsoft has done a good job of making software updates available through the Internet. These updates can include anything from additional documentation to bug fixes. You will be given the choice to install any updates through a Service Pack CD or the Internet. Obviously, the Internet option requires an active connection. Since updates can be quite large, a fast connection is highly recommended.
After you have performed the update process, Visual Studio 2008 is ready to use. Now the real fun can begin! So get comfortable, relax, and enter the world of Visual Basic 2008.
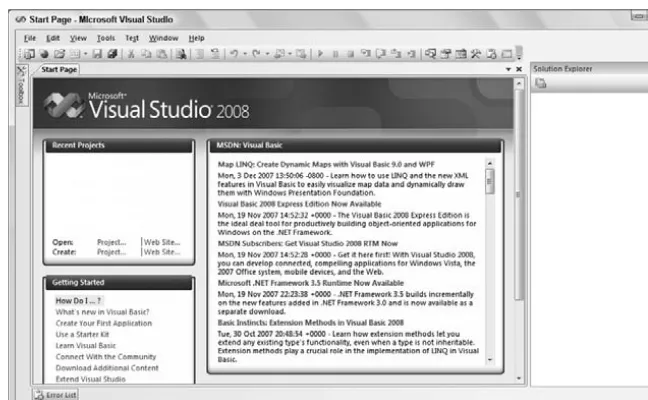
The V isual Basic 2008 IDE
You don ’ t need Visual Basic 2008 to write applications in the Visual Basic .NET language. The ability to run Visual Basic .NET code is included with the .NET Framework. You could write all of your Visual Basic .NET code using a text editor such as Notepad. You could also hammer nails using your shoe as a hammer, but that slick pneumatic nailer sitting there is a lot more efficient. In the same way, by far the easiest way to write in Visual Basic .NET code is by using the Visual Studio 2008 IDE. This is what you see when working with Visual Basic 2008 — the windows, boxes, and so on. The IDE provides a wealth of features unavailable in ordinary text editors — such as code checking, visual representations of the finished application, and an explorer that displays all of the files that make up your project.
The Profile Setup Page
The Menu
By now, you may be eager to start writing some code. Begin your exploration of the IDE by looking at the menu and toolbar, which are not really all that different from the toolbars and menus you have seen in Microsoft Office 2003 (although they differ from the ribbon bars in Microsoft Office 2007).
The Visual Studio 2008 menu is dynamic , which means items will be added or removed depending on what you are trying to do. When looking at the blank IDE, the menu bar consists only of the File, Edit, View, Tools, Window, and Help menus. When you start working on a project, however, the full Visual Studio 2008 menu appears as shown in Figure 1 - 5 .
Figure 1-4
Figure 1-5
At this point, there is no need to cover each menu topic in detail. You will become familiar with each of them as you progress through the book. Here is a quick rundown of what activities each menu item pertains to:
❑ File: Most software programs have a File menu. It has become the standard where you should find, if nothing else, a way to exit the application. In this case, you can also find ways of opening and closing single files and whole projects.
❑ Edit: The Edit menu provides access to the common items you would expect: Undo, Redo, Cut, Copy, Paste, and Delete.
❑ Project: The Project menu allows you to add various files to your application such as forms and classes.
❑ Build: The Build menu becomes important when you have completed your application and want to run it without the use of the Visual Basic 2008 environment (perhaps running it directly from your Windows Start menu, as you would any other application such as Word or Access).
❑ Debug: The Debug menu allows you to start and stop running your application within the Visual Basic 2008 IDE. It also gives you access to the Visual Studio 2008 debugger. The debugger allows you to step through your code while it is running to see how it is behaving.
❑ Data: The Data menu enables you to use information that comes from a database. It allows you to view and add data sources, and preview data. Chapters 16 and 17 will introduce you to work-ing with databases.
❑ Tools: The Tools menu has commands to configure the Visual Studio 2008 IDE, as well as links to other external tools that may have been installed.
❑ Test: The Test menu provides options that allow you to create and view unit tests for your appli-cation to exercise the source code in various scenarios.
❑ Window: The Window menu has become standard for any application that allows more than one window to be open at a time, such as Word or Excel. The commands on this menu allow you to switch between the windows in the IDE.
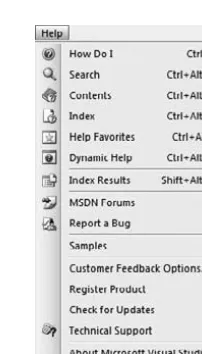
❑ Help: The Help menu provides access to the Visual Studio 2008 documentation. There are many different ways to access this information (for example, through the help contents, an index, or a search). The Help menu also has options that connect to the Microsoft web site to obtain updates or report problems.
The Toolbars
Many toolbars are available within the IDE, including Formatting, Image Editor, and Text Editor, which you can add to and remove from the IDE through the View Toolbars menu option. Each one provides quick access to often - used commands, preventing you from having to navigate through a series of menu options. For example, the leftmost icon (New Project) on the default toolbar (called the Standard toolbar), shown in Figure 1 - 6 , is available from the menu by navigating to File New Project.
Figure 1-6
The next group of icons is for editing (Cut, Copy, and Paste). The next icon is for finding and replacing items in your code.
The third group of icons is used for commenting out and un - commenting sections of code. This can be useful in debugging when you want to comment out a section of code to determine what results the program might produce by not executing those lines of code.
The fourth group of icons is for undoing and redoing edits and for navigating through your code. The fifth group of icons provides the ability to start (via the green triangle), pause, and stop your
application. You can also use the last three icons in this group to step into your code line by line, step over entire sections of code, and step out of a procedure. These icons will be covered in depth in Chapter 10 . The final group of icons provides quick links to the Solution Explorer, Properties window, Object Browser, Toolbox, Error List, and the Immediate window. If any of these windows is closed, clicking the appropriate icon will bring it back into view.
If you forget what a particular icon does, you can hover your mouse pointer over it so that a tooltip appears displaying the name of the toolbar option.
You could continue to look at each of the windows in the IDE by clicking on the View menu and choosing the appropriate window. But, as you can see, they are all empty at this stage and therefore not too revealing. The best way to look at the capabilities of the IDE is to use it while writing some code.
Creating a Simple Application
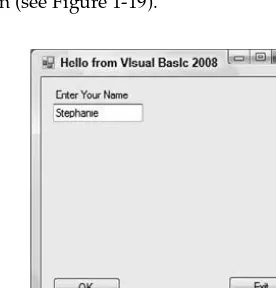
To finish your exploration of the IDE, you need to create a project, so that the windows shown earlier in Figure 1 - 4 have some interesting content for you to look at. In the following Try It Out exercise, you are going to create a very simple application called HelloUser that will allow you to enter a person ’ s name and display a greeting to that person in a message box.
1.
Click the New Project button on the toolbar.2.
In the the New Project dialog box, select Visual Basic in the Project Types tree-view box to the left and then select Windows beneath it. The Templates box on the right will display all of the available templates for the project type chosen. Select the Windows Forms Application template. Finally, type Hello User in the Name text box and click OK. Your New Project dialog box should look like Figure 1-7.Figure 1-7
Visual Studio 2008 allows you to target your application to a specific version of the Microsoft .NET Framework. The combo box in the upper right corner of the New Project dialog box has version 3.5 selected, but you can target your application to version 3.0 or even version 2.0 of the .NET Framework.
The IDE will then create an empty Windows application for you. So far, your Hello User program consists of one blank window, called a Windows Form (or sometimes just a form), with the default name of Form1.vb, as shown in Figure 1-8.
Whenever Visual Studio 2008 creates a new file, either as part of the project creation process or when you create a new file, it will use a name that describes what it is (in this case, a form) followed by a number.
Windows in the Visual Studio 2008 IDE
the top) and dragging it to a new location. The windows in the IDE can float (stand out on their own) or be docked (as they appear in Figure 1 - 8 ). The following list introduces the most common windows:
Figure 1-8
❑ Toolbox: The Toolbox contains reusable controls and components that can be added to your application. These range from buttons to data connectors to customized controls that you have either purchased or developed.
❑ Design window: The Design window is where a lot of the action takes place. This is where you will draw your user interface on your forms. This window is sometimes referred to as the Designer.
❑ Solution Explorer: The Solution Explorer window contains a hierarchical view of your solution. A solution can contain many projects, whereas a project contains forms, classes, modules, and components that solve a particular problem.
❑ Data Sources: The Data Sources window allows you to connect to a database and choose the database objects for your application.
Next you’ll give your form a name and set a few properties for it.
1.
Change the name of your form to something more indicative of what your application is. Click Form1.vb in the Solution Explorer window. Then, in the Properties window, change theFile Name property from Form1.vb to HelloUser.vb and press Enter, as shown in Figure 1-9. When changing properties you must either press Enter or click on another property for it to take effect.
Figure 1-9
Try It Out
Creating a HelloUser Project (cont.)
2.
Note that the form’s file name has also been updated in the Solution Explorer to readHelloUser.vb.
3.
Click the form displayed in the Design window. The Properties window will change to display the form’s Form properties (instead of the File properties, which you have just been looking at). You will notice that the Properties window is dramatically different. The differ-ence is the result of two different views of the same file. When the form name is highlighted in the Solution Explorer window, the physical file properties of the form are displayed. When the form in the Design window is highlighted, the visual properties and logical properties of the form are displayed.Figure 1-10
4.
Right now, the title (Text property) of your form (displayed in the bar at the top) is Form1. This is not very descriptive, so change it to reflect the purpose of this application. Locate theText property in the Properties window. Change the Text property’s value to Hello from Visual Basic 2008 and press Enter. Note that the form’s title has been updated to reflect the change.
If you have trouble finding properties, click the little AZ icon on the toolbar toward the top of the Properties window. This changes the property listing from being ordered by category to being ordered by name.
5.
You are now finished with the procedure. Click the Start button on the Visual Studio 2008 toolbar (the green triangle) to run the application. As you work through the book, whenever we say “run the project” or “start the project,” just click the Start button. An empty window with the title Hello from Visual Basic 2008 is displayed.That was simple, but your little application isn ’ t doing much at the moment. Let ’ s make it a little more interactive. To do this, you are going to add some controls — a label, a text box, and two buttons to the form. This will let you see how the Toolbox makes adding functionality quite simple. You may be wondering at this point when you will actually look at some code. Soon! The great thing about Visual Basic 2008 is that you can develop a fair amount of your application without writing any code. Sure, the code is still there, behind the scenes, but, as you will see, Visual Basic 2008 writes a lot of it for you.
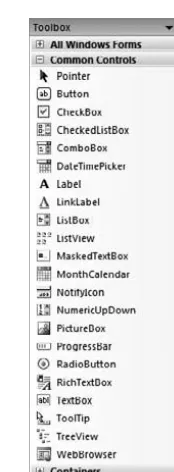
The Toolbox
The Toolbox contains a Node type view of the various controls and components that can be placed onto your form. Controls such as text boxes, buttons, radio buttons, and combo boxes can be selected and then drawn onto your form. For the HelloUser application, you will be using only the controls in the Common Controls node. Figure 1 - 11 shows a listing of common controls for Windows Forms.
Figure 1-11
Controls can be added to your forms in any order, so it does not matter if you add the label control after the text box or the buttons before the label. In the following Try It Out exercise, you start adding controls.
1.
Stop the project if it is still running, because you now want to add some controls to your form. The simplest way to stop your project is to click the close (X) button in the top-right corner of the form. Alternatively, you can click the blue square on the toolbar (which displays a ToolTip that says “Stop Debugging” if you hover over it with your mouse pointer).2.
Add a Label control to the form. Click Label in the Toolbox, drag it over to the form’s Designer and drop it in the desired location. (You can also place controls on your form by double-clicking the required control in the Toolbox or clicking the control in the Toolbox and then drawing it on the form.)3.
If the Label control you have just drawn is not in the desired location, it really isn’t a problem. When the control is on the form, you can resize it or move it around. Figure 1-12 shows whatthe control looks like after you place it on the form. To move it, click the dotted border and drag it to the desired location. The label will automatically resize itself to fit the text that you enter in the Text property.
4.
After drawing a control on the form, you should at least configure its name and the text that it will display. You will see that the Properties window to the right of the Designer has changed to Label1, telling you that you are currently examining the properties for the label. In the Properties window, set your new label’s Text property to Enter Your Name. Note that, once you press Enter or click on another property, the label on the form has automatically resized itself to fit the text in the Text property. Now set the Name property to lblName.5.
Now, directly beneath the label, you want to add a text box, so that you can enter a name. You are going to repeat the procedure you followed for adding the label, but this time make sure you select the TextBox control from the toolbar. After you have dragged and dropped (or double-clicked) the control into the appropriate position as shown in Figure 1-13, use the Properties window to set its Name property to txtName.Notice the sizing handles on the left and right side of the control. You can use these handles to resize the text box horizontally.
Figure 1-12
6.
In the bottom left corner of the form, add a Button control in exactly the same manner as you added the label and text box. Set its Name property to btnOK and its Text property to &OK. Your form should now look similar to the one shown in Figure 1-14.The ampersand (&) is used in the Text property of buttons to create a keyboard shortcut (known as a hot key). The letter with the & sign placed in front of it will become underlined (as shown in Figure 1-14) to signal users that they can select that button by pressing the Alt+letter key combi-nation, instead of using the mouse (on some configurations the underline doesn’t appear until the user presses Alt). In this particular instance, pressing Alt+O would be the same as clicking the OK button. There is no need to write code to accomplish this.
Figure 1-14