BEGINNING iOS GAME DEVELOPMENT
INTRODUCTION . . . xxi
⊲ PART I
THE TOOLS TO GET STARTED
CHAPTER 1 Games on iOS . . . 3CHAPTER 2 The Xcode Programming Environment . . . .17
CHAPTER 3 The C Programming Language . . . 45
CHAPTER 4 The Objective-C Programming Language . . . 95
CHAPTER 5 The Cocoa Foundation Framework . . . .137
⊲ PART II
GAME BUILDING BLOCKS
CHAPTER 6 Drawing with UIKit and Core Graphics . . . 173CHAPTER 7 Responding to User Interaction . . . 219
CHAPTER 8 Animating Your Graphics . . . 251
CHAPTER 9 Making Noise with iOS Audio APIs . . . 289
CHAPTER 10 Building a Networked Game with GameKit . . . 333
APPENDIX Answers to Exercises . . . 369
BEGINNING
BEGINNING
iOS Game Development
Indianapolis, IN 46256 www.wiley.com
Copyright © 2012 by Patrick Alessi
Published by John Wiley & Sons, Inc., Indianapolis, Indiana Published simultaneously in Canada
ISBN: 978-1-118-10732-4 ISBN: 978-1-118-22408-3 (ebk) ISBN: 978-1-118-23161-6 (ebk) ISBN: 978-1-118-26231-3 (ebk)
Manufactured in the United States of America 10 9 8 7 6 5 4 3 2 1
No part of this publication may be reproduced, stored in a retrieval system or transmitted in any form or by any means, electronic, mechanical, photocopying, recording, scanning or otherwise, except as permitted under Sections 107 or 108 of the 1976 United States Copyright Act, without either the prior written permission of the Publisher, or authorization through payment of the appropriate per-copy fee to the Copyright Clearance Center, 222 Rosewood Drive, Danvers, MA 01923, (978) 750-8400, fax (978) 646-8600. Requests to the Publisher for permission should be addressed to the Permissions Department, John Wiley & Sons, Inc., 111 River Street, Hoboken, NJ 07030, (201) 748-6011, fax (201) 748-6008, or online at http://www.wiley.com/go/permissions.
Limit of Liability/Disclaimer of Warranty: The publisher and the author make no representations or warranties with respect to the accuracy or completeness of the contents of this work and specifi cally disclaim all warranties, including without limitation warranties of fi tness for a particular purpose. No warranty may be created or extended by sales or pro-motional materials. The advice and strategies contained herein may not be suitable for every situation. This work is sold with the understanding that the publisher is not engaged in rendering legal, accounting, or other professional services. If professional assistance is required, the services of a competent professional person should be sought. Neither the pub-lisher nor the author shall be liable for damages arising herefrom. The fact that an organization or Web site is referred to in this work as a citation and/or a potential source of further information does not mean that the author or the publisher endorses the information the organization or website may provide or recommendations it may make. Further, readers should be aware that Internet websites listed in this work may have changed or disappeared between when this work was written and when it is read.
For general information on our other products and services please contact our Customer Care Department within the United States at (877) 762-2974, outside the United States at (317) 572-3993 or fax (317) 572-4002.
Wiley publishes in a variety of print and electronic formats and by print-on-demand. Some material included with stan-dard print versions of this book may not be included in e-books or in print-on-demand. If this book refers to media such as a CD or DVD that is not included in the version you purchased, you may download this material at
http://booksupport.wiley.com. For more information about Wiley products, visit www.wiley.com. Library of Congress Control Number: 2011940541
ABOUT THE AUTHOR
PATRICK ALESSI has been fascinated with writing computer programs since he fi rst saw his name fl ash across a terminal in 1980. Since then, he has written software using every language and hard-ware platform that he could get his hands on, including a brief and painful foray into Fortran on a VAX system during his engineering education. Patrick holds a B.S. degree in Civil Engineering from Rutgers University and an M.S. in Computer Science from Stevens Institute of Technology.
Professionally, Patrick has built data-centric applications for clients ranging from small business databases to large-scale systems for the United States Air Force. He has also developed a variety of real-time systems, graphics intensive desktop applications, and games. Currently, he is focused on developing connected applications and games for mobile devices such as the iPhone and iPad.
When he can back away from the computer, Patrick enjoys photography, traveling, gaming on his Xbox and doing just about anything with his family. You can follow him on Twitter at @pwalessi and read his blog at iphonedevsphere.blogspot.com.
ABOUT THE TECHNICAL EDITOR
ACQUISITIONS EDITOR Mary James
PROJECT EDITOR Brian MacDonald
TECHNICAL EDITOR Michael Gilbert
PRODUCTION EDITOR Rebecca Anderson
COPY EDITOR Mike La Bonne
EDITORIAL MANAGER Mary Beth Wakefi eld
FREELANCER EDITORIAL MANAGER Rosemarie Graham
ASSOCIATE DIRECTOR OF MARKETING David Mayhew
MARKETING MANAGER Ashley Zurcher
BUSINESS MANAGER Amy Knies
PRODUCTION MANAGER Tim Tate
VICE PRESIDENT AND EXECUTIVE GROUP PUBLISHER
Richard Swadley
VICE PRESIDENT AND EXECUTIVE PUBLISHER Neil Edde
ASSOCIATE PUBLISHER Jim Minatel
PROJECT COORDINATOR, COVER Katie Crocker
PROOFREADER Nancy Carrasco
INDEXER Robert Swanson
COVER DESIGNER Ryan Sneed
COVER IMAGE
ACKNOWLEDGMENTS
I WOULD LIKE TO take this opportunity to thank everyone who made this book possible. Mary James, my acquisitions editor, encouraged me to get back to writing and fostered this book through the acquisitions process. My project editor, Brian MacDonald, was instrumental in turning my stream of consciousness into a cohesive work. Mike Gilbert, my technical editor, gave up valuable app development and gaming time to review my work. I would also like to thank all of the other edi-torial and production staff that put many hours into this project to help get it to print.
CONTENTS
INTRODUCTION xxi
PART I: THE TOOLS TO GET STARTED
CHAPTER 1: GAMES ON IOS 3
What Makes a Good iOS Game?
4
Device Usage 4
Use Unique Features of iOS 4
Make Your Game Fun 5
Graphics and Design 6
Developing Your Idea
6
Documenting Your Game 6
Prototyping Your Game 7
Preparing to Code 8
Game-Related Frameworks
9
Cocoa 9
Drawing: UIKit and Core Graphics 11
User Interaction: Cocoa Touch 12
Animation: Core Animation 12
Sound: Core Audio 13
Game Kit 14
Summary 14
CHAPTER 2: THE XCODE PROGRAMMING ENVIRONMENT 17
The Coding Environment
18
Creating a Project 19
Navigating Your Project 22
The Navigator Area 22
Navigating by Symbol 23
Searching Your Code 23
Viewing Code Issues 24
Examining Logs 24
Editing Your Code 25
Code Coloring 25
Fix-it 28
Integrated Help 28
Using the Jump Bars 29
The Assistant Editor 30
Xcode Debugging Tools
31
Breaking and Stepping through Your Code 31
Additional Breakpoint Features 35
Building a Simple Interface
36
Summary 42
CHAPTER 3: THE C PROGRAMMING LANGUAGE 45
Introducing C
45
Variables and Expressions
46
Data Types 46
Variables 47
Base Data Types 47
Generating Output and
Accepting Input 47
Extending the Data Types 50
Operators 51
Assignment Operators 52
Arithmetic Operators 54
Relational Operators 54
Logical Operators 55
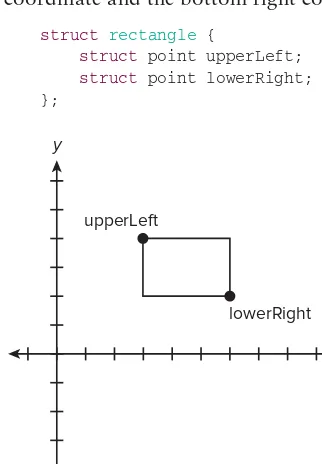
Scope 55 Structures 56 Arrays 61
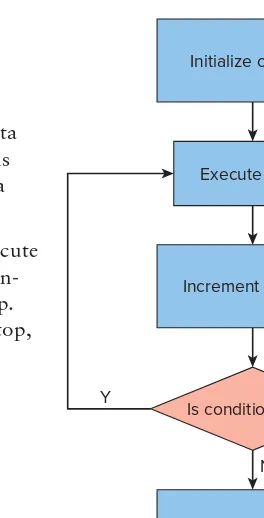
Loops 64
for Loops 64
while and do…while Loops 67
break and continue 72
Execution Flow and Decisions
73
The if Statement 73
The Conditional Operator 74
Choosing an Option with switch 75
Breaking Up Code with Functions
77
Pointers 82
A Game Example
85
CONTENTS
CHAPTER 4: THE OBJECTIVE-C PROGRAMMING LANGUAGE 95
Classes and Objects
96
Instance Variables 97
Methods and Messages 98
Managing Memory 104
Automatic Reference Counting 106
Inheritance 107
Building Subclasses from a Base Class 107
Overriding Base Class Methods 110
Polymorphism 111
Building a Game in Objective-C
114
Exposing Class Data with Properties 115
Declaring a Property 115
Accessing a Property 117
Class Methods 117
Implementing the MindPlayer 119
Building the Game Loop 127
Summary 134
CHAPTER 5: THE COCOA FOUNDATION FRAMEWORK 137
Model-View-Controller Architecture
138
Your First iOS Game
138
Building the UI
140
Outlets and Actions
140
Handling Text with NSString
144
NSString Methods 144
Mutable and Immutable Types 144
String Comparison 145
Collecting Objects with NSArray
146
NSArray Methods 146
Modifying Arrays by Using NSMutableArray 147
Wrapping Numbers with NSNumber 147
Other Collection Classes 148
NSSet 148 NSDictionary 148
Building the Game Model
157
PART II: GAME BUILDING BLOCKS
CHAPTER 6: DRAWING WITH UIKIT AND CORE GRAPHICS 173
Introducing the Drawing Frameworks
173
UIKit 174
Core Graphics 175
The Drawing Environment
175
The Graphics Context 175
The UIView Coordinate System 176
The drawRect: Method 176
Drawing Shapes with UIBezierPath 177
Specifying Colors with UIColor 178
Advanced Drawing with Core Graphics
186
Shadows 186 Gradients 188
Starting the Blocker Game with the BlockView
192
Working with Images
197
The Image Classes 198
The View Hierarchy 199
Animation and Timing with CADisplayLink
206
Finishing the Blocker Game
215
Summary 217
CHAPTER 7: RESPONDING TO USER INTERACTION 219
Events in iOS
219
The Event Architecture 220
Event Objects 221
Handling Multitouch Events 222
Building a Simple Touch-Based Game: Simon Says
225
Responding to Motion with the Accelerometer
241
Recognizing Gestures
247
Summary 249
CHAPTER 8: ANIMATING YOUR GRAPHICS 251
Animating Images with UIImageView
252
Introducing Core Animation
255
A Brief Introduction to Blocks
255
Animating UIView Properties and Transitions
256
Property Animations 256
CONTENTS
Core Animation Basics
275
Layer Layout 276
Animatable Properties 276
Layer Trees 282
Summary 285
CHAPTER 9: MAKING NOISE WITH IOS AUDIO APIS 289
Playing Simple Sounds with the System Sound Services
290
Playing Sounds with the AV Foundation Framework
291
The AVAudioPlayer Class 291
Format and Performance Considerations 292
Confi guring the Audio Session 293
Playing Multiple Sounds Simultaneously 313
Looping Sounds 313
Media Player Framework
322
Summary 330
CHAPTER 10: BUILDING A NETWORKED GAME WITH GAMEKIT 333
Introducing GameKit
333
Starting Out
334
Networking Your Game
351
NSData and NSCoding
352
Converting Classes to Data with Archives
353
Connecting and Sending Data
354
Running the Game
364
Summary 366
APPENDIX: ANSWERS TO EXERCISES 369
INTRODUCTION
IOS DEVICES PROVIDE DEVELOPERS with a unique and exciting platform for making games. The iPhone gives gamers a tiny computer in their pocket that they have with them all the time. The iPad provides a similar gameplay experience but with a larger screen, more processing power, and more memory. The devices allow for unique control schemes with their touch-sensitive displays, acceler-ometer, and even a gyroscope on the latest devices.
According to Scott Forstall at Apple’s 2011 World Wide Developer Conference, there are over 200 million iOS devices. This represents a huge audience for games. In the fi rst 14 months after the release of the iPad, Apple sold 25 million devices. Forstall also said that in the App Store’s three years, 14 bil-lion apps have been downloaded. Developers have been paid a total of $2.5 bilbil-lion for their efforts.
According to market research fi rms NewZoo and Distimo (http://www.distimo.com/
blog/2011_05_distimo-and-newzoo%C2%A0partner-on-games-data-over-5-million-ios-games-downloaded-per-day-by-63-million-ios-gamers-in-us-eu/), games are the largest cat-egory of applications on the app store. A full half of all downloads of free and paid apps are games. According to the National Gamers Survey in March 2011, there were more than 60 million iOS gamers in the US and Europe.
As you can see, there is a huge fi nancial incentive to write games for the iOS platform. But, there is more to it than that. Writing games is fun! If you like to write interesting programs and solve diffi cult problems, you will enjoy writing games. Also, games are a very expressive form of programming. As a corporate programmer in my day job, I sometimes feel like I’ve built the same three-tier database/ web application a hundred times. But, with games, every one is different.
With the right tools, you can make a game out of just about anything that you could possibly imag-ine. Apple provides some terrifi c, and free, tools for building games for iOS. Xcode, the development environment, is one of the best that I have ever worked with. If you are familiar with Visual Studio, Eclipse, or any of the other industry standard IDEs, you will feel right at home with Xcode. Apple also put a lot of thought into creating well-designed APIs to help you to take advantage of the fea-tures of the iOS platform. Once you learn some of the key fundamentals, you should be able to pick up and run with any of the core technologies and this book will help you to get there. Most chapters in this book feature real, working games that you will build. I think that the best way to learn is by doing, and by working along with the game examples in this book, you will learn how to use Apple’s tools to build games.
WHO THIS BOOK IS FOR
If you already have experience with Java, C#, or another object-oriented programming language, so much the better. If you already know C and/or Objective-C, feel free to skim over Chapters 3 and 4 as they will probably be old hat for you. However, I may have a little nugget in there that could teach you something new.
The book assumes no experience in writing for the Mac or iOS. That was a major factor in my decision to write this book. Every other book that I have seen on iOS game development assumes a foundation in basic iOS programming. I have not done that. I start from the beginning and guide you through the whole process of writing games for iOS from start to fi nish. By the end of this book, you will have written several games and you will have experience with many of the frameworks that you can use to draw graphics, perform animation, work with sound, and handle user input.
Keep in mind that this is a “Beginner” level title. If you have already published dozens of games for iOS, this book probably is not for you. In order to keep the book accessible for beginners, I have steered clear of the more diffi cult APIs. For example, I do not cover using OpenGL to render graph-ics. However, I do mention that advanced tools exist, explain their use, and attempt to point readers in the right direction if they decide that the technology may be appropriate for their project.
Finally, in addition to aspiring game developers, I think that this book would be handy for all devel-opers of iOS applications. After all, the APIs for graphics, animation, sound, and user input are just as applicable to a boring database application as they are to games. You might be able to spice up your next business tool and wow your customers and clients with eye-popping animations or you may be able to accept input in a way that you never thought of before reading this book.
WHAT THIS BOOK COVERS
As I mentioned, this is a beginner-level book, so I cover all of the technologies that a reader new to the iOS platform needs to get started writing games.
In the fi rst part of the book, I cover the absolute basics that you need to know in order to write any iOS program, game or not. I cover the IDE, Xcode, which every iOS programmer uses, including those at Apple, to write, debug, and test their programs. Then, I go on to cover the C and Objective-C pro-gramming languages, which you will use to create native iOS applications. Finally, I cover the Cocoa Foundation framework that provides basic functionality that you need to write iOS programs.
In the second part, after you have the basics nailed down, I cover the tools that you will need to write games. You will learn how to use Apple’s frameworks to perform the basic functions necessary for games. I’ve broken it down into four areas: graphics, user interaction, animation, and sound. Once you have fi nished with part two, you will certainly be capable of developing your own games from scratch.
INTRODUCTION
HOW THIS BOOK IS STRUCTURED
I have organized the book so that a reader new to iOS development can work through the book in order from start to fi nish. I would recommend working through the book in order, as each chapter builds upon concepts covered in the previous chapters. I organized the book this way to provide a tutorial type of experience for the reader as opposed to a referential one. Sure, you can use the book as a reference guide to the APIs that I cover when you are done, but I tried to write the book in a way that gently guides the reader from one topic to the next. If you learn how to use the Apple documentation effectively, you already have a terrifi c reference. What I aim to do is be your guide through the APIs.
WHAT YOU NEED TO USE THIS BOOK
In order to build applications for iOS, you will need an Apple computer with Mac OS X. Addition-ally, you need to install the Xcode development environment. Xcode 4 is a free download that you can get from the Mac App Store.
If you intend to run your games on a device such as the iPhone or iPad, as opposed to running your code in the iPhone simulator, you will need to join the iOS developer program. At the time of this writing, joining the program costs $99 annually and entitles you to build and run programs on your device and to submit your fi nished applications to the Apple App Store for sale. If you are not cur-rently part of the developer program, don’t worry. There is very little in the book that requires you to run on an actual device. Nearly everything will work correctly in the simulator. Where there is a need to run on the device, I have noted that in the text.
CONVENTIONS
To help you get the most from the text and keep track of what’s happening, we’ve used a number of conventions throughout the book.
TRY IT OUT
The Try It Out is an exercise you should work through, following the text in the book.
1.
They usually consist of a set of steps.2.
Each step has a number.3.
Follow the steps on your copy of Xcode.How It Works
As for styles in the text:
‰ Wehighlight new terms and important words when we introduce them.
‰ We show keyboard strokes like this: Ctrl+A.
‰ We show fi le names, URLs, and code within the text like so: persistence.properties. We present code in two different ways:
We use a monofont type with no highlighting for most code examples.
We use bold to emphasize code that’s particularly important in the present context.
Also, Xcode’s code editor provides a rich color scheme to indicate various parts of code syntax. That’s a great tool to help you learn language features in the editor and to help prevent mistakes as you code. To reinforce Xcode’s colors, the code listings in this book are colorized, using colors similar to what you would see on screen in Xcode working with the book’s code. In order to optimize print clarity, some colors have a slightly different hue in print than what you see on screen. But all of the colors for the code in this book should be close enough to the default Xcode colors to give you an accurate representation of the colors.
SOURCE CODE
As you work through the examples in this book, you may choose either to type in all the code manually or to use the source code fi les that accompany the book. All of the source code used in this book is available for download at www.wrox.com. You will fi nd the code snippets from the source code are accompanied by a note indicating the name of the program, so you know it’s available for download and can easily locate it in the download fi le. Once at the site, simply locate the book’s title (either by using the Search box or by using one of the title lists) and click the Download Code link on the book’s detail page to obtain all the source code for the book.
NOTE Because many books have similar titles, you may fi nd it easiest to search by ISBN; this book’s ISBN is 978-1-118-10732-4.
Once you download the code, just decompress it with your favorite compression tool. Alternately, you can go to the main Wrox code download page at www.wrox.com/dynamic/books/download .aspx to see the code available for this book and all other Wrox books.
ERRATA
INTRODUCTION
another reader hours of frustration and at the same time you will be helping us provide even higher quality information.
To fi nd the errata page for this book, go to www.wrox.com and locate the title using the Search box or one of the title lists. Then, on the book details page, click the Book Errata link. On this page you can view all errata that has been submitted for this book and posted by Wrox editors. A complete book list including links to each book’s errata is also available at www.wrox.com/misc-pages/ booklist.shtml.
If you don’t spot “your” error on the Book Errata page, go to www.wrox.com/contact/
techsupport.shtml and complete the form there to send us the error you have found. We’ll check the information and, if appropriate, post a message to the book’s errata page and fi x the problem in subsequent editions of the book.
P2P.WROX.COM
For author and peer discussion, join the P2P forums at p2p.wrox.com. The forums are a web-based system for you to post messages relating to Wrox books and related technologies and interact with other readers and technology users. The forums offer a subscription feature to e-mail you topics of interest of your choosing when new posts are made to the forums. Wrox authors, editors, other industry experts, and your fellow readers are present on these forums.
At p2p.wrox.com you will fi nd a number of different forums that will help you not only as you read this book, but also as you develop your own applications. To join the forums, just follow these steps:
1.
Go to p2p.wrox.com and click the Register link.2.
Read the terms of use and click Agree.3.
Complete the required information to join as well as any optional information you wish to provide and click Submit.4.
You will receive an e-mail with information describing how to verify your account and com-plete the joining process.NOTE You can read messages in the forums without joining P2P but in order to post your own messages, you must join.
Once you join, you can post new messages and respond to messages other users post. You can read messages at any time on the Web. If you would like to have new messages from a particular forum e-mailed to you, click the Subscribe to this Forum icon by the forum name in the forum listing.
PART I
The Tools to Get Started
⊲
CHAPTER 1:
Games on iOS
⊲
CHAPTER 2:
The Xcode Programming Environment
⊲
CHAPTER 3:
The C Programming Language
⊲
CHAPTER 4:
The Objective-C Programming Language
Games on iOS
WHAT YOU WILL LEARN IN THIS CHAPTER:
‰ Examining the unique features of games on iOS
‰ Documenting and developing your idea
‰ Prototyping and preparing your game for coding
‰ Getting an overview of the game-related frameworks in iOS
Since you have picked up this book and are reading this, you must be interested in writing a game for iOS. Why do you want to write a game? There are some great reasons to write a game for iOS, fi rst and foremost is that writing a game is fun! You can escape all of the con-straints of reality in a game. In your game, you make the rules.
Writing games for iOS can be particularly fun because of the amazing capabilities of the device. You can include using a GPS, camera, accelerometer, and even a gyroscope in your game. Writing games for iOS can also be fi nancially rewarding. With the ubiquity of iOS devices, millions of people can play your game. Moreover, since you will distribute your game in Apple’s App Store, you do not have to worry about setting up your own storefront to distribute your creations. In January of 2011, Apple released a list of the top-selling applica-tions on the App Store:
‰ Doodle Jump
‰ Tap Tap Revenge 3
‰ Pocket God
‰ Angry Birds
‰ Tap Tap Revenge 2.6
‰ Bejeweled 2 + Blitz
‰ Traffi c Rush
‰ Tap Tap Revenge Classic
‰ AppBox Pro Alarm
‰ Flight Control
Notice that nine of the ten best-selling applications of all time for the iOS platform are games. Therefore, your choice to start investing your valuable time as an iOS game developer is a good one.
But, before worrying about making millions in the App Store, you need to think about not just mak-ing any iOS game, but makmak-ing a good game.
WHAT MAKES A GOOD IOS GAME?
As an aspiring iOS game developer, the fi rst question that you need to ask yourself is, “What makes a good iOS game?” In this section, I’ll try to give you some ideas that you can think about while you are designing your game.
Device Usage
As you start to formulate your ideas on your iOS game, you need to keep several things in mind. The fi rst is how people use iOS devices and how that relates to the way that they play games.
Take another look at the top iOS applications. You could categorize each of the games as a casual game. There are no 100-hour RPGs or fi rst person shooters on the list. All of the games on the list are easy to pick up for fi rst-time gamers. Additionally, all of these games let you get in and out quickly in short bursts.
Think about how people use games or other applications in general on a mobile device. When you take out your phone to game, or use the address book, calendar, or text messaging, you want to get into the application and do what you want to do and get out quickly. Mobile users generally do not have a lot of time to dig into all of the features that may be present in a full-featured desktop appli-cation. The same is true for games. The most successful games for iOS are simple, with easy-to-learn rules and short levels that can be played in a few minutes. This may change as the iPad becomes a more prevalent gaming platform; but for now, short levels and simple rules are the best way to start the design of a successful game.
Use Unique Features of iOS
Some other factors that you should consider when designing your iOS game is how a player will con-trol the game and how you can take advantage of the advanced features of iOS devices.
What Makes a Good iOS Game?
x
5in its Human Interface Guidelines (HIG), which I recommend that you read. The HIG is available online at http://developer.apple.com/library/ios/#documentation/userexperience/ conceptual/mobilehig/Introduction/Introduction.html.
You can use the touch capability of iOS devices to immerse the player in the game. When you allow a player to control a game by interacting directly with the parts of the game, the player feels more involved with the game. Think about building a board game like chess. It is more intuitive and immersive for a player to move the chess pieces as opposed to using an onscreen joystick and buttons to move the pieces.
You can also use some of the other features of iOS devices to make your games more immersive. All iOS devices contain an accelerometer that you can use to determine the orientation of the device. Consider how you can use this to enhance the controls of your game. Imagine a game that the player controls by tilting a device. You will learn how to build this type of game later in the book. This control scheme allows you to incorporate the physical world of the player with the imaginary world of your game.
Another feature widely available is GPS. Think about how you could incorporate the location of a player into your game. Perhaps you could build a game that gives a player points for going to certain locations. On the other hand, maybe, if a player were in a certain location he or she would be able to get a special weapon.
Make Your Game Fun
Your most important consideration while you are designing your game should be to make the game fun. If the game is not fun, no one will want to play it. Keep in mind that you will be playing the game very often as you are developing it. If the game is not fun, you will not enjoy the development process and this will show through in the game. Think about what makes games fun and apply those things to your game. Different people have different ideas of fun, and your perception of fun may not be the same as everyone else’s. It is helpful to have as many other people as possible try out your game during the development process. These testers can often provide valuable feedback that you can use to make your game better.
First, the game should be easily approachable. Games with rules that are diffi cult to understand are often diffi cult for new players to pick up. You do not want to do anything to deter players from playing your game. Instead, use a simple set of rules that players will readily understand. If you have to write 10 pages of help to explain the rules of your game, it is probably too complex for a hand-held device. If you do decide to make a complex game, you should be prepared to offer players a tutorial. Players are far more inclined to work through an in-game experience as opposed to reading a document to learn the rules.
Finally, reward the player. When a player accomplishes something of note in your game, reward him. You can do this by showing an animated cut scene. You can also award achievements by using the GameKit APIs. You can also use Game Center Leader boards to foster competition between players of your game.
The most important thing is that you have fun developing your game. If the game is not fun for you to develop, it likely will not be fun for players. Let your enthusiasm and excitement for the game show through.
Graphics and Design
Do not underestimate the value of graphics in your game. A wonderful icon may be the only thing that a potential buyer of your game sees in the iTunes store. If you plan to sell your game in the iTunes store, spend the time, or money, to develop a beautiful icon for your game.
Aside from the icon, pay close attention to the graphics and motif of your game. Nice graphics can make the difference between App Store success and failure. There are many physics-based destruc-tion games on the App Store; however, Angry Birds reigns supreme because the graphic design of the bird and pig characters makes Angry Birds stand out from its competition. The gameplay is identical to many other games in the genre, but the characters in Angry Birds stand out from the crowd.
Unfortunately, I am not a graphic artist or designer, so you may notice that the quality of the graph-ics in this book is sub par. This is fi ne for instructional purposes; however, if your graphic skills are as weak as mine and you intend on selling your game, you would do well to hire a professional to develop your graphics.
DEVELOPING YOUR IDEA
After you have come up with the basic idea for your game, you need to start developing it
further. At this stage, you should not be thinking about writing code. Instead, you need to focus on what your game will do, not how you will do it.
Documenting Your Game
The fi rst step is to commit the concepts for your game to writing. I know that this may seem like a painful and tedious chore, but the specifi cations that you create in this phase will guide the entire development process. This step is particularly important if you are developing the game for a cus-tomer and not just for yourself. In this case, the specifi cation will serve as a sort of contract that both you and your customer can use to measure the success of your efforts and to evaluate how far along you are on the game.
Developing Your Idea
x
7Once you have your application defi nition statement, you are ready to start defi ning the features that you will implement in your game. You can do this in a formal document, or you can just write a checklist. For a beginner’s chess game, you may come up with a feature list like this:
‰ Implement the correct rules of chess.
‰ Provide the ability for the player to undo moves.
‰ Give the player a way to ask the computer for suggested moves.
‰ Show the player legal moves for any selected piece.
‰ Build a computer opponent that can adapt to the player’s skill level.
There is no need to specify every tiny detail of your game in this document. You need only worry about the key features that defi ne the game or make your implementation of the game special. Notice that this list is very high level. At this point, there is no need to go into deep detail. This list will serve as a checklist that you can use to gauge your progress in the development process.
I like to use the feature list as an outline during the development process. As you learn more about each feature in the list, you can fl esh out each item. For example, for the fi rst item, “Implement the correct rules of Chess,” you may want to add separate sub items as you get into the development process. Some of these may be:
‰ Enforce rules for each piece.
‰ Correctly allow castling when appropriate.
‰ Do not let a player move the king into “check.”
‰ Implement the en-passant rule.
Once you have fi nished documenting all of your game’s features, go back and evaluate it against your application defi nition statement. If you have features that confl ict with the application defi ni-tion, eliminate them from the game, or put them off as enhancements that you may build later. In the chess example, perhaps you decided that one of the features should be an extensive library of openings. Most beginners at chess do not understand the myriad openings, so this may not be an important feature for a game targeted at beginners. It is critical to keep your target audience in mind as you decide on the features that you want to include with your game.
Prototyping Your Game
Once you have defi ned the features and audience for your game, you are ready to do some prototyp-ing. This may not be necessary for a well-understood game like chess, but for a new idea, it
is critical.
FIGURE 1-1: A pen-and-paper prototype
In the best case, do this with a friend or two. This is especially important for original ideas because you will learn a lot about the fl ow and gameplay of your game before you write your fi rst line of code. You may discover that the game’s rules are diffi cult to understand or that the game is too easy. You may even realize that the game is just not fun and you have to go back to the drawing board. You are much better off learning this after you spent an hour making paper game pieces as opposed to discovering that your game is not fun after spending weeks or months writing code.
Preparing to Code
When you are convinced that your game is fun and meets the goals stated in your application defi -nition statement, you are just about ready to start working on the software. At this point, I would recommend building a mockup of your game in a graphics or layout program. You can use any pro-gram that you are comfortable with such as Illustrator, Photoshop, or OmniGraffl e.
Using a graphics editor, you can get a feel for the pixel dimensions of your game objects and see how the objects will relate to each other on screen. You need not be a great artist to do this. The graphics that you build at this point are only for your personal use.
Game-Related Frameworks
x
9TABLE 1-1: Screen Resolution Sizes
DEVICE RESOLUTION
iPad 1024 ⫻ 768
iPhone 4 960 ⫻ 640
Other iPhones and iPod touch 480 ⫻ 320
Now, start drawing your game graphics and add them to your document. Continue to work with this document to refi ne the size of your game elements. When you are fi nished, you will have a fi le that you can use to estimate the correct size and position for the graphics in your game.
GAME-RELATED FRAMEWORKS
Now that you have a fundamental idea for a game, you need to think about how you will build your game. The iOS technologies that you will use to build games are the primary focus of this book. In this section, I hope to give you a broad overview of the components that you will piece together to build your games. Then, later in the book, you will learn how to implement these components to bring your game to life.
In order to build just about any game, you will need an understanding of several key components: graphics, sound, and user interaction. Without these components, you really cannot create an inter-esting game. Before you can get into any of that, however, you need to learn about the basic frame-work that you will use to build any iOS application, game, or otherwise: Cocoa.
Cocoa
The very fi rst step for anyone new to iOS programming is an explanation of Cocoa. According to Apple, “Cocoa is a set of object-oriented frameworks that provides a runtime environment for appli-cations running in Mac OS X and iOS.” In its most basic sense, Cocoa is a library of classes that you can use to build your games. Additionally, Cocoa includes the runtime environment that pres-ents the user interface that you see on iOS devices, which enables your games to run.
The libraries in Cocoa encompass everything you need to build just about any program for the iOS platform. In cases where the libraries do not meet your needs, you can extend them to work for you. Cocoa provides the building blocks, which you will combine to build your games.
The Cocoa libraries are written in Objective-C. Objective-C is a superset of the C programming lan-guage, which the programmers have extended to include object-oriented features. You will use the Objective-C language with Cocoa throughout this book to build games for iOS. Do not worry if you do not already know C and Objective-C. You will learn more about both languages later on in the book. The important thing to take away here is that you will use the Cocoa frameworks with the Objective-C language to develop games for iOS.
The two most important Cocoa frameworks for building iOS applications are Foundation and UIKit.
The Foundation framework provides many low-level classes that are used in every iOS program, hence the name Foundation. Foundation includes object-oriented versions of base types such as strings and dates; collections such as arrays, dictionaries, and sets; along with utility classes for working with I/O, URLs, autorelease pools, and timers.
The UIKit framework contains the classes that you use to build the user interface of your programs. UIKit contains classes that implement buttons, images, text, tables, search bars, and myriad other user interface widgets. UIKit also provides classes that you can use to handle user interaction such as gesture recognizers and an interface to the hardware accelerometer. UIKit also provides you with the canvas on which you will draw your games: the View.
Figure 1-2 shows how the Cocoa framework fi ts into the overall picture of the iOS environment. Everything below your game in the fi gure is provided by iOS.
Your game
UIKit
Cocoa Touch
Media Services
Core Services
Core OS
Foundation
FIGURE 1-2: Cocoa in iOS
At the bottom of the iOS stack is the Core OS. This layer contains the most basic components of the iOS operating system including the Kernel, fi le system, networking components, and device drivers.
Game-Related Frameworks
x
11The Media Services layer is next up the stack. The media layer is responsible for providing the graphics and sound APIs that you will use to build your games. These APIs include Core Graphics, Core Animation, and Core Audio. You will learn more about using these APIs to build your game graphics, animation, and sound in Part II of this book.
The highest level APIs in the iOS ecosystem are in the Cocoa Touch layer. This layer includes the UIKit framework, which you learned about earlier. It is atop the Cocoa Touch layer that you build your software.
One of the great things about Cocoa is that it provides frameworks that allow you to work at vari-ous levels of abstraction allowing you to choose the level that is right for your application. For example, there are different APIs for drawing graphics that you can choose among based on the complexity of your application. This allows you to use simple APIs when it is appropriate, but gives you the fl exibility to work with more powerful and therefore complex APIs when needed.
Drawing: UIKit and Core Graphics
The idea that Cocoa provides different APIs to help you reach your program goals based on the complexity of your application, is evidenced by the drawing APIs. Figure 1-3 shows a simplifi ed stack of the iOS drawing APIs.
2D Drawing
UIKit GLKit
Core Graphics OpenGL ES
3D Drawing
FI GURE 1-3: iOS Drawing APIs
The fi rst choice that you need to make is to determine if you will render your game in 2D or 3D. To keep the examples in this book simple, I have decided to build all of the games in 2D. However, iOS provides excellent support for 3D games.
When you are working with 2D graphics, you should start with the top layer of the 2D graphics stack in Figure 1-3: UIKit. Since UIKit sits atop Core Graphics, it supports most of the features of Core Graphics in a simplifi ed way. Both UIKit and Core Graphics help you create and manipulate Bezier paths, images, bitmaps, colors, and fonts. Core Graphics extends the capabilities in UIKit by giving you the ability to directly work with line attributes, color spaces, pattern colors, gradients, shadings, and image masks.
Since UIKit is built on top of Core Graphics, UIKit and Core Graphics work together seamlessly. This allows you to begin your project by using the easiest API (UIKit) and only dropping down to the lower level API (Core Graphics) when you need access to features that are not supported by UIKit. You will learn to use the 2D APIs in Chapter 6.
introduced a new framework called GLKit that sits atop the OpenGL ES layer. GLKit promises to simplify certain aspects of 3D development for iOS developers.
Unfortunately, due to the size and scope of the OpenGL ES library, it is beyond the scope of this book. However, I wanted to make you aware of the capability to use OpenGL on iOS. If you build a game by using the native drawing APIs, and discover that the performance is not good enough to support your game, you can migrate your drawing code to OpenGL for a performance boost.
User Interaction: Cocoa Touch
Handling user interaction in iOS is straightforward using the classes in UIKit. Like working with graphics, you can handle user interaction in several ways based on the level of granularity that you need. For example, there are several ways that you can work with a user tapping the screen.
The most straightforward method for handling this sort of input is by using the UIButton class. Buttons provide the capability to react when a player taps them. Therefore, if you are only con-cerned with when a player taps a button, the simplest solution is to use a button.
If your game demands more precise control of the timing of when the player taps the screen, you can monitor touch events. These touch events represent every action that occurs when a player touches the screen. Touch events include the player touching down on the screen, the player moving his fi n-ger while touching the screen, and the player lifting his fi nn-ger from the screen.
A fi nal way of dealing with user interaction with the screen is by using gesture recognizers. Gesture recognizers are pre-built classes that you can use to recognize specifi c motions that are common to iOS, such as pinching and swiping. Instead of having to monitor the touch events to determine if a user is performing a two-fi nger pinch, you can use a gesture recognizer. The gesture recognizer will collect all of the touch data for you, analyze it, and send a message when it detects that the user has performed a gesture.
You will learn all about using these methods of handling user interaction later in Chapter 7.
I have one fi nal note on user interaction. As you are designing your game, keep in mind some of the other interesting ways that a user can interact with an iOS device aside from touch. iOS devices have a built-in accelerometer, which allows you to determine the physical orientation of the device. Therefore, you can build a game that the user interacts with by moving the actual device. You will learn how to access the accelerometer later as well.
Animation: Core Animation
Another core component of an interesting game is animation.
You perform frame-based animation for real-time action games by drawing each frame individually, with each frame differing slightly from the last. For instance, in the Blocker game that you will build later in the book, you will draw the ball in a slightly different position in each frame, giving your game the illusion of motion.
Game-Related Frameworks
x
13turn-based game, you may not require this sort of precision. In that case, a much easier way to per-form animation is through the Core Animation framework.
Core Animation is the framework behind the animations that you see in the iPhone user interface. You use Core Animation by changing properties on animatable objects. Then, Core Animation automatically animates the changes that you have made. For instance, if you want to animate the movement of an object from one point on the screen to another, you can specify the endpoint and tell Core Animation to move the object.
It is easy to create very complex animations by using Core Animation by linking animations together and performing more than one animation at a time. You will learn to use Core Animation to build a card game in Chapter 8.
Sound: Core Audio
As you have seen with the Drawing and User Interaction APIs, Cocoa provides many ways to achieve your goal. The sound APIs are no different. There are several different sound frameworks that you can use depending on the needs of your application.
The simplest way to play sounds is to use the System Sound Services. System Sound Services is part of the AudioToolbox framework. The purpose of the System Sound Services is to play notifi cations for UI events such as button clicks, so it is designed to play sounds that are 30 seconds or shorter. This API is very easy to use, so if you are interested in playing only short sound effects, you will want to try using System Sound Services.
When your game requires more than playing sound effects in response to UI actions, you will fi nd yourself moving up to the AV Foundation framework. The AV Foundation framework provides an Objective-C interface with many more options and fewer limitations for playing sounds and video.
Perhaps you want to allow a user to access the music in his iPod library during your game. You can accomplish this by using the Media Player framework. The Media Player framework gives you access to the iPod library along with a rich set of APIs for media playback.
You will learn how to use System Sound, AV Foundation, and The Media Player framework in Chapter 9.
There are other sound APIs in iOS that are even more detailed. Although I will not cover them in this book, they bear mentioning here in case you need them in your game or are simply interested in learning more about them.
First of these APIs is the Audio Toolbox framework. Audio Toolbox is a step deeper than AV Foundation. Using Audio Toolbox, you can precisely synchronize audio playback with your applica-tion. This would be especially important in a music simulation game like Rock Band or Guitar Hero where you need the player’s action to be in exact sync with the music. You can also use Audio Toolbox to access individual packets of audio, parse audio streams, and record audio at the packet level.
Finally, you can use the OpenAL framework to create positional-based stereo sound playback. By using OpenAL, you can accurately position the sounds in your game in three-dimensional space.
Game Kit
Each of the frameworks described previously help you to build the basic features of your game: graphics, sound, animation, and user interaction. There is one fi nal framework that you can use to take your games farther and add advanced features that will take your games to the next level. That framework is called Game Kit.
Game Kit enables three core pieces of functionality: Peer-to-peer networking, In-game voice chat, and Game Center.
Peer-to-peer networking lets you set up an ad hoc network between devices. You can use either Bluetooth or a wireless network to enable this communication. The peer-to-peer networking capa-bilities in Game Kit helps you create a connection between devices running your game and enables you to share information between these devices. The peer-to-peer network framework does not specify the format of the data that you can exchange between the devices on the network, so you have a large amount of fl exibility in developing a data format that works for your game.
In-game voice chat enables you to allow players of your game to chat with each other during a game.
Finally, Game Center helps you add a social aspect to your games. Game Center is a social gaming service that includes Leader Boards, Achievements Friends Lists, Turn-based Gaming, and Auto-matching to anonymous players.
You can use Leader Boards and Achievements to repeatedly encourage players to come back to your game. Leader Boards show player scores for your game. Many players will constantly check the leader boards in an effort to outdo their friend’s high scores. Achievements are awards that you can give to players for completing certain goals in your game. Players can track their achievements by using Game Center and comparing their achievements to those of their friends.
Based Gaming lets you set up a game that your players can play over a period of time. Turn-Based Gaming allows your players to compete against each other even if they are not connected to Game Center at the same time. Additionally, the Turn-Based Gaming framework classes support players competing in multiple instances of your game simultaneously.
SUMMARY
In this chapter, you had a brief overview of building games for iOS. First, you looked at the features of iOS that make it a great platform for gaming. Then, you familiarized yourself with the process of developing your idea into a game, including documentation and prototyping. Finally, you took a high-level look at the frameworks that you will learn in this book.
Summary
x
15⊲ WHAT YOU LEARNED IN THIS CHAPTER
TOPIC MAIN POINTS
Unique features of iOS
Allow players to interact directly with your game by using the touch screen. Integrate features such as the Accelerometer and Gyroscope where appropriate.
Developing your idea
Write an application defi nition statement to defi ne the concept of your game. Build prototypes of your game by using pencil and paper and graphics soft-ware to refi ne your game idea.
Cocoa framework Includes fundamental classes that you will use to build all types of iOS applications including games. Support for strings, collections, and other basic programming constructs.
Drawing APIs In this book, you will use UIKit and Core Graphics for your drawing. iOS sup-ports 3D drawing with OpenGL ES.
User Interaction The Cocoa Touch framework classes provide support for dealing with user interaction. You can handle complex interactions with Gesture Recognizers. Animation You can perform interesting animations to enhance your games by using the
Core Animation framework.
Sound You can use the System Sound Services API to create short sounds for UI actions. For more complex audio, you will use AV Foundation. You can play music from a user’s iPod library by using the Media Player framework. Game Kit The Game Kit API includes libraries to enable social interaction in your
The Xcode Programming
Environment
WHAT YOU WILL LEARN IN THIS CHAPTER:
‰ Using Xcode to write and debug programs
‰ Navigating your project’s code and assets by using the Navigation area and the Jump bars
‰ Creating and editing code eff ectively by using the Editor area
‰ Debugging your code by using breakpoints
‰ Stepping through your code and inspecting variable values
‰ Building a simple user interface by using Interface Builder
Once you have the idea for your game planned out and you are ready to start writing code, you need to think about how you are going to get your code into the computer. You could use a simple text editor like emacs, vi, TextEdit, or BB Edit to write your code because code fi les are just basic ASCII text fi les. However, there is a better way, the Xcode Integrated Development Environment or IDE.
You may be familiar with using an IDE on other platforms. For example, Visual Studio is the most prevalent IDE for building software based on the .Net platform on Windows. Eclipse is an open source IDE that you can use to develop software in many languages including Java. Xcode is the IDE for building software for the Mac and iOS platform.
Aside from the capabilities of an advanced text editor, a good IDE provides you with addi-tional tools that help you with the software development process. The typical tools include fi le management, integration with the code compiler, UI design functionality, and debugging fea-tures. In this chapter, you will see how Xcode incorporates all of these features to provide you with a top-quality development environment.
I realize that this is a book about writing games and that you are probably very excited to start working on some games. However, you will do all of your development for iOS using the Xcode IDE, so it is very important that you take the time now to learn how to use it. Just as you cannot become a master carpenter without learning about your tools, you cannot become a great iOS devel-oper without learning about Xcode. The time that you spend learning Xcode now will help you to develop and debug your code for years to come.
THE CODING ENVIRONMENT
In order to build applications for the iPhone, you will use Apple’s Xcode integrated development environment (IDE). Xcode is a powerful integrated development environment that has all of the features of a modern IDE. It integrates many powerful features including code editing, debugging, version control, and software profi ling.
You can obtain a copy of Xcode from the Mac App Store by selecting “App Store…” from the Apple menu in the menu bar and searching the store for Xcode. At the time of this writing, Xcode is a free download from the App Store.
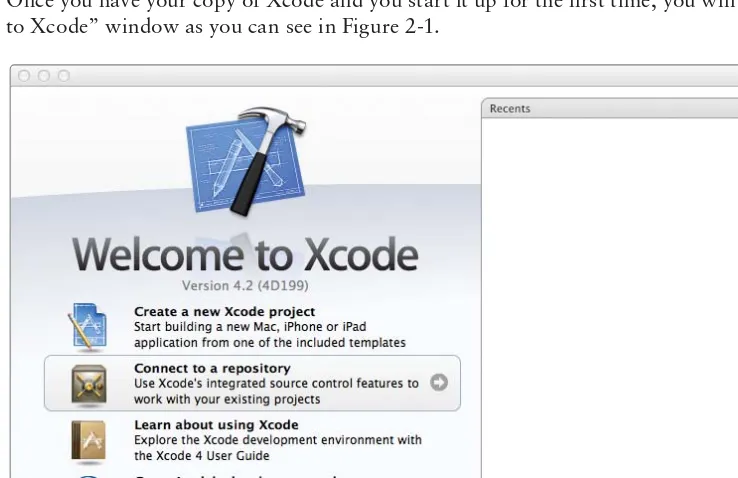
Once you have your copy of Xcode and you start it up for the fi rst time, you will see the “Welcome to Xcode” window as you can see in Figure 2-1.
FIGURE 2-1: Welcome to Xcode!
The Coding Environment
x
19prevent this dialog from showing each time that you open Xcode by unchecking the box at the bot-tom of the window that says, “Show this window when Xcode launches.”
It is easiest to show how Xcode works by working with it. Therefore, in the next section, you will create a very simple project in Xcode to get you started.
Creating a Project
In this section, you will get started with Xcode by creating a new project and building a very simple program.
Start up Xcode and select “Create a new Xcode project” from the “Welcome to Xcode” window. If you have already dismissed the welcome window or if you have chosen not to show the welcome window when Xcode starts, select New Í New Project … from the File menu.
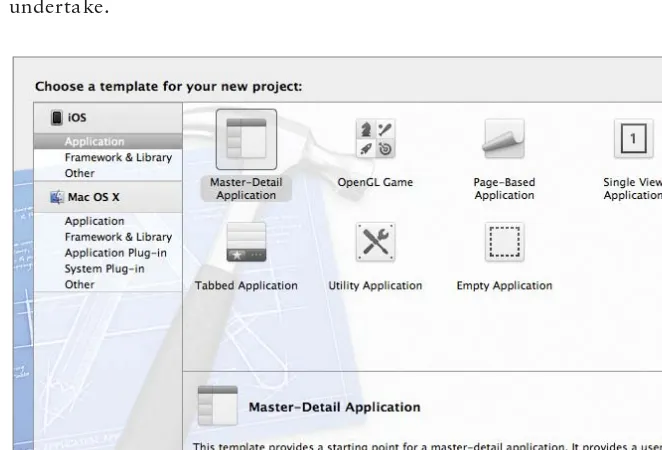
After choosing to start a new project, Xcode will present a dialog box asking you to choose a template for your new project as you can see in Figure 2-2. This dialog shows you all of the templates that you have installed for the various types of coding projects that you will likely undertake.
FIGURE 2-2: Choosing a project template
Xcode divides the left side of the dialog into sections for templates for building software for iOS and for Mac OS X. Since you are reading this book, you are probably most interested in developing games for iOS. So, you will generally choose among the templates presented in the top section.
The Application group consists of the following templates:
‰ Master-Detail Application: This template provides a starting point for a master-detail applica-tion. It provides a user interface confi gured with a navigation controller to display a list of items and also a split view on iPad. You probably will not use this template for game development.
‰ OpenGL Game: This template provides a starting point for an OpenGL ES-based game. It provides a view into which you render your OpenGL ES scene, and a timer to allow you to animate the view. Game developers commonly use OpenGL ES for game development, but using OpenGL ES to develop games is beyond the scope of this book.
‰ Page-Based Application: This template provides a starting point for a page-based application that uses a page view controller. You will generally not use this template for games.
‰ Single View Application: This template provides a starting point for an application that uses a sin-gle view. It provides a view controller to manage the view, and a storyboard or nib fi le that contains the view. Because of its simplicity, you will use this template for most of the games in this book.
‰ Tabbed Application: This template provides a starting point for an application that uses a tab bar. It provides a user interface confi gured with a tab bar controller, and view controllers for the tab bar items. You will not generally use this template for games.
‰ Utility Application: This template provides a starting point for a utility application that has a main view and an alternate view. For iPhone, it sets up an Info button to fl ip the main view to the alternate view. For iPad, it sets up an Info bar button that shows the alternate view in a popover. You will not generally use this template for games.
‰ Empty Application: This template provides a starting point for any application. It provides just an application delegate and a window. You can use this template if you want to build your game entirely from scratch without very much template code.
The Framework & Library template set consists of a single template: Cocoa Touch Static Library. You can use this template to build static libraries of code that link against the Foundation frame-work. You will not use this template in this book. However, this template is useful for building libraries of code that you can share amongst multiple projects.
The Other template set also consists of only a single template: Empty. The Empty template is just an empty project waiting for you to fi ll it up with code. You will not use this template in this book, but it is useful if you want to start a new project and none of the existing templates are appropriate.
In the Choose Template dialog, select “Application” under the iOS section on the left-hand side. Then, in the right pane, select “Single View Application,” and click Next.
The next dialog asks you to choose some options for your new project.
The Product Name is self-explanatory. Come up with a clever name for your project and type it into the Product Name text box. I used FirstProgram.
The Coding Environment
x
21The device family drop-down defi nes the device for which you want to write your program, the iPhone, iPad, or Universal. Universal applications work on both the iPhone and the iPad. For this example, select iPhone.
The Use Storyboard checkbox enables you to storyboard your application. Storyboarding lets you use Interface Builder to lay out all of the screens in your program and defi ne the transitions between them. You will not use storyboarding for this example, so ensure that the Use Storyboard checkbox is not checked.
The Use Automatic Reference Counting checkbox enables automatic reference counting for your application. You will learn about memory management and reference counting in Chapter 4. For now, just ensure that this box is checked.
The Include Unit Tests checkbox allows you to include unit test code with your project. Unit tests are useful for testing the logic of your program. Since you will not
be using unit tests in this example, ensure that the Include Unit Tests checkbox is not checked, and then click Next.
Next, Xcode will prompt you for a location to save your program. Pick a location that you will remember because this is where all of your source code will be stored.
Uncheck the “Create local git repository for this project,” checkbox. A git repository stores your source code and version control infor-mation. An in-depth examination of git and source code control is beyond the scope of this book. You can read more about source control and git in the Xcode 4 user guide. In particular, there is a section called, “Keep Track of Changes with Source Control” at
http://developer.apple.com/library/mac/#documentation/ ToolsLanguages/Conceptual/Xcode4UserGuide/SCM/SCM.html. Finally, click Create, and Xcode will create your new project.
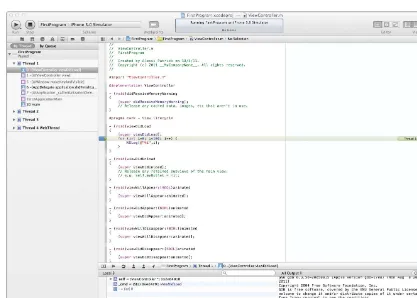
Believe it or not, you have just created your fi rst functioning iOS program. Pretty nice considering that you have not even typed in a line of code yet; unfortunately, it does not do anything except display a gray screen. If you select Product Í Run from the menu bar, the iOS Simulator will launch and run your new app. The simulator should look like Figure 2-3.
You use the iOS simulator to run iOS programs on your computer. You can specify whether to use the iPhone simulator or the iPad simulator in the scheme dropdown at the top of the Xcode interface. The simulator uses the resources of your computer to run, so you should be aware that the results of running your games in the simulator are not identical to what you see when running your games on a device. This is especially important to realize in game development because you will see far greater performance in the simulator than you will see on a device. This applies to both the game logic, which is CPU dependent, and to graphics operations which are GPU dependent. As a result, you should absolutely test your games on actual devices as much as possible during the development process, particularly when you are doing performance testing.
Navigating Your Project
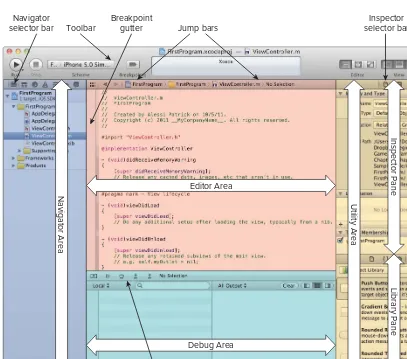
Now that you have created your fi rst Xcode project, you are ready to take a closer look at the IDE. With all of the Views open and the editor set to show the Assistant editor, your screen will look like Figure 2-4, but without the color and labels.
Navigator Area Editor Area
Inspector Pane
Library Pane
Utility Area
Debug Area
Debug bar Navigator
selector bar
Inspector selector bar
Filter bar Library
selector bar Toolbar
Breakpoint
gutter Jump bars
FIGURE 2-4: The Xcode interface
The Navigator Area
The fi rst bit of the IDE that you will explore is the Navigator area, shown in blue on the left side of Figure 2-4. The Navigator simplifi es navigation through various aspects of your project. The selec-tor bar at the top of the navigaselec-tor area allows you to select the specifi c area that you want to navi-gate. There are seven different navigators that you can use.
The Coding Environment
x
23Whatever item you select in the Project Navigator appears in the Editor area. Selecting a source code fi le (a fi le with the .m extension) will result in Xcode opening that fi le in the Editor area. If you select a user interface fi le (a fi le with the .xib extension), Interface Builder will open in the Editor area allowing you to work on the user interface fi le. You will learn more about Interface Builder later on in this chapter.
You can change various confi guration settings for your project by selecting the project node at the top of the Project Navigator to open the project settings in the Editor area. You can try navigation by using the FirstProgram project by selecting various fi les in the Project Navigator and observing what Xcode displays in the Editor area.
There is also another way to navigate to fi les in your project by using the Jump bars at the top of the Editor window. You will learn about using the Jump bars in the section on editing your code later in this chapter.
Navigating by Symbol
The second icon is the Symbol Navigator. The Symbol Navigator allows you to navigate through your project based not on source code fi le, but by the symbols or program units themselves. In the Symbol Navigator, your code is organized by class. Each class in your project is like a folder with all of its methods underneath. Do not worry if you do not understand the terms class and method, you will learn more about them in Chapter 4. For now, just keep in mind that by using the Symbol Navigator, you can navigate directly to the class header or method that you want to work on by clicking the method name regard-less of which source code fi le contains the method.
You can try this by using the FirstProgram project by opening a class in the Symbol Navigator and clicking on a method name. To see this in action, switch to the Symbol Navigator and expand the ViewController class by clicking on the arrow next to the class name. Then, click on the -viewDidUnload method under the
ViewController. The Editor area should automatically switch to the ViewController.m source code fi le and highlight the
-(void)viewDidUnload method.
Searching Your Code
The third icon is the Search Navigator. As you might expect, you use this navigator to execute searches on your code. You can type a search term in the blank text fi eld at the top of the window and Xcode will display the search results below. If you click on the mag-nifying glass icon in the search fi eld, you can turn on more search options by selecting, “Show Find Options,” along with revisiting your recent searches. Clicking on any search result takes you to the point in your code where the result occurs. Figure 2-5 shows the results of a search of the FirstProgram project for the word “First.” Feel free to experiment by searching through your FirstProgram project for various words and phrases.