Tom Green
Adam Thomas
Flash CS3 Video
Master the latest techniques for creating,
manipulating and delivering Flash video
Learn how to play HD video on your web site
Foundation Flash CS3 Video
Lead Editor Copyright © 2008 by Tom Green and Adam Thomas
All rights reserved. No part of this work may be reproduced or transmitted in any form or by any means, electronic or mechanical, including photocopying, recording, or by any information storage or retrieval system, without the prior written permission
of the copyright owner and the publisher. ISBN-13 (pbk): 978-1-59059-956-3
ISBN-10 (pbk): 1-59059-956-X ISBN-13 (electronic): 978-1-4302-0578-4
ISBN-10 (electronic): 1-4302-0578-4
Printed and bound in the United States of America 9 8 7 6 5 4 3 2 1
Trademarked names may appear in this book. Rather than use a trademark symbol with every occurrence of a trademarked name, we use the names only in an editorial fashion and to the benefit of the trademark owner, with no intention of infringement
of the trademark.
Distributed to the book trade worldwide by Springer-Verlag New York, Inc., 233 Spring Street, 6th Floor, New York, NY 10013. Phone 1-800-SPRINGER, fax 201-348-4505, e-mail [email protected], or visit www.springeronline.com. For information on translations, please contact Apress directly at 2855 Telegraph Avenue, Suite 600, Berkeley, CA 94705.
Phone 510-549-5930, fax 510-549-5939, e-mail [email protected], or visit www.apress.com.
Apress and friends of ED books may be purchased in bulk for academic, corporate, or promotional use. eBook versions and licenses are also available for most titles. For more information, reference our Special Bulk Sales—eBook Licensing web page at
http://www.apress.com/info/bulksales.
The information in this book is distributed on an “as is” basis, without warranty. Although every precaution has been taken in the preparation of this work, neither the author(s) nor Apress shall have any liability to any person or entity with respect to any loss or
damage caused or alleged to be caused directly or indirectly by the information contained in this work. The source code for this book is freely available to readers at www.friendsofed.comin the Downloads section.
and her husband-to-be, Phil Darling.
May your marriage be as joyful and adventurous as
the one I have with your mother, Keltie.
—Tom Green
To my Dad and Grandpa; I pray I can be half the husband
and father you exemplified.
About the Authors
. . .xi
About the Technical Reviewer
. . .xiii
About the Cover Image Designer
. . .xv
Acknowledgments
. . .xvii
Introduction
. . .xix
Chapter 1
Creating and Playing Flash Video
. . .1
Chapter 2
Editing Video for Flash
. . .25
Chapter 3
Alternative FLV-Creation Tools
. . .45
Chapter 4
Creating a Custom Player
. . .67
Chapter 5
“Talking Head” Video and Alpha Channels
. . .109
Chapter 6
Adding Filters and Blend Effects to Flash Video
. . .147
Chapter 7
Masking Video
. . .173
Chapter 8
Flash Video Tricks, Tips, and Special Effects
. . .211
Chapter 9
Playing with Multiple Videos
. . .247
Chapter 10
The Camera Object and Flash Video
. . .275
Chapter 11
Cue Points and Captions in Flash Video
. . .301
Chapter 12
Going Small and Going Big with Flash Video
. . .329
About the Authors
. . .xi
About the Technical Reviewer
. . .xiii
About the Cover Image Designer
. . .xv
Acknowledgments
. . .xvii
Introduction
. . .xix
Chapter 1
Creating and Playing Flash Video
. . .1
Before you import . . . 2
Importing a video with the Flash Import Video Wizard . . . 3
Using the Flash CS3 Video Encoder . . . 10
Playing an FLV file in Flash CS3 Professional . . . 16
So your clients saw YouTube . . . and now they want online video . . . 21
What you’ve learned . . . 23
Chapter 2
Editing Video for Flash
. . .25
Nonlinear editing . . . 28
Windows Movie Maker . . . 29
Working with clips . . . 31
Editing in Movie Maker. . . 32
Exporting . . . 35
Apple iMovie. . . 36
Editing in iMovie . . . 38
Working with iMovie clips . . . 39
Adding and adjusting audio . . . 41
Exporting your movie. . . 42
What you’ve learned . . . 43
Chapter 3
Alternative FLV-Creation Tools
. . .45
Data rate . . . 46
Using Flix Pro . . . 49
Playing Blade Runnerin Toronto . . . 282
Preparing the Video objects . . . 286
Recording and broadcasting video . . . 288
Capturing the screen . . . 292
Capturing webcam content. . . 295
Your turn: A little game of “gotcha” . . . 296
What you’ve learned. . . 298
Chapter 11
Cue Points and Captions in Flash Video
. . .301
Cue points explained . . . 302
Using the Flash CS3 Video Encoder to create cue points . . . 304
ActionScript and cue points . . . 307
Cue points and XML . . . 309
Using the FLVPlaybackCaptioning component . . . 313
Timed text XML for captions . . . 314
Navigating through cue points with ActionScript . . . 317
Using the ComboBox for cue point navigation . . . 320
Your turn: Using event cue points to launch web pages . . . 322
What you’ve learned. . . 326
Chapter 12
Going Small and Going Big with Flash Video
. . .329
Going small—playing video on a cell phone . . . 330
Controlling video using the soft keys . . . 333
Going the other way—Flash to QuickTime . . . 336
Using the keypad to play multiple videos . . . 339
Going big—enter H.264 . . . 342
Playing an H.264 video . . . 344
Using the metadata in an MPEG-4 file . . . 346
Let’s think big—really big . . . 348
Using the FLVPlayback component to play HD video . . . 352
What you’ve learned. . . 358
Tom Greenis professor of interactive multimedia at the Humber Institute of Technology and Advanced Learning in Toronto. When not in class, Tom is a partner with Community MX, a reg-ular columnist for Digital-Web.com, and a frequent contributor to the Adobe Developer Center. Tom has written four books for friends of ED, including Foundation Flash CS3 for Designers, which he coauthored with David Stiller. He is also an “Adobe community expert”; participates in several advisory boards at Adobe; speaks at user group meetings and conferences around the world; and is one of the founding members of FlashinTO, the largest Flash user group on the planet. Tom has also regularly lectured at universities and colleges in Germany, the United States, Canada, and China. His web site can be found at www.tomontheweb.ca.
David Stiller is an independent contractor whose portfolio includes multimedia programming and design for NASA, DOT, Adobe, Nickelodeon, Wendy’s, Saatchi & Saatchi, and dozens of clients across the United States and Canada. David gets a kick out of sharing “aha!” moments with others through consultation, mentoring, and regular contributions to the Adobe Flash and ActionScript forums, his blog (http:// quip.net/blog/), and articles for CommunityMX.com. David coauthored Foundation Flash CS3 for Designers (friends of ED) with Tom Green, contributed the interactivity chapter to
Corné van Doorendesigned the front cover image for this book. After taking a brief from friends of ED to create a new design for the Foundation series, he worked at combining technological and organic forms, with the results now appearing on this and other books’ covers.
Corné spent his childhood drawing on everything at hand and then began exploring the infinite world of multimedia— and his journey of discovery hasn’t stopped since. His mantra has always been “The only limit to multimedia is the imagi-nation,” a saying that keeps him moving forward constantly. Corné works for many international clients, writes features for multimedia magazines, reviews and tests software, authors multimedia studies, and works on many other friends of ED books. You can see more of his work and contact him through his web site, www.cornevandooren.com.
If you like Corné’s work, be sure to check out his chapter in New Masters of Photoshop: Volume 2
The path to this book has been one “long strange trip” that started over hamburgers in 2005 with Flash product manager Mike Downey. He showed us a pre-Alpha version of Flash 8 and this really cool codec (VP6) from On2 technologies. The journey continued in the late spring of 2007, when a very small group of us were shown an HD video running in the Flash Player and learned that this capability would be in a Flash Player release later that year. This explains why I have been writing about this fascinating subject for so long. I sometimes feel like a kid in a candy store and I also get to meet some amazing people along the way.
This is the fourth book I have written for friends of ED and is the first one involving my new editor, Ben Renow-Clarke. The relationship between an editor and a writer is an odd one; it can either be very satisfying or an utter horror show. Thankfully it was the former with Ben, and for that I am thankful. I should also acknowledge the work of Richard Dal Porto, the project manager who somehow managed to juggle the schedule as Adobe kept introducing new tech-nologies almost up to the day I write this.
Finding a coauthor of Adam Thomas’ caliber also helps. Adam and I shared a lot of laughs over the past year, and he exhibited the patience of a saint as I kept coming up with examples and project ideas and he brought them to life. This also marks the second collaborative effort between David Stiller and me. We regard ourselves as “Tom and Jerry” because we both share a whacked sense of humor. Anybody who can bring Puppetji to a book is okay by me. Thanks, buddy.
My students, especially the first-year students, are my harshest critics and unwitting quality-control participants. They get to work through the exercises in the book and don’t hesitate to tell me when something doesn’t make sense or a project or exercise simply “sucks.” Thanks, guys.
Finally I want to acknowledge the support and understanding of my wife and life partner for the past 30 years, Keltie. She greets the start of each new book with stoicism and patience as I move into and out of “writing moods.” It will be great to get out of my office as I try to get a life.
In 2003, I was in Seattle getting ready to do a presentation on Flash video at Digital Design World. Jim Heid, the conference organizer, saw the title slide of the presentation and mentioned that I might be facing a rather tough crowd. I looked out over audience members, sized them up, and told Jim I had his back covered. He said he wasn’t too sure about that and pointed to the title on my screen: “QuickTime is dead.” Looking out into the darkened room, I watched about 200 people in the audience open their PowerBooks; hundreds of bright white Apple logos stared back at me. It was indeed going to be a tough crowd.
Nobody really expected the stranglehold that Apple, Microsoft, and Real had on the web streaming market in 2003 to be broken. Yet by spring 2005, just 18 months after that presenta-tion, that is exactly what happened. Those three web video delivery technologies practically van-ished and were replaced almost entirely by Flash video. This is not to say QuickTime and Windows Media are dead technologies. They aren’t by a long shot, but when it comes to putting video on the Web, the Flash Player has rapidly become the only game in town. Before I get going, you have to understand how Apple, Microsoft, and Real “lost” the market.
How video players “got dead”
QuickTime, Windows Media, and Real essentially lost the market when they were blindsided by the growth of the Web, fast Internet connections, and the “standards movement.” When practi-cally everyone had an Internet connection, and the cost of bandwidth to the consumer was plummeting, the web standards movement—led by Jeff Zeldman, Molly Holzschlag, and Eric Meyer—started taking hold, and web designers and developers began to look at the web page as a space they controlled. Content went where they said content should be, and that was the end of that discussion.
The upshot was that consumers, with more bandwidth than ever before, were unwilling to wait for video to download before it played, and the guys who designed the sites realized that they controlled the web space. Their attitude was the following: if a video was to be content in a page with text running around it, there was no way they were going to let Apple’s QuickTime plug-in tell their viewers to “upgrade to pro,” or let Microsoft’s video player move the video off the page into another area of the screen. This was a profound shift in perception for the design community. Up to that point, video was a “cool” technology, and cool won out over control every time. When developers and designers started looking at video not as “video” but as “con-tent,” we started our move toward the Flash Player and Flash video.
Another favorite of mine is hitting a site and being told I don’t have the codec. The browser is really nice and asks me whether I want to locate it. I click OK, and I am told, “Your codec is here. You are a smart fellow; go find it.” Safari will tell me a plug-in is not supported. Windows Media tells me that the “specified octet stream is not recognized.” And more often than not, when there is a video I really want to watch, I can (as long as I am prepared to sit through a bazillion ads). I use these examples not to point an accusatory finger at the designers, the companies, or even the technologies. I use them because they are prime examples of what makes the experi-ence of watching web video such a profoundly negative experiexperi-ence. We are awash in a world of video thanks to TV. We bring our TV mindset to this technology on the Web and, when we want to watch a video, we expect “play” to mean “play.”
Further, we expect “play” to mean “play on whatever device we are using to watch the video.” Web video is being delivered to desktop computers with an Ethernet cable stuck into the back of the box. Web video is being delivered to portable computers in coffee shops and parks out-side Macy’s in New York that are connected to a wireless network. Web video is being wirelessly delivered to my PDA. Web video is being delivered to my Nokia cell phone. These are heady times for us and I suspect that this is just the start. If you told me five years ago that video would sweep the Web and that the Flash Player would be the delivery platform, I would have thought you were more optimistic than pragmatic.
A short history of Flash video
The rise of Flash video from relative obscurity to a web standard is a fascinating tale. There is no one date we can point to and say, “This is when it happened.” Some would point to Flash MX and the inclusion of the Sorenson Spark codec. Others will claim it was Flash Professional MX 2004 that really got things started, and a valid case can be made for the current iteration of Flash (Flash CS3) and the improved FLVPlayback component, which seems to be so ubiquitous in today’s video experience.
For me, Flash video became real in 2000. I was in New York, attending the inaugural meeting of the New York Macromedia user group, and the evening’s speaker was Hillman Curtis. This was just before Hillman became famous, and the room was filled with Director guys who were there to listen to Hillman talk about motion graphics in Flash. During the course of his presentation, Hillman played some video in Flash. To say he got my attention would be an understatement. Up until that point, video in Flash was a pipe dream. Many of us hanging around the forums would have long discussions regarding the “theoretical” use of video in Flash. Here I was—a few stories up in New York City—and theory had become reality.
FLV format. What caught everyone’s attention was how small these FLV files were compared with the original. (I cited the example of a 5.4MB video file being compressed down to around 40KB in a book I wrote about MX Studio.)
At the same time Spark was on the street, Sorenson Media, which had developed the Sorenson codec (regarded as the standard for streaming video at the time) also developed a standalone FLV encoder called Squeeze. This product offered even more power and flexibility than Spark, and many Flash video developers started regarding Spark as being nothing more than “Squeeze Lite” and shifted to Squeeze to create their videos for Flash.
In these early days, we rapidly discovered there was a huge problem with Flash video. It still had to be embedded on the Flash timeline, and the result was a rather massive SWF file. The odd thing was that users were quite content to wait for the SWF file to load simply because video was such a novelty. The other issue was that video longer than two minutes in length experi-enced image and playback degradation.
The next iteration of Flash, Flash Professional MX 2004, solved those issues. Instead of embed-ding video into the Flash timeline, developers and designers could stream video from a web server. Those new to video could use drag-and-drop video behaviors to get into the game, and, most important of all, the FLV format became an output format for all of the major video-editing applications, including QuickTime. While all of this was going on, the On2 Technologies company developed an amazing codec, TrueMotion VP6, which could be used for broadcast purposes. Macromedia was also paying attention to Flash developer community members and started talking to them about a Flash version of the codec.
While all of this was going on, Flash video was seriously catching on, thanks to the rapid adop-tion rate of the Flash Player 7. The rate was the fastest in Flash history, and Macromedia would tell anybody who would listen that more than three million Flash Players were installed each day. Microsoft, Apple, and Real also found themselves caught in the perfect storm. Bandwidth became cheap, users were demanding an easy install, and these same users regarded the plat-form as irrelevant—video content should play equally well on both the Mac and the PC platforms.
Netscape lost the browser war, and RealPlayer was a part of the Netscape browser. Once Netscape went south, Real’s potential—at the time it was the best streaming video solution out there—followed Netscape. The sad part of the decline of Real is that it supported the SMIL lan-guage, which allowed it to do more than just video. Real never developed good tools for SMIL authoring and it’s still trying to play catch up. Windows Media Player was OS-dependent, which cut out a lot of Mac users (there is a Mac version, but it never really caught on). The fact that Microsoft had 90 percent of the operating system market, but only a 70 percent market share in the streaming media arena, tended to indicate that its clients were not exactly happy campers. QuickTime, thanks to the adoption of the technology by a variety of media companies, became a de facto standard for broadcast-quality streaming, but it failed to catch on with the general public. Today, Adobe can claim that the Flash Player is on 97.3 percent of all the Internet-enabled computers in use today. Microsoft’s Windows Media Player is on 83 percent of computers, QuickTime is on about 66 percent, and Real is hovering at 56 percent.
and Adobe bought Macromedia shortly thereafter. If you were to ask people from Adobe why they bought Macromedia, the answer was succinct: Flash.
Flash video takes over
In 2004, Flash video was still a bit of a novelty. Two years later it was a standard. It is the video format of choice for two of the most popular sites on the Web: YouTube and MySpace. Those two sites are classic examples of that old business adage of “being at the right place at the right time with the right product.” As the Web evolved from a static, page-based format to what the pundits are calling social networking, the market realized that video is a more powerful com-munications medium than words and images. YouTube and MySpace have also become outlets for video captures from cell phones, digitized videotape recordings, and webcams. The market has caught onto the fact that if you can digitize a video, you can broadcast it. The odd thing about this is that video is the least interactive media format out there.
Many of the major media companies, the Washington Post and the New York Timesamong them, are recognizing that web video is a great value-added and economical feature that sup-plements their print efforts. They can get into the broadcast game without the major-league expense of creating a TV network.
When the tsunami devastated the East Indies, the New York Timescould broadcast audio, video, and photographic records of the disaster in both the paper and the multimedia section of the site within hours of its occurrence. In fact, video has become so important to the New York Timesthat there is an entire multimedia section on its web site, and the front page of the web site contains a Flash video broadcast that changes on a regular basis. Obviously, it is no longer “all the news that’s fit to print;” it is “all the news that’s fit to print and broadcast.” Even so, the broadcasters aren’t missing a beat.
At a recent online marketing conference, Ross Levinsohn, president of Fox Interactive Media, talked about Fox’s recent promos for The Simpsonsand the start of the show’s 18th season. In the three days that The Simpsonsclip was available on Fox, it kicked out 1.4 million streams. What’s more, 80 percent of MySpace users watched 5 minutes of the clip, he added, while 50 percent of visitors who streamed the clip from Fox.com saw the entire video. Those are num-bers that will yank advertising executives out of their chairs and get them running for their interactive divisions.
News organizations and broadcasters aren’t the only ones getting in on the web video game. Retailers are adopting this technology big time. Vodaphone is one of the best retail examples where video is treated as content.
Where is all this heading?
Businesses now realize that video is a powerful marketing tool. One of the most common ques-tions I hear is this one: “The boss wants to take the stuff from our corporate DVD and put it on our web site. How can we do that?” Two years ago, that sort of thing was in the realm of sheer wishful thinking. The advertising industry is now crazy about this technology because it can now measure its impact using real numbers; 80 percent of MySpace users and 1.4 million streams over 3 days for an 8-minute clip of the The Simpsonsmakes a rather powerful business case for media buyers.
From my perspective, I find the shift from “video as video” to “video as content,” especially on the Flash stage, to be rather fascinating. Experimenting with After Effects, I have come to the conclusion that the boundaries are blurring between “Flash content” and “video content” in a Flash movieclip. I have been bending video around objects, putting the FLV file in a movieclip, and applying Alpha transparency and the Blend modes to the movieclip. The upshot is what I call a “meta movieclip,” which is content in a Flash movieclip that is a hybrid of Flash and video content. Even simple things, such as using a video with an Alpha transparency and embedding it in an HTML page, are no longer in the realm of advanced web video tricks. It will become more and more commonplace when designers and developers discover that it really isn’t that hard to do. Toss in HD video and the capability to play an FLV file on a cell phone and you can pretty well say that Adobe has all the bases covered.
What I am really looking forward to, though, is the day I can stand on a stage at a conference somewhere and when I watch the Apple logos wink on in the darkened auditorium or the iPhones light up, I know they will be able to see exactly what I see when they want to see it. (This article, written by Tom Green, originally appeared on Digital-web.com. We want to thank them for permission to use it here.)
What’s in it for you?
So now that you know why you are here, you should also know that this book is a continuation of the journey we started together in the first edition of this book, Foundation Flash 8 Video. When the book was written two years ago, the authors claimed not to be experts in the field “because the field is too new.” We can still make that claim because even though there is a growing body of knowledge out there, the community is finding creative uses for web video, and Adobe is continuing to provide the new software and platforms for its delivery. In two years, we have gone from simply creating and playing with video to being able to do the following:
Deliver HD video to a web page (see Chapter 12)
Create an FLV file for cell phone playback (see Chapter 12)
Record a video and stream it live in the FLV file or in the H.264 format (see Chapter 10) Deliver video directly to a desktop AIR application known as the Adobe Media Player (see Chapter 3)
The amazing thing about this is that these were the technologies that hit the street when we started writing this book.
The first three chapters of the book are a primer. They are designed to get you up and running with Flash video and cover the fundamentals of the workflow from concept to encoding to upload.
The rest of the book explores the creative uses of video from creating a custom video player to playing an HD video through the FLVPlayback component. In between those two techniques, we explore a number of techniques:
Working and playing with Alpha channel video Using filters and blend effects
Masking video Ageing video
Working with multiple videos Using a webcam
Working with cue points and captions
We hope you learn something from this book and (most importantly) that you have the same amount of fun that Adam, David, and I had as we worked our way through the book. Playing wonderful “what-if “games and having fun with this technology is what has made the past sev-eral years so exciting. We can hardly wait to see what’s in store in the next seven years.
Layout conventions
To keep this book as clear and easy to follow as possible, the following text conventions are used throughout.
Important words or concepts are normally highlighted on the first appearance in bold type. Code is presented in fixed-width font.
New or changed code is normally presented in bold fixed-width font. Pseudo-code and variable input are written in italic fixed-width font. Menu commands are written in the form Menu ➤Submenu ➤Submenu. Where I want to draw your attention to something, I’ve highlighted it like this:
Sometimes code won’t fit on a single line in a book. Where this happens, I use an arrow like this:➥.
This is a very, very long section of code that should be written all on ➥
Let’s start this book in an odd place. Let’s learn how to swim.
There is a school of thought that claims the best way to learn to swim is to jump into the deep end and figure it out. That is sort of where we are starting this book. You will dive right into the deep end of creating a video for Flash CS3 Professional, but we will be there helping you along every step of the way.
Before you step off the deck and into the deep end, there are a couple of things you need to know:
You are not creating a video; you are encoding a video. This means you will be simply converting a video from one format—MOV—to another—FLV—which is the Flash video format. This conversion process is referred to as encoding. FLV files can be encoded using the Import Video Wizard built into Flash CS3 Professional. The wizard is really nothing more than a series of panels that carefully walk you through the process of creating the FLV.
FLV files can also be encoded using the standalone Flash CS3 Video Encoder. When you installed Flash CS3 Professional onto your computer you also installed a separate application called the Flash CS3 Video Encoder. The Encoder is found in \Program Files\Adobe\Adobe Flash CS3 Video Encoder
on the PC and in \Applications\Adobe Flash CS3 Video Encoderon the Macintosh.
With two encoding choices, you might be wondering which way to go. Either one is acceptable, but if you are new to using the video features of Flash CS3 Professional, we suggest you start with the wiz-ard. Once you start moving into more complex video use and special effects, the standalone Video Encoder will become your tool of choice.
We’ll start with the Video Import Wizard built into Flash CS3 Professional, but before that you need to know a bit about the file that is being encoded.
What we’ll cover in this chapter: Video formats used by Flash CS3
Importing a video into Flash using the Video Import Wizard Encoding a video using the Flash CS3 Video Encoder Using the Flash CS3 FLVPlayback component to play video Files used in this chapter:
tortoise.mov(Chapter01\ExerciseFiles_Ch01\Exercise\tortoise.mov)
Before you import
Flash can import video only if you have QuickTime 7, QuickTime 6.5, or (for Windows users) Direct X 9 or higher installed on your computer. If you don’t have them, things might not work as expected, so you might need to visit the Microsoft or Apple sites to download and install the software.
If you have QuickTime on your Mac or PC, it must be installed to import the following file formats:
Audio Video Interleave (AVI): The AVI format is very common on Windows systems.
Digital Video (DV): DV is the format used by your camcorder.
Motion Pictures Experts Group (MPEG): This is the organization that devised the MPG or MPEG standard. The most common type of video using this format are MPG, MP4, and M4A formats.
QuickTime (MOV): This standard, developed by Apple in the early 1990s, is the one used by most video professionals.
If you are a Windows user and have Direct X 9 or higher installed, you can also use these formats:
Windows Media File (WMF or ASF): WMV or ASF is commonly used by the Windows Media Player.
Audio Video Interleave (AVI)
Motion Picture Experts Group (MPEG)
The other thing you need to do is to make sure the video you are using is as uncompressed as pos-sible. That might sound odd, but it really has a lot to do with the quality of the final product. The encoders used by Flash actually compress the file. Video that is compressed has already lost some information, which is why video compressors are called lossy. If you compress an already compressed file, you will lose a lot of information, which will have a direct impact upon the quality of the finished product. What does the compression job is a codec, which is short for enCOder—DECoder or
COmpressor—DECompressor, depending upon who you are talking to.
Importing a video with the Flash
Import Video Wizard
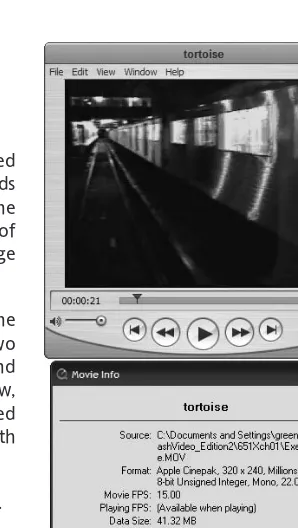
The source video for this exercise is a music video named “Tortoise.” It is a QuickTime video that is 3 minutes and 43 seconds long, and has a file size of 41.3 megabytes, which puts it in the realm of really big web files. You can download the .zipversion of this file from www.friendsofed.comor, if you have some footage you would rather use, feel free to substitute.
When importing video, it is important that you closely match the frame rate and physical dimensions of the source video. These two values are easily obtained by opening the video in QuickTime and selecting Window ➤ Show Movie Info. The Movie Info window, shown in Figure 1-1, will open, and all the information you need will be presented. Matching the values here will ensure smooth playback later on.
Now that you know what you’re working with, let’s go swimming.
In this chapter we will be focusing on creating an FLV that—until this update of Flash Player (Flash Player 9)—was the standard format for video in Flash. In fact, much of this book (right up to Chapter 12) will work with this format. In the final quarter of 2007 Adobe handed us the ability to work with H264, M4A, and MOV formats directly within the FLVPlayback component and a video object. This will be the subject of the final chapter of this book.
Throughout this book we will be using the terms videoordigital video. Both refer to a document using one of the formats listed previously. Files produced by a video camera will be referred to as a DV file.
1.
Open Flash CS3 Professional and create a new Flash File (ActionScript 3.0) document. The first thing to check is the frame rate of the Flash movie. It should closely match that of the video. In this case, it is 15 frames per second, which just happens to closely match the default frame rate of 12 frames per second on the Flash timeline. If the video is shot using the North American NTSC standard, you obviously won’t have Flash play at 29.97 frames per second. In this situation, setting the Flash frame rate to 24 or even 30 frames per second will work.2.
The next step in the process is to select File ➤Import➤ Import Video, which will open theImport Video Wizard.
The Import Video Wizard is a rather clever series of screens that walks you through the entire video-encoding process, starting from locating the video to actually placing it on the stage and having it ready to play. You will be asked some rather interesting questions along the way, such as “Is the video to be played from your web server?” and “What style of video controls would you like to use?”
3.
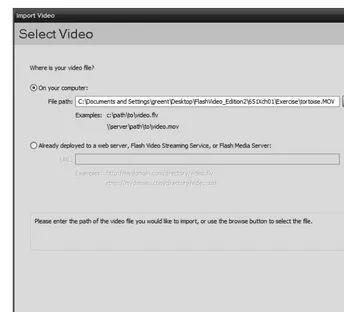
The first screen that opens—Select Video—simply asks you to locate the video to be encoded. There are only two places where the video can be located: in a folder on your computer or on an actual server used to stream media. This means you have a Flash Media Server (FMS), Flash Communication Server (FlashComm), or a FlashComm account with an Internet Service Provider (ISP). The other server location is a Flash Video Streaming Service (FVSS), which is a company that charges you a monthly fee to store and deploy Flash video on the Web.4.
Click the Browsebutton shown in Figure 1-2; when the Opendialog box appears, navigate tothe folder containing the video to be encoded. Click it and then click the OKbutton. If you have a FlashComm or FVSS account, you only need to enter the URL where the video file (which has to be an FLV file) is located. Click the Nextbutton.
5.
Now that Flash knows where the video is located, you need to decide where it will be sent for playback. The next screen you see, the Deploymentscreen, determines how the FLV file will be created. Your choices are the following (as shown in Figure 1-3):Progressive download from a web server: This option assumes that the FLV file will be sitting in a directory on your web server and playing from that server. When you select this option, Flash understands that the video data must be streamed into the SWF file in a slightly dif-ferent manner than it would if you were to use an FMS or FVSS. This “slightly difdif-ferent man-ner” is called a progressive download. What happens is enough data is “streamed” into the SWF file to enable it to play smoothly from start to finish. When that point is reached, the video starts to play. This means there might be, depending on the size and length of the video, a very slight delay before the video starts to play or during playback if there is some heavy network traffic.
Stream from Flash Video Streaming Service: This option assumes that you have an account with one of these companies.
Figure 1-2.Use the Select Videopanel to navigate to the location of the video to be encoded.
Embed video in SWF and play in timeline: Essentially this option will move the FLV file into the Flash library and put the video on the main timeline or (if the video is in a movieclip) on the movieclip’s timeline. In many respects, this is not recommended. When a video is placed on a Flash timeline, the timeline will expand to the full content of the video. In this case, the video will require thousands of frames to play. That might not seem like much, but when a SWF file loads in a web page, it won’t start playing until a large portion, if not all, of the video has loaded. The other nasty aspect of this option is a corresponding increase in the size of the SWF file to accommodate the video. Still, if the video is short—five to ten seconds—or if you want to play with it in some manner, this option works.
Select the Progressive download from a web serveroption (see Figure 1-3) and click the Nextbutton.
Figure 1-3.The Deploymentpanel
6.
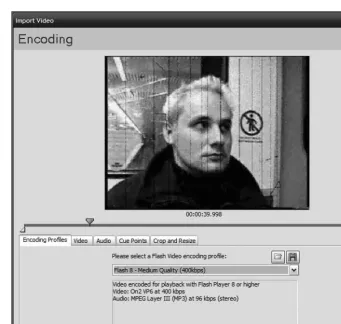
The next screen, shown in Figure 1-4, is the Encodingpanel, in which you have to decide which codec will be used to create the FLV file, the streaming rate, the frame rate, and a number of other choices that will have an impact on playback. The decisions you make here will have a direct impact upon your viewer’s experience, so let’s spend some time looking at the panel.Figure 1-4.The Encodingpanel
The first thing you see is the default encoding profile. If you click the drop-down menu, you will see ten presets, each targeted at the Flash 7 or Flash 8 Players or at a DV capture. If you select a preset, the settings are outlined in the Information area directly below your choice. Essentially the choice of Flash Player comes down to a choice of codec. Flash Player 7 uses only the Sorenson codec, and the new On2 VP6 codec can be used only in Flash Player 8 or higher.
The default you are looking at essentially says that the video will be playable only in Flash Player 8 or higher because it is encoded using the On2 VP6 codec. The rest of the information tells you that the video will stream at a rate of 400 kilobytes per second (kbps), and the sound in the video will be con-verted to an MP3 stereo format and streamed out at 96kbps.
At the top of the screen you see the first frame of the video and three sliders under it. The top slider lets you move forward and backward in the video. The two sliders under it set the Inand Outpoints. The top slider is commonly called a Jog Control, and if you move it to the right you will see that you can advance through the video. The other important thing that happens is the time under the image changes to show you exactly where you are in the video. This time measurement is quite precise:
hours: minutes: seconds: milliseconds. This measurement will come in very handy later in the book when you create a movie that triggers events based on the current time of the video and when you create captioned video.
The Inand Outpoints are also quite useful. They establish the start and end of the video, and can be used to remove unwanted footage at the start or end of the video—or even to extract a short piece in the middle of the video. Using the Inand Outsliders to remove footage also has the pleasant side effect of reducing the final size of the FLV file.
The bottom half of the screen contains a number of tabs that allow you to precisely control many of the streaming values and other properties used when a video is encoded. We’ll dig deeper into this area later on in this chapter when you use the Flash CS3 Video Encoder.
7.
Click the Next button to advance to the Skinning panel. When the panel opens, select theSkinUnderAllNoFullScreen.swfoption from the drop-down menu.
The Skinningpanel has a rather confusing name because it allows you to choose the playback controls used to play the video. The look of the controls, such as the buttons used and the color of the con-troller, is called a skin. In this panel you actually determine whether playback controls will be added to the video. Previous versions of Flash treated skinning much the same way Henry Ford treated the color of Model T cars: “[People] can have any color they want as long as it is black.” Previous versions of Flash let you use any skin you wanted as long as it was the Halo skin used to determine the look and feel of Flash components.
Flash CS3 Professional offers you 35 different controller styles or skins that come in a variety of but-ton combinations. In addition, you can even create a custom skin—put your client’s logo in the con-troller or whatever—or click the Color chip and add the client’s corporate color to the concon-troller. When you select a skin style, you can see what it looks like in the preview area of the panel. The vari-ous skins, shown in Figure 1-5, appear either over the video or under the video. You can’t place them at the top or to the sides of the video.
Figure 1-5.The Skinningpanel with the various skin (or control) options shown
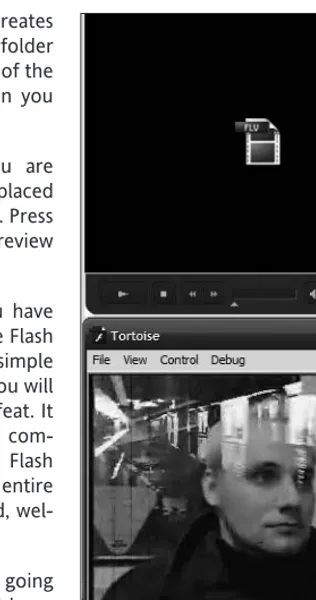
The encoding process actually does two things: it creates the FLV file used in Flash and places it in the same folder as the Flash file you just saved. It also places a copy of the
SkinUnderAllNoFullScreen.swf skin (or whatever skin you have chosen) in that folder.
9.
When the encoding process finishes, you are returned to the Flash stage, and the video is placed on the stage in the FLVPlayback component. PressCtrl+Enter (PC) or Cmd+Return (Mac) to preview the video, as shown in Figure 1-7.
Congratulations and welcome to Flash video. You have just encoded a video, chosen the skin, put it on the Flash stage, and played the video. All this in eight rather simple steps. If you have used previous versions of Flash, you will see that Adobe has pulled off a rather interesting feat. It made what was a complicated process even more com-plex—but easier to use. If you have never used Flash video or created an FLV file, or have regarded the entire video in Flash “thing” as being a bit over your head, wel-come to the shallow end of the pool.
Take a moment to towel yourself off because we’re going back into the deep end of the pool. Now you will learn how to use the Flash CS3 Video Encoder application.
Using the Flash CS3 Video Encoder
The Video Encoder and the Import Video Wizard are somewhat similar, but are also completely dif-ferent. The purpose of the Encoder is to create the FLV file and nothing more. Skins and so on are added in Flash.
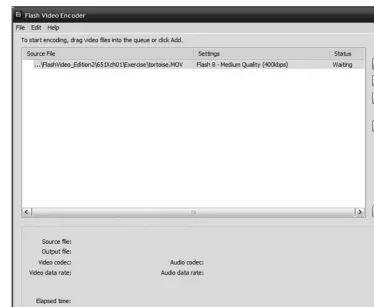
The Encoder shown in Figure 1-8 is available in both Macintosh and PC versions of the application.
1.
Navigate to the Flash Video Encoder. The Encoder is found in\Program Files\Adobe\Adobe Flash CS3 Video Encoderon the PC and in \Applications\Adobe Flash CS3 Video Encoder on the Macintosh.
2.
The first screen that opens, shown in Figure 1-9, is where you add the video to be encoded. Click the Add button and navigate to the folder containing the video you’ll be using. If you are using the materials supplied by this book, navigate to the tortoise.mov file in your Exercise folder and click Open. When your video appears in the dialog box, click the Settingsbutton to open the Encoding Settingspanel.Figure 1-7.Playing back the video that has been imported into Flash
Figure 1-9.The first screen of the Flash Video Encoder is used to locate the video to be encoded.
3.
The first reaction you might have to the Encoding Settingspanel is this: “Hey, haven’t I seen this before?” You have. It is the same panel used by the Flash Video Wizard you used to encode that earlier FLV file. We will use settings that are quite different from the presets. Name the video to be created Tortoise.In fact, the first thing you should always do is name the file. This is a great way, for example, of creating a video targeted at a variety of bandwidth situations. You could have a copy of this video aimed at users who have dial-up and limited bandwidth named TortoiseLowand another aimed at the high-speed user named TortoiseHi.The first things to note are the tabs, which give you a tremendous amount of control over the video-encoding process and even what the viewer sees. The four main tabs—Video,Audio,Cue Points, and
Crop and Resize—quite succinctly state their purpose. The default selection is, of course, Encoding Profiles.
4.
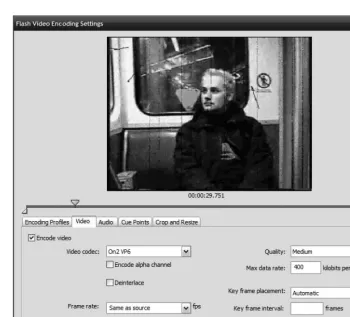
Click the Videotab to open the video-encoding settings area at the bottom of the panel shown in Figure 1-10.Figure 1-10.The video-encoding settings
The video-encoding window contains a lot of mysterious stuff. Here’s what each one does:
Video codec: This drop-down menu allows you to choose between the Sorenson Spark or On2 VP6 codecs. If your movie is targeted at Flash Player 7 or lower, you must use the Sorenson Spark codec. If you have a “Talking Head” video containing an Alpha mask, select Encode alpha channel. This feature—alpha channel video—works only with Flash Player 8 or higher and you can only use the On2 VP6 codec. If you select Sorenson Spark, this selection will be grayed-out.
Frame rate: This choice gives you seven selections. The frame rate determines how fast—in frames per second—the video will play. A good rule to follow is this: match the frame rate of the FLV file to the FLA file. If your FLA file has a frame rate of 12 frames per second, use that number as the frame rate for the FLV file. Another good rule of thumb is to set the frame rate of the FLV file to half that of the video being encoded. If the video frame rate is 30 frames per second, the FLV rate would be 15.
Key frame placement: Key frames in video are, in many respects, similar to key frames in Flash. In video, a key frame contains all the data in that frame, but where they part company is in what happens between the key frames. In video, the frames between the key frames are called
difference framesor, if you are really “techie,” delta frames. Difference frames have the stuff that doesn’t change between key frames removed. For example, if you have a video of a piece of paper moving across a wall, only the paper will be in the Difference frame because it is the only thing different between the current frame and the previous frame. The wall doesn’t change, so for the purposes of illustration it is removed. This means the file size is reduced. Be very careful because a bad decision here can ruin your work.
If you were to stand at the side of a major city intersection and film cars and people walking by, there would be a lot of change and very few difference frames. Now take your camera into a farmer’s field and shoot some footage of a tree. There won’t be a lot of change, meaning a lot of difference frames. This explains why a 30-second video of a Formula One race is a lot larger in file size than that of a 30-second video of a tree in a field. Fewer difference frames means larger file size. The problem is that if you spread out the key frames in the Formula One video, the image quality degrades and looks blurry. We wish we could tell you that there is a hard-and-fast rule about key frame frequency, but there isn’t. Before you encode the video, watch the video and see whether there is a lot of movement, both in the video and with the camera. This will determine the key frame frequency. If you are at all unsure about what to do, select Automaticfrom the drop-down menu and let the software do the work for you.
Quality: This drop-down menu, shown in Figure 1-11, has absolutely nothing to do with the “quality” of the final output, but it has everything to do with the quality of the user’s experience. This is where you set the data rate for the video stream into the user’s computer.
If you select one of the three presets, the Max data rate
value in the input box below the Qualitychoice will show
150kbps,400kbps, or 700kbps. What this means is that a video using the High Qualitysetting will be fed into the computer at the rate of 700,000 bits per second. This is great for T1 or high-speed Internet connections, but fatal for the dial-up user. If you can form a mental image of trying to push a grape through a common garden worm, you can see what your user is in for. The modem simply won’t be able to keep pace; and the
video will start, stop, start, stop, and so on. The result is one seriously upset user. If you select Custom (see Figure 1-12), you can enter your own value in the Max data ratetext box. We tend to use a data rate of 300kbps for most situations and use a relatively low number— 100kbps to 125kbps—for dial-up.
Figure 1-11.The four quality options available to you
Resize video: Ignore this area. Changing the dimensions of a video will only make it really fuzzy if you increase the dimensions and less fuzzy if you reduce them. The most common dimen-sions for video are 320 x 240, 240 x 180, and 180 x 120. This option uses the standard 4:3 aspect ratio established by Apple when it unleashed QuickTime on an unsuspecting world. If you must resize a video, make sure to always have the Maintain aspect ratiocheck box selected. We highly recommend that if you must resize a video, do it in a video-editing application, not here. We’ll show you how to do that in the next chapter.
5.
Click the Audiotab to open the Encode audiosettings for the FLV file, shown in Figure 1-13. You really only have a single decision to make here: what data rate will be used to stream the audio portion of the video?Video is composed of two tracks. One is a video track, which we just dealt with, and the other is the audio track. This area allows you to manage the encoding of the audio track. Actually. . . audio stream.
Figure 1-13.Setting the data rate for the audio track
If you click the Data rate drop-down menu, you will be presented with several choices. The bot-tom line is that the larger the data rate, the larger the final file size. The choice you make here is added to the video data rate for a total data rate for the FLV file. For example, if you select the 400kbps rate for the video and 256kbps for the audio, the total data rate for the FLV file will be 656kbps, which, for many users, will result in a “grape through the worm” experience. Unless there is a compelling need for stereo (okay, the train rumbling from one speaker to the next or the THX soundtrack are very cool effects, but are they really necessary?), you can knock the audio back to 64kbps mono and the user will never know the difference.
6.
When you click OK, you are returned to the main Video Encoder window. Click the Start Queuebutton.
Figure 1-14.The video is encoding, and you will see a preview.
The other thing that happens is the Start Queuebutton changes to a Stop Queue button. If you have made a mistake, click the Stop Queuebutton; a dialog box will appear and ask you if you really want to do this. If you click the Yes button, the process stops, and an Errors dialog box will appear (Figure 1-15). Don’t get upset. You didn’t make a mistake. All this dialog box does is show you the settings and inform you that you interrupted the process.
Figure 1-15.The Errorsdialog box
When you close the Errorsbox, you are returned to the Encoder.
When you release the mouse, the status will change to Waitingand at this point you can return to the Encoder and change the settings or click the Start Queuebutton. When the encoding process is finished, close the Encoder by clicking the Closebutton.
Playing an FLV file in Flash CS3 Professional
The first thing to understand about the FLV file you just created is that you really can’t play it any-where but through Flash Player. In fact, you really can’t play any FLV file in a web page unless it is played through a Flash SWF file.
Flash CS3 Professional makes the addition of video to a Flash movie even easier and more intuitive than in the past. This is accomplished through the use of the FLVPlayback component found in the
Video Componentlist.
1.
Open a new document in Flash CS3 Professional. Save the file to your Exercise folder. SelectWindow ➤Components (Ctrl+F7on a PC or Cmd+F7on a Mac).
2.
Drag a copy of the FLVPlaybackcomponent onto the stage.When you release the mouse, depending on what you have done, you might or might not see a skin. Don’t worry about that. The important thing is to notice that the component resembles the FLV player created using the Import Video Wizard. The major difference is that the wizard knows where the FLV file is located and which skin to use. This component needs to be given that information.
3.
Select the component on the stage, and select the Parameterstab in the Property Inspectorto open the component’s parameters. You can also select the component and open theComponent Inspectorby selecting Window ➤Component Inspector. Regardless of which method is chosen, the information required by either one is identical.
The FLVPlayback component does not work with Flash Player 8 or lower. Before you get started, all documents you will be creating throughout this book will be ActionScript 3.0 documents. It is extremely important you understand this because there are two versions of the FLVPLayback component you will be using in this and other chapters. The Flash 8 version is the one that appears when you open a new ActionScript 2.0 document. Choose this and you will be e-mailing us to tell us that the instructions “suck.” If you really want to make sure you have opened the right version, take a look at Figure 1-17. If you don’t see the Captioning component, you are not working with an ActionScript 3.0 document.
Figure 1-17.Selecting the FLVPlayback component in Flash CS3 Professional
Figure 1-18.There are two ways to access the FLVPlayback component’s parameters.
4.
Click once in the autoPlayparameter and select falsefrom the drop-down menu, which ensures that the movie doesn’t start playing as soon as it loads. This is a good habit to develop if you use skins that have Pause and Play buttons.5.
Click once in the sourcearea. When you see the file folder—it is a Browsebutton—click it to open the Content Pathdialog box and navigate to the folder where you saved the encoded video. Before you close this dialog box by clicking OK, be sure to click the Match source FLV dimensionscheck box. This ensures that the component matches the exact dimensions of the encoded video. If you see a path to the video, this tells you that you haven't saved the FLA to the same folder as the FLV file. At this point you would click the Cancel button and save the FLA.Figure 1-19.The Content Pathdialog box
6.
Click the Skinparameter and click the magnifying glass to open the Select Skindialog box. Select SkinOverPlayCaption.swf, as shown in Figure 1-20. Click once on the Color Picker and select #990000(Deep Red) as the skin color. Click OK.You will notice there are only two types of skin: Overand Under. The Overseries of skins is dependent on user interaction to become visible if skinAutoHideis set to true in the parameters. If it is true, the controls appear only when the user rolls over the video. This is a good thing and a bad thing. The good thing is that the controls aren’t visible. The bad thing is that by setting the Autoplay parameter to false and the skinAutoHide parameter totrue, the user sees only the first frame of the video and doesn’t have a clue that it can be played. It could easily be mistaken for an image on the page.
Figure 1-20.The Select Skindialog box
7.
You now have all the information necessary, as shown in Figure 1-21, for Flash to play the video. Close the Component Inspector.Figure 1-21.The completed FLVPlayback component parameters
If you now press Ctrl+Enter(PC) or Cmd+Return(Mac), you can test the movie in Flash Player. Obviously, there is a bit of an issue here. There is a lot of wasted space on the stage, which only serves to increase the file size and nothing else. Close the preview; let’s fix it right now.
8.
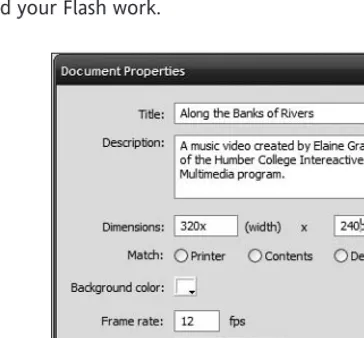
Click once on the stage and click the Size button in the Property Inspector to open theDocument Propertiesdialog box.
In Flash CS3 Professional, Document Propertieshas been seriously improved over earlier versions of the application. The Titleand Descriptionareas of the dialog box, shown in Figure 1-22, now allow you to enter metadatainto the SWF file. This means that your Flash content is now searchable by web search engines—they can find your Flash work.
Figure 1-22.Use the Document Propertiesdialog box to remove the wasted space on the stage, add metadata, and set the Flash movie’s frame rate to closely match that of the video.
9.
Set the width of the document to 320pixels, which matches the width of the video. Set the height value to 240, which allows for the height of the video to 240 pixels. Click OK.10.
Select the video on the stage and make sure that its X and Y coordinates in the Property Inspectorare set to 0. Test the video. The video will open in the SWF file and start playing when you click the Playbutton (see Figure 1-23).Figure 1-23.The video, with skin, playing in the component
So your clients saw YouTube . . . and now they want
online video
It’s rapidly becoming a commonplace scenario in 2007.
The Web has surpassed other forms of media as the most ideal platform for delivery of media, especially when you take into account that younger demographics are spending more time online than they do in front of the television. A high percentage of sites now incorporate Adobe’s Flash video, and it’s undeniably the fastest and easiest way to serve fluid video content, surpassing all other players. I judged the 2006 FlashForward Video category and was not surprised to see how many big news corpo-rations had made the switch to Flash video.
The times they are a-changin’. The advertising world has awakened to the power of Flash video. Influencers such as Kevin Roberts (CEO of Saatchi & Saatchi worldwide) are predicting mass migration to alternative “screens” and suggesting that agencies should be putting one-third of their overall budget into interactive/digital.
As clients are becoming educated about the endless possibilities of integrating video into their online marketing mix, it’s very easy for those same clients to look at the success of the YouTube phenomenon and want a piece of that action. Let’s face it; who hasn’t yet heard of YouTube?
Two facts I tell all my clients are these:
■ YouTube is worth more than the Manchester United Football club. Who hasn’t heard of Beckham?
■ YouTube is worth more than Sir Paul McCartney. Who hasn’t heard of The Beatles?
But do clients understand the ramifications and involvement needed to produce engaging and compelling Flash video content? Do they really comprehend the differ-ence between optimizing existing assets and actually staging, producing, filming, editing, and compressing custom-built video content for an online audience?
I’m not suggesting that a digital media team should suddenly become the next Kurosawa or Lucas/ILM (or maybe I am), but clients need to be educated on what is involved in the whole process; i.e., preparations, locations, subject matter/content, shooting, editing, and post-production. After all, there is no magic Ctrl+F13 button that suddenly makes their web site have instantaneous stunning motion video and bring with it a massive increase in viewers.
So, let’s go beyond the intricacies and technicalities of RTMP, FMS, VP6 CODEC, frame rates, audio synchronization, or shooting in HDV or DVCPRO HD to understand online video. Even if we boil it down to actual video content (embedded into a native SWF file), there are still issues with preplanning.
Recently, I was consulting on a big-budget production based around a series of tradi-tional cinema/television commercial spots. I had to advise a “big-time” ad director from California on how I essentially needed the subjects/actors to return to the exact same positions after each section. This was to ensure smooth and seamless jumps when implementing simple interactivity in Flash video. Small nuances such as avoiding rapid and large movements (to avoid pixilation and blur) were also “considerations” that were discussed.
Regrettably, he proceeded to do what he thought was best. He was the “Hollywood-salary-director,” and what did a “web designer” know about shooting video? Needless to say, the online component of the campaign was compromised; the smooth and natural scene jump effects were lost; a substandard “transition” was introduced as a last-minute quick fix; and the online video needed additional editing and audio enhancements adding stress, costs, post-production time, and delayed launch dates.
The yard mark for Flash video, at least for me, is Dove’s “Evolution,” winning the most prestigious advertising award in the world: the Grand Prix at the Cannes Lions International Advertising Festival.
Flash video is here to stay, and the world is watching.
What you’ve learned
Okay, towel yourself off and climb up to the pool deck. Congratulations! What you have just done in this chapter is perform the very tasks that will get you into the Flash video game. In this chapter you learned
How to create a video using the Flash Import Video Wizard Best practices of using the Flash CS3 Video Encoder How to create the FLVPLayback component How to test a video
This chapter covered a lot of ground, but you have also seen just how easy it can be to add video to Flash CS3 Professional. Whether you choose to use the Import Video Wizard or the Flash CS3 Video Encoder to create the FLV file is really irrelevant because they both use the Encoder. The only differ-ence between the two methods is that the Flash CS3 Video Encoder only creates the FLV file. The skin needs to be entered using the FLVPlayback component’s parameters.
Before we dive into creating Flash video, it is important that you understand where the content you will use comes from and how the video being encoded and used in Flash is created.
Video is prepared in an editing program of some sort. The more popular professional video-editing tools include the following:
Premiere Pro CS3 (Adobe) After Effects CS3 (Adobe) Final Cut Pro (Apple)
They are industrial-strength tools that come with an industrial-strength price tag. In fact, each one of them has quite a number of books dedicated specifically to the application or effects that they can produce.
For the rest of us, two tools are available—and free—and come with practically every computer on the market these days:
Windows Movie Maker Apple iMovie
By the time you reach Chapter 6, you will have been exposed to all five of these applications.
We will start with the last two—Movie Maker and iMovie—because we’ll work with some rather simple source footage that doesn’t require a lot of power under the hood.
What we’ll cover in this chapter: Using Windows Movie Maker
Exporting a Windows Movie Maker file for use in Flash Using iMovie from Apple
Exporting an iMovie project for use in Flash Files used in this chapter:
Movie Maker:
CD_TT384K_Stream.wmv(Ch02_Exercises\Exercise\MovieMaker\CD_TT384K_Stream.wmv)
club1384K_Stream.wmv(Ch02_Exercises\Exercise\MovieMaker\club1384K.wmv)
Copyofclub1.wmv(Ch02_Exercises\Exercise\MovieMaker\CopyofClub1.wmv)
dancing1384_Stream.wmv(Ch02_Exercises\Exercise\MovieMaker\dancing1384_Stream.wmv)
drive_fast384K_Stream.wmv(Ch02_Exercises\Exercise\MovieMaker\ drive_fast384K_Stream.wmv)
exit34K_Stream.wmv(Ch02_Exercises\Exercise\MovieMaker\exit34K_Stream.wmv)
fwd_rev384K_Stream.wmv(Ch02_Exercises\Exercise\MovieMaker\fwd_rev384K_Stream.wmv)
hand384K_Stream.wmv(Ch02_Exercises\Exercise\MovieMaker\hand384K_Stream.wmv)
mirror384K_Stream.wmv(Ch02_Exercises\Exercise\MovieMaker\mirror384K_Stream.wmv)
traffic384K_Stream.wmv(Ch02_Exercises\Exercise\MovieMaker\traffic384K_Stream.wmv)
traffic2384K_Stream.wmv(Ch02_Exercises\Exercise\MovieMaker\ traffic2384K_Stream.wmv)
TT_colour384K_Stream.wmv(Ch02_Exercises\Exercise\MovieMaker\ TT_colour384K_Stream.wmv)
NiteLife.mp3(Ch02_Exercises\Exercise\MovieMaker\NiteLife.mp3)
You should download the files used in this chapter fromwww.friendsofed.com
iMovie:
CD_TT.mov(Ch02_Exercises\Exercise\iMovie08\NiteLifeProject\Videos\CD_TT.mov)
club1.mov(Ch02_Exercises\Exercise\iMovie08\NiteLifeProject\Videos\club1.mov)
dancing1.mov(Ch02_Exercises\Exercise\iMovie08\NiteLifeProject\Videos\ dancing1.mov)
dancing2.mov(Ch02_Exercises\Exercise\iMovie08\NiteLifeProject\Videos\ dancing2.mov)
drive_fast.mov(Ch02_Exercises\Exercise\iMovie08\NiteLifeProject\Videos\ drive_fast.mov)
exit.mov(Ch02_Exercises\Exercise\iMovie08\NiteLifeProject\Videos\exit.mov)
fwd_rev.mov (Ch02_Exercises\Exercise\iMovie08\NiteLifeProject\Videos\ fwd_rev.mov)
hand.mov (Ch02_Exercises\Exercise\iMovie08\NiteLifeProject\Videos\hand.mov) mirror.mov(Ch02_Exercises\Exercise\iMovie08\NiteLifeProject\Videos\mirror.mov)
traffic.mov(Ch02_Exercises\Exercise\iMovie08\NiteLifeProject\Videos\traffic.mov)
traffic2.mov(Ch02_Exercises\Exercise\iMovie08\NiteLifeProject\Videos\ traffic2.mov)
TT_colour.mov(Ch02_Exercises\Exercise\iMovie08\NiteLifeProject\Videos\ TT_colour.mov)
NiteLife.aiff(Ch02_Exercises\Exercise\iMovie08\NiteLifeProject\Audio\ NiteLife.aiff)
Before we start, we have created a separate tutorial for each of the applications. Let’s face it: we don’t know which platform you use, so we are covering all the bases. Although we don’t recommend skip-ping exercises, in this case feel free to go to the app you plan to use. In either case, it is a relatively simple three-step process:
1.
Capture video from a camera or import footage.2.
Edit the footage.3.
Export the footage in a format that can be encoded for Flash.Figure 2-1.Let’s go to a club.
Before we get going, here’s a quick bit of background.
Nonlinear editing
Maybe this makes me sound like an old fart, but you have it easy these days. If you have never had the pleasure of using an analog video-editing system, you aren’t missing much. Analog editing involves using X-Acto knives and razor blades to cut and splice tape. It was an exacting process that required an enormous degree of organization and patience. Video edited on a computer—a process called
nonlinear editing (NLE), in which you can jump around the “film” at will—can be done quickly. And because it is nondestructive—razor blades and X-Acto knives are things of the past—it is also very forgiving.
Windows Movie Maker
Movie Maker is a small NLE application that is installed when you install Windows XP or Vista. If you are an advanced video developer or have quite a bit of experience with Premiere or Final Cut Pro, for example, you will find this application a bit rudimentary. Even so, it does give the average user the tools necessary to create and export a video.
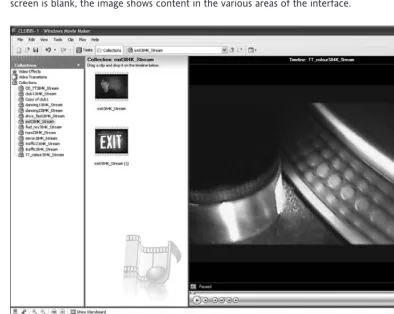
Getting started is not at all difficult. Select Start➤ All Programs ➤ Accessories ➤ Windows Movie Maker. Double-click the application and you will see the window shown in Figure 2-2. Although your screen is blank, the image shows content in the various areas of the interface.
Figure 2-2.The Movie Maker interface
As you can see, there isn’t much complexity to this application; it is designed for ease of use and quick editing. Instead of getting into how to use the features of the application, we’ll explain many of the important aspects as we move through this exercise.
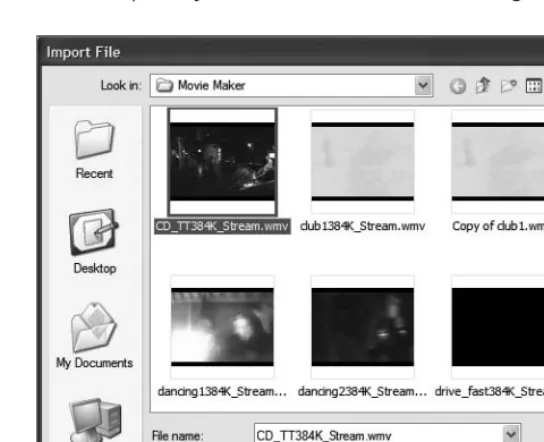
1.
Open Movie Maker and click theImport Videolink in theTaskspane to open theImport File dia-log box. Navigate to the Exercise folder for this chapter and open the Movie Maker folder (see Figure 2-3). The video clips inside the folder will be visible. If you press theShiftkey and then click the first and the last clip, you will select them all. Click theImportbutton and the clips will be added to the Clip library, which is called acollection(see Figure 2-4).Figure 2-3.Clips are imported into Movie Maker.