A Division of Microsoft Corporation One Microsoft Way
Redmond, Washington 98052-6399
Copyright © 2008 by Anil Desai and J.C. Mackin
All rights reserved. No part of the contents of this book may be reproduced or transmitted in any form or by any means without the written permission of the publisher.
Library of Congress Control Number: 2008920566
Printed and bound in the United States of America.
1 2 3 4 5 6 7 8 9 QWT 3 2 1 0 9 8
Distributed in Canada by H.B. Fenn and Company Ltd.
A CIP catalogue record for this book is available from the British Library.
Microsoft Press books are available through booksellers and distributors worldwide. For further infor-mation about international editions, contact your local Microsoft Corporation office or contact Microsoft Press International directly at fax (425) 936-7329. Visit our Web site at www.microsoft.com/mspress. Send comments to [email protected].
Microsoft, Microsoft Press, Active Directory, ActiveX, Aero, BitLocker, Excel, Internet Explorer, MSDN, MS-DOS, Outlook, RemoteApp, SharePoint, SQL Server, Visio, Visual Basic, Visual Studio, Win32, Windows, Windows Live, Windows Media, Windows NT, Windows PowerShell, Windows Server, and Windows Vista are either registered trademarks or trademarks of Microsoft Corporation in the United States and/or other countries. Other product and company names mentioned herein may be the trademarks of their respective owners.
The example companies, organizations, products, domain names, e-mail addresses, logos, people, places, and events depicted herein are fictitious. No association with any real company, organization, product, domain name, e-mail address, logo, person, place, or event is intended or should be inferred.
J.C. Mackin
J.C. Mackin (MCITP, MCTS, MCSE, MCDST, MCT) is a writer, editor, consultant, and trainer who has been working with Microsoft networks for more than a decade. Books he has previously authored or co-authored include MCSA/MCSE Self-Paced Training Kit (Exam 70-291): Implementing, Managing, and Maintaining a Microsoft Windows Server 2003 Network Infrastructure; MCITP Self-Paced Training Kit (Exam 70-443): Designing a Database Server Infrastructure Using Microsoft SQL Server 2005; and MCITP Self-Paced Training Kit (Exam 70-622): Supporting and Troubleshooting Applications on a Windows Vista Client for Enterprise Support Technicians. He also holds a master’s degree in telecommunications and network management.
When not working with computers, J.C. can be found with a panoramic camera photograph-ing medieval villages in Italy or France.
Anil Desai
Anil Desai (MCITP, MCSE, MCSD) is an independent consultant based in Austin, Texas. He specializes in evaluating, implementing, and managing IT solutions. He has worked extensively with Microsoft server products and the Microsoft .NET development platform and has more than 12 years of IT experience. Anil is a Microsoft MVP (Windows Server – Management Infrastructure).
Anil is the author of numerous technical books focusing on Microsoft certifications, the Windows Server platform, virtualiza-tion, Active Directory, Microsoft SQL Server, and IT management topics. He has made dozens of conference presentations at national events and is a contributor to several online and print magazines. In his spare time, he enjoys cycling, playing guitar and drums, and
v
1
Implementing and Configuring a Windows Deployment
Infrastructure . . . 1
2
Configuring Server Storage and Clusters . . . 81
3
Installing and Configuring Terminal Services . . . 129
4
Configuring and Managing a Terminal Services Infrastructure . . . 179
5
Installing and Configuring Web Applications . . . 239
6
Managing Web Server Security . . . 309
7
Configuring FTP and SMTP Services . . . 377
8
Configuring Windows Media Services . . . 437
9
Configuring Windows SharePoint Services . . . 487
Answers . . . 537
Glossary . . . 559
Appendix . . . 567
vii
Introduction . . . xvii
Hardware Requirements (Virtual PC) . . . xvii
Hardware Requirements (Physical) . . . xviii
Software Requirements . . . xix
Practice Setup Instructions . . . xix
Phase 1: Create the Virtual Machines . . . xxi
Phase 2: Configure the Operating Systems on Server1 and Core1 . . . xxiv
Phase 3: Configure Internet Access for the Contoso.com Network . . . xxix
Phase 4: Activate the Servers (Recommended) . . . xxxi
Using the CD and DVD . . . xxxi
How to Install the Practice Tests. . . xxxii
How to Use the Practice Tests . . . xxxii
How to Uninstall the Practice Tests . . . xxxiv
Microsoft Certified Professional Program . . . xxxiv
Technical Support. . . xxxiv
1
Implementing and Configuring a Windows Deployment
Infrastructure . . . 1
Before You Begin . . . .2
Lesson 1: Deploying Windows in a Windows Server 2008 Environment . . . .3
Windows Deployment Fundamentals . . . .3
Windows Deployment Methods . . . .8
Practice: Creating a Windows PE CD. . . .13
Lesson Summary. . . .14
Lesson Review . . . .15
Microsoft is interested in hearing your feedback so we can continually improve our books and learning resources for you. To participate in a brief online survey, please visit:
www.microsoft.com/learning/booksurvey/
Lesson 2: Configuring Windows Deployment Services . . . 16
Introducing Windows Deployment Services . . . 16
Understanding WDS Infrastructure Components . . . 17
Installing WDS . . . 19
Configuring WDS . . . 20
Capturing Images with WDS . . . 30
Deploying Images with WDS . . . 33
Practice: Configuring Windows Deployment Services . . . 37
Lesson Summary . . . 42
Lesson Review . . . 42
Lesson 3: Deploying Virtual Machines . . . 44
What Are Virtual Machines? . . . 44
Virtual PC 2007 . . . 46
Virtual Server 2005 R2 SP1 . . . 50
Hyper-V . . . 52
Lesson Summary . . . 61
Lesson Review . . . 62
Lesson 4: Implementing a Windows Activation Infrastructure . . . 63
Product Activation Types . . . 63
Implementing MAK Activation . . . 64
Implementing KMS Activation . . . 68
Activation Infrastructure Example . . . 72
Practice: Activating Windows Server 2008 . . . 73
Lesson Summary . . . 74
Lesson Review . . . 74
Chapter Review . . . 76
Chapter Summary. . . 76
Key Terms . . . 77
Case Scenarios. . . 77
Case Scenario 1: Deploying Servers . . . 77
Case Scenario 2: Creating an Activation Infrastructure . . . 78
Suggested Practices . . . 78
Configure Windows Activation . . . .79
Configure Hyper-V and Virtual Machines . . . .79
Take a Practice Test . . . .80
2
Configuring Server Storage and Clusters . . . 81
Before You Begin . . . .82
Lesson 1: Configuring Server Storage . . . .83
Understanding Server Storage Technologies . . . .83
Managing Disks, Volumes, and Partitions in Windows Server 2008 . . . .89
Practice: Working with Disk Sets . . . 102
Lesson Summary. . . 108
Lesson Review . . . 109
Lesson 2: Configuring Server Clusters . . . 111
Server Cluster Fundamentals . . . 111
Configuring an NLB Cluster . . . 115
Creating a Failover Cluster . . . 117
Practice: Exploring Failover Clustering . . . 122
Lesson Summary. . . 122
Lesson Review . . . 123
Chapter Review. . . 124
Chapter Summary . . . 124
Key Terms . . . 124
Case Scenarios . . . 125
Case Scenario 1: Designing Storage . . . 125
Case Scenario 2: Designing High Availability . . . 125
Suggested Practices . . . 126
Configure Storage . . . 126
Configure High Availability . . . 127
Take a Practice Test . . . 127
3
Installing and Configuring Terminal Services . . . 129
Before You Begin . . . 130
Lesson 1: Deploying a Terminal Server . . . 131
Enabling Remote Desktop . . . 134
Installing Terminal Services . . . 137
Staging the Terminal Server . . . 144
Practice: Installing a Terminal Server . . . 147
Lesson Summary . . . 150
Lesson Review . . . 150
Lesson 2: Configuring Terminal Services . . . 152
Introducing the Terminal Services Configuration Console. . . 152
Configuring Connection (RDP-Tcp) Properties . . . 153
Configuring Terminal Services Server Properties. . . 162
Configuring Terminal Services Printer Redirection . . . 166
Practice: Installing and Configuring a License Server . . . 168
Lesson Summary . . . 174
Lesson Review . . . 174
Chapter Review . . . 176
Chapter Summary. . . 176
Key Terms . . . 176
Case Scenarios. . . 177
Case Scenario 1: Choosing a TS Licensing Strategy . . . 177
Case Scenario 2: Troubleshooting a Terminal Services Installation . . . 177
Suggested Practices . . . 178
Deploy a Terminal Server Farm. . . 178
Watch a Webcast . . . 178
Take a Practice Test . . . 178
4
Configuring and Managing a Terminal Services Infrastructure . . . 179
Before You Begin . . . 180
Lesson 1: Configuring and Managing Terminal Services Clients . . . 181
Configuring Terminal Services Client Settings . . . 181
Configuring User Profiles for Terminal Services . . . 187
Managing Terminal Services User Connections . . . 189
Managing Resources in Client Sessions. . . 194
Practice: Managing Client Connections . . . 195
Lesson Review . . . 200
Lesson 2: Deploying Terminal Services Gateway . . . 202
Overview of Terminal Services Gateway . . . 202
Installing and Configuring a TS Gateway Server . . . 204
Practice: Installing and Configuring TS Gateway. . . 211
Lesson Summary. . . 215
Lesson Review . . . 215
Lesson 3: Publishing Applications with TS RemoteApp. . . 217
Overview of TS RemoteApp . . . 217
Configuring a Server to Host RemoteApp Programs . . . 218
Adding Programs for Publication in TS RemoteApp Manager . . . 219
Deploying a RemoteApp Program through TS Web Access . . . 221
Creating an RDP File of a RemoteApp Program for Distribution . . . 222
Creating a Windows Installer Package of a RemoteApp Program for Distribution . . . 224
Practice: Publishing Applications with TS RemoteApp Manager . . . 227
Lesson Summary. . . 232
Lesson Review . . . 233
Chapter Review. . . 234
Chapter Summary . . . 234
Key Terms . . . 235
Case Scenarios . . . 235
Case Scenario 1: Managing TS Sessions. . . 235
Case Scenario 2: Publishing Applications . . . 236
Suggested Practices . . . 236
Deploy a Terminal Services Infrastructure . . . 236
Watch a Webcast . . . 237
Perform a Virtual Lab. . . 237
Take a Practice Test . . . 237
5
Installing and Configuring Web Applications . . . 239
Before You Begin . . . 240
Lesson 1: Installing the Web Server (IIS) Role . . . 241
Understanding IIS Components and Options . . . 245
Understanding the Application Server Role . . . 245
Understanding IIS 7.0 Role Services. . . 248
Installing the Web Server (IIS) Role . . . 256
Using Windows System Resource Manager . . . 263
Practice: Installing and Verifying the Web Server (IIS) Role . . . 265
Lesson Summary . . . 266
Lesson Review . . . 267
Lesson 2: Configuring Internet Information Services . . . 268
Working with IIS Management Tools. . . 268
Creating and Configuring Web Sites . . . 272
Understanding Web Applications . . . 278
Working with Application Pools . . . 280
Working with Virtual Directories . . . 285
Using Command-Line Management . . . 286
Managing Web Server Configuration Files. . . 290
Migrating From IIS 6.0 . . . 296
Practice: Configuring and Managing IIS Settings . . . 298
Lesson Summary . . . 302
Lesson Review . . . 302
Chapter Review . . . 304
Chapter Summary. . . 304
Key Terms . . . 304
Case Scenarios. . . 305
Case Scenario 1: IIS Web Server Administration . . . 305
Case Scenario 2: Managing Multiple Web Sites . . . 305
Suggested Practices . . . 306
Manage Web Applications . . . 306
Take a Practice Test . . . 307
6
Managing Web Server Security . . . 309
Before You Begin . . . 311
Lesson 1: Configuring IIS Security . . . 311
Managing File System Permissions . . . 313
Configuring IIS Administration Features. . . 313
Managing Request Handlers . . . 324
Practice: Managing IIS Security Settings. . . 334
Lesson Summary. . . 337
Lesson Review . . . 338
Lesson 2: Controlling Access to Web Services . . . 339
Managing IIS Authentication . . . 339
Managing URL Authorization Rules . . . 347
Configuring Server Certificates . . . 350
Configuring IP Address and Domain Restrictions . . . 360
Configuring .NET Trust Levels. . . 365
Practice: Securing Web Servers and Web Content . . . 369
Lesson Summary. . . 371
Lesson Review . . . 372
Chapter Review. . . 373
Chapter Summary . . . 373
Key Terms . . . 373
Case Scenarios . . . 374
Case Scenario 1: Configuring Remote Management for IIS . . . 374
Case Scenario 2: Increasing Web Site Security . . . 374
Suggested Practices . . . 375
Implement Web Server Security . . . 375
Take a Practice Test . . . 376
7
Configuring FTP and SMTP Services . . . 377
Before You Begin . . . 377
Lesson 1: Configuring FTP . . . 378
Installing the FTP Publishing Service. . . 379
Configuring FTP Sites by Using IIS 6.0 Manager . . . 380
Installing and Managing FTP 7 . . . 388
Managing FTP Sites . . . 389
Managing FTP User Security. . . 395
Managing FTP Site Settings. . . 405
Using FTP Client Software . . . 409
Practice: Configuring and Testing FTP. . . 410
Lesson Summary . . . 414
Lesson Review . . . 414
Lesson 2: Configuring SMTP . . . 416
Installing the SMTP Server Feature . . . 416
Configuring SMTP Services . . . 417
Monitoring SMTP Virtual Servers . . . 426
Using an SMTP Virtual Server . . . 427
Practice: Configuring and Testing SMTP Services . . . 430
Lesson Summary . . . 431
Lesson Review . . . 431
Chapter Review . . . 433
Chapter Summary. . . 433
Key Terms . . . 433
Case Scenarios. . . 434
Case Scenario 1: Implementing a Secure FTP Site . . . 434
Case Scenario 2: Configuring an SMTP Virtual Server . . . 434
Suggested Practices . . . 435
Work with FTP and SMTP Services. . . 435
Take a Practice Test . . . 436
8
Configuring Windows Media Services. . . 437
Before You Begin . . . 438
Lesson 1: Configuring Windows Media Services . . . 439
Understanding Media Services . . . 439
Installing Streaming Media Services . . . 441
Using Windows Media Services Management Tools. . . 444
Managing Publishing Points . . . 447
Configuring Source Settings . . . 454
Creating Announcements . . . 455
Configuring Publishing Point Properties. . . 463
Configuring Security for Windows Media Services. . . 466
Enabling Cache/Proxy Features . . . 470
Protecting Media by Using DRM . . . 475
Practice: Configuring the Windows Media Services Server Role . . . 477
Lesson Summary. . . 479
Lesson Review . . . 480
Chapter Review. . . 482
Chapter Summary . . . 482
Key Terms . . . 482
Case Scenarios . . . 483
Case Scenario 1: Protecting Streaming Media Content. . . 483
Case Scenario 2: Improving Windows Media Services Performance and Scalability . . . 483
Suggested Practices . . . 484
Configure Windows Media Services . . . 484
Take a Practice Test . . . 485
9
Configuring Windows SharePoint Services . . . 487
Before You Begin . . . 487
Lesson 1: Configuring and Managing Windows SharePoint Services . . . 488
Understanding Windows SharePoint Services . . . 489
Understanding WSS Deployment Options. . . 491
Verifying the WSS Installation . . . 493
Using the SharePoint Central Administration Web Site . . . 496
Managing SharePoint Operations Settings . . . 500
Understanding Backup and Recovery for WSS . . . 510
Deploying and Configuring SharePoint Sites. . . 515
Managing Web Applications . . . 522
Installing Application Templates . . . 528
Practice: Configuring and Managing Windows SharePoint Services . . . 529
Lesson Summary. . . 532
Lesson Review . . . 532
Chapter Review. . . 534
Key Terms . . . 534
Case Scenarios. . . 535
Case Scenario 1: Deploying Windows SharePoint Services . . . 535
Case Scenario 2: Managing Windows SharePoint Services . . . 535
Suggested Practices . . . 535
Implement and Manage Windows SharePoint Services . . . 536
Take a Practice Test . . . 536
Answers . . . 537
Glossary. . . 559
Appendix. . . 567
Index . . . 637
Microsoft is interested in hearing your feedback so we can continually improve our books and learning resources for you. To participate in a brief online survey, please visit:
www.microsoft.com/learning/booksurvey/
xvii
This training kit is designed for information technology (IT) professionals who support or plan to support Windows Server 2008 networks and who also plan to take the Microsoft Cer-tified Technology Specialist (MCTS) 70-643 exam. It is assumed that before you begin using this kit, you have a solid, foundation-level understanding of Microsoft Windows client and server operating systems and common Internet technologies.
The material covered in this training kit and on the 70-643 exam relates to the technologies in a Windows Server 2008 network that support distributed access to Web content, media, oper-ating systems, and applications.
By using this training kit, you will learn how to do the following:
Q Deploy Windows servers and clients across a network by using Windows Deployment Services and the Windows Automated Installation Kit (WAIK)
Q Configure Hyper-V and other Windows virtualization technologies
Q Configure high-availability storage solutions for servers
Q Configure and manage Terminal Services in Windows Server 2008
Q Configure and manage Internet Information Services 7.0
Q Configure Windows Media Services
Q Configure Windows SharePoint Services
Find additional content online As new or updated material that complements your book becomes available, it will be posted on the Microsoft Press Online Windows Server and Client Web site. Based on the final build of Windows Server 2008, the type of material you might find includes updates to book content, articles, links to companion content, errata, sample chapters, and more. This Web site will be available soon at www.microsoft.com/learning/books/online/serverclient and will be updated periodically.
Hardware Requirements (Virtual PC)
If you choose to use virtualization software, you need only one physical computer to perform the exercises in this book. That physical host computer must meet the following minimum hardware requirements:
Q 1-GHz processor
Q 2.0 GB of RAM or more (recommended if you are using Windows Vista or Windows Server 2008 as the host operating system in a virtual environment)
Q 80 GB of available hard disk space
Q DVD-ROM drive
Q Internet connectivity
Hardware Requirements (Physical)
If you choose to use physical computers instead of virtualization software, use the following list to meet the minimum hardware requirements of the practice exercises in this book:
Q Three personal computers, each with a 1-GHz processor, 512 MB of RAM, network card, video card, and DVD-ROM drive.
Q The following storage requirements:
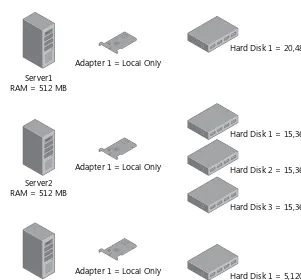
T Computer 1 (Server1) must have one attached hard disk with a storage capacity of at least 20 GB.
T Computer 2 (Server2) must have at least two and preferably three attached hard disks. Each hard disk should have a storage capacity of at least 15 GB.
T Computer 3 (Core1) must have one attached hard disk with a storage capacity of at least 5 GB.
T All hard disks must be freshly formatted. (No software should be installed.)
Q All three computers must be physically connected to each other and to the Internet.
Q The network adapter on Computer 2 (Server2) must be PXE-boot compatible.
Q If your network does not already include an Internet gateway, Computer 1 (Server1) needs a second network adapter so that it can act as the Internet gateway for the other two computers.
Software Requirements
The following software is required to complete the practice exercises:
Q If you are using Virtual PC 2007 or later to create the practice exercises in a virtual envi-ronment, the physical host computer must already be running a Windows operating sys-tem and have network drivers installed. At the time of this writing, Virtual PC 2007 is officially supported on Windows Vista Business, Windows Vista Enterprise, Windows Vista Ultimate, Windows XP Professional, and Windows XP Tablet PC Edition. You can check the Virtual PC Web site at http://www.microsoft.com/windows/products/winfamily/ virtualpc/default.mspx for updated information about which operating systems can run Virtual PC.
Q Windows Server 2008. You can download an evaluation edition of Windows Server 2008 at the Microsoft Download Center at http://www.microsoft.com/downloads. Note that you must use a 32-bit version of Windows Server 2008 within Virtual PC.
Q The Windows Automated Installation Toolkit (WAIK). You can download the WAIK at the Microsoft Download Center at http://www.microsoft.com/downloads.
Q If you are not using virtualization software, you need software that allows you to handle .iso and .img files. This software needs to perform either or both of the following functions: T Burn .iso and .img files to CDs or DVDs. (This solution also requires CD/DVD
recording hardware.)
T Mount .iso and .img files as virtual CD or DVD drives on your computer.
Practice Setup Instructions
You need to prepare three computers for the exercises in this training kit. The following instructions assume you have installed Virtual PC 2007 or later on a host computer that meets the minimum hardware requirements specified in the “Hardware Requirements (Virtual PC)” section of this introduction. If you choose to use other virtualization software or physical computers in place of Virtual PC, you can use the following instructions to determine the gen-eral setup requirements of the practice, but you will need to adjust the step-by-step instruc-tions accordingly.
IMPORTANT Download required software
The practice setup occurs in four phases. In the first phase, you create the three virtual machines. Figure 1 shows the virtual hardware configuration of the virtual machines as they appear after this first phase.
Figure 1-1 Hardware configuration for the three computers in Virtual PC
In the second phase of the practice setup, you configure the software for the Server1 and Core1 machines. (No software configuration is necessary for Server2 because this computer must be left clean as a virtual bare-metal machine.)
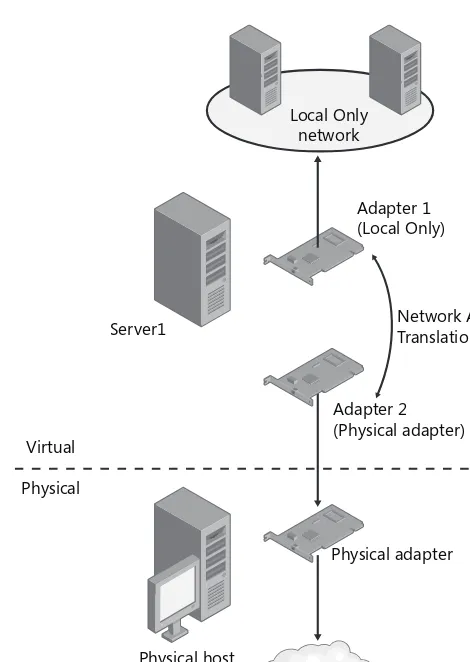
The third phase of practice setup describes the configuration necessary to provide an Internet connection for all three computers. By performing these steps, you add a second virtual net-work adapter to Server1 and configure Netnet-work Address Translation (NAT) across its two adapters, as shown in Figure 2.
Adapter 1 = Local Only
Adapter 1 = Local Only
Adapter 1 = Local Only Server1
RAM = 512 MB
Server2 RAM = 512 MB
Core1 RAM = 512 MB
Hard Disk 1 = 20,480 MB
Hard Disk 1 = 15,360 MB
Hard Disk 2 = 15,360 MB
Hard Disk 3 = 15,360 MB
Figure 1-2 Providing an Internet connection for all three computers in Virtual PC
In the fourth and final phase of the practice setup, you activate the Server1 and Core1 servers over the Internet.
Phase 1: Create the Virtual Machines
Perform the following steps to create the virtual machines for this training kit.
Create the Server1 Virtual Machine
In the Virtual PC console, click the New button to launch the New Virtual Machine Wizard, and then specify the following settings:
Local Only network
Adapter 1 (Local Only)
Physical adapter
Network Address Translation (NAT) Server1
Virtual
Physical
Physical host
Q Options: Create a Virtual Machine
Q Name and location: Server1
(The default location is used if you specify only a name for this setting.) Q Operating System: Windows Server 2003 (Windows Server 2008 if available)
At the time of this writing, Virtual PC 2007 does not offer the option to specify Windows Server 2008 as the operating system. When this option does become available, choose Windows Server 2008.
Q RAM: 512 MB
If you choose Windows Server 2003 as the operating system, Virtual PC recommends 256 MB of RAM. In this case, select the option to adjust the recommended RAM and enter 512 instead.
Q Hard disk size: 20,480 MB
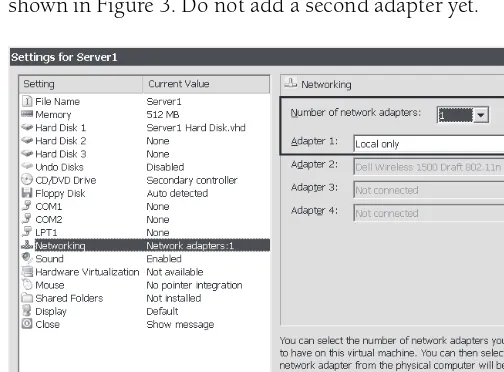
Configure the Network Adapter in Virtual PC After you have created a new (empty) vir-tual machine named Server1 in Virvir-tual PC, use the Virvir-tual PC console to open the settings of the Server1 machine. Then, configure Adapter 1 to connect to the Local Only network, as shown in Figure 3. Do not add a second adapter yet.
Create the Core1 Virtual Machine
Use the New Virtual Machine Wizard to create a second virtual machine. Configure all settings identically to those of the Server1 machine (including the network adapter) except in the fol-lowing two cases:
Q Name and location: Core1
Q Hard disk size: 5120 MB
Create the Server2 Virtual Machine
Use the New Virtual Machine Wizard to create the final virtual machine. Configure all settings identically to those of the Server1 machine (including the network adapter) except in the fol-lowing two cases:
Q Name and location: Server2
Q Hard disk size: 15360 MB
IMPORTANT In Hyper-V, use a legacy adapter for Server2
If you are creating your servers in Hyper-V instead of Virtual PC, be sure to configure the network adapter on Server2 as a legacy adapter. Otherwise, the adapter will not be PXE-compatible. This feature is required for the deployment of Windows Server 2008 that is performed on Server2 in the exercises found at the end of Chapter 1, Lesson 2, “Configuring Windows Deployment Services.”
Configure the second and third hard disks for Server2 Use the Virtual PC console to open the settings for the Server2 virtual machine. In the Settings For Server2 dialog box, select Hard Disk 2 in the left pane, and then click the Virtual Disk Wizard button. Use the Virtual Disk Wizard to create a virtual hard disk with a name and location of your choice. Choose the option for a Dynamically Expanding disk, and then specify the size as 15360 MB. After the vir-tual disk is created, in the Settings For Server2 dialog box, select the Virvir-tual Hard Disk File option and browse to select the new virtual hard disk you have just created.
Finally, use the same process to create and attach a 15360 MB virtual hard disk for Server2’s Hard Disk 3.
Figure 1-4 The Server2 virtual machine should have three attached virtual hard disks
Phase 2: Configure the Operating Systems on Server1 and Core1
Use the following instructions to configure the Server1 and Core1 computers.
Configure Server1
Server1 will be used as a DHCP server, DNS server, and Active Directory domain controller for the contoso.com domain. Server1 also needs to have the WAIK installed. Perform the follow-ing steps to meet the configuration requirements for the server.
Figure 1-5 Attaching an ISO file to a virtual machine
2. Perform a default installation of Windows Server 2008. Use the following guidelines: T If desired, choose a language and keyboard corresponding to your region.
T Do not enter a product key at this time.
T Choose Windows Server 2008 Standard (Full Installation) or Windows Server 2008 Enterprise (Full Installation).
T Install Windows in the default location (Disk 0 Unallocated Space).
T Use a strong password of your choice when logging on as Administrator for the first time.
T After you log on as Administrator, use the Initial Configuration Tasks window to make the following configuration changes.
3. Configure the Local Area Connection on Server1. You can perform this step by using either the Initial Configuration Tasks window or a command prompt.
In the Initial Configuration Tasks window, click Configure Networking, open the prop-erties of the Local Area Connection, and then configure the propprop-erties of Internet Proto-col version 4 (TCP/IPv4) with the following options and values:
T Select Use The Following IP Address
O IP Address: 192.168.10.1
O Subnet Mask: 255.255.255.0
T Select Use The Following DNS Server Addresses
O Preferred DNS server: 192.168.10.1
O Alternate DNS server: leave blank
To configure these same IP settings at a command prompt, type the following two commands in succession:
netsh interface ipv4 set address "local area connection" static 192.168.10.1 255.255.255.0
netsh interface ipv4 set dns "local area connection" static 192.168.10.1
Configure the computer name. You can perform this step by using either the Initial Configuration Tasks window or a command prompt.
In Initial Configuration Tasks, click Provide Computer Name And Domain. Then, click the Change button and specify the computer name as Server1. Do not specify a domain at this time.
To set the computer name at the command prompt, type the following command: netdom renamecomputer %computername% /newname:Server1 /reboot
4. Use the Run box from the Start menu to run Dcpromo and configure Server1 as a domain controller in a new Active Directory domain named contoso.com. Specify the fol-lowing options in the Active Directory Domain Services Installation Wizard:
T Create a New Domain In A New Forest.
T FQDN Of The Forest Root: contoso.com.
T Forest Functional Level: Windows Server 2008.
T Additional Domain Controller Options: DNS Server (Default).
T If you are warned that the computer has a dynamically assigned IP address, click Yes.
T If you are warned that a delegation for this DNS server cannot be created, click Yes.
T Locations for database, log files, and Sysvol: Leave defaults.
T Directory Services Restore Mode Administrator Password: Any strong password of your choice.
5. After the Active Directory Domain Services Installation Wizard completes, restart Server1 immediately, and then log on to the contoso.com domain from Server1 as CON-TOSO\Administrator.
IMPORTANT How do you log on to a computer in Virtual PC?
6. Add the DHCP Server role. In the Initial Configuration Tasks window, click Add Roles. Use the Add Roles Wizard to add the DHCP Server role with the following options:
T Network Connection Bindings: Default. (Leave 192.168.10.1 checked.)
T IPv4 DNS Server Settings:
O Parent Domain: contoso.com.
O Preferred DNS Server IPv4 Address: 192.168.10.1. O Alternate DNS Server IPv4 Address: Leave blank.
T WINS Server Settings: WINS is not required.
T Add a DHCP scope with the following specifications:
O Scope Name: Contoso.com. O Starting IP Address: 192.168.10.2. O Ending IP Address: 192.168.10.10. O Subnet Mask: 255.255.255.0.
O Default Gateway: 192.168.10.1. (This assumes an Internet access configura-tion as described in Phase 3 of the practice setup instrucconfigura-tions.)
O Subnet Type: Wired.
O Activate This Scope: Leave checked.
O DHCPv6 Stateless Mode: Leave default.
O IPv6 DNS Server Settings: Leave default.
O Authorize DHCP Server: Leave default.
7. Create and name three domain administrator accounts. To do so, use the following step-by-step instructions.
a. In the Active Directory Users And Computers administrative tool, expand the con-toso.com node in the console tree, and then select the Users folder.
b. Right-click the Users folder, point to New on the shortcut menu, and then click User.
c. In the New Object – User dialog box, type the name ContosoAdmin1 in the Full Name and User Logon Name text boxes, and then click Next.
d. Enter a password of your choice, click Next, and then click Finish.
e. In the Active Directory Users And Computers console, locate the ContosoAdmin1 account you have just created in the details pane. Right-click the account, and then click Add To A Group from the shortcut menu.
g. Create two additional domain administrator accounts named ContosoAdmin2 and ContosoAdmin3, respectively, using steps b through f.
h. If desired, create an additional domain administrator account with your name.
8. Enable File Sharing on Server1. Open Network and Sharing Center by right-clicking on the Network icon in the Notification area and clicking Network And Sharing Center. In the Sharing And Discovery area, select the option to turn on file sharing.
9. Install the Windows Automated Installation Kit (WAIK) using the WAIK DVD or IMG file you have downloaded from the Microsoft Download Center. To do so, use the follow-ing step-by-step instructions.
a. Mount the WAIK DVD or .img file as a DVD drive in Virtual PC by using the Cap-ture ISO Image command from the CD menu.
b. In the Welcome To Windows Automated Installation Kit window, use the .NET Framework Setup and MSXML 6.0 Setup links to install these components if necessary.
If either of these components is already installed on the local machine, you will not be given an Install option.
c. Use the Windows AIK Setup link to install the WAIK.
10. Install Virtual Machine Additions on Server1.
From the Action menu, select Install Or Update Virtual Machine Additions. Follow the prompts to install Virtual Machine Additions on Server1. Restart the computer and log back on as CONTOSO\Administrator.
Configure Core1
Core1 will act as a member server in the contoso.com domain. Use the following instructions to configure the Core1 server.
1. Attach the Windows Server 2008 ISO file or DVD to the Core1 virtual machine, and then perform a default installation of Windows Server 2008 Server Core. Use the following guidelines:
T If desired, choose a language and keyboard corresponding to your region.
T Do not enter a product key at this time.
T Choose Windows Server 2008 Standard (Server Core Installation) or Windows Server 2008 Enterprise (Server Core Installation).
T To log on for the first time, click the Other User tile, and then specify a User Name Of Administrator with a blank password.
You will immediately be prompted to change the password.
2. Verify the IP configuration. At the command prompt, type ipconfig /all to ensure that Core1 has received an IP configuration from Server1.
3. Configure the Core1 computer name and domain membership. At the command prompt, type the following command:
netdom renamecomputer %computername% /newname:Core1
4. To join Core1 to the Contoso.com domain, type the following command: netdom join %computername% /domain:Contoso.com /userd:ContosoAdmin1 /passwordd:*
5. Then, type the password associated with the domain user (ContosoAdmin1) when prompted.
NOTE Note the spelling
Note the repetition of the letter “d” used in the passwordd switch in the Netdom command.
6. Finally, restart Core1 by typing the following command: shutdown /r /t 0
Phase 3: Configure Internet Access for the Contoso.com Network
In this phase, you add to Server1 a second adapter that is bound to a physical network adapter on the physical host machine. You then configure network address translation (NAT) on Server1.
Add and Configure a Second Virtual Adapter on Server1
Complete the following steps to add and configure a second virtual adapter on Server1.
1. Shut down Server1. Use the Virtual PC Console to open Server1 settings.
2. In the Settings For Server1 dialog box, set the number of network adapters to 2. For Adapter 2, choose the network adapter that corresponds to the physical adapter con-nected to the Internet on the host machine.
Figure 1-6 Configuring the second adapter on Server1
3. Start and log on to Server1.
4. In Server Manager, click Add Roles. Use the following information to complete the Add Roles Wizard:
T Select Server Roles: Network Policy and Access Services
T Select Role Services: Routing and Remote Access Services (Do not select any other role services at this time.)
Configure NAT on Server1
Use the following step-by-step instructions to configure NAT on Server1.
1. Open the Routing And Remote Access administrative tool.
2. In the Routing And Remote Access console tree, right-click the Server1 node, and then click Configure And Enable Routing And Remote Access.
3. Specify the following settings in the Routing And Remote Access Server Setup Wizard: T On the Configuration page, click Network Address Translation (NAT).
T On the NAT Internet Connection page, select Local Area Connection 2 as the pub-lic interface to connect to the Internet.
5. Open Internet Explorer and select Internet Options from the Tools menu. Set the home page to an Internet-based Web page of your choice.
6. Verify Internet connectivity in Internet Explorer by clicking the Home icon.
Phase 4: Activate the Servers (Recommended)
Perform the following steps if you have product keys for both Server1 and Core1.
1. Activate Server1. Open the System Control Panel and select the option to change the product key. Type the product key when prompted and click Next.
Windows will automatically activate over the Internet.
2. Activate Core1 by using the following step-by-step procedure:
a. Log on to contoso.com from Core1 as a domain administrator, and then type the following command, where productkey is your product key (with dashes):
slmgr -ipk productkey
b. When you receive a message indicating that the product key was installed success-fully, type the following command:
slmgr -ato
c. After you receive a message indicating that the product has been activated success-fully, you can shut down Core1 by typing the following command:
shutdown /s /t 0
Using the CD and DVD
A companion CD is included with this training kit. The companion CD contains the following:
Q Practice tests You can reinforce your understanding of how to configure Windows Server 2008 by using electronic practice tests you customize to meet your needs from the pool of Lesson Review questions in this book. Alternatively, you can practice for the 70-643 certification exam by using tests created from a pool of over 200 realistic exam ques-tions, which give you many practice exams to ensure that you are prepared.
Q Webcasts To supplement your learning, the CD includes Microsoft-sponsored Web-casts from experts. These WebWeb-casts are lectures and demonstrations that provide addi-tional information about subjects covered in the book.
Q Sample chapters Sample chapters from other Microsoft Press titles on Windows Server 2008. These chapters are in PDF, as well.
How to Install the Practice Tests
To install the practice test software from the companion CD to your hard disk, do the following:
1. Insert the companion CD into your CD drive and accept the license agreement. A CD menu appears.
NOTE If the CD menu does not appear
If the CD menu or the license agreement does not appear, AutoRun might be disabled on your computer. Refer to the Readme.txt file on the CD-ROM for alternate installation instructions.
2. Click Practice Tests and follow the instructions on the screen.
How to Use the Practice Tests
To start the practice test software, follow these steps.
1. Click Start\All Programs\Microsoft Press Training Kit Exam Prep.
A window appears that shows all the Microsoft Press training kit exam prep suites installed on your computer.
2. Double-click the lesson review or practice test you want to use. NOTE Lesson reviews vs. practice tests
Lesson Review Options
When you start a lesson review, the Custom Mode dialog box appears so that you can config-ure your test. You can click OK to accept the defaults, or you can customize the number of questions you want, how the practice test software works, which exam objectives you want the questions to relate to, and whether you want your lesson review to be timed. If you are retaking a test, you can select whether you want to see all the questions again or only the questions you missed or did not answer.
After you click OK, your lesson review starts.
Q To take the test, answer the questions and use the Next and Previous buttons to move from question to question.
Q After you answer an individual question, if you want to see which answers are correct— along with an explanation of each correct answer—click Explanation.
Q If you prefer to wait until the end of the test to see how you did, answer all the questions, and then click Score Test. You will see a summary of the exam objectives you chose and the percentage of questions you got right overall and per objective. You can print a copy of your test, review your answers, or retake the test.
Practice Test Options
When you start a practice test, you choose whether to take the test in Certification Mode, Study Mode, or Custom Mode.
Q Certification Mode Closely resembles the experience of taking a certification exam. The test has a set number of questions. It is timed, and you cannot pause and restart the timer.
Q Study Mode Creates an untimed test in which you can review the correct answers and the explanations after you answer each question.
Q Custom Mode Gives you full control over the test options so that you can customize them as you like.
In all modes the user interface when you are taking the test is basically the same but with dif-ferent options enabled or disabled, depending on the mode. The main options are discussed in the previous section, “Lesson Review Options.”
How to Uninstall the Practice Tests
To uninstall the practice test software for a training kit, use the Add Or Remove Programs option (Windows XP) or the Programs And Features option (Windows Vista) in Windows Control Panel.
Microsoft Certified Professional Program
The Microsoft certifications provide the best method to prove your command of current Microsoft products and technologies. The exams and corresponding certifications are devel-oped to validate your mastery of critical competencies as you design and develop, or imple-ment and support, solutions with Microsoft products and technologies. Computer professionals who become Microsoft certified are recognized as experts and are sought after industry-wide. Certification brings a variety of benefits to the individual and to employers and organizations.
MORE INFO All the Microsoft certifications
For a full list of Microsoft certifications, go to http://www.microsoft.com/learning/mcp/default.asp.
Technical Support
Every effort has been made to ensure the accuracy of this book and the contents of the com-panion CD. If you have comments, questions, or ideas regarding this book or the comcom-panion CD, please send them to Microsoft Press by using either of the following methods:
Q E-mail: [email protected]
Q Postal mail at:
Microsoft Press
Attn: MCTS Self-Paced Training Kit (Exam 70-643): Configuring Windows Server 2008 Appli-cations Infrastructure, Editor
One Microsoft Way
Redmond, WA 98052-6399
1
Implementing and Configuring a
Windows Deployment
Infrastructure
For years before the arrival of Windows Vista and Windows Server 2008, the process of deploying Windows in large networks remained virtually unchanged. This latest generation of Windows operating systems, however, has introduced a number of new deployment technol-ogies (such as ImageX and Windows Deployment Services) along with new deployment con-siderations (such as virtual machines and Windows activation infrastructure). Consequently, there is now much to learn about the seemingly elementary topic of Windows deployment, even for experienced Windows administrators. This chapter introduces you to the many new deployment technologies and concepts that you need to understand for the 70-643 exam.
For more in-depth information about deployment that goes beyond what you need to know for the exam, consult the appendix at the back of this training kit.
Exam objectives in this chapter:
Q Deploying Servers
T Deploy images by using Windows Deployment Services.
T Configure Microsoft Windows activation.
T Configure Windows Server Hyper-V and virtual machines.
Lessons in this chapter:
Q Lesson 1: Deploying Windows in a Windows Server 2008 Environment . . . .3
Q Lesson 2: Configuring Windows Deployment Services . . . .16
Q Lesson 3: Deploying Virtual Machines . . . 44
Before You Begin
To complete the lessons in this chapter, you must have:
Q A domain controller named Server1.contoso.com with at least 3 GB of free space on any partition or volume.
Q A computer or virtual machine with no operating system installed and at least 512 MB of RAM. (This bare-metal computer will be used for Server2.)
Q Downloaded the Windows Automated Installation Kit (Windows AIK) from the Microsoft Download Center (http://www.microsoft.com/download) and installed the Windows AIK on Server1.
Real World
JC Mackin
Should we begin with the fact that all Windows installations are now image-based? Or should we start by naming some of the new tools that you need to learn—such as ImageX, Windows PE, Windows System Image Manager, and Windows Deployment Ser-vices—which are all used to support deploying these new Windows images? Or maybe we should talk first about the fact that, since those handy corporate versions of Win-dows are things of the past, you now need to learn how to activate massive numbers of computers after deployment. And by the way, before deploying any servers or clients, you should definitely decide whether it’s best to deploy them on a physical or virtual hardware platform.
Lesson 1: Deploying Windows in a Windows Server 2008
Environment
To deploy an operating system means to make that operating system ready for use, typically on many computers in a corporate network. In a network made up of clients running Windows Vista and servers running Windows Server 2008, you can deploy new clients and servers in a number of ways, and all these methods—including basic installation—are based on imaging technology. To deploy Windows images, you can use the installation media (DVD), Windows imaging tools such as ImageX and Microsoft System Center Configuration Manager 2007, or the Windows Deployment Services server role built into Windows Server 2008.
After this lesson, you will be able to:
Q Understand the tools that can help you manage, edit, and deploy Windows images. Q Understand the various methods you can use to deploy Windows Vista and
Win-dows Server 2008. Q Create a Windows PE CD. Estimated lesson time: 50 minutes
Windows Deployment Fundamentals
Beginning with Windows Vista and continuing with Windows Server 2008, Microsoft has introduced a new process for installing and deploying Windows. This change is reflected in new technologies and tools that support the new Windows imaging format, which is based on the WIM file.
What Is a WIM File?
A Windows Imaging Format (WIM) file contains one or more disk images in the WIM format. These images are file-based, which means that they are composed of collections of volume files and are not merely sector-based snapshots of disk data, as is common with many other disk imaging applications. The main advantage of file-based images over sector-based images is that you can modify them before, during, and after deployment.
Figure 1-1 Viewing WIM file information
NOTE Install.wim
The base images of Windows Server 2008 stored on the Windows product DVD are contained in the file Install.wim.
WIM files offer a number of additional Windows deployment advantages, including the following:
Q Because the WIM image format is hardware-agnostic, you need only one image to sup-port many hardware configurations or hardware abstraction layers (HALs). (Separate images, however, are needed for x86 and 64-bit operating systems.)
Q WIM files enable you to customize images by scripts or automate them by answer files upon installation.
Q The WIM image format enables you to modify the contents of an image offline. You can add or delete certain operating system components, updates, and drivers without creat-ing a new image.
Q WIM files need to keep only one copy of disk files common to all the images stored in the file. This feature dramatically reduces the amount of storage space required to accommo-date multiple images.
Q The WIM image format allows for nondestructive deployment. This means that you can leave data on the volume to which you apply the image because the application of the image does not erase the disk’s existing contents.
Q A WIM file image uses only as much space as the files that comprise it. Therefore, you can use WIM files to capture data on a volume with empty space and then migrate the data to a smaller volume.
Q A WIM file can span multiple CDs or DVDs.
Q WIM files support two types of compression—Xpress (fast) and LZX (high)—in addition to no compression (fastest).
Windows Automated Installation Kit Tools
You can download the Windows Automated Installation Kit (AIK) from the Microsoft Down-load Center at http://www.microsoft.com/downloads. The Windows AIK provides both corpo-rate administrators and original equipment manufacturers (OEMs) with a set of tools and documentation for performing unattended installs of Windows Server 2008, Windows Vista, and some earlier versions of Microsoft Windows, including Windows XP and Windows Server 2003.
The Windows AIK includes several important deployment tools, including the following:
Q Windows Preinstallation Environment (Windows PE) 2.0 Windows Preinstallation Envi-ronment (PE) 2.0, also known as WinPE, is a bootable and lightweight version of Windows that you can use to start a computer from a removable medium such as a CD or USB key or from a network source. Although the main purpose of Windows PE is to provide an environment from which to capture or apply a Windows image, you can also use it to troubleshoot or recover an installed operating system. In general, you can think of Windows PE as a replacement for bootable MS-DOS disks, but unlike the 16-bit MS-DOS that requires its own set of drivers, the 32-bit and 64-bit Windows PE operating system versions both take advantage of the drivers used in Windows Vista and Windows Server 2008.
NOTE A lightweight version of Windows
Although installations of Windows PE vary in size, a typical installation requires about 100 MB of RAM. Because of its size, Windows PE cannot be run from a floppy disk and must be run from a CD, DVD, USB key, or a network source.
command prompt will appear from which you can run built-in tools and other programs you have made available through customization.
NOTE Windows Setup and Windows PE
Windows PE provides the basis for all Windows Vista and Windows Server 2008 installations. Whenever you boot from the product DVD and run the Setup program, Windows PE is actu-ally running in the background.
Although Windows PE starts from the CD drive, Windows PE 2.0 does not actually run from the CD when it is fully booted. Windows PE 2.0 instead creates a RAM disk (a por-tion of RAM used as a drive), loads the operating system into that drive, and then runs from that RAM disk. This RAM disk is assigned the drive letter X.
NOTE Replacing the CD in Windows PE
Because Windows PE loads into and runs from a RAM disk, you can remove the Windows PE CD and insert a second CD to access additional required drivers or software. The X:\Win-dows\System32 folder contains many programs and utilities you can execute in Windows PE. Although most of these tools are also used in the full version of Windows Vista, some tools are specific to Windows PE.
Q ImageX ImageX is a command-line tool you can use to capture, modify, and apply WIM images for deployment. The main function of ImageX is to enable you to capture a vol-ume to a WIM file image and apply a WIM file image to a volvol-ume. For example, to capture an image, you can boot into Windows PE and use the command Imagex.exe /capture
path\wimfilename.wim “Image_Name”. To apply an image to a volume, use Imagex /apply
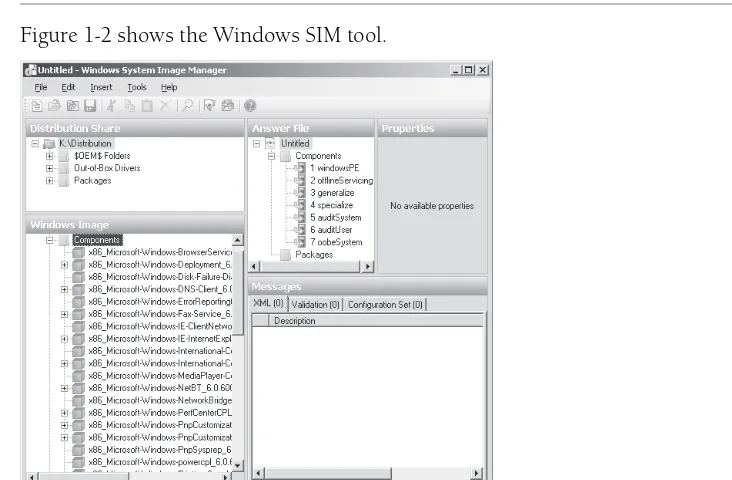
path\wimfilename.wim 1. (In this case, the value 1 indicates the index number of the image within the file wimfilename.wim.) Another important feature of ImageX is that it enables you to mount a WIM file image in the Windows file system so that you can modify the con-tents of that image. For example, you can mount an operating system image to add device drivers and then unmount it so that it is once again ready to be applied to a volume Q Windows SIM Windows System Image Manager (SIM) is the tool used to create
NOTE Windows SIM vs. Setup Manager
As a means to create answer files for unattended installations, Windows SIM replaces the Setup Manager tool used with previous versions of Windows.
Windows SIM uses catalog (.clg) files along with Windows images (WIM files) to dis-play the available components and packages that can be added to an unattended answer file. Catalog files and WIM files contain configurable settings that you can modify once the component or package is added to an answer file.
NOTE Catalog (.clg) files
You need to re-create the catalog file associated with a Windows image whenever you update a WIM file image.
Figure 1-2 shows the Windows SIM tool.
Figure 1-2 Windows SIM
Sysprep
Sysprep is a tool found in the %SystemRoot%\System32\Syseprep folder of a Windows Vista or Windows Server 2008 installation. The purpose of Sysprep is to generalize a model com-puter installation image so that it can be used on many other comcom-puters. Sysprep achieves this generalization by removing only those settings of the model installation that should not be shared by other computers—settings such as the computer name, its domain membership, the time zone, the product key, the security identifier (SID), and various other user and machine settings. When you run Sysprep on an installation of Windows, a Sysprep image is generated and the installation is said to be Sysprepped.
After you run Sysprep, the computer shuts down. The Sysprepped installation then resides on the hard disk, ready to be captured by ImageX or Windows Deployment Services into a WIM file and deployed to other computers.
Of course, the settings removed by Sysprep need to be replaced on each computer that uses the Sysprepped image. Some of these settings (such as the computer SID) are automatically regenerated when the installation boots for the first time after Sysprep has run. Other settings might be provided by an answer file you configure in advance and supply when the Sysprepped image first boots. All remaining settings needed by the system are provided by the user in an interactive wizard that appears during the first boot after Sysprep is run.
Windows Deployment Methods
Deployment technologies in a Windows Server 2008 network are used to deploy both Windows clients and Windows servers. The following section discusses deployment methods, therefore, that relate to both Windows Vista and Windows Server 2008.
Windows Vista and Windows Server 2008 are typically deployed in one of four ways: by means of the product DVD, WIM files stored on a network share, Windows Deployment Ser-vices, or System Center Configuration Manager 2007. Each of these four methods offers an increasing level of automation, but each method also requires an increasing amount of resources, expertise, and preparation. The most suitable method for you to use depends on the resources you have available, the size of your organization, and the number of deploy-ments you need to make.
Booting from a DVD
method is most suitable when no high-bandwidth connection to the destination computer is available (as might be the case with a branch office), when you are deploying Windows to a small number of computers, and when no IT personnel are available at the site of the target computer. Compared to other automated forms of deployment, this deployment method also requires the least amount of technical preparation, resources, and expertise at both source and destination sites.
However, deploying Windows by means of the product DVD does have significant limitations. First, it requires more interaction on the part of nontechnical end users than is ideal for oper-ating system installations. If the target computer does not have a floppy disk drive or if you have distributed the Autounattend.xml through a network connection, the required user inter-action is significant; the user must place the answer file at the root of a UFD or floppy disk and boot the computer with that disk and the product DVD loaded. A second limitation of the media distribution method is that it does not allow for any additional drivers or updates (called configuration sets) to be installed as part of Setup without significant technical exper-tise at the site of the end user. Finally, one last limitation of this deployment method is that physical media need to be distributed to every target computer. Installation can occur simul-taneously only on as many computers as product DVDs you have available.
Using Windows AIK Tools and a Network Share Distribution
You can deploy Windows Vista and Windows Server 2008 to computers from a network share in one of two ways: by using the Setup program or by applying a WIM file image. In the first method, the contents of the Windows product media are stored on the network share. You can then either keep the default version of Install.wim or replace it (and associated catalog files) with an image of your own custom-configured master installation. Setup is then launched from the command prompt in Windows PE on the local computer. To specify an answer file, use the /unattend switch. For example, if you have mapped a drive Y to the network share con-taining the installation files and saved an answer file named deploy_unattend.xml in the same share, you could boot the local computer by means of Windows PE and type the following:
Y:\setup.exe /unattend:deploy_unattend.xml
The second way to deploy Windows by means of a network share is to store on that share the captured WIM file image of a Sysprepped master installation. In this case, you can even keep an answer file inside the installation in the following location: %SystemRoot%\Panther\Unattend. (The name of the answer file must be Unattend.xml or Autounattend.xml.) Then, on the tar-get computer, you can apply the Windows image by means of Windows PE and ImageX. For example, if you have mapped a drive Y to the network share containing the WIM file images, you would boot the local computer by means of Windows PE and type the following:
Deploying Windows through a network share is a suitable solution when sufficient bandwidth exists to copy very large files across the network, when you need to deploy only a small num-ber (between five and 20) of computers, and when the network environment does not include an Active Directory directory service domain or the System Center Configuration Manager 2007 network management application.
The main disadvantage of this method is that it is not completely automated. Instead, it requires someone at the site of the target computer with the technical expertise to boot into Windows PE and run appropriate commands at the command prompt. Unlike Windows Deployment Services (WDS), this solution does not automatically find the source files on the network and provide a menu of operating systems to download. Unlike System Center Con-figuration Manager 2007, this solution does not allow an administrator to deploy operating systems automatically to remote locations.
Besides this lack of automation, a second disadvantage of network share deployment is that it is not a managed solution. There is no central tool from which to manage and modify the Windows images stored at the network source. As a result, network share deployments are typically scalable only to network sizes of 20 or fewer computers.
Windows Deployment Services
Unlike the network share deployment scenario, WDS enables an end user without any tech-nical expertise to boot a computer with no operating system and simply select, from a menu, a Windows image to install. The target computer is able to find the WDS server and download this operating system menu from it by means of the Pre-boot eXecution Environment (PXE) boot process. PXE is a technology that takes advantage of Dynamic Host Configuration Proto-col (DHCP) to locate a WDS server during a computer’s boot phase.
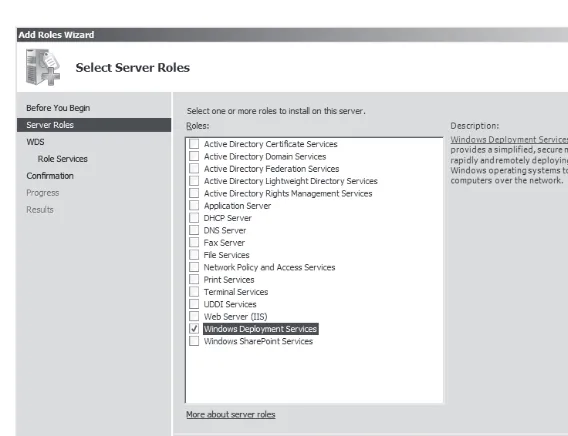
NOTE PXE-boot computers
For a WDS client computer to find a WDS server, the client computer needs to have a PXE–boot compatible network card.
WDS is a far more scalable and manageable solution than is simply storing WIM files on a net-work. However, in almost all installations (in which the Deployment Server role service is installed), WDS does have the following fairly extensive infrastructure requirements:
Q Dynamic Host Configuration Protocol You must have a working DHCP server with an active scope on the network because Windows Deployment Services uses PXE, which in turn uses DHCP. The DHCP server does not have to be on the Windows Deployment Ser-vices server, but it (or a DHCP Relay Agent) does need to be on the same subnet as the client. Q Domain Name System A working Domain Name System (DNS) server on the network is required to run Windows Deployment Services. The DNS server does not have to be running on the Windows Deployment Services server.
Q NTFS volume The server running Windows Deployment Services requires an NTFS file system volume for the image store.
Q A high-speed, persistent connection between the WDS servers and the target computers
Such a connection is necessary because of the size of the images being distributed to the target computers. In addition, these servers should be on adjacent subnets to the target computers to ensure high-speed connectivity.
Aside from the extensive infrastructure requirements of WDS, another limitation of this deployment solution is that it requires end-user participation. The administrator cannot sim-ply choose to push an operating system to any desktop in the organization.
As a result of these limitations, WDS does not scale well to the largest corporate networks with multiple Active Directory domains, IP subnets, or physical sites.
NOTE WDS outside of Active Directory
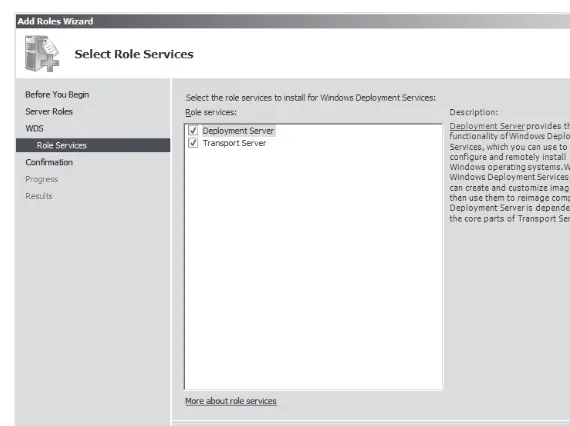
Besides the Deployment Server role service, the Windows Deployment Services role also includes the Transport Server role service. The Transport Server role service enables the transmission of any files or folders (such as operating system images, data files, or an MP3 archive) to remote clients by using multicast IP addressing. When used without the Deployment Server, Transport Server does not require an Active Directory infrastructure or DHCP, but it is a far more complicated method for deploying an operating system. Unlike the Deployment Server role service, it does not respond to PXE requests. It is also managed and used only through the Wdsutil.exe command-line tool. Out-side of Active Directory domains, you will most likely find deploying Windows Vista and Windows Server 2008 easier by using network shares with the Windows AIK tools.
Quick Check
Q What are the server and infrastructure requirements for WDS? Quick Check Answer
System Center Configuration Manager 2007
When used in conjunction with the other deployment methods, System Center Configura-tion Manager 2007 enables you to create a fully managed deployment soluConfigura-tion for large orga-nizations. Unlike other deployment options, System Center Configuration Manager 2007 allows for a completely unattended operating system deployment to remote computers.
System Center Configuration Manager 2007 assists with the many tasks involved when you apply automated procedures to multiple servers and client computers, tasks such as:
Q Selecting computers that have the hardware necessary for a given operating system and that you are ready to support.
Q Distributing the operating system source files to all sites, including remote sites and sites without technical support staff.
Q Monitoring the distribution to all sites.
Q Providing the appropriate user rights for the upgrade.
Q Automatically initiating the installation of software packages, with the possibility of hav-ing users control the timhav-ing.
Q Resolving problems related to the distributions or installations.
Q Reporting on the rate and success of deployment.
Q Verifying that all computers in your organization have received the standardized operat-ing system configuration.
Deploying Windows Vista or Windows Server 2008 with System Center Configuration Man-ager 2007 requires a high-speed, persistent connection between the servers and target com-puters used in the deployment process. Such a connection is necessary because of the large size of the images being distributed to the target computers.
PRACTICE
Creating a Windows PE CD
In this practice, you will create a bootable Windows PE CD from which you can capture or apply native Windows images. This practice requires you to have installed the Windows AIK on the C drive on Server1.
Exercise Create a Windows PE CD
In this exercise, you will create a WinPE CD with which you can later boot a computer and use tools such as ImageX.
1. On Server1, launch Windows PE Tools Command Prompt from the Windows AIK pro-gram group.
2. In Windows PE Tools Command Prompt, type the line below that corresponds to the CPU architecture of the computer or computers on which you will use the Windows PE CD:
Copype.cmd x86 C:\WinPE_x86 Copype.cmd amd64 C:\WinPE_amd64 Copype.cmd ia64 C:\WinPE_ia64
The Copype.cmd script creates a new directory with the name specified in the com-mand. After you run this command, the new directory will contain, among other files and folders, a directory named ISO. This ISO directory is important because it contains the eventual contents of the WinPE CD. For this reason, you need to copy any tools (such as the ImageX utility) that you want to include on the WinPE CD to the ISO direc-tory. You copy these tools in the next step.
3. In Windows PE Tools Command Prompt, type the line below that corresponds to the CPU architecture of the computer or computers on which you will use the Windows PE CD:
Copy “C:\Program files\Windows AIK\Tools\x86\imagex.exe” C:\WinPE_x86\ISO Copy “C:\Program files\Windows AIK\Tools\amd64\imagex.exe” C:\WinPE_amd64\ISO Copy “C:\Program files\Windows AIK\Tools\ia64\imagex.exe” C:\WinPE_ia64\ISO
4. In Notepad, create an empty file named Wimscript.ini and save it to the new WinPE_x86 \ISO, WinPE_amd64\ISO, or WinPE_ia64\ISO folder as appropriate.