Windows 7: Up and Running
Wei-Meng Lee
Windows 7: Up and Running
by Wei-Meng Lee
Copyright © 2010 Wei-Meng Lee. All rights reserved. Printed in the United States of America.
Published by O’Reilly Media, Inc., 1005 Gravenstein Highway North, Sebastopol, CA 95472.
O’Reilly books may be purchased for educational, business, or sales promotional use. Online editions are also available for most titles (http://my.safaribooksonline.com). For more information, contact our corporate/institutional sales department: (800) 998-9938 or [email protected].
Editors: Brian Jepson and Laurel Ruma
Production Editor: Sumita Mukherji
October 2009: First Edition.
Nutshell Handbook, the Nutshell Handbook logo, and the O’Reilly logo are registered trademarks of O’Reilly Media, Inc. Windows 7: Up and Running, the image of a Persian greyhound, and related trade dress are trademarks of O’Reilly Media, Inc.
Many of the designations used by manufacturers and sellers to distinguish their products are claimed as trademarks. Where those designations appear in this book, and O’Reilly Media, Inc., was aware of a trademark claim, the designations have been printed in caps or initial caps.
While every precaution has been taken in the preparation of this book, the publisher and author assume no responsibility for errors or omissions, or for damages resulting from the use of the information con-tained herein.
ISBN: 978-0-596-80404-6
[M]
Table of Contents
Preface . . . ix
1. Installing Windows 7 . . . 1
Versions of Windows 7 1
System Requirements 3
Installing Windows 7 4
What’s New in Windows 7 9
Summary 17
2. Getting Around Windows 7 . . . 19
Taskbar 19
Aero Peek 20
Pinning Applications to the Taskbar 21
Jump Lists 22
Libraries 26
Exploring Libraries 26
Creating Your Own Library 27
Desktop Gadgets 31
Summary 35
3. File Sharing . . . 37
HomeGroup 37
Creating a New HomeGroup 39
Joining a HomeGroup 43
Sharing Files 43
Sharing Printers 43
Streaming Music 46
File Sharing with Windows XP 47
File Sharing with Mac OS X 50
Summary 51
4. Security . . . 53
Action Center 53
User Account Control 57
The Credential Manager 59
Using the Credential Manager 60
Linking Online IDs 61
Backing Up the Credentials 63
BitLocker Drive Encryption 64
BitLocker 65
BitLocker To Go 67
Encrypting File System (NTFS Encryption) 69
Creating Certificates 71
Importing Certificates 73
Antispyware and Firewall Applications 73
Windows Defender 73
Windows Live Photo Gallery 87
Windows Live Writer 88
Windows Live Family Safety 89
Windows Live Movie Maker 91
Built-in Applications 92
Snipping Tool 92
Sound Recorder 94
Windows PowerShell 95
Windows Photo Viewer 97
Windows Disc Image Burner 99
Windows Media Center 101
Windows Media Player 12 107
Summary 108
6. Internet Explorer 8 . . . 109
Usability 109
Smart Address Bar 110
Enhanced Tabbed Browsing and Grouping 110
Compatibility View 112
Installing Windows XP Mode 131
Using Windows XP Mode 132
Running Windows XP Mode Seamlessly with Windows 7 135
USB Mode 137
Installing Other Operating Systems 138
Creating a New Virtual Machine 138
Starting the New Virtual Machine 139
Summary 142
8. Windows 7 Tips and Tricks . . . 143
Customizing the UI 143
Change Windows Explorer’s Default View 143
Open a Command Window Anywhere 147
Use Themes for Other Locations 148
Touch Gestures 150
Auto-Login 151
Taskbar 152
Rearranging the Icons in the Taskbar 153
Displaying the Old Quick Launch Bar 153
Taskbar Shortcuts 154
Pinning Folders to the Taskbar 157
Utilities/Troubleshooting Tools 157
Projector Screen Selection 157
Problems Steps Recorder 158
Troubleshooting Sleep Mode Problems 159
Windows Disk Image Burner 162
Calibrating Your Display 163
Windows 7 Compatibility Mode 164
Installing Windows 7 167
Installing Windows 7 Using a USB Hard Drive 167
Installing Windows 7 Using a USB Thumb Drive 170
Dual Booting Windows 7 with Windows Vista and Windows XP 171
Installing Windows 7 on a Virtual Hard Disk (VHD) File 172
Summary 177
Index . . . 179
Preface
Windows 7 is Microsoft’s latest version of its Windows operating system. Unlike its predecessor, Vista, Windows 7 offers incremental upgrades and is aimed at ensuring maximum compatibility with applications and hardware already supported in Vista. Microsoft’s key agenda around Windows 7 is to woo many of the Windows XP users who skipped Vista.
Windows 7 offers significant performance improvements over its predecessors—most notably Windows Vista and Windows XP. It is still based on the Vista kernel, but comes with a redesigned Windows shell, a new taskbar, and a less-annoying User Account Control (UAC) system. There are also improvements in networking, in particular the
introduction of a home network system known as HomeGroup.
This compact book offers the quickest path for Windows XP and Vista users to get started with Microsoft’s new Windows 7 operating system. Microsoft has learned from the mistakes of Windows Vista, and Windows 7 shows it—this new OS is much faster and more stable. Millions of people have tried the public beta and Windows 7 Release Candidate, and many give the software high marks.
Windows 7: Up and Running helps you be productive immediately. You’ll learn what’s new and what’s changed, as well as everything you need to get going, from installing to configuring the system. Windows 7 is poised to be a big hit among PC users, and with this handy guide, you can be up and running with this new operating system right away.
This book will help you:
• Quickly learn the system’s user interface, including the taskbar, Jump Lists, Desk-top Gadgets, Aero Shake, system tray, and more.
• Discover the joys of networking with HomeGroup and file sharing, along with improved Wi-Fi usability.
• Take a tour of the system’s improved security, including the Action Center, User Account Control, and the Credential Manager.
• Learn how to use Windows Live Essentials for messaging, photo sharing, movie making, email, and blogging.
• Get to know the built-in applications and utilities, such as IE8, Windows Media Player 12, Microsoft Paint, and WordPad.
How This Book Is Organized
The chapters in this book are organized as follows: Chapter 1, Installing Windows 7
This chapter first walks you through the different versions of Windows 7 available, and then gives you an overview of the installation process. You will then take a look at some of the new features in Windows 7 before we examine them in detail in subsequent chapters.
Chapter 2, Getting Around Windows 7
Among the new features (see Chapter 1) are the much improved taskbar, the
im-proved capabilities of gadgets, as well as the many UI improvements that make the Windows experience a much more enjoyable one. In this chapter, you will take a more detailed look at three features that have the greatest effect on your daily Windows experience: taskbar, Libraries, and Desktop Gadgets.
Chapter 3, File Sharing
File sharing has been one of the common features across all Windows operating systems. Besides sharing files with other Windows computers, the file sharing fea-ture in Windows 7 also allows users to share files with other non-Windows com-puters, such as those running Mac OS X and Linux. In Windows 7, file sharing has been further simplified with the new HomeGroup feature. In this chapter, you will learn about the HomeGroup feature, as well as learn how to share files with other computers on the network.
Chapter 4, Security
On the security front, Windows 7 has streamlined several features found in Win-dows Vista, making them much more accessible and less irritating in this new version of Windows. For example, the infamous UAC is one of the most irritating features in Vista. In this version of Windows, Microsoft has tweaked UAC so that it interrupts users only when needed. Microsoft has also replaced the Security Center in Vista with the new Action Center in Windows 7, which focuses not just on displaying problems, but also on offering suggestions and solutions to solve problems. The Credential Manager now has the ability to back up its credential information to a file. In addition, Enterprise and Ultimate users can now encrypt a portable thumb drive using BitLocker To Go.
Chapter 5, Essential Applications
One of the longstanding Windows traditions that Windows 7 broke is related to bundled applications: it contains far fewer bundled applications than did previous versions. For example, Microsoft Mail will not be available when you install Windows 7. Similarly, Messenger will also not be available when you install Windows 7. Instead, Microsoft will offer a suite of essential applications as a sep-arate download. Doing so allows Microsoft to have sepsep-arate release timelines for Windows and these essential applications. This also allows it to make these es-sential applications available for earlier versions of Windows more easily. In the first part of this chapter, you will first see how you can install the suite of essential applications from Microsoft free of charge. You will then look at the suite of built-in applications that ship with Wbuilt-indows 7.
Chapter 6, Internet Explorer 8
Windows 7 ships with the new Internet Explorer 8 (IE8). IE8 builds on the foun-dation of IE7, and this latest release contains many useful enhancements in the areas of usability, privacy, and security. In this chapter, you will learn about some of the innovations in IE8 and how they affect the way you surf the Web.
Chapter 7, Using Windows XP Mode
When Microsoft introduced Windows Vista, many users were very upset, as they discovered that some of their older applications could not work correctly in Vista (some application vendors simply did not upgrade their applications for Vista, or charged more for new versions than users were happy to pay). As such, a lot of users (and businesses) cited this as a reason for not upgrading to Vista. Microsoft realizes the severity of this problem and hopes to solve this problem in Windows 7 by providing a feature known as Windows XP Mode (XPM). XPM lets you run your legacy Windows XP applications inside a virtualized environment, either from within a virtual XP window or as a seamlessly integrated application within Win-dows 7.
Chapter 8, Windows 7 Tips and Tricks
Windows 7 is a complex operating system that is more evolutionary than revolu-tionary. A lot of features available in Windows 7 are based on the features available in the earlier versions of Windows: XP and Vista. Nevertheless, Windows 7 con-tains a wealth of new features that greatly improve the usability of Windows and its performance. In this chapter, you will learn some of the tips and tricks to getting the most out of Windows 7.
Who This Book Is For
This book is written primarily for existing users of Microsoft Windows operating sys-tems who are interested in upgrading to Windows 7. In particular, I am assuming that you are at least familiar with Windows XP or Windows Vista (or both). If you are a
new user coming to Windows 7 from another platform (such as Mac OS X or Linux), you will still find this book easy to follow.
Conventions Used in This Book
The following typographical conventions are used in this book:
Italic
Indicates new terms, URLs, email addresses, filenames, and file extensions.
Constant width
Used for program listings, as well as within paragraphs to refer to program elements such as variable or function names, databases, data types, environment variables, statements, and keywords.
Constant width bold
Shows commands or other text that should be typed literally by the user.
Constant width italic
Shows text that should be replaced with user-supplied values or by values deter-mined by context.
This icon signifies a tip, suggestion, or general note.
This icon signifies a warning or caution.
Using Code Examples
This book is here to help you get your job done. In general, you may use the code in this book in your programs and documentation. You do not need to contact us for permission unless you’re reproducing a significant portion of the code. For example, writing a program that uses several chunks of code from this book does not require permission. Selling or distributing a CD-ROM of examples from O’Reilly books does require permission. Answering a question by citing this book and quoting example code does not require permission. Incorporating a significant amount of example code from this book into your product’s documentation does require permission.
We appreciate, but do not require, attribution. An attribution usually includes the title,
author, publisher, and ISBN. For example: “Windows 7: Up and Running by Wei-Meng
Lee. Copyright 2010 Wei-Meng Lee, 978-0-596-80404-6.”
If you feel your use of code examples falls outside fair use or the permission given here, feel free to contact us at [email protected].
How to Contact Us
Please address comments and questions concerning this book to the publisher: O’Reilly Media, Inc.
1005 Gravenstein Highway North Sebastopol, CA 95472
800-998-9938 (in the United States or Canada) 707-829-0515 (international or local)
707-829-0104 (fax)
We have a web page for this book, where we list errata, examples, and any additional information. You can access this page at:
http://oreilly.com/catalog/9780596804046
To comment or ask technical questions about this book, send email to:
For more information about our books, conferences, Resource Centers, and the O’Reilly Network, see our website at:
http://oreilly.com
Safari® Books Online
Safari Books Online is an on-demand digital library that lets you easily search over 7,500 technology and creative reference books and videos to find the answers you need quickly.
With a subscription, you can read any page and watch any video from our library online. Read books on your cell phone and mobile devices. Access new titles before they are available for print, and get exclusive access to manuscripts in development and post feedback for the authors. Copy and paste code samples, organize your favorites, down-load chapters, bookmark key sections, create notes, print out pages, and benefit from tons of other time-saving features.
O’Reilly Media has uploaded this book to the Safari Books Online service. To have full digital access to this book and others on similar topics from O’Reilly and other pub-lishers, sign up for free at http://my.safaribooksonline.com.
Acknowledgments
My sincere thanks to my editor, Brian Jepson, for suggesting that we do a book on Microsoft’s latest operating system—Windows 7. Although many users were not too thrilled with Windows Vista, the early beta and candidate releases of Windows 7 took many critics by surprise. Not only does Windows 7 come with some really nice features, but more importantly, it was a very stable operating system that performs well even with older hardware. Realizing the potentials of Windows 7, I was very excited when I got the chance to work on this book—especially with Brian, who has been more of a mentor to me than an editor. Thanks, Brian!
I would also like to thank O’Reilly Managing Editor Marlowe Shaeffer. She has been instrumental in getting the book ready so that you can get this book in your hands before Windows 7 ships. Thank you, Marlowe.
Last but not least, I want to thank my family for their love and support, especially my wife, SzeWa, and our lovely dog, Ookii. I love you all!
And of course, a big thank you to the production crew at O’Reilly, who made this book possible.
CHAPTER 1
Installing Windows 7
Windows 7 is Microsoft’s latest version of its Windows operating system. Unlike its predecessor, Vista, Windows 7 offers incremental upgrades and is aimed at ensuring maximum compatibility with applications and hardware already supported in Vista.
As mentioned in the Preface, Microsoft’s key agenda regarding Windows 7 is to lure
back many of the Windows XP users who skipped Vista.
Windows 7 offers significant performance improvements over its predecessors—most notably Windows Vista and Windows XP. It is still based on the Vista kernel, but comes with substantial performance improvements and a redesigned Windows shell, a new taskbar, and a less-annoying User Account Control (UAC) system. There are also im-provements in networking, in particular the introduction of a home network system
known as HomeGroup.
This chapter first walks you through the different versions of Windows 7 available, followed by an overview of the installation process. We will then take a look at some of the new features in Windows 7 before we get into them in detail in subsequent chapters.
Versions of Windows 7
With Windows Vista, Microsoft released multiple editions of its operating system with the intention of targeting different segments of its user base with different features at different price points. However, this approach wasn’t well received, as it confused the market; many users urged Microsoft to come up with one simple, all-encompassing version of the operating system.
With Windows 7, Microsoft still has many editions. However, Microsoft is expected to focus its marketing effort on just two editions—Home Premium and Professional— just as it did with Windows XP. Here is a list of the available editions, in ascending order, from least to most advanced:
Starter Edition
A lightweight edition for netbook computers. Netbooks are low-powered
comput-ers specifically designed for lightweight tasks such as web browsing and emailing. In this edition, Windows 7 will lack more advanced features such as Media Center, Aero Glass, fast user switching, multiple-monitor support, DVD playback, and multitouch support. This edition is geared toward replacing Windows XP on in-expensive computers such as netbooks, a market that is currently dominated by Windows XP. This edition will likely be available only as a preinstallation by OEMs.
Windows 7 Starter Edition Application Limits?
In the early beta days of Windows 7, Microsoft announced that Windows 7 Starter Edition would have a three-application limit. That is, no more than three applications could run at the same time. Apparently, this did not go over well with the public, and Microsoft reversed the decision.
Some restrictions remain. Microsoft has disabled the Personalize option in the context menu that is shown when you right-click the desktop. This means that you won’t be able to change your wallpaper. This limitation might be to allow OEMs to provide their own custom-branded wallpapers. At press time, it is unclear whether Microsoft will lift this limitation as well. To me, it makes perfect sense to lift this limitation—how can you call your computer a Personal Computer when you can’t even change your wallpaper?
Home Basic
This edition is designated for emerging markets only; it is for customers who are looking for an inexpensive entry-level Windows experience (limited Aero support, no features such as Windows Media Center or multitouch support).
Home Premium
This edition is designed for home users and will include features like Media Center, multitouch support, the Aero Glass UI, and so on.
Professional
This edition is designed for home workers and small businesses, and will include features like advanced network backup and the Encrypting File System.
Enterprise
Includes everything that Professional includes and adds BitLocker protection. It will have the option to encrypt USB flash drives and external hard disks. It also includes DirectAccess, which allows remote workers to access a company network securely without using a VPN, and federated search.
Ultimate
Includes all the features available in Windows 7.
Windows 7 Ultimate edition is really the same as the Enterprise edition. The key difference is that the Enterprise edition will be sold through volume licensing to companies, as well as through the Software Assur-ance program. The Ultimate edition, however, will be available to retail customers.
One key thing to note about the different editions of Windows 7 is that each higher edition is a superset of its lower edition. That is, all the features available in Starter Edition will be available on the Home Basic edition, and the Home Premium edition will include all the features of Home Basic, and so on. This is different from Vista, where Media Center was included in the Home Premium edition but not available in the Business edition.
Though there are six different editions of Windows 7, Microsoft will focus its marketing effort on just the Home Premium, Professional, and Ultimate editions. This is very similar to Windows XP, in which you have only two main editions—Home and Pro-fessional. As a quick rule of thumb, Windows 7 Home Premium is targeted at con-sumers and Professional is targeted at small businesses.
System Requirements
If you are currently running Windows Vista, the good news is that you are ready for Windows 7. Tests performed by various parties have consistently confirmed that Win-dows 7 outperformed WinWin-dows Vista on a similar hardware configuration.
If you are coming from previous versions of Windows (pre-Vista), take note of the
following suggested hardware requirements:
• 1 GHz or faster 32-bit or 64-bit processor • 1 GB RAM (for 32-bit) or 2 GB RAM (for 64-bit)
• 16 GB of available disk space (for 32-bit) or 20 GB of available disk space (for 64-bit)
• DirectX 9 graphics device with Windows Display Driver Model 1.0 or higher (for Aero—the graphical user interface and default theme in most editions of Windows 7)
Though it is suggested that you have at least 1 GB of RAM, Windows 7 runs perfectly on my old trusty Dell Inspiron 5150 notebook (a 3 GHz Pentium 4 processor with 640 MB of RAM). The suggested require-ments are necessary to experience all the features of Windows 7 (such as Aero Glass effects), but Windows 7 will still function on lesser hardware.
Installing Windows 7
If you are currently running Windows Vista (with Service Pack 1), you can upgrade to Windows 7 directly from within Vista. Windows XP users will need to install a fresh copy of Windows 7.
Upgrading from Windows XP to Windows 7
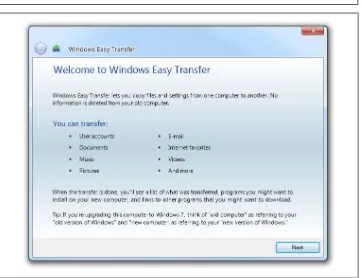
Although Windows XP users cannot upgrade directly to Windows 7, Microsoft pro-vides the Windows Easy Transfer utility, which allows you to easily transfer your computer’s settings and files to the new Windows 7.
To launch the Windows Easy Transfer utility, log in to Windows XP, insert the Win-dows 7 installation disc, and navigate to the \support\migwiz folder. Double-click migwiz.exe to launch the Windows Easy Transfer utility (see Figure 1-1). Follow the instructions on the screen to save the settings to another computer via a cable or net-work, or save them to a hard disk or USB drive.
When Windows 7 has been installed, you can run the Windows Easy Transfer utility via Start→All Programs→Accessories→System Tools→Windows Easy Transfer. Follow the online instructions to copy the saved settings onto the new Windows 7 installation.
Figure 1-1. Use Windows Easy Transfer to migrate your Windows XP settings to Windows 7
The following steps will walk you through the process of installing Windows 7 on a fresh computer.
Installing Windows 7 is straightforward—if you’re doing a clean install, simply boot up your computer with the Windows 7 installation DVD inside the DVD drive and instruct your computer to boot from the DVD (you may need to press a key, such as F11 or F12, while the computer is starting to enter the boot selection screen). If you’re upgrading, simply boot into Windows Vista, insert the disc, and run the installer (if
you are using Windows XP, see the previous sidebar “Upgrading from Windows XP to
Windows 7”).
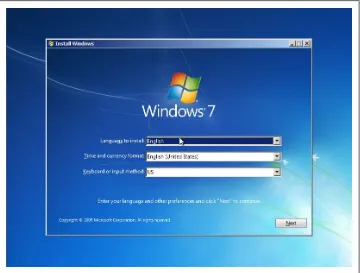
When the installer has booted up, you will be greeted with the screen shown in
Fig-ure 1-2 (the upgrade screen is slightly different; you will have an option to check the compatibility of your system or start the installation). You will be asked to select the language to install, the time and currency format, and your keyboard type.
Figure 1-2. Installing Windows 7: the first step
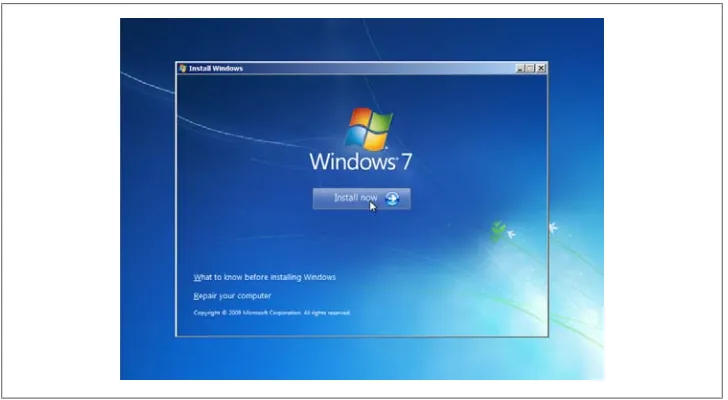
With the selections made, you can now install Windows 7 by clicking the “Install now” button (see Figure 1-3).
You will be asked to accept the license agreement. (If you are upgrading, you’ll first have the option to go online to get any updates to the installer first.) Check the licensing checkbox and continue.
Figure 1-3. Click the “Install now” button to start the Windows 7 installation process
On the next screen, you have a choice between upgrading your existing Windows or installing a fresh copy of Windows. If you are using Windows XP or earlier, the first
option will not work for you—select the Custom (advanced) option (see Figure 1-4).
Figure 1-4. Two ways to install Windows 7—upgrade or fresh installation
You can upgrade from Windows Vista only if you run the installer from within Windows Vista. If you do a fresh boot using the Windows 7 installation disc, you will not be able to upgrade (you will be asked to rerun the installation from within Windows).
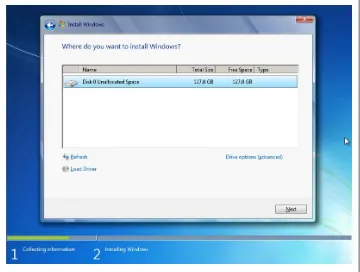
For a fresh installation, you will be asked to select a disk for installing Windows 7.
Select the appropriate disk and click Next (see Figure 1-5). If you are upgrading, the
Windows 7 installer will generate a compatibility report and save it to your desktop.
Figure 1-5. Selecting the disk for installing Windows 7
If you are doing a clean install via the Custom (advanced) option, be sure to back up any important data you have previously saved on your hard drive before starting the installation. Installing Windows 7 will wipe out all previous data.
Windows will now take some time to copy all the files into the selected disk and proceed
with the installation (see Figure 1-6). This will take about 20–30 minutes, depending
on the speed of your computer.
Figure 1-6. Windows 7 proceeding with the installation
When the installation is complete, Windows 7 will restart. After Windows 7 has been
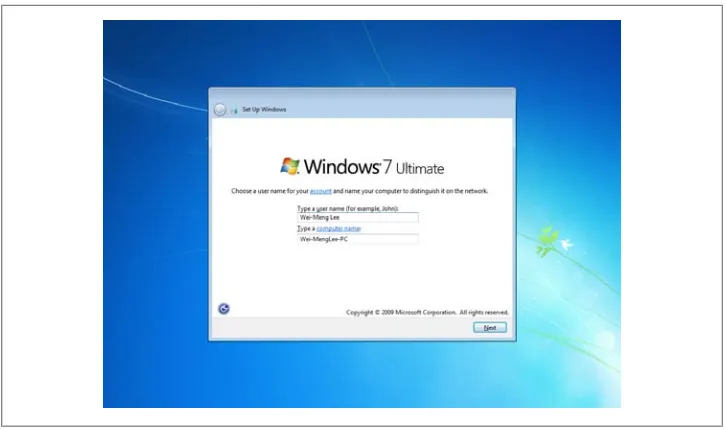
restarted, you should see the screen shown in Figure 1-7. Provide a username; your
computer name will be created based on what you have entered (you can change it to another name if you want to after the installation). Click Next.
Figure 1-7. Providing a username for your account
You will be asked to enter a password to protect your user account. You are strongly advised to provide one. In the next screen, you will be asked to enter a product key to activate Windows 7.
You will also be asked to select a way to update Windows. I suggest that you select the
first option, “Use recommended settings”; see Figure 1-8.
Figure 1-8. Selecting a way to update Windows
Next, you will set up the current date and time, and finally, if your computer has a
network card, Windows 7 will prompt you to select your current location (see
Fig-ure 1-9; wireless network users will be asked to select a wireless network to connect to). Choose a location that best describes the environment you are in.
That’s it! You are now ready to explore Windows 7 (see Figure 1-10).
What’s New in Windows 7
The first time you power up Windows 7, you may feel a sense of déjà vu—it looks very similar to Windows Vista. However, behind the familiar UI lies a more powerful and versatile operating system. Subsequent chapters will cover some of the new features in more detail, but here are some of the most prominent new features in Windows 7.
Figure 1-9. Select your computer’s current location
Figure 1-10. You are now ready to explore Windows 7
Touchscreen support
Windows 7 is designed with touchscreen support, especially multitouch, in mind. At the time of this writing, companies like Dell and HP were shipping touchscreen com-puters that work with Windows 7’s multitouch. As touchscreen comcom-puters are still not common, this book will not discuss the touch capability of Windows 7.
But in case you’re interested, to demonstrate the power of touch in Windows 7, Microsoft has created the Microsoft Touch Pack for Windows 7. The Microsoft Touch Pack for Windows 7 is a collection of six applications that are optimized for touch
interactions. It consists of three games and three Microsoft Surface applications that
have been recreated for Windows 7. These applications are:
Microsoft Surface Globe
Displays a 3D earth with which you can interact using—what else?—your hands.
Microsoft Surface Collage
Manages your digital photos; you can resize and rearrange them.
Microsoft Surface Lagoon
A screensaver that you can interact with through multitouch.
Microsoft Blackboard
A game utilizing physics where you can use gestures to rotate gears, fans, seesaws, and other objects.
Microsoft Rebound
A ball game in which you can play against another user or the computer.
Microsoft Garden Pond
Another interactive game where you use touch to place objects in a virtual pond.
The Microsoft Touch Pack for Windows 7will be made available first to OEMs shipping touch-enabled PCs, although Microsoft may make it available to end users.
New taskbar
Perhaps the most outstanding feature in Windows 7 is the new taskbar. The quick-launch area that most Windows XP and Vista users are so used to is now gone. In place of it is the ability to pin your applications icons in the taskbar for easy access, regardless of whether the application is itself running.
Sadly, the classic Start menu has also been disabled in Windows 7. Hopefully, Microsoft will turn it back on in a future service pack, or determined hackers will find a way to replace it.
Figure 1-11 shows the new taskbar in Windows 7 with several application icons in it. On the left is the Start menu button, followed by Internet Explorer 8 (IE8), Windows Explorer, and Windows Media Player.
Figure 1-11. The new taskbar in Windows 7
By default, the taskbar in Windows 7 has three applications pinned to it—IE8, Win-dows Explorer, and WinWin-dows Media Player. As these applications are used often, they are given permanent spots in the taskbar (for more information about pinning, see the section “Pinning Applications to the Taskbar” on page 21). As you can see in Fig-ure 1-11, the Media Player application does not have the rectangular border around it—this signifies that the application is not running currently. Next to the Windows Media Player icon are: Paint, Notepad (also not currently running), and Word.
New Show desktop shortcut
In the taskbar is another button known as the Show desktop shortcut. The Show desk-top shortcut is the button on the extreme right of the taskbar (see Figure 1-12).
Figure 1-12. The Show desktop shortcut button
Positioning the mouse over this button will make all the current windows transparent (this feature requires an Aero-capable video card and an edition of Windows 7 that
supports Aero), revealing the desktop (known as “peeking at the desktop”; see
Fig-ure 1-13).
You can disable the “peeking at the desktop” feature by right-clicking the Show desktop shortcut button and unchecking the Peek at Desktop item.
Clicking this button minimizes all opened windows and shows the desktop.
Aero Peek, Aero Shake, and Aero Snap
Another cool new feature in Windows 7 is Aero Peek. Aero Peek displays live previews
of active applications when you move the mouse over the application icon in the
task-bar. Figure 1-14 shows Aero Peek in action when the mouse hovers over the IE icon in
the taskbar.
Figure 1-14. Aero Peek in action
Figure 1-13. Peeking at the desktop in action
Aero Peek requires an Aero-capable video card and a Windows 7 edition that supports Aero. Aero Shake and Aero Snap will work on any Win-dows 7 system.
Windows displays the live previews of all running instances of IE. When the mouse hovers over one of the live previews, the selected window appears, and the rest of the windows turn transparent. To select the window, simply click the live preview.
When an application has too many open windows, the title of each window will be displayed in a list instead of live preview thumbnails.
Aero Shake allows users to quickly minimize all nonactive windows by “shaking” the current active window. To see Aero Shake in action, open up a few windows, click the title bar of one window, and use the mouse to “shake” the application. You will notice that all other windows will now be minimized, leaving the current window. To get all the other windows back to their respective states, perform the same shaking action again and they should now all appear again.
Another very useful UI feature in Windows 7 is Aero Snap. How many times have you
tried to arrange multiple windows on your desktop so that you see the windows side-by-side? In Windows 7, when you drag a window to the left side of the screen, the
window is automatically docked onto the left of the screen (see Figure 1-15), occupying
half the screen. Likewise, when dragged to the right, the window will be docked to the right. When dragged to the top, the window will be maximized. Besides dragging,
Windows 7 provides several shortcuts (see Table 1-1) for window management.
Figure 1-15. Aero Snap works by docking the window to the sides of the screen
Table 1-1. Aero Snap keyboard shortcuts
Shortcuts Descriptions
Windows Key + ↓ Restores/minimizes window
Windows Key + ← Docks window to left of screen
Windows Key + → Docks window to right of screen
Windows Key + ↑ Maximizes window
Windows Key + Shift + ← Moves to left monitor
Windows Key + Shift + → Moves to right monitor
Gadgets
Microsoft first introduced gadgets in Vista. Gadgets are small utility applications that “float” on your screen, providing quick access to them. In Windows 7, gadgets are not confined to the sidebar (which itself was docked to one side of your screen in Vista)
but are free to roam about on your desktop (see Figure 1-16).
Figure 1-16. Gadgets can now roam the entire desktop without restrictions
Revised Paint and WordPad Applications
The venerable Paint and WordPad applications (see Figure 1-17) finally got a revision
in Windows 7. This time, both of them were updated to use the new ribbon interface that was introduced in Office 2007.
Calculator
Besides the Paint and WordPad applications, another longtime built-in Windows ap-plication has also received some new improvements. The Calculator now has two ad-ditional modes (in addition to the Standard and Scientific modes): Programmer and Statistics (see Figure 1-18).
Figure 1-18. The Calculator in Programmer and Statistics modes
Figure 1-17. The Paint and WordPad applications both sport a new ribbon UI
Besides the two new modes, the calculator also allows you to perform conversion tasks such as unit and date conversions. It also provides worksheets for you to calculate
mortgages, vehicle leases, and fuel economy (see Figure 1-19).
Figure 1-19. The new worksheets in the Windows 7 Calculator
Summary
In this chapter, you have seen the various editions of Windows 7 and the system re-quirements that you need to satisfy in order to run it. Over the years, Microsoft has streamlined the installation process—and Windows 7 is no exception. Windows 7 performs exceedingly well, and stays out of your way thanks to a less naggy UAC. In the following chapters, you will learn more about each of the new features of Windows 7 and how you can use each of them to your advantage.
CHAPTER 2
Getting Around Windows 7
In Chapter 1, we took a quick glance at the various new features in Windows 7. Among the new features are the much improved taskbar, the improved capabilities of gadgets, and the many UI improvements that make the Windows experience a much more en-joyable one.
In this chapter, we will take a more detailed look at three features that have the most effect on your daily Windows experience:
Taskbar
The taskbar is now more than just a windows-switcher—it is also an application launcher. You’ll learn how mastering the taskbar will make your life easier.
Libraries
The Libraries is a new feature in Windows 7. Using the Libraries, you can group your files and folders into logical units so they are easier to manage.
Desktop Gadgets
Gadgets in Windows 7 now have a new lease on life. In Windows Vista, gadgets were constrained to the Sidebar, which was never really a popular feature among people with small-screen computers (netbooks and small portable computers). In Windows 7, gadgets are free to roam about on your desktop.
Taskbar
One of the most significant changes in Windows 7 is the taskbar. The new taskbar in Windows 7 combines the good old Windows taskbar with the Quick Launch feature available in previous versions of Windows. As mentioned, it is no longer just a windows switcher—it is also an application launcher, in which application icons can be pinned for easy access.
Aero Peek
In Windows 7, mousing over an icon in the taskbar whose application is running reveals
the live thumbnails of all the opened windows of that application. For example,
Fig-ure 2-1 shows the live thumbnails of all the IE windows currently open when the mouse is moved over the IE icon. If your computer or Windows edition is not Aero-capable (or if you’ve chosen a non-Aero theme), you will instead see a list of open window titles.
Figure 2-1. Aero Peek displays live thumbnails of all opened windows
As you move the mouse over the live thumbnails of the IE windows, the corresponding
window will appear on the screen (see Figure 2-2) and all other windows will turn
transparent, allowing you to quickly preview the content of the current window. If you decide to switch to the selected window, simply click the thumbnail, and the selected window will now be active.
Figure 2-2. Viewing a selected window
For most applications, each open window is represented by a single thumbnail. For IE, however, each tab page or window is represented by a single thumbnail. Developers writing applications for the Windows 7 platform have the flexibility to decide how their applications are repre-sented by Aero Peek in the taskbar.
Pinning Applications to the Taskbar
In the previous versions of Windows, only running applications appear in the taskbar. In Windows 7, you can keep an application’s icon in the taskbar even when it’s not running.
This feature is very similar to that of Dock for Mac OS X, where fre-quently used applications can have their icons “docked” on the Dock.
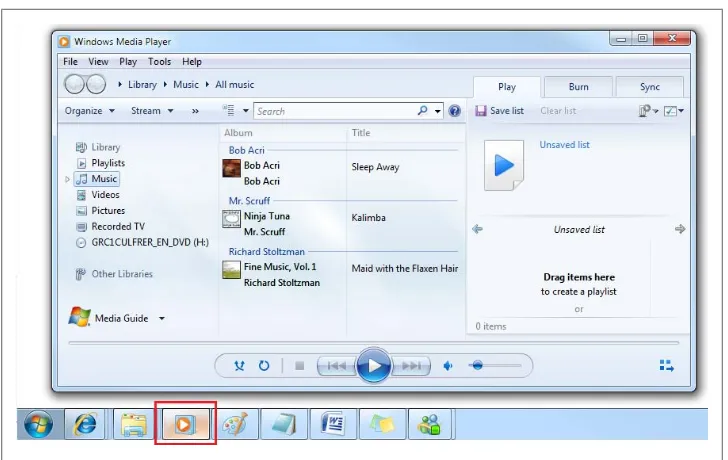
Applications can have their icons “pinned” in the taskbar permanently. For example,
Windows Media Player (see Figure 2-3) is pinned by default to the taskbar, as it is a
commonly used utility application. Clicking the icon will open the Windows Media Player.
Figure 2-3. The Windows Media Player is pinned to the taskbar by default
You can unpin a pinned application icon from the taskbar by right-clicking it and then selecting “Unpin this program from taskbar.”
So, how do you know which applications are currently running and which ones are merely pinned to the taskbar? The taskbar highlights all running applications with a
rectangular border (see Figure 2-4); those not running do not have any border.
Appli-cations that require attention have flashing icons (see the rightmost icon in Figure 2-4).
Figure 2-4. The taskbar uses a rectangular border to denote running applications; flashing icons indicate a call for attention
Jump Lists
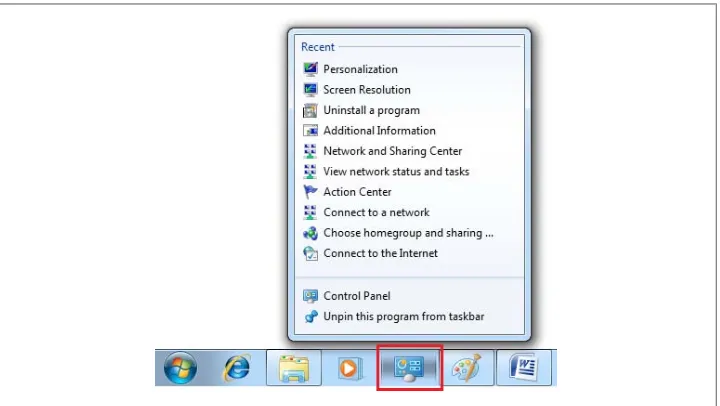
When you right-click an application icon in the taskbar, Windows 7 will display a list
of menus known as Jump Lists. Jump Lists contain several default options as well as a
list of tasks and destinations that you can perform within the selected application. For
example, Figure 2-5 shows the Jump List of the Control Panel application. It contains
a section called Recent that displays a list of recently used applications in the Control Panel.
Figure 2-5. The taskbar showing the list of recent activities performed with the Control Panel application
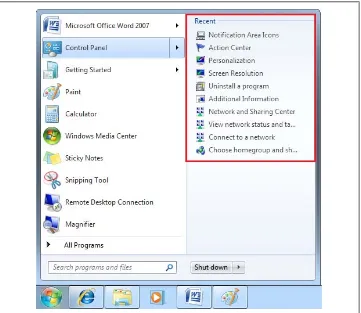
The Jump List of an application can also be seen in the Start menu. If you click the Start menu, you will notice that there are several items with an arrow next to them. For example, clicking the Control Panel item (see Figure 2-6) will reveal its Jump Lists.
Figure 2-6. Jump Lists can also be seen in the Start menu
Tasks
As mentioned, Jump Lists contain a list of tasks and destinations. The tasks list contains application-specific actions that you can perform with an application. Tasks are context-free actions, independent of whether the application is running. As an example,
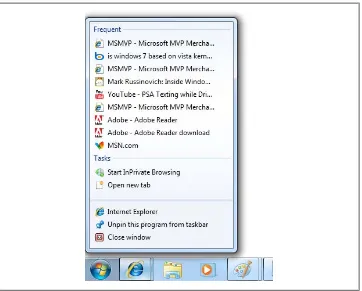
the Jump List for Internet Explorer (see Figure 2-7) contains a Tasks section in which
you can invoke InPrivate Browsing or create a New Tab page.
Destinations
Besides showing the recent tasks that you have performed with an application, the Jump
Lists of an application also shows the destinations of an application. For example, in
the Jump List of Internet Explorer (as shown in Figure 2-7), you will see a section called Frequent, which displays the list of frequently visited websites (the destinations of a web browser).
The Difference Between Tasks and Destinations
The easiest way to differentiate tasks from destinations is to think of a task as a verb and a destination as a noun. For instance, some examples of tasks are:
• Play all music (Windows Media Player) • Resume previous list (Windows Media Player) • Go to MSN home page (Live Messenger) • New Note (Sticky Notes)
Some examples of destinations are:
• Recently visited websites (Internet Explorer) • Documents (Word)
• Images (Paint)
Figure 2-7. The Frequent destination shows the list of frequently visited sites
Default entries
By default, a Jump List has at least two list items in it. Figure 2-8 shows the Jump List for the Paint application. The first item allows you to launch a new instance of the application. The second allows you to pin (or unpin if it has already been pinned onto the taskbar) the program from the taskbar.
Figure 2-8. The default items in a Jump List
The third item closes the application and will appear only if at least one instance of the program is already running.
To pin an application onto the taskbar, first launch the application, and then right-click the application’s icon in the taskbar. Select the “Pin this program to taskbar” list item. By doing so, the application will now always appear in the taskbar.
You can also pin items listed in the Recent destination. For example, Figure 2-9 shows
the Recent destination of the Jump List for Word. You can pin an item by clicking the pin icon shown to the right of the item. The pinned item will then appear in the Pinned destination.
Figure 2-9. Pinning items in the Recent destination
Some applications, such as Internet Explorer 8, let you pin destinations by dragging them to the application’s taskbar icon. To pin a web page to IE8’s Jump List, drag the web page icon to IE8’s taskbar icon. The web page icon appears to the left of its URL in the location field at the top of the IE8 window.
Libraries
In Windows XP and Windows Vista, you have special folders named “My Documents,” “My Pictures,” and so on for storing your files. However, not many people actively used these folders for storing their personal data. Instead, people created their own folders,
with names like C:\My project June 2008 and C:\photos\Photos from Japan trip 2007.
Although there is nothing wrong with this approach, it makes indexing and searching very time-consuming, not to mention frustrating.
In Windows 7, Microsoft has attempted to address this problem with the concept of
Libraries. Conceptually, Libraries are a central repository of all the various folders on your computer. To search for files in your computer, go to the Libraries and navigate the various subfolders contained within it. You can still create an assortment of folders, but you can avoid the chaos by adding a folder to one of your libraries.
Exploring Libraries
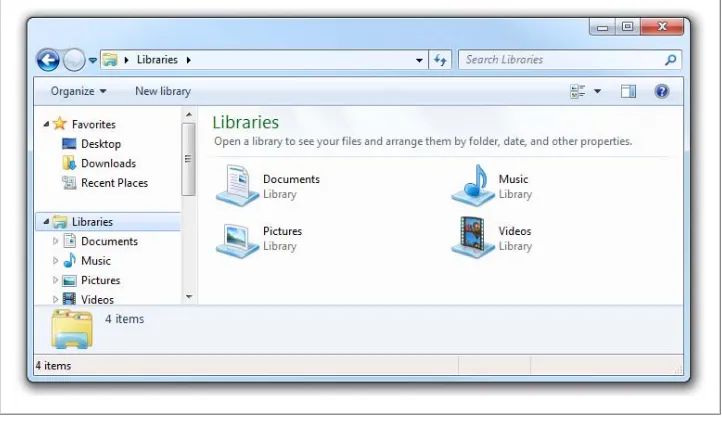
The Libraries are found in Windows Explorer. Figure 2-10 shows the application with
its four default libraries—Documents, Music, Pictures, and Videos.
Figure 2-10. The Libraries in Windows Explorer
When you click the arrow to the left of the Documents library (or double-click its icon),
you will observe that there are two folders contained within it (see Figure 2-11): My
Documents and Public Documents. These two folders are actual folders located else-where on your computer.
Figure 2-11. The Documents library, which contains two folders
Each library is mapped to two separate folders for a good reason. The first folder, called the private folder, is for saving your own personal data. The second folder, called the public folder, is for everyone. If you use the HomeGroup feature (see Chapter 3) to share files, the private folder will have read-only permission. This means that other users on the network can view what is in your private folder, but cannot make changes to it. In contrast, public folders will have read-and-write per-missions, which means that other users can view their content as well as make changes to it.
In fact, My Documents is mapped to C:\Users\username\My Documents and Public
Documents is mapped to C:\Users\Public\Public Documents.
With the Libraries, all your content should ideally be grouped under the default
libra-ries. For example, all your documents should be saved in either the My Documents or
Public Documents folder. When you need to search for documents, you simply go to the Documents library and start your search from there.
Creating Your Own Library
Of course, not everyone wants to save their documents in a generic folder named My
Documents. You can still save your documents in a specific folder—say, C:\My Report June 2009—and then link it with the Libraries. Suppose you want to create a library to contain all your reports. In this case, the first thing you do is to create a new library by right-clicking Libraries and selecting New→Library (see Figure 2-12).
Figure 2-12. Creating a new library
Name your library (for this example, I have named it as Reports) and your newly created
library will now be empty (see Figure 2-13).
Figure 2-13. Your newly created library
To link your library to an actual folder, click the “Include a folder” button and specify
a folder name. For example, I have added the C:\My Report June 2009 folder to my
library. The Reports library now looks like Figure 2-14.
Figure 2-14. Adding a folder to a library
To add more folders to the library, click the “1 location” link (see Figure 2-15).
Figure 2-15. Adding more folders to the library
Click the Add button to specify a folder to add to the library (see Figure 2-16). You can add as many folders are you like.
Figure 2-16. Adding additional folders to the library
Note that the first folder added to the library will be the default save location for the
library. This means that when you drag-and-drop an item to the Reports library, the
item will be copied into the My Report June 2009 folder (because this is the first folder added to the library).
You specify another folder as the default save location by right-clicking a folder in this list and choosing “Set as default save location.” You can change the order in which these appear by right-clicking and choosing Move Up or Move Down.
You can now use the library just like a normal folder. The files inside each folder are saved in their respective directories, but the library itself offers a logical grouping of related files (see Figure 2-17).
Figure 2-17. Using the library
You may remove the entire library if you want, but this will not remove the files or directories that are part of the library.
Desktop Gadgets
In Windows 7, Microsoft eliminated the Windows Sidebar, because feedback showed that docking gadgets to the side of the screen is very restrictive, especially for small-screen portable computer users.
What Is the Windows Sidebar?
Windows Vista included a feature called the Windows Sidebar. The Sidebar is a rectangular strip displayed on the side of your screen (hence the name “sidebar”) that hosts mini-applications known as gadgets. A Sidebar gadget is an easy-to-use mini-application that is designed to provide information at a glance. Sidebar gadgets afford an easy way to access information at your fingertips and can be easily created by developers familiar with HTML and scripting languages like JavaScript.
In Windows 7, you can now display the gadgets directly on the desktop rather than be constrained to the Sidebar.
Windows 7 desktop gadgets are fully compatible with the Sidebar gadg-ets in Windows Vista.
To view the list of gadgets installed on your computer, right-click the desktop and select Gadgets. A list of gadgets will be shown (see Figure 2-18).
Figure 2-18. Displaying the list of available gadgets
As shown in Figure 2-18, Windows 7 includes 10 default gadgets. To add a gadget to your desktop, double-click the gadget. By default, the gadget will be docked to the right
side of the screen. Figure 2-19 shows the Slide Show gadget. Unlike in Windows Vista,
you can now drag the gadget onto any part of the desktop.
Figure 2-19. The Slide Show gadget, docked to the right side of the screen
To locate more gadgets, click the “Get more gadgets online” link. You will be shown a page displaying a list of gadgets that you can add (see Figure 2-20).
Figure 2-20. Viewing the list of gadgets you can download
To download a gadget, click the “Download gadget” link below each gadget. You will be prompted to open or save the gadget. Click Open (see Figure 2-21) to directly download and install the gadget.
Figure 2-21. Downloading a gadget
Once the download is complete, IE will prompt you with a security warning to ask whether you want to run the application. Click Run to open the gadget. Next, you will be prompted with another security warning. Click Install to install the gadget on your computer.
Once the installation is complete, you will see the new gadget in the Gadgets window (see Figure 2-22), and it will also automatically add a copy of itself to your desktop.
Figure 2-22. Locating the newly installed gadget
Summary
In this chapter, you learned about the improvements made to the taskbar. The new Aero Peek feature allows you to preview windows without switching to them. And Jump Lists allow you to jump to a specific destination or task by simply right-clicking an application icon. In addition, you also learned about the new Libraries feature, which makes it easy for you to organize your files. And in Windows 7, the Desktop Gadgets has a new lease on life.
In the next chapter, you will learn more about another new feature in Windows 7:
HomeGroup. HomeGroup will make use of the new Libraries feature to allow you to easily share files with other users on the same network.
CHAPTER 3
File Sharing
File Sharing has been one of the features common to all Windows operating systems. Besides sharing files with other Windows computers, the File Sharing feature in Win-dows also allows users to share files with other non-WinWin-dows computers, such as Mac OS X and Linux users. In Windows 7, file sharing has been further simplified with the new HomeGroup feature.
In this chapter, you will learn about the new HomeGroup feature, as well as learn how to share files with other computers on your network.
HomeGroup
One of the challenges with previous versions of Windows is how to share files easily with other users on the network. Suppose that you have multiple files on your notebook computer that you have created while you were in the office and when you go back home you want to use the files on your home desktop computer. Prior to Windows 7, you had to create a shared folder on your notebook, navigate to the Network Neigh-borhood on the other computer, and look for the notebook’s shared folder.
In Windows 7, Microsoft has made file sharing very simple with HomeGroup. Using HomeGroup, you can easily share files as well as your digital media (such as music and videos) with other users on the same network. What’s more, HomeGroup also allows you to share one or more USB printers connected to a single computer with the rest of the users on the network.
Wireless Networking
Connecting to wireless networks is now very simple in Windows 7. As in the previous versions of Windows, there is the wireless signal icon in the system tray. However, unlike previous versions, you can now click the wireless icon to display a list of wireless networks available (see Figure 3-1).
To connect to a wireless network, simply move the mouse over the network name and click the Connect button. If the wireless network requires a key, you will be prompted to enter one. And you are connected!
Figure 3-1. Selecting from a list of wireless networks
HomeGroup revolves around the concept of a “home” network. When you are at home, you want to be able to share files and printers easily with other family members. Hence, the HomeGroup feature will work only if you are connected to the Home network (see Figure 3-2).
When you are connected to the Home network, Windows 7 will initiate a network discovery to start looking for other computers on the same network and will check to see whether a HomeGroup is available for joining.
You can easily switch to another network by going to Control Panel→Network and Sharing Center and clicking the link below the Network name (it will be labeled Home network, Work network, or Public network).
Creating a New HomeGroup
Creating a HomeGroup is straightforward. Go to Control Panel and click “Choose homegroup and sharing options,” which is found under the Network and Internet section. If there is currently no HomeGroup created in your Home network, you will see the screen as shown in Figure 3-3.
Windows 7 Starter Edition cannot create a HomeGroup, but it can join a HomeGroup that you’ve created on another computer. Any users on the Home network can create a HomeGroup. As soon as one user has created a HomeGroup, the rest can just join the HomeGroup.
Figure 3-2. Selecting a location for the network
To create a HomeGroup, click the “Create a homegroup” button. You will be asked to select the libraries and devices (such as printers) that you want to share. Click Next.
Only the default libraries created by Windows are displayed for you to select. To share your own custom libraries, refer to the next section.
A password will be generated. Users who want to participate in this HomeGroup will need this password. Click Finish to complete the creation process.
Changing the HomeGroup Password
You can always change the password that HomeGroup has generated for you. However, Microsoft’s research has shown that users normally use their own personal password for this purpose, and when they realize that this password must be shared with those who need to join the HomeGroup, they are generally reluctant to share the password. Hence, it is usually a good idea to use the generated password.
If you want to change the password, click the “Change the password...” link as shown in Figure 3-4.
Figure 3-3. Creating a new HomeGroup
The HomeGroup window should now look like Figure 3-4.
Figure 3-4. The HomeGroup window, showing the various options available
To leave the HomeGroup, click the “Leave the homegroup...” link.
Controlling what is shared (and what is not)
In Chapter 2, you learned about the new Libraries feature in Windows 7. Recall that for each of the default libraries (Documents, Music, Pictures, and Videos), there are two
locations. For example, the Documents library has two locations: My Documents and
Public Documents (see Figure 3-5).
By default, when you share a library, Windows 7 will apply different security settings
for each of the locations in the four libraries. The first folder (for example, My
Pic-tures) will have read-only permission applied to it. This means that users in your HomeGroup can only view the items in the folder, but not make changes to it. The
other folder (for example, Public Pictures) will have read-and-write permission.
To change the share permission of a library, select the library, click the “Share with”
button, and select the relevant permission: Nobody, HomeGroup (Read), or
HomeGroup(Read/Write); see Figure 3-6.
Figure 3-6. Modifying the share permission for a library Figure 3-5. Each library has two locations
You can also share a library with specific people by selecting the “Spe-cific people...” menu item.
You can also modify each libraries’ location’s share permission by selecting the location and then choosing the “Share with” button. In addition, you can also use this technique to share your own custom library.
Joining a HomeGroup
Once a HomeGroup is created, users on the same Home network can join the Home-Group and share files and devices (such as printers). If someone in the Home network has created a HomeGroup, the HomeGroup window will appear.
Windows 7 will also try to detect an available HomeGroup during in-stallation time. If there is one, you will be invited to join the group.
To join the HomeGroup, click the “Join now” button. You will be asked to select the libraries and devices that you want to share. Click Next to continue.
You will then be asked to enter the password to join the network. Enter the password, click Next, and then click Finish to join the HomeGroup.
Sharing Files
Once you have joined a HomeGroup, you will be able to view the files shared by other users in the HomeGroup. To view the files, open Windows Explorer and look for the
item named HomeGroup displayed on the left side of the window (see Figure 3-7).
When you click a shared library (such as the Music library shown in Figure 3-7),
Win-dows Explorer will display all the files inside the two locations on the right side of the window (My Music and Public Music). If you drag-and-drop files into a library, the files will automatically be copied onto the public folder. This makes sense, as the public folder has read-and-write permissions.
Sharing Printers
One really cool feature of the HomeGroup is the ability to share printers. Very often, you have a printer connected to a computer via USB and you might want to share it with other computers in your home network. Prior to Windows 7, sharing printers required you to perform a series of steps to configure the printers for sharing.
In Windows 7, you can share a printer easily using the HomeGroup feature. When another computer joins the HomeGroup, it will be able see the printer connected to your computer. If the printer has the Windows logo, HomeGroup users will instantly
see the printer in their Devices and Printers window. Figure 3-8 shows the printer
con-nected to a computer on the HomeGroup made available to the local computer.
The Windows logo indicates that the printer manufacturer is partici-pating in a program that ensures it is safe to automatically install its driver on your computer without your direct consent.
If the printer does not have the Windows logo, the HomeGroup page will display a
message indicating that it has found a shared printer on the home network (see
Fig-ure 3-9). Click the “Install printer” button to install the printer driver.
Figure 3-7. Viewing files shared by other users in the HomeGroup
Figure 3-8. Printers shared from another computer
Figure 3-9. Detecting a shared printer on the home network
You will be prompted to install the driver for the printer. Click “Install driver.”
The best part of this is that the installation of the driver is automatic—the driver is copied from the host computer (connected to the printer) and installed on the local computer. With HomeGroup, a printer attached to one computer is made available to everyone in the HomeGroup.
If you are logged in as a normal user, installing the printer driver will require an administrator’s credentials.
Streaming Music
Using the new HomeGroup feature, you can now stream music from one Windows 7 computer to other computers and devices.
To stream your music and videos to other devices on the home network, check the “Stream my pictures, music, and videos to all devices on my home network” checkbox in the HomeGroup window.
To customize the files streamed to each individual computer in the HomeGroup, click the “Choose media streaming options...” link. The Media streaming options window will now appear (see Figure 3-10).
Figure 3-10. Customizing the streaming options for each computer and device
You can give a name to your media library and then click the Customize... link for each device on your network to control which files to stream to each device.
Users on the HomeGroup will now be able to see your music collection from within Media Player (see Figure 3-11).
Figure 3-11. Viewing the shared music collections from Windows Media Player
The shared music collection is also available in the Windows Media Center.
File Sharing with Windows XP
Though the new HomeGroup feature in Windows 7 makes file sharing very simple, it is incompatible with previous versions of Windows. If you need to share files with Windows XP or Windows Vista computers, you have to rely on the old trusty file-sharing mechanism:
1. To share files with other users and computers on the network, turn off password-protected sharing so that users can access the files without authentication.
2. Go to Control Panel→Network and Internet→Network and Sharing Center. Click
the “Change advanced sharing settings” link.
3. Scroll to the bottom of the page and locate the “Password protected sharing” sec-tion (see Figure 3-12). Turn off the password-protected sharing, as this will allow other users to access your shared file without needing an account on your com-puter. Click the “Save changes” button when done.
The previous step is needed only if you want everyone on your network to access your files. If you want to share only with specific users on other computers, you will need to create an account and password for them on your computer so that they can use it to access your files.
Figure 3-12. Turning off password-protected sharing
4. Create a folder that you want to share. For example, create a folder on the desktop
and name it Common Files.
5. Right-click the folder and select Properties.
6. Click the Sharing tab and click the Share... button. You will see the File Sharing
window, as shown in Figure 3-13.
Alternatively, you can also use the new “Share with” button located in Windows Explorer to configure file sharing.
7. Click the drop-down arrow to select from a list of users who can access the shared folder. Once selected, click Add to add the user to the shared list. You can also configure the read/write permission for each user. Here, I am sharing the files with everyone on the network.
8. Click Share.
Figure 3-13. Configuring who is allowed to access the file
On the Windows XP computer, open the My Network Places window, and you should be able to see the various shared folders on the network. Double-click the one that contains your shared folder.
You will now be able to access the content in the shared folder.
Viewing Shared Folders from Within Windows 7
In Windows 7, to view shared folders from other computers, launch Windows Explorer and expand the Network item on the bottom-left corner of the window (see Fig-ure 3-14). All shared folders on the network will be listed here.
File Sharing with Mac OS X
If you want to share your Windows 7 files with Mac OS X users, use the SMB (Server Message Block) protocol in Mac OS X.
The following steps outline how you can view shared folders in Mac OS X: 1. In Finder, select Go→Connect to Server....
2. Specify the “smb://” prefix, followed by the IP address (or computer name) of the Windows 7 computer and the “:139” port number. Click Connect.
3. If the connection is successful, you will be asked to log in to the Windows 7 com-puter. For sharing with everyone, select the Guest account and click Connect.
4. You will be asked to select the folder to mount in Mac OS X (see Figure 3-15).
Select the folder and click OK.
5. Finally, the shared folder is now available in Mac OS X.
Figure 3-15. Selecting the shared folder to mount
Figure 3-14. Viewing the various shared folders on the network in Windows 7
Summary
In Windows 7, Microsoft greatly simplified file- and printer-sharing using the new HomeGroup feature. Using HomeGroup, sharing files and printers is now a seamless experience for Windows users. Not only that, but the ability to stream music from one Windows 7 computer to another also makes Windows 7 an ideal platform on which to build your next media center.
Although HomeGroup works only on Windows 7 computers, file sharing with other platforms (such as Mac OS X, Windows XP, and Windows Vista) can still be performed using the old file-sharing mechanism.