Transitioning to .NET Core on Red Hat
Enterprise Linux
Transitioning to .NET Core on Red Hat Enterprise Linux
by Don Schenck
Copyright © 2017 O’Reilly Media. All rights reserved. Printed in the United States of America.
Published by O’Reilly Media, Inc., 1005 Gravenstein Highway North, Sebastopol, CA 95472. O’Reilly books may be purchased for educational, business, or sales promotional use. Online
editions are also available for most titles (http://oreilly.com/safari). For more information, contact our corporate/institutional sales department: 800-998-9938 or [email protected].
Editors: Nan Barber and Susan Conant
Production Editor: Melanie Yarbrough
Copyeditor: Gillian McGarvey
Proofreader: Jasmine Kwityn
Interior Designer: David Futato
Cover Designer: Karen Montgomery
Illustrator: Rebecca Demarest
September 2016: First Edition
Revision History for the First Edition
2016-09-20: First Release 2016-10-21: Second Release 2016-12-06: Third Release
The O’Reilly logo is a registered trademark of O’Reilly Media, Inc. Transitioning to .NET Core on Red Hat Enterprise Linux, the cover image, and related trade dress are trademarks of O’Reilly Media, Inc.
While the publisher and the author have used good faith efforts to ensure that the information and instructions contained in this work are accurate, the publisher and the author disclaim all
responsibility for errors or omissions, including without limitation responsibility for damages
to ensure that your use thereof complies with such licenses and/or rights. 978-1-491-97055-3
What to Expect from This Book
This book is targeted at—but not limited to—.NET developers with any level of experience. Starting with a basic “Hello World” console application, it moves along through ASP.NET, MVC, and Entity Framework applications, eventually arriving at a full-featured application running in a Linux
container. Because the code in this book is limited to C#, your existing knowledge of .NET and C# will largely determine the speed at which you progress through this volume. More experienced developers will be interested in the few key differences when developing for Linux (and there are quite a few), whereas beginning developers can use this book to learn more advanced programming techniques—the fact that those techniques are related to .NET Core is just icing on the cake.
If you’ve spent most of your time writing code in a language other than C#, with Linux as your native operating system, don’t fret. Though knowledge of C# is highly recommended, even a novice
developer with a desire to learn can use this volume, perhaps in concert with another manual that guides the reader in C# development.
Some Assumptions
This book assumes some previous experience with the .NET Framework. Again, while it’s technically not necessary to have prior knowledge when you begin reading, you will need to be
familiar with .NET (either by experience or education) to understand what’s happening. Again, not to worry—the knowledge needed isn’t as deep as you might fear. Grasp a few key concepts and you’ll be good to go.
For the purposes of simplicity, the Linux distribution used in the examples will be Red Hat Enterprise Linux (RHEL). Any adjustments necessary for other Linux distributions will be pointed out as we go.
Your Environment
To follow along with the narrative and code, you need to install the Red Hat Container Development Kit (CDK) and clone or download a repository from GitHub. Step-by-step instructions are provided in Chapter 1.
Formatting
The following typographical conventions are used in this book: Text will be in the typeface you are reading now.
usingSystem;
namespace ConsoleApplication
{
publicclass Program {
publicstaticvoidMain(string[] args) {
Console.WriteLine("Hello World!"); }
} }
Command-line commands will be shown like this
Italic
Indicates new terms, URLs, email addresses, filenames, and file extensions. Constant width
Used for program listings, as well as within paragraphs to refer to program elements such as variable or function names, databases, data types, environment variables, statements, and keywords.
Constant width bold
Shows commands or other text that should be typed literally by the user.
Constant width italic
Shows text that should be replaced with user-supplied values or by values determined by context.
TIP This element signifies a tip or suggestion.
NOTE This element signifies a general note.
.NET Core Is the Future
In November 2014, Microsoft announced that the .NET Framework would be transitioned to an open source development model. This announcement was met with surprise and open arms by the .NET community. Although Microsoft had, up to that moment, done an admirable job of soliciting input from developers about .NET features and bugs, making the source available meant a much higher level of engagement. The standard open source model of using a GitHub repo—with issues, milestones, pull requests, and the related discussions—meant that anyone, anywhere could have instant and
transparent access to the development team. Developers could participate in discussions and research defects and workarounds. Schedules and roadmaps would now be available to everyone, leading to more realistic expectations. Surprise announcements would give way to planned milestones.
Meanwhile, developers outside the .NET world saw this as an opportunity to bring their open source experience and knowledge to one of the more pervasive software development platforms. The free exchange of ideas, code reviews, and sense of community found its place inside the Microsoft-centric developer’s world. The infusion of non-.NET developers meant that “dot netters” could gain a
broader view of development in general. This is a very good thing. This is the new model. This is the future.
.NET Core is not just another .NET Framework. Rather, it is the future of .NET. Microsoft has stated that the previous framework, 4.6.1, will still be supported, and bug fixes will be applied, but any new .NET features will be reserved for .NET Core. Using .NET Core as your basis for future work is in line with Microsoft’s stated intentions. While migrating existing code to .NET Core may or may not be a good idea, future development should be based on .NET Core if possible. In short, this is the .NET Framework. Period. Full stop.
What’s Missing
Because some parts of .NET are either specific to Windows or outdated, not everything made the journey from proprietary software to the open source model and .NET Core 1.0.
Here’s a list of some of the things that didn’t make the transition: MWF (Windows Forms)
Web forms WCF (SOAP)
In addition, some things haven’t been ported yet—perhaps the biggest being SignalR. Microsoft has publicly stated that SignalR will be ported to .NET Core.
From this point on, unless the difference is worth noting, references to .NET CoreCLR, CoreFX, and the like, will be simplified to “.NET”.
What’s New
.NET is more modular now, which is a definite benefit from starting over when designing the
Chapter 1. Setting Up Your Environment
This chapter will guide you through setting up the environment used in the examples in this book. It includes a Linux Virtual Machine (VM) running on a Windows 10 machine, and a clone or download of a GitHub repository (repo). The VM in this setup will use the Red Hat Container Development Kit (CDK), which includes an image of Red Hat Enterprise Linux (RHEL), Oracle’s Virtual Box, and Vagrant.
Your Red Hat Account
Before you can download the RHEL image and the CDK, you need to register at the Red Hat
Developer website. This is free; all you need is an email address and a password. You can opt out of the Red Hat Developers newsletter if you wish, but I suggest keeping it—at least initially.
This gives you access to all the tools and help, including the CDK (with RHEL), forums, knowledge base, and more.
Keep your username and password handy; you’ll need them every time you start your VM in order to register with Red Hat and enable your subscription.
Installing the CDK
The Red Hat CDK includes a copy of RHEL 7 that’s been preloaded with the docker command and OpenShift. It runs the RHEL VM using Vagrant and Virtual Box. Fortunately, if you’re not familiar with these technologies, the CDK makes the process of installing them transparent. Basically, you download, install, and run.
Figure 1-1. Select Red Hat Container Development Kit
This takes you to the Container Development Kit page.
Figure 1-2. Container Development Kit download page
After the CDK installer is downloaded (the installer is development-suite-1.0.0-GA-bundle-installer.exe, which is about 1.4 GB in size), open it and follow the prompts to install the CDK on your Windows machine. You’ll need your Red Hat username and password to get started, as you can see in Figure 1-3.
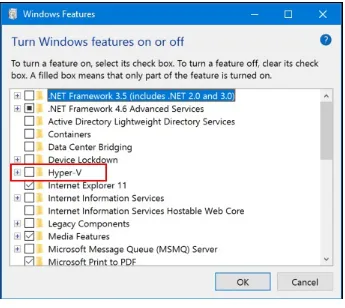
Disable Hyper-V
Before you can use Vagrant, you’ll need to disable Hyper-V on your Windows machine. Use the Windows Features Control Panel applet to do this, as shown in Figure 1-4.
Figure 1-4. Disable Hyper-V
If you need to switch between enabling and disabling Hyper-V, there’s a helpful guide at Scott Hanselman’s blog.
Start Your VM
Now that you’ve installed everything, you can start the VM. Assuming that you used the default values during the installation, open a command prompt, navigate to the proper folder, and launch the VM using the vagrant up command:
PS C:\DevelopmentSuite\cdk\components\rhel\rhel-ose> vagrant up Bringing machine 'default' up with 'virtualbox' provider...
==> default: Clearing any previously set forwarded ports... ==> default: Clearing any previously set network interfaces... ==> default: Preparing network interfaces based on configurat... default: Adapter 1: nat
default: Adapter 2: hostonly ==> default: Forwarding ports... default: 22 => 2222 (adapter 1)
==> default: Running 'pre-boot' VM customizations... ==> default: Booting VM...
==> default: Waiting for machine to boot. This may take a few... default: SSH address: 127.0.0.1:2222
default: SSH auth method: password
default: Warning: Connection timeout. Retrying...
default: Warning: Remote connection disconnect. Retrying... ==> default: Machine booted and ready!
==> default: Registering box with vagrant-registration... default: Would you like to register the system now (defau... default: username: **redacted**
default: password:
[default] GuestAdditions 5.0.26 running --- OK. ==> default: Checking for guest additions in VM...
==> default: Configuring and enabling network interfaces... ==> default: Copying TLS certificates to C:/DevelopmentSuite/... ==> default: Rsyncing folder: /cygdrive/c/DevelopmentSuite/cdk/... ==> default: Mounting SMB shared folders...
default: C:/shared => /shared
==> default: Machine already provisioned. Run `vagrant provis... ==> default: flag to force provisioning. Provisioners marked... ==> default: Running provisioner: shell...
default: Running: inline script
==> default: Running provisioner: shell... default: Running: inline script
==> default:
==> default: Successfully started and provisioned VM with 2... ==> default: To modify the number of cores and/or available... ==> default: VM_CPU respectively VM_MEMORY.
==> default: You can now access the OpenShift console on: https... ==> default:
==> default: To use OpenShift CLI, run: ==> default: $ vagrant ssh
==> default: $ oc login 10.1.2.2:8443 ==> default:
==> default: Configured users are (<username>/<password>): ==> default: openshift-dev/devel
==> default: admin/admin ==> default:
==> default: If you have the oc client library on your host,... PS C:\DevelopmentSuite\cdk\components\rhel\rhel-ose>
RUN AS ADMINISTRATOR
Get in the habit of opening the command prompt—I suggest using PowerShell—by using the “Run as Administrator” option because you’ll need administrator privileges later when you are editing and debugging from Windows.
Now you can use ssh to get into the VM. The easiest option is to use the vagrant ssh command, which will open an ssh session inside the VM, as shown in Figure 1-5.
Figure 1-5. Using vagrant SSH to start a bash session on the VM
Getting the Source Code
Once you are inside the VM, you can go ahead and fetch the source code associated with this book. You can do this by running the following command:
git clone https://github.com/donschenck/NetOnLinuxBook
You’ll now have a directory, NetOnLinuxBook, that contains subdirectories for this book.
NOTE
Chapter 2. Getting Started: From Zero to
“Hello World” in One Chapter
From Zero to “Hello World” in One Chapter
One of the benefits of .NET Core is the ability to get a simple console application up and running in a matter of seconds. While more complex applications require a deeper understanding of the
framework and the language (C#, in our case), the building and execution of a simple “Hello World” application can be done with very little effort. This chapter will get you up and running in one quick session.
ASSOCIATED SOURCE CODE The source code can be found in the /NetOnLinuxBook/HelloWorld/ directory.
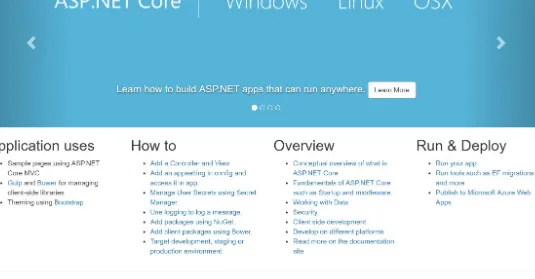
Overview of .NET
When Microsoft introduced the .NET Framework in 2002, it marked a new era in software development for Microsoft-centric developers. The move marked a shift in thinking, allowing Windows Forms developers to create websites in a way that was somewhat familiar. Dragging text areas and buttons onto a form and adding code-behind code made the transition almost seamless, if somewhat unconventional. In fact, it was sometimes referred to as “Windows for the Web.”
Fast-forward 12 years, and Microsoft announces that .NET will be open source. It now supports MVC, ORM, CSS, and every other TLA (three-letter acronym) one can imagine.
What happened?
In short, as has been said, “Open source won.”
With the fight over, Microsoft has pivoted quickly and is now releasing pieces of the .NET
framework at a much faster pace, with thousands of developers from all over the world contributing. In November 2015, when Microsoft and Red Hat announced a partnership (to replace an adversarial relationship), it became clear that .NET was not only moving into the world of open source but that being able to run .NET programs on Linux—with the full blessings and support of Microsoft and Red Hat—was actually going to happen.
time to get started.
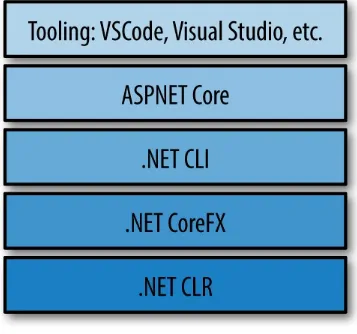
Installing .NET
Installing the framework is easier and quicker than ever; that’s because it’s been separated into small layers. It’s helpful to understand these layers of .NET. Each layer exists separately from the other and evolves at a different pace. Each has a separate code base and GitHub repo, as shown in Figure 2-1.
Figure 2-1. The layers of the new world of .NET
.NET CLR
This is where the Common Language Runtime (CoreCLR) lives. It includes the garbage collector, the Just-In-Time (JIT) compiler, base data types, and some low-level classes.
.NET CoreFX
The System.* and Microsoft.* libraries that run on .NET Core and enable you to run your
.NET CLI
The command-line interface, which allows you to build and launch your applications. Compiling programs, pulling NuGet packages, running tests, running your applications—all these tasks use the dotnet CLI. As a developer, you’ll likely spend a great deal of time here or use an IDE that leverages the CLI.
ASP.NET Core
These are the libraries that allow you to write web services and websites. Because it is totally modular, ASP.NET Core allows you to include only the pieces you need—for example, running a static website—while excluding the bits you don’t need. This reduces size, increases performance, and makes deployment faster.
Tooling
Any tools that make your life easier as a developer—whether they are a part of Visual Studio or Visual Studio Code, or other tools (such as yeoman)—reside at this level. This level is not only optional, but tools may or may not be available depending on your operating system and toolset. Whereas in the beginning, .NET development tools from Microsoft were tightly coupled with the framework and Visual Studio, now they are totally separate (this has actually been the case since 2008).
HELP, I DON’T REALLY KNOW LINUX THAT WELL!
New to Linux? That’s OK; we all were at one point in our lives. Don’t fret—you can download a free Linux Cheat Sheet at the Red Hat Developer’s website.
Installation Instructions
Assuming you have a Red Hat Enterprise Linux 7 subscription, follow these instructions to install .NET Core. Note that you will need administrator privileges to perform the installation:
sudo subscription-manager list --available
Figure 2-2. subscription-manager list --available output showing Pool ID
Using the Pool ID, run the following command:
sudo subscription-manager attach --pool=<Pool ID>
Now you can enable the package and perform the installation:
sudo subscription-manager repos --enable=rhel-7-server-dotnet-rpms sudo yum install -y scl-utils
sudo yum install -y rh-dotnetcore10
Finally, to make the framework available to your command line, use the following command, which will enable the framework in a new bash session:
sudo scl enable rh-dotnetcore10 bash
Every time you open a bash session in the VM, you’ll need to run the this command. Not only is this a nuisance, but it won’t work if you wish to debug your code from within Visual Studio. To avoid this issue, add the following line to the file ~/.bashrc in your VM:
source scl_source enable rh-dotnetcore10
This will download and install the latest RHEL-approved .NET Core distribution and make it
available. You can verify your installation (and see what version you are using) by using the version command:
dotnet --version
Other Linux Distros
The easiest way to install on other distros is to visit the .NET website and follow the screen prompts.
WHAT IF I DON’T HAVE RHEL?
Windows machine and use it to run RHEL (I strongly recommend this route), visit the Red Hat .NET website and follow the prompts to download and install RHEL. While you’re at it, I recommend grabbing and installing the Container Development Kit (CDK). You can use it later when working with Linux containers.
Keeping Current
To keep up to date with the progress of .NET, visit the project current release page on GitHub.
Your First .NET Application on Linux
Be prepared to be underwhelmed. Creating your first .NET application, the standard “Hello World” application, on Linux involves only three steps (five if you include creating a directory and moving into it).
Actually, the creation of the source code is only one command:
mkdir helloworld cd helloworld dotnet new dotnet restore dotnet run
Putting it all together should yield something like the following (the output is included in this snippet):
$ mkdir hw $ cd hw $ dotnet new
Created new C# project in /home/vagrant/src/hw. $ dotnet restore
log : Restoring packages for /home/vagrant/src/hw/project.j... log : Writing lock file to disk.
Path: /home/vagrant/src/hw/project.lock.json log : /home/vagrant/src/hw/project.json log : Restore completed in 809ms. $ dotnet run
Microsoft has promised that support for F# and Visual Basic is coming. In fact, you can go ahead and run dotnet new --lang F# now and see what happens.
We’ll cover the commands later, but first let’s take a look at what was generated by the dotnet new command:
$ ls -l total 8
-rwxrw-r--. 1 vagrant vagrant 202 Jun 15 14:43 Program.cs -rwxrw-r--. 1 vagrant vagrant 348 Jun 15 14:43 project.json $
Chapter 3. Diving into the “Hello World”
Application
In Chapter 1, we installed .NET and easily created, built, and ran the “Hello World” application. Let’s take a look at what happened when we built and ran our “Hello World” application (although you and I both know you’ve already looked inside all the generated files).
ASSOCIATED SOURCE CODE The source code can be found in the /NetOnLinuxBook/HelloWorld/.
We started by running the dotnet new command. Confession time: in fact, we skipped a command. After running dotnet restore, you can run the dotnet build command to build the binary output. We skipped it in the interest of brevity, and in fact when you execute dotnet run, the command will check to see if a new build is required and run the build automatically. We’ll cover dotnet build later in this chapter.
The dotnet new Command
The dotnet new command will create a new .NET project with the minimum amount of code and associated files necessary to run the application. When run without any additional options, it will create the “Hello World” console application. In this case, two files are created—Program.cs and
project.json:
$ ls -altr total 8
-rwxrw-r--. 1 vagrant vagrant 348 Jun 15 14:43 project.json -rwxrw-r--. 1 vagrant vagrant 202 Jun 15 14:43 Program.cs drwxrwxr-x. 3 vagrant vagrant 23 Jul 8 11:24 ..
drwxrwxr-x. 2 vagrant vagrant 42 Jul 8 11:25 .
Program.cs is the program, and it’s short and sweet:
usingSystem;
} } }
The result is obvious; an app that writes “Hello World” to the console.
Just for fun, let’s change it to say “Hello from Linux” (or whatever you please), then run the dotnet run command again:
$ dotnet run
Project hw (.NETCoreApp,Version=v1.0) will be compiled because inputs were modified
Notice the message from the compiler. Even though we requested the program to run and didn’t specifically ask for a compile, the dotnet CLI recognized the change in the source code and
automatically invoked the compiler (i.e., dotnet build). If you run dotnet build now, you’ll see that the compile is not done.
Then why use dotnet build at all? Because you need it in your continuous integration/continuous deployment (CI/CD) pipeline.
The dotnet restore Command
After we ran dotnet new, we used the dotnet restore command. What does that do?
It’s a package manager, similar to how one would use npm when working in Node.js, or pip when working in Python.
The dotnet restore command pulls the dependency libraries, which are listed in the file project.json, from the configured repository. In fact, the location is found inside the file
~/.nuget/NuGet/NuGet.Config. This file is created the first time you run the dotnet restore command. You can edit the NuGet.Config file, adding your own repositories if you wish. For example, you may have a repository of company-standard libraries stored within your local network or a remote server (i.e., the cloud). Likewise, you can remove the reference to NuGet.org. Additionally, if you want to live on the bleeding edge, you can use the NuGet.Config file to access daily builds in MyGet.org. In addition to the default NuGet.Config file location, the restore command will automatically use a
NuGet.Config file that is in your project’s root directory. For example, if your project is in the directory ~/src/web, and you have a file ~/src/web/NuGet.Config, it will automatically be used. It will also be given priority over the default NuGet.Config file.
Finally, you can specify a NuGet.Config file at any location by using the --configfile option of the dotnet restore command. When you do this, be aware that the default configuration file is not used.
What Gets Restored?
A look inside the file project.json reveals which libraries are restored when running dotnet restore. In our case, there are no libraries listed, so none need to be restored:
{
"version": "1.0.0-*", "buildOptions": {
"debugType": "portable", "emitEntryPoint": true },
"imports": "dnxcore50" }
} }
(The other sections of the project.json file will be discussed later.)
This project.json file represents an ASP.NET MVC application that uses the Entity Framework with SQL Server. As you can see from this list, each component must explicitly be included in the
“dependencies” section. Later, you’ll see that you must also write code to include these bits. This modular approach is a welcome change to .NET.
NOTE
This project.json file is purposely not a good example. This will be explained in “Library Versioning in project.json”.
Where Do the Dependencies Go?
When you run dotnet restore, the DLLs are stored in the location specified by the environment variable DOTNET_PACKAGES. If this variable is not set, the libraries are placed in
~/.nuget/packages/.
When you restore the dependency libraries, a new file that contains a list of your dependencies is created. This is needed to build your application.
$ ls -altr total 288
-rwxrw-r--. 1 vagrant vagrant 348 Jun 15 14:43 project.json -rwxrw-r--. 1 vagrant vagrant 202 Jun 15 14:43 Program.cs drwxrwxr-x. 3 vagrant vagrant 23 Jul 8 11:24 ..
drwxrwxr-x. 2 vagrant vagrant 66 Jul 8 11:27 . -rwxrw-r--. 1 vagrant vagrant 283663 Jul 8 11:27 project.lock.json
The new file, project.lock.json, ensure that your dependencies are fixed to a moment in time—the moment you ran dotnet restore. Note that if you alter your project.json file and run dotnet restore again, the lock file will be updated.
A peak inside the project.lock.json file reveals not only the dependencies you listed, but their dependencies as well.
But which version of any particular library is restored? In the previous sample, the version numbers “1.0.0*” are used. What does that mean?
Library Versioning in project.json
In short, you should fix your versions, such as in the following example:
"Microsoft.AspNetCore.Mvc.TagHelpers": "1.0.0"
Using this technique, you not only fix your dependencies for a moment in time, but at a particular version. This is a best practice. If you are using an IDE such as Visual Studio or Visual Studio Code, IntelliSense will guide you to select the most current version.
What Gets Built?
When you run dotnet build, what gets built? What happens?
Staying within our “Hello World” application and using the default project.json file, the dotnet build command will produce a library at the following location:
./bin/<configuration>/<framework>/<binary name>.
In our case, that will be ./bin/Debug/netcoreapp1.0/helloworld.dll.
When you use the run command, it finds the library in the /bin.. directory and runs it. You can change this behavior by using the --project option on the dotnet run command and explicitly telling dotnet to use a library. Consider the following example:
mkdir ~/apps/helloworld
dotnet build --framework netcoreapp1.0 --output ~/apps/helloworld/
dotnet run --project ~/apps/helloworld.dll
This DLL is a .NET portable app, meaning you can run it on any platform that has .NET Core installed. Yes, you can literally put the library on a thumb drive and run it on OS X and/or Windows without any changes.
You can also build self-contained applications for Windows and OS X.
In the next chapter, we’ll create a web application: an ASP.NET MVC application.
The dotnet CLI has a model of inputs and outputs, and checks that for each output all of the inputs are older. If any of the inputs are newer, it needs to rebuild.
Chapter 4. “Hello World” for the Web
Now that we’ve successfully created the “Hello World” console application, let’s take the same idea and create a simple “Hello World” application for a browser.
To do that, we first need to install ... nothing more.
No web server, no IIS...nothing. Why is that? Because in .NET Core, a web app is a console app. That’s right—you start it from the command line and shut it down with Ctrl-C, just like any
continuously running console application.
How do web pages get served? Introducing: Kestrel.
In the natural world, a kestrel is a small falcon that is built for speed. Likewise, the Kestrel web server is built for speed, with non-reviewed benchmarks coming in at 5.2 million requests per second, eight times faster than Node.js and four times faster then Go.
That’s flying!
ASSOCIATED SOURCE CODE The source code can be found in the /NetOnLinuxBook/HelloWeb/ directory.
The Kestrel Web Server
So how do you access this speedy server? If you don’t install anything, what do you need to do? Let’s take a look.
Start by forking and cloning (or downloading) the code at the NetOnLinuxBook repo and move into the HelloWeb directory.
Viewing the contents, we immediately notice a few things:
$ ls -altr total 336
drwxrwxr-x. 8 vagrant vagrant 4096 Jul 9 09:49 .. -rwxrw-r--. 1 vagrant vagrant 327085 Jul 9 09:50 project.lock.json
drwxrwxr-x. 3 vagrant vagrant 18 Jul 9 09:53 obj drwxrwxr-x. 3 vagrant vagrant 18 Jul 9 09:53 bin
Where is wwwroot? Where is web.config? Where is everything?
Relax—everything we need is here. Because of the new modular programming model for .NET, everything we need is in code. Let’s start by taking a look at the project.json file because we know that’s where the bits get installed:
{
"buildOptions": {
"emitEntryPoint": true, "debugType": "portable" },
"dependencies" : {
"Microsoft.NETCore.App": { "type": "platform",
"version": "1.0.0" },
"Microsoft.AspNetCore.Server.IISIntegration": "1.0.0", "Microsoft.AspNetCore.Server.Kestrel": "1.0.0"
},
PRO TIP: MASTER THE PROJECT.JSON FILE
If you want to be a master with .NET Core, no matter what the platform, you want to master the
project.json file. Top skill in this area will go a long way toward understanding your builds and reducing the size of your applications.
Microsoft has hinted that project.json will play a much smaller role in the future, but the
knowledge will still be applicable, even if these settings are stored somewhere else (*.csproj
file, for example). Get started by visiting the Microsoft documentation page.
The project.json File
Starting at the top and working our way down, let’s take a closer look at each line and what it represents:
"buildOptions"
(This was "compilationOptions" until shortly before the release of .NET Core, so if you encounter that in a project file, you can change it.)
If true, the build will create an executable. Otherwise, a DLL will be built. "dependencies"
This is where you keep a list of the dependencies (libraries/DLLs) that are needed by the project. The name of the dependency is followed by version information.
"Microsoft.NETCore.App"
An example of a dependency. In this case, a set of .NET APIs that are part of the .NET Core application model. If you really want to see what this encompasses, check out the package on NuGet.org.
"type": "platform"
This defines when you will need this dependency. The value "platform" means you expect this dependency (in our case, Microsoft.NETCore.App) to be available on the platform on which your application will run. In other words, it is part of the environment and not part of your application. The value "build" means the library or libraries must be available during the build phase of your application, and they will be included with your application. They do not need to be previously installed on the machine where your app will run.
"version": "1.0.0"
The server version of the dependency you are using/installing. If you’re using an IDE to edit your program, IntelliSense will prompt you. Or, you can find the appropriate page on NuGet.org and see the version history.
“Microsoft.AspNetCore.Server.IISIntegration”: “1.0.0”
These are the components needed to work with the IIS module. In our example, using Kestrel in Linux, we don’t need this. However, if we remove it, we get the following error when building our application:
Startup.cs(4,28): error CS0234:
The type or namespace name 'HttpOverrides' does not exist in the namespace 'Microsoft.AspNetCore' (are you missing an assembly reference?)
Line 4 of Startup.cs reads as follows:
usingMicrosoft.AspNetCore.HttpOverrides;
“Microsoft.AspNetCore.HttpOverrides”:" 1.0.0”
Not only does this work but this is a perfect example of the modularity of .NET and how you can select only those bits you need. This lowers memory usage and improves performance.
“Microsoft.AspNetCore.Server.Kestrel”: “1.0.0”
This gives us the Kestrel web server.
“frameworks”: “netcoreapp1.0”
Defines the framework(s) you are targeting. Perhaps more useful, you can use this section to “lie” to the compiler, allowing you to include libraries that were written for your framework but that are, in fact, compatible. In other words, if you need a library that is targeted at Portable Framework 4.5 and Windows 8, you can add an “options” section to the frameworks, such as the following:
"frameworks": { "netcoreapp1.0": {
"imports": "portable-net45+win8" }
}
A full explanation of all the project.json file values can be found at the project.json reference page.
Program.cs: Where the Magic Happens
}
Looking at the source code, you see how the web server is built in code rather than specified in one or more configuration files. Certainly, you can (and should and will) store settings in configuration files, but the task of creating a web server is now on the developer in code, not on the framework via configuration.
Notice we are using Kestrel, the web server. The ".UseContentRoot" function sets where the web server starts looking for content. Using the current directory is simple, but you can obviously change this for, say, security reasons.
The .UseStartup function is a dependency injection point, where you specify the name of the startup library. The .UseUrls() function tells the web server which address and port to watch.
The host.Run() function launches the web server. Because this is a console app, you can observe what’s happening simply by watching the stdout (i.e., the messages to the console). Simply run the dotnet run command and watch Kestrel take over, as shown in Figure 4-1.
Figure 4-1. Results of HelloWeb
“I’M RUNNING RHEL IN A VM, AND LOCALHOST:5000 DOESN’T WORK!”
If you are running RHEL inside a VM on your PC (or Mac), you won’t be able to access the website from your PC desktop. That’s because localhost inside your VM is referring to just the VM, and not the host (your PC).
If you are running a UI on your VM (e.g., Gnome), you can open the browser in your VM and see the website.
If you’re running your VM as a text interface (i.e., just the console), you’ll need to modify the generated code to make it visible to your host.
In your VM, open the file Program.cs and change the .UseStartup line to read as follows:
This allows your website to be reached from outside of the VM.
Save the change and use the dotnet run command to start the application; you’ll then be able to view the website at the IP address (and port 5000) of your VM. If you are using the Red Hat CDK, this is 10.1.2.2:5000.
To see where the web server does its work, look inside Startup.cs:
// Startup.cs
usingMicrosoft.AspNetCore.Builder;
usingMicrosoft.AspNetCore.Hosting;
usingMicrosoft.AspNetCore.Http;
usingMicrosoft.AspNetCore.HttpOverrides;
namespace HelloWeb
{
publicclass Startup {
publicvoidConfigure(IApplicationBuilderapp) {
app.Run(context => {
returncontext.Response.WriteAsync( "Hello World Wide Web!");
}); } } }
As you can see, when this Startup class is executed, it asynchronously returns a response. Very simply, it sends the “Hello World Wide Web!” response. Because this is not an MVC application, there is no routing or filtering—there’s only a simple response.
Chapter 5. ASP.NET and MVC
At this point, we know how to create a basic web application in .NET Core. We know how to pull down the bits we need (the dependencies), where everything goes, and how to build a portable app. We can run the web app and see it in a browser.
In this chapter, we’ll learn how to create an ASP.NET MVC web app—a bit more complicated and closer to what you’ll work with in the wild.
There is no source code associated with this chapter; you’ll be creating it.
Creating a Basic MVC Web Application
We’ll start by creating a directory, moving into it, and then creating an MVC web application. This is done by introducing a new option to the dotnet new command—the --type web option:
mkdir ~/mvc cd ~/mvc
dotnet new --type web
Done. We’ve just created a skeleton ASP.NET MVC web app in C#. Next, restore the dependencies (dotnet restore) and run (dotnet run) the application. The prompt will point to the URL to browse this basic ASP.NET MVC site at http://localhost:5000.
ACCESSING THE URL FROM THE WINDOWS DESKTOP
If you are running Linux in a command-line environment inside a VM, you’ll need to alter the code in Program.cs to include the following line to make it available outside the VM:
.UseStartup<Startup>().UseUrls("http://*:5000");
Figure 5-1. Default MVC web app created by the command dotnet new -t web
As you click on one of the links in the page header, you can watch the console window from which you launched the web server (where you ran dotnet run). Watching the logged information is not only encouraging (“It’s working!”), but you can learn a lot from perusing it, such as the request (HTTP/1.1 GET http://10.1.2.2:5000/), the action method invoked, the assets being served, and more. This may come in handy when debugging so keep this tip in mind.
If you close the app (Ctrl-C) and get a directory listing (bash command ls -altr), you’ll see what the dotnet new --type web command created.
Viewing the contents of the directory, we can see that there’s a great deal more content as compared to the console application:
[vagrant@rhel-cdk mvc]$ ls -altr total 52
drwxrwxr-x. 4 vagrant vagrant 33 Jul 8 16:27 ..
drwxrwxr-x. 5 vagrant vagrant 56 Jul 8 16:27 wwwroot drwxrwxr-x. 6 vagrant vagrant 4096 Jul 8 16:27 Views drwxrwxr-x. 2 vagrant vagrant 73 Jul 8 16:27 Services drwxrwxr-x. 4 vagrant vagrant 78 Jul 8 16:27 Models drwxrwxr-x. 3 vagrant vagrant 53 Jul 8 16:27 Data drwxrwxr-x. 2 vagrant vagrant 83 Jul 8 16:27 Controllers drwxrwxr-x. 8 vagrant vagrant 4096 Jul 8 16:27 .
Here we see files, subdirectories, and support for a few tools—gulp and bower. While it’s not necessary to review the contents of every file in this project for this tutorial, there are some that will reveal insight into .NET Core.
MVC: An Inside Look
For starters, the Program.cs file has some interesting and telling lines:
// Program.cs as created by dotnet new --type web
namespace WebApplication
This is completely different than previous versions of .NET. For starters, it looks just like a console app. That’s because it is. In the new .NET, web apps are console apps. You don’t need IIS to run your web server; you invoke it from the command line, and the new server, Kestrel, handles the HTTP requests. You can use IIS if you are running in Windows—hence the line .UseIISIntegration(), but as we did in the previous chapter, this can be removed when running in Linux (or OS X). Along with it, you can remove the reference to Microsoft.AspNetCore.Server.IISIntegration in the
project.json file.
Because we covered this code in the previous chapter, let’s focus on the .UseStartup function and go into more detail. Specifically, we’ll look at the Startup class that is being referenced here:
usingSystem.Collections.Generic;
// see https://go.microsoft.com/fwlink/?LinkID=532709.
builder.AddUserSecrets();
public voidConfigureServices(IServiceCollection
}); } } }
Dependency injection is now an integral part of ASP.NET. Before, it was optional, and you used the
global.asax file to execute methods such as Application_Start and Application_End. Filter and route configurations, for example, were done by using the Application_Start method and associated classes such as RouteConfig.
With .NET Core, you trade in those multiple sections of code for the Startup class, and the two methods ConfigureServices and Configure. These two methods are conventions (this convention can be altered, which we’ll see later in this chapter) used by the hosting environment to set up the
ASP.NET pipeline.
When ConfigureServices is called, an IServiceCollection object is supplied as a parameter. This allows you to configure a hosting environment, which will control how your ASP.NET application will handle HTTP requests. In the code generated by dotnet new -t web, multiple services are added to the hosting environment. The SQLite database service is added by using the .AddDbContext
method and the .UseSqlite option. Following that, the Identity service is added, using Entity
Framework to access user identity information in the SQLite database. This allows users to register and log in to the application. The .AddMvc methods make the model-view-controller middleware available to the hosting environment. Because MVC uses convention, this is the minimum needed to host an ASP.NET MVC application.
Finally, the email sender (IEmailSender) and SMS sender (ISmsSender) services are added as
transient services. An object with a lifetime of transient means a new instance of the type (e.g., IEmailSender) is created every time it is requested.
NOTE
The other object lifetimes are Singleton and Scoped. A Singleton object is used every time the object type is requested throughout the lifetime of the application, whereas a Scoped object lives only until the web request is completely handled.
The Configure method of the Startup class is where you define the pipeline for processing HTTP requests. In the ConfigureServices method, certain bits were made available. In the Configure method, you dictate how those pieces are used.
The .AddConsole method loads the “Logging” section of the appsettings.json file to determine logging levels, outputs, and so on. The .AddDebug method builds on that to add debug logging.
Environments
ASPNETCORE_ENVIRONMENT to see if you’re in development (the variable is set to
Development) or not (e.g., Staging or Production). Notice that if you are in development, a special page is used to display exceptions and database errors.
NOTE
Development, Staging, and Production are the values used by convention. Any other values can be used, but their interpretation is up to you, the developer.
The .UseBrowserLink method is for IIS; we can ignore it for Linux.
The .UseDeveloperExceptionPage method is of special note and value. This allows you to have an error page when in development, which displays information that is valuable to a developer and that you do not want made public. As you can see in the code, when not in the development environment, the method .UseExceptionHandler points to a controller method that handles errors. Typically, this is where you would test for errors (400s, 500s) and display the appropriate page. Note that if you wish to display a static web page, you will need to make sure the .UseStaticFiles() method is added to the pipeline, which you see in the code immediately following the IsDevelopment if/then block.
Notice that the routing is now specified in the Startup class, and default values (such as “Home” and “Index”) can be supplied. It’s important to note that routes are inspected in order of appearance, and the first match will be acted upon.
Error-Handling Example
A good example of error handling and the “development versus production” environment can be experienced by running the code as is. When you do, and when you attempt to register, you get an error, as shown in Figure 5-2.
Figure 5-2. Error message when not in development environment
Thankfully, the screen does instruct the developer. But notice that there is no clue as to what the error is. Again, in the new world of .NET, it is on you, the developer, to handle everything.
export ASPNETCORE_ENVIRONMENT=Development
Now when we attempt to register, we receive the error, shown in Figure 5-3.
Figure 5-3. Same error, but in development environment
Notice how much more detail we receive, as well as a button to resolve the issue. Certainly we’d never want this in production, but in development this is a huge benefit.
Clicking the Apply Migrations button solves the problem, as shown in Figure 5-4.
Figure 5-4. Successful login
You can get insight into what happens when you change the environment and set up your own environments or rules by looking at the Tag Helpers in the file /Views/Shared/_Layout.cshtml:
<environmentnames="Development"> <linkrel="stylesheet"
href="~/lib/bootstrap/dist/css/bootstrap.css" /> <linkrel="stylesheet"href="~/css/site.css" /> </environment>
<environmentnames="Staging,Production"> <linkrel="stylesheet"
href="https://ajax.aspnetcdn.com/
ajax/bootstrap/3.3.6/css/bootstrap.min.css" asp-fallback-href="~/lib/bootstrap/ dist/css/bootstrap.min.css"
asp-fallback-test-class="sr-only" asp-fallback-test-property="position" asp-fallback-test-value="absolute" /> <linkrel="stylesheet"
Startup Conventions and Environments
An ASP.NET Core application is bootstrapped by calling the Startup class by default. This
convention, however, has extensions that you can use to your benefit. Any class following the pattern Startup{EnvironmentName} (e.g., StartupDevelopment) is called instead when the value in the
environment variable ASPNETCORE_ENVIRONMENT matches. If you have large differences between development and production, for example, then this convention is a cleaner solution versus using a long If-Then construct.
Another option is to keep the Startup class and instead use environment-defined Configure and ConfigureServices methods. These are called based on name in a similar fashion, with the
conventions being Configure{EnvironmentName} and Configure{EnvironmentName}Services (e.g., ConfigureStaging and ConfigureStagingServices).
Chapter 6. Creating a RESTful
Microservice
RESTful services are commonplace—that’s not news. As ubiquitous as they are, the emerging trend of microservices is once again bringing this technology into the discussion.
While there is no set-in-stone definition of what a microservice is, there seems to be general agreement that a microservice has the following characteristics:
Does one and only one thing Is owned by a small team Is very small and performant
Can be swapped out with zero impact
ASSOCIATED SOURCE CODE The source code can be found in the /NetOnLinuxBook/HelloMvcApi/ directory.
RESTful Microservices
In .NET, you create a RESTful microservice using much of the same techniques and technologies as when building an MVC website. The key difference is that you code the routes and HTTP verb handling in your controller class. The following is an example of a RESTful microservice with one function: to return a list of products. Note that in a real-life situation you’d probably pull the
information from a data store. Here is the ProductsController.cs class:
usingSystem.Collections.Generic;
publicIEnumerable<Product> Get()
Near the beginning of the code, you’ll notice that the MVC component is included. This provides the necessary support for routing.
Inspecting the Program.cs class, which runs the microservice, we see that it appears very familiar— in fact, it looks exactly like the ASP.NET MVC program in the previous chapters:
usingSystem.IO;
A look into the Startup.cs class reveals the JSON formatter as well as installation of MVC services:
{
loggerFactory.AddConsole(LogLevel.Debug); app.UseMvc();
} } }
As you can see, there’s not much involved in a simple microservice such as this. Granted, you would add logging, datastore access, and some more robust error handling, but this gives you the basic idea. One could have a minimum viable product (MVP) ready in a few minutes or hours. This is the allure of microservices, and .NET is a ready player in this area now.
A dotnet restore followed by a dotnet run will start this microservice. Notice how quickly it builds— one of the benefits of using a microservice. Because we’re running in a VM using the Red Hat
CDK, we can open a browser window and point it to:
http://10.1.2.2:5000/products
to see these results:
[
Chapter 7. Using Entity Framework Core
Entity Framework (EF) is now Entity Framework Core. While it is a separate project from the .NET framework, it is being developed in concert with the new framework. As such, it has some changes from the previous version, and is truly a version 1.0—not an update. Because of this, some parts are initially missing as the rewrite takes place. Rest assured that it will continue to grow and expand. EF started with version 3.5, with the initial version and version 4 both being a part of the larger .NET framework. This resulted in lengthy release cycles, both for new features and bug fixes.
With versions 4.1 through 5, the core components of EF were included with the .NET framework, while new components were made available from NuGet. This separation meant faster bug fixes and the freedom to add features outside of the .NET framework.
With version 6 through 6.2, the entire EF runtime is available from NuGet, with tooling (i.e., add-ins for Visual Studio) available from the Visual Studio Download Center.
EF 7 became EF Core 1.0, with all the bits available via NuGet. Additionally, now that it’s open source, the source code and all development-related conversations (issues, pull requests, comments) are now stored at the GitHub repo.
Documentation is available at the EF project documentation website.
ASSOCIATED SOURCE CODE
The source code can be found in the /NetOnLinuxBook/MusicStore/samples/MusicStore/ directory.
Adding EF Is Easy
To explore EF, we’ll use the code from the GitHub repo associated with this book. After cloning or downloading the code, the code for this chapter can be found in the directory /book/MusicStore, which is a modified version of the ASP.NET example Music Store app.
While the Program.cs file is very similar to what we’ve seen before, and unremarkable, the
Startup.cs file has some noteworthy changes.
In the previous chapter, the various startup configuration options were described, including being able to use different Configure and ConfigureServices methods. In the MusicStore example, we see that concept put into practice. Notice the following four methods in the Startup.cs file:
publicvoidConfigureDevelopment(IApplicationBuilderapp
publicvoidConfigureStaging(IApplicationBuilderapp, ILoggerFactoryloggerFactory)
publicvoidConfigureProduction(IApplicationBuilderapp, ILoggerFactoryloggerFactory)
publicvoidConfigure(IApplicationBuilderapp)
As mentioned in Chapter 4, you can determine which of these four methods—exclusive of the other three—is called when the application starts by setting the value of the environment variable
ASPNETCORE_ENVIRONMENT. Values of Development, Staging, Production, or null will call the methods in the previous example, respectively.
Note that the method Configure is called at the end of each of these environment-specific methods. The code specific to each environment is executed before the general configuration is called. If the environment variable is not set, the code defaults to executing only the Configure method.
EF Core introduces InMemory databases, which are ephemeral datastores that are excellent for testing, especially during the early stages of development. Using an InMemory database is as simple as the following .UseInMemoryDatabase() method example from the Startup.cs file:
if (_platform.UseInMemoryStore) options.UseSqlServer(Configuration[
StoreConfig.ConnectionStringKey.Replace("__", ":")])); }
In this example, if the operating system doesn’t support SQL Server, the system will default to using the InMemory database. Note that SQLite is also supported by EF.
The EF Command
Entity Framework has its own set of commands, based on the dotnet ef command. Some commands of note are:
dotnet ef database update
This allows you to perform database migrations. dotnet ef dbcontext list
dotnet ef dbcontext scaffold
Perhaps the most powerful command in the EF toolbox, this allows you to create code and inject it as required based on an existing schema or table. By supplying the connection string and
provider, you can insert code and create the underlying tables.
Other New Parts
This is not an exhaustive list, but other new parts include:
Nonrelational databases are now supported in EF, including some LINQ operations for NoSQL. Support for Redis is promised.
SQLite is supported, as well as PostgreSQL and Azure Table Stores. Support for MySQL is coming.
A list of database providers can be found at the database providers documentation web page. Caching and batch updates have been improved, resulting in performance increases of about 80 percent. Out of the box, and without any special programming, updates are batched (where possible) and sent as one command.
Chapter 8. Creating a Standalone
Application
Up until this point, all of the applications we’ve built require .NET to be installed on your Linux machine. But what if you want to distribute your application to other machines that may not have .NET installed? Or what if you need to guarantee which version of .NET is used to run your application?
The previous examples all built “portable” applications, which are simply DLLs that can be run on any machine with .NET Core installed.
Yes, any machine—be it Linux, OS X, or Windows—as long at it has the proper version of .NET Core installed.
But a standalone application means just that: the application is copied to the machine and runs—no other installations required.
ASSOCIATED SOURCE CODE The source code can be found in the /NetOnLinuxBook/HelloWebStandalone/ directory.
Creating the Application
To start, switch to the directory HelloWebStandalone (from the repo you cloned or downloaded in
Chapter 3). The content of the directory is the same as the “HelloWeb” application, with one small change. The file project.json has been altered:
{
"buildOptions": { "emitEntryPoint": true, "debugType": "portable" },
"dependencies" : {
"Microsoft.NETCore.App": { "version": "1.0.0"
},
"Microsoft.AspNetCore.Server.IISIntegration": "1.0.0", "Microsoft.AspNetCore.Server.Kestrel": "1.0.0" },
"frameworks": { "netcoreapp1.0": { "imports": [
"portable-net45+wp80+win8+wpa81+dnxcore50" ]
} } }
Under dependencies, you can see that the type: platform entry has been removed for
Microsoft.NETCore.App. This tells the compiler not to assume that the .NET framework is present. In turn, when the application is built, it will put the framework files where necessary, as you’ll see. Notice the addition of the runtimes section, with the value rhel.7.2-x64. This tells the compiler to build for this runtime. You can have more than one value listed here, and other valid values include win10-x64, centos.7.1-x64, osx.10.11-x64, and many more. A complete list of valid Runtime
Identifiers (RIDs) can be found at the RID catalog web page.
The Debug Build
With these small changes in place, the standalone application is built for debugging using the following commands:
dotnet restore
dotnet build rhel.7.2-x64
This builds a debug version of your application, dropping it in the
./bin/Debug/netcoreapp1.0/HelloWebStandalone subdirectory. To run it, simply move to the subdirectory and run ./HelloWebStandalone. Now listening on: http://*:5000<br>Application started. Press Ctrl+C to shut down.
The Release Build
After testing and debugging, you can prepare the release version by running dotnet publish c release -r -rhel.7.2-x64, which puts the application and all the necessa-ry .NET files into the
./bin/release/netcoreapp1.0/HelloWebStandalone subdirectory. If you view the contents of this subdirectory, you’ll see a lot of files, including all the DLLs necessary to run .NET.
Chapter 9. Visual Studio Code
In April 2015, Microsoft announced the availability of Visual Studio Code (VS Code), a free code editor that runs on every platform, including Windows, OS X, and Linux. While Visual Studio remains Windows-only, VS Code reflects Microsoft’s commitment to open source, specifically to making it easier for .NET developers to be productive in any environment.
Installing Visual Studio Code
VS Code requires a UI environment to work. If you are running Linux as a VM in a console-only environment, you won’t be able to use VS Code in Linux. However, if you are running Gnome or some other desktop shell, you can run VS Code.
USING A VISUAL EDITOR FROM OUTSIDE THE VM
You can edit code that resides inside your VM from outside the VM, with VS Code or even
Visual Studio, provided the host is running a GUI such as Windows or OS X. The short version of how you do this is that you share a volume between the host and the VM and put the code there. For more details, refer to Chapter 10.
VS Code supports multiple languages, with code assistance (e.g., IntelliSense) and navigation for each. C#, JavaScript, TypeScript, Node.js, as well as support for just about every other language is available. This is because VS Code is built on the Electron engine, the same editor base that is used for the Atom editor.
(The fact is, you can use Electron to build any cross-platform application. It’s HTML, JavaScript, and CSS.)
To begin, visit the Visual Studio Code home page and download and install the version for your operating system.
Note that VS Code will not automatically update on Linux, so you need to check for updates and install them manually.
VS Code relies on Node.js for a lot of functionality, so installing Node.js is recommended.
Launching VS Code
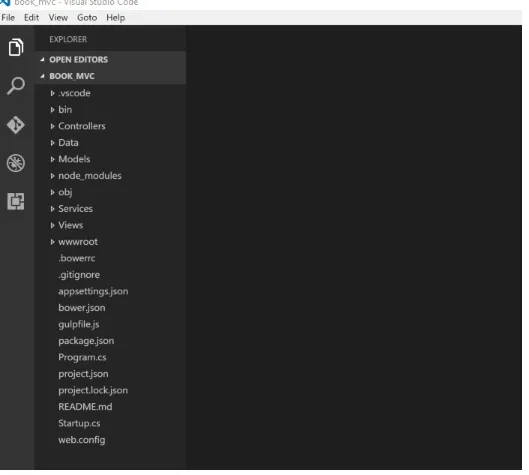
You can launch VS Code as you would any other desktop application by double-clicking the icon. In addition, a more useful way to open VS Code is from the command line, with a command that will open a tree view of your entire project.
As an example, open a bash terminal session and move into a project, such as the ASP.NET MVC application from Chapter 4. Next, launch the VS Code editor using the code . command, as shown in
Figure 9-1.
Figure 9-1. Visual Studio Code launched using the code . command
VS Code will launch with your directory structure in a tree view, allowing you to move through and around your project much like you’ve done if you have ever used Visual Studio. Notice in Figure 9-1
the five icons on the left side of the application window—that vertical part is known as the view bar. They are shown and described in Figures 9-2 through 9-6.
Clicking on the icon shown in Figure 9-3 will toggle the visibility of the tree view.
Figure 9-3. Search
Clicking on the icon shown in Figure 9-4 opens the search and replace prompt.
Figure 9-4. Git integration
Clicking on the icon shown in Figure 9-5 opens the git integration panel.
Figure 9-5. Debugging
Clicking on the icon shown in Figure 9-6 opens the debugging panel, which includes the ability to launch the program from within VS Code.
Figure 9-6. Extension manager
Clicking on this icon opens the extension manager. You can view your current extensions (C# support is an extension), update your existing extensions, and add and/or remove extensions. Because VS Code is built on Electron, there are hundreds of extensions, including other languages.
Extensions can also be managed from the command line with the following commands:
code --list-extensions code --install-extension code --uninstall-extension
Note that Visual Studio extensions (.vsix files) are not compatible with VS Code.
Chapter 10. Editing from Windows
Running Linux in a VM is a great solution for Windows developers who prefer to stay in their
Windows development environment. Whether the VM runs on your local machine or in the cloud, you can use it to develop .NET code while keeping your Windows desktop environment undisturbed. If you are running Linux in a “headless” configuration, that means you don’t have access to a UI for the OS. While you can edit code using vi, one of Linux’s command line–based editors, it doesn’t support IntelliSense, color coding, tree views of projects, and various other features. In short, it is quite the suboptimal environment.
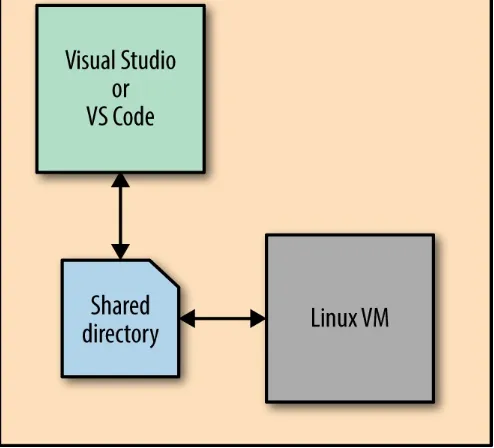
Wouldn’t it be great if you could open VS Code or Visual Studio and edit the code on your Linux VM? Well, you can. You can keep and run your code in Linux while, at the same time, editing it from Visual Studio or VS Code running in Windows.
Figure 10-1. Edit your Linux code from the Windows desktop
Within your Windows desktop environment, run your editor (any editor will work; we’ll assume you’re using VS Code) and point it to a folder that is shared between your Windows host and the Linux VM. Any changes on either side are reflected on the other, as you would expect.
FOLDERS VERSUS DIRECTORIES
In this chapter, “folder” is used when discussing the Windows environment, and “directory” is used when discussing the Linux environment. These seem to be the standard terms for these environments.
The Key: Sharing
folder can be found by searching the Red Hat Customer Portal.
Using the Red Hat Container Developer Kit (CDK), found at the CDK download page, setting up a shared folder/directory is simple and takes just five steps
Step 1: Create a Share on Your Windows PC
We’ll be using the command line to create and share a folder in Windows, so open Powershell using the “Run as Administrator” option.
For this example, we’ll keep it simple and put a share directly off the root of the C drive. Create a folder, giving it any name; we’ll use “LinuxShare”.
NEW-ITEM C:\SharedWithVM-typedirectory
PowerShell will verify the new folder:
Directory:C:\
Mode LastWriteTime LengthName
- --
----d--- 8/8/2016 3:59PM SharedCode
Step 2: Share the Folder
Now that the folder is created, use the following command to create a Windows shared folder:
New-SmbShare
-NameShareWithVM
-PathC:\ShareWithVM
-FullAccess Username
Replace Username with your Windows username.
Step 3: Share the Folder with Your Linux VM
Because we’re using Vagrant (as part of the Red Hat CDK), you can share the folder between Windows and Linux by adding the following entry to your Vagrantfile:
synced_folder "\\ShareWithVM", "/sharewithvm",
type: "smb",
smb_username: "username", smb_password: "password"
Step 4: Restart the VM
With the changes made, enable them by restarting your VM:
vagrantreload
Step 5: Move into the VM and View the Directory
Next, ssh into the VM:
vagrantssh
Finally, you can view the contents of the shared directory:
ls /sharewithvm
Now, anything you place into this directory is available from both the Linux VM and your Windows desktop. Open Visual Studio or VS Code and you will be able to edit your code.
Chapter 11. “Off-Road” Debugging
When I first heard about debugging .NET on Linux from Visual Studio, I was both excited about the idea and curious about how it was done. What I didn’t wonder about at the time was what it was called. It wasn’t too long, however, before I heard it called “off-road debugging” and fell in love with the term.
After all, this is certainly “off the beaten path” when it comes to debugging. At the time of writing (August 2016), this is most definitely not a point-and-click procedure. In fact, there are five steps to get started—although after the initial setup, it’s rather simple and fast for future debugging. Once a VM is configured to allow off-road debugging, adding this feature to a project is one step to configure and one command to launch.
I have no insight, but I wouldn’t be surprised if this isn’t folded into a future release of .NET tooling.
ASSOCIATED SOURCE CODE The source code can be found in the /NetOnLinuxBook/HelloMvcApi/ directory.
Installation and Configuration
Because this feature is not built into the current .NET tooling, we’ll need to install and configure it. It takes six steps, but the first four steps are done only once per VM; the final two steps are done once for each project. This way, once you’ve set things up, it just takes a quick configuration in your project and you’re ready to debug from inside Visual Studio.
Step 1: Enable Visual Studio on Windows
You need Visual Studio 2015 Update 2 or newer to enable debugging. Any version works, including the no-charge Community Edition.
MIDebugEngine is the Windows-side executable that talks to the Linux-side application. To enable MIDebugEngine you need to enable C++ iOS development:
1. Open the Programs and Features applet in the Control Panel.
2. Right-click on Microsoft Visual Studio 2015 and select the Change option. 3. When the dialog box appears, select the Modify button.