Oracle® Fusion Middleware
Administrator's Guide for Authorization Policy Manager
11
g
Release 1 (11.1.1)
E14431-01
Copyright © 2003, 2010, Oracle and/or its affiliates. All rights reserved.
Primary Author: Carlos Subi
Contributing Author:
Contributor: Josh Brunaugh, Akila Natarajan, Sanatan Sahgal, Peter Seo, Vinay Shukla, Nigel Smith, Sanjeev Topiwala, Sivakumar Venugopal, Roger Wigenstam.
This software and related documentation are provided under a license agreement containing restrictions on use and disclosure and are protected by intellectual property laws. Except as expressly permitted in your license agreement or allowed by law, you may not use, copy, reproduce, translate, broadcast, modify, license, transmit, distribute, exhibit, perform, publish, or display any part, in any form, or by any means. Reverse engineering, disassembly, or decompilation of this software, unless required by law for interoperability, is prohibited.
The information contained herein is subject to change without notice and is not warranted to be error-free. If you find any errors, please report them to us in writing.
If this software or related documentation is delivered to the U.S. Government or anyone licensing it on behalf of the U.S. Government, the following notice is applicable:
U.S. GOVERNMENT RIGHTS Programs, software, databases, and related documentation and technical data delivered to U.S. Government customers are "commercial computer software" or "commercial technical data" pursuant to the applicable Federal Acquisition Regulation and agency-specific supplemental regulations. As such, the use, duplication, disclosure, modification, and adaptation shall be subject to the restrictions and license terms set forth in the applicable Government contract, and, to the extent applicable by the terms of the Government contract, the additional rights set forth in FAR 52.227-19, Commercial Computer Software License (December 2007). Oracle USA, Inc., 500 Oracle Parkway, Redwood City, CA 94065.
This software is developed for general use in a variety of information management applications. It is not developed or intended for use in any inherently dangerous applications, including applications which may create a risk of personal injury. If you use this software in dangerous applications, then you shall be responsible to take all appropriate fail-safe, backup, redundancy, and other measures to ensure the safe use of this software. Oracle Corporation and its affiliates disclaim any liability for any damages caused by use of this software in dangerous applications.
Oracle is a registered trademark of Oracle Corporation and/or its affiliates. Other names may be trademarks of their respective owners.
Contents
Preface
... xiAudience... xi
Documentation Accessibility ... xi
Related Documentation ... xii
Conventions ... xii
1
Introduction to Oracle Authorization Policy Manager
1.1 Audience and Prerequisites... 1-1 1.2 What Is Authorization Policy Manager? ... 1-2 1.3 The Big Picture ... 1-2 1.3.1 Installing and Configuring Authorization Policy Manager ... 1-3 1.3.1.1 Installation ... 1-3 1.3.1.2 High Availability ... 1-3 1.3.1.3 Single Sign-On... 1-3 1.3.1.4 SSL ... 1-3 1.3.1.5 Loggers... 1-4
2
The OPSS Authorization Model
2.1 The Basic Security Artifacts ... 2-1 2.3.3.3 Permission and Entitlement ... 2-4 2.3.4 Application Policy ... 2-5 2.3.5 Role Categories... 2-5
3
Getting Started with Oracle Authorization Policy Manager
3.5 Online Help... 3-5 3.6 Some Frequently Used Operations... 3-6
4
Querying Security Artifacts
4.1 Searching External Roles... 4-1 4.2 Searching Application Roles ... 4-2 4.3 Searching Application Resource Types ... 4-4 4.4 Searching Application Resources ... 4-5 4.5 Searching Application Entitlements... 4-7 4.6 Searching Application Policies... 4-9 4.6.1 Finding Application Policies that Match Entitlements or Resources... 4-9 4.6.2 Finding Application Policies that Match Principals ... 4-9 4.7 Reusing Search Parameter Values ... 4-10
5
Managing Security Artifacts
5.1 Managing Application Security Artifacts... 5-1 5.1.1 Managing Application Roles... 5-2 5.1.1.1 Creating a Role... 5-2 5.1.1.2 Modifying a Role ... 5-3 5.1.2 Managing Application Resource Types ... 5-4 5.1.2.1 Creating a Resource Type... 5-4 5.1.2.2 Modifying a Resource Type ... 5-5 5.1.3 Managing Application Resources ... 5-5 5.1.3.1 Creating a Resource... 5-5 5.1.3.2 Modifying a Resource ... 5-6 5.1.4 Managing Application Entitlements... 5-6 5.1.4.1 Creating an Entitlement... 5-6 5.1.4.2 Modifying an Entitlement ... 5-7 5.1.5 Managing Application Policies... 5-8 5.1.5.1 Creating a Policy... 5-8 5.1.5.2 Modifying a Policy ... 5-9 5.1.6 Managing Application Role Categories ... 5-10 5.2 Viewing the External Role Hierarchy ... 5-10 5.3 Managing the Application Role Hierarchy ... 5-11 5.3.1 Roles that an Application Role Inherits... 5-11 5.3.2 Roles that Inherit an Application Role ... 5-12 5.4 Mapping Application Roles to an External Role ... 5-12 5.5 Mapping External Roles to an Application Role ... 5-13
6
Delegated Administration
6.2.3 Managing the External Roles Mapped to a Delegated Administrator ... 6-3
7
Customizing the User Interface
7.1 Customizing Authorization Policy Manager... 7-1 7.2 Customizing Headers, Footers, and Logo... 7-2 7.3 Customizing Color Schemes ... 7-3 7.4 Customizing the Login Page ... 7-3
8
Internationalization
8.1 Language Support... 8-1
A
Using an OpenLDAP Identity Store
A.1 Using an OpenLDAP Identity Store... A-1
B
Troubleshooting Oracle Authorization Policy Manager
B.1 Unable to Login ... B-1 B.2 Need Further Help? ... B-1
Preface
This guide explains the features, configuration, and use of Oracle Authorization Policy Manager, a tool to manage global and application security artifacts.
This preface addresses the following topics:
■ Audience
■ Documentation Accessibility
■ Related Documentation
■ Conventions
Audience
The intended audience of this guide are security administrators.
Documentation Accessibility
Our goal is to make Oracle products, services, and supporting documentation accessible to all users, including users that are disabled. To that end, our
documentation includes features that make information available to users of assistive technology. This documentation is available in HTML format, and contains markup to facilitate access by the disabled community. Accessibility standards will continue to evolve over time, and Oracle is actively engaged with other market-leading
technology vendors to address technical obstacles so that our documentation can be accessible to all of our customers. For more information, visit the Oracle Accessibility Program Web site at http://www.oracle.com/accessibility/.
Accessibility of Code Examples in Documentation
Screen readers may not always correctly read the code examples in this document. The conventions for writing code require that closing braces should appear on an
otherwise empty line; however, some screen readers may not always read a line of text that consists solely of a bracket or brace.
Accessibility of Links to External Web Sites in Documentation
This documentation may contain links to Web sites of other companies or
Oracle Support at 1.800.223.1711. An Oracle Support Services engineer will handle technical issues and provide customer support according to the Oracle service request process. Information about TRS is available at
http://www.fcc.gov/cgb/consumerfacts/trs.html, and a list of phone numbers is available at http://www.fcc.gov/cgb/dro/trsphonebk.html.
Related Documentation
Information about security administration is also found in the following documents:
■ Oracle Fusion Middleware Administrator's Guide
■ Oracle Fusion Middleware Application Security Guide
■ Oracle Fusion Middleware Security and Administrator's Guide for Web Services
■ Oracle Fusion Middleware Administrator's Guide for Oracle Internet Directory
For a comprehensive list of Oracle documentation or to search for a particular topic within Oracle documentation libraries, see
http://www.oracle.com/technology/documentation/index.html.
Conventions
The following text conventions are used in this document:
Convention Meaning
boldface Boldface type indicates graphical user interface elements associated with an action.
italic Italic type indicates book titles, emphasis, terms defined in text, or placeholder variables for which you supply particular values.
1
1
Introduction to Oracle Authorization Policy
Manager
Oracle Authorization Policy Manager is graphical interface tool to manage application authorization policies. This chapter describes the basic functionality of this tool in the following sections:
■ Audience and Prerequisites
■ What Is Authorization Policy Manager?
■ The Big Picture
1.1 Audience and Prerequisites
The intended users of Authorization Policy Manager are security administrators.
Authorization Policy Manager requires that:
■ The domain policy store be LDAP-based; the only supported policy store type is
Oracle Internet Directory. Before using Authorization Policy Manager, make sure that the policy store has been reassociated to an Oracle Internet Directory. For details on reassociating the domain policy store, see Oracle Fusion Middleware Application Security Guide.
■ The domain identity store be LDAP-based; supported identity store types are:
– Oracle Internet Directory
– Oracle Virtual Directory
– WebLogic EmbeddedLDAP
– Sun Java System Directory Service version 6.3
– Active Directory 2003, 2008
– Novell eDirectory 8.8
– OpenLDAP 2.2. For the special configuration required for this type, see Appendix A, "Using an OpenLDAP Identity Store."
– Tivoli Directory Server
For information about Oracle Fusion Middleware Certification and Supported Configurations, visit
Applications whose policies are managed with Authorization Policy Manager are assumed to use Oracle Platform Security Services for authorization. For details about integrating an application with these services, see Oracle Fusion Middleware Application Security Guide.
1.2 What Is Authorization Policy Manager?
A security administrator can use WLST commands or Fusion Middleware Control to manage application policies. On the one hand, using WLST command requires manually running commands; on the other hand, even though Fusion Middleware Control offers a graphical user interface, it is a rather complex tool that requires that the administrator work with low-level security artifacts and know names and concepts familiar to, typically, only developers (such as permission class names or task-flow names, for example).
Authorization Policy Manager greatly simplifies the creation, configuration, and administration of application policies over those two other tools by offering:
■ User-friendly names and descriptions of security artifacts; for details, see
Chapter 2, "The OPSS Authorization Model."
■ A way to organize application roles by business, product, or any other parameter
specific to an application; for details, see Section 2.3.5, "Role Categories."
■ A uniform graphic interface to search, create, browse, and edit security artifacts;
for details, see Chapter 4, "Querying Security Artifacts," and Chapter 5, "Managing Security Artifacts."
■ A way to specify a subset of applications that a role can manage; for details, see
Chapter 6, "Delegated Administration."
1.3 The Big Picture
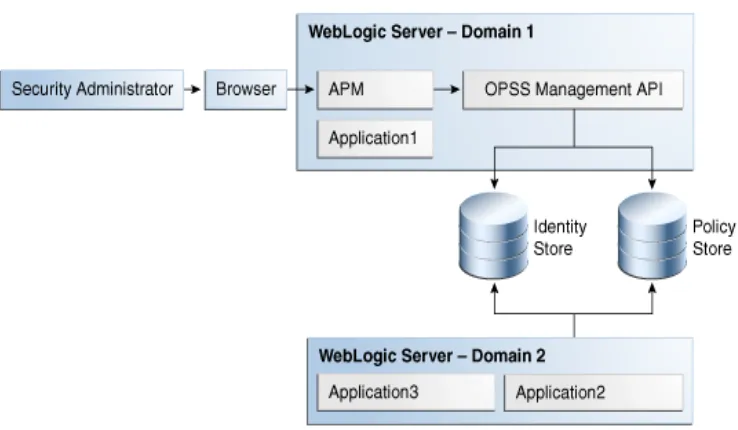
Figure 1–1 illustrates how a security administrator accesses Authorization Policy Manager, and how the tool communicates with the domain policy and identity stores within the context of Oracle WebLogic server.
That figure also illustrates the fact that Authorization Policy Manager can access policies (and identities) of application deployed in a different domain to that in which Authorization Policy Manager is deployed, provided that those other domains point to the same policy and identity store. Authorization Policy Manager uses OPSS
The Big Picture
Figure 1–1 APM Deployed in a WebLogic Domain
Authorization Policy Manager does not support the management of users and external roles; these artifacts can only be viewed with the tool. Their provision and
management is typically accomplished using Oracle Identity Manager. Changes to the identity store are immediately visible in Authorization Policy Manager.
1.3.1 Installing and Configuring Authorization Policy Manager
This section provides links to other documentation that describe the following topics:
■ Installation
■ High Availability
■ Single Sign-On
■ SSL
■ Loggers
1.3.1.1 Installation
For details about installing Authorization Policy Manager, see Oracle Fusion Middleware Installation Guide for Oracle Identity Management.
1.3.1.2 High Availability
For details about high availability for Authorization Policy Manager, see Oracle Fusion Middleware High Availability Guide.
1.3.1.3 Single Sign-On
Oracle Access Manager 11g can be used to configure SSO between OIM and
Authorization Policy Manager. For details, see Oracle Access Manager Integration Guide.
1.3.1.4 SSL
SSL. These settings are similar to those of any other application running in the Oracle WebLogic server.
For details about configuring SSL in Oracle Fusion Middleware applications when OHS is not being used, see chapter 12 in Oracle Fusion Middleware Securing Oracle WebLogic Server.
For details about configuring SSL in Oracle Fusion Middleware applications when OHS is being used, see chapter 6 in Oracle Fusion Middleware Administrator's Guide.
1.3.1.5 Loggers
2
2
The OPSS Authorization Model
This chapter describes the OPSS authorization model and the security objects used in the model. These objects, which a security administrator can manage with Oracle Authorization Policy Manager, are explained in the following sections:
■ The Basic Security Artifacts
■ External Roles
■ The Policy Model
The terms defined in this chapter are used in the Authorization Policy Manager user-interface and throughout this guide.
2.1 The Basic Security Artifacts
An application stripe is a logical subset of the domain policy store where the application policies are kept. Unless specified otherwise, the application stripe name is derived from the application display name: an application with display name
appName(version) has application stripe name appName#vers. An application stripe can be shared by several applications.
The first distinction among security artifacts accessible with Authorization Policy Manager is between global and application-specific artifacts.
Global artifacts include users, external roles, and system policies and they apply to all application stripes. Even though system policies are stored in the domain policy store, in this release, Authorization Policy Manager does not support viewing or managing system policies. System policies are instead managed with Fusion Middleware Control, as explained in Oracle Fusion Middleware Application Security Guide.
Application-specific artifacts include the resource catalog, application policies, application roles, and role categories, and they apply to just an application stripe.
2.2 External Roles
An external role is a collection of users and other groups. The term external role is often synonymous with the terms enterprise role or enterprise group, and it is typically
implemented as LDAP groups in the identity store. Similar to other kind of roles, external roles can be structured hierarchically.
2.3 The Policy Model
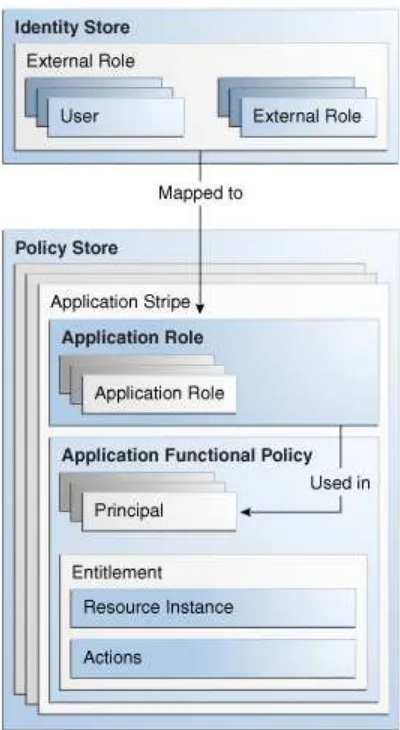
Figure 2–1 illustrates the logical model of an application policy. The figure does not show resource types (within entitlements), that users and external roles can also be used as principals, and that external roles can be hierarchical.
Figure 2–1 Application Policy Logical Model
The components and details of an application stripe are explained in the following sections:
■ Application Role
■ Principal
■ The Resource Catalog
– Resource Type
– Resource
The Policy Model
– Permission and Entitlement
■ Application Policy
■ Role Categories
2.3.1 Application Role
An application role is a collection of users, groups, and other application roles; it can be hierarchical. Application roles are defined by application policies and not necessarily known to a JavaEE container. Application roles can be many-to-many mapped to external roles. For example, the external group employee (stored in the identity store) can be mapped to the application role helpdesk service request (in one stripe) and to the application role self service HR (in another stripe).
2.3.2 Principal
A principal is the identity to which the authorization in the policy is granted. A
principal can be a user, an external role, or an application role. Most frequently, it is an application role.
2.3.3 The Resource Catalog
The resource catalog comprises resource types, resources, actions, and entitlements.
2.3.3.1 Resource Type
A resource type represents the type of a secured artifact. UI artifacts, such as ADF Taskflows, pages, buttons, fields, web services, reports, URLs, and scheduled jobs, are examples of resource types. Essentially, a resource type is a template for creating resources.
A resource type is associated with one Java class (the matcher class) that describes the actions that can be invoked on instances of the resource type and that must implement the class java.security.Permission. For example, for the resource type ADF Taskflow, the permission class allows Viewing or Customizing task-flows.
The following points apply to the specification of a resource type:
■ The name is required and case insensitive.
■ The matcher class name is required and case insensitive. Typically, the matcher
class is the provided OPSS ResoucePermission class, although it can be a custom class. No two distinct resource types can specify the same matcher class
unless it is the class ResourcePermission. For further details about this class, see Oracle Fusion Middleware Application Security Guide.
■ The description string is optional and case insensitive.
■ The display name is optional and case insensitive. Specifying a meaningful display
name is recommended since it is displayed in Oracle Authorization Policy Manager, and it provides extra information that helps security administrators identify artifacts.
■ The list of actions is optional, case sensitive, and can be empty. An empty action
For details about creating a resource type, see Section 5.1.2, "Managing Application Resource Types."
An action is tied to a resource type and defines an operation allowed on a resource. The matcher class associated with a resource type typically describes the list of actions for the resource type. The following are some examples of actions on resources:
■ Get or post, on a URL.
■ Read, write, copy, edit, or delete, on a file.
■ Deposit, withdraw, view balance, view history, transfer to savings, or transfer from
savings, on a checking bank account.
2.3.3.2 Resource
A resource or resource instance is an instance of a resource type that represents a concrete resource; it defines an application resource that can be secured by a policy, such as URLs, EJBs, JSPs. At runtime, the application passes the resource name to have permissions checked to determine whether a principal is authorized.
A resource requires an associated resource type, and it can exist independent of entitlements. Note the following points about the case sensitivity of the various strings in a resource specification:
■ The name is required and case sensitive. At runtime, this is the name that the
application passes to the have permissions checked to determine whether a user is authorized.
■ The description is optional and case insensitive.
■ The display name is required and case insensitive. Specifying a meaningful
display name is recommended since it is displayed in Oracle Authorization Policy Manager, and it provides extra information that helps security administrators identify artifacts.
For details about creating a resource, see Section 5.1.3, "Managing Application Resources."
2.3.3.3 Permission and Entitlement
A permission aggregates a class, resources, and, for each resource, a subset of the actions allowed by the type of the resource.
An entitlement or permission set represents a small set of resources and privileges needed to perform a task, that is, it groups related resources, possibly of different types, needed to perform a business function. Entitlements are reusable collections of permissions that can be granted to multiple principals.
The Policy Model
Note the following points about the case sensitivity of the various strings in an entitlement specification:
■ The name is required and case insensitive.
■ The description is optional and case insensitive.
■ The display name is required and case insensitive. Specifying a meaningful
display name is recommended since it is displayed in Oracle Authorization Policy Manager, and it provides extra information that helps security administrators identify artifacts.
For details about creating an entitlement, see Section 5.1.4, "Managing Application Entitlements."
2.3.4 Application Policy
An application policy is a functional policy that specifies a set of permissions that an entity (the grantee, a principal or code source) is allowed within an application, such as viewing web pages or modifying reports. That is, it specifies who can do what in an application.
An application policy uses:
■ Principals as grantees, and must have at least one principal (Note that, in this
release of Oracle Authorization Policy Manager, code sources are not allowed as grantees).
■ Either one or more permissions, or an entitlement, but not both. Policies that use
an entitlement are called entitlement-based policies; policies that use one or more permissions are called resource-based policies.
The application policy model is illustrated in Figure 2–1.
Authorization Policy Manager provides a rich user interface that allows security administrators to query, provision, and manage application policies. For details, see Chapter 4, "Querying Security Artifacts," and Chapter 5, "Managing Security Artifacts."
2.3.5 Role Categories
A role category is a collection of application roles. Role categories allow administrators organizing application roles in arbitrary flat collections. Role categories are not used in policy evaluations at runtime.
Role categories are independent of (and should not be confused with) the role hierarchy, which applies to both application and external roles. For details about the role
hierarchy and permission inheritance, see Oracle Fusion Middleware Application Security Guide.
3
3
Getting Started with Oracle Authorization
Policy Manager
Oracle Authorization Policy Manager user interface uses the following general operational principle: first the administrator identifies a security object (by browsing or searching), and then, once the object has been selected, he chooses one of the operations available on it.
This chapter describes the major tabs, the navigation panel, how to use the navigation panel to carry out simple queries on various artifacts, the online help system, and some frequent uses of Authorization Policy Manager.
This information is presented in the following sections:
■ The Two Major Tabs
■ The Welcome Page
■ The Navigation Panel
■ Finding Artifacts with a Simple Search
■ Online Help
■ Some Frequently Used Operations
3.1 The Two Major Tabs
Authorization Policy Manager contains the following three major tabs:
■ The Authorization Management Tab
■ The System Configuration Tab
3.1.1 The Authorization Management Tab
The Authorization Management tab is used to search and maintain security artifacts. For details, see Chapter 4, "Querying Security Artifacts," and Chapter 5, "Managing Security Artifacts."
3.1.2 The System Configuration Tab
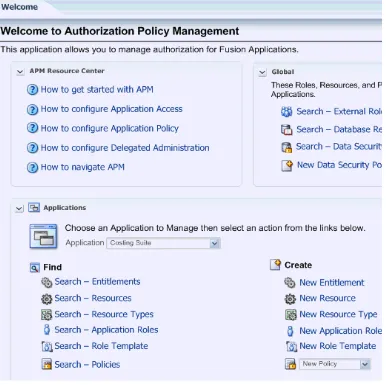
3.2 The Welcome Page
Upon a successful log in, Authorization Policy Manager displays the Welcome page, partially illustrated in Figure 3–1. This page contains is divided into the following areas:
■ The APM Resource Center area contains links to some of the most commonly
used procedures, including how to get started; configuring application access (or how to define the map between application roles and external roles), an
application policy, delegated administration; and how to navigate through the tool UI.
■ The Global area contains links to procedures that pertain artifacts shared across
all applications, including searching external roles.
■ The Applications area contains, at the top, a pull-down listing the application
stripes in the policy store used to select the stripe to manage. This area also contains links to procedures, including searching and creating entitlements, resources, resource types, application roles, and application policies.
The Navigation Panel
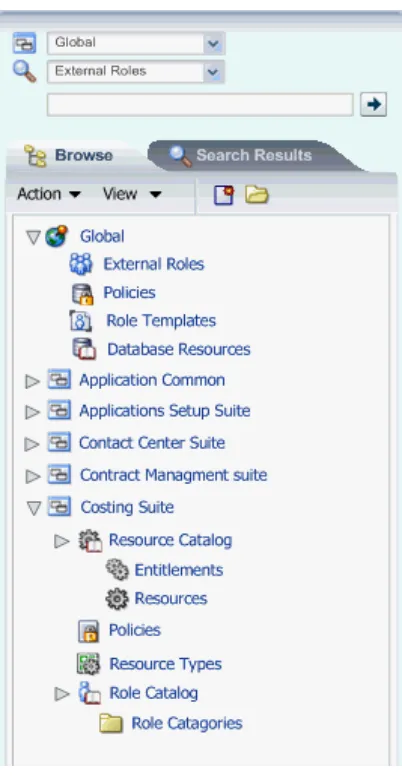
3.3 The Navigation Panel
The navigation panel help users finding security artifacts by browsing or searching. For details about using the navigation panel to search, see Finding Artifacts with a Simple Search.
The navigation panel, partially illustrated in Figure 3–2, is a collapsible and expandable panel that contains, from top to bottom, the following UI gadgets:
■ A pull-down list to select the scope of a simple search. The scope can be global or
specific to a selected application stripe.
■ A pull-down list to select the artifact to query with a simple search. When the
search scope is global, the list shows global artifacts; when specific to an application stripe, it shows application policy artifacts.
■ A text box to enter a string that the simple search should match. The string you
enter is compared against the name and display name of security artifacts, and those that match are displayed in the Search Results tab.
■ The Browse tab, which displays the following expandable and collapsible
hierarchy of nodes:
– The Global node, from where to access global artifacts such as external roles.
– One node per application stripe and to which the logged in user has access. Note that the list of applications shown depends on the logged in user. For details, see Chapter 6, "Delegated Administration."
From any of these nodes, one can access application-specific artifacts such as resource types, entitlements, resources, policies, and the role category.
■ The Search Results tab, which displays the results of the last simple search.
Note: As mentioned above, each node in the hierarchy identifies a application stripe in the domain policy store. Several applications can
share a logical stripe.
Figure 3–2 The Navigation Panel
3.4 Finding Artifacts with a Simple Search
The top of the navigation panel, shown in Figure 3–2, is used to specify simple queries. Advanced queries are also available; for details see Chapter 4, "Querying Security Artifacts."
To specify a simple search, proceed as follows:
1. Select the search scope from the pull-down list at the top of the navigation panel.
2. Select the object type to search from the pull-down list second from the top. The list of available object types varies according to the search scope selected.
If you select Resource Instance (on an application), you must also select the Resource Type from the pull-down list next to the object type box.
3. Enter a string to match in the text box, possibly using the wildcard characters % or * (the wild character matches any character in the pattern).
Online Help
4. Click the Go button to trigger the search and to display the results in the tab
Search Results, which is automatically brought to the foreground when the search is completed. Positioning the cursor on the blue information button next to an item displays the item details. The Search Results tab shows at most the first 200 matches found by the search.
5. Once an item is selected in the Search Results, it can be opened or edited by clicking Open or Edit at the top of the table.
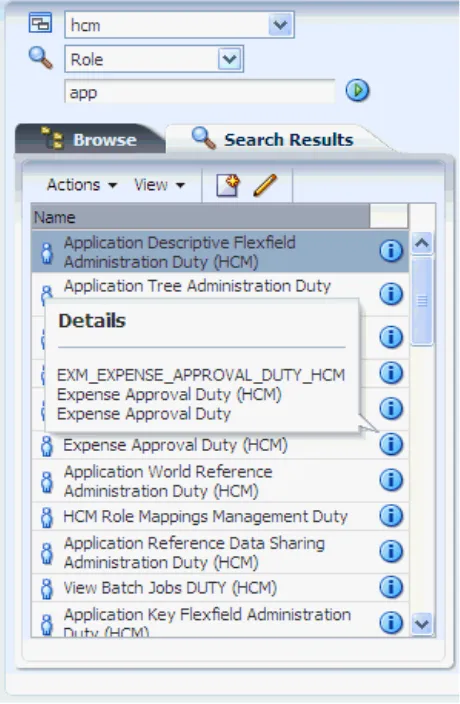
Figure 3–3 illustrates the results of a simple search on roles for an application and the details of an application role returned by the simple search.
Figure 3–3 The Search Results Tab
3.5 Online Help
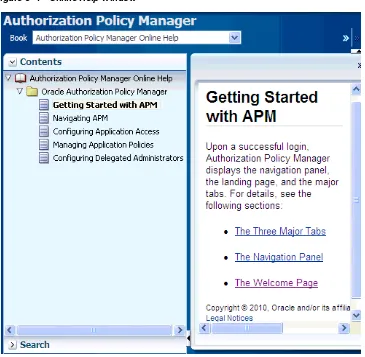
To access online help documentation, on the upper right corner of any window, click Help to bring up the help window, partially illustrated in Figure 3–4.
In this window, you can select the documentation to view by choosing an item from the pull-down Book box. Selecting Authorization Policy Manager Online Help displays several topics in the online documentation; selecting Administrator’s Guide for Authorization Policy Manager displays the table of contents of this guide.
Figure 3–4 Online Help Window
3.6 Some Frequently Used Operations
The following scenarios describe frequent uses of Authorization Policy Manager:
■ Find artifacts whose names or display names match a pattern. For details, see
Finding Artifacts with a Simple Search.
■ Given an external role, view all the application roles mapped to the external role.
For details, see Section 5.4, "Mapping Application Roles to an External Role."
■ Given an application role, view all the external roles mapped to the application
role. For details, see Section 5.5, "Mapping External Roles to an Application Role."
■ Given an application role, view the application hierarchy at the role. For details,
see Section 5.3, "Managing the Application Role Hierarchy."
■ Given an entitlement, view all application policies that use the entitlement. For
details, see Section 4.6.1, "Finding Application Policies that Match Entitlements or Resources."
■ Given a principal (that is, a user, an external role, or an application role), view all
4
4
Querying Security Artifacts
Oracle Authorization Policy Manager allows two kinds of queries over OPSS security objects: simple and advanced. Simple queries are conducted in the navigation panel of the Authorization Management tab, and they involve matching names and display names only, as explained in Section 3.4, "Finding Artifacts with a Simple Search." Advanced queries are conducted in different pages of the Authorization Management tab, and they use the operators start with, ends with, contains, and equal to, which allow specifying more sophisticated matchings.
This chapter explains how to specify advanced queries, in the following sections:
■ Searching External Roles
■ Searching Application Roles
■ Searching Application Resource Types
■ Searching Application Resources
■ Searching Application Entitlements
■ Searching Application Policies
■ Reusing Search Parameter Values
There is no support for wildcard characters in advanced queries. In particular, the characters * or % are treated as plain characters in the specification of any advanced search parameter.
4.1 Searching External Roles
To search external roles, proceed as follows:
1. Expand Global in the navigation panel to expose the External Roles under it.
2. Either double-click External Roles or select it and click Open to display the Search - External Roles tab in the Authorization Management tab.
3. In the Search area of that tab, enter the query parameters as follows:
■ Select an operator for the Name from the first pull-down list and enter a string
to match.
■ Select an operator for the Display Name from the second pull-down list and
enter a string to match.
■ Optionally, click Reset to set the parameter values to the values they had
4. Optionally, click Save... to save the current query parameters. The name of the saved collection then appears in the pull-down list Saved Search. Selecting a saved search from this pull-down list fills in the query parameters automatically with the saved values.
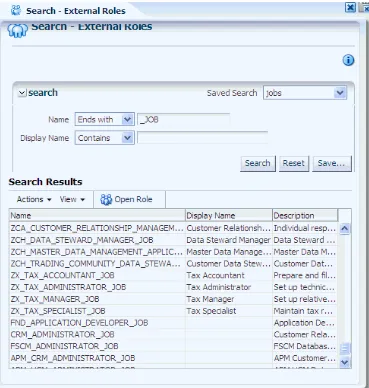
5. Click Search to trigger the search. All external roles matching the query parameters are displayed in the Search Results area.
The action at the top of this table allows viewing the details of a role (Open Role). Figure 4–1 illustrates the results of an advanced search on external roles with
previously saved query parameters (under jobs).
Figure 4–1 External Roles - Advanced Search
4.2 Searching Application Roles
To query application roles, proceed as follows:
1. Select an application in the navigation panel and expand it to expose all nodes in the hierarchy.
Searching Application Roles
3. In the Search area of that tab, enter the query parameters as follows:
■ Select an operator for the Role Name from the first pull-down list and enter a
string to match.
■ Select an operator for the Display Name from the second pull-down list and
enter a string to match.
■ Select an operator for the Category and enter a string to match.
■ Optionally, click Reset to set the parameter values to the values they had
before you entered the current values.
4. Optionally, click Save... to save the current query parameters. The name of the saved collection then appears in the pull-down list Saved Search. Selecting a saved search from this pull-down list fills in the query parameters automatically with the saved values.
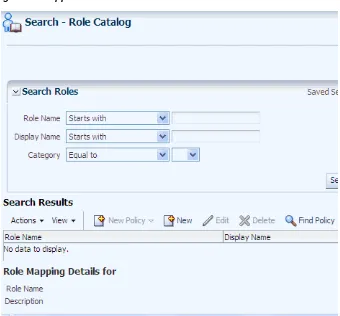
5. Click Search to trigger the search. All role categories matching the entered specifications are displayed in the table Search Results. Figure 4–2 illustrates this page.
The actions at the top of this table allow:
■ Creating a new application policy (New Policy) based on an application role
selected from the table. For details, see Section 5.1.5.1, "Creating a Policy."
■ Creating a new application role (New). For details, see Section 5.1.1.1,
"Creating a Role."
■ Modifying or deleting a role selected from the table (Open, Delete). For
details, Section 5.1.1.2, "Modifying a Role."
Deleting a role deletes the role and all roles nested in it; Authorization Policy Manager prompts for a confirmation before executing this cascading deletion. All references to a removed role are removed from application policies in the application stripe.
■ Finding the policies matching a role selected from the table (Find Policies). To
search policies that match entitlements or resources, see Finding Application Policies that Match Entitlements or Resources.
6. In addition, to modify the external roles assigned (mapped) to an application role in the Search Results table, select a role to display the area Role Mapping Details
for the selected role.
In that area, the table External Role Assignments lists the external roles mapped to the application role. The actions at the top of this table allow:
■ Adding an external role (Add External Role). ■ Removing an external role (Remove External Role).
■ Viewing an external role selected from the table (Open External Role).
Figure 4–2 Application Roles - Advanced Search
4.3 Searching Application Resource Types
To search application resource types, proceed as follows:
1. Select an application in the navigation panel and expand it to expose all nodes in the hierarchy.
2. Either double-click Resource Types or select it and click Open to display the
Search - Resource Types tab in the Authorization Management tab.
3. In the Search area of that tab, enter the query parameters as follows:
■ Select an operator for the Name from the first pull-down list and enter a string
to match.
■ Select an operator for the Display Name from the second pull-down list and
enter a string to match.
■ Select an operator for Actions and enter a string to match.
■ Optionally, click Reset to set the parameter values to the values they had
before you entered the current values.
4. Optionally, click Save... to save the current query parameters. The name of the saved collection then appears in the pull-down list Saved Search. Selecting a saved search from this pull-down list fills in the query parameters automatically with the saved values.
Searching Application Resources
The actions at the top of this table allow:
■ Creating a resource type (New) ■ Editing a resource type (Open) ■ Deleting a resource type (Delete)
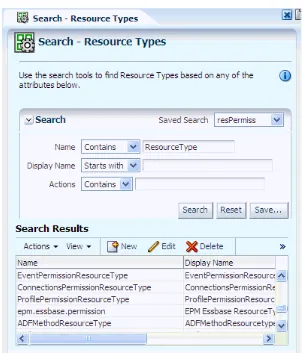
Figure 4–3 illustrates the results of an advanced search on resource types with previously saved query parameters (under resPermiss).
Figure 4–3 Resource Types - Advanced Search
4.4 Searching Application Resources
To search application resources, proceed as follows:
1. Select an application in the navigation panel and expand it to expose all nodes in the hierarchy.
2. Either double-click Resources or select it and click Open to display the Search - Resources tab in the Authorization Management tab.
3. In the Search area of that tab, enter the query parameters as follows:
■ Select an operator for the Name from the first pull-down list and enter a string
■ Select an operator for the Display Name from the second pull-down list and
enter a string to match.
■ Select an operator for the Resource Type and then select a resource type from
the pull-down list to the right. This selection is required.
■ Optionally, click Reset to set the parameter values to the values they had
before you entered the current values.
4. Optionally, click Save... to save the current query parameters. The name of the saved collection then appears in the pull-down list Saved Search. Selecting a saved search from this pull-down list fills in the query parameters automatically with the saved values.
5. Click Search to trigger the search. All resources matching the entered specifications are displayed in the table Search Results.
The actions at the top of this table allow:
■ Creating a resource (New) ■ Editing a resource (Open) ■ Deleting a resource (Delete)
■ Creating a new policy based on a resource (New Policy) ■ Finding policies that contain a resource (Find Policy) ■ Detaching the Search Results table (Detach)
Searching Application Entitlements
Figure 4–4 Resources - Advanced Search
4.5 Searching Application Entitlements
To search application entitlements, proceed as follows:
1. Select an application in the navigation panel and expand it to expose all nodes in the hierarchy.
2. Either double-click Entitlements or select it and click Open to display the Search - Entitlements tab in the Authorization Management tab.
3. In the Search area of that tab, enter the query parameters as follows:
■ Select an operator for the Name from the first pull-down list and enter a string
to match.
■ Select an operator for the Display Name from the second pull-down list and
enter a string to match.
■ Select an operator for the Resource and enter a string to match.
■ Optionally, click Reset to set the parameter values to the values they had
before you entered the current values.
saved search from this pull-down list fills in the query parameters automatically with the saved values.
5. Click Search to trigger the search. All entitlements matching the entered specifications are displayed in the table Search Results.
The actions at the top of this table allow:
■ Creating an entitlement (New) ■ Editing an entitlement (Open) ■ Delete an entitlement (Delete)
■ Creating a new policy based on an entitlement (New Policy) ■ Finding policies that contain an entitlement (Find Policy) ■ Detaching the Search Results table (Detach)
Figure 4–5 illustrates the results of an advanced search on entitlements with previously saved query parameters (under myEnts).
Searching Application Policies
4.6 Searching Application Policies
Application policies can be searched by specifying entitlements, resources, or principals to match, as explained in the following sections:
■ Finding Application Policies that Match Entitlements or Resources
■ Finding Application Policies that Match Principals
Alternative ways of finding application policies that contain an entitlement or a resource is available using the action menu Find Policy as explained in sections Searching Application Entitlements and Searching Application Resources.
4.6.1 Finding Application Policies that Match Entitlements or Resources
To query application policies that match entitlements or resources, proceed as follows:
1. Select an application in the navigation panel and expand it to expose all nodes in the hierarchy.
2. Either double-click Policies or select it and click Open to display the Search - Policies tab in the Authorization Management tab.
3. In this tab, click Function Resource to display the page where you specify parameters for entitlement and/or resource names.
4. Select an operator for the Entitlement Name from the first pull-down list and enter a string to match, and/or select an operator for the Resource Name from the second pull-down list and enter a string to match.
At least one of Entitlement Name or Resource Name must be specified.
5. Click Search to trigger the search.
6. To view all entitlement-based policies matching the specification, click
Entitlement Policies. The actions New Policy and Delete at the top of table in this area allows creating an entitlement-based policy and deleting a policy.
7. To view all resource-based policies matching the specification, click Resource Based Policies. The actions New Policy, Open, and Delete at the top of table in this area allows creating, editing, and deleting a resource-based policy.
8. To view the details of a item, linger the cursor over the information blue button.
4.6.2 Finding Application Policies that Match Principals
To query application policies that match principals, proceed as follows:
1. Select an application in the navigation panel and expand it to expose all nodes in the hierarchy.
2. Either double-click Policies or select it and click Open to display the Search - Policies tab in the Authorization Management tab.
3. In this tab, click Principal to display the page where you specify parameters for the principal to match.
4. Select the type of principal from the first pull-down, an operator from the second pull-down list, and enter a string to match.
5. Click Search to trigger the search.
7. To view all resource-based policies matching a principal, select a principal from the Found Principals table, and click Resource Based Policies. The New Policy
and Open menus at the top of table in this area allows creating and editing a resource-based policy.
8. To view the details of a item, linger the cursor over the information blue button.
4.7 Reusing Search Parameter Values
Advanced search allows saving the set of parameters used in the search. This option facilitates reproducing the results of a previous search quickly without the need to enter the same set of values multiple times.
A set of parameters is given a name and saved using the button Save..., and it is reused using the pull-down list Saved Search. Selecting a set of parameters from that list, automatically fills in the search parameters with the saved values. Figure 4–6 illustrates the Create Saved Search dialog.
5
5
Managing Security Artifacts
This chapter describes the procedures an administrator follows to manage
application-specific security artifacts, view the external role hierarchy, manage the application role hierarchy, and manage the many-to-many mapping of application roles to external roles from both the application and the external role point of view.
This chapter is divided into the following sections:
■ Managing Application Security Artifacts
■ Viewing the External Role Hierarchy
■ Managing the Application Role Hierarchy
■ Mapping Application Roles to an External Role
■ Mapping External Roles to an Application Role
5.1 Managing Application Security Artifacts
Authorization Policy Manager allows performing CRUD (create, read, update, delete) operations on several application security artifacts.
The menu New, to create an artifact, is available in the Browser and Search Results tabs of the navigation panel, and advanced search results tables.
The menu Open, to view and modify an artifact, is available in the Search Results tab of the navigation panel and advanced search results tables.
The menu Delete, to remove an artifact, is available in advanced search results tables. The following sections describe how to manage specific security artifacts:
■ Managing Application Roles
■ Managing Application Resource Types
■ Managing Application Resources
■ Managing Application Entitlements
■ Managing Application Policies
■ Managing Application Role Categories
5.1.1 Managing Application Roles
The following sections describe how to manage application roles:
■ Creating a Role
■ Modifying a Role
5.1.1.1 Creating a Role
To create an application role, proceed as follows:
1. In the navigation panel, right-click the application Role Catalog icon and select
New, to open an Untitled page on the right panel.
2. In the General tab of the page, enter the following data for the role being created:
■ A role name (required)
■ A display name (required)
■ A description (optional). Although optional, it is recommended because it can
provide useful information about the role.
■ A role category, to which the role being created belongs (optional)
3. Click Save. Note the following changes in the page: (a) the title Untitled changes to the string entered for display name; (b) two other tabs, Application Role Hierarchy and External Role Mapping, become available.
4. To position the role being created in the application role hierarchy:
1. Bring the Application Role Hierarchy tab to the foreground.
2. To view or specify the application roles this role inherits, select Inherits and click Add to display the Add a Role dialog.
In the Add a Role dialog, query application roles with a given display name (empty string fetches all roles), select one or more roles from the results (Ctrl-click allows selecting one role at the time), and then click Add, to display the selected roles in the Inherits table.
To delete a role from the Inherits table, select the role and click Remove; only roles directly under the top can be removed. To view a role, select the role and click Open; to find the policies that use a role, select the role and click Find Policies. To create a policy based on the application role, click Create Policy at the top of the page.
To specify application roles for a role in the Inherits table, select the role, and click Add to display the Add a Role dialog. In that dialog, click the radio button for the selected role, and proceed to search and select roles to add. Then click Add, to display the added roles under the selected role.
3. To view the application roles that this role is inherited by, select Is Inherited By.
To view a role in the Is Inherited table, select the role and click Open; to view the policies that use a role, select the role and click View Policies.
In both pages, Inherits and Is Inherited By, the bottom area displays the summary information of a role selected from the table.
5. To map external roles to the application role being created:
Managing Application Security Artifacts
2. Click Add to display the Add a Role dialog, or select an item an click Remove
to delete it.
3. In the Add a Role dialog, query external roles with a given display name (empty string fetches all roles), select one or more roles from the results (Ctrl-click allows selecting one role at the time), and then click Add, to display the selected roles in the External Roles tab.
Figure 5–1 illustrates part of the ApplicationRole Hierarchy tab.
Figure 5–1 Roles that an Application Role Inherits
5.1.1.2 Modifying a Role
Deleting a role deletes the role and all roles nested in it; Authorization Policy Manager prompts a confirmation before executing this cascading deletion. Moreover, all
references to a removed role are removed from application policies in the application stripe.
To delete an application role, use the procedure in Section 4.2, "Searching Application Roles" to identify the role in the Search Results table of an advanced search, select the role, and then click Delete.
1. Select the application role in the Search Results of the navigation panel, and double-click it or click Open to display the page for the application role. For details, see Section 3.4, "Finding Artifacts with a Simple Search."
2. Modify, as appropriate, the current specifications in the General, Application Role Hierarchy, and External Role Mapping tabs. If any data in the General tab is changed, click Apply.
5.1.2 Managing Application Resource Types
The following sections describe how to manage application resource types:
■ Creating a Resource Type
■ Modifying a Resource Type
5.1.2.1 Creating a Resource Type
To create an application resource type, proceed as follows:
1. In the navigation panel, right-click the application Resource Types icon and select
New, to open an Untitled page on the right panel.
2. In that page, enter the following data for the resource type being created:
■ A name (required).
■ A display name (required).
■ A description (optional). Although optional, it is recommended because it can
provide useful information about the resource type.
■ A fully qualified name of the permission class for the resource type, in the box
labeled Matcher (required).
■ The actions allowed by the type - to insert an action in the current list, click
New to display the New Action dialog; enter the name of the action and then click Save; the Action list is then updated with the new action.
Managing Application Security Artifacts
Figure 5–2 Creating a Resource Type
5.1.2.2 Modifying a Resource Type
To modify an application resource instance type, proceed as follows:
1. Identify the application resource type to modify or view. For details, see Section 4.3, "Searching Application Resource Types."
2. Select the resource, and click Open to open the page for the resource. (The Delete and New menus, also available, allows deleting a selected resource or creating a new one).
3. In that page, modify the resource type as appropriate.
4. Click Apply to save changes.
5.1.3 Managing Application Resources
The following sections describe how to manage application resources:
■ Creating a Resource
■ Modifying a Resource
5.1.3.1 Creating a Resource
To create an application resource instance, proceed as follows:
1. In the navigation panel, right-click the application Resources icon and select New, to open an Untitled page on the right panel.
2. In that page, enter the following data for the resource instance being created:
■ A name (required)
■ A description (optional). Although optional, it is recommended because it can
provide useful information about the resource instance.
■ A resource type - Select a resource type for the instance from the pull-down
Resource Types (required)
3. Click Save. The tab changes its title to the name of the resource instance just created.
5.1.3.2 Modifying a Resource
To modify an application resource instance, proceed as follows:
1. Identify the application resource to modify or view. For details, see Section 4.4, "Searching Application Resources."
2. Select the resource, and click Open to open the page for the resource. (The Delete menu, also available, allows deleting a selected resource).
3. In that page, modify the resource as appropriate.
4. Click Apply to save changes.
Alternatively, use a simple search to identify the resource, select it, and then click
Open to edit its attributes.
5.1.4 Managing Application Entitlements
The following sections describe how to manage application entitlements:
■ Creating an Entitlement
■ Modifying an Entitlement
5.1.4.1 Creating an Entitlement
To create an application entitlement, proceed as follows:
1. In the navigation panel, right-click the application Entitlements icon and select
New, to open an Untitled page on the right panel.
2. In that page, enter the following data for the entitlement being created:
■ A name (required)
■ A display name (required)
■ A description (optional). Although optional, it is recommended because it can
provide useful information about the entitlement.
3. Add resources to the entitlement being created. There are two ways of accomplishing this task; the first way is as follows:
1. List the resources available to the application by performing a regular search on resource instances.
2. Drag an drop resource instances from the Search Results tab (on the navigation panel) into the area labeled Resources.
The second, alternative way is as follows:
1. Click Add at the top of the area Resources, to display the Add Resource
Managing Application Security Artifacts
2. In that dialog, search for the available resources whose names or display names match a string, and a selected Resource Type. The resources matching the query are displayed in the table at the bottom of the dialog.
3. From the results, select the resources to add (the combination ctrl-left click allows you to select multiple items from the list), and then click Add. Only resources not already in the Resources list are allowed to be added.
4. Select actions for resources - First select a resource that you have added (from the Resources list) to display the resource details in the Resource Details area at the bottom of the page. Then check the desired actions for that resource in the area
Actions. Only the actions allowed for the type of the selected resource are
available in this area. Repeat this step for each of the resources you have added to the entitlement being created.
5. Click Save. The page changes its title to the name of the entitlement just created. Figure 5–3 illustrates part of the page after the entitlement myEntitlement has been created and in which the area Resources has been collapsed.
Figure 5–3 Creating an Entitlement
5.1.4.2 Modifying an Entitlement
1. Select the entitlement in the Search Results of the navigation panel, and
double-click it or click Open to display the page for the entitlement. For details, see Section 3.4, "Finding Artifacts with a Simple Search."
2. Modify, as appropriate, the current specifications in the page.
3. Click Apply to save changes.
5.1.5 Managing Application Policies
The following sections describe how to manage application functional policies:
■ Creating a Policy
■ Modifying a Policy
5.1.5.1 Creating a Policy
The following procedure describes a way to create an application policy based in an application role; alternative ways to create policies based on a principal, an
entitlement, or a resource by using the New Policy menu are described in Section 4.6.1, "Finding Application Policies that Match Entitlements or Resources," and Section 4.6.2, "Finding Application Policies that Match Principals."
To create an application policy based on a specific application role, proceed as follows:
1. Select Policies under the application for which you want to create the policy, and double-click it or click Open to display the Search - Policies page.
2. In that page, bring the tab Principal to the foreground and specify parameters for a Search, to locate and select the principals (application role, external role, or user) on which to base the policy being created.
3. In the tab Function Security, at the bottom area of the page, select either
Entitlement Policies or Resource Based Policies (according to the kind of policy to create), and then click New Policy to display an Untitled policy page.
If creating an entitlement-based policy, then in the Untitled page:
1. Add principals to the policy - Either use the button Add at the top of the
Principal table, or, alternatively, perform a simple search on application roles, external roles, or users, and drag-and-drop items from the search results into the Principal table. For details, see Section 3.4, "Finding Artifacts with a Simple Search."
2. Add an entitlement to the policy - Either use the button Add at the top of the
Entitlement table, or, alternatively, perform a simple search on the application entitlements, and drag-and-drop an entitlement from the search results into the Entitlement table.
3. Click Save.
If creating a resource-based policy, then in the Untitled page:
1. Add principals to the policy - Either use the button Add at the top of the
Principal table, or, alternatively, perform a simple search on application roles, external roles, or users, and drag-and-drop items from the search results into the Principal table. For details, see Section 3.4, "Finding Artifacts with a Simple Search."
2. Add resource instances to the policy - Either use the button Add in the
Managing Application Security Artifacts
resource instances, and drag-and-drop a resource instances from the search results into the Resources table.
3. For each of the resource instance added, select a resource instance and specify the actions allowed by checking the appropriate boxes in the Actions area at the bottom of the page.
4. Click Save.
Figure 5–4 illustrates part of the page after creating a policy based on an entitlement.
Figure 5–4 Creating an Entitlement-Based Policy
5.1.5.2 Modifying a Policy
Entitlement-based policies cannot be modified.
To modify or view a resource-based policy, proceed as follows:
1. Identify the resource-based application policy to modify or view in either of the following ways:
■ By matching an application role in the policy. For details, see step 7 in
procedure in Section 4.6.2, "Finding Application Policies that Match Principals."
■ By matching a resource name in the policy. For details, see step 7 in procedure
in Section 4.6.1, "Finding Application Policies that Match Entitlements or Resources."
2. Select the policy, and click Open to open the page for the policy.
4. Click Apply to save changes.
5.1.6 Managing Application Role Categories
Authorization Policy Manager does not support modifying role categories, but only creating and deleting them.
To create an application role category, proceed as follows:
1. In the navigation panel, right-click the application Roles Categories icon and select New, to open an Untitled page on the right panel.
2. In that page, click New to display the New Category dialog.
3. In that dialog, enter the following data for the category being created:
■ A name (required)
■ A display name (required)
■ A description (optional). Although optional, it is recommended because it can
provide useful information about the category.
4. Click Create: the new category is displayed in the list under the Role Categories page.
Figure 5–5 partially illustrates the Role Categories page after a category has been created.
Figure 5–5 Creating an Application Role Category
5.2 Viewing the External Role Hierarchy
To view the external role hierarchy under a given external role, proceed as follows:
1. Select an external role in the Search Results of the navigation panel, and double-click it or select it and click the View icon to display the page for the external role. For details, see Section 3.4, "Finding Artifacts with a Simple Search."
Managing the Application Role Hierarchy
3. The table in that tab displays all the external roles from which the selected role inherits permissions. Any external role in the table admits being expanded to further show the deeper levels of the hierarchy.
In addition, the actions at the top of the table allow:
■ Opening a selected external role for view (Open Role)
Figure 5–6 partially illustrates the External Role Hierarchy tab for the external role OPS FEDERAL.
Figure 5–6 External Role Hierarchy
5.3 Managing the Application Role Hierarchy
This section explains how to view and modify an application role hierarchy, specifically, the hierarchy of application roles below and above a given application role.
■ Roles that an Application Role Inherits
■ Roles that Inherit an Application Role
5.3.1 Roles that an Application Role Inherits
To view or modify the application role hierarchy below a given application role, proceed as follows:
2. Bring the tab Application Role Hierarchy to the foreground and select Inherits.
3. The table in that region displays the application roles under the role. The actions at the top of this table allow:
■ Adding application roles (Add) ■ Removing a selected role (Remove)
■ Opening for viewing a selected role (Open)
■ Viewing the policies that contain a selected role (View Policies)
5.3.2 Roles that Inherit an Application Role
To view or modify the application role hierarchy above a given application role, proceed as follows:
1. Select an application role in the Search Results of the navigation panel, and double-click it or click Open to display the page for the application role. For details, see Section 3.4, "Finding Artifacts with a Simple Search."
2. Bring the tab Application Role Hierarchy to the foreground and select Is Inherited By.
3. The table in that region displays the application roles under the role. The actions at the top of this table allow:
■ Adding application roles (Add) ■ Removing a selected role (Remove)
■ Opening for viewing a selected role (Open)
■ Viewing the policies that contain a selected role (View Policies)
5.4 Mapping Application Roles to an External Role
To map application roles to an external role, proceed as follows:
1. Select the external role in the Search Results of the navigation panel, and
double-click it or click Open to display the page for the external role. For details, see Section 3.4, "Finding Artifacts with a Simple Search."
2. In that page, select the Role Mapping tab.
3. In that tab, in the table in the area External Role Hierarchy, select Map Roles to display the Map Application Roles to External Roles dialog.
4. Use that dialog to search and select the application roles you want to map into the external role, and then click Map Roles. The current list of application roles mapped to the external role is shown in the table in the area Application Role Hierarchy for:.
In addition, the actions at the top of the table allow:
Mapping External Roles to an Application Role
5.5 Mapping External Roles to an Application Role
To map external roles to an application role, proceed as follows:
1. Select an application role in the Search Results of the navigation panel, and double-click it or click Open to display the page for the application role. For details, see Section 3.4, "Finding Artifacts with a Simple Search."
2. Bring the tab External Role Mapping tab to the foreground.
3. In that tab, click Add to display the Add a Role dialog. Use this dialog to search and select the set of external roles to be mapped to the application role; then click
Map Roles.
The table showing the external roles mapped to the application role is then updated to include the selected roles. In addition to adding external roles, the actions at the top of this table allow:
■ Removing a selected role (Remove)
■ Opening for viewing a selected role (Open)
Figure 5–7 illustrates the Add a Role dialog with results of an External Role Search and three external roles selected.
Figure 5–7 Selecting the External Roles to Map to an Application Role
Figure 5–8 Displaying the External Roles Mapped to an Application Role
An alternative way to add external roles to an application role (with the action menu