For your convenience Apress has placed some of the front
matter material after the index. Please use the Bookmarks
Contents at a Glance
About the Author ...
xli
About the Technical Reviewers ...
xliii
Acknowledgments ...
xlv
Introduction ...
xlvii
Chapter 1: Getting Started with Java 8
...
1
Chapter 2: New Features of Java 8
...29
Chapter 3: Strings
...49
Chapter 4: Numbers and Dates
...65
Chapter 5: Object-Oriented Java
...97
Chapter 6: Lambda Expressions
...
133
Chapter 7: Data Structures and Collections
...153
Chapter 8: Input and Output
...187
Chapter 9: Exceptions and Logging
...207
Chapter 10: Concurrency
...223
Chapter 11: Debugging and Unit Testing
...249
Chapter 12: Unicode, Internationalization, and Currency Codes
...
263
Chapter 13: Working with Databases
...
283
Chapter 14: JavaFX Fundamentals
...331
CONTENTS AT A GLANCE
Chapter 17: JavaFX on the Web
...473
Chapter 18: Nashorn and Scripting
...505
Chapter 19: E-mail
...527
Chapter 20: XML Processing
...
537
Chapter 21: Networking
...553
Chapter 22: Security
...571
Introduction
The Java programming language was introduced in 1995 by Sun Microsystems. Derived from languages such as C and C++, Java was designed to be more intuitive and easier to use than older languages, specifically due to its simplistic object model and automated facilities such as memory management. At the time, Java drew the interest of developers because of its object oriented, concurrent architecture; its excellent security and scalability; and because applications developed in the Java language could run on any operating system that contained a Java Virtual Machine (JVM). Since its inception, Java has been described as a language that allows developers to “write once, run everywhere” as code is compiled into class files that contain bytecode, and the resulting class files can run on any compliant JVM. This concept made Java an immediate success for desktop development, which later branched off into different technological solutions over the years, including development of web-based applications and rich Internet applications (RIAs). Today, Java is deployed on a broad range of devices, including mobile phones, printers, medical devices, Blu-ray players, and so on.
The Java platform consists of a hierarchy of components, starting with the Java Development Kit (JDK), which is composed of the Java Runtime Environment (JRE), the Java programming language, and platform tools that are necessary to develop and run Java applications. The JRE contains the Java Virtual Machine (JVM), plus the Java application programming interfaces (APIs) and libraries that assist in the development of Java applications. The JVM is the base upon which compiled Java class files run and is responsible for interpreting compiled Java classes and executing the code. Every operating system that is capable of running Java code has its own version of the JVM. To that end, the JRE must be installed on any system that will be running local Java desktop or stand-alone Java applications. Oracle provides JRE implementations for most of the major operating systems. Each operating system can have its own flavor of the JRE. For instance, mobile devices can run a scaled down version of the full JRE that is optimized to run Java Mobile Edition (ME) and Java SE embedded applications. The Java platform APIs and libraries are a collection of predefined classes that are used by all Java applications. Any application that runs on the JVM makes uses the Java platform APIs and libraries. This allows applications to use the functionality that has been predefined and loaded into the JVM and leaves developers with more time to worry about the details of their specific application. The classes that comprise the Java platform APIs and libraries allow Java applications to use one set of classes in order to communicate with the underlying operating system. As such, the Java platform takes care of interpreting the set of instructions provided by a Java application into operating system commands that are required for the machine on which the application is being executed. This creates a facade for Java developers to write code against so that they can develop applications that can be written once and ran on every machine that contains a relevant JVM.
INTRODUCTION
on the JVM. It provides a rich set of graphical and media user interfaces to develop extraordinary visual applications. This release is another nice update to the JavaFX platform, adding in features such as the Swing node and the Print API.
This book covers the fundamentals of Java development, such as installing the JDK, writing classes, and running applications. It delves into essential topics such as the development of object oriented constructs, exception handling, unit testing, and localization. The book also provides solutions for desktop application development using the JavaFX, and some web-based and database solutions. It covers JavaFX 8 in depth and is an essential guide for developers beginning to use JavaFX 8. This book can be used as a guide for solving problems that ordinary Java developers may encounter at some point. A broad range of topics is discussed, and the solutions to the problems that are covered in this book are concise and to the point. If you are a novice Java developer, we hope that this book will help you get started on your journey to working with one of the most advanced and widely used programming languages available today. For those of you who have used the Java language for some time, we hope that this book will provide you with updated material that is new to Java 8 and JavaFX 2.0 so that you can further refine your Java development skills. We ensure that advanced Java application developers will also learn a thing or two regarding the new features of the language and perhaps even stumble upon some techniques that were not used in the past. Whatever your skill level, this book is good to have close at hand as a reference for solutions to those problems that you encounter in your daily programming.
Who This Book Is For
This book is intended for all those who are interested in learning the Java programming language and/or already know the language but would like some information regarding the new features included in Java SE 8 and JavaFX 8. Those who have not yet programmed in the Java language can read this book, and it will allow them to start from scratch to get up and running quickly. Intermediate and advanced Java developers who are looking to update their arsenal with the latest features that Java SE 8 and JavaFX 8 make available to them can also read the book to quickly update and refresh their skill set. Java desktop programmers will find this book useful for its content on developing desktop applications using the JavaFX API. There are, of course, a myriad of other essential topics that will be useful to Java developers of any type.
How This Book Is Structured
CHAPTER 1
Getting Started with Java 8
In this chapter we present a handful of recipes to help programmers who are new to the Java language, as well as those having experience in other languages, become accustomed to Java 8. You will learn to install Java 8, and also install an Interactive Development Environment (IDE) from which you’ll develop applications and experiment with the solutions provided in this book. You will learn basics of Java such as how to create a class and how to accept keyboard input. Documentation is often overlooked, but in this chapter you will quickly learn how to create great documentation for your Java code.
Note Java 8 Recipes is not intended as a complete tutorial. Rather, it covers key concepts of the Java language. If you are truly new to Java, we recommend buying and reading one of the many Beginning Java books that are also published by Apress.
1-1. Creating a Development Environment
Problem
You want to install Java and experiment with the language. You’d also like a reasonable IDE to use with it.
Solution
Install Java Development Kit 8 (JDK). That gives you the language and a compiler. Then install the NetBeans IDE to provide a more productive working environment.
Java Standard Edition (Java SE) is sufficient for most recipes in this book. To download the release, visit the following page on the Oracle Technology Network (OTN):
http://www.oracle.com/technetwork/java/javase/overview/index.html
CHAPTER 1 GETTING STARTED WITH JAVA 8
Note If you chose to only install the Java Platform (JDK) and not NetBeans, you can download NetBeans at a later time by visiting netbeans.org.
How It Works
The name Java
™
is a trademark owned by Oracle Corporation. The language itself is open source, and its evolution is controlled by a process known as the Java Community Process SM (JCP SM). You can read more about that process at www.jcp.org.There are many editions of Java, such as the Mobile Edition (ME) and the Enterprise Edition (EE). Java SE is the Standard Edition and represents the heart of the language. We’ve built the recipes in this book for Java SE programmers. Those interested in the development of mobile or embedded applications may be interested in learning more about Java ME. Similarly, those interested in developing web applications and working with enterprise solutions may be interested in learning more about Java EE.
Note Enterprise Edition programmers may want to buy and read a copy of Java EE 7 Recipes (Apress, 2013).
There are several good websites that you can visit to learn more about Java and keep up-to-date with the latest on the platform. A good place to begin for all things Java is the following page on the Oracle Technology Network:
http://www.oracle.com/technetwork/java/index.html
The wealth of resources available from this page can be overwhelming at first, but it’s worth your time to look around and get passingly familiar with the many links that are available.
One of the links will be to Java SE, which takes you to the page shown earlier in Figure 1-1. It is from there that you can download Java SE and the NetBeans IDE. Also from there you have access to the official documentation, to community resources such as forums and newsletters, and to training resources designed to help you build knowledge in Java and become certified in the language.
CHAPTER 1 GETTING STARTED WITH JAVA 8
1-2. Getting to “Hello, World”
Problem
You’ve installed Java SE 8 and the NetBeans IDE. Now you want to run a simple Java program to verify that your installation is working properly.
Solution
Begin by opening the NetBeans IDE. You should see a workspace resembling the one in Figure 1-2. You may see some projects in the left-hand pane if you’ve already been working on projects within the IDE.
CHAPTER 1 GETTING STARTED WITH JAVA 8
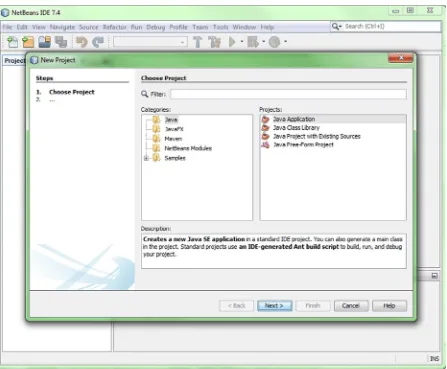
Go to the File menu and select New Project. You’ll see the dialog in Figure 1-3. Choose the Java category, and then Java Application. Click Next to advance to the dialog shown in Figure 1-4.
CHAPTER 1 GETTING STARTED WITH JAVA 8
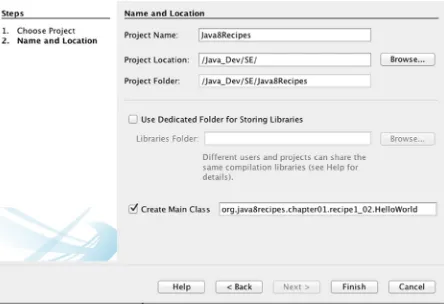
Give your project a name. For the project related to this book, use the name Java8Recipes. Enter that name into the Project Name text box at the top of the dialog in Figure 1-4.
Then specify the name of your main class in the Create Main Class text box. Give the following name:
org.java8recipes.chapter01.recipe1_02.HelloWorld
Be sure to that you’ve entered the project name and class name just as we provide them here, because the code to follow depends upon your doing so. Make sure the Project Name text box specifies Java8Recipes. Make sure the Create Main Class text box specifies org.java8recipes.chapter01.recipe1_02.HelloWorld.
Tip Pay attention to case, Java is case-sensitive.
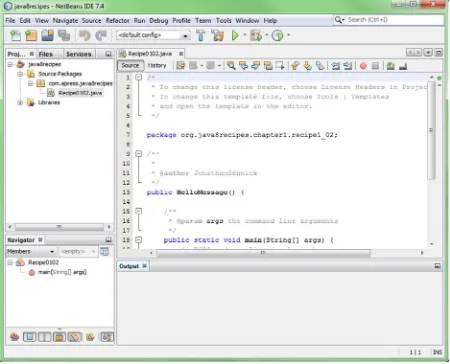
Press Finish to complete the wizard and create a skeleton project. You should now be looking at a Java source file. Skeleton code is generated for you, and your NetBeans IDE window should resemble the one in Figure 1-5.
CHAPTER 1 GETTING STARTED WITH JAVA 8
Place your cursor anywhere in the source code pane. Press CTRL-A to select all the skeleton code. Then press Delete to get rid of it. Replace the deleted code with that from Listing 1-1.
Listing 1-1. A “Hello, World” Example
package org.java8recipes.chapter01.recipe1_02;
/* An object of this class will hold the message. */ class HelloMessage {
private String message = "";
public HelloMessage() {
this.message = "Default Message"; }
CHAPTER 1 GETTING STARTED WITH JAVA 8
public void setMessage (String m) { this.message = m;
}
public String getMessage () {
return this.message.toUpperCase(); }
}
/* The main program begins in this class */ public class HelloWorld {
public static void main(String[] args) {
HelloMessage hm;
hm = new HelloMessage();
System.out.println(hm.getMessage());
hm.setMessage("Hello, World");
System.out.println(hm.getMessage()); }
}
You can find the code in Listing 1-1 as part of our example download for the book. It’s in the file HelloWorld.java, and you’ll find that file within the NetBeans source package named org.java8recipes.chapter01.recipe1_02. All recipe solutions of substance throughout this book are in that example download.
Make sure you have pasted (or typed) the code from Listing 1-1. Compile and run the program, and you should see the following output:
run:
DEFAULT MESSAGE HELLO, WORLD
BUILD SUCCESSFUL (total time: 1 second)
This output will appear in a new pane named “Output” that is opened by NetBeans at the bottom of the IDE window.
How It Works
CHAPTER 1 GETTING STARTED WITH JAVA 8
Packages
The solution example begins by creating a Java package:
package org.java8recipes.chapter01.recipe1_02;
Packages are a way of grouping related classes together into a shared namespace. The idea is to achieve universal uniqueness by working your way down your organization’s domain name in reverse order. It is also customary to write package names in all lowercase.
NetBeans will create a directory structure to mimic your package path. In this case, NetBeans created the following directory path:
C:\Users\JonathanGennick\Documents\NetBeansProjects\ Java8Recipes\src\org\java8recipes\chapter01\recipe1_02
Following are some things to notice about this path: The front part is
C:\Users\...\NetBeansProjects. NetBeans creates all projects under a NetbeansProject directory unless you specify otherwise, which you can do from the dialog in Figure 1-4. Many developers specify shorter paths.
Next is the first occurrence of
Java8Recipes. This occurrence corresponds to the project name
you gave when you filled in the Project Name text box from Figure 1-4. Any source files you create go into the
src directory. NetBeans creates other directories at this
level. For example, NetBeans creates a build directory, and then underneath it is a classes subdirectory to hold your compiled class files.
Last are the directories mirroring the package path that you specify, in this case
org\java8recipes\chapter01\recipe1_02. When you compile your code, an identical structure is created under the build\classes directory. Note that if using another IDE, you may see differences in the directories that are created.
You do not need to explicitly create a package. If you do not create one, the Java compiler will create one for you, and give it a name that is hidden from you. We prefer to be explicit, and you should too. Being thoughtful and explicit about Java package names is de rigueur in the professional setting. Organization, as well as judiciously chosen naming conventions, is important when developing any significant application.
JavaBeans-Style Classes
Next in the solution example you see a class definition following the JavaBeans pattern. The definition of
HelloMessage follows a pattern that you’ll encounter often in Java programming, and we include it for that reason. The class is a simple one, capable of holding a single, string value named greeting.
Three methods are defined on the class:
HelloMessage(). This method, also known as the constructor, is named the same as the class. In this case, it takes no arguments. It’s automatically invoked whenever you create a new object of the class. Note that this is known as a “no-arg” constructor because it is typed out within the class, and it takes no arguments. If you do not supply a constructor, the JVM will supply a default constructor (also takes no arguments) automatically.
CHAPTER 1 GETTING STARTED WITH JAVA 8
Note Accessor methods are used in JavaBeans classes to access any privately declared class members. In this case, the private variable identified as message can be accessed using these methods. Accessor methods are more commonly referred to as “getters” and “setters.”
Methods beginning with set and get are termed as setter and getter methods. The variable message is private to the class, which means you have no direct access to message from outside of the class.
You’ll see the keyword this used in the class. It is a special keyword in Java used to reference the current object. Its use is redundant in Listing 1-1, but would be needed if any of the methods happened to create variables of their own that were also named message.
It is common in Java to mediate access to class variables through setter and getter methods like those in our example. Those methods represent a contract of sorts with other classes and your main program. Their benefit is that you can change the storage implementation of HelloMessage however you like. Other code that depends upon HelloMessage will continue to work properly so long as you maintain the external behavior of setMessage() and getMessage().
The Main Program
The incantation public static void main(...) is used from within a public class to denote the beginning point of a Java program. That declaration begins an executable method named main. You must specify one parameter that is an array of strings, and typically that parameter is defined as String[] args.
When you execute the currently selected class, NetBeans compiles the code to a set of binary files, and then transfers control to the main() method. That method, in turn, does the following:
1. Executes HelloMessage hm to create a variable named hm that is capable of holding an instance of the class HelloMessage. The variable hm is empty at this point.
2. Invokes new HelloMessage() to create an object of the class by that name. The no-arg constructor will be executed, and "Default Message" is now the greeting text. The new object is now stored in the variable hm.
3. Makes a call to System.out.println() to show that the object’s no-arg constructor has indeed executed as expected. The greeting "DEFAULT MESSAGE" is displayed in the “Output” pane.
4. Sets the message to be the traditional text "Hello, World".
5. Makes another call to System.out.println() to output the new message that has just been set. Now you see the greeting "hello, world" added to the “Output” pane.
The pattern in the solution is common in Java programming. The main() method is where execution begins. Variables are defined, and objects are created using the new operator. Object variables are often set and retrieved using setter and getter methods.
CHAPTER 1 GETTING STARTED WITH JAVA 8
1-3. Compiling and Executing from the Command-line Interpreter
Problem
You aren’t able to install an IDE, or you don’t want to do so. You want to compile and execute your Java programs from the command-line.
Solution
Compile your programs using the javac command. Then execute them via the java command.
Begin by making sure you have your JDK’s bin directory in your execution path. You might need to execute a command such as one of the following.
Windows:
path %path%C:\Program Files\Java\jdk1.8.0\bin
OS X:
export PATH=/Library/Java/JavaVirtualMachines/jdk1.8.0.jdk/Contents/Home/bin
Then make sure your CLASSPATH environment variable includes the directory containing your Java code. The following is an example of setting the environment variable under Windows:
set CLASSPATH=<<path-to-my-Java>>
Now change your current working directory to be the one corresponding to your project. Recipe 1-2 had you create a project named Java8Recipes. Change to that project’s directory on a Windows system as follows:
cd <path-to-project>\Java8Recipes
Descend one level into the src subdirectory:
cd src
From here, you can issue javac commands to compile any classes in your project. Prepend the appropriate package name as part of your path leading to each source file to be compiled. Be sure to include the .java extension after your file name. For example, issue the following command to compile the HelloWorld class from Recipe 1-2.
Windows:
javac org\java8recipes\chapter01\recipe1_02\HelloWorld.java
OS X:
javac org/java8recipes/chapter01/recipe1_02/HelloWorld.java
You should now have a .class file in the same directory as your .java file. For example:
dir org\java8recipes\chapter01\recipe1_02 /B
CHAPTER 1 GETTING STARTED WITH JAVA 8
Compilation produces two files. One is for HelloMessage, and the other is for the class named HelloWorld implementing the main() method.
Execute the main() method by issuing the java command to invoke the Java Virtual Machine (JVM). Pass the fully-qualified class name as a parameter to the command. Qualify the class name by prepending the package name, but this time use the same dot-notation as used in your source file. For example:
java org.java8recipes.chapter1.recipe1_02.HelloWorld
Do not specify .class at the end of the command. You are referencing HelloWorld now as a class name, and not as a file name. You should see the same output as from Recipe 1-2.
Tip One compiles source code. Source code is kept in files, so your operating-system’s file and directory-path notation is appropriate. One executes a class. A class is an abstract concept in the language, so the language’s dot-notation becomes appropriate. Keep this distinction in mind to help yourself remember when to use which notation.
How It Works
The first two solution steps are housekeeping steps. You must have the Java compiler and the virtual machine in your execution path. It’s also necessary for any classes used by your program to be found somewhere along what is termed the class path. One way to specify the class path is through the CLASSPATH environment variable.
The command java with no c at the end is for executing compiled code. Pass as a parameter the qualified name of the class containing your main method. The JVM will interpret and execute the byte-code within that class, beginning from the main method. The JVM will search along the class path for any additionally required classes such as HelloMessage.
The compiler’s default behavior is to place each generated class file into the same directory as holds the corresponding source file. You can override that behavior through the -d option. For example:
javac -d "<specify-different-location>" "<path-to-project>
\Java8Recipes\src\org\java8recipes\chapter1\recipe1_02\HelloWorld.java"
The -d option in this command specifies the same directory as NetBeans is using in our own environment as the target for holding generated class files. The command also specifies the full path and file name of the source file. Thus, the command can be executed with the same result regardless of the current working directory.
Tip Configure your system so that your command-line environment has the execution path and class path set correctly by default. The typical approach in Linux is to put appropriate commands into your .profile or .bash_profile files. Under Windows you can specify environment variable defaults from the Control Panel applet named System, by clicking on the Advanced system settings link, and then on the Environment Variables button.
There may be times when you need to specify a custom class path for a specific execution of the JVM. You can do that through the -cp parameter, as follows:
CHAPTER 1 GETTING STARTED WITH JAVA 8
This execution will search first in the current working directory (the leading dot in the class path), and then under the specified package directory corresponding to where NetBeans would place the compiled classes.
Note See Recipe 1-10 for more on configuring your class path.
1-4. Declaring Simple Variables
Problem
You want to create some variables and manipulate data within your program.
Solution
Java implements eight primitive data types. There is also special support for the String class type. Listing 1-2 shows an example declaration of each. Draw from the example to declare the variables needed in your own application.
Listing 1-2. Declarations for Primitive and String Types package org.java8recipes.chapter01.recipe1_04;
public class DeclarationsExample {
public static void main (String[] args) {
boolean BooleanVal = true; /* Default is false */
char charval = 'G'; /* Unicode UTF-16 */
charval = '\u0490'; /* Ukrainian letter Ghe(DZ) */
byte byteval; /* 8 bits, -127 to 127 */ short shortval; /* 16 bits, -32,768 to 32,768 */
int intval; /* 32 bits, -2147483648 to 2147483647 */ long longval; /* 64 bits, -(2^64) to 2^64 - 1 */
float floatval = 10.123456F; /* 32-bit IEEE 754 */ double doubleval = 10.12345678987654; /* 64-bit IEEE 754 */
String message = "Darken the corner where you are!"; message = message.replace("Darken", "Brighten"); }
}
Variables are subject to the concept of visibility. Those created in Listing 1-2 are visible from the main() method after they have been created, and they are deallocated when the main() method ends. They have no “life” beyond the main() method, and are not accessible from outside of main().
CHAPTER 1 GETTING STARTED WITH JAVA 8
Listing 1-3. Visibility and the Concept of Fields package org.java8recipes.chapter01.recipe1_04;
class TestClass {
private long visibleOnlyInThisClass; double visibleFromEntirePackage;
void setLong (long val) {
visibleOnlyInThisClass = val; }
long getLong () {
return visibleOnlyInThisClass; }
}
public class VisibilityExample {
public static void main(String[] args) { TestClass tc = new TestClass(); tc.setLong(32768);
tc.visibleFromEntirePackage = 3.1415926535; System.out.println(tc.getLong());
System.out.println(tc.visibleFromEntirePackage); }
}
Output:
32768 3.1415926535
Fields are typically tied to an object of a class. Each object of a class holds an instance of each field in the class. However, you can define so-called static fields that occur just once, and with a single value shared by all objects of the given class. Listing 1-4 illustrates the difference.
Listing 1-4. Static Fields
package org.java8recipes.chapter01.recipe1_04;
class StaticDemo {
public static boolean oneValueForAllObjects = false; }
public class StaticFieldsExample {
public static void main (String[] args) { StaticDemo sd1 = new StaticDemo(); StaticDemo sd2 = new StaticDemo();
CHAPTER 1 GETTING STARTED WITH JAVA 8
System.out.println(sd1.oneValueForAllObjects); System.out.println(sd2.oneValueForAllObjects); }
}
Listing 1-4 produces the following output:
false false true true
The field oneValueForAllObjects was set to true only for the class instance named sd1. Yet it is true for instance sd2 also. This is because of the keyword static used in declaring that field. Static fields occur one time for all objects of their class.
How It Works
Listing 1-2 illustrates the basic format of a variable declaration:
type variable;
It’s common to initialize variables when declaring them, so you’ll often see:
type variable = initialValue;
Field declarations can be preceded by modifiers. For example:
public static variable = initialValue; private variable;
It’s common to put the visibility modifier — public or private — first, but you are free to list the modifiers in any order you like. Be aware that there are additional modifiers that you will encounter and need to learn about as you get deeper into the language.
The String type is special in Java. It’s really a class type, but syntactically you can treat it as a primitive type. Java automatically creates a String object whenever you enclose a string of characters within double-quotes ("..."). You aren’t required to invoke a constructor, nor to specify the new keyword. Yet String is a class, and there are methods in that class that are available to you. One such method is the replace() method shown at the end of Listing 1-2.
Strings are composed of characters. Java’s char type is a two-byte construct for storing a single character in Unicode-s UTF-16 encoding. You can generate literals of the char type in two ways:
If a character is easy to type, then enclose it within single quotes (e.g.:
'G').
Otherwise, specify the four-digit UTF-16
code point value prefaced by \u (e.g.: '\u0490').
Some Unicode code points require five digits. These cannot be represented in a single char value. See Chapter 10 if you need more information on Unicode and internationalization.
CHAPTER 1 GETTING STARTED WITH JAVA 8
If you are new to Java, you may be unfamiliar with the String[] array notation, as demonstrated in the examples. Please see Chapter 7 for more information on arrays. It covers enumerations, arrays, and also generic data types. Also in that chapter are examples showing how to write iterative code to work with collections of values such as an array.
Note If you’re curious about the Ukrainian letter in Listing 1-2, it is the Cyrillic letter Ghe with upturn. You can read about its history at: http://en.wikipedia.org/wiki/Ghe_with_upturn. You can find its code point value in the chart at http://www.unicode.org/charts/PDF/U0400.pdf. And the URL http://www.unicode.org/charts/ is a good place to start whenever you need to find the code point corresponding to a given character.
1-5. Converting to and from a String
Problem
You have a value in a primitive data type, and you want to represent that value as a human-readable string. Or, you want to go in the other direction by converting a human-readable string into a primitive data type.
Solution
Follow one of the patterns from Listing 1-5. The listing shows conversion from a string to a double-precision floating-point value, and shows two methods for getting back to a string again.
Listing 1-5. General Pattern for String Conversions package org.java8recipes.chapter01.recipe1_05;
public class StringConversion {
public static void main (String[] args) { double pi;
String strval;
pi = Double.parseDouble("3.14");
System.out.println(strval = String.valueOf(pi)); System.out.println(Double.toString(pi));
} }
How It Works
The solution illustrates some conversion patterns that work for all the primitive types. First, there is the conversion of a floating-point number from its human-readable representation into the IEEE 754 format used by the Java language for floating-point arithmetic:
CHAPTER 1 GETTING STARTED WITH JAVA 8
Notice the pattern. You can replace Double with Float, or by Long, or by whatever other type is your target data type. Each primitive type has a corresponding wrapper class by the same name but with the initial letter uppercase. The primitive type here is double, and the corresponding wrapper is Double. The wrapper classes implement helper methods such as Double.parseDouble(), Long.parseLong(), Boolean.parseBoolean(), and so forth. These parse methods convert human-readable representations into values of the respective types.
Going the other way, it is often easiest to invoke String.valueOf(). The String class implements this method, and it is overloaded for each of the primitive data types. Alternatively, the wrapper classes also implement toString() methods that you can invoke to convert values of the underlying type into their human-readable forms. It’s your own preference as to which approach to take.
Conversions targeting the numeric types require some exception handling to be practical. You generally need to gracefully accommodate a case in which a character-string value is expected to be a valid numeric representation, but it’s not. Chapter 9 covers exception-handling in detail, and the upcoming Recipe 1-7 provides a simple example to get you started.
Caution Literals for the Boolean type are "true" and "false". They are case-sensitive. Any value other than these two is silently interpreted as false when converting from a String using the Boolean parseBoolean() conversion method.
1-6. Passing Arguments via Command-Line Execution
Problem
You want to pass values into a Java application via the command-line.
Solution
Run the application using the java command, and specify the arguments that you want to pass into it after the application name. If you’re passing more than one argument, each should be separated by a space. For example, suppose you want to pass the arguments to the class created in Listing 1-6.
Listing 1-6. Example of Accessing Command-Line Arguments package org.java8recipes.chapter01.recipe1_06;
public class PassingArguments {
public static void main(String[] args){ if(args.length > 0){
System.out.println("Arguments that were passed to the program: "); for (String arg:args){
System.out.println(arg); }
} else {
System.out.println("No arguments passed to the program."); }
CHAPTER 1 GETTING STARTED WITH JAVA 8
First, make sure to compile the program so that you have a .class file to execute. You can do that from within NetBeans by right-clicking the file and choosing the “Compile File” option from the context menu.
Next, open a Command Prompt or terminal window and traverse into the build\classes directory for your project. (See Recipe 1-3 for an extensive discussion of executing from the command-line). For example:
cd <path-to-project>\Java8Recipes\build\classes
Now issue a java command to execute the class, and type some arguments on the command-line following the class name. The following example passes two arguments:
java org.java8recipes.chapter01.recipe1_06.PassingArguments Upper Peninsula
You should see the following output:
Arguments that were passed to the program: Upper
Penninsula
Spaces separate arguments. Enclose strings in double quotes when you want to pass an argument containing spaces or other special characters. For example:
java org.java8recipes.chapter01.recipe1_06.PassingArguments "Upper Peninsula"
The output now shows just one argument:
Arguments that were passed to the program: Upper Penninsula
The double quotes translate the string "Upper Peninsula" into a single argument.
How It Works
All Java classes that are executable from the command-line or terminal contain a main() method. If you look at the signature for the main() method, you can see that it accepts a String[] argument. In other words, you can pass an array of String objects into the main() method. Command-line interpreters such as the Windows Command Prompt and the various Linux and Unix shells build an array of strings out of your command-line arguments, and pass that array to the main() method on your behalf.
The main() method in the example displays each argument that is passed. First, the length of the array named args is tested to see whether it is greater than zero. If it is, the method will loop through each of the arguments in the array by executing a for loop, displaying each argument along the way. If there are no arguments passed, the length of the args array will be zero, and a message indicating such will be printed. Otherwise, you see a different message followed by a list of arguments.
Command-line interpreters recognize spaces and sometimes other characters as delimiters. It’s generally safe to pass numeric values as arguments delimited by spaces without bothering to enclose each value within quotes. However, you should get into the habit of enclosing character-string arguments in double quotes, as shown in the final solution example. Do that to eliminate any ambiguity over where each argument begins and ends.
CHAPTER 1 GETTING STARTED WITH JAVA 8
1-7. Accepting Input from the Keyboard
Problem
You are interested in writing a command-line or terminal application that will accept user input from the keyboard.
Solution
Make use of the java.io.BufferedReader and java.io.InputStreamReader classes to read keyboard entry and store it into local variables. Listing 1-7 shows a program that will keep prompting for input until you enter some characters that represent a valid value of type long.
Listing 1-7. Keyboard Input and Exception Handling package org.java8recipes.chapter01.recipe1_07;
import java.io.*;
public class AcceptingInput {
public static void main(String[] args){
BufferedReader readIn = new BufferedReader( new InputStreamReader(System.in) );
String numberAsString = ""; long numberAsLong = 0;
boolean numberIsValid = false; do {
/* Ask the user for a number. */
System.out.println("Please enter a number: "); try {
numberAsString = readIn.readLine();
System.out.println("You entered " + numberAsString); } catch (IOException ex){
System.out.println(ex); }
/* Convert the number into binary form. */ try {
numberAsLong = Long.parseLong(numberAsString); numberIsValid = true;
} catch (NumberFormatException nfe) { System.out.println ("Not a number!"); }
} while (numberIsValid == false); }
CHAPTER 1 GETTING STARTED WITH JAVA 8
Following is an example run of this program:
Please enter a number: No
You entered No Not a number!
Please enter a number: Yes
You entered Yes Not a number!
Please enter a number: 42
You entered 42
BUILD SUCCESSFUL (total time: 11 seconds)
The first two inputs did not represent valid values in the long data type. The third value was valid, and the run ended.
How It Works
Quite often our applications need to accept user input of some kind. Granted, most applications are not used from the command-line or terminal nowadays, but having the ability to create an application that reads input from the command-line or terminal helps to lay a good foundation, and may be useful in some applications. Terminal input can also be useful in developing administrative applications that you or a system administrator may use.
Two helper classes were used in the solution to this recipe. They are java.io.BufferedReader and java.io.InputStreamReader. The early portion of the code that’s using those classes is especially important to understand:
BufferedReader readIn = new BufferedReader( new InputStreamReader(System.in) );
The innermost object in this statement is System.in. It represents the keyboard. You do not need to declare System.in. Java’s runtime environment creates the object for you. It is simply “there” to be used.
System.in provides access to raw bytes of data from the input device, which is the keyboard in our example. It is the job of the InputStreamReader class to take those bytes and convert them into characters in your current character set. System.in is passed to the InputStreamReader() constructor to create an InputStreamReader object.
InputStreamReader knows about characters, but not about lines. It is the BufferedReader class’s job to detect line breaks in the input stream, and to enable you to conveniently read a line at a time. BufferedReader also aids efficiency by allowing physical reads from the input device to be done in different-size chunks than by which your application consumes the data. This aspect can make a difference when the input stream is a large file rather than the keyboard.
Following is how the program in Listing 1-7 makes use of an instance (named readIn) of the BufferedReader class to read a line of input from the keyboard:
numberAsString = readIn.readLine();
CHAPTER 1 GETTING STARTED WITH JAVA 8
3. BufferedReader breaks the character stream into lines of input. 4. readLine() returns one line of input to the application.
I/O calls must be wrapped in try...catch blocks. These blocks catch any exceptions that may occur. The try part in the example will fail in the event a conversion is unsuccessful. A failure prevents the numberIsValid flag from being set to true, which causes the do loop to make another iteration so that the user can try again at entering a valid value.
The following statement at the top of Listing 1-7 deserves some mention:
import java.io.*;
This statement makes available the classes and methods defined in the java.io package. These include InputStreamReader and BufferedReader. Also included is the IOException class used in the first try...catch block.
1-8. Documenting Your Code
Problem
You want to document some of your Java classes to assist in future maintenance.
Solution
Use Javadoc to place comments before any class, method, or field that you want to document. To begin such a comment, write the characters /**. Then begin each subsequent line with an asterisk (*). Lastly, close the comment with the characters */ on a line by themselves at the end. Listing 1-8 shows a method commented with Javadoc.
Listing 1-8. Comments Made in Javadoc Form package org.java8recipes.chapter01.recipe1_08;
import java.math.BigInteger;
public class JavadocExample { /**
* Accepts an unlimited number of values and * returns the sum.
*
* @param nums Must be an array of BigInteger values. * @return Sum of all numbers in the array.
*/
public static BigInteger addNumbers(BigInteger[] nums) { BigInteger result = new BigInteger("0");
for (BigInteger num:nums){ result = result.add(num); }
return result; }
/**
CHAPTER 1 GETTING STARTED WITH JAVA 8
public static void main (String[] args) {
BigInteger[] someValues = {BigInteger.TEN, BigInteger.ONE}; System.out.println(addNumbers(someValues));
} }
Comments can be added to the beginning of classes and fields in the same way. The comments are helpful to you and other programmers maintaining the code, and their specific format enables easy generation of an HTML reference to your code.
Generate the HTML reference by invoking the tool named Javadoc. This is a command-line tool that parses a named Java source file and formulates HTML documentation based upon the defined class elements and Javadoc comments. For example:
javadoc JavadocExample.java
This command will produce several HTML files containing the documentation for the class, methods, and fields. If no Javadoc comments exist within the source, some default documentation will still be produced. To view the documentation, load the following file into your browser:
index.html
The file will be in the same directory as the class or package that you are documenting. There will also be an index-all.html file giving a strict alphabetical listing of documented entities.
Keep in mind that the same rules apply when using the Javadoc tool as when using javac. You must reside within the same directory as the source file, or prepend the name of the file with the path to where the file is located.
How It Works
Generating documentation for applications from scratch can be quite tedious. Maintaining documentation can be even more troublesome. The JDK comes packaged with an extensive system for documentation known as Javadoc. Placing some special comments throughout your code source and running a simple command-line tool makes it easy to generate useful documentation and keep it current. Moreover, even if some of the classes, methods, or fields in an application are not commented specifically for the Javadoc utility, default documentation will still be produced for such elements.
Formatting the Documentation
To create a Javadoc comment, begin with the characters /**. Although optional since Java 1.4, a common practice is to include an asterisk as the first character of every subsequent line within the comment. Another good practice is to indent the comment so that it aligns with the code that is being documented. Lastly, close the comment with the characters */.
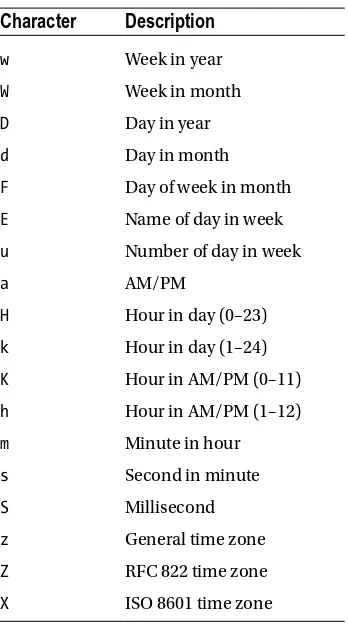
Javadoc comments should begin with a short description of the class or method. Fields are rarely commented using Javadoc, unless they are declared public static final (constants), in which case it is a good idea to supply a comment. A comment can be several lines in length, and can even contain more than one paragraph. If you want to break comments into paragraphs, then separate those paragraphs using the <p> tag. Comments can include several tags that indicate various details regarding the method or class that is being commented. Javadoc tags begin with an ampersand (@), and some of the common tags are as follows:
CHAPTER 1 GETTING STARTED WITH JAVA 8
You may also include inline links within Javadoc to reference URLs. To include an inline link, use the tag {@link My Link}, where link is the actual URL that you want to point at and My Link is the text that you want to have appear. There are also many other tags that can be used within Javadoc comments, including {@literal}, {@code}, {@value org}, and many others. For a complete listing, see the Javadoc reference on the Oracle Technology Network website.
Executing the Tool
The Javadoc tool can also be run against entire packages or source. Simply pass a package name to the Javadoc tool rather than individual source file names. For instance, if an application includes a package named org.juneau.beans, all source files within that package can be documented by running the tool as follows:
javadoc org.juneau.beans
To generate Javadoc for more than one package at a time, separate the package names with spaces as follows:
javadoc org.juneau.beans org.juneau.entity
Another option is to specify the path to the source files using the –sourcepath flag. For example:
javadoc –sourcepath /java/src
By default, the Javadoc tool will generate HTML and place it into the same package as the code being documented. That result can become a cluttered nightmare if you like to have source files separate from documentation. You can instead set up a destination for the generated documentation by passing the –d flag to the Javadoc tool.
1-9. Organizing Code with Packages
Problem
Your application consists of a set of Java classes, interfaces, and other types. You want to organize these source files to make them easier to maintain and avoid potential class-naming conflicts.
Solution
Create Java packages and place source files within them much like a filing system. Java packages can be used to organize logical groups of source files within an application. Packages can help to organize code, reduce naming conflicts among different classes and other Java type files, and provide access control. To create a package, simply create a directory within the root of your application source folder and name it. Packages are usually nested within each other and conform to a standard naming convention. For the purposes of this recipe, assume that the organization is named Juneau and that the organization makes widgets. To organize all the code for the widget application, create a group of nested packages conforming to the following directory structure:
/org/juneau
CHAPTER 1 GETTING STARTED WITH JAVA 8
package named org.juneau, physically move the source file into a directory named juneau, which resides within the org directory, which in turn resides within the root of the source folder for the application. The directory structure should look like the following:
/org/juneau/JuneauWidgets.java
The source for JuneauWidgets.java is as follows:
package org.juneau;
/**
* The main class for the Juneau Widgets application. * @author juneau
*/
public class JuneauWidgets {
public static void main(String[] args){ System.out println("Welcome to my app!"); }
}
The first line in the source contains the package statement, which lists the name of the package that the source file is located within. The entire package path is listed in the statement, and the names in the path are separated by dots.
Note A package statement must be the first statement listed within the Java source. However, there may be a comment or Javadoc comment written before the package statement.
An application can consist of any number of packages. If the widget application contains a few classes that represent widget objects, they could be placed within the org.juneau.widget package. The application may have interfaces that can be used to interact with the widget objects. In this case, a package named org.juneau.interfaces may also exist to contain any such interfaces.
How It Works
Java packages are useful for organizing source files, controlling access to different classes, and ensuring that there are no naming conflicts. Packages are represented by a series of physical directories on a file system, and they can contain any number of Java source files. Each source file must contain a package statement before any other statements in the file. This package statement lists the name of the package in which the source file resides. In the solution to this recipe, the source included the following package statement:
package org.juneau;
CHAPTER 1 GETTING STARTED WITH JAVA 8
Note When a class resides within a Java package, it is no longer referenced by only the class name, but instead the package name is prepended to the class name, which is known as the fully qualified name. For instance, because the class that resides within the file JuneauWidgets.java is contained within the org.juneau package, the class is referenced using org.juneau.JuneauWidgets, not simply JuneauWidgets. An identically named class can reside within a different package (for instance, org.java8recipes.JuneauWidgets).
Packages are very useful for establishing levels of security as well as organization. By default, different classes that reside within the same package have access to each other. If a source file resides within a different package than another file that it needs to use, an import statement must be declared at the top of the source file (underneath the package statement) to import that other file for use; otherwise, the fully qualified package.class name must be used within the code. Classes may be imported separately, as demonstrated in the following import statement:
import org.juneau.JuneauWidgets;
However, it is often likely that all classes and type files that reside within a package need to be used. A single import statement utilizing a wildcard character (*) can import all files within a named package as follows:
import org.juneau.*;
Although it is possible to import all files, it is not recommended unless absolutely necessary. As a matter of fact, it is considered a poor programming practice to include many import statements that use the wildcard. Instead, classes and type files should be imported individually.
Organizing classes within packages can prove to be very helpful. Suppose that the widget application that was described in the solution to this recipe includes different Java classes for each different widget object. Each of the widget classes could be grouped into a single package named org.juneau.widgets. Similarly, each of the widgets could extend some Java type or interface. All such interfaces could be organized into a package named
org.juneau.interfaces.
Any substantial Java application will include packages. Any Java library or Application Programming Interface (API) that you use includes packages. When you import classes or types from those libraries and APIs, you are really importing packages.
1-10. Configuring the CLASSPATH
Problem
You want to execute a Java program, or include an external Java library in the application you are executing.
Solution
Set the CLASSPATH variable equal to the directory location of the user-defined Java classes or Java Archive (JAR) files that you need to have access to for executing your application. Let’s say that you have a directory named JAVA_DEV located at the root of your OS drive, and all the files your applications needs to access are located in this directory. If this is the case, then you would execute a command such as the following:
CHAPTER 1 GETTING STARTED WITH JAVA 8
Or on Unix and Linux systems:
export CLASSPATH=/JAVA_DEV/some-jar.jar
Alternately, the javac command provides an option for specifying the location of resources that need to be loaded for an application. On all platforms, setting the CLASSPATH using this technique can be done via the -classpath option as follows:
javac –classpath /JAVA_DEV/some-jar.jar
Of course, on Microsoft Windows machines the file path will use the backslash (\) instead.
Note The javac –cp option may be used, rather than specifying the –classpath option.
How It Works
Java implements the concept of a class path. This is a directory search path that you can specify system-wide using the CLASSPATH environment variable. You can also specify the class path for a specific invocation of the JVM via the java command’s -classpath option. (See Recipe 1-3 for an example.)
When executing Java programs, the JVM finds and loads classes as needed using the following search order: 1. The classes that are fundamental to the Java platform and are contained in the Java
installation directory.
2. Any packages or JAR files that are located within the extension directory of the JDK. 3. Packages, classes, JAR files, and libraries that are loaded somewhere on the specified
class path.
You may need to access more than one directory or JAR file for an application. This could be the case if your dependencies are located in more than one location. To do so, simply use the delimiter for your operating system (; or :) as a separator between the locations specified by the CLASSPATH variable. Following is an example of specifying multiple JAR files in the CLASSPATH environment variable on Unix and Linux systems:
export CLASSPATH=/JAVA_DEV/some-jar.jar:/JAVA_LIB/myjar.jar
Alternatively, you can specify the class path via a command-line option:
javac –classpath /JAVA_DEV/some-jar.jar:/JAVA_LIB/myjar.jar
When loading the resources for a Java application, the JVM loads all the classes and packages that are specified in the first location, followed by the second, and so on. This is important because the order of loading may make a difference in some instances.
CHAPTER 1 GETTING STARTED WITH JAVA 8
Sometimes you’ll want to include all JAR files within a specified directory. Do that by specifying the wildcard character (*) after the directory containing the files. For example:
javac –classpath /JAVA_DEV/*:/JAVA_LIB/myjar.jar
Specifying a wildcard will tell the JVM that it should be loading JAR files only. It will not load class files that are located in a directory specified with the wildcard character. You’ll need to specify a separate path entry for the same directory if you also want the class files. For example:
javac –classpath /JAVA_DEV/*:/JAVA_DEV
Subdirectories within the class path will not be searched. In order to load files that are contained within subdirectories, those subdirectories and/or files must be explicitly listed in the class path. However, Java packages that are equivalent to the subdirectory structure will be loaded. Therefore, any Java classes that reside within a Java package that is equivalent to the subdirectory structure will be loaded.
Note It is a good idea to organize your code; it is also good to organize where you place your code on the computer. A good practice is to place all your Java projects within the same directory; it can become your workspace. Place all the Java libraries that are contained in JAR files into the same directory for easier management.
1-11. Reading Environment Variables
Problem
The application you are developing needs to make use of some environment variables. You want to read the values that have been set from the operating-system level.
Solution
Make use of the Java System class to retrieve any environment variable values. The System class has a method called getenv(), which accepts a String argument corresponding to the name of a system environment variable. The method will then return the value of the given variable. If no matching environment variable exists, a NULL value will be returned. Listing 1-9 provides an example. The class ReadOneEnvVariable accepts an environment variable name as a parameter, and displays the variable’s value that has been set at the operating-system level.
Listing 1-9. Reading an Environment Variable’s Value package org.java8recipes.chapter1.recipe1_11;
public class ReadOneEnvVariable {
public static void main(String[] args) { if (args.length > 0) {
String value = System.getenv(args[0]); if (value != null) {
System.out.println(args[0].toUpperCase() + " = " + value); } else {
CHAPTER 1 GETTING STARTED WITH JAVA 8
} else {
System.out.println("No arguments passed"); }
} }
If you are interested in retrieving the entire list of environment variables that is defined on a system, do not pass any arguments to the System.getenv() method. You’ll receive back an object of type Map having all the values. You can iterate through them as shown in Listing 1-10.
Listing 1-10. Iterating Through a Map of Environment Variables package org.java8recipes.chapter1.recipe1_11;
import java.util.Map;
public class ReadAllEnvVariables {
public static void main(String[] args){ if(args.length > 0){
String value = System.getenv(args[0]); if (value != null) {
System.out.println(args[0].toUpperCase() + " = " + value); } else {
System.out.println("No such environment variable exists"); }
} else {
Map<String, String> vars = System.getenv(); for(String var : vars.keySet()){
System.out.println(var + " = " + vars.get(var)); }
} } }
How It Works
The System class contains many different utilities that can aid in application development. One of those is the getenv() method, which will return a value for a given system environment variable.
You can also return the values from all variables, in which case those values are stored in a map. A map is a collection of name/value pairs. Chapter 7 provides additional information about maps, including a recipe showing in detail how to iterate over them.
CHAPTER 1 GETTING STARTED WITH JAVA 8
Summary
CHAPTER 2
New Features of Java 8
Java 8 has introduced a magnitude of new features, making it one of the most significant releases of Java in years. This chapter covers a handful of the new features of Java 8 and includes short examples of each. These recipes are meant to provide a brief overview of the some new features in Java 8 and to get you up and running quickly using them. This is by no means a comprehensive list of the new features that were introduced in Java 8, but more of a precursor of what to expect throughout this book. At the end of each recipe, you’re directed to the chapter in this book, or to an another resource, that covers the topic in more detail.
Java Language Enhancements
The release of Java 8 introduced a number of new features to the language, making it more productive, easier to manage, and more efficient. This section covers some of these new features via a variety of recipes.
2-1. Passing Functionality as a Method Argument
Problem
You want to write an action for a JavaFX button without generating an anonymous inner class.
Solution
Utilize a lambda expression to incorporate the action functionality using compact, inline syntax. The following JavaFX application contains a button that utilizes a lambda expression to encapsulate the functionality of the button, rather than an anonymous inner class.
public class Recipe_02_01 extends Application {
final Group root = new Group(); /**
* @param args the command-line arguments */
public static void main(String[] args) { Application.launch(args);
CHAPTER 2 NEW FEATURES OF JAVA 8
@Override
public void start(Stage primaryStage) { primaryStage.setTitle("Hello Lambda"); Scene scene = new Scene(root, 300, 250); Button btn = new Button();
Label message = new Label(); btn.setLayoutX(60);
btn.setLayoutY(80);
btn.setText("Invoke Lambda Expression"); btn.setOnAction((event) -> {
message.setText("Lambda expression invoked!"); });
root.getChildren().add(btn); message.setLayoutX(300/2 - 90); message.setLayoutY(30);
root.getChildren().add(message); primaryStage.setScene(scene); primaryStage.show();
} }
This JavaFX application produces a simple application that looks like Figure 2-1. When you press the button, the ActionListener, which is a lambda expression, is invoked.
CHAPTER 2 NEW FEATURES OF JAVA 8
How It Works
Lambda expressions are one of the new features of Java 8 that will have a tremendous impact on productivity and business logic. Lambda expressions are anonymous blocks of code that accept zero or more parameters, encapsulate a series of statements or an expression, and return a result. They are analogous to closures from other languages, being anonymous functions that can be passed into other code as needed.
The syntax of a lambda expression includes an argument list, a new character to the language known as the “arrow token” (->), and a body. The following model represents the structure of a lambda expression:
(argument list) -> { body }
The argument list for a lambda expression can include zero or more arguments. If there are no arguments, then an empty set of parentheses can be used. If there is only one argument, then no parentheses are required. Each argument in the list can include an optional type specification. If the type of the argument is not specified, then the type is derived from the current context.
Lambda expressions are built on functional interfaces, which are simply Java interfaces containing a single abstract method. Simply put, the lambda expression itself is an anonymous inner class that implements a functional interface, which can then be assigned to a variable and invoked. This recipe is merely a primer for lambda
expressions; to learn more about them, refer to Chapter 6.
2-2. Calling On an Existing Method from a Lambda Expression
Problem
You are using a lambda expression to call on a single existing method that implements a functional interface, and you’d like to shorten the length of the code required to perform this method call. Moreover, you want to be able to pass the method functionality as an argument.
Solution
Utilize a method reference to call on a single existing method that implements a functional interface. In the following example, a pool calculation class implements a functional interface in order to obtain the calculated volume of a pool. The functional interface Volume is as follows:
public interface Volume { double calculateVolume(); }
The PoolCalculator class implements Volume, as it contains an implementation for the calculateVolume() method. Therefore, that method can be called on via a method reference and assigned to a variable, which can then be passed as an argument as needed. The following code shows the PoolCalculator class.
public class PoolCalculator implements Volume { private double width;
private double length; private double minDepth; private double maxDepth;
CHAPTER 2 NEW FEATURES OF JAVA 8
public PoolCalculator(double width, double length,
public void setWidth(double width) { this.width = width;
public void setLength(double length) { this.length = length;
public double calculateVolume(){
CHAPTER 2 NEW FEATURES OF JAVA 8
* @return */
public double calculateGallons(Volume vol){ return 7.48 * vol.calculateVolume(); }
/**
* @return the minDepth */
public double getMinDepth() { return minDepth;
}
/**
* @param minDepth the minDepth to set */
public void setMinDepth(double minDepth) { this.minDepth = minDepth;
}
/**
* @return the maxDepth */
public double getMaxDepth() { return maxDepth;
}
/**
* @param maxDepth the maxDepth to set */
public void setMaxDepth(double maxDepth) { this.maxDepth = maxDepth;
} }
A method reference can now be used to assign the functionality of the calculateVolume() method to a variable. In the following code, the method reference is assigned to a variable identified as volume, and then the volume variable is passed to the calculateGallons() method.
PoolCalculator calculator = new PoolCalculator(); calculator.setLength(32);
calculator.setWidth(16); calculator.setMinDepth(4); calculator.setMaxDepth(8);
Volume volume = calculator::calculateVolume; double poolVolume = volume.calculateVolume();