Table of Contents
The Significance of Ret r o Com put er Syst em s You Really Can Lear n t o Pr ogr am
My Vision for This Book
Chapt er 1. Br inging Your Ret r o Machine t o Life Set t ing Up Your TRS- 80 Color Com put er Color Com put er St or age Devices Set t ing Up Your At ar i 400/ 800 I nst allat ion I nst r uct ions I nst alling t he Power Supply Connect ing t he At ar i t o a Monit or Connect ing Your At ar i t o a TV I nst alling Your Disk Dr ive Connect ing t he Joyst ick Set t ing Up Your Com m odor e 64 Set t ing Up Your Apple I I
Chapt er 2. Sim ply Com plicat ed Gam e Pr ogr am m ing Gam e Syst em s: Sim ilar but Differ ent
The 1960s
The Birt h of Vect or Gr aphics Space War s
A New Age of Video Gam es Space I nvader s
Conclusion
Chapt er 4. Assem bly Language Under st anding Assem bly Language Moving Mem or y Ar ound in Your Com put er
Under st anding Num ber s and Mat h in Assem bly Language Addr essing Modes
Wor king w it h t he St ack Syst em Flags
Logic and Br anching I nst r uct ions Facing t he Code
Appr oxim at ing Shapes wit h Lim it ed Pixels Sym bolism
Visual Cues
Put t ing Them Toget her Conclusion Cr eat e a Gener ic Display List
Find t he Locat ion of Your Display List in Mem or y Find t he St art of Video Mem ory
Cr eat ing Your New Display List The Load Mem or y Scan I nst r uct ion
Swit ching Back t o Video Mem or y Polishing Off t he Display List And Then Ther e Was Light A Mor e Advanced Display List Cr eat ing a Gener ic Display List I nsert ing Text Mode Lines What 's Next ?
Wr it ing DLI I nt er r upt s Wr it ing a Display List
Wr it ing t he Code for Your Display List I nt er r upt Guar ding t he Com put er 's Mem or y
Wr it ing t he Act ual Heart of t he Display List I nt err upt Conver t ing Assem bly Language Code t o Decim al I nsert ing t he Display List int o Mem or y
Set t ing t he Video Mode on t he Com m odor e 64 Conclusion
Chapt er 7. Hacking t he Video Buffer
I dent ify t he Char act er ist ics of t he Cur r ent Gr aphics Mode Video Buffer Hacking 101
Placing Dat a in t he Video Buffer Page Flipping
Conclusion
Chapt er 8. Adding Player I nput , Physics, and AI Cr eat ing Your Com put er 's I nt elligence Tr acking Algor it hm s
Evasion Algor it hm s
Bet t er Tr acking and Evasion Algor it hm s Pat t er ns
Chapt er 9. Sound Effect s
How Sound Wor ks in t he Real Wor ld
Mim icking Real Wor ld Sounds on a Ret r o Gam e Machine Com put er s wit h Special Sound Har dwar e
The Com m odor e 64 The At ar i 400/ 800 Basic Sound Com m and Assem bly Sound Pr ogr am m ing Conclusion
I nit ializat ion The Gam e Loop Cleanup
Pr ogr am m ing Text - Based Gam es What I s a Text - Based Gam e? Building Your Fir st Text - Based Gam e The St or y
The Lay of t he Land
Cr eat ing Things That Go Bum p in t he Night Tools of t he Tr ade
Cr eat ing a Language for Your Gam e Wr it ing t he Code for Your Gam e Mapping Out Your Pr ogr am Mapping Out Your Wor ld
Jum ping fr om Text - Based Gam es t o Gr aphics- Based Gam es Conclusion
I ndex
Copyright
© 2005 by Premier Press, a division of Course Technology. All rights reserved. No part of this book may be reproduced or transmitted in any form or by any means, electronic or mechanical, including photocopying, recording, or by any information storage or retrieval system without written permission from Course PTR, except for the inclusion of brief quotations in a review.
The Premier Press logo and related trade dress are trademarks of Premier Press and may not be used without written permission.
Portions of the material in this book are copyright: ©A. S. Douglas 1952; ©Willy Higinbotham; ©Digital Equipment Corporation; ©Tech Model Railroad Club; ©1967 Ralph Baer; ©1972 Magnavox; ©1976 Fairchild Camera & Instruments; ©Taito, Corp. All Rights Reserved.; ©Atari, Pac-Man™ ©Namco Limited, All Rights Reserved.; Donkey Kong™, ©Nintendo. Games are the property of their respective owners. Nintendo of America, Inc.
All other trademarks are the property of their respective owners.
Important:Course PTR cannot provide software support. Please contact the appropriate software manufacturer's technical support line or Web site for assistance.
Course PTR and the author have attempted throughout this book to distinguish
Information contained in this book has been obtained by Course PTR from sources believed to be reliable. However, because of the possibility of human or mechanical error by our sources, Course PTR, or others, the Publisher does not guarantee the accuracy, adequacy, or completeness of any information and is not responsible for any errors or omissions or the results obtained from use of such information. Readers should be particularly aware of the fact that the Internet is an ever-changing entity. Some facts may have changed since this book went to press.
Educational facilities, companies, and organizations interested in multiple copies or licensing of this book should contact the publisher for quantity discount information. Training manuals, CD-ROMs, and portions of this book are also available individually or can be tailored for specific needs.
Library of Congress Catalog Card Number: 2005921081
Printed in the United States of America
05 06 07 08 09 BH 10 9 8 7 6 5 4 3 2 1
Course PTR, a division of Course Technology 25 Thomson Place
Boston, MA 02210
http://www.courseptr.com
Publisher and General Manager of Course PTR:Stacy L. Hiquet
Associate Director of Marketing:Sarah O'Donnell
Marketing Manager:Heather Hurley
Manager of Editorial Services:Heather Talbot
Senior Acquisitions Editor:Emi Smith
Series Editor:André LaMothe
Marketing Coordinator:Jordan Casey
Technical Reviewer:Alex Varanese
PTR Editorial Services Coordinator:Elizabeth Furbish
Interior Layout Tech:Marian Hartsough
Cover Designer:Mike Tanamachi
Indexer:Sharon Shock
Proofreader:Sara Gullion
Dedication
Then she said, "I want you to love me as a poet loves his sorrowful thoughts. I want you to remember me as a traveler remembers a calm pool in which his image was reflected as he drank its water. I want you to remember me as a mother remembers her child that died before it saw the light, and I want you to remember me as a merciful king remembers a prisoner who died before his pardon reached him. I want you to be my companion, and I want you to visit my father and console him in his solitude because I shall be leaving him soon and shall be a stranger to him."
Kahlil Gibran,Broken Wings
To my mother who has passed away. This book, like all positive things I do, is dedicated to you and your memory.
"He was a genius—that is to say, a man who does superlatively and without obvious effort something that most people cannot do by the uttermost exertion of their abilities."
Robertson Davies,Fifth Business
This book is dedicated to all of the legends that made the video game industry, the computer industry, and indeed, the way of life we know today possible.
Acknowledgments
proud of. Only the faster I ran, the slower I seemed to move through life. After years of running and getting nowhere, I crashed and burned. There were many who loved me and wanted to help, but who can understand a motherless son?
I thank my Grandmother, Hazel Cooper; my Father, Earl Carey; and my Uncle Farion; my aunts; my uncles; my cousins; my sister and brother, Earnessa and Earlin Carey; my teachers; everyone who toiled with me and trained me over the years. I know now that it is not easy to raise a man. We did not always agree, but in the end, we all have to live on this Earth together. We may as well love each other and be done with it. I have resolved myself to do just that.
I thank my wife, Mitchlyn Carey. When I was in a dark place, she was able to bring me light. The two things I always wanted in life were to achieve greatness and to raise my family. The path to having my own family always seemed uncertain, because with all of the troubles of this world, I knew I had little control over finding someone I could trust to the extent required for marriage. You came and allowed me to find myself, and you helped to bring me from a very dark place. I love you and I appreciate you, especially for bearing with me over the years as I moved from one project to the next, still trying to accomplish that one great elusive goal that I could not identify. Most of all, I thank you for my son, Zurial Earl Carey.
Zurial, what was I doing with my life before I had you? I do not even remember because it is impossible for me to envision a world without you. You give my life new meaning. Watching you grow amazes me. How could so pure an entity exist? I love you, and whatever positive thing it takes for me to ensure that you reach your full potential will be done.
I need to thank my boss Kathy Ingraham for being so supportive of me in this venture. When I needed time off to work or to recover from a long weekend of labor or even to take a trip to California to go to conferences, I always had full support.
I need to thank André LaMothe on so many levels. Thanks for basically starting the whole game programming book industry. Like so many programmers around the world, I gained much knowledge from the books André wrote. This game programming series created an opportunity for my voice to be heard. He took a chance on me, and I will never forget it. Thank you.
I need to thank my project editor Sandy Doell. She was patient and stern at the same time. She kept me focused and made sure I got through author review. I need to thank Alex Varanese for helping me to keep my facts straight. I need to thank my acquisitions editor Emi Smith for her help. I need to thank Heather Hurley for helping me with the
marketing of this book.
Last, but by no means least, I need to thank all of the legends who created the game industry: Ralph Baer, Willy Higinbotham, Nolan Bushnell, Steve Jobs, Steve Wozniak . . . the list goes on. I thank everyone who made computers and their software. Everyone who grew up on video games and all who are now growing up on video games. All of you have helped to make the game industry what it is today.
About the Author
EARLJ. CAREYbegan programming on the TRS-80 color computer at the age of 5. He has created numerous C/C++, Visual Basic®, and assembly programs. He now leads a fulfilling career as a computer programmer and graphic artist and is currently the chief graphic artist/programmer of Capital City Marketing in Nassau, Bahamas. Carey recently delivered a lecture on Retro Game Programming at the Vintage Computer Festival 7.0. Visit his Web site athttp://www.ristudios.net.
About the Series Editor
ANDRÉLAMOTHE, CEO of Xtreme Games LLC and the creator of the XGameStation, has been involved in the computing industry for more than 27 years. He wrote his first game for the TRS-80 and has been hooked ever since! His experience includes 2D/3D graphics, AI research at NASA, compiler design, robotics, virtual reality, and
telecommunications. His books are best sellers in the game programming genre and his experience is echoed in the Thomson Course Technology PTR Game Developmentbooks. You can contact André [email protected].
Letter from the Series Editor
Over 25 years ago in the mid-1970s, there was a "singularity" in the computer industry where in a single moment everything changed. This moment was, more or less, the introduction of the "computer" to the masses. Now, some historians will argue when this actually occurred. Some will say in 1974 when the Altair was released, others will argue it was the release of the Apple II in 1977. Still others will say that the creation of Atari and PONG in 1972 was the big bang. Whomever you tend to agree with more, there is no arguing that in a short period of time we had a "punctuated" evolution in the computing industry.
selling computer.
So what do all these companies and historic events have in common? Video games! For example, Nolan Bushnell, founder of Atari in 1972, wanted to create games; specifically, he wanted to create a cheap, high quality version of the Spacewar!game he had played while attending college. The results of this were Computer Spaceand the first steps of Atari. Atari was the quintessential, prototypical model of all the Silicon Valley companies to follow. Nolan Bushnell was the "rock star" of technology and games and the first Silicon Valley millionaire with the jet and the $25M in change to prove it from the sale of Atari. But wait; there's more. . . .
At the same time Atari was in its heyday in the late 1970s, a young
programmer/tech named Steve Jobs was working there. Steve had a friend, Steve Wozniak, and together they would create Apple Computer. The interesting thing, however, is that the Apple computer and Steve Jobs'
experience with customer satisfaction, marketing, and human factors all came from Atari. Steve Wozniak, the technical genius behind the Apple I/II, made the Apple simply to play games.
The stories go on and on, all of them intertwined, but all of them connected to video games in one way or another. Even the great duo, John Romero and John Carmack, were Apple programmers first; they turned to IBM PCs later.
Retro game programming is not only fascinating from a technical standpoint, but the history and stories are even more fascinating to study. Entire empires were created because of video games! And the technology we have today has its roots in games, so studying this material and getting into the minds of the early hardware and software developers is a treat that everyone should indulge in. This book will introduce you to the brilliance of these early innovators, their machines, and their games.
With that, please enjoyRetro Game Programming: Unleashed for the Massesas your first step on this incredible journey of discovery.
Sincerely,
André LaMothe 2005
Game DevelopmentSeries Editor
If we value the pursuit of knowledge, we must be free to follow wherever that search may lead us. The free mind is not a barking dog, to be tethered on a ten-foot chain.
Adlai E. Stevenson, Jr. (1900–1965),
speech at the University of Wisconsin, Madison, October 8, 1952
Twenty-one years ago, I read a book that changed my life. Today I hope to write a book that will change yours. This is not a self-help book or some form of new philosophy. This book is the gateway to the inner sanctums of game programming, past and present. Bold words, I know, but I believe in this book with my whole heart. To someone who has never touched a keyboard or written a single line of code, game development can seem daunting. In the old days, this was usually the result of a lack of information. Game programming books weren't available at your local bookstore, so it was very difficult to learn the skills needed to build games unless you were very intuitive and willing to dedicate a large amount of your time to trial and error.
Today, game programming is difficult to learn because there is almost too much
information: DirectX, OpenGL, Vertex shaders, pixel shaders . . . the list goes on and on. Ironically, most information about modern computer systems is in the form of closely guarded trade secrets. Even if this were not the case, it would take a lifetime for the average person to master all that information. Finally, even if he could master it, the hardware would be obsolete long before he could use his knowledge!
In the 21 years that I have been programming, two things have not changed: Computers are based on binary logic, and the basic structure of games has not changed. It is these two facts that give me the courage to call this book the gateway to the game
programming world past and present. Master the past to understand the present. The book I read 21 ago that changed my life, was the Users' Manual for the original TRS-80 color computer. It made computer programming easy to learn and formed the foundation for my entire programming career. The goal of this book is to make retro game programming easy for anyone to learn. After you are able to understand the underlying principles of retro game programming, it will be easier to understand the complexities of modern game programming.
By the end of this book, you will not only be building games, but you will have the foundation you need to understand how today's modern games work. If you still have questions, please feel free to contact me [email protected]
or [email protected]. I will help you in any way possible. You can also visit my Web site atwww.ristudios.netfor more information and a chance to interact with your fellow retro game programmers around the world.
Computer programming has been very rewarding to me. Exactly 80.7695 percent of my life has revolved around either programming computers, fixing computers, or just making them do really "cool things." It is my hope that, through this book, you will find this journey as rewarding as I have.
The Significance of Retro Computer Systems
Every generation makes discoveries and innovations that are important. Every so often, a generation comes along and makes discoveries so profound that they change the way we think and live, and alter the very fabric of our lives. The innovation that was the catalyst for virtually all modern development over the past 20 years is the computer. The
machines studied in this book are a part of a great legacy that should be preserved. Future generations need to know the role they played in the development of the computer
industry, which in turn, has had an undeniable and absolute effect on society as a whole.
A wise man once said that, "The more things change, the more they remain the same." My grandfather used to tell me, "The only thing constant is change." When those two thoughts merged in my mind, the result was the idea that "everything is constantly changing into another form of the same thing." For example, take the computer industry; new technologies come out every day that render ones only a little older obsolete. Yet the exact same principles are used as the foundation for both. You can take the principles of assembly language programming that you learned programming an Apple IIe and use them, with slight modifications and a memory map, to write code for an 8086, 286, 386, 486, and straight up to whatever happens to be the most advanced computer system in use as you read this book. While you may not use these systems to run your business, the principles that you will learn programming these machines will never be completely obsolete.
There is a big difference between a programmer and a normal person who reads the following in a computer manual in bold caps:
"THIS COMPUTER SYSTEM CANNOT PERFORM ANY OPERATION THAT IS NOT DESCRIBED IN THIS MANUAL."
The "normal" person looks at the list to see if the features he needs are available. If they aren't, he moves on to another computer system. The programmer reads the same list, smiles to himself, takes a deep breath, and then spends the next sleepless week coding until he has created the features that the manual claimed were impossible.
Pushing computers beyond their limits is a key element in the spirit of the programmer. No other type of programming pushes personal computers harder than game
programming. By learning game programming you will learn how to make use of every single piece of disk space, RAM, and silicon that the computer has.
software application pushes the computer to its limits the way video games do. Even today, when processors have long since crossed the multi-gigabyte milestone, computer games are pushing the boundaries of what a PC can do by fueling the development of ever more powerful and sophisticated video cards. The level of real-time photo-realism that is currently possible is staggering, and it is still growing. What is even more staggering is the fact that such technology is available to home users. "Necessity is the mother of invention," and no other application requires the same level of real-time 3D rendering and powerful processors that games do. Without games, I'm sure these
technologies would still have been developed, but I think that such advanced technology might only have been available to universities or large corporations, just as mainframes were in the early days of computers. If there were no real need for individual users to have powerful desktop machines, they wouldn't exist.
Old School Meets New
For a long time, people have said that assembly language programming was dead. Every game programmer on the planet knew that this was absurd, yet that strange idea persisted. Occasionally though, something would happen to turn that idea on its head. When Intel released its new MMX technology, for
instance, the only way to take advantage of the processor's full functionality was through the use of assembly language because these features had yet to be integrated into any of the high level languages! These features consist of 57 multimedia instructions that could perform functions normally and handle my video and sound cards, such as Digital Signal Processing (DSP). Programmers used assembly to create "MMX-enabled" software, which could use this new technology.
With the advent of Application Programming Interfaces (APIs), such as OpenGL and DirectX, many games today do not make use of assembly language programming! Instead of writing fast screen routines and other common functions needed to create a game, most programmers use the graphic functions found in the previously mentioned APIs (DirectX and OpenGL). Although many programmers might still use assembly language to program certain areas of the game or even to improve the speed and power of DirectX itself, computer processors are becoming faster every day, and high speed computer systems are becoming more inexpensive, so the need for such
optimizations is, for the most part, unnecessary—with one exception—the video card.
programmers is not so much getting the program itself to run faster but getting these smaller programs that are being executed by the GPU on the video card to run faster. Ironically, these programs are written in two languages: one
resembling C, and another resembling assembly language.
What this means for you is that the optimizations you must learn in order to write fast games on a retro game machine are the same kinds of optimizations that you must make in order to make these vertex and pixel shaders run faster. Age-old programming methods are the same ones used to perform today's most high tech programming!
Why not just learn to program vertex and pixel shaders on a PC? Well, for many people, this is an option, but for others, it is not. Today's computers, although more powerful, are more difficult to learn to program. These machines are a lot more complicated than retro game machines. There is much more that you need to know in order to write a game for a modern PC than you needed to know to write a game for a retro game machine.
To exacerbate the problem, there is an ever-increasing level of secrecy around today's hardware—"security by obscurity." Computer designers and
manufacturers want to keep a competitive edge by making the inner workings of their hardware a closely guarded secret. When the computer industry was young, hobbyists and hackers were encouraged to experiment with computers. To that end, every single piece of information about the computer system was made public, including schematic diagrams of how the entire system was wired together! This information was often included in the Owners' Manual. Try finding it in the manual of any computer that you buy today—assuming that it even comes with a manual.
If you want to learn hard core programming, you have two choices: you can start on a modern PC where many things are mysteriously undocumented and you have to learn a new language. Or you can start on a retro game machine where everything about the computer system is laid out plainly, and the only thing that you have to learn is how to practice good programming. By choosing the latter and reading this book, you will have a firm foundation from which to learn how to program today's modern computer systems.
You Really Can Learn to Program
grasp of programming principles, the path gets much easier and you can adapt to almost any programming language.
My goal in this book is to make retro programming as easy to understand as possible, while explaining the most advanced programming concepts in operation on these machines. If you follow along and apply yourself, you will be amazed at what you are able to do.
My Vision for This Book
I called this bookRetro Game Programming: Unleashed for the Masses, but it could just as easily have been calledThe Joy of Programmingafter the famous line of cookbooks. The vision for this book is that even someone who has never touched a keyboard can learn how to program retro game machines, and people who are already able to program retro game machines will learn to do it better.
In writing this book, I am not trying to create blockbuster games. My goal is to make the concepts behind blockbuster retro games easy to understand so that you can create them. I want to make a cookbook of sorts. The last chapter contains recipes for games.
Everything up to that point is designed to help you understand the ingredients used in those recipes. This way, after you see how I have made my games, you can take those same recipes, modify them, and get started making games of your own.
You may want to go about reading this book in several different ways, but I will suggest two.
First of all, you might try reading the first part of the book first to understand how all this stuff works. Then you could read the chapters where we actually build games to see the concepts all put together. Next, start writing your own games.
I think the best way to use this book, however, is to set up your machine or emulator, fire up your assembly program, and load in the source for one of the games. Run the game and play it a few times. Next, just look at the code and see if you understand what is going on. Now readChapter 10, "Putting It All Together: Building Games," to cement your knowledge of how the game was made and how it works. If you are unsure about a topic, then flip over to the chapter where that topic is discussed, read it, understand it, and then go back to deciphering the program. When you are done, you should know how to make your own arcade game!
Even though I gave you these suggestions, I would like for you to read this book the way that makes you feel comfortable. You know best what that is.
Chapter 1. Bringing Your Retro
Machine to Life
Setting Up Your TRS-80 Color Computer
The TRS-80 Color Computer (also known as the COCO) is a "deceptively" easy machine to work with. One of the great things about this machine is that you do not need to have a degree in computer engineering in order set it up. Furthermore, when the machine starts up it has everything you need to start programming right there onscreen in front of you. There are no diskettes to load or operating systems to worry about. There are operating systems such as Disk Basic and OS9 (not to be confused with Apple's operating system) and disks available for the color computer but you do not need to even look at these things until you are ready to.
Take a look at the photo of the back of the TRS-80 inFigure 1.1.
Figure 1.1. Photo of the back of the TRS-80COCO/ COCO2.
There are three switches and five ports. Starting at the left, the first thing you see is the reset switch. When you press this button and the machine is turned on it will reset the machine. What this means is that it will clear memory and all of the registers, basically placing the machine into the state that the machine was in when the computer first started. When the rest is completed you will see an OK onscreen.
Second from the left is the cassette port. This is where you plug your cassette player into the color computer to use as a storage device.
Next are two joystick ports. This is where we connect our joysticks in order to play arcade video games.
Sixth over from the left is the channel selection switch. This switch allows you to choose between using channels 3 or 4 on your TV screen to view the computer's output. The 7th element from the left on the back of the computer is the TV connection. This is where you will plug in the cable that connects your computer to the TV.
Finally the eighth element from the left is the power switch that turns the computer on and off. Over to the far right is the built-in power cord.
The beauty of this machine is that if all you want to do is jump in and start programming, we may completely ignore five of the eight elements on the back of the machine. As you advance and your knowledge of the machine expands, you can make use of the other elements. The greatest feature of this machine is that you can easily get started using its basic features without being intimidated by its more complex elements. As your
knowledge grows, you can move on and make use of more and more of the computer's resources.
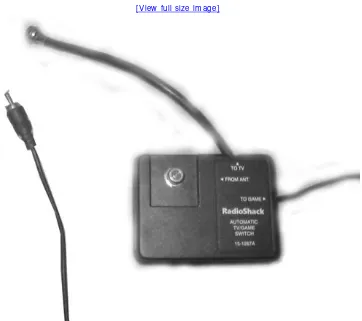
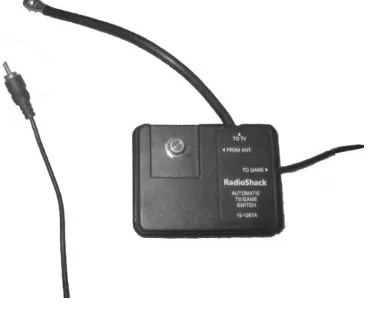
Figure 1.2is a photo of an RF switch.
Figure 1.2. Photo of the RF switch.
This is all you need to get started programming the TRS-80. ExamineFigure 1.3.
Figure 1.3. Diagram of basic TRS-80 color computer installation.
As you can see from the diagram, all that you need to get started programming is to connect the computer to your TV using an RF switch and then plugging in the machine's power cord.
Turn on the machine by pressing the power switch and you are good to go.
Right now your screen should look like the screen shown inFigure 1.4.
You are now in extended color basic (or color basic if you are following along on a COCO1). The text onscreen tells you which version of basic you are using. Also note that you may have a color computer that has been upgraded to extended basic, in which case, you will know which system you have by looking at the case. (The COCO1 has a gray case while the COCO2 has a white case.)
Color Computer Storage Devices
You have two options for storage: disk drives or cassette tapes, discussed in the following sections.
Cassette Tapes
We will discuss cassette tapes first. Fortunately, the tape cassette is very easy to install.
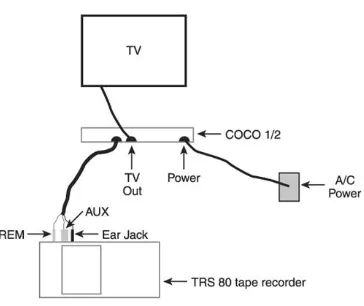
Figure 1.5is an illustration of how to install the TRS-80's CTR-80A cassette recorder. There are other cassette recorders that may work, but the connection will be different, and there is no guarantee that they will function correctly.
One end of the cable has a single connection, pictured inFigure 1.6.
Figure 1.6. Illustration showing the connection that plugs into the computer.
Next, take a look at the three plugs on the other end of the cable, illustrated inFigure 1.7.
Figure 1.7. Illustration of the other end of the cable.
The small gray plug connects to the REM jack, the large gray plug connects to the AUX jack, and the black plug connects to the ear jack.
Finally, plug the recorder power cord into the wall's power supply.
Disk Drives
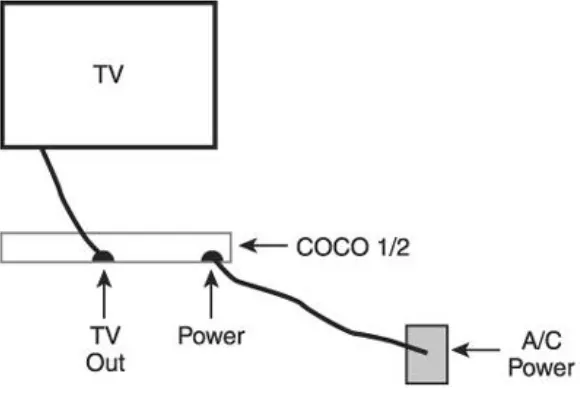
Setting up the floppy disk drives is just as easy. Look at the diagram inFigure 1.8.
Figure 1.8. Diagram of the installation of the floppy disk drive.
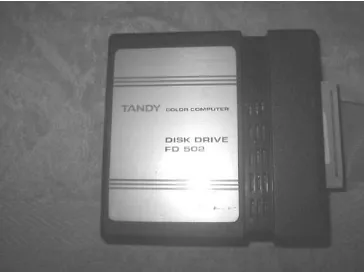
There are two cables coming out of the floppy disk drive. One looks like a power cord, and the other looks suspiciously like a game cartridge. This appearance is a hint as to how the floppy drive is connected. The cable that ends with an improvised cartridge case (shown inFigure 1.9) is plugged into the TRS-80's ROM drive on the right side of the computer.
Next we plug the power cord into the wall socket. After turning the power switch on the back of the floppy disk into the on position, you are ready to go. When you turn on your computer with a disk drive connected, the Disk Basic operating system will automatically be loaded which will give you the ability to interact with the disk drive.
Setting Up Your Atari 400/800
Before you can use the Atari 800, you have to set it up. The exact cables that you need to install an Atari 800 vary slightly depending on whether you are connecting it to a TV or to a monitor. Following is a list of the devices that you will need to install your Atari.
Power supply (Figure 1.10)
Serial Cable (Figure 1.11)
Figure 1.11. Serial Cable: This is used to connect the computer system to the disk drive.
Joy Stick (Figure 1.12)
Figure 1.12. Joystick: Of course no video game system would be complete without one of these. You will use this to control all of the action on your
Disk Drive (Figure 1.13andFigure 1.14)
Figure 1.13. Atari 810 disk drive front view: This is used to store your programs.
Figure 1.14. Atari 810 disk drive rear view: This is used to store programs.
Figure 1.15. Generic RF switch: This is used to connect your Atari to the television.
In Line connector (Figure 1.16)
Figure 1.16. In-line connector: You will have to use this along with your RF Switch to connect the Atari to your TV.
Video Cable (Figure 1.17)
Installation Instructions
Now, you have gathered all the parts needed to fire up the Atari 800, so let's bring this "baby" to life.
Installing the Power Supply
First things first; we have to give our machine some power. Look at theFigure 1.11
above for a picture of the power supply. Set the Atari before you with the keyboard facing you. Put your hand on the right side of the machine and turn that end of the Atari to face you. What you see should look likeFigure 1.18.
Figure 1.18. Side view of the Atari 800.
Monitors and Receivers
At first glance a TV and a computer monitor may seem to be exactly the same. Indeed, today with the plasma screens being used for both television and
image than television. The downside is that they usually do not have the circuitry needed to convert television signals to an image on the screen. A television set does not have the same high resolution of a computer monitor, but it does possess the circuitry to convert a television signal to an image on its screen.
When you connect the Atari to a computer monitor, it passes a standard composite signal to the monitor. A composite signal carries the data that determines the brightness and color of each point on the screen.
Things get a bit more involved when you connect your television to the Atari. The television was designed to receive a composite signal that has been mixed with an RF (radio frequency) signal. A composite signal has all of the
information that is needed to display an image on the screen. The problem is that a composite signal is not strong enough to travel through the air.
If all we had were composite signals, broadcast television would be impossible. RF signals are strong enough to travel great distances through the air. These are the signals that are used on AM and FM radios. By combining RF signals with composite signals, we can send television images great distances through the air.
In order for your Atari to display images onscreen, it has to take its standard composite signal and combine it with an RF signal so that the telvision is used for receiving.
This technique, which is calledcrowbar modulation, was actually invented by Mr. Ralph Baer as a way to display the images from his games on television screens.
The connections that you see going from left to right are as follows:
• Monitor port: This is where we are going to plug our monitor into the computer. • Serial port: This is where we connect the disk drive to the computer.
• Channel selection switch: You can use this to decide whether your Atari should function on channel 2 or 3 if you choose to use a TV to play your games.
• Power switch: This is the master switch, which is used to turn the Atari off and on. • The power port: This is where the power supply is plugged in.
Be sure that the power switch on the power supply is in the off position. Pick up your power supply and examine both ends. You will notice that one end looks just like a regular drop cord. Plug this end into your wall socket or surge. InFigure 1.19, you will see a picture of the other end of the power supply. Plug this end into the power port of your Atari 800.
Connecting the Atari to a Monitor
You can use either a TV or a computer monitor to view the action on your Atari.
First, we will go through the steps for connecting your Atari to a computer monitor.
Figure 1.20pictures the monitor port on the Atari. Figure 0.21 is a picture of a generic video cable. One end of this cable separates into four separate cables; the other is round and cylindrical. It is this cylindrical end that we are interested in first. Look inside this end of the cable and make note of the pattern of the pins inside. Now, look at the pattern of the holes in the monitor port of the Atari. You will see that they both form a half circle as seen inFigures 1.20and1.21.
Figure 1.21. Be sure to match the patterns of the Atari's monitor port and the generic video cable.
Now take this same end of the cable and hold it just below the monitor port, shown in
Figure 1.21.
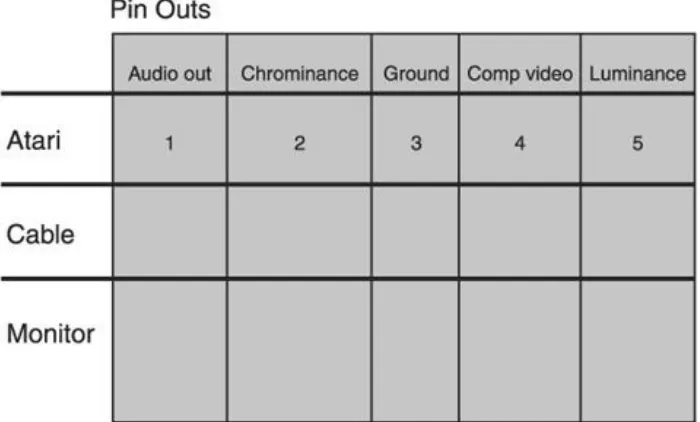
Turn the cable until the patterns of the port and the cable line up with each other. Now push the cable into the port. Connecting the other end of the cable to the video monitor is going to be tricky. You have to get the pinout for the generic video cable. This tells you which pin on the cylindrical end of the cable corresponds to which pin on the other side of the cable. This is very important for you to know when connecting any of these computers (except the Apple) to your monitor. Next, after finding this information, you will need to know the pinout information for the Atari 800's monitor port. This
information is provided for you inFigure 1.22.
Look atFigure 1.23carefully. Make note of which pin is used to transmitluma, which transmitschroma, and which transmitsaudio. Now carefully pull out the monitor cable from the Atari and hold it as shown inFigure 1.23.
Note
Chromais short for chrominance and refers to color.Lumais short for
Luminance and refers to brightness. The Chroma line controls the colors on the screen while the Luma line controls the brightness of the colors on the screen. Theaudioline transmits the sounds that people playing your game are going to hear.
Make a note of which pin on the cable corresponds to the connection on the monitor port for Luma. Now make a note of which pin connects to the connection for Chroma and Audio. Now you have all of the information you need to hook up your monitor. This information is laid out inFigure 1.24.
Figure 1.24. A diagram of all the information you need to connect your Atari to a computer monitor.
On the back of your monitor, you will see connections labeled Luma, Chroma, and Audio. Use the pinout information that you found for your generic video cable to identify which cable is transmitting luma, audio, and chroma from the Atari and connect them to the appropriate port on the monitor.
Most of you will be connecting your Atari to a TV though. For this configuration you will need three things:
• An RF switch
• An inline connector
• A TV
Located at the rear of the Atari you will find a built-in RF cable. The original Atari came with its own RF switch, which had a female input. For this reason, the built-in RF cable on the back of the Atari had a male connector (take a look atFigure 1.25for an example of the differences between male and female connectors). Most RF switches today have a male connection that is designed to plug into a female socket at the back of the computer device you are working with. For this reason, you probably will not be able to directly connect your Atari to your RF switch unless you are lucky enough to find an original Atari RF switch.
Figure 1.25. The relationship between male and female connectors.
This is where the inline connector comes into play. The inline connector has female connections on both sides. That helps us because we can connect the RF switch to one end and the Atari 800 to the other, as seen inFigure 1.26.
Figure 1.26. You can use an inline connector to hook the Atari up to your TV using a modern RF switch.
It's a Boy!
connection will be concave and the other will be convex. The convex connection will typically plug into the concave. As an example of this, think about when you plug your TV in to a wall socket. The plug from the TV is convex and is called male. The wall socket is concave and is called female. The male drop cord plugs into the female wall socket.
Installing Your Disk Drive
Now it is time to connect your disk drive. First, get your second power supply and plug the appropriate end into your wall socket or surge protector; plug the other end into the power socket on the disk drive. Next connect one end of your serial cable to the disk drive and the other end to your Atari as shown inFigure 1.27.
Figure 1.27. Both ends of the serial cable are identical, so don't worry about which end goes where. After it is properly oriented it will fit just fine.
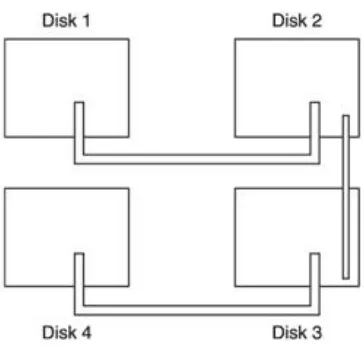
Now you must adjust the jumpers at the back of the disk drive so that the Atari will recognize this as disk one. Take a look back atFigure 1.14to see a picture of the rear of the Atari 810 disk drive. You will notice that there are two identical I/O connectors. The disk has two connectors so that we candaisy chaina number of disks together. What this means is that we could actually string a number of disk drives together by connecting a serial cable from the Atari itself to the first disk drive by inserting the cable into one of the I/O connectors. We could then connect a second disk drive by running a serial cable from the second I/O connector to one of the I/O connectors on the second disk drive. This process can go on until you have connected a total of four disk drives as seen inFigure 1.28.
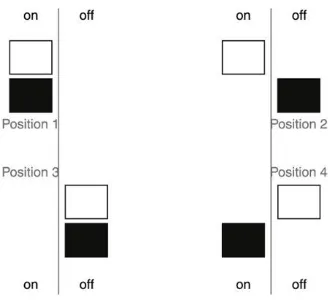
Once you have daisy chained several disk drives together, or even if you only have one disk drive, the computer needs to know which drive is which. For this reason, on the back of the Atari 810 disk drive there are two binary switches. These two switches can be adjusted to form any one of four combinations. Depending on the combination that these switches are set to on each disk drive, the Atari will be able to tell which is disk 1, 2, 3, or 4. These combinations can be seen inFigure 1.29.Figure 1.30illustrates daisy chaining and the disk settings for each switch.
Figure 1.30. This diagram illustrates both daisy chaining as well as the appropriate switch settings for each disk in the daisy chain.
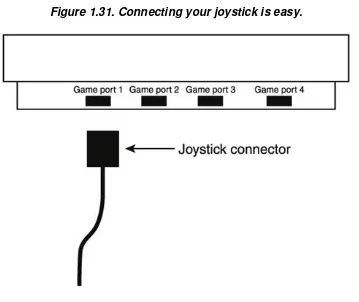
Connecting the Joystick
Figure 1.31. Connecting your joystick is easy.
Setting Up Your Commodore 64
Like the Atari and the Color Computer, the Commodore 64 is very easy to set up. Before you get started, make sure that you have the following items, pictured inFigures 1.32
through1.36.
Figure 1.32. Commodore 64.
[ View full size im age]
Figure 1.34. If you are using a monitor, you will need a video cable.
When you have all of these items, you are ready to get started. ExamineFigures 1.37and
1.38.
Figure 1.37. Side panel of the Commodore 64.
Figure 1.38. Back panel of the Commodore 64.
If you do not have a dedicated monitor for your Commodore, you will have to use a TV set. Fortunately, this is no problem to do.
The first thing that you need to do is connect your computer to some form of video output. These steps will vary depending upon whether you are using a monitor or a television set. If you are using a TV, you will attach one end to your computer's TV connector and the other end to the back of your set. Figure 1.39below illustrates.
Connecting your Commodore is just as easy; it just requires a bit more attention to detail. It is easy to tell which end goes into the computer. SeeFigure 1.40.
Figure 1.40. This end of the video cable gets connected to the computer.
The other ends of the cable will vary slightly depending on the manufacturer. There will usually be a white or red connector that must be connected to the video input on your monitor. Your cable should come with a pinout. Compare it toFigure 1.41to be sure that you are connecting the right cable to the right inputs.
After you have confirmed that you know where to put each cable (seeFigure 1.42), you can connect your monitor.
Figure 1.42. Your array of cables.
Now all that you have to do is connect the power supply to your computer and you are almost ready to rock. There is just one more thing you need to do, and that is connect your disk drive.
Setting Up Your Apple II
This machine comes in a few different flavors. The one that I am going to be using is the IIe Platinum Edition.
In order for you to set up your Apple II, you need the following items:
Retro Computer Monitor
Video Cable
Power Cable
Disk Drive
DOS Boot Disk
You can connect your Apple II using the diagram inFigure 1.43.
Figure 1.43. Basic configuration used to set up our Apple II.
Let's go through the process step by step. The first thing you need to do is to ensure that your power switch is in the off position and the power switch is disconnected. Also make sure that your computer monitor is turned off.
Now that you are sure that there is no power going to your computer, you can begin the process of installing the machine.
Connect one end of the video cable to the video port of the Apple II. Plug the other end into the chroma port of the video monitor.
Connecting a joystick is usually optional, and you do not need one in order to use your Apple computer. If you are going to be playing games, however, then a joystick is a must. Find the joystick port on the back of your Apple computer. You can useFigure 1.43as a guide.
Finally, double check to make sure that the power switch is in the off position and plug in the power cord. You are now ready to go; turn on your computer monitor and flip the power switch on the back of your computer into the on position. Your Apple II will now roar to life. Welcome to the world of the Apple II. You are now ready to get started working with your retro machine.
Chapter 2. Simply Complicated Game
Programming
I want you to understand that game programming is easy and complicated at the same time. Look at the map shown inFigure 2.1.
Figure 2.1. Map of a fictitious neighborhood.
Programming in BASIC (Beginner's All-purpose Symbolic Instruction Code) is the equivalent of drawing pictures and maps or slowly using a human-to-machine dictionary to communicate with your computer. You speak in a human language, and the computer speaks in binary. BASIC is designed to get you started communicating with your
computer. You can tell it to print files, draw graphics, and perform really complicated procedures. You can have it do almost anything as long as you do not want to do anything really super fast. Because of the way BASIC is designed and the innate limitations of "High Level Languages" (computer languages that closely resemble the English language), programs written in BASIC run very slowly.
Imagine you are sitting right next to your best friend, who we will call Cindy. You tell her to go and pick up a ball on the opposite side of the room. Your friend gets up right away and does as you ask. Your instructions were carried out very quickly, just the way you like it.
Now imagine that you are still sitting next to your friend. There is another person in the room, who we will call Tom. Tom speaks a language you do not understand. Your friend knows how to speak a little of Tom's language. The only way for us to get Tom to go and get the ball would be for us to ask Cindy to ask Tom to go and get the ball. It takes time for you to ask Cindy to ask Tom to get the ball. It takes time for Cindy to remember how to say that in Tom's language. It takes time for Cindy to ask Tom to get the ball. It takes even more time for Tom to make sense of the translation before he actually gets the ball.
In the first example, we spoke directly to our friend and our instructions were carried out immediately. In the second example, we spoke to Tom using an interpreter (Cindy ), which took much more time. The second example is very similar to the way that BASIC works. BASIC is usually designed in the form of an interpeted language. You type your program into a text editor and then you run your program. When you run your program, an interpreter that is usually found in memory reads your instructions and loosely interprets them into binary, which the computer can understand. The effect is similar to asking Cindy to tell Tom to pick up the ball for us. The job will get done, but it is going to take a lot longer than if we were able to tell Tom to pick up the ball directly.
Some flavors of BASIC do come in a compiled version. What this means is that rather than our BASIC program being interpreted and executed at the same time, the program is interpreted and stored on disk in the computer's native language where it can be executed at any time. This is the equivalent of having Cindy tape record the instructions for Tom to pick up the ball. We can play the instruction to Tom any time we wish, which would speed up the process a bit. The only problem is that these languages usually are not very optimized. What that means is that they will usually create more lines of binary
instructions than we really need. If we need the computer to multiply the value of two variables, the computer may generate 10 lines of binary code when we really only need 5.
instructions to use in specific situations, which means that its choice of instructions will not be the best combination of instructions for our program.
To get the ultimate speed from your computer, you would have to learn binary as the pioneers of computer science did. Unfortunately, applications, especially games, are much more complex than those that ran on early machines, so writing them in binary is out of the question. We must limit ourselves to the next best thing, which is writing in assembly language. Assembly mangles human and binary into a language, which is just enough like English to be understood by humans and close enough to binary that it can be easily assembled accurately into binary.
Because BASIC is an introductory computer language, it is designed more in favor of being understood by humans. Its commands reflect human concepts: Print something onscreen, make a sound, draw a circle, and so on. Assembly language, on the other hand, is designed more in favor of computers. The commands reflect the way computers think: move bits of information from memory to a register or from a register to a register, test these bits, and so on.
At first, the way the computer thinks may seem a bit odd. It becomes easier to understand when you know one very important point. Anything that your computer does, no matter how complex it seems, no matter how intelligent it seems, as awesome as the latest 3D shooter looks, every single thing the computer does is done by moving bits from one location to another.
At its core, a computer is made up of millions of logic gates. These gates are given names such asAnd Gates,Or Gates,XOR Gates, and so on. These gates control the flow of binary data through the circuitry. While we call these circuits gates, they act more like switches. Each gate will have two or more inputs (places where binary data can enter the switch) and one exit. When there is no data coming in to the gates, the exit will usually be closed, which would mean that no binary data is leaving the gate.
In the case of an AND gate, the gate's exit will be opened (thus allowing for binary data to flow out of the gate) only when we have binary data coming into all of the inputs. An OR gate will open when either the first OR, the second OR, or any of the inputs receive data. An XOR or Exclusive OR gate will open when any one of the inputs receive data but will cut off if more than one of the inputs gets data. It is these basic logic functions that allow the computer to control the flow of binary data flowing through the machine.
These same logic gates are re-created in software using logical statements and are used to control the flow of the program. This allows us to give instructions like "If variable VB and a variable XC are greater than 50 then go to line 100."
instructions in our programs are executed. This allows us to apply some logic to the way in which the binary data is manipulated.
I am typing this book on a laptop computer. From my perception I am pressing keys on the keyboard and somehow characters are magically appearing onscreen. To the
computer, on the other hand, every few seconds a random set of switches is being flipped. Each time these switches are flipped, a pattern of eight bits is placed into a part of the computer's memory (don't worry if you do not know what a bit is; I will explain this shortly). Several times a second, the computer moves that pattern of eight bits to the video memory where video circuitry puts it onscreen. This is a rather simplistic way of looking at how the computer works, but it does emphasize our point. Moving bits of information around performs most of the complex processes the computer does.
Once we learn how to effectively communicate with our computers, programming video games becomes very simple. We tell the computer to put an image onscreen, do some stuff in the background, and finally put a new image onscreen. We do this over and over again, and from the perspective of the player, a game is being played onscreen. You and I know better though. We know that it is really a very basic operation being repeated again and again. Everything else is just an illusion.
The tricky part comes in knowledge. We need to know exactly how to put images onscreen. We need to learn more about the "stuff" that we need to do in the background, and of course, because we know how to put an image onscreen we know how to put a new image onscreen. On the other hand, after we know how to do these three things we can build any game that our hearts desire.
Game Systems: Similar but Different
All game systems are the same! They all have some form of input. They all have some form of video output. They all have some form of sound output. They all speak some dialect of assembly language.
All game systems are different because they interact with these elements in slightly different ways.
When you begin with a new game system, you need a few different bits of information in order to work with it.
Assembly Dialect
As mentioned earlier, the majority of the work that computers do involves moving bits of data around the computer, so the largestclassof instructions will always be Move instructions. These instructions move data from one memory location to the other, from memory to registers, from registers to memory, and from register to register.
Another class of instructions is the arithmetic instructions. These allow the computer to perform basic calculations such as addition, subtraction, multiplication, and division.
The next class of instructions are logical operators, which form the basis of all computer logic and come into play whenever the computer must make a decision.
Working hand in hand with the logical instructions are the branch instructions. These allow the program to jump back and forth from one group of instructions to another. This allows the program to change the way it operates depending on what happens while it is running.
Finally, each CPU tends to have a few miscellaneous instructions to assist you. These instructions are useful but do not fit into any of the above categories. An example of this is the NOP instruction. This instruction literally performs no operation. We use this to "pad" our program. When we run an assembly language program, it is loaded into memory and each line is given an address. Certain instructions, such as jump or logical instructions, need to know the address of each line so that they can properly control the flow of the program. When we add new lines of code to the program, we change the address of the lines in our program. To solve this problem, if you think that you may need to insert a few lines of code into your program at a later time, you can insert a few lines of NOP instructions. The CPU will just ignore them, but if we replace them with other instructions later on then new functionality can be added to the program without changing the address of the line in our program.
Apart from always using the same classes of instructions, all instructions are usually three-letter abbreviations for what the instructions actually do. For example, the Move instruction which is used to move binary data from one location to another in your computer's memory will usually be written as
Mov.
All of these concepts will become much clearer when we cover the chapter on assembly programming.
The Memory Map
computer's input and how to find sound registers. After you know the language of your computer and you have a memory map, you can do almost anything.
CPU, Bus, and Memory Characteristics
Finally, you will need to know how much disk space, RAM memory, and CPU speed you have available. These characteristics create the confines in which you will have to build your games. The slower the CPU, the slower your programs will run and the harder you will have to work to optimize your code to obtain a fast moving video game.
The size of RAM memory limits the overall size of your program.
The amount, or availability, of the disk space determines the size your program can be, as well as what other features you can use such as saving the highest scores of your players.
BASIC 101
At this time we want to focus completely on learning how to get started programming in BASIC.
You need to familiarize yourself with the environment that you will be working with, shown in theFigure 2.2.
Figure 2.2. Screen shot of the Atari 800 work area.
The first thing you see in the work area is the word READY. This is just the Atari's way of letting you know that it's all set and ready to go. Just below this we see a light blue rectangle. This is what is called a cursor. When you press a key on the keyboard, the letter or number you press appears onscreen at the exact location where this cursor is located. It's time to introduce yourself to the computer. Type the following message and see what the computer does. Type: Hello my name is Earl. (You should replace my name with yours.) Your screen will look similar to the one shown inFigure 2.3.
Figure 2.3. Our first try at introducing ourselves to the computer.
What's this? The computer says you made an error. What did you do wrong? Did you spell your name right? Maybe you should have used a period? Well, the problem is you were simply speaking the wrong language. In order for you to make the computer follow your commands you must learn to talk in a way that the computer can understand.
The first thing we'll do is get the computer to print something. Type the following instructions at the command prompt and press Enter:
Print "hello I am an Atari 800"
Figure 2.4illustrates.
Figure 2.4. Screen shot of the computer obeying our commands.
Principles of BASIC
Your primary school teachers did not try to teach you every single word that you will ever see for the rest of your life. Instead they taught you how to use the alphabet and later how to use a dictionary. By learning these basic principles, you were empowered with the ability to understand words, which allowed you to form sentences that allow you to communicate with almost any person you will ever meet. I want to use the same concept here. I want to teach a few basic principles that you can use to communicate with any retro game machine using the BASIC language.
Using the principles detailed in the following sections, you should be able to create computer programs on any computer system equipped with the BASIC language.
The Variable Principle
color in those pixels? Well, for each and every pixel onscreen, there is a portion of Random Access Memory (RAM) that is referred to as video memory. Video memory is simply a large collection of ... you guessed it ... 0s and 1s. Each color that the computer is able to generate is represented by a particular combination of 0s and 1s.
Figure 2.5. Screen shot of my computer taken as I write this book.
[ View full size im age]
In order to generate an image on the monitor, you must set each pixel onscreen to a particular color, and the color of each pixel is determined by what combination of 0s and 1s are in a particular portion of video memory. Then all you have to do to put a picture onscreen is to fill video memory with a particular combination of 0s and 1s.
Anything the computer does, no matter how elaborate it seems, boils down to a simple manipulation of 0s and 1s. Of course, typing millions of 0s and 1s is not the most efficient way to create a computer program. The human brain simply is not designed to process information in exactly the same way as the computer. It is for this reason that computer languages such as BASIC were created. Rather than having to think in binary to communicate with computers we can think in a language that is much closer to English. After we have created our program in this "English-like" language a compiler or
interpreter is used to convert our "English like" language into full-fledged binary.
The most basic form of data manipulation is based around a concept called avariable.
The variable principle states that:
"A variable is a container that you can store information in. Generally speaking as long as your computer does not lose power and you do not give it any commands that would cause it to alter the memory location where the variable is stored, or you specifically alter the value kept in the variable; then when you place a value into a variable it will always remain there and remain unchanged."
Let's see this in action. Type the following instructions into your Atari 800 emulator (you should be running Atari Basic):
LET Q = 6
Your screen should look like the one shown inFigure 2.6.
Figure 2.6. Creating a variable for the first time.
You just created a variable called Q and placed a value of 6 inside it. The LET command tells the computer that you have some information you need to store and tells it to create a variable called Q and LET a value of 6 be put inside of that variable. But let us see if the computer really did do what we asked it to. Enter the following command:
You have just given the computer the print command. This command has nothing to do with printing to an actual printer but instead it will print out whatever you ask it to on the video screen. In the case above we asked the computer to print out the contents of the variable named Q. Your screen should now look like that inFigure 2.7.
Figure 2.7. Printing a variable for the first time.
As you can see, the value 6 really was stored in the variable Q. Now take a few minutes and play with this concept. Experiment with creating variables and storing information in them, but for now only attempt to store numbers and not letters. You will see why in a few moments.
Earlier I told you not to try to store any letters in the variables you were creating and now you will see why. Enter the following command
GR.0
All that command will do is clear the screen. Now enter this command:
LET G = BN
Now the computer tells us that it is ready to attempt to print out the value of this command. Enter:
Your screen should look something like that shown inFigure 2.8.
Figure 2.8. A failed attempt at printing a text stored in a generic variable.
But what went wrong? Why didn't the computer store our letters the same way it did the numbers? Well, the answer is that you have to ask the computer to store letters a bit differently than the way you ask it to store numbers. Here is the command to ask the computer to store letters:
DIM NAME (X)
In the above command line, DIM is the actual command. It is short for dimension. NAME is the portion of the command that you would use to give your variable a name. The X represents an integer value that tells the computer how many letters your variable should be able to hold. So to put it all together if we want to create a variable calledG$
that can be used to store five letters, we would declare it like this.
DIM G$(5)
Notice that we have added a dollar sign to the end of the name of our variable. This is to signify that this variable is a string variable. Any variable that you create to hold letters must have this dollar sign at the end of it. Now try this command for yourself; enter the following code:
Next enter this line of code:
LET D$ = "QWERTY"
Now finally enter this line of code:
PRINT D$
Your screen should look similar to the one shown inFigure 2.9.
Figure 2.9. A successful attempt at printing text stored in a string variable.
This time the computer has indeed stored our letters in memory. Once again, experiment with creating different string variables. (In programming, the termstringis used to describe anything that has to do with storing or manipulating letters and words. As a result, variables that hold letters are called string variables.) Experiment with printing them out to be sure that the computer has indeed saved them until you are satisfied that this stuff works.
The Input Principle
program it is calledruntime. We need a way to get input from the user at runtime and have this information placed into the variable at runtime.
This is where the input principle comes into effect. The input principle may be stated as follows:
"Most flavors of basic provide instructions the computer can use to obtain information from the user at runtime. These instructions are usually able to also store the information they receive into a variable."
What time is runtime?
As are so many other terms in programming that seem so complicated when you first hear them, the terms runtime and design time are not very complicated concepts at all. The time you spend sitting down actually typing out the lines of code for your program is called design time. When you enter theruncommand,
which will be covered later, and your program code begins to actually execute, this period of time is called runtime. Simple, isn't it? Over the years, I have on many occasions taught people how to use various aspects of the computer. The biggest problem that most people have to overcome is that the machine
intimidates them. Many people think they will break the machine, or they think that the computer is so complicated they can never comprehend it. It is
important that you do not get caught up with these beliefs. Nothing in life is really hard; there are just things you do not know how to do yet. These computers are more resilient than you may think, and they will not break as easily as you might imagine.
Let's see this principle in action. Enter the following code:
DIM L$(5) INPUT L$
Your screen should look something like the one shown inFigure 2.10.
What you just did was create a string variable, as we have done so many times before. You gave that variable a length of 5 letters. What's new here is theINPUTstatement. This
statement tells the computer, "I need you to get some information from the user via the keyboard and place that information into a variable for me." As you can see from this example, we have asked the computer to store the information it gets from the user into a string variable we just created calledL$.
The format for this command is as follows:
INPUT (string variable)
INPUTis the actual command being given to the computer and (string variable) is where
we enter the name of the variable we want the data to be stored in.
Type in five letters and press Enter. The computer should display READY as a sign that it has accepted the input and is ready to move on. Now as we have done so many times before, let's ask the computer to print out the contents of our variable. Enter:
PRINT L$
As you can see, the computer prints out the contents of the variableL$, which is the data
that you just typed in.
string variables and numeric variables just for fun. Experiment with this concept until you are sure you completely understand how it works, and then move on.
Your computer's memory is probably pretty cluttered and unorganized because you have been creating so many variables and filling themn with random data. In order to clean things up a bit we will use theNEWcommand. What this command does is erase any
variables or programs that may be stored in memory. In essence, your computer's
memory will be just as empty as when you first turned it on. It is important for us to note that this command will not clear the screen as you might expect. In order to clear the screen, we will use the following command:GR.0. Now let's give these commands a try.
Enter the following code
NEW GR.0
At this point your screen should look just like when you first turned it on, as shown in
Figure 2.11.
Figure 2.11. The Atari display after clearing memory and the screen.