•HowtoprogrammaticallyconfiguretheSpringcontainerandbeans •Howtouseannotationsfordependencyinjection
•Howtousecollectionsandcustomtypes
•Howtocustomizeandconfigurebeanpropertiesandbeanlifecycleinterfaces •HowtohandlemetadatausingXML,annotations,andtheGroovybeanreader •HowtousethenewSpringBootandSpringXD
Afterreadingthisbook,youwillhaveallyouneedtostartusingtheSpringFrameworkeffectively. •SendandreceiveJMSmessagesusingSpring
•UsetheSpringunittestingfeatures
•SendandreceiveAMQPmessagesusingSpringwithRabbitMQ •Utilizeaspect-orientedprogramminginSpring
•IntegratetheSpringFrameworkusingJDBCandNoSQLdatabaseslikeMongoDB •CreatewebapplicationsandexposeRESTAPIs
For your convenience Apress has placed some of the front
matter material after the index. Please use the Bookmarks
v
Contents at a Glance
About the Author ...
xv
About the Technical Reviewer ...
xvii
Acknowledgments ...
xix
Introduction ...
xxi
Part 1: Spring Framework Basics
■
...
1
Chapter 1: Your First Spring Application
■
...
3
Chapter 2: Working with Classes and Dependencies
■
...
13
Chapter 3: Applying Different Configurations
■
...
25
Chapter 4: Using Beans Scopes
■
...
45
Chapter 5: Working with Collections and Custom Types
■
...
53
Chapter 6: Using Resource Files
■
...
61
Chapter 7: Testing Your Spring Application
■
...
75
Part 2: Spring Framework
■
...
87
Chapter 8: Give Advice to Your Spring Application
■
...
89
Chapter 9: Adding Persistence to Your Spring Application
■
...
111
Chapter 10: Showing Your Spring Application on the Web
■
...
133
Chapter 11: Integrating Your Spring Application with External Systems
■
...
145
Chapter 12: Exposing a REST API
■
...
169
vi
Part 3: Spring Framework Advanced
■
...
193
Chapter 14: Using Dynamic Languages
■
...
195
Chapter 15: Spring Data Within Your Spring Application
■
...
203
Chapter 16: Messaging with Your Spring Application
■
...
217
Chapter 17: Be Social and Go Mobile
■
...
231
Part 4: Spring I/O
■
...
251
Chapter 18: Spring and Groovy
■
...
253
Chapter 19: Spring Boot, Simplifying Everything
■
...
263
Chapter 20: Your First Spring XD Application
■
...
277
Appendix A: Installing Tools
■
...
289
xxi
Introduction
This book is an introduction to the well-known Spring Framework that offers an inversion of control container for the Java platform. The Spring Framework is an open source application framework that can be used with any Java application.
After reading this book, you will know how to do the following: Use the Spring Framework efficiently.
•
Add persistence through JDBC and NoSQL databases.
•
Do unit and integration testing.
•
Apply AOP (aspect-oriented programming) to separate concerns.
•
Create web applications and expose RESTful APIs.
•
Send messages via JMS and AMQP by using ActiveMQ and RabbitMQ.
•
Use dynamic languages like Groovy, Ruby, and Bean Shell.
•
Use Groovy with Spring.
•
Use the new Spring Boot and Spring XD technologies.
•
Who This Book Is For
Introducing Spring Framework is a hands-on guide for any developer who is new to the Spring Framework and wants to learn how to build applications with it. Within this book you will find all the necessary elements to create enterprise-ready applications by using the Spring Framework and all its features and modules.
How This Book Is Organized
This book uses a simple My Documents application that you will develop incrementally over the course of the book. The book consists of the following four parts:
Part I: Spring Framework Basic: You will learn about the dependency injection design pattern,
•
and Spring’s container implementation and how it will help you create a better design by programming towards interfaces. You’ll learn the different configurations that you can apply to the Spring Framework. You will also learn how to use bean scopes, work with collections and resource files, and how to test your Spring applications.
Part II: Spring Framework: You will learn how to use aspect-oriented programming by using
•
xxii
Part III: Advance Techniques With Spring Framework: You will learn how to integrate existing
•
applications with dynamic programming languages such as Groovy or Ruby. You’ll learn how to use NoSQL databases with Spring and how to use RabbitMQ to send messages. Finally you will learn how to send tweets using Spring Social.
Part IV: The New Spring I/O: You will learn how to integrate Spring and Groovy into your
•
Spring application. You’ll learn about two new technologies from the Spring team: Spring Boot, which simplifies your development by permitting zero configuration files, and Spring XD, a new technology for real-time analytics.
Spring Framework Basics
The Spring Framework provides a programming and configuration model for creating Java-based enterprise applications. In Part I, you will learn all the basics of this framework.
You will begin by creating your very first Spring application and get a sneak peek at one of the newest technologies, Spring Boot. You’ll see how Spring Boot will speed up your development. You will then start working with classes and their dependencies, and you’ll see how they interact with each other. Then you will apply different configurations, find their differences and apply them to the Spring Framework.
After that you’ll work with bean scopes and discover how the Spring container instantiates the classes depending on the scope of your choice. Also you will work with collections. You will find out how collections can interact with your Spring application. You’ll be using resource files that will help you to have an external configuration without having to recompile your code.
3
Your First Spring Application
Most books start with a very long explanation about the technology they are using, the history of it, and often a small example that you can’t run until you reach later chapters. In this book, I am going to take a different approach. I am going to start with some basic examples and I will explain in detail what they do and how to use them so that you get to know Spring quickly. The examples in this chapter will show you how easy it is to integrate the Spring Framework into any existing project or how to start one from scratch and modify it without any effort.
Figure 1-1 shows the Spring Framework web site, http://spring.io. In this web site, you can find all of the Spring Extensions, guides, and documentation to help you understand better the Spring ecosystem.
4
Pre-Requirements
In order to start with the first example you need to have some tools installed.
You need the Java JDK installed and configured. (The JVM must be accessible on the
•
command line, either Windows or Unix). You can install the JDK 1.6 and above. Look for it at this link: www.oracle.com/technetwork/java/javase/downloads/index.html.
Because you are going to use the latest version of Spring Framework, version 4.0.5.RELEASE,
•
you are going to use Gradle to build and run your examples. So far Gradle is one of the best building tools available today that runs using Groovy as a primary language; it is extensible and robust; contains a better library management that can be extended; and is now the preferred way by the Spring core team to build the Spring Framework and its Extensions. If you want to know more about Gradle, take a look at their web site at www.gradle.org (see Figure 1-2).
5
Note
■
Appendix A shows you how to install Gradle.
Hello World Example
Let’s start with the famous and well known “Hello World” example for your first Spring Application. You need to create the following folder structure (either in Windows or Unix).
• build.gradle ••• src ••• main ••• java ••• com ••• apress ••• isf
••• spring
• Application.java • HelloWorldMessage.java • MessageService.java
Why do you need this folder structure? Gradle follows a community standard for creating Java applications, and primarily is based on Maven (an XML build tool that still is widely used) and a convention. So everything that belongs to the src/main/java folder will be compiled, and the result will be output to a build folder.
Listing 1-1 shows your build.gradle file. This file is the key for Gradle to run. In this file, you specify what plug-ins you are going to use. Every plug-in has its own tasks that you can run, such as compile, build, test, jar, etc. Also, you can specify what repositories to use in order to look for the dependencies you specified. In this example, you are going to use the spring-context module version 4.0.5.RELEASE that Gradle will download with all its dependencies. Furthermore, you are telling it that you are going to pass the name of the mainClass in order to run it.
Listing 1-1. build.gradle
apply plugin: 'java' apply plugin: 'application'
mainClassName = System.getProperty("mainClass")
repositories {
mavenCentral()
}
dependencies {
compile 'org.springframework:spring-context:4.0.5.RELEASE'
6
Listing 1-2 shows a simple Interface with only one method.
Listing 1-2. MessageService.java
package com.apress.isf.spring;
public interface MessageService { public String getMessage();
}
Next, let’s create the HelloWorldMessage that will return just the simple “Hello World” (see Listing 1-3).
Listing 1-3. HelloWorldMessage.java
package com.apress.isf.spring;
public class HelloWorldMessage implements MessageService {
public String getMessage(){ return "Hello World";
} }
Listing 1-3 shows the implementation of the interface in Listing 1-2. You can make any implementation you want if you keep following the contract that your interface provides. For example, right now you just return a string, but you can actually call a service or go into a database and pick a random message.
Note
■
All of these examples can be edited using any text editor or any favorite IDE (integrated development
environment).
Now you are ready to test your implementation, but you need to add a starting point.
Running the Hello World Application
Listing 1-4 shows the main class where you are going to test your MessageService class implementation (Listing 1-3, the HelloWorldMessage class). Now you need to take a look at Listing 1-4, because I am introducing some annotations (annotations were introduced as a new feature in Java 5). These annotations are markers for the Spring Framework to help understand your classes and they collaborate together. But wait! Spring Framework? Right now you are going to run this example as it is; later in this and the following chapter, you will learn what the Spring Framework is and how it can help you to deliver enterprise-ready applications.
Listing 1-4. Application.java
package com.apress.isf.spring;
import org.springframework.context.ApplicationContext; import org.springframework.context.annotation.Bean;
7
@Configuration@ComponentScan
public class Application {
@Bean
MessageService helloWorldMessageService() { return new HelloWorldMessage();
}
public static void main(String[] args) { ApplicationContext context =
You must have Gradle installed, because this tool will help you to compile, build, and run all your examples. The following command will run the example. Also remember that this command should be executed from the root of the project where the build.gradle file is located.
gradle run -DmainClass=com.apress.isf.spring.Application
Running the above command should output something similar to the following:
isf-book$ gradle run -DmainClass=com.apress.isf.spring.Application
20:37:08.705 [main] DEBUG o.s.b.f.s.DefaultListableBeanFactory - Returning cached instance of singleton bean 'helloWorldMessageService'
Hello World
Note
■
You can also run the
gradlecommand from the project base by just adding the chapter’s folder, like so:
$ gradle :ch01:run–DmainClass=com.apress.isf.spring.Application.
The Spring Framework is based on one simple principle: dependency injection. This is a design pattern that has been around for several years; it works, based on interface design, by injecting through setters or constructors all of the dependencies and implementations that have collaboration and interaction among classes. The Spring Framework creates a container that can handle all of this interaction and collaboration between objects.
This simple example defines an interface. In the main class, you are injecting its implementation by using the
8
Then, in your main method, you are calling the Spring container by using the ApplicationContext class. This class, with help from the other annotations (@Config, @ComponentScan, and @Bean), will create the container and wire everything up for ready to use, so when you call the context.getBean method the Spring Container already knows what object to use.
Note that if you change your implementation, it will be the only class to change; the other classes will remain intact. This will create an extensible and robust application, even if it is as simple as the Hello World example.
Note
■
If you need to get more information about dependency injection and how it is used with the Spring Framework,
I recommend the Pro Spring series of books from Apress.
In the following chapters, you will get more details on all of the features of the Spring Framework, the Spring Extensions, and subprojects, plus how you can use them.
Spring Boot: Even Easier
With the release of the Spring Framework 4, the Spring team also released a new extension of the Spring technology: Spring Boot. You are going to do a small example (the famous “Hello World”) using this new technology and yes, this is also Spring.
Spring Boot makes development even easier. Any Spring application can be reduced to less code with minimum effort, and it will be production-ready. Let’s create the folder structure and add the following files:
• build.gradle ••• src ••• main ••• java ••• com ••• apress ••• isf
••• spring
• HelloWorldController.java
This shows the structure you are going to use and the HelloWorldController.java file that it will run. Note that it is necessary to create your build.gradle file to run your example (see Listing 1-5).
Listing 1-5. build.gradle
apply plugin: 'application'
mainClassName = System.getProperty("mainClass")
dependencies {
compile("org.springframework.boot:spring-boot-starter-web:1.0.2.RELEASE")
}
repositories {
mavenCentral()
9
url "http://repo.spring.io/libs-snapshot"url 'http://repo.spring.io/milestone' url 'http://repo.spring.io/libs-release'
} }
Listing 1-5 shows that instead of adding the Spring Framework dependency, now you are using a spring-boot-starter that will actually help to wire up everything to run this application as a web application.
Listing 1-6 shows your main class, the HelloWorldController; this class introduces new annotations that will help the Spring container know what to do and create the necessary collaboration classes and run it as a web application.
Listing 1-6. HelloWorldController.java
package com.apress.isf.spring;
import org.springframework.boot.SpringApplication;
import org.springframework.boot.autoconfigure.EnableAutoConfiguration; import org.springframework.stereotype.Controller;
import org.springframework.web.bind.annotation.RequestMapping; import org.springframework.web.bind.annotation.ResponseBody;
@Controller
@EnableAutoConfiguration
public class HelloWorldController {
@RequestMapping("/") @ResponseBody
String getMessage() {
return "<h1>Hello World!</h1>";
}
public static void main(String[] args) throws Exception { SpringApplication.run(HelloWorldController.class, args);
} }
The @Controller annotation will mark your class as a web controller that has a @RequestMapping and a
@ResponseBody. All this means is that when your web application is running, it will accept requests from the
http://localhost:8080/ URL and you should get some response back, such as the famous “Hello World” message.
Running the Spring Boot Application
Run the HelloWorldClass with the following command:
10
You should have the following output after executing the gradle command:
isf-book$ gradle run -DmainClass=com.apress.isf.spring.HelloWorldController :ch01:compileJava UP-TO-DATE
:ch01:compileGroovy UP-TO-DATE :ch01:processResources UP-TO-DATE :ch01:classes UP-TO-DATE
:ch01:run
:: Spring Boot :: (v1.0.2.RELEASE)
INFO 84872 --- [main] .t.TomcatEmbeddedServletContainerFactory : Server initialized with port: 8080 INFO 84872 --- [main] o.apache.catalina.core.StandardService : Starting service Tomcat
INFO 84872 --- [main] org.apache.catalina.core.StandardEngine : Starting Servlet Engine: Apache Tomcat/7.0.52
INFO 84872 --- [ost-startStop-1] o.a.c.c.C.[Tomcat].[localhost].[/] : Initializing Spring embedded WebApplicationContext
INFO 84872 --- [ost-startStop-1] o.s.web.context.ContextLoader : Root WebApplicationContext: initialization completed in 2030 ms
INFO 84872 --- [main] s.b.c.e.t.TomcatEmbeddedServletContainer : Tomcat started on port(s): 8080/http INFO 84872 --- [main] c.a.isf.spring.HelloWorldController : Started HelloWorldController in 7.086 seconds (JVM running for 7.599)
> Building 80% > :ch01:run
Now you can go to any browser and type in the URL http://localhost:8080 (see Figure 1-3).
11
Figure 1-3 shows the result of running the HelloWorldController.java file. Spring Boot will know what to do to create a web context and response to any request based on the annotation provided. But why am I showing this? Well if you know how to create a Java web application, you can see that Spring Boot simplifies everything because you’re not writing any configuration files for a Java web application; it’s configuration free!
Spring Boot,
à
la Groovy
Spring Boot also provides a powerful interaction with the Groovy programming language, making it even easier to create applications. But wait! Groovy? What is Groovy? The Groovy programming language is based on Java and of course is run on the JVM. If you know Java, you already know Groovy. Groovy is a dynamic programming language that gets rid of all of the boilerplate of any Java class and adds extensible methods to existing Java classes, making it a powerful language.
I am not going into the details of the Groovy language here, but I will say that it is one of the languages in the JVM community that has gathered many followers and developers. So the Spring Team has made the interaction between Groovy and the Spring Framework possible.
Let’s continue with the next example. You are going to create only one file; there is no need to create any structure as before. Only one file:
• app.groovy
Listing 1-7 shows the app.groovy file.
Listing 1-7. app.groovy
@Controller
class MyApp {
@RequestMapping("/") @ResponseBody String message() {
return "<h1>Hello World!</h1>"
}
}
But why is Listing 1-7 different from Java? I just said that “if you know Java, you know Groovy.” Well, if you add the
public keywords to the class and the method, and you put a semicolon after every statement, you have a Java class. Note that you are still using some annotations like @controller, @RequestMapping, and @responseBody, similar to Listing 1-6. But now you are not using any imports! That’s right! There is no package and there are no imports. Spring Boot will recognize all the annotations used and it will integrate all the libraries in this simple application.
Let’s run the code in Listing 1-7, but before you do so, you need to install Spring Boot (see Appendix A for details on how to install Spring Boot on your system). Another difference from the previous example (Listing 1-6) is that you are not using Gradle this time. You are going to use the Spring Boot runtime environment, a command-line tool that will help you to build and run Groovy examples.
Once you have installed Spring Boot, you can execute the following command:
12
After executing the above command, you should see something like the following output:
spring run app.groovy Resolving dependencies..
:: Spring Boot :: (v1.0.2.RELEASE)
INFO 84872 --- [main] .t.TomcatEmbeddedServletContainerFactory : Server initialized with port: 8080 INFO 84872 --- [main] o.apache.catalina.core.StandardService : Starting service Tomcat
INFO 84872 --- [main] org.apache.catalina.core.StandardEngine : Starting Servlet Engine: Apache Tomcat/7.0.52
INFO 84872 --- [ost-startStop-1] o.a.c.c.C.[Tomcat].[localhost].[/] : Initializing Spring embedded WebApplicationContext
INFO 84872 --- [ost-startStop-1] o.s.web.context.ContextLoader : Root WebApplicationContext: initialization completed in 2030 ms
INFO 84872 --- [main] s.b.c.e.t.TomcatEmbeddedServletContainer : Tomcat started on port(s): 8080/http INFO 84872 --- [main] c.a.isf.spring.HelloWorldController : Started HelloWorldController in 7.086 seconds (JVM running for 7.599)
> Building 80% > :ch01:run
Now you can go to any web browser and type in the URL http://localhost:8080, and you should see the same as Figure 1-3. The Spring Boot will know what to do when it’s running the app.groovy file. It will create a web context and response to any request based on the annotations provided.
Summary
In this chapter, you saw how to create a simple Spring “Hello World” application and run it. You also learned how Spring uses dependency injection to create all the dependencies and collaboration between classes. Thanks to the small example, you saw that it doesn’t matter what implementation you create, as long as you follow the interface, Spring will inject its implementation and have it ready when you need it.
You got a small sneak peek of the Spring Boot, a new project by the Spring Team that will be covered in the following chapters. You also saw how Spring plays well with the Groovy programming language.
13
Working with Classes
and Dependencies
In this chapter, you are going to create an application that will help you understand the features and benefits of using the Spring Framework. In the next sections, I will discuss your application, what it does, and what do you need to do to create it.
You are going to use the book’s companion source code, so you need to download it from the Apress.com web site. You will use the Gradle build tool to run and test your application.
My Spring Application – My Documents
In this section, I will describe the main application. You are going to name your Spring application “My Documents” and the main idea is to have an application where you can add any type of document (Microsoft Office, Apple Office, Open Documents, and PDFs), text notes, and web site links. They can be accessed any time in any device (computer, tablet, smart phone) and they will be organized in a way that makes them easy to find. Figure 2-1 shows a general diagram of the My Documents application. This diagram represents how My Documents is going to be searchable and the possible types of documents it can contain, such as notes, web links, and any other types (PDFs, for example).
14
Requirements of
My Documents
The following list shows the requirements for your My Documents application: Basic credentials (username, password)
•
Ability to add, remove, delete, edit items/documents:
•
Microsoft Office, Apple, Open Documents, and PDF files
•
Notes (text notes, limited to 255 characters)
•
Web site links (URLs)
•
Every item/document can be private or public
•
Private: The owner of the item/documents can see it
•
Public: Everybody can see the document
•
Searchable by keyword, name, type, content, tags, category
•
Organizable by category
•
Every item/document can be sent by e-mail or external messaging system
•
These requirements are simple—nothing too complicated. Keep in mind that every application tends to change over time, and this application will be no exception. My Documents will be your main Spring application for the entire book!
Defining Classes and Dependencies
The My Documents application will use some classes so you can see how dependencies work. You are going to start with something simple (see Figure 2-2).
15
Let’s start by defining your Document file (see Listing 2-1).
Listing 2-1. Document.java
package com.apress.isf.java.model;
import java.util.Date;
public class Document { private String name; private Type type; private String location; private Date created; private Date modified;
//Setters/Getters omitted }
Your Document class (Listing 2-1) has a one-to-one relationship with the Type class. The Type class (see Listing 2-2) defines the type of document: a PDF, a note, or a web document.
Listing 2-2. Type.java
package com.apress.isf.java.model; public class Type {
private String name; private String desc; private String extension;
//Setters/Getters omitted }
Listing 2-3 shows your SearchEngine class that will use the Document class and the Type relationship. With this class, you can look for a specific type and retrieve all the relevant documents.
Listing 2-3. SearchEngine.java
package com.apress.isf.java.service; public interface SearchEngine {
public List<Document> findByType(Type documentType); public List<Document> listAll();
}
16
public class MySearchEngine implements SearchEngine {
@Override
17
As you can see, you just implemented the findByType and you used a private storage method that will retrieve some documents and their types. Also, you implemented the listAll method that directly uses the storage method. Note that this is a naïve example to start showing some of the Spring Framework features. Next, you need to test what you have done. So let’s create a unit test using JUnit (see Listing 2-5).
Listing 2-5. MyDocumentsTest.java
private SearchEngine engine = new MySearchEngine();
18
In Listing 2-5, you are going to test the two methods you implemented. As you can see in the code, you are creating just a simple document and asserting that it belongs to the Documents list that you are getting from calling the findByType method. Now, let’s run your test class using Gradle. Listing 2-6 shows the build.gradle file that you are going to use to run your unit test.
Listing 2-6. build.gradle
apply plugin: 'java' apply plugin: 'groovy' apply plugin: 'eclipse' apply plugin: 'idea'
group = 'com.apress.isf' version = '1.0'
repositories {
mavenCentral() }
dependencies {
compile 'org.codehaus.groovy:groovy-all:2.2.0'
compile 'org.springframework:spring-context:4.0.5.RELEASE' testCompile 'junit:junit:4.11'
}
test {
testLogging {
events 'started', 'passed' }
}
The following command will run the task: test. This will tell the Gradle tool that it needs to look for all the unit tests available in the code and execute them.
$ gradle test
After executing the above command, you should see something like the following output:
:ch02:compileJava :ch02:compileGroovy
:ch02:processResources UP-TO-DATE :ch02:classes
:ch02:compileTestJava :ch02:processTestResources :ch02:testClasses
:ch02:test
19
■
The above output shows all the tests in this chapter. You can run from the base project with the following
command:
$ gradle :ch02:testUsing the Spring Framework
As you can see, you started with a simple Java application, and a clean design using interfaces that will promote decoupling and will not depend on a specific implementation because it follows a contract. But there is still some code that you need to refactor in your unit test. Listing 2-5 shows that you need to instantiate a new MySearchEngine
class, but what happens if you need to add a different implementation? Well, just change the name, and recompile and rerun to test it, right? Or maybe you need to instantiate more of these classes somewhere; it will be some hard work! That’s why you need some kind of dependency mechanism tool to avoid this hassle. In other words, you need a way to create this dependency dynamically and avoid instantiating a class every time you add a new implementation. The Spring Framework’s primary goal is to offer a dependency injection container that will facilitate the creation of instances and interaction between objects. But how are you going to use the Spring Framework? And what is the dependency injection thing? Or the Spring container? Well, let’s start coding and answer your questions.
You are going to create the file shown in Listing 2-7. If you are using the book’s companion source code, you can find it at <isf-book>/ch02/src/test/resources/META-INF/spring.
Listing 2-7. mydocuments-context.xml
<?xml version="1.0" encoding="UTF-8"?>
<beans xmlns="http://www.springframework.org/schema/beans" xmlns:xsi="http://www.w3.org/2001/XMLSchema-instance"
xsi:schemaLocation="http://www.springframework.org/schema/beans
http://www.springframework.org/schema/beans/spring-beans.xsd">
<bean id="engine" class="com.apress.isf.java.service.MySearchEngine" />
<bean id="documentType" class="com.apress.isf.java.model.Type"> <property name="name" value="WEB" />
<property name="desc" value="Web Link" /> <property name="extension" value=".url" /> </bean>
</beans>
20
In this case, it’s the com.apress.isf.java.service.MySearchEngine class and this class will be used by the Spring Framework to create the instance you need. Next, you defined a “documentType” bean that will create a new instance of a com.apress.isf.java.model.Type with its values. This will be similar to using the new keyword and the use of setters.
Next, you are going to modify your unit test, and you are going to start using some of the Spring Framework classes that will start up the container. It will instantiate your classes and it will know about the behavior of your application. Listing 2-8 shows your unit test class.
Listing 2-8. MyDocumentsTestWithSpring.java
private ClassPathXmlApplicationContext context; private SearchEngine engine;
private Type documentType;
@Before
public void setup(){
context = new ClassPathXmlApplicationContext("META-INF/spring/mydocuments-context.xml"); engine = context.getBean(SearchEngine.class);
assertEquals(documentType.getName(),documents.get(0).getType().getName()); assertEquals(documentType.getDesc(),documents.get(0).getType().getDesc());
21
@Test
public void testWithSpringListAll() {
List<Document> documents = engine.listAll(); assertNotNull(documents);
assertTrue(documents.size() == 4); }
}
As you can see in Listing 2-8, you are using a ClassPathXmlApplicationContext class that will use your configuration file (see Listing 2-7); it will get the instance of the bean when you use the context.getBean method. The Spring Framework will automatically know what bean ID you are referring to because of its type. In this example, it will know that when you call context.getBean(SearchEngine.class) it will get your MySearchEngine
implementation and so on for the Type class.
Next, let’s run the test using the following command:
gradle run –Dtest.single=MyDocumentsWithSpringTest test
Note
■
Remember that you can run the
gradlecommand from the project base directory and execute the command
gradle run –Dtest.single=MyDocumentsWithSpringTest :ch02:test
.
The following output shows the result of running your unit test:
:ch02:compileJava :ch02:compileGroovy
:ch02:processResources UP-TO-DATE :ch02:classes
:ch02:compileTestJava :ch02:compileTestGroovy :ch02:processTestResources :ch02:testClasses
:ch02:test
com.apress.isf.spring.test.MyDocumentsWithSpringTest > testWithSpringFindByType STARTED com.apress.isf.spring.test.MyDocumentsWithSpringTest > testWithSpringFindByType PASSED com.apress.isf.spring.test.MyDocumentsWithSpringTest > testWithSpringListAll STARTED com.apress.isf.spring.test.MyDocumentsWithSpringTest > testWithSpringListAll PASSED
BUILD SUCCESSFUL
Total time: 11.33 secs
Spring Framework and Dependency Injection
22
Figure 2-3 shows how any implementation of your SearchEngine interface can be injected. Perhaps you are searching through a database or maybe you’re using a file to retrieve some information. The Spring Framework also provides several features such as the following:
Dependency injection
•
Aspect-oriented programming
•
Data access
•
Transaction management
•
Web flow and MVC
•
Social frameworks
•
Messaging
•
Remoting
•
Testing
•
and more . . .
•
Right now you do not need to worry about each of these features. Over the course of the book, you are going to see each one of them in action through your Spring application, My Documents.
I was talking about how the Spring Framework creates instances of your declared beans in the XML file (Listing 2-7), and how these are ready when you need them or are injected when required. But how does the Spring Framework know what classes need to be injected? The Spring Framework has several mechanisms to accomplish this: by name or by type. The injection can be either using Setters methods or constructors. But you are going to see this in detail in the following chapters. For now, let’s take a look at Figure 2-4 for an overview of the Spring container.
23
Figure 2-4 shows the Spring dependency injection container and its life cycle, using a configuration based on bean definitions. This configuration can be via XML, as you did, or Java configuration annotations, or programmatically.
In the book’s companion source code, you can find the Groovy version of this chapter. You can run it using the following command:
gradle run –Dtest.single=MyDocumentsGroovyTest test
Summary
In this chapter, you defined your first Spring application, called My Documents. This application will evolve over the course of the entire book so you can experiment and add more features using the Spring Framework and its extensions.
You saw the differences using plain Java and you added a Spring flavor to it; the Spring Framework will help you to have a better object-oriented design, applying its dependency injection implementation.
In the next chapters, you will dive deeper into Spring and learn how to enhance your application. You will see how to use collections, how to add some persistence, and how to expose your application on the web, and much more!
25
Applying Different Configurations
The Spring Framework supports different ways to configure its container and this chapter will cover the XML configuration used previously. Also, you are going to learn how can you accomplish the same configuration using different mechanisms, such as Spring annotations, Java bean configuration class, and the new
GroovyBeanDefinitionReader class.
In the previous chapter, you defined your Spring application, My Documents, and you saw how to use a XML configuration file to inject your implementation of the SearchEngine interface. In this chapter, you will be using the same XML configuration and you will see what you need to do in order to use all of these new different ways of configuration.
My Documents XML Configuration
Let’s start by reviewing your current XML configuration (from the My Documents application) context and examine it (see Listing 3-1).
Listing 3-1. mydocuments-context.xml
<?xml version="1.0" encoding="UTF-8"?>
<beans xmlns="http://www.springframework.org/schema/beans" xmlns:xsi="http://www.w3.org/2001/XMLSchema-instance"
xsi:schemaLocation="http://www.springframework.org/schema/beans http://www.springframework.org/schema/beans/spring-beans.xsd">
<bean id="engine" class="com.apress.isf.java.service.MySearchEngine" />
<bean id="documentType" class="com.apress.isf.java.model.Type"> <property name="name" value="WEB" />
<property name="desc" value="Web Link" /> <property name="extension" value=".url" /> </bean>
</beans>
26
But wait! Bean? What does “bean” mean? In the Java world, this is a concept that has being around since the Java language was created, so the Spring Framework team followed the same naming convention. A Java bean must have some conventions like method naming (set/get/is), construction, and behavior, so it can be reusable and it can interact with other beans and other classes. Later, in the Java community, the Java bean was transformed to the well-known POJO: Plain Old Java Object.
The Spring Framework takes advantage of these conventions to know, create, inject, interact, and even destroy all the declared classes on its container.
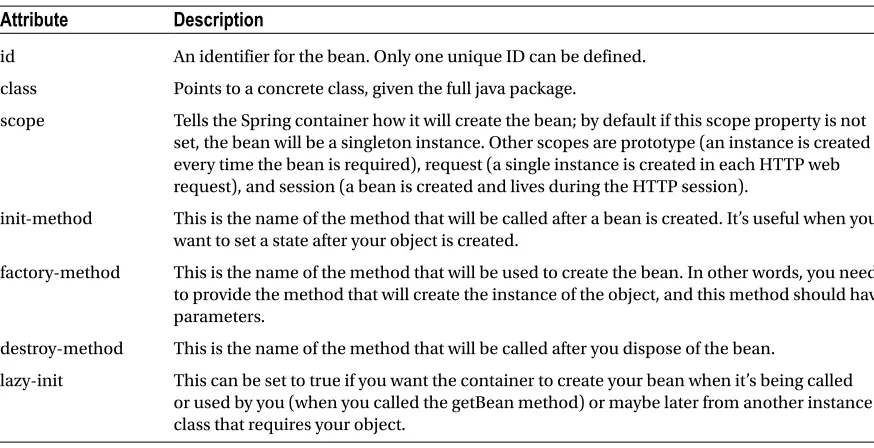
A bean is declared as a <bean/> tag in the XML file and can contain the attributes described in Table 3-1.
Table 3-1. Bean Tag Attributes
Attribute
Description
id An identifier for the bean. Only one unique ID can be defined. class Points to a concrete class, given the full java package.
scope Tells the Spring container how it will create the bean; by default if this scope property is not set, the bean will be a singleton instance. Other scopes are prototype (an instance is created every time the bean is required), request (a single instance is created in each HTTP web request), and session (a bean is created and lives during the HTTP session).
init-method This is the name of the method that will be called after a bean is created. It’s useful when you want to set a state after your object is created.
factory-method This is the name of the method that will be used to create the bean. In other words, you need to provide the method that will create the instance of the object, and this method should have parameters.
destroy-method This is the name of the method that will be called after you dispose of the bean.
lazy-init This can be set to true if you want the container to create your bean when it’s being called or used by you (when you called the getBean method) or maybe later from another instance class that requires your object.
The Spring Framework has different ways to add information about your classes and their dependencies, and how they interact with each other. All of this will be covered throughout the book by adding some features to your Spring application, My Documents.
Listing 3-2 shows your SearchEngine implementation from the previous chapter: MySearchEngine looks like a lot of code, and there is a lot of data hard-coded that has been added to the class. So what happens if you need to add more types or more methods? You need to edit and recompile it again and again with any new changes. Too much work!
Listing 3-2. MySearchEngine.java
package com.apress.isf.java.service;
import java.util.ArrayList; import java.util.List;
import com.apress.isf.java.model.Document; import com.apress.isf.java.model.Type;
27
public class MySearchEngine implements SearchEngine {
@Override
public List<Document> findByType(Type documentType) { List<Document> result = new ArrayList<Document>();
document.setLocation("/Users/felipeg/Documents/Random/Book Template.pdf");
document.setLocation("/Users/felipeg/Documents/Contracts/Sample Contract.pdf");
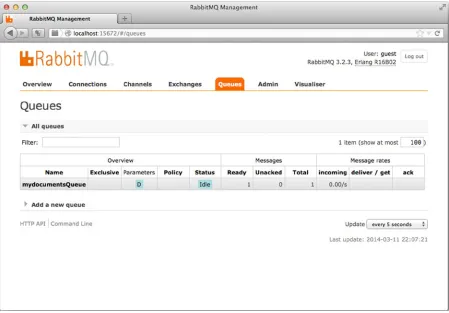
document.setLocation("/Users/felipeg/Documents/Random/Clustering with RabbitMQ.txt");
28
So, let’s create a new implementation for your SearchEngine interface and use some of the setter-based dependency injections to add some types. Listing 3-3 is an example of your new SearchEngineService class.
Listing 3-3. SearchEngineService.java
public class SearchEngineService implements SearchEngine {
private DocumentDAO documentDAO;
public DocumentDAO getDocumentDAO() { return documentDAO;
}
public void setDocumentDAO(DocumentDAO documentDAO) { this.documentDAO = documentDAO;
}
29
public List<Document> listAll() {
return Arrays.asList(documentDAO.getAll()); }
}
Let’s compare Listing 3-2 and Listing 3-3. In Listing 3-3, you got rid of the hard-coded code, you got rid of the
storage method, and you are including a new attribute, documentDAO, which will be injected through its setter method, but you need to help the Spring container to know about this new attribute and the class that will contain the data.
Next, let’s create the new classes, DocumentDAO and DocumentRepository. See Listing 3-4 and Listing 3-5. Listing 3-4 shows the DocumentDAO, which is the class that holds all the information about your documents that, for now, will be in memory. Of course, the DocumentRepository (see Listing 3-5) is your implementation of it.
Listing 3-4. DocumentDAO.java
Listing 3-5 shows your DocumentRepository with four Document properties with their own setters and getters. And yes, you are going to inject four documents through their setters.
Listing 3-5. DocumentRepository.java
package com.apress.isf.spring.data;
import com.apress.isf.java.model.Document;
30
Well, now this looks a little better. You are separating the way you are extracting the data, but how are you doing this? Well, if you recall, you were using some kind of storage method to retrieve the information, right? (See Listing 3-2.) Then you decided to reimplement your SearchEngine interface by adding a new way to get the data, and the solution was to create an interface that will be injected independent of its implementation, making your class more robust and easy to maintain. But let’s see how you are going to modify the XML so the Spring container knows about all of these new modifications. Listing 3-6 is an example of your new modified mydocuments-context.xml
configuration file. This configuration holds all the information about your new DocumentDAO class implementation (DocumentRepository) and how it’s being injected in your SearchEngine implementation.
Listing 3-6. mydocuments-context.xml
<?xml version="1.0" encoding="UTF-8"?>
<beans xmlns="http://www.springframework.org/schema/beans" xmlns:xsi="http://www.w3.org/2001/XMLSchema-instance"
xsi:schemaLocation="http://www.springframework.org/schema/beans
http://www.springframework.org/schema/beans/spring-beans.xsd">
<bean id="engine" class="com.apress.isf.spring.service.ServiceSearchEngine"> <property name="documentDAO" ref="documentDAO"/>
</bean>
<bean id="documentDAO" class="com.apress.isf.spring.data.DocumentRepository"> <property name="doc1" ref="doc1"/>
<property name="doc2" ref="doc2"/> <property name="doc3" ref="doc3"/> <property name="doc4" ref="doc4"/> </bean>
31
<bean id="doc1" class="com.apress.isf.java.model.Document"> <property name="name" value="Book Template"/>
<property name="type" ref="pdfType"/>
<property name="location" value="/Users/felipeg/Documents/Random/Book Template.pdf"/> </bean>
<bean id="doc2" class="com.apress.isf.java.model.Document"> <property name="name" value="Sample Contract"/>
<property name="type">
<bean id="pdfType" class="com.apress.isf.java.model.Type"> <property name="name" value="PDF" />
<property name="desc" value="Portable Document Format" /> <property name="extension" value=".pdf" />
</bean> </property>
<property name="location" value="/Users/felipeg/Documents/Contracts/Sample Contract.pdf"/> </bean>
<bean id="doc3" class="com.apress.isf.java.model.Document"> <property name="name" value="Clustering with RabbitMQ"/> <property name="type" ref="noteType"/>
<property name="location" value="/Users/felipeg/Documents/Random/Clustering with RabbitMQ.txt"/> </bean>
<bean id="doc4" class="com.apress.isf.java.model.Document"> <property name="name" value="Pro Spring Security Book"/> <property name="type" ref="webType"/>
<property name="location" value="http://www.apress.com/9781430248187"/> </bean>
<bean id="webType" class="com.apress.isf.java.model.Type"> <property name="name" value="WEB" />
<property name="desc" value="Web Link" /> <property name="extension" value=".url" /> </bean>
<bean id="pdfType" class="com.apress.isf.java.model.Type"> <property name="name" value="PDF" />
<property name="desc" value="Portable Document Format" /> <property name="extension" value=".pdf" />
</bean>
<bean id="noteType" class="com.apress.isf.java.model.Type"> <property name="name" value="NOTE" />
<property name="desc" value="Text Notes" /> <property name="extension" value=".txt" /> </bean>
</beans>
32
Also, take a look on the bean with id "doc2". You are embedding a new bean as value; this is allowed by the Spring configuration rules.
As you can see, you are putting all your data about the types and documents in your XML file. Maybe there is a better way, but for now let’s create your unit test. Listing 3-7 shows your modified unit test.
Listing 3-7. MyDocumentsTest.java
private ClassPathXmlApplicationContext context; private SearchEngine engine;
private Type webType;
@Before
public void setup(){
context = new ClassPathXmlApplicationContext("META-INF/spring/mydocuments-context.xml"); engine = context.getBean(SearchEngine.class);
assertEquals(webType.getName(),documents.get(0).getType().getName()); assertEquals(webType.getDesc(),documents.get(0).getType().getDesc());
33
In Listing 3-7, in your setup() method (this method will run before each method in this class gets executed), you are using the ClassPathXmlApplicationContext class that will run your Spring container by creating and wiring up all the instances and having them ready when you need them.
Now let’s run the unit test (see Listing 3-7) with the following command:
gradle test
Or if you are on the project’s base path, you can run it with
gradle :ch03:test
Note
■
Every chapter will contain several unit test files, so the following command will run a specific test:
gradle –Dtest.single=MyDocumentsTest test
So far you have seen how to configure the Spring container by adding beans and referencing them so the container knows about the creation and relationship, and gets them ready when you need them. Also, remember that the Spring Framework allows you to have different configurations apart from the XML, so in the next section you are going to see how to use annotations to accomplish the same configuration.
Using Spring Annotations
Java annotations were introduced in Java 5, and they added a great value to the Java language because you can add metadata to a class that can be used at compile time and at runtime, making new ways to develop. The Spring team took advantage of this new feature to provide a Spring annotation-based configuration. This feature was introduced in version 2.5.
But enough talk, let’s go to the code and see what you are going to change in order to use the Spring annotation configuration. See Listing 3-8.
Listing 3-8. AnnotatedSearchEngine.java
package com.apress.isf.spring.annotated.service;
import java.util.ArrayList; import java.util.Arrays; import java.util.List;
import org.springframework.beans.factory.annotation.Autowired; import org.springframework.stereotype.Service;
import com.apress.isf.java.model.Document; import com.apress.isf.java.model.Type;
import com.apress.isf.java.service.SearchEngine; import com.apress.isf.spring.data.DocumentDAO;
@Service("engine")
34
@Autowired
private DocumentDAO documentDAO;
public List<Document> findByType(Type documentType) { List<Document> result = new ArrayList<Document>();
Listing 3-8 shows your new implementation of the SearchEngine, the AnnotatedSearchEngine class. As you can see, you are using the @Service(“engine”) and the @Autowired annotations. The Spring Framework supports several annotations (see Table 3-2) that are only markers or stereotypes like the @Service annotation. This annotation can have a value, in this case “engine”, meaning that the container will create a bean with id: "engine" and it will point to the AnnotatedSearchEngine class. This is the same as putting the following tag in an XML file:
<bean id="engine" class="com.apress.isf.spring.annotated.service AnnotatedSearchEngine" />
Table 3-2. Stereotypes
Stereotype/Markers
Description
@Component This is a marker, a generic stereotype that Spring will recognize as a Spring-managed component.
@Repository This is a specialization of the @Component annotation and it fulfills the idea of the data access object. Classes annotated with this annotation can be processed by other tools or even aspects within the Spring container.
@Service This is a specialization of the @Component annotation and it fulfills the idea of a service layer.
@Controller This is also a specialization of the @Component annotation and normally is used on a web context.
Also, you used the @Autowired annotation. This annotation will tell the Spring container to actually create the instance and assign it to the declared variable. This will be the same as the following configuration:
<property name="documentDAO" ref="documentDAO" />
So, at the end, the AnnotatedSearchEngine class will be like having the following configuration all together:
<bean id="engine" class="com.apress.isf.spring.annotated.service AnnotatedSearchEngine"> <property name="documentDAO" ref="documentDAO" />
35
In Listing 3-9, you are going to create the AnnotatedDocumentRepository class. This class will have another marker or stereotype, @Repository, and this class will be injected into your SearchEngine implementation with the
@Autowired annotation (see Listing 3-8).
Listing 3-9. AnnotatedDocumentRespository.java
public class AnnotatedDocumentRepository implements DocumentDAO {
document.setLocation("/Users/felipeg/Documents/Random/Book Template.pdf");
36
document = new Document();
document.setName("Clustering with RabbitMQ"); document.setType(type);
document.setLocation("/Users/felipeg/Documents/Random/Clustering with RabbitMQ.txt");
Next, let’s take a look at Listing 3-10. It shows your XML configuration file and the necessary tags that will tell the Spring container to look for annotated classes and their annotations. In this file, you are using a special tag:
<context:component-scan-base-package/>. This tag belongs to an XML namespace that is also declared on your configuration. This new namespace will add more tags that you will see in the following chapters of the book. For now, this tag will instruct the Spring container to start looking for annotated classes from the package specified, in this case
"com.apress.isf.spring.annotated" and all subpackages.
Listing 3-10. Mydocuments-annotations-context.xml
<?xml version="1.0" encoding="UTF-8"?>
<beans xmlns="http://www.springframework.org/schema/beans" xmlns:xsi="http://www.w3.org/2001/XMLSchema-instance"
xmlns:context="http://www.springframework.org/schema/context" xsi:schemaLocation="http://www.springframework.org/schema/beans
http://www.springframework.org/schema/beans/spring-beans.xsd <property name="name" value="WEB" />
<property name="desc" value="Web Link" /> <property name="extension" value=".url" /> </bean>
37
Spring Stereotypes
Spring sterotypes are simply markers that help the Spring container to identify them as Spring-managed components. These markers can be used for external processing tools or can be used as a reference for pointcuts in an aspect-oriented programming context. Nowadays in the Spring community, in many projects, the use of these stereotypes helps not only to understand the code by making it more readable but also by identifying the structure and the architectural layers. The most used stereotypes (by the Spring community and of course in your Spring application My Documents) are described in Table 3-2.
Using the Java Bean Configuration
The Spring Framework version 3.0 adopted a new way to configure the Spring container, using a new Java bean configuration class. This began as a separate project, but the Spring Framework team included it in version 3.0 as a part of its core. Nowadays it is one of the most preferable ways to configure the container, because it helps to get a clear picture of the relationship between classes and it shows how it interacts between them. And, in some cases it even helps to avoid all the clutter of using XML files.
Now let’s see the following Java configuration class. Listing 3-11 is the equivalent of your XML configuration file (see Listing 3-6). Every bean definition in your XML corresponds to the @Bean annotation placed into the method.
Listing 3-11. MyDocumentsContext.java
private Map<String,Document> documents = new HashMap<String,Document>(); private Map<String,Type> types = new HashMap<String,Type>();
38
document.setLocation("/Users/felipeg/Documents/Random/Book Template.pdf");
document.setLocation("/Users/felipeg/Documents/Contracts/Sample Contract.pdf");
39
private Document getDocumentFromMap(String documentKey){ return documents.get(documentKey);
}
private Type getTypeFromMap(String typeKey){ return types.get(typeKey);
} }
As you can see in Listing 3-10, you are adding @Configuration at the top of the class and in the methods the
@Bean annotations. When you use the @Configuration, it is like telling the Spring container, “here are my bean definitions.” And when you use the @Bean annotation over a method, it is the same as creating the <bean/> tag and setting its properties. So, this class will tell the Spring container what the beans are and how they will be wired.
Now, let’s use this new Java bean configuration feature in your unit test. See Listing 3-12.
40
@Before
public void setup(){
context = new AnnotationConfigApplicationContext(MyDocumentsContext.class); engine = context.getBean(SearchEngine.class);
webType = context.getBean(Type.class); }
@Test
public void testWithBeanConfigurationFindByType() {
List<Document> documents = engine.findByType(webType); assertNotNull(documents);
assertTrue(documents.size() == 1);
assertEquals(webType.getName(),documents.get(0).getType().getName()); assertEquals(webType.getDesc(),documents.get(0).getType().getDesc());
assertEquals(webType.getExtension(),documents.get(0).getType().getExtension()); }
@Test
public void testWithBeanConfigurationListAll() { List<Document> documents = engine.listAll(); assertNotNull(documents);
assertTrue(documents.size() == 4); }
}
In Listing 3-12, you are now using the AnnotationConfigApplicationContext class to load your Java configuration class. This will tell the Spring container that the configuration will be based on a class and not on an XML file.
Running your unit test (see Listing 3-12) will be the same as running the gradle command:
gradle test
Using the GroovyBeanDefinitionReader Class
The new Spring Framework 4 introduces a new way to configure beans using the Groovy programming language. This new feature was based on the Grails Framework, introducing a DSL (domain-specific language) for creating beans.
Let’s examine the following example in Listing 3-13.
41
documentDAO(DocumentRepository){ doc1 = ref("doc1")
location = "/Users/felipeg/Documents/Random/Clustering with RabbitMQ.txt" }
webType(com.apress.isf.java.model.Type){ name = "WEB"
desc = "Web Link" extension = ".url" }
pdfType(com.apress.isf.java.model.Type){ name = "PDF"
desc = "Portable Document Format" extension = ".url"
}
noteType(com.apress.isf.java.model.Type){ name = "NOTE"
desc = "Text Notes" extension = ".txt" }
}
42
Now, let’s create your unit test (see Listing 3-14). In this unit test, you will use a new class to load your bean definitions: the GroovyBeanDefinitionReader. This class will load the mydocuments.groovy Listing 3-13 file.
Listing 3-14. MyDocumentsBeanDefinitionReaderTest.java
context = new GenericGroovyApplicationContext("META-INF/spring/mydocuments.groovy"); engine = context.getBean(SearchEngine.class);
assertEquals(webType.getName(),documents.get(0).getType().getName()); assertEquals(webType.getDesc(),documents.get(0).getType().getDesc());
43
In Listing 3-14, you are now using the GenericGroovyApplicationContext class that will load your Groovy script, by passing the groovy file's classpath where it is located (META-INF/spring/mydocuments.groovy); it will start up your Spring Container by creating all the necessary instances, wiring up your classes and having them ready when you need them. Remember that you are now using Groovy! to configure your Spring container.
And now run your unit test with the following command:
gradle test
Which Configuration to Choose?
Every type of configuration has some differences and some applicable usage (see Table 3-3).
Table 3-3. Differences and Usage
Type of Configuration
Usage
XML This can be used with third party libraries and/or different development
environments. It’s easy to read and follow but it can grow, and even though it can be split into different files, you need to keep track of them.
Annotations It is another way to do configurations, but here you are attaching the Spring context to your application. This can be avoided by using your own domain-based annotations and just these can be annotated.
Java Bean Configuration This is now one of the preferred methods for developers who hate to struggle with the XML, and it can be used for beans or components that don’t change too much. Groovy Bean Configuration This is a new complete feature that can be used with the power of the Groovy
programming language; it’s simple and there’s less to type.
So it will depend on your needs and how you want to manage your development cycle. Or you may have a team that prefers some configuration because it is easy to manage and doesn’t affect your development goals.
Summary
In this chapter, you saw ways to accomplish the same behavior using different styles or conventions to create beans. You saw the different classes that load up your beans, such as ClassPathXmlApplicationContext,
AnnotationConfigApplicationContext, and the new GenericGroovyApplicationContext.
You saw how you can annotate classes so the Spring container knows about the beans to use, its dependencies, and relationship with other classes. You saw how the @Repository marks your class as a Spring-managed component that act as a data access object.
Also, you saw how to use the Java configuration class and its @Configuration and @Bean annotations to create the beans and their relationship. And you saw how to use Groovy to expose the beans using the Groovy programming language.
45
Using Beans Scopes
So far you have an application called My Documents that for now is exposing a service that returns either all the documents available or it can return a list of documents by specific type. We were talking about the SearchEngine
class implementation and the way you had configured it. Based on your XML configuration, you have set its scope to be a Singleton class, meaning that every time you require it by invoking the context.getBean method, you always get the same instance. But what happens if you require different instances, such as another service that is required to handle a fresh instance of your SearchEngine implementation to use its search methods.
In this chapter, I will talk about how the Spring Framework instantiates the classes and its dependencies in the
My Documents application, by using your existing code and classes such as the SearchEngine implementation. You will see what scopes you can use and the benefits of each one.
Scopes
Right now your existing code doesn’t print out any information about what is going on, so let’s start by putting some
logs (recording activity) into your classes so you know what is happening when the Spring container creates and uses them as shown in Listing 4-1.
Listing 4-1. SearchEngineService.java
package com.apress.isf.spring.service;
import java.util.ArrayList; import java.util.Arrays; import java.util.List;
import org.slf4j.Logger; import org.slf4j.LoggerFactory;
import com.apress.isf.java.model.Document; import com.apress.isf.java.model.Type;
import com.apress.isf.java.service.SearchEngine; import com.apress.isf.spring.data.DocumentDAO;
public class SearchEngineService implements SearchEngine { private static final Logger log =
LoggerFactory.getLogger(ServiceSearchEngine.class); private DocumentDAO documentDAO;
46
public void setDocumentDAO(DocumentDAO documentDAO) { if(log.isDebugEnabled())
log.debug("Document DAO set: " + documentDAO);
this.documentDAO = documentDAO; }
public List<Document> findByType(Type documentType) { List<Document> result = new ArrayList<Document>();
In Listing 4-1 you have just added a Logger into your ServiceSearchEngine class using the SLF4J library. Also, you added a constructor for this class, and you have set the level of debug in the same constructor and in the setter method for your DocumentDAO implementation. With this, every time the container creates an instance, you should see ServiceSearchEngine create: <ID> with some object ID. When the container sets your DocumentDAO
implementation, you should see the output Document DAO set: <ID> with some Object ID. For now you haven’t changed anything in the code; you only added the Logger just to illustrate what the Spring container is doing when it creates your beans.
47
import com.apress.isf.java.model.Document; import com.apress.isf.java.model.Type;
import com.apress.isf.java.service.SearchEngine;
public class MyDocumentsTest {
private ClassPathXmlApplicationContext context; private SearchEngine engine;
private Type webType;
@Before
public void setup(){
context = new ClassPathXmlApplicationContext("META-INF/spring/mydocuments-context.xml"); }
In Listing 4-2, you have simply created one test method that contains the call of the getBean method. In this case, you want to know how the Spring container can deal with the creation of the SearchEngine and the injection of your
DocumentDAO implementation.
If you run Listing 4-2 without modifying the XML file (mydocuments-context.xml), then you should see the following output:
$ gradle -Dtest.single=MyDocumentsTest test