INTRODUCTION . . . xxv
⊲ SECTION I
ADMINISTRATION AT THE SITE LEVEL
LESSON 1 Using the Site Administration Menu . . . 3LESSON 2 Using the Site Actions Menu . . . 11
LESSON 3 Changing a Site’s Look and Feel . . . .19
LESSON 4 Using Custom Themes . . . 23
LESSON 5 Managing Reporting Services . . . .31
⊲ SECTION II
ADMINISTRATION AT THE SITE COLLECTION LEVEL
LESSON 6 Site Collection Administration Settings . . . 39LESSON 7 Managing the Solutions Gallery . . . 47
⊲ SECTION III
MANAGING SEARCH
LESSON 8 Setting Search Options at the Site Collection Level . . . 57LESSON 9 Search Scopes for Site Collection Administrators . . . 65
LESSON 10 Managing Search Keywords for Site Collection Administrators . . . 73
LESSON 11 Managing Search Availability at the List and Site Level for Site Administrators . . . 79
⊲ SECTION IV
SETTING UP CONTENT MANAGEMENT OPTIONS
LESSON 12 Setting Up Content Types . . . 91LESSON 13 Publishing Content Types to Use Across Site Collections . . . 101
LESSON 14 Setting Up the Content Organizer . . . 105
LESSON 15 Using Document Sets . . . 115
LESSON 16 Using Hold and Discovery . . . 121
LESSON 17 Setting Up Records Management . . . .127
⊲ SECTION V
MANAGING PUBLISHING SITES
⊲ SECTION VI
CONFIGURING USERS AND PERMISSIONS
LESSON 24 SharePoint Security Groups . . . 189LESSON 25 Permission Levels . . . 197
⊲ SECTION VII CONFIGURING SERVICE APPLICATIONS
LESSON 26 Confi guring Access Services . . . 207SharePoint® Server 2010 Administration 24-Hour Trainer
Copyright © 2012 by John Wiley & Sons, Inc., Indianapolis, Indiana
Published simultaneously in Canada
ISBN: 978-0-470-93906-2 ISBN: 978-1-118-22152-5 (ebk) ISBN: 978-1-118-23527-0 (ebk) ISBN: 978-1-118-26001-2 (ebk)
Manufactured in the United States of America
10 9 8 7 6 5 4 3 2 1
No part of this publication may be reproduced, stored in a retrieval system or transmitted in any form or by any means, electronic, mechanical, photocopying, recording, scanning or otherwise, except as permitted under Sections 107 or 108 of the 1976 United States Copyright Act, without either the prior written permission of the Publisher, or authorization through payment of the appropriate per-copy fee to the Copyright Clearance Center, 222 Rosewood Drive, Danvers, MA 01923, (978) 750-8400, fax (978) 646-8600. Requests to the Publisher for permission should be addressed to the Permissions Department, John Wiley & Sons, Inc., 111 River Street, Hoboken, NJ 07030, (201) 748-6011, fax (201) 748-6008, or online at http://www.wiley.com/go/permissions.
Limit of Liability/Disclaimer of Warranty: The publisher and the author make no representations or warranties with respect to the accuracy or completeness of the contents of this work and specifi cally disclaim all warranties, including without limitation warranties of fi tness for a particular purpose. No warranty may be created or extended by sales or pro-motional materials. The advice and strategies contained herein may not be suitable for every situation. This work is sold with the understanding that the publisher is not engaged in rendering legal, accounting, or other professional services. If professional assistance is required, the services of a competent professional person should be sought. Neither the pub-lisher nor the author shall be liable for damages arising herefrom. The fact that an organization or Web site is referred to in this work as a citation and/or a potential source of further information does not mean that the author or the publisher endorses the information the organization or Web site may provide or recommendations it may make. Further, readers should be aware that Internet Web sites listed in this work may have changed or disappeared between when this work was written and when it is read.
For general information on our other products and services please contact our Customer Care Department within the United States at (877) 762-2974, outside the United States at (317) 572-3993 or fax (317) 572-4002.
Wiley publishes in a variety of print and electronic formats and by print-on-demand. Some material included with standard print versions of this book may not be included in e-books or in print-on-demand. If this book refers to media such as a CD or DVD that is not included in the version you purchased, you may download this material at http://booksupport.wiley.com. For more information about Wiley products, visit www.wiley.com.
Library of Congress Control Number: 2011928392
For Seamy McGivern, always remembered by his
friends.
—Martin Reid
For Michelle
—
My Crustacean Forevermore
BILL CRIDER is a SharePoint architect and principal consultant at Ascendum Solutions in Cincinnati,
Ohio. He is an active speaker, writer, and blogger on all things SharePoint. His current interests include mobile applications, social networks for businesses, and SharePoint in the cloud. You can visit his website at http://www.DrSharePoint.com for a variety of posts, podcasts, and videos on
SharePoint administration, development, and architecture.
MARTIN REID is an analyst with the Queens University of Belfast where he works with a large
SharePoint 2010 farm. Martin is married with six children and lives in Belfast, Northern Ireland. Martin’s main interest is using SharePoint to solve business issues.
CLINT RICHARDSON has been working in the IT industry for more than a decade, and has focused
exclusively on SharePoint for the last 5 years. His primary interest is in the deployment and adminis-tration of large scale farms. He has assisted multiple branches of the US military in locations around the world. Currently he runs his own SharePoint consultancy in the Ohio Valley area of the US.
ABOUT THE TECHNICAL EDITORS
TODD MEISTER has been working in the IT industry for over fi fteen years. He’s been a Technical
Editor on over 75 titles ranging from SQL Server to the .NET Framework. Besides technical editing titles he is the Senior IT Architect at Ball State University in Muncie, Indiana. He lives in central Indiana with his wife, Kimberly, and their four great children.
MARTIN REID is an analyst with the Queens University of Belfast where he works with a large
ACQUISITIONS EDITOR
James Saturnio, Word One New York
I would like to thank the staff at Wrox for giving me the opportunity to write my fi rst book. Also my thanks go out to them for their patience along the way. The process of writing is much more dif-fi cult and time consuming that I imagined when I started this project. Many thanks to my wife, who put up with my 60 hour weeks turning into 80 hour weeks as I fought to cross the fi nish line with this project. Finally, I would like to thank my co-author Martin, who stepped in at the last minute and put forth an incredible amount of effort to bring this project to a successful close.
—Bill Crider
I would like to thank my wife, Patricia, for her usual support when I am working on these books. People always say it would not be possible without that support, in my case that is more than true.
INTRODUCTION xxv
SECTION I: ADMINISTRATION AT THE SITE LEVEL
LESSON 1: USING THE SITE ADMINISTRATION MENU 3
Accessing the Site Administration Menu
3
Setting the Regional Settings Options 5
Site Libraries and List Links
6
Viewing and Managing User Alerts 6
Confi guring RSS Feeds 6
Managing Content and Structure 7
Try It
8
Lesson Requirements 8
Hints 8 Step-By-Step 8
LESSON 2: USING THE SITE ACTIONS MENU 11
Manage Site Features
11
What is a Feature 12
Save Site as Template 12
Reset to Site Defi nition 14
Using the Site Analytics Web Analytics Reports 15
Try It
15
Lesson Requirements 15
Hints 15 Step-by-Step 16
LESSON 3: CHANGING A SITE’S LOOK AND FEEL 19
Title, Description, and Icon
19
Displaying Navigation Options
19
Try It
20
Lesson Requirements 20
CONTENTS
LESSON 4: USING CUSTOM THEMES 23
Accessing the Site Themes Page
23
Creating a Theme
24
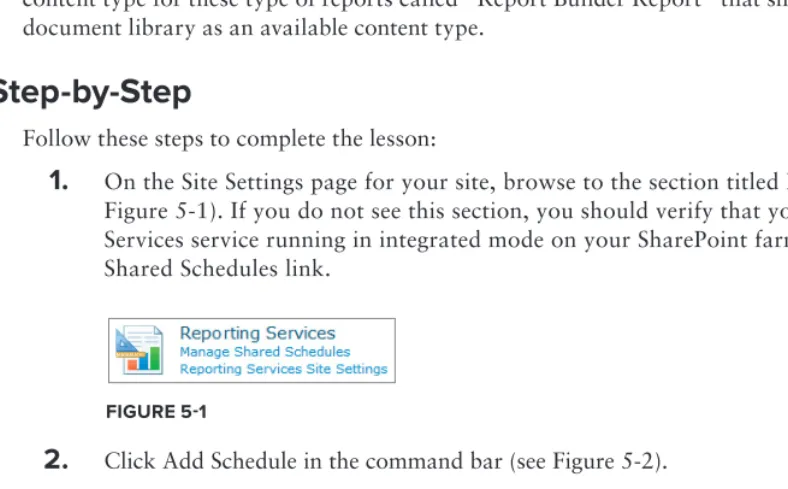
LESSON 5: MANAGING REPORTING SERVICES 31
Manage the Shared Schedule
31
Reporting Services Site Settings
32
Enable RSClientPrint ActiveX Control Download 32
Enable Local Mode Error Messages 32
Enable Accessibility Metadata for Reports 32
Try It
33
Lesson Requirements 33
Hints 33 Step-by-Step 33
SECTION II: ADMINISTRATION AT THE SITE COLLECTION LEVEL
LESSON 6: SITE COLLECTION ADMINISTRATION SETTINGS 39
Defi ning Site Collections
39
Site Collection Administrative Options
40
Try It
41
Lesson Requirements 41
Hints 41 Step-by-Step 42
LESSON 7: MANAGING THE SOLUTIONS GALLERY 47
Solution Framework
47
Deploying a Custom Solution
49
LESSON 8: SETTING SEARCH OPTIONS AT THE
SITE COLLECTION LEVEL 57
Search Results
58
Try It
59
Lesson Requirements 59
Step-by-Step 60
LESSON 9: SEARCH SCOPES FOR SITE COLLECTION
ADMINISTRATORS 65
Creating a New Scope
65
Managing Where the Scope Appears
68
Setting Rules for the Scope
68
Try It
69
Lesson Requirements 69
Step-by-Step 69
LESSON 10: MANAGING SEARCH KEYWORDS
FOR SITE COLLECTION ADMINISTRATORS 73
Try It
73
Lesson Requirements 74
Step-by-Step 74
LESSON 11: MANAGING SEARCH AVAILABILITY AT THE LIST
AND SITE LEVEL FOR SITE ADMINISTRATORS 79
Try It
81
Lesson Requirements 81
CONTENTS
SECTION IV: SETTING UP CONTENT MANAGEMENT OPTIONS
LESSON 12: SETTING UP CONTENT TYPES 91
Using Content Types to Manage Content
91
Item #1: A Common Template 93
Item #2: Three Types of Proposals in the Same Library 93 Item #3: A Diff erent Business Process for Each Type of Proposal 93 Item #4: Diff erent Views of the Documents for Diff erent People 93 Item #5: A Designation of Sold, in Progress, or Not Sold 93 Item #6: Repeating the Process for Multiple Departments 93
Creating a Content Type Hierarchy
94
Try It
94
Lesson Requirements 94
Hints 94 Step-by-Step 95 LESSON 13: PUBLISHING CONTENT TYPES TO USE
ACROSS SITE COLLECTIONS 101
Creating a Content Type Publishing Hub
101
Try It
102
Lesson Requirements 102
Hints 102 Step-by-Step 102
LESSON 14: SETTING UP THE CONTENT ORGANIZER 105
The Content Organizer’s Functionality
105
Setting Up the Content Organizer
107
Integrating E-Mail into the Content Organizer
107
Try It
108
Lesson Requirements 109
Step-by-Step 109
LESSON 15: USING DOCUMENT SETS 115
Create a Document Set Content Type
115
Try It
116
Hints 116 Step-by-Step 116 LESSON 16: USING HOLD AND DISCOVERY 121
Discovery: Find It
121
LESSON 17: SETTING UP RECORDS MANAGEMENT 127Records in SharePoint 2010
127
Declaring an Item a Record
128
Try It
128
Lesson Requirements 128
Hints 128 Step-by-Step 129 LESSON 18: SETTING UP RELATED LISTS 135
Try It
135
Lesson Requirements 135
Hints 136 Step-by-Step 136
SECTION V: MANAGING PUBLISHING SITES
LESSON 19: SETTING UP A PUBLISHING SITE 141
CONTENTS
LESSON 20: SETTING NAVIGATION
OPTIONS IN PUBLISHING SITES 151
Navigational Options
151
LESSON 21: SETTING BRANDING OPTIONS
IN PUBLISHING SITES 161
LESSON 22: USING CONTENT APPROVAL IN PUBLISHING SITES 171
Try It
174
Lesson Requirements 174
Hint 174
Step-by-Step 175
LESSON 23: USING VARIATIONS IN PUBLISHING SITES 179
SECTION VI: CONFIGURING USERS AND PERMISSIONS
LESSON 24: SHAREPOINT SECURITY GROUPS 189
Inheritance 189
SharePoint and Active Directory Groups 189
Default SharePoint Groups 190
Try It
191
Lesson Requirements 191
Step-by-Step 191 LESSON 25: PERMISSION LEVELS 197
Setting New Permission Levels
199
Adding Rights Levels to a Permission Level 199
Best Practice 199
Try It
200
Lesson Requirements 200
Step-by-Step 200
SECTION VII: CONFIGURING SERVICE APPLICATIONS
LESSON 26: CONFIGURING ACCESS SERVICES 207
Access Services
207
Try It
210
Lesson Requirements 210
Step-by-Step 210 LESSON 27: CONFIGURING EXCEL SERVICES 215
Confi guring a Trusted Location
216
Using Your Workbook
217
Try It
220
Lesson Requirements 220
Step-by-Step 220 LESSON 28: CONFIGURING VISIO SERVICES 225
The Visio Graphics Service
225
Visio Process Repository 227
Visio Graphics Application 228
CONTENTS
Try It
229
Lesson Requirements 229
Step-by-Step 229
LESSON 29: CONFIGURING POWERPOINT SERVICES 231
PowerPoint Service Application
231
Try It
232
Lesson Requirements 232
Step-by-Step 232
LESSON 30: CREATING METADATA SERVICES 237
Activating the Service
237
Groups, Sets, and Terms
238
Try It
239
Lesson Requirements 239
Hints 239 Step-by-Step 239
LESSON 31: USING METADATA 245
Try It
247
Lesson Requirements 247
Hints 247 Step-by-Step 248 LESSON 32: CONFIGURING PERFORMANCEPOINT SERVICES 251
Activating Business Intelligence Features
251
Secure Store and Unattended Service Account 251
PerformancePoint Services Application 252
Try It
252
Lesson Requirements 253
Step-by-Step 253
Trusted Content Locations 257
LESSON 33: CREATING A PERFORMANCEPOINT SITE 259
BI Sites and Features
259
Try It
263
Lesson Requirements 263
LESSON 34: CREATING A BUSINESS CONNECTIVITY SERVICE 267 LESSON 35: CREATING AN EXTERNAL LIST 275
Try It
276
Lesson Requirements 276
Step-by-Step 276
SECTION VIII: SITE TEMPLATES
LESSON 36: USING THE FORM TEMPLATE LIBRARY 283
Overview of Forms Services
283
Publishing Templates
284
Try It
285
Lesson Requirements 286
Step-by-Step 286 LESSON 37: USING THE RECORDS CENTER SITE TEMPLATE 291
Features of the Records Center Site
291
Using the Records Center Management Console Page 292
Try It
293
Lesson Requirements 293
Hints 293 Step-by-Step 293 LESSON 38: CREATING A MEETING WORKSPACE 297
Creating a Meeting Workspace
297
Try It
298
Lesson Requirements 298
Step-by-Step 298 LESSON 39: PERSONALIZATION SITES 301
Linking to My Site
301
CONTENTS
Try It
302
Lesson Requirements 302
Hints 302 Step-by-Step 302 LESSON 40: CREATING AN ENTERPRISE WIKI SITE 305
Wiki Features
305
Try It
306
Lesson Requirements 306
Hints 306 Step-by-Step 306 APPENDIX : WHAT’S ON THE DVD? 311
System Requirements
311
Using the DVD
311
What’s on the DVD
312
Troubleshooting 312
Customer Care
313
SHAREPOINT IS ONE THE MOST SUCCESSFUL products in Microsoft’s history. It can be found in
small businesses, universities, and Fortune 500 companies. SharePoint 2010, the latest release, con-tains many new areas for existing and new SharePoint server administrators and site administrators. This book will help you meet the new challenges SharePoint administrators face in their day to day deals with the product.
Existing SharePoint administrators will fi nd there are a lot of changes in SharePoint 2010 with which they may not be very familiar. One of the major changes covered extensively is the move away from a single farm Shared Service Provider to a system of Service Applications which need to be confi gured and managed. For example Access Services, new to SharePoint with this release will allow your users to actually convert Access 2010 databases to run within the browser hosted by SharePoint.
Our intention in writing this book was to help you with what is, being honest, a complicated bit of Software to manage and one of the main requirements required with SharePoint is patience when things don’t work out as expected! This book is there to guide you, to provide help when you need it. Each lesson looks at one particular area of administration giving you the tools and information to get a service up and running. Video fi les accompany each lesson, extending the information given in the book with real world experience and useful tips.
It would be an unusual day in the life of a SharePoint administrator to know the answer to every question encountered when managing this product. This book will go a long way to helping you understand the questions, provide many answers to common issues, and give you a thorough grounding in the skills required to manage what is in our view the best product ever released by Microsoft.
WHO THIS BOOK IS FOR
This book is aimed at both new and existing SharePoint Server and SharePoint 2010 Foundation server and site administrators. The book covers almost every aspect of SharePoint administration at the server level using Central Administration to working at the site collection level. No previous experience is required as the authors take you through each area using real world examples rein-forced with Lesson DVD videos.
WHAT THIS BOOK COVERS
INTRODUCTION
HOW THIS BOOK IS STRUCTURED
The book is divided into several sections each organized to provide you with a comprehensive guide to a particular SharePoint administrative area. The following areas of SharePoint Administration are covered included real work practical exercises accompanied by a video demonstration of both the exercise and extended information on the topic.
‰ Section 1—Administration at the Site Level
‰ Section 2—Administration at the Site Collection Level
‰ Section 3—Managing Search
‰ Section 4—Setting up Content Management Options
‰ Section 5—Managing Publishing Sites
‰ Section 6—Setting Users and Permissions
‰ Section 7—Managing Service Applications
‰ Section 8—Site Templates
WHAT YOU NEED TO USE THIS BOOK
In order to work with the examples in the book you will of course require access to SharePoint 2010 either the full version or SharePoint Foundation 2010. For some of the practical example you will also need access to Microsoft Offi ce 2010, however Microsoft Offi ce 2007 will work just as well to create some of the example fi les required. You will also need appropriate permissions to the Central Administration web site and Site Collection Administrator permissions to fully follow all the examples.
CONVENTIONS
To help you get the most from the text and keep track of what’s happening, we’ve used a number of conventions throughout the book.
TRY IT
The TryIt is an exercise you should work through, following the text in the book.
1.
They usually consist of a set of steps.2.
Each step has a number.Boxes with a warning icon like this one hold important, not-to-be-forgotten information that is directly relevant to the surrounding text.
The pencil icon indicates notes, tips, hints, tricks, or and asides to the current discussion.
As for styles in the text:
‰ We highlight new terms and important words when we introduce them.
‰ We show keyboard strokes like this: Ctrl+A.
‰ We show fi le names, URLs, and code within the text like so: persistence.properties.
SOURCE CODE
As you work through the examples in this book, you may choose either to type in all the code man-ually, or to use the source code fi les that accompany the book. All the source code used in this book is available for download at www.wrox.com. When at the site, simply locate the book’s title (use the
Search box or one of the title lists) and click the Download Code link on the book’s detail page to obtain all the source code for the book. Code that is included on the web site is highlighted by the following icon:
Listings include the fi lename in the title. If it is just a code snippet, you’ll fi nd the fi lename in a code note such as this:
Code snippet fi lename
INTRODUCTION
Once you download the code, just decompress it with your favorite compression tool. Alternately, you can go to the main Wrox code download page at www.wrox.com/dynamic/books/download.aspx to see the code available for this book and all other Wrox books.
ERRATA
We make every effort to ensure that there are no errors in the text or in the code. However, no one is perfect, and mistakes do occur. If you fi nd an error in one of our books, like a spelling mistake or faulty piece of code, we would be very grateful for your feedback. By sending in errata, you may save another reader hours of frustration, and at the same time, you will be helping us provide even higher quality information.
To fi nd the errata page for this book, go to www.wrox.com and locate the title using the Search box or one of the title lists. Then, on the book details page, click the Book Errata link. On this page, you can view all errata that has been submitted for this book and posted by Wrox editors. A complete book list, including links to each book’s errata, is also available at www.wrox.com/misc-pages/ booklist.shtml.
If you don’t spot “your” error on the Book Errata page, go to www.wrox.com/contact/techsupport .shtml and complete the form there to send us the error you have found. We’ll check the information and, if appropriate, post a message to the book’s errata page and fi x the problem in subsequent edi-tions of the book.
P2P.WROX.COM
For author and peer discussion, join the P2P forums at p2p.wrox.com. The forums are a Web-based system for you to post messages relating to Wrox books and related technologies and interact with other readers and technology users. The forums offer a subscription feature to e-mail you topics of interest of your choosing when new posts are made to the forums. Wrox authors, editors, other industry experts, and your fellow readers are present on these forums.
At p2p.wrox.com, you will fi nd a number of different forums that will help you, not only as you read this book, but also as you develop your own applications. To join the forums, just follow these steps:
1.
Go to p2p.wrox.com and click the Register link.2.
Read the terms of use and click Agree.3.
Complete the required information to join, as well as any optional information you wish to provide, and click Submit.You can read messages in the forums without joining P2P, but in order to post your own messages, you must join.
Once you join, you can post new messages and respond to messages other users post. You can read messages at any time on the Web. If you would like to have new messages from a particular forum e-mailed to you, click the Subscribe to this Forum icon by the forum name in the forum listing.
Administration at the Site Level
⊲
LESSON 1:
Using the Site Administration Menu
⊲
LESSON 2:
Using the Site Actions Menu
⊲
LESSON 3:
Changing a Site’s Look and Feel
⊲
LESSON 4:
Using Custom Themes
1
Using the Site Administration
Menu
A SharePoint application is largely organized around the concept of the individual site. Every SharePoint site must have at least one owner who will have available to him or her the full range of administrative options at the site level.
In many cases the people responsible for building and maintaining a SharePoint site are not IT professionals. More often they are business users charged with organizing documents, posting meeting information, and uploading photos of the company picnic. The purpose of this chapter is to explain the basic administration functions that are available to a user who has adminis-trative access to a site. Typically, this person is known as the site owner.
The SharePoint administration interface is displayed by a browser and is security-trimmed. This means that many of the menu options, links, and other parts of the interface can be viewed only by people who have a certain level of rights. If you are following the steps in this chapter and the accompanying video walkthrough, and you are not seeing the links and menu items described, it’s likely that you do not have a suffi cient level of rights to the site. Someone with a higher level of access will have to increase your security level.
ACCESSING THE SITE ADMINISTRATION MENU
Every SharePoint site includes a Site Settings page. This page consists of various link group-ings that contain all of the various administration and confi guration options available to a site owner. You can access the site settings page from any page on a SharePoint site using the site actions menu. The site actions menu is usually found in the upper left corner of a SharePoint site. If the page has been modifi ed from its original layout, it could be located somewhere else.
4
x
LESSON 1 USING THE SITE ADMINISTRATION MENUof the list should be an option called Site Settings. Clicking this link takes you to the Site Settings page.
On the Site Settings page for any SharePoint site, you will fi nd a large collection of links organized under several categories. See Figure 1-2.
For this chapter we focus on the links under the heading Site Administration. (Later chapters discuss the other headings.) These links deal with a range of functions and settings common to every SharePoint site.
You may notice that the links under your Site Administration heading are different from the ones in this book. SharePoint offers a dizzying array of options, features, and confi guration settings. The links that appear on the Site Actions page depend on the ver-sion of SharePoint being used and the type of site that was created; in addition, optional features may have been activated.
Links that are the result of optional confi gurations will be dis-cussed in later chapters. In this chapter we will deal strictly with the site administration options found on all (or at least most) SharePoint sites.
FIGURE 1-2
A SharePoint installation typically contains a number of individual sites. Each option in the site administration menu must be set separately for each SharePoint site. Other items we will look at later have a larger scope and will affect the behavior of several sites at once.
In the following sections in this lesson, we will discuss the purpose of each link in the site admin-istration menu. The links found in the Site Adminadmin-istration menu common to all SharePoint sites include:
‰ Regional Settings
‰ Site Libraries and Lists
‰ RSS
‰ Content and Structure
‰ Content and Structure Logs
Exploring these administrative functions will be the focus of this lesson.
Setting the Regional Settings Options
The Regional Settings link in the Site Administration menu opens the Regional Settings page. The Regional Settings page is used by administrators to determine how SharePoint displays certain elements that change according to a user’s time zone or location. Let’s walk through the various options and discuss the effect each one has on the site. Figure 1-3 shows the Regional Settings page.
FIGURE 1-3
‰ Locale: Selecting a locale causes SharePoint to display numbers, dates, and time-related ele-ments in the formats used in the locale selected. It will also cause some less obvious behaviors such as showing the names of months on a calendar view in the chosen locale.
‰ Sort Order: If you have the proper language pack installed for the selection you make in this drop-down box, items in lists and libraries are sorted in alphabetical order according to the chosen language. Language packs should be installed by a SharePoint farm administrator.
‰ Time Zone: This setting is important to set properly because often the users of a SharePoint portal are in a different time zone from the physical server that SharePoint is hosted on. Users expect time and date stamps on documents and items to refl ect local time. If a server sits in California, but users are in New York, leaving the default setting here causes the time stamps of the users’ documents to be three hours too early. If you are the owner of a site, make sure this setting is correct for the predominant location of your users.
6
x
LESSON 1 USING THE SITE ADMINISTRATION MENU‰ Enable an Alternate Calendar: The alternate calendar presents an alternate month and year next to the month and year in the chosen format for calendar views. In addition, next to each day of the month shown in the calendar view, the alternate day is shown in parentheses to highlight differences between the chosen and alternate calendar formats.
‰ Defi ne Your Work Week: This option is refl ected in calendar views, as the weekday shown on the far left side of a calendar view will be the day chosen here as the fi rst day of the week. Options for the work week and for the start and end times for the workday affect which days and times in the calendar views are shaded darker. Non-working days and hours are shaded, while working hours have a white background.
‰ Time Format: The 12-hour format shows time in the more common format, with a.m. and p.m. indicators. The 24-hour setting is military time, such as 15:00 for 3 p.m. (12 p.m. plus three hours).
SITE LIBRARIES AND LIST LINKS
The Site Libraries and Lists link provides a shortcut by which a site administrator can access the list and library settings page for all the lists and libraries on a site. This page presents a link for each list and library in the site. Clicking the link takes you to the settings page for that list or library.
Viewing and Managing User Alerts
Alerts are a method for users to receive notifi cation when content in the site are added, changed or deleted. Users can voluntarily set alerts that will send e-mails to them when the contents of lists or libraries change. Note that you cannot set up alerts for other users using the browser interface pro-vided in SharePoint. Users must elect to receive them and set the alerts themselves. However, this page enables you to view alerts that users have set up and to delete them at your discretion.
Sometimes users decide they no longer wish to receive alert notifi cations and ask an administrator to remove them.
For alerts to work, the SharePoint farm administrator must have previously set up an e-mail server. Because alerts rely on the SharePoint server using e-mail, commands that enable users to set alerts are not visible unless an e-mail server has been set up and associated with the SharePoint farm. This must be done by someone with farm administration rights. Figure 1-4 shows the Share & Track toolbar on the ribbon. If the e-mail server has not been set, the Alert Me bell icon will not be visible.
Confi guring RSS Feeds
RSS stands for Really Simple Syndication. As with most technical acronyms, the individual words don’t have any meaning to people who aren’t already information technology professionals. So what does Really Simple Syndication mean? RSS is a means people who have some content, usually on a website but not always, to publish that content and have it subscribed to on other websites, iPods, and a host of other medium. It enables updates to the source information to be refl ected in all the locations that show the source content.
SharePoint lists can use RSS in a variety of ways. For instance, using the RSS Web part, content from other sites that have RSS feeds can be pulled into SharePoint. In addition, SharePoint lists and libraries can serve as sources of feeds for others to subscribe to. The Confi guring RSS Feeds page deals with using SharePoint lists and libraries as feeds for others to subscribe to.
On the RSS Settings page you will see either one or two checkboxes, titled Enable RSS and (if appli-cable) Site Collection RSS (see Figure 1-4). You will see the Site Collection RSS checkbox only if the site is the top-level site of a site collection. The Site Collection checkbox enables or disables allowing RSS feeds for lists and libraries for every site in the collection. That includes the current site and any site below it. Disabling this checkbox overrides any setting that may be set on sites below it. The Enable RSS checkbox will allow or disallow feeds for the current site only.
In the Enable RSS setting you can allow RSS feeds for an individual site. If the Site Collection RSS setting is not enabled, the Allow RSS Feeds in this Site setting will be grayed out. If RSS is not enabled for a site or site collection, the RSS Feed option in the ribbon (see Figure 1-5) will be grayed out as well.
Finally, in the Advanced Settings section, you can enter some information about the
RSS feed that will appear to someone who subscribes to the feed. The Time to Live setting affects how often the feed will update to subscribers. Decreasing the Time to Live will cause the feed to be updated more often and increase traffi c on the site. See Figure 1-6 for an example of how these options appear.
FIGURE 1-6
Managing Content and Structure
This feature and related links are available only if you have the licensed version of SharePoint 2010, SharePoint Server 2010, installed. If you are using SharePoint Foundation 2010, you will not see this link under Site Administration. In addition, you will have the publishing feature activated for these links to appear. Lessons 2 and 6 discuss the concept of activating features.
This feature consists of two separate links under the Site Administration heading: Site Content and Structure, and Content and Structure Logs. The fi rst presents a tree view of the site collection, sites, and various site elements. Furthermore, it enables the user to view settings and permissions on the objects and move them around the hierarchy of the site collection. The second link (Content and Structure Logs) shows the same page but with an additional view of long running background processes.
8
x
LESSON 1 USING THE SITE ADMINISTRATION MENUTRY IT
In this lesson, you will review the Site Administration menu and how the options affect a SharePoint site. To participate in this walkthrough, you can either follow along with the accompanying
instructional DVD or visit www.wrox.com/go/sp2010-24, or try a more hands-on approach via a SharePoint site using your Web browser.
Lessons Requirements
To perform this lesson you will need the following:
‰ Access to a SharePoint site
‰ Administrator rights to the site
Hints
This lesson is a survey of the Site Administration menu. It covers only the elements common ele-ments to all (or most) SharePoint sites. Many optional features will be covered in other lessons in this book.
Step-By-Step
1.
From the home page of a SharePoint Site, locate the Site Actions drop-down menu. You should fi nd it in the upper left-hand corner of the screen. Select Site Settings. This will open the Site Settings page. You should be presented with a page full of various links under different headings. Look for the heading titled Site Administration. If you are following along on your own website the links you see may differ from what is displayed on the video or in the screen-shots in this walkthrough. There are many factors that affect which links will become visible based on confi guration choices, licenses, and a host of other options. Figure 1-2, from earlier in the lesson, shows the Site Administration menu as it is presented on the Site Settings page.2.
Click the Regional Settings link under the Site Administration heading. Make the following changes to the settings on the page (see Figure 1-7):‰ Change the time zone to (UTC-9:00) Alaska.
‰ Change the Calendar setting to Japanese Emperor Era (a popular setting in Alaska).
‰ Set the checkboxes for the work week as Mon–Thu. Leave the others blank. (No real work gets done on Friday anyway.)
‰ Click the OK button at the bottom of the screen.
3.
Create a list of type Calendar. You will see the calendar displaying Japanese characters refl ecting your choices from Step 2.FIGURE 1-7
5.
Return to the Site Settings page and click the Site Libraries and Lists link. This will open a page that will contain a link to the settings page for every list and library on the site, as shown in Figure 1-9. This page makes it easier for administrators to manage their lists and libraries.6.
On the Site Settings page, click the User Alerts link to view the Alerts Management page. On this page you can view the current alerts and delete them at your discretion. Note that there is no way to set alerts for users in the interface. They must set their own alerts, or you can use programming to set them. To view alerts, choose a user name from the drop-down box and click the Update button. The details of the alert will be shown below on the page and you can delete it by selecting the appropriate checkbox and clicking the Delete Selected Alerts link. See Figure 1-10 for an example.FIGURE 1-10
Please select Lesson 1 on the DVD or visit www.wrox.com/go/sp2010-24 to view the video that accompanies this lesson.
FIGURE 1-8
2
Using the Site Actions Menu
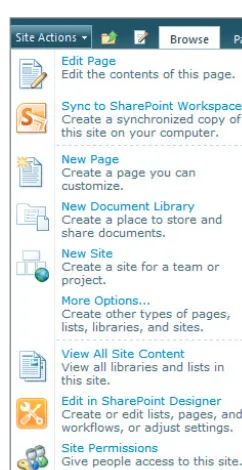
The Site Actions menu is another collection of administrative links on the Site Settings page and is open only to users with the Manage Web Site permission level. By default, this permis-sion level is assigned to the Site Owner’s group. It is also possible to assign this permispermis-sion level separately, a topic we explore in Lesson 25. Most users typically have only Read or Contribute permissions and cannot access this menu.
The Site Actions menu contains a handful of important site-related functions that you need to learn just as you did the options in the Site Administration menu in Lesson 1. In this lesson we examine each of the features made available through the Site Actions menu. Figure 2-1 shows the Site Actions menu.
FIGURE 2-1
MANAGE SITE FEATURES
Clicking the Manage Site Features link takes you to the managefeatures.aspx page. See
Figure 2-2.
12
x
CHAPTER 2 USING THE SITE ACTIONS MENUOn the left side of the screen you can see the names and descriptions of various features, and on the right side is a toggle button for each feature that activates or deactivates it. If the feature is active, you see a blue box with the word Active in white text next to the button. The button displays the text Deactivate. If the feature is not active, the button text reads Activate.
As with everything else in SharePoint, the items you see in the feature list vary greatly based on the version of SharePoint you are running, how it is confi gured, and a host of other factors.
What is a Feature
A feature is a piece of functionality in SharePoint that can be activated (turned on) at different levels of the SharePoint farm. The concept of the feature was introduced in the 2007 version of SharePoint and it enables site owners to turn on certain functions on their sites and leave others off. Each time you activate a feature you turn on additional functionality. Site Features only affect the site where they are located. Other features can affect entire site collections or the whole SharePoint installa-tion. Features in the Site Actions menu, however, only apply to a single individual site. In addition to the features supplied by SharePoint, developers can deploy their custom solutions using this same framework. Creating custom features and deploying them is a subject for a more developer-oriented book. Here the goal is merely to make you familiar with what features are and why you need to understand them.
One of the most important things to understand about features is the effects of turning them on or off. When features are activated, or when active features are deactivated, they can create a variety of changes on your site. One typical change is displaying menu items that were previously hidden. Another change is displaying previously inactive, gray items on the ribbon. These changes may affect the choices a user has when selecting, for example, the type of list to create on a site. Turning on certain features increases the list or site templates available to a user creating new content. As we discuss different functionalities we will mention which features need to be turned on to enable those functionalities.
If you cannot fi nd links, list choices, or ribbon options that you have seen on other sites or expect to see on your site, one of the most likely culprit is a disabled feature. If you fi nd yourself missing functions or links, always visit the Site Features page to determine if this is the problem. (If that doesn’t work, visit Lesson 25, which discusses permissions. It may be you don’t have rights to see the feature.)
To obtain a better understanding of how a feature works, you will turn one on and off as part of the Try It section at the end of this chapter.
Save Site as Template
Save Site as Template is a link on the Site Actions menu. The Save Site as Template link is used to create a site template out of the current site. Before we look at the details of this process, it is impor-tant to understand why you would want to create a site template.
ele-‰ Custom lists
‰ Custom icons and company logos
‰ Page layouts
‰ Combinations of lists and libraries in a site
Site templates are used to save a site that can then be recreated with its layouts, lists, and other ele-ments already present. Without templates, these eleele-ments would have to be manually recreated for each new site. Figure 2-3 shows the form used when saving a site as a template, the items on the form are discussed below.
FIGURE 2-3
‰ File Name: The template is saved as a fi le with the extension of .wsp. Enter the name for the fi le here.
‰ Template Name: When users create a new site using this template, the template name is what they see on the page where the new site is created and the list of available templates is displayed.
‰ Template Description: Next to the template name, users can see a description of what the template is for and what elements it contains. Fill out this item to provide the description. Figure 2-4 shows where the title and description are displayed on the Create Site dialog using a custom template.
‰ Include Content: Check this box if you want the list items added to lists and the documents added to libraries to be present in any new sites created from this template. Usually content is specifi c to the site on which it is created and you don’t want to use this option. However, there are some scenarios where it makes sense:
‰ For lists that contain elements for drop-down options. Each site created from the template uses the same drop-down options.
‰ For custom pages you have created with custom branding.
14
x
CHAPTER 2 USING THE SITE ACTIONS MENUFIGURE 2-4
Reset to Site Defi nition
The purpose of the Reset to Site Defi nition link is to remove customizations that have been made to the site using SharePoint Designer. It is beyond the scope of this book to discuss the architectural implications of customizing a site with SharePoint Designer. Suffi ce it to say that if the farm admin-istrators enable the use of SharePoint Designer on a SharePoint site, it is possible to create a wide range of customizations to that site. Sometimes these customizations cause unforeseen problems or the attempt just doesn’t work out as planned. If you decide you want to revert to how the site looked when you fi rst created it, clicking this link undoes any changes made to the site defi nition.
Note that not every change to a site is a customization that is undone by this command. Common changes to a site that can be reset this way include:
‰ Changes to the underlying layout pages and master pages of the site
‰ Data views
Examples of changes that cannot be undone by this command are:
‰ Web Parts added to pages
‰ Custom lists or libraries you have created
‰ Themes
Using the Site Analytics Web Analytics Reports
Site analytics simply tell you how many people are looking at your site. SharePoint keeps statistics on how many pages are viewed, how many unique users visit the site, and various other metrics. To view these reports, an administrator has to turn on a service that collects the data. If this service is not set up, you will see the error in Figure 2-5.
FIGURE 2-5
In this case the SharePoint farm administrator needs to provision the Web Analytics service applica-tion. This function is beyond the rights level assigned to the average user in most SharePoint deploy-ments. Once the service is provisioned, you will see the page in Figure 2-6.
FIGURE 2-6
TRY IT
In this lesson we will review the items in the Site Actions menu and how they affect a SharePoint site.
Lesson Requirements
To complete this lesson, you will need the following:
‰ Access to a SharePoint site
‰ Administrator rights to the site
Hints
16
x
CHAPTER 2 USING THE SITE ACTIONS MENUStep-by-Step
First you will activate a site feature and see how it affects other elements of the site. Select the Site Settings option from the Site Actions drop-down menu in the upper left corner of the screen. Under the Site Actions header, select the Manage Site Features link.
1.
Find the feature called Group Work Lists and click the Activate button. This feature creates some lists with some functionality for team and resource scheduling. Figure 2-7 shows this feature.FIGURE 2-7
2.
Select the View All Site Content link in the Site Actions drop-down menu, which remains in the upper-left corner of the screen. Notice in Figure 2-8 how three new lists have been cre-ated as a result of the feature’s activation: Phone Call Memo, Resources, and Whereabouts. Every feature is different, but activating a feature frequently creates these kinds of changes to a site — creating new elements, adding new options to the toolbar, and so on.FIGURE 2-8
3.
The next action in the Site Actions menu is to save a site as a template. To save a site as a template, click the Save Site as Template link in the Site Actions menu.installations. Figure 2-9 shows the template form you must fi ll out to save a site as a template. Galleries are discussed in more detail in Lesson 7.
FIGURE 2-9
5.
The next link in the Site Actions menu is the Reset to Site Defi nition link. This command will give you two options for resetting any customizations you have made to the page. The fi rst option is to reset an individual page whose address you provide. The second option is to reset the entire site. Figure 2-10 shows this page.FIGURE 2-10
6.
Click the View the Web Analytics reports link.There are two sets of analytics reports, one for the site and one for the site collection. You will see the site collection link only if you have Site Collection Administrator rights. If you are an owner for this site only and not for the site collection (the difference is discussed in Lesson 8) you will see only one link for the site-level reports.
3
Changing a Site’s Look and Feel
On the Site Settings page is a heading titled Look and Feel. Under this heading are several links that are used to alter aspects of the SharePoint site’s user interface. The Look and Feel commands give users with Site Owner or Designer permissions the ability to make some basic branding and navigation changes. In this lesson we examine these options. In Lesson 4 we dis-cuss creating custom themes.
TITLE, DESCRIPTION, AND ICON
Clicking on the Title, Description, and Icon link under the Look and Feel heading takes you to the Title, Description, and Icon screen. This screen enables you to upload a custom logo to add some branding to your site. The title and description are displayed to the right of the logo. Figure 3-1 shows
where the icon, title, and description elements are positioned on the page in the upper left cor-ner of the screen.
DISPLAYING NAVIGATION OPTIONS
A SharePoint site has two main navigation sections, a top link bar that usually displays sites below the current site and a left-side navigation element that is commonly referred to as the Quick Launch section. The Quick Launch section is normally used to display elements in the site, such as lists, document libraries, or web pages that have been created. Both menus are fully customizable by site administrators, and you can put links to anything you like on either the top bar or the Quick Launch section.
Figure 3-2 shows the menu for modifying the Quick Launch and Top Link bar navigation elements.
20
x
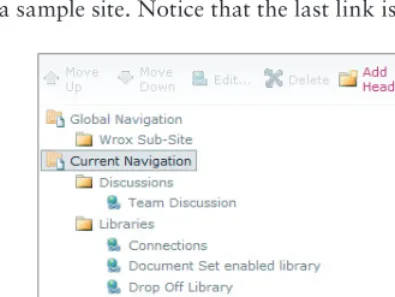
LESSON 3 CHANGING A SITE’S LOOK AND FEELThe tree view option shows the various lists, libraries, and sub-sites along the left side of the screen. This view can be used along with or in place of the Quick Launch menu. Unlike the Quick Launch menu, the tree view cannot be customized on the Site Settings screen. Figure 3-3 shows the tree view of a sample site. Notice that the last link is to a sub-site.
TRY IT
In this Try It, we will examine and confi gure the options available in the Look and Feel menu on the Site Settings page.
Lesson Requirements
To perform this lesson, you will need the following:
‰ Access to a SharePoint site
‰ Administrator or Designer rights to the site
Hints
This lesson is a survey of the Site Administration menu. It covers only the most common elements among all SharePoint sites. A lot of the links you see that are not covered in this lesson are related to optional features, some of which are covered in other lessons in this book.
Step-by-Step
1.
Navigate to the Site Settings page and fi nd the Look and Feel heading. Click the Title link,FIGURE 3-2
for the title, the description, and a URL that is a link to an image that you want to place on the screen on your site. It is common to store the image you want to use on your site in a library on the site itself.
FIGURE 3-4
2.
Figure 3-5 shows how the changes to the Title fi eld, the Description fi eld, and the Logo URL will show on the page. The Title fi eld is circled. The description is underlined, and the logo is circled. One important thing to keep in mind is that if the URL you choose for your logo is notaccessible to a visitor to your site, the visitor will not see the site logo. In this case, she will see whatever you place in the description fi eld below it, or a red X if you leave this fi eld blank.
3.
On the Site Settings page, under the Look and Feel heading, the Tree View link enables you to select navigation options for the left side of the screen. Enabling the Quick Launch option will show the Quick Launch links, which can be added for each ele-ment that you add to a site, such as a list, library, or picture. Enabling the Tree View option shows a collapsible view of every site element, grouped by type of content. Select the Tree View checkbox and return to the home page of your site to see how the selection affects the navigation. See Figure 3-6 for a screen-shot of the tree view.Please select Lesson 3 on the DVD or visit www.wrox.com/go/sp2010-24 to view the video that accompanies this lesson.
FIGURE 3-5
4
Using Custom Themes
A SharePoint theme is a quick means by which a user can apply some branding to his or her site, primarily with text and background color schemes. The advantage of themes is that they are available to any user with owner or designer rights on the site and do not require admin-istrative or developer resources to create. Themes have changed quite a bit from previous ver-sions of SharePoint, offering more fl exibility in some areas and less in others. In this lesson we examine the process for creating a simple theme using the SharePoint UI and also walk through an example of creating a theme for your SharePoint site using Microsoft Offi ce 2010 products.
ACCESSING THE SITE THEMES PAGE
Custom themes are created on the Site Themes page. The link to this page is located on the Site Settings page, under the Look and Feel heading. Access to the link requires either owner or designer permissions on the site.
First, access the Settings page by expanding the Site Actions menu. The Site Settings link is the last link on the Site Actions drop-down menu. See Figure 4-1.
24
x
LESSON 4 USING CUSTOM THEMESFIGURE 4-1
CREATING A THEME
The themes page is divided into three sections. Let’s take a look at what you need to do in each to create your theme.
Select a Theme
Figure 4-3 shows the list of available themes. Each theme’s associated color scheme is displayed on the left side of the screen.
Changing your theme selection changes the color schemes. Later in this lesson we’ll look at how the different columns displaying the color scheme correspond to various elements in the SharePoint site. For now, browse through the theme choices on the right and select one that looks appealing. For this chapter I’m using Azure.
Customizing Themes
After you have chosen your basic color scheme you can customize it for each major color category in the theme and for unselected and selected hyperlink colors. In addition you can choose the prevail-ing fonts for headprevail-ings and body text on the site. You have a much greater ability to customize your theme than in previous versions of SharePoint, in which the color scheme was much more of a take-it-or-leave-it proposition, unless you were prepared to do some more serious customization work beyond the level of the average user. Figure 4-4 shows how the interface for customizing the color scheme is presented to the user.
FIGURE 4-4
Notice the 10 columns in the color scheme squares on the left. (The page does not appear this way on the site; the color scheme squares have been transposed in this fi gure for clarity.) From left to right, the columns relate to the fi rst 10 items on the right side of the screen, the four text/back-ground colors and the six accents. In addition, you can modify the color of hyperlinks and previ-ously selected hyperlinks. Finally, the two drop-down boxes enable you to change the font types of headings and the body fonts. A lot of the customization process is going to be trial and error to work out the shades of color you like for each column and where you want those colors to appear on the page.
Selecting Colors
26
x
LESSON 4 USING CUSTOM THEMESFIGURE 4-5
At this point you have two options for selecting a custom color. The fi rst and simplest is to select a color on the color wheel and click OK. You will notice a box under the heading New Color, whose value changes as you select colors on the color wheel. The other color-selection option is to enter your own color value in this box.
The advantage of typing your own value in this box is that it enables you to choose from a vast array of shades far beyond what is available on the color wheel. The disadvantage is that the color box requires you to enter a value in hexadecimal format. This is why the number in the box is preceded by a number sign (#). However, unless you spent your high school and/or college years
programming for fun and playing Dungeons and Dragons on the weekend, you may not have any idea what hexadecimal numbers are. Here is a crash course on picking colors using hexadecimal notation.
Notice that the color number consists of six digits. This does not represent one large number but in fact is three two-digit numbers, each with a value between zero and 255. The fi rst two digits desig-nate the level of red shading, the second green, and the third blue.
With normal numbers you enter the digits 0 through 9. With hexadecimal notation you can enter the digits 0 through 9 and the letters A through F. Don’t worry about how it works, just understand that A is 10, B is 11, and so forth. The largest value you can enter for any two digits is FF (represent-ing 255) and the smallest is 00. For example, if you want pure red you enter #FF0000. The number
sign (#) is required for hexadecimal notation, the FF for the fi rst two digits maxes out the red
ing. The second two digits represent zero, or no green and the last two digits indicate no blue shad-ing at all. From there you can create any shade you want by modifyshad-ing the mix of red, blue, and green shades.
Preview the Theme
FIGURE 4-6
This is also a good way to see how your modifi cations to color choices will look.
TRY IT
In this section, you open Microsoft PowerPoint 2010 and create a theme for a PowerPoint presenta-tion from a list of available choices. Then you save that theme, import it into SharePoint, and apply it to a SharePoint site.
Lesson Requirements
‰ A SharePoint site and Microsoft Offi ce PowerPoint 2010.
Hints
You can also use Microsoft Word to create custom themes similar to what is shown in this walkthrough.
Step-by-Step
1.
Open Microsoft PowerPoint 2010.2.
Click the Design tab on the top menu bar.3.
In the Theme group of toolbars, select a theme for the presentation.4.
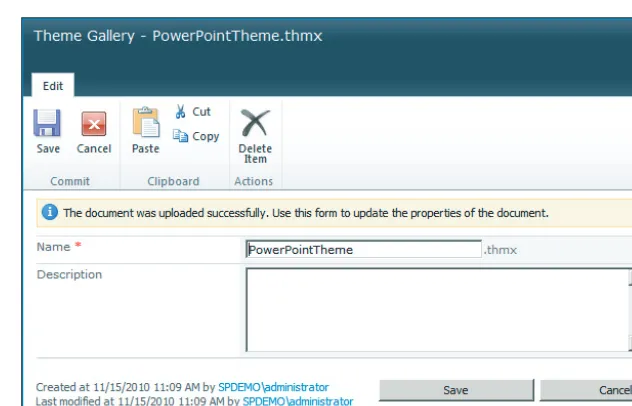
Click the File tab on the top menu bar, select Save As, and choose to save as type offi ce theme. Save the presentation to your machine. The fi le will have a .thmx extension. The SaveAs dialog box is shown in Figure 4-7.
5.
Open your SharePoint site and browse to the Site Settings page. Under the Galleries page, select Themes. The Galleries menu is shown in Figure 4-8.6.
On the Themes gallery page, select the Documents option under Library Tools. Then select Upload Document, as shown in Figure 4-9.7.
Browse to where you saved the fi le in Step 4 and select it. Add a description if you wish, and then click Save. See Figure 4-10.8.
Look at the list in the Themes gallery. You should now see the theme you just uploaded.28
x
LESSON 4 USING CUSTOM THEMES10.
In the list of themes, you should see the theme you uploaded to the gallery. Select it and click Apply. Notice the change in color scheme on the page.FIGURE 4-7
FIGURE 4-8
FIGURE 4-10
You can also select and export themes from Microsoft Word and you can import them into SharePoint.
5
Managing Reporting Services
On the Site Settings page of a SharePoint site is a heading called Reporting Services. SharePoint site administrators can use these settings to schedule and display reports created from a tool called Reporting Services. Typically the reports created from this tool pull data from an external data source or a SharePoint list, and present a view of that data on the report.
This lesson shows you how to use Reporting Services to schedule the report and display it in a document library. By scheduling the report, we mean periodically refreshing the informa-tion from the report’s data source. This lesson assumes someone else has already confi gured the Reporting Services tool and created the report. What follows is a brief description of the Reporting Services tool, whose use is beyond the scope of this lesson.
Reporting Services is a feature of SQL Server that can be integrated with SharePoint. It enables a SharePoint site owner to make schedules for creating reports and for viewing reports via SharePoint that were created in Reporting Services. The initial setup and confi guration of Reporting Services is quite complex: a SQL server database administrator and a SharePoint administrator must work together to enable SharePoint Server to act as a reporting portal.
After Reporting Services is confi gured, reports can be created in SQL Server and published to a location on a SharePoint Server site. Alternatively, they can be uploaded to a document library and placed on a schedule to run automatically. This lesson deals only with how to set a report schedule and enable some Reporting Services settings. It is beyond the scope of this lesson to discuss the setup and confi guration of Reporting Services or to delve into the details of how the reports are created. The goal of this lesson is to show you the fi nal product of the Reporting Services application and to walk through the confi guration options open to SharePoint site administrators.
MANAGE THE SHARED SCHEDULE
32
x
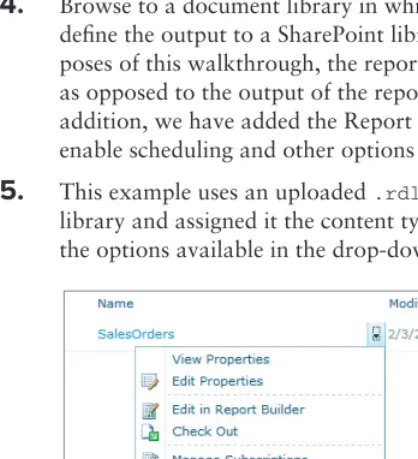
LESSON 5 MANAGING REPORTING SERVICEScan use the schedule to automatically update according to the schedule assigned to it. Schedules are created under the Manage Shared Schedule link in the Reporting Services section on the Site Settings page. Reports used in this fashion are created using a program called Report Builder that is part of the SQL Server 2008 R2 Reporting Services toolkit. A completed report can be uploaded into a SharePoint library and assigned to a schedule. Incidentally, you can download Report Builder 3.0 for free from http://www.microsoft.com.
REPORTING SERVICES SITE SETTINGS
On the Site Settings Page page is a heading titled Reporting Services. Clicking on the Reporting Services Site Settings link under this heading reveals a small menu consisting of three checkboxes.
Enable RSClientPrint ActiveX Control Download
Check the Enable RSClientPrint Active X Control Download checkbox if you want to allow users to download an ActiveX control that can give them printing functionality for reports from their browsers. (An ActiveX control is a sort of mini-program that is downloaded to the browser and pro-vides extra features.) A user must also take action to ensure the ActiveX control is downloaded and installed. If you do not check the Enable RSClientPrint Active X Control Download checkbox users will not have the option to download the additional control and take advantage of the print options.
Enable Local Mode Error Messages
In order to display information in reports on the browser, SharePoint uses a control behind the scenes called the Report Viewer. In previous versions of SQL Server before 2008 R2, your SharePoint farm had to be integrated with your Reporting Services server that processes the reports in order to view them in a SharePoint document library. New to SQL Server 2008 R2 is a method for rendering reports from Reporting Services without integrating the SharePoint farm with a Reporting Services server. Using the Report Viewer control to view reports from a Reporting Services server not integrated with SharePoint is referred to as being in local mode. If you wish to view detailed error messages from reports while using this disconnected mode, select the Enable Local Error Messages checkbox. Local mode can be useful for troubleshooting, but it is generally considered poor form for production applications to display detailed error messages, and in some cases it is a security risk. Reports using local mode are more likely to produce errors because of the additional confi guration and security concerns. The purpose of this checkbox is to make this trou-bleshooting easier. It should be unchecked once the reports are working properly.
For additional information on local mode, refer to the following Microsoft documentation:
http://msdn.microsoft.com/en-us/library/ff487969(v=SQL.105).aspx.