EMS2348X
TH
PRECA UTIONS TO AVOID POSSIB L E EXPOSURE TO
EXCESSIVE MICROWAVE ENERGY
3
IMPORTA NT SA FETY INSTRUCTIONS
4
Grounding Installation
6
UTENSIL S
7
SETTING UP YOUR OVEN
8
Installation
9
Control Panel and Features
10
Operation Instructions
11
17
Touble shooting
18
Technical Data
19
Customer Care Center
SAVE THESE INSTRUCTIONS CAREFULLY
Read these instructions carefully before using your
microwave oven,and keep it carefully.
If you follow the instructions, your oven will provide you with
many years of good service.
PRECA UTIONS TO AVOID POSSIB L E EXPOSURE
TO EXCESSIVE MICROWAVE ENERGY
(a) Do not attempt to operate this oven with the door open since this can
result in harmful exposure to microwave energy. It is important not to
break or tamper with the safety interlocks.
(b) Do not place any object between the oven front face and the door or allow
soil or cleaner residue to accumulate on sealing surfaces.
(c) WARNING: If the door or door seals are damaged, the oven must not
be operated until it has been repaired by a competent person.
If the apparatus is not maintained in a good state of cleanliness, its surface could
be degraded and affect the lifespan of the apparatus and lead to a dangerous
situation.
IMPORTA NT SA FETY INSTRUCTIONS
WA RNING
To reduce the risk of fire, electric shock, injury to persons
or exposure to excessive microwave oven energy when
using your appliance, follow basic precautions, including
the following:
1. Warning: Liquids and other foods must
not be heated in sealed containers since
they are liable to explode.
2. Warning: It is hazardous for anyone other
than a competent person to carry out any
service or repair operation that involves
the removal of a cover which gives
protection against exposure to microwave
energy.
3. This appliance can be used by children
aged from 8 years and above and persons
with reduced physical, sensory or mental
capabilities or lack of experience and
4. Keep the appliance and its cord out of
5. Only use utensils suitable for use in
microwave ovens.
6. The oven should be cleaned regularly and
any food deposits should be removed.
7. Read and follow the
TIONS TO AVOID POSSIBLE EXPOSURE
TO EXCESSIVE MICROWAVE ENERGY".
8. When heating food in plastic or paper
containers, keep an eye on the oven due
to the possibility of ignition.
9. If smoke is emitted, switch off or unplug
the appliance and keep the door closed
in order to stifle any flames.
13. Install or locate this oven only in
accordance with the installation
instructions provided.
14. Eggs in the shell and whole hard-boiled
eggs should not be heated in microwave
ovens since they may explode, even
after microwave heating has ended.
15.This appliance is intended to be used in
household and similar applications such
as:
-staff kitchen areas in shops, offices and
other working environments;
-by clients in hotels, motels and other
residential type environments;
-farm houses;
-bed and breakfast type environments.
16. If the supply cord is damaged, it must
be replaced by the manufacturer, its
service agent or similarly qualified
persons in order to avoid a hazard.
17. Do not store or use this appliance
outdoors.
18. Do not use this oven near water, in a
wet basement or near a swimming
pool.
19. The temperature of accessible surfaces
may be high when the appliance is
operating. The surfaces are liable to get
hot during use.Keep cord away from
heated surface, and do not cover any
vents on the oven.
20. Do not let cord hang over edge of table
or counter.
21. Failure to maintain the oven in a clean
condition could lead to deterioration
of the surface that could adversely
knowledge if they have been given
supervision or instruction concerning use
of the appliance in a safe way and
understand the hazards involved.
Children shall not play with the appliance.
Cleaning and user maintenance shall
not be made by children unless they are
older than 8 and supervised.
33.The rear surface of appliance shall be placed against a wall.
34.The microwave oven shall not be placed in a cabinet unless it has been tested in a
cabinet.
READ CAREFULLY AND KEEP FOR FUTURE
REFERENCE
23. Microwave heating of beverages can result in delayed eruptive boiling, therefore
care must be taken when handling the container.
24.The appliance is not intended for use by persons (including children) with reduced
physical , sensory or mental capabilities, or lack of experience and knowledge,
unless they have been given supervision or instruction concerning use of the appliance
by a person responsible for their safety.
25.Children should be supervised to ensure that they do not play with the appliance.
26.The appliances are not intended to be operated by means of an external timer or
separate remote-control system.
27. Accessible parts may become hot during use. Young children should be kept away.
28.Steam cleaner is not to be used.
29 During use the appliance becomes hot. Care should be taken to avoid touching heating
elements inside the oven.
30. Only use the temperature probe recommended for this oven.(for ovens provided with a
facility to use a temperature-sensing probe.)
31. WARNING: The appliance and its accessible parts become hot during use.Care should
be taken to avoid touching heating elements. Children less than 8 years of age shall be
kept away unless continuously supervised.
32. The microwave oven must be operated with the decorative door open.(for ovens with a
decorative door.)
DA NGER
Electric Shock Hazard
Touching some of the interna components
can cause serious personal injury or death.
Do not disassemble this appliance.
WA RNING
Electric Shock Hazard
Improper use of the grounding can result in
electric shock. Do not plug into an outlet until
appliance is properly installed and grounded.
To Reduce the Risk of Injury to Persons
Grounding Installation
CL EA NING
Be sure to unplug the appliance from the
power supply.
1. Clean the cavity of the oven after using
with a slightly damp cloth.
2. Clean the accessories in the usual way
in soapy water.
3. The door frame and seal and
neighbouring parts must be cleaned
carefully with a damp cloth when they
are dirty.
1. A short power-supply cord is provided
to reduce the risks resulting from becoming
entangled in or tripping over a longer cord.
This appliance must be grounded. In the
event of an electrical short circuit,
grounding reduces the risk of electric
shock by providing an escape wire for
the electric current. This appliance is
equipped with a cord having a grounding
wire with a grounding plug. The plug must
be plugged into an outlet that is properly
installed and grounded.
Consult a qualified electrician or
serviceman if the grounding instructions
are not completely understood or if doubt
exists as to whether the appliance is
properly grounded. If it is necessary to
use an extension cord , use only a 3-wire
extension cord.
2)The extension cord must be a
grounding-type 3-wire cord.
3)The long cord should be arranged so that
it will not drape over the counter top or
tabletop where it can be pulled on by
children or tripped over unintentionally.
4. Do not use harsh abrasive cleaners
or sharp metal scrapers to clean the
oven door glass since they can
scratch the surface, which may
result in shattering of the glass.
5. Cleaning Tip---For easier cleaning of the
cavity walls that the food cooked can
touch:
Place half a lemon in a bowl, add 300ml
(1/2 pint) water and heat on 100%
microwave power for 10 minutes.
CAUTION
Personal Injury Hazard
It is hazardous for anyone
other than a compentent person
to carry out any service or repair
operation that involves the removal
of a cover which gives protection
against exposure to microwave
energy.
Utensil Test:
1. Fill a microwave-safe container with 1 cup of cold
water (250ml) along with the utensil in question.
2. Cook on maximum power for 1 minute.
3. Carefully feel the utensil. If the empty utensil is
warm, do not use it for microwave cooking.
4. Do not exceed 1 minute cooking time.
Materials you can use in microwave oven
Utensils Remarks
Aluminum foil
Shielding only. Small smooth pieces can be used to cover thin parts of
meat or poultry to prevent overcooking. Arcing can occur if foil is too
close to oven walls. The foil should be at least 1 inch (2.5cm) away from
oven walls.
Follow manufacturer’s instructions. The bottom of browning dish must be
at least 3/16 inch (5mm) above the turntable. Incorrect usage may cause
the turntable to break.
Microwave-safe only. Follow manufacturer's instructions. Do not use
cracked or chipped dishes.
Always remove lid. Use only to heat food until just warm. Most glass jars
are not heat resistant and may break.
Heat-resistant oven glassware only. Make sure there is no metallic trim.
Do not use cracked or chipped dishes.
Follow manufacturer’s instructions. Do not close with metal tie. Make
slits to allow steam to escape.
Use for short–term cooking/warming only. Do not leave oven unattended
while cooking.
Use to cover food for reheating and absorbing fat. Use with supervision
for a short-term cooking only.
Use as a cover to prevent splattering or a wrap for steaming.
Microwave-safe only. Follow the manufacturer’s instructions. Should be
labeled "Microwave Safe". Some plastic containers soften, as the food
inside gets hot. "Boiling bags" and tightly closed plastic bags should be
slit, pierced or vented as directed by package.
Microwave-safe only. Use to cover food during cooking to retain
moisture. Do not allow plastic wrap to touch food.
Thermometers
Microwave-safe only (meat and candy thermometers).
Wax paper
Use as a cover to prevent splattering and retain moisture.
Browning dish
Glass jars
Glassware
UTENSIL S
See the instructions on "Materials you can use in
microwave oven or to be avoided in microwave oven."
There may be certain non-metallic utensils that are not
safe to use for microwaving. If in doubt, you can test the
utensil in question following the procedure below.
Oven cooking
bags
Paper plates
and cups
Paper towels
Parchment
paper
Plastic
Plastic wrap
Dinnerware
A) Control panel
B) Turntable shaft
Materials to be avoided in microwave oven
Utensils Remarks
Aluminum tray
Food carton with
metal handle
Metal or
metal-trimmed utensils
Metal twist ties
Paper bags
Plastic foam
Wood
F
G
A C B E DSETTING UP YOUR OVEN
Names of Oven Parts and Accessories
Remove the oven and all materials from the carton and oven cavity.
Your oven comes with the following accessories:
Glass tray 1
Turntable ring assembly 1
Instruction Manual 1
Metal shields the food from microwave energy. Metal trim may
cause arcing.
May cause a fire in the oven.
Plastic foam may melt or contaminate the liquid inside when exposed
to high temperature.
Wood will dry out when used in the microwave oven and may split
or crack.
May cause arcing. Transfer food into microwave-safe dish.
May cause arcing. Transfer food into microwave-safe dish.
Remove all packing material and accessories.
Examine the oven for any damage such as
dents or broken door. Do not install if oven is
damaged.
Countertop Installation
Cabinet: Remove any protective film found
on the microwave oven cabinet surface.
Do not remove the light brown Mica cover
that is attached to the oven cavity to
protect the magnetron.
Hub (underside)
Glass tray
Turntable ring assembly
a. Never place the glass tray upside down. The glass
tray should never be restricted.
b. Both glass tray and turntable ring assembly must
always be used during cooking.
c. All food and containers of food are always placed
on the glass tray for cooking.
d. If glass tray or turntable ring assembly cracks or
breaks, contact your nearest authorized service
center.
Turntable Installation
Turntable shaft
Installation
Select a level surface that provide
enough open space for the intake
and/or outlet vents.
(4) Blocking the intake and/or outlet openings
can damage the oven.
(5) Place the oven as far away from
radios and TV as possible.
Operation of microwave oven may
cause interference to your radio or TV
reception.
2. Plug your oven into a standard household
outlet. Be sure the voltage and the
frequency is the same as the voltage
and the frequency on the rating label.
WARNING: Do not install oven over a
range cooktop or other heat-producing
appliance. If installed near or over a heat
source, the oven could be damaged and
the warranty would be void.
1.
The accessible surface
may be hot during
operation.
(2) The rear surface of appliance shall
be placed against a wall.
Leave a minimum clearance of
30cm above the oven, a minimum
clearance of 20cm is required
between the oven and any adjacent
walls.
(3) Do not remove the legs from the
(1) The minimum installation height is
85cm.
20cm 30cm 20cm min85cm 0cmOperation
Control Panel and Features
1. LED display
2. Program Selection Buttons
3. Selection Knob
4. Function Buttons
1
2
3
4
Operation Instructions
2) Turn " " to adjust the hour figures, the input time should be within 0--23.
3) Press "
", the minute figures
will flas .
1. Clock Setting
1) Press "
" twice to select clock function, the hour figures "0" will flash.
4) Turn " " to adjust the minute figures, the input time should be within 0--59.
5) Press "
" to finish clock setting. ":" will flash, and the time will light.
Note: 1) If the clock is not set, the clock function will not work when powered.
2) During the process of clock setting, if you press " ", the
1) Press " ", the screen displays "0:00". "MICROWAVE" and
" to start cooking.
TIMER / CLOCK
TIMER / CLOCK
TIMER / CLOCK
If you don't press " " or there is operation in 1 minute, the
s.
3. Microwave Cooking
"HI" will light
ontinue to press " " to select different power levels.
2) Turn " " to adjust the cooking time between 0:05-95:00.
3) Press "
(1) Press "
"
(2) Turn " " to enter the correct time.(The maximum timer is 95 minutes.)
(3) Press "
" to confirm setting.
(4) When the kitchen time is reached, timer indicator will go out. "End" will display and flash.
Note: 1) The kitchen Time is different from 24-hour system. Kitchen Timer is a timer,
TIMER / CLOCK
2. Kitchen Timer
once, LED will display 0:00.
2) Kitchen Timer function can be set together with other cooking functions.
oven will go back to the previous status automatically.
START
MICROWAVE
MICROWAVE
STOP/CLEAR
START
u
. C
The CLOCK icon will appear.
The
icon will
appear.
it does not activate the cooking.
TIMER
h
"
00
"
Buzzer will ring times. If no operation in 2 minutes, buzzer will sound once, and "End"
will stop flashing.
7
Instructions
LED Display
Microwave
Power
Power
Grill
1
2
3
4
5
6
7
8
0%
55%
36%
100
45%
64%
" Microwave/Grill/Combi." Pad instructions
1) Press " ", the screen displays "0:00" "GRILL" and '"Top" will light.
2) Turn " " to
Note:If half the grill time passes, the oven sounds twice, and this is normal. In order
to have a better effect of grilling food, you should turn the food over,
HI
M-HI
MED
M-LO
LO
adjust the cooking time. The maximum cooking time is 95 minutes.
3) Press " " to start cooking.
Note: the step quantities for the adjustment time of the coding switch are as follow:
0---1 min : 5 seconds
1---5 min : 10 seconds
5---10 min : 30 seconds
10---30 min : 1 minute
30---95 min : 5 minutes
START
4. Grill Function
GRILL
.
M+GRILL
+GRILL
LO
GRILL
80W
240W
400W
640W
800W
0W
1) Press " " once, and the oven will display "0:00". "TIME" will light.
2) Turn " " to select the defrost time. The MAX time is 95 minutes.
" once to set the timer function.
Press " " twice to inquire the current time for 3 seconds.
3) Press " " to start defrosting.The defrost power is P30, and it cannot be
1) In standby mode, press " " to start cooking with 100% power for 30 seconds,
each added press will increase 30 seconds cooking time up to 95 minutes.
2) In microwave, grill, combination cooking or time defrost state, each press of
" " can increase 30 seconds of cooking time.
changed.
TIMER / CLOCK
"MICROWAVE" and "HI" will light.
the screen displays "0:00". "M+GRILL" and
" to start cooking.
LO+GRILL" will light.
1) Press " ",
2) Turn " " to adjust the cooking time. The maximum cooking time is 95 minutes.
3) Press "
START
START
START
START
5. Combination Function
6. Quick Start
9. Inquiring Function
DEFROST
COMBI
"
7. Defrost By Time
1) Press " " twice, and the oven will display "100","WEIGHT" will light.
2) Turn " " to select the weight of food from 100 to 2000 g.
3) Press " " to start defrosting. The time will be set automatically according
Note: Halt of the defrosting time passes, the oven will sound to remind you t
n the
food over. If no operation, the over will conti ce cooking.
nu
START
DEFROST
o tur
8. Defrost By Weight
to the weight.
(1) In cooking state without timer, press "
TIMER / CLOCK
2) Continue to press " " to select different menu.
3) Turn " " to choose the default weight as the menu chart.
4) Press " " to start cooking.
cooking. hen cooking finish
, buzzer sounds five times.
1) Press " " once, and the oven will display "0:00". "TIME" will light.
2) Turn " " to select the defrost time till "5:00" displays.
3) Press " " twice, "MICROWAVE" and "M-HI" will light.
"7:00".
At most 2 sections can be set for cooking. In multi-setting cooking, if one section is
defrosting, then defrosting shall be placed in the first section.
Example: If you want to defrost food for 5 minutes and then cook with 80% microwave
power for 7 minutes, operate it as the following:
1) Press " " once to choose the menu, the default weight or portron
4) Turn " " to adjust the cooking time till the oven displays
5) Press " " to start cooking, and buzzer will sound once for the first section,
START
START
10. Multi-setting cooking
11. Auto Menu
DEFROST
MICROWAVE
AUTO MENU
AUTO MENU
and " " indicator will light.
defrosting time counts down; buzzer will sound once again entering the second
W
es
" once to inquire the current time for 3 seconds.
TIMER / CLOCK
(2) In timer state, press "
" once to inquire the timer.
TIMER / CLOCK
Lock: In waiting state, press " " for 3 seconds, the oven beep once. After
" 00:00 ". " " icon
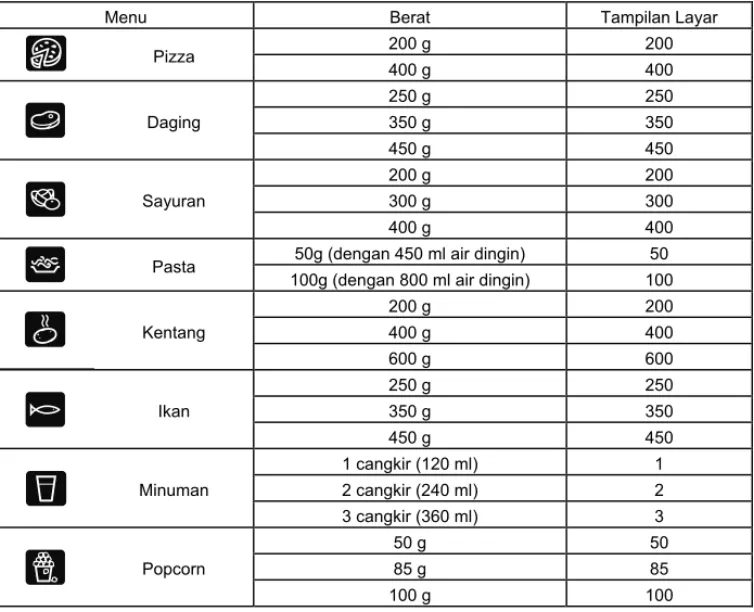
Menu
Weight
Display
Meat
Vegetable
Potato
Pasta
Fish
Popcorn
200 g
400 g
250 g
350 g
450 g
200 g
300 g
400 g
50g(with 450 ml cold water)
100g(with 800 ml cold water)
200 g
400 g
600 g
250 g
350 g
450 g
1 cup(120 ml)
2 cups(240 ml)
3 cups(360ml)
50 g
85 g
100 g
Pizza
Beverage
200
400
250
350
450
200
300
400
50
100
200
400
600
250
350
450
1
2
3
50
85
100
The menu chart:
12 . Lock for Children
STOP/CLEAR
Cancel Lock: In locked state, press " " for 3 seconds, the oven beep once.
3 seconds, the oven beeps once agein
denoting entering the children-lock state and
current time will
will light.
STOP/CLEAR
e screen will display the current time or 00:00.
an current time will display if the time has been set, otherwise, the
LED will display
After 3 seconds, the oven beeps once again and turns back to waiting state.
Th
13. Memory Function
1 . Specification
(1) The buzzer will sound once when turning the knob at the beginning;
(2) "
" must be pressed to continue cooking if the door is
opened during cooking;
(3) Once the cooking programme has been set , "
" is not pressed
1 minute. The current time will be displayed. The setting will be cancelled.
1) The oven will remember the last microwave cooking setting.
For example, the oven worked for 5 minutes with M-HI power level.
Press " " again, then turn " " to set the cooking time.
Press " " and the oven
work wi M-HI power leve automatically.
2) If the electricity is cut off, the cooking setting will be reset to factory default.
START
MICROWAVE
in
START
START
4
( )
4
th
l
When cooking finishes, "End" will display and flash. Buzzer will ring 7 times.
If no operation in 2 minutes, buzzer will sound once, and "End" will stop flashing.
EMS2348X
3
4
6
7
8
9
10
11
17
18
19
F
G
A
C B E D
20cm 30cm
20cm
min85cm
1
2
3
0%
HI
64%
1
2
4
6
7
8
200
400
250
350
450
200
300
400
50
100
200
400
600
250
350
450
1
2
3
50
85
100
CHÚ Ý TRÁNH TIẾP XÚC TRỰC TIẾP
VỚI NĂNG LƯỢNG SÓNG ĐIỆN TỪ
3
NHỮNG CHỈ DẪN AN TOÀN QUAN TRỌNG
4
Hướng dẫn nối đất
6
CÁC VẬT DỤNG SỬ DỤNG ĐƯỢC TRONG LÒ VI SÓNG
7
CHUẨN BỊ VÀ THIẾT LẬP CHO LÒ VI SÓNG
8
Lắp đặt
9
Bảng điều khiển và các tính năng
10
Những chỉ dẫn vận hành thiết bị
11
17
Khắc phục sự cố
18
Thông số kỹ thuật
19
Trung tâm Chăm sóc Khách hàng
MỤC LỤC
VUI LÒNG CẤT GIỮ SÁCH HƯỚNG DẪN SỬ DỤNG CẨN THẬN
MẪU MÁY: EMS2348X
Lò Vi Sóng
HƯỚNG DẪN SỬ DỤNG
Xin vui lòng đọc kỹ các hướng dẫn trong sách này trước khi sử
dụng lò vi sóng và cất giữ sách cẩn thận.
Nếu quý khách tuân thủ những hướng dẫn trong sách, lò vi
sóng của quý khách sẽ hoạt động tốt trong nhiều năm.
CHÚ Ý TRÁNH TIẾP XÚC TRỰC TIẾP VỚI
NĂNG LƯỢNG SÓNG ĐIỆN TỪ
(a)
(b)
PHỤ LỤC
Không cố vận hành thiết bị khi cửa lò đang mở vì việc vận hành lò khi
cửa lò mở có thể dẫn tới sự tiếp xúc có hại với năng lượng sóng điện từ.
Không được làm gẫy hoặc kẹt khóa liên động an toàn.
Không đặt bất cứ vật gì giữa mặt trước của lò vi sóng và cánh cửa hoặc
để bụi bẩn hoặc chất tẩy rửa còn dư tích tụ ở bề mặt gioăng cửa.
CẢNH BÁO: Nếu cửa lò hoặc gioăng cửa bị hư hại, không được vận
hành lò cho tới khi lò được sửa chữa bởi người có chuyên môn.
Nếu thiết bị không được vệ sinh sạch sẽ, bề mặt thiết bị có thể bị xuống cấp
và ảnh hưởng đến tuổi thọ của thiết bị và dẫn tới những tình huống nguy
hiểm.
NH NG CH
N AN TOÀN QUAN TR NG
C NH BÁO
3. T . 15.T
T
T
V
T
T
T
THẬN TRỌNG
Nguy cơ thương tích
Các chất liệu có thể dùng trong lò vi sóng
Đồ đựng Chú ýTấm bọc nhôm
Chỉ sử dụng các loại khay đĩa an toàn trong lò vi sóng. Làm theo hướng r dẫn của nhà sản xuất. Không dùng các khay đĩa đã bị vỡ hoặc sứt mẻ. Luôn nhớ mở nắp bình khi dùng trong lò vi sóng. Chỉ dùng bình để hâm Chỉ sử dụng các đồ đựng chịu nhiệt cho lò vi sóng không có họa tiết kim loại. Không dùng các đồ đã bị vỡ hoặc sứt mẻ.
Làm theo hướng dẫn của nhà sản xuất. Không để túi đựng quá sát với thành trong của lò. Nhớ tạo khe hở cho hơi nước thoát ra ngoài. Chỉ dùng khi cần hâm nóng đồ ăn trong thời gian ngắn. Nhớ luôn luôn trông chừng lò vi sóng khi sử dụng khay giấy và cốc giấy.
Dùng để bọc đồ ăn khi muốn hâm nóng hoặc để thấm mỡ. Chỉ sử dụng khi hâm nóng đồ ăn trong thời gian ngắn. Nhớ trông chừng khi sử dụng Dùng để bọc đồ ăn nhằm tránh hiện tượng phồng nổ hoặc bọc đồ ăn
Chỉ sử dụng các loại tấm bọc an toàn trong lò vi sóng. Dùng tấm bọc khi muốn giữ độ ẩm cho đồ ăn. Không để tấm bọc chạm vào đồ ăn khi nấu Nhiệt kế Chỉ sử dụng các loại nhiệt kế cho thịt và bánh an toàn trong lò vi sóng Giấy sáp Dùng để bọc đồ ăn giúp tránh phồng nổ và giữ độ ẩm cho đồ ăn. Đĩa đựng đồ ăn Bình thủy tinh Đồ đựng thủy
CÁC VẬT ĐỰNG
Túi đựng dành cho lò vi sóng Khay giấy và cốc giấy Khăn giấy Giấy dầu Đồ đựng bằng Tấm bọc đồ ăn Khay đĩa đựng Không để bất kỳ người nào trừ nhân viên kỹ thuật có trình độ chuyên môn thực hiện các thao tác sửa chữa lò mà cần tháo bỏ tấm chắn an toàn giúp bảo vệ người dùng khỏi việc tiếp xúc trực tiếp với năng lượng vi ba.Xem hướng dẫn ở mục “Các chất liệu có thể dùng và không được dùng trong lò vi sóng.” Một số vật đựng không làm từ kim loại có thể không an toàn khi dùng trong lò vi sóng. Nếu còn băn khoăn, quý khách có thể thử vật đựng còn nghi ngờ theo quy trình dưới đây: Thử vật đựng trong lò vi sóng:
1. Đặt vật đựng còn nghi ngờ trong lò cùng với một cốc nước lạnh (250ml).
2. Bật lò ở công suất tối đa trong vòng 1 phút. 3. Cẩn thận kiểm tra vật đựng còn nghi ngờ. Nếu vật
đựng ấm lên, không nên sẽ dụng cho mục đích nấu nướng trong lò vi sóng. 4. Khi thử vật đựng, không được bật lò quá 1 phút. đồ ăn tinh nhựa bằng nhựa Chỉ dùng để bọc đồ ăn. Có thể dùng các miếng bọc nhôm nhỏ và phẳng để bọc miếng thịt mỏng để tránh bị quá lửa. Nếu miếng bọc ở quá gần thành trong của lò, có thể xuất hiện tia lửa. Miếng bọc cần ở cách thành trong của lò ít nhất 2.5cm.
Làm theo hướng dẫn của nhà sản xuất. Đáy của đĩa nướng phải ở cách trục quay ít nhất 5mm. Sử dụng đĩa nướng không đúng cách có thể làm hỏng trục quay.
nóng đồ ăn. Hầu hết các loại bình thủy tinh đều dễ vỡ ở nhiệt độ cao.
khi hấp.
Chỉ sử dụng các loại đồ đựng .
Làm theo hướng dẫn của nhà sản xuất. Một số loại đồ đựng sẽ bị mềm ra khi thức ăn ở trong nóng lên. “Túi hấp cách thuỷ” hoặc các loại túi nhựa kín khác cần được rạch khe hoặc chọc lỗ theo hướng dẫn trên bao bì.
A) Bảng điều khiển B) Trục quay đĩa C) Vòng quay đĩa Khay nhôm
Hộp đựng thức ăn có tay cầm kim loại Đồ kim loại hoặc có viền kim loại Dây buộc kim loại Túi giấy Đồ đựng bằng bọt Gỗ F G A C B E D
CHUẨN BỊ VÀ THIẾT LẬP CHO LÒ
Tên của các bộ phận và phụ kiện của lò
Dỡ bỏ lò vi sóng và các vật liệu ra khỏi bao bì và khoang lò. Lò đi kèm với các thiết bị sau:
Đĩa thủy tinh 1 Vòng quay đĩa: 1 Sách hướng dẫn sử dụng: 1
Kim loại sẽ làm giảm hiệu quả của tia vi sóng đối với thức ăn. Các hoạ tiết hoặc viền kim loại có thể gây ra tia lửa.
Có thể bắt lửa và bốc cháy trong lò vi sóng.
Có thể tan chảy hoặc làm bẩn chất lỏng ở trong khi gặp nhiệt độ cao. Gỗ sẽ bị khô kiệt khi sử dụng trong lò vi sóng và có thể bị gãy vỡ. Có thể gây ra tia lửa. Chuyển sang đĩa đựng an toàn trong lò vi sóng Có thể gây ra tia lửa. Chuyển sang đĩa đựng an toàn trong lò vi sóng
Có thể gây ra tia lửa và gây cháy trong lò vi sóng.
Các chất liệu có thể dùng trong lò vi sóng
Đồ đựng Chú ý
Lắp đặt trên mặt bàn bếp
Trục quay (bên dưới) Đĩa thủy tinh
Vòng quay đĩa
Lắp đặt đĩa quay
Trục quay đĩaLắp đặt
(4) (5) 2. 1. (2) (3) (1) 20cm 30cm 20cm 85cm 0cm9
a. Không đặt đĩa thủy tinh úp xuống dưới. Không được để bất cứ vật gì cản trở vòng quay của đĩa.
b. Phải sử dụng cả đĩa quay và vòng quay đĩa trong suốt quá trình nấu.
c. Luôn đặt thực phẩm, hộp đựng thực phẩm lên trên đĩa quay khi nấu.
d. Nếu đĩa quay hoặc vòng quay đĩa bị nứt hoặc gãy, vui lòng liên hệ với Trung tâm Chăm sóc Khách hàng gần nhất.
Tháo tất cả bao bì đóng gói và phụ kiện của Khoang lò: Tháo tất cả các tấm phim bảo thiết bị ra. Kiểm tra lò vi sóng để đảm bảo vệ trên bề mặt khoang lò.
rằng lò không có bất kì hư hỏng nào chẳng Không tháo nắp chụp đèn bằng mica màu hạn như trầy xước hay bể cửa. Không lắp nâu được gắn vào khoang trống của lò để đặt nếu phát hiện lò bị hư hỏng. bảo vệ đèn ma-nhê-trông
Lựa chọn bề mặt phẳng đủ để tạo khoảng trống cho các lỗ thông khí.
Chiều cao tối thiểu của kệ đỡ là 85 cm. Mặt sau của thiết bị nên được đặt dựa vào tường.
Khoảng cách tối thiểu giữa nắp lò và tường bên trên là 30 cm. Khoảng cách tối thiểu giữa lò và các bức tường bao quanh là 20 cm.
Không tháo các chân kê ở đáy lò.
Các lỗ thoát của thiết bị nếu tắc nghẽn sẽ gây hư hại cho lò.
Đặt lò càng xa đài radio và tivi càng tốt. Hoạt động của lò có thể gây nhiễu sóng cho radio và tivi.
Cắm lò vi sóng vào ổ điện tiêu chuẩn dùng cho hộ gia đình. Đảm bảo rằng điện áp và tần số của nguồn điện phải bằng với điện áp và tần số của lò được ghi trên bản ghi thông số kỹ thuật. CẢNH BÁO: Không lắp đặt lò bên trên các bề mặt toả nhiệt hoặc thiết bị tỏa nhiệt khác. Nếu lắp đặt lò gần hoặc trên nguồn nhiệt, lò vi sóng có thể sẽ bị hư hỏng và sẽ bị từ chối bảo hành. Bề mặt tiếp xúc có thể sẽ rất nóng trong quá trình hoạt động. tối thiểu
Vận hành
Bảng điều khiển và các tính năng
1. Màn hình LED
2. Núm lựa chọn chương trình.
3. Núm lựa chọn.
4. Các núm chức năng
1
2
3
4
Hướng dẫn vận hành
2) Xoay núm " " để điều chỉnh giờ. Thời gian nhập vào trong khoảng từ 0--23 3) Ấn nút “TIMER/CLOCK”. Số “00” ở phần chỉ phút sẽ nhấp nháy.
1. Thiết lập đồng hồ
1) Ấn nút “TIMER/CLOCK” hai lần để lựa chọn chức năng thiết lập đồng hồ. Số 0 ở phần
4) Xoay núm " " để điều chỉnh phút. Thời gian nhập vào trong khoảng từ 0--59 5) Ấn nút “TIMER/CLOCK” để kết thúc quá trình thiết lập đồng hồ. Ký tự : sẽ nhấp nháy và Lưu ý:
1) Ấn nút “MICROWAVE”, màn hình hiển thị “0:00”. Đèn “MICROWAVE” và “HI” sẽ sáng
3. Nấu vi sóng
Tiếp tục ấn nút “MICROWAVE” để lựa chọn các mức năng lượng khác nhau. 2) Xoay núm" " để điều chỉnh thời gian nấu từ 0:05 -- 95:00.
3) Ấn nút “START” để bắt đầu nấu ăn hoặc ấn nút “STOP/CLEAR” để hủy thiết lập.
2. Hẹn giờ
chỉ giờ sẽ nhấp nháy. Biểu tượng CLOCK (đồng hồ) sẽ xuất hiện
thời gian sẽ phát sáng
1) Nếu đồng hồ không được thiết lập, chức năng đồng hồ sẽ không hoạt động khi được kích hoạt.
2) Trong quá trình thiết lập đồng hồ, nếu quý khách ấn “STOP/CLEAR”, lò vi sóng sẽ tự động quay trở về trạng thái liền kề trước đó.
Nếu quý khách không ấn “ ”hoặclòhoạtđộngtrongvòng 1 phút, lò vi sóng sẽ quay trở về trạng thái liền kề trước đó.
(1) Ấn nút “TIMER/CLOCK” một lần, đèn LED sẽ hiển thị 0:00. Biểu tượng hẹn giờ sẽ xuất hiện.
(2) Xoay núm để lựa chọn thời gian hẹn giờ (Thời gian hẹn giờ tối đa là 95 phút.)
(3) Ấn nút “START” để xác nhận thiết lập.
(4) Khi thời gian hẹn giờ đã hết, biểu tượng hẹn giờ sẽ biến mất. Chữ “End” (Kết thúc) sẽ hiển thị và nhấp nháy. Chuông báo sẽ kêu 7 lần. Nếu lò vi sóng không vận hành trong vòng 2 phút, chuông báo sẽ kêu 1 lần, và chữ “End” sẽ ngừng nhấp nháy.
Lưu ý:
1) Giờ trong chức năng hẹn giờ khác với hệ giờ 24 tiếng. Chức năng hẹn giờ chỉ sử dụng để hẹn giờ, nó không kích hoạt quá trình nấu nướng của lò vi sóng. 2) Chức năng hẹn giờ có thể được thiết lập cùng với các chức năng nấu khác.Chỉ dẫn
Màn hình LED hiển thị
Năng lượng
Vi sóng
Năng lượng
Nướng
1(Cao)
2(TB cao)
3 (Trung bình)
4(TB thấp)
5(Thấp)
6(Nướng)
7(TB + nướng)
8(Thấp + nướng)
0%
55%
36%
100
45%
64%
Bảng chỉ dẫn “Vi sóng/ Nướng/ Hỗn hợp”
Chú ý:HI
M-HI
MED
M-LO
LO
Lưu ý: Mức thay đổi thời gian tối thiếu của thời gian nấu sẽ phụ thuộc vào tổng thời gian
4. Chức năng nướng
M+GRILL
+GRILL
LO
GRILL
80W
240W
400W
640W
800W
0W
nấu được thiết lập, theo như bảng dưới đây: 0---1 phút : 5 giây
1---5 phút : 10 giây 5---10 phút : 30 giây 10---30 phút : 1 phút 30---95 phút : 5 phút
1) Ấn nút “GRILL”, màn hình hiển thị “0:00”. Đèn “GRILL” và “Top” sẽ sáng.
2) Xoay núm để điều chỉnh thời gian nướng. Thời gian nướng tối đa là 95 phút. 3) Ấn nút “START” để bắt đầu nướng.
5. Nấu kết hợp
6. Khởi động nhanh
9. Chức năng kiểm tra thời gian
7. Rã đông theo thời gian
Lưu ý:
8. Rã đông theo khối lượng
1) Ấn nút “COMBI”. Màn hình hiển thị “0:00”. Đèn “M+GRILL” và “LO+GRILL” sẽ sáng. 2) Xoay núm để điều chỉnh thời gian nấu. Thời gian nấu tối đa là 95 phút. 3) Ấn nút “START” để bắt đầu nấu.
1) Ở chế độ chờ, ấn nút “START” để bắt đầu nấu ở mức 100% năng lượng trong vòng 30 giây, mỗi lần ấn sẽ kéo dài thời gian nấu thêm 30 giây cho tới 95 phút.
Đèn “MICROWAVE” và “HI” sẽ sáng.
2) Ở chức năng nấu vi sóng, nướng, nấu hỗn hợp hoặc chế độ rã đông theo thời gian, mỗi lần ấn nút “START” sẽ kéo dài thời gian nấu thêm 30 giây.
1) Ấn nút “DEFROST” một lần. Lò vi sóng sẽ hiển thị “0:00”. Đèn “TIME” sẽ sáng. 2) Xoay núm để lựa chọn thời gian rã đông. Thời gian tối đa là 95 phút.
3) Ấn nút “START” để bắt đầu rã đông. Mức năng lượng dùng để rã đông là P30 và không thể thay đổi được.
1) Ấn nút “DEFROST” hai lần. Lò vi sóng sẽ hiển thị “100”. Đèn “WEIGHT” sẽ sáng. 2) Xoay núm để lựa chọn khối lượng rã đông trong khoảng từ 100 đến 2000g. 3) Ấn nút “START” để bắt đầu rã đông. Thời gian rã đông sẽ được thiết lập tự động dựa
vào khối lượng cần rã đông.
Khi nửa thời gian rã đông trôi qua, lò vi sóng sẽ phát ra âm thanh để nhắc quý khách lật thực phẩm. Nếu quý khách không điều chỉnh gì, lò sẽ tiếp tục hoạt động.
(1) Ở trạng thái nấu hoặc hẹn giờ, ấn nút “TIMER/CLOCK” để kiểm tra thời gian và thời gian sẽ hiển thị trong vòng 3 giây.
(2) Trong quá trình nấu có hẹn giờ, ấn nút “TIMER/CLOCK” một lần để kiểm tra đồng hồ hẹn giờ.
10. Thiết lập nấu nhiều bước
11. Thực đơn tự động
Quý khách có thể thiết lập tối đa 2 bước cho quá trình nấu nướng của mình. Trong thiết lập nấu nhiều bước, nếu có quá trình rã đông, rã đông cần được đặt lên trước.
Ví dụ: Nếu quý khách muốn rã đông trong 5 phút và sau đó nấu với 80% năng lượng vi sóng trong 7 phút, vui lòng làm như sau:
1) Nhấn nút "DEFROST" một lần, lò vi sóng sẽ hiển thị "0:00". Đèn TIME sẽ sáng. 2) Xoay núm để lựa chọn thời gian cho tới khi màn hình hiển thị "5:00". 3) Nhấn nút MICROWAVE hai lần, các đèn "MICROWAVE" và "M-HI" sẽ sáng. 4) Xoay núm để điều chỉnh thời gian nấu cho tới khi lò hiển thị “7:00"
5) Nhấn nút START để bắt đầu nấu, và lò sẽ phát âm báo một lần cho bước đầu tiên, thời gian rã đông bắt đầu được tính; lò sẽ phát âm báo một lần nữa để bắt đầu bước thứ hai. Khi quá trình nấu kết thúc, lò sẽ phát âm báo 5 lần.
1) Nhấn "AUTO MENU" một lần để lựa chọn thực đơn, khối lượng và phần chia tự động. Đèn sẽ sáng.
2) Tiếp tục nhấn "AUTO MENU" để lựa chọn các thực đơn khác nhau. 3) Xoay núm để chọn khối lượng mặc định như trong bảng thực đơn. 4) Nhấn START để bắt đầu nấu.
Thực đơn Khối lượng Hiển thị Thịt Rau Khoai tây Mỳ ống Cá Bỏng ngô 200 g 400 g 250 g 350 g 450 g 200 g 300 g 400 g 50g (với 450 ml nước lạnh) 100g (với 800 ml nước lạnh) 200 g 400 g 600 g 250 g 350 g 450 g 1 cốc (120 ml) 2 cốc (240 ml) 3 cốc (360ml) 50 g 85 g 100 g Pizza Đồ uống 200 400 250 350 450 200 300 400 50 100 200 400 600 250 350 450 1 2 3 50 85 100 Bảng thực đơn dùng cho thực đơn tự động
12 . Khóa trẻ em
Khóa: Ở trạng thái chờ, nhấn "STOP/ CLEAR" trong vòng 3 giây, lò sẽ phát âm báo 1 lần. Sau 3 giây, lò sẽ phát hai âm báo cho biết lò đã bị khóa và thời gian hiện tại sẽ được hiển thị nếu như lò đã được thiết lập thời gian, nếu không màn hình sẽ hiển thị "00:00". Biểu tượng " " sẽ bật sáng.
Mở khóa: Khi lò đang ở trạng thái khóa, nhấn "STOP/CLEAR" trong vòng 3 giây, lò sẽ phát âm báo 2 lần. Lò quay trở lại trạng thái chờ, và màn hình sẽ hiển thị thời gian hiện tại hoặc 00:00
13. Chức năng bộ nhớ
14. Một số chú ý
1) Lò sẽ phát âm báo một lần khi vặn núm xoay lần đầu.
2) Nếu mở cửa trong khi lò đang hoạt động, sau khi đóng cửa lò cần bấm "START" để lò tiếp tục hoạt động.
3) Khi đã thiết lập chương trình nấu và nút "START" không được nhấn trong vòng 1 phút, màn hình sẽ hiển thị thời gian hiện tại và hủy các thiết lập.
4) Khi quá trình nấu ăn kết thúc, màn hình sẽ hiển thị "End". 1) Lò sẽ tự lưu lại thiết lập của lần nấu cuối cùng.
Ví dụ, lò đã hoạt động trong 5 phút với mức năng lượng M-HI. Nhấn "MICROWAVE" một lần nữa, rồi xoay núm để thiết lập thời gian. Nhấn "START" và lò sẽ tự động hoạt động với mức năng lượng M-HI.
Khắc phục sự cố
Các hiện tượng bình thường
Lò vi sóng gây nhiễu sóng
TV.
Bộ tiếp sóng của radio và TV có thể bị nhiễu
sóng khi lò hoạt động. Hiện tượng này tương tự
những nhiễu gây bởi các thiết bị điện gia dụng
khác chẳng hạn như máy xay, máy hút bụi, quạt
điện. Hiện tượng này là bình thường.
Đèn sáng lờ mờ.
Hơi nước bị đọng trên cửa,
hơi nóng thoát ra ngoài.
Lò hoạt động mà không có
thực phẩm bên trong.
Không được để lò hoạt động mà không có thực
phẩm bên trong. Điều này rất nguy hiểm.
Khi nấu, hơi nước thoát ra từ thực phẩm. Hầu
hết sẽ thoát ra qua lỗ thoát khí, nhưng một số sẽ
đọng lại trên những bề mặt lạnh như cửa lò.
Khi nấu ở công suất thấp, đèn trong lò có thể
sáng lờ mờ. Điều này là bình thường.
Sự cố
Nguyên nhân
Cách khắc phục
Lò không hoạt động
Lò không nóng Đĩa xoay kêu to khi lò hoạt động.
Dây điện không được cắm chắc chắn vào nguồn.
Cháy cầu chì hoặc áptômát tự ngắt khi nhảy. Ổ cắm điện gặp sự cố. Không đóng kín cửa Rô-lơ xoay và đáy lò bị dơ.
Rút phích cắm rồi cắm lại vào nguồn sau 10 giây.
Thay cầu chì hoặc bật lại áptômát (Việc này cần được thực hiện bởi các nhân viên có trình độ chuyên môn của công ty chúng tôi). Sử dụng thiết bị điện khác để kiểm tra ổ cắm điện.
Đóng lại cửa cho thật chặt Tham khảo phần “Vệ sinh và bảo dưỡng” để vệ sinh các thiết bị.
Thông tin môi trường
Nếu quý khách muốn vứt bỏ sản phẩm này trong tương lai, vui lòng không vứt bỏ cùng rác thải sinh hoạt. Hãy thải loại thiết bị ở nơi tập kết phế thải của địa phương nếu có thể.
Sản phẩm này tuân thủ quy định về Hạn chế vật chất nguy hiểm RoHS. Tuân thủ
THÔNG SỐ KỸ THUẬT
Mẫu máy
Điện áp:
Vui lòng tham khảo bảng ghi thông số kỹ thuật
Công suất tiêu thụ của vi sóng:
1250W
Công suất vi sóng:
800W
Công suất tiêu thụ của mạch nướng
1000W
Dung tích lò:
23L
Chu vi đĩa xoay:
270mm
Kích thước bên ngoài:
485x
x29
mm
Trọng lượng tịnh:
Khoảng 13,2 kg
EMS2348X
70
3
2,5
TRUNG TÂM CHĂM SÓC KHÁCH HÀNG
Việt Nam Dịch vụ chăm sóc khách hàng (miễn phí): 1800-58-88-99 ĐT: +(84) 8 3910 5465 Công ty TNHH Electrolux Vietnam Tầng 9, tòa nhà A&B, Số 76 đường Lê Lai, Quận 1, Thành phố Hồ Chí Minh, Việt NamSingapore Tel: (+65) 6507 8699
e-mail: [email protected] Electrolux S.E.A Pte. Ltd.
11 Lorong 3 Toa Payoh, Jackson Square Block B, #01-13/14/15 Singapore 319579
Malaysia
Toll-Free: 1300-88-11-22 Tel: (+60 3) 7843 5999
e-mail: [email protected] Electrolux Home Appliances Sdn. Bhd. 7th floor, Tower 2, Jaya 33,
No 3. Jalan Semangat, Seksyen 13, 46100 Petaling Jaya, Selangor
Bạn có nhớ lần gần đây nhất mình nhận được một món quà khiến bạn phải thốt lên “Ôi chao! Làm thế nào cậu biết được thế? Đây đúng là thứ mình cần!” Đó chính là thứ cảm xúc mà những nhà thiết kế của Electrolux muốn gợi lên nơi những khách hàng đã chọn lựa hoặc sử dụng bất kỳ sản phẩm nào của chúng tôi. Chúng tôi cống hiến thời gian, hiểu biết cũng như rất nhiều trăn trở nhằm dự đoán và tạo ra các thiết bị mà các khách hàng của chúng tôi thực sự muốn và cần có.
Sự quan tâm sâu sắc này cũng đồng nghĩa với việc cải tiến với tầm nhìn thấu suốt. Không phải thiết kế vị thiết kế, mà phải là thiết kế vị khách hàng. Đối với chúng tôi, những thiết kế sâu sắc có nghĩa tạo ra những thiết bị dễ sử dụng và tạo nên sự thích thú cho khách hàng khi vận hành, tạo điều kiện cho khách hàng tận hưởng mọi sự dễ chịu và xa hoa của thế kỷ 21. Mục tiêu của chúng tôi là mang đến cảm giác thoải mái này đến với nhiều người hơn nữa, trong nhiều lãnh vực hơn nữa của cuộc sống thường ngày trên toàn thế giới. Vì vậy, khi chúng tôi nói rằng chúng tôi đang nghĩ cho bạn, những khách hàng của Electrolux, bạn hiểu đó là lời nói thành tâm của chúng tôi.
Cam kết “luôn quan tâm đến khách hàng” của Electrolux không dừng lại ở việc đáp ứng nhu cầu hiện tại của quý khách hàng, mà còn là sự cam kết tạo ra các sản phẩm thân thiện với môi trường – cho hiện tại và cho thế hệ mai sau.
Electrolux. Thinking of you.
Chia sẻ thêm với chúng tôi tại www.electrolux.vn
DAFTAR ISI
PERINGATAN AWAL UNTUK MENGHINDARI
PAPARAN ENERGI GELOMBANG MIKRO YANG BERLEBIHAN --- 3
PETUNJUK KESELAMATAN YANG PENTING --- 4
Instalasi Pentanahan --- 6
PERALATAN MEMASAK --- 7
PERSIAPAN OVEN --- 8
Instalasi --- 9
Panel Kontrol dan Fitur --- 10
Petunjuk Operasi --- 11
Penanganan Masalah --- 17
Data teknis --- 18
Pusat layanan konsumen --- 19
Oven Microwave
PETUNJUK PENGGUNAAN
MODEL: EMS2348X
Bacalah petunjuk ini dengan seksama sebelum menggunakan oven
microwave anda, dan simpanlah dengan baik.
Bila petunjuk-petunjuk ini diikuti, oven anda dapat digunakan dengan baik
selama bertahun-tahun.
PERINGATAN AWAL UNTUK MENGHINDARI PAPARAN ENERGI
GELOMBANG MIKRO YANG BERLEBIHAN
(a) Jangan berupaya untuk mengoperasikan oven ini dengan pintu oven
terbuka karena dapat menyebabkan paparan ke energi microwave yang
berbahaya. Tidak berupaya merusak atau mengakali sistem kunci
pengaman adalah hal yang penting.
(b) Jangan meletakkan benda apapun antara sisi depan dan pintu oven atau
membiarkan kotoran atau sisa zat pembersih menumpuk pada
permukaan komponen penyekat.
(c) PERINGATAN: Bila pintu atau penyekat pintu rusak, oven tidak boleh
digunakan sebelum diperbaiki oleh orang yang berkompeten.
TAMBAHAN
Bila kebersihan oven microwave tidak dijaga dengan baik, kualitas
permukaan luar oven bisa berkurang, yang berpengaruh pada usia pakai
oven microwave dan membawa kepada situasi yang berbahaya.
PETUNJUK KESELAMATAN YANG PENTING
PERINGATAN
1. Peringatan: Cairan dan makanan lain tidak boleh dipanaskan dalam wadah yang tertutup rapat karena dapat meletus.
2. Peringatan: Adalah berbahaya bagi seseorang yang tidak berkompeten untuk melaksanakan tindakan servis atau perbaikan yang melibatkan dilepaskannya tutup yang melindungi terhadap paparan energi gelombang mikro.
3. Oven ini dapat digunakan oleh anak-anak berusia 8 tahun atau lebih dan orang-orang yang memiliki kekurangan kemampuan fisik, sensorik, atau mental dan pengetahuan, bila mereka telah diberikan pengawasan atau petunjuk mengenai penggunaan oven dengan cara yang aman dan mereka telah memahami bahaya-bahaya yang terlibat.
Anak-anak tidak boleh tidak bermain dengan oven ini. Pembersihan dan perawatan oleh pengguna tidak boleh dilakukan oleh anak-anak kecuali mereka berusia lebih dari 8 tahun dan dengan pengawasan.
4. Jauhkan oven serta kabelnya dari jangkauan anak-anak yang berusia kurang dari 8 tahun. 5. Gunakan hanya peralatan memasak yang
sesuai untuk penggunaan dalam oven
microwave.
6. Oven harus dibersihkan secara berkala dan endapan makanan apapun harus disingkirkan. 7. Baca dan ikutilah secara seksama:
"PERINGATAN AWAL UNTUK MENGHIN-DARI KEMUNGKINAN PAPARAN
TERHADAP ENERGI GELOMBANG MIKRO SECARA BERLEBIHAN."
8. Saat memanaskan makanan dalam wadah plastik atau kertas, awasi oven karena ada kemungkinan wadah terbakar.
9. Bila terjadi asap, matikan oven atau cabut steker oven dari stopkontak dan biarkan pintu oven tertutup untuk memadamkan nyala api. 10. Jangan memasak makanan hingga terlalu
matang.
13. Pasang atau tempatkan oven ini hanya sesuai dengan petunjuk instalasi yang terdapat dalam manual ini.
14. Telur dalam cangkangnya dan telur rebus utuh matang tidak boleh dipanaskan dalam oven microwave karena dapat meletus, walaupun pemanasan oleh oven microwave telah berakhir.
15. Oven ini ditujukan untuk penggunaan di rumah tangga dan aplikasi serupa seperti: - daerah dapur staf di toko-toko, kantor, dan
lingkungan kerja lainnya;
- oleh para klien di hotel, motel, serta lingkungan residensial jenis lainnya; - rumah pertanian;
- lingkungan tempat istirahat dan makan. 16. Bila kabel listrik rusak, kabel hanya boleh
diganti oleh Electrolux, agen servisnya, atau orang yang berkualifikasi serupa untuk menghindari risiko.
17. Jangan menyimpan atau menggunakan oven ini di luar ruangan.
18. Jangan menggunakan oven ini di dekat air, di ruang bawah tanah yang basah atau di dekat kolam renang.
19. Temperatur permukaan yang bisa tersentuh manusia dapat menjadi tinggi saat oven bekerja. Permukaan tersebut bisa menjadi panas saat oven bekerja. Jauhkan kabel listrik oven dari permukaan yang dipanaskan dan yang menghalangi ventilasi apapun pada oven.
20. Hindarkan kabel menjuntai pada pinggir meja makan atau meja dapur.
21. Kegagalan untuk menjaga oven tetap bersih dapat menyebabkan penurunan kualitas permukaan yang dapat memberi pengaruh buruk pada usia oven dan dapat
menyebabkan situasi berbahaya.
22. Isi botol susu dan wadah makanan bayi harus diaduk atau dikocok dan temperaturnya harus diperiksa sebelum dikonsumsi untuk
Untuk mengurangi risiko kebakaran, sengatan listrik, cedera pada seseorang atau paparan ke energi gelombang mikro secara berlebihan saat menggunakan oven, ikutilah peringatan pendahuluan, termasuk hal-hal berikut:
23. Memanaskan minuman dengan oven microwave dapat menyebabkan pendidihan dengan letupan tunda, karena itu berhati-hatilah saat menangani wadah.
24. Oven ini tidak ditujukan untuk digunakan oleh orang (termasuk anak-anak) yang memiliki kekurangan kemampuan fisik, sensorik, atau mental, atau kurang pengalaman dan pengetahuan, kecuali kepada mereka telah diberikan pengawasan atau petunjuk mengenai penggunaan oven ini oleh orang yang bertanggung jawab atas keselamatan mereka.
25. Anak-anak harus diawasi untuk memastikan mereka tidak bermain-main dengan oven. 26. Oven ini tidak ditujukan untuk digunakan dengan memakai pengatur waktu eksternal atau sistem
kendali jarak jauh terpisah.
27. Komponen-komponen yang dapat bisa tersentuh dapat menjadi panas selama penggunaan. Anak-anak kecil harus dijauhkan dari oven.
28. Penggunaan pembersih uap tidak diperbolehkan.
29. Selama pemakaian, oven ini akan menjadi panas. Hati-hatilah untuk menghindari menyentuh elemen-elemen pemanas di dalam oven.
30. Gunakan hanya peraba temperatur yang direkomendasikan untuk oven ini (untuk oven yang dilengkapi dengan fasilitas untuk menggunakan suatu peraba temperatur).
31. PERINGATAN: Oven serta komponennya yang bisa tersentuh manusia akan menjadi panas saat digunakan. Hati-hatilah untuk menghindari menyentuh elemen-elemen pemanas di dalam oven. Anak-anak yang berusia kurang dari 8 tahun harus dijauhkan dari oven ini kecuali diawasi terus-menerus.
32. Oven microwave hanya boleh dioperasikan dengan pintu dekoratif (hias) dalam keadaan terbuka (untuk oven dengan pintu hias).
33. Permukaan belakang oven harus dihadapkan ke dinding.
34. Oven microwave ini tidak boleh dipasang dalam lemari dapur (kabinet) kecuali telah diuji untuk pemakaian dalam kabinet.
BACALAH DENGAN SEKSAMA DAN SIMPANLAH
UNTUK RUJUKAN MENDATANG
Untuk Mengurangi Risiko Cedera Pada Manusia
Instalasi Pentanahan
BAHAYA
Bahaya Sengatan Listrik
Tersentuhnya beberapa komponen internal dapat menyebabkan cedera diri berat atau kematian. Jangan membongkar oven ini.
PERINGATAN
Bahaya Sengatan Listrik
Penggunaan pentanahan yang tidak tepat dapat menyebabkan sengatan listrik. Jangan memasang steker oven pada stopkontak sebelum oven ini dipasang dan ditanahkan dengan baik.
Oven ini harus ditanahkan. Bila terjadi hubung singkat listrik, pentanahan mengurangi risiko sengatan listrik dengan menyediakan kawat penyalur bagi arus listrik. Oven ini dilengkapi dengan kabel yang memiliki kawat tanah dan steker dengan saluran pentanahan. Steker tersebut harus dipasangkan pada suatu stopkontak yang dipasang dan ditanahkan dengan baik.
Hubungilah teknisi listrik atau teknisi servis berkualifikasi bila instalasi pentanahan tidak dipahami dengan baik atau terdapat keraguan mengenai apakah alat ini telah ditanahkan dengan baik. Bila perlu menggunakan kabel tambahan, gunakan hanya kabel tambahan dengan 3 kawat. Bila diperlukan pemakaian kabel tambahan, gunakan hanya kabel tambahan 3 kawat.
1. Oven ini dilengkapi dengan kabel listrik yang pendek mengurangi risiko terbelit atau tersandung kabel yang lebih panjang. 2. Bila menggunakan kabel yang panjang atau
kabel tambahan:
1) Tanda peringkat kelistrikan kabel atau
2) Kabel tambahan tersebut harus berupa kabel 3 kawat dengan pentanahan. 3) Kabel yang panjang harus ditata agar tidak
menjuntai dari meja dapur atau permukaan meja sehingga anak-anak dapat menariknya atau tersandung pada kabel.
PEMBERSIHAN
Pastikan untuk mencabut steker oven dari catu daya listrik.
1. Bersihkan ruang dalam oven setelah pemakaian dengan lap yang sedikit lembap. 2. Bersihkan aksesori oven dengan cara
sebagaimana biasanya dalam air sabun. 3. Rangka pintu dan penyekat dan
komponen-komponen sekitarnya harus dibersihkan dengan seksama menggunakan lap lembap bila kotor.
4. Jangan menggunakan zat pembersih yang kasar atau pengikis logam yang tajam untuk membersihkan kaca pintu oven karena dapat menggores permukaan, yang dapat menyebabkan kaca pecah.
5. Saran pembersihan---Agar membersihkan ruang dalam oven yang dapat tersentuh makanan yang dimasak menjadi lebih mudah:
Letakkan sepotong lemon dalam satu mangkuk, tambahkan air 300 ml (1/2 pint) dan panaskan pada daya microwave 100% selama 10 menit.
Laplah oven hingga bersih menggunakan lap yang lembut dan kering.
PERALATAN MEMASAK
PERHATIAN
Risiko Cedera Diri
Adalah berbahaya bagi seseorang yang tidak berkompeten untuk melakukan tindakan servis atau perbaikan yang melibatkan dilepaskannya tutup yang melindungi terhadap paparan energi gelombang mikro.
Lihatlah petunjuk pada bagian "Material yang dapat anda gunakan dalam oven microwave atau yang harus dihindarkan dari penggunaan dalam oven microwave". Bisa jadi terdapat peralatan memasak non-logam yang tidak aman untuk digunakan pada memasak dengan oven
microwave. Bila anda ragu, peralatan memasak tersebut
dapat diuji menggunakan prosedur berikut: Pengujian Peralatan Memasak:
1. Isilah wadah yang aman untuk oven microwave dengan 1 cangkir air dingin (250 ml) bersama peralatan memasak yang akan diuji.
2. Masaklah pada daya maksimum selama 1 menit. 3. Sentuhlah peralatan memasak tersebut dengan
hati-hati. Bila peralatan memasak tersebut terasa hangat, jangan gunakan untuk memasak dengan oven
microwave.
4. Jangan melampaui 1 menit waktu memasak.
Material yang dapat digunakan dalam oven microwave.
Peralatan Memasak KeteranganLembar aluminium. Hanya untuk penutup. Potongan kecil yang halus dapat digunakan untuk menutup bagian-bagian daging atau unggas yang tipis untuk mencegahnya menjadi terlalu matang. Lompatan bunga api dapat terjadi bila lembar aluminium terlalu dekat dengan dinding oven. Lembar aluminium harus berada sekurang-kurangnya 2 inci (2,5 cm) dari dinding oven. Wadah untuk
mematangkan makanan.
Ikuti petunjuk pabrik. Bagian bawah wadah harus terletak sekurang-kurangnya 3/6 inci (5 mm) di atas tadah putar. Penggunaan yang tidak benar dapat menyebabkan tadah putar pecah.
Wadah keramik Hanya yang aman untuk oven microwave. Ikuti petunjuk pabrik. Jangan menggunakan wadah yang retak atau sumbing.
Toples kaca. Selalu lepaskan tutupnya. Gunakan hanya untuk memanaskan makanan hingga hanya terasa hangat. Sebagian besar toples kaca tidak tahan panas dan dapat pecah.
Wadah kaca. Hanya gunakan wadah kaca yang tahan panas oven. Pastikan tidak terdapat hiasan logam. Jangan menggunakan wadah yang retak atau sumbing.
Kantong tempat
makanan Ikuti petunjuk pabrik. Jangan mengikat kantong dengan kawat logam. Buatlah sayatan pada kantong agar uap dapat keluar. Piring dan cangkir
kertas Gunakan hanya untuk memasak /memanaskan untuk waktu singkat. Jangan meninggalkan oven tanpa dijaga saat memasak. Tisu kertas Gunakan untuk menutup makanan untuk pemanasan ulang dan menyerap lemak. Gunakan
dengan pengawasan dan hanya untuk memasak dalam waktu singkat. Kertas perkamen Gunakan sebagai penutup untuk mencegah cipratan atau sebagai bungkus untuk
pengukusan.
Plastik Hanya yang aman untuk oven microwave. Ikuti petunjuk pabrik. Harus memiliki label "Aman bagi Oven Microwave". Beberapa wadah plastik bisa menjadi lunak seiring panasnya makanan di dalamnya. "Kantong untuk merebus" dan kantong plastik yang tertutup rapat harus dibelah, dilubangi, atau diberi saluran udara sebagaimana ditunjukkan oleh kemasannya.
Bungkus plastik Hanya yang aman untuk oven microwave. Gunakan untuk menutup makanan selama memasak untuk mempertahankan kelembapan. Hindarkan bungkus plastik bersentuhan dengan makanan.
Termometer Hanya yang aman untuk memasak dengan oven microwave (termometer daging dan termometer gula).
Bahan-bahan yang dapat digunakan dalam oven microwave.
Peralatan Memasak KeteranganBaki aluminium Dapat menyebabkan lompatan bunga api. Pindahkan makanan ke wadah yang aman bagi oven microwave.
Karton makanan dengan
gagang logam Dapat menyebabkan lompatan bunga api. Pindahkan makanan ke wadah yang aman bagi oven microwave. Peralatan memasak yang
terbuat dari logam atau memiliki lapisan logam.
Logam menghalangi makanan dari energi gelombang mikro. Lapisan logam dapat menyebabkan lompatan bunga api.
Kawat pengikat logam Dapat menyebabkan lompatan bunga api dan menyebabkan kebakaran dalam oven. Kantong kertas Dapat menyebabkan kebakaran dalam oven.
Busa plastik Busa plastik dapat mencair dan mencemari cairan di dalamnya bila terkena temperatur tinggi.
Kayu Kayu akan menjadi kering bila digunakan dalam oven microwave dan bisa terbelah atau retak.
PERSIAPAN OVEN
Nama Komponen-komponen dan Aksesori Oven
Keluarkan oven dan semua material dari karton dan ruang oven. Oven anda dilengkapi dengan aksesori berikut:
Baki kaca 1 Rangkaian cincin tadah putar 1 Petunjuk Pemakaian 1
A) Panel kontrol B) Poros tadah putar
C) Rangkaian cincin tadah putar D) Baki kaca