800 East 96th Street, Indianapolis, Indiana, 46240 USA
James Foxall
Sams
Teach Yourself
24
in
Hours
Visual
transmitted by any means, electronic, mechanical, photocopying, recording, or otherwise, without written permission from the publisher. No patent liability is assumed with respect to the use of the information contained herein. Although every precaution has been taken in the preparation of this book, the publisher and author assume no responsibility for errors or omissions. Nor is any liability assumed for damages resulting from the use of the information contained herein. ISBN-13: 978-0-672-33113-8
ISBN-10: 0-672-33113-6
Library of Congress Cataloging-in-Publication Data: Foxall, James D.
Sams teach yourself Visual Basic 2010 in 24 hours complete : starter kit / James Foxall. p. cm.
Includes index.
ISBN 978-0-672-33113-8
1. Microsoft Visual BASIC. 2. BASIC (Computer program language) 3. Microsoft .NET. I. Title. QA76.73.B3F69529 2010
006.7'882--dc22
2010011612
Printed in the United States on America First Printing May 2010
Trademarks
All terms mentioned in this book that are known to be trademarks or service marks have been appropriately capitalized. Sams Publishing cannot attest to the accuracy of this information. Use of a term in this book should not be regarded as affecting the validity of any trademark or service mark.
Warning and Disclaimer
Every effort has been made to make this book as complete and as accurate as possible, but no warranty or fitness is implied. The information provided is on an “as is” basis. The author and the publisher shall have neither liability nor responsibility to any person or entity with respect to any loss or damages arising from the information contained in this book or from the use of the DVD or programs accompanying it.
Bulk Sales
Sams Publishing offers excellent discounts on this book when ordered in quantity for bulk purchases or special sales. For more information, please contact
U.S. Corporate and Government Sales 1-800-382-3419
For sales outside of the U.S., please contact
International Sales [email protected] Executive Editor Neil Rowe Development Editor Mark Renfrow Managing Editor Patrick Kanouse Project Editor Mandie Frank Copy Editor Margo Catts Indexer Ken Johnson Proofreader Leslie Joseph Technical Editor J. Boyd Nolan
Contents at a Glance
Introduction. . . .1
PART I The Visual Basic 2010 Environment HOUR 1 Jumping in with Both Feet: A Visual Basic 2010 Programming Tour ...5
2 Navigating Visual Basic 2010...29
3 Understanding Objects and Collections ...57
4 Understanding Events ...79
PART II Building a User Interface 5 Building Forms: The Basics ...95
6 Building Forms: Advanced Techniques...117
7 Working with Traditional Controls...145
8 Using Advanced Controls...173
9 Adding Menus and Toolbars to Forms ...195
PART III Making Things Happen—Programming 10 Creating and Calling Code Procedures ...217
11 Using Constants, Data Types, Variables, and Arrays...237
12 Performing Arithmetic, String Manipulation, and Date/Time Adjustments...269
13 Making Decisions in Visual Basic Code ...293
14 Looping for Efficiency ...309
15 Debugging Your Code ...323
16 Designing Objects Using Classes ...347
17 Interacting with Users ...367
18 Working with Graphics ...389
PART IV Working with Data 19 Performing File Operations...409
20 Working with the Registry and Text Files...427
21 Working with a Database ...451
22 Controlling Other Applications Using Automation...469
PART V Deploying Solutions and Beyond 23 Deploying Applications ...481
24 The 10,000-Foot View...491
Introduction
1
PART I:
The Visual Basic 2010 Environment
HOUR 1:
Jumping in with Both Feet: A Visual Basic 2010 Programming Tour
5
Starting Visual Basic 2010 ...6
Creating a New Project ...7
Understanding the Visual Studio 2010 Environment ...10
Changing the Characteristics of Objects ...11
Adding Controls to a Form...16
Designing an Interface ...17
Writing the Code Behind an Interface ...21
Running a Project ...25
HOUR 2:
Navigating Visual Basic 2010
29
Using the Visual Basic 2010 Start Page ...30Navigating and Customizing the Visual Basic Environment ...32
Working with Toolbars ...37
Adding Controls to a Form Using the Toolbox ...38
Setting Object Properties Using the Properties Window ...40
Managing Projects ...45
A Quick-and-Dirty Programming Primer ...51
Getting Help ...53
HOUR 3:
Understanding Objects and Collections
57
Understanding Objects ...58Understanding Properties ...58
Understanding Methods ...65
Building a Simple Object Example Project ...67
Understanding Collections ...72
Contents
v
HOUR 4:
Understanding Events
79
Understanding Event-Driven Programming ...79
Building an Event Example Project ...87
Keeping Event Names Current ...92
PART II:
Building a User Interface
HOUR 5:Building Forms: The Basics
95
Changing a Form’s Name ...96Changing a Form’s Appearance ...97
Showing and Hiding Forms ...107
HOUR 6:
Building Forms: Advanced Techniques
117
Working with Controls ...117Creating Topmost Nonmodal Windows...134
Creating Transparent Forms...134
Creating Scrollable Forms...134
Creating MDI Forms ...136
Setting the Startup Form...140
HOUR 7:
Working with Traditional Controls
145
Displaying Static Text with the LabelControl ...145Allowing Users to Enter Text Using a Text Box ...146
Creating Buttons ...154
Creating Containers and Groups of Option Buttons...157
Displaying a List with the List Box ...161
Creating Drop-Down Lists Using the Combo Box ...168
HOUR 8:
Using Advanced Controls
173
Creating Timers ...174Creating Tabbed Dialog Boxes ...177
Storing Pictures in an Image ListControl ...180
Building Enhanced Lists Using the List ViewControl ...182
HOUR 9:
Adding Menus and Toolbars to Forms
195
Building Menus...196
Using the Toolbar Control ...207
Creating a Status Bar ...213
PART III:
Making Things Happen—Programming
HOUR 10:Creating and Calling Code Procedures
217
Creating Visual Basic Code Modules ...217Writing Code Procedures ...219
Calling Code Procedures...225
Exiting Procedures ...231
Avoiding Infinite Recursion ...232
HOUR 11:
Using Constants, Data Types, Variables, and Arrays
237
Understanding Data Types ...238Defining and Using Constants ...242
Declaring and Referencing Variables ...244
Working with Arrays...250
Determining Scope ...254
Declaring Variables of Static Scope ...258
Naming Conventions ...259
Using Variables in Your Picture Viewer Project ...261
HOUR 12:
Performing Arithmetic, String Manipulation,
and Date/Time Adjustments
269
Performing Basic Arithmetic Operations with Visual Basic ...270Comparing Equalities ...274
Understanding Boolean Logic ...274
Manipulating Strings ...278
Working with Dates and Times ...283
HOUR 13:
Making Decisions in Visual Basic Code
293
Making Decisions Using If...Then ...293Contents
vii
HOUR 14:
Looping for Efficiency
309
Looping a Specific Number of Times Using For...Next ...309
Using Do...Loopto Loop an Indeterminate Number of Times ...315
HOUR 15:
Debugging Your Code
323
Adding Comments to Your Code ...324Identifying the Two Basic Types of Errors ...326
Using Visual Basic’s Debugging Tools ...329
Writing an Error Handler Using Try...Catch...Finally ...336
HOUR 16:
Designing Objects Using Classes
347
Understanding Classes ...348Instantiating Objects from Classes...357
HOUR 17:
Interacting with Users
367
Displaying Messages Using the MessageBox.Show()Function ...367Creating Custom Dialog Boxes ...373
Using InputBox()to Get Information from a User ...377
Interacting with the Keyboard ...379
Using the Common Mouse Events ...382
HOUR 18:
Working with Graphics
389
Understanding the GraphicsObject ...389Working with Pens ...392
Using System Colors ...393
Working with Rectangles ...396
Drawing Shapes ...397
Drawing Text...399
Persisting Graphics on a Form ...400
Building a Graphics Project Example ...400
PART IV:
Working with Data
HOUR 19:Performing File Operations
409
Using the OpenFileDialogand SaveFileDialogControls ...409Manipulating Files with the FileObject...415
HOUR 20:
Working with the Registry and Text Files
427
Working with the Registry ...427
Reading and Writing Text Files ...439
HOUR 21:
Working with a Database
451
Introducing ADO.NET ...452Manipulating Data...456
HOUR 22:
Controlling Other Applications Using Automation
469
Automating Microsoft Excel ...470Automating Microsoft Word...475
PART V:
Deploying Solutions and Beyond
HOUR 23:Deploying Applications
481
Understanding ClickOnce Technology ...481Using the Publish Wizard to Create a ClickOnce Application ...482
Testing Your Picture Viewer ClickOnce Install Program ...486
Uninstalling an Application You’ve Distributed ...486
Setting Advanced Options for Creating ClickOnce Programs...488
HOUR 24:
The 10,000-Foot View
491
The .NET Framework ...491Common Language Runtime...492
Microsoft Intermediate Language ...493
Namespaces ...494
Common Type System ...496
Garbage Collection ...496
Further Reading ...497
About the Author
James Foxallis president of Tigerpaw Software, Inc. (www.tigerpawsoftware.com), a Bellevue, Nebraska, Microsoft Certified Partner specializing in software solutions for technology providers. Tigerpaw’s award-winning business automation solution is designed to automate contact management, marketing, service and repair, proposal generation, inventory control, and purchasing. At the start of 2010, the current release of Tigerpaw had more than 25,000 licensed users. Foxall’s experience in creating certi-fied Office-compatible software has made him an authority on application interface and behavior standards of applications for the Microsoft Windows and Microsoft Office environments.
Foxall has been writing commercial production Visual Basic code for more than 14
years. He’s the author of numerous books, including Practical Standards for Microsoft
Visual Basicand MCSD in a Nutshell: The Visual Basic Exams. He also has written articles for Access-Office-VBA Advisor andVisual Basic Programmer’s Journal. Foxall has a bache-lor’s degree in management of information systems (MIS) and a master’s degree in Business Administration (MBA). He is a Microsoft Certified Solution Developer and an international speaker on programming technologies as well as business process
improvements. James enjoys spending time with his family, playing guitar, listening to amazing bands, and playing computer games. You can reach him at
www.jamesfoxall.com.
Dedication
This book is dedicated to Neil Rowe, for allowing me to create the
book I have always envisioned.
Acknowledgments
value your opinion and want to know what we’re doing right, what we could do bet-ter, what areas you’d like to see us publish in, and any other words of wisdom you’re willing to pass our way.
You can email or write me directly to let me know what you did or didn’t like about this book—as well as what we can do to make our books stronger.
Please note that I cannot help you with technical problems related to the topic of this book, and that due to the high volume of mail I receive, I might not be able to reply to every message.
When you write, please be sure to include this book’s title and author as well as your name and phone or email address. I will carefully review your comments and share them with the author and editors who worked on the book.
Email: [email protected]
Mail: Neil Rowe
Executive Editor Sams Publishing 800 East 96th Street Indianapolis, IN 46240 USA
Reader Services
Audience and Organization
1Introduction
Visual Basic 2010 is Microsoft’s latest incarnation of the enormously popular Visual Basic language, and it’s fundamentally different from the versions that came before it. Visual Basic is more powerful and more capable than ever before, and its features and functionality are on par with “higher-level” languages such as C++. One conse-quence of this newfound power is added complexity. Gone are the days when you could sit down with Visual Basic and the online Help and teach yourself what you needed to know to create a functional program.
Audience and Organization
This book is targeted toward those who have little or no programming experience or who might be picking up Visual Basic as a second language. The book has been structured and written with a purpose: to get you productive as quickly as possible. I’ve used my experiences in writing large commercial applications with Visual Basic and teaching Visual Basic to create a book that I hope cuts through the fluff and teaches you what you need to know. All too often, authors fall into the trap of focus-ing on the technology rather than on the practical application of the technology. I’ve worked hard to keep this book focused on teaching you practical skills that you can apply immediately to a development project. Feel free to post your suggestions or success stories at www.jamesfoxall.com/forums.
This book is divided into five parts, each of which focuses on a different aspect of developing applications with Visual Basic. These parts generally follow the flow of tasks you’ll perform as you begin creating your own programs with Visual Basic. I recommend that you read them in the order in which they appear.
.
Part I, “The Visual Basic 2010 Environment,” teaches you about the Visual Basic environment, including how to navigate and access Visual Basic’s numerous tools. In addition, you’ll learn about some key development con-cepts such as objects, collections, and events..
Part II, “Building a User Interface,” shows you how to build attractive and functional user interfaces. In this part, you’ll learn about forms and controls— the user interface elements such as text boxes and list boxes.dis-Watch
Out!
Did you
Know?
cover how to create modules and procedures, as well as how to store data, per-form loops, and make decisions in code. After you’ve learned the core pro-gramming skills, you’ll move into object-oriented propro-gramming and debugging applications.
.
Part IV, “Working with Data,” introduces you to working with graphics, text files, and programming databases and shows you how to automate external applications such as Word and Excel. In addition, this part teaches you how to manipulate a user’s file system and the Windows Registry..
Part V, “Deploying Solutions and Beyond,” shows you how to distribute an application that you’ve created to an end user’s computer. In Hour 24, “The 10,000-Foot View,” you’ll learn about Microsoft’s .NET initiative from a higher, less-technical level.Many readers of previous editions have taken the time to give me input on how to make this book better. Overwhelmingly, I was asked to have examples that build on the examples in the previous chapters. In this book, I have done that as much as possible. Instead of learning concepts in isolated bits, you’ll be building a feature-rich Picture Viewer program throughout the course of this book. You’ll begin by building the basic application. As you progress through the chapters, you’ll add menus and toolbars to the program, build an Options dialog box, modify the pro-gram to use the Windows Registry and a text file, and even build a setup propro-gram to distribute the application to other users. I hope you find this approach beneficial in that it enables you to learn the material in the context of building a real program.
Conventions Used in This Book
This book uses several design elements and conventions to help you prioritize and reference the information it contains:
By the Way boxes provide useful sidebar information that you can read immedi-ately or circle back to without losing the flow of the topic at hand.
By the
Way
Did You Know? boxes highlight information that can make your Visual Basic pro-gramming more effective.
Onward and Upward!
3New terms appear in an italictypeface for emphasis.
In addition, this book uses various typefaces to help you distinguish code from regu-lar English. Code is presented in amonospacefont. Placeholders—words or characters that represent the real words or characters you would type in code—appear initalic monospace. When you are asked to type or enter text, that text appears inbold.
Menu options are separated by a comma. For example, when you should open the File menu and choose the New Project menu option, the text says “Select File, New Project.”
Some code statements presented in this book are too long to appear on a single line. In these cases, a line-continuation character (an underscore) is used to indicate that the following line is a continuation of the current statement.
Onward and Upward!
This is an exciting time to be learning how to program. It’s my sincerest wish that when you finish this book, you feel capable of using many of Visual Basic’s tools to create, debug, and deploy modest Visual Basic programs. Although you won’t be an expert, you’ll be surprised at how much you’ve learned. And I hope this book will help you determine your future direction as you proceed down the road to Visual Basic mastery.
5
HOUR 1
Jumping in with Both Feet:
A Visual Basic 2010
Programming Tour
What You’ll Learn in This Hour:
.
Building a simple (yet functional) Visual Basic application.
Letting a user browse a hard drive.
Displaying a picture from a file on disk.
Getting familiar with some programming lingo.
Learning about the Visual Studio 2010 IDELearning a new programming language can be intimidating. If you’ve never pro-grammed before, the act of typing seemingly cryptic text to produce sleek and power-ful applications probably seems like a black art, and you might wonder how you’ll ever learn everything you need to know. The answer, of course, is one step at a time. I believe the first step to mastering a programming language is building confidence. Programming is part art and part science. Although it might seem like magic, it’s more akin to illusion. After you know how things work, a lot of the mysticism goes away, and you are free to focus on the mechanics necessary to produce the desired result.
By the
Way
In the past, Visual Basic was an autonomous language. This has changed. Now,Visual Basic is part of a larger entity known as the .NET Framework. The .NET Framework encompasses all the .NET technology, including Visual Studio .NET (the suite of development tools) and the common language runtime (CLR), which is the set of files that make up the core of all .NET applications. You’ll learn about these items in more detail as you progress through this book. For now, realize that Visual Basic is one of many languages that exist within the Visual Studio family. Many other languages, such as C#, are also .NET languages, make use of the CLR, and are developed within Visual Studio.In this hour, you’ll complete a quick tour of Visual Basic that takes you step by step through creating a complete, albeit small, Visual Basic program. Most introductory programming books start by having the reader create a simple Hello World program. I’ve yet to see a Hello World program that’s the least bit helpful. (They usually do nothing more than printhello worldto the screen—what fun!) So, instead, you’ll create a Picture Viewer application that lets you view Windows bitmaps and icons on your computer. You’ll learn how to let a user browse for a file and how to display a selected picture file on the screen. The techniques you learn in this chapter will come in handy in many real-world applications that you’ll create, but the goal of this chap-ter is for you to realize just how much fun it is to program using Visual Basic 2010.
Starting Visual Basic 2010
Before you begin creating programs in Visual Basic 2010, you should be familiar with the following terms:
.
Distributable component: The final, compiled version of a project. Compo-nents can be distributed to other people and other computers, and they don’t require the Visual Basic 2010 development environment (the tools you use to create a .NET program) to run (although they do require the .NET runtime, which I’ll discuss in Hour 23, “Deploying Applications”). Distributable compo-nents are often called programs. In Hour 23, you’ll learn how to distribute the Picture Viewer program that you’re about to build to other computers..
Project:A collection of files that can be compiled to create a distributable component (program). There are many types of projects, and complex applica-tions might consist of multiple projects, such as Windows application projects and support dynamic link library (DLL) projects.Creating a New Project
7Visual Studio 2010 is a complete development environment, and it’s called the IDE (short for integrated development environment). The IDE is the design framework in which you build applications; every tool you’ll need to create your Visual Basic proj-ects is accessed from within the Visual Basic IDE. Again, Visual Studio 2010 supports development using many different languages, Visual Basic being the most popular. The environment itself is not Visual Basic, but the language you’ll be using within Visual Studio 2010 isVisual Basic. To work with Visual Basic projects, you first start the Visual Studio 2010 IDE.
Start Visual Studio 2010 now by choosing Microsoft Visual Basic 2010 Express Edition from the Start/Programs menu. If you are running the full retail version of Visual Stu-dio, your shortcut may have a different name. In this case, locate the shortcut on the Start menu and click it once to start the Visual Studio 2010 IDE.
Creating a New Project
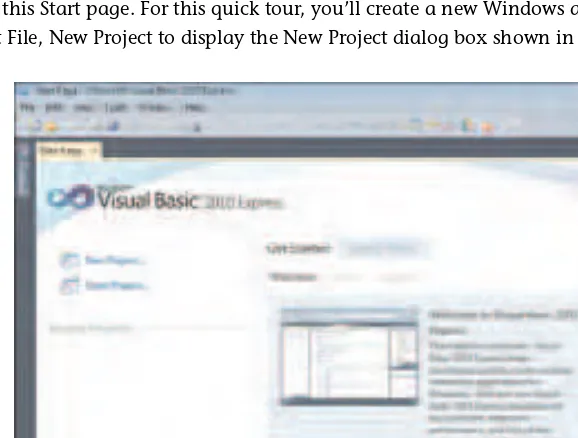
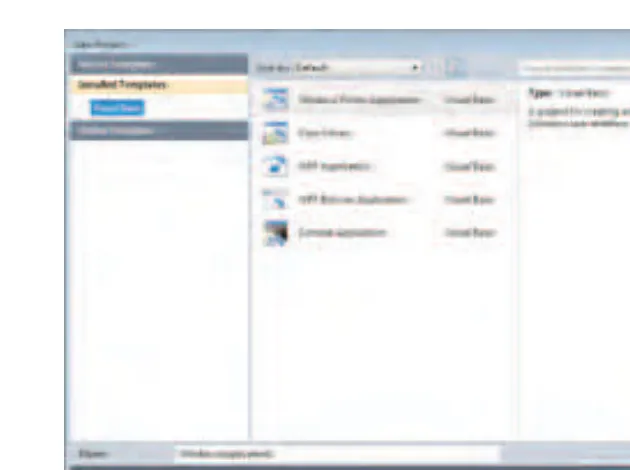
When you first start Visual Studio 2010, you see the Start Page tab within the IDE, as shown in Figure 1.1. You can open projects created previously or create new projects from this Start page. For this quick tour, you’ll create a new Windows application, so select File, New Project to display the New Project dialog box shown in Figure 1.2.
FIGURE 1.1
If your Start page doesn’t look like the one shown in Figure 1.1, chances are that you’ve changed the default settings. In Hour 2, “Navigating Visual Basic 2010,” I’ll show you how to change them back.
By the
Way
The New Project dialog box is used to specify the type of Visual Basic project to create. (You can create many types of projects with Visual Basic, as well as with the other supported languages of the .NET Framework.) The options shown in Figure 1.2 are limited because I am running the Express edition of Visual Basic for all examples in this book. If you are running the full version of Visual Studio, you will have many more options available.
Create a new Windows Forms Application now by following these steps:
1. Make sure that the Windows Forms Application item is selected. (If it’s not, click it once to select it.)
2. At the bottom of the New Project dialog box is a Name text box. This is where, oddly enough, you specify the name of the project you’re creating. Enter
Picture Viewerin the Name text box.
3. Click OK to create the project.
Always set the Name text box to something meaningful before creating a project, or you’ll have more work to do later if you want to move or rename the project.
Did you
Know?
FIGURE 1.2
Creating a New Project
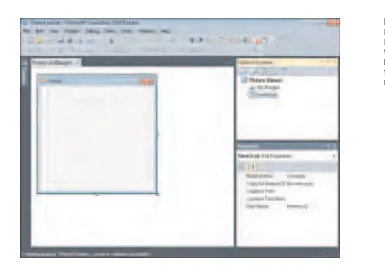
9When Visual Basic creates a new Windows Forms Application project, it adds one form (the empty gray window) for you to begin building the interfacefor your appli-cation, as shown in Figure 1.3.
Within Visual Studio 2010,formis the term given to the design-time view of a window that can be displayed to a user.
By the
Way
Your Visual Studio 2010 environment might look different from that shown in the fig-ures in this hour, depending on the edition of Visual Studio 2010 you’re using, whether you’ve already played with Visual Studio 2010, and other factors, such as your monitor’s resolution. All the elements discussed in this hour exist in all editions of Visual Studio 2010, however. (If a window shown in a figure doesn’t appear in your IDE, use the View menu to display it.)
To create a program that can be run on another computer, you start by creating a project and then compiling the project into a component such as an executable(a program a user can run) or a DLL(a component that can be used by other pro-grams and components). The compilation process is discussed in detail in Hour 23. The important thing to note at this time is that when you hear someone refer to creating or writing a program, just as you’re creating the Picture Viewer program now, that person is referring to the completion of all steps up to and including compiling the project to a distributable file.
By the
Way
FIGURE 1.3
Understanding the Visual Studio 2010
Environment
The first time you run Visual Studio 2010, you’ll notice that the IDE contains a num-ber of windows, such as the Properties window on the right, which is used to view and set properties of objects. In addition to these windows, the IDE contains a number of tabs, such as the vertical Toolbox tab on the left edge of the IDE (refer to Figure 1.3). Try this now: Click the Toolbox tab to display the Toolbox window (clicking a tab dis-plays an associated window). You can hover the mouse over a tab for a few seconds to display the window as well. To hide the window, simply move the mouse off the window (if you hovered over the tab to display it) or click another window. To close the window, click the Close (X) button in the window’s title bar.
If you opened the toolbox by clicking its tab rather than hovering over the tab, the toolbox does not close automatically. Instead, it stays open until you click another window.
By the
Way
You can adjust the size and position of any of these windows, and you can even hide and show them as needed. You’ll learn how to customize your design environment in Hour 2.
Unless specifically instructed to do so, don’t double-click anything in the Visual Studio 2010 design environment. Double-clicking most objects produces an entirely different result than single-clicking does. If you mistakenly double-click an object on a form (discussed shortly), a code window appears. At the top of the code window is a set of tabs: one for the form design and one for the code. Click the tab for the form design to hide the code window and return to the form.
Watch
Out!
The Properties window on the right side of the design environment is perhaps the most important window in the IDE, and it’s the one you’ll use most often. If your computer display resolution is set to 800×600, you can probably see only a few prop-erties at this time. This makes it difficult to view and set propprop-erties as you create proj-ects. All the screen shots in this book were captured on Windows 7 running at 800×600 because of size constraints, but you should run at a higher resolution if you
can. I highly recommend that you develop applications with Visual Basic at a screen resolution of 1024×768 or higher to have plenty of work space. To change your
Changing the Characteristics of Objects
11You’ll find that I often mention material coming up in future chapters. In the pub-lishing field, we call these forward references. For some reason, these tend to unnerve some people. I do this only so that you realize you don’t have to fully grasp a subject when it’s first presented; the material will be covered in more detail later. I try to keep forward references to a minimum, but unfortunately, teaching programming is not a perfectly linear process. There will be times I’ll have to touch on a subject that I feel you’re not ready to dive into fully yet. When this happens, I give you a forward reference to let you know that the subject will be covered in greater detail later.
Watch
Out!
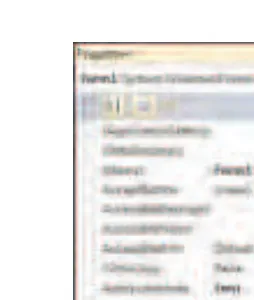
Every object has a distinct set of attributes known as properties(regardless of whether the object has a physical appearance). Properties define an object’s characteristics. You have certain properties, such as your height and hair color. Visual Basic objects have properties as well, such as Heightand BackColor. When you create a new object, the first thing you need to do is set its properties so that the object appears and behaves the way you want it to. To display an object’s properties, click the object in its designer (the main work area in the IDE).
Click anywhere in the default form now, and check to see that its properties are dis-played in the Properties window. You’ll know because the drop-down list box at the top of the Properties window contains the form’s name: Form1
System.Windows.Forms.Form. Form1is the object’s name, and System.Windows.Forms.Formis the object’s type.
Naming Objects
The property you should always set first when creating any new object is the Name property. Press F4 to display the Properties window (if it’s not already visible), and scroll toward the top of the properties list until you see the (Name)property, as shown in Figure 1.4. If the Nameproperty isn’t one of the first properties listed, the Properties
Changing the Characteristics of Objects
window is set to show properties categorically instead of alphabetically. You can show the list alphabetically by clicking the Alphabetical button that appears just above the properties grid.
I recommend that you keep the Properties window set to show properties in alphabetical order; doing so makes it easier to find properties that I refer to in the text. Note that the Nameproperty always stays toward the top of the list and is called (Name). If you’re wondering why it has parentheses around it, it’s because the parentheses force the property to the top of the list; symbols come before letters in an alphabetical sort.
By the
Way
When saving a project, you choose a name and a location for the project and its files. When you first create an object within the project, Visual Basic gives the object a unique, generic name based on the object’s type. Although these names are func-tional, they simply aren’t descriptive enough for practical use. For instance, Visual Basic named your form Form1, but it’s common to have dozens (or even hundreds) of forms in a project. It would be extremely difficult to manage such a project if all forms were distinguishable only by a number (Form2, Form3, and so forth).
What you’re actually working with is a form class, or template, that will be used to create and show forms at runtime. For the purposes of this quick tour, I simply call it a form. See Hour 5, “Building Forms: The Basics,” for more information.
By the
Way
To better manage your forms, give each one a descriptive name. Visual Basic gives you the chance to name new forms as they’re created in a project. Visual Basic cre-ated this default form for you, so you didn’t get a chance to name it. It’s important
FIGURE 1.4
Changing the Characteristics of Objects
13not only to change the form’s name but also to change its filename. Change the pro-grammable name and the filename by following these steps:
1. Click the Nameproperty and change the text from Form1 to ViewerForm. Notice that this does not change the form’s filename as it’s displayed in the Solution Explorer window, located above the Properties window.
2. Right-click Form1.vb in the Solution Explorer window (the window above the Properties window).
3. Choose Rename from the context menu that appears.
4. Change the text from Form1.vb to ViewerForm.vb.
I use the Form suffix here to denote that the file is a form class. Suffixes are optional, but I find that they really help you keep things organized.
By the
Way
The form’s Nameproperty is actually changed for you automatically when you rename the file. In future examples, I will have you rename the form file so that the Nameproperty is changed automatically. I had you set it in the Properties window here so that you could see how the Properties window works.
Setting the Form’s
Text
Property
Notice that the text that appears in the form’s title bar says Form1. Visual Basic sets the form’s title bar to the name of the form when it’s first created,but doesn’t change it when you change the name of the form. The text in the title bar is determined by the value of the form’s Textproperty. Change the text now by following these steps:
1. Click the form once more so that its properties appear in the Properties window.
2. Use the scrollbar in the Properties window to locate the Textproperty.
3. Change the text to Picture Viewer. Press the Enter key or click a different prop-erty. You’ll see the text in the form’s title bar change.
Saving a Project
The following instructions assume that you have access to the source files for the examples in this book. They are available at http://www.samspublishing.com. You can also get these files, as well as discuss this book, at my website at http:/ /www.jamesfoxall.com/books.aspx. When you unzip the samples, a folder is cre-ated for each hour, and within each hour’s folder are subfolders for the sample projects. You’ll find the icon for this example in the folder Hour 01\Picture Viewer. You don’t have to use the icon I’ve provided for this example; you can use any icon. If you don’t have an icon available (or you want to be a rebel), you can skip this section without affecting the outcome of the example.
By the
Way
To give the form an icon, follow these steps:
1. In the Properties window, click the Iconproperty to select it.
2. When you click the Iconproperty, a small button with three dots appears to the right of the property. Click this button.
FIGURE 1.5
When saving a project, choose a name and location for the project and its files.
Click the Save All button on the toolbar (the picture of a stack of floppy disks) now to save your work. Visual Basic displays the Save Project dialog box, shown in Figure 1.5. Notice that the Nameproperty is already filled in because you named the project when you created it. The Location text box is where you specify the location in which the project is to be saved. Visual Basic creates a subfolder in this location, using the value in the Name text box (in this case, Picture Viewer). You can use the default location or change it to suit your purposes. You can have Visual Basic create a solu-tion folder, and if you do Visual Basic creates the solusolu-tion file in the folder, and it cre-ates a subfolder for the project and the actual files. On large projects, this is a handy feature. For now, it’s an unnecessary step, so uncheck the Create Directory for Solu-tion box and then click Save to save the project.
Giving the Form an Icon
Changing the Characteristics of Objects
153. Use the Open dialog box that appears to locate the Picture Viewer.ico file or another icon file of your choice. When you’ve found the icon, double-click it, or click it once to select it and then choose Open.
After you’ve selected the icon, it appears in the Iconproperty along with the word Icon. A small version of the icon appears in the upper-left corner of the form as well. Whenever this form is minimized, this is the icon displayed on the Windows taskbar.
Changing the Form’s Size
Next, you’ll change the form’s Widthand Heightproperties. The Widthand Height values are shown collectively under the Sizeproperty; Widthappears to the left of the comma, and Heightto the right. You can change the Widthor Heightproperty by changing the corresponding number in the Sizeproperty. Both values are repre-sented in pixels. (That is, a form that has a Sizeproperty of 200, 350 is 200 pixels wide and 350 pixels tall.) To display and adjust the Widthand Heightproperties sep-arately, click the small triangle next to the Sizeproperty (see Figure 1.6). (After you click it, it changes to a triangle pointing diagonally down.)
A pixel is a unit of measurement for computer displays; it’s the smallest visible “dot” on the screen. The resolution of a display is always given in pixels, such as 800×600 or 1024×768. When you increase or decrease a property by one pixel, you’re making the smallest possible visible change to the property.
By the
Way
Change the Widthproperty to 400 and the Heightto 325 by typing in the correspon-ding box next to a property name. To commit a property change, press Tab or Enter,
FIGURE 1.6
or click a different property or window. Your screen should now look like the one shown in Figure 1.7.
You can also size a form by dragging its border, which you’ll learn about in Hour 2, or by using code to change its properties, which you’ll learn how to do in Hour 5.
By the
Way
Save the project now by choosing File, Save All from the menu or by clicking the Save All button on the toolbar—it has a picture of stacked floppy disks.
Adding Controls to a Form
Now that you’ve set the initial properties of your form, it’s time to create a user inter-face by adding objects to the form. Objects that can be placed on a form are called controls. Some controls have a visible interface with which a user can interact, whereas others are always invisible to the user. You’ll use controls of both types in this example. On the left side of the screen is a vertical tab titled Toolbox. Click the Tool-box tab to display the ToolTool-box window to see the most commonly used controls, expanding the Common Controls section if necessary (see Figure1.8). The toolbox contains all the controls available in the project, such as labels and text boxes.
FIGURE 1.7
Designing an Interface
17FIGURE 1.8
The toolbox is used to select controls to build a user interface.
The toolbox closes as soon as you’ve added a control to a form and when the pointer is no longer over the toolbox. To make the toolbox stay visible, click the little picture of a pushpin located in the toolbox’s title bar.
I don’t want you to add them yet, but your Picture Viewer interface will consist of the following controls:
.
TwoButtoncontrols:The standard buttons that you’re used to clicking in pretty much every Windows program you’ve ever run.
APictureBoxcontrol:A control used to display images to a user.
AnOpenFileDialogcontrol:A hidden control that exposes the Windows Open File dialog box functionalityDesigning an Interface
Adding a Visible Control to a Form
Start by adding a Buttoncontrol to the form. Do this by double-clicking the Button item in the toolbox. Visual Basic creates a new button and places it in the upper-left corner of the form, as shown in Figure 1.9.
Using the Properties window, set the button’s properties as shown in the following list. Remember, when you view the properties alphabetically, the Nameproperty is listed first, so don’t go looking for it down in the list or you’ll be looking a while.
Now you’ll create a button that the user can click to close the Picture Viewer program. Although you could add another new button to the form by double-clicking the Buttoncontrol on the toolbox again, this time you’ll add a button to the form by cre-ating a copy of the button you’ve already defined. This enables you to easily create a button that maintains the size and other style attributes of the original button when the copy was made.
To do this, right-click the Select Picture button, and choose Copy from its context menu. Next, right-click anywhere on the form, and choose Paste from the form’s
FIGURE 1.9
When you double-click a control in the toolbox, the control is added to the upper-left corner of the form.
Property Value
Name btnSelectPicture
Location 295,10 (295 is the x coordinate; 10 is the y coordinate.)
Size 85,23
Designing an Interface
19shortcut menu. (You can also use the keyboard shortcuts Ctrl+C to copy and Ctrl+V to paste.) The new button appears centered on the form, and it’s selected by default. Notice that it retains almost all the properties of the original button, but the name has been reset. Change the properties of the new button as follows:
The last visible control you need to add to the form is a PictureBoxcontrol. A PictureBoxhas many capabilities, but its primary purpose is to show pictures, which is precisely what you’ll use it for in this example. Add a new PictureBoxcontrol to the form by double-clicking the PictureBoxitem in the toolbox, and set its properties as follows:
After you’ve made these property changes, your form will look like the one shown in Figure 1.10. Click the Save All button on the toolbar to save your work.
Property Value
Name btnQuit
Location 295,40
Text Quit
Property Value
Name picShowPicture
BorderStyle FixedSingle
Location 8,8
Size 282,275
FIGURE 1.10
Other controls in addition to the OpenFileDialogcontrol give you file functional-ity. For example, the SaveFileDialogcontrol provides features for allowing the user to specify a filename and path for saving a file.
By the
Way
Display the toolbox and scroll down using the down arrow in the lower part of the toolbox until you can see the OpenFileDialogcontrol (it’s in the Dialogs category), and then double-click it to add it to your form. Note that the control isn’t placed on the form; rather, it appears in a special area below the form (see Figure 1.11). This
FIGURE 1.11
Controls that have no inter-face appear below the form designer.
Adding an Invisible Control to a Form
All the controls you’ve used so far sit on a form and have a physical appearance when a user runs the application. Not all controls have a physical appearance, how-ever. Such controls, called nonvisual controls(or invisible-at-runtime controls), aren’t designed for direct user interactivity. Instead, they’re designed to give you, the pro-grammer, functionality beyond the standard features of Visual Basic.
Writing the Code Behind an Interface
21happens because the OpenFileDialogcontrol has no form interface to display to the user. It does have an interface (a dialog box) that you can display as necessary, but it has nothing to display directly on a form.
Select the OpenFileDialogcontrol and change its properties as follows:
Don’t actually enter the text <make empty>for the filename; I really mean delete the default value and make this property value empty.
By the
Way
TheFilterproperty is used to limit the types of files that will be displayed in the Open File dialog box. The format for a filter is description|filter. The text that appears before the first pipe symbol is the descriptive text of the file type, whereas the text after the pipe symbol is the pattern to use to filter files. You can specify more than one filter type by separating each description|filter value with another pipe symbol. Text entered into theTitleproperty appears in the title bar of the Open File dialog box.
The graphical interface for your Picture Viewer program is now finished. If you pinned the toolbox open, click the pushpin in the title bar of the toolbox now to close it. Click Save All on the toolbar now to save your work.
Writing the Code Behind an Interface
You have to write code for the program to be capable of performing tasks and responding to user interaction. Visual Basic is an event-drivenlanguage, which means that code is executed in response to events. These events might come from users, such as a user clicking a button and triggering its Clickevent, or from Windows itself (see Hour 4, “Understanding Events,” for a complete explanation of events). Currently, your application looks nice, but it won’t do anything. Users can click the Select Pic-ture button until they can file for disability with carpel tunnel syndrome, but nothing will happen, because you haven’t told the program what to do when the user clicks
Property Value
Name ofdSelectPicture Filename <make empty>
the button. You can see this for yourself now by pressing F5 to run the project. Feel free to click the buttons, but they don’t do anything. When you’re finished, close the window you created to return to Design mode.
You’ll write code to accomplish two tasks. First, you’ll write code that lets users browse their hard drives to locate and select a picture file and then display it in the picture box (this sounds a lot harder than it is). Second, you’ll add code to the Quit button that shuts down the program when the user clicks the button.
Letting a User Browse for a File
The first bit of code you’ll write enables users to browse their hard drives, select a pic-ture file, and then see the selected picpic-ture in the PictureBoxcontrol. This code exe-cutes when the user clicks the Select Picture button; therefore, it’s added to the Click event of that button.
When you double-click a control on a form in Design view, the default event for that control is displayed in a code window. The default event for a Buttoncontrol is its Clickevent, which makes sense, because clicking is the most common action a user performs with a button. Double-click the Select Picture button now to access its Click event in the code window (see Figure 1.12).
When you access an event, Visual Basic builds an event handler, which is essentially a template procedure in which you add the code that executes when the event occurs.
FIGURE 1.12
Writing the Code Behind an Interface
23After you insert the statement that begins with Ifand press Enter, Visual Basic automatically creates the End Ifstatement for you. If you type in End If, you’ll wind up with two End Ifstatements, and your code won’t run. If this happens, delete one of the statements. Hour 13, “Making Decisions in Visual Basic Code,” has all the details on the Ifstatement.
By the
Way
It’s time for another comment. The cursor is currently between the statement that starts with Ifand the End Ifstatement. Leave the cursor there and type the follow-ing statement, rememberfollow-ing to press Enter at the end of the line:
’ Load the picture into the picture box.
Don’t worry about indenting the code by pressing the Tab key or using spaces. Visual Basic automatically indents code for you.
Did you
Know?
The cursor is already placed within the code procedure, so all you have to do is addcode. Although this may seem daunting, by the time you’re finished with this book, you’ll be madly clicking and clacking away as you write your own code to make your applications do exactly what you want them to do—well, most of the time. For now, just enter the code as I present it here.
It’s important that you get in the habit of commenting your code, so the first state-ment you’ll enter is a comstate-ment. Beginning a statestate-ment with an apostrophe (’) desig-nates that statement as a comment. The compiler won’t do anything with the
statement, so you can enter whatever text you want after the apostrophe. Type the fol-lowing statement exactly as it appears, and press the Enter key at the end of the line:
’ Show the open file dialog box.
The next statement you’ll enter triggers a method of theOpenFileDialogcontrol that you added to the form. Think of a method as a mechanism to make a control do something. TheShowDialog()method tells the control to show its Open dialog box and let the user select a file. TheShowDialog()method returns a value that indicates its success or failure, which you’ll then compare to a predefined result
(DialogResult.OK). Don’t worry too much about what’s happening here; you’ll be learning the details of all this in later hours. The sole purpose of this hour is to get your feet wet. In a nutshell, theShowDialog()method is invoked to let a user browse for a file. If the user selects a file, more code is executed. Of course, there’s a lot more to using theOpenFileDialogcontrol than I present in this basic example, but this sim-ple statement gets the job done. Enter the following statement and press Enter to com-mit the code (don’t worry about capitalization; Visual Basic will fix the case for you):
This next statement, which appears within the Ifconstruct (between the Ifand End Ifstatements), is the line of code that actually displays the picture in the picture box.
Enter the following statement:
picShowPicture.Image = Image.FromFile(ofdSelectPicture.Filename)
In addition to displaying the selected picture, your program also displays the path and filename of the picture in the title bar. When you first created the form, you changed its Textproperty in the Properties window. To create dynamic applications, properties need to be constantly adjusted at runtime, and you do this using code. Insert the following two statements, pressing Enter at the end of each line:
’ Show the name of the file in the form’s caption.
Me.Text = “Picture Viewer(“ & ofdselectpicture.FileName & “)”
After you’ve entered all the code, your editor should look like that shown in Figure 1.13.
Terminating a Program Using Code
The last bit of code you’ll write terminates the application when the user clicks the Quit button. To do this, you need to access the Clickevent handler of the btnQuit button. At the top of the code window are two tabs. The current tab says Viewer-Form.vb*. This tab contains the code window for the form that has the filename View-erForm.vb. Next to this is a tab that says ViewerForm.vb [Design]*. Click this tab to switch from Code view to the form designer. If you receive an error when you click the
FIGURE 1.13
Running a Project
25The Me.Close()statement closes the current form. When the last loaded form in a program is closed, the application shuts itself down—completely. As you build more robust applications, you’ll probably want to execute all kinds of cleanup rou-tines before terminating an application, but for this example, closing the form is all you need to do.
By the
Way
Running a Project
Your application is now complete. Click the Save All button on the toolbar (the stack of floppy disks), and then run your program by pressing F5. You can also run the pro-gram by clicking the button on the toolbar that looks like a right-facing triangle and resembles the Play button on a DVD player. (This button is called Start, and it can also be found on the Debug menu.) Learning the keyboard shortcuts will make your development process move along faster, so I recommend that you use them whenever possible.
When you run the program, the Visual Basic interface changes, and the form you’ve designed appears, floating over the design environment (see Figure 1.14).
You are now running your program as though it were a stand-alone application run-ning on another user’s machine; what you see is exactly what users would see if they
FIGURE 1.14
When in Run mode, your pro-gram executes just as it would for an end user. tab, the code you entered contains an error, and you need to edit it to make it the
same as shown in Figure 1.13. After the form designer appears, double-click the Quit button to access its Clickevent.
Enter the following code in the Quit button’s Clickevent handler; press Enter at the end of each statement:
ran the program (without the Visual Studio 2010 design environment in the back-ground, of course). Click the Select Picture button to display the Select Picture dialog box, shown in Figure 1.15. Use this dialog box to locate a picture file. When you’ve found a file, double-click it, or click once to select it and then click Open. The selected picture is then displayed in the picture box, as shown in Figure 1.16.
When you click the Select Picture button, the default path shown depends on the last active path in Windows, so it might be different for you than shown in Figure 1.15.
By the
Way
FIGURE 1.15
The
OpenFileDialog control handles all the details of browsing for files. Cool, huh?
FIGURE 1.16
27
Q&A
If you want to select and display a picture from your digital camera, chances are the format is JPEG, so you’ll need to select this from the Files of Type drop-down. Also, if your image is very large, you’ll see only the upper-left corner of the image (what fits in the picture box). In later hours, I’ll show you how you can scale the image to fit the picture box, and even resize the form to show a larger picture in its entirety.
By the
Way
Summary
When you’re finished playing with the program, click the Quit button to return to Design view.
That’s it! You’ve just created a bona fide Visual Basic program. You’ve used the tool-box to build an interface with which users can interact with your program, and you’ve written code in strategic event handlers to empower your program to do things. These are the basics of application development in Visual Basic. Even the most complicated programs are built using this fundamental approach: You build the interface and add code to make the application do things. Of course, writing code to do things exactlythe way you want things done is where the process can get com-plicated, but you’re on your way.
If you take a close look at the organization of the hours in this book, you’ll see that I start out by teaching you the Visual Basic (Visual Studio .NET) environment. I then move on to building an interface, and later I teach you about writing code. This organization is deliberate. You might be eager to jump in and start writing serious code, but writing code is only part of the equation—don’t forget the word Visualin Visual Basic. As you progress through the hours, you’ll build a solid foundation of development skills.
Soon, you’ll pay no attention to the man behind the curtain—you’llbe that man (or woman)!
Q&A
Q.
Can I show bitmaps of file types other than BMP and JPG?
Q.
Is it possible to show pictures in other controls?
A. PictureBoxis the control to use when you are just displaying images. How-ever, many other controls allow you to display pictures as part of the control. For instance, you can display an image on a button control by setting the but-ton’s Imageproperty to a valid picture.
Workshop
Quiz
1. What type of Visual Basic project creates a standard Windows program?
2. What window is used to change the attributes (location, size, and so on) of a form or control in the IDE?
3. How do you access the default event (code) of a control?
4. What property of a picture box do you set to display an image?
5. What is the default event for a button control?
Answers
1. Windows Forms Application
2. The Properties window
3. Double-click the control in the designer
4. The Imageproperty
5. The Clickevent
Exercises
1. Change your Picture Viewer program so that the user can also locate and select GIF files. (Hint: Change the Filterproperty of the OpenFileDialogcontrol.)
29
HOUR 2
Navigating Visual Basic 2010
What You’ll Learn in This Hour:
.
Navigating Visual Basic.
Using the Visual Studio 2010 Start Page to open and create projects.
Showing, hiding, docking, and floating design windows.
Customizing menus and toolbars.
Adding controls to a form using the toolbox.
Viewing and changing object attributes using the Properties window.
Working with the many files that make up a project.
How to get helpThe key to expanding your knowledge of Visual Basic is to become as comfortable as possible—as quickly as possible—with the Visual Basic design environment. Just as a carpenter doesn’t think much about hammering a nail into a piece of wood, per-forming actions such as saving projects, creating new forms, and setting object prop-erties should become second nature to you. The more comfortable you are with Visual Basic’s tools, the more you can focus your energies on what you’re creating with the tools.
Using the Visual Basic 2010 Start Page
By default, the Visual Basic 2010 Start Page, shown in Figure 2.1, is the first thing you see when you start Visual Basic. (If Visual Basic isn’t running, start it now.) The Visual Basic 2010 Start Page is a gateway for performing tasks with Visual Basic. From this page, you can open previously edited projects, create new projects, and get help.
Creating New Projects
The Start Page consists of three category boxes. The Recent Projects category in the upper-left corner is used to create new projects or open projects already created. To create new projects, click the New Project link. This opens the New Project dialog box, shown in Figure 2.2. The Templates list varies from machine to machine, depending on which products of the Visual Studio .NET family are installed. Of course, we’re interested in only the Visual Basic Project types in this book.
You can create many types of projects with Visual Basic. However, this book focuses mostly on creating Windows Forms applications, the most common of the project types and the primary application type of the Express edition of Visual Basic 2010. You will learn about some of the other project types as well, but when you’re told to create a new project and unless you are told otherwise, make sure that the Windows Forms Application icon is selected.
By the
Way
FIGURE 2.1
Using the Visual Basic 2010 Start Page
31By the
Way
FIGURE 2.2
Use the New Pro-ject dialog box to create Visual Basic projects from scratch.
When you create a new project, be sure to enter a name for it in the Name text box before clicking OK or double-clicking a Templates icon. This ensures that the project is created with the proper path and filenames, eliminating work you would otherwise have to do to change these values later. After you specify a name, you can create the new project. Either double-click the type that represents the Template type of project you want to create, or click the template icon to select it and then click OK. After you’ve performed either of these actions, the New Project dialog box closes, and a new project of the selected type is created.
When you first create a project, the project files are virtual—they haven’t been saved to the hard drive. When you click Save or Save All for the first time, you are prompted to specify a path in which to save the project. The name you give your project is used as its folder name by default, but the path chosen depends on the last project you cre-ated. If you’re on a team of developers, you might choose to locate your projects on a shared drive so that others can access the source files.
You can create a new project at any time (not just when starting Visual Basic) by choosing File, New Project. When you create or open a new project, the current project is closed. Visual Basic asks whether you want to save any changes to the current project before it closes it, however.
Opening an Existing Project
Over time, you’ll open existing projects more often than you create new ones. There are essentially two ways to open projects from the Visual Studio Start Page:
.
If it’s a project you’ve recently opened, the project name appears in the Recent Projects category toward the upper-left corner of the Start Page (as Picture Viewer does in Figure 2.1, shown earlier). Because the name displayed for the project is the one given when it was created, it’s important to give your projects descriptive names. Clicking a project name opens the project. I’d venture to guess that you’ll use this technique 95% of the time..
To open a project for the first time (such as when opening sample projects), click the Open Project link on the Visual Basic 2010 Start Page. This displays a standard dialog box that you can use to locate and select a project file.As with creating new projects, you can open an existing project at any time, not just when starting Visual Basic, by selecting File, Open Project. Remember that opening a project causes the current project to be closed. Again, if you’ve made changes to the current project, you’ll get a chance to save them before the project is closed.
By the
Way
Navigating and Customizing the Visual
Basic Environment
Visual Basic lets you customize many of its interface elements such as windows and toolbars, enabling you to be more efficient in the work you do. Create a new Win-dows application now by opening the File menu and choosing New Project. This proj-ect illustrates manipulating the design environment, so name this projproj-ect
Environment Tutorialand click OK to create the project. (This exercise won’t create anything reusable, but it will help you learn how to navigate the design environ-ment.) Your screen should look like the one shown in Figure 2.3.
Your screen might not look exactly like that shown in Figure 2.3, but it’ll be close. By the time you’ve finished this hour, you’ll be able to change the appearance of the design environment to match this figure—or to any configuration you prefer.
By the
Way
Working with Design Windows
Navigating and Customizing the Visual Basic Environment
33FIGURE 2.3
This is pretty much how the integrated devel-opment environ-ment (IDE) appears when you first install Visual Basic.
A design window can be placed in one of four primary states:
.
Closed:The window is not visible..
Floating: The window floats over the IDE..
Docked: The window is attached to an edge of the IDE. The Solution Explorer and Properties window in Figure 2.3 are docked..
Automatically hidden: The window is docked, but it hides itself when not in use (like the Toolbox).Showing and Hiding Design Windows
Floating Design Windows
Floating design windows are visible windows that float over the workspace, as shown in Figure 2.4. Floating windows are like typical application windows in that you can drag them around and place them anywhere you please, even on other monitors when you’re using a multiple-display setup. In addition to moving a floating window, you can change its size by dragging a border. To make a window float, click the title bar of the docked window and drag it away from the edge that is currently docked.
Docking Design Windows
Visible windows appear docked by default. A dockedwindow appears attached to the side, top, or bottom of the work area or to some other window. The Properties window shown in Figure 2.3, for example, is docked to the right side of the design environ-ment (contrast this to where it’s floating in Figure 2.4). To make a floating window become a docked window, drag the title bar of the window toward the edge of the design environment to which you want to dock the window. As you drag the window, guides appear on the screen, as shown in Figure 2.5. If you move the mouse over one of the icons that appear as part of the guides, Visual Basic shows a blue rectangle where the window will appear if you release the mouse button. This is a quick and easy way to dock a window. You can also drag the window to an edge and get the same blue rectangle. This rectangle will “stick” in a docked position. If you release the mouse while the rectangle appears this way, the window is docked. Although it’s diffi-cult to explain, this is very easy to do.
FIGURE 2.4
Navigating and Customizing the Visual Basic Environment
35FIGURE 2.5
The guide icons make it easy to dock a window.
You can size a docked window by dragging its edge opposite the side that’s docked. If two windows are docked to the same edge, dragging the border between them enlarges one while shrinking the other.
By the
Way
To try this, you’ll need to float a window that’s already docked. To float a window, you “tear” the window away from the docked edge by dragging the title bar of the docked window away from the edge to which it’s docked. Note that this technique doesn’t work if a window is set to Auto Hide (which is explained next). Try docking and floating windows now by following these steps:
1. Ensure that the Properties window is currently displayed (if it’s not, show it by pressing F4). Make sure that the Properties window isn’t set to Auto Hide by right-clicking its title bar and deselecting Auto Hide from the shortcut menu (if it’s selected).
3. Dock the window once more by dragging the window’s title bar toward the right edge of the design environment. When the guide diamond appears, mouse over the bottom icon (see Figure 2.5). You see a blue rectangle appear where the Properties window will be docked. Release the mouse button to dock the window.
If you don’t want a floating window to dock, regardless of where you drag it, right-click the window’s title bar and choose Floating from the context menu. To allow the window to be docked again, right-click the title bar and choose Dockable.
Did you
Know?
Auto-Hiding Design Windows
Visual Basic windows can auto hide themselves when you’re not using them. Although you might find this a bit disconcerting at first, after you get the hang of things, this is a productive way to work. Your workspace is freed up, yet design win-dows are available whenever you move the mouse over them. Winwin-dows that are set to Auto Hide are always docked; you can’t set a floating window to Auto Hide. When a window auto hides, it appears as a vertical tab on the edge to which it’s docked— much as minimized applications are placed in the Windows taskbar.
Look at the left edge of the design environment. Notice the vertical tab titled Toolbox. This tab represents an auto-hidden window. To display an auto-hidden window, move the pointer over the tab representing the window. When you move the pointer over a tab, Visual Basic displays the design window so that you can use its features. When you move the pointer away from the window, the window automatically hides itself— hence the name. To make any window hide itself automatically, right-click its title bar and select Auto Hide from its shortcut menu. You can also click the little picture of a pushpin appearing in the title bar next to the Close button to toggle the win-dow’s Auto Hide state.
Working with Toolbars
37Working with Toolbars
Toolbars are the mainstay for performing functions quickly in almost every Windows program. (You’ll probably want to add them to your own programs at some point, and in Hour 9, “Adding Menus and Toolbars to Forms,” I’ll show you how.) Every toolbar has a corresponding menu item, and buttons on toolbars are essentially shortcuts to their corresponding menu items. To maximize your efficiency when developing with Visual Basic 2010, you should become familiar with the available toolbars. As your skills improve, you can customize existing toolbars and even create your own toolbars to more closely fit the way you work.
Showing and Hiding Toolbars
Visual Basic includes a number of built-in toolbars you can use when creating proj-ects. One toolbar is visible in most of the figures shown so far in this hour: the Stan-dard toolbar. You’ll probably want this toolbar displayed all the time.
The toolbars you’ll use most often as a new Visual Basic developer are the Standard, Text Editor, and Debug toolbars; each of these is discussed in this hour. You can also create your own custom toolbars to contain any functions you think necessary.
To show or hide a toolbar, open the View menu and choose Toolbars to display a list of available toolbars. Toolbars that are currently visible are checked, as shown in Figure 2.6. Click a toolbar name to toggle its visible state.
FIGURE 2.6
You can also right-click any visible toolbar to quickly access the list of available toolbars.
Did you
Know?
Docking and Resizing Toolbars
Just as you can dock and undock Visual Basic’s design windows, you can dock and undock the toolbars. Unlike the design windows, however, Visual Basic’s toolbars don’t have a title bar that you can click and drag when they’re in a docked state. Instead, each docked toolbar has a drag handle(a vertical stack of dots along its left edge). To float (undock) a toolbar, click and drag the grab handle away from the docked edge. When a toolbar is floating, it has a title bar, which you can drag to an edge to dock the toolbar. This is the same technique you use to dock design windows.
A shortcut for docking a floating toolbar, or any other floating window, is to double-click its title bar.
Did you
Know?
Although you can’t change the size of a docked toolbar, you can resize a floating toolbar (a floating toolbar behaves like any other normal window). To resize a float-ing toolbar, move the pointer over the edge you want to stretch, and then click and drag to the border to change the toolbar’s size.
Adding Controls to a Form Using the
Toolbox
The IDE offers some fantastic tools for building a graphical user interface (GUI) for your applications. Most GUIs consist of one or more forms (Windows) with various ele-ments on the forms, such as text boxes, list boxes, and buttons. The toolbox is used to place controls on a form. Figure 2.7 shows the default toolbox you see when you first open or create a Visual Basic project. These controls are discussed in detail in Hour 7, “Working with Traditional Controls,” and Hour 8, “Using Advanced Controls.”
You can