i
TABLE OF CONTENTS
Page
CHAPTER I. INTRODUCTION
1. Introduction 1 - 1
2. System Requirements 1 - 1
3. User Access Rights 1 - 1
4. Base Tables 1 - 2
5. URL Address of ASEAN Coal Database and Information System 1 - 2
6. ASEAN Coal Database Form 1 - 3
CHAPTER II. ADMINISTRATOR
iii
CHAPTER III. VERIFICATOR
1. Logging into the administration site as a verificator 3 - 1
2. Verificator Home Page 3 - 1
CHAPTER IV. PUBLIC USER
1. Homepage of ASEAN Coal Database and Information System 4 - 1
2. Webmap 4 - 2
3. Optional Parameter Query From Base Table 4 - 6
3.1. Country 4 - 6
3.2. Commodity Type 4 - 6
iv
3.4. Project Undertaken 4 - 7
3.5. Data Form 4 - 8
3.6. Author Name 4 - 8
3.7. Topography Sheet Name 4 - 9
3.8. Topography Sheet Number 4 - 9
3.9. Geological Sheet Name 4 - 10
3.10. Geological Sheet Number 4 - 10
3.11. Exploration Stage 4 - 11
3.12. Exploration Method 4 - 11
3.13. Previous Investigator 4 - 12
3.14. Resources Class 4 - 12
3.15. Reserves Class 4 - 13
3.16. Deposit Status 4 - 13
1. Introduction
Mining activities as one of the ASEAN countries’ revenues should be well-managed in order to give a sustainable contribution in relating to well-documented coal resources data as required information. In this case, ASEAN countries should manage all data of coal resources in one integrated database system which can provide coal information online to increase ASEAN revenues.
ASEAN Coal Database and Information System (ACDIS) is an integrated database system between textual and spatial data web based application. This application is developed by Center for Geological Resources, Agency of Geology, Ministry of Energy and Mineral Resources of Republic of Indonesia. The goal of this application is to provide facility of managing ASEAN coal resources data and information in order to arrange all data textual and spatial into one integrated database system and well-documented.
ACDIS is developed using open source software, such as Linux UBuntu Operating System, Apache Web Server, PHP and Javascript Language Program, PostGreSQL Database, PostGIS and Mapserver GIS application, Source Edit Editor Program. This application can be accessed online through internet (web based) and the output of the application is dynamic information in WebGIS form. All opensource software can be downloaded from below URL :
http://www.maptools.org
Basic data of ASEAN member countries can be downloaded from below URL : http://www.bps.go.id
http://worldatlas.com http://www.cebu-online.com http://earthsci.org
2. System Requirements
System requirements of user clients to access ACDIS are :
1. Computer minimum Intel Pentium III or equal. 2. Harddisk capacity minimum 10 GB.
3. RAM minimum 256 MB.
4. Operating System Windows XP. 5. Browser Internet Explorer 6.
6. JRE (Java Runtime Environment) from http://www.java.com.
3. User Access Rights
There are three types of administrator user access rights in ACDIS, i.e:
1. Administrator can add, edit, or delete user and menu.
2. Operator can add, edit, or delete all data in reports and base tables based on each login country.
4. Base Tables
There are seventeen base tables in ASEAN minerals information and database application, i.e:
1. Mineral energy table. 2. Data form table. 3. Maps scale table. 4. Project ubdertaken table. 5. Exploration method table. 6. Exploration stage table. 7. Estimation method table. 8. Coal structure table. 9. Deposit status table. 10. Resources class table. 11. Reserves class table. 12. Unit table.
13. Country table. 14. Province table. 15. District table. 16. Sub district table. 17. Location table.
5. URL Address of ASEAN Coal Database and Information System (ACDIS)
1. Portal of ACDIS: http://psdg.bgl.esdm.go.id/dbafoc/
2. Coal Resources Web GIS: http://webgis.psdg.bgl.esdm.go.id/dbafoc/ 3. Coal Resources Database Administrator:
http://webgis.psdg.bgl.esdm.go.id/dbafoc/administrator/
REMARK OFASEAN COAL DATABASE FORM
A. GENERAL INFORMATION
I. REPORT
1.
Report Title:
title of coal investigation/research report source and it must be filled.
2.
Project Undertaken by
: consist of government, private, joint venture, or others. Give
check sign (v) to institution which fund project of coal investigation/research in the
box.
3.
Reporting Agency:
institution orcompany which
conducting an inventory and
exploration and the reporting activities
.
4.
Author(s):
consist ofone person or more, as a teamwhich
conducting an inventory
and exploration
, it can be from government or private company.
5.
Year of Publication:
years of investigation and the report made.
6.
Data Form:
consist ofdigital, hardcopy, or both. Give check sign (v) to data source.
7.
Report Number:
number of coal investigation/research report if there is any.
8.
Remarks:
additional note that related to the report.
II. BLOCK INFORMATION
1.
Block Name/Number:
name or number of coal block in the research area.
2.
Sub District/Township/Commune:
name of sub district/township/commune location of
coal block in the research area.
3.
Regency/District
: name of regency/district location of coal block in the research area.
4.
Province/State/Division:
name of province/state/division location of coal block in the
research area.
5.
Country:
name of the country location of coal block in the research area.
6.
Area Coordinates:
geographic coordinates
consist of longitude and latitude of
coal
block in the research area which convert to decimal degree. N
orth latitude (+) and
south latitude (-).
III. MAPS
1.
Topography Map:
sheetname, sheet number and scale of topography base map
which related to coal block in the research area.
2.
Geological Map:
sheetname, sheet number and scale of geological base map which
related to coal block in the research area.
IV. EXPLORATION ACTIVITY
1.
Organization(s):
name of organization/institution which fund or conducting coal
exploration activity.
2.
Project Leader/Coordinator/Manager:
name of project leader/coordinator/manager
which conducting coal exploration activity.
3.
Exploration Stage
: consist of reconnaissance, prospecting, general exploration, or
detail exploration. Give check sign (v) to stage of exploration which related to coal
exploration activity in the box. It can be more than one option.
4.
Exploration Methods:
consist of geological, geophysical, drilling or others. Give check
sign (v) to method of exploration which related to coal exploration activity in the box. It
can be more than one option.
5.
Duration of Survey:
start date until end date of survey or how long coal exploration
activity has been done.
6.
Previous Investigation(s):
name of previous investigator who has investigated
previously in the related coal block or research area
both from domestic and
foreign, public and private, as a frame of reference for the investigation.
V. ABSTRACT
Abstract :
abstract content of coal exploration activity consist of summary of general
geology, general information of coal bearing formation, tectonic, main regional structure,
seam, precipitation environment, geological summary (morphology,
stratigraphy,
geological structure and information about resources)
.
B. COMMODITY INFORMATION
I. COAL INFORMATION
1.
Location name:
location name of coal area.
2.
Point Coordinate:
point coordinate of coal seam.
3.
Seam Total:
total of coal seam in the related coal block research area.
4.
Structure:
consist of syncline, anticline, or others. Give check sign (v) to structure of
coal in the box.
5.
Strike/Dip
: strike direction and dip angle of coal seam.
6.
Dimension:
averagerange of length, width, and thickness of coal seam from coal
outcrop or coal drilling measurement in meter.
II. RESOURCES
1.
Deposit status:
consist of deposit or occurrence. Give check sign (v) to deposit status
of coal in the box.
2.
Resources class:
consist of hypothetic, inferred, indicated, measured, pre-feasibility
study, or feasibility study. Give check sign (v) toresources class of coal in the box.
3.
Resources :
total resources of coal in the coal block area
4.
Unit
: measurement unit of coal resources in tones or cubic meter.
5.
Reserves class:
consist of probable or proven. Give check sign (v) toreserves class of
coal in the box.
6.
Reserves:
total reserves of coal in the coal block area.
7.
Unit:
measurement unit of coal reserves in tones or cubic meter.
8.
Resources/Reserves Estimation Methods:
consist of primordial, polygon, cross
section, kriging, or others. Give check sign (v) toresources
/
reserves estimation
method of coal in the box.
9.
Coal quality:
average quality of coal based on received and proximate analysis
consist of :
FM:
Free Moisture
TM:
Total Moisture
M:
Moisture
III. MISCELLANEOUS
1.
Data Entry by:
name ofperson who conducting data entry report.
2.
Entry date:
date of entry data with day, month, year in dd/mm/yyyy format.
3.
Data verification by
: name ofperson who conducting data verification data report.
4.
Data verification date:
date of verification data with day, month, year in dd/mm/yyyy
1. Logging into the administration site
Go to the administrator page athttp://webgis.psdg.bgl.esdm.go.id/dbafoc/administrator/
2. Administrator Homepage
The administrator homepage is divided into six main menus/sections :
a. Home
Home contains banner and menu title of administrator homepage.
b. File
File contains three sub menus :
- Logout has function to logout from administrator page
- Change Password has function to change password of user admin - Exit has function to exit from administrator page
c. Reports
Reports contains one sub menu :
- Data Form Entry has function to input, edit and delete data of ASEAN coal form as agreed
d. Tables
Tables contains five sub menus :
- Commodity contains base table of commodity type, mineral energy
- Report contains base table of data form, maps scale, and project undertaken - Block Information contains base table of exploration method and exploration stage
- Commodity General contains base table of estimation method , coal structure, deposist status, resources class, reserves class, and unit
- Places contains base table of ASEAN countries, provinces, districts, sub districts, and location
e. Administrator
Administrator contains seven sub menus : - Status contains enable or disable user status - Menus contain menu list of administrator page - Users contain list of users
- Rights contain user access rights - User Groups contain user groups/levels - Group Rights contain user access right groups
- Group Menus contain user menu editing right in administrator page
f. Help
Help contains two sub menus :
- About contains information of application developer - Manual contains administrator manual
1. Type username
2. Type password
Menubar of administrator page
3. Reports Section
Reports section consist of only one sub menu i.e. data form entry.
Data form entry sub menu has function to input, edit and delete all data in ASEAN coal form as agreed which is related to user access right. This sub menu provides the following main buttons :
a. Add New Button : To create new report from ASEAN coal form.
b. Detail Button or Edit Button : To view and edit content of choosen report.
c. Delete Button : To delete content of choosen report.
d. Page View Button : To view output of report content.
e. Create Map Button : To create map of choosen report.
f. Status Button : To know data status whether a field in reports table has already been filled or not.
g. Back Button : To return previous administrator page.
h. Choose Button : To choose option.
3.1. Data Form Entry Sub Section
This sub section is located under reports section. There are few input forms should be filled in the data form entry.
3.1.1. Steps of Filling Form Add Report
Click add new button to make a new report form.
Click detail button under Content column to view
and edit choosen report. Click delete button to delete choosen report.
Click 1 Page View button to view choosen report.
Click Create Map button to create map in a report.
Click detail button under Block Information column to view and edit choosen block information in a report.
Filled status of a field Unfilled status of a field
2. Click this button to choose Commodity Type.
3. Select one of the commodity type from the commodity type base table radio button, then click OK button to accept the option or Cancel button to cancel the option.
6.Select one of the projects undertaken from project undertaken base table radio button, then click OK button to accept the option or Cancel button to cancel the option.
5. Click this button to choose Project Undertaken By.
7. Type the reporting agency and year of publication (four digits) in the text box.
8. Click this button to choose Data Form.
3.1.2. Steps of Editing Form Add Report
10. Type the report number and remark (if necessary).
11. Type satellite/aerial images serial number (if necessary).
12. Type the regional geology. These fields must be filled in the text box and can’t be left blank. Miscellaneous can’t be filled and automatically filled based on login username.
13. Click OK button to accept the Form Add Report or Cancel button to cancel.
2. Click Edit button under Action column.
3.1.3. Steps of Filling Form Add Author
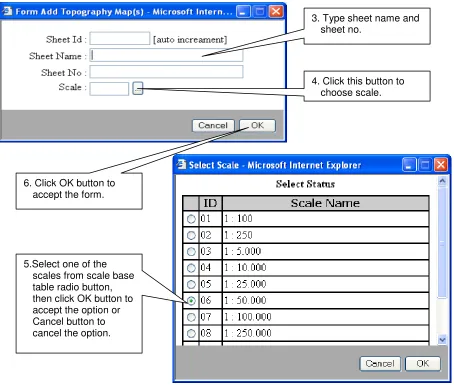
3.1.4. Steps of Filling Form Add Topography Map(s)
1. Click Detail button of Authors under Other Status column.
2. Click Add New button to add author name or Edit button to edit author name or Delete button to delete author name.
3.Type author name, then click OK button.
Author Id is
automatically filled by the system.
1. Click Detail button of Topo Maps under Other Status column.
3.1.5. Steps of Filling Form Add Geological Map(s)
3. Type sheet name and sheet no.
4. Click this button to choose scale.
5.Select one of the scales from scale base table radio button, then click OK button to accept the option or Cancel button to cancel the option.
1. Click Detail button of Geo Maps under Other Status column.
2. Click Add New button to add geological maps or Edit button to edit or Delete button to delete . 6. Click OK button to
3.1.6. Steps of Filling Form Add Block Information
3. Type sheet name and sheet no.
4. Click this button to choose scale.
5.Select one of scales from scale base table radio button, then click OK button to accept the option or Cancel button to cancel the option.
1. Click Detail button under Block Information column. 6. Click OK button to
3.1.7. Steps of Editing Form Add Block Information
2. Click Add New button .
3. Type block name/number.
4. Type organization & project leader of exploration activity.
5. Click this button to choose date of starting&ending survey duration from date time picker.
6. Click OK button to accept the form.
3.1.8. Steps of Filling Form Add Province List
2. Click Edit button under Action column.
3. Edit content of block information form, then click OK button to accept the form.
2. Click Add New button to add province or Edit button to edit province or Delete button to delete province.
3. Click this button to choose scale. Block Id is
automatically filled, don’t change it.
4.Select one of provinces from province base table radio button, then click OK button to accept the option or Cancel button to cancel the option.
3.1.9. Steps of Filling Form Add District List
1. Click Detail button District
under Others column.
2. Click Add New button to add district or Edit button to edit district or Delete button to delete district.
3. Click this button to choose province. Block Id is
automatically filled, don’t change it.
6.Select this district
radio button that will be shown which is related to province as added before in the block information, then click OK button to accept the option or Cancel button to cancel the option.
5. Click OK button to accept the form. 5. Click this button to
choose district. Block Id is
3.1.10. Steps of Filling Form Add Sub District List
1. Click Detail button Sub District under Others column.
2. Click Add New button to add sub district or Edit button to edit sub district or Delete button to delete sub district.
3. Click this button to choose province. Block Id is
automatically filled, don’t change it.
7. Click this button to choose sub district. Block Id is
automatically filled, don’t change it. 5. Click this button to
choose district. Block Id is
automatically filled, don’t change it.
6.Select this district radio button that will be shown which is related to province as added before in the block information, then click OK button to accept the option or Cancel button to cancel the option.
3.1.11. Steps of Filling Form Add Area Coordinate
9. Click OK button to accept the form
1. Click Detail button Area Coordinates under Others column
2. Click Add New button to add sub district or Edit button to edit sub district or Delete button to delete sub district.
3. Type longitude and latitude in decimal degree that is separated with point, e.g : 116.25 (this will be converted into six digits after point become 116.250000). For South Lat, if minus,
add minus sign (-), e.g : -0.25
4. If the data in dms format (degree,minute,second), click Other format button to convert the data into decimal degree. Coordinate Id is filled automatically.
5. Type the value into text box coordinat in
degrees-minutes-seconds or in UTM, then click Convert button to convert the value, and click OK button to accept the conversion.
3.1.12. Steps of Filling Form Add Exploration Stage
1. Click Detail button Exploration Stage under Others column.
2. Click Add New button to add exploration stage or Edit button to edit exploration stage or Delete button to delete exploration stage.
3.1.13. Steps of Filling Form Add Exploration Method
4.Select one of exploration stages from exploration stage base table radio button, then click OK button to accept the option or Cancel button to cancel the option.
5. Click OK button to accept the form.
2. Click Add New button to add exploration method or Edit button to edit exploration method or Delete button to delete exploration method.
3. Click this button to choose exploration method.
4.Select one of exploration methods from exploration method base table radio button, then click OK button to accept the option or Cancel button to cancel the option.
3.1.14. Steps of Filling Form Add Previous Investigation
1. Click Detail button Previous
Investigation(s) under Others column.
2. Click Add New button to add previous investigation or Edit button to edit previous investigation or Delete button to delete previous investigation.
3. Type previous investigator, report title and year of previous
investigation (four digits) in the text box.
Id is filled
automatically by the system.
3.1.15. Steps of Filling Form Add Coal General
1. Click Detail button under Commodity column at Block Information Page.
2. Click Add New button to add commodity general form.
4.Select one of commodities from commodity base table radio button, then click OK button to accept the option or Cancel button to cancel the option.
5. Click this button to choose province.
7. Click this button to choose district.
8.Select this district radio button that will be shown which is related to province as added before in the block information, then click OK button to accept the option or Cancel button to cancel the option.
10.Select this sub district radio button that will be shown which is related to district as added before in the block information, then click OK button to accept the option or Cancel button to cancel the option.
11. Click this button to choose location.
13. Type longitude, latitude, strike / dip, deposit dimension (length, width, thickness in meter), deposit size (in hectare), overburden (in meter), and uses/utility in the text box.
14. Click this button to choose deposit status.
15. Select one of deposit status from deposit status base table radio button, then click OK button to accept the option or Cancel button to cancel the option.
3.1.16. Steps of Editing Form Add Coal General
1. Click Detail button under Content column at Commodity General Page.
3.1.17. Steps of Filling Form Add Coal Structure
3. Edit the content (if necessary), then click OK button to accept the form.
2. Click Add New button to add or Edit button to edit or Delete button to delete coal structure.
3. Click this button to choose coal structure.
4. Select one of coal structure from coal structure base table radio button, then click OK button to accept the option or Cancel button to cancel the option.
3.1.18. Steps of Filling Form Add Resources Class
1. Click Detail button under Others column Resource Class.
2. Click Add New button to add or Edit button to edit or Delete button to delete resource class.
4. Select one of resources classes from resources class base table radio button, then click OK button to accept the option or Cancel button to cancel the option.
5. Type value of resources.
6. Click this button to choose resources unit.
3.1.19. Steps of Filling Form Add Reserves Class
8. Click OK button to accept the form.
1. Click Detail button under Others column Reserves Class.
3. Click this button to choose reserves class.
4. Select one of resources classes from reserves class base table radio button, then click OK button to accept the option or Cancel button to cancel the option.
5. Type value of reserves.
3.1.20. Steps of Filling Form Add Estimation Method
7. Select one of units from unit base table radio button, then click OK button to accept the option or Cancel button to cancel the option.
8. Click OK button to accept the form.
2. Click Add New button to add or Edit button to edit or Delete button to delete estimation method.
3. Click this button to choose estimation method.
4. Select one of estimation method from estimation method base table radio button, then click OK button to accept the option or Cancel button to cancel the option.
3.1.21. Steps of Filling Form Add Coal Quality
1. Click Detail button under Others column Coal Quality.
2. Click Add button under Action column to add content of coal quality.
3. Type the value of quality coal (FM, TM, M, IM, VM, Ash, FC, S Total, CV, Specific Energy).
If decimal degree must be separated with point not comma, e.g : 3.100 not 3,100
3.1.22. Steps of Creating Map
Map can be created if all data in the field in block information, commodity, and report has already been filled, especially there must be area coordinate to create map. If there is only one coordinate point, map can’t be created because it’s only point, not area or region. The result of creating map can be viewed at webmap.
The result of creting map as shown at the picture of webmap below.
Click Create Map button to create map of block area commodity.
4. Tables Section
Tables section consist of five sub menus : commodity, report, block information, commodity general, and places. Each sub menu contains base table.
Sub menu commodity consists of one base table : 1. Mineral Energy
Sub menu report consists of three base tables : 1. Data form
2. Maps scale 3. Project undertaken
Sub menu block information consists of two base tables : 1. Exploration method
2. Exploration stage
Sub menu commodity general consists of six base tables : 1. Estimation method
2. Coal Structure 3. Deposit status 4. Resources class 5. Reserves class 6. Unit
Sub menu places consists of five base tables : 1. Country
2. Province 3. District 4. Sub district 5. Location
4.1. Sub Menu Commodity
4.1.1. Mineral Energy Base Table
1. Click Add New button to add fossil energy or mouseover
edit to edit or delete to delete fossil energy.
2. Type International Name, Abbreviation Name, Local Name in the text box.
Non Metalic Id is filled automatically by the system.
4.2. Sub Menu Report
Go to Tables section, then choose Report.
4.2.1. Data Forms Base Table
4.2.2. Maps Scales Base Table
2. Type Data Form Name in the text box. Data Form Id is filled
automatically by the system.
3. Click OK button to accept the form.
4.2.3. Project Undertaken Base Table
2. Type Maps Scale Name, Description in the text box.
Maps Scale Id is filled automatically by the system.
3. Click OK button to accept the form.
1. Click Add New button to add project undertaken or
mouseover edit to edit or delete to delete project undertaken.
2. Type Project
Undertaken Name in in the text box. Project Undertaken Id
is filled automatically by the system.
4.3. Sub Menu Block Information
Go to Tables section, then choose Block Information.
4.3.1. Exploration Methods Base Table
1. Click Add New button to add exploration method or
mouseover edit to edit or delete to delete exploration method.
2. Type Explor Method Name in the text box. Explor Method Id is
filled automatically by the system.
4.3.2. Exploration Stages Base Table
4.4. Sub Menu Commodity General
Go to Tables section, then choose Commodity General.
1. Click Add New button to add exploration stage or mouseover edit to edit or delete to delete exploration stage.
2. Type Exploration Stage Name in the text box.
Exploration Stage Id is filled automatically by the system.
4.4.1. Estimation Methods Base Table
4.4.2. Coal Structure Base Table
1. Click Add New button to add estimation method or
mouseover edit to edit or delete to delete estimation method.
2. Type Estimation Method Name, Description in the text box.
Estimation Method Id is filled automatically by the system.
3. Click OK button to accept the form.
4.4.3. Deposit Status Base Table
2. Type Alteration Name, Description in the text box.
Alteration Id is filled automatically by the system.
3. Click OK button to accept the form.
4.4.4. Resources Classes Base Table
2. Type Deposit Status Name, Description in the text box.
Deposit Status Id is filled automatically by the system.
3. Click OK button to accept the form.
1. Click Add New button to add resources class or
4.4.5. Reserves Classes Base Table
2. Type Resources Class Name,
Description in the text box.
Resources Class Id is filled automatically by the system.
3. Click OK button to accept the form.
1. Click Add New button to add reserves class or mouseover edit to edit or delete to delete reserves class.
2. Type Reserves Class Name, Description in the text box.
reservesclass Id is filled automatically by the system.
4.4.6. Unit Base Table
4.5. Sub Menu Places
Go to Tables section, then choose Places.
1. Click Add New button to add unit or
mouseover edit to edit or delete to delete unit.
2. Type Unit Name, Description in the text box.
Unit Id is filled automatically by the system.
4.5.1. Countries Base Table
4.5.2. Provinces Base Table
4. Click OK button to accept the form. 3. Type Province
Name in the text box.
4. Click OK button to accept the form. 3. Type Province
Name in the text box.
District Id is filled automatically by the system. 2. Click Add New button to add district or mouseover edit to edit
4.5.4. Sub Districts Base Table
4.5.5. Locations Base Table
4. Click OK button to accept the form. 3. Type Sub District Name in the text box.
Sub District Id is filled automatically by the system.
1. Mouseover Detail under Location Column to add or view or edit or delete location which is related to the choosen country, province, district and sub district, e.g. location in Sinabung sub district, Kab. Simeulue district, Nanggroe Aceh Darussalam province, Indonesia country.
5. Administrator Section
Administrator section consists of eight sub menus. Each sub menu contains one base table. 1. Status
2. Menus 3. Users 4. Groups 5. Rights 6. User Groups 7. Group Rights 8. Group Menus
Go to Tables section, then choose Administrator.
4. Click OK button to accept the form. 3. Type Location
Name in the text box.
5.1. Sub Menu Status
1. Click Add New button to add status or
mouseover edit to edit or delete to delete status.
2. Type Status Name, Description in the text box.
Status Id is filled automatically by the system.
5.2. Sub Menu Menus
1. Click Add New button to add menu or
5.3. Sub Menu Users
2. Type Menu Name, Description in the text box.
Menu Id is filled automatically by the system.
3. Click OK button to accept the form.
2. Type User Id, User Name, Password, Retype Password (case sensitive) in the text box.
3. Click this button to choose user type.
5. Click this button to choose country.
7. Click this button to choose status.
5.4. Sub Menu Groups
9. Click OK button to accept the form.
1. Click Add New button to add group or
2. Type Group Name in the text box.
Group Id is filled automatically by the system
3. Click this button to choose status.
5.5. Sub Menu Rights
5. Type Description, then click OK button to accept the form.
1. Click Add New button to add user right or mouseover edit to edit or delete to delete user right.
2. Type Right Name, Description in the text box.
Right Id is filled automatically by the system.
5.6. Sub Menu User Groups
1. Click Add New button to add group users or
mouseover edit to edit or delete to delete group users.
3. Select one of the groups from group base table radio button, then click OK button to accept the option or Cancel button to cancel the option.
4. Select user from user list box.
5a. Click this button to move one user from not selected list box to selected list box.
5b. Click this button to move all users from not selected list box to selected list box.
5c. Click this button to move one user from selected list box to not selected list box.
5d. Click this button to move all users from selected list box to not selected list box.
5.7. Sub Menu Group Rights
1. Click Add New button to add group rights or
mouseover edit to edit or delete to delete group rights.
3. Select one of the groups from group base table radio button, then click OK button to accept the option or Cancel button to cancel the option.
5a. Click this button to move one user right from not selected list box to selected list box.
5b. Click this button to move all user rights from not selected list box to selected list box.
5c. Click this button to move one user right from selected list box to not selected list box.
5d. Click this button to move all user rights from selected list box to not selected list box.
5.8. Sub Menu Group Menus
1. Click Add New button to add group menus or
mouseover edit to edit or delete to delete group menus.
3. Select one of the groups from group base table radio button, then click OK button to accept the option or Cancel button to cancel the option.
5a. Click this button to move one menu from not selected list box to selected list box.
5b. Click this button to move all menus from not selected list box to selected list box.
5c. Click this button to move one menu from selected list box to not selected list box.
5d. Click this button to move all menus from selected list box to not selected list box.
6. File Section
File section consists of three sub menus as the following : 1. Logout
2. Change Password 3. Exit
Go to File section at the administrator page.
6.1. Sub Menu Logout
Sub menu Logout has function to logout from administrator page and return to administrator login page.
6.2. Sub Menu Change Password
Sub menu Change Password has function to change password of user.
6.3. Sub Menu Exit
Sub menu Exit has function to exit from administrator page and close the window.
1. Type Old Password (case sensitive).
2. Type New Password (case sensitive).
3. Retype New Password (case sensitive).
4. Click OK button to accept the form or cancel to cancel changing password.
1. Cick OK button.
2a. Click Yes button to close the window.
7. Help Section
File section consists of two sub menus as the following : 1. About
2. Manual
Go to Help section at the administrator page.
7.1. Sub Menu About
Sub menu About contains information of developer of ASEAN Coal Information and Database application.
7.2. Sub Menu Manual
1. Logging into the administration site as a verificator
Go to the administrator page at http://webgis.psdg.bgl.esdm.go.id/dbafoc/administrator/.
2. Verificator Home Page
The content in verificator page almost the same with administrator page. The difference between verificator and operator admin is in the verification reports. A verificator not only can view all data that has already been inputed by operator admin but also can verify or give status to all data whether the data is valid or not. A verificator can’t input, edit or delete all data, but only give message to data status valid or not. An operator admin can input, edit or delete all data, but can’t verify the data.
The different access between administrator and verificator is in access reports menu/section. Verificator can only access four sections, i.e. Home, File, Reports and Help. Tables and administrator section can’t be accessed by verificator.
1. Type username as a verificator.
2. Type password.
3. Choose country from listbox. 4. Click login button
Menubar of verificator page.
Sub Menu
3. Reports Section
Reports section consist of only one sub menu i.e. data form entry.
Verificator has access right to verify data and give message to status column as not valid in this section. The buttons that are provided in this section as the following :
a. Page View Button : To view output of report content.
b. Valid Status Button : To know data status is valid.
c. Invalid Status Button : To know data status is invalid.
3. Mouseover Verify to verify the report.
4. Write message in the text box if there is mistake.
5a. Click Yes button if the data report is already valid.
5b. Click No button if the data report is invalid.
5c. Click Cancel to cancel the form.
4. File Section
File section consists of three sub menus as the following : 1. Logout
2. Change Password 3. Exit
Go to File section at the administrator page.
4.1. Sub Menu Logout
Sub menu Logout has function to logout from administrator page and return to administrator login page.
4.2. Sub Menu Change Password
Sub menu Change Password has function to change password of user.
4.3. Sub Menu Exit
Sub menu Exit has function to exit from administrator page and close the window.
1. Type Old Password (case sensitive).
2. Type New Password (case sensitive).
3. Retype New Password (case sensitive).
4. Click OK button to accept the form or cancel to cancel changing password.
1. Cick OK button.
2a. Click Yes button to close the window.
5. Help Section
File section consists of two sub menus as the following : 1. About
2. Manual
Go to Help section at the administrator page.
5.1. Sub Menu About
Sub menu About contains information of developer of ASEAN Mineral Information and Database application.
5.2. Sub Menu Manual
REVISION FOR CHAPTER IV (PUBLIC USER)
1. Homepage of ASEAN Coal Database and Information System (ACDIS)
Go to the administrator page at http://webgis.psdg.bgl.esdm.go.id/dbafoc/.
2. Webmap
Webmap page provides main buttons to access. Each button has a function as shown in the table below.
No Name Symbol Function
1 Zoom In To zoom in map page
2 Zoom Out To zoom out map page
3 Recenter To recenter map page
4 Point Query To show information selected map point
5 Check Box To show or hide layer of map
6 Redraw Map To redraw map after selecting layer
7 List Box To zoom to full extent
1. Check ( ) Coal to show coal map location or uncheck to hide coal map location.
3. Click this botton to show information selected map.
5. Click detail to see detail information of block or commodity or report.
6. Detail information of commodity will be shown if you select detail of commodity.
8. Detail information of block will be shown if you select detail of block information.
9. Click this detail to see detail information of report.