The Kubernetes Book
Nigel Poulton
This book is for sale athttp://leanpub.com/thekubernetesbook
This version was published on 2017-10-27
This is aLeanpubbook. Leanpub empowers authors and publishers with the Lean Publishing process.Lean Publishingis the act of publishing an in-progress ebook using lightweight tools and many iterations to get reader feedback, pivot until you have the right book and build traction once you do.
Huge thanks to my wife and kids for putting up with a geek in the house who genuinely thinks he’s a bunch of software running inside of a container on top of
midrange biological hardware. It can’t be easy living with me!
Massive thanks as well to everyone who watches my Pluralsight videos. I love connecting with you and really appreciate all the feedback I’ve gotten over the years. This was one of the major reasons I decided to write this book! I hope it’ll be
Contents
0: About the book . . . 1
What about a paperback edition . . . 1
Why should I read this book or care about Kubernetes? . . . 2
Should I buy the book if I’ve already watched your video training courses? 2 Versions of the book . . . 3
1: Kubernetes Primer . . . 4
Kubernetes background . . . 4
A data center OS . . . 8
Chapter summary . . . 10
2: Kubernetes principles of operation . . . 12
Kubernetes from 40K feet . . . 12
Masters and nodes . . . 15
The declarative model and desired state . . . 19
Pods . . . 21
Pods as the atomic unit . . . 24
Services . . . 26
Deployments . . . 29
Chapter summary . . . 30
3: Installing Kubernetes . . . 31
Play with Kubernetes . . . 31
Minikube . . . 36
Google Container Engine (GKE) . . . 45
Installing Kubernetes in AWS . . . 48
CONTENTS
Chapter summary . . . 59
4: Working with Pods . . . 60
Pod theory . . . 60
Hands-on with Pods . . . 68
Chapter Summary . . . 76
5: ReplicaSets . . . 77
ReplicaSet theory . . . 77
Hands-on . . . 85
Chapter summary . . . 95
6: Kubernetes Services . . . 96
Setting the scene . . . 96
Theory . . . 97
Hands-on . . . 105
Real world example . . . 113
Chapter Summary . . . 116
7: Kubernetes Deployments . . . 117
Deployment theory . . . 117
How to create a Deployment . . . 121
How to perform a rolling update . . . 126
How to perform a rollback . . . 129
Chapter summary . . . 131
8: What next . . . 132
0: About the book
This is an*up-to-datebook about Kubernetes. No prior knowledge required! If you’re interested in Kubernetes,want to know how it works and how to do things properly, this book is dedicated to you!
What about a paperback edition
I’m a fan of ink and paper, and I’m also a fan of quality products. So I’ve made a high-quality, full-color, paperback edition available via Amazon. If you like paperbacks, you’ll love this! No cheap paper, and definitely no black-and-white diagrams from the 1990’s!
0: About the book 2
Why should I read this book or care about
Kubernetes?
Alongside Docker, Kubernetes is the hottest infrastructure technology on the planet! It’s literally changing the way we do everything in IT.
So, if you want to push ahead with your career and work with one of the coolest technologies to every hit the scene, you need to read this book. If you’d rather get left behind… don’t read the book. It’s the truth.
Should I buy the book if I’ve already watched
your video training courses?
You’re asking the wrong person :-D
Kubernetes is Kubernetes. So there’s gonna be some duplicate content - there’s not a lot I can do about that!
But… I’m a huge believer in learning via multiple methods. It’s my honest opinion that a combination of video training and books is way forward. Each brings its own strengths, and each reinforces the other. So yes, I think you should consume both! But I suppose Iwouldsay that ;-)
0: About the book 3
Versions of the book
Kubernetes is developing fast! As a result, the value of a book like this is inversely proportional to how old it is! In other words, the older this book is, the less valuable it is. So, I’m committed toat least two updates per year. If my Docker Deep Dive book is anything to go by, it’ll be more like an updated version every 2-3 months! Does that seem like a lot?Welcome to the new normal!
We no-longer live in a world where a 5-year-old book is valuable.On a topic like
Kubernetes, I even doubt the value of a 1-year-old book!As an author, I really
wish that wasn’t true. But it is! Again… welcome to the new normal! Don’t worry though, your investment in this book is safe!
If you buy the paperback copy fromAmazon, you get the Kindle version for dirt-cheap! And the Kindle and Leanpub versions get access to all updates at no extra cost! That’s the best I can currently do!
I you buy the book through other channels, things might be different - I don’t control other channels - I’m a techie, not a book distributor.
Below is a list of versions:
• Version 1.Initial version.
• Version 2. Updated content for Kubernetes 1.8.0. Added new chapter on
ReplicaSets. Added significant changes to Pods chapter. Fixed typos and made a few other minor updates to existing chapters.
Having trouble getting the latest updates on your
Kindle?
Unfortunately, Kindle isn’t great at delivering updates. But the work-around is easy: Go to http://amzn.to/2l53jdg
1: Kubernetes Primer
This chapter is split into two main sections.
• Kubernetes background - where it came from etc. • The idea of Kubernetes as a data center OS
Kubernetes background
Kubernetes is an orchestrator. More specifically, it’s an orchestrator of containerized apps. This means it helps us deploy and maintain applications that are distributed and deployed as containers. It doesscaling,self-healing,load-balancingand lots more. Starting from the beginning… Kubernetes came out of Google! In the summer of 2014 it was open-sourced and handed over to the Cloud Native Computing Foundation (CNCF).
Figure 1.1
Since then, it’s gone on to become one of the most important container-related technologies in the world - on a par with Docker.
1: Kubernetes Primer 5
Kubernetes and Docker
The first thing to say about Kubernetes and Docker is that they’re complimentary technologies.
For example, it’s very popular to deploy Kubernetes with Docker as the container runtime. This means Kubernetes orchestrates one or more hosts that run containers, and Docker is the technology that starts, stops, and otherwise manages the con-tainers. In this model, Docker is a lower-level technology that is orchestrated and managed by Kubernetes.
At the time of writing, Docker is in the process of breaking-out individual compo-nents of its stack. One example iscontainerd- the low-level container supervisor and runtime components. Kubernetes has also released the Container Runtime Interface (CRI) - a runtime abstraction layer that 3rd-arty container runtimes can plug in to and seamlessly work with Kubernetes. On the back of these two important projects is a project to implementcontainerdwith the CRI and potentially make it the default Kubernetes container runtime (author’s personal opinion). The project is currently a Kubernetes Incubator project with an exciting future.
Althoughcontainerd will not be the only container runtime supported by Kuber-netes, it will almost certainly replace Docker as the most common, and possibly default. Time will tell.
The important thing, is that none of this will impact your experience as a Kubernetes user. All the regular Kubernetes commands and patterns will continue to work as normal.
What about Kubernetes vs Docker Swarm
AtDockerCon EU in Copenhagen in October 2017, Docker, Inc. formally announced native support for Kubernetes in Docker Enterprise Edition (Docker EE).
Note: All of the following is my personal opinion (everything in
1: Kubernetes Primer 6
This was a significant announcement. It essentially “blessed” Kubernetes to become the industry-standard container orchestrator.
Now then, I am aware that Kubernetes did notneed Docker’s “blessing”. I’m also aware that the community had already chosen Kubernetes. And… that Docker was bowing to the inevitable. However, it was still a significant move. Docker, Inc. has always been heavily involved in community projects, and already, the number of Docker, Inc. employees working openly on Kubernetes and Kubernetes-related projects has increased. Clearly this was a good announcement for Kubernetes. On the topic of Docker Swarm, the announcement means that the orchestration components of Docker Swarm (a rival orchestrator to Kubernetes) will probably become less of a focus for Docker, Inc. It will continue to be developed, but the long-term strategic orchestrator for containerized applications is Kubernetes!
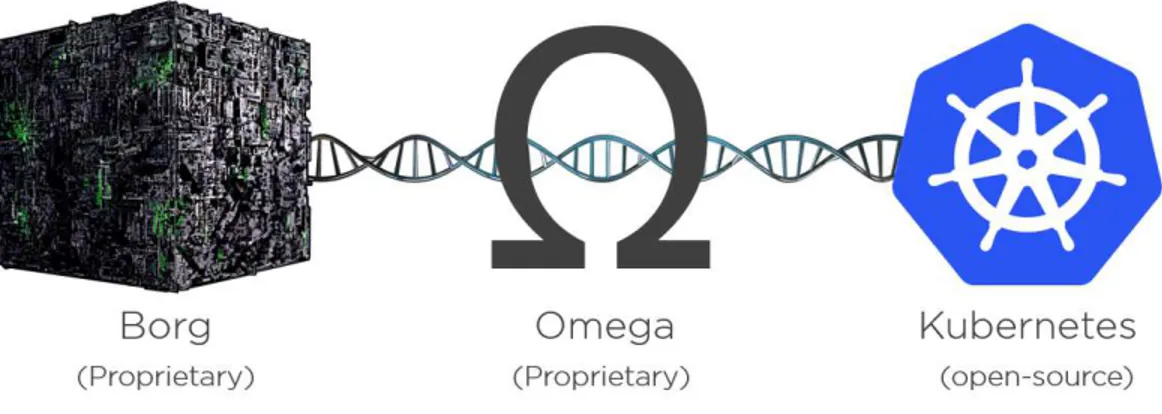
Kubernetes and Borg: Resistance is futile!
There’s a pretty good chance you’ll hear people talk about how Kubernetes relates Google’sBorg andOmegasystems.
It’s no secret that Google has been running many of its systems on containers for years. Legendary stores of them crunching through billions of containers a week are retold at meetups all over the world. So yes, for a very long time – even before Docker came along - Google has been running things likesearch,Gmail, andGFSon containers. Andlotsof them!
1: Kubernetes Primer 7
Figure 1.2 - Shared DNA
The point is, all three are separate, but all three are related. In fact, a lot of the people involved with building Borg and Omega were also involved in building Kubernetes. So, although Kubernetes was built from scratch, it leverages much or what was learned at Google with Borg and Omega.
As things stand, Kubernetes is open-source project under the CNCF, licensed under the Apache 2.0 license, and version 1 shipped way back in July 2015.
Kubernetes - what’s in the name
1: Kubernetes Primer 8
Figure 1.3 - The Kubernetes logo
Rumor:There’s a good rumor that Kubernetes was originally going to be calledSeven of Nine. If you know your Star Trek, you’ll know thatSeven of Nineis a femaleBorgrescued by the crew of the USS Voyager under the command of Captain Catherine Janeway. It’s also rumored that the logo has 7 spokes because ofSeven of Nine. These could be nothing more than rumors, but I like them!
One last thing about the name before moving on… You’ll often see the name shortened tok8s. The idea is that the number 8 replaces the 8 characters in between the K and the S – great for tweets and lazy typists like me ;-)
A data center OS
As we said in the intro, I’m assuming you’ve got a basic knowledge of what containers are and how they work. If you don’t, go watch my 5-star video course here https://app.pluralsight.com/library/courses/docker-containers-big-picture/table-of-con-tents
1: Kubernetes Primer 9
As a general rule, if your legacy apps had hundreds of VMs, there’s a good chance your containerized apps will have thousands of containers! If that’s true, we desperately need a way to manage them.
Say hello to Kubernetes!
When getting your head around something like Kubernetes it’s important to get your head around modern data center architectures. For example, we’re abandoning the traditional view of the data center as collection of computers, in favor of the more powerful view that the data centeris a single large computer.
So what do we mean by that?
A typical computer is a collection of CPU, RAM, storage, and networking. But we’ve done a great job of building operating systems (OS) that abstract away a lot of that detail. For example, it’s rare for a developer to care which CPU core or memory DIM their application uses – we let the OS decide all of that. And it’s a good thing, the world of application development is a far friendlier place because of it.
So, it’s quite natural to take this to the next level and apply those same abstractions to data center resources - to view the data center as just a pool of compute, network and storage and have an over-arching system that abstracts it. This means we no longer need to care about which server or LUN our containers are running on - just leave this up to the data center OS.
Kubernetes is one of an emerging breed of data center operating systems aiming to do this. Others do exist, Mesosphere DCOS is one. These systems are all in the cattle business. Forget about naming your servers and treating them likepets. These systems don’t care. Gone are the days of taking your app and saying“OK run this part of the app on this node, and run that part of it on that node…”. In the Kubernetes world, we’re all about saying “hey Kubernetes, I’ve got this app and it consists of these parts… just run it for me please”. Kubernetes then goes off and does all the hard scheduling work.
1: Kubernetes Primer 10
The same goes for app in Kubernetes. Package it as a container, give it a declarative manifest, and let Kubernetes take care of running it and keeping it running. It’s a beautiful thing!
While all of this sounds great, don’t take thisdata center OS thing too far. It’s not a DVD install, you don’t end up with a shell prompt to control your entire data center, and you definitely don’t get a solitaire card game included! We’re still at the very early stages in the trend.
Some quick answers to quick questions
After all of that, you’re probably pretty skeptical and have a boat-load of questions. So here goes trying to pre-empt a couple of them…
Yes, this is forward thinking. In fact, it’s almost bleeding edge. But it’s here, and it’s real! Ignore it at your own peril.
Also, I know that most data centers are complex and divided into zones such as DMZs, dev zones, prod zones, 3rd party equipment zones, line of business zones etc. However, within each of these zones we’ve still got compute, networking and storage, and Kubernetes is happy to dive right in and start using them. And no, I don’t expect Kubernetes to take over your data center. But it will become a part of it.
Kubernetes is also very platform agnostic. It runs on bare metal, VMs, cloud instances, OpenStack, pretty much anything with Linux.
Chapter summary
Kubernetes isthe leading container orchestrator that lets us manage containerized apps at scale. We give it an app, tell it what we want the app to look like, and let Kubernetes make all the hard decisions about where to run it and how to keep it running.
1: Kubernetes Primer 11
Disclaimer!
Kubernetes is a fast-moving project under active development. So things are chang-ing fast! But don’t let that put you off - embrace it! Rapid change like this is the new normal!
2: Kubernetes principles of
operation
In this chapter, we’ll learn about the major components required to build a Kuber-netes cluster and deploy a simple app. The aim of the game is to give you a big-picture. You’re not supposed to understand it all at this stage - we will dive into more detail in later chapters!
We’ll divide the chapter up like this:
• Kubernetes from 40K feet • Masters and nodes
• Declarative model and desired state • Pods
• Services • Deployments
Kubernetes from 40K feet
At the highest level, Kubernetes is an orchestrator of containerized apps. Ideally microservice apps. Microservice app is just a fancy name for an application that’s made up of lots of small and independent parts - we sometimes call these small parts services. These small independent services work together to create a meaningful/use-ful app.
Let’s look at a quick analogy.
2: Kubernetes principles of operation 13
he or she gives everyone a position and organizes them into a team with a plan. We go from Figure 2.1 to Figure 2.2.
Figure 2.1
Figure 2.2
2: Kubernetes principles of operation 14
We start out with an app made up of multiple services. Each service is packaged as aPodand no two services are the same. Some might be load-balancers, some might be web servers, some might be for logging… Kubernetes comes along - a bit like the coach in the football analogy – and organizes everything into a useful app.
In the application world, we call this “orchestration”.
To make this all happen, we start out with our app, package it up and give it to the cluster (Kubernetes). The cluster is made up of one or moremasters, and a bunch of nodes.
The masters are in-charge of the cluster and make all the decisions about which nodes to schedule application services on. They also monitor the cluster, implement changes, and respond to events. For this reason, we often refer to the master as the control plane.
Then the nodes are where our application services run. They also report back to the masters and watch for changes to the work they’ve been scheduled.
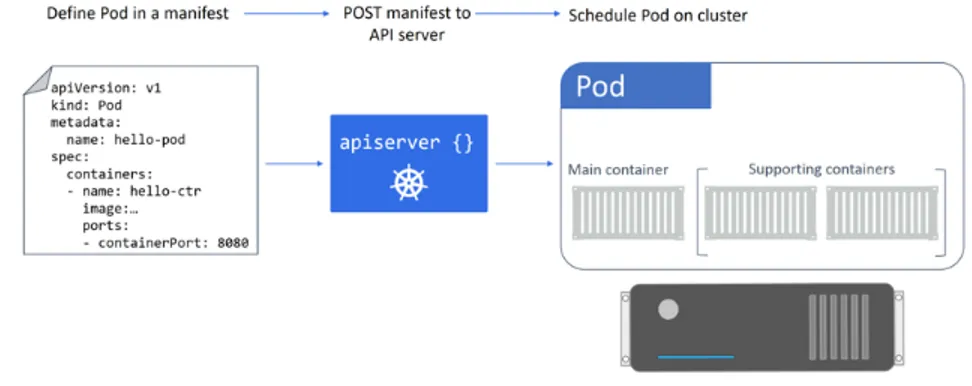
At the time of writing, the best way to package and deploy a Kubernetes application is via something called a Deployment. With Deployments, we start out with our application code and we containerize it. Then we define it as a Deployment via a YAML or JSON manifest file. This manifest file tells Kubernetes two important things:
• What our app should look like – what images to use, ports to expose, networks to join, how to perform update etc.
• How many replicas of each part of the app to run (scale)
Then we give the file to the Kubernetes master which takes care of deploying it on the cluster.
But it doesn’t stop there. Kubernetes is constantly monitoring the Deployment to make sure it is running exactly as requested. If something isn’t as it should be, Kubernetes tries to it.
2: Kubernetes principles of operation 15
Masters and nodes
A Kubernetes cluster is made up of masters and nodes. These are Linux hosts running on anything from VMs, bare metal servers, all the way up to private and public cloud instances.
Masters (control plane)
A Kubernetes master is a collection of small services that make up the control plane of the cluster.
The simplest (and most common) setups run all the masterserviceson a single host. However, multi-master HA is becoming more and more popular, and is amust have for production environments. Looking further into the future, we might see the individual services comprise the control plane split-out and distributed across the cluster - a distributed control plane.
It’s also considered a good practicenotto run application workloads on the master. This allows the master to concentrate entirely on looking after the state of the cluster. Let’s take a quick look at the major pieces that make up the Kubernetes master.
The API server
The API Server (apiserver) is the frontend into the Kubernetes control plane. It exposes a RESTful API that preferentially consumes JSON. We POST manifest files to it, these get validated, and the work they define gets deployed to the cluster. You can think of the API server as the brains of the cluster.
The cluster store
If the API Server is the brains of the cluster, thecluster storeis its memory. The config and state of the cluster gets persistently stored in the cluster store, which is the only stateful component of the cluster and is vital to its operation - no cluster store, no cluster!
2: Kubernetes principles of operation 16
The controller manager
The controller manager (kube-controller-manager) is currently a bit of a monolith - it implements a few features and functions that’ll probably get split out and made pluggable in the future. Things like the node controller, endpoints controller, namespace controller etc. They tend to sit in loops and watch for changes – the aim of the game is to make sure thecurrent stateof the cluster matches thedesired state (more on this shortly).
The scheduler
At a high level, the scheduler (kube-scheduler) watches for new workloads and assigns them to nodes. Behind the scenes, it does a lot of related tasks such as evaluating affinity and anti-affinity, constraints, and resource management.
Control Plane summary
Kubernetes masters run all of the cluster’s control plane services. This is the brains of the cluster where all the control and scheduling decisions are made. Behind the scenes, a master is made up of lots of small specialized services. These include the API server, the cluster store, the controller manager, and the scheduler.
The API Server is the front-end into the master and the only component in the control plane that we interact with directly. By default, it exposes a RESTful endpoint on port 443.
2: Kubernetes principles of operation 17
Figure 2.3
Nodes
First up,nodesused to be calledminions. So, when some of the older docs and blogs talk about minions, they’re talking aboutnodes.
2: Kubernetes principles of operation 18
Figure 2.4
Kubelet
First and foremost is the kubelet. This is the main Kubernetes agent that runs on all cluster nodes. In fact, it’s fair to say that the kubeletisthe node. You install the kubelet on a Linux host and it registers the host with the cluster as a node. It then watches the API server for new work assignments. Any time it sees one, it carries out the task and maintains a reporting channel back to the master.
If the kubelet can’t run a particular work task, it reports back to the master and lets the control plane decide what actions to take. For example, if a Pod fails on a node, the kubelet isnotresponsible for restarting it or finding another node to run it on. It simply reports back to the master. The master then decides what to do.
On the topic of reporting back, the kubelet exposes an endpoint on port10255where you can inspect it. We’re not going to spend time on this in the book, but it is worth knowing that port10255on your nodes lets you inspect aspects of the kubelet.
Container runtime
2: Kubernetes principles of operation 19
More often than not, the container runtime that Kubernetes uses is Docker. In the case of Docker, Kubernetes talks natively to the Docker Remote API.
More recently, Kubernetes has released the Container Runtime Interface (CRI). This is an abstraction layer for external (3rd-party) container runtimes to plug in to. Basically, the CRI masks the internal machinery of Kubernetes and exposes a clean documented container runtime interface.
The CRI is now the default method for container runtimes to plug-in to Kubernetes. ThecontainerdCRI project is a community-based open-source project porting the CNCF containerd runtime to the CRI interface. It has a lot of support and will probably replace Docker as the default, and most popular, container runtime used by Kubernetes.
Note:containerdis the container supervisor and runtime logic stripped out of the Docker Engine. It was donated to the CNCF by Docker, Inc. and has a lot of community support.
At the time of writing, Docker is still the most common container runtime used by Kubernetes.
Kube-proxy
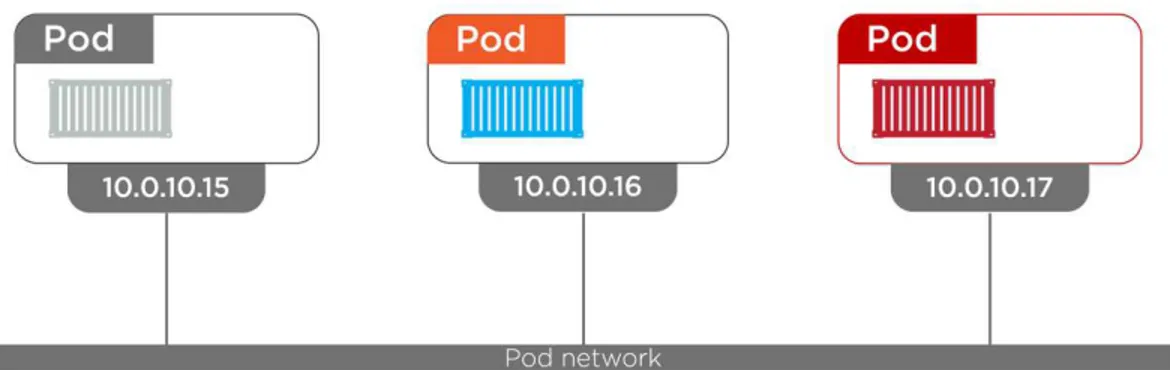
The last piece of the puzzle is the kube-proxy. This is like the network brains of the node. For one thing, it makes sure that every Pod gets its own unique IP address. It also does lightweight load-balancing on the node.
The declarative model and desired state
The declarative model and the concept of desired state are two things at the very heart of the way Kubernetes works. Take them away and Kubernetes crumbles! In Kubernetes, the two concepts work like this:
2: Kubernetes principles of operation 20
2. We POST it the API server
3. Kubernetes stores this in the cluster store as the application’s desired state 4. Kubernetes deploys the application on the cluster
5. Kubernetes implements watch loops to make sure the cluster doesn’t vary from desired state
Let’s look at each step in a bit more detail.
Manifest files are either YAML or JSON, and they tell Kubernetes how we want our application to look. We call this is the desired state. It includes things like which image to use, how many replicas to have, which network to operate on, and how to perform updates.
Once we’ve created the manifest, we POST it to the API server. The most common way of doing this is with thekubectlcommand. This sends the manifest to port 443 on the master.
Kubernetes inspects the manifest, identifies which controller to send it to (e.g. the Deployments controller) and records the config in the cluster store as part of the cluster’s overall desired state. Once this is done, the workload gets issued to nodes in the cluster. This includes the hard work of pulling images, starting containers, and building networks.
Finally, Kubernetes sets up background reconciliation loops that constantly monitor the state of the cluster. If the current state of the cluster varies from the desired state Kubernetes will try and rectify it.
It’s important to understand that what we’ve described is the opposite of the imperative model. The imperative model is where we issue lots of platform specific commands.
Not only is the declarative model a lot simpler than long lists of imperative commands, it also enables self-healing, scaling, and lends itself to version control and self-documentation!
2: Kubernetes principles of operation 21
Assume we have an app with a desired state that includes 10 replicas of a web front-end Pod. If a node that was running two replicas dies, the current state will be reduced to 8 replicas, but the desired state will still be 10. This will be picked up by a reconciliation loop and Kubernetes will schedule two new replicas on other nodes in the cluster.
The same thing will happen if we intentionally scale the desired number of replicas up or down. We could even change the image we want the web front-end to use. For example, if the app is currently using the v2.00image, and we update the desired state to use thev2.01image, Kubernetes will go through the process of updating all replicas so that they are using the new image.
Though this might sound simple, it’s extremely powerful! And it’s at the very heart of how Kubernetes operates. We give Kubernetes a declarative manifest that describes how we want an application to look. This forms the basis of the application’s desired state. The Kubernetes control plane records it, implements it, and runs background reconciliation loops that constantly check what is running is what you’ve asked for. When current state matches desired state, the world is a happy and peaceful place. When it doesn’t, Kubernetes gets busy until they do.
Pods
In the VMware world, the atomic unit of deployment is the virtual machine (VM). In the Docker world, it’s the container. Well… in the Kubernetes world, it’s thePod.
2: Kubernetes principles of operation 22
Pods and containers
It’s true that Kubernetes runs containerized apps. But those containersalwaysrun inside of Pods! You cannot run a container directly on a Kubernetes cluster.
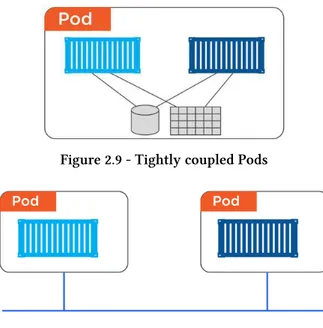
However, it’s a bit more complicated than that. The simplest model is to run a single container inside of a Pod, but there are advanced use-cases where you can run multiple containers inside of a single Pod. Thesemulti-container Pods are beyond the scope of this book, but common examples include the following:
• web containers supported ahelpercontainer that ensures the latest content is available to the web server.
• web containers with a tightly coupled log scraper tailing the logs off to a logging service somewhere else.
These are just a couple of examples.
Figure 2.6
Pod anatomy
2: Kubernetes principles of operation 23
Figure 2.7
If those containers need to talk to each other (container-to-container within the Pod) they can use the Podslocalhostinterface.
Figure 2.8
2: Kubernetes principles of operation 24
Figure 2.9 - Tightly coupled Pods
Figure 2.10 - Loosely coupled Pods
Pods as the atomic unit
2: Kubernetes principles of operation 25
Figure 2.11 - Scaling with Pods
The deployment of a Pod is an all-or-nothing job. You never get to a situation where you have a partially deployed Pod servicing requests. The entire Pod either comes up and it’s put into service, or it doesn’t, and it fails. A Pod is never declared as up and available until every part of it is up and running.
A Pod can only exist on a single node. This is true even of multi-container Pods, making them ideal when complimentary containers need to be scheduled side-by-side on the same node.
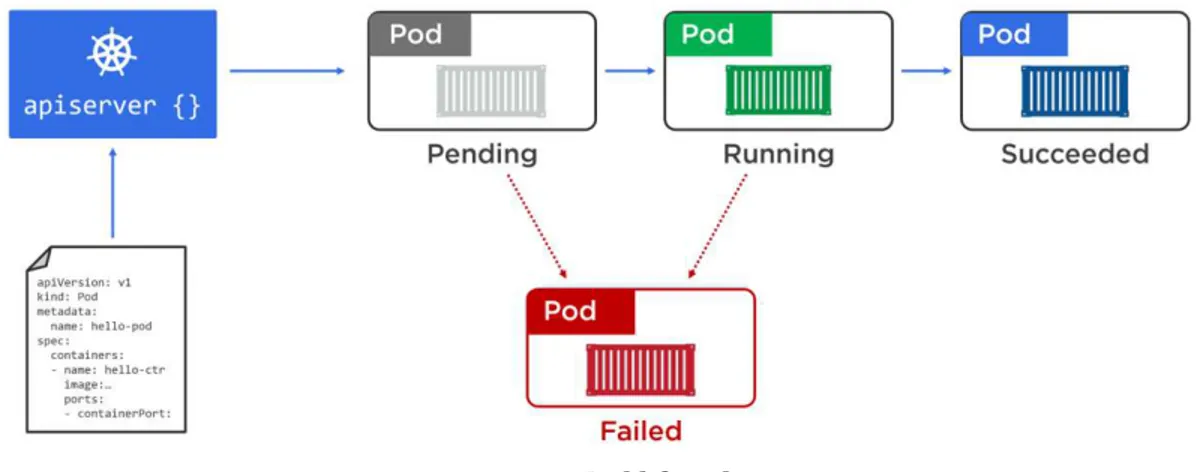
Pod lifecycle
Pods are mortal. They’re born, they live, and they die. If they die unexpectedly, we don’t bother trying to bring them back to life! Instead, Kubernetes starts another one in its place – but it’s not the same Pod, it’s a shiny new one that just happens to look, smell, and feel exactly like the one that just died.
2: Kubernetes principles of operation 26
Deploying Pods
We normally deploy Pods indirectly as part of something bigger, such as aReplicaSet orDeployment (more on these later).
Deploying Pods via ReplicaSets
Before moving on to talk about Services, we need to give a quick mention to ReplicaSets (rs).
A ReplicaSet is a higher-level Kubernetes object that wraps around a Pod and adds features. As the names suggests, they take a Pod template and deploy a desired number ofreplicasof it. They also instantiate a background reconciliation loop that checks to make sure the right number of replicas are always running – desired state vs actual state.
ReplicaSets can be deployed directly. But more often than not, they are deployed indirectly via even higher-level objects such as Deployments.
Services
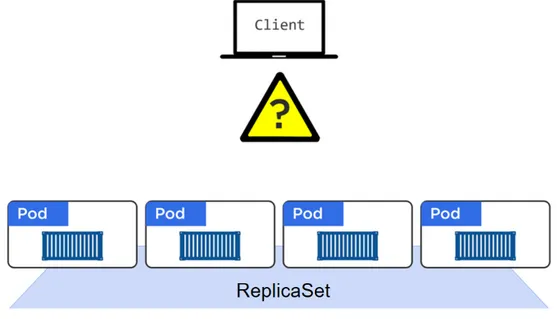
We’ve just learned that Pods are mortal and can die. If they are deployed via ReplicaSets or Deployments, when they fail, they get replaced with new Pods somewhere else in the cluster - these Pods have totally different IPs! This also happens when we scale an app - the new Pods all arrive with their own new IPs. It also happens when performing rolling updates - the process of replacing old Pods with new Pods results in a lot of IP churn.
The moral of this story is that we can’t rely on Pod IPs. But this is a problem. Assume we’ve got a microservice app with a persistent storage backend that other parts of the app use to store and retrieve data. How will this work if we can’t rely on the IP addresses of the backend Pods?
2: Kubernetes principles of operation 27
Take a look at Figure 2.12. This shows a simplified version of a two-tier app with a web front-end that talks to a persistent backend. But it’s all Pod-based, so we know the IPs of the backend Pods can change.
Figure 2.12
If we throw a Service object into the mix, as shown in Figure 2.13, we can see how the front-end can now talk to the reliable IP of the Service, which in-turn load-balances all requests over the backend Pods behind it. Obviously, the Service keeps track of which Pods are behind it.
Figure 2.13
2: Kubernetes principles of operation 28
addresses, and support TCP and UDP (TCP by default). They also perform simple randomized load-balancing across Pods, though more advanced load balancing algorithms may be supported in the future. This adds up to a situation where Pods can come and go, and the Service automatically updates and continues to provide that stable networking endpoint.
The same applies if we scale the number of Pods - all the new Pods, with the new IPs, get seamlessly added to the Service and load-balancing keeps working.
So that’s the job of a Service – it’s a stable network abstraction point for multiple Pods that provides basic load balancing.
Connecting Pods to Services
The way that a Service knows which Pods to load-balance across is via labels. Figure 2.14 shows a set of Pods labelled asprod,BE(short for backend) and1.3. These Pods are loosely associated with the service because they share the same labels.
Figure 2.14
2: Kubernetes principles of operation 29
Figure 2.15
One final thing about Services. They only send traffic to healthy Pods. This means if a Pod is failing health-checks, it will not receive traffic form the Service.
So yeah, Services bring stable IP addresses and DNS names to the unstable world of Pods!
Deployments
Deployments build on top of ReplicaSets, add a powerful update model, and make versioned rollbacks simple. As a result, they are considered the future of Kubernetes application management.
In order to do this, they leverage the declarative model that is infused throughout Kubernetes.
2: Kubernetes principles of operation 30
Deployments and updates
Rolling updates are a core feature of Deployments. For example, we can run multiple concurrent versions of a Deployment in true blue/green or canary fashion.
Kubernetes can also detect and stop rollouts if the new version is not working. Finally, rollbacks are super simple!
In summary, Deployments are the future of Kubernetes application management. They build on top of Pods and ReplicaSets by adding a ton of cool stuff like versioning, rolling updates, concurrent releases, and simple rollbacks.
Chapter summary
In this chapter we introduced some of the major components of a Kubernetes cluster. The master is where the Kubernetes control plane services live. It’s a combination of several system-services, including the API server that exposes a REST interface to the control plane. Masters make all of the deployment and scheduling decisions, and multi-master HA is important for production-grade environments.
Nodes are where application workloads run. Each node runs a service called the kubeletthat registers the node with the cluster, and communicates with the master. This includes receiving new work tasks and reporting back about them. Nodes also run a container runtime and a kube-proxyservice. The container runtime, such as Docker or containerd, is responsible for all container related operations. The kube-proxyservice is responsible for networking on the node.
We also talked about some of the main Kubernetes API objects, such as Pods, Repli-caSets, Services, and Deployments. The Pod is the basic building-block, ReplicaSets add self-healing and scaling, Services add stable networking and load-balancing, and Deployments add a powerful update model and simple rollbacks.
3: Installing Kubernetes
In this chapter, we’ll take a look at some of the ways to install and get started with Kubernetes.
We’ll look at:
• Play with Kubernetes (PWK)
• Using Minikube to install Kubernetes on a laptop
• Installing Kubernetes in the Google Cloud with the Google Container Engine (GKE)
• Installing Kubernetes on AWS using thekopstool • Installing Kubernetes manually usingkubeadm
Two things to point out before diving in…
Firstly, there are a lot more ways to install Kubernetes. The options I’ve chosen for this chapter are the ones I think will be most useful.
Secondly, Kubernetes is a fast-moving project. This means some of what we’ll discuss here will change. But don’t worry, I’m keeping the boo up-to-date, so nothing will be irrelevant.
Play with Kubernetes
Play with Kubernetes (PWK) is a web-based Kubernetes playground that you can use for free. All you need is a web browser and an internet connection. It is the fastest, and easiest, way to get your hands on Kubernetes.
Let’s see what it looks like.
3: Installing Kubernetes 32
2. Confirm that you’re a human and lick+ ADD NEW INSTANCE
You will be presented with a terminal window in the right of your browser. This is a Kubernetes node (node1).
3. Run a few commands to see some of the components pre-installed on the node.
$ docker version
Docker version 17.06.0-ce, build 02c1d87
$ kubectl version --output=yaml clientVersion:
As the output shows, the node already has Docker and kubectl(the Kuber-netes client) pre-installed. Other tools includingkubeadmare also pre-installed. It is also worth noting that although the command prompt is a$, we’re actually running as root on the node. You can confirm this with the whoami or id commands.
4. Use thekubeadmcommand to initialise a new cluster
3: Installing Kubernetes 33
$ kubeadm init --apiserver-advertise-address $(hostname -i) [kubeadm] WARNING: kubeadm is in beta, do not use it for prod... [init] Using Kubernetes version: v1.7.9
[init] Using Authorization modes: [Node RBAC]
<Snip>
Your Kubernetes master has initialized successfully! <Snip>
Congratulations! You now have a brand new single-node Kubernetes cluster! The node that we executed the command from (node 1) is initialized as the master.
The output of thekubeadm initgives you a short list of commands to copy the Kubernetes config file and set permissions. You can ignore these instructions as PWK already has constructs configured for you. Feel free to poke around inside of $HOME/.kube.
5. Use thekubectlcommand to verify the cluster
$ kubectl get nodes
NAME STATUS AGE VERSION
node1 NotReady 1m v1.7.0
The output shows a single-node Kubernetes cluster. However, the status of the node isNotReady. This is because there is no Pod network configured. When you first logged on to the PWK node, you were given a list of three commands to configure the cluster. So far, we’ve only executed the first one (kubeadm init).
6. Initialize cluster networking (a Pod network)
3: Installing Kubernetes 34
$ kubectl apply -n kube-system -f \
"https://cloud.weave.works/k8s/net?k8s-version=$(kubectl version | base64 |\ tr -d '\n')"
serviceaccount "weave-net" created clusterrole "weave-net" created
clusterrolebinding "weave-net" created daemonset "weave-net" created
7. Verify the cluster again to see if node1has changed toReady
$ kubectl get nodes
NAME STATUS AGE VERSION
node1 Ready 2m v1.7.0
Now that Pod networking has been configured and the cluster has transitioned into theReadystatus, you’re now ready to add more nodes.
8. Copy thekubeadm joincommand from the output of thekubeadm init When you initialized the new cluster withkubeadm init, the final output of the command listed akubeadm joincommand that could be used to add more nodes to the cluster. This command included the cluster join-token and the IP socket that that the API server is listening on. Copy this command and be ready to paste it into the terminal of a new node (node2).
9. Click the+ ADD NEW INSTANCEbutton in the left pane of the PWK window You will be given a new node called <uniqueID>_node2. We’ll call thisnode2 for the remainder of the steps.
10. Paste thekubeadm joincommand into the terminal ofnode2
3: Installing Kubernetes 35
$ kubeadm join --token 948f32.79bd6c8e951cf122 10.0.29.3:6443 Initializing machine ID from random generator.
[kubeadm] WARNING: kubeadm is in beta... [preflight] Skipping pre-flight checks <Snip>
Node join complete:
* Certificate signing request sent to master and response received. * Kubelet informed of new secure connection details.
1. Switch back tonode1and run anotherkubectl get nodes
$ kubectl get nodes
NAME STATUS AGE VERSION
node1 Ready 5m v1.7.0
node2 Ready 1m v1.7.0
Your Kubernetes cluster now has two nodes.
Feel free to add more nodes with thekubeadm joincommand. Congratulations! You have a fully working Kubernetes cluster.
It’s worth pointing out that node1 was initialized as the Kubernetes master, and additional nodes will join the cluster as nodes. PWK gives Masters a blue icon next to their names, and Nodes a transparent icon. This helps you easily identify Masters and Nodes.
3: Installing Kubernetes 36
Minikube
Minikube is great if you’re a developer and need a local Kubernetes development environment on your laptop. What it’s not great for is production. You’ve been warned!
Basic Minikube architecture
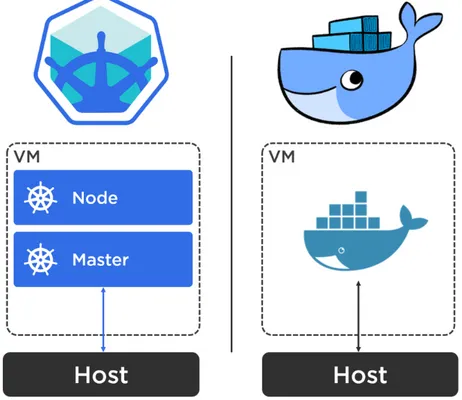
If you know Docker, Minikube is similar toDocker for MacandDocker for Windows - a super-simple way to spin up something on your laptop.
Figure 3.1 shows how the implementation of Minikube is similar to Docker for Mac and Docker for Windows. On the left is the high-level Minikube architecture, on the right is theDocker for MacorDocker for Windows architecture.
3: Installing Kubernetes 37
At a high level, you download the Minikube installer and typeminikube start. This creates a local virtual machine (VM) and spins up Kubernetes cluster inside of the VM. It also sets up your local shell environment so that you can access the cluster directly from your current shell (no requirement to SSH into the VM).
Inside of the Minikube VM there are two high level things we’re interested in:
• First up, there’s thelocalkube construct. This runs a Kubernetes node and a Kubernetes master. The master includes an API server and all of the other control plane stuff.
• Second up, the container runtime is pre-installed. At the time of writing this defaults to Docker, though you can specifyrkt instead if you require.
This architecture is shown in Figure 3.2.
Figure 3.2
Finally, outside of the VM we have kubectl, the Kubernetes client. When you run minikube start, your environment will be configured so that kubectl will issue commands to the Kubernetes cluster running inside the Minikube.
3: Installing Kubernetes 38
Installing Minikube
You can get Minikube for Mac, Windows, and Linux. We’ll take a quick look at Mac and Windows, as this is what most people run on their laptops.
Note:Minikube requires virtualization extensions enabled in your sys-tem’s BIOS.
Installing Minikube on Mac
Before jumping in and installing Minikube it’s probably a good idea to installkubectl (the Kubernetes client) on your Mac. You will use this later to issue commands to the Minikube cluster.
1. Use Brew to installkubectl
$ brew install kubectl Updating Homebrew...
This puts the kubectl binary in/usr/local/binand makes it executable. 2. Verify that the install worked.
$ kubectl version --client
Client Version: version.Info{Major:"1", Minor:"8"...
Now that we’ve installed thekubectlclient, let’s install Minikube.
1. Use Brew to install Minikube.
$ brew cask install minikube
==> Downloading https://storage.googlapis.com/minikube...
Provide your password if prompted.
2. Use Brew to install thexhyvelightweight hypervisor for Mac.
3: Installing Kubernetes 39
$ brew install docker-machine-driver-xhyve
==> Downloading https://homebrew.bintray.combottles...
3. Set the user owner of xhyveto be root (the following command should be issued on a single line and there should be no backslashes in the command\).
$ sudo chown root:wheel $(brew --prefix)/opt/docker-machine-driver-xhyve/bin\ /docker-machine-driver-xhyve
4. Grant it the ability tosetuid(the following command should be issued on a single line and there should be no backslashes in the command\).
$ sudo chmod u+s $(brew --prefix)/opt/docker-machine-driver-xhyve/bin/docker\ -machine-driver-xhyve
5. Start Minikube with the following command.
$ minikube start --vm-driver=xhyve Starting local Kubernetes cluster... Starting VM...
minikube start is the simplest way to start Minikube. Specifying the --vm-driver=xhyve flag will force it to use the xhyve hypervisor instead of VirtualBox.
You now have a Minikube instance up and running on your Mac!
Usekubectlto verify the Minikube install
The minikube startoperation configures your shell so that you can use kubectl against your new Minikube. Test this by running the followingkubectlcommand from same shell that you ranminikube startfrom.
3: Installing Kubernetes 40
Great, your kubectl context is set to Minikube (this meanskubectl commands will be sent to the Minikube cluster).
It’s worth pointing out that kubectl can be configured to talk to any Kubernetes cluster by setting different contexts - you just need to switch between contexts to send commands to different clusters.
Use thekubectl get nodescommand to list the nodes in the cluster.
$ kubectl get nodes
NAME STATUS AGE VERSION minikube Ready 1m v1.8.0
That’s our single-node Minikube cluster ready to use!
Deleting a Minikube cluster
We spun up the Minikube cluster with a singleminikube startcommand. We can stop it with aminikube stopcommand.
$ minikube stop
Stopping local Kubernetes cluster... Machine stopped
Stopping a Minikube keeps all the config on disk. This makes it easy to start it up again and pick things up from where you left off.
To blow it away completely - leaving no trace - use theminikube deletecommand.
$ minikube delete
Deleting local Kubernetes cluster... Machine deleted
How simple was that!
Running a particular version of Kubernetes inside of Minikube
Minikube lets you specify the version of Kubernetes you want to run. This can be particularly useful if you need to match the version of Kubernetes used in your production environment.
3: Installing Kubernetes 41
$ minikube get-k8s-versions
The following Kubernetes versions are available: - v1.8.0
Use the following command to start a Minikube cluster running Kubernetes version 1.7.0.
Run anotherkubectl get nodescommand to verify the version.
$ kubectl get nodes
NAME STATUS AGE VERSION minikube Ready 1m v1.7.0
Bingo!
So that’s Minikube on Mac. Now let’s look at it on Windows 10.
Installing Minikube on Windows 10
3: Installing Kubernetes 42
1. Using the Chocolaty package manager 2. Downloading via your web browser
If you are using Chocolaty, you can install it with the following command.
> choco install kubernetes-cli
If you are not using Chocolaty, you can download it via your web browser.
Point your web browser to https://kubernetes.io/docs/tasks/tools/install-kubectl/ and click theWindowstab under theInstall kubectl binary via curlheading. You will be given a link to download the latest version using your browser. You do not need to usecurl.
Once the download is complete, copy thekubectl.exefile to a folder in your system’s %PATH%.
Verify the installation with akubectl versioncommand.
> kubectl version --client=true --output=yaml clientVersion:
Now that you havekubectl, you can proceed to install Minikube for Windows.
1. Open a web browser to the Minikube Releases page on GitHub • https://github.com/kubernetes/minikube/releases
3: Installing Kubernetes 43
3. Start the installer and click through the wizard accepting the default options. 4. Make sure Hyper-V has an external vSwitch .
Open Hyper-V Manager and go toVirtual Switch Manager.... If there is no Virtual Switch configured with the following two options, create a new one:
• Connection type = External network
• Allow management operating system to share this network adapter For the remainder of this section we will assume that you have Hyper-V configured with an external vSwitch calledexternal. If you’re has a different name, you will have to substitute your name in the following commands. 5. Verify the Minikube version with the following command.
> minikube version
minikube version: v0.22.3
6. Use the following command to start a local Minikube instance running Kubernetes version 1.8.0.
You can use the minikube get-k8s-versions command to see a list of available Kubernetes versions.
The following command assumes a Hyper-V vSwitch called external. You may have named yours differently.
> minikube start \
Kubectl is now configured to use the cluster.
3: Installing Kubernetes 44
If the target machine actively refuses the network connection with aUnable to connect to the server: dial tcp... error. This is most likely a network related error. Make sure that your external vSiwtch is configured correctly, and that you specified it correctly with the--hyperv-virtual-switch flag. kubectltalks to Kubernetes inside theminikubeHyper-V VM over port 8443.
Congratulations! You’ve got a fully working Minikube cluster up and running on your Windows 10 PC.
You can now typeminikubeon the command line to see a full list of minikube sub-commands. A good one to try out might beminikube dashboard which will open the Minikube dashboard GUI in a new browser tab.
Figure 3.3
3: Installing Kubernetes 45
Google Container Engine (GKE)
First up, that’s not a typo in the title above. We shorten Google Container Engine to GKE not GCE. The first reason is that GKE is packagedKubernetes running on the Google Cloud, so theKis for Kubernetes. The second reason is that GCE is already taken for Google Compute Engine.
Anyway, a quick bit of background to set the scene. GKE is layered on top of Google Compute Engine (GCE). GCE provides the low-level virtual machine instances and GKE lashes the Kubernetes and container magic on top.
Figure 3.4
The whole raison d’être behind GKE is to make Kubernetes and container orchestra-tion accessible and simple! Think of GKE asKubernetes as a Service– all the goodness of a fully-featured, production-grade Kubernetes cluster pre-packaged ready for us consume. McDonalds anyone!?
Configuring GKE
To work with GKE you’ll need an account on the Google Cloud with billing configured and a blank project setting up. These are all really easy to setup, so we won’t spend time explaining them here - for the remainder of this section I’m assuming you already have an account with billing configured and a new project created.
3: Installing Kubernetes 46
1. From within the Console of your Google Cloud Platform (GCP) project, open the navigation pane on the left-hand side and selectContainer Engine from under theCOMPUTEsection. You may have to click the three horizontals bars at the top-left of the Console to make the navigation pane visible.
2. Make sure that Container clusters is selected in the left-hand navigation pane and click the+ CREATE CLUSTERbutton.
This will start the wizard to create a new Kubernetes cluster. 3. Enter aNameandDescriptionfor the cluster.
4. Select the GCP Zone that you want to deploy the cluster to. At the time of writing, a cluster can only exist in a single zone.
5. Select theCluster Version. This is the version of Kubernetes that will run on your master and nodes. You are limited to the versions available in the drop-down list.
6. Select theMachine typethat you want your cluster nodes to be based on. 7. UnderNode imagechoseCOS. This is the Container Optimized OS image based
on Chromium OS. It supersedes the oldercontainer-vmimage.
8. Use the Size field to choose how many nodes you want in the cluster. This is the number of nodes in the cluster and does not include the master/control plane which is built and maintained for you in the background.
9. Leave all other options as their defaults and clickCreate.
You can also click the More link to see a long list of other options you can customize. It’s worth taking a look at these but we won’t be discussing them in this book.
Your cluster will now be created!
Exploring GKE
Now that you have a cluster, it’s time to have a quick look at it.
Make sure you’re logged on to the GCP Console and are viewing Container clustersunderContainer Engine.
3: Installing Kubernetes 47
Figure 3.5
Click the cluster name to drill in to more detail. Figure 3.6 shows a screenshot of some of the detail you can view.
Figure 3.6
Clicking the> CONNECTconsole icon towards the top right of the web UI (not shown in the Figure above) gives you the option to open a Cloud Shell session that you can inspect and manage your cluster from.
3: Installing Kubernetes 48
$ gcloud container clusters list
NAME ZONE MASTER MASTER_IP NODE_VER NODES STATUS clus2 us-centr 1.7.6 35.188... 1.7.6 3 RUNNING
The output above has been clipped to make it more readable.
If you click > CONNECT and choose the Show gcloud command option, you will be presented with the commands needed to configure kubectl to talk to the cluster. Copy and paste those commands into the Cloud Shell session so that you can manage your Kubernetes cluster withkubectl.
Run akubectl get nodescommand to list the nodes in the cluster.
$ kubectl get nodes
NAME STATUS AGE VERSION
gke-cluster... Ready 5m v1.7.6 gke-cluster... Ready 6m v1.7.6 gke-cluster... Ready 6m v1.7.6
Congratulations! You now know how to create a production-grade Kubernetes cluster using Google Container Engine (GKE). You also know how to inspect it and connect to it.
Installing Kubernetes in AWS
There’s more than one way to install Kubernetes in AWS. We’re going to show you how to do it using thekopstool that is under active development. So, expect some of the specifics to change over time.
Note:kops is short for Kubernetes Operations. At the time of writing, the only provider it supports is AWS. However, support for more platforms is in development. At the time of writing there is also nokops binary for Windows.
3: Installing Kubernetes 49
• kubectl
• thekopsbinary for your OS • theawsclitool
• the credentials of an AWS account with the following permissions: – AmazonEC2FullAccess
– AmazonRoute53FullAccess – AmazonS3FullAccess – IAMFullAccess
– AmazonVPCFullAccess
The examples below are from a Linux machine, but it works the same from a Mac (and probably Windows in the future). The example also uses a publicly routable DNS domain called tf1.com that is hosted with a 3rd party provider such as GoDaddy. Within that domain I have a subdomain calledk8sdelegated Amazon Route53. You will need to use a different domain in your own lab.
Download and install
kubectlFor Mac, the download and installation is a simplebrew install kubectl. The following procedure is for a Linux machine.
1. Use the following command to download the latestkubectlbinary.
$ curl -LO https://storage.googleapis.com/kubernetes-release/release/$(curl \ -s https://storage.googleapis.com/kubernetes-release/release/stable.txt)/bin\ /linux/amd64/kubectl
The command above is a single command, but is quite long and will wrap over multiple lines in the book and insert backslashes at the end of each printed line \. These backslashes are not part of the command. It will download the kubectlbinary to your home directory.
3: Installing Kubernetes 50
$ chmod +x ./kubectl
3. Add it to a directory in your PATH
$ mv ./kubectl /usr/local/bin/kubectl
4. Run akubectlcommand to make sure it’s installed and working.
Download and install
kops1. Download thekopsbinary with the followingcurlcommand (the command should be issued on one line and have no backslashes\in it).
$ curl -LO https://github.com/kubernetes/kops/releases/download/1.5.3/kops-l\ inux-amd64
2. Make the downloaded binary executable.
$ chmod +x kops-linux-amd64
3. Move it to a directory in your path.
$ mv kops-linux-amd64 /usr/local/bin/kops
4. Run akops versioncommand to verify the installation.
$ kops version
Version 1.5.3 (git-46364f6)
Install and configure the AWS CLI
The example below shows how to install the AWS CLI from the default app repos used by Ubuntu 16.04.
3: Installing Kubernetes 51
$ sudo apt-get install awscli -y
2. Run theaws configurecommand to configure your instance of the AWS CLI You will need the credentials of an AWS IAM account withAmazonEC2FullAccess, AmazonRoute53FullAccess, AmazonS3FullAccess, IAMFullAccess, and Ama-zonVPCFullAccessto complete this step.
$ aws configure
AWS Access Key ID [None]: ************** AWS Secret Access Key [None]: ************** Default region name [None]: enter-your-region-here Default output format [None]:
$
3. Create a new S3 bucket for kops to store config and state information.
The domain name you use in the example below will be different if you are following along. Thecluster1is the name of the cluster we will create,k8sis the subdomain delegated to AWS Route53, andtf1.comis the public domain I have hosted with a 3rd party.tf1.comis fictional and only being used in these examples to keep the command line arguments short.
$ aws s3 mb s3://cluster1.k8s.tf1.com make_bucket: cluster1.k8s.tf1.com
4. List your S3 buckets andgrepfor the name of the bucket you created. This will prove that the bucket created successfully.
$ aws s3 ls | grep k8s
2017-06-02 13:09:11 cluster1.k8s.tf1.com
5. Tellkopswhere to find its config and state.
$ export KOPS_STATE_STORE=s3://cluster1.k8s.tf1.com 6. Make your AWS SSH key available tokops.
The command below will copy the keys in your authorized_keys file to a new file in ∼/.ssh/id_rsa.pub. This is because kops expects to find your
3: Installing Kubernetes 52
$ cp ~/.ssh/authorized_keys ~/.ssh/id_rsa.pub
7. Create a new cluster with the followingkops create clustercommand.
$ kops create cluster \
--cloud=aws --zones=eu-west-1b \ --dns-zone=k8s.tf1.com \
--name cluster1.k8s.tf1.com --yes
The command is broken down as follows. kops create cluster tells kops to create a new cluster.--cloud=awstells kops to create this cluster in AWS using the AWS provider.--zones=eu-west-1b tells kops to create cluster in the eu-west-1b zone. We tell it to use the delegated zone with the --dns-zone=k8s.tf1.com flag. We name the cluster with the --name flag, and the --yesflag tellskopsto go ahead and deploy the cluster. If you omit the--yes flag a cluster config will be created but it will not be deployed.
It may take a few minutes for the cluster to deploy. This is because kops is doing all the hard work creating the AWS resources required to build the cluster. This includes things like a VPC, EC2 instances, launch configs, auto scaling groups, security groups etc. After it has built the AWS infrastructure it also has to build the Kubernetes cluster.
8. Once the cluster is deployed you can validate it with the kops validate clustercommand.
$ kops validate cluster
Using cluster from kubectl context: cluster1.k8s.tf1.com
INSTANCE GROUPS
NAME ROLE MACHINETYPE MIN MAX SUBNETS master.. Master m3.medium 1 1 eu-west-1b nodes Node t2.medium 2 2 eu-west-1b
NODE STATUS
NAME ROLE READY
3: Installing Kubernetes 53
Your cluster cluster1.k8s.tf1.com is ready
Congratulations! You now know how to create a Kubernetes cluster in AWS using thekopstool.
Now that your cluster is up and running you can issuekubectlcommands against it, and it might be worth having a poke around in the AWS console to see some of the resources thatkopscreated.
Deleting a Kubernetes cluster in AWS with
kopsTo delete the cluster, you just created you can use the kops delete cluster command.
The command below will delete the cluster we created earlier. It will also delete all of the AWS resources created for the cluster.
$ kops delete cluster --name=cluster1.k8s.tf1.com --yes
Manually installing Kubernetes
In this section, we’ll see how to use thekubeadmcommand to perform a manual install of Kubernetes.kubeadmis a core Kubernetes project tool that’s pretty new at the time I’m writing this book. However, it’s got a promising future and the maintainers of the project are keen not to mess about with command line features etc. So, the commands we shown here shouldn’t change too much in the future (hopefully).
The examples in this section are based on Ubuntu 16.04. If you are using a different Linux distro some of the commands in the pre-reqs section will be different. However, the procedure we’re showing can be used to install Kubernetes on your laptop, in your data center, or even in the cloud.
3: Installing Kubernetes 54
if these machines are VMs on your laptop, bare metal servers in your data center, or instances in the public cloud -kubeadmdoesn’t care!
Figure 3.7
The high-level plan will be to initialize a new cluster withnode1as the master. We’ll create an overlay network, then addnode2andnode3as nodes. All three nodes will get:
• Docker • kubeadm • kubelet • kubectl • The CNI
Dockeris the container runtime,kubeadmis the tool we’ll use the build the cluster, kubeletis the Kubernetes node agent,kubectlis the standard Kubernetes client, and CNI (Container Network Interface) installs support for CNI networking.
Pre-requisites
The following commands are specific to Ubuntu 16.04 and need to be ran onall three nodes.
apt-get update && apt-get install -y apt-transport-https
curl -s https://packages.cloud.google.com/apt/doc/apt-key.gpg | apt-key add
3: Installing Kubernetes 55
apt-get update
These commands set things up (on Ubuntu 16.04) so that we can install the right packages from the right repos.
1. Install Docker, kubeadm, kubectl, kubelet, and the CNI.
$ apt-get install docker.io kubeadm kubectl kubelet kubernetes-cni Reading package lists... Done
Building dependency tree <SNIP>
2. Run the same command again to see version info
$ apt-get install docker.io kubeadm kubectl kubelet kubernetes-cni <SNIP>
docker.io is already at the latest version (1.12.6-0ubuntu1~16.04.1). kubeadm is already at the latest version (1.6.1-00).
kubectl is already at the latest version (1.6.1-00). kubelet is already at the latest version (1.6.1-00).
kubernetes-cni is already at the latest version (0.5.1-00).
That’s the pre-reqs done.
Initialize a new cluster
3: Installing Kubernetes 56
$ kubeadm init <SNIP>
Your Kubernetes master has initialized successfully!
To start using your cluster, you need to run (as a regular user):
sudo cp /etc/kubernetes/admin.conf $HOME/ sudo chown $(id -u):$(id -g) $HOME/admin.conf export KUBECONFIG=$HOME/admin.conf
<SNIP>
You can join any number of machines by running the following on each node\ as root:
kubeadm join --token b90685.bd53aca93b758efc 172.31.32.74:6443
The command pulls all required images and creates all the required system Pods etc. The output of the command gives you a few more commands that you need to run to set your local environment. It also gives you thekubeadm joincommand and token required to add additional nodes.
Congratulations! That’s a brand-new Kubernetes cluster created comprising a single master.
Complete the process by running the commands listed in the output of thekubeadm initcommand shown above.
$ sudo cp /etc/kubernetes/admin.conf $HOME/ $ sudo chown $(id -u):$(id -g) $HOME/admin.conf $ export KUBECONFIG=$HOME/admin.conf
These commands may be different, or even no longer required in the future. However, they copy the Kubernetes config file form /etc/kubernetes into your home directory, change the ownership to you, and export an environment variable that tells Kubernetes where to find its config. In the real world, you may want to make the environment variable a permanent part of your shell profile.
3: Installing Kubernetes 57
$ kubectl get nodes
NAME STATUS AGE VERSION node1 NotReady 1m v1.6.1
Run anotherkubectlcommand to find the reason why the clusterSTATUSis showing asNotReady.
$ kubectl get pods --all-namespaces
NAMESPACE NAME READY STATUS RESTARTS AGE
kube-system kube-apiserver-node1 1/1 Running 0 1m kube-system kube-dns-39134729... 0/3 Pending 0 1m kube-system kube-proxy-bp4hc 1/1 Running 0 1m kube-system kube-scheduler-node1 1/1 Running 0 1m
This command shows all pods in all namespaces - this includes system pods in the system (kube-system) namespace.
As we can see, none of thekube-dnspods are running. This is because we haven’t created a pod network yet.
Create a pod network. The example below creates a multi-host overlay network provided by Weaveworks. However, other options exist, and you do not have to go with the example shown here.
$ kubectl apply --filename https://git.io/weave-kube-1.6 clusterrole "weave-net" created
serviceaccount "weave-net" created clusterrolebinding "weave-net" created daemonset "weave-net" created
Be sure to use the right version of the Weaveworks config file. Kubernetes v1.6.0 introduced some significant changes in this area meaning that older config files will not work with Kubernetes version 1.6 and higher.
3: Installing Kubernetes 58
$ kubectl get nodes
NAME STATUS AGE VERSION node1 Ready 4m v1.6.1
Great, the cluster is ready and the DNS pods will now be running. Now that the cluster is up and running it’s time to add some nodes.
To do this we need the cluster’s join token. You might remember that this was provided as part of the output when the cluster was first initialized. Scroll back up to that output, copy thekubeadm joincommand to the clipboard and then run it on
node2andnode3.
Note:The following must be performed onnode2andnode3 and you
must have already installed the pre-reqs (Docker, kubeadm, kubectl, kubelet, CNI) on these nodes.
node2$ kubeadm join --token b90685.bd53aca93b758efc 172.31.32.74:6443 <SNIP>
Node join complete:
* Certificate signing request sent to master and response received * Kubelet informed of new secure connection details.
Repeat the command onnode3.
Make sure that the nodes successfully registered by running anotherkubectl get nodeson the master.
3: Installing Kubernetes 59
Chapter summary
In this chapter we learned how to install Kubernetes in various ways and on various platforms. We learned how to use Minikube to quickly spin up a development environment on your Mac or Windows laptop. We learned how to spin up a managed Kubernetes cluster in the Google Cloud using Google Container Engine (GKE). Then we looked at how to use thekops tool to spin up a cluster in AWS using the AWS provider. We finished the chapter seeing how to perform a manual install using the kubeadmtool.
4: Working with Pods
We’ll split this chapter in to two main parts:
• Theory • Hands-on
So let’s crack on with the theory.
Pod theory
In the VMware and Hyper-V worlds, the atomic unit of scheduling is the Virtual Machine (VM). Deploying workloads in these environments means stamping them out in VMs.
In the Docker world, the atomic unit is the container. Even though Docker now supports services and stacks, the smallest and most atomic unit of scheduling is still the container.
In the Kubernetes world, the atomic unit is thePod!
Figure 4.1
4: Working with Pods 61
Pods vs containers
At a high-level, Pods sit somewhere in between a container and a VM. They’re bigger, and arguably more high level than a container, but they’re a lot smaller than a VM. Digging a bit deeper, a Pod is just a shared execution environment for one or more containers. More often than not, a Pod only has one container. But multi-container Pods are definitely a thing. For example, multi-container Pods are excellent for co-scheduling tightly-coupled containers - containers that share resources and wouldn’t work well if they were scheduled on different nodes in the cluster.
Pods: the canonical example
The example we all use when describing the advantages of multi-container Pods is a web server that has a file synchronizer.
In this example we have two clear concerns:
1. Serving the web page
2. Making sure the content is up-to-date
Micro-service design patterns dictate that we should keep these concerns separate. One way to do that is deploy them in separate containers - one container for the web service, another container for the file-sync service.
This approach has a lot of advantages.
Instead of building a mini-monolith where a single container runs the web service andfile-sync service, we are building two micro-services, each with its own separate concern. This means we can have different teams responsible for each of the two services. We can scale each service independently. We can also update them independently. And if the container running the file-sync service fails, the web service can stay up (though it may end up serving stale content).