Microsoft Dynamics
NAV 2009 Programming
Cookbook
Build better business applications with NAV
Over 110 simple but incredibly effective recipes for taking
control of Microsoft Dynamics NAV 2009
Matt Traxinger
Microsoft Dynamics NAV 2009 Programming Cookbook
Build better business applications with NAV
Copyright © 2010 Packt Publishing
All rights reserved. No part of this book may be reproduced, stored in a retrieval system, or transmitted in any form or by any means, without the prior written permission of the publisher, except in the case of brief quotations embedded in critical articles or reviews.
Every effort has been made in the preparation of this book to ensure the accuracy of the information presented. However, the information contained in this book is sold without warranty, either express or implied. Neither the author, Packt Publishing, nor its dealers or distributors will be held liable for any damages caused or alleged to be caused directly or indirectly by this book.
Packt Publishing has endeavored to provide trademark information about all the companies and products mentioned in this book by the appropriate use of capitals. However, Packt Publishing cannot guarantee the accuracy of this information.
First published: October 2010
Production Reference: 141010
Published by Packt Publishing Ltd. 32 Lincoln Road
Olton
Birmingham, B27 6PA, UK.
ISBN 978-1-849680-94-3
www.packtpub.com
Credits
Author
Matt Traxinger
Reviewer David Roys
Acquisition Editor Rashmi Phadnis
Development Editor Mayuri Kokate
Technical Editor Alina Lewis
Indexer Rekha Nair
Editorial Team Leader Gagandeep Singh
Project Team Leader Priya Mukherji
Project Coordinator Sneha Harkut
Proofreader Lesley Harrison
Graphics
Geetanjali Sawant
Production Coordinator Arvindkumar Gupta
Cover Work
About the author
Matt Traxinger graduated from the Georgia Institute of Technology in 2005 with a B.S.
in Computer Science, specializing in Human Computer Interaction and Cognitive Science. After college, he took a job as an add-on developer using a language he was unfamiliar with and for a product he had never heard of: Navision. It turned out to be a great decision.In the years following, Matt learned all areas of the product and earned Microsoft Certified Business Solutions Professional certifications in both technical and functional areas of NAV. He continues to stay current with new releases of the product and is certified in multiple areas for versions 4.0, 5.0, and 2009.
Currently, Matt works in Norcross, GA, for Canvas Systems—one of the largest resellers of new and refurbished computer equipment—as an in-house NAV Developer and Business Analyst. He supports multiple offices in the United States as well as locations in the United Kingdom and the Netherlands.
In his spare time you can find him on the online communities Mibuso.com and DynamicsUser.net under the name MattTrax, helping others learn more about the Dynamics NAV software.
I would like to thank my mom, Norma, not just for buying me my first computer, but for everything that I cannot put into words. Your decisions have put me down the path I am on and I would not trade it for anything.
Thank you to my sister, Alex. Your hard work inspires me. I could not imagine having a better sister than you.
For my wife, Kim. Watching you chase your dreams for the past six years has motivated me to keep going after mine. Thank you for everything you do for me.
About the reviewer
David Roys is a Microsoft Most Valuable Professional (MVP) for the Microsoft Dynamics
NAV product and is a co-author of the first book on NAV 2009–Implementing Microsoft Dynamics NAV 2009–which was published by Packt Publishing in December 2008.He works for Intergen Ltd., a bunch of fun-loving, incredibly smart people who are guided by the BHAG (Big Hairy Audacious Goal): "Everyone, every day is touched positively by the things we do". To learn more about Intergen and to read their blog, visit www.intergen.co.nz.
David created www.teachmenav.com, a website that allows readers to access programming samples that accompany the book he wrote with Vjeko Babić and
regularly blogs on the subject of NAV at http://www.teachmenav.com/blogs/dave/ default.aspx.
Table of Contents
Preface 1
Chapter 1: Strings, Dates, and Other Data Types
7
Introduction 7 Retrieving the system date and time 8
Retrieving the work date 10
Determining the day, month, and year from a given date 12 Converting a value to a formatted string 14
Creating an array 16
Creating an Option variable 19 Converting a string to another data type 21 Manipulating string contents 23 Using date formulas to calculate dates 26
Chapter 2: General Development
29
Introduction 29 Repeating code using a loop 30 Displaying a Progress Bar 33 Checking for conditions using an IF statement 35 Using a CASE statement to test multiple conditions 38
Creating a function 40
Passing parameters by reference 41
Referencing dynamic tables and fields 44
Using recursion 46
Chapter 3: Working with Tables and Records
49
Introduction 50
Table of Contents
Retrieving a single record from the database 59
Using advanced filtering 60
Retrieving data using FIND 63 Adding a FlowField to a table 65
Creating a SumIndex field 68
Marking records for future use 70
Clearing filters, keys, and values 72
Using temporary tables to store data 73 Retrieving data from another company 76
Merging records 77
Writing your own rollback routine 79
Chapter 4: Designing Forms
87
Introduction 87 Obtaining input without a form 88 Using the Form Generation Wizard 89
Changing text appearance 92
Preventing editable lookup forms 93
Adding an editable field to a non-editable form 94
Creating a matrix form 95
Creating a wizard-style form 100
Designing a form based on a temporary table 105 Updating a subform from a parent form 106 Updating a parent form from a subform 110
Chapter 5: Report Design
115
Introduction 115 Using the Report Generation Wizard 116
Adding custom filters to the request form 119
Setting filters when a report is loaded 122
Creating a report to process data 123 Displaying a check mark on a report 125 Dynamically showing Sections on reports 127 Grouping data to display totals 129 Adding page totals to reports 131
Display page X of Y 133
Using virtual tables to loop through data 140 Adding a watermark to a page 144
Chapter 6: Diagnosing Code Problems
151
Introduction 151
Using the debugger 152
Table of Contents
Using Code Coverage 158
Handling runtime errors 160
Using Client Monitor to diagnose problems 162 Finding errors when using NAS 165 Implementing Try / Catch / Finally 167
Chapter 7: Roles and Security
173
Introduction 173 Adding roles through the User Setup table 174 Creating and assigning a security role 176 Using FILTERGROUP to restrict data 178
Checking for user-assigned roles 180
Checking Active Directory groups 184
Using security filters 189
Field-level security 191
Assigning menu suites based on company 197
Ending an idle session 201
Automatically adding users to NAV 202
Hiding values in Zoom 205
Chapter 8: Leveraging Microsoft Office
209
Introduction 209 Using the style sheet tool 210 Sending data to Microsoft Word 213
Sending an e-mail from NAV through Outlook 216
Exporting data using the Excel buffer 218 Creating a data connection from Excel to NAV 222 Creating an InfoPath form with NAV data 224
Instant messaging using Office Communicator 227
Creating charts with Visio 231
Chapter 9: OS Interaction
237
Introduction 237
Using HYPERLINK to open external files 238
Working with environment variables 240 Using SHELL to run external applications 243
Browsing for a file 244
Browsing for a folder 245
Checking file and folder access permissions 247
Table of Contents
Chapter 10: Integration
255
Introduction 255
Flat file exchange using dataports 256
Sharing information through XMLports 259
Manually writing to and reading from files 261
Creating a web service 264
Consuming web services 265
Sending data through FTP 267
Printing reports to PDF 269
Creating a custom NAS handler 273 Writing your own automation using C# 275 Using ADO to access outside data 277
Chapter 11: Working with SQL Server
281
Introduction 281 Creating a basic SQL query 282 Adding the xp_ stored procedures 284 Understanding SIFT tables 286
Using SQL Profiler 290
Displaying data from a SQL view in NAV 293 Figuring out who is blocking whom 295 Setting up a backup plan 297 Scheduling NAV tasks from SQL Server 300
Chapter 12: The RoleTailored Client
307
Introduction 307 Creating a page using the Page Generation Wizard 308
Building a Role Center 311
Changing default filter columns 316
Building the report layout 318 Interactive sorting for reports 321 Displaying a graph on a report 324
Displaying a .NET add-in on a page 327
Preface
Microsoft Dynamics NAV 2009 is a business management solution that helps simplify and streamline highly specialized business processes such as finance, manufacturing, customer relationship management, supply chains, analytics, and electronic commerce for small and medium-sized enterprises. ERP systems like NAV thus become the center of a company's day-to-day operations. When you learn to program in an environment like this, it opens up doors to many other exciting areas such as .NET programming, SQL Server, and Web Services.
Microsoft Dynamics NAV 2009 Programming Cookbook will take you through interesting topics that span a wide range of areas such as integrating the NAV system with other software applications like Microsoft Office, creating reports to present information from multiple areas of the system, and so on. You will not only learn the basics of NAV programming, but you will also be exposed to the technologies that surround the NAV system such as .NET programming, SQL Server, and Web Services.
The first half of the cookbook will help programmers using NAV for the first time by walking them through the building blocks of writing code and creating objects such as tables, forms, and reports.
The second half focuses on using the technologies surrounding NAV to build better solutions. You will learn how to write .NET code that works with the NAV system and how to integrate the system with other software applications such as Microsoft Office or even custom programs. You will also discover some of the features of the RoleTailored client including creating pages and custom add-ins.
What this book covers
Chapter 2, General Development, focuses on the traditional code structures native to most programming languages. These structures include loops, conditional statements, functions, and so on. You will also learn some commands that are found exclusively in C/AL including ones that allow you to create your own progress bars and how to reference dynamic data.
Chapter 3, Working with Tables and Records, discusses the many things that can be done with the database in NAV. You will learn how to create table structures to hold business data, such as fields and keys, and how to filter that data to return only what you wish to see. Additionally, you will find out how to retrieve data from other companies and rollback any data changes that may have been committed to the database.
Chapter 4, Designing Forms, shows you how to create displays that will allow your users to interact with the data. You will learn how to create several different types of forms including matrixes and wizards and to customize its look and feel.
Chapter 5, Report Design, focuses on displaying data from multiple sources to your users. You will learn how to group data and display totals, and create reports that only process data. There are also recipes that will teach you how to make reports look more professional with tools such as watermarks and page counts.
Chapter 6, Diagnosing Code Problems, explains how to use built-in NAV tools such as Debugger and Client Monitor to find problems in your code. You will also learn techniques for structuring your code so that you can bypass any errors that might occur.
Chapter 7, Roles and Security, covers setting up user roles and permissions. You will learn several methods that will let you interact with the NAV security system and different ways to restrict user access to data such as field-level security and overriding the Zoom window. Integration with Active Directory is also discussed.
Chapter 8, Leveraging Microsoft Office, describes different methods to integrate with the Microsoft Office suite of products. These include Word, Excel, InfoPath, Communicator (instant messenger), and Visio. Many of these recipes require you to build .NET automation classes that will be used within the NAV client.
Chapter 9, OS Interaction, focuses on different ways to integrate with the Windows operating system. There are several recipes to replace deprecated functions from versions prior to NAV 2009. You will learn how to search the file system as well as how to directly query the system registry.
Chapter 10, Integration, explains different methods by which NAV can interact with outside applications. You will learn how to exchange flat files with Dataports and XMLports, write your own .NET classes which can be used in NAV, and access data directly from other systems. The new Web Services features in NAV 2009 are also discussed.
Chapter 12, The RoleTailored Client, covers many of the new features found in NAV 2009. You will learn the basics of creating pages, Role Centers, and report layouts. In addition, you will learn how to write your own .NET add-in to display data from outside sources directly in the NAV client.
What you need for this book
Used in the recipes: NAV 2009 SP1, Visual Studio 2008, SQL Server 2008.
Most recipes will work with: NAV 5.0, Visual Studio 2005, SQL Server 2005.
Who this book is for
If you are a junior/entry level NAV developer then the first half of the book is designed
primarily for you. You may or may not have any programming experience. This book focuses on the basics of NAV programming. It would be best if you have gone through a brief introduction to the NAV client.
If you are a mid-level NAV developer, you will find the second half more useful. These chapters explain how to think outside the NAV box when building solutions. Senior developers will find these recipes useful too.
Conventions
In this book, you will find a number of styles of text that distinguish between different kinds of information. Here are some examples of these styles, and an explanation of their meaning.
Code words in text are shown as follows: "The sp_who command queries the sys. sysprocesses system table in SQL."
A block of code is set as follows:
Window.OPEN('Customer No: #1####################'); Window.INPUT(1, CustomerNo);
Window.CLOSE;
IF Customer.GET(CustomerNo) THEN
MESSAGE('Customer Name: %1', Customer.Name) ELSE
MESSAGE('No customer found!);
New terms and important words are shown in bold. Words that you see on the screen, in menus or dialog boxes for example, appear in the text like this: "From the NAV client menu, click on Tools | Debugger | CodeCoverage."
Warnings or important notes appear in a box like this.
Tips and tricks appear like this.
Reader feedback
Feedback from our readers is always welcome. Let us know what you think about this book—what you liked or may have disliked. Reader feedback is important for us to develop titles that you really get the most out of.
To send us general feedback, simply send an e-mail to [email protected], and mention the book title via the subject of your message.
If there is a book that you need and would like to see us publish, please send us a note in the SUGGEST A TITLE form on www.packtpub.com or e-mail [email protected].
If there is a topic that you have expertise in and you are interested in either writing or contributing to a book, see our author guide on www.packtpub.com/authors.
Customer support
Now that you are the proud owner of a Packt book, we have a number of things to help you to get the most from your purchase.
Downloading the example code for this book
Errata
Although we have taken every care to ensure the accuracy of our content, mistakes do happen. If you find a mistake in one of our books—maybe a mistake in the text or the code—we would be grateful if you would report this to us. By doing so, you can save other readers from frustration and help us improve subsequent versions of this book. If you find any errata, please report them by visiting http://www.packtpub.com/support, selecting your book, clicking on the erratasubmissionform link, and entering the details of your errata. Once your errata are verified, your submission will be accepted and the errata will be uploaded on our website, or added to any list of existing errata, under the Errata section of that title. Any existing errata can be viewed by selecting your title from http://www.packtpub.com/support.
Piracy
Piracy of copyright material on the Internet is an ongoing problem across all media. At Packt, we take the protection of our copyright and licenses very seriously. If you come across any illegal copies of our works, in any form, on the Internet, please provide us with the location address or website name immediately so that we can pursue a remedy.
Please contact us at [email protected] with a link to the suspected pirated material.
We appreciate your help in protecting our authors, and our ability to bring you valuable content.
Questions
1
Strings, Dates, and
Other Data Types
In this chapter, we will cover:
f Retrieving the system date and time
f Retrieving the work date
f Determining the day, month, and year from a given date
f Converting a value to a formatted string
f Creating an array
f Creating an Option variable
f Converting a string to another data type
f Manipulating string contents
f Using date formulas to calculate dates
Introduction
Simple data types are building blocks for everything you will program. C/AL contains the same data types that you will find in most other programming languages: Booleans, integers, decimals, dates, and strings. There are of course more than just these five, but majority of your programming will revolve around using these types of variables.
The recipes you will find in this section may not be the most interesting, but are valuable. The functionality described here is used throughout the system. As such, each example in this chapter is accompanied by actual code from base NAV objects in order to better illustrate how they can be used.
Retrieving the system date and time
There are many instances when it is necessary to obtain the current date and time from the user's system. This recipe will show you how to get that information.
How to do it...
1. Create a new codeunit from ObjectDesigner.
2. Write the following code in the OnRun trigger of the codeunit:
MESSAGE('Todays Date: %1\Current Time: %2', TODAY, TIME);
3. Save and close the codeunit.
4. When you run the codeunit you should see a window similar to the following screenshot:
How it works...
The TODAY keyword returns the date from the system clock on the client computer. In Windows, the current system time is usually located at the bottom-right corner of the task bar. The same holds true for the system time which is returned by the TIME keyword.
There's more...
The actual date and time returned depends on which version of the NAV client you are using. In the RoleTailoredclient, the date and time come from the NAV server. In the Classicclient, the date and time come directly from the client computer and users will be able to manipulate the system clock to their advantage if they need to. An example could be a time clock
You can also retrieve the system date and time, all at once, using the CURRENTDATETIME function. The date and time can be extracted using the DT2DATE and DT2TIME
functions respectively.
For a complete list of date functions, search the C/SIDE Reference Guide under the Help menu for date and time functions.
Logging changes and events
The ChangeLog is a base NAV module that allows you to track changes to specific fields in tables. The following code can be found in Codeunit 423, Change Log Management, in the InsertLogEntry() method.
ChangeLogEntry.INIT;
ChangeLogEntry."Date and Time" := CURRENTDATETIME;
ChangeLogEntry.Time := DT2TIME(ChangeLogEntry."Date and Time");
Here, instead of using the WORKDATE function, we use the CURRENTDATETIME function and then extract the time using the DT2TIME function. The system designers could have just done the following setup:
ChangeLogEntry.Date := TODAY; ChangeLogEntry.Time := TIME;
The advantage of using CURRENTDATETIME over TODAY and TIME is minimal.
CURRENTDATETIME makes one request to the system, while the second method makes two. It is possible that another operation or thread on the client machine could take over between retrieving the date and time from the computer, however, this is very unlikely. The operations could also take place right before and after midnight, generating some very strange data. The requirements for your modification will determine which method is suits best, but generally
CURRENTDATETIME is the correct method to use.
See also
f Retrieving the work date
f Determining the day, month, and year from a date
f Converting a value to a formatted string
Retrieving the work date
The work date is an essential part of the NAV system. This recipe will show you how to determine what that date is, as well as when and where you should use it.
Getting ready
1. Click on Tools | Workdate from the NAV client.
2. Set the work date to 01/01/2010.
How to do it...
1. Create a new codeunit from ObjectDesigner.
2. Write the following code in the OnRun trigger of the codeunit:
MESSAGE('Work Date: %1\Todays Date: %2\Current Time: %3', WORKDATE, TODAY, TIME);
3. Save and close the codeunit.
4. When you run the codeunit you should see a window like the following screenshot:
How it works...
There's more...
It is important to understand the difference between the NAV work date and the computer system date. They should be used in specific circumstances. When performing general work in the system, you should almost always use the WORKDATE keyword. In cases where you need to log information and the exact date or time when an action occurred, you should use TODAY and TIME or CURRENTDATETIME.
Populating date fields when a document is created
The following code can be found in table 36, Sales Header, in the InitRecord() method:
IF "Document Type" IN ["Document Type"::Order,"Document
Type"::Invoice,"Document Type"::Quote] THEN BEGIN "Shipment Date" := WORKDATE;
"Order Date" := WORKDATE; END;
IF "Document Type" = "Document Type"::"Return Order" THEN "Order Date" := WORKDATE;
IF NOT ("Document Type" IN ["Document Type"::"Blanket
Order","Document Type"::Quote]) AND ("Posting Date" = 0D) THEN "Posting Date" := WORKDATE;
IF SalesSetup."Default Posting Date" = SalesSetup."Default Posting Date"::"No Date" THEN
"Posting Date" := 0D; "Document Date" := WORKDATE;
It is common to create and call an InitRecord() method from a table's OnInsert trigger especially for document-style tables. Unlike with the InitValue property for fields in a
table, fields here are filled in based on conditional logic. More importantly, validation can be performed to ensure data integrity.
Looking at this snippet of code, we can see that every date is filled in using the WORKDATE keyword, and not using TODAY. This is so that a user can easily create records that are pre-dated or post-pre-dated.
See also
f Retrieving the system date and time
Determining the day, month, and year from a
given date
Sometimes it is necessary to retrieve only a part of a date. NAV has built-in functions to do just that. We will show you how to use it in this recipe.
How to do it...
1. Create a new codeunit from ObjectDesigner.
2. Add the following global variables:
Name Type
Day Integer
Month Integer
Year Integer
3. Write the following code in the OnRun trigger of the codeunit:
Day := Date2DMY(TODAY, 1); Month := Date2DMY(TODAY, 2); Year := Date2DMY(TODAY, 3);
MESSAGE('Day: %1\Month: %2\Year: %3', Day, Month, Year); 4. Save and close the codeunit.
5. When you run the codeunit you should see a window like the following screenshot:
How it works...
The second parameter is an integer that tells the function which part of the date to return. This number can be 1, 2, or 3 and corresponds to the day, month, and year (DMY) respectively.
There's more...
NAV has a similar function called Date2DWY. It will return the week of the year instead of the month if 2 is passed as the second parameter.
Determining depreciation
Codeunit5616, DepreciationCalculation, contains functions to calculate depreciation based on start and end dates. In order to correctly calculate these values, you must know some details such as the number of days between two dates and whether or not any of those days is a leap day. It is with these types of operations that date functions like DATE2DMY are extremely useful. Have a look at the function DeprDays365 in this codeunit.
StartingYear := DATE2DMY(StartingDate,3); EndingYear := DATE2DMY(EndingDate,3); LeapDays := 0;
IF (DATE2DMY(StartingDate,1) = 29) AND
(DATE2DMY(StartingDate,2) = 2) AND (DATE2DMY(EndingDate,1) = 29) AND (DATE2DMY(EndingDate,2) = 2) THEN
LeapDays := -1;
ActualYear := StartingYear;
WHILE ActualYear <= EndingYear DO BEGIN LeapDate := (DMY2DATE(28,2,ActualYear) + 1); IF DATE2DMY(LeapDate,1) = 29 THEN BEGIN
IF (LeapDate >= StartingDate) AND (LeapDate <= EndingDate) THEN LeapDays := LeapDays + 1;
END;
ActualYear := ActualYear + 1; END;
EXIT((EndingDate - StartingDate) + 1 - LeapDays);
See also
f Retrieving the system date and time
f Retrieving the work date
f Converting a value to a formatted string
Converting a value to a formatted string
There will be many occasions when you will need to display information in a certain way or display multiple variable types on a single line. The FORMAT function will help you change almost any data type into a string that can be manipulated in any way you see fit.
How to do it...
1. Create a new codeunit from Object Designer.
2. Add the following global variables:
Name Type Length
FormattedDate Text 30
3. Add the following code to the OnRun trigger:
FormattedDate := FORMAT(TODAY, 0, '<Month Text> <Day,2>, <Year4>'); MESSAGE('Today is %1', FormattedDate);
4. Save and close the codeunit.
5. When you run the codeunit you should see a window similar to the following :
How it works...
The FORMAT function takes one to three parameters. The first parameter is required and can be of almost any type: date, time, integer, decimal, and so on. This parameter is returned as a string.
The second parameter is the length of the string to be returned. A default zero means that the entire string will be returned. A positive number tells the function to return a string of exactly
There are two options for the third and final parameter. One is a number, representing a predefined format you want to use for the string and the other is a literal string. In the example, we used the actual format string. The text contained in brackets (< >) will be parsed and replaced with the data in the first parameter.
There's more...
There are many predefined formats for dates. The examples listed in the following table are taken from the C/SIDE Reference Guide in the Help menu of the NAV client. Search for "Format Property" to find more information.
Date Format Example
<Closing><Day,2>-<Month,2>-<Year> 0 05-04-03 <Closing><Day,2>-<Month,2>-<Year> 1 05-04-03 <Day,2><Month,2><Year><Closing>D 2 050403D <Closing><Year>-<Month,2>-<Day,2> 3 03-04-05 <Closing><Day>. <Month Text> <Year4> 4 5. April 2003 <Closing><Day,2><Month,2><Year> 5 050403 <Closing><Year><Month,2><Day,2> 6 030405 <Day,2><Filler Character,
>. <Month Text,3> <Year4> 7 5. Apr 2003
XML format 9 2003-04-05
Creating filters using other variable types
You will often need to create filters on dates or other simple data types. Usually these filters are not just for a single value. For example, a date filter for all values between January 1st, 2010 and January 31st, 2010 would look like 010110..013110. Because ".." is a string, and you cannot concatenate it with two date variables. Instead, you will have to convert those dates into strings and then place the filters together.
Take the CreateAccountingDateFilter function from codeunit 358, DateFilter-Calc. It creates date filters based on accounting periods for the exact scenario we are describing.
AccountingPeriod.RESET; IF FiscalYear THEN
AccountingPeriod.SETRANGE("New Fiscal Year",TRUE); AccountingPeriod."Starting Date" := Date;
AccountingPeriod.FIND('=<>');
Filter := '..' + FORMAT(
Name := STRSUBSTNO(Text000,FORMAT(DATE2DMY(StartDate,3))) ELSE
Name := AccountingPeriod.Name; IF AccountingPeriod.NEXT <> 0 THEN Filter := FORMAT(StartDate) + '..' +
FORMAT(AccountingPeriod."Starting Date" - 1) ELSE BEGIN
Filter := FORMAT(StartDate) + '..' + FORMAT(12319999D); Name := Name + '...';
END;
See also
f Retrieving the system date and time
f Retrieving the work date
f Determining the day, month, and year from a given date
f Converting a string to another data type
f Checking for conditions using an IF statement
f Using advanced filtering
f Retrieving data using FIND
Creating an array
Creating multiple variables to store related information can be time consuming. It leads to more code and hence, more work. Using an array to store related and similar type of information can speed up development and lead to much more manageable code. This recipe will show you how to create and access array elements.
How to do it...
2. Add the following global variables:
Name Type
i Integer
IntArray Integer
3. With the cursor on that variable, click on View | Properties (Shift + F4).
4. Set the following property:
Property Value
Dimensions 10
5. In the OnRun trigger add the following code:
FOR i := 1 TO ARRAYLEN(IntArray) DO BEGIN IntArray[i] := i;
MESSAGE('IntArray[%1] = %2', i, IntArray[i]); END;
6. When you run the codeunit you will see ten windows, one after the other, similar to the following screenshot:
How it works...
An array is a single variable that holds multiple values. The values are accessed using an integer index. The index is passed within square brackets ([]).
There's more...
NAV provides several functions to work with arrays. ARRAYLEN returns the number of
Creating an address using the format address codeunit
Open codeunit 365, FormatAddress. Notice the first function, FormatAddr, has a parameter which is an array. This is the basic function that all of the address formats use. It is rather long, so we will discuss only a few parts of it here.
This first section determines how the address should be presented based on the country of the user. Variables are initialized depending on which line of the address should certain information appear. The variables will be the indexes of our array.
CASE Country."Contact Address Format" OF Country."Contact Address Format"::First: BEGIN
Then we will fill in the array values in the following manner:
AddrArray[NameLineNo] := Name; AddrArray[Name2LineNo] := Name2; AddrArray[AddrLineNo] := Addr; AddrArray[Addr2LineNo] := Addr2;
Scroll down and take a look at all the other functions. You'll see that they all take in an array as the first parameter. It is always a text array of length 90 with 8 dimensions. These are the functions you will call when you want to format an address. To use this codeunit correctly, you will need to create an empty array with the specifications listed before and pass it to the correct function. Your array will be populated with the appropriately formatted address data.
See also
f Manipulating string contents
Creating an Option variable
If you need to force the user to select a value from a pre-defined list then an Option is the way to go. This recipe explains how to create an Option variable and access each of its values.
How to do it...
1. Create a new codeunit from ObjectDesigner.
2. Add the following global variables:
Name Type
ColorOption Option
3. Set the following property on the variable:
Property Value
OptionString None,Red,Green,Blue
4. Add the following code to the OnRun trigger of your codeunit: ColorOption := ColorOption::Red;
CASE ColorOption OF
ColorOption::None: MESSAGE('No Color Selected'); ColorOption::Red: MESSAGE('Red');
ColorOption::Green: MESSAGE('Green'); ColorOption::Blue: MESSAGE('Blue'); END;
How it works...
An Option is a field or variable that stores one value from a selectable list. In a form, this list will appear as a drop-down from which the user can select a value. The list of options is stored as a comma-separated string in the OptionString property.
These values are accessed using the variable_name::option_name syntax. The first line of the example assigns one of the possible values (Red) to the variable. Then we use a CASE statement to determine which of the values was selected.
There's more...
You can also access possible options in other ways. In a database, an Option is stored as an integer. Each Option corresponds to a specific number, starting with the number 1. In this case None=1, Red=2, Green=3, and Blue=4. You could write this code to perform the safe actions:
ColorOption := ColorOption::"1"; CASE ColorOption OF
ColorOption::None: MESSAGE('No Color Selected'); ColorOption::Red: MESSAGE('Red');
ColorOption::Green: MESSAGE('Green'); ColorOption::Blue: MESSAGE('Blue'); END;
To reduce your development time, you can also use a shorthand notation to access the Option values. Again, the following code is exactly the same as that above:
ColorOption := ColorOption::R; CASE ColorOption OF
ColorOption::None: MESSAGE('No Color Selected'); ColorOption::Red: MESSAGE('Red');
ColorOption::Green: MESSAGE('Green'); ColorOption::Blue: MESSAGE('Blue'); END;
When you close, save, and reopen the codeunit, the Option values will automatically be filled in for you. That is, both of these examples will look exactly like the first example once it has been saved and reopened. It is always best to write the code exactly as you want it to appear.
Using Options in documents
Now, design codeunit80, Sales-Post. Examine the OnRun trigger. Early in the function, you will see the following code:
CASE "Document Type" OF
"Document Type"::"Return Order": Ship := FALSE;
"Document Type"::"Credit Memo": BEGIN
This is a common example of how Options are used in NAV. You can scroll through the codeunit to find more examples.
See also
f Using a CASE statement to test multiple conditions
Converting a string to another data type
Sometimes a string representation isn't enough. In order to perform certain actions, you need your data to be in a certain format. This recipe will show you how to change that data into a format that you can use.
How to do it...
1. Create a new codeunit from ObjectDesigner.
2. Add the following global variables:
3. Write the following code in the OnRun trigger:
DateText := '01/01/2010'; EVALUATE(DateValue, DateText); MESSAGE('Date: %1', DateValue); 4. Save and close the codeunit.
5. When you run the codeunit you should see a window similar to the following screenshot:
How it works...
The EVALUATE() function takes in two parameters. The first is a variable of the type that you want your value to be converted into. This could be date, time, boolean, integer, or any other simple data type. This parameter is passed by reference, meaning that the result of the function is stored in that variable. There is no need to do a manual assign using the
:= syntax.
The second parameter is the string which you need to convert. This text is usually stored in a field or variable, but can also be hard coded.
For a list of all of the functions related to text variables, search for "Text Data Type" in the C/ SIDE Reference Guide under the Help menu.
There's more...
EVALUATE() returns a boolean value when executed. If the conversion is successful, it returns TRUE or 1; otherwise, it returns FALSE or 0. If the function returns FALSE, an error will be generated. If you wish to display the standard system error, you can leave the code as it is, but if you want to handle the error yourself, you must make the following changes:
DateText := '01/01/2010';
IF NOT EVALUATE(DateValue, DateText) THEN ERROR('Custom Error Message');
Incrementing a number series
Number series are used throughout the NAV system. Every document has a unique identifier that is usually retrieved from the No. Series table. This table keeps a track of the last number used so that it knows what the next number should be.
However, this identifier is not just a number. A purchase order, for example, might have an identifier of PO123456, which means that it is actually a string. As you can't add a number to a string, you will have to figure out what the number part is, convert it to an actual number, and then increment it. This code from the IncrementNoText() function in codeunit 396, NoSeriesManagement, does exactly that. As this code calls several other functions, it may be beneficial for you to look through the entire codeunit.
GetIntegerPos(No,StartPos,EndPos);
EVALUATE(DecimalNo,COPYSTR(No,StartPos,EndPos - StartPos + 1)); NewNo := FORMAT(DecimalNo + IncrementByNo,0,1);
ReplaceNoText(No,NewNo,0,StartPos,EndPos);
See also
f Converting a value to a formatted string
f Checking for conditions using an IF statement
f Passing parameters by reference
Manipulating string contents
It can be very useful to parse a string and retrieve certain values. This recipe will show you how to examine the contents of a string and manipulate that data.
How to do it...
1. Create a new codeunit from ObjectDesigner.
2. Add a function called RemoveNonNumeric(). It should return a text variable named NewString.
3. The function should take in the following parameter:
Name Type Length
4. Add the following global variable:
Name Type
I Integer
5. Add the following global variables:
Name Type Length
OldPhoneNumber Text 30
NewPhoneNumber Text 30
6. Add the following code to the RemoveNonNumeric() function:
FOR i := 1 TO STRLEN(String) DO BEGIN
IF String[i] IN ['0', '1', '2', '3', '4', '5', '6', '7', '8', '9'] THEN NewString := NewString + FORMAT(String[i]);
END;
7. Add the following code to the OnRun trigger:
OldPhoneNumber := '(404) 555-1234';
NewPhoneNumber := RemoveNonNumeric(OldPhoneNumber); MESSAGE('Old Phone Number: %1\New Phone Number: %2', OldPhoneNumber, NewPhoneNumber);
8. When you run the codeunit you will see a window similar to the following screenshot:
How it works...
A string is actually an array of characters. The same array syntax will be used to access the individual characters of the string.
Next, we access the character at that index using square brackets. If the character is a number, meaning we want to keep it because it is numeric, we add it to our resulting string.
We can only add strings to other strings so we must convert this character using the FORMAT() function. If the character is not a number, we ignore it.
There's more...
NAV comes with plenty of built-in string manipulation functions to remove characters, return substrings, find characters within string, and many more. A search in the C/SIDE Reference Guide from the NAV client help menu for string functions will give you a complete list.
Parsing strings has several uses in NAV. Some easy-to-implement examples include checking/ converting a phone number to a proper format based on country code, properly capitalizing names, and removing illegal characters.
Linking records with strings
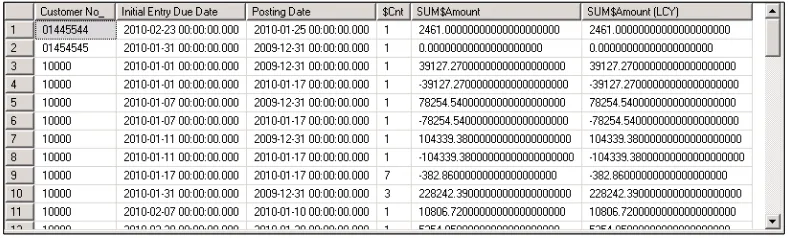
Using the ObjectDesigner run table 6508, ValueEntryRelation. You should see a column named Source RowId that contains some strange looking text. A careful examination reveals that these are not as strange as they appear. It is simply a string containing six values, each separated by a semicolon and enclosed within quotes. For example: "123";"0";"123456";""; "0";"10000".
In a typical installation involving shipments and receipts, the value of the current inventory is adjusted every time an item comes in or goes out of stock. This amount is stored in the Value Entry table. In order to know which document created which value entry, a subsidiary table was created: Value Entry Relation. In this basic scenario, the first field refers to the table that the value entry came from. The most common are: 113 for shipments and 123 for receipts. The third value stores the document number and the sixth contains the line number. Take a look at the function DecomposeRowID() in codeunit 6500, ItemTrackingManagement.
FOR ArrayIndex := 1 TO 6 DO StrArray[ArrayIndex] := ''; Len := STRLEN(IDtext);
Pos := 1;
ArrayIndex := 1;
WHILE NOT (Pos > Len) DO BEGIN Char := COPYSTR(IDtext,Pos,1); IF (Char = '"') THEN BEGIN Write := FALSE;
ELSE BEGIN
NoWriteSinceLastNext := Next; END;
StrArray[ArrayIndex] += Char; Pos += 1;
END;
This is an amazing example of how you can manipulate strings to your advantage. The code is fairly complex and may take some time to understand, but it can give you a basis to write your own code. You should be able to see the code that looks for semicolons, or field separators, as well as the code that finds quotes, or field identifiers. The code separates out those fields and stores them in a string array for later use.
See also
f Converting a value to a formatted string
f Creating an array
f Repeating code using a loop
f Checking for conditions using an IF statement
Using date formulas to calculate dates
How to do it...
1. Create a new codeunit from ObjectDesigner. 2. Add the following global variable:
Name Type
CalculatedDate Date
3. In the OnRun trigger write the following code:
CalculatedDate := CALCDATE('CM+1D', 01012010D); MESSAGE('Calculated Date: %1', CalculatedDate); 4. Save and close the codeunit.
5. When you run the codeunit you should see a window like the following screenshot:
How it works...
The CALCDATE() function takes in two parameters, a calculation formula and a starting date. The calculation formula is a string that tells the function how to calculate the new date. The second parameter tells the function which date it should start with. A new date is returned by this function, so the value must be assigned to a variable using standard := syntax.
There's more...
The following units can be used in the calculation formula:
Unit Description
D Day
These units may be different depending on what language your version of NAV is running under.
You have two options for the number to place before the unit. This can either be a standard number ranging between 1 and 9, or the letter C, which stands for Current. These units can be added and subtracted to determine a new date based on any starting date.
Calculation formulas can become very complex. The best way to fully understand them is to write your own formulas to see the results. Start out with basic formulas like 1M+2W-1D and move on to more complex ones like –CY+2Q-1W.
Calculating reminder terms using date formulas
NAV has the ability to issue a reminder whenever a customer goes past due on their balance. These reminders are issued at specific times based on date formulas entered by the user during setup.
Look at the MakeReminder() method in codeunit 392, Reminder-Make. This function has a large amount of code so only a small section is shown here. The date formula is stored in a field called Grace Period and is used to determine if those many days have passed since the due date of the document.
IF (CALCDATE(ReminderLevel."Grace Period",ReminderDueDate) < ReminderHeaderReq."Document Date") AND
((LineLevel <= ReminderTerms."Max. No. of Reminders") OR (ReminderTerms."Max. No. of Reminders" = 0))
THEN BEGIN
See also
f Retrieving the system date and time
f Retrieving the work date
f Determining the day, month, and year from a given date
2
General Development
In this chapter, we will cover:
f Repeating code using a loop
f Displaying a Progress Bar
f Checking for conditions using an IF statement
f Using a CASE statement to test multiple conditions
f Creating a function
f Passing parameters by reference
f Referencing dynamic tables and fields
f Using recursion
Introduction
Generally developers are not the ones who generate data for their company. Programmers are not employees entering sales orders or new contacts into the system. As a developer, you give users the ability to enter that data, but your main job is to build business logic to manipulate data for the company's benefit.
If you have programmed in other languages you will notice obvious similarities in syntax. It's the logic behind the program, and not the way you code it that makes the difference. After all, there are so many ways to assign values to variables, check for conditions, and create functions. These basic commands and functions are building blocks for any program world. NAV is no different. Once you've mastered the nuts and bolts, you can begin to put them together to perform any function your company needs. This chapter will serve as a brief introduction to these parts, but for a more in-depth study you can read "Programming Microsoft Dynamics NAV 2009" by David Studebaker or "Implementing Microsoft Dynamics NAV 2009" by David Roys and Vjekoslav Babic.
Repeating code using a loop
Looping is an essential part of dealing with records in NAV. Using a FOR loop is a common way to iterate over multiple lines of code. This recipe will show you how to construct a FOR loop and use it.
How to do it...
1. Create a new codeunit from ObjectDesigner.
2. Add the following global variables:
Name Type
n Integer
i Integer
Factorial Integer
3. Add the following code to the OnRun trigger of the codeunit:
Factorial := 1; n := 4;
FOR i := 1 TO n DO
Factorial := Factorial * i;
5. When you run the codeunit you will see a window similar to the following screenshot:
How it works...
A FOR loop has four parts: a counter, a starting value, the step to be taken, and an ending value. In this code, our counter variable is "i". The starting value is 1 and the ending value is "n", which in this case has been assigned to the value 4.
Each time the loop iterates, the value of "i" is increased by one (the step). The code indented under the FOR loop will be executed four times. It is exactly the same as:
Factorial := Factorial * 1; Factorial := Factorial * 2; Factorial := Factorial * 3; Factorial := Factorial * 4;
If you want to use a step other than one or negative one you will need to use a WHILE loop or REPEAT..UNTIL loop.
There's more...
You can also use a FOR loop by decreasing the counter. To do this, instead of a TO you use DOWNTO. The structure for this type of loop is as follows:
Factorial := 1; n := 4;
FOR i := n DOWNTO 1 DO
Factorial := Factorial * i;
Using a WHILE loop
MESSAGE('Factorial of %1 = %2', n, Factorial);
First we have to initialize our starting value, which is accomplished by the third line i:=1.
Then in the WHILE line, we have to give a stop condition. As long as i <= n (4), we want the statements to execute.
Finally, we have added the i+=1; command to the code inside our loop. A FOR loop does this behind the scenes, but a WHILE loop doesn't. Here we can increment our counter by any value we want. This basic line is perhaps the most important. Without it we will never reach our stop condition and be stuck in an infinite loop.
Using a REPEAT..UNTIL loop
If you have programmed in other languages you know this loop by another name: DO..WHILE. The difference between this type of loop and a standard WHILE loop is that the code is guaranteed to execute at least once. You will use this type of loop often to go access records through tables.
MESSAGE('Factorial of %1 = %2', n, Factorial);
See also
f Creating an array
f Using recursion
Displaying a Progress Bar
There's nothing more frustrating for a user than wondering if the system is done with processing something or not. Displaying an indicator to show the user the system's progress, is an easy way to make the system more user-friendly.
How to do it...
1. Create a new codeunit from ObjectDesigner.
2. Add the following global variables:
Name Type
ProgressBar Dialog
AmountProcessed Integer
AmountToProcess Integer
PercentComplete Integer
3. Add the following code to the OnRun trigger of your Codeunit:
AmountToProcess := 50000;
ProgressBar.OPEN('@1@@@@@@@@@@@@@@@@@@@@'); REPEAT
AmountProcessed += 1;
PercentComplete := ROUND(AmountProcessed / AmountToProcess * 10000, 1); ProgressBar.UPDATE(1, PercentComplete);
UNTIL AmountProcessed = AmountToProcess; 4. Save and close the codeunit.
How it works...
In order to track the progress of something, you need to know two things: how much you have to do and how much you have already done. We create two variables for this data, AmountToProcess and AmountProcessed. In our code shown in step 3, we have set the AmountToProcess equal to 50,000. Depending on the speed of your computer, this may make the progress bar advance either too quickly or too slowly. You might need to adjust it.
Basic information such as this is displayed to the user using what is called a Dialog. The dialog is given a string as an input parameter. The @ sign tells it to display as a progress indicator and the 1 identifies the indicator for later updates. The rest of the @ signs specify the length of the progress bar.
The minimum and maximum values for the progress bar are not 0 and 100 as you might expect. Instead, they are 0 and 10,000 respectively. This is why we multiply by 10,000 when we are calculating our PercentComplete value. As the percentage is an integer, we must also round up our result to the nearest digit.
There's more...
Updating the screen dramatically slows down the process. When dealing with so many items to process the percent processed does not change with every item. You can rather update the screen periodically by adding a single line of code:
AmountToProcess := 50000;
ProgressBar.OPEN('@1@@@@@@@@@@@@@@@@@@@@'); REPEAT
AmountProcessed += 1;
PercentComplete := ROUND(AmountProcessed / AmountToProcess * 10000, 1); IF AmountProcessed MOD 100 = 0 THEN
ProgressBar.UPDATE(1, PercentComplete); UNTIL AmountProcessed = AmountToProcess;
Processing only reports
A common way to process large amounts of data is to create a "processing only" report. In this situation, your AmountToProcess would be the number of records in the table. This would be calculated in the OnPreDataItem trigger. You would also open the dialog here. In the OnAfterGetRecord trigger, you would update your AmountProcessed variable and update the progress bar as necessary.
Some examples of processing only reports in the base system are: number 296, Batch Post Sales Orders, and 299, Delete Invoiced Sales Orders.
See also
f Checking for conditions using an IF statement
f Creating a report to process data
Checking for conditions using an IF
statement
Some code should only be executed when certain conditions occur. This recipe will show you how to write code to make that decision.
How to do it...
1. Create a new codeunit from ObjectDesigner.
2. Add the following global variables:
Name Type Subtype
SalesHeader Record Sales Header
RecordsProcessed Integer
3. Write the following code in the OnRun trigger:
IF SalesHeader.FINDSET THEN BEGIN REPEAT
RecordsProcessed += 1; UNTIL SalesHeader.NEXT = 0;
MESSAGE('Processed %1 records.', RecordsProcessed); END ELSE
5. When you run the codeunit you will see a window like the one shown in the following screenshot:
How it works...
In order to execute the code that processes the records, there must be records in the table. That's exactly what the first line does. It tells the code that IF you find some records THEN it should do these actions. In this case, the action is to count the records in the table and display a message to the user.
It could be discouraging for the user to try to process something and have nothing happen, though. That's where the ELSE part comes in. When the condition in the IF statement does not evaluate to true, control falls to the next ELSE statement. So IF we find some records THEN the code must do something OTHERWISE (ELSE) it should do something else. Our "something else" is to inform the user that no records were found. The ELSE part is by no means required, but you should always consider what should happen if the condition is false.
There's more...
IF statements can be chained together to form complex conditionals.
IF DATE2DMY(WORKDATE,1) = 1 THEN MESSAGE('Monday')
ELSE IF DATE2DMY(WORKDATE,1) = 2 THEN MESSAGE('Tuesday')
ELSE IF DATE2DMY(WORKDATE,1) = 3 THEN MESSAGE('Wednesday')
ELSE IF DATE2DMY(WORKDATE,1) = 4 THEN MESSAGE('Thursday')
ELSE IF DATE2DMY(WORKDATE,1) = 5 THEN MESSAGE('Friday')
ELSE
The next IF is simply a new statement inside the ELSE clause within the previous IF statement.
Generally, if you have more than three possibilities you should not use an IF statement, but a CASE statement instead. This example simply illustrates the possibilities with conditionals.
Testing multiple conditions
You may need to execute code only when multiple conditions are true. The following syntax can be used to test for conditions in a single statement:
IF(condition1)AND(condtion2)THEN
IF(condition1)OR(condition2)THEN
IF(NOTcondition1)AND(condition2)THEN
The first will only execute when both conditions are true, the second when either of the conditions are true, and the third when the first condition is not true and the second is true. You can combine these operators (AND, OR, NOT) to form very complex conditionals and test as many conditions as necessary.
One thing you need to remember is that the entire clause before the AND or OR has to evaluate to a Boolean value. That means you have to surround your entire condition with parentheses. The following line of code will not work:
IF DATE2DMY(WORKDATE,1) >= 5 AND DATE2DMY(WORKDATE,1) <= 6 THEN
NAV sees the AND as applying like this: 5 AND DATE2DMY(WORKDATE, 1). The 5 doesn't evaluate to a Boolean value and neither does the DATE2DMY function. You have to write it like this:
IF (DATE2DMY(WORKDATE,1) >= 5) AND (DATE2DMY(WORKDATE,1) <= 6) THEN
Here, the AND applies to everything in the parentheses, before and after it, each of which evaluates to a boolean value.
See also
Using a CASE statement to test multiple
conditions
When you have more than two conditions to test, it can often be beneficial to use a CASE statement for better code readability.
How to do it...
1. Create a new codeunit from ObjectDesigner.
2. Add the following global variables:
Name Type
I Integer
3. Add the following code to the OnRun trigger of your codeunit:
i := 2;
CASE i OF 1:
MESSAGE('Your number is %1.', i); 2:
MESSAGE('Your number is %1.', i); ELSE
MESSAGE('Your number is not 1 or 2.'); END;
How it works...
A CASE statement compares the value given, in this case "i", to various conditions contained within that statement. Each condition, other than the default ELSE, is followed by a colon. Here it checks if "i" is equal to 1, if "i" is equal to 2, and if "i" is neither 1 nor 2. You would get the same result if you wrote the following code:
IF i = 1 THEN
MESSAGE('Your number is %1.', i) ELSE IF i = 2 THEN
MESSAGE('Your number is %1.', i) ELSE
MESSAGE('Your number is not 1 or 2.');
There's more...
This example just checks very basic conditions and only conditions where the variable is equal to a specific value. You can do more advanced condition checking like the following example:
Creating a function
Most programs will need to execute code from different NAV objects. This code is contained in functions. This recipe will show you how to create a function and explain what functions are in more detail.
How to do it...
1. Create a new codeunit from ObjectDesigner.
2. Add a function called CountToN that takes an integer parameter, n.
3. Add the following local variables
Name Type
I Integer
4. Add the following code to your function: FOR i := 1 TO n DO
MESSAGE('%1', i);
5. Add the following code to the OnRun trigger of the codeunit: CountToN(3);
6. Save and close the codeunit.
7. When you run the codeunit you will see several windows like the following screenshot:
How it works...
There's more...
Proper use of functions is essential to good software development. You will have difficulty finding any objects in NAV that don't contain even a single function.
The main use of functions is to divide complex tasks into manageable chunks of code. This makes debugging a lot easier. Other developers who may add to your code later, will be able to better understand what you were trying to accomplish. By encapsulating code in functions you also reduce the number of places where changes need to be made when you find faulty business logic.
Once written, these functions can then be called from other objects. A great practice is to keep a codeunit with common utility functions in it. You can load this codeunit into any database you happen to be working on and have instant access to your code from any object in the system.
Creating local or private functions
By default, all functions are created as global functions, which means that they can be accessed from any object in the system. Sometimes, though, you may only want a function to be accessed from within the object in which it resides.
It may seem counter-intuitive, but you still define these functions in the same way you define global functions. If you view the properties of the function (Shift + F4 or click on View | Properties from the menu), you will see one called Local. Set this property to yes and it will only be available in the current object.
See also
f Passing parameters by reference
Passing parameters by reference
How to do it...
1. Create a new codeunit from ObjectDesigner.
2. Add the following global variables:
Name Type Subtype Length
CustomerRec Record Customer
OldName Text 50
NewName Text 50
3. Add a function called ChangeCustomerName.
4. The function should take in the following parameter:
Name Type Subtype
Customer Record Customer
5. Write the following code in the ChangeCustomerName function:
Customer.Name := 'Changed Name';
6. Add a function called ChangeCustomerNameRef.
7. The function should take in the following parameter:
Name Type Subtype
Customer Record Customer
8. Place a check-mark in the Var column for the parameter.
9. Write the following code in the ChangeCustomerName function:
Customer.Name := 'Changed Name';
10. Write the following code in the OnRun trigger of your codeunit:
IF CustomerRec.FINDFIRST THEN BEGIN OldName := CustomerRec.Name; ChangeCustomerName(CustomerRec); NewName := CustomerRec.Name;
MESSAGE('Pass by value:\Old Name: %1\New Name: %2', OldName, NewName); OldName := CustomerRec.Name;
ChangeCustomerNameRef(CustomerRec); NewName := CustomerRec.Name;
11. Save and close your codeunit.
12. When you run the codeunit, you will see the following two windows:
How it works...
The first function, ChangeCustomerName, passes the parameter by value, which means that a copy of the variable is created and the function uses that copy. So even though the customer name is changed in the function, only its copy is changed. The original stays the same.
The second function, ChangeCustomerNameRef, passes the parameter by reference. When you pass a parameter by reference, the parameter refers to the same location in memory that the actual variable is stored. No copy is made. Any changes made to the parameter will be reflected in the original variable.
There's more...
See also
f Creating a function
Referencing dynamic tables and fields
You may, on occasion, need to retrieve data from the system, but not know in advance where that data should come from. NAV accommodates this by allowing you to reference tables and fields dynamically.
How to do it...
1. Create a new codeunit from ObjectDesigner.
2. Add a global function, GetFirstRecord.
3. The function should take in the following parameter:
Name Type
TableNo Integer
4. Add the following local variables:
Name Type
RecRef RecordRef FieldRef FieldRef
5. Write the following code in your GetFirstRecord function:
RecRef.OPEN(TableNo);
IF RecRef.FINDFIRST THEN BEGIN IF RecRef.FIELDEXIST(1) THEN
FieldRef[1] := RecRef.FIELDINDEX(1); IF RecRef.FIELDEXIST(2) THEN
FieldRef[2] := RecRef.FIELDINDEX(2);
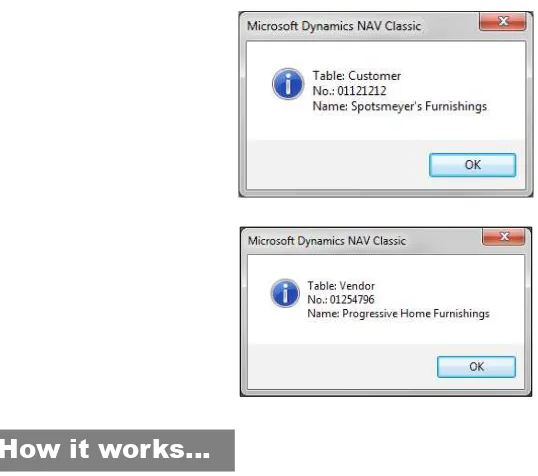
IF FieldRef[1].ACTIVE AND FieldRef[2].ACTIVE THEN MESSAGE('Table: %1\%2: %3\%4: %5', RecRef.NAME, FieldRef[1].NAME, FieldRef[1].VALUE, FieldRef[2].NAME, FieldRef[2].VALUE) ELSE
MESSAGE('You cannot retrieve an inactive field.'); END ELSE
6. Write the following code in your OnRun trigger:
GetFirstRecord(DATABASE::Customer); GetFirstRecord(DATABASE::Vendor);
7. Save and close your codeunit.
8. When you run the codeunit you will see the following windows:
How it works...
We are creating a function, GetFirstRecord, that will return information about the first record found in an unknown table. The TableNo parameter will tell the function which table in the database to find the data.
When you don't know the table until runtime, you must use a RecordRef variable, which stands for record reference and can refer to any record/table in the database. To point it to the right table, you use the OPEN command. Here we tell the RecordRef variable to open any table we pass into the function. If a record is found in that table we continue on, otherwise we display the message "No records found!"
To store references to the fields we care about, we have created an array of FieldRef variables called FieldRef. In this function, we have hard-coded a lookup for fields one and two, but
you could just as easily pass another parameter with the ID of the field you need. If that field exists, we assign its value into our FieldRef variable to an appropriate index.
The code in the OnRun trigger runs the function with two different tables. The DATABASE::"Table Name" syntax resolves to an integer. You could also pass the actual ID of the tables.
There's more...
Record references act just like their record counterparts. You can use them to insert, modify, or delete records. You can set filters on them and use them to find records. For a complete list of functions and properties, you can use the Symbol menu and investigate the C/SIDE Reference Guide from the Help menu in the client.
The data migration codeunits in NAV are full of functions that use record and field references. I recommend you start with the functions in codeunit8611, MigrationManagement. This is a great place to see real examples of how this type of code can be used.
See also
f Checking for conditions using an IF statement
f Writing your own rollback routine
Using recursion
Recursion is not used often in NAV, but the option is available and can shorten your code. Recursion is the process by which a function calls itself.
How to do it...
1. Create a new codeunit from ObjectDesigner.
2. Add a global function, Fibonacci, that returns an integer with no name.
3. The function should take the following parameter:
Name Type
i Integer
4. Write the following code in your Fibonacci function. IF (i <= 2) THEN
EXIT(1);
5. Write the following code in your OnRun trigger:
MESSAGE('Fibonacci(%1) = %2', 4, Fibonacci(4));
6. When you run the codeunit you will see a window like the one shown in the following screenshot:
How it works...
The Fibonacci sequence is a series of numbers where the value in a certain position is the sum of the number in the previous two positions.
That is: 1, 1, 2, 3, 5, 8, 13, 21, 34, 55...
A recursive function has two parts. The first is a stopping condition. In our Fibonacci function, the stopping condition is when the variable i is less than or equal to two. In that case, the function will return 1 as the output.