Mastering phpMyAdmin 3.3.x
for Effective MySQL Management
A complete guide to getting started with
phpMyAdmin 3.3 and mastering its features
Marc Delisle
for Effective MySQL Management
Copyright © 2010 Packt Publishing
All rights reserved. No part of this book may be reproduced, stored in a retrieval system, or transmitted in any form or by any means, without the prior written permission of the publisher, except in the case of brief quotations embedded in critical articles or reviews.
Every effort has been made in the preparation of this book to ensure the accuracy of the information presented. However, the information contained in this book is sold without warranty, either express or implied. Neither the author, nor Packt Publishing, and its dealers and distributors will be held liable for any damages caused or alleged to be caused directly or indirectly by this book.
Packt Publishing has endeavored to provide trademark information about all of the companies and products mentioned in this book by the appropriate use of capitals. However, Packt Publishing cannot guarantee the accuracy of this information.
First published: October 2010
Production Reference: 1041010
Published by Packt Publishing Ltd. 32 Lincoln Road
Olton
Credits
Author
Marc Delisle
Reviewers
Michal Čihař Ben Dodson Kai 'Oswald' Seidler
Development Editor
Reshma Sundaresan
Technical Editor
Conrad Sardinha
Indexer
Hemangini Bari
Editorial Team Leader
Akshara Aware
Project Team Leader
Lata Basantani
Project Coordinator
Sneha Harkut
Proofreader
Dirk Manuel
Production Coordinator
Adline Swetha Jesuthas
Cover Work
About the Author
Marc
Delisle
was awarded "MySQL Community Member of the year 2009" because of his involvement with phpMyAdmin. He started to contribute to the project in December 1998, when he developed the multi-language version. He is still involved with phpMyAdmin as a developer and project administrator. Marc is a system administrator at Cegep de Sherbrooke, Québec, Canada. He has taught networking, security, and web application development. In one of his classes, he was pleased to meet a phpMyAdmin user from Argentina. Marc lives in Sherbrooke with his wife and they enjoy spending time with their four children. This book was Marc's first one and was quickly followed by Creating your MySQL Database: Practical Design Tips and Techniques, also published by Packt Publishing.I am truly grateful to Louay Fatoohi who approached me for this book project, and to the Packt team whose sound comments were greatly appreciated during the production. My thanks also go to the excellent reviewers Kai 'Oswald' Seidler, Ben Dodson, and Michal Čihař. Their sharp eyes helped in making this book clearer and more complete.
About the Reviewers
Michal
Čihař
was born in 1980 in Prague, the capital city of the Czech Republic, and he is still living there. He studied Software Engineering at the Czech Technical University, and during these studies he started contributing to several free software projects, with the biggest contributions being made to phpMyAdmin and Gammu, and related projects. He currently works for Novell, mostly on the SUSE Linux Enterprise platform.Michal has been active in the phpMyAdmin project since 2001, when he started as a translator for the Czech language, later moving to a developer role (working, for example, on index manipulation, and export and import subsystems), and since 2010 he has also acted as a secondary project manager.
Ben
Dodson
has worked with the Internet for over 15 years, yet originally studied Politics. He trained briefly as an Air Traffic Controller for the RAF before deciding to change career paths and work as a freelance HTML/PHP developer, in Devon. He relocated to London to work for a digital agency, and was rapidly promoted to Development Manager in charge of a team of front- and back-end web developers in several countries.everything from browser extensions to OpenID servers. He is a keen photographer and designer, and is currently working on his first book, which discusses
Machiavellian republicanism.
Ben has been invited to speak at several conferences and has appeared on BBC Television's "Working Lunch" program to discuss e-commerce, and also Channel Five's "The Gadget Show" to demonstrate iPhone Application development.
Kai 'Oswald' Seidler
was born in Hamburg in 1970. He graduated from the Technical University of Berlin with a Diplom Informatiker degree (Master of Science equivalent) in Computer Science. In the '90s he created and managed Germany's biggest IRCnet server, irc.fu-berlin.de, and co-managed one of the world's largest anonymous FTP servers, ftp.cs.tu-berlin.de. He professionally set up his first public web server in 1993. From 1993 until 1998, he was a member of Projektgruppe Kulturraum Internet, a research project on net culture and network organization. In 2002, he co-founded Apache Friends and created the multi-platform Apache web server bundle XAMPP. Around 2005, XAMPP became the most popular Apache stack worldwide. In 2006, his third book, Das XAMPP-Handbuch, waspublished by Addison Wesley.
Table of Contents
Preface
1
Chapter 1: Getting Started with phpMyAdmin
7
Introducing phpMyAdmin 7
Web applications 7
PHP and MySQL: The leading open source duo 8
What is phpMyAdmin? 9
Installing on different platforms 12
Installing on a remote server using a Windows machine 12 Installing on a local Linux server 12 Installing on local Windows servers (Apache, IIS) 13
Configuring phpMyAdmin 13
The config.inc.php file 13
Avoiding false error messages about permissions on config.inc.php 14
Configuration principles 14
Web-based setup script 16
Manually creating config.inc.php 22
Tips for editing config.inc.php on a Windows client 23
Description of some configuration parameters 23
PmaAbsoluteUri 23
Server-specific sections 24
PersistentConnections 26
Upgrading phpMyAdmin 26
Chapter 2: Configuring Authentication and Security
29
Logging in to MySQL through phpMyAdmin 29
Logging in to an account without a password 30
Authenticating a single user with config 30
Testing the MySQL connection 31
Authenticating multiple users 31
Authentication types offered 31
The control user 32
Logging out 32
Authenticating with HTTP 33 Authenticating users with cookie values 33 Authenticating through the signon mode 35
Configuring for multiple server support 36
Defining servers in the configuration file 37 Authenticating through an arbitrary server 38
Securing phpMyAdmin 39
Protecting phpMyAdmin at the directory level 39
Displaying error messages 40
Protecting with IP-based access control 40
Defining rules 40
Order of interpretation for rules 41
Blocking root access 42
Protecting in-transit data 42
Authenticating using Swekey hardware 43
Configuring Swekey authentication 43 Using phpMyAdmin in a Swekey context 44
Security note 45
Access logging 45
Available information 45
Configuring Apache 46
Summary 46
Chapter 3: Over Viewing the Interface
47
Over viewing panels and windows 47
Login panels 47
Navigation and main panels 48
Home page 48
Views 48
Query window 49
Starting page 49
Displaying MySQL documentation links 51
Themes 51
Configuring themes 52
Selecting themes 52
Assigning colors using the color picker 53
Sliders 54
Limiting URL lengths 54
Restricting the list of databases 54
Character sets, collations, and language 55
Collations 55
Unicode and UTF-8 56
Selecting languages 56
Effective character sets and collations 57
Navigation panel 58
Configuring the logo 59
Database and table list 59
Light mode 60
Full mode 62
Table short statistics 63
Table quick-access icon 63 Nested display of tables within a database 63
Choosing from the server list 65
Handling many databases or tables 66
Limits on the interface 66
Improving fetch speed 67
Icons for the home page and menu tabs 72
Opening a new phpMyAdmin window 73
Query window 73
Summary 74
Chapter 4: Taking First Steps
75
Creating a database 75
No privileges? 76
First database creation is authorized 76
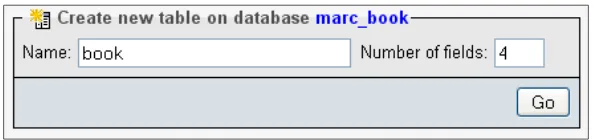
Creating our first table 78
Choosing the fields 78
Creating a table 78
Inserting data manually 82
Data entry panel tuning for CHAR and VARCHAR 83
Browse mode 84
Limiting the length of each column 91
Display options 91
Browsing distinct values 92
Customizing the browse mode 93
Creating an additional table 93
Summary 95
Chapter 5: Changing Data and Structure
97
Changing data 97
Entering edit mode 97
Moving to the next field with the tab key 99
Moving with arrows 99
Handling NULL values 99
Applying a function to a value 100 Duplicating rows of data 102
Multi-row editing 102
Editing the next row 103
Deleting data 104
Deleting a single row 104
Deleting many rows 105
Deleting all of the rows in a table 105 Deleting all rows in many tables 106
Deleting tables 106
Deleting databases 107
Changing a table's structure 107
Adding a field 107
Vertical mode 109
Horizontal mode 109
Editing field attributes 109
TEXT fields 110
TIMESTAMP options 118
Bit fields 118
Managing indexes 119
Single-field indexes 119
Multi-field indexes and index editing 120
FULLTEXT indexes 121
Optimizing indexes with EXPLAIN 122 Detecting index problems 124
Summary 124
Chapter 6: Exporting Structure and Data (Backup)
125
Dumps, backups, and exports 125
Scope of the export 126
Exporting a database 126
The export subpanel 128
SQL 128
Defining options for SQL export 128
The "Save as file" subpanel 133
File name template 133
Compression 134
Choosing a character set 134
Kanji support 135
Excel 97-2003 and Excel 2007 Workbook 144
MediaWiki table 145
Exporting a table 145
Split-file exports 146
Exporting selectively 146
Exporting partial query results 146
Exporting and checkboxes 147
User-specific save directories 150
Memory limits 150
Summary 150
Chapter 7: Importing Structure and Data
151
Limits for the transfer 152
Time limits 153
Other limits 153
Handling big export files 154
Uploading into a temporary directory 154
Importing SQL files 154
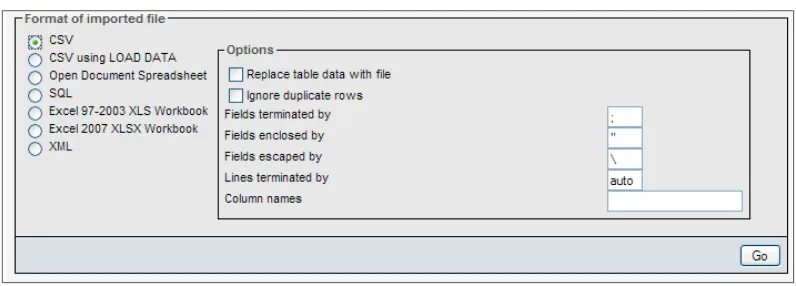
Importing CSV files 156
Differences between SQL and CSV formats 156
Exporting a test file 157
CSV 157
CSV using LOAD DATA 158
Requirements 158
Using the LOAD DATA interface 159
Importing other formats 160
Open Document Spreadsheet 160
Excel 161
XML 161
Reading files from a web server upload directory 162 Displaying an upload progress bar 163
Configuring APC 163
Displaying a character set dialog 164
Summary 164
Chapter 8: Searching Data
165
Using Search page daily 165 Single-table searches 165
Entering the search subpage 166
Searching criteria by field—query by example 166
Searching for empty or non-empty values 167
Producing reports with Print view 168
Searching with wildcard characters 168
Performing a case-sensitive search 169
Combining criteria 170
Performing a complete database search 172
Restricting the search to a column 174
Stopping an errant query 174
Summary 175
Chapter 9: Performing Table and Database Operations
177
Maintaining a table 178
Renaming, moving, and copying tables 183
Appending data to a table 184
Multi-table operations 184
Repairing an "in use" table 185
Database operations 186
Renaming a database 186
Copying a database 186
Summary 187
Chapter 10: Benefiting from the Relational System
189
Relational MySQL 189
InnoDB and PBXT 190
Linked-tables infrastructure 191
Goal of the infrastructure 191
Location of the infrastructure 191
Installing the linked-tables infrastructure 192
Installing for a single user 192 Installing for multiple users 195
Defining relations with the relation view 196
Defining internal relations 196
Defining the relation 197
Defining the display field 197
Foreign key relations 198
Foreign keys without linked-tables infrastructure 201
Defining relations with the Designer 202
Over viewing the interface 202
Defining relations 205
Defining foreign key relations 207
Defining the display field 207
Benefiting from the defined relations 208
Foreign key information 208
The drop-down list of foreign keys 209
The browsable foreign-table window 210
Referential integrity checks 211
Automatic updates of metadata 212
Column-commenting 212
Automatically migrating column comments 213
Summary 214
Chapter 11: Entering SQL Commands
215
The SQL query box 215
The Database view 216
The Table view 216
The Fields selector 218
Clicking into the query box 218
The Query window 218
Query window options 220
Session-based SQL history 220
Database-based SQL history (permanent) 220
Editing queries in the query window 221
Multi-statement queries 222 Pretty printing (syntax-highlighting) 223
The SQL Validator 223
System requirements 224
Making the Validator available 224
Validator results 224
Standard-conforming queries 224 Non-standard-conforming queries 225
Summary 226
Chapter 12: Generating Multi-table Queries
227
Choosing tables 228
Exploring column criteria 229
Field selector: Single-column or all columns 229
Sorting columns 230
Showing a column 230
Updating the query 230
Generating automatic joins 235
Executing the query 236
Summary 237
Chapter 13: Synchronizing Data and Supporting Replication
239
Synchronizing data and structure 239
Goals of synchronization 240
Moving between the development and production servers 240 Collaboration between database designers 240 Preparing for replication 240
Over viewing the synchronization process 241
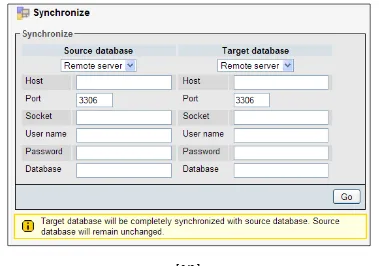
Preparing for the synchronization exercise 242
Choosing source and target servers and databases 242
Analyzing comparison results 244
Performing a complete synchronization 245
Performing a selective synchronization 246
Supporting MySQL replication 247
The Replication menu 248
Configuring replication 248
Master server configuration 248 Slave server configuration 252
Setting up a test environment 253
Controlling a slave server 254
Obtaining replication information 255
Gathering replication status 255
Replicated databases 255
Replicated tables 256
Summary 257
Chapter 14: Using Bookmarks
259
Comparing bookmark and query history features 260
Creating bookmarks 260
Creating a bookmark after a successful query 260
Storing a bookmark before sending a query 262
Making bookmarks public 263
The default initial query for a table 263
Multi-query bookmarks 264
Recalling bookmarks from the bookmarks list 265
Executing bookmarks 265
Manipulating bookmarks 266
Bookmark parameters 266
Creating a parameterized bookmark 266
Executing bookmarks by browsing the pma_bookmark table 268
Summary 268
Chapter 15: Documenting the System
269
Producing structure reports 269
Creating a printable report 269
The database print view 270
The selective database print view 270
The table print view 271
Preparing a complete report with the data dictionary 272
Generating relational schemas in PDF 272
Adding a third table to our model 273
Editing PDF pages 274
Page planning 274
Creating a new page 274
Editing a page 275
Displaying a page 276
Changing the font in PDF schema 279
Laying out a PDF schema with the Designer feature 279
Summary 280
Chapter 16: Transforming Data Using MIME
281
Browsing data without transformations 281
Switching display options 282
Enabling transformations 282
Configuring settings for MIME columns 283
Selecting the MIME type 284 Browser transformations 284 Assigning values to transformation options 285
Requirements for image generation 285
Configuring GD2 library availability verification 285 Asserting support of JPEG and PNG libraries 286 Evaluating the impact of memory limits 287
Examples of transformations 287
Clickable thumbnail (.jpeg or .png) 287
Adding links to an image 288
Date formatting 289
Links from text 289
text/plain: link 290
text/plain: imagelink 290
IP address 294
Transforming data via external applications 294
External application example: In-cell sort 295
Summary 297
Chapter 17: Supporting MySQL 5.0 and 5.1
299
Activating support for views 299
Manually creating a view 300
Main panel and views 301
Creating a view from results 302
Renaming a view 304
Controlling row counting for improved performance 304
Supporting routines—stored procedures and functions 304
Creating a stored procedure 305
Changing the delimiter 305 Entering the procedure 305
Testing the procedure 306
Manipulating procedures and functions 306
Manually creating a function 307
Testing the function 309
Exporting stored procedures and functions 309
Executing code with triggers 310
Manually creating a trigger 310
Testing the trigger 311
Using information_schema 311
Profiling 312
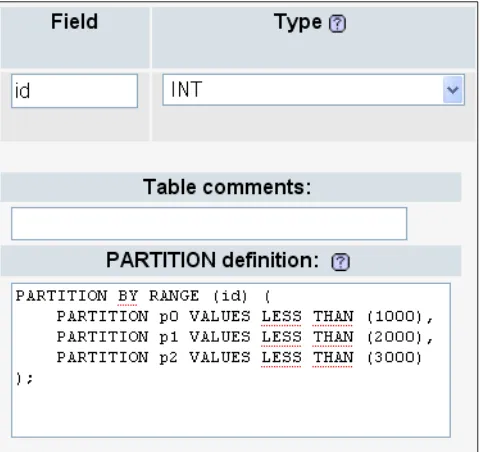
Partitioning 314
Creating a table with partitions 314
Maintaining partitions 315
Exporting a partition definition 315
Exploring the Event Scheduler 315
Activating the scheduler 316
Examining implementation limitations in phpMyAdmin 318
Creating the PBMS system tables 319
Uploading to the BLOB repository 320
Streaming the data from the repository 321
Changing repository data 322
Summary 322
Chapter 18: Tracking Changes
323
Understanding the goals of the tracking system 323
Tracking in other software applications 323
Tracking in phpMyAdmin 324
Prerequisites 324
Configuring a basic tracking mechanism 324
Principles 325
Versioning 325
Taking a snapshot of the current structure 326
Understanding archiving issues 326
Initiating tracking for one table 326
Choosing the statements to be tracked 328
Testing the tracking mechanism 328
Tracking report 329
Determining tracking status 330
Deactivating and activating tracking 332
Structure snapshot 333
Exporting a version 334
Creating a new version 335
Quickly accessing tracking information 336
Deleting tracking information 336
Summary 337
Chapter 19: Administrating the MySQL Server with phpMyAdmin 339
Managing users and their privileges 339
The user overview 340
Privileges reload 341
Adding a user 341
Entering the username 342
Assigning a host value 342
Setting passwords 343
Removing a user 348
Database information 348
Enabling statistics 349
Sorting statistics 349
Checking the database privileges 350
Dropping selected databases 350
Server information 351
Verifying server status 351
The general status page 351
InnoDB status 352
Server variables 352
Server processes 353
Storage engines 354
Available character sets and collations 354
Examining binary logs 355
Summary 355
Appendix A: The History of phpMyAdmin
357
Early events 357
Project re-launch 359
Distributors 360
Evolution 360
GoPHP5 and the 3.x branch 361
Awards 362
Future phpMyAdmin versions 364
Appendix B: Troubleshooting and Support
365
System requirements 365
Verifying the base configuration 366 Solving common errors 366
Troubleshooting error messages 366
A "404: page not found" error when modifying a row 369
Troubleshooting other problems 369
Blank page or weird characters 369 Not being able to create a database 370 Problems importing large files or uploading large BLOB files 370 MySQL root password lost 370 Duplicate field names when creating a table 370 Authentication window displayed more than once 371 Column size changed by phpMyAdmin 371 Seeing many databases that are not ours 371 Not being able to store a value greater than 127 371
Seeking support 372
FAQs 372
Help forums 372
Creating a SourceForge account 372
Choosing the thread title 372
Reading the answers 373
Using the support tracker 373
Using the bug tracker 373
Environment description 373
Bug description 373
Contributing to the project 374
The code base 374
Translation updates 374
Patches 374
Preface
phpMyAdmin is an open source tool written in PHP. It handles the administration of MySQL over the World Wide Web (WWW). It can perform various tasks, such as creating, modifying, or deleting databases, tables, fields, or rows. It can also execute SQL statements and manage users and their permissions. When it comes to exploiting phpMyAdmin to its full potential, even experienced developers and system administrators search for tutorials to accomplish their tasks.
Mastering phpMyAdmin 3.3.x for Effective MySQL Management is an easy-to-read, step-by-step practical guide that walks you through every facet of this legendary tool—phpMyAdmin—and takes you a step ahead in taking full advantage of its potential. This book is filled with illustrative examples that will help you to understand every phpMyAdmin feature in detail.
This book jump starts with installing and configuring phpMyAdmin, and then looks into phpMyAdmin's features. This is followed by configuring authentication in phpMyAdmin, and setting parameters that influence the interface as a whole. You will first create two basic tables, and then edit and delete data, tables, and databases. As backups are crucial to a project, you will create up-to-date backups and take intermediary snapshots during development and production phases. Then you will look into importing the data that you have exported. You will also explore the various search mechanisms, and query across multiple tables.
You will also learn some new features introduced in version 3.3.x, such as synchronizing databases on different servers, and managing MySQL replication in order to improve performance and data security. You will also store queries as bookmarks for their quick retrieval. Towards the end of the book you will learn to document your database, track changes made to the database, and manage user accounts using phpMyAdmin server management features.
This book is an upgrade from the previous version that covered phpMyAdmin Version 3.1. Version 3.3.x introduced features such as new import and export modules, tracking changes, synchronizing structure and data between servers, providing support for replication.
What this book covers
Chapter1, Getting Started with phpMyAdmin,gives us the reasons why we should use phpMyAdmin as a means of managing MySQL databases. It then covers the downloading and installation procedures for phpMyAdmin.
Chapter 2, Configuring Authentication and Security, provides an overview of various authentication types used in phpMyAdmin. It then covers the security issues related to the phpMyAdmin installation.
Chapter 3, Over Viewing the Interface, gives us an overview of the phpMyAdmin interface. This includes the login panel, the navigation and main panels in both Light mode and Full mode, and the Query window.
Chapter 4, Taking First Steps, is all about database creation. It teaches us how to create a table, how to insert data manually, and how to sort the data.
Chapter 5, Changing Data and Structure, covers the various aspects of data editing in phpMyAdmin. It teaches us how to handle NULL values, multi-row editing, and data deletion. Finally, it explores the subject of changing the structure of tables, focusing on editing field attributes and index management.
Chapter 6, Exporting Structure and Data (Backup), deals with backups and exports. It lists various ways to trigger an export, available export formats, the options associated with export formats, and the various places where the export files can be sent.
Chapter 8, Searching Data, presents the mechanisms that are useful for searching data effectively.
Chapter 9, Performing Table and Database Operations, covers ways to perform some operations that influence and can be applied on entire tables or databases as a whole. Finally, it deals with table maintenance operations for table repair and optimization.
Chapter 10, Benefiting from the Relational System, is where we start covering the advanced features of phpMyAdmin. The chapter explains how to define inter-table relations. It also explains how to install the linked-tables infrastructure —a prerequisite for the advanced features.
Chapter 11, Entering SQL Commands, teaches us how to enter our own SQL
commands. The chapter also covers the Query window—the window used to edit an SQL query. Finally, it also shows us how to obtain the history of typed commands.
Chapter 12, Generating Multi-table Queries, covers the multi-table query generator, which allows us to produce these queries without actually typing them.
Chapter 13, Synchronizing Data and Supporting Replication, teaches us how to synchronize databases on the same server, or from one server to another one. It then covers how to manage MySQL replication.
Chapter 14, Using Bookmarks, covers one of the features of the linked-tables
infrastructure. It explains how to record bookmarks and how to manipulate them. Finally, it covers how to pass parameters to bookmarks.
Chapter 15, Documenting the System, gives an overview of how to produce documentation that explains the structure of a database, by using the tools offered by phpMyAdmin.
Chapter 16, Transforming Data Using MIME, explains how to apply transformations to data in order to customize its format at view time.
Chapter 17, Supporting MySQL 5.0 and 5.1, covers phpMyAdmin's support for the MySQL features that are new in these versions.
Chapter 18, Tracking Changes, teaches us how to record structure and data changes done from the phpMyAdmin interface.
Appendix A, The History of phpMyAdmin, provides a history of the project, from its roots back in 1998 through the project re-launch in 2001, and its subsequent evolution.
Appendix B, Troubleshooting and Support, explains how to troubleshoot phpMyAdmin by examining some of its error messages, and proposing appropriate solutions. It also explains how to interact with the development team for support, bug reports, and contributions.
What you need for this book
You need to have access to a server or workstation that has the following installed:
• A web server with PHP 5.2 or later
• MySQL 5.0 or later
Who this book is for
If you are a developer, system administrator, or web designer who wants to manage MySQL databases and tables efficiently, then this book is for you. This book assumes that you are already well-acquainted with MySQL basics. This book is a must-read for every serious phpMyAdmin user who would like to use this outstanding application to its full power.
Conventions
In this book, you will find a number of styles of text that distinguish between different kinds of information. Here are some examples of these styles, and an explanation of their meaning.
Code words in text are shown as follows: "The cookie authentication mode is superior to http in terms of the functionalities offered".
A block of code is set as follows:
When we wish to draw your attention to a particular part of a code block, the relevant lines or items are set in bold:
$cfg['Servers'][$i]['pmadb'] = 'marc_book';
$cfg['Servers'][$i]['bookmarktable'] = 'pma_bookmark'; $cfg['Servers'][$i]['relation'] = 'pma_relation';
Any command-line input or output is written as follows:
tar -xzvf phpMyAdmin-3.3.2-all-languages.tar.gz
New terms and important words are shown in bold. Words that you see on the screen, in menus or dialog boxes for example, appear in the text like this: "If Show hiddenmessages appears and we click on this link, messages that might have been shown earlier are revealed".
Warnings or important notes appear in a box like this.
Tips and tricks appear like this.
Reader feedback
Feedback from our readers is always welcome. Let us know what you think about this book—what you liked or may have disliked. Reader feedback is important for us to develop titles that you really get the most out of.
To send us general feedback, simply send an e-mail to [email protected], and mention the book title via the subject of your message.
If there is a book that you need and would like to see us publish, please send us a note in the SUGGEST A TITLE form on www.packtpub.com or e-mail [email protected].
Customer support
Now that you are the proud owner of a Packt book, we have a number of things to help you to get the most from your purchase.
Downloading the example code for this book
You can download the example code files for all Packt books you have purchased from your account at http://www.PacktPub.com. If you
purchased this book elsewhere, you can visit http://www.PacktPub. com/support and register to have the files e-mailed directly to you.
Errata
Although we have taken every care to ensure the accuracy of our content, mistakes do happen. If you find a mistake in one of our books—maybe a mistake in the text or the code—we would be grateful if you would report this to us. By doing so, you can save other readers from frustration and help us improve subsequent versions of this book. If you find any errata, please report them by visiting http://www.packtpub. com/support, selecting your book, clicking on the erratasubmissionform link, and entering the details of your errata. Once your errata are verified, your submission will be accepted and the errata will be uploaded on our website, or added to any list of existing errata, under the Errata section of that title. Any existing errata can be viewed by selecting your title from http://www.packtpub.com/support.
Piracy
Piracy of copyright material on the Internet is an ongoing problem across all media. At Packt, we take the protection of our copyright and licenses very seriously. If you come across any illegal copies of our works, in any form, on the Internet, please provide us with the location address or website name immediately so that we can pursue a remedy.
Please contact us at [email protected] with a link to the suspected pirated material.
Getting Started with
phpMyAdmin
I wish you a warm welcome to this book! The goal of this first chapter is to:
• Know the position of this software product in the web spectrum
• Be aware of all its features
• Become proficient at installing and configuring it
Introducing phpMyAdmin
This section describes the place of phpMyAdmin in the context of PHP/MySQL web applications.
Web applications
The Web has evolved! In the last few years the Web has changed dramatically. In its infancy, the Web was a medium used mainly to convey static information ("Look, my home-page is on the Web!"). Now, large parts of the Web carry information that is dynamicallygenerated by application programs on which enterprises, and even individuals, rely for their intranets and public websites.
Those who are not operating a database-driven website are not using the medium to its fullest capability. Also, they could be lagging behind competitors who have made the switch. So, it is not a question of whether we should implement a database-driven site, but rather about when and how to implement it.
Why web applications? Because they improve the user experience and involve users in the process by opening up possibilities such as:
• Gathering feedback about the site
• Letting users communicate with us and with each other through forums
• Ordering goods from our e-commerce site
• Enabling easily-editable web-based information (content management)
• Designing and maintaining databases from the Web
Nowadays, WWW might stand for WorldWideWave—a big wave that profoundly modifies the way developers think about user interface, data presentation, and most of all, the way data reaches users and comes back to the data center.
PHP and MySQL: The leading open
source duo
When we look at the web applications platforms currently offered by host providers, we will see that most prevalent is the PHP/MySQL combination.
Well-supported by their respective homesites—http://www.php.net and http://www.mysql.com—this duo has enabled developers to build a lot of ready-made open source web applications and, most importantly, enabled in-house developers to quickly put solid web solutions in place.
PHP, usually installed as a module on the web server, is a popular scripting language in which applications are written to communicate with MySQL (or other database systems) on the backend and browsers on the frontend. Ironically, the acronym's significance has evolved along with the evolution of the Web, from Personal HomePage to Professional HomePage to its current recursive definition: PHP: Hypertext Processor. An explanation of the successive name changes can be seen in PHP's source code at http://svn.php.net/viewvc/archived/php3/ trunk/CHANGES?r1=5246&r2=5459. Available on millions of web domains, PHP drives its own wave of quickly-developing applications.
What is phpMyAdmin?
phpMyAdmin (see the official home page at http://www.phpmyadmin.net) is a web application written in PHP; it contains (like most web applications) XHTML, CSS, and JavaScript client code. This application provides a complete web interface for administering MySQL databases, and is widely recognized as the leading application in this field. Being open source since its birth, it has enjoyed support from numerous developers and translators worldwide (being translated into 58 languages at the time of writing this book). The project is currently hosted at Sourceforge.net and developed using their facilities by the phpMyAdmin team.
Host providers everywhere are showing their trust in phpMyAdmin by installing it on their servers. The popular cPanel (a website control application) interfaces with phpMyAdmin. In addition, we can install our own copy of phpMyAdmin inside our webspace, as long as our provider respects the minimum requirements (see the
Systemrequirements section later in this chapter).
The goal of phpMyAdmin is to offer the complete web-based management
of MySQL servers and data, and to keep up with the evolution of MySQL and web standards. While the product is always evolving, it supports all standard operations, along with extra features.
The development team constantly fine-tunes the product based on the reported bugs and requested features, releasing new versions regularly.
Project documentation
Further information about phpMyAdmin is available on the homesite's documentation page, located at http://www.phpmyadmin.net/home_page/docs.php. Moreover, the development team, helped by the community, maintains a wiki at http://wiki. phpmyadmin.net.
Installing phpMyAdmin
It's time to install the product and configure it minimally for first-time use. Our reason for installing phpMyAdmin could be one of the following:
• Our host provider did not install a central copy
• Our provider installed it, but the version installed is not current
• We are working directly on our enterprise's web server
Required information
Some host providers offer an integrated web panel where we can manage accounts, including MySQL accounts, and also a file manager that can be used to upload web content. Depending on this, the mechanism that we use to transfer phpMyAdmin source files to our webspace may vary. We will need some specific information (listed below) before starting the installation:
• The web server's name or address: Here, we will assume it to be www.mydomain.com.
• Our web server's account information (username, password): This information will be used for either FTP or SFTP transfer, SSH login, or web control panel login.
• The MySQL server's name or IP address: If this information is not available, a good alternative choice is localhost, which means that the MySQL server is located on the same machine as the web server. We will assume this to be localhost.
System requirements
The up-to-date requirements for a specific phpMyAdmin version are always stated in the accompanying Documentation.html file. For phpMyAdmin 3.3, the minimum PHP version required is PHP 5.2 with session support and the Standard PHPLibrary (SPL). Moreover, the web server must have access to a MySQL server (version 5.0 or later)—either locally or on a remote machine. It is strongly recommended that the PHP mcrypt extension be present for improved performance in cookie authentication mode (more on this in Chapter2, ConfiguringAuthentication andSecurity). In fact, on a 64-bit server, this extension is required.
On the browser side, cookie support must be activated, whatever authentication mode we use.
Downloading the files
There are various files available in the Download section of http://www. phpmyadmin.net. There might be more than one version offered here, and it is always a good idea to download the latest stable version. We only need to download one file, which works regardless of the platform (browser, web server, MySQL, or PHP version). For version 3.3, there are two groups of files—english and all-languages. If we need only the English interface, we can download a file whose name contains "english"—for example, phpMyAdmin-3.3.2-english.zip. On the other hand, if we have the need for at least one other language, choosing all-languages would be appropriate.
If we are using a server supporting only PHP4—for which the PHP team has discontinued support since December 31, 2007—the latest stable version of phpMyAdmin is not a good choice for download. I recommend using version 2.11.x, which is the latest branch that supports PHP4.
The files offered have various extensions: .zip, .tar.bz2, .tar.gz, .7z. Download a file having an extension for which you have the corresponding extractor. In the Windows world, .zip is the most universal file format, although the files are bigger than .gz or .bz2 files (which are common in the Linux/Unix world). The .7z extension denotes a 7-Zip file, which is a format that achieves a higher compression ratio than the other formats offered—an extractor is available at http://www.7-zip. org. In the following examples, we will assume that the chosen file was phpMyAdmin-3.3.2-all-languages.zip.
Installing on different platforms
The next step depends on the platform you are using. The following sections detail the procedures for some common platforms. You may proceed directly to the relevant section.
Installing on a remote server using a Windows
machine
Using the File explorer, we double-click the phpMyAdmin-3.3.2-all-languages. zip file that we just downloaded on the Windows machine. A file extractor will start, showing us all of the scripts and directories inside a main phpMyAdmin-3.3.2-all-languages directory.
Use whatever mechanism your file extractor offers to save all the files, including subdirectories, to some location on your workstation. Here, we have chosen C:\. Therefore, a C:\phpMyAdmin-3.3.2-all-languages directory has been created for extraction.
Now, it's time to transfer the entire directory structure C:\phpMyAdmin-3.3.2-all-languages to the web server in our webspace. We use our favorite SFTP or FTP software, or the web control panel, for the transfer.
The exact directory under which we transfer phpMyAdmin may vary. It could be our public_html directory or another directory to which we usually transfer web documents. For further instructions about the exact directory to be used, or the best way to transfer the directory structure, we can consult our host provider's help desk. After the transfer is complete, these files can be removed from our Windows machine as they are no longer needed.
Installing on a local Linux server
Let's say we chose phpMyAdmin-3.3.2-all-languages.tar.gz and downloaded it directly to some directory on the Linux server. We move it to our web server's document root directory (for example, /var/www/html) or to one of its subdirectories (for example, /var/www/html/utilities). We then extract it by issuing the
Installing on local Windows servers (Apache, IIS)
The procedure here is similar to that described in the Installationonaremoteserver usingaWindowsmachine section, except that the target directory will be under our DocumentRoot (for Apache) or our wwwroot (for IIS). Of course, we do not need to transfer anything after modifications are made to config.inc.php (described in the next section), as the directory is already on the webspace.
Apache is usually run as a service. Hence, we have to ensure that the user under whom the service is running has normal read privileges to access our newly-created directory. The same principle applies to IIS, which uses the IUSR_machinename user. This user must have read access to the directory. You can adjust permissions in the Security/permissions tab of the directory's properties.
Configuring phpMyAdmin
Here, we will learn how to prepare and use the configuration file containing the parameters to connect to MySQL, and which can be customized as per our requirements.
Before configuring, we can rename the directory phpMyAdmin-3.3.2-all-languages to something like phpMyAdmin or just something easier
to remember. This way, we and our users can visit an easily-remembered URL to start phpMyAdmin. On most servers, the directory part of URLs is case-sensitive, so we should communicate the exact URL to our users. We can also use a symbolic link if our server supports this feature.
The config.inc.php file
This file contains valid PHP code that defines the majority of the parameters (expressed by PHP variables) that we can change in order to tune phpMyAdmin to our own needs. There are also normal PHP comments in it, and we can comment our changes.
Be careful not to add any blank lines at the beginning or end of the file; doing so would hamper the execution of phpMyAdmin.
In versions before 2.8.0, a generic config.inc.php file was included in the
downloaded kit. Since 2.8.0, this file is no longer present in the directory structure. Since version 2.9.0, a config.sample.inc.php file is included, and this can be copied and renamed to config.inc.php to act as a starting point. However, it is recommended that you use the web-based setup script (explained in this chapter) instead, for a more comfortable configuration interface.
There is another file—layout.inc.php—that contains some configuration information. Because phpMyAdmin offers theme management, this file contains the theme-specific colors and settings. There is one layout.inc.php file per theme, located in themes/themename, for example, themes/original. We will cover modifying some of those parameters in Chapter4, TakingFirstSteps, under the
Customizing the browse mode section.
Avoiding false error messages about permissions
on config.inc.php
In its normal behavior, phpMyAdmin verifies that the permissions on this file do not allow everyone to modify it. This means that the file should not be writable to the world. Also, it displays a warning if the permissions are not correct. However, in some situations (for example, an NTFS file system mounted on a non-Windows server), the permission detection fails. In these cases, you should set the following parameter to false:
$cfg['CheckConfigurationPermissions'] = false;
The following sections explain various methods for adding or changing a parameter in the config.inc.php file.
Configuration principles
If the notion of a MySQL root user eludes you, now might be the
time to browse http://dev.mysql.com/doc/refman/5.1/ en/privilege-system.html, in order to learn the basics about
MySQL's privilege system.
Since version 3.1.0, the development team has wanted to promote a more flexible login panel. This is why, with the lack of a configuration file, phpMyAdmin displays the cookie-based login panel by default (more details on this in Chapter2, Configuring AuthenticationandSecurity, which explains that with the default configuration, it's not possible to log in with an empty password):
The cookie-based authentication method uses Blowfish encryption for storing credentials in browser cookies. If no configuration file exists, a Blowfish secret key is generated and stored in session data, which can open the door to security issues. This is why the following warning message is displayed: Theconfigurationfilenow needsasecretpassphrase(blowfish_secret).
At this point, we have some choices:
• Use phpMyAdmin without a configuration file
• Use the web-based setup script to generate a config.inc.php file • Create a config.inc.php file manually
These options are presented in the following sections. We should note that even if we use the web-based setup script, we should familiarize ourselves with the config.inc.php file format, because the setup script does not cover all of the possible configuration options.
Web-based setup script
The web-based setup mechanism is strongly recommended in order to avoid syntax errors that could result from the manual creation of the configuration file. Also, because this file must respect PHP's syntax, it's common for new users to experience problems in this phase of the installation.
A warning is in order here: The current version has only a limited number of translation languages for the setup interface.
In most cases, the icons beside each parameter point to the respective phpMyAdmin official wiki and to their documentation, providing you with more information about this parameter and its possible values.
There are three warnings here. As taking care of the first message will require more manipulations, we will handle it in a moment. Let's cover the second message—Insecureconnection. This message appears if we are accessing the web server over HTTP—an insecure protocol. As we are possibly going to input confidential information, such as the username and password, in the setup phase, it's recommended that you communicate over HTTPS, at least for this phase. HTTPS uses SecureSocketLayer (SSL) to encrypt the communication and make eavesdropping on the line impossible. If our web server supports HTTPS, we can simply follow the proposed link. This will restart the setup process, this time over HTTPS. We have made this assumption in our example.
The third warning encourages you to use the ForceSSL option, which will automatically switch to HTTPS when using phpMyAdmin (not related to the setup phase).
The first warning tells us that phpMyAdmin did not find a writable directory with the name config. This is normal as it was not present in the downloaded kit. Also, as the directory is not yet there, we observe that the Save, Load, and Delete buttons in the interface are gray. In this config directory, we can:
• Save the working version of the configuration file during the setup process
• Load a previously-prepared config.inc.php file
It's not absolutely necessary that we create this configuration directory, as we can download the config.inc.php file produced by the setup procedure to our client machine. We can then upload it to phpMyAdmin in the first-level directory via the same mechanism (say FTP) that we used to upload phpMyAdmin. In any case, we'll create this directory.
The principle here is that the web server must be able to write to this directory. There is more than one way to achieve this. Here is one that would work on a Linux server—adding read, write, and execute permissions for everyone on this directory:
Having done that, we refresh the page in our browser and we see:
In the configuration dialog, a drop-down menu permits the user to choose the proper end-of-line format. We should choose the format that corresponds to the platform (UNIX/Linux or Windows) on which we will open later, with a text editor, the config.inc.php file.
A single copy of phpMyAdmin can be used to manage many MySQL servers, but for now we will define parameters describing our first MySQL server. We click Newserver, and the server configuration panel is shown.
A complete explanation of these parameters can be found in the following sections of this chapter, and also in Chapter10, Benefiting from the Relational System. For now, we notice that the setup process has detected that PHP also supports the mysqli extension. Therefore, this is the one that is chosen by default. This extension is the programming library used by PHP to communicate with MySQL.
It's recommended you abide by the philosophy proposed by the interface, and keep cookie as the Authenticationtype. We assume that our MySQL server is located on localhost. Hence, we keep this value, and all of the proposed values intact, except for the following:
• Verbosenameofthisserver: We enter my server
We then click on Save and are brought back to the Overview panel. This save operation did not yet save anything to disk; changes were saved in memory. We are warned that a Blowfish secret key was generated. However, we don't have to remember it, as it's not keyed in during login process, but is used internally. For the curious, you can switch to the Features panel and click on the Security tab to see which secret key was generated. Back to the Overview panel. Now our setup process knows about one MySQL server, and there are links that enable us to Edit or Delete these server settings:
We can have a look at the generated configuration lines by using the Display button; and then we can analyze these parameters using the explanations given in the Descriptionofsomeconfigurationparameters section later in this chapter. At this point, this configuration is still just in memory, so we need to save it. This is done via the Save button on the Overview panel. It saves config.inc.php in the special config directory that we created previously. This is a directory strictly used for configuration purposes. If, for any reason, it was not possible to create this config directory, you just have to Download the file and upload it to the web server directory where phpMyAdmin is installed.
The last step is to copy config.inc.php from the config directory to the top-level directory—the one that contains index.php. By copying this file, it becomes owned by the user instead of by the web server, ensuring that further modifications are possible. This copy can be done via FTP or through commands such as:
cd config
cp config.inc.php ..
As a security measure and until the configuration steps are completed, it's recommended that you change the permission on the config
directory—for example, with the chmodugo-rwxconfig command.
Other configuration parameters can be set with these web-based setup pages. To do so, we would have to:
1. Enable read and write access to the config directory 2. Copy the config.inc.php to this directory
3. Ensure that read and write access are provided to this file for the web server 4. Start the web-based setup tool
After the configuration steps are done, it's recommended that you completely remove the config directory, as this directory is only used by the web-based setup script. Since version 3.2.0, phpMyAdmin displays the following warning on the home page (see Chapter3, Over Viewing the Interface) if it detects that this directory still exists:
Directoryconfig,whichisusedbythesetupscript,stillexistsinyour
phpMyAdmin directory.YoushouldremoveitoncephpMyAdminhasbeen configured.
You are invited to peruse the remaining menus to get a sense of the available configuration possibilities, either now or later when we cover a related subject. In order to keep this book's text lighter, we will only refer to the parameters' textual values in the following chapters.
Manually creating config.inc.php
We can create this text file from scratch by using our favorite text editor, or by using config.sample.inc.php as a starting point. The exact procedure depends upon which client operating system we are using. We can refer to the next section for further information.
The default values for all possible configuration parameters that can be located inside config.inc.php are defined in libraries/config.default.php. We can take a look at this file to see the syntax used, as well as further comments about configuration. See the important note about this file in the UpgradingphpMyAdmin
Tips for editing config.inc.php on a Windows
client
This file contains special characters (Unix-style end of lines). Hence, we must open it with a text editor that understands this format. If we use the wrong text editor, this file will be displayed with very long lines. The best choice is a standard PHP editor such as NetBeans or Zend Studio for Eclipse. Another choice would be WordPad, metapad, or UltraEdit.
Every time the config.inc.php file is modified, it will have to be transferred to our webspace again. This transfer is done via an FTP or an SFTP client. You have the option to use a standalone FTP/SFTP client such as FileZilla, or save it directly via FTP/SFTP, if your PHP editor supports this feature.
Description of some configuration parameters
In this chapter and the next one, we will concentrate on the parameters that deal with connection and authentication. Other parameters will be discussed in the chapters where the corresponding features are explained.
PmaAbsoluteUri
The first parameter we will look at is: $cfg['PmaAbsoluteUri'] = '';.
PMA is a familiar abbreviation for phpMyAdmin. For configuration parameters, the chosen convention is to capitalize the first letter, producing Pma in this case. At some places in its code, phpMyAdmin sends an HTTP Location header and must know the absolute URI of its installation point. Using an absolute URI in this case is required by RFC 2616, section 14.30.
In most cases, we can leave this one empty, as phpMyAdmin tries to auto-detect the correct value. If we browse a table later, and then edit a row and click on Save, we will receive an error message from our browser saying, for example, Thisdocument doesnotexist. This means that the absolute URI that phpMyAdmin built in order to reach the intended page was wrong, indicating that we must manually put the correct value in this parameter.
For example, we would change it to:
Server-specific sections
The next section of the file contains server-specific configurations, each starting with:
$i++;
$cfg['Servers'][$i]['host'] = '';
If we examine only the normal server parameters (other parameters will be covered starting in Chapter10, Benefiting from the Relational System), we see a section that looks like the following for each server:
$i++;
$cfg['Servers'][$i]['host'] = ''; $cfg['Servers'][$i]['port'] = ''; $cfg['Servers'][$i]['socket'] = ''; $cfg['Servers'][$i]['connect_type'] = 'tcp'; $cfg['Servers'][$i]['extension'] = 'mysqli'; $cfg['Servers'][$i]['compress'] = FALSE; $cfg['Servers'][$i]['controluser'] = ''; $cfg['Servers'][$i]['controlpass'] = ''; $cfg['Servers'][$i]['auth_type'] = 'cookie';
In this section, we have to enter in $cfg['Servers'][$i]['host'], either the hostname or IP address of the MySQL server—for example, mysql.mydomain.com or localhost. If this server is running on a non-standard port or socket, we need to enter the correct values in $cfg['Servers'][$i]['port'] or $cfg['Servers'] [$i]['socket']. See the section on connect_typefor more details about sockets.
The displayed server name inside phpMyAdmin's interface will be the one entered in 'host' (unless we enter a non-blank value in the following parameter). For example:
$cfg['Servers'][$i]['verbose'] = 'Test server';
extension
The traditional mechanism PHP uses to communicate with a MySQL server, as available in PHP before version 5, is the mysql extension. This extension is still available in PHP 5. However, a new extension called mysqli has been developed and should be preferred for PHP 5, because of its improved performance and its support of the full functionality of the MySQL family 4.1.x. This extension is designed to work with MySQL version 4.1.3 and higher. As phpMyAdmin supports both extensions, we can choose either one for a particular server. We indicate the extension we want to use in $cfg['Servers'][$i]['extension'].
connect_type, socket, and port
Both the mysql and mysqli extensions automatically use a socket to connect to MySQL if the server is on localhost. Consider this configuration:
$cfg['Servers'][$i]['host'] = 'localhost'; $cfg['Servers'][$i]['port'] = '';
$cfg['Servers'][$i]['socket'] = ''; $cfg['Servers'][$i]['connect_type'] = 'tcp'; $cfg['Servers'][$i]['extension'] = 'mysql';
The default value for connect_type is tcp. However, the extension will use a socket because it concludes that this is more efficient as the host is localhost. So in this case, we can use tcp or socket as the connect_type. To force a real TCP connection, we can specify 127.0.0.1 instead of localhost in the host parameter. Because the socket parameter is empty, the extension will try the default socket. If this default socket, as defined in php.ini, does not correspond to the real socket assigned to the MySQL server, we have to put the socket name (for example, /tmp/mysql.sock) in $cfg['Servers'][$i]['socket'].
If the hostname is not localhost, a TCP connection will occur—here, on the special port 3307. However, leaving the port value empty would use the default 3306 port:
$cfg['Servers'][$i]['host'] = 'mysql.mydomain.com'; $cfg['Servers'][$i]['port'] = '3307';
compress configuration
Beginning with PHP 4.3.0 and MySQL 3.23.49, the protocol used to communicate between PHP and MySQL allows a compressed mode. Using this mode provides better efficiency. To take advantage of this mode, simply specify:
$cfg['Servers'][$i]['compress'] = TRUE;
PersistentConnections
Another important parameter (which is not server-specific but applies to all server definitions) is $cfg['PersistentConnections']. For every server we connect to using the mysql extension, this parameter, when set to TRUE, instructs PHP to keep the connection to the MySQL server open. This speeds up the interaction between PHP and MySQL. However, it is set to FALSE by default in config.inc.php because persistent connections are often a cause of resource depletion on servers. So you will find MySQL refusing new connections. For this reason, the option is not even available for the mysqli extension. Hence, setting it to TRUE here would have no effect if you are connecting with this extension.
Upgrading phpMyAdmin
Normally, upgrading is just a matter of installing the newer version into a separate directory and copying the previous version's config.inc.php to the new directory. If the previous version is phpMyAdmin 2.6.0 or earlier, we cannot copy its config. inc.php to the new version because the file format has changed a lot.
An upgrade path or the first-installation path, which should notbe taken, is to copy libraries/config.default.php to config.inc.php.
This is because the default configuration file is version-specific and is not guaranteed to work for future versions.
New parameters appear from version to version. These are documented in Documentation.html and defined in libraries/config.default.php. If a configuration parameter is not present in config.inc.php, its value from
libraries/config.default.php will be used. Therefore, we do not have to include it in config.inc.php if the default value suits us.
Summary
This chapter covered how the web has evolved as a means of delivering applications, and why we should use PHP/MySQL to develop these applications. The chapter also gave an overview of why phpMyAdmin is recognized as a leading application to interface MySQL from the Web, and provided a brief list of its features. It then discussed common reasons for installing phpMyAdmin, steps for downloading it from the main site, basic configuration, uploading phpMyAdmin to our web server, and also described how to upgrade it.
Configuring Authentication
and Security
There are many ways of configuring authentication in phpMyAdmin depending on our goals, the presence of other applications, and the level of security we need. This chapter explores the available possibilities.
Logging in to MySQL through
phpMyAdmin
When we type in a username and password, although it seems that we are logging in to phpMyAdmin, we are not! The authentication system is a function of the MySQL server. We are merely using phpMyAdmin (which is running on the web server) as an interface that sends our username and password information to the MySQL server. Strictly speaking, we do not log in to phpMyAdmin, but through phpMyAdmin.
This is why, in user support forums about phpMyAdmin, people asking for help about authentication are often referred back to their MySQL server's administrator, because a lost MySQL username or password is not a phpMyAdmin problem.
Logging in to an account without a password
MySQL's default installation leaves a server open to intrusion because it creates a MySQL account named root without a password—unless a password has been set by the MySQL distributor. The recommended remedy for this weakness in security is to set a password for the root account. In the eventuality that we cannot set one or do not want to set one, we will have to make a configuration change to phpMyAdmin. Indeed, a server-specific configuration parameter, $cfg['Servers'] [$i]['AllowNoPassword'], has been introduced in phpMyAdmin 3.2.0. Its default value is false, which means that no account is permitted to log in without a password. Generally, this directive should remain false to avoid this kind of access via
phpMyAdmin, as hackers are actively probing the web for insecure MySQL servers. Go through the Securing phpMyAdmin section for other ideas about protecting your server.
If the AllowNoPassword parameter is set to false and a login attempt
is made without a password, an Accessdenied message is displayed.
Authenticating a single user with config
We might need to automatically connect to a MySQL server via phpMyAdmin, using a fixed username and password, without even been asked for it. This is the precise goal of the config authentication type.
For our first example, we will use this config authentication, which is easy to understand. However, in the Authenticating multiple users section, we will see more powerful and versatile ways of authenticating.
Using the config authentication type leaves our phpMyAdmin open to
intrusion, unless we protect it as explained in the Securing phpMyAdmin
section of this chapter.
Here we ask for config authentication, and enter our username and password for this MySQL server:
Testing the MySQL connection
Now it's time to start phpMyAdmin and try connecting with the values we configured. This will test the following:
• The values we entered in the config file or on the web-based setup • The setup of the PHP component inside the web server, if we did a
manual configuration
• Communication between web and MySQL servers
We start our browser and point it to the directory where we installed phpMyAdmin, as in http://www.mydomain.com/phpMyAdmin/. If this does not work, we try http://www.mydomain.com/phpMyAdmin/index.php. (This would mean that our web server is not configured to interpret index.php as the default starting document.)
If you still get an error, refer to AppendixB for troubleshooting and support. We should now see phpMyAdmin's home page. Chapter 3, Over Viewing the Interface
gives an overview of the panels seen now.
Authenticating multiple users
We might want to allow a single copy of phpMyAdmin to be used by a group of persons, each having their own MySQL username and password, and seeing only the databases they have rights to. Or we might prefer to avoid having our username and password in clear text in config.inc.php.
Authentication types offered
Instead of relying on a username and password stored in config.inc.php,