in
10 Minutes
Mac OS
®
X Lion
™
Sams
Teach Yourself
Brad Miser
stored in a retrieval system, or transmitted by any means, elec-tronic, mechanical, photocopying, recording, or otherwise, without written permission from the publisher. No patent liability is assumed with respect to the use of the information contained herein.
International Standard Book Number-10: 0-672-33570-0 International Standard Book Number-13: 978-0-672-33570-9 Library of Congress Cataloging-in-Publication data is on file.
Trademarks
All terms mentioned in this book that are known to be trademarks or service marks have been appropriately capitalized. Pearson cannot attest to the accuracy of this information. Use of a term in this book should not be regarded as affecting the validity of any trademark or service mark.
Warning and Disclaimer
Every effort has been made to make this book as complete and as accurate as possible, but no warranty or fitness is implied. The information provided is on an “as is” basis. The author and the publisher shall have neither liability nor responsibility to any per-son or entity with respect to any loss or damges arising from the information contained in this book.
Bulk Sales
Pearson offers excellent discounts on this book when ordered in quantity for bulk purchases or special sales. For more informa-tion, please contact
U.S. Corporate and Government Sales 1-800-382-3419
Contents
Introduction 1
1 Getting Started with Mac OS X Lion 5
Touring the Lion Desktop ...5
Starting Up and Logging In ...5
Pointing, Clicking, Dragging, and Scrolling ...9
Understanding Windows ...12
Understanding Applications, Files, and Folders ...15
Working with Disks, Discs, Volumes, and Other Devices ...16
Using Menus ...17
Sleeping...18
Logging Out ...18
Shutting Down ...19
2 Working on the Lion Desktop 21 Navigating the Desktop ...21
Working with Finder Windows...23
Using the Dock ...31
Searching with Spotlight ...39
3 Installing, Using, and Managing Applications 41 Using the App Store to Install and Update Applications ...41
Installing and Updating Applications from the Desktop ...48
Launching, Quitting, and Managing Applications ...50
Working with Documents ...55
4 Touring Lion’s Applications 61 Understanding Mac OS Lion’s Applications ...61
Previewing Documents with Preview ...62
Enjoying DVD Content with DVD Player ...65
Communicating with FaceTime ...65
Managing Your Time with iCal ...66
Playing Digital Music and Video with iTunes ...67
Managing Email with Mail ...68
Surfing the Web with Safari ...69
Being Creative with the iLife Suite ...70
5 Personalizing Lion 73 Setting Finder Preferences ...73
Working with the System Preferences Application ...76
Organizing the Launchpad ...88
Configuring Mission Control ...89
Configuring the Dashboard ...94
6 Connecting Your Macto the Internet and a Local Network 97 Connecting Your Mac to the Internet ...97
Working on a Local Network ...109
7 Installing and Using Printers 117 Understanding Printing Options ...117
Installing and Configuring a Printer Connected to a Mac ...119
Installing and Configuring a Network Printer ...121
Printing ...124
Printing to PDF ...126
8 Working with Mice, Keyboards, and Trackpads 131 Understanding Input Devices ...131
Working with Mice...132
Working with Keyboards...138
9 Configuring and Managing User Accounts 145
Understanding User Accounts ...145
Creating User Accounts ...147
Applying Parental Controls to User Accounts ...154
Opening Documents and Applications Automatically at Login ..159
Configuring the Login Process ...160
Working with Fast User Switching ...161
Changing User Accounts ...163
Deleting User Accounts ...163
10 Securing and Protecting Your Mac 165 Understanding Threats to Your Mac ...165
Updating Your Software ...165
Protecting Your Mac from Internet Attacks ...168
Protecting Your Data with Encryption ...177
Backing Up Your Data with Time Machine ...180
11 Troubleshooting and Solving Problems 187 Solving Problems ...187
Performing General Troubleshooting Steps ...188
Repairing Drives with Disk Utility ...195
Recovering Data from a Time Machine Backup ...198
Reinstalling Mac OS X Lion ...201
Getting Help with Problems ...202
12 Running Windows on Your Mac 207 Understanding Options to Run Windows on a Mac ...207
Installing and Using Boot Camp to Run Windows ...209
Installing and Using a Virtual Environment to Run Windows ....215
Index 221
v
Brad Miserhas written extensively about technology, with his favorite topics being Apple’s amazing Macintosh computers, iPods, and iPhones. Books Brad has written include: Sams Teach Yourself iTunes 10 in 10 Minutes;My iPod touch, Second Edition; My iPhone, Fourth Edition; Easy iLife ’09;Special Edition Using Mac OS X Leopard;Absolute Beginner’s Guide to Homeschooling;Teach Yourself Visually MacBook,Third Edition; and MacBook Pro Portable Genius, Third Edition. He has also been an author, development editor, or technical editor on more than 50 other titles.
Brad is or has been a sales support specialist, the director of product and customer services, and the manager of education and support services for several software development companies. Previously, he was the lead pro-posal specialist for an aircraft engine manufacturer, a development editor for a computer book publisher, and a civilian aviation test officer/engineer for the U.S. Army. Brad holds a Bachelor of Science degree in mechani-cal engineering from California Polytechnic State University at San Luis Obispo and has received advanced education in maintainability engineer-ing, business, and other topics.
Originally from California, Brad now lives in Brownsburg, Indiana, with his wife Amy; their three daughters, Jill, Emily, and Grace; a rabbit; and a sometimes-inside cat.
Dedication
To those who have given the last full measure of devotion so the rest of us can be free.
Acknowledgments
As the reader of this book, you are our most important critic and com-mentator. We value your opinion and want to know what we’re doing right, what we could do better, what areas you’d like to see us publish in, and any other words of wisdom you’re willing to pass our way.
You can email or write me directly to let me know what you did or didn’t like about this book—as well as what we can do to make our books stronger.
Please note that I cannot help you with technical problems related to the topic of this book, and that due to the high volume of mail I receive, I might not be able to reply to every message.
When you write, please be sure to include this book’s title and author, as well as your name and contact information. I will carefully review your comments and share them with the author and editors who worked on the book.
Email: [email protected]
Introduction
Mac OS X, now in the Lion release (version 10.7 for those of you who aren’t crazy about big cats), is the software that runs all Macintosh com-puters from the top-of-the-line Power Mac to the extremely popular MacBook laptops. This software provides the desktop from which all your activities start, enables you to configure and personalize your Mac, and controls all the applications and the many processes that are required to make your Mac do all the great things it can do. Along with the operating system itself, Mac OS X Lion includes many applications that you can use to surf the Web, email, chat (text, audio, and video), keep track of your time and contacts, and much more. Learning how to use Mac OS X Lion enables you to get the most fun and productivity from your Mac; this book helps you tame this lion (sorry, I had to make a bad pun with this at some point so I figured I’d get it out of the way early).
About This Book
Similar to the other books in the Sams Teach Yourself in 10 Minutesseries, the purpose of this book is to enable you to learn how to use Mac OS X Lion quickly and easily; hopefully, you’ll even enjoy yourself along the way! This book is composed of a series of lessons. Each lesson covers a specific aspect of using Mac OS X Lion. For example, Lesson 4, “Touring Lion’s Applications,” teaches you how to work with applications, and Lesson 8, “Working with Mice, Trackpads, and Keyboards,” shows you how to use all sorts of input devices.
The lessons include both information and explanations along with step-by-step tasks. You’ll get more out of the lessons if you perform the step-by-steps as you read the lessons. Figures are included to show you what key steps look like on your computer’s screen.
Who This Book Is For
This book is for anyone who wants to get the most out of Mac OS X Lion; Mac OS X Lion is widely recognized as the most intuitive and easy-to-use operating system, but even so, you’ll learn much faster with this guide to help you. If you’ve never used Mac OS X Lion, this book can get you started and help you move toward becoming a Mac OS X Lion guru. If you’ve dabbled with Mac OS X Lion, this book helps you go beyond basic tasks to be able to use all of Mac OS X Lion’s amazing functionality. If you’ve spent a fair amount of time using Mac OS X Lion, this book pro-vides lessons to round out your Mac OS X Lion expertise.
What Do I Need to Use This Book?
The only technical requirement to be able to use this book is a computer with Mac OS X Lion installed on it. Much of Mac OS X Lion’s function-ality requires an Internet connection, so you’ll have a much better experi-ence if you can connect your computer to the Net (you’ll learn how to do this, too).In addition to the basic technical requirements, you need a sense of adven-ture and curiosity to explore all this book offers you. Mac OS X Lion is fun to use and, with this guide to help you, it should be fun to learn as well.
3
Introduction
NOTE:A note provides information that adds to the knowledge you gain through each lesson’s text and figures.
TIP:Tips offer alternative ways to do something, such as keyboard shortcuts, or point out additional features.
LESSON 1
Getting Started with
Mac OS X Lion
In this lesson, you learn how to get started using a Mac running Mac OS X Lion.
Touring the Lion Desktop
The Macintosh Operating System, Lion (10.7) version, or Mac OS X Lion for short, is one of the most powerful and easy-to-use computer operating systems. After you’ve spent some time on its desktop, which is what you see on your Mac’s screen, you’ll soon feel right at home here.
The desktop displays content through windows that, just like windows in the real world, enable you to see things. What you see depends on the con-text in which you are working. When you are running an application, you see the content you are creating or editing in that application, such as text and graphics in a word processing document, or content that you are using, such as a webpage, music, or video.
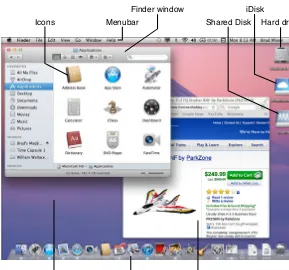
When you are on the desktop, you see a variety of objects, which are shown in Figure 1.1 and described in the following sections. You learn how to use what is on your desktop throughout the rest of this book. In this lesson, focus on getting an overview of what you see and understand-ing the key concepts so you become comfortable with the contents of your desktop. Becoming comfortable with what you see on the desktop is the first step in learning how to use a Mac running Mac OS X Lion.
Starting Up and Logging In
Hard drive
Application window Dock
Desktop
Shared Disk iDisk Finder window
Icons Menubar
FIGURE 1.1 The Mac OS X Lion desktop is where you work with
docu-ments, view webpages, and much more.
Assistant walks you through the basic configuration of your Mac. The Assistant appears only the first time you power a Mac up.
To start your Mac, you press the Power key, which is a round button with a circle and vertical line running through it. The location of this button depends on the specific kind of Mac computer you are using. For example, if you are working with a MacBook or MacBook Pro, this button is located on the upper-right corner of the keyboard. When you press this button, the Mac powers on and loads the software it needs to run, which is Mac OS X Lion. This software controls everything that happens on your Mac.
7
Starting Up and Logging In
account name and a password. You provide these credentials to log in to Mac OS X so you can access your specific resources on the computer.
When you work through the assistant the first time you start your Mac, you create a user account including the account name and password. However, by default, the assistant sets automatic login, which means the account information is entered for you automatically each time you start your computer, so you don’t have to enter it yourself. In Lesson 9, “Configuring and Managing User Accounts,” you learn how to turn off automatic login and work with user accounts.
When automatic login is disabled and you start up your Mac, you must log in to a user account. Depending on your Mac’s configuration, you see either a list of user accounts or empty username and password fields. You use one or the other of these screens to log in to your Mac so you can start using it.
If you see a screen similar to Figure 1.2, perform the following steps to log in:
1. Point to the user account you want to use. (If you don’t under-stand pointing and clicking, skip these steps for now and read this entire lesson; then come back to these steps.)
2. Click the icon for the user account you want to use. You are prompted to enter the associated password.
3. Type the password for the user account you clicked in step 2.
4. Press the Return key. If you provided the correct password for the user account you selected, you move onto your desktop and your Mac is ready to use. If you didn’t provide the correct pass-word, the screen “shivers” and you need to enter it again.
If you see the screen shown in Figure 1.3, perform the following steps instead:
1. Click in the top box. (If you don’t understand pointing and click-ing, skip these steps for now and read this entire lesson; then come back to these steps.)
Brad Miser George Washington Testy
Sleep Restart Shut Down
98% 8:20AM
FIGURE 1.2 On this version of the Login window, you see an icon for each
user account on your Mac.
Sleep Restart Shut Down
FIGURE 1.3 On this version of the Login window, you enter a username
9
Pointing, Clicking, Dragging, and Scrolling
3. Press the Tab key. You move into the Password field.
4. Type the password for the username you typed in step 2.
5. Press the Return key. If you provided a valid username and pass-word, you move onto your desktop and your Mac is ready to use. If you didn’t provide the correct information, the screen “shivers” and you need to enter it again.
Pointing, Clicking, Dragging, and
Scrolling
Mac OS X Lion uses a graphical interface; this means that you interact with graphical objects on the screen, such as icons, windows, and so on. Before you interact with something, you must tell Mac OS X with which object you want to interact. You do this by pointing to the object with which you want to work. The pointer that appears on the screen tells Mac OS X where your focus is, and it is how you tell the software what you want to take action on. You do this by moving the pointer; when you are working on the desktop, the pointer is an arrow. In other situations, it can become other icons, but after you’ve used the arrow pointer, you can use any of them.
To move the pointer around the screen, you can use a mouse or trackpad (there are other options, but these are the two that are used by the vast majority of Mac users).
To point with a trackpad, move a finger toward the “top” of the trackpad (toward the screen) to move the pointer up the screen; moving your finger toward you moves the pointer down the screen. Moving your finger to the left or right causes the pointer to move to the left or right.
NOTE:Pointing Speeds
In Lesson 5, “Personalizing Lion,” you learn how to control how far the pointer moves in relation to moving the mouse or your fingers on a trackpad. As you get more comfortable, you’ll probably want the pointer to move faster so you can get around the desktop more quickly.
Pointing to an object doesn’t tell the Mac OS when you are ready to take action; this is where clicking comes in. When you click on an object, you tell the OS that you’ve reached the object in which you are interested; this is also calledselectingan object. How you click depends on the specific mouse or trackpad you are using. If you are using a Magic Mouse, you click by pressing down on the top of the mouse once until it “clicks.” Other types of mice might have a button you click instead. If you are using a trackpad, you press it once or tap it once to click. When you click on (select) an object, it usually becomes highlighted in some way, such as turning dark gray, which is your visual confirmation that you have selected it.
A click opens an object. As you probably can guess, you double-click by pressing the top of the mouse twice in relatively rapid fashion; on a trackpad, you press or tap twice. After the second click, your Mac opens the object on which you clicked. This could be an application, in which case it starts running; a folder, in which case it opens and you see its con-tents; a document, which then opens in a window; a menu, which opens to show you the commands you can perform; and so on.
11
Pointing, Clicking, Dragging, and Scrolling
number of mouse motions and key presses. How you can perform a sec-ondary click depends on how the device you are using is configured (you learn how to configure a mouse and trackpad in Lesson 5), but you can always perform a second click by holding the Control key down and click-ing the mouse or trackpad button. A menu appears and you can choose a command; what is on this menu depends on the object on which you per-formed the secondary click.
NOTE:Left- and Right-Clicks
Some mice have buttons you click. The left button is usually a sin-gle-click, while the right button is a secondary click. Because of this, you will often hear the term right-clickused instead of the more formal term secondary click.
Another important Mac skill is dragging. This is how you move or copy objects. To drag something, you single-click on it so it becomes high-lighted but don’t release your click. If you are using a mouse, keep press-ing down on the top of the mouse; if you are uspress-ing a trackpad, don’t lift your finger. The object on which you clicked remains selected and is “attached” to the pointer; as you move the pointer, so moves the object. When you have reached your destination, release the mouse or lift your finger and the object is “dropped” in its new location. This action is often referred to as drag and drop.
NOTE:Trackpad Dragging
With a trackpad, you can drag using a gesture, which is touching three fingers to the trackpad when you are pointing to the object you want to move. As you move your fingers, the object moves on the screen. To release it, lift your fingers off the trackpad. You learn how to set this preference in Lesson 5.
One is to drag the scrollbars in the direction you want to scroll. Another is to move two fingers on a trackpad or on the top of a Magic Mouse to move the content being displayed around so you can see all of it.
Understanding Windows
Anything you view on your Mac is looked at through a window. There are many types of windows, including windows for applications, documents, folders, and so on. Fortunately, even though there are many types of win-dows, they have certain elements that are consistent no matter what type of window you are working with. (The details of using windows are provided in Lesson 2, “Working on the Lion Desktop”). Figure 1.4 shows the ele-ments of a Finder window, and Figure 1.5 shows an application window.
FIGURE 1.4 You use Finder windows constantly as you use your Mac
13
Understanding Windows
The following is an overview of elements that are common to almost all windows:
. Close button. The red button in the upper-left corner of a window is the Close button. The window you were viewing closes; if you were working with a document that has unsaved changes, you are prompted to save your changes before the window closes. In other situations, the window just disappears from the desktop.
. Minimize button. Just to the right of the Close button is the yel-low Minimize button. When you click this, the window remains open but “shrinks” and moves onto the Dock. You can return to the window by clicking its icon.
. Zoom button. The green Zoom button either causes windows to open to the size needed to view all the contents of the window or causes the window to be as large as possible. Clicking it again returns the window to its previous size.
FIGURE 1.5 This example of a window shows a webpage; notice it has
. Title. The text in the center of the top of the window is the name of whatever you are viewing. For example, when you are viewing a webpage, this is the name of the page. When you are viewing a document, it is the document’s filename. When you are viewing a Finder window, this is the name of the folder whose content you are viewing.
. Toolbar. Most windows have a toolbar at the top. This toolbar contains icons on which you can click to perform actions related to the content of the window.
. Resize handles. Although the resize handles are not a visible feature, you can drag the corners or any side of a window to resize it. To do this, point to the corner or side of the window you want to resize. When the arrow pointer becomes a diagonal line with an arrow on each end, you can resize the window. Drag the handle until the window is the shape and size you want it to be. When you release the drag, the window retains its new size.
15
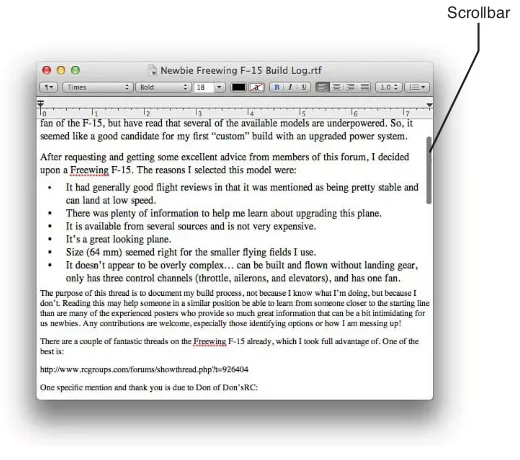
Understanding Applications, Files, and Folders
Scrollbar
FIGURE 1.6 Scrollbars indicate your relative position within a window.
Understanding Applications,
Files, and Folders
Much of what you do on your Mac involves applications, files, and folders.
Anapplicationis a collection of computer code that translates commands you select and input you make into information, actions, and everything else that happens on your Mac. You use a lot of applications as you work with your Mac. In Lesson 3, “Installing, Using, and Managing
Applications,” you learn how to install and manage applications. Mac OS X Lion includes a number of applications by default; you learn about these in Lesson 4, “Touring Lion’s Applications.” The application that runs your desktop is the Finder, so you use the Finder quite a lot.
kinds of content. Files also make up Mac OS X Lion; you typically do not interact with system files directly. Files have names that include filename extensions, such as .jpg and .doc (which can be hidden), and they are rep-resented by icons in Finder windows and email attachments. Icons show a preview of what the file contains in their thumbnail images.
Like folders in the physical world, folders on a Mac are a means to orga-nize things, such as files and other folders. Mac OS X Lion includes many folders by default. You can create, name, delete, and organize folders in any way you see fit (mostly any way—there are some folders you cannot or should not change). You open a folder in a Finder window to view its contents.
Working with Disks, Discs,
Volumes, and Other Devices
Ultimately, your Mac manages data—lots and lots of data. It can use a num-ber of types of devices to store and organize the data with which you work.
A disk drive, also known as a hard drive, is one type of physical device that Macs use to store data. A hard drive contains a magnetic disk accessed through a read/write head to read or store information. All Macs have at least one internal hard drive that contains the software it needs to work with Mac OS X Lion, applications you install, and documents you create. You can connect external disk drives to Macs through USB, FireWire, FireWire 800, or Thunderbolt ports to expand the available stor-age room. Drives come in various storstor-age capacities, such as 750GB, 1TB, 2TB, and so on and operate at various speeds. Drives are represented on a Mac with icons that look different to represent different kinds of drives (internal versus external, for example).
17
Using Menus
Avolumeis an area of a disk created using software rather than a physical space. A drive can be partitioned into multiple volumes, where each vol-ume acts like a separate disk. A volvol-ume performs the same task as a disk, which is to store data. In fact, when you work with a volume, you might not be able to tell the difference. You can also access volumes being shared with you over a network. Some files (called disk images) appear as volumes that you use as if they were a volume on a disk. Volumes are used to organize data in different ways and to represent various resources you work with.
There are other kinds of devices on which you can store data, too, such as flash drives, digital cards, and so on. Mostly, these behave just like a hard drive, although they have much less storage capacity.
Using Menus
Menus contain commands that you can choose to perform various actions. All applications have their own menus, but most applications provide at least standard options, including File, Edit, View, and so on. Applications also have a menu that is named with the application’s name. For example, the Finder menu appears when you are working on your desktop using the Finder application.
The Apple menu, located on the left end of the menu bar, is a special menu because it almost always appears regardless of what you are doing. It contains system-level commands that you might need at any time, which is why it is always available.
FIGURE 1.7 You work with menus extensively to perform different tasks in
the applications you use.
Sleeping
When you aren’t actively using your Mac, you can put it to sleep, which is a low-power mode. When a Mac sleeps, most of the processes stop, the display goes dark, and so on. To put a Mac to sleep, open the Apple menu and select Sleep, or if you use a mobile Mac, just close its lid. The Mac goes into sleep mode.
To wake it up, move the mouse, touch the trackpad, press a key, or open the lid (mobile Macs).
Logging Out
You can log out of your Mac when you are done using it. When you log out, all the open windows and applications on your desktop close and all processes stop. You end up at the Login window that you can use to log back in to the account you were using or in to a different account.
19
Summary
Shift+cmd+Q. In the resulting dialog box, uncheck the Reopen windows when logging back incheck box if you don’t want the windows you are currently using to open again when you log back in (in other words, you pick up exactly where you left off). Click the Log Outbutton to complete the logout process.
Shutting Down
To turn your Mac off, you shut it down. When you shut down a Mac, all its processes stop. You only need to shut down your Mac when you won’t be using it for a while; otherwise, log out or put it to sleep to enable you to get back to work much faster with one of those options because you won’t have to power up your Mac again.
To shut down your Mac, open the Apple menu and select Shut Down. In the resulting dialog box, uncheck the Reopen windows when logging back incheck box if you don’t want the windows you are currently using to open again when you start the Mac again. Click the Shut Downbutton to complete the shutdown process.
Summary
LESSON 2
Working on the Lion
Desktop
In this lesson, you learn how to use the Lion desktop so you can work efficiently with your Mac.
Navigating the Desktop
The desktop is where all your Mac activities start; the Finder is the Mac application that provides the desktop and controls what you can do there. Figure 2.1 shows a typical desktop. The major elements with which you work are described in the following list:
. Apple menu. In the upper-left corner of the desktop is the Apple menu. As you learned in Lesson 1, “Getting Started with Mac OS X Lion,” this menu is always on the far left end of the menu bar and contains system-level commands, such as those you use to shut down your Mac.
. Menu bar. At the top of the desktop is the menu bar. The first section of this (starting from the left side) is the menu bar for the application you are using. When you are working on the desktop, this is the Finder menu. When you are working with other appli-cations, this menu is the name of the application. You learned how to use menus in Lesson 1.
. Spotlight. At the far right end of the menu bar is the Spotlight search tool, which has the magnifying glass icon. You learn about this later in this lesson.
. Dock. By default, the Dock is located on the bottom of the win-dow (as you learn in Lesson 5, “Personalizing Lion,” you can change its location). You learn about the Dock later in this lesson.
. Finder window. Finder windows show you the contents stored on your Mac; these include applications, folders, documents, and other files. You use Finder windows to move to, view, and take action on files and folders.
23
Navigating the Desktop
To perform a task, such as opening a document, you follow a similar pat-tern, which is the following:
1. Open a Finder window (if there isn’t one open already).
2. Select the starting point.
3. Navigate to the end point.
4. Take action.
Sometimes, there are fewer steps. For example, if what you want to use is on the Dock, these steps collapse into one, which is to click the icon for what you want to open. And sometimes you start with a search instead of choosing a starting point, but the general flow of performing tasks is similar.
As you navigate, you move into and around in folders to get to the specific item with which you want to work. How you do this depends on the Finder window view you are using; you read more on these later in this lesson.
Working with Finder Windows
Because all the tasks you do start with the desktop and Finder application, it’s important to understand how to work with Finder windows. Finder windows work a bit differently than other kinds of windows, such as those for applications and documents.
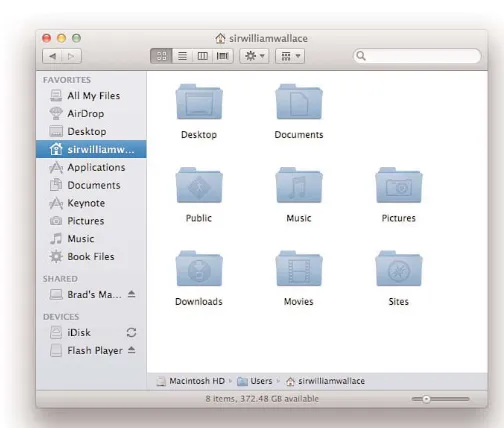
Using the Sidebar
Located on the left side of Finder windows, the Sidebar lets you easily get to specific locations. It comes with a number of default locations, but you can add items to or remove them from the Sidebar so that it contains the items you use most frequently.
To use an item on the Sidebar, click it. What happens when you click depends on the kind of icon you clicked. Examples of outcomes are pro-vided in Table 2.2.
Each type of item of the Sidebar has a distinctive icon, making distin-guishing what each icon represents easy.
You can show or hide the contents of each section. Point to the section’s title and click Hide. The section is collapsed so you only see its title. Click Show to expand a section.
You can change the contents of the Sidebar using the following steps:
1. SelectFinder,Preferences. The Finder Preferences window appears.
2. Click the Sidebartab.
3. Check the check box for each item that you want to appear on the Sidebar.
4. Uncheck the check box for any items that you don’t want to appear on the Sidebar.
5. Close the Finder Preferences window.
TABLE 2.1 Sidebar Sections
Section Description
FAVORITES This section contains locations on your Mac that you visit most frequently. FAVORITES includes a number of folders and other locations by default, but you can change the contents of this section to customize it. The contents of this section remain as you configure it.
SHARED This section contains items you are accessing on a net-work, such as a shared hard disk or Time Capsule. The contents of this section change as you use different shared items.
25
Working with Finder Windows
You can also change the contents of the FAVORITES section by doing the following:
1. Open a Finder window.
2. To remove an item, perform a secondary click (one way is to hold the control key down while you click) on it and select Remove from Sidebar. The icon disappears. Of course, when you remove something from the Sidebar, it’s not removed from the computer. The item remains in its current location on your Mac, but it is no longer accessible from the Sidebar.
TABLE 2.2 Sidebar Icons
Icon Action
All My Files This icon causes all the files you’ve worked with to be shown in the Finder window. You can use the view and browse tools to access any file you want to work with. AirDrop When you click this icon, any Mac (running Mac OS X
10.7 or higher) that your Mac can communicate with using Wi-Fi appears with the icon of its current user. You can send files to other users by dropping them on the related icon; people can share files with you in the same way.
Devices When you click a device, the contents of that device are displayed in the Finder window. For example, when you click a hard drive’s icon, you see its contents. Shared folder
or drive
When you select a shared network resource, you either see the tools you can use to log in to that resource or you see the contents of the resource if your Mac is configured to log in to it automatically.
Folder When you click a folder, you see its contents in the Finder window.
Document Clicking a document’s icon opens the associated appli-cation and you can see and work with the document’s contents.
Application If the icon is for an application, the application launches.
3. To add something to the Sidebar, drag it from a Finder window or desktop onto the FAVORITES section. As you move the item onto the Sidebar, a blue line appears on the Sidebar at the loca-tion to which you’ve moved the item.
4. When you’re over the location in which you want to place the item, release the button. The item’s icon is added to the Sidebar, and you can use it just like the default items.
5. To change the order of items, drag them up or down the list. As you move an item, other items slide apart to show you where the item you are moving will be.
Using the Toolbar
The toolbar appears at the top of Finder windows and contains buttons and pop-up menus that you can use to access commands quickly and easily. It includes a number of default buttons and pop-up menus, but you can con-figure the toolbar so that it contains the tools you use most frequently. The default icons on the toolbar are described in Table 2.3 (from left to right).
TABLE 2.3 Toolbar Icons
Icon Action
Back/Forward buttons
These buttons move you along the chain of Finder win-dows that you’ve moved through, just like Back and Forward buttons in a web browser.
View buttons Use these to change the window view (more on this later in this lesson).
Action pop-up menu
This menu contains a number of useful contextual commands. These commands are the same as those that appear when you perform a secondary click on an item.
Arrange menu This menu enables you to arrange the contents of the window. For example, you can group items by name, date last opened, size, and so on. Select None to remove the arrange settings.
27
Working with Finder Windows
TIP:Customizing the Toolbar
You can change the icons on the toolbar. Select View,Customize Toolbar. Remove icons by dragging them off the toolbar, or add items by dragging them onto the toolbar. Use the Show menu to change the toolbar’s appearance. Click Doneto save your changes.
Working with Finder Window Views
Finder windows offer different views of their contents. Each view works a bit differently and has advantages. To change views, open the view menu and select the view you want to use or click a view’s icon on the toolbar (the view buttons are in the order as they are described from left to right on the toolbar). The views are as follows:
. Icon. In this view, contents appear as icons (refer to Figure 2.1) on which you double-click to open the related item (folder or file). The Icon view is the most pleasing to look at but offers the least information and functionality.
TIP:Customizing Views
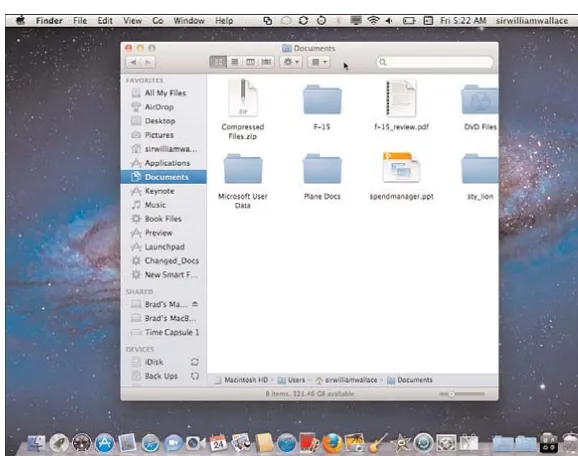
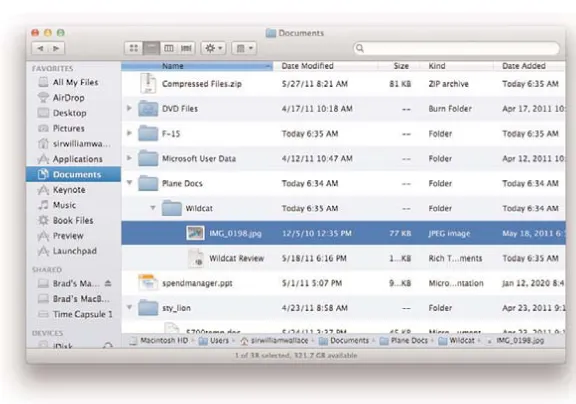
. List. When in List view, contents of a window are shown in a list. You can sort items by clicking the column heading by which you want to sort the list; click it again to reverse the order. You can also expand or collapse the contents of folders by clicking the triangle that appears next to the folder’s icon. Using the View Options, you can determine which columns of information appear. You can also drag columns to the left or right to change the order in which they appear. The List view is extremely useful because of the information it provides (see Figure 2.2).
FIGURE 2.2 The List view provides lots of information about the items you
are viewing.
29
Working with Finder Windows
FIGURE 2.3 The Columns view provides the most efficient navigation.
. Cover Flow. The Cover Flow, as shown in Figure 2.4, sort of com-bines the Icon and List views. At the top of the window are thumb-nails of the folders and files in the folder you are viewing. You can flip through these by dragging across them, clicking on the left or right side, or using the scrollbar that appears just below the thumb-nails. The bottom section of the view is in List view, and this sec-tion works much like a window in that view. The thumbnail directly facing you is in focus and is highlighted on the list.
FIGURE 2.4 The Cover Flow view shows a stack of files and folders you
Whichever view you choose, you can open an item to view its contents if it is a folder or to work with it in its associated application. Experiment with the various views to find the ones most useful to you.
Searching with Finder Windows
You’ll end up with lots of files and folders on your Mac. Navigating directly to something of interest to you is not always easy. Fortunately, you can use Finder windows to search for items of interest to you. Here’s how:
1. In the Search bar, located on the right edge of the Finder window toolbar, type what you want to search for. As you type, the Finder presents a menu of items that meet your search; these are organized by type of search, such as Filenames, Kinds, and so on. The results of the search are shown in the Finder window.
2. If the menu shows you what you want, you can jump directly to an item by clicking it on the list; if not, keep typing until you’ve entered all that you want to search for. As you type, the Finder continues to narrow the results shown in the window to match what you’ve typed.
3. You can change the location you are searching by clicking the buttons on the left side of the Search toolbar that appears when you perform a search. Options include This Mac, the folder cur-rently selected, Shared, and so on.
4. To make what you are searching for more specific, click the Add button(+) located just under the Search bar. A new row appears in the Search toolbar.
5. Use the menus, text boxes, and date boxes to make your search more specific. For example, select Kind on the first menu and Document on the second menu to search for document files. The options that appear change based on what you select on the first menu.
31
Using the Dock
TIP:Saving Searches
You can save a search by clicking the Save button just under the Search bar. Name the search and select the location in which you want to save it (the default is the Saved Searches folder). If you want the search to be placed on the Sidebar, check the Add To Sidebarcheck box. Click Saveto save the search. You can perform the search again by clicking its icon on the Sidebar or moving to it in a Finder window and double-clicking on it.
NOTE:Defaults
The information on the Dock, Launchpad, Dashboard, and Mission Control in the following sections is based on default configurations. You can customize each of these elements to suit your prefer-ences. For example, you can change the location of the Dock on the screen. Customizing these elements is explained in Lesson 5. Learn to use them as described in this lesson, and once you get comfortable, tailor them to work according to your own preferences.
Using the Dock
The Dock, as shown in Figure 2.5, provides one-click access to applica-tions, folders, documents, and the Trash.
The Dock is an important part of your desktop. It is organized in two gen-eral sections. The area to the left of the application/document separation line (the white, dashed line that looks like a highway dividing line that is a few icons to the left of the Trash icon) contains application icons. On the right side of this line are icons for documents, folders, and minimized Finder or application windows and the Trash/Eject icon.
FIGURE 2.5 The Dock enables you to access applications, folders, and
files with a single click.
FIGURE 2.6 When you click a folder icon on the Dock, it expands on the
33
Using the Dock
This has many purposes, including the following:
. Shows open applications (some applications are installed on the Dock and you always see their icons there). Application icons also provide information about what is happening with those applications. For example, when you receive email, the Mail application’s icon changes to indicate the number of messages you have received since you last read messages.
. Enables you to open applications, folders, minimized windows, and documents quickly by clicking the related icon.
. Enables you to quickly switch among open applications and win-dows by clicking the icon for the item you want to bring to the front.
. Gets your attention. When an application needs your attention, its icon bounces on the Dock until you move into that application and handle whatever the issue is.
. Enables you to control an application and switch to any windows open in an application. When you perform a secondary click on the icon of an application, a pop-up menu appears. When the application is running, this menu lists commands as well as all the open windows related to that application. When the applica-tion isn’t running, you see a different set of commands, such as the Open command you can use to open the application.
. Enables you to customize its appearance and function. You can store the icon for any item (applications, folders, and documents) on the Dock. You can control how the Dock looks, including its size; whether it is always visible; where it is located; and which applications, folder, and documents appear on it.
The Trash icon stores the folders and files you delete. When the Trash contains files or folders, its icon includes crumpled paper so that you know the Trash is full. When you select an ejectable item, such as a DVD, the Trash icon changes to the Eject symbol. You can drag a disc or other ejectable item onto that icon to eject the disc, disk, or volume.
Unless an application is permanently installed on the Dock (in which case the icon remains in the same position), the icon for each application you open appears on the right (or bottom) edge of the application area of the Dock.
Unlike open applications, open documents don’t automatically appear on the Dock. Document icons appear on the Dock only when you add them to the Dock manually or when you have minimized a document’s window.
When you minimize a window, by default, the window becomes a thumb-nail that moves onto the Dock. Minimized windows are marked with the related application’s icon in the lower-right corner of the Dock icon so you can easily tell from which application the windows come.
When you quit an open application, its icon disappears from the Dock (unless you have added that application to the Dock so that it always appears there). Minimized windows disappear from the Dock when you maximize them or when you close the application from which a document window comes.
Using the Launchpad
35
Using the Dock
To open an application, click its icon. The Launchpad closes and you move into the application on which you clicked.
To access applications stored in a folder, click the folder. It expands so you can see the icons it contains. Click the icon you want to use.
FIGURE 2.7 The Launchpad provides quick access to any application.
TIP:Launchpad Gestures
Using the Dashboard
The Dashboard contains widgets, which are small, single-purpose applica-tions. The Dashboard is always running, so its widgets are always avail-able to you. You can open the Dashboard in the following ways:
. Press Fn+F12 (default if you are using an Apple keyboard).
. Click the Dashboard’s icon on the Dock (it looks like a gauge).
. Double-click the Dashboard’s icon in the Applications folder.
. Open Mission Control and move all the way to the left.
When you open the Dashboard, the widgets that are configured to open when it is activated appear. You can then use those widgets or see their information.
When you finish using widgets, close the Dashboard again by pressing Fn+F12 (Apple keyboards) or by clicking the right-facing arrow in the lower-right corner of the window.
Using Mission Control
Mission Control is a tool that enables you to see and access anything on your desktop. When you open Mission Control, thumbnails are displayed at the top of the screen for the following items, as shown in Figure 2.8:
. Dashboard.
. Your desktops, named as Desktop X, where Xis a sequential number; spaces are collections of applications and windows that you can create.
. Applications open in Full screen mode.
37
Using the Dock
FIGURE 2.8 Mission Control shows you everything that’s happening on your
Mac.
TIP:Mission Control Gestures
If you use a trackpad, you can open Mission Control by dragging three or four fingers (depending on your preference, which you learn how to set in Lesson 5, “Personalizing Lion”) up the trackpad; drag them down to close it. You can change spaces by dragging to the left or right.
To move into a specific window, open the desktop in which it resides by clicking it and then click on the window into which you want to move.
Mission Control helps you manage screen clutter from open windows. It has three modes:
. Hide all open windows. This mode is useful when your desktop is so cluttered that you are having a hard time finding anything. Press the keyboard shortcut (the default is Fn+F11 if you are using an Apple keyboard). All the windows are moved off the screen, leaving an uncluttered desktop on which you can work. At the sides of the screen are the edges of the windows that have been moved off to the side. Press the keyboard shortcut or click anywhere in the shaded borders of the desktop to cause the win-dows to slide back onto the visible part of the desktop where you can use them again.
. Open Mission Control to reduce all open windows to thumb-nails. This technique (which you learned about earlier) is useful when you have a lot of open windows and want to move into a specific one. You can reduce all your windows to thumbnails and then move into the window you want to use by clicking it. Press the keyboard shortcut (Fn+F9 by default), and all the windows in the current desktop appear. If you have more than one desktop defined (you learn how in Lesson 5), click the desktop on which the window you want to use appears and then click on the win-dow you want to use.
39
Searchin with Spotlight
no longer using), they appear as smaller thumbnails toward the bottom of the screen. When you point to a window, it is high-lighted in blue to show it will become active when you click. To move into a window, click it. The window becomes active (if you click the window for a closed document, it opens) and moves to the front so that you can use it, and the rest of the open applica-tion windows move into the background.
Searching with Spotlight
Spotlight enables you to search your Mac a bit more completely than using the Search bar in Finder windows. The results are more organized, too. Do the following to use Spotlight:
1. Click the Magnifying glass icon in the upper-right corner of the window. The Spotlight tool opens.
2. Type what you want to search for. This can be literally anything, including text, dates, and so on. As you type, Spotlight shows the results of the search, organized in sections based on the types of results you’ve found. Results can include documents, emails, webpages, contacts, and so on.
3. Keep typing until you find the results for which you are looking.
4. Click a result to open it.
5. To move back to your results, press cmd+spacebar.
TIP:Web Search
Summary
LESSON 3
Installing, Using, and
Managing Applications
In this lesson, you learn how to install, use, and manage applications.
Using the App Store to Install
and Update Applications
The App Store is an application whose purpose is to help you find, down-load, and install applications on your Mac. The great thing about the App Store is that it combines all these functions into one application so adding new applications to your Mac is a snap. It also helps you keep those appli-cations current with the most recent release so you can be sure you are always using the latest and greatest version of your favorite applications.
The App Store enables you to browse for applications in a number of ways, and you can search for specific applications in which you are inter-ested. You can view information about applications, such as screenshots, and when you want to get an application, you can do so with just a few clicks. The App Store application manages the process of downloading and installing the applications you buy so you don’t have to do anything else to get the applications ready to use.
FIGURE 3.1 The App Store application makes finding, downloading, and
installing applications a snap.
Configuring the App Store Application
To get started, open the App Store application and configure it to use your existing Apple ID or to create one for you. Here’s how:
1. Click the App Storeicon on the Dock. The App Store applica-tion opens (see Figure 3.1).
2. In the Quick Links section, click Account. The Sign In sheet appears.
TIP:Sign In Instead
If you already have an Apple ID and don’t want to view your account information, click Sign In, enter your Apple ID and password, and click Sign In instead of using these steps.
43
Using the App Store to Install and Update Applications
step 9. If you don’t already have an Apple ID, continue to the next step.
4. ClickCreate Apple ID. You see the Welcome to the App Store screen, which is the first screen in an assistant that guides you through the creation of your Apple ID.
5. ClickContinue.
6. Read and agree to the license conditions.
7. Provide the details for your Apple ID, such as email address, password, and so on; just follow the assistant’s steps until you’ve provided all the required information. This includes a credit or debit card so you can pay for applications that have a license fee. When you finish, you have an Apple ID and password.
8. Go back to step 3.
9. Review your account information, and click Done. You are signed in to your account and are ready to shop in the App Store.
TIP:Changing Account Info
If you ever need to change your account information, view your account and click the Edit link for the information you want to change.
Finding, Downloading, and Installing
Applications from the Mac App Store
The App Store provides three ways to browse for applications in which you are interested; the following tabs are available for your browsing pleasure:
. Featured. The Featured tab is sort of the home page for the App Store. It includes applications that are “new and noteworthy” and “hot,” and there are several top 10 lists of apps there. You can also use the quick links area to get to categories of apps.
. Categories. This one organizes applications by their categories, such as Productivity, Entertainment, Finance, and so on.
Using these tools is simple. Just click the tab at the top of the window that you want to use to browse. Then, click on links (graphics, text, and so on) to drill down within areas to get to individual applications of interest to you. After you’re there, you can evaluate an application and download it (details are in the following paragraphs).
You can also search in the App Store for specific applications to down-load. Suppose you want to manage your finances on your Mac and have heard that iBank is a great personal finance tool (which it is by the way). To find, evaluate, and download iBank, perform the following steps:
1. Type iBankin the Search tool located in the upper-right corner of the App Store window and press Return. The application searches for applications associated with your search term and presents them on a list (in a specific search like this, you’ll prob-ably only find one or two, but if you perform a more general search, you’ll get more results).
2. Click the application you want to evaluate. Its detail page opens, as shown in Figure 3.2.
FIGURE 3.2 An application’s detail page enables you to read about it, view
45
Using the App Store to Install and Update Applications
3. Scroll around the screen and read the information, which includes a description of the application, screenshots of the appli-cation, customer ratings, and so on.
4. To download and install an application, click its Buybutton if it has a license fee (the button shows the cost) or its Freebutton if it is a free application. (If it’s a free application, you can skip the next two steps.)
5. If the application has a license fee, enter your Apple ID password and click Sign In.
6. ClickBuy. (Check the check box if you don’t want to see this prompt when you buy applications.)
The Launchpad opens and you see the application being downloaded to your Mac (see Figure 3.3). After download is complete, the application is installed for you and is ready to use.
NOTE:Making Progress
The progress of the download process is indicated on the applica-tion’s icon and in the Launchpad icon on the Dock.
Updating Applications with the App Store
Application
One of the best things about the App Store application is that it monitors the versions of the applications you have installed and lets you know when
FIGURE 3.3 On the Launchpad, you see the application being downloaded
updates are available. When they are, you can use the App Store applica-tion to download and install them.
When updates are available, you see the number of updates available in a red circle on the App Store icon on the Dock. When you are ready to install the updates, open the App Store application and click the Updates tab (which also shows the number of available updates), as shown in Figure 3.4.
To update all the applications, click Update All, or you can update indi-vidual applications by clicking each one’s Updatebutton. The download and installation process starts and a progress bar displays next to the appli-cation. When the process is complete, the Update button is replaced by the Installed graphic and the next time you run the application, you’ll use the current version.
Installing Applications from the Mac App
Store on Other Macs
The App Store application enables you to install applications you purchase on more than one Mac. Most applications don’t include any protection fea-tures; the developers are relying on Mac users to be reasonable about their use of applications on multiple computers. In most cases, you can
reason-FIGURE 3.4 Use the Updates tab to download and install updates for the
47
Using the App Store to Install and Update Applications
ably pay for one license for all the Macs you have in your home, for exam-ple, but if you use an application for business purposes, you really should purchase a copy for each Mac that is using it at the same time.
To install an application you’ve downloaded from the App Store on other Macs, perform the following steps:
1. Launch the App Store on the Mac on which you want to install the application.
2. Sign in to the App Store using the account under which the appli-cation was downloaded. If another account is already signed in, clickAccountand, in the resulting sheet, click Sign Out. Then sign in under the account associated with the application.
3. Click the Purchasedtab. Here all the applications that have been downloaded under this account are shown. Applications that haven’t been installed on the current computer have an Install button, while those that have been installed have the Installed graphic instead, as shown in Figure 3.5.
4. To install an application, click its Installbutton. The application is downloaded and the progress of the download is shown next to the application. When the process is complete, the application is ready to use.
FIGURE 3.5 The Purchased tab lists all the applications that have been
Installing and Updating
Applications from the Desktop
Unfortunately, not all Mac applications are available in the App Store. In those cases, you can obtain applications on a DVD or CD or download them from the Web. However you obtain them, there are two basic ways to install applications outside of the App Store app: using an installer appli-cation or via drag and drop.Installing Applications with an Installer
Some applications include an installer application that you run to install the application. Using one of these is straightforward; simply launch the installer program and follow the onscreen instructions to complete the installation (see Figure 3.6 for an example).
FIGURE 3.6 Using an installer application is mostly a matter of following
49
Installing and Updating Applications from the Desktop
Installing Applications with Drag and Drop
Some applications are installed simply by dragging them onto the Applications folder and dropping them there. Many applications you download from the Web use this technique.
Download the application from the Web. The resulting file is typically a self-mounting disk image, which appears as a volume in the Devices sec-tion of the Sidebar. When the image has been downloaded and installed, a folder opens showing you what to do, as shown in Figure 3.7.
Open a new Finder window and either move into your Applications folder or select Go,Applications. Drag the application icon onto the
Applications folder. It is installed; the progress of the process is shown on the screen. When it is done, the application is ready for use.
NOTE:Disk Images
If a disk image downloads but doesn’t open automatically, double-click it.
FIGURE 3.7 Firefox is an example of an application that you install by
Launching, Quitting, and
Managing Applications
If you have used the Mac App Store application, you already have the basics of using applications down. In this section, you get more informa-tion to help you use applicainforma-tions even more effectively.
Launching Applications
The first step to using an application is to start it, more commonly called launchingoropeningit. There are many ways to do this, including the following:
. Click its icon on the Dock.
. Click its icon on the Sidebar.
. Open the Launchpad and click its icon.
. Open the Applications folder and double-click its icon.
. Open a document with which the application is associated.
. Configure it to be opened automatically when you log in to your user account.
. Click a link tied to the application, such as a URL to open a Web browser or a link to a song to open iTunes.
You’ll probably use several of these methods as you work with your Mac. Generally, you want the applications you use most to be available on the Dock because it is almost always available to you. If you always or almost always have an application open (such as an email application), configure your user account so that it opens whenever you log in to your account; that way, you seldom have to launch it manually. (See Lesson 9, “Configuring and Managing User Accounts,” to learn how to do this.)
Managing Open Applications
51
Launching, Quitting, and Managing Applications
means many windows will be open on your desktop; managing all these applications and windows can be a challenge.
An important concept to understand about running multiple applications is that one application is frontmost or active at any one time. The other appli-cations continue to run in the background, but you aren’t actively using them. The open applications and the windows open in those applications are “stacked” on top of each other, and you can usually see multiple win-dows at the same time. The active application and window are the ones “on top” of the stack (frontmost).
There are a couple of ways to tell which application is active. First, notice the menu bar at the top of the screen. It always shows the active applica-tion’s menu; the first choice to the right of the Apple menu is the name of the active application. Second, look for the window with the three buttons (close, minimize, and zoom) in color; this indicates the active window. Windows in the background have these buttons, but the buttons contain no color. For example, in Figure 3.8, the window titled All My Files is active and the window called Documents is open but is in the background. Notice that the item next to the Apple menu is Finder, showing that the Finder is the active application.
FIGURE 3.8 Understanding how windows and applications are stacked in
You can move into any window by clicking in it. When you do, it moves to the front and the application providing it becomes active so you can use it.
Also realize that an application can be active (at the top of the stack) but have no open windows. In this case, you only see the application’s menu at the top of the screen, even though it doesn’t have any windows associated with it. If other windows are open, you might see them “underneath” the active application.
Almost all applications allow you to have multiple windows open at the same time, too. For example, you might be working on multiple docu-ments simultaneously or need to copy and paste parts of one document into another. Like applications on the desktop, open windows within an application are stacked on top of each other, with the window on top being the active one. An application’s Window menu enables you to see the names of its open windows; choose a window on this menu to bring it to the front.
With multiple applications running and many windows open, it can be diffi-cult to know exactly which is “on top,” and you might not be able to see the window you want to move into in order to click in it to bring it to the front. Fortunately, Mac OS X Lion includes a number of features to help you manage multiple applications and lots of windows, including the following:
. Mission Control. Mission Control enables you to quickly move into any open application and into any window within those open applications. Mission Control is explained in Lesson 2, “Working on the Lion Desktop.”
. Desktops. Desktops are collections of applications that you cre-ate based on how you use applications. You can switch between applications easily by changing desktops through Mission Control. Doing so is also explained in Lesson 2.
53
Launching, Quitting, and Managing Applications
. Application Switcher. The Application Switcher enables you to jump into any open application using the keyboard. To use the Application Switcher, press cmd+Tab. The Application Switcher appears as shown in Figure 3.9. Icons for each running applica-tion are shown; the applicaapplica-tion that you will move to when you move out of the Switcher is highlighted in a white box and its name is shown under the icon. To move to a different application, press Tab or Shift+Tab while holding down the cmd key. When the application you want to move into is highlighted with the box, release the keys. That application becomes the active application, and you move into the window you worked in most recently. (You can also click an application’s icon to move into it.)
Another useful tool to manage applications is the contextual menu that appears when you perform a secondary click (one way to do this is to hold down the control key and click) on an application’s icon on the Dock. If the application is running, a menu displays that enables you to move into any window with the application or to access its commands. For example, Figure 3.10 shows the contextual menu for Mail.
TIP:Open Applications
The icons for open applications always appear on the Dock. If they are installed on the Dock, they appear where they are installed. If not, they appear to the left of the dashed dividing line. In either case, you can jump back into an application and make it active by clicking its icon on the Dock.
FIGURE 3.9 Use the Application Switcher to quickly jump into any open
FIGURE 3.10 Open an application’s contextual menu on the Dock to control
it or jump into any of its windows.
Quitting Applications
When you’re done with an application, you can quit it. The benefit of quit-ting an application is that it no longer uses any resources (processor or active memory) and it removes some of the clutter from the desktop because when you quit an application, all its windows close. The downside of quitting an application is the time it takes to restart the application, so you should only quit an application when you won’t be using it again for a while. (You’ll probably leave some applications, such as email, running all the time.)
TIP:Hiding Applications
If you want to keep an application open but move it out of the way, use the Hide applicationcommand on the applicationmenu, where
applicationis the name of the application. When you hide an appli-cation, it (and all the windows open in it) disappears from the desk-top but continues to run in the background. You can move back into the application using the Application Switcher or by clicking its icon on the Dock. The shortcut for the Hide command is cmd+H. If you press Option+cmd+H, all applications except for the active one are hidden.
55
Working with Documents
applicationis the name of the application, or press cmd+Q. The applica-tion stops running; if you have open documents with unsaved changes, you are prompted to save the changes before the application quits. When the application stops, all its windows close and its icon disappears from the Dock unless it is installed there.
When an application isn’t working correctly and is hung (meaning it appears to be active but does not respond to any commands), you can force it to quit. (A hung application is usually accompanied by a spinning, col-ored wheel.) You should only do this after waiting a few minutes to make sure the application is actually hung and that there just isn’t some process slowing things down. When you are sure the application is hung, you can force it to quit.
CAUTION:Force Quits
When you force an application to quit, you lose unsaved changes in all its open documents. So, don’t force quit unless you are sure the application is completely hung.
There are a couple of common ways to force an application to quit:
. Open the application’s contextual menu on the Dock and select Force Quit (this command appears only when the application is hung, which is indicated by the text “Not Responding”).
. Open the Apple menu and select Force Quit or press
Option+cmd+Power key. In the resulting dialog box, select the application that is not responding (it will be highlighted in red) and click Force Quit. Click Force Quit at the prompt.
When you force an application to quit, move into the other open applica-tions and save your documents. Then, restart your Mac.