Flash
™
5 Bible
Robert Reinhardt and Jon Warren Lentz
Hungry Minds, Inc.
Copyright © 2001 Hungry Minds, Inc. All rights reserved. No part of this book, including interior design, cover design, and icons, may be reproduced or transmitted in any form, by any means (electronic, photocopying, recording, or otherwise) without the prior written permission of the publisher.
ISBN: 0-7645-3515-5
Printed in the United States of America 10 9 8 7 6 5 4 3 2 1
1B/QX/QS/QR/FC
Distributed in the United States by Hungry Minds, Inc. Distributed by CDG Books Canada Inc. for Canada; by Transworld Publishers Limited in the United Kingdom; by IDG Norge Books for Norway; by IDG Sweden Books for Sweden; by IDG Books Australia Publishing Corporation Pty. Ltd. for Australia and New Zealand; by TransQuest Publishers Pte Ltd. for Singapore, Malaysia, Thailand, Indonesia, and Hong Kong; by Gotop Information Inc. for Taiwan; by ICG Muse, Inc. for Japan; by Intersoft for South Africa; by Eyrolles for France; by International Thomson Publishing for Germany, Austria, and Switzerland; by Distribuidora Cuspide for Argentina; by LR International for Brazil; by Galileo Libros for Chile; by Ediciones ZETA S.C.R. Ltda. for Peru; by WS Computer Publishing Corporation, Inc., for the Philippines; by Contemporanea de Ediciones for Venezuela; by Express Computer Distributors for the Caribbean and West Indies; by Micronesia Media Distributor, Inc. for Micronesia; by Chips Computadoras S.A. de C.V. for Mexico; by Editorial Norma de Panama S.A. for Panama; by American Bookshops for Finland.
foreign-language translations, please contact our Customer Care department at 800-434-3422, fax 317-572-4002 or write to Hungry Minds, Inc., Attn: Customer Care Department, 10475 Crosspoint Boulevard, Indianapolis, IN 46256.
For information on licensing foreign or domestic rights, please contact our Sub-Rights Customer Care department at 650-653-7098.
For information on using Hungry Minds’ products and services in the classroom or for ordering examination copies, please contact our Educational Sales department at 800-434-2086 or fax 317-572-4005. For press review copies, author interviews, or other publicity information, please contact our Public Relations department at 650-653-7000 or fax 650-653-7500.
For authorization to photocopy items for corporate, personal, or educational use, please contact Copyright Clearance Center, 222 Rosewood Drive, Danvers, MA 01923, or fax 978-750-4470.
Library of Congress Cataloging-in-Publication Data Reinhardt, Robert, 1973–
Flash 5 Bible / Robert Reinhardt and Jon Warren Lentz.
p. cm. Includes Index.
ISBN 0-7645-3515-3 (alk. paper)
1. Computer simulation. 2. Flash (computer file) 3. Interactive multimedia. I. Lentz, Jon Warren. II. Title.
TR897.7 .R46 2001
006.6'96- -dc21 00-143896
LIMIT OF LIABILITY/DISCLAIMER OF WARRANTY: THE PUBLISHER AND AUTHOR HAVE USED THEIR BEST EFFORTS IN PREPARING THIS BOOK. THE PUBLISHER AND AUTHOR MAKE NO REPRESENTATIONS OR WARRANTIES WITH RESPECT TO THE ACCURACY OR COMPLETENESS OF THE CONTENTS OF THIS BOOK AND SPECIFICALLY DISCLAIM ANY IMPLIED WARRANTIES OF MERCHANTABILITY OR FITNESS FOR A PARTICULAR PURPOSE. THERE ARE NO WARRANTIES WHICH EXTEND BEYOND THE DESCRIPTIONS CONTAINED IN THIS PARAGRAPH. NO WARRANTY MAY BE CREATED OR EXTENDED BY SALES REPRESENTATIVES OR WRITTEN SALES MATERIALS. THE ACCURACY AND COMPLETENESS OF THE INFORMATION PROVIDED HEREIN AND THE OPINIONS STATED HEREIN ARE NOT GUARANTEED OR WARRANTED TO PRODUCE ANY PARTICULAR RESULTS, AND THE ADVICE AND STRATEGIES CONTAINED HEREIN MAY NOT BE SUITABLE FOR EVERY INDIVIDUAL. NEITHER THE PUBLISHER NOR AUTHOR SHALL BE LIABLE FOR ANY LOSS OF PROFIT OR ANY OTHER COMMERCIAL DAMAGES, INCLUDING BUT NOT LIMITED TO SPECIAL, INCIDENTAL, CONSEQUENTIAL, OR OTHER DAMAGES. Trademarks:Hungry Minds and It’s all possible! are trademarks or registered trademarks of Hungry Minds, Inc. All other trademarks are the property of their respective owners. Hungry Minds, Inc., is not associated with any product or vendor mentioned in this book.
About the Authors
Robert Reinhardt —Robert’s curiosity and autodidactic energy have carried him from psychology (University of Toronto) to photography (Ryerson University) to new media authoring, teaching, and writing. After discovering the Internet while studying in the Image Arts department at Ryerson in Toronto, Robert began the journey of discovery that eventually enabled him to fuse his interest in technology and communication with his background in the visual arts.
Robert has developed and taught workshops addressing all aspects of content cre-ation and has become increasingly involved with the development of systems for interactive interfaces and data management. Although his head often leads him into the land of scripting and programming, he remains dedicated to the world of images. The main reward of digital literacy has been the ability to move freely between medi-ums and tools to share ideas through art and design. Before leaving Toronto, Robert worked as a collage and video artist to create set and screen art for the Warner Bros. feature film, Gossip.
During their first year in Los Angeles, Robert and his partner, Snow Dowd, formed a multimedia consulting and design company called the Makers (www.theMakers.com). They created a broadband Web site for Gossipwith Warner Bros. Online, as well as graphics for a tie-in video with the band Tonic. Recently, the Makers has also created screen graphics for The Pledge,a film directed by Sean Penn, and worked with Outlaw Productions on previsualization graphics for the forthcoming Warner Bros. film Training Day(to star Denzel Washington and Ethan Hawke). In addition to work for entertainment companies, the Makers has done work for independent artists and nonprofit organizations.
While establishing the Makers, Robert also worked as senior art director and program developer with Rampt.com to create a unique Flash interface and search engine, launched in November 1999. After being recognized as a Macromedia Site of the Day and nominated in the FlashForward film festival in New York, Rampt received the Bandies 2000 award for Best Interface Application, as well as an award of excellence from the New Media Invision Awards 2000.
your workflow and include in-depth information and new developments as they happen.
Jon’s favorite movie, Fellini’s Satyricon,was released the year that he graduated from high school. A decade later, Jon graduated from the Classical Studies program at UCSC, where he first received notice as a poet and translator. He then metamor-phosed into a sculptor and began working with sand-carved glass — a process that he helped to define as a fine art medium. Following a disabling accident, he rein-vented himself as an artist working with cameras and computers. Jon’s images have been featured in the Graphis Poster Annual, Mac Art & Design Magazine (Sweden), IdN — The International Designer’s Network Magazine (Hong Kong), and Shutterbug Magazine. His stock photography is represented by two agencies, AGE and
SuperBild. Jon’s abstract fine art and a selection of his glass sculpture may be viewed online at www.uncom.com.
Technical Editors
High school did not represent Jeffrey Bardzell’sglory years, and it concluded inaus-piciously with the release of Dances With Wolves, “memorable,” he writes, “because it was so popular and I absolutely hated it.” A decade later and a Ph.D. Candidate in Comparative Literature (Indiana University), Jeffrey sought a way to pull together his then-conflicting desires to teach, to express himself creatively with vectors, and to sustain himself with electronic publishing. An interesting job listing prompted him to check Flash out. The job didn’t materialize, but Jeffrey became taken with Flash’s potential for online learning. For him, tools such as Flash and the Internet pose as fundamental a revolution in human communication and teaching as another period he knows something about: the advent of literacy in twelfth century Europe. He has created online learning environments for Indiana University and Ignatius University, while working as a Flash and Fireworks author for Flash-Guru.com and eHandsOn. He is also coauthoring Fireworks 4 Expert Edgewith Lisa Lopuck. In addition to his computer-related publications, he has published on education finance reform, early reading intervention, and epic poetry. Not only did Jeffrey work as a technical editor for the Flash 5 Bible, but he also drafted the Quick Start section and formatted the initial Generator chapters.
Project Editor
Julie M. Smith
Technical Editors
Jeffrey Bardzell Shane Elliot Ellen Finkelstein
Copy Editors
Richard H. Adin Laura Stone
Proof Editors
Cindy Lai Patsy Owens
Project Coordinators
Louigene A. Santos Danette Nurse
Permissions Editor
Carmen Krickorian
Media Development Specialist
Angela Denny
Media Development Coordinator
Marisa Pearman
Jude Levinson Michael Lewis Victor Pérez-Varela Ramses Ramirez
Quality Control Technician
Dina F Quan
Book Designer
Drew R. Moore
Illustrators
Gabriele McCann Ronald Terry John Greenough Karl Brandt Brian Drumm
Proofreading and Indexing
York Production Services
Cover Image
To Snow, Stella, and Al. I won’t forget the year 2000.
RJR
I dedicate my efforts on this book to the memory of my mother-in-law, Phyllis Rogers.
I would also like to thank my family — near and far — for their unconditional love, support, and encouragement, especially my wife, Roanne; my son, Rob; and my mother and father. In addition, I am also thankful for my newfound friends, Jeffrey Bardzell and Nik Schramm, for their wisdom, expertise, and encouragement.
Foreword
T
he Web has certainly changed the way that people work, live, and communi-cate. One cannot help but draw parallels between the digital revolution and other innovations that changed and shaped generations of people — the telephone, radio, and television. Though each of these technologies were rather crude when they started, they eventually became much more dynamic, powerful and attractive to use. The telephone changed from a two-piece handset box to a tiny wireless com-munication device that acts as mobile office. Television has evolved into high-defi-nition systems that are akin to a movie theater experience in a living room. The Web started out and for many people is still a slow-loading, static, uncompelling experience. Macromedia Flash has revolutionized the way in which designers, ani-mators, and developers alike can express their creativity, enabling over two hun-dred million viewers worldwide to catch a glimpse into what the Web can be. With each evolution of Macromedia Flash, we have seen a larger audience of users take advantage of the many innovative features it has to offer. First there were illus-trators and animators creating amazing vector work, and then there were Web designers creating interactive navigation systems, motion graphics, and full Web pages. Developers started creating cutting-edge Web applications and database front-ends. Others create rich-media advertisements, viral marketing content, screensavers, and product simulations. Still others are using Macromedia Flash to create original cartoon series for television and short films. It is no wonder the Macromedia Flash community has grown to include over half a million users, with dozens of dedicated resource Web sites and thousands of attendees at regional con-ferences, all sharing a common thread — the Macromedia Flash authoring tool. Our users have never ceased to amaze and encourage me with the innovative works they are developing with each release of Flash, continuing to push the envelope of what can be done. The incredible user base and the content they create is the inspiration that drives our team at Macromedia to improve and iterate the Flash platform. It has been my privilege to know and work with the coauthors of this book — Jon Warren Lentz and Robert Reinhardt — two of the most respected experts in the Flash community. To bring greater breadth and depth to this book, they assembled a team of over forty guest tutorialists; a group that includes some of the finest artists, developers, and authors working with Flash. The Flash 5 Bibleis an essen-tial all-purpose reference guide for Macromedia Flash, providing insights and tips for mastering the creation of all types of Flash content. It is one book any serious Web designer, developer, or animator should own.Jeremy Clark
Preface
I
n 1997, Macromedia acquired a small Web graphics program, FutureSplash, from a company named FutureWave. FutureSplash was a quirky little program with the astounding ability to generate compact, vector-based graphics and animations for delivery over the Web. With Macromedia’s embrace, Flash blossomed. Now Flash has obtained ubiquity. The Flash Player plug-in ships with most major browsers and operating systems. Now Flash graphics appear all over the Web, and the number of Flash users continues to increase at an astounding pace. Flash 5 has greatly expanded the interactive and programmatic features of Flash movies. Flash movies can now communicate directly with server-side scripts and programs, using standard URL-encoded variables or XML-formatted structures. Sounds can be imported and exported as MP3 audio, for high-quality music on the Web at the smallest file sizes. The Flash interface now looks and feels like other Macromedia products, with tool options contained in user-configurable panels. Third-party developers are creating applications that output to the Flash movie format, .SWF files. Flash is poised to be the central application for generating hot, low-bandwidth, interactive content for delivery over the Web.Is there any other Flash book for you?
The Flash 5 Bibleis the most comprehensive and exhaustive reference on Flash. It helps you get started on your first day with the program and will still be a valuable resource when you’ve attained mastery of the program. When you are looking for clues on how to integrate Flash with other programs so that you can deliver unique and compelling content in the Flash format, you’ll know where to turn.
✦Exhaustive coverage of Flash. We spent a great deal of time covering every aspect of Flash functionality. The first part of the book is entirely dedicated to the Flash interface, and Parts II and III explain how to integrate animations and sound into your Flash movies.
✦Flash is not just one tool.You can think of Flash as a multitasking application: It’s an illustration program, an image and sound editor, an animation machine, and a scripting engine, all rolled into one. In this book, we dissect Flash into each of these components and explain how each works with the other parts. ✦This is a real-world book.We’ve gone to great lengths to make sure that our
source .FLA files and original artwork for the examples and lessons in the book. It also includes trial versions of Flash 5 and other Macromedia products, as well as many of the applications discussed in this edition.
✦The book’s Web site.In order to create a forum for the delivery of updates, notes, and sample files, we have also established a Web site:
www.flash5bible.com
Jon Warren Lentz has his own Flash Bible Web site: www.theflash5bible.com At the Web site, you’ll find a detailed evaluation form for the Flash 5 Bible. We invite you to contribute your comments and suggestions for this edition, so that we can continue to improve our material.
How to get the most out of this book
Here are two things to know so you can get the most out of this book.
First, regarding menu and keyboard commands, here’s the convention for indicating that you’re going to need to select a command from a menu: The menu and command are separated by an arrow symbol. For example, if we tell you to open the Info Panel from the Flash Menu Bar, the instructions will say to choose Window➪Panels➪Info. Second, jump in anywhere. Although this book was written to take a beginner by the hand, starting from page one, you can also use it as a reference. Use the index and the table of contents to find what you’re looking for, and just go there. If you already know Flash and want to get some details on sound, for example, just go to the sound sections.
Icons: What do they mean?
Although the icons are pretty standard and self-explanatory (they have their names written on them!), here’s a brief explanation of what they are and what they mean.
Tips offer you extra information that further explains a given topic or technique, often suggesting alternatives or workarounds to a listed procedure.
Notes provide supplementary information to the text, shedding light on background processes or miscellaneous options that aren’t crucial to the basic understanding of the material.
When you see the Caution icon, make sure you’re following along closely to the tips and techniques being discussed. Some external applications may not work exactly the same with Flash on different operating systems.
If you want to find related information to a given topic in another chapter, look for the cross-reference icons.
Cross-Reference
xv
Preface
The New Feature icons point out any differences between Flash 5 and previous versions of Flash.
This icon indicates that the CD-ROM contains a related file in the given folder.
How this book is organized
Based on feedback from our readers, we have greatly expanded the content in this edition of the Flash Bible, so much in fact that the book has doubled in page count. This book has been written in a format that gives you access to need-to-know infor-mation very easily in every section (or Part) of the book. If you are completely new to Flash, then you’ll want to read Parts I through V. After you have developed a familiarity with the Flash interface, then you can proceed to Parts VI, VII, and VIII. However, if you’ve already used Flash 4, then you may want to review the changes to the Flash 5 interface in Part I, and then jump right into Parts V through VIII to learn more about ActionScript, working with Generator, creating artwork and con-tent in other applications, and integrating Flash with HTML. Part VII is especially useful if you have a favorite application such as Dreamweaver or Director in which you want to use Flash movies.
Part I — Mastering the Flash Environment
The first part of this book explores the Flash file format and the interface of Flash 5, explaining the context in which Flash movies interact on the Web (Chapter 1), and working with the new panels and tools (Chapters 2-7). Specifically, you can read about the new Pen Tool in Chapter 4, and you learn how to use the new Mixer Panel in Chapter 6.
Part II — Creating Flash Graphics
After you’ve learned how to work your way through the Flash interface, you can read about the timeline structures (Chapter 8) and the Flash Library (Chapter 9), where you learn about the symbol types in Flash 5. You can learn how to draw with Flash (Chapter 10), animate with Motion and Shape Tweens (Chapter 11), and incorporate external media files such as JPEGs and GIFs into your Flash artwork (Chapter 12). You see how to structure content on the Main Timeline and create a simple scrolling text interface (Chapter 13).
Part III — Sound Planning
Because Parts I and II focus mainly on the visual presentation of a Flash movie, you need to start thinking about the effect of sound within a Flash movie. In Chapter 14, you learn the basics of digital sound and see which file formats can be imported into Flash. Chapter 15 shows you how to control the playback of sounds within a Flash movie, and you learn how to create interactive buttons with rollover sounds. Chapter 16 explains how to adjust and optimize audio compression in an exported Flash movie.
Part IV — Adding Basic Interactivity to Flash Movies
Not everyone wants to use Flash to create animating buttons for HTML documents on the Web. In Part IV, you learn how to start using Flash actions to create interac-tive and responsive presentations. You learn the difference between Normal and Expert Modes of the Actions Panel (Chapter 17). Flash 5 has greatly increased the capacity of a Flash movie to communicate with its own internal elements, such as nested Movie Clips (Chapter 18). Properties and methods of the Movie Clip Object are introduced (Chapter 19), and you master the art of preloading and sharing Flash .SWF files (Chapter 20).
Part V — Programming Flash Movies with ActionScript
Flash 5 brings with it a whole new interactive language and syntax called ActionScript. While Flash 4 implemented new interactive functions and controls, Flash 5 enables interactive designers to write code much more easily and fluidly. You learn about solving interactive problems (Chapter 21), making functions and arrays (Chapter 22), detecting Movie Clip collisions and using Smart Clips (Chapter 23), creating Flash forms and loading XML (Chapter 24), and using HTML text fields and properties (Chapter 25). Part V ends with an entire chapter dedicated to advanced Flash movie examples (Chapter 26).
Part VI — Using Flash with Generator and Other Server Technologies
As the Web and Flash mature together, developers increasingly need more dynamic content and data-driven systems for faster updates and maintenance of Web sites, especially for large sites with hundreds (if not thousands) of pages and assets. Macromedia Generator can create and load dynamic graphics and data into Flash movie templates. Chapters 27–29 show you how to get up and running with Generator 2 and other server-side technologies.Part VII — Using Flash with Other Programs
Every multimedia designer uses Flash with some other graphics, sound, and authoring application to create a unique workflow that solves the problems of daily interactive project development. Part V shows you how to create content in popu-lar applications such as Macromedia Fireworks, Freehand, and Director, as well as Adobe Photoshop and Discreet 3D Studio Max — just to name a few. We’re sure that you’ll find our coverage of RealPlayer, QuickTime 4, and QuickTime Flash movies particularly interesting.
Part VIII — Distributing Flash Movies
xvii
Preface
your HTML, then read Chapter 26, which describes how to use the <EMBED>and <OBJECT>tags, how to load Flash movies into framesets, and how to create plug-in detection systems for your Flash movies. If you want to find out how to create a Flash standalone projector, or use the Flash standalone player, then check out Chapter 27.
Appendixes
You’ll find directions for using the Flash 5 BibleCD-ROM and a listing of our contrib-utors’ contact information in the appendixes.
Getting in touch with us
Unlike many authors, we aren’t going to make any promises about answering every e-mail that comes to us. We already have more mail than we can possiblybegin to answer. However, if you have a really, really good tip or idea that you want to share with us, we’d like to hear from you. You can also send us comments about the book to:
[email protected] [email protected]
Also check Appendix B for more information on contacting this book’s various contributors and technical editors.
You
can help make Flash better!
The latest version of Flash is more powerful, has more robust capabilities, and is easier to use than any previous version of Flash. It’s also the best program that’s capable of creating highly-compact, vector-based content for transmission over the Web (although FreeHand can also export to the .SWF file format). We’re convinced that Flash 5 is a greatprogram. (That’s why we wrote this book!) But we also know that Macromedia is probably already planning the next version. So, if you have an idea or feature request for the next version, let the folks at Macromedia know. Send an e-mail to:
Acknowledgments
R
obert Reinhardt:This book would not have been possible without the help and talent of many people. I am grateful for the added breadth and depth the tutorials bring to this second edition. First and foremost, I would like to thank the Flash development community. In my six years of multimedia research and produc-tion, I haven’t seen another community that has been so open, friendly, and willing to share advanced tips and techniques. It was a wonderful experience to meet many of you at the FlashForward 2000 conferences in San Francisco and New York. Along the lines of communal experiences, I would like to thank my award-winning Flash team from Rampt.com. All of them have contributed to this book in one way or another. With Scott Brown, Daniel Cluff, Sandro Corsaro, and Shane Elliott, I learned more about real Flash production in one short year than any books, tech notes, or tutorials could ever describe.I would like to thank everyone at Hungry Minds (formerly IDG Books Worldwide) who saw this book through a tough production schedule. As anyone in a creative team can attest, a great manager can make or break a project — or, in this case, a book. Julie Smith, our development editor, was always there (on ICQ and at the phone, weekdays and weekends) to answer questions and steer us in the right direction. A great deal of gratitude must also go to Mike Roney, our acquisitions editor. Even when I was pushing deadlines, Mike trusted that I would do whatever it took to see this book, doubled in size from its previous edition, to print.
I find it hard to believe that some authors can go without a literary agent. If it weren’t for David Fugate, our agent at Waterside Productions, this book wouldn’t have been written — at least, not before the next release of Flash. David, I couldn’t have gotten through this without your invaluable guidance and encouragement. Of course, a book about Flash would not be very useful if it wasn’t technically accu-rate. Many thanks to the developers, engineers, and support staff at Macromedia, especially Gary Grossman and Jeremy Clark, who answered my questions during the development of Flash 5. Also, I am indebted to Jeffrey Bardzell and Shane Elliott for their watchful eyes and keen observations of the material.
of development for the original Flash 4 Bible, I came up with the idea of solicitung Expert Tutorials from eminent Flash artists in order to augment and deepen our coverage of the program. At that time, I had no idea how popular and effective that concept would be – but, judging by the emails from readers and comments to me in person, the idea was clearly a huge success. Accordingly, this book is graced with nearly 50 tutorials which are the contributions of nearly 40 guest tutorialists. In soliciting these contributions, I’ve had the pleasure of collaborating with and edit-ing the wisdom of some of the finest minds in the Flash world. (The contact infor-mation for these contributors is listed in Appendix C.) These contributions have added immeasurable breadth and depth to our book. On behalf of my readers, my co-author, and myself, I want to thank all of you tutorialists for your generosity and genius: you gals and guys ROCK!
I also owe an incredible debt to all of my friends and associates; both on the Flash beta, and also the denizens of the many Flash lists and communities — your unthreatened willingness to share your knowledge and ideas, confident that you have an endless supply better ideas, is what makes our Flash community so vibrant and personally rewarding.
I would like to thank my co-author, Robert Reinhardt for his unflagging support and solidarity throughout all phases of this intensely demanding project. I would also like to thank our agent, David Fugate of the Waterside Agency, for his insight and counsel. I am also grateful to my students and readers: Your questions and ideas have helped me to revise and improve this book on each and every page. For all the people at Macromedia — especially Jeremy Clark, Flash product manager — I heap high praise and infinite thank yous.
Finally, I would like to thank all of the people at IDG/Hungry Minds, Inc., for the extraordinary efforts which they brought to this project. Thanks to Walt Bruce, our publisher, for allocating so much special attention to this book. Thanks to Andy Cummings for his careful management. Thanks to Michael Roney, our Acquisitions Editor, for keeping us on track and for resolving so many natty details that threat-ened to impinge on our progress. Thanks to Julie Smith, our Developmental Editor, for your clear and consistent handling of our submissions. Thanks to all of the other amazing people at IDG/Hungry Minds, Inc., for carrying this project from manuscript to the book that you now hold in your hands.
Contents at a Glance
Preface . . . xiii
Acknowledgments . . . xix
Quick Start: Flash in a Flash . . . 1
Part I: Mastering the Flash Environment . . . 37
Chapter 1: Understanding the Flash Framework . . . 39
Chapter 2: Exploring the Interface: Panels, Settings, and More . . . 49
Chapter 3: Using Tools for Navigation and Viewing . . . 93
Chapter 4: Working with Selections and the Pen Tool . . . 101
Chapter 5: Working with the Drawing and Painting Tools . . . 123
Chapter 6: Applying Color . . . 157
Chapter 7: Working with Text . . . 183
Part II: Creating Flash Graphics . . . 201
Chapter 8: Exploring the Timeline . . . 203
Chapter 9: Checking Out the Library: Symbols and Instances . . . 229
Chapter 10: Drawing in Flash . . . 263
Chapter 11: Animating in Flash . . . 299
Chapter 12: Using Bitmaps and Other Media with Flash . . . 325
Chapter 13: Designing Interfaces and Interface Elements . . . 355
Part III: Sound Planning . . . 389
Chapter 14: Understanding Sound for Flash . . . 391
Chapter 15: Importing and Editing Sounds in Flash . . . 403
Chapter 16: Optimizing Flash Sound for Export . . . 417
Part IV: Adding Basic Interactivity to Flash Movies . . . 433
Chapter 17: Understanding Actions and Event Handlers . . . 435
Chapter 18: Navigating Flash Timelines . . . 455
Chapter 19: Controlling Movie Clips . . . 493
Part V: Programming Flash Movies with ActionScript . . . 587
Chapter 21: Planning Code Structures . . . 589
Chapter 22: Creating Subroutines and Manipulating Data . . . 623
Chapter 23: Understanding Movie Clips as Complex Objects . . . 659
Chapter 24: Sending Data In and Out of Flash . . . 691
Chapter 25: Understanding HTML and Text Field Functions in Flash . . . 719
Chapter 26: Advanced Movie Clip Architecture and Beyond . . . 729
Part VI: Using Flash with Generator and Other Server Technologies 751
Chapter 27: What Is Generator? . . . 753Chapter 28: Revving Up Generator . . . 769
Chapter 29: Working with Third-party, Server-side Applications . . . 801
Part VII: Using Flash with Other Programs . . . 817
Chapter 30: Working with Raster Graphics . . . 819
Chapter 31: Working with Vector Graphics . . . 849
Chapter 32: Working with Audio Applications . . . 897
Chapter 33: Working with 3D Graphics . . . 929
Chapter 34: Working with QuickTime . . . 965
Chapter 35: Working with RealPlayer . . . 997
Chapter 36: Creating Full-Motion Video with Flash . . . 1013
Chapter 37: Creating Cartoon Animation with Flash . . . 1035
Chapter 38: Planning Flash Production with Flowcharting Software . . . 1069
Chapter 39: Working with Authoring Applications . . . 1103
Part VIII: Distributing Flash Movies . . . 1147
Chapter 40: Publishing Flash Movies . . . 1149
Chapter 41: Integrating Flash Content with HTML . . . 1181
Chapter 42: Using Players, Projectors, and Screensaver Utilities . . . 1211
Appendix A: Using the CD-ROM . . . 1239
Appendix B: Contact Information for Contributors and Expert Tutorialists . . 1241
Index . . . 1245
End-User License Agreement . . . 1300
Contents
Preface . . . xiii
Acknowledgments . . . xix
Quick Start: Flash in a Flash . . . 1
The Tutorial . . . 1
Starting Flash projects . . . 1
The width of a circle . . . 4
Your first animation . . . 8
Movie Clip Symbols . . . 13
Frame labels and comments . . . 15
Working with text . . . 16
The Button symbol . . . 18
The sound and the fury . . . 26
Figuring items over time . . . 27
An ActionScript primer . . . 28
Adding actions . . . 31
Testing movies . . . 34
Tips for Effective Flash Development . . . 34
A process approach to Flash authoring . . . 35
Know Flash 5’s capabilities and limitations . . . 36
Part I: Mastering the Flash Environment
37
Chapter 1: Understanding the Flash Framework . . . 39
Introducing the Flash 5 Framework . . . 39
Bitmap handler . . . 40
Vector program . . . 40
Vector animator . . . 41
Authoring program . . . 41
Animation sequencer . . . 41
Programming interface and database front end . . . 42
Viewing Flash movies . . . 43
Finding Applications for Flash 5 Movies . . . 43
Planning interactive Flash projects . . . 45
xxv
The difference between the Brush Tool and thePencil Tool . . . 141 Using the Paint Bucket Transform Fill option
Chapter 6: Applying Color . . . 157
Introducing Color Basics . . . 157 Discussing Web-Safe Color issues . . . 158 Using hexadecimal values . . . 158 Applying ColorSafe and other solutions . . . 159 Using color effectively . . . 164 Working with Flash Color . . . 165 Using Toolbox Color . . . 165 Applying color from the Stroke and Fill Panels . . . 167 Working with the Swatches Panel . . . 168 Working with the Mixer Panel . . . 170 Creating gradient colors . . . 172Chapter 7: Working with Text . . . 183
Understanding Font Display Problems . . . 183 Problems with fonts on the Mac . . . 184 Problems with fonts on the PC . . . 184 Cross-platform issues and codevelopment problems . . . 184 The Text Tool . . . 185 Working with Flash text boxes . . . 186 Using the Character Panel . . . 188 Using the Paragraph Panel . . . 191 Using the Text Options Panel . . . 193 Reshaping and Manipulating Text Characters . . . 198Part II: Creating Flash Graphics
201
Chapter 11: Animating in Flash . . . 299
Observations and notes about the resultsxxix
Contents
Determining Flash movie properties . . . 356 Mapping site areas to keyframes . . . 357 Creating content for each area . . . 359 Adding Navigation Elements to the Main Timeline . . . 370 Creating text buttons for a menu . . . 370 Browsing the product catalog . . . 373 Basic Text Scrolling . . . 383
Part III: Sound Planning
389
Part IV: Adding Basic Interactivity to Flash Movies
433
Chapter 17: Understanding Actions and Event Handlers . . . 435
Actions and Event Handlers . . . 435 What is ActionScript? . . . 436 Setting up the Actions Panel . . . 436 Your First Six Actions . . . 440 Go To . . . 440 Play . . . 443 Stop . . . 444 Toggle High Quality . . . 444 Stop All Sounds . . . 445 Get URL . . . 445 Making Actions Happen with Event Handlers . . . 447Combining an action with an event handler
xxxi
Communicating between multiple movies on different levels . . . . 576 Unloading movies . . . 577Part V: Programming Flash Movies with ActionScript 587
xxxiii
Contents
Chapter 24: Sending Data In and Out of Flash . . . 691
Using Text Fields to Store and Display Data . . . 691 Input Text fields . . . 691 Dynamic Text fields . . . 692 Defining a Data Process with States . . . 694 Input state . . . 694 Send state . . . 694 Wait state . . . 695 Output state . . . 696 Creating a Flash Form . . . 696 Using XML Data in Flash Movies . . . 702 Understanding XML . . . 703 Loading an XML document into a Flash movie . . . 704 Using the Flash Exchange . . . 709Chapter 25: Understanding HTML and Text Field Functions in Flash 719
Exploring HTML Usage in Text Fields . . . 719 Supported HTML tags . . . 720 Formatting text with the Character and Text Options Panel . . . 721 Inserting HTML tags into Text Fields with ActionScript . . . 723 Using asfunction in <A HREF> tags . . . 724 Controlling Text Field Properties . . . 725 Manipulating Text with the Selection Object . . . 726Chapter 26: Advanced Movie Clip Architecture and Beyond . . . 729
Advanced Tutorials for Flash Interactivity . . . 729Part VI: Using Flash with Generator and
Other Server Technologies
751
Creating a Bar Chart . . . 773 Lists and Tickers . . . 775 Basic Lists . . . 777 Scrolling Lists . . . 782 Tickers . . . 784 Using Generator Templates in Production . . . 787 Publishing Generator Templates (.SWT files) . . . 788 Using Generator Templates in HTML . . . 790 Using Generator Templates in other Flash movies . . . 791
Chapter 29: Working with Third-party, Server-side Applications . . 801
Using ASP with Flash Movies . . . 801 Flash Generation Utilities . . . 813 Swift Tools’ Swift Generator . . . 813 SwiffPEG by SwiffTOOLS . . . 813 Blue Pacific’s Flash Turbine . . . 813 Form2Flash . . . 813 OpenSWF.org . . . 814Part VII: Using Flash with Other Programs
817
xxxvii
Contents
Animator’s Keys and Inbetweening . . . 1045 Walk cycles (or walk loops) . . . 1046 Repeaters . . . 1047 Types of walks . . . 1048 Coloring the art . . . 1048 Flash Tweening . . . 1050 Panning . . . 1050 Instance swapping . . . 1050 Lip-synching . . . 1052 Shape morphing is not for lip-sync . . . 1053 Expression and lip-sync . . . 1053 Lip-sync tricks . . . 1053 Synching with music and sound effects . . . 1054 Finishing Up . . . 1058 Final output . . . 1059
Chapter 38: Planning Flash Production with
Part VIII: Distributing Flash Movies
1147
xxxix
Contents
Distribution on CD-ROM or floppy disk . . . 1214 FSCommands . . . 1215 Stand-alone Limitations and Solutions . . . 1219 Using the Flash Player Plug-in for Web Browsers . . . 1227 Supported operating systems . . . 1227 Supported browsers . . . 1227 Plug-in and Flash movie distribution on the Web . . . 1228 Plug-in installation . . . 1228 Alternative Flash-Content Players . . . 1229 Flash Player Java edition . . . 1230 RealPlayer 8.0 with Flash playback . . . 1231 QuickTime Player . . . 1231 Shockwave Player . . . 1232 Screensaver utilities . . . 1232 Future players, future features . . . 1237
Appendix A: Using the CD-ROM . . . 1239
Appendix B: Contact Information for Contributors and
Expert Tutorialists . . . 1241
Flash in a Flash
T
he tutorial in this chapter provides a working overview of Flash 5. It guides you through a simple Flash project, from start to finish. Along the way, you’ll gain experience with common tools, learn the location and use of many of the new Flash 5 panels, and gain more than passing familiarity with key Flash concepts.To get the most out of this tutorial, you are strongly encour-aged to first work through the tutorials that ship with Flash 5 — including those located in the Help menu as well as the kite tutorial found in Using Flash 5. Let’s get started!
The Tutorial
In this tutorial, you create a bouncing ball and a button to control the ball. It sounds simple, but completing this tutorial will give you experience with all the major features of Flash.
Starting Flash projects
To begin, let’s open a new movie in Flash and prepare it for our project.
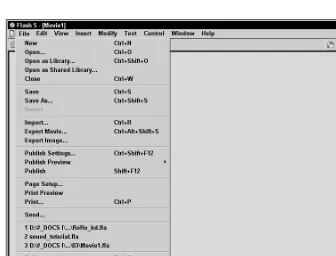
1.Open Flash if it isn’t already open, or open a new file (File➪New).
2.Open the Move Properties dialog. From the main menu, go to Modify➪Movie. You can also use Ctrl+M/Command+M to open this dialog, and you’ll work more efficiently if you form a habit of learning as many keyboard shortcuts as possible.
3.Set the Frame Rate to 12, if it is not already (this is the default). The frame rate determines the speed at which the animation will run. Although in theory a higher frame rate generally smoothes animation, higher frame rates can also bog down Flash files, which are built to be lean.
browser windows of those using the common 800×600 resolution. For those running at a smaller resolution, such as 640×480, these dimensions could be a problem. However, as you progress through this book, you learn ways of embedding Flash movies so that they scale to fit. In this tutorial, we chose the larger size to give you plenty of room in which to work.
5.Click OK.
Now you are staring at an empty Stage and timeline.
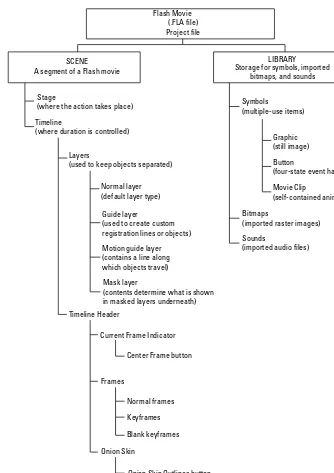
The Stage should present no particular difficulties — it looks like what you’d find in a drawing or page-layout program, or, for that matter, even in a word processor. But for many of you, the timeline might be something new. A clear understanding of the timeline is critical to productive work in Flash, so let’s take a moment to look it over. The timeline is best understood if you imagine that this tool is used to order graphic information across two dimensions: time and depth.
✦Arranged horizontally, from left to right, is the sequence of frames as they appear in time. Thus, if your movie is set to 12 frames per second, then the frame 24 occurs at the 2-second mark of your animation.
✦Arranged vertically, from bottom to top, are layers. The timeline layers enable you to separate different content items on discrete layers. They also enable you to separate content from actions, comments, labels, and sounds, which are another kind of content. Items placed on layers above will block out any items beneath them, without otherwise affecting each other. In the editing environment, you can set layer visibility (the Eye icon), editablility (the Lock icon), and the color of its outlines (the Square icon) — note, however, that these settings do not affect the final movie — all layer content, regardless of visibility or outline settings, is included in the final movie.
The red rectangle with a line extending down through all layers is the Playhead. The Playheadindicates which frames are currently displayed on the Stage. Drag it to activate and display another area of the timeline. You can also drag it for a pre-view of your animation; this is called scrubbing the timeline.
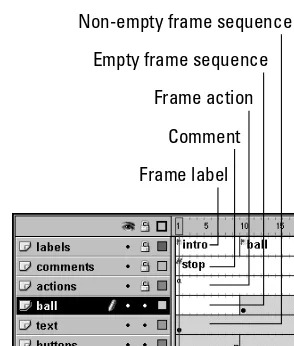
As you’ll see soon, a powerful feature of the timeline is that a quick glance at the frames of the timeline provides a lot of information about what is on those frames. Sounds are represented by their waveforms, tweens are colored, actions are desig-nated with an a, and labels are marked with a red flag.
3
Quick Start ✦ Flash in a Flash
There are really two ways in which you can plan your file. The first is to use a con-sistent way of structuring your Flash files. One way to do that is to use a standard set of layers in everynew .FLA. These layers will be the same in every movie you make. The second way to plan your file is to think through what items will populate your movie and make room for them ahead of time by adding layers for them in advance. These layers, of course, will vary by movie.
Always give every layer a meaningful name — Flash movies can get complex fast, and one of the best ways to ensure that you’re putting everything where it belongs is to give all of your layers a meaningful name.
Let’s cover the standard layers first. You can always add more later, but we suggest you always begin with the following set of layers:
✦Labels:In this layer, you’ll place frame labels. You can use frame labels to identify certain timeline segments both for your own ease of reading the time-line and to enable Flash to address specific frames. This is done with actions, which we cover in more detail later in this tutorial.
✦Comments:Frame comments are notes visible in the timeline that you make to yourself and your collaborators. Flash ignores them.
✦Actions:Although you can attach actions to any frame in Flash, it is not advis-able. Keep all of your actions in one layer because this will make your file much easier to author and maintain.
✦Content layers:Under the preceding three layers you place all of the layers that have content.
Inserting and naming layers is easy.
1.Double-click the name of the original (and only) layer in your timeline (Layer1) to select it.
2.Type contents. Flash is case-sensitive, and although that does not make much difference for layers, it does make a difference for other assets. It is probably easier to keep everything lowercase.
3.On the lower left-hand side of the timeline, and beneath your new contents layer, are two folded page icons, one white (with a plus sign) and one blue (with a wavy line). These add new layers: The white adds regular layers, and the blue adds guide layers.
4.Click the white Insert Layer icon to add a new layer.
5.Following Steps 1 and 2, rename the layer actions.
6.Now add two more layers, calling the first commentsand the second labels. If you can’t see all the layers in your timeline, you can either scroll up and down or drag the gray line across the bottom of the timeline downward to give it more room.
sounds — but it does not prevent you from adding labels, comments, or actions. Thus, one way to make sure that you do not accidentally put a Button in the actions layer is to lock it. Now lock the labels, comments, and actions layers.
Now that you have your standard layers set up, it’s time to identify the items that you intend to use in your project. Of course, these may well change during author-ing, and you can make changes if necessary. But for now, you can still add new lay-ers for the different kinds of content that you’ll be creating.
Here is the plan for the final output of this tutorial. You’ll create a simple interface in which users can click a button and make a ball fall and bounce several times before resting. They can click again, and the ball will go away. Onscreen directions will explain this information to them.
You know from this plan that your content will include two Buttons, a bouncing ball, and some text. Thus, a reasonable next step is to add new layers to accommo-date these items.
1.Double-click the contents layer name and change it to buttons.
2.Insert two new layers above the buttons layer and call them text and ball. The ball layer should be between the actions and text layers, and the buttons layer should be on the bottom, as shown in the Figure QS-1.
Figure QS-1: The timeline layers that we’ll be using in this tutorial.
The width of a circle
In this section of the tutorial, you draw a circle, fill it with a gradient so that it looks like a ball, and then animate the ball.
Insert Layer
5
Quick Start ✦ Flash in a Flash
Drawing, strokes, and fills
Now you have an empty Stage and all these empty layers just begging to be filled. Let’s get to work. Our first major task is to create the ball animation.
1.Click the first frame of the ball layer.
2.Click to activate the Oval Tool in the Toolbox on the left. Alternatively, you can press O to activate it.
3.Draw a circle anywhere on the screen. To constrain the oval to a perfect cir-cle, hold down the Shift key as you drag. (This also works for drawing perfect squares with the Rectangle Tool, for constraining lines to 45-degree angles, and other operations.
If you have not changed Flash’s default settings, your circle is probably red with a black border going around it. (If it is not — don’t worry, because we’ll change it in a moment anyway.) The red color that fills the circle is called the fill, and the black border around the circle is called the stroke. Every closed vector item (squares, parallelograms, irregular polygons, and so on) is made up of these two components (though you can set both stroke and fill to none).
Let’s modify this circle and make it look more like a ball.
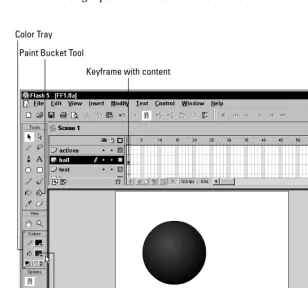
1.Click the edge of the circle (in other words, the stroke). Notice that you can select both the fill and the stroke separately simply by clicking them. Also, you can double-click either to select both. For now, just select the stroke.
2.Using the Launcher Bar (at the bottom-right corner of the screen), click the Show Info icon to open the Info Panel, if it isn’t already open.
3.Click the Stroke tab to open the Stroke Panel.
4.In the first drop-down list (Stroke Style), Solid should already be chosen for you by default. Before continuing, why don’t you check out some of the alter-natives? Then, when you’re done, select Solid.
5.Below the Stroke Style drop-down are two other controls. The first, Stroke Height, which has a two-headed arrow beside it, is used to set the thickness of the stroke. Set it to 2.
6.The third control is Stroke Color, which previews the current stroke color. It should display the default to black, which is what we want. This control is also a button. So, if another color is displayed, click the Stroke Color button to invoke the swatches pop-up and choose black.
7.Next, click the fill of the ball to select it (and deselect the stroke), and then click the Fill tab (beside the Stroke tab) to open the Fill Panel.
white spectrum appears in the dialog. The extreme left of the gradient is black, and the extreme right of the gradient is white. This gradient should change the fill of the ball immediately. Between the two extremes of this gradi-ent, black fades into white. However, to make our circle appear spherical, we want a red ball that fades to black around the edges.
10.Click the black Color Pointer located at the extreme left of the gradient. At right, a Pointer Color control appears.
11.Click the Pointer Color control to open a color palette and choose the bright red swatch midway down the left side of the palette. Your circle’s fill becomes red fading to white.
12.Next, click the white Color Pointer, and change it to black. Now your circle looks more like a ball!
13.But there’s one problem: The highlight of the ball is exactly in the center, which isn’t very realistic. The most likely light source is from above the ball and off to one side, so the lighting of the ball should reflect that. In the Toolbox, choose the Paint Bucket Tool, which is used to modify fills.
14.Notice the Fill Color control in the Color Tray beneath the Toolbox; the gradi-ent is shown. This indicates that it’s the active fill, so any shapes that you fill with the Paint Bucket Tool will have this fill.
15.This may take some experimentation, but click within the ball about three-quarters up from the bottom and a little off to the side until you have a more realistic-looking ball (see Figure QS-2).
Sizing and positioning the ball
Now that the ball looks the way you want it to, let’s resize it and position it. Although you can resize by using the Scale Tool in the Options Tray (when the Arrow Tool is active) at the bottom of the Toolbox, and you can position simply dragging items, it is more precise to use the Info Panel.
1.From the Launcher Bar, open the Info Panel (it is in the same set as the Stroke and Fill Panels, so it might already be open).
2.The first two controls (W and H) are entry fields that enable you to set the physical dimensions. In both fields, enter 75.
7
Quick Start ✦ Flash in a Flash
these squares represent an invisible bounding box that encloses the selected item. Every shape created in Flash, even circles, resides in a square or rectan-gular bounding box that includes the extremities of the shape. Now, this align-ment grid enables you to position the selected item relative to either its upper-left corner or its center. Click either square to define which point to use for positioning. Because this is a circle, which by definition doesn’t have any corners (although it is still surrounded by an invisible bounding box), it makes more sense to position it relative to its center. Click the center square of the alignment grid, which should turn the middle square black, and the upper-left square to white.
4.Enter 450 for the X position and 75 for the Y position. When you’re done, the ball should appear at a new size, near the upper-right corner of the Stage. This will be the origin point of the ball before it falls in the animation.
Figure QS-2: You can use off-center radial gradients to make a circle look like a sphere.
Color Tray
Paint Bucket Tool
Keyframe with content
Your first animation
Now that you have created and positioned the ball, you’re ready to set it in motion. As you may be aware, Flash offers several different methods of animation, including Frame-by-Frame and both Motion and Shape Tweens. For now, we’ll work with Motion Tweening, which is perhaps the easiest of the three.
In the next couple of steps, we cover the full mechanics of a Motion Tween. For now, what you need to know is that a Motion Tween enables you to make an item move from one location to another over time. Now, for Flash to Motion Tween an item over time, it has to understand that the item in the first frame of the animation and the item in the last frame (and all the other items between) are all the same item. In our case, we need Flash to know that the ball in the air at the beginning is the same ball as the one hitting the ground at the end of the first Tween.
Simple graphics versus symbols and instances
To enable Flash to recognize that the item that occurs at the beginning and end of a Motion Tween is the same, you need to change the ball from a standard piece of art-work to a symbol, so that you can reuse the artart-work throughout the movie. In other words, by converting the artwork into a symbol, you make it possible for Flash to recognize two pieces of art that are located in different frames on the timeline as two instances of the same item. Once Flash sees that the ball in the air at the begin-ning of the Motion Tween is the same ball as the one striking the ground at the end of the Motion Tween, it’s capable of tweening, or drawing, the intervening positions for you; that is, the series of ball pictures that change incrementally as it falls to the ground. Tweening saves you a lot of time and work.
Converting artwork to symbols also saves you bandwidth. Because Flash refers to the singular symbol to generate multiple instances, your user will only have to download the ball once, even if you use it hundred of times on your site. Similar to the programming distinction between an item class and an item based on that class, when you create an instance of a symbol, behind the scenes you’re literally reusing the same code. Flash keeps track of this by creating a link between your many instances and the one symbol they are based upon — and every time you deploy an instance, Flash simply inserts a copy of the symbol. Another bonus is that if you decide that you need to edit the symbol, it will automatically update all of the instances, saving you some painstaking work.
While it may be conceptually difficult to understand what symbols are and the pos-sibilities they enable, actually making your graphic into a symbol is quite easy. So, let’s get started working with symbols now and develop more of the conceptual background as we go:
9
Quick Start ✦ Flash in a Flash
2.Then choose Insert➪Convert to Symbol. In the Symbol Properties dialog, name it ball, then click the Graphic radio button, and then click OK or press Enter to continue.
Notice that your ball is no longer selected with gray hatching; instead, there is a blue bounding box around it. This change in the appearance of the selection indi-cates a change in the architectural status of the item. The ball on screen is no longer a piece of artwork. The ball is now an instance of the ball symbol that you just created and which resides in your Library. Choose Window➪Library, or Ctrl+L in Windows, or Command+L on a Mac, to open the Library panel.
Frames, keyframes, and frame sequences
In a tweened animation, an instance of a symbol is either moved or manipulated across a span of frames, with incremental changes displayed in the intervening frames. So, now that you understand the reason for symbols and instances and understand the logic of tweening, you’re probably wondering how to designate beginning and ending frames. In other words, how does Flash know when to start and when to stop a tween?
The answer is that there are different kinds of frames in the timeline, and you use these different frames to establish and define changes of content across a given layer of the timeline.
✦Keyframes:A keyframe is a frame in which something changes in a layer of the timeline. The first frame of every layer is, by default, a keyframe. Key-frames can be empty or they can have any number of items in them. You can use empty keyframes as a way to stop the display of existing content on a given layer.
✦Frames:Also known as static frames, regular frames depend on keyframes. By definition, no new content can be added in a regular frame. Thus, if a ball appears in a keyframe, and is followed by ten static frames, the ball would remain motionless throughout that span of ten frames (unless the first keyframe initiates a tween).
✦Frame Sequences:The new Flash 5 timeline makes heavy use of this concept: A frame sequence is a keyframe and all of the static frames that follow it, up to, but not including, the next keyframe in a layer. Frame sequences are selectable as an entity, which means that they can be easily copied and moved in the timeline.
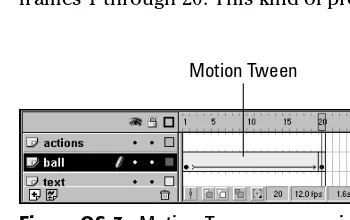
Creating a Motion Tween
Motion Tweens are animations between two keyframes. These animations can involve a change in color, shape, size, space, or any combination of the preceding. As regards an animation through space, the placement of the item in the first keyframe determines the starting point of the item, and its placement in the second keyframe determines the item’s ending point.
Now, let’s create a simple Motion Tween with the ball, wherein the ball will appear to fall down to the bottom of the Stage. Before you can do that, you’ll need to insert a second keyframe in the timeline, which will designate where the ball will land.
1.Click frame 20 in the timeline of the stage. Then, to insert a keyframe, choose Insert➪Keyframe from the main menu, or press F6.
2.Notice that the ball is still at the top of the screen, just where it was in frame 1. Actually, this is a new instance of the same ball symbol. That’s because Flash automatically creates a new instance of any placed instance that occurs on the preceding keyframe, every time you create a new keyframe.
3.With frame 20 selected, drag the ball down so it is near the bottom of the Stage. Remember that before you click and drag, you should hold down the Shift key and then drag to force the ball to go straight down — you don’t want a wobble, or for it to fall at a diagonal!
4.Now that the ball is correctly positioned in both keyframes, insert a Motion Tween to let Flash do the animating. Click the first keyframe of the ball layer.
5.Next, from the main menu, choose Insert➪Create Motion Tween, or open the Frame Panel (Windows➪Panels➪Frame, or Ctrl/Command+F). In the Tweening drop-down menu, choose Motion.
6.You now have a Motion Tween (see Figure QS-3). Note that the span in the timeline extending from one keyframe to the other is now blue and has an arrow pointing from the first keyframe to the second.
7.You can preview your Tween by dragging the Playhead back and forth across frames 1 through 20. This kind of preview is called scrubbing the timeline.
Figure QS-3: Motion Tweens appear in the timeline as a blue-shaded region with an arrow pointing from the first keyframe to the second.
11
Quick Start ✦ Flash in a Flash
If you had a steady hand while you were scrubbing the timeline, you probably noticed something. When a real-life ball is dropped, it accelerates. That is, it is mov-ing faster when it hits the ground than it was when it left your hands. However, your ball moves uniformly to the ground and stops. Is this just a case of a computer not being able to animate as well as a human can?
Although there is no substitute for hand-drawn animation, Flash does have a few tricks. One trick is Easing,which enables you to control acceleration and decelera-tion in Modecelera-tion Tweens.
Easing is an option that appears in the Frame Panel on the frame in which a Motion Tween is initiated.
1.Click the first frame of the ball layer of the timeline.
2.Using the Launcher Bar, open the Instance Panel and then click the Frame tab to open the Frame Panel.
3.In the Tweening drop-down menu, you should see Motion already selected.
4.Beneath that is a control labeled Easing, as shown in Figure QS-4. The drop-down arrow pulls up a slider, which you can drag drop-down into negative num-bers, or up into positive numbers. Positive Easing, called Easing Out, causes the tweened item to start quickly and to slow toward the end — just the oppo-site of what we want. Drag the slider all the way down to the bottom, so that the number is –75.
If you scrub the timeline again, with a steady hand, you’ll see the effect of the Easing.
Figure QS-4: The Easing slider on the Frame Panel
Easing slider
Frame Panel is in the Instance Panel group
bounce back up. Let’s add a few bounces, so that the ball goes up and down a few times before resting on the ground.
If you think about it for a moment, you’ll realize that the bounces are going to require more tweens — twice as many tweens as there are bounces. Also, you’ll have to reverse the effect of Easing for each tween, because when the ball is falling, it accelerates, and while it is rebounding, it decelerates.
In addition, you know that every time you add a keyframe, Flash simply copies the contents of the last keyframe, which means that half of your work is already done for you. The ball will bounce or land from the same spot on the ground each time, meaning that the location of the ball in frame 20 will also be the location of the ball in every other keyframe until (and including) the final keyframe, in which the ball stops.
Let’s make the ball bounce three times and come to a rest on the fourth.
1.Press F6 to insert keyframes in frames 40, 55, 70, 80, 90, and 98. Notice that we are shortening the span of time each bounce requires — because with each bounce, the ball won’t travel as high as the previous bounce, the ball will need less time to rise and fall.
2.Click frame 1 and note where the ball is. Then click frame 40 and drag the ball about three-fourths of the way up — don’t forget to constrain with the Shift key! (If you’re mathematically inclined, you can use the Y position in the Info Panel to figure out exactlywhere the three-quarter mark is.)
3.Click frame 20 and from the Frame Panel, insert a Motion Tween, and set the Easing to 100, to make the ball Ease Out.
4.Scrub the timeline to preview the effect.
5.Click frame 55. How convenient! The ball is already back on the ground.
6.Click frame 40 and insert a Motion Tween, setting the Easing at –75.
7.Click frame 70 and drag the ball to about half the height it was in frame 1.
8.Return to frame 55 and insert a Motion Tween, setting the Easing to 100.
9.Again, the ball in frame 80 is already where it needs to be. Click frame 70 and insert a Motion Tween, setting the Easing to –75.
10.In frame 90, drag the ball up so that it is one-quarter the height it was in frame 1.
11.Returning to frame 80, insert a Motion Tween and set the Easing to 100.
12.Finally, click frame 90, insert a Motion Tween, and set the easing to –75.
13.Scrub the timeline from beginning to end to watch the animation!
13
Quick Start ✦ Flash in a Flash
Movie Clip Symbols
Working with a Movie Clip is in many ways like working with the main movie. Each Movie Clip has its own Stage, timeline, and layers. All of the drawing tools work in the same ways that they work on the main Stage. You can even place other symbols (for example, Button instances and other Movie Clips) inside Movie Clips. In short, Movie Clips are like full-blown Flash movies that can be placed in a single frame of the main movie. It’s this nesting that gives Flash Movie Clips their power.
A primary (and initially most obvious) structural benefit of Movie Clips is that Movie Clip timelines play independently of the Main Timeline. This independence facilitates great flexibility in the overall development of your movie. It enables your movie to stop and keep moving at the same time. Later in this lesson, you’ll end up with only two frames of content on your Main Timeline. In one of the two
keyframes, there will be the Movie Clip of the bouncing ball animation you’ve just created, and the ball will bounce even though the Playhead of the Main Timeline has stopped!
Convert the timeline-based animation to a Movie Clip
Enough theory — it’s time to find out how simple it is to convert a Main Timeline animation into a Movie Clip.
1.Click any of the static frames in the ball layer (any blue-shaded nonkeyframe) to select the entire animation from beginning to end.
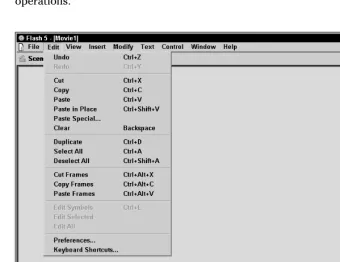
2.Now, copy the frames: Proceeding from the Main Menu, choose Edit➪Copy Frames; or, from the keyboard, Ctrl+Alt+C/Option+Command+C; or right-click/Ctrl+click and choose Copy Frames.
3.Next, create a new Movie Clip symbol. Choose Insert➪New Symbol (Ctrl+F8/Command+F8).
4.In the Symbol Properties dialog, name your symbol bbfor bouncing ball. Leave the behavior at its default, which is Movie Clip.
5.You should now be viewing a blank Stage with an empty timeline. You have entered Symbol Editing Mode, which simply means that you’re authoring in a symbol, and not in the main movie. One indication of this change in authoring environments is the appearance of a new tab at the upper-left of the timeline. This tab displays the Movie Clip icon, together with the title of this Movie Clip, bb. Thus, both the timeline and Stage that you now see belong to the symbol only. Click the first frame of the timeline (be sure that it is selected, which is indicated by its being displayed with black), and choose Edit➪Paste Frames, Ctrl+Alt+V/Option+Command+V, or right-click/Ctrl+click and choose Paste Frames.
sitting in your Library, and the original animation is still on the Main Timeline. Let’s replace the Main Timeline animation with an instance of the Movie Clip animation.
1.Return to the main movie by clicking the Scene 1 button just above the left-hand side of the timeline, shown in Figure QS-5. Alternatively, you can choose Edit➪Movie from the main menu (Ctrl+E/Command+E).
Figure QS-5: These tabs above the timeline help you determine which Stage you are editing — that of the main movie or that of a symbol
2.Click any static frame in the tweened animation to select the entire animation sequence. (Note: This selection method works only if the Flash 5 Selection Style and Frame Drawing have been left as the default in Edit➪Preferences➪ General.)
3.Choose Insert➪Remove Frames to remove both the contents of each of the frames and the empty frames (including keyframes) themselves. When you’re done, the entire layer should be entirely empty, lacking even a keyframe in frame 1.
4.Now, insert a keyframe in frame 1 by pressing F6.
5.Then, open your Library (Ctrl+L/Command+L), if it isn’t already open.
6.Finally, with frame 1 of the ball layer still active, click and drag the bb Movie Clip out of the Library and drop it on the main Stage.
All 98 frames of the bb Movie Clip are now placed entirely within frame 1 of the ball layer of the Main Timeline. If the movie were to stop in frame 1, the complete ball animation would still play, because all 98 of its frames are encapsulated in the bb Movie Clip placed on frame 1.
Position the Movie Clip
The only problem now is that the ball is wherever you dropped it, and not where we placed it so precisely using the Info Panel in an earlier step. Let’s reposition the ball with the Info Panel again.