A P a r e n t - f r i e n d l y G u i d e t o P y t h o n P r o g r a m m i n g
B r y s o n P a y n e
Teach
Your Kids
To Code
Teach
Advance Praise for
Teach Your Kids to Code
“The text is clear, the graphics are engaging, and the apps are awesome. This is the programming guide for parents and kids to enjoy together.”
—Aaron Walker, Cybersecurity Expert, NASA
“The energy and excitement Bryson brings to teaching is captured perfectly in Teach Your Kids to Code, with colorful, captivating games and graphics that help develop real-world skills.”
—Bindy Auvermann, Executive Director, Next Generation Youth Development, Inc.
“Provides the building blocks of a great future in the rapidly changing world of technology.”
—JoAnne Taylor, former Vice President, Global Telecommunications, IBM
“The concepts in Teach Your Kids to Code can help any young person enhance their college prospects and expand their career opportunities, and Dr. Payne presents these skills through fun, challenging games and apps.”
—Dr. Raj Sunderraman, Department Chair of Computer Science, Georgia State University
“Every child on the planet should have this book, and so should every parent.”
—James E. Daniel, Jr., Founder, App Studios, LLC
“An innovative, motivating guide . . . Builds skills that can last a lifetime.”
—Dr. Steven Burrell, Vice President for Information Technology & CIO, Georgia Southern University
“The kind of book I wish I’d had as a kid.”
“Dr. Bryson Payne is a computer scientist and professor of the highest caliber, and with Teach Your Kids to Code, he brings the power of computers within easy reach for readers young and old.” —Dr. Antonio Sanz Montemayor, Informatics Professor,
Universidad Rey Juan Carlos, Spain
“A brilliant combination of engaging, imaginative apps and valuable, lifelong skills.”
—Ted Cunningham, author of The Power of Home
“Teach Your Kids to Code and the logical thinking it introduces will help build the next generation of technology leaders.”
—N. Dean Meyer, author and executive coach
“This book can jump-start your child’s success in a high-tech world.”
—Ken Coleman, leadership author and former radio host of
The Ken Coleman Show
“Dr. Payne set us on the path that led us to our dream jobs! With
Teach Your Kids to Code, he’s providing parents and teachers everywhere the chance to do the same for the next generation of creative problem-solvers.”
—Shah and Susan Rahman, Riot Games
“Bryson helps people improve their lives with technology. His book does the same.”
—Ash Mady, Technical Manager, RedHat, Inc.
“Enjoyable and accessible to parents and children alike.” —Steve McLeod, Deputy CIO, University of North Georgia
“Dr. Payne used robots, games, and fun programs to motivate me in college, and Teach Your Kids to Code extends that same passion for coding cool apps beyond the walls of the campus.”
Teach
Your Kids
to Code
A Pa r e nt- Fr i e n d ly G u i d e to
Py th o n Pro g r a m m i n g
By B ryso n Pay n e
TeAch Your Kids To code. Copyright © 2015 by Bryson Payne.
All rights reserved. No part of this work may be reproduced or transmitted in any form or by any means, electronic or mechanical, including photocopying, recording, or by any information storage or retrieval system, without the prior written permission of the copyright owner and the publisher.
19 18 17 16 15 1 2 3 4 5 6 7 8 9
Developmental Editors: Tyler Ortman and Leslie Shen Technical Reviewers: Michelle Friend and Ari Lacenski Copyeditor: Rachel Monaghan
Compositor: Riley Hoffman Proofreader: Paula L. Fleming
Indexer: BIM Indexing & Proofreading Services
For information on distribution, translations, or bulk sales, please contact No Starch Press, Inc. directly: No Starch Press, Inc.
245 8th Street, San Francisco, CA 94103 phone: 415.863.9900; [email protected] www.nostarch.com
Library of Congress Cataloging-in-Publication Data
Payne, Bryson.
Teach your kids to code : a parent-friendly guide to Python programming / by Bryson Payne. -- 1st edition. pages cm
Includes index.
Summary: "A guide to teaching basic programming skills for parents and teachers, with step-by-step explanations, visual examples, and exercises. Covers programming concepts including loops, lists, functions, and variables, and how to build games and applications"-- Provided by publisher.
ISBN 978-1-59327-614-0 -- ISBN 1-59327-614-1
1. Python (Computer program language)--Study and teaching (Elementary) 2. Computer programming--Study and teaching (Elementary) 3. Python (Computer program language)--Study and teaching (Middle school) 4. Computer programming--Study and teaching (Middle school) I. Title.
QA76.73.P98P39 2015 005.13'3--dc23
2015006794
No Starch Press and the No Starch Press logo are registered trademarks of No Starch Press, Inc. Other product and company names mentioned herein may be the trademarks of their respective owners. Rather than use a trademark symbol with every occurrence of a trademarked name, we are using the names only in an editorial fashion and to the benefit of the trademark owner, with no inten-tion of infringement of the trademark.
About the Author
Dr. Bryson Payne is a tenured professor of computer science at the University of North Georgia, where he has taught aspiring coders for more than 15 years. His students have built successful careers at Blizzard Entertainment, Riot Games, Equifax, CareerBuilder, and more. He was the first department head of computer science at UNG, and he holds a PhD in computer science from Georgia State University. In addition, he works extensively with K–12 schools to promote technology education.
Dr. Payne has been programming for more than 30 years. The first program he sold was to RUN magazine (Commodore 64) for their “Magic” column in 1985, for $10.
Dr. Payne lives north of Atlanta, Georgia, with his wife, Bev, and two sons, Alex and Max.
About the Illustrator
Miran Lipovac� a is the author of Learn You a Haskell for Great Good!. He enjoys boxing, playing bass guitar, and, of course, drawing. He has a fascination with dancing skeletons and the number 71, and when he walks through automatic doors he pre-tends that he’s actually opening them with his mind.
About the Technical Reviewer
BRIEF CONTENTs
Acknowledgments . . . xix
Introduction: What Is Coding and Why Is It Good for Your Kids? . . . xxi
Chapter 1: Python Basics: Get to Know Your Environment . . . 1
Chapter 2: Turtle Graphics: Drawing with Python . . . 11
Chapter 3: Numbers and Variables: Python Does the Math . . . 31
Chapter 4: Loops Are Fun (You Can Say That Again) . . . 53
Chapter 5: Conditions (What If?). . . 77
Chapter 6: Random Fun and Games: Go Ahead, Take a Chance! . . . 105
Chapter 7: Functions: There’s a Name for That . . . 141
Chapter 8: Timers and Animation: What Would Disney Do?. . . 175
Chapter 9: User Interaction: Get into the Game. . . 207
Chapter 10: Game Programming: Coding for Fun . . . 231
Appendix A: Python Setup for Windows, Mac, and Linux . . . 263
Appendix B: Pygame Setup for Windows, Mac, and Linux . . . 279
Appendix C: Building Your Own Modules . . . 289
Glossary . . . 295
CONTENTs IN DETAIl
Acknowledgments xix
Introduction
What Is Coding and Why Is It Good for Your Kids? xxi
Why Should Kids Learn to Code? . . . xxii
Coding Is Fun . . . xxii
Coding Is a Valuable Job Skill . . . xxii
Where Can Kids Learn to Code? . . . xxiii
How to Use This Book. . . .xxiv
Explore! . . . .xxiv
Do It Together! . . . xxv
Online Resources. . . xxv
Coding = Solving Problems. . . .xxvi
1 Python Basics: Get to Know Your Environment 1 Getting Started with Python . . . 3
1. Download Python . . . 4
2. Install Python . . . 5
3. Test Python with a Program . . . 5
Writing Programs in Python . . . 6
Running Programs in Python. . . 6
What You Learned . . . 7
Programming Challenges . . . 8
#1: Mad Libs . . . 8
#2: More Mad Libs! . . . 9
2 Turtle Graphics: Drawing with Python 11 Our First Turtle Program. . . 12
How It Works. . . 13
What Happens. . . 14
Turtle on a Roll . . . 16
Turtle Roundup . . . 17
Adding a Touch of Color . . . 19
A Four-Color Spiral. . . 20
What You Learned . . . 27
Programming Challenges . . . 27
#1: Changing the Number of Sides . . . 27
#2: How Many Sides? . . . 28
#3: Rubber-Band Ball . . . 28
3 Numbers and Variables: Python Does the Math 31 Variables: Where We Keep Our Stuff . . . 32
Numbers and Math in Python . . . 34
Python Numbers . . . 34
Python Operators . . . 35
Doing Math in the Python Shell. . . 36
Syntax Errors: What Did You Say? . . . 37
Variables in the Python Shell. . . 38
Programming with Operators: A Pizza Calculator . . . 39
Strings: The Real Characters in Python . . . 42
Improving Our Color Spiral with Strings . . . 44
Lists: Keeping It All Together . . . 46
Python Does Your Homework . . . 48
What You Learned . . . 50
Programming Challenges . . . 52
#1: Circular Spirals . . . 52
#2: Custom Name Spirals . . . 52
4 loops Are Fun (You Can say That Again) 53 Building Your Own for Loops . . . 55
Using a for Loop to Make a Rosette with Four Circles . . . 56
Modifying Our for Loop to Make a Rosette with Six Circles . . . 58
Improving Our Rosette Program with User Input . . . 59
Game Loops and while Loops . . . 61
The Family Spiral . . . 64
Putting It All Together: Spiral Goes Viral . . . 68
What You Learned . . . 73
Programming Challenges . . . 74
#1: Spiral Rosettes . . . 74
What You Learned . . . 201 User Interaction: Get into the Game 207 Adding Interaction: Click and Drag. . . 208 Game Programming: Coding for Fun 231 Building a Game Skeleton: Smiley Pong, Version 1.0 . . . 232
Drawing a Board and Game Pieces . . . 234
Keeping Score . . . 235
Showing the Score . . . 241
Putting It All Together . . . 243
Adding Difficulty and Ending the Game: Smiley Pong, Version 2.0 . . . 245
What You Learned . . . 260
Programming Challenges . . . 261
#1: Sound Effects. . . 261
#2: Hits and Misses . . . 262
#3: Clear the Bubbles . . . 262
A Python setup for Windows, Mac, and linux 263 Python for Windows . . . 264
Download the Installer . . . 264
Run the Installer . . . 265
Try Out Python . . . 269
Python for Mac . . . 271
Download the Installer . . . 271
Run the Installer . . . 272
Try Out Python . . . 275
Python for Linux . . . 276
B Pygame setup for Windows, Mac, and linux 279 Pygame for Windows . . . 280
Pygame for Mac. . . 284
Python 2.7 and Pygame 1.9.2 . . . 284
Pygame for Linux . . . 287
Pygame for Python 2 . . . 287
C Building Your Own Modules 289 Building the colorspiral Module. . . 290
Using the colorspiral Module . . . 291
Reusing the colorspiral Module . . . 292
Additional Resources . . . 294
Glossary 295
Acknowledgments
This book would not have been possible without the exceptional support of the No Starch Press team. Thanks especially to Bill Pollock for believing in the project; to Tyler Ortman for champion-ing and editchampion-ing; and to Leslie Shen, Riley Hoffman, Lee Axelrod, Mackenzie Dolginow, Serena Yang, and Laurel Chun for their indefatigable editing, reviewing, marketing, and production prowess and for the countless ways they helped me improve this book from my original manuscript. And thanks to Rachel Monaghan and Paula Fleming for their help copyediting and proofreading.
Thanks to Michelle Friend and Ari Lacenski for their thought-ful and thorough technical review, and to Conor Seng for being the first to read the book and try out the programs—at 10 years old.
Thanks to Miran Lipovac� a for his amazing illustrations—they bring the kind of life to the text that I could only have dreamed of.
Thanks to my father-in-law, Norman Petty, a retired IBM’er, who began teaching himself Python using an early draft of the book.
Special thanks to my wife and best friend, Bev, for her con-stant support, and to my amazing sons, Alex and Max, for helping test every program and suggesting improvements. This book and my entire life are infinitely better because of the three of you.
Introduction
WHAT Is CODING AND WHY
Is IT GOOD FOR YOUR KIDs?
Computer programming, or
coding
, is a crucial skill
Everyone can learn to code; it’s just like solving a puzzle or a riddle. You apply logic, try a solution, experiment a little more, and then solve the problem. The time to start learning to code is now! We are at an unprecedented time in history: never before could bil-lions of people connect with one another every day like we do now with computers. We live in a world of many new possibilities, from electric cars and robot caregivers to drones that deliver packages and even pizza.
If your children start learning to code today, they can help define this fast-changing world.
Why should Kids learn to Code?
There are many great reasons to learn computer programming, but here are my top two:
• Coding is fun.
• Coding is a valuable job skill.
Coding Is Fun
Technology is becoming a part of everyday life. Every company, charitable organization, and cause can benefit from technology. There are apps to help you buy, give, join, play, volunteer, connect, share—just about anything you can imagine.
Have your children wanted to build their own level for their favorite video game? Coders do that! What about create their own phone app? They can bring that idea to life by programming it on a computer! Every program, game, system, or app they’ve ever seen was coded using the same programming building blocks they’ll learn in this book. When kids program, they take an active role in technology—they’re not just having fun, they’re making
something fun!
Coding Is a Valuable Job skill
Coding is the skill of the 21st century. Jobs today require more problem-solving ability than ever before, and more and more careers involve technology as an integral requirement.
2014–2015 Occupational Outlook Handbook that do not require master’s or doctoral degrees are in the computer science or infor-mation technology (IT) fields.
Mark Zuckerberg was a college student working from his dorm room when he developed the first version of Facebook in 2004. Just 10 years later, 1.39 billion people were using Facebook every month
(source: http://newsroom.fb.com/company-info/). Never before in history had an idea, product, or service been able to engage a billion people in under a decade. Facebook demonstrates the power of tech-nology to reach more people, faster, than ever before.
Where Can Kids learn to Code?
This book is only the beginning. There are more places than ever to learn programming; websites like Code.org, Codecademy (see Figure 1), and countless others teach basic to advanced program-ming in a variety of in-demand programprogram-ming languages. Once you’ve completed this book with your kids, your children can take free courses through websites like EdX, Udacity, and Coursera to extend their learning even further.
Figure 1: Codecademy teaches you how to program step by step in a variety of languages.
How to Use This Book
This book isn’t just for kids—it’s for parents, teachers, students, and adults who want to understand the basics of computer pro-gramming, both to have fun and to gain access to new jobs in the high-tech economy. No matter what your age, you can have a great time learning the basics of programming. The best way to do this is to experiment and work together.
Explore!
Learning to program is exciting if you’re willing to try new things. As you and your kids follow along with the programs in this book, try changing numbers and text in the code to see what happens to the program. Even if you break it, you’ll learn something new by fixing it. In the worst case, all you have to do is retype the example from the book or open the last saved version that worked. The point of learning to code is to try something new, learn a new skill, and solve problems in a new way. Make sure your kids are playing around—testing their code by changing something, saving the pro-gram, running it, seeing what happens, and fixing any errors.
The point of learning to code is to try something new, learn a new skill, and solve problems in a new way. Test your code by changing something, saving the program, running it, seeing what happens, and fixing errors if needed.
For example, I wrote some code to make a colorful drawing (Figure 2) and then went back, changed some numbers here and there, and tried running the program again. This gave me another drawing that was completely different but just as amazing. I went back again, changed some other numbers, and got yet another beau-tiful, unique drawing. See what you can do just by playing around?
Do It Together!
Experimenting with code is a great way to learn how programs work, and it’s even more effective if you work with someone else. Whether you’re teaching a child or student or studying for yourself, it’s not just more fun to play with code together—it’s also more
effective.
For example, in the Suzuki Method of music instruction, par-ents attend lessons with their child and even study ahead so they can help their child between lessons. Starting early is another hallmark of the Suzuki Method; kids can start formal study by the age of three or four.
I began introducing my two sons to programming when they were two and four, and I encouraged them to have fun by changing small parts of each program, like the colors, shapes, and sizes of shapes.
I learned to program at the age of 13 by typing program examples from books and then modifying them to make them do something new. Now, in the computer science courses I teach, I often give students a program and encourage them to play around with the code to build something new.
If you’re using this book to teach yourself, you can work with others by finding a friend to work through examples with you or by starting an after-school or community coding club (see http:// coderdojo.com/ or http://www.codecademy.com/afterschool/ for ideas and tips). Coding is a team sport!
Online Resources
All the program files for this book are available atCoding = solving Problems
Whether your child is 2 years old and learning to count or 22 and looking for a new challenge, this book and the concepts it introduces are a great pathway to a rewarding, inspiring pastime and better career opportunities. People who can program—and thus solve problems quickly and effectively—are highly valued in today’s world, and they get to do interesting, fulfilling work.
1
PYTHON BAsICs:
GET TO KNOW YOUR ENVIRONMENT
Just about anything could have a computer in
it—a phone, a car, a watch, a video game console,
an exercise machine, a medical device, industrial
equipment, a greeting card, or a robot. Computer
pro-gramming, or
coding
, is how we tell a computer to
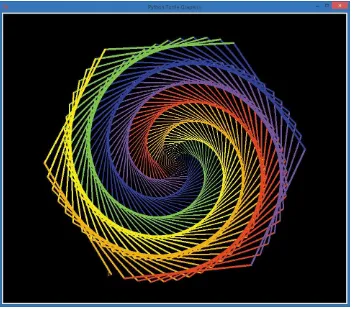
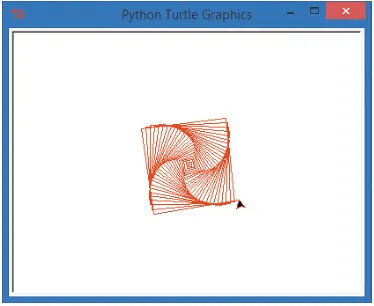
Computer programs—also called applications, or apps—tell computers what to do. A web app can tell the computer how to keep track of your favorite music; a game app can tell the computer how to display an epic battlefield with realistic graphics; a simple app can tell the computer to draw a beautiful spiral like the hexagon in Figure 1-1.
Figure 1-1: A colorful spiral graphic
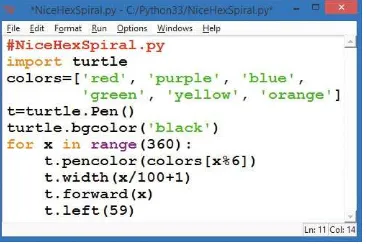
Some apps are composed of thousands of lines of code, while others may be just a few lines long, like the program
Figure 1-2: NiceHexSpiral.py, a short Python program that draws the spiral in Figure 1-1
This short program draws the colorful spiral shown in Fig-ure 1-1. I wanted a pretty pictFig-ure to use as an example in this book, so I decided to solve that problem using a computer pro-gram. First I sketched out an idea, and then I started coding.
In this chapter, we’ll download, install, and learn to use the programs that will help us write code to build any kind of app you can imagine.
Getting started with Python
To begin coding, we have to speak the computer’s language. Computers need step-by-step instructions, and they can only understand certain languages. Just like a person from Russia might not be able to understand English, computers only understand languages made for them.
4 Chapter 1
Likewise, computers have their own limitations, but they can do whatever you tell them to do in their language. The language we’ll use in this book is Python, a simple, powerful programming language. Python is taught in introductory computer science courses in high school and college, and it’s used to run some of the most powerful apps in the world, including Gmail, Google Maps, and YouTube.
To get you started using Python on your computer, we’ll go through these three steps together:
1. Download Python.
2. Install Python on your computer. 3. Test Python with a simple program
or two.
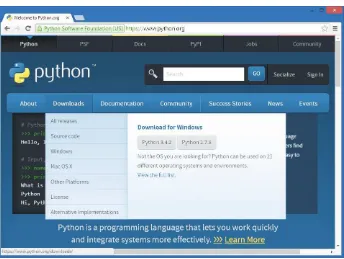
1. Download Python
Python is free and easy to get from the Python website, shown in Figure 1-3.
In your web browser, go to https://www.python.org/. Hover your mouse over the downloads menu button near the top and click the button that begins with Python 3.
2. Install Python
Find the file you just downloaded (it’s probably in your Downloads
folder) and double-click it to run and install Python and the IDLE editor. IDLE is the program we’ll use to type and run our Python programs. For detailed installation instructions, see Appendix A.
3. Test Python with a Program
In your Start menu or Applications folder, find the IDLE program and run it. You’ll see a text-based command window like the one shown in Figure 1-4. This is called the Python shell. A shell is a window or screen that lets the user enter commands or lines of code.
Figure 1-4: The IDLE Python shell—our command center for learning Python
The >>> is called a prompt, and it means that the computer is ready to accept your first command. The computer is asking you to tell it what to do. Type
print("Hello, world!")
and press enter or return on your keyboard. You should see
Writing Programs in Python
You’ll usually want to write programs that are longer than a single line, so Python comes with an editor for writing longer programs. In IDLE, go to the File menu and select File4New Window or File4New File. A blank screen will pop up, with Untitled at the top.
Let’s write a slightly longer program in Python. In the new, blank window, type the following three lines of code:
# YourName.py
name = input("What is your name?\n") print("Hi, ", name)
The first line is called a comment. Comments, which begin with a hash mark (#), are programming notes or reminders that the computer ignores. In this example, the comment is just a note to remind us of the program’s name. The second line asks the user to input their name and remembers it as name. The third line prints "Hi, " followed by the user’s name. Notice that there’s a comma (,) separating the quoted text "Hi, " from the name.
Running Programs in Python
When you save the file and run it, you’ll see your Python shell window start the program by showing the question What is your name?. Type your name on the next line and press enter. The
pro-gram will print Hi, followed by the name you typed. Since this is all that you asked your program to do, the program will end, and you’ll see the >>> prompt again, as shown in Figure 1-5.
Figure 1-5: The computer knows my name!
For younger learners, like my three-year-old son, it’s fun to explain that the program is asking them to type their name. Max knows the letters in his name, so he types m-a-x on the keyboard, and he loves it when I tell him the program said Hi, max back to him. Ask your young learner if she’d like the program to say some-thing different. Max said “Hello,” so I edited the earlier program on the third line to say Hello, instead of Hi,.
Then I changed the third line to read:
print("Hello, ", name, name, name, name, name)
Max loved it when the program replied to him with Hello, max max max max max. Try experimenting with the second and third lines of the program to have the computer ask different questions and print different answers.
What You learned
exercised your mind, and you’ve answered a question. Hopefully, you’ve also had fun.
In this chapter, we solved our first major problem: we installed the Python programming language on our computers so that we could start coding. It was as easy as downloading a file, installing it, and running it.
In the chapters that follow, you’ll learn how to solve problems using code. You’ll start with simple visual puzzles, like drawing shapes on the computer screen (or a tablet or phone), and then find out how to create simple games like Guess a Number, Rock-Paper-Scissors, and Pong.
From the foundation you’ll build in these first programs, you can go on to code games, mobile apps, web apps, and more.
At this point, you should . . .
• Have a fully functional Python programming environment and text editor.
• Be able to enter programming commands directly into the Python shell.
• Be able to write, save, run, and modify short programs in IDLE.
• Be ready to try more advanced, fun programs in Chapter 2.
Programming Challenges
At the end of each chapter, you can practice what you’ve learned—and make even cooler programs!—by trying a couple of challenges. (If you get stuck, go to http://www .nostarch.com/teachkids/ for sample answers.)
#1: Mad libs
Let’s modify the program YourName.py and save it as
MadLib.py. Instead of asking for the user’s name, we’ll ask for an adjective, a noun, and a past-tense verb and store them in three different variables, just as we did for name in the original program. Then, we’ll print out a sentence like “The adjectivenounverb over the lazy brown dog.” Here’s what the code should look like after these changes.
MadLib.py
adjective = input("Please enter an adjective: ") noun = input("Please enter a noun: ")
verb = input("Please enter a verb ending in -ed: ") print("Your MadLib:")
print("The", adjective, noun, verb, "over the lazy brown dog.")
You can enter any adjective, noun, and verb you wish. Here’s what you should see when you save and run
MadLib.py (I’ve entered smart, teacher, and sneezed):
>>>
Please enter an adjective: smart Please enter a noun: teacher
Please enter a verb ending in -ed: sneezed Your MadLib:
The smart teacher sneezed over the lazy brown dog. >>>
#2: More Mad libs!
2
TURTlE GRAPHICs:
DRAWING WITH PYTHON
In this chapter, we’ll write short, simple programs to
create beautifully complex visuals. To do this, we’ll use
amaz-Using turtle graphics, not only can you create impressive visuals with a few lines of code, but you can also follow along with the turtle and see how each line of code affects its movement. This will help you understand the logic of your code.
Our First Turtle Program
Let’s write our first program using turtle graphics. Type the following code into a new window in IDLE and save it as SquareSpiral1.py. (You can also download this program, and all the others in the book, at http://www.nostarch.com/ teachkids/.)
SquareSpiral1.py
# SquareSpiral1.py - Draws a square spiral
import turtle t = turtle.Pen()
for x in range(100): t.forward(x) t.left(90)
When we run this code, we get a pretty neat picture (Figure 2-1).
How It Works
Let’s break the program down line by line to see how it works. The first line of SquareSpiral1.py is a comment. As you learned in Chapter 1, a comment begins with a hash mark (#). Comments allow us to write notes in our programs to ourselves or to other humans who might read the program later. The computer doesn’t read or try to understand anything after the hash mark; the comment is just for us to write something about what the pro-gram is doing. In this case, I’ve put the name of the propro-gram in the comment, as well as a brief description of what it does.
The second line imports the ability to draw turtle graph-ics. Importing code that’s already been written is one of the coolest things about programming. If you program something interesting and useful, you can share it with other people and even reuse it yourself. Some cool Python programmers built a library—a reusable set of code—to help other programmers use turtle graphics in Python, even
though turtle graphics are originally from the Logo programming language of the 1960s.1
When you type import turtle, you’re saying that you want your program to be able to use the code that those Python programmers wrote. The little black arrow in Figure 2-1 repre-sents the turtle, drawing with its pen as it moves around the screen.
The third line of our program, t = turtle.Pen(), tells the computer that we’ll use the letter t to stand for the turtle’s pen. This will allow us to draw with the turtle’s pen as the turtle moves around the screen just by typing t.forward() instead of writing out turtle.Pen().forward(). The letter t is our shortcut for telling the turtle what to do.
The fourth line is the most complex. Here we’re creating a
loop, which repeats a set of instructions a number of times (it
14 Chapter 2
(Computers almost always start counting at 0, not 1 like we usually do.) The loop then steps the letter x through each of the numbers in that range. So x starts as 0, and then it becomes 1, then 2, and so on as it counts all the way up to 99, for a total of 100 steps.
This x is called a variable.2
(In the program YourName.py in Chapter 1, name was a variable.) A variable stores a value that can change, or vary, as we move through our program. We’ll be using variables in almost every program we write, so it’s good to get to know them early.
The next two lines are indented, or spaced over from the left. That means that they are in the loop and go with the line above, so they’ll be repeated each time x gets a new number in the range from 0 to 99, or 100 times.
What Happens
Let’s see what happens the first time Python reads this set of instructions. The command t.forward(x) tells the turtle pen to move forward x dots on the screen. Because x is 0, the pen doesn’t move at all. The last line, t.left(90), tells the turtle to turn left by 90 degrees, or a quarter turn.
Because of that for loop, the pro-gram continues to run, and it goes back to the starting position of our loop. The computer adds 1 to move x to the next value in the range, and since 1 is still in the range from 0 to 99, the loop continues. Now x is 1, so the pen moves forward 1 dot. The pen then moves again to the left by 90, because of t.left(90). This continues again and again. By the time x gets to 99, the last time through the loop, the pen is draw-ing the long lines around the outside of the square spiral.
Here is a step-by-step visual of the loop as x grows from 0 toward 100:
for x in range(100): t.forward(x) t.left(90)
Loops 0 to 4: The first four lines are drawn (after x = 4).
Loops 5 to 8: Another four lines are drawn; our square emerges.
Loops 9 to 12: Our square spiral grows to 12 lines (three squares).
The dots, or pixels, on your computer screen are probably too tiny for you to see them very well. But, as x gets closer to 100, the turtle draws lines consisting of more and more pixels. In other words, as x gets bigger, t.forward(x) draws longer and longer lines.
The turtle arrow on the screen draws for a while, then turns left, draws some more, turns left, and draws again and again, with longer lines each time.
By the end, we have a hypnotizing square shape. Turning left 90 degrees four times gives us a square, just like turning left four times around a building will take you around the building and back where you started.
The reason we have a spiral in this example is that every time we turn left, we go a little farther. The first line that’s drawn is just 1 step long (when x = 1), then 2 (the next time through the loop), then 3, then 4, and so on, all the way through 100 steps, when the line is 99 pixels long. Again, the pixels are probably so tiny on your screen that you can’t easily see the individual dots, but they’re there, and you can see the lines get longer as they con-tain more pixels.
Turtle on a Roll
Let’s see what happens when we change one of the numbers in the program. One way to learn new things about a program is to see what happens when you change one part of it. You won’t always get a pretty result, but you can learn even when something goes wrong.
Change just the last line of the program to t.left(91) and save it as SquareSpiral2.py.
SquareSpiral2.py
import turtle t = turtle.Pen()
for x in range(100): t.forward(x) t.left(91)
I mentioned that a 90-degree left turn creates a perfect square. Turning just a little more than 90 degrees—in this case, 91 degrees every turn—throws the square off just a bit. And because it’s already off a bit when it makes the next turn, our new shape looks less and less like a square as the program continues. In fact, it makes a nice spiral shape that starts to swirl to the left like a staircase, as you can see in Figure 2-2.
This is also a nice visual to help you understand how being off by just one number can drastically change the result of your program. One degree doesn’t seem like a big deal, unless you’re off by one degree 100 times (which adds up to 100 degrees), or 1,000 times, or if you’re using a pro-gram to land an airplane . . .
If you don’t know how degrees work yet, don’t worry about it for now. Just play with the numbers and see what happens. Change the number of lines the program draws to 200, or 500, or 50, by changing the value in parentheses after range.
Also try changing the angle in the last line to 91, 46, 61, or 121, and so on. Remember to save the program each time. Then run it to see how your changes affect what the program draws. Older readers who know a bit of geometry will see some familiar shapes based on the angles used and may even be able to predict the shape based on the angle before the program runs. Younger readers can just enjoy changing things up a bit, and this exer-cise might come back to them when they’re in a geometry class someday.
Turtle Roundup
Speaking of geometry, turtle graphics can draw lots more interest-ing shapes than just straight lines. We’ll come back to the square shape again in the next section, but let’s take a short detour to check out more of the Python Turtle library.
Let’s change one more line of code: t.forward(x). We saw earlier that this command, or function, moves the turtle’s pen forward x pixels and draws a straight line segment; then the turtle turns and does it again. What if we changed that line of code to draw something more complex, like a circle?
CircleSpiral1.py
import turtle t = turtle.Pen()
for x in range(100): t.circle(x) t.left(91)
Wow! Changing one command from t.forward to t.circle gave us a much more complex shape, as you can see in Figure 2-3. The t.circle(x) function tells the program to draw a circle of radius x at the current position. Notice that this drawing has something in common with the simpler square spiral shape: there are four sets of circle spirals just like there were four sides to our square spiral. That’s because we’re still turning left just a little over 90 degrees with the t.left(91) command. If you’ve studied geometry, you know that there are 360 degrees around a point, like the four 90-degree corners in a square (4 × 90 = 360). The turtle draws that spiral shape by turning just a little more than 90 degrees each time around the block.
Figure 2-3: Just one more change gives us a beautiful set of four spiraling circles.
A radius of x means that the diameter, or total width, of the circle will be two times x. In other words, t.circle(x) draws a circle 2 pix-els across when x is equal to 1, 4 pixels across when x is 2, all the way up to 198 pixels across when x is 99. That’s almost 200 pix-els across, or twice the size of our biggest side in the square, so the circle spiral is about double the size of our square spiral—and maybe twice as cool, too!
Adding a Touch of Color
These spirals are nice shapes, but wouldn’t it be cooler if they were a bit more colorful? Let’s go back to our square spiral code and add one more line to our program, right after the t = turtle.Pen() line, to set the pen color to red:
SquareSpiral3.py
import turtle t = turtle.Pen() t.pencolor("red")
for x in range(100): t.forward(x) t.left(91)
Run the program, and you’ll see a more colorful version of our square spiral (Figure 2-4).
Figure 2-4: The square spiral gets a little more colorful.
different colors with the Turtle library, including some weird ones like "salmon" and "lemon chiffon". (Visit http://www.tcl.tk/man/ tcl8.4/TkCmd/colors.htm for a full list.) Making the whole spiral a different color is a nice step, but what if we wanted to make each
side a different color? That’s going to take a few more changes to our program.
A Four-Color spiral
Let’s think through the algorithm—that is, the set of steps—that will turn our one-color spiral into a four-color spiral. Most of the steps are the same as in our previous spiral programs, but there are a few added twists:
1. Import the turtle module and set up a turtle. 2. Tell the computer which colors we’d like to use. 3. Set up a loop to draw 100 lines in our spiral.
4. Pick a different pen color for each side of the spiral. 5. Move the turtle forward to draw each side.
6. Turn the turtle left to get ready to draw the next side.
First, we need a list of color names instead of a single color, so we’re going to set up a list variable called colors and put four colors in the list, like this:
colors = ["red", "yellow", "blue", "green"]
The next thing we need to do is change the pen color every time
we step through the drawing loop. To do this, we need to move the t.pencolor() function into the group of instructions under the for loop. We also need to tell the pencolor function that we want to use one of the colors from the list.
Type the following code and run it.
ColorSquareSpiral.py
import turtle t = turtle.Pen()
colors = ["red", "yellow", "blue", "green"]
for x in range(100):
t.pencolor(colors[x%4]) t.forward(x)
t.left(91)
The list of four colors makes sense, and we can see them in the running example (Figure 2-5). So far, so good.
Figure 2-5: A much more colorful version of our square spiral program
every time x changes. In this case, our color list only has four colors, so we’ll rotate through these four colors over and over:
colors = ["red", "yellow", "blue", "green"] 0 1 2 3
The % symbol in [x%4] is called the modulo, or mod, operator and represents the remainder in long division (5 ÷ 4 equals 1 with a remainder of 1, because 4 goes evenly into 5 once with 1 left over; 6 ÷ 4 has a remainder of 2; and so on). The mod operator is useful when you want to rotate through a certain number of items in a list, like we’re doing with our list of four colors.
Changing Background Colors
Let’s mix things up a bit again to see if we can create some-thing even more beautiful than Figure 2-5. For example, as my five-year-old son Alex pointed out, the yellow sides are hard to see. That’s because, just like yellow crayons on white drawing paper, the yellow pixels on the screen don’t show up well against the white background color. Let’s fix that by changing the back-ground color to black. Type the following line of code anywhere after the import line in our program:
turtle.bgcolor("black")
Adding this one line gives us an even neater picture: all of the colors now stand out on the black background. Notice that we’re not changing anything about the turtle’s pen (represented by the variable t in our program). Instead, we’re changing some-thing about the turtle screen, namely the background color. The turtle.bgcolor() command allows us to change the color of the entire drawing screen to any of the named colors in Python. In the line turtle.bgcolor("black"), we’ve chosen black as the screen color, so the bright red, yellow, blue, and green show up nicely.
While we’re at it, we can change the range() in our loop to 200, or even more, to make larger squares in our spiral. See Figure 2-6 for the new version of our picture with 200 lines on a black background.
24 Chapter 2
Always willing to help make my programs more awesome, Alex asked for one more change: what if we replaced the line segments with circles now? Wouldn’t that be the coolest picture of all? Well, yes, I have to agree—it is even cooler. Here’s the full code.
ColorCircleSpiral.py
import turtle t = turtle.Pen()
turtle.bgcolor("black")
colors = ["red", "yellow", "blue", "green"]
for x in range(100):
t.pencolor(colors[x%4]) t.circle(x)
t.left(91)
You can see the result in Figure 2-7.
One Variable to Rule Them All
So far, we’ve used variables to change the color, size, and turning angle of our spiral shapes. Let’s add another variable, sides, to rep-resent the number of sides in a shape. How will this new variable change our spiral? To find out, try this program, ColorSpiral.py.
ColorSpiral.py
import turtle t = turtle.Pen()
turtle.bgcolor("black")
# You can choose between 2 and 6 sides for some cool shapes!
sides = 6
colors = ["red", "yellow", "blue", "orange", "green", "purple"]
for x in range(360):
t.pencolor(colors[x%sides]) t.forward(x * 3/sides + x) t.left(360/sides + 1) t.width(x*sides/200)
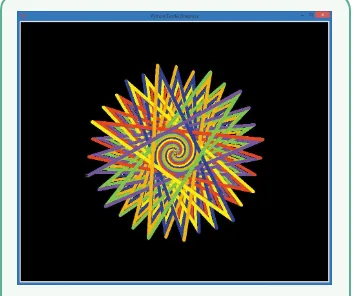
You can change the value of sides from 6 down to 2 (one side’s not very interesting, and you won’t be able to use bigger numbers unless you add more colors to the list in the sixth line of the program). Then save and run the program as many times as you’d like. Figure 2-8 shows the pictures created with sides = 6, sides = 5, all the way down to sides = 2, which is the weird, flat spiral shown in Figure 2-8(e). You can change the order of the colors in the list, and you can use bigger or smaller numbers in any of the functions in the drawing loop. If you break the program, just go back to the original ColorSpiral.py and play some more.
a)
b) c)
d) e)
What You learned
In this chapter, we drew impressive, colorful shapes in Python using the Turtle library of tools. We brought this library into our program by using the import command, and you learned that reusing code in this way is one of the most powerful things about programming. Once we’ve written something useful, or borrowed code that some-one else has been kind enough to share, we not only save time but can also use that imported code to do neat new things.
You’ve also been introduced to variables like x and sides in our programs. These variables store, or remember, a number or value so that you can use it multiple times in a program and even change the value as you go. In the next chapter, you’ll learn more about the power of variables and how Python can even help you do your math homework!
At this point, you should be able to do the following:
• Draw simple graphics with the Turtle library.
• Use variables to store simple number values and strings.
• Change, save, and run programs in IDLE.
Programming Challenges
Try these challenges to practice what you’ve learned in this chapter. (If you get stuck, go to http://www.nostarch.com/ teachkids/ for sample answers.)
#1: Changing the Number of sides
We used a variable, sides, in the ColorSpiral.py program on page 25, but we didn’t vary it much or change its value except for editing, saving, and running the program again. Try changing the value of sides to another number, say 5. Save and run the program to see how this affects your drawing. Now try 4, 3, 2, and even 1! Now, add two or more colors, in quotes, separated by commas, to the list of colors in the sixth line of the program. Increase the value of sides to use this new number of colors—try 8 or 10 or more!
#2: How Many sides?
What if you want to let a user decide the number of sides while the program runs? Using what you learned in Chapter 1, you can ask the user for a number of sides and store that input in the variable sides. Our only extra step is to evaluate the number the user enters. We can find out which number the user typed with the eval() function, like this:
sides = eval(input("Enter a number of sides between 2 and 6: "))
Replace the line sides = 6 in ColorSpiral.py with the preceding line. Your new program will ask how many sides the user wants to see. Then, the program will draw the shape the user asks for. Give it a try!
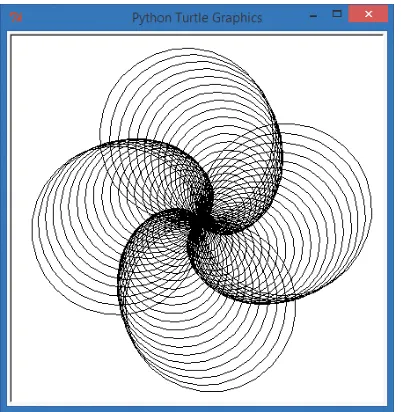
#3: Rubber-Band Ball
Figure 2-9: Adding an extra 90 degrees to each turn in ColorSpiral.py
turns it into RubberBandBall.py.
Save this new version as RubberBandBall.py, or go to
3
NUMBERs AND VARIABlEs:
PYTHON DOEs THE MATH
We’ve used Python to do really fun things, like make
colorful pictures in just a few lines of code, but our
programs have been limited. We just ran them and
watched them make pictures. What if we wanted to
Variables: Where We Keep Our stuff
In Chapters 1 and 2, we used a few variables (you might remem-ber name from our first program in Chapter 1 or x and sides from Chapter 2). Now let’s look at what variables really are and how they work.A variable is something you want the computer to remem-ber while your program is running. When Python “rememremem-bers” something, it’s storing that information in the computer’s memory. Python can remember values of several types, including number values (like 7, 42, or even 98.6) and strings (letters, symbols, words, sentences, or anything you can type on the keyboard and then some). In Python, as in most modern programming languages, we
assign a value to a variable with the equal sign (=). An assignment like x = 7 tells the computer to remember the number 7 and give it back to us anytime we call out x. We also use the equal sign to assign a string of keyboard characters to a variable; we just have to remember to put quotation marks (") around the string, like this:
my_name = "Bryson"
Here, we assign the value "Bryson" to the variable my_name. The quotation marks around "Bryson" tell us that it is a string.
Whenever you assign a value to a variable, you write the name of the variable first, to the left of the equal sign, and then write the value to the right of the equal sign. We name variables something simple that describes their contents (like my_name when I’m storing my name) so we can easily
remember them and use them in our programs. There are a few rules to keep in mind as we make up names for variables.
you’ve listed two variables separated by a space). Third, variable names in Python are case sensitive; that means that if we use all
lowercase letters in a variable name (like abc), then we can only use the value stored in the variable if we type the variable name exactly the same way, with the same capitalization. For example, to use the value in abc, we have to write abc; we can’t use uppercase
letters like ABC. So My_Name is not the same as my_name, and MY_NAME is a different variable name altogether. In this book, we’ll use all lowercase letters in our variable names, separating words with the _ symbol.
Let’s try a program using some variables. Type the following code in a new IDLE window and save it as ThankYou.py.
ThankYou.py
my_name = "Bryson" my_age = 43
your_name = input("What is your name? ") your_age = input("How old are you? ")
print("My name is", my_name, ", and I am", my_age, "years old.") print("Your name is", your_name, ", and you are", your_age, ".") print("Thank you for buying my book,", your_name, "!")
When we run this program, we’re telling the computer to remember that my_name is "Bryson" and that my_age is 43. We then ask the user (the person running the program) to enter their name and age, and we tell the computer to remember these as the vari-ables your_name and your_age. We’re using Python’s input() function to tell Python that we want the user to enter (or input) something with the keyboard. Input is what we call information that’s entered into a program while it’s running—in this case, the user’s name and age. The part in quotes inside the parentheses, ("What is your name? "), is called the prompt because it prompts the user, or asks them a question requiring their input.
In the last three lines, we tell the computer to print out the value we stored in my_name and the other three variables. We even use your_name twice, and the computer remembers everything cor-rectly, including the parts the user typed as input.
34 Chapter 3
Figure 3-1: A program with four variables and the output it creates
Numbers and Math in Python
The computer is great at remembering values. We can use the same variable hundreds or thousands of times in the same pro-gram, and the computer will always give us the right value as long as we’ve programmed it correctly. Computers are also great at performing calculations (addition, subtraction, and so on). Your computer is able to perform over one billion (1,000,000,000, or a thousand million) calculations every second!
That’s much faster than we can compute numbers in our heads; although we’re still better than computers at some tasks, fast math is a contest the computer will win every time. Python gives you access to that mathematical computing power with two main types of numbers, and it also lets you use a whole set of sym-bols to do math with those numbers, from + to - and beyond.
Python Numbers
The two primary types of numbers in Python are called integers
(whole numbers, including negatives, like 7, -9, or 0) and floating-point numbers (numbers with decimals, like 1.0, 2.5, 0.999, or 3.14159265). There are two additional number types that we won’t use much in this book. The first is Booleans, which hold true or false values (sort of like the answers on a “true or false” test at school), and the second is complex numbers, which hold even imaginary number values (this might excite you if you know some advanced algebra, but we’re keeping it real here—pun intended).
Floating-point, or decimal, numbers are great when we want fractions, like 3.5 miles, 1.25 pizzas, or $25.97. Of course, in Python, we don’t include the units (miles, pizzas, dollars), just the number with the decimal. So if we want to store a variable with the cost of our pizza (cost_of_pizza), we might assign it as follows: cost_of_pizza = 25.97. We’ll just have to remember that the units we’re using there are dollars, euros, or some other currency.
Python Operators
The math symbols like + (plus) and - (minus) are called operators
because they operate, or perform calculations, on the numbers in our equation. When we say “4 + 2” aloud or enter it on our calcu-lator, we want to perform addition on the numbers 4 and 2 to get their sum, 6.
Python uses most of the same operators that you would use in a math class, including +, -, and parentheses, (), as shown in Table 3-1. However, some operators are different from what you may have used in school, like the multiplication operator (the asterisk, *, instead of ×) and the division operator (the forward slash, /, instead of ÷). We’ll get to know these operators better in this section.
Table 3-1: Basic Math Operators in Python
Math symbol
Python operator
operation example result
+ + Addition 4 + 2 6
– - Subtraction 4 - 2 2
× * Multiplication 4 * 2 8
÷ / Division 4 / 2 2.0
42 ** Exponent or power 4 ** 2 16
( ) () Parentheses
(grouping)
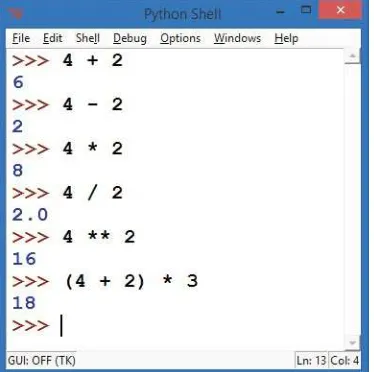
Doing Math in the Python shell
This is a great time to give Python math a try; let’s use the Python shell this time. As you might remember from Chapter 1, the Python shell gives you direct access to Python’s power without writing a whole program. It’s sometimes called the command line
because you can type commands line by line and instantly see the result. You can type a math problem (called an expression in programming) like 4 + 2 directly at the command prompt (the >>> symbol with the flashing cursor) in the Python shell, and when you press enter, you’ll see the
result of the expression, or the answer to the math problem.
Try typing some of the examples listed in Table 3-1 and see what Python says; Figure 3-2 shows some sample output. Feel free to try your own math problems as well.
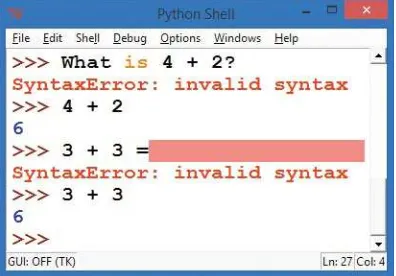
syntax Errors: What Did You say?
While we’re typing in the Python shell, we have a chance to learn about syntax errors. Whenever Python, or any programming lan-guage, can’t understand the command you typed, it may respond with a message like "Syntax Error". This means there was a prob-lem with the way you asked the computer to do something, or your syntax.
Syntax is the set of rules we follow in building sentences or
statements in a language. When we program computers, we call a mistake in a statement a syntax error; when we make a mistake in a sentence in English, we might call it bad grammar. The differ-ence is that, unlike English speakers, computers can’t understand bad grammar atall. Python, like most programming languages, is very good at performing calculations as long as we follow syntax rules, but it can’t understand anything we’re saying if we mess up the syntax. Take a look at Figure 3-3 to see some examples of syn-tax errors, followed by the expressions stated in a way that Python can understand.
Figure 3-3: Learning to speak Python’s language
The fact that we can rely on a computer to answer correctly and quickly every time we give it proper input is one of the most powerful aspects of coding. We can count on computers for fast, accurate calculations, as long as we program them correctly in a language they understand. That’s what you’re learning to do as you learn to code in Python.
Variables in the Python shell
As we’ve discussed, the Python shell gives us direct access to the programming power of Python without having to write entire stand-alone programs. We can even use variables, like x and my_age, when we’re typing in the Python shell; we just have to assign them values, as you learned to do in this chapter’s opening example.
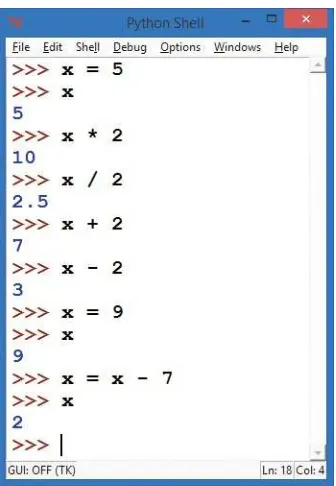
If you type x = 5 at the command prompt (>>>), Python will store the value 5 in memory as the variable x and will remember it until you tell Python to change the value (for example, by entering x = 9 to give x a new value of 9). See the examples in the Python shell in Figure 3-4.
Notice that in the last assignment statement, we used x on
both sides of the equal sign: x = x - 7. In an algebra class, this would be an invalid statement, since x can never equal x - 7. But in a program, the computer evaluates the right side of the equation
first, calculating the value of x - 7before it assigns that value to the x on the left side. Variables on the right side of the equal sign get substituted with their values; here, the value of x is 9, so the computer plugs 9 into x - 7 to get 9 - 7, which is 2. Finally, the vari-able on the left side of the equal sign, x, is assigned the result of the calculation from the right side. The value of x changes only at the end of the assignment process.
Before we move on to a programming example, let’s go over one additional feature of math in Python. In Table 3-1 and in Figures 3-2 and 3-4, we used the division operator—the for-ward slash (/)—and Python responded with a decimal value. For 4 / 2, Python gave us 2.0, not the 2 that we might expect. This is because Python uses what it calls true division, which is meant to be easier to understand and less likely to cause errors.
We see the positive effect of Python’s true division in Figure 3-4 when we ask Python to calculate x / 2, with x equal to 5. Python tells us that 5 divided by 2 is equal to 2.5, which is the result we expect. This division is like dividing five pizzas equally between two teams: each team gets 2.5 pizzas (the result of 5 / 2). In some programming languages, the division operator returns only the whole number (that would be 2 in this case). Just remember that Python does “pizza division.”
Programming with Operators:
A Pizza Calculator
Speaking of pizza, now let’s imagine you own a pizzeria. Let’s write a small program to figure out the total cost of a simple pizza order, including sales tax. Say we’re ordering one or more pizzas that all cost the same, and we’re ordering in Atlanta, Georgia, in the United States. There’s a sales tax that’s not included in the menu price but is added at the end of the pur-chase. The rate is 8 percent, meaning that for every dollar we pay for the pizza, we must also pay eight cents in sales tax. We could model this program in words as follows:
3. Calculate the total cost of the pizzas as our subtotal. 4. Calculate the sales tax owed, at 8 percent of the subtotal. 5. Add the sales tax to the subtotal for the final total. 6. Show the user the total amount due, including tax.
We’ve seen how to ask the user for input. To calculate with numbers we’ve entered as input, we need one more function: eval(). The eval() function evaluates, or figures out the value of, the input that we typed. Keyboard input in Python is always received as a string of text characters, so we use eval() to turn that input into a number. So if we type "20" into our program, eval("20") would give us the number value 20, which we can then use in math formulas to calculate new numbers, like the cost of 20 pizzas. The eval() function is pretty powerful when it comes to working with num-bers in Python.
Now that we know how to turn user input into numbers that we can calculate with, we can convert the numbered steps of our program plan into actual code.
N O T E For each programming example, you can try writing your own pro-gram first, before you look at the code in the book. Start by writing comments (#) outlining the steps you’ll need to solve the problem. Then fill in the programming steps below each comment, checking the code in the book when you need a hint.
Type this into a new window and save it as AtlantaPizza.py.
AtlantaPizza.py
# AtlantaPizza.py - a simple pizza cost calculator
# Ask the person how many pizzas they want, get the number with eval()
number_of_pizzas = eval(input("How many pizzas do you want? "))
# Ask for the menu cost of each pizza
cost_per_pizza = eval(input("How much does each pizza cost? "))
# Calculate the total cost of the pizzas as our subtotal
subtotal = number_of_pizzas * cost_per_pizza
# Calculate the sales tax owed, at 8% of the subtotal
tax_rate = 0.08 # Store 8% as the decimal value 0.08
# Add the sales tax to the subtotal for the final total
total = subtotal + sales_tax
# Show the user the total amount due, including tax
print("The total cost is $",total)
print("This includes $", subtotal, "for the pizza and") print("$", sales_tax, "in sales tax.")
This program combines what you’ve learned about variables and operators into a single powerful program. Read through it and make sure you understand how each part works. How would you change the program to make it work for a different rate of sales tax?
Notice that we have included the steps of our program as comments, using the # (hash mark). Remember that comments are there for humans to read; the IDLE editor colors comments red to remind us that Python will ignore those parts. This practice of spelling out our programs step by step in words first, then putting those steps into our program as comments, can be very helpful as we build longer and more complex programs. This is our algorithm, the set of steps to be followed in our program. Algorithms are like recipes: if we follow all the steps in the right order, our program turns out great!
When you’ve written your program, you can run it and inter-act with it by going to run4run Module. Figure 3-5 shows some sample output.
Figure 3-5: A sample run of our AtlantaPizza.py pizza calculator program
strings: The Real Characters
in Python
We’ve seen that Python is terrific at working with numbers, but what about when we want to communicate with people? People are better at understanding words and sentences, rather than just numbers all by themselves. To write programs that people can use, we need another variable type known as strings. Strings are what we call text, or keyboard characters, in a programming language; they are groups (or “strings”) of letters, numbers, and symbols. Your name is a string, as is your favorite color—even this paragraph (or this whole book) is a long string of letters, spaces, numbers, and symbols all mixed together.
One difference between strings and numbers is that we can’t calculate with strings; they’re usually names, words, or other information that can’t go into a calculator. A common way to use strings is in printing. For example, we asked the user for their name in our program at the beginning of the chapter so that we could print it out later.
SayMyName.py
# SayMyName.py - prints a screen full of the user's name
# Ask the user for their name
name = input("What is your name? ")
# Print their name 100 times
for x in range(100):
# Print their name followed by a space, not a new line
print(name, end = " ")
There’s something new in the print() statement in this pro-gram’s last line: it contains a keyword argument. In this case, the
keyword is end, and we’re telling the program to end each print() statement with a space (there’s a space between our quotes: " ") instead of the regular end-of-line character. Print statements in Python usually end with the newline character, which is like pressing enteron your keyboard, but with this keyword
argu-ment we are telling Python we don’t want every printout of our name to be on a new line.
To see this change a little more clearly, modify the last line of the program to the following, and then run the program:
print(name, end = " rules! ")
If you run this, you’ll see "Your Name rules!" printed 100 times! The keyword argument end = " rules! " lets us change how the print() statement works. The end of every print() statement is now " rules! " instead of a return or enter newline character.
In programming languages, an argument
44 Chapter 3
of the current line without returning, or starting a new line, until the current line fills up completely and wraps around to the next one. Take a look at the result in Figure 3-6.
Figure 3-6: Python prints a screen full of my name when I run SayMyName.py.
Improving Our Color spiral
with strings
Strings are so popular that even turtle graphics in Python have functions for taking strings as input and writing them to the screen. The function to ask a user for a string, or text, in the Turtle library is turtle.textinput(); this opens a pop-up window asking the user for text input and lets us
store that as a string value. Figure 3-7 shows the nice graphical window that Turtle pops up for us when we use turtle.textinput("Enter your name", "What is your name?"). There are two arguments in Turtle’s textinput() func-tion. The first argument, "Enter your name", is the window title for the pop-up window. The second argument, "What is your name?", is the prompt that asks the user for the information we want.
The function for writing a string on the turtle screen is write(); it draws text in the turtle’s pen color and at the turtle’s location on the screen. We can use write() and turtle.textinput() to combine
the power of strings with colorful turtle graphics. Let’s give it a try! In the following program, we’ll set up turtle graphics just like in our earlier spirals, but instead of drawing lines or circles on the screen, we’ll ask the user for their name and then draw it on the screen in a colorful spiral. Type this into a new window and save it as SpiralMyName.py.
SpiralMyName.py
# SpiralMyName.py - prints a colorful spiral of the user's name
import turtle # Set up turtle graphics
t = turtle.Pen() turtle.bgcolor("black")
colors = ["red", "yellow", "blue", "green"]
# Ask the user's name using turtle's textinput pop-up window
u your_name = turtle.textinput("Enter your name", "What is your name?")
# Draw a spiral of the name on the screen, written 100 times
for x in range(100):
t.pencolor(colors[x%4]) # Rotate through the four colors
v t.penup() # Don't draw the regular spiral lines
w t.forward(x*4) # Just move the turtle on the screen
x t.pendown() # Write the user's name, bigger each time
y t.write(your_name, font = ("Arial", int( (x + 4) / 4), "bold") ) t.left(92) # Turn left, just as in our other spirals