Expert Shell Scripting
■ ■ ■
All rights reserved. No part of this work may be reproduced or transmitted in any form or by any means, electronic or mechanical, including photocopying, recording, or by any information storage or retrieval system, without the prior written permission of the copyright owner and the publisher.
ISBN-13 (pbk): 978-1-4302-1841-8
ISBN-13 (electronic): 978-1-4302-1842-5
Printed and bound in the United States of America 9 8 7 6 5 4 3 2 1
Trademarked names may appear in this book. Rather than use a trademark symbol with every occurrence of a trademarked name, we use the names only in an editorial fashion and to the benefit of the trademark owner, with no intention of infringement of the trademark.
Lead Editor: Frank Pohlmann Technical Reviewer: Brian Culp
Editorial Board: Clay Andres, Steve Anglin, Mark Beckner, Ewan Buckingham, Tony Campbell, Gary Cornell, Jonathan Gennick, Michelle Lowman, Matthew Moodie, Jeffrey Pepper, Frank Pohlmann, Ben Renow-Clarke, Dominic Shakeshaft, Matt Wade, Tom Welsh
Project Manager: Sofia Marchant Copy Editor: Candace English
Associate Production Director: Kari Brooks-Copony Production Editor: Liz Berry
Compositor: Pat Christenson Proofreader: Lisa Hamilton Indexer: Julie Grady Artist: April Milne
Cover Designer: Kurt Krames
Manufacturing Director: Tom Debolski
Distributed to the book trade worldwide by Springer-Verlag New York, Inc., 233 Spring Street, 6th Floor,
New York, NY 10013. Phone 1-800-SPRINGER, fax 201-348-4505, e-mail [email protected], or
visit http://www.springeronline.com.
For information on translations, please contact Apress directly at 2855 Telegraph Avenue, Suite 600, Berkeley, CA 94705. Phone 510-549-5930, fax 510-549-5939, e-mail [email protected], or visit http:// www.apress.com.
Apress and friends of ED books may be purchased in bulk for academic, corporate, or promotional use. eBook versions and licenses are also available for most titles. For more information, reference our Special
Bulk Sales–eBook Licensing web page at http://www.apress.com/info/bulksales.
The information in this book is distributed on an “as is” basis, without warranty. Although every precaution has been taken in the preparation of this work, neither the author(s) nor Apress shall have any liability to any person or entity with respect to any loss or damage caused or alleged to be caused directly or indirectly by the information contained in this work.
iv
Contents at a Glance
About the Author
. . . xvAbout the Technical Reviewer
. . . .xviiAcknowledgments
. . . xixIntroduction
. . . xxiPART 1
■ ■ ■
Basic Scripting Techniques
■
CHAPTER 1
Shell Script Debugging
. . . 3■
CHAPTER 2
Standard Function Library
. . . 13■
CHAPTER 3
Date and Time Manipulation
. . . 19■
CHAPTER 4
Comparisons and Tests
. . . 25■
CHAPTER 5
Accepting Command-Line Options, Switches,
and Parameters
. . . 31■
CHAPTER 6
Testing Variables and Assigning Defaults
. . . 37■
CHAPTER 7
Indirect Reference Variables
. . . 43■
CHAPTER 8
Shell Process Tree
. . . 49■
CHAPTER 9
Data Redirection
. . . 59■
CHAPTER 10
Piping Input to read
. . . 65PART 2
■ ■ ■
System Interaction and Advanced
Techniques
■
CHAPTER 11
Math from the Shell
. . . 75■
CHAPTER 12
cron
. . . 81■
CHAPTER 13
Self-Linked Scripts
. . . 87■
CHAPTER 14
Throttling Parallel Processes
. . . 91■
CHAPTER 15
Command-Line Editing and History
. . . 99■
CHAPTER 16
Scripting from the Command Line
. . . 103■
CHAPTER 20
Directory Copying
. . . 125■
CHAPTER 21
A Brief Tour of the X Display Environment
. . . 131■
CHAPTER 22
X Navigation Window
. . . 141■
CHAPTER 23
Command-Line E-mail Attachments
. . . 151■
CHAPTER 24
Text-Processing One-Liners
. . . 157■
CHAPTER 25
Editing Files in Place
. . . 173■
CHAPTER 26
Evaluating Variables in a Flat File
. . . 181■
CHAPTER 27
Read Piped Input
. . . 183■
CHAPTER 28
Free-Format Output Using cat
. . . 185■
CHAPTER 29
Automating Interactive Processes
. . . 187PART 3
■ ■ ■
Useful Scripts
■
CHAPTER 30
Automating E-Mail with procmail
. . . 193■
CHAPTER 31
Process-Management Monitor
. . . 201■
CHAPTER 32
Managing File Counts
. . . 211■
CHAPTER 33
Processes Running from inittab
. . . 215■
CHAPTER 34
Automatic RCS
. . . 219■
CHAPTER 35
Colorful /proc Reporting
. . . 223■
CHAPTER 36
Password-Aging Notification
. . . 231■
CHAPTER 37
A Pseudo–shadow File
. . . 241■
CHAPTER 38
Linux Gold-System Build
. . . 245■
CHAPTER 39
System Snapshots
. . . 251■
CHAPTER 40
Removing Large Files and Log Rolling
. . . 261■
CHAPTER 41
Core Finder
. . . 265■
CHAPTER 42
Network Adapter Failover
. . . 267■
APPENDIX A
Test Switches
. . . 273■
APPENDIX B
Special Parameters
. . . 275■
APPENDIX C
Other Shell-Scripting Resources
. . . 277vii
Contents
About the Author
. . . xvAbout the Technical Reviewer
. . . .xviiAcknowledgments
. . . xixIntroduction
. . . xxiPART 1
■ ■ ■
Basic Scripting Techniques
■
CHAPTER 1
Shell Script Debugging
. . . 3Shell Trace Options
. . . 3Simple Output Statements
. . . 6Controlling Output with Debug Levels
. . . 8Simplifying Error Checking with a Function
. . . 9Manual Stepping
. . . 11■
CHAPTER 2
Standard Function Library
. . . 13The Library File
. . . 13Some Useful Functions
. . . 14Using Your Library
. . . 16■
CHAPTER 3
Date and Time Manipulation
. . . 19Date in Days
. . . 19Days Since Epoch
. . . 20Alternatives for Finding the Date in Seconds
. . . 22Evaluating for the Current Day and Time
. . . 22■
CHAPTER 4
Comparisons and Tests
. . . 25■
CHAPTER 5
Accepting Command-Line Options, Switches,
and Parameters
. . . 31■
CHAPTER 6
Testing Variables and Assigning Defaults
. . . 37Setting Defaults
. . . 37Variable Substitution
. . . 38:= Syntax
. . . 39= Syntax
. . . 40:- Syntax
. . . 40- Syntax
. . . 40:? Syntax
. . . 41? Syntax
. . . 41:+ Syntax
. . . 42+ Syntax
. . . 42■
CHAPTER 7
Indirect Reference Variables
. . . 43Log File Monitoring with Indirect Variables
. . . 43The Main Monitor Loop
. . . 44■
CHAPTER 8
Shell Process Tree
. . . 49Process Tree Implemented Using Arrays
. . . 50Process Tree Implemented Using Indirect Variables
. . . 55Bourne Shell Implementation of a Process Tree
. . . 56■
CHAPTER 9
Data Redirection
. . . 59Avoiding Confusion
. . . 59Common Redirection
. . . 60Access to User-Specified File Handles
. . . 62Descriptor Access from the Shell
. . . 64■
CHAPTER 10
Piping Input to read
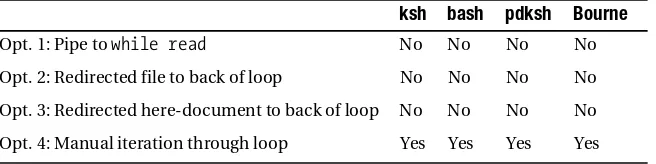
. . . 65Line-by-Line Option 1
. . . 66Line-by-Line Option 2
. . . 67■C O N T E N T S ix
Line-by-Line Option 4
. . . 68Pipe to read Directly
. . . 70Process Input Word-by-Word
. . . 70PART 2
■ ■ ■
System Interaction and Advanced
Techniques
■
CHAPTER 11
Math from the Shell
. . . 75expr
. . . 75Internal Shell Math
. . . 76bc
. . . 78dc
. . . 78■
CHAPTER 12
cron
. . . 81crontab Entries
. . . 81Environment Problems
. . . 82Output Redirection
. . . 84■
CHAPTER 13
Self-Linked Scripts
. . . 87■
CHAPTER 14
Throttling Parallel Processes
. . . 91Parallel Processing with ksh
. . . 92Parallel Processing with bash
. . . 97■
CHAPTER 15
Command-Line Editing and History
. . . 99Setting Up vi Editing
. . . 100bash
. . . 100ksh
. . . 101Command and File Completion
. . . 101■
CHAPTER 16
Scripting from the Command Line
. . . 103■
CHAPTER 17
Automating User Input with expect
. . . 107A Shell Script to Customize Parameters for an expect Script
. . . 108An expect Script to Automate telnet
. . . 111■
CHAPTER 18
User Input Timeout
. . . 115Manual Timeout Method
. . . 115Timeout Using stty
. . . 117General Timeout Utility
. . . 118■
CHAPTER 19
Instant Keyboard Response
. . . 121■
CHAPTER 20
Directory Copying
. . . 125Using cp
. . . 125Using tar
. . . 126Using find
. . . 126Using rsync
. . . 127■
CHAPTER 21
A Brief Tour of the X Display Environment
. . . 131The Display
. . . 131X Traffic Through ssh
. . . 133X Applications Through a Third-Party System
. . . 133User-Profile Entry
. . . 135Root-Profile Entry
. . . 137Throw a Temporary Root Window
. . . 138■
CHAPTER 22
X Navigation Window
. . . 141Navigation Window Usage
. . . 141Navigation Setup
. . . 142Navigation Window
. . . 145■
CHAPTER 23
Command-Line E-mail Attachments
. . . 151uuencode
. . . 151■C O N T E N T S xi
■
CHAPTER 24
Text-Processing One-Liners
. . . 157Displaying Specific Fields
. . . 157Specifying the Field Separator
. . . 158Simple Pattern-Matching
. . . 158Matching Fields Against Several Values
. . . 159Determining the Number of Fields
. . . 159Determining the Last Field
. . . 159Determining the Second-to-Last Field
. . . 160Passing Variables to awk
. . . 160Using a Variable Passed to awk in a Condition
. . . 161Displaying a Range of Fields (Main Method)
. . . 161Displaying a Range of Fields (Alternate Method)
. . . 162Determining the Length of a String Using awk
. . . 163Determining the Length of a String Using expr
. . . 163Displaying a Substring with awk
. . . 163Displaying a Substring with expr
. . . 164Conducting Simple Search and Replace with sed
. . . 164Disregarding Blank and Commented Lines from a File
. . . 164Conducting Dual Search and Replace with sed
. . . 165Filtering Lines with sed
. . . 165Searching for Multiple Strings with egrep
. . . 166A Clean Method of Searching the Process Table
. . . 166Summing Columns Using awk
. . . 167Generating Random Numbers Using awk
. . . 167Generating Random Numbers from the Shell
. . . 168Displaying Character-Based Fields with sed
. . . 168Escaping Special Characters
. . . 169Returning Trailing Lines from a Pattern Match Using grep
. . . 170Returning Preceding Lines to a Pattern Match Using grep
. . . 171■
CHAPTER 25
Editing Files in Place
. . . 173Simple Search and Replace with ed
. . . 174Search and Replace Using ed, Dissected
. . . 174Examples of ed Commands
. . . 175Escaping Special Characters in a File
. . . 178■
CHAPTER 27
Read Piped Input
. . . 183■
CHAPTER 28
Free-Format Output Using cat
. . . 185■
CHAPTER 29
Automating Interactive Processes
. . . 187PART 3
■ ■ ■
Useful Scripts
■
CHAPTER 30
Automating E-mail with procmail
. . . 193The .procmailrc File
. . . 194Usage Examples
. . . 196The Code
. . . 196■
CHAPTER 31
Process-Management Monitor
. . . 201■
CHAPTER 32
Managing File Counts
. . . 211File-Count Monitor
. . . 211Testing File-Count Methods
. . . 213■
CHAPTER 33
Processes Running from inittab
. . . 215■
CHAPTER 34
Automatic RCS
. . . 219■
CHAPTER 35
Colorful /proc Reporting
. . . 223■
CHAPTER 36
Password-Aging Notification
. . . 231Script Initialization
. . . 232Processing Begins
. . . 234Determine Password Age
. . . 236■
CHAPTER 37
A Pseudo–shadow File
. . . 241■C O N T E N T S xiii
■
CHAPTER 39
System Snapshots
. . . 251Snapshot Script
. . . 253Snapshot Promotion
. . . 255Creating the Latest Snapshot
. . . 258Final Thoughts
. . . 258■
CHAPTER 40
Removing Large Files and Log Rolling
. . . 261■
CHAPTER 41
Core Finder
. . . 265■
CHAPTER 42
Network Adapter Failover
. . . 267Check the Network
. . . 270Switch the Interfaces
. . . 271■
APPENDIX A
Test Switches
. . . 273■
APPENDIX B
Special Parameters
. . . 275■
APPENDIX C
Other Shell-Scripting Resources
. . . 277Manual Pages
. . . 277Books
. . . 277Scripting Books
. . . 278Supplementary Books
. . . 278Shell Resources
. . . 278Online Resources
. . . 279xv
xvii
About the Technical Reviewer
■BRIAN CULP has worked professionally in the information-services industry for 20 years. Throughout those years he has worked with startups and small businesses, and spent a dozen years employed by a leading company in the IT industry. Brian has spent time on service desks, as a UNIX systems admin, a project manager, an e-commerce/business web site administrator, and a solutions developer.
xix
F
or most things in this world, we depend on others. This book is no exception; this project is larger than most I have taken on, and I could not have done it alone. I would firstly and most importantly like to thank my God for the free gift of life as well as the skills and abili-ties that enabled me to write this book. I would also like to thank my wife, Kathleen, and my two boys, Austin and Grant, for enduring the seemingly endless hours and evenings I’ve been spending with my laptop.I want to express my gratitude to the two Brians: to Brian Grell for giving me ideas and discussing many topics that have found their way into this book, and to Brian Culp for reviewing the whole book and keeping me focused on what I was trying to say, and asking the right questions so I could maintain clarity.
Finally, I want to thank all the other editors who have had a hand in helping me remove the Englilsh1 from my writing.
xxi
Introduction
I
learned the basics of programming when I was in school; I learned how to shell-script by example.I’ve met and worked with many system administrators and other *NIX folks, each of whom has their own bag of tricks when it comes to managing a system, interacting with their environment, or coding a script. It’s always very useful to have conversations and interact with people like this because you invariably gain some tidbits that you can throw into your own collection of tricks. I decided to collect all the useful shell-scripting and interaction techniques I have learned through the years and combine them into one beneficial reference guide. In fact, I used some of my own notes about those techniques while writing this book. Since I haven’t memorized everything present in this book, I would periodically look up items when I was working on various tasks. I want this book to be the beginning of a higher-level reference library that can be added to and can grow continually.
You might be aware of the large number of shell-scripting books and online resources aiding in the mastery of shell scripting. Many are excellent and cover a wide range of topics. The main purpose of this book is to combine some of the most unique tools, code snippets, and scripts that go beyond the level of basic scripts. I wanted to create a cookbook of sorts— lesser-known recipes and fairly advanced algorithms that have proved useful to me.
I have included scripts you can use as is, and sample scripts illustrating a specific algo-rithm. I also demonstrate a few complex commands that may be useful on the command line. I have tried to tailor the scripts to be useful at multiple levels. Most times, however, there is little or no error-checking since that is not necessarily the point of a specific script. You must be prepared to make modifications to fit your local environment.
How This Book Came About
My friend Brian Culp and I have worked together as UNIX system administrators for many years. Periodically, Brian or I will be working on some script and run into a problem. One of us will stop, walk over to the other, and say something like, “Do you have any code that does X?” The answer may be no, in which case we’ll launch into a discussion on how we might tackle the problem, or come up with a few different solutions. However, many times it might be something like, “Hmm, yeah, I think I remember doing something like that in a script that does X on system Y. Let me look for a minute.” A few carefully chosen grep
Although finding the solution we want is great, it’s not the most efficient use of our time. To go from having a place to store and organize all of our (and, of course, other programmers’) gems and having them in a heavily documented form, to writing a book on the subject was only a short step. Even though it is possible to search online references quickly for specific code, there were many occasions when I just wanted to pull a book off my shelf. It’s not always obvious what to search for when you have a specific itch that needs scratching, so you’re not sure exactly to what search for online.
This is to some extent an expression of my own limitations: my family and friends think I’m a computer guru, but rest assured, I know better. There are many programmers out there who are much more adept at shell coding than I am. I mainly intended to collect, order, and explain code that I have found to be highly useful in my professional experi-ence as a system administrator, and share that information with others.
Who Should Read This Book
The book is meant for the intermediate shell coder up to the advanced shell-code hacker, because I don’t explain many basic programming structures. If you’re looking for that type of book, you should look to the resources mentioned in Appendix C.
This is not to say that the beginner won’t find this book useful; it may work well as a supple-mentary reference to a more traditional shell-scripting training guide. But there is a difference between learning English as a second language and learning how to apply sarcasm. This book is like sarcasm in that example; it assumes some basic shell-code literacy.
I go into great detail about how and why the scripts were written in their present form, and I include some explanation of how to avoid certain problems. Much of my learning came from sources heavy in obfuscation and light on clarity, so I tried to be as explicit as possible, and favored explaining too much rather than too little. You can think of many chapters I included as shell scripts with extremely detailed commentary.
The book is divided into three parts: “Basic Scripting Techniques,” “System Interaction and Advanced Techniques,” and “Useful Scripts.” Most chapters serve as stand-alone discussions, although they may refer to other chapters on some minor points.
Issues and Ideas
■ ■ ■
P A R T 1
3
■ ■ ■
Shell Script Debugging
E
ven though this book isn’t a “how to script” manual, some concepts that are funda-mental to writing successful scripts should be discussed. Debugging is one of them. Debugging code is a significant part of writing code. No matter how disciplined you are or how skilled you become at coding, you will have bugs in your code, in the form of either syntax or logic errors. The syntactical problems tend to be simpler to resolve since many times they show up when the code throws an error when it is run. The logical bugs, on the other hand, may be more difficult to track down since the code may run without error, but the resulting output does not match the design of the program. The more complex your code becomes as your skill increases, the more difficult these types of problems will be to detect.Since writing bug-free code is nearly impossible, you need a few techniques up your sleeve that will help you finish, diagnose, repair, and clean up your code. This chapter pre-sents a few ways to debug code that I have used consistently and that help me extract details from the inner workings of my scripts. These techniques validate that the code is living up to my expectations and demonstrate where the code needs more work to per-form the intended task.
Shell Trace Options
The first technique—using the set command—is the simplest to implement and can give you great amounts of detail about how the logic is progressing and the values of variables internal to your script. Using the set command is really just using shell options to display verbose output when the script is running. One of the functions of the set command is to turn on and off the various options that are available in the shell. In this case, the option being set is -x, or xtrace. This is where the running script will, in addition to any normal output, display the expanded commands and variables of a given line of code before the code is run. With this increased output, you can easily view what is happening in the run-ning script and possibly determine where your problem lies.
4 C H A P T E R 1 ■ S H E L L S C R I P T D E B U G G I N G
preceded by a plus-sign (+) prompt to designate it as part of the trace output. Traced commands from the running shell that are being executed in a subshell are denoted by a double plus sign (++).
To demonstrate what the use of set -x can do for you, consider this script:
#!/bin/sh #set -x
echo -n "Can you write device drivers? " read answer
answer=`echo $answer | tr [a-z] [A-Z]` if [ $answer = Y ]
then
echo "Wow, you must be very skilled" else
echo "Neither can I, I'm just an example shell script" fi
Note that the set -x line is currently commented out. When this script is entered in the file example and run, the behavior is as expected.
$ ./example
Can you write device drivers? y Wow, you must be very skilled
or
$ ./example
Can you write device drivers? n
Neither can I, Im just an example shell script
This is the output when the set -x line is uncommented:
$ ./example
+ echo -n 'Can you write device drivers? ' Can you write device drivers? + read answer y
++ tr '[a-z]' '[A-Z]' ++ echo y
+ answer=Y + '[' Y = Y ']'
+ echo Wow, you must be very skilled Wow, you must be very skilled
$ ./example
+ echo -n 'Can you write device drivers? ' Can you write device drivers? + read answer n
++ echo n
++ tr '[a-z]' '[A-Z]' + answer=N
+ '[' N = Y ']'
+ echo Neither can I, Im just an example shell script Neither can I, Im just an example shell script
The output is a verbose trace of the script’s execution. Note that the lines without the plus sign are the output of the script that would be displayed if the script were run without tracing enabled. As you can see, this type of trace is highly useful in determining the value that variables contain during the execution of a script, as well as the route that the code took based on the conditions satisfied.
A shell option that is a slight variation of this output can also be used for troubleshoot-ing. The -v option to the shell enables verbose mode and outputs the script code (as it is being executed) to the standard error file handle (often abbreviated as stderr). More specifically, in the case of a shell script, each line of code that is encountered during exe-cution is output to stderr along with any other output from the script. (Chapter 9 contains more discussion of file handles.) The following is the output from the same script when the set -v line is implemented:
$ ./example
echo -n "Can you write device drivers? " Can you write device drivers? read answer y
answer=`echo $answer | tr [a-z] [A-Z]`
echo $answer | tr [a-z] [A-Z]if [ $answer = Y ] then
echo "Wow, you must be very skilled" else
echo "Neither can I; I'm just an example shell script" fi
Wow, you must be very skilled
6 C H A P T E R 1 ■ S H E L L S C R I P T D E B U G G I N G
$ ./example
echo -n "Can you write device drivers? " Can you write device drivers? read answer n
answer=`echo $answer | tr [a-z] [A-Z]`
echo $answer | tr [a-z] [A-Z]if [ $answer = Y ] then
echo "Wow, you must be very skilled" else
echo "Neither can I; I'm just an example shell script" fi
Neither can I; I'm just an example shell script
The verbose (-v) option to the shell is more useful if you simply want to see the running code of the script that you’re working with (as opposed to the expanded values of vari-ables) to make sure the code is working as designed with the xtrace (-x) option. Both options can be employed together by using set -xv, and you’ll see both types of output at the same time, although it may be difficult to wade through.
Both the verbose and xtrace options are valuable in their own way for troubleshooting both logical and syntactical problems. As with all options to the shell, they can be turned on and off. The syntax for disabling an option is the opposite of that for turning on an option. Instead of using a minus (-) sign as you did before to enable an option such as in
-x, you would use a plus sign, as in +x to disable the option. This will disable the option from that point on. This is very useful if you want to debug only a small portion of the script. You would enable the option just prior to the problem area of code, and disable it just after the problem area so you aren’t inundated with irrelevant output.
Simple Output Statements
The next debugging technique—the use of echo or print commands in the code—is also very simple, but it is used frequently to gather specific variable values from a running script rather than displaying potentially large amounts of data using the set -x option. Typically these commands are used for simple output of a script to some type of display or file. In this case, however, they will be used as a checkpoint in the code to validate vari-able assignments.
valuable in tracing through the running of a script, it can be cumbersome to isolate the exact piece of data that you’re looking for. With an echo or print statement, you can dis-play a single line of output with multiple variables that include some headings for easy reading. The following line is an example of the code you might use:
echo Var1: $var1 Var2: $var2 Var3: $var3
The output doesn’t need to be polished since it is simply for your validation and trou-bleshooting, but you will want it to be meaningful so you can see the exact data you’re looking for at its exact spot in the code.
The second way is to output a debugging line to verify that the logic is correct for known input data. If you are running a script that should have known results but does not, it may contain a logical error where what you’ve designed and what you’ve coded don’t quite match. Such errors can be difficult to find. Adding some echo statements in key positions can reveal the flow of control through the script as it executes, and so val-idate whether you are performing the correct logical steps.
I’ve modified the script slightly to add echo statements at two key positions, but only one of the statements in each echo-statement pair will be executed because of the if state-ment. This way you not only see the output of the statement itself, but you know which condition of the if statement the code executed. In the following very simple example code, you can see that there is an echo statement as part of the original code. When there are many conditions and comparisons without output, these types of statements are very valuable in determining if your logic is correct.
#!/bin/sh
echo -n "Can you write device drivers? " read answer
answer=`echo $answer | tr [a-z] [A-Z]` if [ $answer = Y ]
then
echo Wow, you must be very skilled echo this is answer: $answer
else
echo Neither can I, Im just an example shell script echo this is answer: $answer
fi
8 C H A P T E R 1 ■ S H E L L S C R I P T D E B U G G I N G
Controlling Output with Debug Levels
The problem with using echo statements as I described previously is that you have to com-ment or remove them when you don’t want their output displayed. This is fine if your program is working to perfection and will not need further modification. However, if you’re constantly making changes to a script that is actually being used, the need to add back or uncomment echo statements each time you debug can be tiresome. This next debugging technique improves on the basic echo statement by adding a debugging level that can be turned on or off. After you’ve prepped your script once, enabling or disabling debugging output is as simple as changing a single variable.
The technique is to set a debug variable near the beginning of the script. This variable will then be tested during script execution and the debug statements will be either dis-played or suppressed based on the variable’s value.
The following is our original example, modified once again for this technique:
#!/bin/sh debug=1
test $debug -gt 0 && echo "Debug is on" echo -n "Can you write device drivers? " read answer
test $debug -gt 0 && echo "The answer is $answer" answer=`echo $answer | tr [a-z] [A-Z]`
if [ $answer = Y ] then
echo Wow, you must be very skilled
test $debug -gt 0 && echo "The answer is $answer" else
echo Neither can I, Im just an example shell script test $debug -gt 0 && echo "The answer is $answer" fi
This idea can be expanded to include many debug statements in the code, providing output of varying levels of detail during execution. By varying the value to which $debug is compared in the test (e.g., $debug -gt 2), you can, in principle, have an unlimited number of levels of debug output, with 1 being the most simple and the highest-numbered level of your choosing being the most complex. You can, of course, create any debug-level logic you wish. In the example here, I am checking if the debug variable is greater than some specified value. If it is, the debug output is displayed. With this model, if you have various debug output levels and your debug variable is assigned a value higher than the highest debug level, all levels below that one will be displayed. Here are a few lines of code to illus-trate the point:
debug=2
If these three lines were executed in a script, only the output from the first two would be displayed. If you were to change the logic of the test from “greater than” (-gt) to “equal to” (-eq), only the output of the last debug statement would be displayed.
My mind works best when things are simple. For simple scripts I usually set the debug value to either on or off. Multilevel debugging is more valuable for larger scripts, since the code can become quite complex and difficult to track. Using multiple debug levels in a complex script allows you to follow the code’s logic as it executes, selecting the level of detail desired.
A further improvement to this technique is to design the script to accept a debug switch when the script is called. You can then use the switch to specify whatever value of debug level you desire for the information you’re looking for, without having to modify the code every time you would like to view debugging output. See Chapter 5 for more information on how to process command-line switches passed to a script.
Simplifying Error Checking with a Function
The last debugging approach I’ll discuss is an error-checking technique. Instead of simply checking the values of variables and debug statements, this method is more proactive. You evaluate the final condition of an executed command and output a notification if the command was unsuccessful.
The code is a very simple function that I include in a standard function library I use. (You can find information on function libraries in Chapter 2.) This function uses the $?
shell internal variable. The shell sets this variable automatically to the value of the previous command’s return code. This function uses that value and alerts you of the command’s success or failure. A command’s return code is a numeric value that defines the exit status of the most recently executed command. Traditionally, a successful com-pletion of a command will yield a value of 0 for the $? shell variable. Error checking is an important part of all types of coding. Not only do you need to get the commands, logic, and functionality of the program correct along the desired path of execution, you should also check for problem conditions along the way. Anticipating potential prob-lems will make your code more robust and resilient.
The function that is included here is called alert since it notifies you of any issues. A function is something like a mini-program within the main code, and it can be called like any other regular command. A good use for a function is to reduce duplication of code if you’re going to perform a given task many times throughout the script. The alert
10 C H A P T E R 1 ■ S H E L L S C R I P T D E B U G G I N G
befind, mv, sed, and a few others. These are the commands that are performing real action, and I would consider them critical.
When you identify a line of code that you want to check, you should call the alert function directly following the execution of that command because that is when you can first retrieve the value of the $? shell variable and thus determine the effect of the executed command.
The alert function’s code is simple. The function is called with $? as its first argument, and a string describing what is being reported as its second argument. If the value of $?
is 0, the function echoes that the operation succeeded; otherwise it echoes that it didn’t.
alert () {
# usage: alert <$?> <object> if [ "$1" -ne 0 ]
then
echo "WARNING: $2 did not complete successfully." >&2 exit $1
else
echo "INFO: $2 completed successfully" >&2 fi
}
The following is an example of a command followed by a call to the alert function. The command simply mails the contents of a log file specified in the environment variable LOG
to a predefined recipient specified in the variable TO.
cat $LOG | mail -s "$FROM attempting to get $FILE" $TO alert $? "Mail of $LOG to $TO"
Depending on the success or failure of the cat and mail commands, the output of the call to alert would look like this:
INFO: Mail of $LOG to $TO completed successfully
or like this:
INFO: Mail of $LOG to $TO did not complete successfully
with the LOG and TO variables expanded to their values.
The following code is a more advanced form of the previous alert function. It is sim-pler to call and has a couple of additional features. First, it has been combined with a global DEBUG variable so that it will only report issues if that variable is set. It has also been combined with a global STEP_THROUGH variable. When that variable is set to 1, the code pauses for input on any error it encounters. If the STEP_THROUGH variable is set to 2, the function pauses every time it has been called.
alert () { local RET_CODE=$?
if [ -z "$DEBUG" ] || [ "$DEBUG" -eq 0 ] ; then return
We first set the RET_CODE variable to the last command’s return code and then deter-mine if the DEBUG variable is either undefined or set to 0. The -z test determines if a variable has a zero length. If either of these conditions are true, the function will return to the main code from which it was called.
if [ "$RET_CODE" -ne 0 ] ; then
echo "Warn: $* failed with a return code of $RET_CODE." >&2 [ "$DEBUG" -gt 9 ] && exit "$RET_CODE"
The next step is to determine if the return code of the command was nonzero, which implies a failure of some kind. If it is zero, the code echoes out a warning that states what the command was attempting to do and the return code that it received. The $* shell internal variable holds all the positional parameters that were passed to the function itself. If it was called with something like alert creating the archive of last months records and there was a problem, the output would look like this: Warn: creating the archive of last months records failed with a return code of 1. In a real case, the return-code value will vary.
The last line in this code segment determines if the DEBUG variable is greater than 9. If this is the case, the script will exit with the most recent failure’s return code.
[ "$STEP_THROUGH" = 1 ] && {
echo "Press [Enter] to continue" >&2; read x }
fi
[ "$STEP_THROUGH" = 2 ] && {
echo "Press [Enter] to continue" >&2; read x }
}
This last bit of code is where the function allows you to pause, either at only nonzero return codes or any time the alert function was called. You could improve the function by sending output to an optional log file for later review.
Manual Stepping
12 C H A P T E R 1 ■ S H E L L S C R I P T D E B U G G I N G
involved, we were focusing on the directory permissions and the user that needed to write to the directory. We failed to notice the permissions on the files in the directory.
I’m not suggesting that all problems are this easy to find. Debugging code can take hours, days, or even longer when the code is complex, but a few lessons can be learned from this simple example.
First, before you start writing a program, attempt to perform the code’s steps manually where appropriate. This won’t always be feasible, but when it is you may be able to weed out some trouble spots before they are mixed in with all the script’s other tasks.
Second, try out the code with sample input and attempt to follow it through by per-forming the loops and conditionals as they are written. It is not an easy task, but attempt to look at the code as objectively as possible without making assumptions, and ask the too-obvious-to-ask questions about what is happening.
13
■ ■ ■
Standard Function Library
A
fter writing many scripts, I realized there were several functions and routines I was using repeatedly. Sometimes I would write the code for these duplicated functions again, and other times I would copy and paste the code from an earlier script. But the best cod-ing practice is to keep a file around that contains all of your already tested and workcod-ing functions. This creates a scriptwriter’s toolbox, or, in programming speak, a library. With a library in place, many of the tools you need often are close at hand and you don’t have to code the functions anew each time you need them. This chapter shows you how to set up a standard function library and how to utilize the library in your scripts.The Library File
The library itself is simply a collection of functions held in a single file. When the library is brought into your script’s environment, you can call any of the library functions as if they were in your original code. You could create a single library that contains all of your func-tions or, if you have a large and varied number of them, create a set of libraries where each one is specific to a category of coding.
Libraries are not only handy to have around; they eliminate redundant coding as well as provide a common environment for all programmers involved to work from. Function libraries reduce redundant code and speed up the development process, plus they can reduce debugging and code-hardening time. If there are bugs in any of the functions, fixes will positively impact all scripts that rely on those bits of code. Function libraries can also level the programming field when working with many and varied system types by adding a layer of abstraction between system differences and the programmer writing the code.
14 C H A P T E R 2 ■ S T A N D A R D F U N C T I O N L I B R A R Y
#!/bin/echo Warning: this library should be sourced!
# ostype(): Define OSTYPE variable to current operating system ostype() {
osname=`uname -s`
# Assume we do not know what this is OSTYPE=UNKNOWN
case $osname in
"FreeBSD") OSTYPE="FREEBSD" ;;
"SunOS") OSTYPE="SOLARIS" ;;
"Linux") OSTYPE="LINUX" ;;
esac return 0 }
The first line of the library is an excellent method of ensuring that the library is sourced rather than executed as a regular script. With this line, error output will be generated if someone attempts to run the library instead of sourcing it into the environment. The out-put would look like this:
Warning: this library should be sourced! /path_to_library
Another way to avoid execution of libraries is to make them nonexecutable.
The first function, ostype(), determines the operating system of the computer on which the library is running. Because there are subtle differences between operating sys-tems, knowing what OS your script is running on will help you take the differences into account. There are, of course, many more operating systems than we are able to list here.
Some Useful Functions
The code in this section comes from a few utility functions that I find very useful. You will probably come up with many more that are specifically geared toward the systems you work with. Gentoo Linux provides an excellent example of a library of shell func-tions. If you’re running this Linux distribution, you can find the library under the filename /etc/init.d/functions.sh. Even if you’re not a Gentoo user, you should be able to get a copy of this library and use it by performing an Internet search for Gentoo and functions.sh, making sure that you follow the applicable usage guidelines con-tained within the file.
half based on the numeric value of the system name. The cool trick is the use of the sed
command to determine the last character of a string. Once the last digit is found, the func-tion returns a true value of 1 if the digit is an even number and a false of 0 if it is not. I will discuss this command and others like it in Chapter 24.
evenodd() {
# determine odd/even status by last digit LAST_DIGIT=`echo $1 | sed 's/\(.*\)\(.\)$/\2/'` case $LAST_DIGIT in
0|2|4|6|8 ) return 1 ;;
*)
return 0 ;;
esac }
This second function is one I have used many times. It determines whether a remote system is running and connected to the network. It works by pinging the specified machine three times and sending the output to /dev/null. Success is based on the value of $? that is returned following the ping command. If the value of $? is 0, then the machine is alive. The usage of the ping command is encapsulated in the setupenv() function, which I’ll present next. The switches and usage of the ping command varies among oper-ating systems. The usage presented here will work on Linux systems. HP-UX machines would use the command ping $NODE 3 for the same functionality.
isalive() { NODE=$1
$PING -c 3 $NODE >/dev/null 2>&1 if [ $? -eq 0 ]
then return 1 else return 0 fi
}
The final function is one you’ll find useful if you need to run your scripts on multiple hosts, some for which you don’t know the exact configuration. It sets the path to an exe-cutable based on the operating-system type, in this case the path to ping, and stores its value as a variable. Your scripts can then call this variable when they need to utilize the executable without you needing to hand-code the exact path for each unique host. You can use this function as a template for storing the location of other executables.
16 C H A P T E R 2 ■ S T A N D A R D F U N C T I O N L I B R A R Y
setupenv() {
if [ "$OSTYPE" = "" ] then
ostype fi
NAME=`uname -n` case $OSTYPE in "LINUX" )
PING=/usr/sbin/ping ;;
"FREEBSD" ) PING=/sbin/ping ;;
"SOLARIS" )
PING=/usr/sbin/ping ;;
*) ;; esac }
Using Your Library
Once you’ve included a library in your shell scripting environment, all functions it con-tains become available to your scripts. There are several ways to incorporate the library into the environment.
You can make the library available by entering the source command at the shell prompt, as shown here. This command evaluates the commands in a file, which in the case of our library places its resources inside the current shell environment.
source std_lib
Another way of sourcing a library file is with dot syntax. This is a shorthand way of per-forming the same task as the source command by replacing the command with a dot (.). This is a built-in function included in both ksh and bash.
. std_lib
the libraries to each machine when changes are made. This is viable only if you have an environment with only a few systems.
19
■ ■ ■
C H A P T E R 3
Date and Time Manipulation
O
n occasion, the need for date math arises, such as when you’re trying to calculate a time interval between events. The calculations seem easy enough because there are pre-cise numbers of seconds, minutes, and hours in a day. It gets tricky, though, when you consider the fact that values have to roll over when, for example, Monday turns into Tues-day or June becomes July.For instance, calculating the difference in minutes between 6:53 am and 7:04 am is easy enough: you can multiply the hours (6 and 7) by 60 for each value, add the minutes that do not make up the next full hour, then subtract to find the difference. But what if you want the difference in minutes between 11:57 pm and 1:13 am? This calculation is more com-plex because it involves a change in day. And the comcom-plexity only increases when the date interval spans months or years.
Date in Days
The following script shows one way to make date and time calculations much easier. Because UNIX and Linux calculate time based on a starting point of January 1, 1970, the script measures time in seconds since that date.
Although the use of seconds may seem cumbersome, the math is simple, as you’ll see in the bit of code in the “Days Since Epoch” section of this chapter. You reduce the date and time values to numbers of seconds elapsed since the base date then manipulate these values. All of the issues that arise when spanning across calendar increments, such as days or months, simply disappear.
You might use this type of calculation when determining the age of a user’s password. The third field of an account entry in a system /etc/shadow file contains the day value on which the password was changed for a particular account, as counted from 1/1/1970 (the epoch). This number can be used for various purposes—for example, to determine when passwords are about to expire so as to facilitate user notifications. You can find an exam-ple of this in Chapter 36 in connection with password aging.
system to seconds elapsed since the beginning of the UNIX epoch, the calculation becomes a simple subtraction.
■
Caution
Yes, the Network Time Protocol (NTP) keeps system clocks in sync. However, not all systems run NTP implementations. Also, clocks on some aging hardware keep such poor time that even NTP can‘t keep them in sync. NTP implementations can generally keep system clocks synchronized, but if a particular clock drifts beyond the panic threshold, NTP will not update the clock. Additionally, even where NTP is ubiq-uitous, systems can fail.The following “Days Since Epoch” script calculates the number of days between two dates. The valid dates for this equation (taken from the Gregorian calendar) range from October 15, 1582 to December 31, 9999. Dates outside this range (or dates from different calendars) require a different equation. This script is a fairly longhand way of getting these values, but the benefit is that it will run on most any system using ksh or bash. The alternatives may not.
The script is based on the following formula. When the program runs, it calculates and displays the number of days that have elapsed since January 1, 1970 by determining the number for 1/1/1970 and subtracting that from the number for the current date.
(Year*365)+(Year/4)-(Year/100)+(Year/400)+(Month*306001/10000)+(Day)
There are a couple of caveats to using this formula to account for dates that land on a number line. In that case, before you perform the calculation, the values of Month and Year
may need to be altered: for the months of January (1) and February (2), you must add 13 to Month and subtract 1 from Year; for all other months you simply add 1 to Month to return the correct value. The Day value to be used is always the day of the month. Thus, the equa-tion applied to January 1, 1970, is as follows:
(1969*365)+(1969/4)-(1969/100)+(1969/400)+(14*306001/10000)+1
Days Since Epoch
The start of the script sets the variables for the current time and date. Since the epoch (1/1/1970) is fixed, its value can be calculated once and the constant 719591 used in its place, thus saving some CPU cycles.
#!/bin/sh
epoch_days=719591 second=`date +'%S'` minute=`date +'%M'` hour=`date +'%k'` day=`date +'%d'`
C H A P T E R 3 ■ D A T E A N D T I M E M A N I P U L A T I O N 21
You could improve the script’s performance as follows, although it reduces readability. Instead of performing a date call to set each time and date variable, you could make one
date call that outputs space-delimited values, then place those values into an array. To initialize the array in ksh, use
set -A DATE `date +"%S %M %k %d %m %Y"
In bash, use
declare -a DATE=( `date +"%S %M %k %d %m %Y"` )
For example, to access the third array element in either bash or ksh, use something like
echo ${DATE[2]}
where 2 is referencing the third element in the DATE array. Note that the first element in an array would be accessed with a subscript of 0.
The following code makes the initial changes to the month and year variables the equa-tion needs:
if [ $month -gt 2 ] then
month=$(($month+1)) else
month=$(($month+13)) year=$(($year-1)) fi
If the month is not January or February (greater than 1 or 2), you have to add 1 to the month. Otherwise you have to add 13 to the month and subtract 1 from the year.
The following code calculates the day value for today. Once you know this, you subtract the epoch value from that value to get the number of days since the start of the epoch. The script then outputs that value. The output is left unformatted in case you want to use the number as input for another command or process.
today_days=$((($year*365)+($year/4)-\ ($year/100)+($year/400)+\ ($month*306001/10000)+$day))
days_since_epoch=$(($today_days-$epoch_days)) echo $days_since_epoch
You may find it useful to have two versions of this script: one that outputs the elapsed time in days and the other that outputs it in seconds.
seconds_since_epoch=`echo "($days_since_epoch*86400)+\ ($hour*3600)+($minute*60)+$second" | bc`
Alternatives for Finding the Date in Seconds
There are two other ways to calculate the number of seconds since the epoch. Both of them are much simpler than the preceding script, but they require system utilities that you may not have installed, such as Perl and the latest GNU utilities. Most administrators would probably install whatever is needed to get the job done, but there are controlled production environments where it’s not that simple—sometimes many requirements must be met and testing must be performed before any changes are made to a system. In those cases, it is simpler to come up with a solution that utilizes existing resources as opposed to installing more-advanced tools.
The first alternative uses the GNU version of the date command. If you have this ver- sion, you can produce output that is almost identical to that of the script discussed in the section “Days Since Epoch” except that, because the number of seconds since epoch in that script is calculated based on GMT, it may be out of sync with your local time zone. If so, you may want to add the appropriate number of seconds for your local time zone. (This may not be necessary if you’re using the values to simply calculate the difference between two arbitrary dates/times in which the local time zone information is irrele-vant.)The following date command is much simpler than deriving the calculations manually. This returns the number of seconds since epoch directly.
gnu_seconds_since_epoch=`date +%s`
There is also a Perl function for performing the same task. You can access it like this:
perl_seconds_since_epoch=`perl -e 'print time'`
Evaluating for the Current Day and Time
Say you want to schedule a job, such as a system monitor, to run at particular times or on certain days. You want to know whether there are issues on the system, but you don’t necessarily want to be jarred awake by your pager simply to learn that the message is non-critical; you’d like to get those routine notices by page during the day and by e-mail at other times.
The following script determines whether the current day and hour are within a certain time frame that you set. This code would be called from another script, which actually performs the notifications.
C H A P T E R 3 ■ D A T E A N D T I M E M A N I P U L A T I O N 23
same. If the current day and hour values do not lie within the given range, a different mes-sage is output and the function returns a 1 (representing failure).
#!/bin/sh if [ $# -ne 4 ] then
echo Usage: $0 {day begin} {day end} {hour begin} {hour end} echo " Days are 0-6 where 0 is Sunday."
echo " Hours are 0-23." exit
fi
The script starts by determining how many parameters have been sent to the script. Recall that four is the expected number. If four parameters haven’t been sent, such as if the script calling this code were written incorrectly, you should output a usage message containing some explanation of how the script should be invoked. The usage explanation provided here shows that the four parameters that should be passed are DAY_BEGIN,
DAY_END, HOUR_BEGIN, and HOUR_END. All of these values are integers in which the day values range from 0–6 where Sunday is 0, and the hours range from 0–23.
If the parameter count is correct, the code assigns the parameters to variables with more meaningful names, such as DAY_BEGIN and DAY_END instead of 1 and 2. Making this change helps the readability and it is easier to see what is happening.
DAY_BEGIN=$1 DAY_END=$2 HOUR_BEGIN=$3 HOUR_END=$4
Next, the variables for the current day and hour need to be set.
DAY=`date +%w` HOUR=`date +%H`
The code here is the main check to determine whether it is time to notify the adminis-trator. The large if statement compares the current DAY and HOUR values with the values that were passed to the script.
if [ $DAY -ge $DAY_BEGIN -a $DAY -le $DAY_END\ -a $HOUR -ge $HOUR_BEGIN -a $HOUR -le $HOUR_END ] then
echo "It is time to notify" return 0
else
echo "It is not time to notify" return 1
■
Note
The valid day and hour ranges include the end points specified by the parameters. That is, if the script was invoked with DAY values of 1 and 5, the test should succeed on Monday, Friday, and on the days in between.In a real-world implementation, you would probably replace the echo lines with code for performing actual notification, such as a call to a paging utility such as QuickPage.1
As mentioned earlier, I’ve assumed for simplicity that the actual notification is handled by the code that calls this script. That script might be an exhaustive monitoring utility that performs many types of monitoring tasks. Each monitor could call this script with differ-ent parameters based on the level of criticality. The calling script would then evaluate the return code by accessing the $? variable to determine whether to send a notification.
To simplify this script, you could hard-code the DAY_BEGIN/DAY_END and HOUR_BEGIN/
HOUR_END ranges instead of assigning them the values of the passed parameters. You would then remove the validation check for the number of parameters passed.
25
■ ■ ■
C H A P T E R 4
Comparisons and Tests
T
wo of the fundamental types of operations in any programming language are the comparison and the test. They are the building blocks of conditional statements (if/ then and case) and iteration statements (while). They give you the ability to examine relationships between data items, such as files, variables, strings, and numeric values, and to take action based on the result. You can also carry out actions based on the attributes of a particular item, such as a file’s type, whether a variable has been assigned a value, and the return code of a command.The examples in this chapter illustrate various ways to compare items or to check their properties, and use the results. I have used all of these techniques throughout this book, although some are used more frequently than others. Here I want to present a diverse set of examples that demonstrate the many uses of the test shell programming structure.
The Basics of Comparisons
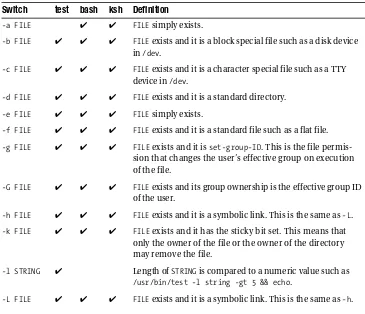
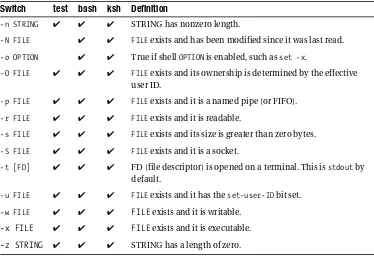
In UNIX shell scripting there are both internal operators that allow you to test attributes or to compare values, and a /usr/bin/test system call. Please refer to Appendix A for more specific information.
The following two comparison examples are among the most common forms:
if [ "$string" = "some_string" ];then... if [ $integer -eq 15 ];then...
The first example represents a string comparison and the second an integer test. The quotation marks are required only for an explicit string. Quotation marks around the name of a string variable are not required. It is wise, however, to always quote your string variables to gracefully handle an undefined variable or white space within the string. A comparison involving an unquoted, undefined string variable in the bash
variable is skipped over in the comparison, and too many because an unquoted string containing white space will be viewed as more than one argument instead of a single string.
The spaces between the values being compared and the square brackets are required syntax, but the spaces between the values being compared and the comparison operator are optional.
Note that the operators for string and numeric comparison are the opposite of what you might expect. To my mind, the equal sign (=) implies a numeric comparison and the
-eq operator suggests a string operation, but this is not the case. The other conditional operators mirror this distinction. The operators =, !=, >, and < used for string comparisons are direct counterparts to the numeric comparison operators -eq, -ne, -gt, and -lt. There are still more operators that can be found in both the test man page and the man pages for specific shells.
The square brackets in the previous examples contain the enclosed expressions to cre-ate a stcre-atement that represents the logical result (true or false) of the test described by the enclosed expressions. To be more accurate, the left square bracket ([) is both a command internal to the shell and a system command (/usr/bin/[) that can be thought of the same as the test command. The [ command has specific syntax that must be followed; for instance, the comparison is completed with a closing right square bracket (]), and this command’s return code determines if the comparison is true. In the following example, the square brackets have been replaced with the test command to illustrate another method of forming a comparison statement. The square brackets can be used inter-changeably with the test command.
if test $string = "some_string" ;then...
All examples so far have used the if/then structure for comparing values. Usually, if the expression given to the test command or enclosed in the square brackets evaluates to true, then we perform some task. The syntax of this example is slightly different. In this code pattern, the test on the left of the && operator is performed as in previous compari-son examples and based on the result (true or false); the code on the right is executed or skipped. Here, if the debug variable is set to 1, the left-hand expression evaluates to true and the echo command will be run. The line of code can also be read as “test the condi-tion AND execute the additional code if the test evaluates as true.”
test $debug -eq 1 && echo some_debug_output
An alternative is available. If the logical AND (&&) is replaced with a logical OR (||), the additional code is executed only if the test returns false. This example can be read as “test
the condition OR execute the additional code (if the test evaluates as false).”
C H A P T E R 4 ■ C O M P A R I S O N S A N D T E S T S 27
Both the logical AND (&&) and logical OR (||) sequences are simply shortcut versions of the more verbose syntax presented here.
test $debug -eq 1 && { echo some_debug_output echo some_more_debug_output }
In both of the previous examples, the additional code following the logical AND or OR to be run was a single command. Compound commands can be formed by surrounding the individual commands with curly braces. Such groupings can contain any amount of code, including output statements, control structures, assignments, or all of the above.
As you’ve seen before, the test command can be replaced with square brackets; the two forms of syntax are equivalent. This segment of code evaluates the expression within the square brackets and runs the compound statement if the expression evalu-ates as true. I have not noticed any significant performance differences between these two syntax types.
[ $debug -eq 1 ] && { echo some_debug_output echo some_more_debug_output }
Conditional logic can become quite complex. The following example demonstrates two test expressions that must each evaluate as true before the additional code will run. In this case, the logical AND (&&) characters are used to perform two separate functions. The first instance of && is used to require both the first and second expressions to be true. The second instance is used to indicate the additional code that should be run if they both evaluate as true. The use of a logical OR (||) in both places is also valid, and specifies that both of the tests would need to be false to execute the additional code.
[ "$txt" ] && [ "$txt" != "$txt2" ] && some_text="$txt $txt2"
The following example adds another layer of complexity to the previous example. Not only are there two expressions to evaluate, but the first expression of the two contains two additional expressions of its own. Note that the two main expressions are surrounded by square brackets and are separated by a logical OR (||). The use of the OR indicates that the entire test evaluates as true whenever either one of the two expressions is true. The -a
operator inside the first expression is also a logical AND. You can string multiple expres-sions together with the -a or the logical OR (-o) operator, as you can with the && and ||
syntax.
When such expressions become very complex, it is easy to make logic mistakes that can be difficult to track down. In the following examples, the complexity has been toned down.
if [ -n $string ];then... if [ $any_variable ];then...
You can use this code to determine whether variables have been defined. The first example of the two applies to string variables, since the -n operation evaluates to true if the length of the supplied string variable is nonzero. However, this method also works for determining whether a numeric variable has been defined, as its value is then treated as a string.
The second example simply tests a variable. Once the variable has been assigned a value, the expression will evaluate to true. Thus, both expressions determine if a variable has been assigned a value.
The following expressions are similar to the previous ones; they determine if a variable is undefined:
if [ -z $string ];then... if [ ! $any_variable ];then...
These conditional statements are simply the negations of the corresponding expres-sions in the previous examples (-z tests whether a string has zero length, and ! is the logical NOT symbol).
The next example uses a couple of features, one of which we have already seen.
if [ "`grep nodename /etc/hosts`" ];then...
The test here evaluates to true if the quoted expression is not null. You saw one exam-ple of this earlier, in connection with quoted string variables. In this case, however, you are not looking at the value of a variable, but rather running an external command, and you’re capturing its output to be tested within the square brackets as if it were a string. An expression enclosed in reverse single quotes (`) is evaluated by the shell and substituted with the resulting output. Here, if the grep command returns a match from /etc/hosts, then there is output and the test evaluates as true because the quoted expression is non-null. If grep returns nothing, the quoted expression would then be null and the test would evaluate as false.
A test can be performed on more than just a variable or a value, such as a number or a string. In the following example, the test examines the return code of a command:
if ping -c 3 node.mydomain.com > /dev/null 2>&1;then
C H A P T E R 4 ■ C O M P A R I S O N S A N D T E S T S 29
output is being redirected to /dev/null. The return code will tell you that. If a system is unresponsive to a ping, the return code will be nonzero. This is a much simpler method than retrieving and analyzing the output of the command.
The last example uses the -l switch to the test system command.
/usr/bin/test -l "hello" -gt 4 && echo some_message
31
■ ■ ■
Accepting Command-Line
Options, Switches, and
Parameters
S
ometimes you may want to pass optional parameters to your script, allowing its behav-ior to be controlled more precisely. For example, the tar archiving utility uses optional parameters. It creates archives and restores directory and file trees, but it can do so in dif-ferent ways. The GNU version of tar has roughly 80 different options that can be used in various combinations to tailor the ways in which the utility performs. The major benefit of this technique is that you can write a single program and have it perform multiple tasks based on the command-line input. Additionally, you’re not duplicating code by writing smaller, more specific scripts tailored to each individual task.You are unlikely to use the code demonstrated here in its current form, as it is designed to demonstrate processing of command-line options within a framework of a specific task for a specific application environment. However, it’s a good basic set of simple utilities that you could give to first-level support staff for basic initial troubleshooting so they don’t have to remember all the paths and commands. That could be especially helpful if that support staff is not very proficient with the command line. To modify the sample code for more general use, you could have the code view the /var/log/messages file with one switch, perform a df -k with another switch, and perform a netstat -a with yet another. This is much like creating a set of command-line aliases to save time by reducing keystrokes for commonly used commands and utilities.
32 C H A P T E R 5 ■ A C C E P T I N G C O M M A N D - L I N E O P T I O N S , S W I T C H E S , A N D P A R A M E T E R S
For instance, a typical tar command might be tar -xvf file.tar. This could also be entered as tar -x -v -f file.tar. Attempting to account for all possible combinations of user-specified options using shell-script code that works with positional variables would be very problematic.
This brings us to the getopts utility, which handles command-line switches much more elegantly. You have to concern yourself only with how the script will function based on the supplied parameters, not how to read the parameters and account for their poten-tial variability.
The following example code does not represent a full script. It is a single function that would get sourced into your environment through a login script such as /etc/profile or through a standard library of functions (see Chapter 2). To use this function, you type its name (jkl) at the command line and pass it various parameters to perform specific tasks. The code was used in an environment where there were