What Readers Are Saying About
Core Data
I was putting off learning Core Data—and then I saw Marcus’s book. Bought it, read it, learned Core Data. It even covers the hard things I really needed to know but weren’t well written elsewhere: things like Spotlight integration, version migration, syncing, and, most important for me, multithreading.
Brent Simmons
Developer, NetNewsWire
If your application deals with data, you need Core Data. If you need Core Data, you need to know Marcus Zarra.
Mike Lee
Engineer, United Lemur
At last we have a book to introduce people to this fantastic devel-oper technology. Starting with a high-level overview and ending with advanced techniques, Marcus expertly guides developers on their journey from Core Data noob to expert.
Steve Scott (Scotty) The Mac Developer Network
This book does a wonderful job of leading you through Core Data’s steep learning curve. Even experienced Core Data developers will learn something new.
Jon Trainer
President, Outer Level
I have been using Core Data since it was introduced, and there were still new techniques that I uncovered in this book.
Luis de la Rosa
Core Data
Apple’s API for Persisting Data on Mac OS X
Marcus S. Zarra
The Pragmatic Bookshelf
Many of the designations used by manufacturers and sellers to distinguish their prod-ucts are claimed as trademarks. Where those designations appear in this book, and The Pragmatic Programmers, LLC was aware of a trademark claim, the designations have been printed in initial capital letters or in all capitals. The Pragmatic Starter Kit, The Pragmatic Programmer, Pragmatic Programming, Pragmatic Bookshelf and the linkingg device are trademarks of The Pragmatic Programmers, LLC.
Every precaution was taken in the preparation of this book. However, the publisher assumes no responsibility for errors or omissions, or for damages that may result from the use of information (including program listings) contained herein.
Our Pragmatic courses, workshops, and other products can help you and your team create better software and have more fun. For more information, as well as the latest Pragmatic titles, please visit us at
http://www.pragprog.com
Copyright © 2009 Marcus S. Zarra.
All rights reserved.
No part of this publication may be reproduced, stored in a retrieval system, or transmit-ted, in any form, or by any means, electronic, mechanical, photocopying, recording, or otherwise, without the prior consent of the publisher.
Printed in the United States of America.
ISBN-10: 1-934356-32-8 ISBN-13: 978-1-934356-32-6
Printed on acid-free paper. P1.0 printing, September 2009
Contents
1 Introduction 8
1.1 What Is Core Data? . . . 9
1.2 In This Book . . . 10
1.3 Acknowledgments. . . 12
2 Getting Started with Core Data 14 2.1 Our Application . . . 14
2.2 Our Application Design . . . 15
2.3 Advanced Readers . . . 16
2.4 Creating Our Xcode Project . . . 16
2.5 Building the Data Model . . . 16
2.6 Building the Controller Layer . . . 22
2.7 Building the User Interface . . . 25
2.8 Adding a Splash of Code . . . 29
3 Core Data and Bindings 34 3.1 Key Value Coding . . . 34
3.2 Key Value Observing . . . 39
3.3 Cocoa Bindings and Core Data . . . 40
3.4 Other Elements That Use KVO, KVC, and Core Data . 44 4 Under the Hood of Core Data 51 4.1 NSManagedObject . . . 52
4.2 NSFetchRequest. . . 59
4.3 NSSortDescriptor . . . 63
4.4 NSManagedObjectContext . . . 64
4.5 NSManagedObjectModel . . . 68
4.6 NSPersistentStoreCoordinator. . . 69
4.7 Fetched Properties . . . 71
CONTENTS 6
5 Versioning and Migration 73
5.1 Some Maintenance Before We Migrate . . . 74
5.2 A Simple Migration . . . 76
5.3 Fundamentals of Core Data Versioning . . . 82
5.4 A More Complex Migration. . . 85
5.5 Automatic Data Migration . . . 88
5.6 Manual Data Migration. . . 90
5.7 Progressive Data Migration . . . 90
5.8 Tips and Tricks . . . 96
6 Performance Tuning 97 6.1 Persistent Store Types . . . 97
6.2 Optimizing Your Data Model. . . 99
6.3 Fetching . . . 104
6.4 Faulting . . . 108
6.5 Access Patterns . . . 112
7 Spotlight, Quick Look, and Core Data 114 7.1 Integrating with Spotlight . . . 116
7.2 Integrating with Quick Look . . . 130
7.3 Putting It All Together . . . 138
7.4 Taking It Further . . . 139
8 Sync Services and Core Data 140 8.1 Sync Services Fundamentals . . . 141
8.2 Updating Our Data Model . . . 143
8.3 Creating the Sync Schema. . . 146
8.4 Creating the Client Description File . . . 149
8.5 Modifying the NSPersistentStoreCoordinator . . . 151
8.6 Creating the Sync Helper . . . 152
8.7 The Syncrospector . . . 158
8.8 Wrapping Up. . . 160
9 Multithreading and Core Data 162 9.1 Why Isn’t Core Data Thread Safe? . . . 162
9.2 Creating Multiple Contexts . . . 163
9.3 Exporting Recipes. . . 165
9.4 Importing Recipes. . . 173
9.5 The Recursive Copy Reviewed . . . 178
CONTENTS 7
10 Core Data and iPhone 184
10.1 Similarities and Differences . . . 184
10.2 Memory Management. . . 190
10.3 Data Change Notifications . . . 192
10.4 Recipes for the iPhone . . . 195
10.5 Going Further . . . 206
11 Recipe: Distributed Core Data 207 11.1 Building the Server . . . 209
11.2 Building the Client . . . 218
11.3 Testing the Networking Code . . . 221
11.4 Wrapping Up. . . 227
12 Recipe: Dynamic Parameters 228 12.1 Building the Xcode Example Project . . . 230
12.2 The DocumentPreferences Object. . . 230
12.3 Review . . . 236
Chapter 1
Introduction
It is hard to believe that I have been working on this book for nine months and that it is now complete. I freely admit that I walked into this project with a lot of trepidation. There was simply no way that I was going to fill an entire book about Core Data! Now looking back on it, I realize how wrong I was. If you look at Core Data in a vacuum, then it can be a fairly small subject, and believe me, that is a good thing. But when we take it as part of the whole ecology of OS X, then it becomes so much more, which makes it possible to write several books on the subject.Back when Core Data was first introduced, I was in the process of designing a desktop application later to become known as Simple Ele-gant Sales. This point-of-sale software was originally written for my wife and her business as a photographer. I wanted her to be able to easily handle the accounting of her business from her laptop as she traveled from location to location. When I originally wrote the software, I had far more experience with Java than with Objective-C, but I knew that if the app was going to be taken seriously as an OS X application, the user interface had to be written in Objective-C and Cocoa. A Java UI simply would not do. However, I decided to write the back side of the applica-tion in Java so that I could take advantage of the powerful databases and relational mapping abilities of Hibernate.
WHATISCOREDATA? 9
Joe Asks. . .
Is This Book for You?
If you plan on writing an application that saves data to disk, then you should be taking a very long look at Core Data. Whether you are focusing on the desktop or the iPhone, Core Data is the most efficient solution to data persistence.
A good way to confirm that you know enough Cocoa to bene-fit from this book is to take a look at Chapter2,Getting Started
with Core Data, on page 14. You should find that chapter
dense, but every step should be familiar to you.
drawing board, scratched the entire project, and started over. It was that much of an improvement over what I was doing.
Since that day, I have been enraptured by Core Data, and I quickly learned everything about it that I possibly could.
1.1
What Is Core Data?
In the simplest terms, Core Data is an object graph that can be per-sisted to disk. But just like describing a man as a “bag of mostly water,” that description hardly does Core Data justice. If you’ve worked with Interface Builder, you know that it effectively removes a third of the cod-ing design known as MVC. With Interface Builder, a developer does not need to spend countless hours writing and rewriting their user inter-face to make sure that it is pixel perfect. Instead, they simply drag and drop the elements in the IDE, bind them together, and call it done.
Of course, the problem with Interface Builder is that we still need to code the other two parts! Both the controller and the model need to be developed in code and made to work with the interface we just designed. That is where Core Data comes in. In a nutshell, Core Data removes another third from that MVC design. Core Data is the model.
INTHISBOOK 10
disk, but it is also all the objects in memory that we normally consider to be data objects. If you have experience working with Java, C#, or some other object-oriented language, the data objects take a lot of time to write, and they are generally very repetitive in nature. Core Data eliminates most, if not all, of that boilerplate code for us and lets us focus on the business logic, or the controller layer, of our application. It does this with an interface that is as easy to use as Interface Builder.
In addition to ease of use, Core Data is also highly flexible. If we need to step in and change the functionality of some portion of the data model, we can. From how a value is handled when it is being accessed to how data is migrated from one persistent store to another, we can choose how little or how much we want to code ourselves and how much we want Core Data to do for us.
The original design and idea of Core Data came from Enterprise Ob-jects, which is part of Web ObOb-jects, another Apple framework. You may be surprised to learn that Enterprise Objects and Web Objects, the ancestors of Core Data, still run a large portion of Apple’s public-facing websites. Both iTunes and http://www.apple.comrun on a Web Objects server. Therefore, although Core Data is a relatively new technology for the OS X desktop, it has a long lineage.
We are also not at the end of the story with Core Data. Although it is a stable and mature framework that is being used by thousands of applications on a daily basis, there are most certainly things coming in the future that will make it even greater. Just comparing its abilities to those of Enterprise Objects, we know that the best is yet to come. If you are starting an application now, you should be using Core Data.
1.2
In This Book
Within this book we’ll build a single application that utilizes Core Data. We’ll use that application as the foundation through our journey with Core Data. Once we have the application started, we’ll cover a few of the technologies that are not strictly speaking part of Core Data, but they nonetheless make Core Data work. We will then start exploring Core Data in depth and how it applies to and works with the other technologies of OS X.
INTHISBOOK 11
them very quickly. The goal of the chapter is to give us a frame upon which to build as we explore the depths of Core Data. By the end of the chapter, we will have a basic Core Data application running that we can then expand upon.
In Chapter3,Core Data and Bindings, on page34, we will explore Key Value Observing (KVO) and Key Value Coding (KVC), which are at the heart of what makes Core Data such a powerful framework. Without an understanding of KVO and KVC, the rest of Core Data will seem like magic. Therefore, we will make sure we have a solid understanding of how these technologies work and how they apply to Core Data.
Next in Chapter 4, Under the Hood of Core Data, on page 51, we will explore the big pieces of Core Data. We will take each component and grasp how it works with our application that we wrote and what it does in the overall Core Data framework. I strongly recommend bookmarking this chapter, because we will be utilizing its components through the rest of the book.
In Chapter 5, Versioning and Migration, on page 73, we will explore how to change our underlying data model once our application has been released to the public. Mistakes happen, and more often than not, improvements to an application cause a need for the data to change. In this chapter we will explore how to handle the changes to data and how to migrate it from one version to another. At the end of this chapter, we will discuss a technique that makes versioning and migration easier and reduces the amount of maintenance we need to perform.
In Chapter6,Performance Tuning, on page97, we take the components we learned from Chapter 4 and explore how to make them run as fast as possible. Although Core Data does a lot of work for us and is very performant, it is still possible to do the wrong thing and slow it down. In this chapter we will discuss some of the common mistakes made and how to avoid them. With that knowledge, we will be better armed going forward to avoid those mistakes so that we don’t have to go back and fix them later.
ACKNOWLEDGMENTS 12
In Chapter8,Sync Services and Core Data, on page140, we’ll discuss ways in which we can sync the data that is in our application across multiple instances. With more and more users having more than one computer, it is ever more important to be able to keep data “in the cloud” and sync it properly across machines. By the end of this chapter, we will be able to add that functionality to our application.
In Chapter9,Multithreading and Core Data, on page162, you’ll see how to maximize the use of the computing power available to us. Modern desktops and laptops have more than one CPU available to use, and if the situation demands it, it is expected that our applications will take advantage of all that processing power in a parallel manner. In this chapter, we explore the safe ways to make a Core Data application multithreaded.
In Chapter10,Core Data and iPhone, on page184, we take a side step to discuss how we can use the power and flexibility of Core Data to make our iPhone development easier. In this chapter we will also be introduced to a new controller object that does not currently exist on the Desktop.
In Chapter 11, Recipe: Distributed Core Data, on page207, we explore one solution for using Core Data across a distributed environment. By combining Core Data, Bonjour, and distributed objects, we can access a Core Data repository from more than one client spread across a local network. Although I would not recommend developing the next great MMORPG with this solution, it certainly has its uses.
In Chapter 12, Recipe: Dynamic Parameters, on page 228, the final chapter, I share one of my secrets that I used in Simply Elegant Sales and have used several times since its original design. In this recipe, we design a document-level properties storage system similar to NSUserDe-faults.
By the end of this book, we will have a superior grasp of all that Core Data can do along with many practical applications of this technology. From here we can take that knowledge to build the next generation of fantastic desktop applications.
1.3
Acknowledgments
ACKNOWLEDGMENTS 13
continued sharing discoveries with other technologies as my enjoyment of the sharing became addictive. A while back I had the pleasure of meeting a fellow developer by the name of Matt Long and helped him become more proficient with Cocoa and its related technologies. During that time, we continued to share what we were learning and teaching in the form of the blog “Cocoa Is My Girlfriend.” All of that led to this book. What started out with a simple altruistic gesture has turned into the text you are about to enjoy. Along the way I have been helped by a number of fantastic developers.
First, I would like to thank Matt Long for convincing me to share what we learned in a broader space than just one on one. I think that dis-cussion has changed both of our lives forever.
Second, I would like to thank Tom Harrington for turning me on to Core Data in the first place. Being pointed at this technology at that particular time had a drastic positive change on my development efforts at the time.
I would also like to thank one man who tends to remain behind the scenes: Brent Simmons. A quote comes to mind when I think of Brent: “Keep away from people who try to belittle your ambitions. Small people always do that, but the really great make you feel that you, too, can become great.” —Mark Twain. Thank you, Brent, for making me feel that I, too, can become great.
Chapter 2
Getting Started with Core Data
Instead of starting off discussing theory or reviewing the concepts be-hind Core Data, we will dive right into writing a Core Data application. The application we build in this chapter will be used throughout the rest of the book to explore the intricacies of Core Data.
You will be learning through doing. We will build a basic application and, in the chapters following, look back through it to understand what the pieces actually do. In this book we are writing a food recipe appli-cation that uses Core Data. The concepts within a recipe appliappli-cation are well known, and we will avoid spending cycles on trying to figure out the concepts of the application while also trying to grok Core Data itself.
2.1
Our Application
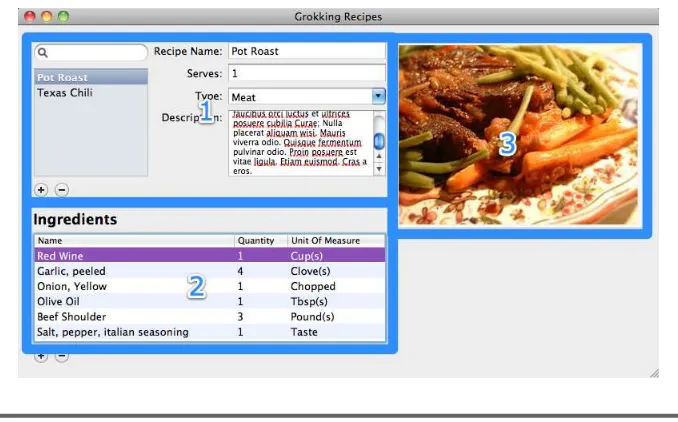
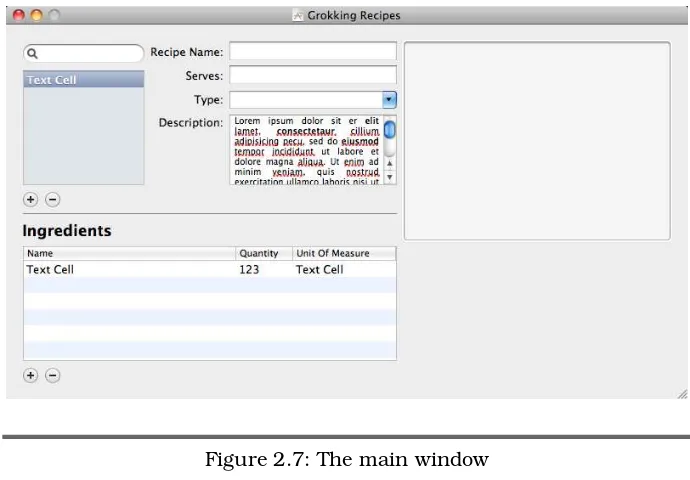
Before we start building our application, we will do a quick overview of how the UI will look and work (see Figure2.1, on the following page).
In section 1, we will allow the user to edit information about individual recipes. Each recipe can be selected in the list and its details edited next to it.
In section 2, we will allow the user to enter the ingredients of the selected recipe. Each recipe will have its own list of ingredients that can be added, viewed, and edited here.
OURAPPLICATIONDESIGN 15
Figure 2.1: Our recipe application
2.2
Our Application Design
In this chapter, we will start at the very beginning. You will be launching Xcode and proceeding through all the steps to create the application and bring it to a usable state. At the end of this chapter, you may be surprised that the steps to create our application are so few. This is part of the allure and strength of Cocoa development. Coupled with Core Data, it is doubly so.
In the first version of our recipe application, we will give our future users the following abilities:
• The ability to add recipes with a description, type, name, image, and number of people it serves
• The ability to add ingredients to those recipes that include a name, quantity, type, and unit of measure
ADVANCEDREADERS 16
2.3
Advanced Readers
If you are already a bit familiar with Core Data and building a Core Data application, please feel free to move quickly through the rest of this chapter. In this chapter, we will walk through the construction of our project and how to build its data model. The end result will be a data model like the one shown in Figure2.4, on page21.
2.4
Creating Our Xcode Project
The first step is to create our Xcode project. With the recent versions of Xcode, quite a few project templates are available to us, and more than one of those is based on Core Data. If you are using Leopard, then you will want to use the Core Data Application template, and if you are using Snow Leopard, then you want to select the Cocoa Application template and ensure that the “Use Core Data for storage” checkbox is selected.
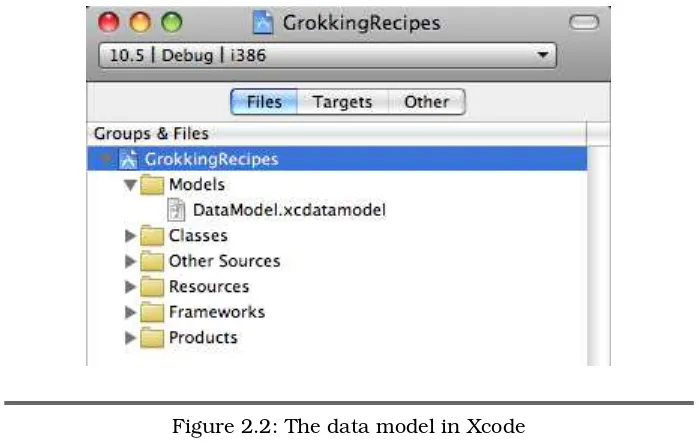
Once we select which template, we will name the project Grokking Recipes, which will also be the name of our application.1In your Groups & Files listing in Xcode, you will see an additional folder namedModels
containing the data model file (see Figure2.2, on the following page).
The basic Core Data template gives us an application that works some-what like Address Book. In Address Book, the user has only one data file and generally accesses that data file via one window. Our recipes application will be designed around that same pattern. We will have exactly one data file that all the user’s recipes will be stored in.
Once the project is created in Xcode, it is time to start building the Core Data aspects of our application.
2.5
Building the Data Model
Core Data applications are like database-driven applications, and in that light, we will start with building the data structures first and then move to the user interface. The three components we are going to be working with at this point are entities, attributes, and relationships.
In our design (see Section2.2,Our Application Design, on the previous page), we already described at least two of the data objects that we
BUILDING THEDATAMODEL 17
Figure 2.2: The data model in Xcode
want to use and at least some of the attributes. Therefore, we will start with them. In our Xcode project, there is a group called Models, and within that group is a file called DataModel.xcdatamodel.2 This file is a representation of the data structure that Core Data will use. This file has a lot of similarities to an entity-relationship diagram (ERD) except that Xcode will compile it directly into our final data file structure.
Adding an Entity to the Model
In Core Data, an entity has a lot of similarities to a table in a normal database design. Although this similarity is not exact, it is a good place to start.
To add our first entity to our data model, first open the .xcdatamodelfile in the Models group, and then choose Design > Data Model > Add Entity from the menu bar (or use the + button in the entry area in the top left). This will add a blank entity to our data model. Next, double-click the name of the entity, and rename it toRecipe.
BUILDING THEDATAMODEL 18
Figure 2.3: Attribute details
Adding an Attribute Property
Just as an entity has a lot of similarities to a table, a property has quite a few similarities to a column in that table. This similarity breaks down very quickly when we start adding relationships, but it helps in the beginning to think of it this way. Properties are further broken down into several subtypes; the two most relevant are attributes and rela-tionships. Relationship properties describe the relationships between two entities, and attribute properties are the values of an entity.
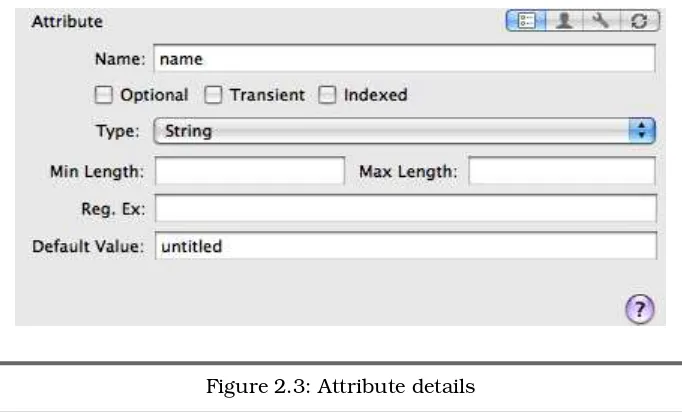
To add our first attribute property to ourRecipeentity, select the entity, and choose Design > Data Model > Add Attribute from the menu bar; you can also use the top + button or the keyboard shortcut. Like the entity creation, this will create a new attribute property within our entity. Double-click the name of this property, and rename it toname. After renaming the attribute, select it to see its details, as shown in Figure2.3.
BUILDING THEDATAMODEL 19
Once the first attribute is finished, add the following attributes to the
Recipeobject:
• SetimagePathto an optionalStringwithout a default value. • Setdescto an optionalStringwithout a default value.
• Setservesto anInteger 16with a minimum value of 1 and a default value of 1. Be sure to flag it as nonoptional.
• Settypeto an optionalStringwith a default value ofMeat.
Creating Our Second Entity
With the Recipeentity nearly complete, it is time to create our second entity. This second entity will store the ingredients that go into a recipe, and we will call itRecipeIngredient. Following the same steps, we can add these attributes:
• Setnameto a nonoptionalString with a default value ofuntitled. • Setquantityto a nonoptionalInteger 16with a minimum value of 0
and a default value of 1.
• Set unitOfMeasure to a nonoptional String with a default value of
untitled.
Adding a Relationship Property
Relationship properties are created in the same way as attribute prop-erties, although the specifics naturally differ. Add a relationship to the
Recipeentity by selecting Design > Data Model > Add Relationship from the menu bar. For this first relationship, name itingredients, and flag it as optional.
Where a relationship is different from an attribute, however, is in the properties. Instead of defining an object type, default values, and so on, we are instead defining a destination entity, an inverse relationship, and whether this relationship is “to-many.” For this relationship, we will start by naming itingredients, and then we set the destination entity toRecipeIngredient, but we are not going to set the inverse relationship yet. We are also going to flag it as to-many, since a recipe can definitely have more than one ingredient.
BUILDING THEDATAMODEL 20
Joe Asks. . .
What Is One-to-Many?
One-to-many is a database term that describes the
relation-ship between two tables in the database. Normally, there are three kinds of relationships: one-to-one, one-to-many, and many-to-many. Aone-to-onerelationship means that for each record in the first table there can be no more than one record in the second table. In a one-to-many relationship, for each record in the first table, there can be more than one record in the second table. The last relationship type,many-to-many, means that for any record in the first table, there can be any number of records in the second table, and, likewise, for each record in the second table, there can be any number of records in the first table.
Completing the Relationship
One rule that is often repeated by the developers of Core Data is that every relationship in your database should have an inverse. Although this may not make logical sense for the data, it is important for data integrity within Core Data. What this means from our programming perspective is that we need to be able to reference each object in the relationship from either side. Apple recommends this inverse relation-ship for many reasons, which will be discussed in greater detail throughout this book.
To set up the inverse relationship, we select the RecipeIngrediententity and add aRelationshipproperty to it just like we did in theRecipeentity earlier. This new Relationship property is named recipe with a destina-tion of the Recipe entity. Next, we set the inverse relationship to be
ingredients, which was the name of the relationship we set in theRecipe
entity. As soon as we set the inverse relationship on the RecipeIngredi-ent, the graphical view of the relationships will change. Instead of two lines connecting the objects, they are replaced with one line, making the graphical view quite useful for debugging relationship settings. In our current design, an ingredient can have only one recipe; therefore, we leave the to-many option unselected. Lastly, we set the Delete Rule setting to Nullify. This setting will not delete the Recipe entity when a
BUILDING THEDATAMODEL 21
Figure 2.4: The managed object model (MOM)
Adding the Last Entity
We have one more entity to add in this release of our recipe applica-tion. We will be categorizing the recipes that are added. For example, we will be separating desserts from appetizers, and so on. To keep these categories consistent, we store the actual category names in their own object. Therefore, add one more entity to our model called Type. This entity has only one attribute property, called name, which is a nonop-tional string with no default value. Lastly, this entity has no relation-ships because it will be used only as a lookup to populate the type
NSComboBox discussed in Section 2.7, Adding the Recipe Details, on page27.
And with that last entity, that concludes the construction of the data model for our application. The final result should look similar to Fig-ure2.4.
Build the Data Objects
BUILDING THECONTROLLERLAYER 22
2.6
Building the Controller Layer
As you know from your experience developing Cocoa apps, Interface Builder is a very large part of any project. Now that we have built our data model and we have a template ready in Xcode, it is time to put together the user interface.
I should mention two things before we get into the fun of Interface Builder:
• This is not going to be Delicious Library. We will be using standard widgets for our application to help keep the non–Core Data code to a minimum.
• There are a lot of features that we could add to this application but we won’t. Those features, although useful, will detract from our focus.
Adding Objects to the xib
The first part of the user interface we will work on is the objects in the xib file. As with most applications, we need to add theAppDelegate
to the xib so that it both will be instantiated on startup and will be properly linked into the application itself.
Add the AppDelegate
Upon opening MainMenu.xib and depending on the whims of the tem-plates within Xcode, theAppDelegatemay already be in the xib file. If it is, great! Move on to the next section. If it is not, then we need to add it.3
To add theAppDelegateto the xib file, follow these steps:
1. Find the NSObject in the library palette, and drag it to the xib’s window.
2. Click the name of theNSObject, and when it is editable, change it toAppDelegate.
3. Go to the Identity tab on the Inspector palette, and change the class of the object fromNSObject toAppDelegate.
4. Right-drag from the application to the AppDelegate object, and select Delegate.
BUILDING THECONTROLLERLAYER 23
Figure 2.5: The main menu xib
When this is completed, theAppDelegateclass will be instantiated when our application launches, and the application will send all delegate messages to it.
Adding the NSArrayController Objects
Our application is going to display all of our recipes in a single win-dow. To do that, we need to be able to reference the data so that it can be displayed. Therefore, add threeNSArrayControllerobjects into our xib that reference that data. Our window will then reference those NS-ArrayController objects. Once theNSArrayController objects are added and configured, the xib will look like Figure2.5.
To add anNSArrayControllerfor the recipe entities, follow these steps:
1. Find the NSArrayController object in the library, and drag it to the xib file.
2. Click the name of the NSArrayController, and when it is editable, rename it toRecipes. If you have trouble getting the element to go into edit mode, you can change the name in the Identity inspector in Interface Builder and change the identity Name field.
3. On the Attributes tab of the inspector, change the mode from Class to Entity, and change the entity name to Recipe.
BUILDING THECONTROLLERLAYER 24
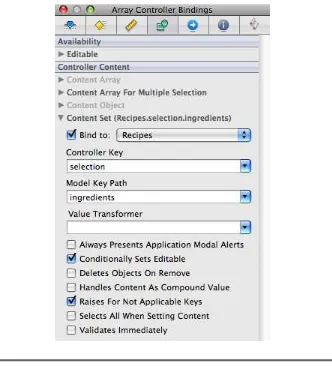
Figure 2.6:NSArrayControllercontent set properties
5. On the Bindings tab of the inspector, bindManagedObjectContext
to the AppDelegate with a model key path of managedObjectCon-text.
BUILDING THEUSERINTERFACE 25
Figure 2.7: The main window
Set the identity of the last NSArrayController, the recipe ingredients’ NS-ArrayController, to RecipeIngredient. In the Attributes inspector, choose Entity, and set the entity name to RecipeIngredient. Set the bindings as before with one additional change. On the Bindings tab of the inspec-tor, enable the content set in the controller content and point it at the recipe’s NSArrayController with a controller key of selection and a model key path ofingredients. See Figure2.6, on the preceding page.
Now we are ready to build theNSWindowitself.
2.7
Building the User Interface
Now that we have all the data objects referenced properly, it is time to build the user interface. Although this interface certainly will not be winning any ADAs4 any time soon, it will allow us to view and edit all the data objects in our model. The window we are building will look like Figure2.7, and we will quickly walk through the steps to set it up with a more detailed review of what we are doing in Chapter 3, Core Data and Bindings, on page34.
BUILDING THEUSERINTERFACE 26
Building the Recipe Source List
The first part of this interface that we are building is in the upper-left corner just below the search field. This view is anNSTableViewthat is configured with one column, no horizontal scroll bar, an automati-cally displaying vertical scroll bar, and the highlight set to Source List. The scroll bars are configured in the inspector for the NSScrollView. The number of columns and the highlight option are configured in the NSTableView inspector. Each of these inspectors can be accessed by Control+Shift-clicking (or Shift+right-clicking) the NSTableView and selecting the appropriate view from the list. If the inspector is not on the screen, it can be displayed from the Tools > Inspector menu item.
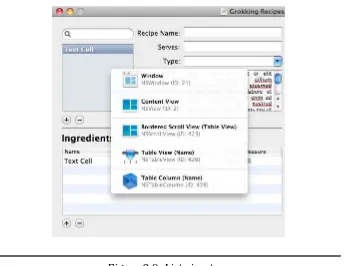
To bind this table to our recipe’s NSArrayController object, though, we need to dig down a little bit and get ahold of theNSTableColumnso that we can tell that column what to display. We could click in the table view until eventually, ideally, we would get the NSTableColumnselected, but fortunately there is an easier way. If we Shift+right-click the table, we will be presented with a pop-up listing all of the views, hereby making it easy for us to select the NSTableColumn (see Figure2.8, on the next page). With the NSTableColumnselected, we can now open its Bindings tab in the inspector and bind its value to the RecipesNSArrayController
with a controller key ofarrangedObjectsand a model key path ofname. Once this is set, ourRecipeentities will now show up in this table. More important, when we click a recipe in this list, that recipe will become the selection that feeds the rest of the UI.
Next we need to add the buttons that will control the creation and removal of Recipe entities. To do this, we drag an NSButton (it does not matter which one) from the Library and place it below theRecipetable view. Then in the button’s Attributes tab, we want to set its image to
NSAddTemplate(a system-level image available for our use), change its style toRound Rect, and remove its title if it has one. Once that is done, we need to select the menu item Layout > Size to Fit to get the button to the perfect size. Once that is done for the add button, select Edit > Duplicate from the main menu to create a second button and change the second button’s image toNSRemoveTemplate.
BUILDING THEUSERINTERFACE 27
Figure 2.8: List view tree
clicking the button, and dragging from the selector sent action to the
NSArrayController. With those small changes, we can now add and remove recipe entities at will.
Adding the Recipe Details
With the source list in place, it is time to add the details about the recipe. These details, specifically thename,serves,description, andtype, will tie to the now-valid selection controller key on the recipe’s NSArray-Controller. That way, when a user clicks in the list, the relevant details of that recipe will be selected.
BUILDING THEUSERINTERFACE 28
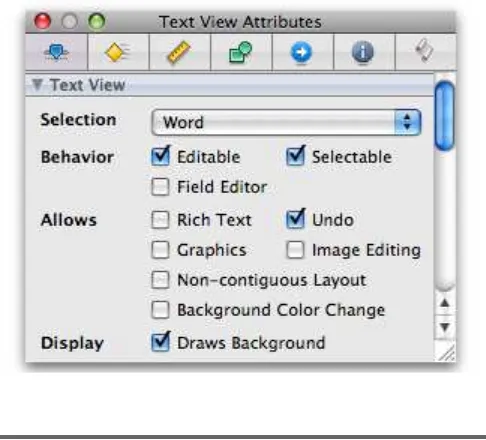
Figure 2.9: Remember to turn off the Rich Text setting.
confusing (see Figure2.9). In addition, to be proper citizens, we should drag over anNSNumberFormatter to the Serves text field and configure it to allow only whole numbers.
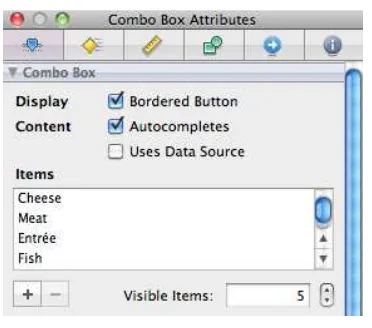
The combo box is a little more complex. Although it is also associated with the selected recipe, we need to populate the entire list with values. For now, we will enter the possible values for this box manually into Interface Builder, as shown in Figure2.10, on the following page. Next we need to bind its current value to the selected recipe. We do this by binding the NSComboBox value to the currently selected recipe’s type value. On the Bindings tab for theNSComboBox, we open the Value sec-tion, bind it to the recipeNSArrayController, and set the controller key to
selection and model key path totype. Later, in Section4.4, NSManage-dObjectContext, on page 64, we will show how to prepopulate this list directly into the Core Data persistent store.
Adding the Ingredients
ADDING ASPLASH OFCODE 29
Figure 2.10: Manual data entry for the combo box
recipe source list. However, unlike the recipe source list, our NSTable-Viewwill have three columns, display its headers and its vertical scroll bar, but hide the horizontal scroll bar. Enter the column headings as Name, Quantity, and Unit of Measure.
Like the recipe source list, bind the values for each column in the NS-TableViewto our recipe ingredients’NSArrayControllerusing the controller keyarrangedObjectsand using the appropriate model key paths:name,
quantity, and unitOfMeasure. The quantity column (or more specifically the table cell in the quantity column) should also have an NSNumberFor-matter assigned to it so that the quantity is properly formatted for the value that it holds. Once those are configured, we can see the recipe ingredients for the selected recipe. Remember that we configured the recipe ingredients’NSArrayControllerto feed off the selected recipe, so we do not have to do anything extra at this point.
Like the recipe source list, the add and subtract buttons are config-ured by binding them to the recipe ingredients’NSArrayControllerobjects
-add: and -remove: methods, respectively. And with that, we have the ingredients section complete and are nearly done with our UI.
2.8
Adding a Splash of Code
ADDING ASPLASH OFCODE 30
our part and start inputting recipes. With the combination of Cocoa and Core Data, we can produce an application like this with no custom code on our part. However, we are not stopping there.
Displaying a Picture of the Recipe
What recipe application would be complete without a picture? The users of our application need to know what the dish is going to (or at leastshould) look like when they are done. Fortunately, from the UI point of view, this is an easy addition. Drag anNSImageView(referred to as an image well in Interface Builder 3.1) onto our window, and con-nect its value path to theimagePathof the recipe’sNSArrayControllerwith a controller key ofselection.
Importing Images
Once we have theNSImageViewadded to our user interface, we need to make ourAppDelegateaware of it. In addition, we need to add a way to
set the image path of ourRecipeentities. Therefore, we need to update our AppDelegate.h and add an IBOutlet for the recipe NSArrayController
and anIBActionto be able to set the image path, as shown here:
DownloadGrokkingRecipes_v1/AppDelegate.h
@interface AppDelegate : NSObject {
IBOutlet NSWindow *window;
IBOutlet NSArrayController *recipeArrayController; NSPersistentStoreCoordinator *persistentStoreCoordinator; NSManagedObjectModel *managedObjectModel;
NSManagedObjectContext *managedObjectContext; }
- (NSPersistentStoreCoordinator *)persistentStoreCoordinator; - (NSManagedObjectModel *)managedObjectModel;
- (NSManagedObjectContext *)managedObjectContext; - (IBAction)saveAction:(id)sender;
- (IBAction)addImage:(id)sender;
@end
ADDING ASPLASH OFCODE 31
Figure 2.11: Add Recipe Image menu item
Once the recipe’s NSArrayController has been added to the AppDelegate
header, we need to go back to Interface Builder briefly and Control+drag from the AppDelegate to the recipe’s NSArrayController to complete the binding.
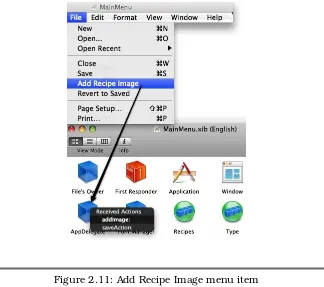
While we are here, we need to add a menu item to the File menu. We do this by making sure theMainMenuelement is open in Interface Builder (it will appear as a floating menu) and clicking its File menu. From there we can either add a new NSMenuItem or use one that already exists that is not being used. Since the Save As menu item is not rele-vant to our application, go ahead and rename it to Add Recipe Image. Once it is renamed, Control+drag from it to theAppDelegate, and bind the menu item to the IBAction we defined in the header, as shown in Figure 2.11. With the bindings in place, it is time to implement the
ADDING ASPLASH OFCODE 32
DownloadGrokkingRecipes_v1/AppDelegate.m
- (IBAction)addImage:(id)sender {
id recipe = [[recipeArrayController selectedObjects] lastObject];
if (!recipe) return;
NSOpenPanel *openPanel = [NSOpenPanel openPanel]; [openPanel setCanChooseDirectories:NO];
[openPanel setCanCreateDirectories:NO]; [openPanel setAllowsMultipleSelection:NO];
SEL select = @selector(addImageSheetDidEnd:returnCode:contextInfo:); [openPanel beginSheetForDirectory:nil
file:nil modalForWindow:window
modalDelegate:self
didEndSelector:select contextInfo:recipe]; }
The implementation of -addImage: will display an NSOpenPanel, which will attach to the window as a sheet, making it modal to the window. Next, we tweak theNSOpenPanela little bit so that it cannot select direc-tories or multiple files or create direcdirec-tories. You will also notice that we first check to make sure a recipe has been selected before we open the panel. A little bit of error checking can go a long way.
Since sheets work asynchronously, we need to hand it a callback to another method in the AppDelegate. Also, while we are engaging the sheet, we will pass along the current recipe reference. When the sheet calls back, we are guaranteed to still be talking about the same recipe we started with.
DownloadGrokkingRecipes_v1/AppDelegate.m
- (void)addImageSheetDidEnd:(NSOpenPanel*)openPanel
returnCode:(NSInteger)returnCode contextInfo:(NSManagedObject*)recipe {
if (returnCode == NSCancelButton) return; NSString *path = [openPanel filename];
//Build the path we want the file to be at
NSString *destPath = [self applicationSupportFolder];
NSString *guid = [[NSProcessInfo processInfo] globallyUniqueString]; destPath = [destPath stringByAppendingPathComponent:guid];
ADDING ASPLASH OFCODE 33
[[NSFileManager defaultManager] copyItemAtPath:path toPath:destPath
error:&error];
if (error) {
[NSApp presentError:error]; }
[recipe setValue:destPath forKey:@"imagePath"]; }
In -addImageSheetDidEnd:returnCode:contextInfo:, we grab the filename from the NSOpenPanel and stick it into the correct recipe. As part of this callback, we get passed the recipe so we will get the filename and set it into the recipe. However, there is a risk there. What happens if the user moves the image? Perhaps it was a temporary image? To ensure that we always have the image available, we will copy it to a known location within our control and then usethat file path. To accomplish this, we grab the filename from the NSOpenPaneland also construct a unique path within ourApplication Support directory structure. Next we use theNSFileManagerto copy the image to that location. Last we set the new file path into ourRecipeobject.
Chapter 3
Core Data and Bindings
Cocoa Bindings provides a lot of the magic behind Core Data. Cocoa Bindings consists of a number of APIs and concepts that together allow us to develop our applications using the Model View Controller para-digm without requiring a tight coupling of the three aspects.
Cocoa Bindings allows us to design views, controllers, and models that all expect data in a specific format without requiring that we bind them to specific classes. This means we can use views in multiple places and swap out controllers and even models without extensive (if any) recoding.
In this chapter, we’ll look at some of the key components of Cocoa Bind-ings and then delve into the specifics of how Core Data works with those bindings. The two primary APIs that we are looking into are Key Value Coding and Key Value Observing. Between these two APIs, we are given a tremendous amount of flexibility in our design. In addition, these APIs are part of the foundation that allows Interface Builder to function and allows us to focus on the business logic of our applications. Lastly, these APIs are used heavily by Core Data to allow us to focus on the business logic of our applications as opposed to the data layer.
3.1
Key Value Coding
KEYVALUECODING 35
-valueForKey:
The method -valueForKey: is a generic accessor to retrieve an attribute on an object. For example, if we had an object calledRecipeand it had an attribute called name, normally we would access that attribute via the following:
Recipe *myRecipe = ...
NSString *recipeName = [myRecipe name];
However, this requires specific knowledge about the Recipe object to exist in the calling method and generally requires that we import the header file of theRecipeobject. However, with Key Value Coding, we can obtain this same attribute without having any preexisting knowledge about theRecipeobject:
id myRecipe = ...
NSString *recipeName = [myRecipe valueForKey:@"name"];
By itself, this is not all that useful. However, there are huge benefits to it that are not apparent on the surface. Here’s an example that shows how you might better take advantage of this:
- (NSString*)description {
NSMutableString *string = [NSMutableString stringWithFormat:@"[%@] {", [self class]];
NSEntityDescription *desc = [self entity];
for (NSString *name in [desc attributeKeys]) {
[string appendFormat:@"\n\t%@ = '%@'", name, [self valueForKey:name]]; }
[string appendString:@"\n}"];
return string; }
In this example, I am utilizing the NSEntityDescription1 class to retrieve the names all of the attributes of an NSManagedObject subclass and generating an NSString for display in the logs. With this method, I can reuse it in every NSManagedObject subclass that I create rather than having to create a custom-descriptionmethod for each subclass.
There are a couple of things to note in this example. First, the tar-get object is not required to have accessor methods for the attribute being queried. If our target object has only an ivar2 for a name, it will still be resolved and retrieved properly. In addition, if the target object
1. We will discuss theNSEntityDescriptionclass in greater detail in Chapter4,Under the Hood of Core Data, on page51
KEYVALUECODING 36
has neither an accessor nor an ivar, the target object will still have a chance to respond to the request before an error occurs via the
-valueForUndefinedKey: method. Lastly, all the properties of an NSMan-agedObjectare queryable via the KVC protocol. What this means is that if we have an NSManagedObject defined in our model, we can retrieve an instance of that object and access its properties without having to implement asingle line of codein the target object!
-setValue:forKey:
Being able to dynamically access properties on an object is quite useful, but that is only half of what KVC does. The other half is the ability to dynamically set attributes on an object in much the same manner that we can retrieve them. Normally, we would change the name attribute on anRecipeobject by calling the setter method:
Recipe *myRecipe = ...
[myRecipe setName:@"Yummy Cookies"];
Like the earlier getter accessor, this requires preexisting knowledge of theRecipeobject to be able to use that accessor without compiler warn-ings. However, with KVC, we can access it in a more dynamic manner:
id myRecipe = ...
[myRecipe setValue:@"Yummy Cookies" forKey:@"name"];
This call will attempt to use the setter-setName:if it is available; if it is not, then it will look for and use the attribute directly if it is available, and failing that, it will call-setValue:forUndefinedKey:on the target object. The combination of the dynamic getter coupled with the dynamic setter allows us to manipulate objects without having to write accessors and without having to know (or care!) if they exist. This is used to great effect in one of the Core Data recipes to create a preferences singleton object that reads its values from a properties table. See Chapter 12,
Recipe: Dynamic Parameters, on page 228.
@property
KEYVALUECODING 37
and name as a defined ivar. This will tell the compiler that getter and setter accessors exist or will exist for that ivar. In a 64-bit application, the ivar itself is not required because the property definition handles that for us as well. For example, if we had an object with the following header:
@interface MyObject : NSObject {
NSString *myString; }
@property (retain) NSString *myString; @end
Xcode would interpret it the same as the following header:
@interface MyObject : NSObject {
NSString *myString; }
- (NSString*)myString;
- (void)setMyString:(NSString*)string; @end
In combination with the @property keyword, we have the @synthesize
and @dynamic keywords for use in our implementation files. @synthe-size will generate the actual accessors that the @property alludes to in the header. Therefore, in our example MyObject.mfile, we can declare the following:
#import "MyObject.h"
@implementation MyObject @synthesize myString;
@end
and have the same effective code as this:
#import "MyObject.h"
@implementation MyObject - (NSString*)myString; {
KEYVALUECODING 38
- (void)setMyString:(NSString*)string;
{
@synchronized(self) {
if ([string isEqualToString:myString]) return; [myString release];
myString = [string retain]; }
}
@end
Theretainin the setter is added by the compiler because we specified it in the property. If we had set it toassigninstead, then no retain would have occurred. Likewise, the locking of the ivar is a default option that we could have turned off by adding thenonatomicoption to the property definition.
When dealing with multiple properties on an object, this can be a great time-saver. There have also been indications that the accessors gener-ated by the compiler are faster than the “normal” accessors that devel-opers write. In addition to generating accessors, the@synthesizekeyword is smart about what it implements. If we need to implement our own setter for a property, then it will not overwrite that setter.
Alongside the@synthesizeproperty, we have the@dynamicproperty. Un-like @synthesize, which generates the accessors for us, @dynamic tells the compiler that while the accessors for the property are not there at compile time, they will be there at run time and to not produce a warn-ing for them. @synthesize and@dynamicare sibling keywords. For each property, we can use one or the other but not both.3 If the accessor methods will be implemented at runtime, we would use the @dynamic
property instead of the @synthesize property so that the compiler does not produce a warning. This is particularly useful for Core Data sub-classes, which we will discuss in Chapter 4, Under the Hood of Core Data, on page51.
It should be noted that it is possible to have a@propertydefinition that does not match the name of the ivar. For example, it is fairly common to have ivars that start with an underscore, but the accessors do not include the underscore. The @property can handle this as well as part of the@synthesizeand@dynamiccalls.
KEYVALUEOBSERVING 39
@interface MyObject : NSObject {
NSString *_myString; }
@property (retain) NSString *myString; @end
@implementation MyObject
@synthesize myString = _myString;
@end
3.2
Key Value Observing
Key Value Observing (KVO) is the sister API to KVC. KVO allows us to request notifications when an attribute has changed. By observ-ing attributes on an object, we can react when those attributes are changed. KVO is also implemented via an informal protocol on the
NSObject, and you register and remove observers using -addObserver:for-KeyPath:options:context: and -removeObserver:forKeyPath:. Although, like KVC, there are other methods involved in the protocol, these are the primary two used.
If we wanted to observe the name value on a recipe, we would add ourselves (or another object) as an observer for that value like this:
static NSString *kPragProgObserver = @"PragProgObserver" id myRecipe = ...
[myRecipe addObserver:self
forKeyPath:@"name"
options:(NSKeyValueObservingOptionNew|NSKeyValueObservingOptionOld) context:kPragProgObserver];
What this snippet of code is doing is adding self as an observer to the myRecipe object and asking that when the name value changes to please notify self of that change and include both the old value and the new value in that notification. We pass along a context so that we can ensure we are acting on observations meant only for us and that they are not accidentally intercepted. After this code has been called, any time the name property is changed on that instance ofRecipe, the
COCOABINDINGS ANDCOREDATA 40
We can then handle that change notification as appropriate:
- (void)observeValueForKeyPath:(NSString*)keyPath
ofObject:(id)object
change:(NSDictionary*)change context:(void*)context
{
if (context != kPragProgObserver) { [super observeValueForKeyPath:keyPath
ofObject:object change:change context:context];
return; }
NSLog(@"Attribute %@ changed from %@ to %@", keyPath, [change valueForKey:NSKeyValueChangeOldKey],
[change valueForKey:NSKeyValueChangeNewKey]); }
When the variable is changed, we will see output similar to the follow-ing:
Attribute name changed from untitled to Beef Chili
When we are done observing a value, we can stop receiving messages by passing-removeObserver:forKeyPath:to the observed object:
id myRecipe = ...
[myRecipe removeObserver:self
forKeyPath:@"name"];
KVO is what allows views to automatically refresh themselves from the model when the data has changed. When a view is initialized, it uses KVO to connect all its components to the underlying objects and uses the notifications to refresh itself.
3.3
Cocoa Bindings and Core Data
The combination of KVO/KVC (collectively referred to as Cocoa Bind-ings) and Core Data reduces the amount of code that we are required to write by a considerable amount. In the previous chapter, we wrote almost no code to create and display our recipe objects. Nearly all the work that we did was in Interface Builder. In this section, we will dis-cuss each of those interface objects that we used and how they worked with Core Data.
How does this apply to our application? Let’s review the user interface that we built in Chapter 2,Getting Started with Core Data, on page14
COCOABINDINGS ANDCOREDATA 41
Figure 3.1: Select eachNSTableColumnindividually.
NSTableView
In our recipe application, we make heavy use of theNSTableView. In the main window of our application, we have two table views, one to list all of the recipes and another to list the ingredients for those recipes. Whenever an application needs to display a list of items or a grid of data, theNSTableViewis the element to use.
NSTableView, likeNSOutlineView (as discussed in Section3.4, NSOutline-View, on page46), plays very nicely with Core Data. This is especially true when theNSTableViewis backed by anNSArrayControllerthat is feed-ing the data. However, it is possible to use NSTableView with a cus-tom data source if that is appropriate for the problem at hand. How-ever, when bound with anNSArrayController, then theNSTableViewcan be manipulated with other objects such as theNSSearchViewdiscussed in a moment to produce interfaces that integrate smoothly and give a great user experience.
In an NSTableView, like the NSOutlineView, we do not actually bind the table itself to theNSArrayController. Instead, we select each column indi-vidually and bind it to a property of the objects in theNSArrayController
COCOABINDINGS ANDCOREDATA 42
Figure 3.2: Bind the table column to the Core Data property.
With this configuration, the NSTableView will display the data from the
NSArrayController automatically and, thanks to KVO, will stay in sync with the data stored in the persistence layer.
NSArrayController
COCOABINDINGS ANDCOREDATA 43
objects, updating those objects, and creating new ones—is all handled for us.
NSArrayController also understands relationships between objects when it is working with Core Data. In our recipe application, we have one
NSArrayController configured to manage RecipeIngredient objects. Based on our data model, these are child objects that are bound to a specific recipe. Because NSArrayController understands these relationships, we can configure it to pull and display only those RecipeIngredientobjects that are connected to aRecipeobject that is selected in another NSArray-Controller. This again is made possible by KVC and KVO. When we con-figure theRecipeIngredient’sNSArrayControllerto provide only those ingre-dients that are related to the specific recipe, what it is doing behind the scenes is accessing the Recipeobject and requesting its ingredients
property via KVC. In theRecipeIngredient’sNSArrayController, we bind the
NSManagedObjectContextso that new ingredients can be added. In addi-tion to properly being able to create (and remove) objects from the per-sistence layer, the NSArrayController will also manage the relationship between the newly created or removed RecipeIngredientand the parent
Recipeobject.
All of this works because Core Data is the entire persistence layer and is accessed in a consistent way no matter what object is being dealt with. Because Core Data uses KVO and KVC, our controller objects do not need to know very much about the objects, other than the name of the objects and where they are stored. The rest is all resolved at runtime based on the settings that we provide in Interface Builder. In our recipe application, we have one NSArrayController that is bound to the Recipe
entity in Core Data. Because we also bound that NSArrayController to ourNSManagedObjectContext, it is able to retrieve thoseRecipe entities automatically and make them available to the rest of the user interface. When our interface is loaded, those NSArrayController objects go out to that NSManagedObjectContext and ask for the entities that currently exist. Once they are loaded into the NSArrayController objects, any view element associated with them will be notified, via KVO, that the data is available for display. All of this happens behind the scenes without requiring us to write code for any of this.
NSFormatter
OTHERELEMENTSTHATUSEKVO, KVC,ANDCOREDATA 44
to the text field or table column and define its display. Likewise, when working with dates, use an NSDateFormatter on the field or column to ensure that the data will be formatted and validated correctly before it is stored in the Core Data repository. When working with Core Data, it is sometimes necessary to manipulate the display of the data both so that the user’s input can be validated and so that it can be displayed in a usable form. For instance, it is not a very good user experience to display currency as 3.99 rather than $3.99 or to display a date in raw seconds.
In our application, we used an NSNumberFormatter to display the quan-tity in the ingredients column of our secondNSTableView. If we were to add a shopping list to our application, we would also use NSNumberFor-matter objects to display currency and NSDateFormatterobjects to show date and time information.
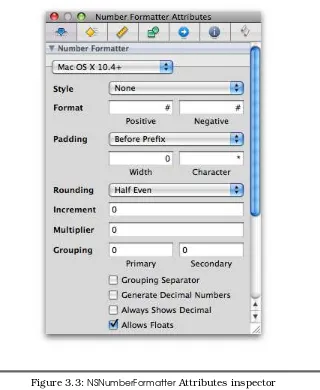
To add anNSFormatter to a field (either a column or a text field), select it in the library palette, and drag it onto the interface element. Once it is in place, you can configure its details in the Attributes inspector, as shown in Figure3.3, on the next page. The Attributes inspector will allow you to configure exactly how the data is presented to the user.
In addition to properly displaying number and date data, the NSFormat-ter classes will also accept input from the user and send it back to the model in the correct format. For example, by applying NSNumberFormat-ter to the quantity column of the ingredients table, we are guaranteed to receive anNSNumberback from the user interface.
Once an NSFormatter has been applied to an object, it can be a little tricky to reference it again to make changes. To be able to change or remove anNSFormatteronce it has been applied, you can select the user interface element, and a small double bracket icon will appear below it. Selecting that icon will reference theNSFormatteragain so that it can be manipulated. See Figure3.4, on page46.
3.4
Other Interface Elements That Use KVO, KVC, and Core Data
OTHERELEMENTSTHATUSEKVO, KVC,ANDCOREDATA 45
OTHERELEMENTSTHATUSEKVO, KVC,ANDCOREDATA 46
Figure 3.4: Accessing an existingNSFormatteron an element
NSObjectController
NSObjectController shares a lot of similarities with the NSArrayController
discussed earlier. However, unlike the NSArrayController, the NSObject-Controlleris designed to represent one instance rather than an array of instances. One common usage of theNSObjectControlleris to represent the selected object of anNSArrayController, thereby making it clearer as to what data is being displayed in the interface elements that are bound to the NSObjectControlleras opposed to an NSArrayController. Another com-mon usage is to have an entire interface, such as a detail sheet or child window, be bound to the values within an NSObjectControllerand then have the File’s Owner reference and populate thatNSObjectController. In this design, the File’s Owner (usually a subclass of NSWindowController) simply has to populate theNSObjectControllerwith a call to -setContent:, and the entire UI will get populated automatically. This again makes the maintenance of the code very easy and also improves readability.
NSOutlineView
If we wanted to change the look of our application, we could display a singleNSOutlineViewinstead of the two table views we have currently. With anNSOutlineView, we could display a list of recipes with a hierarchy of ingredients listed under them, as depicted in Figure3.5, on the next page.
NSOutlineView shares a lot in common with the NSTableView object. In fact, it is a subclass of NSTableView. The major difference is that the
hier-OTHERELEMENTSTHATUSEKVO, KVC,ANDCOREDATA 47
Figure 3.5: Outline view of recipes
archal format. This changes how the data needs to be represented and accessed. Instead of a flat array of objects, theNSOutlineViewexpects the data to be in a tree structure. Fortunately, there is a controller designed just for that use: NSTreeController. Some care needs to be taken when working with Core Data and anNSOutlineView. In general, the NSOutline-Viewand theNSTreeControllerexpect the data to be in a fairly organized state. NSTreeControllerexpects each parent (or branch) to have children accessible via the same methods. This is a bit counterintuitive to hav-ing descriptive names for relationships between objects, and I normally implement accessors instead of making my relationships generic. For instance, if we had a recipe that has children namedRecipeIngredients, I would add another accessor to that relationship calledchildren, purely for theNSOutlineView to use. We will discuss custom NSManagedObject
classes in the next chapter.
Unlike its parent object, NSTableView, the NSOutlineView does not work as cleanly as you might expect. You can combine it with the NSTreeCon-troller, but you get a lot more functionality and control by implement-ing the data source protocol for the NSOutlineView instead of using the
OTHERELEMENTSTHATUSEKVO, KVC,ANDCOREDATA 48
situation will change in the future. However, for now, the data source protocol is the better option when working with theNSOutlineViewobject.
NSTreeController
As discussed in Section 3.4, NSOutlineView, on page 46, NSTreeCon-trollerobjects are primarily used by theNSOutlineViewinterface element. Although they can store any data that lends itself to a tree structure, they are best suited as a controller forNSOutlineView objects. Unfortu-nately, there is still quite a bit of work to be done with the NSTreeCon-troller, and the results we get from working with it can be unexpected and unclear. Therefore, I recommend skipping it at this time and imple-menting the data source protocol instead when working with tree data.
NSSearchField
The NSSearchField interface element is an extremely useful tool to pro-vide that extra little bit of polish to an interface. Its primary purpose is to filter the objects in an NSArrayController. This does not seem like much until we remember that, thanks to KVO, any tables or interface elements associated with that NSArrayController will get updated auto-matically and instantly. This means if we put a search field into our application and link it to our NSArrayController of Recipe objects, our source list of recipes will automatically be filtered based on the user input into that NSSearchField. Even better, we don’t have to write any code to accomplish this! All that we need to do to implement it is con-figure the bindings for theNSSearchField.
To accomplish this, first we need to add an NSSearchField to our appli-cation. In Figure3.6, on the next page, we have decreased the vertical size of theRecipesource list and inserted anNSSearchFieldabove it. Next we need to configure its bindings.
As shown in Figure 3.7, on page 50, the NSSearchField interface ele-ment works with anNSPredicate. We write the predicate in the Predicate Format field substituting $value for whatever the user inputs into the search field and using the controller key, model key path, and value transformer to bind it to our data. In this example, we want to filter on the name of recipes; therefore, we bind thisNSSearchFieldto our recipe’s
NSArrayController using the controller key of filterPredicate and a model key path ofname.
OTHERELEMENTSTHATUSEKVO, KVC,ANDCOREDATA 49
Figure 3.6: Adding anNSSearchFieldto our application
for more than one type of search. Each search will be shown in the drop-down on the NSSearchField, and the Display Name binding will be shown to the user. This allows us to create one NSSearchFieldthat can search for recipe names, ingredients, descriptions, or anything else we may need.
Once the binding is complete, we are done adding a basic search field. Running the application will show that text entered into the search field impacts the list of recipes, as shown in Figure3.8, on the next page.
OTHERELEMENTSTHATUSEKVO, KVC,ANDCOREDATA 50
Figure 3.7:NSSearchFieldbindings
Chapter 4
Under the Hood of Core Data
The more we understand the details of Core Data, the better equipped we are to understand when something goes wrong or how to accomplish a task that is off the beaten path.In my experience of working with and writing persistence layers for var-ious languages, I am constantly amazed at how simple and elegant the Core Data API is. There is very little overlap in functionality between the individual pieces of Core Data—no wasted space or unnecessary redun-dancy. Because Core Data is built upon the infrastructure of Objective-C and Objective-Core Foundation, it does not seek to duplicate functionality that already exists in other parts of the overall API but instead uses it to its full extent.
In this chapter, we will walk through the various pieces that make up Core Data and explore how they apply to the ways that we use Core Data and how they apply to the application we are developing in this book. By the end of this chapter, we will have a firmer grasp of what Core Data is, what we can do with it, and how to use it to its full capabilities.
NSMANAGEDOBJECT 52
Joe Asks. . .
What Is a Stack?
The termstack has a few different meanings depending on its context. In this context, it refers to a multilayered structure that passes data around in a vertical manner. Vertical here means coming in through the top layer and reaching down to the last, or bottom, layer. Data is never passed directly to the bottom layer or any of the middle layers; it always accessed from the top.
4.1
NSManagedObject
NSManagedObject is the object we work with the most in a Core Data application. Each instance ofNSManagedObjectrepresents one entity in our Core Data repository. By combining Core Data with KVC and KVO, this one object can dynamically represent any object that we need and that can be defined in our data model.
All of the properties and relationships defined in our data model are available and are easy to access directly from the NSManagedObject. Without subclassing it, we can access values associated with an NSMan-agedObjectin the following ways.
Accessing Attributes
Attributes are the easiest to access. By utilizing KVC, we can get or set any attribute on theNSManagedObject directly. You may have noticed that we did not write a Recipe entity in the previous chapter. At this point in our application,NSManagedObjectprovides all the functionality that we require. For example, we could get the name as follows:
NSManagedObject *recipe = ...;
NSString *name = [recipe valueForKey:@"name"];
Likewise, we can set the name in a similar fashion:
NSManagedObject *recipe = ...;
[recipe setValue:@"New Name" forKey:@"name"];
NSMANAGEDOBJECT 53
that we can access them directly. In the header of our subclass, we would define the properties normally:
DownloadSpotlight/PPRecipe.h
@interface PPRecipe : NSManagedObject { }
@property (assign) NSString *desc; @property (assign) NSString *name; @property (assign) NSString *type;
@property (assign) NSManagedObject *author; @property (assign) NSDate *lastUsed;
As you can see, we are defining the property like normal, but there are no ivars associated with those properties. Since these properties are created dynamically at runtime, we do not need to declare them in the header. However, we do need to flag them as dynamic so that the compiler will not issue a warning. This is done in the implementation file:
DownloadSpotlight/PPRecipe.m
@implementation PPRecipe @dynamic desc;
@dynamic name; @dynamic type; @dynamic author; @dynamic lastUsed;
By declaring them as @dynamic, we are telling the compiler to ignore any warnings associated with these properties because we “promise” to generate them at runtime. Naturally, if they turn up missing at runtime, then our application is going to crash. However, when we are working withNSManagedObject objects, the attributes will be looked up for us, and we do not need to implement anything. By adding that code, we can access the attribute directly, as shown in the following example:
PPRecipe *myRecipe = ...;
NSString *recipeName = [myRecipe name];
//Do something with the name
[myRecipe setName:recipeName];
Primitive Access
NSMANAGEDOBJECT 54
occur later. In thos