Core Data iOS Essentials
A fast-paced, example-driven guide to data-driven
iPhone, iPad, and iPod Touch applications
B.M. Harwani
Copyright © 2011 Packt Publishing
All rights reserved. No part of this book may be reproduced, stored in a retrieval system, or transmitted in any form or by any means, without the prior written permission of the publisher, except in the case of brief quotations embedded in critical articles or reviews.
Every effort has been made in the preparation of this book to ensure the accuracy of the information presented. However, the information contained in this book is sold without warranty, either express or implied. Neither the author, nor Packt Publishing, and its dealers and distributors will be held liable for any damages caused or alleged to be caused directly or indirectly by this book.
Packt Publishing has endeavored to provide trademark information about all of the companies and products mentioned in this book by the appropriate use of capitals. However, Packt Publishing cannot guarantee the accuracy of this information.
First published: April 2011
Production Reference: 1180411
Published by Packt Publishing Ltd. 32 Lincoln Road
Olton
Birmingham, B27 6PA, UK.
ISBN 978-1-849690-94-2
www.packtpub.com
Credits
Author B.M. Harwani
Reviewers Fred McCann
Muhammad Adil
Acquisition Editor David Barnes
Development Editor Chris Rodrigues
Technical Editor Aditi Suvarna
Copy Editor
Laxmi Subramanian
Indexer
Monica Ajmera Mehta
Rekha Nair
Editorial Team Leader Aditya Belpathak
Vinodhan Nair
Project Team Leader Lata Basantani
Project Coordinator Vishal Bodwani
Proofreader Aaron Nash
Graphics
Geetanjali Sawant
Production Coordinator Alwin Roy
About the Author
B.M. Harwani
is the founder and owner of Microchip Computer Education (MCE), based in Ajmer, India that provides computer education in all programming and web developing platforms. He graduated with a B.E. in computer engineering from the University of Pune, and also has a 'C' Level (Master's diploma in computer technology) from DOEACC, Government Of India. Having been involved in the teaching field for over 16 years, he has developed the art of explaining even the most complicated topics in a straightforward and easily understandable fashion. He has written several books on various subjects that include JSP, JSF, EJB, PHP, .NET, Joomla, jQuery, and Smartphones. He also writes articles on a variety of computer subjects, which can be seen on a number of websites. To know more, visit his blog, http://bmharwani.com/blog.The list of books written by B.M. Harwani are Programming & Problem Solving through C (BPB, 2004), Learn Tally in Just Three Weeks (Pragya, 2005), Data
Acknowledgement
I owe a debt of gratitude to David Barnes, the Senior Acquisition Editor at Packt Publishing for his initial acceptance and giving me an opportunity to create this work. I am highly grateful to the whole team at Packt Publishing for their constant cooperation and contribution to create this book.
My gratitude to Chris Rodrigues, who as a Development Editor offered a significant amount of feedback that helped to improve the chapters. He played a vital role in improving the structure and the quality of information.
I must thank Muhammad Adil, the Technical Reviewer for his excellent, detailed reviewing of the work and the many helpful comments and suggestions he made. Special thanks to Aditi Suvarna, the Technical Editor for first class structural and language editing. I appreciate her efforts in enhancing the contents of the book and giving it a polished look.
I also thank Alwin Roy, the Production Coordinator for doing excellent formatting and making the book dramatically better.
A big and ongoing thanks to Vishal Bodwani, the Project Coordinator for doing a great job and sincere efforts by the whole team to get the book published on time.
A great big thank you to the editorial and production staff and the entire team at Packt, who worked tirelessly to produce this book. I really enjoyed working with each one of you.
I am also thankful to my family—my small world; Anushka (my wife) and my two little darlings, Chirag and Naman for allowing me to work on the book even during the time that I was supposed to spend with them.
About the Reviewers
Fred McCann
is a co-founder of Zumisoft, an independent Mac software company. He started writing code at the tender age of eight on a TI-99a home computer and has since moved on to newer systems. His interests, outside of programming, include Judo, Yoga, Hiking, Kites, Amateur Robotics, Politics, and Meditation.His websites include http://www.duckrowing.com/ and http://www.fredmccann.com/Home.html.
www.PacktPub.com
Support files, eBooks, discount offers, and more
You might want to visit www.PacktPub.com for support files and downloads related to
your book.
Did you know that Packt offers eBook versions of every book published, with PDF and ePub
files available? You can upgrade to the eBook version at www.PacktPub.com and as a print book customer, you are entitled to a discount on the eBook copy. Get in touch with us at
[email protected] for more details.
At www.PacktPub.com, you can also read a collection of free technical articles, sign up for a range of free newsletters and receive exclusive discounts and offers on Packt books and eBooks.
http://PacktLib.PacktPub.com
Do you need instant solutions to your IT questions? PacktLib is Packt's online digital book
library. Here, you can access, read, and search across Packt's entire library of books.
Why Subscribe?
• Fully searchable across every book published by Packt
• Copy and paste, print and bookmark content
• On demand and accessible via web browser
Free Access for Packt account holders
This book is dedicated to my mother Mrs. Nita Harwani and Mark Zuckerberg. My mother is next to God for me and whatever I am today is because of the moral values
taught by her.
Table of Contents
Preface 1
Chapter 1: Overview
7
Prerequisite 7
A brief history 8
Enterprise Object Framework (EOF) 8
Core Data 8
Why use Xcode? 9
Source code 9
Shall we begin? 12
Chapter 2: Understanding Core Data
13
Core Data 13
Core Data features 14
Data Model 15
Entities 15 Properties 15 Attributes 16 Relationships 16
Inverse relationship 17
Model View Controller (MVC) 18
Core Data API 19
Persistent Store 21
Persistent Store Coordinator 22
FetchRequest 22 FetchedResultsController 22 Overview of the application: Sales Record System for a
Departmental Store 23
Entity Relationship Diagram 24
Entering Master Product Information 25
Modifying the Master Product 28
Deleting the Master Product 29
Entering customer information and order details 30
Deleting customer information 31
Searching for specific customers 32
Searching and modifying customer information 33
Entering Customer Sales Information 33
Automatic Master Product Update 36
Summary 37
Chapter 3: Understanding Objective-C Protocol and Table View
39
Protocol 40
Implementing the Strategy pattern 40
Defining the protocol 41
Creating a delegate property 41
Declaring protocol methods 41
Creating a sample application using a protocol and a delegate 42
Adding the ViewController class for entering numerical values 44 Defining the protocol, outlets, and action methods in the
SecondViewController.h header file 45
Defining the SecondViewController class and connecting controls 47
Invoking delegate methods from the SecondViewController.m
implementation file 48
Declaring the delegate, outlet, and action methods in the
demodelegateViewController.h header file 50
Defining the demodelegateViewController and connecting controls 51
Implementing the protocol methods in the
demodelegateViewController.m file 52
Running the project 55
Introduction to Table View 56
Creating an application to display Table View cells 58
Declaring an array in the header file 59
Implementing UITableViewDataSource protocol methods 60
Adding names to the Table View 63
Adding the AddNameController View controller 64
Defining protocols, outlets, and action methods in the
AddNameController.h header file 66
Defining the AddNameController class View and connecting controls 67
Invoking Delegate methods in the
Invoking the AddNameController View and implementing the
protocol methods 72
Placing and connecting the Bar Button Item control in the
RootViewController 73 Summary 77
Chapter 4: Designing a Data Model and Building
Data Objects for Customers
79
Creating a new project 79
Designing the data model 81
Data Model Editor 81
Adding an entity 81
Adding an attribute property 82
Types of attributes 84
Fields applying constraints 85
Building data objects for the Customer entity 86
Understanding code of autogenerated files 90
Header file of Application Delegate 90
Implementation file of Application Delegate 91
applicationWillTerminate method 93
Chapter 5: Creating, Listing, and Deleting Names of Customers
97
Splitting the task into two modules 97
Creating a module to save and delete a customer's name 98
Using the ViewController class for adding the name of the customer 98
Defining protocol, outlets, and action methods in the header file 100
Defining the View of the AddNameController class and
connecting controls 102
Invoking delegate methods from the implementation file 104
Declaring delegate and implementing methods for storing the
name of the customers 107
Key value coding (KVC) 116
Key value methods 116
The -valueForKey: method 116
The -setValue:forKey: method 117
Keypath 117 Implementing the methods of the
NSFetchedResultsControllerDelegate protocol 118
The controllerDidChangeContent method 119
The controller:didChangeObject method 119
The controller:didChangeSection method 120
Running the project 122
Summary 124
Chapter 6: Creating, Listing, Displaying, and Deleting Records
of Customers
125
Understanding multiple managed object context 125
NSNotification 126
Applying the concept of multiple managed object context in
our application 127
Enhancing our application to save, list, display, and delete
customer information 131
Adding the ViewController class 131
Defining a View for entering the customer's information and
connecting controls 134
Coding in the implementation file for accepting the customer's
information and invoking delegate methods 136
Adding the View Controller class for displaying the
customer's information 138
Defining the View and writing the code in the implementation file for
displaying the customer's information 139
Implementing the methods in the RootViewController class for
storing the customer's information 142
viewDidLoad method 145
cell AtIndexPath method 145
didSelectRowAtIndexPath method 145
addCustomer method 146
addcustomerController method 146
Viewing the project 147
Summary 148
Chapter 7: Updating and Searching Records of Customers
149
Applying the update feature 149
Defining a protocol in the DisplayCustomerController class 150
Adding Edit button to enable modifications in the View of
DisplayCustomerController class 152
Implementing the protocol's method for storing modified
customer information 154
Using KVO to know what has been updated 156
Applying search facility 162 Defining outlet of UISearchBar class in the header file of the
RootViewController class 163
Placing the Search Bar control in the View of RootViewController
and specifying its delegate 164
Implementing delegate method in the RootViewController class to
apply searching 165
Understanding NSPredicate 167
Removing the keyboard after selecting a customer's name 168
Using Predicate Builder for creating a search criterion 169
Fetched properties 170
Fetch request templates 170
Building and accessing a fetch request without a variable 171 Building and accessing a fetch request with a variable 176 Summary 180
Chapter 8: Entering, Saving, Listing, and Deleting the Records
of the Products Sold to the Customers
181
Adding the product entity to the Data Model 182
Relationship 183
Types of relationships 184
One to one relationship 184
One to many relationship 184
Many to many relationship 184
Establishing a relationship between the Customer and the
Product entities 185
Setting a relationship from the Customer entity to the Product entity 185
Delete rule 186
Setting a relationship from the Product entity to the Customer
entity (inverse relationship) 187
Building the data object for the Customer and the Product entities 188
Understanding the role of the auto generated special methods of
a relationship 189
Entering the information of the products sold to the customers 191
Creating a module to develop an interface to enter the product
information 192 Adding a ViewController class for entering the information of the
products sold to the customers 193
Defining the protocol, outlets, and action methods in the header file 194
Designing the View of the AddProductController class and
connecting the controls 195
Developing a module to create a menu for manipulating the
product information 200
Adding a ViewController class to display the Product's menu to
manipulate the product's information 201
Defining the outlets and action methods in the header file 202
Designing the View of a ProductInfoController class and connecting
the controls 203
Coding in the implementation file to save, edit, and display the
product's information 206
Creating a module to connect the Product's menu to the rest of
the project 211
Defining the outlets and action methods in the header file 211
Adding a Toolbar control to the View of the DisplayCustomer
Controller class 212
Coding in the implementation file to invoke the View of the
ProductInfoController class 214
Running the project 216
Summary 218
Chapter 9: Entering, Displaying, and Deleting the Stock
219
Adding the MasterProduct entity to the Data Model 220
Storing the image of the MasterProduct 221
Transformable data type 221
The Value Transformer Name: field 222
Creating a value transformer 222
Building the data object for the MasterProduct entity 224
Maintaining the MasterProduct information 226
Image Picker 227
Adding custom images to the Image Picker 227
Making an image appear within a given size 229
Module to develop interface to enter the information of the MasterProduct 231 Adding the ViewController class for entering information of the master products 232
Defining protocol, outlets, and action methods in the header file 232
Designing the View of the MasterProductController class and connecting controls 234
Invoking the delegate and ImagePicker methods from the implementation file 238
Module to create a menu for manipulating the MasterProduct
information 242 Adding the View Controller class to display a menu for adding, editing, and
displaying the MasterProducts 242
Defining the outlets and action methods in the header file 243
Designing the View of the MasterProductInfoController class and connecting controls 244
Coding in the implementation file to save, edit, and display the master
product's information 248
Chapter 10: Editing the Stock Information
255
Module to connect the MasterProduct's menu to the rest of the project 255
Defining outlets and action methods in the header file 256
Adding a Toolbar and a Bar Button Item in the RootViewController class 257 Coding in the implementation file to invoke the View of the
MasterProductinfoController class 259
Making the Toolbar to appear at the bottom of the View 261
Running the application 262
Selecting the image of the master product 263
Deleting the master product 264
Module to modify the information of the master product 266
Adding the View Controller class to display the view to modify
the selected master product 266
Defining the outlets and action methods in the header file 267
Designing the View of EditMasterProductController class 268 Coding in the implementation file to modify the master
product's information 270
Importing the delegate and the View Controller class in the header file 273
Coding in the implementation file to invoke the View of the
EditMasterProductController class 274
Summary 277
Chapter 11: Displaying the Products for Sale and
Updating the Stock
279
Displaying the products available for sale 280
Adding the SearchProductController class 281
Designing the view of SearchProductController 282
Coding in the SearchProductController class 284
Invoking the SearchProductController from the Product menu 289 Displaying name, price, and image of the selected product 291
Updating the stock 294
Running the project 297
Automatically updating the quantity of the product in the
MasterProduct entity 299
Versioning 300
Creating a new Data Model version 300
Migrations 302 Implementing lightweight migration to our application 302 Summary 304
Appendix: Appendix
305
Preface
Since its invention, iPhone has been inspiring developers around the world to develop applications for it. Several applications can be built for iPhone, which include Web applications, Native iPhone applications, Games, Weather, News applications, Data driven applications, and so on.
Looking at the huge demand of developing data applications for iPhone inspired me to write a book on Core Data—a perfect framework for developing data-driven applications for iPhone. In this book, I have tried my level best to keep the code simple and easy to understand. I have provided step-wise instructions with screenshots at each step. Feel free to contact me at [email protected] for any queries. Any suggestions for improving the book will be highly appreciated.
What this book covers
In Chapter 1, Overview, you will see a brief history of the Core Data and a small introduction to EOF and Xcode.
In Chapter 2, Understanding Core Data, you will have an introduction to the Core Data framework and its features. You will learn about the data model and how it defines the structure of data in terms of entities, properties, and their relationships. Also, you will get a brief idea of ModelViewController (MVC), the Core Data API and its main components. Besides this, the chapter includes an overview of the application (Sales Record System for a Store), which we will be building in the book along with its different views and the tasks performed when different controls in these views are selected.
Chapter 4, Designing a Data Model and Building Data Objects for Customers, introduces the working of UITableView and explains step-by-step how information is displayed via the table view. The chapter explains the different methods used in displaying information through table view and also how to add more information to the existing information being displayed via table view. For instance, if four names are already being displayed in a table, this chapter will show how to add the newly entered name to the existing list of names in the table.
In Chapter 5, Creating, Listing, and Deleting Names of Customers, we will be learning how to design a data model for storing any customer's information, that is, we will define the Customer entity and its attributes. Also, we will learn to build the data object (classes) associated with the Customer entity.
Chapter 6, Creating, Listing, Displaying, and Deleting Records of Customers, focuses on explaining how a customer's information, which is stored in the Customer entity, is maintained. The chapter gives a step-by-step explanation of how to save, display, and delete the customer information that comprises customer's name, e-mail address, and contact number.
In Chapter 7, Updating and Searching Records of Customers, we will see how to modify the customer information, which is, unlike the "editing" feature in Chapter 6 that was limited to the deletion of a record; we will see how to update (modify) the information of the existing customers. The chapter explains the procedure to add an Edit button to the view, which when selected will allow us to edit the information of the selected customer. This chapter also covers how to save the modified information back to the persistent store. In this chapter, we will also learn the application of NSPredicate to apply query facility to locate the desired customer quickly.
Chapter 9, Entering, Displaying, and Deleting the Stock, covers the creation of a Master Product entity, which will be used for storing the information of products that the vendor is dealing with. All the products available for sale are stored in this table. In order to store the image of the product, the chapter explains the concept of transformable data type that is used for creating custom data types. The chapter also explains how to enter, save, display, delete, and modify the information of the master products that the vendor deals with. It also covers the working of the Image Picker control—how it is used in selecting images of the products and the different methods to define the size of the image of the product. In all, the chapter explains how to develop a view to enter master product's information, develop a menu to add, delete, and display information of master products for the MasterProduct.
The information of the products entered in the MasterProduct entity is very different from the information of the product entered in the
Product entity. The Product entity stores the information of the products that are sold to the customers, whereas the MasterProduct
entity refers to the products that are available for sale.
Chapter 10, Editing the Stock Information, explains how to connect the menu meant for adding, deleting, and displaying the Master Product information to the rest of the application. Also, the chapter covers the step-by-step approach to develop a view to display and modify the selected master product's information.
In Chapter 11, Displaying the Products for Sale and Updating the Stock, we will learn how to implement query facility while entering the information of the products sold to the selected customer. Also, we will see how the quantity of the master product gets automatically reduced by the amount of quantity sold to the selected customer.
Chapter 12, Appendix, will give you a brief idea about the topics covered in this book.
What you need for this book
The latest version of Xcode that is available at the time of this writing is Xcode 3.2.5. I have used the same version for developing the core data application in this book.
Who this book is for
This book is mainly written for those who are familiar with iPhone SDK
programming and are interested in developing data-driven applications using Core Data. For understanding the concept of Core Data better, knowledge of Objective C protocol and delegation pattern is required. Besides this, familiarity with the data source patterns, such as UITableView and UITableViewDataSource, for the purpose of displaying information is also required. But never mind if you are not aware of these two concepts, Chapters 3 and 4 of the book are focused on getting you acquainted with them.
Conventions
In this book, you will find a number of styles of text that distinguish between different kinds of information. Here are some examples of these styles, and an explanation of their meaning.
Code words in text are shown as follows: "The result may be either in the form of an NSArray (containing the fetched entities) or there may be an error."
A block of code is set as follows:
NSError *error;
NSArray *myArray = [myManagedObjectContext executeFetchRequest: fetchRequest error:&error]
When we wish to draw your attention to a particular part of a code block, the relevant lines or items are set in bold:
@property(nonatomic, retain) Customer *cust;
@property(nonatomic, retain) MasterProduct *mastprod; @property(nonatomic, retain) Product *prod;
Warnings or important notes appear in a box like this.
Tips and tricks appear like this.
Reader feedback
Feedback from our readers is always welcome. Let us know what you think about this book—what you liked or may have disliked. Reader feedback is important for us to develop titles that you really get the most out of.
To send us general feedback, simply send an e-mail to [email protected], and mention the book title via the subject of your message.
If there is a book that you need and would like to see us publish, please send us a note in the SUGGEST A TITLE form on www.packtpub.com or e-mail suggest@ packtpub.com.
If there is a topic that you have expertise in and you are interested in either writing or contributing to a book, see our' author guide on www.packtpub.com/authors.
Customer support
Now that you are the proud owner of a Packt book, we have a number of things to help you to get the most from your purchase.
Downloading the example code
Errata
Although we have taken every care to ensure the accuracy of our content, mistakes do happen. If you find a mistake in one of our books—maybe a mistake in the text or the code—we would be grateful if you would report this to us. By doing so, you can save other readers from frustration and help us improve subsequent versions of this book. If you find any errata, please report them by visiting http://www.packtpub. com/support, selecting your book, clicking on the erratasubmissionform link, and entering the details of your errata. Once your errata are verified, your submission will be accepted and the errata will be uploaded on our website, or added to any list of existing errata, under the Errata section of that title. Any existing errata can be viewed by selecting your title from http://www.packtpub.com/support.
Piracy
Piracy of copyright material on the Internet is an ongoing problem across all media. At Packt, we take the protection of our copyright and licenses very seriously. If you come across any illegal copies of our works, in any form, on the Internet, please provide us with the location address or website name immediately so that we can pursue a remedy.
Please contact us at [email protected] with a link to the suspected pirated material.
We appreciate your help in protecting our authors, and our ability to bring you valuable content.
Questions
Overview
This book is a practical guide to help you in developing Data-Driven iPhone applications using Core Data. The tremendous success of iPhone has increased the demand of mobile applications. Besides the Game-based applications, there is a huge market for the data-driven mobile applications too. The focus of this book is to make you understand how the CoreData, Apple's persistence framework, is used for developing data-driven mobile applications.
Prerequisite
This book assumes that you have a basic understanding of the iPhone SDK and you also know the basics of iPhone SDK programming.
To better understand the concept of Core Data, you should:
• Have a good understanding of the Objective-C protocol and the delegation pattern
A brief history
The iPhone as we all know is an integrated cellular telephone and media player developed and marketed by Apple. It has become very popular in the past few years because of its amazing features. Looking at its huge number of users, developers around the world are attracted to develop applications for this unique device. Developers realized that besides games, there is a huge market of data applications for iPhone device. The attraction of creating data applications for iPhone device resulted into development of the Core Data framework. But the question is where did Core Data come from?
Core Data was first developed at NeXT Computer as the DBKit framework in 1992, which then became the EnterpriseObjectFramework (EOF) in 1994.
Enterprise Object Framework (EOF)
EOF is an object-relationalmapping (ORM) framework that provides a mechanism for accessing the data as an object-oriented class structure. It is well-designed and encourages ModelViewController (MVC) design patterns. It also simplifies the tedious job of creating an application's data model. EOF is not just a framework, it is also a tool that helps in creating the application's data model visually—the task that was previously done by creating Objective-C classes. Besides this, the framework handles all the work involved in persisting the data to a SQL database, flat file, or any other data store. Based on object-oriented architecture, EOF is very flexible to use too. The roots of the Core Data framework come from the Enterprise Objects Framework (EOF).
Core Data
Now the question arises, what is Xcode and why we are using it for developing Core Data applications?
Why use Xcode?
Xcode is Apple's most comprehensive SoftwareDevelopmentKit (SDK), and it provides an environment for developing the applications for iPhone. It is a highly customizable integrated development environment (IDE) that includes compilers and applications, together with an extensive set of programming libraries and interfaces. It is a powerful source editor and a graphic debugger too. While developing applications with XCode, it gives us an option to enable a checkbox for enabling Core Data support. On selecting the checkbox, Xcode automatically creates code for us that make the task of developing core data applications quite easy.
Source code
The source code of the book is available at the URL specified in the Preface of the book.
You'll find chapter-wise code bundle in the ZIP file. The book is so organized that it guides you to develop a data-drive application step-by-step. That is, by the end of the book, you'll be having a complete data-driven running application with you. In case, you want to run the end product directly, follow the below given steps:
1. Unzip the source bundle of the last chapter, Chapter 11, Displaying the Products for Sale and Updating the Stock on your local Mac.
3. Select the BuildandRun icon from the Xcode project window to run the application. You'll get the main view of the application as shown in the following image. But the application is not yet ready to run until we define the photos of the master products (products that we are going to sell through application).
4. To define photos of the master products in iPhone Simulator, go to Home and then click on the Photos icon (refer to the given image (a)).
5. We get the Albums page as shown in image (b). Because we have not created any photo album yet, the figure displays the message, NoPhotos.
6. Drag the first image, IMG_0000.JPG provided in the code bundle of
7. Repeat the procedure for the other three images (IMG_0001.JPG, IMG_0002. JPG, IMG_0003.JPG). After saving the four images, the simulator will display the images as shown in image (a).
9. Now, our application is completely ready for execution. For any guidance regarding operating the application, refer to the An application output sample
section in Chapter 2, Understanding Core Data.
Shall we begin?
Understanding Core Data
In this book, we'll learn how to build a Sales Record Keeping System application using Core Data through a step-by-step approach. So, this chapter will give us an introduction to the following topics:
• Core Data framework and its features
• The data model and how it defines the structure of data in terms of entities, properties, and their relationships
• Model-View-Controller (MVC)
• Core Data API and its main components
• An overview of the application that we will be building in this book and a glance at the different application views and the tasks performed when different controls in these views are selected
Core Data
Besides this, Core Data also provides several features that are required in data manipulation, which includes filtering data, querying data, sorting data, establishing relationships with other data, and persisting data in different repositories.
Core Data features
The Core Data framework provides lots of features that include the following:
• Supports migrating and versioning: It means we can modify our data model, that is, entities of the application, whenever desired. The Core Data will replace the older persistent store with the revised data model. This concept is nicely explained with figures in Chapter 11, Displaying the Products for Sale and Updating the Stock.
• SupportsKey-ValueCoding (KVC): It is used to store and retrieve data from the managed objects. Core Data provides the methods required for setting and retrieving attribute values from the managed object, respectively. We will be using this feature in our application to display the information of customers and the products sold to them through the table view.
• Tracksthe modifications: Core Data keeps track of the modifications performed on managed objects thus allowing us to undo any changes if required. We will be using this feature in our application while modifying the information of a customer or product to know what the earlier value was and what the new value entered for it is.
• Supportslazyloading: It's a situation that arises when all the property values of a managed object are not loaded from the data store and the property values are accessed by the application. In such situations, faulting occurs and the data is retrieved from the store automatically.
• Efficient database retrievals: Core Data queries are optimized for this, though the execution of query is dependent on the data store.
• Multi-threading: Core Data supports multi-threading in an application, that is, more than one thread can be executed in parallel to increase performance. Even some tasks can be performed in the background using a
separate thread.
• Inverse relationship: Core Data maintains an inverse relationship for consistency. If we add an object to a relationship, Core Data will automatically take care of adding the correct object to the inverse
• External data repositories: Core Data supports storing objects in external data repositories in different formats.
Data Model
Core Data describes the data in terms of a data model. A datamodel is used to define the structure of the data in terms of entities, properties, and their relationships.
Entities
Because Core Data maintains data in terms of objects, an entity is an individual data object to represent complete information of the person, item, object, and so on. For example, customer is an entity, which represents information of customers, such as name, address, e-mail ID, contact number, products purchased, date of purchase, and so on. Similarly, the product is an entity, which represents the information of a product, such as name of the product, price, weight, and so on. An entity consists of properties that are a combination of attributes and relationships. An entity in Xcode's Data Model Editor may appear as shown in the following screenshot:
Properties
Attributes
Attributes are the variables within an object (entity). In fact, a collection of attributes makes an entity. In database language, they are known as columns of the table. For example, the customer's entity may consist of attributes such as name, address, contact number, items purchased, and so on. Similarly, the attributes in the products table may be item code, item name, quantity, and so on. While creating attributes of an entity, we have to specify its name and its data type to declare the kind of information (whether integer, float, string, and so on) that will be stored in the attribute. Also, we can define the constraints on the information that can be stored in the column. For example, we can specify the maximum, minimum value (range) that can be stored in that attribute, or whether the attribute can or cannot store certain special symbols, and so on. Also, we can specify the default value of an attribute.
Relationships
Besides attributes, an entity may also contain relationships (which define how an entity is related to other entities). The attributes and relationships of an entity are collectively known as properties. The relationships are of many types (To-One, To-Many, and Many-to-Many) and play a major role in defining connection among the
entities and what will be the impact of insertion or deletion of a row in one entity on the connected entities.
Examples of relationship types:
• The relationship from a child entity to a parent entity is a To-One relationship as a child can have only one parent
• The relationship from a customer to a product entity is a To-Many
relationship as a customer can purchase several products
• The relationship from an employee to a project entity is of Many-to-Many
type as several employees can work on one project and an employee can work on several projects simultaneously
To define a many-to-many relationship in Core Data, we have to use two To-many relationships. The first To-many relationship is set from
the first entity to the second entity. The second To-many relationship is
set from the second entity to the first entity.
In Xcode's Data Model Editor, the relationship from Customer to Product—a
To-Many relationship—is represented by a line that appears pointing from the Customer entity to the Product entity with two arrows, (designating a One-to-Many
When defining relationships in Core Data we may use inverse relationships, though it's optional.
Inverse relationship
In Core Data, every relationship can have an inverse relationship. Like, if there is a relationship from Customer to Product, there will be a relationship from Product to Customer too. A relationship does not need to be the same kind as its inverse; for example, a To-One relationship can have an inverse relationship of type To-Many. Although relationships are not required to have an inverse, Apple generally recommends that you always create and specify the inverse, (even if you won't need) as it helps Core Data to ensure data integrity.
For example, consider a situation when a Customer entity has a relationship of the
To-Many type to a Product entity and some information of a customer is changed or a row of a customer is deleted. Then it will be easier for Core Data to ensure consistency; that is, by inverse relationship, Core Data can automatically find the products related to the deleted customer and hence, delete them too. Inverse relationship is practically used in Chapter 8, Entering, Saving, Listing, and Deleting the Records of the Products Sold to the Customers.
Model View Controller (MVC)
iPhone application development uses MVC architecture where M stands for Model, V stands for View, and C for Controller.
• Model represents the backend data—data model
• View represents the user interface elements through which the user looks at the contents displayed by the application and can interact with them
• Controller represents the application logic that decides the type of view to be displayed on the basis of actions taken by the user
Core Data organizes the data model in terms of objects that are easy to handle and manipulate. The finalized objects are stored on a persistent storage. The usual way of representing data models is through classes that contains variables and accessor methods. We don't have to create classes by hand, (for our data models) as Core Data framework provides a special Data Model Design tool (also known as Data Model Editor) for quickly creating an entity relationship model. The terms that we will be frequently using from now onwards are Managed Object Model, Managed Objects, and Managed Object Context. Let us see what these terms mean:
• Managed Object Model: The data model created by the Data Model Design tool (Data Model Editor) is also known as Managed Object Model.
• Managed Objects: Managed objects are instances of the NSManagedObject class (or its subclass) that represent instances of an entity that are maintained (managed) by the Core Data framework. In a managed object model, an entity is defined by an entity name and the name of the class that is used at runtime to represent it. The NSManagedObject class implements all of the functionality required by a managed object.
• A managed object is associated with an entity description (an instance of NSEntityDescription) that describes the object; for example, the name of the entity, its attributes, relationships, and so on. In other words, an NSEntityDescription object may consist of NSAttributeDescription and NSRelationshipDescription objects that represent the properties of the entity. At runtime, the managed object is associated with a managed object context.
• ManagedObjectContext: The objects when fetched from the persistent storage are placed in managed object context. It performs validations and keeps track of the changes made to the object's attributes so that undo and
All managed objects are registered with managed object context.
For an application, we need the information represented by the Managed Object (instance of an entity) to be stored on the disk (persistent store) via managed object context. To understand the concepts of managed object context and its relation with data persistence, we need to understand the components of Core Data API, so let us go ahead and look at what Core Data API is all about.
Core Data API
The Core Data API, also called the stack, consists of three main components:
• NSPersistentStoreCoordinator
• NSManagedObjectModel
• NSManagedObjectContext
The Managed Object Model (an instance of NSManagedObjectModel class) is created from the data model of our application. If there is more than one data model in our application, the Managed Object Model is created by merging all of the data models found in the application bundle. The managed object (instance of the NSManagedObject class or its subclass) represents an instance of an entity that is maintained (managed) by the Core Data framework. A managed object is an instance of an Objective-C class, but it differs from other objects in three main ways:
• A managed object must be an instance of NSManagedObject or of a class that inherits from NSManagedObject
• The state of managed object is maintained by its managed object context
• A managed object has an associated entity description that describes the properties of the object
For working with a managed object, it is loaded into memory. The managed object context maintains the state of the managed object after it is loaded in memory. The Managed Object Context tracks in-memory changes that have yet to be persisted to the data store. Any changes made to the state of an NSManagedObject do actually affect the state of the object in memory, not just the persistent representation of that object in the data store. When we want to commit the modifications made to the managed object, we save the managed object context to the persistent store. In order to deal with persistent store, the managed object context needs a reference to a PersistentStoreCoordinator. In other words, a pointer to the PersistentStoreCoordinator is required for creating a Managed Object Context. Remember, the PersistentStoreCoordinator is the essential middle layer in the stack that helps in storing and retrieving the managed object model from the persistent store.
The managed object context is an object that plays a major role in the life cycle of managed objects. It handles all the aspects of managed object from faulting to validation including undo/redo. To modify managed objects, they are fetched from a persistent store through managed
context. The modified managed objects are committed to the persistent
store through context only. The managed objects represent data held in a persistent store. Faulting is considered to occur for an object whose property values have not yet been loaded from the external data store.
The result, that is, the set of entities retrieved from the managed object context (on the basis of FetchRequest) are managed by FetchedResultsController—an instance of NSFetchedResultsController.
In fact, FetchRequest is passed to the FetchedResultsController along with a reference to the managed object context. Once the NSFetchedResultsController class has been initialized, we can perform a fetch operation to load the entities (stored in it) into memory.
The managed object context keeps track of all the changes made to the managed object since the last time it was loaded in memory and hence helps in undoing any changes made to the managed object (if required).The Persistent Store Coordinator helps in avoiding redundancy if multiple calls are made by different classes on the same
file at the same time, that is, the multiple calls are serialized by the NSPersistentStoreCoordinator class to avoid redundancy.
Let us now get a detailed understanding of the terms used above.
Persistent Store
PersistentStore is a data store (repository) that handles mapping between data (in the store) and corresponding objects in a managed object context. The managed contexts can be stored in any of the following three formats—In-memory, Binary, and SQLite database format. In other words, the Persistence Store can be of three types—In-memory store, Binary store, and SQLite store.
• The In-memory store is used in caching mechanism
• Binary format stores information in a non-human-readable form but provides better performance
• SQLite database format is scalable and is the fastest
The drawback with the Binary and In-memory store contents is that they have to be entirely loaded in memory at startup and hence consume a lot of memory, whereas the SQLite store can be loaded and unloaded from memory as per requirements. SQLite is an open source embedded database that is highly preferred for Core Data.
Persistent Store Coordinator
The Persistent Store Coordinator is an instance of the
NSPersistentSoreCoordinator class that performs co-ordination between
managed object contexts and persistent store, that is, it helps in storing and retrieving the managed object model from the Persistent Store. All the calls that require "reads" or "writes" to the Persistent Store are serialized by the Persistent Store Coordinator (so that multiple calls against the same file are not being made at the same time). The Persistent Store Coordinator creates a path to a file (on disk drive) in the Documents directory in our application's sandbox.
FetchRequest
FetchRequest is an instance of the NSFetchRequest class and is used to access the objects in managed object context. There are two parts to the creation of an NSFetchRequest:
• Deciding the entity to be retrieved
• Defining an NSPredicate to define the criteria (condition) to retrieve only the desired objects (this part is optional)
To define the entity to be retrieved via NSFetchRequest, we pass the appropriate NSEntityDescription to the NSFetchRequest. Recall that NSEntityDescription consists of the name of the entity, its attributes, relationships, and so on.
When NSFetchRequest is executed against the NSManagedObjectContext, the result may be either in the form of an NSArray (containing the fetched entities) or there may be an error. That is why, the execution of an NSFetchRequest accepts a pointer to an NSError to describe the errors that may occur while execution. If the execution of NSFetchRequest fails, then the pointer will be directed to an instance of NSError that contains the reason of failure. The method signature will be as follows:
NSError *error;
NSArray *myArray = [myManagedObjectContext executeFetchRequest: fetchRequest error:&error]
FetchedResultsController
• Querying the retrieved result
• Arranging the result
• Notifying UIViewController in case any of the entities in the result set are modified (added, deleted, updated, and so on)
The NSFetchedResultsController requires an NSFetchRequest for its initialization. The NSFetchRequest contains the criteria of the entities that are accessed through the NSFetchedResultsController. The NSFetchRequest is passed to the NSFetchedResultsController along with a reference to the NSManagedObjectContext. Once the NSFetchedResultsController has been initialized, we can perform a fetch operation to load the entities into memory.
We have enough knowledge of Core Data and its different components. Let us see what kind of application we will be developing in this book using Core Data.
Overview of the application: Sales
Record System for a Departmental Store
We are going to assume the end user of this app is a wholesale dealer whowants to track in-stock product quantities, sales, and customer information. In this application, the user can store and track information about customers, such as names, e-mail IDs, and phone numbers, as well as sales data and product
information (name, quantity, price, photo, and inventory). Therefore, the application must store information about:
• Products
• Customer information
• Sales
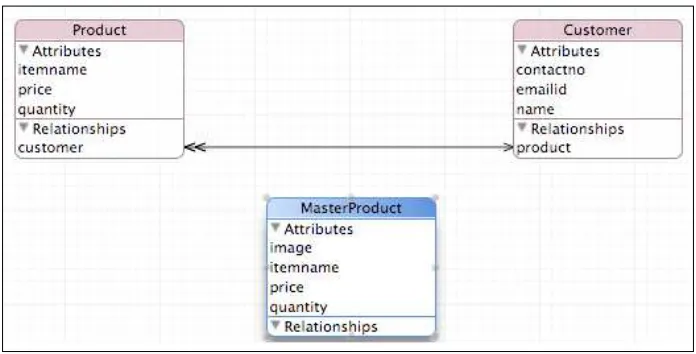
Entity Relationship Diagram
Our application consists of three entities:• Customer
• Product
• MasterProduct
The EntityRelationshipDiagram (ERD) of the application is as shown in the following figure:
Let's have a quick look at the usage of the three entities displayed in the preceding figure:
• The Product table is used to store information about products sold to the selected customer. The table has three fields: itemname, price, and quantity. This table is related to the Customer table via a many-to-one relationship because many customers may purchase the same product.
• The Customer table is used to store information about the customer and has three data fields: name, e-mail ID, and contact number. This table is related to the Product table via a one-to-many relationship because a customer can purchase more than one product.
An application output sample
Let's take a look at how the application works. When the program is started, the initial view will appear, as shown in the following given image (a). The top of the view holds a navigation bar with two bar button items: Edit and +. At the bottom of the view is a toolbar holding a bar button item called MasterProductInformation. The title in the navigation bar, CustomersList, tells us that the two bar button items (Edit and +) are concerned with editing and adding customer information, respectively. The bar button item, MasterProductInformation, is used to store product data: name, price, quantity, and the product image.
Entering Master Product Information
We begin by entering the product data, MasterProductInformation, which will include product name, price, quantity on hand, and a product photo. The product quantity is automatically adjusted after a sale.
The functions of the three bar button item controls are as follows:
• CustomersList: This button will take us back to the main view of the application where we can add or edit customer information.
• Edit: This button allows us to edit master product information. However, the button will work only when there actually are products in the database. Assuming at least one master product exists; the Edit button will show a deletion icon on the left of the master product. When the deletion icon on any master product is selected, a Delete button appears on the right for confirmation. When clicked, the master product is removed from the list.
• Add: This button lets us add new master products to the list. It displays a view as shown in the preceding image (c). We have three text fields to fill:
ProductName, Price, and Quantity. Below the text fields is a button to add a product photo. When we click on a text field, a keyboard for data entry appears. The keyboard covers the bottom half of the view, and covers the SelectProductImage button. So, a method is added to the application that makes the keyboard disappear if the user presses the Return key after entering value in the Quantity text field. After the keyboard has disappeared, our view will appear, as shown in the subsequent image (a).
When the SelectProductImage button is tapped, the Image Picker view displays the PhotoAlbums, as shown in the next image (b). The category SavedPhotos is created by us to contain the master product photos. We'll talk about the steps for creating our own photo category later. When the SavedPhotos category is selected, we are shown all of the images that we have copied into this category as shown in the next image (c). Let's select the image that represents a sample product, as shown in the subsequent
Let's add three more products: Chocolate shown in the next given image (a); Eggs shown in image (b); and Bread shown in image (c). And, to keep things simple, let's use 100 as the beginning inventory quantity.
After adding four master products, our table view will look like the subsequent image (a). The master products are automatically sorted in alphabetical order.
Modifying the Master Product
The black > indicates that selecting a product item will take us to the product editing view, as shown in the next image (b). All the text fields showing master product
Deleting the Master Product
Selecting the deletion icon on any master product displays a Delete button to reconfirm that we really, really want to remove the item. For example, let's say we want to remove the product named Chocolate from the list. We tap on its deletion icon, which brings up a Delete button, as shown in the following image (a). If we tap this button, Chocolate disappears from the list, as shown in the subsequent image (b). The deletion icon will disappear when the Done button is pressed.
Entering customer information and order
details
The black > to the right of each customer can be used for two purposes:
• To modify a customer's information
• To enter the selected customer's purchases
Deleting customer information
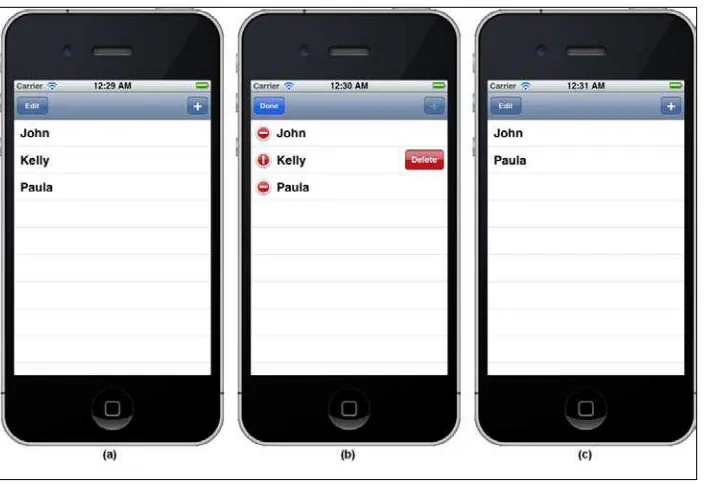
The next given image (a) displays a more specific search on entering more characters in
If the Edit button in the CustomersList view is tapped, a deletion icon appears to the left of the customer's name. The Edit button changes to Done when we are finished editing the data. Tapping the deletion icon of any customer displays a Delete button for confirmation, as shown in the next given image (c). If that button is pressed, the information of the selected customer will be deleted, and pressing Done (from the navigation bar), returns us to the Customer List.
Searching for specific customers
Searching and modifying customer
information
To modify customer information, we first select a customer. The next view displays the customer's data, as shown in the given image (b). The text fields are initially
in disabled mode. To enable the text fields, click on the Edit button from the
navigation bar. The Edit button changes to Done, as shown in image (b). Let's change Ben to David and save it by selecting the Done button. The customer names are alphabetically sorted, so we'll now see that David (previously Ben), appears after Candace, as shown in the given image (c).
Entering Customer Sales Information
Let's enter information about products sold to Candace. On selecting her name, we'll see her information being displayed in the view, as shown in the next image (a). At the bottom of the view is the ProductsInformation button, used to add and edit information about the products sold to the selected customer. When we tap this button, we'll see a view with three buttons—Back, Edit, and Add, as shown in the next image (b).
• Edit is used to delete an entry. This view shows deletion icons to the left of the products sold.
• Add takes us to a view that displays the list of products available for sale, as shown in image (c).
The search bar at the top of the view can be used to search for the desired product. Typing text in the search bar will filter the products and display only those
containing the characters typed into the search bar. After a product is selected, its name, price, and image will appear and we will be asked to enter the quantity of the selected product sold to the customer. For example, if we select Bread from the list, we'll be asked to enter its quantity as shown in image (a). Let's suppose that Candace bought three loaves of bread, so we enter 3 in the Quantity text field as shown in
image (b), then select the Save button from the navigation bar. We will be returned to the table view, which is shown in image (c). Note that the value 3 is displayed to the right of Bread, which tells us that the quantity of the bread sold to Candace
We can again select the Add button to add additional products sold to the customer. The next given image (a) displays the view when Eggs is selected from the available products list. The next given image (b) shows how the name, price, and product image automatically appear, asking the user to fill in the quantity sold.
The Edit button shown in the preceding image (c) is used to delete a product entry sold to the customer. When the Edit button is tapped, we'll see a deletion icon to the left of the items as shown in the next image (a). Note that if we delete a customer, the list of products sold is automatically deleted as well.
Automatic Master Product Update
Summary
• In this chapter, we had an introduction of what Core Data is and its features that make it a preferred framework used for persisting information.
• We also had a brief idea of the Data Model and how it is related to entities, properties, attributes, relationships, inverse relationships, and so on.
• We have also learned about the concept of MVC and the role of the terms: Managed Object Model, Managed Object, and Managed Object Context. Finally, we saw the Core Data API and Persistent Store, Persistent Store Coordinator, Fetch Request, and FetchedResultsController.
• Also, we took a detailed look at the different functions that can be performed by the application we will develop in this book.
• We saw different screenshots the variety of application views, along with their respective controls. Also, we saw the tasks performed when different view controls are selected.
Understanding Objective-C
Protocol and Table View
In the previous chapter, we had a fair enough introduction of the Core Data framework and its components. We also learnt about the Data Model and its different terms including Entities, Properties, Attributes, Relationships, Inverse Relationships, and so on. We also explored the concepts of the Managed Object Model, Managed Object, and Managed Object Context. Finally, we saw the relationships among different components of Core Data API: Persistent Store, Persistent Store Coordinator, Fetch Request, and FetchedResultsController. Besides this, we also had a quick overview of the entire application that we will be building in this book from chapters 4 through 11.
As said in Chapter 1, Overview, for a better understanding of the Core Data, we need to have a good knowledge of two important concepts: How classes can adopt various protocols in Objective-C and knowledge of how information is displayed via Table View control. So, before we begin developing our application—Sales Record System for Departmental Store—we need to learn the first concept, which is about Protocols—what they are, how the methods are declared in a protocol, and the role of the delegate that conforms to the protocol. In other words, we can say that we're going to learn how a class receives tasks performed by another class via the
Delegation Pattern.
You might be thinking, why it is necessary to understand the concept of protocol for developing our Core Data application. The answer is simple. While developing our application (which will begin from Chapter 5, Creating, Listing, and Deleting Names of Customers), we will realize that the main class of the application is the
This chapter will help you to better understand what we mean by the terms protocol, delegate, methods, and so on, through a running application.
Before we begin with the protocols, let's get a quick idea of the two patterns, Delegation pattern and Strategy pattern:
• The Delegation pattern is usually used to allow reuse of objects by allowing a helper object, or delegate, to assume the responsibility of customizing the behavior of the existing object without modifying its code. That is, a delegate is usually used to take some action at a defined hook. This is an alternative to customizing the behavior of a class via subclassing.
• In Strategy pattern, we have a few operations that will perform a calculation as per the strategy of the class that adopts the protocol. Regardless of how this is implemented, the implementation will only ever return a calculated value. The calculated values will not alter or customize the behavior of the object that is making use of the delegate.
Let's see how we can declare and enforce the behavior of delegate objects through protocols.
Protocol
A protocol is not itself a class. Rather, it's an interface that declares methods. Only the methods are declared, that is, there is no body of the method defined in the protocol. The reason that format protocols are used for the delegation pattern is two fold:
1. The protocol acts as a documentation of the delegate interface and it allows for the compiler to check adherence.
2. At runtime you can interrogate an object in a single call to see if a protocol has been adopted rather than checking on a per method basis to see if an object will respond to a message.
The delegates are responsible for implementing the methods of the confirming protocol.
Implementing the Strategy pattern
To work with a protocol, we need to: 1. Define the protocol
Defining the protocol
A protocol is defined by using the @protocol compiler directive, combined with an @end directive. In between the two directives, we must declare the protocol method:
@protocol protocolname method declarations; @end
Creating a delegate property
The delegate property is created in the class definition of the object that will utilize a delegate, not in the protocol nor in the class that adopts the protocol. A delegate property is created by defining an instance variable in the header file and synthesizing it in the implementation file. In the following example, we define an instance variable called delegate of type <protocolname>:
id <protocolname> delegate;
We also define the instance variable as a property with the attributes retain and
nonatomic, used for generating the accessor and mutators:
@property (nonatomic, retain) id <protocolname> delegate;
The instance variable must be synthesized in the implementation file with the following command:
@synthesize delegate
The methods implemented in the delegate class are invoked by using this delegate property.
Declaring protocol methods
Protocol methods are defined between the @protocol and @end directives. The methods can be of two types: optional and required.
The format of the defining methods in the protocol is:
@protocol protocolname
-(void) method1: (data type) parameter1 secondparam: (data type) parameter2;
@optional
-(void) method2: (data type) parameter1 secondparam: (data type) parameter2;