Java Succinctly Part2
ByChristopher Rose And Chiranjit Hazarika Foreword by Daniel Jebaraj
Copyright @2017 All rights reserved.
Co Author : Chiranjit Hazarika
Technical Reviewer: James McCaffrey Copy Editor: John Elderkin
Table of Contents
The Story Behind the Succinctly Series of Books About the Author
Introduction
Chapter 1 Packages and Assert Packages
Adding a package manually
Adding packages using Eclipse suggestions Creating multiple packages
Assert
Chapter 2 Reading and Writing to Files Writing to a text file
Escape sequences Reading a text file Serialization
Serializing objects
Reading serialized objects
Reading an unknown number of objects Chapter 3 Polymorphism
Abstract classes Overriding methods Constructors
Interfaces
Chapter 4 Anonymous Classes
Using an anonymous class as a parameter Anonymous classes and interfaces
Chapter 5 Multithreading Threads
Call stack
Implementing Runnable Concurrency
Thread coordination
Low-level concurrency pitfalls Mutex
Extending the Thread class
Chapter 6 Introduction to GUI Programming Events and event listeners
Example BorderLayout
Chapter 7 GUI Windows Builder Adding a window
Designing a GUI in Design View Converting a design to Swing Adding functionality
Special functions Memory buttons
2-D game engine skeleton Sprite sheet class
GNU image manipulation program (Gimp) Including an image in Java
Loading and rendering sprites Timing and frame skipping Animation class
Game objects Stars
Walls Baddies
Reading the keyboard Keyboard controlled player Collision detection
Player bullets
About the Author
Christopher Rose is an Australian software engineer. His background is mainly in data mining and charting software for medical research. He has also developed desktop and mobile apps and a series of programming videos for an educational channel on YouTube. He is a musician and can often be found accompanying silent films at the Majestic Theatre in Pomona,
Queensland .
Introduction
This is the second e-book in the two-part series Java Succinctly. If you have not read the first book, Java Succinctly Part 1, and if you are not familiar with the basics of the Java language, I strongly recommend you read that e-book first. In this volume, we will concentrate on more advanced features of Java, including multithreading, building GUI applications, and 2-D
graphics/game programming.
Programming computers requires a lot of practice, which means we will inevitably make mistakes and unintentionally cause our programs to crash, hang, and otherwise behave in ways that would make an end user ill. I recommend that you copy and paste the code samples here to get an
overview of how things work. Then, go ahead and changes things later—add new functionality and features to the programs (particularly the Calculator and Space Game applications presented in Chapters 7 and 8). This will give you good insight into a computer programmer’s power. Remember that 100 years ago, there was nobody on Earth who could sensibly demand a billion computations be performed in one second, yet this is trivial for a modern computer programmer. We do it all the time!
Test your programs constantly, and use the debugging features of the IDE (assert, which we will look at in this book), variable watches, and
breakpoints, etc. Save your projects very frequently, too.
Chapter 1 Packages and Assert
Packages
Packages offer a way to organize classes into groups. They allow us to have multiple classes with the same name but that belong to different packages, and they allow us to reuse code. A package is like a folder on a computer. A folder can contain multiple files, just like a package contains multiple
classes. And there can be two files with exactly the same name, so long as they are in different folders. Similarly, you can have two different items with exactly the same identifier in different packages. When we use the import keyword, we can specify the packages and classes to import from.
Adding a package manually
In order to place your class into a new package, you must use the package keyword, followed by the package name, as in Code Listing 1.0.
Code Listing 1.0: Package Keyword class belongs to the MainPackage package!");
} }
Figure 1: Adding a New Package
In the New Package box (the right window in Figure 1), you can specify a new folder for your package. I have left the folder as src. When you name the new package and click Finish, Eclipse will add the new package, but you will notice that MainClass is still not included in our new package, it remains part of the default package. You can drag the MainClass.java file into the MainPackage using the Package Explorer, as in Figure 2. When you move MainClass to the MainPackage package, you might be prompted to save the file first. When the move operation is complete, and if there are no classes in the default package, you will notice that the default package is removed from your project.
Figure 2: Drag MainClass.java into MainPackage
Adding packages using Eclipse suggestions
cursor over the code, and Eclipse will pop up a box full of suggestions as to how to remedy the problem.
Note: In this e-book, I have used Eclipse as the IDE, but many other IDEs allow you to create Java applications. You might like to explore other IDEs, such as NetBeans, IntelliJ, and Android Studio (which is a version of Eclipse primarily designed to assist Android application development).
Figure 3: Eclipse's Suggestions to Add Package
Figure 3 shows two Eclipse suggestions for remedying the problem line “package
MainPackage” when there is no MainPackage. The first suggestion is to move MainClass.java to package MainPackage. This is exactly what we want to do, so we click this suggestion and Eclipse will create the package in the Package Explorer, then move MainClass.java there for us.
Before we fix the problem, let’s also note that there is a light bulb icon in the margin of the code window at the point where our MainPackage is
underlined. You can click this icon to receive the same suggestions as you get by hovering with the mouse cursor.
Be sure to read Eclipse's suggestions very carefully—especially when dealing with potentially large-scale changes such as adding and removing classes from packages. If you are new to programming, good practice is to fix the problems manually before reverting to Eclipse's suggestions.
Programming large-scale projects requires a degree of fluency that can only be obtained through practice.
Let’s add another class in a different package and see how we can import the second class into our MainClass by using the import keyword. Add a new class called OtherClass. Place OtherClass into a package called
OtherPackage either using Eclipse's suggestion or by adding it to the Package Explorer, just as we did a moment ago with MainClass.
Figure 4: Two Packages
Figure 4 shows the two classes, each in a separate package. The code for the OtherClass.java file is listed in Code Listing 1.1.
Code Listing 1.1: The OtherClass package OtherPackage;
public class OtherClass { public void SayHello() {
System.out.println("No, say it yourself!"); }
}
Code Listing 1.2: MainClass.java package MainPackage;
// Import OtherPackage.*; import
OtherPackage.OtherClass;
public class MainClass { public static void main(String[] args) { OtherClass o = new OtherClass(); o.SayHello();
}
Code Listing 1.2 shows how we can import the package called
OtherPackage into our MainClass.java file, create an object from the class, and call a SayHello method. The line that imports the package is "import OtherPackage.OtherClass;". We can also use the wildcard symbol, (*), to import all classes defined as the OtherPackage package with the
commented out line "import OtherPackage.*;".
We can write all the code for a program into a single package or never
Assert
Assert is a useful debugging mechanism. To assert a condition in Java is to ensure that it is true. When we make an assertion, we are saying that if some statement is false, terminate the application and let us know (assert is meant for debugging, it is not designed for the end user or production code). We use assert to include tests in our program. If we are careful in designing the tests throughout our application’s development, assert can let us know that something has gone wrong, and it can improve our ability to maintain and debug our projects.
For the following, I have created a new project called AssertTesting and added a MainClass. The code for the new class is listed in Code Listing 1.3.
Code Listing 1.3: Using Assert import java.util.Scanner;
public class MainClass { public static void main(String[] args) { int numerator; // Numerator for our
fraction. int denominator;// Denominator for our fraction.
Scanner scanner = new Scanner(System.in); // Read a numerator.
System.out.println(numerator + " / " + denominator + " = " +
(numerator / denominator) + " remainder " +
(numerator % denominator));
} }
The program in Code Listing 1.3 reads two integers from the user, a
numerator, and a denominator. It is designed to divide the numerator by the denominator and output the results and remainder of the division. However, if the user inputs 0 as the denominator, the program cannot perform the division because division by 0 is not defined. The program uses “assert(denominator != 0)” to ensure that denominator is not zero.
Notice that the assert keyword has an associated boolean expression in brackets. If the boolean expression is true, the assert passes and the
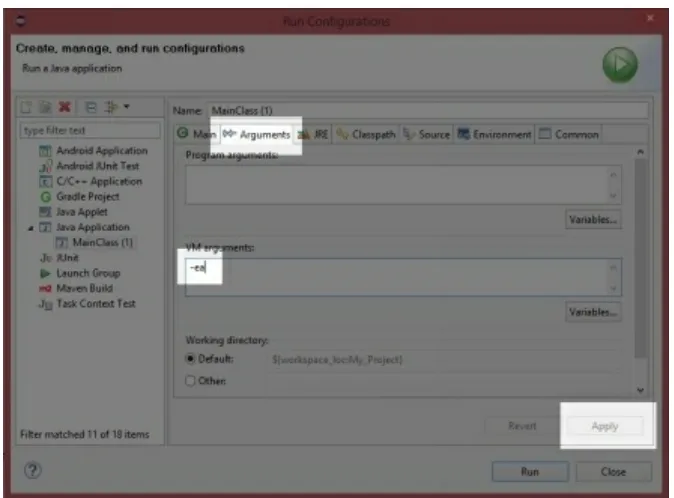
program continues execution normally. If the expression is false (i.e. the user typed 0 as the denominator), then the assertion failed and the program will exit. At least, that is the plan. By default, Eclipse is set to ignore assertions, and upon running the application and inputting a denominator of 0, it will cause our program to crash. In order to run our application and have our assertions halt the program when they fail, we need to supply -ea as a
command-line option to the JVM (-ea is short for enable assertions). In order to supply command-line arguments to the program, select Run from the file menu, followed by Run Configurations. This will open the Run
Figure 5: Specifying Command-Line Arguments to the JVM
In order to turn on assertions, select the Arguments tab and type -ea into the VM arguments box. Do not forget to click Apply after you do this. After the -ea argument is passed to the VM, we can debug our application again, and Eclipse will react more appropriately to our assertions. In order to switch the assertions off (to have the JVM ignore all assertions), remove the -ea
argument from the arguments list as in Figure 5.
When an assertion fails in debugging mode, the program will pause on the assertion and highlight it so that the programmer can examine exactly what went wrong. When an assertion fails in run mode, the console window will show a message that points the programmer to the problem assertion, and to which file the assertion failed.
There are many command-line options available for the JVM and JVC. For more information on the available options, visit:
Chapter 2 Reading and Writing to Files
Reading and writing to files is important because files retain their
information even when the computer is turned off. Files are slower to read and write than RAM (which is where variables and classes are generally stored when the program runs), but files are more permanent. Hard drives represent a memory space called nonvolatile. RAM, however, is volatile—it is cleared when the machine powers down. In addition, hard drives are
generally much larger than RAM. In fact, many modern hard drives are
terabytes in size, whereas the RAM in a desktop computer is often only a few gigabytes.
There are two broad file categories in Java. The difference is arbitrary, and in reality, there is no separation between the two categories, except in how we want to treat the data from the files in our code. Figure 6 shows a binary file on the left and a text file on the right. The two files have been opened in Programmer's Notepad, which is a plaintext editor (available from
http://www.pnotepad.org/).
Figure 6: Binary File vs. Text File
In Figure 6, the binary file on the left is an audio file, and it looks like gibberish. It contains many strange characters and little or nothing is
serialized versions of our objects (we will explore serialization in a moment). On the right of Figure 6 is a text file. Text files consist mostly of human readable characters, such as letters of the alphabet, digits, and punctuation marks. The file on the right contains a description that can be easily read by a human but that a computer would not easily understand. Computers can read text files, but this often involves conversion, e.g., a computer can read the digits 128 from a text file but it must perform a conversion from the string 128 to the integer 128 before the number is readily useable.
Writing to a text file
Create a new project called TextFiles, then add a MainClass and a main method. Code Listing 2.0 shows some simple code for creating and writing a line of text to a text file.
Code Listing 2.0: Creating and Writing to a Text File import java.io.File;
import java.io.FileNotFoundException; import java.io.PrintWriter;
public class MainClass {
public static void main(String[] args) throws FileNotFoundException {
// Create a file:
File myFile = new File("Example.txt"); // Create a writer using the file.
PrintWriter writer = new PrintWriter(myFile); // Write a line of text to the file.
writer.println("This is some example text!"); // Close the writer.
writer.close(); }
}
line, “PrintWriter writer = new PrintWriter(myFile);”, opens the file
referenced by the File object for writing as text. Import java.io.PrintWriter in order to use the PrintWriter class.
If, for some reason, the file cannot be opened, the PrintWriter constructor will throw a FileNotFoundException. For this reason, I have imported java.io.FileNotFoundException and added a throws declaration to my main method.
The next line writes a line of text to our text file using the writer’s println method. The println method takes a string as an argument and writes the characters to the file, appending a new line character to the end.
Finally, the writer is closed on the last line using writer.close(). We must make sure that we close every file we open with our applications because reading and writing to files with multiple programs at once is very difficult to coordinate, and often the operating system will not allow multiple programs to access a single file. Close your files in order to enable other programs (or other instances of your program) to access the file.
Upon running the application, it will appear as though nothing happened. But if you right-click on your project in the Package Explorer and select Refresh, as in Figure 7, you will notice that
Figure 7: Refresh to Show the Example.txt File
We do not typically want to shut down our application when an error occurs, and instead of using a throws declaration for our main method, it is common to surround any code that deals with opening and saving files with try/catch blocks. Code Listing 2.1 shows the same program as above, except it uses a try/catch to respond to a FileNotFoundException more gracefully.
Code Listing 2.1: Surrounding File IO with Try/Catch import java.io.File;
import java.io.FileNotFoundException; import java.io.PrintWriter;
public class MainClass {
public static void main(String[] args) {
// Create a file.
// Surround all file manipulation with try/catch. try {
// Create a writer using the file.
PrintWriter writer = new PrintWriter(myFile); // Write a line of text to the file.
writer.println("This is some example text!"); // Close the writer.
writer.close();
}
catch (FileNotFoundException e) {
// File could not be opened, show an error message. System.out.println("The file could not be opened.");
} } }
You might have noticed that each time you run the code from Code Listing 2.1, the data in the file is overwritten. We can also append new data to a file by using the FileWriter class and opening the file with the append parameter set to true (see Code Listing 2.2 for an example of appending text to a file). This is useful for logging purposes, when we do not want to overwrite the previously logged data each time the file is written to.
Code Listing 2.2: Appending Text to a File import java.io.FileWriter; import
java.io.IOException; import java.io.PrintWriter;
public class MainClass {
public static void main(String[] args) { try {
FileWriter file = new FileWriter("Example.txt", true); // Create a writer object from the file:
PrintWriter writer = new PrintWriter(file);
// Write some new text: writer.println("This text will be added to the end!");
We can write data and variables to a text file, but we must be aware that when we read the data, it must be parsed. Code Listing 2.3 shows an example of writing data to a text file, and we will see a much faster method for
writing data in the section on serialization.
Code Listing 2.3: Writing Data/Variables to a Text File import java.io.File;
import java.io.FileNotFoundException; import java.io.PrintWriter;
public class MainClass { public static void main(String[] args) { File file = new File("test.txt");
try {
PrintWriter out = new PrintWriter(file); // Writing text
out.println("Be good. If you can't be good, be lucky!\n\t~ Alan Davis");
out.println( 129 ); // Integers out.println( 2.7183f ); // Floats out.println( true ); // Boolean out.println( 1.618034 ); // Double
// Close writers after using them so they can be opened by // other programs:
Notice that upon running the application, when you refresh your project in the Package Explorer and open the file “test.txt”, the file will contain the following:
Be good. If you can't be good, be lucky! ~ Alan Davis
129 2.7183 true 1.618034
The numbers are human readable, i.e. the float 2.7183f looks basically the same as it did in the code. This is very different from the way the computer actually stores a float in binary. Also note the use of “\n\t” in the quote from Alan Davis—this causes a new line and a tab character to be inserted into the file. These symbols are called escape sequences.
Location. Alternatively, you can right-click the file in the Package Explorer and select Show in and System Explorer. This will open the file’s location in the Windows Explorer.
Escape sequences
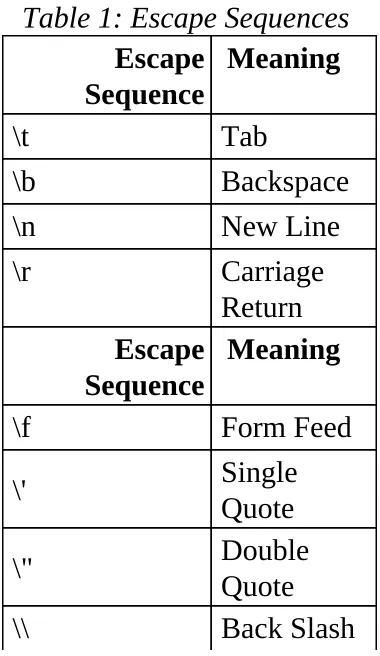
Before we go any further, let’s take a brief detour into escape sequences. When we print text to the screen, sometimes we need to use special symbols in order to add new lines, tabs, or characters that would otherwise end the string (i.e. printing the double-quote character: "). Escape sequences can be used anywhere in Java that writes strings to the screen or a file. This includes System.io and the PrintWriter.println method. Table 1 shows the escape sequences available in Java.
Note: Escape sequences are not inherent to strings. There is nothing about “\t” that makes the JVM print a tab character by itself. Escape
sequences are a programmed behavior in some of the methods that deal with strings (such as println).
Code Listing 2.4: Escape Sequence Examples
// \n causes a new line:
System.out.println("First line\nSecondline!"); // \t inserts a tab, i.e. a small block of whitespace.
System.out.println("This will be separated from\tThis with a tab!"); // Use \" to write " and \' to write '
System.out.println("Then Jenny said, \"It\'s above the fridge\"."); // To print a slash
System.out.println("\\ wears a top hat!");
// Some systems require \r\n in order to use a new line. // Other systems will read this as two new lines, i.e. one
// carriage return and one new line, both of which look the same. System.out.println("New\r\nLine!");
Reading a text file
We can read from a text file by using a scanner. This is similar to reading from the console, except that instead of creating the scanner and passing the System.in parameter, we pass our file. Code Listing 2.5 shows an example of reading the text from Code Listing 2.3.
Code Listing 2.5: Reading from a Text File
import java.io.File;
import java.io.FileNotFoundException; import java.util.Scanner;
"int: " + i + "\n" + "float: " + f + "\n" + "boolean: " + b + "\n" + "double: " + d );
}
catch (FileNotFoundException e) { e.printStackTrace();
} } }
Serialization
We often want to save our objects to disk so that they can be restored later, after the machine has been switched off and on again. The act of converting an object into a format for saving to disk is called serialization. We could employ the preceding text reading/writing methods and specify each member variable to save to a text file, but this technique is slow and requires us to specify each member variable to be saved in the classes, as well making sure to read the members in exactly the same order as we wrote them.
Serializing objects
There are many ways that objects can be saved to disk. When we serialize an object, we typically use an ObjectOutputStream, which is a class that takes an object and performs the conversion from the RAM representation of the object to the disk representation (i.e. serializes the object). Likewise, when we come to deserialize or read our objects back from the disk into our program, we usually use an ObjectInputStream in order to perform the conversion from the disk's representation of the object back to the RAM representation.
Code Listing 2.6: Implementing the Serializable Interface import java.io.Serializable;
public class Animal implements Serializable { // Member variables
System.out.println("Name: " + name + "\n" + "Height: " + height + "\n" +
"Extinct: " + extinct + "\n"); }
}
Serializable (we will look at interfaces and implements in more detail in the following chapter). Java takes care of the rest for us. Now that we have a serializable class, we need to create some objects, then save them to disk. Code Listing 2.7 shows how to write an Animal object to disk using serialization.
public class MainClass implements Serializable {
public static void main(String[] args) throws FileNotFoundException, IOException {
// Create some animals from our Serializable class:
Animal stego = new Animal("Stegosaurus", 12.5f, true);
Animal croc = new Animal("Crocodile", 3.2f, false); Animal mozzie = new Animal("Mosquito",
File file = new File("animals.dat");
// Create a FileOutputStream for writing to the file. FileOutputStream fileOutput = new
// Create object output stream to write serialized objects // to the file stream:
ObjectOutputStream objectOutput = new ObjectOutputStream(fileOutput);
// Write our objects to the stream: objectOutput.writeObject(stego);
objectOutput.writeObject(croc);
objectOutput.writeObject(mozzie); // Close the streams:
objectOutput.close(); fileOutput.close(); }
}
Code Listing 2.7 shows the steps to creating a serializable object from a class, then opening a file stream and an object stream.
If we run the program from Code Listing 2.7, then check the contents of the file (by refreshing the project in the Package Explorer, then double-clicking the file to open its contents), we will see that it no longer contains human readable data, but rather binary data (see Figure 8).
Figure 8: Serialized Objects
Figure 8 shows the contents of the file animals.dat after our three objects have been serialized. The contents of the file are not readable, and although there are a few scattered words, most of the file consists of nonsense
import
java.io.FileInputStream; Reading serialized objects
Now that we have looked at how to serialize objects, let’s look at how to read them back from the disk into RAM. Code Listing 2.8 shows an example of reading serialized objects from a file.
Code Listing 2.8: Reading Serialized Objects import java.io.File;
public class MainClass implements Serializable {
public static void main(String[] args) throws FileNotFoundException, IOException {
// Create some animals from our Serializable class:
Animal stego = new Animal("Stegosaurus", 12.5f, true);
Animal croc = new Animal("Crocodile", 3.2f, false);
// Declare an array to FileOutputStream fileOutput = new FileOutputStream(file); // Create object output stream to write the serialized objects // to the file stream: Reading the objects back into RAM:
animals[1] = (Animal) objectInput.readObject(); animals[2] = (Animal)
objectInput.readObject();
Code Listing 2.8 contains the code to serialize first, exactly the same as before. But the code highlighted in yellow shows how to deserialize the objects, then reads them back from disk into the array called animals. Reading an unknown number of objects
If you do not know how many objects are serialized in a file, you can use a while loop without a terminating condition to read objects until an
EOFException is thrown. EOFException stands for
End-Of-File Exception. Code Listing 2.9 shows an example of reading the three animals into an ArrayList and catching the End-Of-File Exception. I’ve left out the code that serializes the three objects, but it would be exactly the same as Code Listing 2.7.
In Code Listing 2.9, we need to either catch or throw the
ClassNotFoundException. If the file does not contain data that is
serializable to our particular class, this exception will be thrown. We can either catch it or throw it. In Code Listing 2.9, I have dealt with the
ClassNotFoundException by specifying that the main method throws it. Code Listing 2.9: Reading an Unknown Number of Serialized Objects import java.io.EOFException;
import java.io.File;
import java.io.FileInputStream; import
import java.io.FileOutputStream;
public class MainClass implements Serializable {
public static void main(String[] args) throws FileNotFoundException, IOException, ClassNotFoundException {
// ...
// The code above this line is the serializing code.
// Deserializing an unknown number of objects:
// Declare an array to hold the animals we read:
ArrayList<Animal> animals = new ArrayList<Animal>();
}
catch (EOFException e) {
// We do not have to do anything here; this is the normal
// termination of the loop above when all objects have
// been read. }
// Close the streams:
objectInput.close(); fileInput.close();
for(Animal a: animals) { a.print();
Chapter 3 Polymorphism
Polymorphism is a term that refers to code that might behave differently each time it is executed. There are many types of polymorphism in programming, but the term is often used to refer to a particular mechanism in
object-oriented programming. Our objective is to define a parent class with some specific method or methods, then to define multiple child classes that inherit and define different code for the methods. Then, when we execute the
method using the child classes, we can use the same code. However, the child classes will each perform their own specific versions of the methods. In order to illustrate how the same code can behave differently, imagine we are creating a game (we will implement a game in the final chapter of this e-book). In a game, there is often a virtual world populated by objects,
Abstract classes
Notice that the GameObject class is marked with the abstract keyword. This is a safety measure—we do not want to create any instances from the generic GameObject class, so we mark it as abstract in order to prevent instances being created. Any class with one or more abstract methods must be marked as abstract itself. This class has the move method, which is
abstract, so the entire class must be abstract. If you try to create an instance of the GameObject class, Eclipse will give you an error: Cannot instantiate the type GameObject. I call this a safety measure because we could define a body for move in GameObject and remove the abstract keywords
altogether, but it may not be wise—in order for an object in our game to be useful, it must be of some specific type, not just a generic nameless “object.” Notice also that the move method has no body. It consists of nothing more than a function declaration with a semicolon. We are saying that there exists another class, or classes, capable of performing the function move. We may want to refer to instances of these other classes as GameObject objects, but they must specify what the move method does or they will themselves be abstract.
Code Listing 3.1: NPC Class public class NPC extends GameObject {
public void move() { System.out.println(
"The shopkeeper wanders around aimlessly..."); }
}
Code Listing 3.2: Player Class public class Player extends GameObject {
public void move() {
System.out.println("It is the player's move..."); // Poll the keyboard or read the mouse movements, etc. }
}
In Code Listings 3.1 and 3.2, we have defined child classes that inherit from the GameObject class by using the extends keyword. The extends keyword means that all the member variables and the member methods in the
GameObject class also belong to this class. What we have created is called a class hierarchy, which is something like a family tree. The parent class sits at the top and defines all the elements that the lower classes inherit (see Figure 9). The lower classes describe more specific items than does the parent. In our case, the parent describes a generic move method and the child classes define what it means.
Figure 9: GameObject Class Hierarchy
advantages derived from the class hierarchy.
We can create instances of NPC and Player and store them in a collection of GameObjects. All
NPCs are GameObjects, and all instances of the Player class are also GameObjects. Code Listing 3.3 shows an example main method that
employs a collection of GameObjects but that uses polymorphism to call the two different versions of move.
Code Listing 3.3: Polymorphism public class MainClass { public static
void main(String[] args) { // Create 5 objects in our game.
GameObject[] gameObjects = new
The line highlighted in yellow in Code Listing 3.3 is an example of
polymorphism. The first time the loop iterates, the local variable i will be set to 0, and this line will cause the method
are all NPCs, which means the next iterations of this loop will call NPC.move(). The same line of code (i.e.
“gameObjects[i].move();”) is being used to call two different methods. We should understand that we did not create any instances from the
GameObject class directly. We cannot do this because the GameObject class is abstract. We created instances of the NPC and Player classes, but then we used the generic term GameObject to store them and call their methods.
Upon running the application from Code Listing 3.3, the output is as follows: It is the player's move...
The shopkeeper wanders around aimlessly... The shopkeeper wanders around aimlessly... The shopkeeper wanders around aimlessly... The shopkeeper wanders around aimlessly...
Note: In Java, child classes can have only one parent class each. Some languages allow multiple parent classes, called multiple
Overriding methods
An abstract parent class can contain member methods and variables. In the previous examples, the GameObject class might contain x and y variables that specify where the object resides. We can define a method called print that outputs some information about the object (see Code Listing 3.4).
Code Listing 3.4: Nonabstract Parent Methods // Abstract parent class: public
Any child classes that inherit from the GameObject class in Code Listing 3.4 will automatically have the x and y variables of their parent class. They will also inherit the print method, which is not abstract. If we add a loop to our main method to call print with each of our five objects (Code Listing 3.4), they will each use the only version of the print method so far defined— the parent’s print method.
Code Listing 3.5: Calling the Parent’s Print Method
} }
The output from Code Listing 3.5 is as follows: Position: 0, 0
Position: 0, 0 Position: 0, 0 Position: 0, 0 Position: 0, 0
However, if we define a print method with the same signature as the parent’s method in one of the child classes, we will see that the child classes can override the parent’s method. Code Listing 3.6 shows the same code as the original Player class, except that this time I have overridden the parent’s print method.
Code Listing 3.6: Overriding a Parent’s Method public class Player extends GameObject {
public void move() {
System.out.println("Player position: " + x + ", " + y);
} }
First, notice that the @Override annotation is optional. The print method in the Player class of Code Listing 3.6 has exactly the same name as the
Constructors
Constructors are methods that are used to create new instances of objects. An abstract class can supply a constructor, even though we are not allowed to create instances of it. In Code
Listing 3.7, the GameObject class has a constructor defined that sets the x and y values to -1.
Code Listing 3.7: Constructor in an Abstract Parent // Abstract parent class:
public abstract class GameObject { // Member variables:
Player position: -1, -1 Position: -1, -1
Position: -1, -1
Position: -1, -1Position: -1, -1
However, we can also specify constructors for the child classes. Code Listing 3.8 shows the Player class with its own constructor.
Code Listing 3.8: Constructor for the Player Class public class Player extends GameObject {
// // Poll the keyboard or read the mouse movements, etc.
}
@Override
public void print() {
System.out.println("Player position: " + x + ", " + y); }
Super keyword
When we need to refer to the parent class from within the child classes, we use the super keyword. As an example, Code Listing 3.9 shows how to call the GameObject constructor from within the Player constructor.
Code Listing 3.9: Child Constructor Calling Super Constructor // Constructor public
Player() {
// Call the parent's constructor. super();
x = y = 100; // Start the player at 100x100. }
instanceof keyword
Before we move on to interfaces, the instanceof keyword can be used to test the type of an object. The main method in Code Listing 3.10 uses the same class hierarchy as before.
Code Listing 3.10: Testing with instanceof public class MainClass { public static
void main(String[] args) { // Define some object:
GameObject someObject = new Player(); // Test if the first object is a GameObject.
if(someObject instanceof GameObject) System.out.println("Object is a GameObject!");
else
System.out.println("Not a GameObject..."); // Test if it is a Player.
if(someObject instanceof Player)
System.out.println("Object is a Player!"); else
System.out.println("Not a Player...");
// Test if it is an NPC.
if(someObject instanceof NPC)
System.out.println("Object is a NPC!"); else
System.out.println("Not an NPC..."); }
}
use instanceof to test if the type is GameObject, Player, and NPC. Note that the data type of an object can be more than one thing. The output from the preceding main method shows that someObject is both a Player object and a GameObject. However, it is not an NPC:
Object is a GameObject! Object is a Player!
Interfaces
Abstract methods are something like a contract. We say that any class that derives from a parent is capable of performing the abstract methods it inherits. Interfaces take abstract methods to the extreme.
An interface is similar to an abstract parent class, except that it will contain nothing but abstract methods (i.e. there are no methods specified at all in an interface, only method names). Interfaces do not specify member variables (though they can specify static members or class variables). When we derive a class from an interface, we are saying that the derived class must perform the set of methods specified in the interface (or the derived class must itself be an interface or abstract class).
Interfaces often describe some very general aspect of a class hierarchy. Often, interfaces are introduced as being some ultra-abstract version of a class. But there is a subtle difference between the way that an abstract class is typically used and the way an interface is typically used. Interfaces often describe that some particular activity can be performed using the instances of a class rather than describing that the instances can be used to perform some task. For example, an interface might describe objects that are sortable. Many types of objects are sortable—names can be sorted alphabetically, playing cards, and numbers, for example. But while these objects are sortable, the exact mechanism for comparing each is different. We could implement an interface called Comparable, meaning that any two objects that derive from the interface can be compared and thus a list of them might be sorted. Comparing and sorting objects is very common, and Java includes an interface called Comparable already.
Note: In Java, it is not possible to inherit from multiple parent classes. However, it is perfectly legal to inherit from multiple interfaces.
Begin a new project called Interfaces and add the Point class in Code Listing 3.11.
{ // Member variables: public double x, y;
// Constructor public Point(double x, double y) {
// Compute the absolute magnitude of each point from the origin: Double thisAbsMag = Math.sqrt(x * x + y * y);
// Note: Double.compareTo does something like the
Notice the keyword implements on the first line of Code Listing 3.11, which is followed by the interface Comparable. This is how we inherit the
methods from an interface. We do not use the term extends as we did with classes. The Comparable interface defines a single method that has the signature “public int compareTo(Object o)”. Therefore, in order to implement the Comparable interface, we must supply this method in our class.
When we supply the compareTo method in our class, we have to understand the meaning of the parameters and the output. The method takes a single parameter that is presumably the same data type as the class we are defining (it does not make sense to compare points to playing cards, etc.; we are only interested in sorting points here). I have first supplied a test inside the
compareTo method in order to make sure that the object we are comparing is actually a Point. If the object is not a Point, we could throw an exception, but I have returned 0 in Code Listing 3.11, which means the two objects are equal.
meaning to be based on the absolute magnitude of the points (i.e. the distance from 0 on a 2-D plane, which is the square root of (x*x+y*y)). You will notice that I used the boxed version, Double, because the native double type does not implement the Comparable interface, while the boxed version, Double, does. After we have computed the distance between this and o, we call Double.compareTo and return the result. I also included a comment at the end of the code that shows roughly how the Double.compareTo method will behave.
Now that we have a class that implements the Comparable interface, we can create a collection of instances from our Point class and sort them using the standard Java sorting. Next, let’s create a new class called MainClass. The code for this class is presented in Code Listing 3.12.
Code Listing 3.12: Sorting a List of Comparable Objects import java.util.ArrayList; import
java.util.Collections;
public class MainClass { public static void main(String[] args) { // The total number of points in the demo:
int numberOfPoints = 5;
// Create a list of random points:
// Print the sorted points: System.out.println("Sorted: "); for(int i = 0; i < numberOfPoints; i++) points.get(i).print();
// Sort the items in reverse order (from largest to smallest): points.sort(Collections.reverseOrder());
// Print the points sorted in reverse:
System.out.println("Sorted in Reverse: "); for(int i = 0; i < numberOfPoints; i++)
points.get(i).print();
} }
In Code Listing 3.12, we use Collections.sort and
points.sort(Collections.reverseOrder) in order to sort the points and also sort them in reverse order. These sorting methods are designed for use with any objects that implement the Comparable interface. This means we do not have to write a QuickSort (or some other algorithm) and mess around with swapping elements in arrays and comparing them efficiently in an
Chapter 4 Anonymous Classes
Anonymous functions and classes appear in the code itself. They are not declared external to the body of the calling function, but instead are placed inline in the code, and they have no name (hence the term anonymous). They are often used to define a functionality or a class that is only required once at a point in the code. In order to use an anonymous class, we must implement an interface or extend an existing class. An anonymous class is a child class; it is an unnamed derived class that implements or extends the functionality of a parent class. We will see extensive use of anonymous classes in the event handling of the calculator application in Chapter 7.
Code Listing 4.0: Anonymous Inner Class vs. Class Instance public class MainClass {
// Parent class static class OutputLyrics { public void output() {
System.out.println("No lyrics supplied..."); }
}
public static void main(String[] args) {
// Create a normal instance from the OutputLyrics class. OutputLyrics regularInstance = new OutputLyrics(); // Anonymous Inner Class
anonymousClass
Code Listing 4.0 shows a basic example of an anonymous inner class. First, we define a parent class, which is called OutputLyrics. The class contains a single method that prints a string of text to the screen called output. Inside the main method, we create an instance of the OutputLyrics class. Note that the section marked with the comment “// Anonymous Inner
Class” in the next line is important—we define and declare a new class that derives from the OutputLyrics class and that defines its own output
method. Notice that we are creating an instance from a class that derives from OutputLyrics. The instance is called anonymousClass, but the class itself has no name. The syntax for an anonymous class is the same as the syntax for creating an instance from an existing parent class, except that the definition is followed immediately by a code block that defines the child class. Code Listing 4.1 shows the important lines from Code Listing 4.0.
Code Listing 4.1: Anonymous Class // Anonymous Inner Class
OutputLyrics = new OutputLyrics() { public void output() { System.out.println(
"Desmond has a barrow in the market place."); }
};
Notice the first line in Code Listing 4.1 does not end with a semicolon, as a typical object definition would. Instead, we open a code block and override the output method. Declaring an anonymous inner class in this manner is a statement, and the semicolon actually comes at the end, after the code block is closed.
Using an anonymous class as a parameter
The example in Code Listing 4.0 was trivial—it showed the basic syntax for using an anonymous class, but it is not a good example of why we would use this mechanism. Anonymous classes are often used when we need to pass functionality as a parameter to a method. For instance, if we know that we want to perform some operation between two integers and return some result, we could use an anonymous class that derives from the operation class, as per Code Listing 4.2.
Code Listing 4.2: Using Anonymous Inner Classes as Parameters
public class MainClass {
static // Parent class classMathOperation {
public int operation(int a, int b) { return 0;
thod that takes an object of MathOperation as a parameter. int performOperation(int a, int b, MathOperation op) {
return op.operation(a, b);
static void main(String[] args) { // Some variables int x
= 100; int y = 97;
return a + b; }
}); // Ca
int r ll the PerformOperation function with subtraction:esultOfSubtraction = performOperation(x, y, // Anonymous inner class used as a parameter.
new MathOperation() { public int operation(int a, int b) { return a - b;
In Code Listing 4.2, we create a parent class called MathOperation. The class has a single method that takes two int parameters and returns some result. We also define a static method called performOperation that takes two int parameters and an instance of the MathOperation. The fact that the performOperation method takes a MathOperation as a parameter is the main concept in this illustration.
In the main method, we create two variables—resultOfAddition and resultOfSubtraction. The variables are defined as being the result from a call to performOperation, and two integer parameters, x and y, are passed. However, the crucial part is the third parameter to these calls to
int resultOfAddition = performOperation(x, y,
// Anonymous inner class used as a parameter. new
MathOperation() {
public int
operation(int a, int b) {
return a + b; }
});
The third parameter is an anonymous inner class. Instead of passing an
Anonymous classes and interfaces
The previous examples used a class as the parent for our anonymous inner classes. However, the parent class is often abstract or an interface. In Code Listing 4.3, when we use the child classes to call a single method, called operation, what are really doing is passing functionality to the
performOperation class. In our example, we defined the MathOperation class as a normal class, but it might be more useful to define it as an interface (or perhaps an abstract class). The class has only a single method, and it makes little sense to perform an operation when we do not know what the operation is. Code Listing 4.4 shows the same example, except that the MathOperation class has been declared as an interface rather than a class.
Code Listing 4.4: Using an Interface as the Parent Class
interface
// Method that takes an object of MathOperation as a parameter. static int performOperation(int a, int b, MathOperation op) { return op.operation(a, b);
}
public static void main(String[] args) { // Some variables
int x = 100; int y = 97;
// Call the PerformOperation function with addition:
new MathOperation() {
int resultOfSubtraction =
performOperation(x, y,
System.out.println("Subtraction: " + resultOfSubtraction);
} }
In Code Listing 4.4, the relevant changes are highlighted in yellow. Interfaces consist solely of abstract methods, so there is no longer a body for the operation method defined in the MathOperation interface.
The examples we have seen so far show the basic syntax of an anonymous inner class—they do not illustrate the most common usage of this
mechanism. Inner classes are most commonly used to provide functionality for callbacks in event-driven GUI programming. We will see extensive use of inner classes in the section on GUI events in Chapter 7. The basic
objective is to save code. We do not need to declare a class and create an instance to state what should occur when the user clicks a mouse or presses a key at the keyboard. Instead, we declare and define an anonymous inner class that specifies the action to be undertaken when these events occur. This makes our code easier to read, and shorter, because we define the
Chapter 5 Multithreading
Multithreading is a technique for programming more than one execution unit at the same time. Computers traditionally run with a single CPU executing the code. The CPU runs through the instructions one after another, jumping to various methods. CPUs execute code very quickly, but there is a limit to the speed any CPU can execute. A modern CPU can execute billions of instructions every second, but it is very costly to increase this execution speed—the hardware begins to require extreme measures to prevent the CPU from melting or catching on fire (for instance, water and even liquid nitrogen have been used to cool very fast CPUs).
Thankfully, we can greatly improve the performance of our CPUs without increasing the clock speed of the units. Instead, manufacturers add multiple execution units to a single die (die is simply a word for the physical object inside the computer upon which the CPU is etched). The units are called cores, and each can be thought of as being a complete CPU of its own.
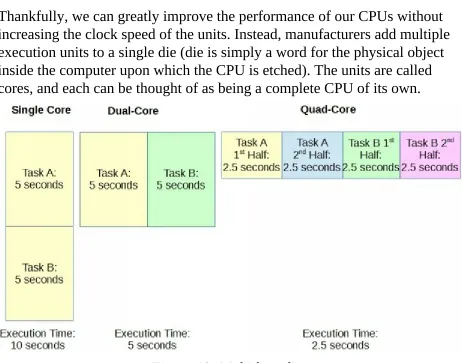
Figure 10: Multithreading
take the CPU five seconds to execute, and thus the total execution time is 10 seconds.
In the middle of Figure 10, the dual-core CPU can execute Tasks A and B at the same time by allowing each to be executed by one of its two cores. Each task takes five seconds to compute, but the tasks are executed at the same time, therefore they will finish at the same time, taking five seconds (plus a small amount of time for overhead).
Finally, the right side of Figure 10 shows a quad-core CPU. It is sometimes possible to split tasks into several sections, and in the diagram, we have assigned one of the four cores of our quad-core CPU to execute a half of Tasks A or B. Execution of half of a task takes 2.5 seconds, and all four cores will finish after approximately 2.5 seconds. This speed represents four times the performance of the single core CPU.
Figure 10 shows a hypothetical case. This is the best possible case, and in practice tasks do not often split in half so easily. However, you can see that as the number of cores increases, the ability of the cores to share the
workload becomes very useful. It is often practical to improve the performance of our applications by 200% or even 400% by employing multithreading and by cleverly allocating our workloads to different cores. As we shall see, typically cores are required to communicate and coordinate their actions with each other, and often we do not get a straight 100%
improvement in speed when we add another core.
Multithreading is an extremely vast and complex topic, and we will only scratch the very surface in this text, but you should practice your
multithreading skills frequently because the future of computing is very heavily dependent on efficient multithreading.
Threads
A thread is an execution unit. For instance, when our application is run by the user, the JVM will create a single, main thread for us to begin executing the main method. It may also create several background threads for garbage collection (to delete unneeded objects behind the scenes), and other
main method, as we have seen many times.
Call stack
When a thread executes code, it jumps to various points in the code while it calls the methods. These method calls can be nested (i.e. a method can call itself; it can call methods). Methods may require parameters to be passed, and they can specify their own local variables. In order to return from
methods in the correct order, to pass parameters to and from methods, and to keep track of the local variables of methods, an area of RAM is allocated called the “call stack.” Each thread has its own call stack, and threads can potentially call any sequence of different methods.
Eclipse shows a simple version of the program’s call stack when it pauses at a breakpoint. Figure 11 shows a screenshot of the Debug window while a program runs. The information presented is the name of the running
application class (MainClass). The thread is called [main], and it suspended due to a breakpoint at line 18 in the Animal class source code file. The next lines are the call stack. The program has executed the Animal.print method, along with the method before that—the MainClass.main method (which called the Animal.print method).
Figure 11: Debug Window
In Java, threads are resource-heavy. It takes time for the system to create and run a new thread, and creating a new thread results in the allocation of other system resources (such as RAM for the call stack). We should never attempt to create hundreds of threads, nor should we attempt to create and kill
threads a system can concurrently execute is always limited by the physical hardware (i.e. the number of cores in the system, the amount of RAM, the speed of the CPU, etc.). There are several methods by which multiple threads can be created in Java, and we will look at two— implementing the
Runnable interface and extending the Thread class.
Note: When we create a new thread, it will often be executed on a new core within the CPU. However, cores and threads are not always directly associated. Often, the operating system switches threads on and off the cores, giving each thread a small
Implementing Runnable
In order to use multiple threads, we can create a class that implements the Runnable interface. This allows us to create a class with a private member thread. The Runnable interface defines an abstract method called run that we must implement in our derived classes. When we create a new thread, it will execute this method (probably using a different core in the CPU to the core that executes the main method). Note that we can create two, four or even eight threads, even if the hardware only has a dual-core CPU. But be careful—as mentioned, threads are resourceheavy, and if you try to create 100 or 1000 threads, your program will not run blisteringly fast, it will stop completely and possibly crash the program, if not the entire system
(requiring a reboot).
Code Listing 5.0: MainClass
public class MainClass { public static void main(String[] args) { // Define Thready objects:
Thready t1 = new Thready("Ned"); Thready t2 = new Thready("Kelly");
this.name = name;
System.out.println("Created thread: " + name); }
// Init and start thread method: public void initThread() {
System.out.println("Initializing thread: " + name);
thread = new Thread(this, name);
thread.start(); }
// Overridden run method: public void run() {
// Print initial message:
System.out.println("Running thread: " + name); // Count to 10:
for(int i = 0; i < 10; i++) {
System.out.println("Thread " + name + " counted " + i);
}
try {
// Wait for 1 second: Thread.sleep(1000); }
catch (Exception e) {
System.out.println("Error: " + e.getMessage()); }
Figure 12: Output from Ned and Kelly
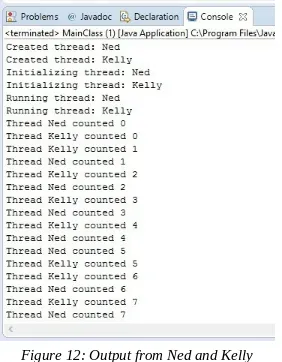
Figure 12 shows one possible output from the program in Code Listings 5.0 and 5.1. Code Listing 5.1 shows the Thready class that implements the Runnable interface, and it defines the run method, which is required to implement Runnable. The class defines a Thread object called thread, which we instantiate in the method called initThread. Then we call the Thread object’s start method, which will in turn call the Runnable
interface’s run method. In the run method, we count from 0 to nine, pausing for one second between each number. Upon running the application, you will see the two threads (created in the MainClass from Code Listing 5.0)
counting slowly to nine.
There are several very important facts about the program from Code Listings 5.0 and 5.1:
• The exact timing and order of the counting threads is not known to us (Ned could inexplicably count slightly faster than Kelly, or vice versa).
• If you run this application on a multicore desktop PC, there is a high likelihood that Ned and Kelly (our threads) will run on different cores inside the machine.
Concurrency
The point above about not knowing the exact order of execution is
important! When we look at the code from Code Listings 5.0 and 5.1, we cannot tell what will happen. Ned could count faster, or Kelly could count faster (the two will count at approximately one second per number, but on the nanosecond level, one thread will always beat the other).
The two threads could count completely randomly—they could swap leader every number, so that each time we execute the application, we might get a different output. Ned and Kelly are called “concurrent.” If you cannot determine in which order the threads will execute simply by looking at the code, then the code is concurrent. It is never safe to assume an order of execution for concurrent threads (in fact, concurrency means we cannot assume the order!). We must be extremely careful when we coordinate concurrent threads. We cannot tell what will happen when we look at the code because the CPU’s task is extremely complicated—it is executing the operating system and hundreds of background tasks. It executes time-slices of each thread and switches the background processes on and off the physical cores. Somewhere, in this mess of instructions, our humble little Ned and Kelly threads will be given some time to execute on a core, then they are put to sleep for some other program to execute on the core. We have no practical way of guessing in which order our threads will execute, thus our threads are concurrent. Generally, we hope that the CPU is not too busy executing
Thread coordination
When the tasks that our threads perform are completely independent, the algorithm is called embarrassingly parallel. Embarrassingly parallel
algorithms are the best-case scenario for multithreading because we can split the workload perfectly and threads do not need to communicate or
synchronize in any way. This means each thread can perform its assigned task as quickly as possible with no interruptions and without worrying about what any other threads are doing. In real-world applications, many
algorithms do not split so perfectly into two or more parts. The workload of each thread is typically not 100% independent from that of the other threads. Threads need to communicate.
In order for one thread to communicate with another, the threads need a shared resource.
Imagine Ned and Kelly wish to perform two tasks—BoilWater and
PourCoffee. The problem is that we need the water boiled before the coffee is poured. So, if Ned is assigned the task of boiling the water, and Kelly is assigned the task of pouring the coffee, then Ned needs some way to indicate to Kelly that the water has been boiled. And Kelly must wait for some signal from Ned before she pours the coffee.
Low-level concurrency pitfalls
Let us take moment to examine some important concepts and pitfalls
involved in concurrent programming. This section might seem particularly low level, but nothing in concurrent programming makes sense unless we know why we must watch our step.
In the current context, resources are variables. Shared resources are variables to which multiple threads can read or write. When we share variables
cycle. A thread first reads the current value of the variable from RAM, then it modifies it by performing the increment on a temporary copy of the
variable, and finally it writes the result back to the actual variable in RAM. Modern CPUs perform almost all operations on variables using a
Read/Modify/Write cycle because they do not have the ability to perform arithmetic on the data in RAM. RAM does not work that way—it allows two operations: read a value at some address or write a value to some address. It does not allow a CPU to add two values together or subtract one from the other. Therefore, the CPU requests some variable from RAM, storing a copy in its internal registers (a register is a variable inside the CPU). The CPU then performs the arithmetic operation on this copy and finally sends the results back to RAM.
Figure 13 shows an example of a race condition. The example shows two threads trying to increment the shared variable from 0 to 2 at the same time. The two threads execute one step at a time, and the time is listed along the left side of the diagram. Both threads read the value of the shared variable as 0, increment this to 1 using their internal register, and write the 1 as the
result. We can see that the final result at time-step 4 is 1 instead of 2. But this is not the only possibility—the CPU is making up the results as it schedules the threads for execution, and the result is out of the programmer’s control.
Figure 13: Race Condition
are no race conditions. This often means that only one thread is allowed access to a shared resource at a time. In order to create shared resources in Java, we can use the synchronized keyword. Any method marked as
Mutex
Mutual Exclusion, or a mutex, is a parallel primitive. It is a mechanism used in parallel programming that allows only one thread at a time to access some section of code. A mutex is used to build critical sections in our code that only one thread at a time is allowed to execute. No mutex is provided in the standard Java libraries, so, as an exercise, we will create one.
The mutex has two methods associated with it—grabMutex and
releaseMutex. The purpose of a mutex is to allow only one thread at a time to complete the call to grabMutex. Once a thread has the mutex (or, in other words, has successfully completed a call to grabMutex), any other threads that try to call grabMutex will block—they will stop execution and wait for the mutex to be released. Thus, any operations performed while a thread has the mutex are atomic. They cannot be interrupted by any other thread until the mutex is released.
In Java, we must synchronize on an object. That is, we must use some object as a lock in order to successfully design a mutually exclusive code block.
Code Listing 5.2: Main Method for Mutex
public class MainClass { public static void main(String[] args) {
// Create three threads:
Thready t1 = new Thready("Ned"); Thready t2 = new Thready("Kelly"); Thready t3 = new Thready("Pole"); // init and run the threads.
// Wait for the threads to finish: while(t1.isRunning()) { }
while(t2.isRunning()) { }
while(t3.isRunning()) { } // Check what the counter is:
System.out.println("All done!" + Thready.getJ());
} }
Let’s now look at three versions of the Thready class, each with a slightly different run method. I will only include the code for the complete class in the first example, as Code Listing 5.3 shows the complete code for the Thready class, although in this code I have purposely designed the class so that the threads are prone to race conditions.
private Thread thread; private String name;
private boolean running = true;
// Static shared resource: private static Counter counter = null;
// Getters:
public static int getJ() { return counter.getJ(); }
public boolean isRunning() { return running;
}
// Constructor public Thready(String name) { // Create the
System.out.println("Initializing thread: " + name); // Create thread thread = new
// Call run thread.start();
Notice the line marked with comment “RACE CONDITION!!!” in Code Listing 5.3. The main method in Code Listing 5.2 creates and executes three threads, Ned, Kelly, and Pole. All three threads try to increment the shared counter.j variable in their run methods, but they do so at the same time with no coordination. Race conditions are disastrous, and to prove that they are much more than mere theory, run the program a few times and witness the final value that the main method reports. The main method will almost
never count up to the intended value of 30,000 (i.e. the value we expect when three threads each increment a variable 10,000 times). It reports 12,672 and 13,722. In fact, it seems to report anything it wants, and we know why—the threads are incrementing their own copies of the shared resource and only occasionally writing a successful update! Let’s take a moment to implement a mutex and see if we can fix the accesses to this shared resource.
Code Listing 5.4: Using a Mutex 1 (The Slow Way)
public void run() { for(int q = 0;