June 2008
Contents
Preface
This document focuses on the Graphic builder engineering in
the CENTUM VP.
Contents
–
Example of Graphic builder
–
Canvas sizes
–
Color
–
Link parts
–
Custom faceplate
–
Wallpaper
–
Tracing layer
–
Aligning tag data and engineering units
–
Graphic conversion tool from CS3000 R3 graphic
Example of Graphic builder
Ribbon
Stencil pane
Canvas pane
Pan & Zoom pane
Layer Window pane
Canvas sizes ( 1)
Recommended canvas sizes in Full screen mode
Resolution
Minimized brow ser bar
Maximized brow ser bar
Canvas
w idth
Canvas height
Canvas
w idth
Canvas height
Without
Soft key
With Soft
key
Without
Soft key
With Soft
key
800 x 600
718
414
334
398
414
334
1024 x 768
942
568
488
622
568
488
1280 x 1024
1198
804
724
878
804
724
1600 x 1200
1518
967
887
1198
967
887
1280 x 720
1198
524
444
878
524
444
1600 x 900
1518
690
610
1198
690
610
1920 x 1080
1838
856
776
1518
856
776
1280 x 800
1198
598
518
878
598
518
Canvas sizes ( 2)
Recommended canvas sizes in Window mode
Resolution
Large Screen ( - SL)
Medium Screen ( - SM)
w idth
Height
Canvas
w idth
Height
Without
Soft key
With Soft
key
Without
Soft key
With Soft
key
800 x 600
594
345.04
265.04
366
179.04
99.04
1024 x 768
773
468.04
388.04
478
256.04
176.04
1280 x 1024
978
638.04
558.04
606
374.04
294.04
1600 x 1200
1235
788.04
708.04
767
456.04
376.04
1280 x 720
978
449.04
369.04
606
247.04
167.04
1600 x 900
1235
566.04
486.04
767
317.04
237.04
1920 x 1080
1490
680.04
600.04
926
390.04
310.04
1280 x 800
978
473.04
393.04
606
261.04
181.04
1680 x 1050
1298
657.04
577.04
806
376.04
296.04
Color ( 1)
Color selection in Graphic builder
The palette refers to set of 40 colors available when
the color picker control is refers color which cannot
be selected from the palette. There are 2 ways to
select the custom color as bellow:
1.
Specify R, G and B value, then add the color to custom
colors palette.
Different color name
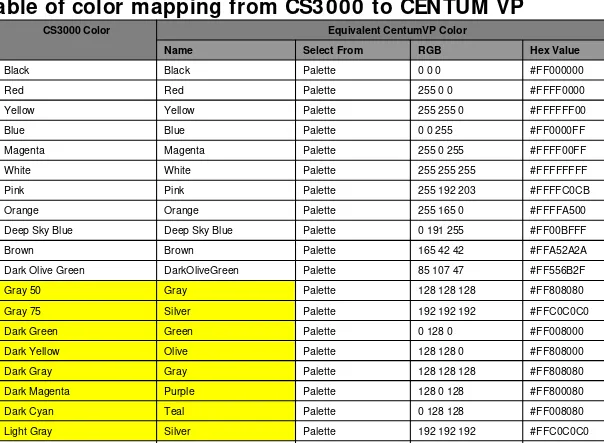
Color ( 2)
CS3000 Color
Equivalent CentumVP Color
Name
Select From
RGB
Hex Value
Black
Black
Palette
0 0 0
#FF000000
Red
Red
Palette
255 0 0
#FFFF0000
Yellow
Yellow
Palette
255 255 0
#FFFFFF00
Blue
Blue
Palette
0 0 255
#FF0000FF
Magenta
Magenta
Palette
255 0 255
#FFFF00FF
White
White
Palette
255 255 255
#FFFFFFFF
Pink
Pink
Palette
255 192 203
#FFFFC0CB
Orange
Orange
Palette
255 165 0
#FFFFA500
Deep Sky Blue
Deep Sky Blue
Palette
0 191 255
#FF00BFFF
Brown
Brown
Palette
165 42 42
#FFA52A2A
Dark Olive Green
DarkOliveGreen
Palette
85 107 47
#FF556B2F
Gray 50
Gray
Palette
128 128 128
#FF808080
Gray 75
Silver
Palette
192 192 192
#FFC0C0C0
Dark Green
Green
Palette
0 128 0
#FF008000
Dark Yellow
Olive
Palette
128 128 0
#FF808000
Dark Gray
Gray
Palette
128 128 128
#FF808080
Dark Magenta
Purple
Palette
128 0 128
#FF800080
Dark Cyan
Teal
Palette
0 128 128
#FF008080
Light Gray
Silver
Palette
192 192 192
#FFC0C0C0
Yellow Green
Yellow Green
Palette
154 205 50
#FF9ACD32
Color ( 3)
CS3000 Color
Equivalent CentumVP Color
Name
Select From
RGB
Hex Value
Green
Lime
Custom Color
0 255 0
#FF00FF00
Dark Red
Maroon
Custom Color
128 0 0
#FF800000
Dark Blue
Navy
Custom Color
0 0 128
#FF000080
Cyan
Cyan
Custom Color
0 255 255
#FF00FFFF
Steel Blue
SteelBlue
Custom Color
70 130 180
#FF4682B4
Spring Green
SpringGreen
Custom Color
0 255 127
#FF00FF7F
Violet
Violet
Custom Color
238 130 238
#FFEE82EE
Midnight Blue
MidnightBlue
Custom Color
25 25 112
#FF191970
Lime Green
LimeGreen
Custom Color
50 205 50
#FF32CD32
Gray 10
NA
Custom Color
26 26 26
#FF1A1A1A
Gray 25
NA
Custom Color
64 64 64
#FF404040
Gray 40
NA
Custom Color
102 102 102
#FF666666
Money Green
NA
Custom Color
192 220 192
#FFC0DCC0
Sky Blue
NA
Custom Color
166 202 240
#FFA6CAF0
Cream
NA
Custom Color
255 251 240
#FFFFFBF0
Medium Grey
NA
Custom Color
160 160 164
#FFA0A0A4
System Color0
Custom Color
255 128 0
#FFFF8000
System Color1
Custom Color
0 192 0
#FF00C000
Color ( 4)
CS3000 Color
Equivalent CentumVP Color
Name
Select From
RGB
Hex Value
System Color4
Custom Color
192 0 192
#FFC000C0
System Color5
Custom Color
192 64 0
#FFC04000
System Color6
Custom Color
0 192 192
#FF00C0C0
System Color7
Custom Color
192 192 0
#FFc0c000
System Color8
Custom Color
255 181 181
#FFFFB5B5
System Color9
Custom Color
255 149 149
#FFFF9595
System Color10
Custom Color
255 117 117
#FFFF7575
System Color11
Custom Color
255 85 85
#FFFF5555
System Color12
Custom Color
255 53 53
#FFFF3535
System Color13
Custom Color
255 21 21
#FFFF1515
System Color14
Custom Color
244 0 0
#FFF40000
System Color15
Custom Color
213 0 0
#FFD50000
System Color16
Custom Color
181 0 0
#FFB50000
System Color17
Custom Color
149 0 0
#FF950000
System Color18
Custom Color
117 0 0
#FF750000
System Color19
Custom Color
85 0 0
#FF550000
System Color20
Custom Color
255 218 181
#FFFFDAB5
System Color21
Custom Color
255 202 149
#FFFFCA95
System Color22
Custom Color
255 186 117
#FFFFBA75
Link parts ( 1)
Click the “New Stencil”
Link parts ( 2)
Drag- and- drop
to Stencil area
Drag- and- drop
to Stencil area
After drag- and-
drop the symbol
to Stencil area,
coming the
saving w indow
After drag- and-
drop the symbol
to Stencil area,
coming the
Link parts ( 3)
Double click an
added link parts,
Then coming the
builder.
Double click an
added link parts,
Then coming the
builder.
Double click an
added link parts,
Then coming the
builder.
Double click an
added link parts,
Then coming the
builder.
Note: Generic name became
possible to search.
Custom Face Plate ( 1)
How to create
1.Create the graphic window.
2.Save the graphic file (same as other graphics).
・
Specified
“$CFPTAG”
to the tag name in builder (Generic name).
・
”$CFPTAG” is replace to actual tag when it was call on HI S.
3.Save to for custom face plate folder by using “Save as” command.
4.Select the save folder.
CENTUMVP/ his/ spconf/ cfp
The rule of file name:
・
Tagname.sva (1FI C200.sva) for specific tag name
・
PI D.sva for specific function block type
Note: 1.Custom faceplate file is only available on own HI S.
I f you want to use it on other HI S, you must copy the same to
other HI S manually.
Custom Face Plate ( 3)
Click the “Save as”
Custom Face Plate ( 4)
Trend w indow
Call the tuning
w indow
Data entry w indow
( I NC/ DEC type)
Mode change button
Data bar ( PV)
Data bar
( SV, MV, OPLO, OPHI )
Photo display
Example of
Wallpaper ( 1)
Set the canvas background image as follow ing
formats.
–
Bitmap ( .bmp)
–
JPEG ( .jpg, .jpeg, .jpe, .jiff)
–
GI F ( .gif)
–
PNG ( .png)
–
I CO ( .ico)
How to create
1.Click the “Draw ” tab in the ribbon
2.Click the “Wallpaper” button in the ribbon.
3.Click the “I mport I mage” in the w allpaper group.
Tracing layer ( 1)
Can use the Tracing layer
What can do Tracing layer ?
–
I t is useful for making graphic layout.
Ex.) User can trace the lines, equipments and other symbols
including its contextures thru tracing the P&I D graphic.
–
Set the tracing layer as follow ing formats
–
Bitmap ( .bmp)
–
JPEG ( .jpg, .jpeg, .jpe, .jiff)
–
GI F ( .gif)
–
PNG ( .png)
–
I CO ( .ico)
How to create
1.Click the “View ” tab in the ribbon
2.Click the “Layer Window ” to display the layer w indow pane.
Tracing layer ( 2)
Graphic builder
Aligning tag data and engineering units ( 1)
Engineer can control the aligning of tag data and engineering data
Option
Description
Example
Option
Description
Example
Left
Displays data and engineering
units in columns, and aligns
data and engineering units to
the left of their respective
columns.
Right
Tight
Aligns data and engineering units
to the right.
Left Tight
Aligns data and engineering
units to the left.
Compact
Center
Displays data and engineering
units in columns, and aligns data
to the right of its column, and
the engineering unit to the left
of its column. Note that this is
the default option.
Center
Displays data and engineering
units in columns, and aligns
data and engineering
units to the center of their
respective columns.
Distribut
ed
Displays data and engineering
units in columns, and aligns data
to the left of its column, and the
engineering unit to the right of
its column.
Right
Aligns data and engineering
units to the right.
Aligning tag data and engineering units ( 2)
Center
Compact
Center
Right
Connector ( 1)
Ease of line connection
Process line can connect from symbol to symbol by using this
tool.
Even symbol position change, the process line w hich is using
the connector tool can follow the symbol.
Graphic conversion tool from CS3000 R3’s graphic ( 1)
How to convert…
1.Select the “Graphic file conversion” tool.
Start menu/ programs/ YOKOGAWA CENTUM/ Graphic file conversion
2.Coming the “Graphic File Converter” window.
3.Add the graphic file/ folder of CS3000.
4.Select the target folder.
5.Push the “Convert” button.
6.The ”SVA file” and “XML file” for CENTUM VP are created.
7.Open the graphic file of CENTUM VP.
Graphic conversion tool from CS3000 R3’s graphic ( 2)
Graphic File
Conversion tool
Graphic conversion tool from CS3000 R3’s graphic ( 3)
Select the menu.
File or Folder
Graphic conversion tool from CS3000 R3’s graphic ( 4)
Graphic file of
CS3000 R3
Graphic conversion tool from CS3000 R3’s graphic ( 5)
Select the
target folder
Select the
Graphic conversion tool from CS3000 R3’s graphic ( 6)
Window of Converted the graphic
Project database conversion from R3 ( 1)
How to convert the R3’s project to R4’s project
1.Systemview automatically convert to R4’s project database if it
was registered in R4’s builder.
2.The “HI S Database Conversion Tool” will be come after project
database converted.
3.Select the HI S name.
I f HI S database w ants to be converted later…
Project database conversion from R3 ( 2)
Convert from initial start of system view
1. System view start
Project database conversion from R3 ( 3)
Project database conversion from R3 ( 4)
4. Select the HI S name
Click the
Conversion button
Click the
Project database conversion from R3 ( 5)
5. Converting window of HI S database
Project database conversion from R3 ( 6)
I f HI S database w ants to be converted later…