by Gurdy Leete, Ellen Finkelstein, and
Mary Leete
FOR
by Gurdy Leete, Ellen Finkelstein, and
Mary Leete
FOR
111 River Street Hoboken, NJ 07030-5774
Copyright © 2004 by Wiley Publishing, Inc., Indianapolis, Indiana Published by Wiley Publishing, Inc., Indianapolis, Indiana Published simultaneously in Canada
No part of this publication may be reproduced, stored in a retrieval system or transmitted in any form or by any means, electronic, mechanical, photocopying, recording, scanning or otherwise, except as permitted under Sections 107 or 108 of the 1976 United States Copyright Act, without either the prior written permission of the Publisher, or authorization through payment of the appropriate per-copy fee to the Copyright Clearance Center, 222 Rosewood Drive, Danvers, MA 01923, (978) 750-8400, fax (978) 646-8600. Requests to the Publisher for permission should be addressed to the Legal Department, Wiley Publishing, Inc., 10475 Crosspoint Blvd., Indianapolis, IN 46256, (317) 572-3447, fax (317) 572-4447, e-mail: [email protected].
Trademarks:Wiley, the Wiley Publishing logo, For Dummies, the Dummies Man logo, A Reference for the Rest of Us!, The Dummies Way, Dummies Daily, The Fun and Easy Way, Dummies.com, and related trade dress are trademarks or registered trademarks of John Wiley & Sons, Inc. and/or its affiliates in the United States and other countries, and may not be used without written permission. All other trademarks are the property of their respective owners. Wiley Publishing, Inc., is not associated with any product or vendor mentioned in this book.
LIMIT OF LIABILITY/DISCLAIMER OF WARRANTY: WHILE THE PUBLISHER AND AUTHOR HAVE USED THEIR BEST EFFORTS IN PREPARING THIS BOOK, THEY MAKE NO REPRESENTATIONS OR WAR-RANTIES WITH RESPECT TO THE ACCURACY OR COMPLETENESS OF THE CONTENTS OF THIS BOOK AND SPECIFICALLY DISCLAIM ANY IMPLIED WARRANTIES OF MERCHANTABILITY OR FITNESS FOR A PARTICULAR PURPOSE. NO WARRANTY MAY BE CREATED OR EXTENDED BY SALES REPRESENTATIVES OR WRITTEN SALES MATERIALS. THE ADVICE AND STRATEGIES CONTAINED HEREIN MAY NOT BE SUITABLE FOR YOUR SITUATION. YOU SHOULD CONSULT WITH A PROFESSIONAL WHERE APPROPRI-ATE. NEITHER THE PUBLISHER NOR AUTHOR SHALL BE LIABLE FOR ANY LOSS OF PROFIT OR ANY OTHER COMMERCIAL DAMAGES, INCLUDING BUT NOT LIMITED TO SPECIAL, INCIDENTAL, CONSE-QUENTIAL, OR OTHER DAMAGES.
For general information on our other products and services or to obtain technical support, please contact our Customer Care Department within the U.S. at 800-762-2974, outside the U.S. at 317-572-3993, or fax 317-572-4002.
Wiley also publishes its books in a variety of electronic formats. Some content that appears in print may not be available in electronic books.
Library of Congress Control Number: 2003105688 ISBN: 0-7645-4222-2
Manufactured in the United States of America 10 9 8 7 6 5 4 3 2 1
Gurdy Leeteis an assistant professor of art and the director of the programs in digital media at Maharishi University of Management, where he has taught computer graphics and animation for the past 11 years. Gurdy has written extensively on computers, graphics and software. He is also an award-winning graphics software engineer, and is a coauthor of the Multitile plug-in for the free GNU image manipulation program, the GIMP. A selection of Gurdy’s com-puter art is available for download under the terms of the free software license, the GNU GPL, from his Web site, www.infinityeverywhere.net.
Ellen Finkelsteinhas written numerous best-selling computer books on AutoCAD, PowerPoint, and Flash. She consults on Web site and presentation content and organization, and maintains a Web site of free tips and tutorials at www.ellenfinkelstein.com. She works at home so that she can help her kids with their homework between paragraphs of her current book.
To MMY, who showed us that life is a lot like open-source software — unrestricted.
Authors’ Acknowledgments
Some of the people who helped bring this book to market include the following:
Acquisitions, Editorial, and Media Development
Project Editor:Pat O’Brien
Acquisitions Editor:Terri Varveris
Copy Editor:John Edwards
Technical Editor:Louis Suarez-Potts
Editorial Manager:Kevin Kirschner
Media Development Specialist:Laura Moss
Media Development Manager:
Laura VanWinkle
Media Development Supervisor:
Richard Graves
Editorial Assistant:Amanda Foxworth
Cartoons:Rich Tennant (www.the5thwave.com)
Production
Project Coordinator: Courtney MacIntyre
Layout and Graphics: Seth Conley, Andrea Dahl, Stephanie D. Jumper, Heather Ryan, Jacque Schneider
Proofreaders: Paula Lowell, Carl William Pierce, TECHBOOKS Production Services
Indexer: TECHBOOKS Production Services
Publishing and Editorial for Technology Dummies
Richard Swadley,Vice President and Executive Group Publisher
Andy Cummings,Vice President and Publisher
Mary C. Corder,Editorial Director
Publishing for Consumer Dummies
Diane Graves Steele,Vice President and Publisher
Joyce Pepple,Acquisitions Director
Composition Services
Gerry Fahey,Vice President of Production Services
Introduction ...1
Part I: Introducing OpenOffice.org ...7
Chapter 1: Getting to Know OpenOffice.org ...9
Chapter 2: Switching to OpenOffice.org ...23
Part II: Using Writer — The Word Processor ...35
Chapter 3: Creating a Document ...37
Chapter 4: Formatting to Perfection ...67
Chapter 5: Designing Complex Documents ...87
Chapter 6: Keeping Control of Your Documents ...113
Chapter 7: Creating Web Pages ...125
Part III: Using Calc — The Spreadsheet ...139
Chapter 8: Creating a Spreadsheet ...141
Chapter 9: At Home on the Range ...155
Chapter 10: Knock on Wood and Print! ...175
Chapter 11: Snazzing Up Your Spreadsheet ...185
Chapter 12: Making Calculations ...201
Part IV: Using Impress — The Presentation
Package ...219
Chapter 13: Creating a Presentation ...221
Chapter 14: Modifying a Presentation ...241
Chapter 15: Making Presentations Picture Perfect ...251
Chapter 16: Animating Impressively ...265
Chapter 17: Showing a Presentation ...275
Part V: Using Draw — The Graphics Program ...285
Chapter 18: Unleashing the Artist Within ...287
Part VI: The Part of Tens ...315
Chapter 19: Ten Reasons to Use OpenOffice.org ...317
Chapter 20: Ten Places to Look for Support ...325
Appendix: Installing OpenOffice.org ...331
Introduction ...1
About This Book ...1
How to Use This Book ...1
Foolish Assumptions ...2
Conventions Used in This Book ...2
How This Book Is Organized ...2
Part I: Introducing OpenOffice.org ...3
Part II: Using Writer — The Word Processor ...3
Part III: Using Calc — The Spreadsheet ...4
Part IV: Using Impress — The Presentation Package ...4
Part V: Using Draw — The Graphics Program ...4
Part VI: The Part of Tens ...4
Appendix ...5
About the CD-ROM ...5
Icons Used in This Book ...5
Where to Go from Here ...6
Part I: Introducing OpenOffice.org ...7
Chapter 1: Getting to Know OpenOffice.org . . . .9
What Is OpenOffice.org? ...9
What is Writer? ...10
What is Calc? ...11
What is Impress? ...12
What is Draw? ...12
Can OpenOffice.org replace my current office suite? ...14
Getting Started with OpenOffice.org ...15
Facing the Interface ...16
Tooling through the toolbars ...16
Using the menus ...18
Cutting it short with keyboard shortcuts ...20
Closing OpenOffice.org ...21
Chapter 2: Switching to OpenOffice.org . . . .23
What OpenOffice.org Can Do for You ...23
Using OpenOffice.org at home ...23
Using OpenOffice.org at work ...24
Getting Help ...31
Using the Contents page ...31
Finding information from the index ...32
Searching ...32
Saving bookmarks ...32
Part II: Using Writer — The Word Processor ...35
Chapter 3: Creating a Document . . . .37
Opening a Document ...37
Starting from scratch ...38
Using what you have ...38
Importing documents ...39
Laying Out the Page ...40
Setting paper size, margins, and orientation ...41
Creating headers and footers ...43
Numbering pages ...44
Entering and Editing Text ...45
Starting to say something ...45
Being selective ...45
Modifying text ...47
Moving and copying text ...47
Finding and replacing text ...48
Correcting mistakes automatically ...49
Putting words in your mouth with Word Completion ...52
Making it go away ...53
Navigating Through Your Document ...53
Hiking with your mouse ...53
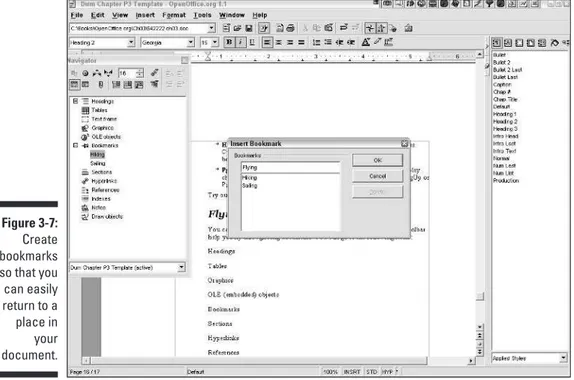
Sailing with the keyboard ...55
Flying with the Navigator ...55
Viewing Your Words ...57
Zooming in and out ...57
Viewing full-screen ...58
Seeing secret characters ...58
Spelling It Correctly ...59
Using the Spellcheck dialog box ...59
Checking spelling as you type ...60
Saving Your Opus ...60
Saving for OpenOffice.org ...61
Saving in other formats ...61
Exporting to other formats ...63
Printing ...63
Previewing your work and saving a tree ...63
Getting the words on paper ...64
Chapter 4: Formatting to Perfection . . . .67
Molding the New Document ...67
Creating new documents with AutoPilot ...67
Starting out with a template ...69
Refining a template ...71
Creating your own templates ...71
Importing templates ...73
Fiddling with Fonts ...73
Choosing a font ...73
Adding character to your characters ...75
Planning Your Paragraphs ...75
Aligning paragraphs ...75
Spacing your lines ...77
Making Lists ...77
Bulleting lists ...77
Numbering lists ...78
Styling with the Stylist ...79
Understanding styles ...79
Using a style ...80
Creating a style ...82
Changing and organizing styles ...84
Chapter 5: Designing Complex Documents . . . .87
Dividing Text into Tables and Columns ...87
Tabling the issue ...87
Formatting the table ...88
Writing in columns ...90
Working with sections ...91
Creating Long, Long Documents ...91
Heading up your text ...92
Creating a table of contents ...94
Indexing your book ...95
Creating Personalized Form Letters ...97
Creating the form letter ...98
Creating and registering a data source ...98
Inserting fields into your form letter ...100
Creating the output ...101
Using Borders and Frames ...103
Chapter 6: Keeping Control of Your Documents . . . .113
Linking to the World ...113
Creating a hyperlink ...114
Editing a hyperlink ...115
Tracking Changes in Documents ...116
Displaying changes ...117
Working with changes ...118
Comparing and merging documents ...119
Managing Versions ...120
Inserting Notes ...121
Password-Protecting Documents ...122
Chapter 7: Creating Web Pages . . . .125
Plunging into HTML Land ...125
Setting the Table ...126
Inserting a table ...127
Formatting a table ...128
Getting Your Web-Safe Colors ...130
Dealing with Text ...131
HTML styles ...132
Aligning text ...132
Adding Pretty Pictures ...132
Creating Lots of Links ...135
Seeing Your HTML Code ...137
Part III: Using Calc — The Spreadsheet ...139
Chapter 8: Creating a Spreadsheet . . . .141
Getting the Basics Down ...141
Inputting Your Data ...142
Entering your data ...142
Editing your data ...143
Using Insert mode and Overwrite mode ...143
Deleting the contents of the active cell ...144
Filling cells automatically ...144
Moving and Grooving in the Grid ...146
Scurrying around your grid with your mouse ...146
Let your fingers do the walking ...146
Managing Columns and Rows ...147
Changing column widths and row heights ...147
Restoring column widths and row heights ...149
Adding columns and rows ...149
Deleting columns and rows ...150
Hiding columns and rows ...150
Restoring hidden columns and rows ...151
Chapter 9: At Home on the Range . . . .155
Selecting Your Cells ...155
Selecting a range of cells ...156
Selecting a large range of cells ...156
Selecting noncontiguous ranges of cells ...157
Selecting one row or column, or many, or all of them ...158
Copying, pasting, cutting, dragging, and dropping your cells ...159
Copying and pasting cells ...159
Cutting and pasting cells ...159
Dragging and dropping cells ...159
Formatting Your Numbers and Text ...160
Formatting numbers with the toolbar ...160
Adding style with the toolbar ...162
Formatting using the Cell Attributes dialog box ...162
To AutoCorrect or not to AutoCorrect ...164
Spell-checking ...167
Seeing Sheer Simplicity in Sheets ...168
Adding sheets ...169
Scrolling through sheets ...170
Entering data into more than one sheet simultaneously ...170
Selecting sheets ...170
Selecting a single sheet ...170
Selecting several sheets simultaneously ...171
Selecting a large group of sheets ...171
Selecting all sheets ...171
Deselecting one sheet at a time ...171
Deselecting a large group of sheets ...171
Deselecting all sheets except the active sheet ...172
Renaming sheets ...172
Moving and copying sheets ...172
Deleting sheets ...173
Chapter 10: Knock on Wood and Print! . . . .175
Previewing Your Printout ...175
Customizing Your Headers and Footers ...176
Dealing with Page Breaks ...177
Previewing page breaks ...178
Inserting manual page breaks ...179
Orienting your printout sideways ...179
Scaling your printout ...179
Printing a Selection ...180
Printing or Suppressing Sheets ...180
Printing the Grid — or Not ...181
Expressing or Suppressing Those Doodles ...181
Printing Formulas ...182
Chapter 11: Snazzing Up Your Spreadsheet . . . .185
Getting That Professional Look with AutoFormat ...185
Going Bananas with Backgrounds and Borders ...187
Adding background colors ...187
Choosing font colors ...187
Adding borders and printable grids ...188
Hiding or showing the screen grids ...189
Functional Fun ...189
Freezing column and row headings ...190
Splitting your window ...190
Using floating frames ...191
Making Terrific Text ...193
Multiline text ...193
Slanted or upside-down text ...194
Using OpenOffice.org Writer as an OLE object ...195
Adding the Art ...196
Going in for the gallery ...197
Importing your art ...197
Resizing your graphic ...197
Moving your graphic ...198
Creating a background with a graphic ...198
Drawing your own masterpieces ...199
Chapter 12: Making Calculations . . . .201
Formula Basics ...201
Adding, Subtracting, and More ...202
Adding and other arithmetic ...202
Adding with the Sum function ...202
Rocketing into Orbit with Functions ...205
Using the AutoPilot:Functions dialog box ...205
Editing functions ...209
Entering functions manually ...210
Copying and pasting formulas ...210
Creating formula arrays ...211
Recalculating formulas ...214
Creating Magic Formulas ...214
Nesting functions ...214
Creating conditional formulas ...215
Part IV: Using Impress — The Presentation
Package ...219
Chapter 13: Creating a Presentation . . . .221
Starting a Presentation ...221
Using AutoPilot to start quickly ...221
Viewing Your Presentation ...224
Using Impress’s views ...224
Understanding Impress’s modes ...225
Adding a template to an existing presentation ...227
Navigating through a presentation ...228
Adding Slides ...229
Creating an outline in Impress ...230
Creating an outline in Writer ...232
Adding text to a slide ...233
Saving Your Presentation for Posterity ...234
Saving in OpenOffice.org format ...234
Saving in other presentation formats ...235
Exporting to other formats ...236
Exporting to HTML format ...237
Exiting Impress ...239
Chapter 14: Modifying a Presentation . . . .241
Editing Text ...241
Selecting text ...241
Changing text ...242
Using Text with Style ...243
Playing with Bullets ...244
Creating a bulleted list ...244
Choosing bullets ...244
Creating numbered lists ...245
Formatting Paragraphs ...246
Lining up with the ruler ...246
Aligning text ...247
Spacing your lines ...247
Using Master View ...248
Creating a plain-colored background ...254
Creating a gradient background ...254
Hatching a background ...255
Using a bitmap image as a background ...256
Adding a Coolness Factor with 3-D ...260
Creating 3-D text ...260
Inserting 3-D objects ...262
Chapter 16: Animating Impressively . . . .265
Using Text Effects Effectively ...265
Adding Sound Bytes ...269
Creating Animated GIF files ...269
Adding Slide Transition Effects ...271
Chapter 17: Showing a Presentation . . . .275
Preparing to Deliver a Slide Show ...275
Setting slide timing ...276
Hiding slides ...276
Specifying slide show settings ...277
Delivering a Slide Show ...278
Using a mouse and keyboard to run your slide show ...278
Navigating through a slide show ...279
Printing presentations ...281
Printing slides ...282
Part V: Using Draw — The Graphics Program ...285
Chapter 18: Unleashing the Artist Within . . . .287
Getting Graphic ...287
Lines and arrows ...288
Rectangles and squares ...291
Circles and ellipses ...292
Polygons ...292
Natural selection ...293
Text ...293
Building with Shapes ...294
Merging shapes ...295
Subtracting shapes ...295
Intersecting shapes ...296
Combining shapes and lines ...296
Editing Exceptionally ...296
Moving, flipping, and rotating ...296
Arranging, aligning, and grouping ...297
Duplicating ...300
Distorting and setting in circles ...302
Cross-fading ...303
Coloring Your World ...304
Coloring consummately ...304
Adding great gradients ...305
Hatching handily ...308
Glorious glows and transparencies ...309
Bitmapping brilliantly ...311
Part VI: The Part of Tens ...315
Chapter 19: Ten Reasons to Use OpenOffice.org . . . .317
It’s Free! ...317
You’re Free! ...318
Sun Powers It ...319
Upgrades and Reinstallations Are Easy ...319
Commercial Support Is Available, If You Want It ...320
Community Support Is Excellent ...320
File Formats Are Open Standards ...321
It’s on Every Major Platform ...321
Lock In Is Locked Out ...322
Choice Is Good ...322
Chapter 20: Ten Places to Look for Support . . . .325
Getting Help on Your Desktop ...325
Searching the E-Mail Archives at OpenOffice.org ...325
Posting to the E-Mail Lists at OpenOffice.org ...327
Searching the Newsgroups ...327
Using Online Forums ...328
Surfing the OpenOffice.org Web site ...328
OO Extras: Extras for OpenOffice.org ...329
Using Other Online Resources ...329
The OpenOffice.org Unofficial FAQ v0.1.5a ...329
Useful macro information for OpenOffice by Andrew Pitonyak ...329
Community-based tech support: How to get help with OpenOffice.org ...330
Signing Up for Classes and Training ...330
Getting Commercial Support ...330
Appendix: Installing OpenOffice.org . . . .331
Installing on Windows ...331
System requirements ...331
Downloading from the Web site ...332
Starting installation ...333
Installing on the Mac ...335
System requirements ...336
Downloading X11 ...336
Installing X11 ...337
Downloading OpenOffice.org 1.0.3 ...338
Installing on Linux ...343
System requirements ...343
Downloading OpenOffice.org for Linux ...343
Installing OpenOffice.org on Linux ...345
Downloading Upgrades ...346
W
elcome toOpenOffice.org For Dummies, your friendly companion to the free office suite. In this book, we explain in plain English how to make the most of this feature-rich office suite. OpenOffice.org For Dummies aims to give you all the information you need to start using OpenOffice.org right away — with no hassle.About This Book
As though you hadn’t guessed, OpenOffice.org For Dummiescovers the OpenOffice.org office suite of programs, including Writer (word processor), Calc (spreadsheet), and Impress (presentation program). We also explain how to use the HTML editor and Draw, the drawing program.
We comprehensively explain OpenOffice.org’s features, including
⻬Switching to OpenOffice.org from other office suites
⻬Creating, editing, and formatting documents in Writer
⻬Creating form letters
⻬Working with graphics in all the OpenOffice.org applications
⻬Creating Web pages with the HTML editor
⻬Creating, editing, and formatting a spreadsheet in Calc
⻬Calculating and using functions
⻬Manipulating data
⻬Creating, editing, and formatting presentations in Impress
⻬Animating a presentation
⻬Creating graphics in Draw
How to Use This Book
need the spreadsheet, start with Part III, “Using Calc — The Spreadsheet.” If you need to draw something, go to Part V, “Using Draw — The Graphics Program.” Read what you need and save the rest for later.
For extra information, don’t pass up Part VI, “The Part of Tens,” where we explain ten reasons to use OpenOffice.org and ten places to look for support. Our appendixes help you install and configure OpenOffice.org.
Keep OpenOffice.org For Dummiesby your computer while you work. You’ll find it to be a loyal helper.
Foolish Assumptions
We assume that you know at least a little about what a word processor, spread-sheet, and presentation program help you accomplish. We also assume that you know the operating system you use. We wrote this book to cover Windows, Linux, and the Mac OS, all at the same time. Talk about foolish! At any rate, we assume that you can get over any minor differences due to your operating system.
Conventions Used in This Book
Sometimes it helps to know why some text is bold and other is italic so that you can figure out what we’re talking about. New terms are in italicsto let you know that they’re new. Messages and other text that come from OpenOffice.org are in a special typeface, like this.
When we say something like “Choose File➪Save As,” it means to click the File menu at the top of your screen and then choose Save As from the menu that opens. When we want you to use a toolbar or toolbox button (or tool), we tell you to click it or choose it.
How This Book Is Organized
To be more specific, this book is divided into six parts. Each part contains two or more chapters that relate to that part. Because some features of OpenOffice.org apply to all the applications, you may find more detail in the part on Writer, which comes early in the book. For example, we don’t explain how to spell check three times; instead, we explain it once and then refer to the first mention later on.
Part I: Introducing OpenOffice.org
Part I contains important introductory information about OpenOffice.org, including why it sounds like a Web site, why it’s free, how to get it (it’s on the CD-ROM that accompanies this book), how it looks, and what applications it includes.
Chapter 2 explains what OpenOffice.org can do for you at home and at work, how OpenOffice.org compares to the other office suites out there, and how to get help.
Part II: Using Writer —
The Word Processor
Part II covers everything you need to know about Writer. Chapter 3 explains the basics of opening a document, laying out the page, entering and editing text, navigating through a document, changing views, spell checking, saving, and printing.
Chapter 4 goes more deeply into formatting, including how to use templates and styles, choosing fonts, setting up paragraphs, as well as adding numbered or bulleted lists. Chapter 5 covers how to create complex documents, including setting up personalized form letters (mail merge); adding borders, frames, and graphics; creating tables of contents and indexes; and dividing a page into columns or tables.
Part III: Using Calc — The Spreadsheet
Part III covers the Calc application, which enables you to crunch all the numbers in your life. Chapter 8 explains how to input data, navigate around your huge spreadsheets, and save them for posterity. Chapter 9 explains how to select, move, and copy data as well as how to format your data. Chapter 10 is all about printing. Chapter 11 tells you how to make your data look good. Chapter 12 covers the details of calculating formulas and using Calc’s built-in functions. On the CD-ROM, a bonus chapter explains how to use Calc to analyze data.
Part IV: Using Impress —
The Presentation Package
Part IV explains how to create impressive impressions using Impress. Chapter 13 gives you the basics of creating a new presentation, using the various views, adding slides, and saving. Chapter 14 covers editing and formatting. Chapter 15 explains how to add images, create backgrounds, and work with 3-D effects. Chapter 16 is all about animation. Chapter 17 covers the process of delivering your slide show and printing. On the CD-ROM, a bonus chapter gives you some tips for setting up Impress.
Part V: Using Draw —
The Graphics Program
Draw creates great graphics that you can use alone or insert into the other OpenOffice.org applications. Chapter 18 explains the basics of creating and editing shapes. On the CD-ROM, a bonus chapter explains layers, curves, fills, special effects, and 3-D.
Part VI: The Part of Tens
Appendix
Last, but not least, we come to the appendix. It adds some valuable informa-tion to the end of this book, including instrucinforma-tions on installing and configur-ing OpenOffice.org.
About the CD-ROM
Don’t forget to check out the CD-ROM. It contains OpenOffice.org for Windows, Linux and Mac OS X, so you don’t have to go far to get it. We make it easy!
Icons Used in This Book
If you see little pictures in the margins, you have found an icon. Icons point out special information in the text and quickly let you know if you need to pay attention or can ignore it.
This icon alerts you to information that you need to keep in mind to avoid wasting time or falling on your face.
OpenOffice.org has some advanced features you may want to know about — or skip over entirely. This icon lets you know when we throw the heavier stuff at you.
Tips help you finish your work more easily, quickly, or effectively. Don’t miss out on these.
Where to Go from Here
If you don’t already have OpenOffice.org installed, get out the CD-ROM and install it. Complete instructions for your operating system are in the appen-dix. Then open OpenOffice.org, turn to Chapter 1 and take the plunge.
Enough of all this talk. Let’s move into the real content of this book and start using OpenOffice.org!
Getting to Know OpenOffice.org
In This Chapter
䊳What is OpenOffice.org?
䊳Getting started with OpenOffice.org
䊳Opening OpenOffice.org
䊳Checking out the applications
䊳Facing the interface
䊳Closing OpenOffice.org
O
penOffice.org is an exciting new Office suite program that is extremely powerful and completely free to everyone. It operates on Windows, Linux, Macintosh, and Solaris, and it can easily read and write a plethora of file formats, including Microsoft Office. It is currently available in more than 30 languages, and people all over the world are migrating to OpenOffice.org for their entire office suite needs. Over sixteen million people currently use the program, and the total is increasing daily!You don’t have to pay a single dime to use OpenOffice.org — either now or in the future! Sounds too good to be true? The more you learn about OpenOffice.org, the more fascinated you’ll become.
What Is OpenOffice.org?
OpenOffice.org, the Office suite, includes the following four major applications:
⻬Writer:A full-featured word processor that also includes an HTML editor for designing Web pages
⻬Calc:An extremely capable spreadsheet program that also allows you to link to corporate databases
⻬Impress:A very capable presentation program for creating electronic slide shows
As its name suggests, OpenOffice.org is also a Web site. The Web site, at
www.openoffice.org, is the home of the project that creates, markets, and distributes the applications.
What is Writer?
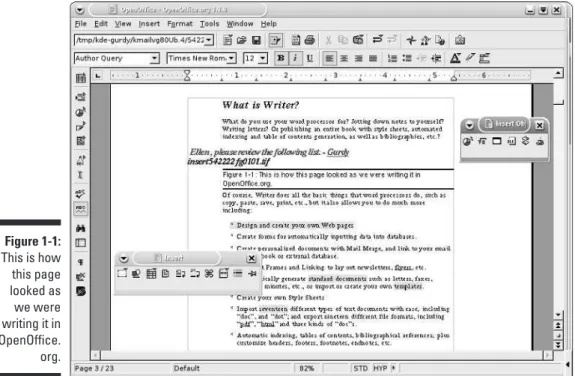
What do you use your word processor for? Jotting down notes to yourself? Writing letters? Or publishing an entire book with style sheets, automated indexing and table of contents generation, as well as bibliographies? Whether your needs are large or small, Writer is up to the job. Figure 1-1 is an example of a Writer document. Look familiar? This book was written in
OpenOffice.org.
Of course, Writer does all the basic things that word processors do, but it also allows you to do much more including:
⻬Design and create your own Web pages.
⻬Create forms for automatically inputting data into databases.
⻬Create personalized documents with Mail Merge, and link to your e-mail address book or external database.
⻬Use Text Frames and Linking to lay out such documents as newsletters and flyers.
⻬Automatically generate standard documents such as letters, faxes, agen-das, minutes, or import or create your own templates.
⻬Create your own Style Sheets
⻬Import seventeen different types of text documents with ease, including “doc”, and “dot”; and export nineteen different file formats, including “pdf”, “html” and three kinds of “doc”s.
⻬Automatic indexing, tables of contents, bibliographical references; plus such details as custom headers, footers, footnotes, and endnotes.
⻬Track changes; compare documents, Automatic outlining, Spellchecking, and Thesaurus.
⻬Automatically correct words, or automatically complete words as you type. (This is all completely customizable, of course.)
⻬Insert Dynamic fields (such as date and time) and hyperlinks.
⻬Connect to e-mail software.
What is Calc?
Calc can calculate anything you hand it. It’s a full-featured spreadsheet pro-gram with all the great bells and whistles you’d expect from the best. While Calc is super at doing all the basic spreadsheet things, such as adding, sort-ing, manipulating rows and columns, and inserting graphics, Calc also lets you do the following:
⻬Link to external databases, such as dBase and MySQL (or even your email address book) and view, query, sort, filter, generate automatic reports and more, without affecting your original database.
⻬Use an intuitive graphical interface to organize your data from your spreadsheets or database.
⻬Filter your spreadsheet or database data to locate information quickly.
⻬Use automatic subtotaling with outlining capabilities to give you instant information of the big picture, whenever you need it.
⻬Use any and all of 364 built-in functions for financial, mathematical, statistical, database and other purposes. Or create your own formulas. Figure 1-1:
⻬Use extensive formatting capabilities, including autoformatting, style sheets, graphical backgrounds, fancy borders, as well as conditional formatting.
⻬Freeze headings, create multiple sheets for a 3-D spreadsheet, use split sheets, floating frames...
⻬Validate data (for example, require a specified format, such as a date)
⻬Save, print, and import and export a variety of formats (including your favorites)
⻬Generate 3-D charts, try out goal seeking, protect your documents, create macros, and lots more.
What is Impress?
Impress creates presentations (also known as slide shows) that you display from your computer, often with a projector, so that people can see what is on your screen. Each page of a presentation is called a slide.You add slides to a presentation and then add text and graphics to each slide. You also have all you need to create a masterful presentation. Impress allows you to do the following:
⻬Create a presentation quickly with AutoPilot or a template
⻬Add notes to each slide that are just for the presenter
⻬View your presentation in several ways using the Drawing, Outline, Slide, Notes, Handout, and Slide Show views
⻬Save, print, and export and import in several formats (including your favorites)
⻬Format text characters and paragraphs
⻬Create bulleted and numbered lists
⻬Control the look of the presentation with a master slide
⻬Insert graphics and control them using layers
⻬Create your own graphics, including 3-D graphics
⻬Add text animation and slide transitions
What is Draw?
⻬Customize your own glows, transparencies, gradients, bitmaps, or use ready-made gradients and import bitmaps.
⻬Use floating toolbars for easy access to create shapes, curves, lines, arrows, dimensional brackets, and more.
⻬Merge, subtract, intersect, rotate, and flip your graphics and otherwise modify them in many ways.
⻬Edit points to fine-tune curves and polygons.
⻬Cross-fade images for animated dissolves and morphing.
⻬Create text animation for livening up your Web pages or presentations.
⻬Use smart connectors to create flow-charts and organizational charts.
⻬Add shadows and 3-D effects; create 3-D objects from 2-D objects. (Careful, this is addicting.)
⻬Add shading, texture, lighting, and materials to 3-D graphics; rotate 3-D objects in three dimensions
⻬Use layers and groups.
⻬Import and export many formats, including SWF Flash Player format.
Why is OpenOffice.org free?
A few years ago, Sun Microsystems, Inc. noticed that it was paying Microsoft millions of dollars for the use of its software, and at the same time, Sun needed office tools for its Solaris operating system. Sun then bought a company called StarDivision, which had cre-ated an office suite that was competitive in fea-tures with Microsoft Office, with one important difference — the suite ran on GNU/Linux and Solaris operating systems as well as Windows. The product was called StarOffice.
Sun released the StarOffice programmers’ source code as an open source program and called it OpenOffice. At the same time, Sun also sells StarOffice as a proprietary program, because some clients requested that Sun pro-vide guarantees and support for the software. StarOffice adds a few proprietary features to OpenOffice, such as licensed templates, extra clip art, and the Adabas D database, along
with 24-hour support from Sun, and Sun offers StarOffice at a reasonable price.
By making OpenOffice.org open source, Sun generated a community of about 100,000 com-puter programmers and enthusiasts to create new features, improved documentation, and provide great support for the program — and all for free! Everyone is excited about OpenOffice. org and wants to be a part of this historic endeavor.
OpenOffice.org, the organization, asks that all public communications use OpenOffice.org when referring to the suite of applications, even though simply using OpenOffice seems to make more sense. Leave it to the lawyers and trademark laws to complicate things, but that’s okay, this way we can always remember where to go for our free upgrades and online support.
Can OpenOffice.org replace
my current office suite?
With OpenOffice.org you can most likely do everything you currently do with your office suite, and maybe even lots more. You may find OpenOffice.org to be even more handy than your current Office suite. Users report that OpenOffice.org is extremely robust and can handle very large, complex documents with ease. And many users are fond of having their files take up 25 to 60 percent less space than that of the leading office suite. Also since OpenOffice.org is open source, any security holes are dealt with extremely quickly. Anyone in the OpenOffice.org community can find and fix any prob-lem or potential probprob-lem in a flash! No waiting for one company to get around to it. This means it is much less likely that anyone could take over your com-puter from another location without your knowledge and consent through OpenOffice.org.
OpenOffice.org was created as a Microsoft Office clone, so Microsoft Office users generally experience little or no difficulty making the transition. However some situations do exist where it is not recommended that you switch to OpenOffice.org. They are as follows:
What is open source software?
In open source software, the source code of the software is freely available to users. If you are a programmer, you can use, modify, and redis-tribute the code. (The distribution part has a few rules.) You are encouraged to participate in the OpenOffice.org project (actually, one of its many projects) by contributing to the project — writing new code, issuing bug reports, writing documentation, and so on. (You don’t need to be
a programmer to contribute.) You can also join mailing lists to read about various aspects of the project on a regular basis.
⻬If your business requires the Exchange Server capabilities of Microsoft Outlook, This feature allows you to have shared workspaces with other people on other computers. OpenOffice.org has no substitute for it — at least not on Windows or Mac.
⻬VBA macros written in Microsoft Office, as well as other macros from other office suites do not convert into OpenOffice.org and must be re-programmed. (It is estimated that this may affect five percent of office suite users.)
In other words, unless you are a power-user of another office suite with special needs, converting to OpenOffice.org should be no problem. Chapter 2 explains more about switching to OpenOffice.org.
To write this book with OpenOffice.org, we needed perfect compatibility with Microsoft Word, because the publisher automatically converts Word text and formatting into QuarkXPress to print the book that you are reading. We imported Wiley’s custom Word template into OpenOffice.org and wrote the entire book in OpenOffice.org. We checked the document in Microsoft Word. Occasionally, we had to change the document format-ting to match what the publisher wanted in Word. However, the actual text transferred perfectly from OpenOffice.org to Word.
Getting Started with OpenOffice.org
Most people who use OpenOffice.org download the program from the Web site of the same name. Other people get it from their friends. But you don’t have to do either. The CD-ROM with the complete program for Windows, Mac, and Linux accompanies this book. Check out Appendix A for Installation Instructions.
If you need to go to Appendix A, go ahead. We’ll wait for you. Then come back here to continue reading about opening and working in OpenOffice.org.
Once you have OpenOffice.org installed on your system, you are ready to open it and get to work!
To open OpenOffice.org, follow these steps:
⻬Windows:Choose Start➪Programs (or All Programs)➪OpenOffice 1.1, and then choose the application that you want from the submenu. For example, to open the word processor, choose Text Document.
Linux has several different desktop environments. If you are using KDE, then choose K➪OpenOffice.org 1.1.0 and then choose the application that you want from the submenu. If you are using Gnome, then choose Applications➪Office and then choose the application that you want from the submenu. Most Linux desktop environments have a relatively straightforward way of finding OpenOffice.org.
⻬Macintosh:Navigate to the folder that contains OpenOffice.org (which should be called OpenOffice.org1.0.1), and double-click the Start OpenOffice.org icon to open a blank Writer document. To open another application, choose File➪New and choose the type of document that you want to open.
Of course, you can place an alias on your desktop and double-click that or drag the alias to your dock.
The first time you open OpenOffice.org, you see the OpenOffice.org Registration dialog box. To register, choose Register Now and click OK. The OpenOffice.org Web site opens, so that you can register.
Facing the Interface
Each application in OpenOffice.org has a somewhat different look, of course, but many features of the interface are common throughout the suite of applications.
In the following sections, we use Writer, the word processor, as an example. However, the principles apply to all the applications. For more details, refer to the parts of this book that explain the applications that you want to use.
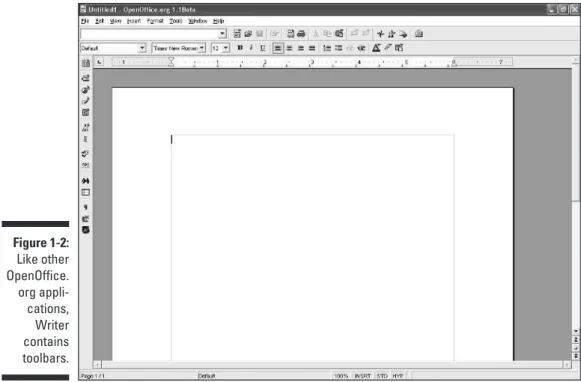
Tooling through the toolbars
A toolbaris a bar of small buttons with pictures on them that you click to exe-cute commands or otherwise complete the task that you are working on. All applications have three commonly used toolbars: the Function toolbar, Main toolbar, and Object toolbar, as shown in Figure 1-2. The toolbar buttons are shown on the Cheat Sheet at the front of this book.
The following sections describe OpenOffice.org’s three main toolbars.
Function toolbar
When you open a window, such as Navigator, Stylist, Gallery, or Preview (in Impress), you can let it float on the desktop or you can dockit. The following points explain docking and undocking:
⻬To dock a window, press Ctrl and drag the window by its title bar to the right side of the application window.
When docked, you can use the arrow icon in the window to collapse the window to a tiny bar that takes up little screen space. Click the arrow again when you need to see the window.
⻬To undock a window, use the same procedure (press Ctrl and drag the window by its top toolbar).
⻬You can also click the Pin icon in the window to change the window from floating to stick (docked).
Main toolbar
The Main toolbar resides along the left side of your screen and contains many often-used commands.
You can turn any fly-out toolbar into a floating toolbar. Click the Insert button on the Main toolbar and hold down the mouse button for a second. You can then drag the fly-out toolbar from its title bar to any location.
Object toolbar
The Object toolbar changes depending on the type of objects that you have in your document or have selected. In general, the Object toolbar has tools for formatting objects. In Writer, you usually see the Text Object toolbar, because you most often work with text in Writer. The purpose of the Text Object toolbar is to help you format text. Other Object toolbars have tools for formatting other types of objects, depending on the application that you are using and the object that you have selected.
Other toolbars
OpenOffice.org has the following additional toolbars:
⻬Hyperlink bar:Use the Hyperlink bar to search the Internet or edit existing hyperlinks. To display or hide the Hyperlink bar, choose View➪Toolbars➪Hyperlink Bar.
⻬Formula toolbar:Use the Formula toolbar to create formulas in your documents. For example, you can create a table, enter numbers, and then add the numbers. To display or hide the Formula toolbar, choose View➪Toolbars➪Formula Bar or press F2.
⻬Status bar:The status bar at the bottom of the screen displays informa-tion about your current document. You can change your display zoom, change from insert to overwrite mode, and so on. If you have made changes to your document since you last saved, you see an asterisk on the status bar. You can display or hide the status bar by choosing View➪Status Bar.
Working with toolbars
You can add buttons to or remove buttons from any toolbar so that you can more easily find the tools that you need quickly. The easiest way to add or remove buttons is to right-click the toolbar that you want to modify; then choose Visible Buttons from the submenu that appears. Figure 1-3 shows the menus button options for the Text Object toolbar in Writer. You can see, for example, that you could add buttons for line spacing.
You can add your own buttons and create your own toolbars. For more infor-mation about customizing toolbars, see Chapter 8.
Using the menus
⻬File: Provides functions for the file as a whole, including open, save, print, export, AutoPilot, and templates
⻬Edit: Provides editing functions, including cut, copy, paste, undo, redo, AutoText, and Find & Replace
⻬View: Provides functions for viewing your document, including zoom, the ruler, toolbars, and nonprinting characters
⻬Insert: Inserts such items as page breaks, special characters, hyperlinks, headers, footers, tables of contents, indexes, tables, and graphics
⻬Format: Formats characters, paragraphs, and pages; adds numbering or bullets; changes case (as in uppercase or lowercase); and specifies styles (collections of formatting instructions)
⻬Tools:Provides Spellcheck, the thesaurus, hyphenation, AutoCorrect, the Gallery, data sources, mail merge, macros, and customization
⻬Window: Switches among open documents so that you can see what is in documents, copy data from one document to another, and so on
⻬Help: Get help!
Each major application has an additional menu, described as follows:
⻬Calc has a Data menu for sorting, filtering, and analyzing the data in your spreadsheet.
⻬Impress has a Slide Show menu for specifying how your presentation runs when you deliver it full-screen.
⻬Draw has a Modify menu for rotating, flipping, aligning, and otherwise changing your drawing objects.
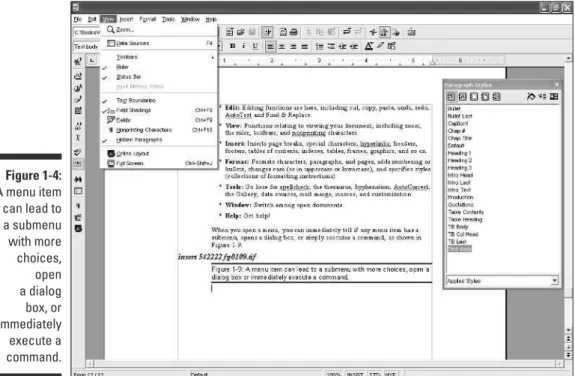
When you open a menu, you can tell whether a menu item has a submenu, opens a dialog box, or simply executes a command, as shown in Figure 1-4.
Cutting it short with keyboard shortcuts
OpenOffice.org has a huge selection of keyboard shortcuts; you can also create your own shortcuts. Keyboard shortcuts are especially useful in Writer, where your hands are on the keyboard most of the time.
When you open a menu, you can see the keyboard shortcuts listed along the right side of the menu. For example, in Figure 1-4, you can see that pressing Ctrl+F10 toggles nonprinting characters on and off.
Closing OpenOffice.org
When you have finished creating a document, spreadsheet, or presentation, you can close OpenOffice.org. It will be waiting for you when you return.
To close OpenOffice.org, do one of the following:
⻬Choose File➪Exit.
⻬Press Ctrl+Q.
Switching to OpenOffice.org
In This Chapter
䊳Understanding what OpenOffice.org can do for you
䊳Working with OpenOffice.org compared to other office suites
䊳Using Help
I
f you are using another office suite — a set of programs that includes a word processor, spreadsheet, and probably a presentation program — how easy is it to switch to OpenOffice.org? Do you have to learn a whole new way of working? Does OpenOffice.org have as many features as Microsoft Office, WordPerfect Office, or StarOffice? Finally, if you have questions about how to accomplish a certain task, how do you get answers?What OpenOffice.org Can Do for You
What does any office suite do for you? You need to write letters, reports, and memos. You have to crunch numbers for your budget or sales projections. You put it all into a presentation to show employees, prospective customers and investors, or colleagues. OpenOffice.org can do all this and more.
Using OpenOffice.org at home
Unfortunately, you often need to take work home from the office. Or, fortu-nately, you work at home all the time, but you need to e-mail documents, spreadsheets, and so on to others. Perhaps you just want an office suite for personal use at home. OpenOffice.org is a great option for home use because it’s free and compatible with other office suites.
If you take work home, you may have access to your company’s intranet or database at home, e-mail documents to yourself as attachments, download documents from a company FTP site, or bring home floppy disks or burned CDs with the material that you need. In any event, you can access databases or open documents in a number of other formats, write and edit documents using OpenOffice.org, and then save the documents in the original format. No one will ever know that you didn’t use Word, for example!
If the file you are importing has some advanced features listed below in this chapter, your document may open but look different than what you expect. Sometimes styles may change, or slight variations can occur which are easily fixed, or in the worst case, some information is lost or your files won’t open at all — but that is very unlikely. (OpenOffice.org Calc, for example, has been reported to open Excel documents that even Excel couldn’t read!)
In January 2003, ACM Queue (www.acmqueue.com)tested Microsoft Word, Excel, and PowerPoint files by opening them in other office suites. Out of 100 doc files collected at random from the Internet, OpenOffice.org Writer opened 90 perfectly. Three had minor differences, four had less minor but fixable differences, and three did not open at all — all were from older ver-sions of Word. (Calc and Impress scored similarly.) This test, however, was done using an earlier version of OpenOffice.org (version 1.0.1) and significant improvements have been made to the new version to improve its compatibility.
As a matter of fact, if you really want all your documents to be in Microsoft Word, Excel, and PowerPoint format, for example, you can set the default format of OpenOffice.org files to be the same as those that are used in Microsoft Office. That way, you never have to even think about multiple file formats.
Again, if you always work at home (lucky you!), you can open documents that people send you from other office suites and save documents in other formats that others can open.
In Chapter 3, we provide details about opening documents that were created in other formats, saving documents in other formats, and changing the default file format for OpenOffice.org.
Using OpenOffice.org at work
⻬Your company lets you use whatever program you want (this is unlikely).
⻬You are the person that makes the software decisions for the entire company.
⻬Your board of directors has chosen to make OpenOffice.org the official office suite for your company.
⻬You are the company.
⻬You’re the boss, and everyone has to do what you say.
Whatever the situation, you need everything to work properly and be com-patible so that you don’t drive your customers, suppliers, and employees crazy. You also don’t want to spend two hours writing a letter when you could accomplish the task in one hour. You need advanced features such as mail merge, graphics, tables, hyperlinks, and revision tracking.
As we explained in the previous section about using OpenOffice.org at home, compatibility is a hallmark of this wonderful program, even though the com-patibility isn’t perfect. The techniques that we described in that section, especially saving in another format, usually take care of any problems.
Advanced features abound in OpenOffice.org. Word processing has been around for a long time, and by now, programmers have a good idea of the fea-tures that people need. All the basics and most of the advanced feafea-tures are built right into OpenOffice.org. Sometimes you need to work a little differ-ently, but that’s what this book is for, after all — to explain how to use OpenOffice.org. OpenOffice.org was created as a Microsoft Office clone, so anyone migrating from Office will feel pretty comfortable right from the start.
As with any new software, if you are introducing OpenOffice.org to your employees, some training is helpful and will be appreciated. You’ll find many small differences — sometimes they’re improvements! — so people may need some time to get up to speed.
Give employees this book to use as a reference.
Comparing OpenOffice.org to
other office suites
Such a comparison is useful for the following cases:
⻬Deciding whether you should make the switch
⻬Justifying a company switch, including preparing a cost/benefit analysis
⻬Understanding questions that you may have, such as why the mail merge isn’t working the way you expected it to
OpenOffice.org and Microsoft Office
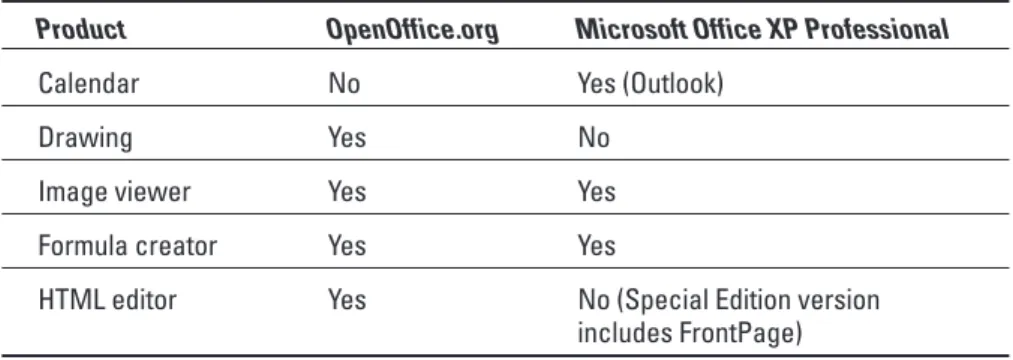
Everyone knows that Microsoft Office is the heavy hitter among the office suites. Office boasts the vast majority of users and is the standard against which users usually compare another office suite. In the following tables, we compare OpenOffice.org with Microsoft Office XP.
The system requirements of OpenOffice.org compared to those of Microsoft Office XP are shown in Table 2-1. As you can see, OpenOffice.org gives you more operating system choices and requires less memory.
Table 2-1
System Requirements
Requirement OpenOffice.org Microsoft Office XPOperating system Windows 95 through XP, Windows 98 through XP, Linux, Solaris OE Mac (with X11 installed) RAM (memory) (MB) 64 128 (varies with configuration) Hard drive space (MB) 250–300 210 (varies with configuration)
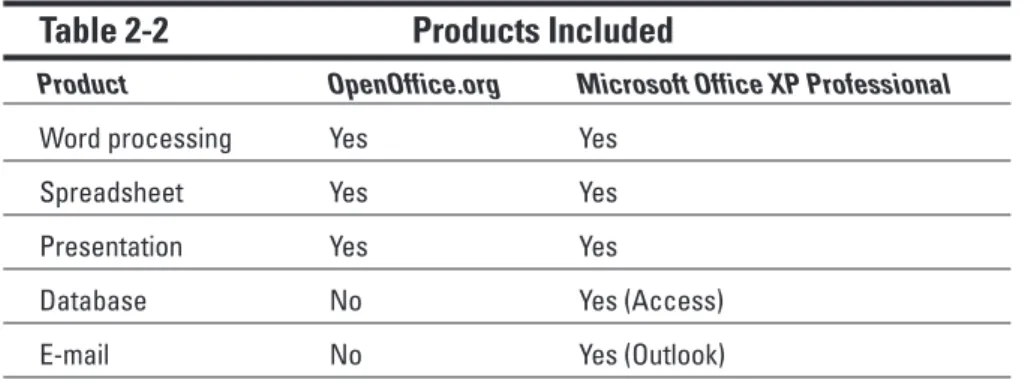
Even more important are the basic products that are included with
OpenOffice.org. Table 2-2 compares OpenOffice.org with Microsoft Office XP Professional, which includes the presentation program PowerPoint.
Table 2-2
Products Included
Product OpenOffice.org Microsoft Office XP Professional
Word processing Yes Yes Spreadsheet Yes Yes Presentation Yes Yes
Product OpenOffice.org Microsoft Office XP Professional
Calendar No Yes (Outlook) Drawing Yes No
Image viewer Yes Yes Formula creator Yes Yes
HTML editor Yes No (Special Edition version includes FrontPage)
OpenOffice.org doesn’t include a database program like Access or an e-mail/calendar program like Outlook. However, OpenOffice.org includes everything else that Office does. In fact, not all versions of Office include FrontPage, but OpenOffice.org has its own HTML editor. Also, OpenOffice.org has its own drawing program, unlike Microsoft Office.
We can’t compare every possible feature or we wouldn’t have any room left to tell you how to use the features — and which is more important? But Table 2-3 compares some important word processing features of OpenOffice.org Writer and Microsoft Word.
Table 2-3
Comparison of Word Processing Features
Feature Writer Word
Customizable menus and toolbars Yes Yes Shortcut keys Yes Yes Tables Yes Yes 3-D effects Yes Yes Revision tracking Yes Yes Headers and footers Yes Yes Tables of contents, indexes Yes Yes Drawing tools Yes Yes Mail merge Yes Yes
Although comparable programs in Microsoft Office and OpenOffice.org may be similar, many details are different. For example, Microsoft Office has AutoShapes, which are graphic objects that you can insert into your docu-ments. OpenOffice.org has its own graphic shapes but doesn’t specifically support Office’s AutoShapes. Therefore, if you open an Office file that con-tains AutoShapes in OpenOffice.org, you may have trouble displaying these AutoShapes. In our AutoShapes test, we had good success opening and dis-playing Microsoft PowerPoint presentations in OpenOffice.org Impress, so you may not have any problems!
In most cases, you will have problems with compatibility between Office and OpenOffice.org only if the formatting is quite complex. Although OpenOffice.org says that the following items may not appear or function correctly, we had excellent experience with most of these items:
⻬AutoShapes
⻬Revision marks
⻬OLE (embedded) objects
⻬Form fields
⻬Indexes
⻬Tables, frames, and columns
⻬Hyperlinks
⻬Bookmarks
⻬WordArt graphics
⻬Animated text
⻬PivotTables (Excel)
⻬New chart types
⻬Conditional formatting (Excel)
⻬Some functions and formulas (Excel)
⻬Background graphics (PowerPoint)
⻬Tab, line, and paragraph spacing
⻬Grouped objects
⻬Some multimedia effects (PowerPoint)
If you are ready to ditch Microsoft Office, use the OpenOffice.org Document Converter AutoPilot to convert all your Office files to OpenOffice.org files. Choose File➪AutoPilot➪Document Converter to open the Document Converter dialog box, as shown in Figure 2-1.
Select the Microsoft Office option button and then choose which types of documents you want to convert. Then click Next. On the next screen, you can specify the folders that you want to include (you don’t have to convert all your files) and where you want to save them. You can convert templates and regular application files.
You can specify the folder to be read and the folder where the converted files are to be saved. You can limit the conversion to specific file types, such as only Word files or only templates. You need to indicate the type of file and location for each of the Microsoft Office applications that you choose. The Document Converter confirms your choices. Click the Convert button to con-vert the files.
You may think that the Document Converter actually converts your Office files to OpenOffice.org files, but that’s not true. Your original files remain as they are, and the Document Converter creates new files in the OpenOffice.org format. You don’t have to worry about losing your original files!
Of course, you can open Microsoft Office documents in OpenOffice.org. However, converting documents first ensures a more perfect fit within OpenOffice.org.
OpenOffice.org and WordPerfect Office
How does OpenOffice.org compare to Corel WordPerfect Office? For the most part, because WordPerfect Office has so many features that are similar to Microsoft Office, you can use the tables that we provided in the previous sec-tion. However, one important difference exists. As of now, you cannot open WordPerfect files.
For word processing, you may find a workaround that exports WordPerfect files to XML or OpenOffice.org’s .sxwformat. Visit http://libwpd.source forge.net/, a Web site that contains resources for importing and exporting WordPerfect documents, and go to the Download page.
OpenOffice.org and StarOffice
StarOffice is an office suite that is distributed by Sun Microsystems. OpenOffice.org and StarOffice are sisters (brothers?). OpenOffice.org is the same program as StarOffice, with the following important differences:
⻬StarOffice costs $79.95, but OpenOffice.org can easily be obtained for free. (For example, OpenOffice.org is included with this book!)
⻬OpenOffice.org is open source software. (We explain open source soft-ware in Chapter 1.) It is free softsoft-ware as defined by the Free Softsoft-ware Foundation in that users are free to run the program for any purpose, free to study and modify the program’s source code, and free to redis-tribute modified or unmodified copies of the program, either gratis or for a fee, to anyone anywhere. Although StarOffice’s code is mostly the same as OpenOffice.org’s, the StarOffice code is not publicly available.
If you have an old version of StarOffice, you can convert it to the current ver-sion of OpenOffice.org. See the instructions in the section “OpenOffice.org and Microsoft Office,” earlier in this chapter.
Getting Help
If you have questions as you’re using OpenOffice.org, the Help feature is always there for you. You can usually find what you’re looking for with little difficulty. To start Help, choose Help➪Contents, as shown in Figure 2-2.
The four tabs in the Help window help you find your answer easily. The Contents tab organizes help according to topics. The Index tab lists informa-tion alphabetically. Use the Find tab to search for keywords. When you find a page that you may want to refer to later, add it to the Bookmarks tab.
Using the Contents page
As you can see from Figure 2-2, you can use the Contents page to get help for any OpenOffice.org application. After you decide which application you want, double-click the appropriate book icon on the left side of the page to display Figure 2-2:
the list of topics for that application. Many topics have subtopics and sub-subtopics, so keep on double-clicking until you find what you want.
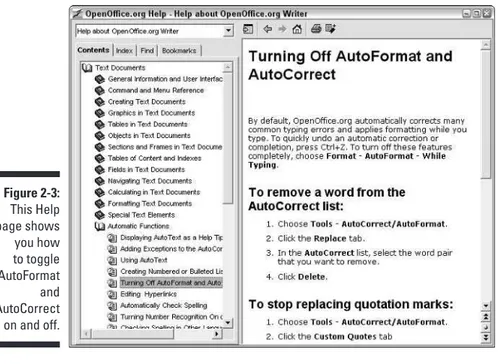
In Figure 2-3, you see the topic that discusses turning off the AutoCorrect function. You get to this topic by choosing the following path in the left side of the Contents page: Text Documents➪Automatic Functions➪Turning Off AutoFormat and AutoCorrect.
The Help system also contains another complete set of instructions. Choose the following path: Text Documents➪General Information and User Interface Usage➪Instructions for Using OpenOffice.org Writer. Here you see a long list of topics from which you can choose. You can probably find the answer you need from either set.
At the bottom of many Help pages, you can find additional related topics that may be just what you are looking for, so always scroll down to the bottom of each page. You can also click on hyperlinked text for more information or to go to another Help page.
Finding information from the index
If you find it cumbersome to search through a list that’s organized by topic, try using the Index tab. The index contains an alphabetical list of Help pages. Only the index items are actual topics. To get help on a particular topic, double-click the indented topic.
Searching
If you’re really at a loss, try using the Find tab, where you can search for Help by entering keywords. Type a word or phrase in the Search Term text box, and press Enter. Double-click the topic that you want from the resulting list.
You cannot use Boolean search techniques that you use on the Web, such as AND or a plus sign.
Saving bookmarks
To bookmark a topic, follow these steps:
1. Display the topic.
2. Click the Add to Bookmarks button at the top of the Help page.
The Add to Bookmarks dialog box opens.
3. To change the name of the bookmark to something that means more to you, type the new name in the Bookmark text box.
4. Click OK.
Using Writer —
The Word
P
art II is all about processing — not food, but words. Writer doesn’t mash up your words; instead, it makes them look great. In any office suite, the word processor is the application that people use most, so you probably don’t want to skip this part.Creating a Document
In This Chapter
䊳Starting a document
䊳Setting up a page
䊳Typing and editing
䊳Moving around in a document
䊳Viewing a document
䊳Checking spelling
䊳Saving
䊳Printing
W
riter is a full-featured word processor. It sounds like you’re cooking something delicious — and in a way, you are. You can add ingredients (words) and then stir, whip, and flip them. Finally, you put them in the oven and out comes a fully printed document!In this chapter, you find out how to create and edit Writer documents. All the basics are here, and everything else is like icing on the cake. If you’ve used another word processor, much of the material will be familiar. Skim through the chapter anyway. Writer has a few quirks and special features.
Opening a Document
Starting from scratch
When you open Writer, a new document awaits you automatically. You can simply start typing away without further ado. To create a new document while you’re already in Writer, choose File➪New➪Text Document or click New on the Function toolbar. This looks like a blank sheet of paper with a rec-tangle that represents your margins.
Writer formats new documents based on the default template. For more infor-mation on using templates to control the formatting of documents, see Chapter 4. Chapter 4 explains in detail how to format documents.
A vertical-line cursor is blinking patiently at you. This cursor represents the location where text appears when you start to type.
Using what you have
To open an existing document, choose File➪Open to display the Open dialog box, as shown in Figure 3-1. For faster access, click the Open button on the Function toolbar or press Ctrl+O (Ô+O on the Mac). In the Open dialog box, locate the file that you want and double-click it. The dialog box closes, and your document opens at its beginning. If necessary, use the scroll bars to move to another location. Later in this chapter, we explain how to quickly navigate through your document with ease and grace.
The discussion on the Open dialog box in this section is based on the Windows operating system. Other operating systems are either slightly or radically different! If you know your operating system fairly well, you won’t have any trouble finding files in this dialog box.
You can use one of the buttons on the left side of the Open dialog box to help you find your file more easily. The Look in drop-down list displays the current folder or directory. Click this list to display all the folders (or directories) from the current folder back to the drive on which they are located. You can then choose another location to find your file.
The buttons at the top help you navigate as well. These buttons are as follows:
⻬Back: Click to return to the previous location (folder or directory). This button is only available after you first use some other method to navi-gate from one location to another.
⻬Up One Level: Moves you one folder or directory closer to the root directory of the drive.
⻬Create New Folder: Creates a new folder in the folder that’s currently displayed in the Look in list box.
⻬View Menu: Choose a view from this drop-down list. You can choose to view a thumbnail image, tiles (large icons), icons (smaller than tiles), a simple list of filenames, or a detailed list of files.
Importing documents
You can open documents from any other format that OpenOffice.org accepts. Follow these steps to import a document:
1. Choose File➪Open (or use one of the shortcuts that was mentioned in
the previous section).
2. In the Open dialog box, choose the format of the document from the Files of Type drop-down list.
3. Navigate to the file’s location.
4. Double-click the file.
Some of the more common formats that OpenOffice.org can import are as follows:
⻬Microsoft Word 97/2000/XP (.doc)
⻬Microsoft Word 97/2000/XP template (.dot) ⻬Rich Text Format (.rtf)