Visual Basic
2005
FOR
by Bill Sempf
Visual Basic
2005
FOR
111 River Street Hoboken, NJ 07030-5774
www.wiley.com
Copyright © 2006 by Wiley Publishing, Inc., Indianapolis, Indiana Published by Wiley Publishing, Inc., Indianapolis, Indiana Published simultaneously in Canada
No part of this publication may be reproduced, stored in a retrieval system or transmitted in any form or by any means, electronic, mechanical, photocopying, recording, scanning or otherwise, except as permit-ted under Sections 107 or 108 of the 1976 Unipermit-ted States Copyright Act, without either the prior written permission of the Publisher, or authorization through payment of the appropriate per-copy fee to the Copyright Clearance Center, 222 Rosewood Drive, Danvers, MA 01923, (978) 750-8400, fax (978) 646-8600. Requests to the Publisher for permission should be addressed to the Legal Department, Wiley Publishing, Inc., 10475 Crosspoint Blvd., Indianapolis, IN 46256, (317) 572-3447, fax (317) 572-4355, or online at
http://www.wiley.com/go/permissions.
Trademarks:Wiley, the Wiley Publishing logo, For Dummies, the Dummies Man logo, A Reference for the Rest of Us!, The Dummies Way, Dummies Daily, The Fun and Easy Way, Dummies.com, and related trade dress are trademarks or registered trademarks of John Wiley & Sons, Inc. and/or its affiliates in the United States and other countries, and may not be used without written permission. Visual Basic and Visual Studio are registered trademarks of Microsoft Corporation. All other trademarks are the property of their respective owners. Wiley Publishing, Inc., is not associated with any product or vendor mentioned in this book.
LIMIT OF LIABILITY/DISCLAIMER OF WARRANTY: THE PUBLISHER AND THE AUTHOR MAKE NO REP-RESENTATIONS OR WARRANTIES WITH RESPECT TO THE ACCURACY OR COMPLETENESS OF THE CON-TENTS OF THIS WORK AND SPECIFICALLY DISCLAIM ALL WARRANTIES, INCLUDING WITHOUT LIMITATION WARRANTIES OF FITNESS FOR A PARTICULAR PURPOSE. NO WARRANTY MAY BE CRE-ATED OR EXTENDED BY SALES OR PROMOTIONAL MATERIALS. THE ADVICE AND STRATEGIES CON-TAINED HEREIN MAY NOT BE SUITABLE FOR EVERY SITUATION. THIS WORK IS SOLD WITH THE UNDERSTANDING THAT THE PUBLISHER IS NOT ENGAGED IN RENDERING LEGAL, ACCOUNTING, OR OTHER PROFESSIONAL SERVICES. IF PROFESSIONAL ASSISTANCE IS REQUIRED, THE SERVICES OF A COMPETENT PROFESSIONAL PERSON SHOULD BE SOUGHT. NEITHER THE PUBLISHER NOR THE AUTHOR SHALL BE LIABLE FOR DAMAGES ARISING HEREFROM. THE FACT THAT AN ORGANIZATION OR WEBSITE IS REFERRED TO IN THIS WORK AS A CITATION AND/OR A POTENTIAL SOURCE OF FUR-THER INFORMATION DOES NOT MEAN THAT THE AUTHOR OR THE PUBLISHER ENDORSES THE INFOR-MATION THE ORGANIZATION OR WEBSITE MAY PROVIDE OR RECOMMENDATIONS IT MAY MAKE. FURTHER, READERS SHOULD BE AWARE THAT INTERNET WEBSITES LISTED IN THIS WORK MAY HAVE CHANGED OR DISAPPEARED BETWEEN WHEN THIS WORK WAS WRITTEN AND WHEN IT IS READ.
For general information on our other products and services, please contact our Customer Care Department within the U.S. at 800-762-2974, outside the U.S. at 317-572-3993, or fax 317-572-4002. For technical support, please visit www.wiley.com/techsupport.
Wiley also publishes its books in a variety of electronic formats. Some content that appears in print may not be available in electronic books.
Library of Congress Control Number: 2005927630 ISBN-13: 978-0-7645-7728-4
ISBN-10: 0-7645-7728-X
Manufactured in the United States of America 10 9 8 7 6 5 4 3 2 1
I am Bill Sempf,and you’ll notice that I don’t write in third person. I have spent an inordinate amount of time in the last several years writing about, thinking about, and coding in VB.NET. I am a coauthor of Pro Visual Studio.NET, Effective Visual Studio.NET, Professional ASP.NET Web Services and Professional VB.NET(among others), and a frequent contributor to the Microsoft Developer Network, Builder.com, Hardcore Web Services, Inside Web Development Journal, and Intranet Journal.
I have recently been an invited speaker for DevEssentials, the International XML Web Services Expo, and the Association of Information Technology Professionals. As a graduate of Ohio State University with a Bachelor of Science in Business Administration, Microsoft Certified Professional, Certified Internet Business Strategist, and Certified Internet Webmaster, I have devel-oped over one hundred Web applications for startups and Fortune 500 companies alike.
I began my career in 1985 by helping my father (also named Bill) manage Apple IIe systems for the local library. Since then, I have built applications for the likes of Lucent Technologies, Bank One, the State of Ohio, Nationwide Insurance, and Sears, Roebuck and Co. I specialized in data-driven Web applications of all types, both public and private. Currently, I am the Senior Technology Consultant at Products of Innovative New Technology in Grove City, Ohio, a Microsoft Certified Partner. I can be reached at
On August 6, 2005, my beautiful wife, Gabrielle, and my new son, Adam, col-laborated on a birthing project. You may have noticed that the publication date of this book puts the majority of the editing right smack dab in the middle of that project. Though it was a busy time, and a crazy few months, I couldn’t be happier.
Gabrielle, I probably needn’t thank you again for putting up with the 5:00-AM editing during the 5:00-AM feeding, but I will anyway. Thank you. You are, as you know, the love of my life.
Adam, hopefully some of this stuck while you were lying on my desk during the editing process. The world needs Visual Basic programmers as smart and handsome as you. I am so looking forward to watching you become a part of this world.
Author’s Acknowledgments
I cannot begin to thank the amazing team at Wiley who led me ever so care-fully through the process of developing this book. Katie Feltman was amazing in helping to solidify the ideas I wanted to present here in the early stages. She also handled the completion stages of the book with tremendous skill. Thank you.
Beth Taylor did a great job editing the initial chapters, and then Leah Cameron, Jean Rogers, Barry Childs-Helton, and others stepped in to make sure what I had to say made sense. Did I mention Leah? She really made this all come together from the editing perspective. If you read a line and say, “Wow, I never heard it put so clearly!” that was probably Leah’s editing.
Special thanks go to Jeff Simmons, who handled the majority of the technical editing, and Rich Hundhausen, who covered some of the earlier chapters. You wouldn’t believe the number of technical details that need to be checked in a book like this.
My army of peer reviewers was fantastic: Theresa Alexander, Jim Andrews, David Deloveh, Rex Mahel, Greg McNamara, Rob Morgan, Blake Sparkes, and Gary Spencer. Here’s a special note about my father, William E. Sempf, whose education background was of inestimable help in reviewing the early concepts for the book. Then, he let me use him as a guinea pig for Part I! What a trouper!
Some of the people who helped bring this book to market include the following:
Acquisitions, Editorial, and Media Development
Editors:Beth Taylor, Leah Cameron, Jean Rogers
Acquisitions Editor:Katie Feltman
Technical Editors:Jeff Simmons, Richard Hundhausen
Editorial Manager:Leah Cameron
Media Development Specialist:Laura Atkinson
Media Development Manager:
Project Coordinator: Kathryn Shanks
Layout and Graphics: Jonelle Burns, Andrea Dahl, Joyce Haughey, Stephanie D. Jumper, Barbara Moore, Barry Offringa
Proofreaders: Leeann Harney, Jessica Kramer, Carl William Pierce, Dwight Ramsey, TECHBOOKS Production Services
Indexer: TECHBOOKS Production Services
Special Help
Barry Childs-Helton
Publishing and Editorial for Technology Dummies
Richard Swadley,Vice President and Executive Group Publisher
Andy Cummings,Vice President and Publisher
Mary Bednarek,Executive Acquisitions Director
Mary C. Corder,Editorial Director
Publishing for Consumer Dummies
Diane Graves Steele,Vice President and Publisher
Joyce Pepple,Acquisitions Director
Composition Services
Gerry Fahey,Vice President of Production Services
Introduction ...1
Part I: Getting to Know .NET Using VB ...9
Chapter 1: Wading into Visual Basic ...11
Chapter 2: Using Visual Studio 2005 ...23
Chapter 3: Designing Applications in VB 2005 ...43
Part II: Building Applications with VB 2005 ...61
Chapter 4: Building Windows Applications ...63
Chapter 5: Building Web Applications ...83
Chapter 6: Building Class Libraries ...109
Chapter 7: Building Web Services ...125
Chapter 8: Debugging in VB 2005 ...141
Part III: Making Your Programs Work ...157
Chapter 9: Interpreting Strings and Things ...159
Chapter 10: Making Decisions in Code ...177
Chapter 11: Getting Loopy ...189
Chapter 12: Reusing Code ...199
Chapter 13: Making Arguments, Earning Returns ...221
Part IV: Digging into the Framework ...237
Chapter 14: Writing Secure Code ...239
Chapter 15: Accessing Data ...253
Chapter 16: Working with the File System ...271
Chapter 17: Accessing the Internet ...283
Chapter 18: Creating Images ...299
Part V: The Part of Tens ...309
Chapter 19: Ten Tips for Using the VB User Interface ...311
Chapter 20: Ten Ideas for Taking Your Next Programming Step ...323
Chapter 21: Ten Resources on the Internet ...335
Introduction...1
About This Book ...2
Conventions Used in This Book ...2
What You’re Not to Read ...3
Foolish Assumptions ...3
How This Book Is Organized ...4
Part I: Getting to Know .NET Using VB ...4
Part II: Building Applications with VB 2005 ...4
Part III: Making Your Programs Work ...5
Part IV: Digging into the Framework ...5
Part V: The Part of Tens ...5
Icons Used in This Book ...5
Where to Go from Here ...6
Part I: Getting to Know .NET Using VB ...9
Chapter 1: Wading into Visual Basic . . . .11
Visual Basic’s Role in the Framework ...11
Saying Hello to VB 2005! ...14
Setting up Visual Studio ...14
Starting a Windows Forms project ...15
Adding functionality to the form with VB code ...17
Running and operating your Windows form ...18
Finding More Power in Visual Studio ...20
Visual Studio doesn’t just do Windows! ...20
Visual Basic goes mobile ...21
VB as your one-stop development shop ...21
Chapter 2: Using Visual Studio 2005 . . . .23
Understanding Visual Studio Tools ...23
Touring the Design View ...24
Accessing controls with the Toolbox ...26
Changing details with the Properties window ...27
Organizing your project with the Solution Explorer ...29
Accessing outside resources with the Server Explorer ...30
Dynamically editing data with the Data Sources window ...33
Moving a Tool Window ...35
Working with Code ...37
Getting to Code View ...37
Using IntelliSense ...37
Customizing with Options ...40
Increasing Efficiency with Third-Party Tools ...41
Chapter 3: Designing Applications in VB 2005 . . . .43
Making Software Simple Using the .NET Framework ...44
Getting to the operating system ...45
Integrating servers and services ...47
Interacting with the user ...48
Comparing Abstract Concepts with the Real World ...48
Classes ...49
Objects ...49
Planning for a Project Using the Project Lifecycle ...49
Scoping out the system ...51
Gathering requirements ...52
Designing the Date Calculator ...53
Storing data ...53
Designing screens ...54
Defining logic ...56
Writing a test plan ...58
Sticking to the plan ...58
Part II: Building Applications with VB 2005 ...61
Chapter 4: Building Windows Applications . . . .63
A Quick Look Back at Visual Basic ...63
Discovering Windows Controls ...65
Making a Windows Application ...67
Adding Functionality to a Windows Form ...70
Adding Features to Windows Forms ...72
Managing text input with the TextBox ...72
Communicating with the user using the status bar ...74
Giving hints with the ToolTip control ...77
Navigating with the MenuStrip control ...78
Activating the right-click with the ContextMenuStrip ...81
Chapter 5: Building Web Applications . . . .83
Seeing How ASP.NET Works with Your Web App ...84
PostBack: Not a returned package ...85
A matter of State ...85
Discovering the Web Controls ...86
Building Your First Web Application ...89
Viewing the extras in Web Forms ...89
Constructing the Web Forms application ...91
Viewing the results in Source View ...93
Looking Below the Surface of Web Forms ...98
Validating user input ...98
Dealing with State ...101
Checking Out Some Cool Web Tricks ...103
Getting from one page to another ...103
Adding pretties ...104
Getting information about the user ...105
Chapter 6: Building Class Libraries . . . .109
Past to Present: DLLs Defined ...110
Designing a Library ...111
Objects and classes ...112
The parts of a class library ...112
Coding a class library ...114
Creating a Class Library ...115
Getting started ...115
Building the Date Calculator ...116
Running a DLL file ...118
Delving Deeper into DLLs ...121
Telling between friends and foes ...121
Be nice and share ...122
Getting more out of less ...123
Chapter 7: Building Web Services . . . .125
Getting to Know XML Web Services ...125
Web services: Characteristics ...127
Web services: Quirks ...127
Designing for Web Services ...128
Planning the design strategy ...128
Getting a grip on the tactics ...129
Building a Web Service ...129
Building the DateCalc Web service ...131
Viewing the DateCalc service in action ...132
Consuming a Web Service ...134
Web Services in More Depth ...137
Chapter 8: Debugging in VB 2005 . . . .141
Cool Visual Tools for Debugging ...141
Breakpoints ...142
The Watch window ...145
The Immediate Window ...146
Using the Debugging Tools in the .NET Framework ...147
The Debug class ...147
Error handling ...148
Debugging the Projects ...150
Windows Forms ...150
Web Forms ...151
Class libraries ...153
Part III: Making Your Programs Work ...157
Chapter 9: Interpreting Strings and Things . . . .159
Types of Information in Visual Basic ...160
Understanding types in Visual Basic ...161
Changing types with CType ...162
Controlling types with validation ...164
Making Words Work with the String Type ...165
The fantastic tools built into strings ...165
Emptiness — handling nulls ...166
Finding Tools for Managing User Input ...167
Constructing strings with the StringBuilder class ...168
Manipulating strings with regular expressions ...169
Things That Aren’t Strings — Numbers and Dates ...171
Integers and reals and imaginaries, oh my! ...171
Working with dates and date math ...172
Changing Types with Parse and TryParse ...174
Chapter 10: Making Decisions in Code . . . .177
Designing Business Logic ...177
Depicting Logic with Flowchart Components ...178
Communicating with the user ...179
Defining the process ...180
Making a decision ...181
Implementing These Processes in Visual Basic ...182
Single process ...182
Multiple choice ...184
Exception ...186
Chapter 11: Getting Loopy . . . .189
Dealing with Zero ...190
Starting at zero ...190
Comparing specific loops and indefinite loops ...190
Writing Loops with For-Next ...192
Using the For-Each Listing with Collections ...193
Writing Indefinite Loops with Do-Loop ...195
Do-While loop, checked at start ...196
Do-While loop, checked at end ...196
Do-Until loop, checked at start ...197
Do-Until loop, checked at end ...198
Checking at the Beginning with While ...198
Chapter 12: Reusing Code . . . .199
Reusing Code to Build Software ...200
Building functions with reuse in mind ...201
Avoiding the Code-Complexity Trap ...205
Protecting the values of parameters ...206
Handling errors effectively in an abstract environment ...207
Finding Other Ways to Reuse Code ...209
Creating custom controls ...209
Adding user controls ...211
Making master pages ...212
Reusing Programs Outside of the Framework ...213
Referencing the old Component Object Model ...214
Calling methods in COM objects ...215
Using other programs with the Process class ...215
Accessing DOS: But Only as a Last Resort ...218
Running command line programs with Shell ...218
Getting focus with AppActivate ...219
Chapter 13: Making Arguments, Earning Returns . . . .221
Using Classes Effectively ...222
Making and destroying objects ...222
Resource utilization ...223
With and Using ...224
Using Event Handlers ...224
Event handling using the Properties window ...225
Event Handlers using IntelliSense ...226
Making Sensible Procedures with Overloading ...227
Reusing your procedure names ...227
Changing built-in functions with operator overloading ...228
Designing for overloading ...229
Optional parameters ...230
Flexible Objects with Generics ...231
Building generics ...231
Designing for generics ...233
Controlling Objects with Threading ...233
Designing for threading ...233
Implementing threading ...234
Part IV: Digging into the Framework ...237
Chapter 14: Writing Secure Code . . . .239
Designing Secure Software ...240
Determining what to protect ...240
Documenting the components of the program ...240
Decomposing the components into functions ...241
Identifying potential threats in those functions ...241
Building Secure Windows Forms Applications ...243
Authentication using Windows login ...243
Encrypting information ...245
Deployment security ...246
Building Secure Web Forms Applications ...247
SQL Injection attacks ...247
Script exploits ...248
Best practices for securing your Web Forms applications ...250
Using System.Security ...251
Chapter 15: Accessing Data . . . .253
Getting to Know System.Data ...254
How the Data Classes Fit into the Framework ...256
Getting to Your Data ...256
Using the System.Data Namespace ...257
Connecting to a data source ...257
Working with the visual tools ...263
Writing data code ...266
Chapter 16: Working with the File System . . . .271
Getting to Know System.IO ...272
Using the System.IO Namespace ...274
Opening a file ...274
Changing the contents of a file ...277
Saving a file ...277
Listing directories and files ...279
Viewing file information ...279
Keeping an eye on files ...280
Chapter 17: Accessing the Internet . . . .283
Getting to Know System.Net ...284
How the Net Classes Fit into the Framework ...285
Using the System.Net Namespace ...286
Checking the network status ...287
Downloading a file from the Internet ...288
E-mailing a status report ...290
Logging network activity ...293
Chapter 18: Creating Images . . . .299
Getting to Know System.Drawing ...300
Graphics ...300
Pens ...301
Brushes ...301
How the Drawing Classes Fit into the Framework ...302
Using the System.Drawing Namespace ...303
Getting started ...304
Setting up the project ...305
Drawing the board ...307
Part V: The Part of Tens ...309
Chapter 19: Ten Tips for Using the VB User Interface . . . .311
Generating Event Handlers from the Properties Window ...311
Generating Event Handlers from the Code View ...313
Pasting Text as HTML ...314
Customizing Your Toolbars for Every File Type ...315
Adding Extender Providers ...316
Using Visual Components That Are Not So Visual ...317
Recording Macros ...318
Using the Task List ...320
Inserting Snippets in Your Code ...321
Chapter 20: Ten Ideas for Taking Your Next Programming Step . . .323
Get Visual Basic 2005 for Home Use ...323
Build Your Own Tools ...324
Join In an Online Competition at TopCoder ...325
Participate in an Open Source Project ...326
Use Third-Party Tools in Your Projects ...327
Integrate a Public Web Service ...328
Try Out CodeRush and Other Code Generators ...330
Write a Web Part ...331
Use the DTE ...332
Write an Article about What You Have Discovered ...333
Chapter 21: Ten Resources on the Internet . . . .335
MSDN Library ...335
VBForDummies.net ...336
GotDotNet.com ...336
ASP.NET Web ...336
The Microsoft Public Newsgroups ...337
.NET 247 ...337
Search IRC ...337
kbAlertz ...337
CodeSwap ...338
<Microsoft> Google for Code Snarfing ...338
W
elcome to the new version of Visual Basic for 2005. As its name implies, Visual Basic is a visualway to create new programs for the Microsoft Windows family of operating systems.And though it is basicin many ways, the Visual Basic language is also very powerful. You can create new class libraries and XML Web services, as well as programs that you can use on your PC or your Web browser, or even your phone or PDA. Anything that can be done in Windows can be done in Visual Basic.
Programming in Visual Basic is easier than you might think, thanks to the visual tools supplied by Visual Studio. You don’t have to type line after line of code to create a working program — Visual Studio automatically generates some code for you when you drag and drop components with the visual tools. Of course, being able to read and write code is important too, and this book provides plenty of code samples so you can understand the inner work-ings of your programs.
This book also shows you some best practices to keep in mind as you get fur-ther along in your programming. Your first programs may be very simple, but when you start getting into more complicated applications, you really need to plan out your program before you start writing the code.
Previous versions of Visual Basic were complete development environments. The latest version of Visual Basic is really only one part of a three-part pro-gramming strategy:
⻬A language:For this book, it is Visual Basic 2005. Other popular lan-guages include C#, J#, Perl, and 24 others.
⻬An Integrated Development Environment (IDE): For this book, it is Visual Studio 2005. Other IDEs include Borland, Macromedia, and several other tools.
About This Book
No matter who you are or what your background is, you are not a dummy if you’re reading this book. You might, however, be a dummy about what Visual Basic is, how to use it, or why it can help you do your job better.
This book is expressly designed to make you a good Visual Basic program-mer. As such, I don’t spend every page talking about the features of the lan-guage, or how to use Visual Studio, or how to connect to a database. I spend a fair amount of time talking about how to make good decisions, build the right software for the problem you need to solve, and not make common mistakes.
Visual Basic — despite all appearances — is really very easy to use. Much of the complexity of the language is hidden in tools provided to you by Microsoft. Many of these tools are not expressly for Visual Basic, but they will become very important to your success as a programmer. This book is also about those tools, because they make writing good, working programs faster and easier.
This book is also about you, the programmer. I’m a programmer like you. I have been writing in BASIC since 1981, and I’ve lived through all the ups and downs. For about 15 years, Visual Basic was a program, not a language, and I lived through that. Now the tables have turned — Visual Basic is again a lan-guage (Visual Studio is the program). In this book, I help you become a good Visual Basic programmer.
Conventions Used in This Book
I have written this book to be easy to read while you are programming. As such, I use certain conventions to make for easier reading:
⻬Words that I want to emphasize or that I’m defining are placed in italics.
⻬Terms that are used in Visual Basic code are in monotypefont.
⻬Menu selections look like this: File➪New. This is shorthand for “From the File menu, select New.”
Bulleted lists are used to create memorable lists. One of the toughest things about programming for me is remembering key points, like features or best practices. I use the bulleted lists to help with those kinds of things.
Code examples are broken out from the rest of the paragraph, as follows:
If DateNumber.Text.Length > 0 Then DateInterval = CInt(DateNumber.Text) End If
NextWeek.Text = DateChooser.Value.Add(TimeSpan.FromDays(7)).ToString()
The code blocks are usually written in such a way that you can copy them right into your program. They will be in monotype font, and sometimes will have linefeeds(the space and underscore character at the end of the line) in inappropriate places because the printed page is only so wide. Remember that when you’re writing out the code and you’re looking at it on-screen, you won’t need to use so many linefeeds. If you have a question about where a break should be, check out the sample code, which you can find on this book’s companion Web site, www.vbfordummies.net.
What You’re Not to Read
If you’re not working with graphics right now, you can skip the chapter on graphics. If you don’t use a database, you can skip the database chapter. See where I am going? If you don’t use Web services, you don’t have to read about it.
Effectively, this is a modular book. Aside from Part I, which everyone needs to read, there are no requirements to read anything in any particular order. Read what you need, and ignore the rest until someone comes into your office and needs something done on that topic. Then you can pull the book out again and read that chapter.
The Technical Stuff icon is for information that is more in-depth than the rest of the book. If you are following along with Visual Studio and don’t want to be distracted, skip over the Technical Stuff icons.
Foolish Assumptions
⻬A PC running some flavor of Windows (Windows 2000 or XP, most likely)
⻬A copy of Visual Studio 2005 installed on your PC
⻬Access to the Internet, for downloading code samples and further reading
How This Book Is Organized
This book is meant to be read as a series of articles, but it can easily be used as a reference or read straight through. I recommend reading it at your com-puter, with Visual Studio running.
Each part is designed to teach you something that you need to know. The only part that I strongly suggest you read, however, is Part I, “Getting to Know .NET Using VB.” After that, you can read whatever you need to get the job done, or read the whole book all the way through — it is up to you.
Part I: Getting to Know .NET Using VB
After a quick jumpstart, I discuss the tools and concepts in this part. Chapter 1 is a Hello Worldintroduction to the language, which experienced VB program-mers will find useful and new programprogram-mers will find vital. Chapter 2 is a tour of the development tool you will be using, Visual Studio 2005.Chapter 3 is arguably the most important chapter in the book. It is about designing good software with Visual Basic. You may want to read that one twice. I wanted to print it twice, but the publisher wouldn’t let me.
Part II: Building Applications
with VB 2005
Part III: Making Your Programs Work
This part is actually about Visual Basic, the language. You see, the projects discussed in Part II are actually available to lots of languages. You can write a Windows Forms project in Java (Microsoft calls it J#) if you want to. The actual VB language doesn’t kick in until you write a program that needs more than the visual design.Part IV: Digging into the Framework
Finally, in Part IV, you look at the last part of the puzzle — what the .NET Framework can do for you. Tons of tools that are built right in to the frame-work are available to all languages, but have a special twist when used with Visual Basic.I begin with the important stuff, specifically security. Then I cover data, files, networks, and drawing. Throughout all these chapters, I provide code exam-ples that will help you through the tougher problems that you may encounter in your VB career.
Part V: The Part of Tens
Some things fit nowhere. That’s what the Part of Tens is for — in this part, I collected the most useful tips that didn’t fit elsewhere and made them into top ten lists. For more of these kinds of lists, check out this book’s compan-ion Web site at www.vbfordummies.net.
Icons Used in This Book
This is the icon I use most often. It highlights a best practice, a common usage, or just something that I think you will find good to know about a fea-ture or tool.
I use this icon to point out something that you want to, well, remember. The famous gotchasthat all programmers are so familiar with get this icon. Some usages aren’t always obvious. I hope to help you help yourself by pointing them out.
This icon points out something you do notwant to do unless you’re willing to suffer the consequences. Read the paragraphs next to the Warning icon so you’ll know how to avoid the pitfall, trap, or mistake.
These icons are pointers to places where the Myobject, new to Visual Basic 2005, can be useful.
Sometimes, I give you more information that you really need. When I do that, I try to use the Technical Stuff icon. You will find things you never wanted to know about the inner workings of the .NET Framework, design ideas, and other geeky stuff alongside this icon.
I use this icon to highlight a new feature in Visual Basic 2005.
Where to Go from Here
If you’re completely new to Visual Basic and Visual Studio, start out by flip-ping the page and reading Chapter 1. If you’re interested in looking up a par-ticular topic, skim through the Table of Contents or the Index and turn to the indicated page.
When you’re feeling more familiar with the language, tool, and project type, branch out by checking out the list of tips in the Part of Tens to take your next programming step.
You can, of course, read the whole book all the way through. Another great way to figure out how Visual Basic works is to follow a project path all the way through — for example, start with a Windows Forms project with
Be sure to use the code samples provided at www.vbfordummies.net. They will give you a broad starting point for a lot of other, larger programs that you might want to write.
You also might be in the position where you have to quickly learn how to use this language for your job, and there might be special libraries and standards that you have to work with there. I recommend that you take the book home, where you can work undistracted, and give yourself a good foundation in the language. Then you can take the book back to work and use it as a reference for your future programming efforts.
Wading into Visual Basic
In This Chapter
䊳Seeing where VB fits in with .NET
䊳Writing your first Visual Basic 2005 program
䊳Exploiting the newfound power of VB
T
o get started with Visual Basic 2005, I recommend that you jump right in and write software! And to help you with such an assertive approach, this chapter gives you just what you need to test the waters of the Visual Basic pool and get comfortable with its place in the larger Visual Studio environment.Then, you can really get your feet wet as you build Hello World— your first VB 2005 Windows Forms application — right here in the first few pages! You find out how to launch Visual Studio 2005 (the development tool for your VB applications), how to start a new project, and how to build a form visually and make it work with code.
Also in this chapter, I give you a glimpse into the deeper power of Visual Basic. Specifically, I introduce how VB 2005 integrates with the Microsoft .NET Framework and offer insight into what that means to you as a programmer.
Visual Basic’s Role in the Framework
But developing applications in .NET doesn’t have to be harder than it was in VB 6.0. The .NET Framework and Visual Basic 2005 can be powerful tools, and the trick is discovering how they work together through the Visual Studio Integrated Development Environment (IDE).
Part of the difficulty that many programmers face when moving to the .NET Framework is the terminology, which can get confusing. I’d like to put the problem with terminology to bed right now, so check out this list of the potentially confusing terms used in .NET development:
⻬Visual Basic 2005:The programming language described throughout this whole book. No longer can you run or load Visual Basic as a sepa-rate entity. It is simply one programming language that speaks to the Microsoft .NET Framework, which is the next term in the list.
⻬.NET Framework: The layer that sits between the language (in this case, Visual Basic) and the operating system, which can be Windows 98, Windows ME, Windows 2000, Windows XP, Windows Server 2003, or any of the sub-versions of those (such as the Tablet PC edition). The .NET Framework layer serves to provide functionality based on the operation of the Windows system on which it resides, as well as to provide libraries for other functionality (such as math computations and data-base access). Figure 1-1 is a visual representation of the relationship of all the layers in the framework.
⻬Visual Studio 2005:The tool that you use to create any kind of applica-tion using any compatible programming language. Visual Studio replaces the Visual Basic 6.0 program that was formerly part of the Visual Studio suite (all individual suite components were labeled Version 6.0). When you go to write a new program in the .NET environment, you run Visual Studio 2005 and select the kind of program you want to write in the pro-gramming language you want to use. For example, you may choose to
Windows COM+ Services
create a Windows Forms program using the Visual Basic language, just like the old days. Or you might want to write an application for a smart device using C#.
⻬Windows Forms: The new term for an old-fashioned Visual Basic appli-cation. This term refers to an application that is written using the .NET Framework and has a Windows user interface.
⻬Web Forms: The term for an application with a Web page interface writ-ten using the .NET Framework. Creating a Web Forms application is very similar to writing a Windows Forms application.
⻬Web services: The class libraries that are written using a standard defined by the same people who defined standards for the World Wide Web. Web services are used for interaction between divergent systems.
The .NET Framework is what you may already know as the Win32 layer in the old Windows DNA system. Like the new .NET Framework, the Win32 layer gave you the ability to get to the functions of the operating system when developing for a Windows platform. Also, the .NET Framework includes a lot of adjunct functionality, such as math and data libraries, that makes program-ming a more cohesive experience.
Basically, everything that Windows does is exposed by the .NET Framework. Specifically, the .NET Framework gives a programmatic name to every object and event that Windows can control. A programmer can use that name to refer to anything having code in the operating system. Do you need to tell the printer to make two copies of your document? Try referring to My.Computer. Printers.DefaultPrinter.PrinterSettings.Copies = 2. Do you need to paint some item on the screen blue? Try System.Drawing.Brushes.Blue.
How VB 2005 differs from VB 6
Visual Basic 6 was a standalone program, and Visual Basic 2005 is one language in a larger development system. To go back to VB’s roots, Basic was a programming language used 20 years ago as part of MS-DOS. In 1985, Basic became Visual Basic and was made into a part of the Windows application-building tool. There’s a lot more to the Visual Basic 6 program than just the language — its form-building soft-ware, for example, is called Ruby.
In this .NET world, the programming language becomes just a way to interact with the framework and, therefore, with the Windows operating system. All programs need a set of established rules to handle the flow (decisions, loops, and the like) within programs. Visual Basic provides one such set of rules, and the framework provides the objects and events to interact with.
Saying Hello to VB 2005!
In this section, I get you started with the classic Hello World program. Although this isn’t the single most exciting application you can build, it helps to make sure that your development environment is set up the best way possible.
Setting up Visual Studio
To follow this example, you need to start by running Visual Studio 2005, which is the development environment used throughout this book to build applications in Visual Basic. Before you can run Visual Studio, you need to install it!
Visual Studio comes in a number of editions:
⻬Team System: Designed for full programming staffs in large corpora-tions, this edition includes large-scale application system design tools such as test-driven development and Team Foundation Server.
⻬Professional Edition: Designed for the developers working with users in a standalone setting. The Professional Edition is more common for the solo developer or for mid-sized application development. This is the edi-tion I use in this book.
⻬Standard Edition: Designed for building smaller, standalone applica-tions, this version is perfectly functional for 80 percent of applications built. But if you plan to build large systems that need to be enterprise-quality and may have many users, go for the Professional Edition.
⻬Express Edition: Designed for students and hobbyists. This version lacks a lot of the project types that the other versions have.
Installing Visual Studio can be rough, so I recommend going with the defaults for your first time. The installation process takes quite a while, too. Even if you are using the DVD, expect to spend two hours installing. If you are work-ing from the CDs, expect to spend four hours.
After installing Visual Studio, you can run it by choosing Start➪All Programs➪
Microsoft Visual Studio 2005➪Microsoft Visual Studio 2005. The environment loads, and you can get started on a program by choosing File➪New➪Project from the main menu. Next, you need to make choices about your project type and language, as described in the next section.
Starting a Windows Forms project
After you choose File➪New➪Project from the Visual Studio main menu, the New Project dialog box appears, as shown in Figure 1-2. In the Project Types pane, you find a folder structure that lists the languages loaded with your installation and the project types available for those languages. I suggest beginning with a plain old Windows Application — which is the Visual Basic 2005 answer to the traditional (and perhaps familiar) VB 6.0 application.
To get started building your Hello World application, following these steps:
1. Select the project type from the Templates pane in the New Project dialog box.
For this example, select Windows Application. Also, make sure Visual Basic is the language selected in the Project Types pane. If you loaded other languages during installation, you may have other choices. Figure 1-2:
2. Type the name you want to give your project to replace the default name in the Name text box.
In this example, I type Hello Worldin the text box.
3. Click OK.
Visual Basic loads the default form (called Form1) and presents it to you in the Design View. The default form comes complete with a workspace, the title bar, and familiar windows elements like the resize buttons and the Close button. You do most of the work to customize your form using this visual view.
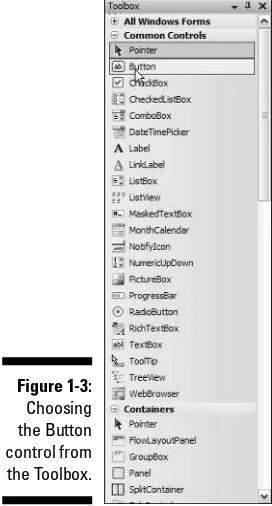
4. Click the word Toolbox on the left side of the screen.
The Toolbox appears, with Windows Forms controls loaded, as shown in Figure 1-3.
5. Double-click the Button control.
Visual Studio loads a button onto the default form in Design View.
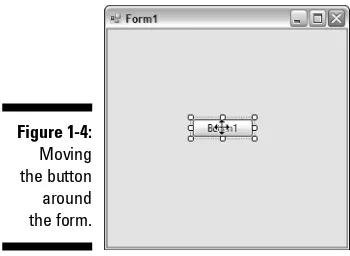
6. On the default Form1, click the Button control and drag it to reposi-tion it on the form.
Figure 1-4 shows the result of dragging the button to the middle of the
Form1window.
This step list gives you the beginnings of the Windows Forms application, which you see as a Form1in the Design View. But to see where Visual Basic comes in, you have to find the code behind the form. Visual Studio offers you (surprise!) the Code View when you’re ready to use Visual Basic to add func-tionality to your form.
Adding functionality to the
form with VB code
To add a little functionality to the Windows form you build in the preceding section, follow these steps:
1. Double-click the Button control to enter Code View.
In the Code View window, you see basic button-click code that looks like the following:
Public Class Form1
Private Sub Button1_Click(ByVal sender As System.Object, ByVal e As System.EventArgs) Handles Button1.Click
End Sub End Class
This code is a template that wraps the code that will be run when you click the button. Visual Studio does the hard part for you, making sure the formatting of the Subis correct!
2. In the Code View window, type a line of code to change the text that appears on the Button control to Hello World.
Specifically, type the following code on the line preceding the End Sub
line:
Button1.Text = “Hello World”
Your button’s code now looks like the following:
Public Class Form1
Private Sub Button1_Click(ByVal sender As System.Object, ByVal e As System.EventArgs) Handles Button1.Click
Button1.Text = “Hello World”
End Sub End Class
Running and operating your Windows form
So, this experience is pretty cool, right? Programming with Visual Basic is so easy that, here in Chapter 1, you can already write a Windows Forms applica-tion. But what can you do with it? Check out the following:⻬Run your Windows Forms application within the Visual Studio envi-ronment. Press the F5 key on your keyboard, and Visual Studio opens your active project as a Windows program. It appears in your taskbar and everything. Click the button on your form, and the button text changes to “Hello World,” (or whatever text you specified in the code). Pretty neat, huh? Your Windows form should look something like the image in Figure 1-5.
⻬Run your application outside of the Visual Studio environment.If you are still in Debug mode, you will need to stop your program first by using the Stop button on the toolbar or by closing the form window. Then you can save and move on.
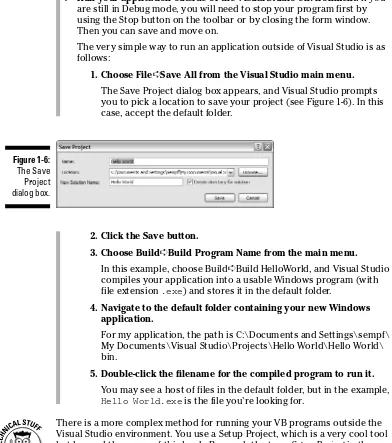
The very simple way to run an application outside of Visual Studio is as follows:
1. Choose File➪Save All from the Visual Studio main menu. The Save Project dialog box appears, and Visual Studio prompts you to pick a location to save your project (see Figure 1-6). In this case, accept the default folder.
2. Click the Save button.
3. Choose Build➪Build Program Name from the main menu. In this example, choose Build➪Build HelloWorld, and Visual Studio compiles your application into a usable Windows program (with file extension .exe) and stores it in the default folder.
4. Navigate to the default folder containing your new Windows application.
For my application, the path is C:\Documents and Settings\sempf\ My Documents\Visual Studio\Projects\Hello World\Hello World\ bin.
5. Double-click the filename for the compiled program to run it.
You may see a host of files in the default folder, but in the example,
Hello World.exeis the file you’re looking for.
There is a more complex method for running your VB programs outside the Visual Studio environment. You use a Setup Project, which is a very cool tool but beyond the scope of this book. Research the term Setup Projectin the MSDN Library when you’re ready to find out more about this device, which helps you distribute your application to other users.
Finding More Power in Visual Studio
Earlier in this chapter, I show you the Windows Forms application develop-ment environdevelop-ment and a little of the new Visual Basic 2005 code. If you are familiar with VB 6.0, the form and the code look pretty familiar at this point. In fact, the major Windows development tools for any programming language work pretty much this way.
But when you look beyond the Windows form and the code structure, a few more details become evident. For instance, Visual Studio takes your VB code beyond the Windows form. The following sections give you an overview of the development power that you find in Visual Studio.
Visual Studio doesn’t just do Windows!
The first evident change that sets Visual Studio apart as a development tool is this: You can use Visual Studio to write programs that run on the World Wide Web as well as on Windows computers. When you click the File menu to add a new project, notice the second option in the menu. As shown in Figure 1-7, the second project option is a new Web Site.Choose this option to create a Web application, which incorporates a whole host of technologies — the .NET Framework, ASP.NET, Visual Basic, and HTML — that each have essential roles for enabling an application to run online.
Visual Basic goes mobile
Mobile computing devices make their move into Visual Basic 2005. Two pro-ject types that run on such devices are built right into Visual Studio.
Windows CE, Pocket PC 2003, and SmartPhone platforms are all represented.
I don’t give examples of these specific project types in this book because you can create a mobile device application in the same manner you create a Windows Forms application (like the Hello World program discussed earlier in the chapter). You should know that getting familiar with the Visual Basic language as presented in this book puts you on the right track for creating applications for a Pocket PC. Mobile computing applications require some special programming practices, so make sure to grab some device-specific information when you work on those project types.
Writing routines to use with other software is easier with Visual Basic 2005. You can write add-ins for Microsoft Office apps, including Excel and Word templates with VB code running behind them. These routines don’t use the VBScript that you may have seen before; a completely new part of Office 2003 allows you to write templates with special, built-in functionality. For example, I’ve built a Word template that automates a reporting process by asking the user for a report number, checking that number against a database of all the reports filed, and filling out part of the document-in-process with the relevant information from the database.
VB as your one-stop development shop
Generally, Visual Studio and the .NET Framework are designed to be the one-stop shop for any kind of development on Windows machines. But in this ver-sion, Visual Basic 2005 can also do it all. The language can now touch all of the parts of the .NET Framework that any of the other languages can get to, without resorting to the cryptic function calls necessary in prior versions of VB.The new features covered in this book include
⻬Security:Encryption, validation, and permissions. Securing your code using sophisticated encryption is now built in to the framework, among other things.
⻬IO:Integrate program activities with files, disks, and folders in a way that requires writing much less code.
⻬System.Net:VB knows about the Internet. Web, FTP, and Mail are all in one place.
⻬Drawing:Comprehensive screen graphics for Web and Windows — even 3D.
⻬The MyObject:Get to the hard-to-reach places more easily with this simple-to-use set of shortcuts.
Using Visual Studio 2005
In This Chapter
䊳Going over Visual Studio tools
䊳Discovering how the code ties it all together
䊳Customizing with options
䊳Using third-party tools
B
efore you can effectively work with Visual Basic, you must know its tools inside and out. For the purpose of this chapter and this book, I will focus on just one — Visual Studio 2005. Visual Studio gives you access to the drag-and-drop controls that were introduced in earlier versions of Visual Basic.Although I don’t cover the specifics of code in this chapter, I do cover all of the code-generating tools that Visual Studio 2005 provides for Visual Basic. For example, I discuss the new improved IntelliSense that can help you remember the 288,000 methods, properties, and events in the .NET Framework, but I don’t cover the framework itself.
Understanding Visual Studio Tools
This ability has never been more apparent than it is with Visual Basic 2005. Even though Visual Basic is a language, and it depends on Visual Studio for its environment, there are many tools that make RAD real. In the following sections, I cover these tools. These tools are language-independent, project-independent, and indispensable.
Keep in mind that Visual Studio isn’t necessary to make Visual Basic programs. You can, in fact, make complete applications in the old-school style by using a command line compiler.
Additionally, much of the documentation provided by the Microsoft Developer Network (MSDN) Library assumes an understanding of the tools. The docu-mentation refers to the tools by name and often doesn’t clearly describe them. You must know where you are working before you can work, so the following sections take you on a tour of the Visual Studio tools.
When you install Visual Studio, you were probably asked to install the MSDN Library. You will find it an indispensable tool (it’s what you get when you go to the Help menu, in fact). Additionally, you can find the library online at
http://msdn.microsoft.com/library.
Touring the Design View
When you launch Visual Studio (usually by selecting its icon in your Start menu) and begin any visual project, you see the Design View. The Design View is where the Graphical User Interface (GUI) work takes place. Generally speaking, anytime you are working with pictures of forms, not code, you are working with the Design View. When I use the term designer window,I am referring to the actual place you do the work. The term Design Viewrefers to the state the application is in.
In the Design View, you can accomplish the following:
⻬Manufacture windows, Web, and smart device forms by dragging con-trols directly to the form in a What-You-See-Is-What-You-Get (WYSIWYG) type environment.
⻬Work with databases and XML files visually.
⻬Create software components by visually managing the parts.
Using the Design View tabs
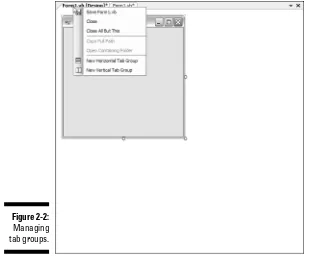
The designer tabs have the word [Design] in the tab name, as shown in Figure 2-1, to indicate you are using the Design View. Tabs are used in the Design and Code Views. The gray tab represents files that are open but not active. An asterisk (*) next to the file name means that you’ve made changes, but not yet saved the file.
The white tab is active and contains the editable form. When you have more than one document open, you can edit only the active form. You can drag the tabs to left and right to change their order. Right-clicking on a tab gives you a menu from which you can choose several screen management options, as shown in Figure 2-2.
Understanding tab groups
Tab groups make it easier to copy information out of one form into another. For example, you can have one set of pages on the top half of the screen and another on the bottom half, and copy from one and paste into the other with-out changing screens. You can also save and close from this menu, or get information, such as the current path or the containing folder.
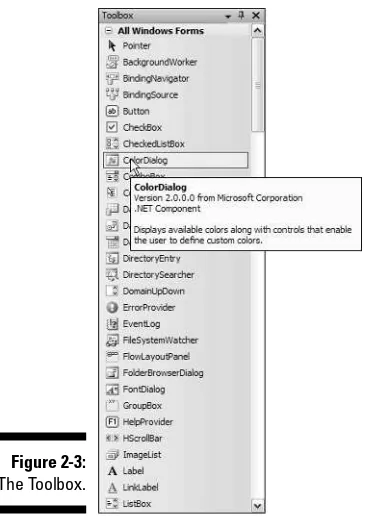
Accessing controls with the Toolbox
To add form components, such as buttons and text, to the form in the Designer window, you simply drag them from the Toolbox. The Toolbox, usu-ally seen on the left side of the Visual Studio environment and to the left of the Designer window, is where the RAD components of various project types are held for use until you need them. The Toolbox is shown in Figure 2-3.The Toolbox is project sensitive,meaning that controls for Web pages and smart devices don’t show up when you are writing a Windows Forms project. Because those controls can’t be used in those project types, the Toolbox doesn’t even let you see them.
You can access the controls in the following ways:
⻬Click a control and drag it to a form, dropping it exactly where you want it.
⻬Double-click the control, and it appears in the upper-left corner of the active form.
If you lose the Toolbox, or it isn’t showing on your screen, you can open it by choosing View➪Toolbox or by pressing Ctrl+Alt+X. Right-clicking on the Toolbox gives you layout options, including ordering and movement. One of the options is Reset Toolbox, which puts it back the way Microsoft had it — a great feature.
The gray dividers, labeled Data or Windows Forms among other things, divide the tools in the Toolbox by category. To open a closed category, click on the bar.
Visual Studio is extendable because of the Toolbox. You can use third-party components with your programs. For example, a clock control that enables the user to set the time would show up in the Toolbox. You can also use the Toolbox to store often-used pieces of text, such as comment blocks.
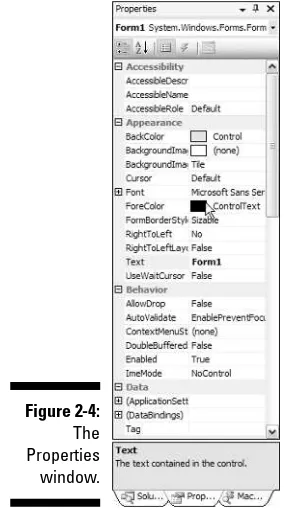
Changing details with the
Properties window
After you drop the controls on the form designer, you will need to edit their properties. Size, name, activity, color . . . these are the kinds of things you find in the Properties window. The Properties window, shown in Figure 2-4, is Figure 2-3:
usually on the right side of the screen. It contains all of the editable values associated with a control.
If the Properties window isn’t on the right side of the screen, you can find it by choosing View➪Properties, or you can press F4.
At the top of the Properties window, you see the form element whose proper-ties are being viewed. You can select a different control by clicking on it in the designer window or by selecting a new control from the drop-down list. In Figure 2-4, the form itself is selected.
Beneath the selected control, there are a few buttons that resort the list or filter by category. Of special interest is the lightning bolt button, which allows you to define what the control does under certain circumstances — a pattern called events. I cover events in depth throughout Part II.
The table that takes up the majority of the Properties window contains the properties of the control. This is a simple hash table format — the properties are on the left, and the possible values are on the right. To change a value, you can usually type in the cell and press Enter. Some properties have an ellipsis button (...) that opens a form to simplify adding complex details, and I cover those as I discuss them in other chapters.
The grouping buttons at the top of the Properties window are a useful fea-ture. The Category button is great when you are just starting out, because you can find the properties based on what you need. The A-Z list is better later on, when you know exactly what property you are looking for.
The bottom of the Properties window has a brief description of the property that is being edited. This information is right out of the documentation and is a very handy feature.
Organizing your project with
the Solution Explorer
Solutions and projects hold forms and components like files in folders. In fact, solutions and projects are represented by folders in the Visual Studio Projects directory of your My Documents folder. The Solution Explorer is Visual Studio’s tool that allows you to manage the files that make up your project.
If you envision your projects like folders, you can imagine that you would group like folders together in a folder one level up, right? That’s what solu-tions do. They are both physically and logically exactly that — folders full of projects.
In Figure 2-5, you see the important files in your project, and a whole bunch of buttons above to help to manage them.
To open a file, double-click the file’s icon or name. To rename, copy, or delete a file, right-click the file and choose your action from the context-sensitive menu that appears. In the Solution Explorer, you can also make new folders and move files into them, or right-click on the project to make a new form or support file.
The buttons above the files themselves are the most significant part of the Solution Explorer. They are, from left to right:
⻬Properties:Opens the Properties window.
⻬Show All Files:Shows hidden files, especially in Web Forms projects.
⻬Refresh:Checks the solution folder for new files that may have been added by another tool. This button is very handy when you’re using third-party tools.
⻬View Code:Opens the selected file in Code View.
⻬View Designer:Opens the selected file in Design View.
Accessing outside resources
with the Server Explorer
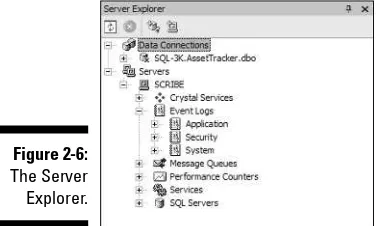
Going outside of your project is one of the most common features that isn’t supported by most development environments. That all changed with Visual Studio 2005 and the addition of the Server Explorer, shown in Figure 2-6. You can open Server Explorer by pressing CTRL+ALT+S, or selecting it on the View menu. Now getting to the servers that provide your necessary services is easier than ever.
Figure 2-6: The Server Explorer.
View Diagram View Designer View Code Refresh Show All Files Properties
The Server Explorer is one of the more dynamic tools in the Visual Studio envi-ronment. In Figure 2-6, I am using my local development machine, Banshee. What you see in the Server Explorer depends on your local configuration.
The Servers node in this explorer shows up in some editions of Visual Studio. At press time, the Professional edition was one of them. Also, the Team System edition certainly has it, and you can get that edition from the Microsoft Web site in a trial version.
Server Explorer gives you access to remote (or local) resources from a man-agement and a code perspective. The tree view inside the Server Explorer can show many servers, and beneath each server are the functional bits that you have access to.
Most developers are looking for a one-stop shop for development, and most often, that includes needing the ability to manage development server(s) and look at databases. The Server Explorer handles both of these, but the new Data Sources window is even better, and I cover it in the following section.
The services available to you in your Server Explorer depend on your envi-ronment, but here is a brief description of some of the services that are common:
⻬Crystal Reports Services:Crystal is a third-party reporting tool that is included with Visual Studio. The services include Crystal Enterprise, Report Application Server, and Web Services.
⻬Event Logs:This represents the normal old Windows NT-style event logs that you can access from the Control Panel. Logs are available both pro-grammatically in .NET and for management from the Server Explorer.
⻬Message Queues:Message Queues are a way to help manage the number of requests to a very large application. The individual queues are made available here.
⻬Performance Counters:This is access to PerfMon from the Windows operating system. Each counter is available both for viewing and pro-gramming.
⻬Services:The services from the Control Panel are available here. You can stop and start the Web services, for example.
⻬Data Connections:Any SQL Servers or other databases that are running on the server are available here. They can also be made available from the Data Connection node or from the Data Sources window.
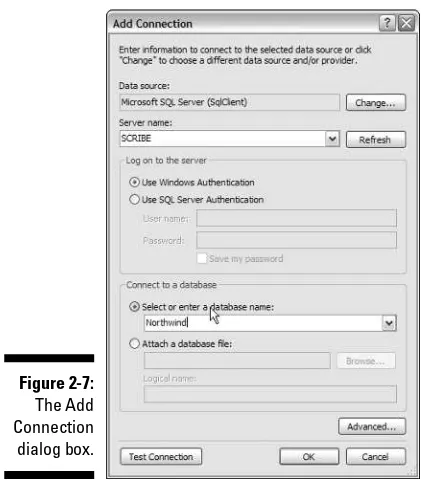
The Data Connections node allows you to connect your application to a data source. Right-click the Data Connections node and choose Add Connection to add a new connection. The Add Connection dialog box appears, shown in Figure 2-7. If you want, you can select a different provider by clicking the Change button next to Data Source. (I use SQL Server as an example.)
In Figure 2-7, I selected my local machine (Scribe) and the Northwind data-base. Depending on your installation of Visual Studio, you should also be running a local SQL Server and be able to select the same database. If not, check your installation instructions for your edition of Visual Studio to see whether you have a SQL Server 2005 Developer Edition available. Also, you may need to download the Northwind database from the book’s Web site at
www.vbfordummies.net.
What this selection does is to connect your project with a database, which then allows you to use the Data Sources window, manage the data objects within the database, and edit data directly. When you have finished adding the values to the Connection Properties dialog box, click the Test Connection button to make sure that your project can get the database you selected. Figure 2-7:
Dynamically editing data with
the Data Sources window
When you start a new project, the Data Sources window says “Your project currently has no data sources associated with it.” In order to maintain data in the .NET world, as with any other environment, you must connect your appli-cation to a data source. The Data Sources window is the primary way to do that.
To connect to a data source (like a database or XML file), follow these steps:
1. Click the Add a New Data Source button.
Doing so starts the Data Source Configuration Wizard.
2. Click the Next button.
The wizard shows the data source options. You can select the Database option to use an SQL Server or Oracle database, the Local Database File option to use a database on your computer stored as an Access or XML file, the Web Service option, or the Object option.
3. Select the connection to Northwind that you made in the “Accessing outside resources with the Server Explorer” section, and then click the Next button (shown in Figure 2-8).
4. Accept the default connection name (probably NorthwindConnection) and click the Next button.
5. Finally, you are given a choice of what objects to include in your dataset.
I cover Datasets in Chapter 15. For now, select the first view as shown back in Figure 2-8 and name the dataset Products.
6. Click the Finish button.
As shown in Figure 2-9, each of the columns in the view you selected appear as the editable object types that can represent them. You can now drag them to the Design View to create a data-bound control. The ability to drag columns is one of the cool new features in Visual Basic 2005.
Just for fun, drag the QuantityPerUnit field onto the blank form that was cre-ated for you when you started the project. Visual Studio will create a bunch of data piping for you, and then add the field and a label to the form. Using the Data Sources window like this provides you with fantastic functionality for quickly developing data applications.
In Figure 2-10, I have a picture of my screen as I dragged the field into the form. You can see in the Design View bottom, where the background is gray, that four components have been added to Form1. Componentsare functional items from the Toolbox, not things that are visible on the screen. The Data Sources window makes all of those components and adds the control to the page, just based on the field you moved. That is the point of these RAD tools. Figure 2-9:
Frankly, the Diagram View is a very sophisticated tool, which I won’t cover in this book. It allows enterprise architects to build component-based software by taking whole blocks of code and moving them in a graphic environment.
Every now and again, when you have written something in Visual Basic, go ahead and load up the Diagram View. You can enter Diagram View by right-clicking a file in the Solution Explorer and selecting View in Designer from the context-sensitive menu. It will create a new file called Classdiagram1.cdin
your Solution Explorer and show you the piping behind the software you have built. It can be an educational experience — try it!
Moving a Tool Window
You can customize the Visual Studio environment to make it easier for you to work in. All of the tools, windows, and views are part of an Integrated Development Environment (IDE) that provides a home location. This makes organization of your personal development space a lot easier.
Most often, you will want to move around a tool window to put it in a more convenient spot. You can display a tool window in the following ways: Figure 2-10:
⻬Floating:A floating window is very mobile — you can drag it around by its handle to place it anywhere you want.
⻬Dockable:When you drag a dockable window, though, you are given the option by Visual Studio to dock the window. This is demonstrated in Figure 2-11, where I am dragging the Solution Explorer window around in the Design View.
⻬Tabbed:You also have the choice to drag the window to the center and have it become a tab at the top of the view window, like the Form1.vb
and Form1.vb [Design]files in Figure 2-11.
There are five options to dock the window. If you drag the window over the top, bottom, left, or right arrow, it will dock to that side. When a window is docked, it has a thumbtack that you can pin or unpin. When pinned, it stays on the side, moving the Design View over. When unpinned, it slides out of the way toward the side it is pinned to. It is a brilliant feature.
If you drag the window to the center of the four-pointed star, it makes the window a tab in the other central windows — much easier than the old triple-click that was so hard to use. The triple-triple-click still works, but you don’t need it anymore!
Working with Code
Most of what you want the user to see of the programs you create with Visual Studio are the controls and the forms. But you will be spending most of your time working with code. Fortunately, Visual Studio has a ton of tools to help you write code.
Getting to Code View
Code View, like Design View or Diagram View, is just another way to look at a file in the Solution Explorer. To get to Code View, you have several choices:
⻬You can right-click on a form in the Solution Explorer or in Design View and select View Code from the context-sensitive menu.
⻬You can click the View Code button in the Solution Explorer.
⻬You can double-click an object in a form.
When you’re working in Code View, most of the tool windows will become inactive. The Toolbox and Properties window, for instance, have little to noth-ing available because their features are designed for use with the Design View rather than in Code View. This is by design, to keep the code out of your way when building business logic.
Using IntelliSense
The problem with using Code View is that you need to know what to type. Welcome to programming! To help you get started, you can use some very productive code-based tools, such as IntelliSense and Smart Tags.
The remainder of the book is about the language, but I want to give you something to start with so that you can see how great these tools are. When you are working with the code as the primary goal, the tools should be second nature. Get started with these steps:
1. In the default project, double-click on the blank Form1 to move to Code View.
2. Type My.in the Form1_Loadmethod.