•GainasolidarchitecturalunderstandingofRESTfulservices
•LearnhowtoleveragetheMVCpatternandcomponentstobuildwebservices •GenerateandprocessJSONdatafromdatamodels
For your convenience Apress has placed some of the front
matter material after the index. Please use the Bookmarks
Contents at a Glance
About the Author ...
xxiii
About the Technical Reviewer ...
xxv
Part 1: Getting Ready
■
...
1
Chapter 1: Getting Readys
■
...
3
Chapter 2: Your First Web API Application
■
...
9
Chapter 3: Essential Techniques
■
...
35
Chapter 4: Understanding HTTP Web Services
■
...
57
Chapter 5: SportsStore: Preparation
■
...
69
Chapter 6: SportsStore: A RESTful Application
■
...
99
Chapter 7: SportsStore: Creating the Clients
■
...
131
Chapter 8: SportsStore: Deployment
■
...
169
Part 2: Results and Parameters
■
...
179
Chapter 9: The Anatomy of ASP.NET Web API
■
...
181
Chapter 10: Creating and Configuring a Web API Application
■
...
191
Chapter 11: Action Method Results
■
...
215
Chapter 12: Creating Media Type Formatters
■
...
243
Chapter 13: Using the Built-in Media Formatters
■
...
267
Chapter 14: Understanding Parameter and Model Binding
■
...
297
Chapter 15: Binding Simple Data Types
■
...
325
Chapter 16: Binding Complex Data Types Part I
■ CONTENTS AT A GLANCE
Chapter 17: Binding Complex Data Types Part II
■
...
389
Chapter 18: Model Validation
■
...
427
Part 3: Dispatching Requests
■
...
449
Chapter 19: Dispatching Requests
■
...
451
Chapter 20: URL Routing: Part I
■
...
483
Chapter 21: URL Routing: Part II
■
...
511
Chapter 22: Controllers and Actions
■
...
535
Chapter 23: Filters Part I
■
...
567
Chapter 24: Filters Part II
■
...
599
Chapter 25: Error Handling
■
...
623
Chapter 26: Using OWIN
■
...
645
PART I
CHAPTER 1
Getting Readys
Web API 2 is the latest evolution of Microsoft’s web services toolkit, which allows you to create RESTful applications built on the ASP.NET platform. It provides a standards-based approach and a high-productivity development model that makes it easy to deliver services to a wide range of clients, including mobile devices.
In this book, I take you right from creating your first Web API web services to the most advanced techniques and features. No prior knowledge of HTTP web services or Web API is required. I start with the basics and explain everything you need to know. In short, this book will give you expert insight and understanding of how to create, customize, and deploy complex, flexible, and robust HTTP web services.
Web services don’t exist in isolation, so I also show you how to write browser-based single-page applications to consume them. I demonstrate how these clients influence the way that Web API web services respond and how you can adapt your web service to different client types.
What Do You Need to Know?
You should be familiar with using the ASP.NET MVC framework to create web applications. This means you are able to use Visual Studio to write C# classes and know how to use Razor and HTML to create views. The term Expert in the title refers to the degree of depth that I cover in this book, and you don’t need any knowledge of Web API or HTTP web services; however, if you don’t know how to use ASP.NET MVC, then you will struggle to follow many of the examples. If you want to brush up on your knowledge of MVC, then read my Pro ASP.NET MVC 5 and Pro ASP.NET MVC Platform books, both published by Apress.
What Does Expert Mean?
This book is for programmers who want to understand every aspect of web services development using ASP.NET Web API. Or, put another way, you want to be an expert in Web API. I dig deeply into the details of how Web API works behind the scenes in this book and give you a warts-and-all view of how Web API can be used to create sophisticated and secure RESTful web services. You don’t have to know anything about Web API or HTTP web services before you start. I build on your existing knowledge of the MVC framework to give you all the information you need.
What Is the Structure of This Book?
CHAPTER 1 ■ GETTING READYS
Part 1: Getting Ready
Part 1 of this book provides the information you need to get ready for the rest of the book. It includes this chapter and a primer for the techniques you will need to follow the examples in this chapter. I also show you how to build your first web service and single-page client and take you through the process of building a more realistic application, called SportsStore.
Part 2: Results and Parameters
Part 2 of this book focuses on the aspect of Web API that you will spend most of your time on during your first real projects: the data sent from clients and the responses that you produce in return. I explain how to create different kinds of HTTP responses using Web API, how to master the data binding process that Web API uses to process request data, and how to ensure that the data you receive from clients is valid.
Part 3: Dispatching Requests
Part 3 of this book explains how Web API dispatches HTTP requests from the moment they arrive from the client until the response is generated. I describe all of the steps that a request goes through and show you how to configure and customize just about every class and interface that Web API relies on to get fine-grain control over how your web services operate. I show you how Web API uses the URL routing system to support RESTful web services, how controllers and action methods are selected, and how to deal with errors and cross-cutting concerns. Many of these techniques are similar to the ones you know from MVC framework development, but Web API uses its own namespaces and classes and has a different approach than the one you are used to using.
Are There Lots of Examples?
There are loads of examples. The best way to learn Web API is by example, and I have packed as many of them as I can into this book. To maximize the number of examples in this book, I have adopted a simple convention to avoid listing the contents of files over and over again. The first time I use a file in a chapter, I’ll list the complete contents, just as I have in Listing 1-1.
Listing 1-1. A Complete Example Document
using System;
using System.Collections.Generic; using System.Linq;
using System.Web.Http;
namespace SportsStore {
public static class WebApiConfig {
public static void Register(HttpConfiguration config) {
config.MapHttpAttributeRoutes();
config.Routes.MapHttpRoute( name: "DefaultApi",
CHAPTER 1 ■ GETTING READYS
config.Formatters.Remove(config.Formatters.XmlFormatter); }
} }
This listing is taken from Chapter 6. Don’t worry about what it does; just be aware that the first time I use a file in each chapter there will be complete listing, similar to Listing 1-1 shown here. For the second and subsequent examples, I show you just the elements that change, in a partial listing. You can spot a partial the listing because it starts and ends with ellipsis (...), as shown in Listing 1-2.
Listing 1-2. A Partial Listing
...
public Product GetProduct(int id) {
Product result = Repository.Products.Where(p => p.Id == id).FirstOrDefault(); if (result == null) {
throw new HttpResponseException(HttpStatusCode.BadRequest); } else {
return result; }
} ...
This is a subsequent listing from Chapter 6. You can see that just the GetProduct method is shown and that I have highlighted a number of statements. This is how I draw your attention to the part of the example that shows the feature or technique I am describing. In a partial listing like this, only those parts shown have changed from the full listing earlier in the chapter.
This convention lets me pack in more examples, but it does mean it can be hard to locate a specific technique. To this end, all of the chapters in which I describe Web API features in Parts 2 and 3 begin with a summary table that describes the techniques contained in the chapter and the listings that demonstrate how they are used.
Where Can You Get the Example Code?
You can download all of the examples for all of the chapters in this book from www.apress.com. The download is available without charge and includes all of the supporting resources that are required to re-create the examples without having to type them in. You don’t have to download the code, but it is the easiest way of experimenting with the examples and cutting and pasting them into your own projects.
If you do want to re-create the examples from scratch, then you will find that every chapter contains detailed listings of all the files I create and modify. I never refer you to an external file or hand-wave about leaving the rest of the example as an exercise; every detail you need to re-create every example is contained within this book.
How Do You Set Up a Development Environment?
CHAPTER 1 ■ GETTING READYS
Getting Visual Studio
There are several editions of Visual Studio, but I will be using the one that Microsoft makes available free of charge, called Visual Studio Express 2013 for Web. Microsoft adds some nice features to the paid-for editions of Visual Studio, but you will not need them for this book, and all of the figures that you see throughout this book have been taken using the Express edition, which you can download from www.visualstudio.com.
There are several versions of Visual Studio 2013 Express, each of which is used for a different kind of development. Make sure you get the Web version, which supports ASP.NET applications.
Note
■
All of the examples in this book will work with Visual Studio Express 2013 for Web, except those in Chapter 26
where I use Visual Studio Express 2013 for Windows Desktop, which allows me to create a console application.
I follow a specific approach to creating ASP.NET projects: I don’t use the predefined templates that Microsoft provides, preferring to explicitly add all of the packages I require. This means more work is required to get set up, but the benefit is that you end up with a much better understanding of how an application fits together. I provide a primer in Chapter 2 that gives an example of what you can expect.
Tip
■
Visual Studio includes NuGet for downloading and installing software packages. I use NuGet throughout this
book and always specify the version of each NuGet package so that you are sure to get the results that I demonstrate.
If you are in doubt, download the source code for this book from
www.apress.com, which contains complete projects for
each chapter.
Preparing Visual Studio
Visual Studio Express contains all the features you need to create, test, and deploy Web API applications, but some of those features are hidden away until you ask for them. To enable all of the features, select Expert Settings from the Visual Studio Tools ➤ Settings menu.
Tip
■
Microsoft has decided that the top-level menus in Visual Studio should be all in uppercase, which means that
the menu to which I just referred is really TOOLS. I think this is rather like shouting, and I will capitalize menu names like
Tools is here throughout this book.
Getting Google Chrome
In this book, I use the Google Chrome browser. In part this is because it has some excellent F12 developer tools (so-called because they are accessed by pressing the F12 key) but also because using Chrome allows me to use Postman, an outstanding HTTP client that makes it easy to test web services by manually crafting HTTP requests.
CHAPTER 1 ■ GETTING READYS
You will also need the Postman Interceptor extension, which increases the functionality and is available through the Google Chrome Extension Store as a zero-cost installation. Click the Chrome settings button (the one with three horizontal lines at the right side of the screen) and select Tools ➤ Extensions. Search for Postman Interceptor and follow the installation instructions.
Selecting Chrome for Debugging
You can select Chrome as the browser that Visual Studio will start when you debug a project by selecting it from the drop-down list of browsers, as shown in Figure 1-1.
Figure 1-1. Selecting Google Chrome in Visual Studio
Summary
CHAPTER 2
Your First Web API Application
The best way to get a feel for a new technology is by applying it, so in this chapter I jump right in and demonstrate one of the most common uses for Web API: adding an HTTP web service to an existing MVC framework application.
This is nowhere near as awkward as it might sound, not least because the MVC framework and Web API share a common heritage and can use the same data models. In fact, you may be surprised at how little time I spend in this chapter creating the web service compared with building the example MVC framework application and writing the JavaScript code that consumes the web service in the browser.
You don’t need to retrofit an HTTP web service to an existing application, of course, and in Chapters 5–8 I build a more complex example that begins with Web API and puts the HTTP web service right at the heart of the development process.
Note
■
I start slowly in this chapter and spell out every detail. I’ll pick up the pace—and the depth of detail—in later
chapters, but I want to make clear the process by which I create projects and emphasize the relationship between the
components in the application.
Preparing the Example Project
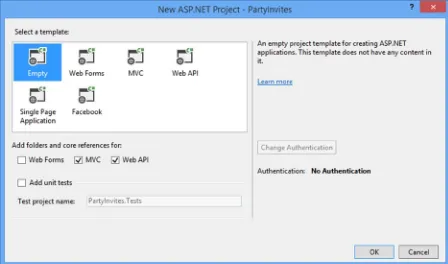
Visual Studio includes templates for different kinds of projects. The basic starting point is the Empty project, which can be set up to include just the files and references required for an MVC or Web API application. Other options add models, views, and controllers to help kick-start a project by providing commonly used features.
I prefer to work with the Empty template and just have Visual Studio add the minimum initial content—and I recommend you do the same. This approach gives you greater insight into how an application is put together and where you need to start looking when something goes wrong. Throughout this book, I’ll be creating projects in the way that I describe here, so I’ll walk through the process step-by-step in this chapter so you know what to expect.
Note
CHAPTER 2 ■ YOUR FIRST WEB API APPLICATION
Creating the Visual Studio Project
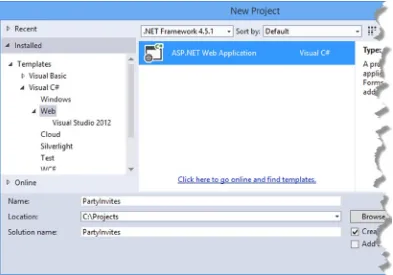
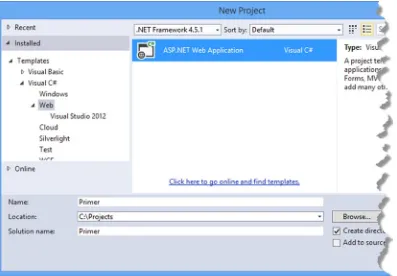
To get started, I created a new Visual Studio project. Select New Project from the File menu to open the New Project dialog window. Navigate through the Templates section to select the Visual C# ➤ Web ➤ ASP.NET Web Application template and set the name of the project to PartyInvites, as shown in Figure 2-1.
Figure 2-1. Creating the new project
CHAPTER 2 ■ YOUR FIRST WEB API APPLICATION
Adding and Updating NuGet Packages
One of the most useful enhancements to Visual Studio in recent years has been the addition of NuGet, which makes it easy to download, install, and update software packages in a project.
I am going to be working with specific versions of NuGet packages in this book to make sure you are able to re-create the examples and get the same results. The days where Microsoft made enormous releases of the entire .NET stack every 18 months have passed, and each piece of technology receives more frequent small updates. This means the versions of the MVC and Web API that are added to projects by Visual Studio may not be the latest versions available.
Select Package Manager Console from the Visual Studio Tools ➤ NuGet Package Manager menu and enter the following commands to update the MVC and Web API packages, as well as the package that is used to process JSON data (I describe JSON in more detail in Chapter 3):
Update-Package microsoft.aspnet.mvc -version 5.1.1 Update-Package microsoft.aspnet.webapi -version 5.1.1 Update-Package Newtonsoft.json -version 6.0.1
There are two other packages that I rely on for the example application in this chapter and those in later chapters. The first is Bootstrap, which is a CSS package that makes it easy to style the HTML generated by MVC views. I have no visual design skills at all—to the extent that I was excused from art lessons at school and allowed to do extra math— but even I can hack together something that looks appealing with Bootstrap. I prefer to work with a real designer on complex projects, but for simple applications, Bootstrap works just fine.
CHAPTER 2 ■ YOUR FIRST WEB API APPLICATION
Tip
■
I don’t describe Bootstrap in this book, but you can get details of the CSS classes I apply at
http://getbootstrap.com.
The second package I use is jQuery, which provides an abstraction layer that simplifies working with the HTML Document Object Model API and makes Ajax requests simpler and more elegant. jQuery is the de facto JavaScript library for developing the client-side part of web applications and—just like Bootstrap—has recently been adopted by Microsoft in the Visual Studio project templates. I provide a primer for using jQuery to make Ajax requests in Chapter 3. The final package I use is Knockout, which makes it easy to build an HTML client that responds dynamically to the data returned by a web service or by interactions with the user. I give a brief introduction to using Knockout in Chapter 3.
To add Bootstrap, jQuery, and Knockout to the project, enter the following commands into the Package Manager Console:
Install-Package jquery -version 2.1.0 Install-Package bootstrap -version 3.1.1 Install-Package knockoutjs –version 3.1.0
Setting the Port and Start URL
The final preparations I need to make specify the TCP port that will be used to receive requests and the initial URL that will be passed to the browser when the project is started. Select Party Invites Properties from the Visual Studio Project menu and click Web to open the settings for ASP.NET projects.
Enable the Specific Page option and enter Home/Index in the field. On the same page, change the value in the Project Url field to http://localhost:37993/ and click the Create Virtual Directory button.
The first change prevents Visual Studio from trying to work out what URL should be shown when the application starts based on the file you edited most recently, and the second change means that requests will be received on TCP port 37993.
Creating the MVC Application
In this section, I create a simple MVC framework application that gathers responses from invitees to a party. This is a variation on the project with which I start the Pro ASP.NET MVC 5 book, and I chose it to emphasize the ease with which Web API can be applied to MVC framework applications. I spend much of the rest of the book explaining the differences, so it is good to start with something that focuses on just how much you already know how to do.
Creating the Model
CHAPTER 2 ■ YOUR FIRST WEB API APPLICATION
Listing 2-1. The Contents of the GuestResponse.cs File
using System.ComponentModel.DataAnnotations;
namespace PartyInvites.Models { public class GuestResponse { [Required]
To create a simple model repository, I created a class file called Repository.cs in the Models folder and used it to define the class shown in Listing 2-2.
Listing 2-2. The Contents of the Repository.cs File
using System.Collections.Generic;
namespace PartyInvites.Models { public class Repository {
private static Dictionary<string, GuestResponse> responses;
static Repository() {
public static void Add(GuestResponse newResponse) { string key = newResponse.Name.ToLowerInvariant();
public static IEnumerable<GuestResponse> Responses { get { return responses.Values; }
CHAPTER 2 ■ YOUR FIRST WEB API APPLICATION
The repository for this application is simple and stores its data objects as a collection in memory that is exposed through static properties. This means the model state will be lost when the application is restarted, but it does allow me to keep the example simple. (I show a more persistent model in Chapter 5 when I create a larger and more realistic MVC/Web API application that stores its model in a database.) In the static constructor, I add some default data so that the model is populated with responses.
Creating the MVC Controller
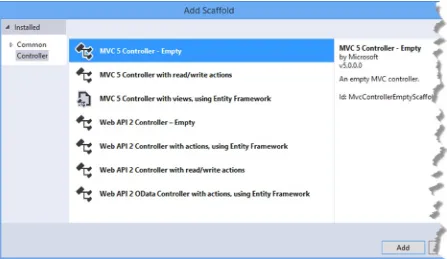
My next step is to create an MVC controller that will generate content and receive form data from my application clients. Web API also has controllers—as you will see in the “Creating the Web Service” section—and I will be clear about which kind of controller I am using throughout this book. I created an MVC controller by right-clicking the Controllers folder and selecting Add ➤ Controller from the pop-up menu. Figure 2-3 shows the options that Visual Studio presents for creating controllers for both MVC and Web API.
Figure 2-3. Selecting a controller type
Visual Studio is able to generate a templated set of action methods for controllers, but I will be using empty controllers for both MVC and Web API throughout this book. Just as with the project template, I prefer to define just the code I need for my applications, and I follow the same approach for the examples in this book so that you know where every action methods comes from and why I have added it.
CHAPTER 2 ■ YOUR FIRST WEB API APPLICATION
Clicking the Add button creates the Controllers/HomeController.cs file, which I used to define the controller shown in Listing 2-3.
Listing 2-3. The Contents of the HomeController.cs File
using System.Web.Mvc; using PartyInvites.Models; using System.Linq;
namespace PartyInvites.Controllers {
public class HomeController : Controller {
public ActionResult Index() { return View();
}
public ActionResult Rsvp() { return View();
}
[HttpPost]
public ActionResult Rsvp(GuestResponse response) { if (ModelState.IsValid) {
Repository.Add(response); return View("Thanks", response); } else {
return View(); }
}
[ChildActionOnly]
public ActionResult Attendees() {
return View(Repository.Responses.Where(x => x.WillAttend == true)); }
} }
CHAPTER 2 ■ YOUR FIRST WEB API APPLICATION
GuestResponse object (enforced by the use of the Required attribute in Listing 2-1), I update the repository and render a view called Thanks. The final action method can be called only as a child action, and it returns the collection of GuestResponse objects that represent users who have indicated they will attend.
This is a pretty basic controller, but it captures the core characteristics of most MVC framework applications, albeit on a simplified basis. Operations are performed on the repository, form data values are bound to object properties using model binding, and action methods are set up to be invoked based on the HTTP verb used in the request.
Creating the Views
I need to create a layout and four views for my example application. I created the Views/Shared folder, and Listing 2-4 shows the _Layout.cshtml file I added to it, which contains references for the Bootstrap, jQuery, and Knockout files.
Listing 2-4. The Contents of the _Layout.cshtml File
<!DOCTYPE html> <html>
<head>
<meta name="viewport" content="width=device-width" /> <script src="~/Scripts/jquery-2.1.0.min.js"></script> <script src="~/Scripts/knockout-3.1.0.js"></script> <link href="~/Content/bootstrap.css" rel="stylesheet" /> <link href="~/Content/bootstrap-theme.css" rel="stylesheet" /> <title>@ViewBag.Title</title>
Listing 2-5 shows the Index.cshtml file that I created by right-clicking the Index action method in the Home controller and selecting Add View from the pop-up menu. I set View Name to Index, ensured that the Use a Layout Page option is checked, and clicked the Add button to create the view file. (Visual Studio also creates the
Views/_ViewStart.cshtml file, which ensures that the _Layout.cshtml file I created in Listing 2-4 is applied.)
Listing 2-5. The Contents of the Index.cshtml File
@{ ViewBag.Title = "Party!";} <div class="text-center">
<h2>We're going to have an exciting party!</h2> <h3>And you are invited.</h3>
@Html.ActionLink("RSVP Now", "Rsvp", null, new { @class="btn btn-success"}) </div>
CHAPTER 2 ■ YOUR FIRST WEB API APPLICATION
Listing 2-6. The Contents of the Rsvp.cshtml File
@model PartyInvites.Models.GuestResponse @{ ViewBag.Title = "Rsvp"; }
<div class="panel panel-success">
<div class="panel-heading"><h4>RSVP</h4></div> <div class="panel-body">
@using (Html.BeginForm()) {
This view contains a standard HTML form that collects values from the user via input and select elements. When the user submits the form with valid data, the Thanks.cshtml view in the Views/Home folder is rendered. You can see the contents of the Thanks.cshtml file in Listing 2-7.
Listing 2-7. The Contents of the Thanks.cshtml File
@model PartyInvites.Models.GuestResponse @Html.Action("Attendees", "Home")
} else {
@:Sorry to hear that you can't make it, but thanks for letting us know. }
CHAPTER 2 ■ YOUR FIRST WEB API APPLICATION
If the user has indicated that they will attend the party, then I use the Html.Action helper to invoke the Attendees child action method, which renders the /Views/Home/Attendees.cshtml view file, whose contents are shown in Listing 2-8.
Listing 2-8. The Contents of the Attendees.cshtml File
@model IEnumerable<PartyInvites.Models.GuestResponse>
@if (Model.Count() == 1) {
<p>You are the first to accept! Hurrah!</p> } else {
<p>Here is the list of cool people coming: @string.Join(", ", Model.Select(x => x.Name))</p>
}
Using the MVC Application
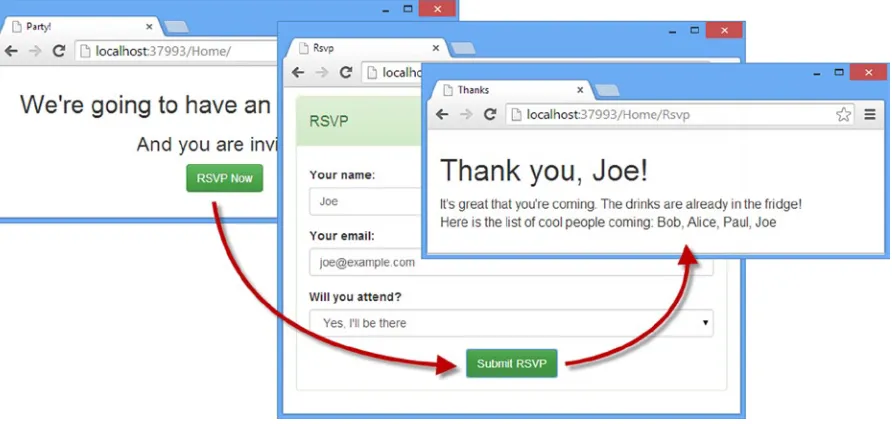
To test the basic functionality, start the application and navigate to the /Home/Index URL. Click the RSVP Now button, fill out the form, and click Submit RSVP. Figure 2-5 shows the different views rendered by the application.
Figure 2-5. Testing the example application
Tip
CHAPTER 2 ■ YOUR FIRST WEB API APPLICATION
Google Chrome, like all modern browsers, contains some useful developer tools, known as the F12 tools because they are opened by pressing F12 on the keyboard. Before adding Web API to the application, I am going to use the F12 tools to measure the number of requests and the total amount of data sent from the server.
Getting an honest assessment of the requests required to go through the RSVP process entails some specific steps, switching between the browser window that displays the applications and the F12 tools. Here is the sequence:
1. Open the F12 tools, click the Network tab and check the Preserve Log option so that the list of network requests isn’t cleared for each new request.
2. Ensure that the first icon in the toolbar, which is a circle, is red, indicating that Chrome will record the network requests it makes. If the circle isn’t red, then click it so that it is.
3. Ensure that the browser window is showing the /Home/Index URL.
4. Click the Clear button on the F12 toolbar (it is next to the red circle button).
5. Right-click the Reload icon in the browser window and select Empty Cache and Hard Reload from the pop-up menu, as shown in Figure 2-6.
Figure 2-6. Clearing the cache and reloading the page
6. Click the RSVP Now button in the browser window, complete the form, and click the Submit RSVP button to send the form data to the server.
Tip
■
The menu shown in Figure
2-6
is available only when the F12 tools window is open.
CHAPTER 2 ■ YOUR FIRST WEB API APPLICATION
Creating the Web Service
Now that I have a basic MVC framework application in place, I can add some Web API functionality to create a web service that exposes my RSVP model to HTTP clients. In the sections that follow, you will see just how easy it is to use MVC and Web API side-by-side.
Tip
■
Adding an HTTP web service to an existing MVC framework isn’t the only way to use Web API, but it is the one
I have started with in this book because it is such a common task. It also lets me demonstrate how much commonality
there is between MVC and Web API and how that commonality can be leveraged for quick results. In Chapter 6, I show
you a more considered approach to using Web API when I start by designing the web service first.
Creating the Web API Controller
Just like MVC, Web API uses controllers that define action methods that handle HTTP requests. I created a Web API controller by right-clicking the Controllers folder, selecting Add ➤ Controller from the pop-up menu, and selecting Web API 2 Controller – Empty from the list of controller types, as shown in Figure 2-7.
Table 2-1. The Request Summary from Google Chrome
Description
Value
Total number of requests 21, of which 13 were made to the server and 8 were satisfied using the browser cache
CHAPTER 2 ■ YOUR FIRST WEB API APPLICATION
Just as with MVC controllers, Visual Studio can create controllers with templated content. I’ll be using the empty controller for Web API throughout this book so that I can explain the purpose of all the code statements I use. Click the Add button once you have selected the type, set the name of the new controller to RsvpController, and click the Add button to create the Controllers/RsvpController.cs file. Listing 2-9 shows the action methods that I added to the RsvpController class to create a simple web service.
Listing 2-9. The Contents of the RsvpController.cs File
using System.Collections.Generic; using System.Linq;
using System.Web.Http; using PartyInvites.Models;
namespace PartyInvites.Controllers {
public class RsvpController : ApiController {
public IEnumerable<GuestResponse> GetAttendees() {
return Repository.Responses.Where(x => x.WillAttend == true); }
CHAPTER 2 ■ YOUR FIRST WEB API APPLICATION
public void PostResponse(GuestResponse response) { if (ModelState.IsValid) {
Repository.Add(response); }
} } }
The first thing to notice about my controller is that the base class is ApiController, which is defined in the System.Web.Http namespace. This is a different base class and namespace than an MVC controller uses because Web API doesn’t use the standard System.Web and System.Web.Mvc namespaces. Instead, Web API uses separate classes, even for functionality that is shared with MVC, such as filter attributes. Hover the mouse over the HttpGet or HttpPost attributes in the code editor, and the pop-up box will tell you that these are classes defined in the System.Web.Http namespace, not the System.Web.Mvc namespace that defines the attribute I applied to the Home MVC controller.
Tip
■
The fact that MVC and Web API have distinct versions of classes with the same names that perform the same
function is confusing and is the most common cause of errors for developers new to Web API. Be careful that you don’t
add the
System.Web.Mvcnamespace to Web API controllers.
Next, notice that the result from the GetAttendees action method is an enumeration of my GuestResponse model class. Web services deliver data to their clients and don’t use views to generate HTML content, so there is no need for the ActionResult objects you are familiar with from MVC applications. This makes Web API controllers more like regular C# classes, although there are lots of options available for taking control over how the data returned from a Web API action method is formatted and sent to the client, which I explain in Part 2 of this book.
IS THAT IT?
The
RsvpControllerclass is the only one I need to add to the project to create an HTTP web service. The rest of
this chapter is given over to checking that the web service works and implementing the client-side jQuery code
that consumes the service.
You might be asking yourself, is that it? The answer is yes and no. Yes, because you can create a basic HTTP web
service just by adding a Web API controller to the project. In this example, I was able to minimize the amount of
work I had to do by reusing the model that I created for the MVC framework application and relying on the default
conventions and configuration of a Web API application.
CHAPTER 2 ■ YOUR FIRST WEB API APPLICATION
Testing the Web API Controller
As simple as the RsvpController is, it is all that I need to add a basic HTTP web service to my application. I am relying on some convention and default configuration settings, of course—which I’ll explain in depth in Part 2, but with the addition of one simple class I have a web service that is capable of delivering data over HTTP.
There are different levels of testing that you can perform on a web service created with Web API. There is unit testing, which can be applied in much the same way as for MVC framework application. And, of course, you can perform system-level testing once the web service is integrated into the client. For this chapter, I am going to use the Postman tool that I described and installed in Chapter 1. To recap, Postman is a Chrome application that provides excellent support for testing web services, even the basic kind that I have created here. It is free to use, although donations are accepted, and it makes it easy to explore a web service without having to write any code at all.
Tip
■
If you have not installed Google Chrome and Postman, then now is the time to do so. I provided instructions and
URLs in Chapter 1.
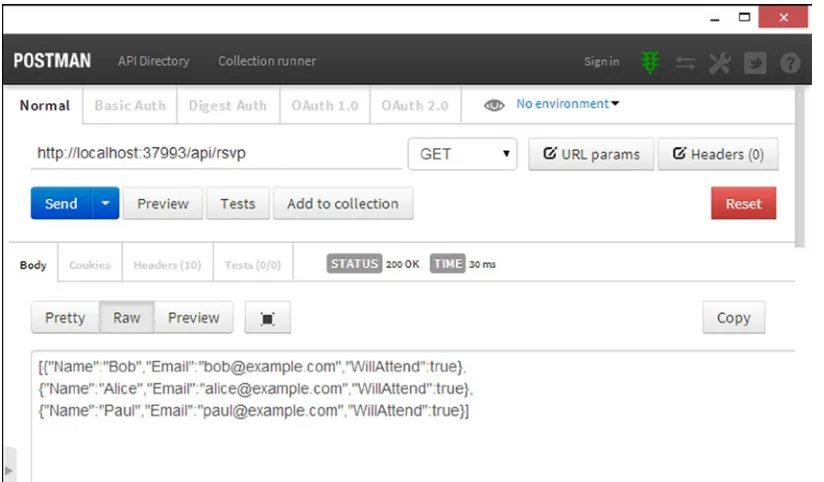
Start the application and then start Postman by opening a new Chrome tab, clicking the Apps icon in the top-left corner of the toolbar, and clicking the Postman icon. Postman will open a new window. Replace the “Enter request URL here” text with, the following URL:
http://localhost:37993/api/rsvp
Once you have entered the URL, click the Send button, and Postman will send a request to the web service and display the data that it gets, as shown in Figure 2-8.
CHAPTER 2 ■ YOUR FIRST WEB API APPLICATION
Tip
■
Web API uses the ASP.NET routing system to match requests to controllers and action methods, which means that
URLs can be customized. The default convention is that all URLs for Web API web services are prefixed with
/api, followed
by the controller name. The selection of the action method is made using the HTTP verb from the request, matched to an
action method whose name begins with the verb—so the GET request sent by Postman to
/api/rsvpis mapped to the
GetAttendeesaction method in the
RsvpControllerclass. I explain more about how this mapping works in Chapter 22.
The URL I specified targeted the GetAttendees action method on the Web API Rsvp controller, and the data that is returned represents the responses from potential guests. It can be hard to make out from the figure, but here is the data that Postman receives from the web service:
[{"Name":"Bob","Email":"[email protected]","WillAttend":true}, {"Name":"Alice","Email":"[email protected]","WillAttend":true}, {"Name":"Paul","Email":"[email protected]","WillAttend":true}]
This is the JSON data format, which is especially easy to work with in JavaScript—as you’ll see when I implement the client-side part of the application in the “Implementing the Client” section. I describe JSON in a little more detail in Chapter 3, but the initial [ and final ] characters indicate an array of objects—just like in C# each set of braces (the { and } characters) denotes a single object. Each object in this array has Name, Email, and WillAttend properties, and the values correspond to the initial model data that I defined in the Repository class in Listing 2-2.
Tip
■
Notice that Web API automatically converted the result from the
GetAttendeesaction method from
IEnumerable<GuestResponse>
to a JSON array. I explain how this happens—and show you how to control the conversion
process—in Part 2.
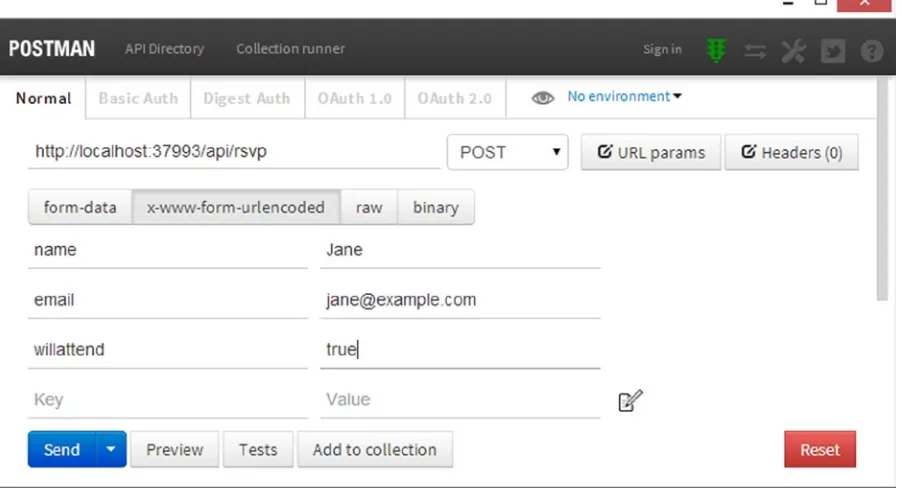
Postman can also be used to test HTTP POST requests, which allows me to test my PostResponse action method as well, although care must be taken to configure the request correctly. To target the PostResponse action method, change the HTTP verb for the request to POST by clicking the button marked GET to the right of the URL and selecting POST from the drop-down list.
Now click the x-www-form-urlencoded button to select the format in which Web API expects to receive form data and enter key/value pairs to define the properties in Table 2-2.
Table 2-2. The Key and Value Pairs for Testing the Web Service
Key
Value
name Jane
email [email protected]
willattend true
CHAPTER 2 ■ YOUR FIRST WEB API APPLICATION
Click the Send button to send the POST request to the application. The PostResponse action method doesn’t return any data, so the response area of the Postman interface doesn’t show any data, but if you send a GET request to the GetAttendees method (which you can easily do from the Postman History area), you will see that a new RSVP object is included in the JSON data, like this:
[{"Name":"Bob","Email":"[email protected]","WillAttend":true}, {"Name":"Alice","Email":"[email protected]","WillAttend":true}, {"Name":"Paul","Email":"[email protected]","WillAttend":true},
{"Name":"Jane","Email":"[email protected]","WillAttend":true}]
Implementing the Single-Page Client
Using Postman allows a web service to be tested by manually composing requests. It is a nice way to test the web service separately from the MVC framework part of the application, but that isn’t good for users, who generally don’t want to type URLs and read JSON strings. In this section, I will update the MVC part of the application to use jQuery to consume the HTTP web service I created using Web API. My goal is to create a simple single-page application, where a single HTML document is requested by the browser and then manipulated and populated using JavaScript and data obtained via Ajax requests.
For this example, I am also going to ensure that non-JavaScript clients can still use the application. JavaScript is remarkably prevalent these days, but there are still devices that don’t support it and a substantial minority of users who disable JavaScript in their browsers, mostly for reasons of security.
CHAPTER 2 ■ YOUR FIRST WEB API APPLICATION
Tip
■
Don’t worry if you are unfamiliar with some of the techniques I use here. Chapter 3 contains a primer to get you
started, focused on what you need to follow the examples in this book and create clients that can consume web applications.
Setting Up JavaScript IntelliSense
Visual Studio is capable of providing the same kind of IntelliSense editor support for JavaScript like it does for C#. This makes working with libraries such as jQuery quicker and less error-prone, especially since JavaScript code doesn’t go through a compiler in the same that that C# does—any errors in the code are not revealed until runtime. To enable JavaScript IntelliSense, add a new JavaScript file called _references.js (don’t forget the leading underscore character) in the Scripts folder. Listing 2-10 shows the additions I made to the new file to set up IntelliSense for the jQuery file present in the project.
Listing 2-10. Adding IntelliSense References to the _references.js File
/// <reference path="jquery-2.1.0.js" />
/// <reference path="knockout-3.1.0.debug.js" />
A reference element has a path attribute that refers to one of the JavaScript files in the Scripts folder.
Tip
■
You don’t have to type the
resourceelements by hand—you can just drop JavaScript files from the Solution
Explorer onto the editor window for the
_resources.jsfile, and Visual Studio will create the
referenceelement for you.
Defining the Client-Side Data Model and Controller
The basic model for creating single-page applications with jQuery and Knockout is to follow the same approach taken on the server side: a data model that is manipulated by a controller, which selects the views to be displayed and responds to user input. To get started, I added a JavaScript file called rsvp.js to the Scripts folder, the contents of which are shown in Listing 2-11.
Listing 2-11. The Contents of the rsvp.js File
var model = {
view: ko.observable("welcome"), rsvp: {
name: ko.observable(""), email: "",
willattend: ko.observable("true") },
attendees: ko.observableArray([]) }
CHAPTER 2 ■ YOUR FIRST WEB API APPLICATION
var getAttendees = function () { $.ajax("/api/rsvp", { type: "GET",
success: function (data) { model.attendees.removeAll();
model.attendees.push.apply(model.attendees, data.map(function(rsvp) { return rsvp.Name;
The PartyInvites application is sufficiently simple that I have defined the data model and the functions that comprise the controller in the same JavaScript file. For more complex projects (like the SportsStore application I created in Chapters 5–8), I use several files. In the sections that follow, I describe the contents of the JavaScript file.
Defining the Model
The data model is at the heart of the client-side part of the application, just as it is in the server. I have defined a JavaScript object called model that has properties that correspond to the data items I need in the application, as follows:
...
var model = {
view: ko.observable("welcome"), rsvp: {
name: ko.observable(""), email: "",
willattend: ko.observable("true") },
attendees: ko.observableArray([]) }
CHAPTER 2 ■ YOUR FIRST WEB API APPLICATION
There are two Knockout-specific features in the model object. The first is the use of the ko.observable method, which is used to create a data value that can be used to automatically update HTML elements when it changes. I use the view property, for example, to keep track of which client-side view should be displayed to the user, and I don’t have to write any additional code to change the view—I just set the value for the view property. The hard work is done by a Knockout binding, which I apply to the HTML in the “Adding Data Bindings” section. Data values that are created with the ko.observable method are known as observables. The other Knockout feature is similar;
the ko.observableArray method performs the same role as ko.observable but for an array of objects, creating what is known as an observable array.
To help you understand what is happening as I apply the data model in the application, Table 2-3 explains the purpose of each property in the model.
Table 2-3. The PartyInvites Data Model Properties
Name
Description
view This property is used to keep track of which part of the client interface is shown to the user.
rsvp This property is set to an object that I use to capture the user’s response to the party invitation. The object has fields for name, e-mail address, and attendance. The name and willattend properties are observable.
attendees This property is an array of the names of the other attendees, which are obtained from the web service after the user has responded to the invitation.
Defining the Controller
The showForm, sendRsvp, and getAttendees functions collectively form the client-side controller. JavaScript isn’t as structured as C#, and I want to keep the example simple, but these are the functions that are used to manipulate the data model and select the content shown to the user, just like an MVC framework controller. The main difference—language aside—is that the data is obtained from the web service using Ajax, rather than from a local repository. I am not going to explain these functions in detail in chapter, but I explain how to make changes to a Knockout data model and how to use jQuery to make Ajax requests in Chapter 3. To help provide context, Table 2-4 describes the purpose of the functions.
Table 2-4. The PartyInvites Controller Functions
Name
Description
showForm This function shows the user the HTML form that gathers their responses to the invitation and allows the response to be sent to the web service.
sendRsvp This function sends a POST request to the web service to submit the RSVP data.
CHAPTER 2 ■ YOUR FIRST WEB API APPLICATION
Initializing Knockout
Knockout requires initialization to associate the observables and observable arrays in the data model with the bindings attached to the HTML elements (which I define shortly). Here is the code that starts the initialization process:
...
$(document).ready(function () { ko.applyBindings();
}) ...
The ko.applyBindings method is called to initialize Knockout but should not be called until the browser has loaded and processed all of the HTML and JavaScript files. The call to $(document).ready is a common incantation in a JavaScript web application. The ready function is provided by jQuery, and when called in this way, it defers execution of the function it is passed until the browser is ready. In this case, it allows me to defer initializing Knockout until the elements that it will operate on have been processed by the browser.
Registering the JavaScript File
Listing 2-12 shows the script element I added to the _Layout.cshtml file so that the browser will request the contents of the rsvp.js file and execute the code it contains.
Tip
■
You don’t have to type
scriptelements into the editor. You can just drag and drop the JavaScript files from the
Solution Explorer to the code editor, and a
scriptelement will be created automatically. Visual Studio shows a cursor so
you can control where the element is added.
Listing 2-12. Adding a script Element to the _Layout.cshtml File
<!DOCTYPE html> <html>
<head>
<meta name="viewport" content="width=device-width" /> <script src="~/Scripts/jquery-2.1.0.min.js"></script> <script src="~/Scripts/knockout-3.1.0.js"></script> <link href="~/Content/bootstrap.css" rel="stylesheet" /> <link href="~/Content/bootstrap-theme.css" rel="stylesheet" /> <title>@ViewBag.Title</title>
<script src="~/Scripts/rsvp.js"></script> <style>
body { padding-top: 10px; } </style>
</head>
<body class="container"> @RenderBody() </body>
CHAPTER 2 ■ YOUR FIRST WEB API APPLICATION
Appling Data Bindings
Now that I have a model and controller in place, I can update the HTML so that it responds dynamically to data changes. Knockout uses a system of bindings, which are applied to elements through the data-bind attribute. Listing 2-13 shows the changes I made to the Index.cshtml file to apply the bindings I need for the application. I have also taken the opportunity to combine the HTML into one file.
Tip
■
A single-page application doesn’t have to be defined in a single HTML page—the principle of updating the
content with data obtained via Ajax requests. For large applications, it often makes sense to have several HTML hub
pages that represent each major area of the application, which is what I do with the SportsStore application in
Chapters 5–8. As with all patterns, don’t let the ideal interfere with pragmatic implementation.
Listing 2-13. Creating a Dynamic Client in the Index.cshtml File
@{ ViewBag.Title = "Party!";}
<div class="text-center" data-bind="visible: model.view() == 'welcome'"> <h2>We're going to have an exciting party!</h2>
<h3>And you are invited.</h3>
<button class="btn btn-success" data-bind="click: showForm">RSVP Now</button> </div>
<div data-bind="visible: model.view() == 'form'"> <div class="panel panel-success">
<div class="panel-heading"><h4>RSVP</h4></div> <div class="panel-body">
CHAPTER 2 ■ YOUR FIRST WEB API APPLICATION
<div data-bind="visible: model.view() == 'thanks'">
<h1>Thank you, <span data-bind="text: model.rsvp.name()"></span>!</h1> <div class="lead">
<span data-bind="visible: model.rsvp.willattend() == 'true'">
It's great that you're coming. The drinks are already in the fridge! <br />
Here is the list of cool people coming:
<span data-bind="text: model.attendees().join(',')"></span> </span>
<span data-bind="visible: model.rsvp.willattend() == 'false'">
Sorry to hear that you can't make it, but thanks for letting us know. </span>
</div> </div>
There are three sections to the HTML, each of which represents a view. I control which view is shown to the user through a Knockout binding, like this one:
...
<div class="text-center" data-bind="visible: model.view() == 'welcome'"> ...
This is an example of the visible binding, which controls whether an element is shown to the user. There are a range of bindings including text (which sets the text content of an element), value (which sets a model value based on the contents of a form element), and click (which calls a function when an element, such as button, is clicked). I describe the available bindings in more detail in Chapter 3.
Some bindings—including the visible binding—evaluate expressions to figure out what they need to do. In this case, the element to which the binding has been applied will be shown to the user if the value of the model.view property is welcome. The other views have their own visible bindings that are looking for different model.view values.
Tip
■
Observable values are functions, which means you have to invoke them to read their value—like
model.view()—and pass values as arguments to set them, such as
model.view(newView).
To change the view, I need to change the value of the model.view property. You can see an example of how I do this on a button element, like this:
...
<button class="btn btn-success" data-bind="click: showForm">RSVP Now</button> ...
This is an example of the click binding, and I have configured it to invoke the showForm controller function when the button element is clicked. The showForm function is defined as follows:
...
var showForm = function() { model.view("form"); }
CHAPTER 2 ■ YOUR FIRST WEB API APPLICATION
The only other binding I have used in the example is value, which synchronizes the contents of a form element, such as an input, with a model value. Here is an example:
...
<input class="form-control" data-bind="value: model.rsvp.name" /> ...
The value that is entered into the input element is synchronized with the model.rsvp.name property, which I use to generate the Ajax POST request to submit the RSVP to the web service.
Testing the Single-Page Client
Start the application to see the effect of the changes I made. There is little obvious difference when using the application, other than being a little snappier, because I have implemented the same application model that the round-trip version of the application used, as illustrated by Figure 2-10. To make sure everything is working, you will need to use the browser F12 tools to see the Ajax requests that are being sent.
CHAPTER 2 ■ YOUR FIRST WEB API APPLICATION
Measuring the Single-Page Implementation
With the addition of a simple Web API controller, some changes to the views, and a little JavaScript code, I have created an application that requests a single HTML document from the server and uses Ajax requests to take the user through the RSVP process.
I want to confirm that my application is working the way that I expect, and a good way to do this is to repeat the tests I performed in the “Using the MVC Application” section earlier in the chapter and use the browser F12 tools to record the requests made by the browser. Table 2-5 shows the results I received.
Table 2-5. The Request Summary from Google Chrome
Description
Value
Total number of requests 10, all of which were made to the server (none was cached)
Total amount of data 246KB
The effect of using Web API has been to eliminate several requests to the server, which is always a good thing. But the amount of data that has been sent by the server remains the same. This is to be expected because all I did in this example was move the content around so that it was all contained in the Index.cshtml file or obtained through Ajax requests. The application does the same things, using the same content; it just does them in a different way.
The main advantage of adding a simple HTTP web service to an application like this is that it improves the user experience because the application responds immediately to user input, rather than needing to send a request to the server and wait for an HTML response that must then be parsed and displayed.
Tip
■
More complex applications, especially those that have the user perform the same task repeatedly, can obtain
some serious bandwidth savings—something that will become apparent in later examples in this book.
Summary
CHAPTER 3
Essential Techniques
As I explained in Chapter 1, this book is targeted at MVC framework developers, which means you already know C# and key components such as Razor and action results. In this chapter, I provide a quick primer for three topics that you may not be as familiar with: using C# async methods, making Ajax requests using jQuery, and using the Knockout library. Understanding all three will help you get the most from this book.
Asynchronous methods are important in Web API development, especially once you go beyond creating action methods and start to customize the way that requests are processed using the techniques I describe in Part 3 of this book.
jQuery and Knockout are not part of Web API, but I use them throughout this book to create client applications that demonstrate different kinds of interactions with web services that I create using Web API. jQuery and Knockout are both packages with a rich range of functionality, but I describe only the features that I use in examples.
Preparing the Example Project
CHAPTER 3 ■ ESSENTIAL TECHNIQUES
Click the OK button to move to the New ASP.NET Project dialog window. Ensure that the Empty option is selected and check the MVC and Web API core references options, as shown in Figure 3-2. Click the OK button, and Visual Studio will create the project.
CHAPTER 3 ■ ESSENTIAL TECHNIQUES
Adding and Updating NuGet Packages
Select Package Manager Console from the Visual Studio Tools ➤ NuGet Package Manager menu and enter the following commands to update the MVC and Web API packages and install the jQuery Bootstrap and Knockout packages:
Update-Package microsoft.aspnet.mvc -version 5.1.1 Update-Package microsoft.aspnet.webapi -version 5.1.1 Update-Package Newtonsoft.json -version 6.0.1
Install-Package jquery -version 2.1.0 Install-Package bootstrap -version 3.1.1 Install-Package knockoutjs –version 3.1.0
Creating the Web API Controller
I need a simple web service for this chapter, which means creating a Web API controller class. The controller I create in this chapter is basic, rather like the one I created in Chapter 2, and it exists only so I can demonstrate essential techniques. You can see a more complete example in Chapter 6, when I create a more realistic Web API application, and I explain how controllers fit into Web API in Chapter 22.
To create the controller, right-click the Controllers folder and select Add ➤ Controller from the pop-up menu. Select Web API 2 Controller – Empty from the list of controller types, as shown in Figure 3-3.
CHAPTER 3 ■ ESSENTIAL TECHNIQUES
Click the Add button once you have selected the type, set the name of the new controller to PageSizeController, and click the Add button to create the Controllers/PageSizeController.cs file. Listing 3-1 shows the action method I added to the controller.
Listing 3-1. Adding an Action Method to the PageSizeController.cs File
using System.Net; using System.Web.Http; using System.Diagnostics;
namespace Primer.Controllers {
public class PageSizeController : ApiController {
private static string TargetUrl = "http://apress.com";
public long GetPageSize() {
WebClient wc = new WebClient(); Stopwatch sw = Stopwatch.StartNew();
byte[] apressData = wc.DownloadData(TargetUrl);
Debug.WriteLine("Elapsed ms: {0}", sw.ElapsedMilliseconds); return apressData.LongLength;
} } }
CHAPTER 3 ■ ESSENTIAL TECHNIQUES
The action method is called GetPageSize, and it makes HTTP requests for the Apress home page and returns the number of bytes returned. I use the Stopwatch class from the System.Diagnostics namespace to measure how long the requests take and use the Debug class to write out the duration to the Visual Studio Output window.
Tip
■
Getting the number of bytes returned by a URL isn’t something you will often need in a real project, but it is a
helpful demonstration of a task that can be performed synchronously and asynchronously without requiring me to write
any code beyond the Web API controller. If you are keen to see a more realistic example, then skip ahead to Chapter 5,
where I begin the development of the SportsStore application.
Creating the MVC Framework Controller
I will be using the MVC framework to deliver HTML and JavaScript to the browser so that I can explain how to send Ajax requests back to the web service and use Knockout to respond to the data that is received. To create an MVC controller, right-click the Controllers folder and select Add ➤ Controller from the pop-up menu. Figure 3-4 shows the options that Visual Studio presents for creating controllers for both MVC and Web API.
Figure 3-4. Selecting a controller type
CHAPTER 3 ■ ESSENTIAL TECHNIQUES
Clicking the Add button creates the Controllers/HomeController.cs file, the contents of which are shown in Listing 3-2.
Listing 3-2. The Contents of the HomeController.cs File
using System.Web.Mvc;
namespace Primer.Controllers {
public class HomeController : Controller {
public ActionResult Index() { return View();
} } }
The only action method is Index, which renders the default view. To create the view, right-click the action method in the code editor and select Add View from the pop-up menu. Ensure that the View Name field is set to Index and click the Add button to create the Views/Home/Index.cshtml file. Replace the contents of the file so they match Listing 3-3.
Listing 3-3. The Contents of the Index.cshtml File
@{ Layout = null;} <!DOCTYPE html> <html>
<head>
<meta charset="utf-8" />
<meta name="viewport" content="width=device-width, initial-scale=1.0"> <title>Primer</title>
<script src="~/Scripts/jquery-2.1.0.min.js"></script> <script src="~/Scripts/knockout-3.1.0.js"></script> <link href="~/Content/bootstrap.css" rel="stylesheet" /> <link href="~/Content/bootstrap-theme.css" rel="stylesheet" /> </head>
<body>
<h2>Content will be added here</h2> </body>
</html>
CHAPTER 3 ■ ESSENTIAL TECHNIQUES
The view contains script elements for jQuery and Knockout and link elements for the Bootstrap files. I have left a placeholder within the body element that I will replace when I start to demonstrate client-side features later in the chapter.
Setting the Port and Start URL
The final preparations I need to make specify the TCP port that will be used to receive requests and the initial URL that will be passed to the browser when the project is started, just as I did in Chapter 2. Select Primer Properties from the Visual Studio Project menu and click Web to open the settings for ASP.NET projects.
Enable the Specific Page option and enter Home/Index into the field. On the same page, change the value shown in the Project Url field to http://localhost:38000/ and click the Create Virtual Directory button.
The first change prevents Visual Studio from trying to work out what URL should be shown when the application first starts based on the file you edited most recently, and the second change means that requests will be received on TCP port 38000.
Testing the Web Service
Start the application by selecting Start Debugging from the Visual Studio Debug menu. Ignore the browser window that is opened; I will not add any useful content to the view until the “Making Ajax Requests with jQuery” section.
Instead, start the Postman client (which I described in Chapter 1 and used in Chapter 2) and send a GET request to the following URL:
http://localhost:38000/api/pagesize
CHAPTER 3 ■ ESSENTIAL TECHNIQUES
Note
■
The Apress web site changes often to reflect new releases and special offers. The number of bytes you receive
is likely to be different from the result I show here.
Understanding Asynchronous Methods
Asynchronous methods have been part of ASP.NET for a while, but as something of an afterthought. Web API adopts asynchronous methods throughout its API. They are optional in controllers, but many of the classes that customize the way that Web API processes requests define only asynchronous methods.
Asynchronous methods are one of the most misunderstood aspects of web application development. In the sections that follow, I’ll explain the benefit they offer, dispel a commonly held misconception, and demonstrate the patterns you will need to deal with asynchronous methods in Web API.
Understanding the Problem Asynchronous Methods Solve
When writing action methods—or any part of a web application—the natural tendency is to think about the path that a single request follows through the code. In the case of the GetPageSize action method in the PageSize controller, the path is simple: a request arrives at the action method, I make a request to the remote web server, and 500 milliseconds later, I get the data I need and can return the result, as illustrated by Figure 3-7. (The actual elapsed time will differ, but I am going to assume a constant 500 milliseconds.)
GetPageSize
GetPageSize
Figure 3-8. The request sequence
GetPageSize
Invoke Action Method
Send Request to
Apress.com Wait 500ms Return Result
Figure 3-7. The request path for the GetPageSize action
The handler that is processing the request has nothing to do except wait during the 500 milliseconds it takes for the action method to send the HTTP request to Apress.com and receive the response.
CHAPTER 3 ■ ESSENTIAL TECHNIQUES
Tip
■
An application server that handles only one request at a time isn’t as unlikely as it may seem, as the success of
Node.js has demonstrated.
The handler can start processing a request only when it has finished processing the previous one, and for the majority of the time, the handler is sitting idle. The problem isn’t the work that the action method is performing—it is the way that the handler and the action method work together.
The solution is to perform the request to Apress.com asynchronously, which frees up the handler to process other incoming client requests instead of waiting for the Apress.com response. Listing 3-4 shows the application of the async and await keywords to the GetPageSize action method.
Listing 3-4. Creating an Asynchronous Action Method in the PageSizeController.cs File
using System.Net; using System.Web.Http; using System.Diagnostics; using System.Threading.Tasks;
namespace Primer.Controllers {
public class PageSizeController : ApiController {
private static string TargetUrl = "http://apress.com";
public async Task<long> GetPageSize() { WebClient wc = new WebClient(); Stopwatch sw = Stopwatch.StartNew();
byte[] apressData = await wc.DownloadDataTaskAsync(TargetUrl); Debug.WriteLine("Elapsed ms: {0}", sw.ElapsedMilliseconds); return apressData.LongLength;
} } }
The async keyword is applied to the method definition, and the result is changed to a Task<long>, which means a Task object that will yield a long value when it completes. Within the action method, I have used an asynchronous implementation of the method that gets the HTTP data, and I apply the await keyword to indicate that this is an asynchronous operation and that the statements that follow can be packaged up by the complier to generate the Task<long> result required as the method result.
This arrangement doesn’t change the work that the action method performs, but it does mean that the handler is free to handle other client requests while the action method is waiting for the response from Apress.com. Figure 3-9