For your convenience Apress has placed some of the front
matter material after the index. Please use the Bookmarks
Contents at a Glance
About the Author ...
xiii
About the Technical Reviewer ...
xv
Acknowledgments ...
xvii
Introduction ...
xix
Chapter 1: Core JavaScript and JavaScript Frameworks
■
...
1
Chapter 2: Overview of Ext JS 4
■
...
9
Chapter 3: Understanding the Ext JS 4 API
■
...
17
Chapter 4: Controls and Layout
■
...
31
Chapter 5: Working with Data
■
...
67
Chapter 6: Data Controls
■
...
93
Chapter 7: Drag and Drop
■
...
131
Chapter 8: Theming and Styling
■
...
153
Chapter 9: MVC with Ext JS 4
■
...
171
Chapter 10: Extending, Unit Testing, and Packaging
■
...
185
Introduction
This book is a succinct guide to the Ext JS 4 framework written from a developer’s perspective. My objective is that, after reading this book, you should be able to develop an Ext JS 4 application right away.
Who Should Read This Book?
This book is written for programmers who want to build rich Internet applications using the Ext JS 4 library. If you are working on a project using Ext JS 4, or are ready to get started with a new Ext JS 4 application, this book is for you, as it explains all the concepts in Ext JS 4 from a developer’s point of view. Or if you are just interested in reading about Ext JS 4 and its features, this book should make it clear.
I have assumed a basic knowledge of HTML and JavaScript on the part of the reader. If you have been an OO programmer but have never been in the mainstream of JavaScript development, and now want to write rich web applications, then Ext JS 4 and this book are for you. However, this book should not be used as a primer on general web application development and JavaScript; it is more specialized than that.
How to Read This Book?
It’s strongly recommended that you read the book in chapter order from the first to the last. Each chapter talks about a particular topic and will have examples built using the concepts covered in previous chapters. Hence skipping chapters may lead to confusion as you may well run into terms that were explained in the chapters you missed.
This book is not a comprehensive substitute for the Ext JS 4 API documentation. Ext JS 4 provides tons of classes and functions, and I don’t have time and space to explain all of them. So you still need to refer to the documentation.
The concepts are explained in a pretty straightforward and succinct manner.
Contents overview
Chapter 1• , Core JavaScript and JavaScript Frameworks introduces you to the core language features of JavaScript such as function hoisting, the arguments keyword, JSON, etc., that will help you understand Ext JS 4 API better. It also introduces you to JavaScript frameworks in general and their significance in web development.
Chapter 2
• , Overview of Ext JS 4 gets you started with Ext JS 4 by setting up the environment and writing some basic code.
Chapter 3
• , Understanding Ext JS 4 API explains the structure of the Ext JS 4 API. I show you how to use Ext JS 4 syntax to create custom classes and objects, and introduce features like inheritance, overriding, and mixins.
Chapter 4
Chapter 5
• , Working with Data dives into the data exchange and data handling capabilities of Ext JS 4. You will learn how to access server and HTML 5 resources and exchange JSON and XML data.
Chapter 6
• , Data Controls delves deeper into data controls like grids, trees, list boxes, and charts.
Chapter 7
• , Drag and Drop explains drag and drop behavior in Ext JS 4. You will learn the Drag and Drop API in detail and apply it to UI components like grids, trees, etc.
Chapter 8
• , Theming and Styling introduces you to the concepts of styling and theming in Ext JS 4. You will see the usage of SASS and Compass with practical examples.
Chapter 9
• , MVC and Ext JS 4 covers MVC architecture in Ext JS 4 in detail. We’ll build an application from scratch using the MVC architecture.
Chapter 10
Core JavaScript and JavaScript
Frameworks
A lot of applications are being developed today using Ajax and HTML 5. Developing a rich web application can get really tedious, thanks to JavaScript. Building an application by writing JavaScript code that can be easily tested and maintained is not simple. It requires a great deal of coding discipline. Moreover we don’t want to be doing repetitive tasks like validating our forms, sending Ajax requests, manipulating the DOM, drawing, etc., in all our applications. And that’s the reason you have a number of JavaScript frameworks available today.
These JavaScript frameworks make life easier for web developers. They provide APIs that save time and effort in implementing the necessary behavior. These frameworks give us ready-made UI controls and reusable methods and properties that make developing applications a breeze.
This chapter talks about some of the popular JavaScript libraries and highlights the features of Ext JS 4. You’ll also learn about some features of the JavaScript language that will help you prepare for working with Ext JS 4 API. The objective of this chapter is to introduce you to the kind of JavaScript code we need to write when working with Ext JS 4 API. The Ext JS 4 API is simple to understand, provided you have a good knowledge of the JavaScript language.
JavaScript Frameworks
Let’s take a quick look at some JavaScript libraries that are widely used by developers. I’ll just highlight the important aspects of these libraries, and not delve into them in detail.
• Prototype- One of the early JavaScript frameworks that made coding in JavaScript really simple, Prototype provides a set of utility functions to work with the DOM and Ajax. It doesn’t offer ready-made UI components. Prototype is a nice little API that can be used for simple tasks like form validations, sending Ajax requests, DOM operations etc.
• jQuery- jQuery is a very popular JavaScript library that took JavaScript coding to the next level. It provides an easy-to-use API. The jQuery UI, which is built over the core of jQuery, gives us a lot of UI controls. You can extend it to suit your needs by creating plugins. But jQuery has some drawbacks; for instance its codebase can grow to be a monster when used alone. It’s more convenient when used with frameworks like Backbone or KnockOut for greater modularity.
• GWT- Google Web Toolkit is actually a Java library that gets compiled to JavaScript. We develop a Java web application using GWT API, and it emits highly optimized JavaScript code that can be deployed to a web server. Naturally, the library is targeted at Java developers.
• Angular JS- This is an open source library from Google. It’s popular for the Model-View-Controller (MVC) capabilities it offers. Angular JS gives you a template-based declarative solution for building web pages. Its main drawback is a steep learning curve, largely due to its poor documentation and code examples.
As a developer, I have used most of these JavaScript libraries in my applications. Libraries like jQuery and Prototype are well suited to smaller applications. If you’re looking at developing an enterprise application that deals with graphs, data grids, communicating with a server, and exchanging lot of data, drag and drop behavior etc, Ext JS 4 is a pretty good candidate. Personally Ext JS 4 has impressed me a lot compared to other libraries. Here’s a list of features in Ext JS 4 that make it more compelling to work with.
• Object-Oriented flavor- JavaScript has never been taken seriously as a programming language. We never learn JavaScript the way we have learned Java or C# or Ruby. Developers who come from an OO background find it difficult to shift to the functional style of coding; so JavaScript, as a functional programming language, poses adaptability issues for OO developers. Ext JS 4 lends an OO flavor to the JavaScript language. So developers who are accustomed to coding in OO languages will be in tune with the Ext JS 4 API.
• Rich UI controls- Ext JS 4 provides a rich set of UI components, like any other JavaScript library. The UI controls include different types of form components, and data components such as grid, tree, and charts. You have to write a few lines of code in JavaScript even to create a simple label or a textbox. The programmatic approach to using UI components paves the way for extending and customizing them.
• Support for HTML 5- HTML 5 provides a set of features like a new set of UI tags, multimedia capabilities without depending on third party plugins, data storage facilities, web sockets, web workers, Canvas API for drawing, GeoLocation, and working with history. The Ext JS 4 API supports HTML 5 tags, working with local storage and session storage, drawing, etc.
• MVC architecture- Modularity has always been an issue in JavaScript libraries. Maintenance is a nightmare in web applications developed using JavaScript, no matter what framework we use. Incorporating new behavior into existing code is a tedious task. Very few libraries in JavaScript take care of modularity. Ext JS 4 stands apart in this respect. One of the reasons for Ext JS 4’s popularity is the support that it offers for implementing MVC. The complete code can be organized into folders and files following the MVC architecture. Making changes and testing becomes easier because of this.
• Theming and Styling- Creating stylesheets by writing vanilla CSS code for an entire
application can be very frustrating: it’s an uphill task. Ext JS 4 gives us themes that can be used in applications. You can modify those themes to suit your needs. But we don’t have to write CSS code to do that. Ext JS 4 relies upon SASS (Syntactically Awesome StyleSheets) scripts for styling. The style sheets for the UI controls are available as SASS files which we can play with. The SASS scripts are then compiled to CSS files using a Ruby script called Compass. This makes styling our applications much easier.
• Moving to the mobile version- Many of my clients who have built web applications targeting desktop browsers also plan to build—or already building—mobile-friendly versions of the same applications. Building applications that can work seamlessly in a desktop, as well as on smart phones and tablets, requires a great deal of effort. Using Ext JS 4 in applications has an added advantage if you aim to develop a mobile version too. Sencha provides us with a popular JavaScript library called Sencha Touch for building mobile web applications. The structure of Sencha Touch API is very similar to Ext JS 4. The concepts, coding style and the patterns of these two libraries are almost the same. There are some differences and Sencha has been working to even out these two APIs with every release. Apart from the inherent complexities in developing mobile applications, developers working with Ext JS 4 can very quickly adopt Sencha Touch and create a mobile version.
Ext JS 4 is one of the very few frameworks where you develop the UI not using plain HTML but by writing JavaScript code. As mentioned earlier, even if you want to create a simple UI component like a Button you would have to write some lines of JavaScript code. You can imagine the number of lines of code you would need to create components like grid, trees and charts. So it’s very important to be extremely comfortable with the core JavaScript language before you begin working with Ext JS 4.
If you want to understand Ext JS 4 API and master its use, it’s important to understand certain aspects of JavaScript. These concepts are often ignored by OO developers who find they have to write JavaScript code. Let’s run through these concepts in JavaScript which play an important role in understanding Ext JS 4 API.
Note
■
The next section talks about some core JavaScript concepts and their relevance to the code we’ll write using
Ext JS 4. If you are eager to get started coding with Ext JS 4, just jump ahead to Chapter 2. But bear in mind that reading
this section will reinforce your awareness of the JavaScript features you need to be happy with before using Ext JS 4.
It will also give you a feel for the style of code that you’ll be writing in Ext JS 4.
JavaScript Language Features
JavaScript is a functional, interpreted, and dynamically typed language. It’s case-sensitive and a lot of its programming constructs—like the for and while loops, if-else, switch-case statements etc.—are very similar to their equivalents in C and Java.
In this first chapter, it would be hopeless to try to describe all the features of JavaScript. Instead, I shall focus on those that will get you started with Ext JS 4 quickly.
Let’s begin with the arguments keyword.
The Arguments Keyword
The arguments keyword is an implicit parameter available to functions in JavaScript. It’s an array that is used to access the function’s parameter list, which basically says you don’t really have to formally declare arguments for a function, but you can still access the values passed, using the ‘arguments’.
Listing 1-1. The arguments keyword
function sum(){ var sum = 0;
for(var i=0;i<arguments.length;i++){ sum += arguments[i];
}
console.log(sum); }
add(1,2,3); //Prints 5
add(10,20,30,40,50); //Prints 150
add(100,12); //Prints 112
You can see that the arguments keyword is a built-in array parameter that can be used to access the parameters passed when the function is invoked.
Use of Arguments in Ext JS 4
Ext JS 4 API has many functions defined to accept a number of arguments, but you do not always invoke them by passing all the arguments. For example, here is a code snippet where I handle the itemclick event for a data grid. Both lines are valid; the difference lies in the number of arguments you pass to the function.
Ext.getCmp("mygrid").on("itemclick",function(src,record){...}); Ext.getCmp("mygrid").on("itemclick",function(src,record,index){...});
You can call a base class method from the derived class method in Ext JS 4 by writing this.callParent(arguments); notice the use of the arguments keyword. You will learn more about creating classes in Chapter 3.
Functions
In JavaScript functions are first class citizens, like classes in OO languages. You can define a function in the traditional way like this.
function eat(){ console.log("Eating"); }
You can invoke the eat() function even before you define it, as shown here.
eat();//Prints Eating
function eat(){ console.log("Eating"); }
Though JavaScript is an interpreted language, function definitions are run first, irrespective of where they are placed in the code. So you can invoke a function even before you define it like the eat() function call.
You can also assign a function to a variable like this:
Though eat is defined to be a variable, you can still invoke it like a normal function call: eat(). But what you have to watch out for is that you cannot invoke the eat() function before defining the variable. The following code will throw an error if the function is declared as an expression.
eat();//Uncaught TypeError: Property 'eat' of object [object DOMWindow] is not a function
var eat = function(){ console.log("Eating"); }
So what’s the use of assigning a function to a variable? You can pass the eat variable as an argument to other functions, as shown in Listing 1-2.
Listing 1-2. Functions as arguments
function work(arg){ arg();
}
work(eat);
work(function(){console.log("Coding");});
As shown in Listing 1-2, the work() function accepts an argument which can be a reference to another function. We can then invoke the passed function using the arg() call. A function that accepts another function as an argument is commonly referred as a Higher-order function.
Use of Higher-Order Functions in Ext JS 4
In Ext JS 4 you have plenty of functions that accept other functions as arguments. For example, the function that’s called after the DOM is loaded is:
Ext.onReady(function(){ ...
});
Ext.onReady() is a higher order function.. You’ll learn about this in detail in Chapter 2.
Classes in JavaScript
As you have seen, JavaScript is a functional language. It doesn’t have classes like those in OO languages. You can treat functions as classes, and create objects, by using the new keyword. You can create function objects that you can manipulate and pass around like objects. This feature can be used to write traditional OO code.
Say you want to create a class with variables and methods in JavaScript. Instantiate it just as you would in C# or Java. Let’s create a class Person with name and age attributes and an eat() method as shown in Listing 1-3.
Listing 1-3. Person class
function Person(theName,theAge){
this.name = theName; //public variable this.age = theAge;
this.eat = function(){
console.log(this.name + " is eating"); }
If you now want to create an object of class Person and invoke its eat() method, you can use the new keyword just as in other OO languages.
var p1 = new Person("Sam",23); p1.eat(); //Prints Sam is eating
console.log(p1.age); // Prints 23
The new keyword creates an object from the Person function and returns a reference to the object. Notice the use of this keyword in the Person class. The this keyword binds a variable to the object that is created. You can treat this keyword like a public variable.
Use of Classes in Ext JS 4
The UI components in Ext JS 4 are available as classes. So if you want to create a button, you actually create an object of Button class like this.
var button = new Ext.button.Button();
Now you know how a Button class would be defined in Ext JS 4. It’s just a function. I’ll discuss this in detail in Chapter 4.
JSON
One of the most popular and widely-used features of JavaScript is the JavaScript Object Notation (JSON). It’s used to represent a JavaScript object. It’s also used as a data format like XML. Here’s a JSON object.
var myBook = {
title : "Practical Ext JS4", author:"Prabhu Sunderaraman", publisher : "APress",
price : 49.99,
formats : ["e-book","paperback"], order : function(){
console.log("Ordering " + this.title + " in Amazon"); }
};
Use of JSON in Ext JS 4
Ext JS 4 uses JSON heavily. The properties of the UI components that you create in Ext JS 4 are specified in JSON format. Here is some code that creates a button in Ext JS 4.
var btn = new Ext.button.Button({ text : "Click",
id : "mybutton", handler : function(){
console.log("Button clicked"); }
});
As you can infer from the code, the button’s attributes like text, handler, id are specified as properties of a JSON object.
Summary
In this chapter I discussed various JavaScript frameworks, zooming in to an overview of the features of Ext JS 4. Ext JS 4 provides an OO based API, support for the MVC architecture, creating custom themes, extending UI components, etc. I explained some of the core JavaScript features like arguments, JSON, higher order functions, classes etc., that are pretty important when working with Ext JS 4.
Overview of Ext JS 4
Let’s get started with Ext JS 4. In this chapter you’ll learn Ext JS 4 from scratch. We’ll install it, configure it, and churn out some code to get a feel for the API.
Downloading Ext JS 4
Getting started with Ext JS 4 is really easy. You can download the latest stable version of Ext JS 4 from
http://www.sencha.com/products/extjs/download/. You have two options that you can choose for downloading.
• Commercial trial version: You can download a 45-day commercial evaluation version of Ext JS 4. You can buy commercial licenses for Ext JS 4, based on your project needs, from
https://www.sencha.com/store/extjs/.
• GPL version: Ext JS 4 is available under the General Public License (GPL) version 3. You can use this for building open source projects. Note, however, that Ext JS 4 applications built using the GPLv3 license require the release of the source code.
Just visit http://www.sencha.com/products/extjs/license/ to read more about Ext JS 4 licensing options. No matter which version you choose, you’ll get a zip file of the entire Ext JS 4 library.
The examples in this book were tested against version 4.2 of Ext JS 4.
Getting Started With Ext JS 4
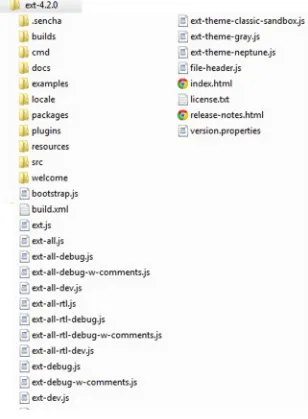
Let me give you a quick overview of the contents of the folder. The
• resources folder contains the standard set of themes that you can use in your application. The
• src folder contains the entire API organized into numerous JavaScript files. The
• docs folder contains the API documentation and guides. The
• ext.js file contains the core API. The
• ext-all.js file contains the complete API in a compressed or minified format. It’s a large-sized file that is suitable for development purposes only.
The
• ext-all-dev.js contains the complete API with comments. The
• ext-all-debug-w-comments.js contains the complete API with comments and console warnings. This file is meant to be used for development.
The Ext JS 4 zip file can be extracted to a web server’s directory to access the documentation as a web application. I have a Microsoft Internet Information Services (IIS) server running on my Windows machine. I extracted the zip archive into the IIS root directory C:\inetpub\wwwroot folder. Figure 2-2 shows the index.html file, one of the documents loaded when you access it from a web browser.
IDE for Ext JS 4 Development
Sencha has a product known as Sencha Architect that can be used to design Ext JS 4 applications. Sencha Architect is not a full-fledged editor, but it is very useful to design the UI and then use the generated code in the main copy of the application.
You can use any simple JavaScript editor for working with Ext JS 4. The choice usually depends on the server side technology you decide to use while working with Ext JS 4 applications. If you’re a Java developer, you can use Eclipse or Net Beans or IntelliJ IDEA. If you’re a .NET developer, Visual Studio is all that you need. The same applies to Rails or Grails as well.
Ext JS 4 applications run on almost all major browsers. Chrome, Safari, or Firefox is generally preferred during development because of the debugging facilities they provide.
Let’s create an Ext JS 4 application and crack some Ext JS 4 code.
Hello World With Ext JS 4
Let’s create an Ext JS 4 application called Chapter02. We’ll create a folder called extjs in Chapter02. The extjs folder will contain the Ext JS 4 library files that we need for developing the application. We’ll copy the necessary resources from the Ext JS 4 folder that we’ve extracted earlier and put them in the Chapter02/extjs folder. The resources include the js files, css files, and the default set of images. You don’t really have to call the folder extjs, though; it’s just a convention. You can name it scripts or lib or resources, or anything that you feel is appropriate.
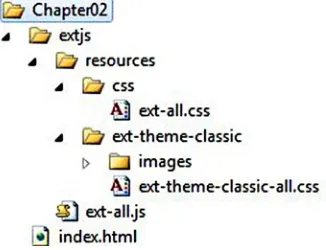
Let’s create an index.html file and write some Ext JS 4 code in it. The structure of the Chapter02 application is shown in Figure 2-3.
The application contains an extjs folder where we have copied the ext-all.js file from the Ext JS 4 library folder. The ext-all.js file contains the complete Ext JS 4 API code. While you may not really need the entire API in a project, this is adequate to get started with the coding. The resources folder contains the css files with the default theme folder ext-classic-theme. The classic theme is the standard theme that gives a bluish look and feel to the entire application. You can change it if you want, but let’s not worry about that right now.
Let’s play with the index.html file by adding references to the ext-all.css and ext-all.js files. And let’s display a Hello world in an alert box. Listing 2-1 shows the code for index.html.
Listing 2-1. index.html File
<!DOCTYPE html>
<html> <head>
<link href="extjs/resources/css/ext-all.css" rel="stylesheet" type="text/css" /> <script src="extjs/ext-all.js" type="text/javascript"></script>
<script>
Ext.onReady(function () {
Ext.Msg.alert("Hello World","All set!!!"); });
</script> </head> <body> </body> </html>
Running index.html page in the browser will pop up a window with the title Hello World, as shown in Figure 2-4.
The starting point of the Ext JS4 application is an Ext.onReady() function. The onReady() function takes a function as an argument. The onReady() function is called when the document is loaded and DOM is ready. We’ve created a simple dialog box using Ext.Msg.alert() method.
If you want to display hello world in a label, let’s modify the onReady() method in Listing 2-1 as shown below. We can create an object of the Label class provided by Ext JS 4 as shown below.
Ext.onReady(function () { Ext.create("Ext.form.Label", { text: "Hello World",
renderTo: Ext.getBody() });
});
We create an object of the class Ext.form.Label and render it to the document body. If you have to display a Hello World button, we’ll create an object of the Ext.Button class and render it to the document body as shown below.
Ext.onReady(function () { Ext.create("Ext.Button",{ text : "Hello World", renderTo : Ext.getBody() });
});
One noteworthy aspect of Ext JS 4 code is its object-oriented approach. All the UI components are available as classes, and we just need to create instances of the classes and render them.
Let’s add an event handler to the button we created. Clicking the button will pop up a message as shown in Listing 2-2.
Listing 2-2. Button With the Click Event Handler
Ext.create("Ext.Button",{ text : "Hello World", handler : function(){
Ext.Msg.alert("You clicked the hello world button"); },
renderTo : Ext.getBody() });
Now, let’s create a textbox and a button and render them to the body of the document. We can create a container such as a panel and add textbox and button components as shown in Listing 2-3.
Listing 2-3. Panel With a Textbox and Button
Ext.create("Ext.Panel",{ title : "Hello World Panel", items : [
Ext.create("Ext.form.field.Text",{ fieldLabel : "Name"
}),
Ext.create("Ext.Button",{ text : "Click"
}) ],
renderTo : Ext.getBody() });
The Ext.Panel class has an array property called items. The items array holds the list of components that need to be added to the panel. The output of Listing 2-3 is shown in Figure 2-5.
If you want to display the value of the textbox, when the button is clicked, let’s modify the code in Listing 2-3 and add an id to the textbox and access it like this.
Ext.create("Ext.form.field.Text",{ fieldLabel : "Name",
id:"nametext" }),
Ext.create("Ext.Button",{ text : "Click",
handler : function(){
Ext.Msg.alert(Ext.getCmp("nametext").getValue()); }
})
We’ve used the Ext.getCmp() method to access the UI component by specifying the id. You can then invoke the
getValue() method on the text box to fetch the value.
I hope this short introductory chapter has given you a basic feeling for Ext JS 4 coding style. The intent is to get you started with some Ext JS 4 code without really worrying about the syntax. You’ll learn more about the API in the subsequent chapters. As we delve deeper into the API, you’ll find various different options available for creating even a simple component like a button.
At this point if you are able to view an Ext JS 4 textbox and button in your browser you’re good to go to the next chapter.
Summary
In this chapter you got started working with Ext JS 4. We extracted the Ext JS 4 library and created a simple Ext JS 4 application by copying the necessary CSS and JavaScript files. Ext.onReady() is the starting point in an Ext JS 4 application. All the UI components are available as classes. You saw how to create simple UI components such as a textbox, a button, and a label. I introduced you to adding simple event handlers to components such as buttons. I also discussed container components like Panel where you can add child components as items.
Understanding the Ext JS 4 API
Ext JS 4 is one of the few JavaScript libraries whose API has been designed specifically for developers with experience in working with object-oriented (OO) languages. The library is organized into packages and classes, making it easy for any OO programmer to understand.
In this chapter, you’ll find out about the structure of Ext JS 4 API. And you’ll learn how to write OO code using Ext JS 4.
Structure of the API
The Ext JS 4 API documentation can be found at http://docs.sencha.com/extjs/4.2.0/#!/api.
The Ext JS 4 API is grouped into packages like those in Java. Every package contains a collection of classes, whose names begin with the letters Ext. Examples of class names are Ext.JSON, Ext.chart.series.Pie. You can think of Ext as a root namespace name for all the classes, though technically Ext is a JavaScript object that houses all other classes in Ext JS 4. You can think of Ext as being defined thus:
var Ext = {};
The general format of any class name is
Ext.packageName.optionalSubPackageName.ClassName
All class names begin with an uppercase character. Package names begin with a lowercase character. The names follow the “CamelCase” naming convention, where words are run together with no intervening spaces, and each word begins with an uppercase. Ext.Base is the base class for all the classes in Ext JS 4.
The packages are stored in folders with the same name as the package, and the classes are stored in files with the same name as the class. Let’s take the class Ext.chart.series.Pie. In this case you’ll find the class Pie defined in Pie.js file. The class Pie is present in chart and series packages. You’ll have the Pie.js file stored in the series folder. The series folder will be present in the chart folder. Figure 3-1 shows the folder structure Ext.chart.series.Pie class.
Developing an Ext JS 4 application involves not only using the built-in classes but also defining your own classes by using the constructs of an OO language. Let’s discuss the features involved in creating custom classes.
Classes and Objects
You can define a new class in Ext JS 4 using the Ext.define method. You pass in the class name and the object where you define the attributes and behavior of the class as arguments to the Ext.define method.
Ext.define("Book",{});
If you have worked with Ext JS 3 or the earlier versions, you will notice that the Ext.define method incorporates the functionalities of using Ext.reg, Ext.ns, and Ext.extend methods.
You can create an object of the Book class using Ext.create method as shown here.
Ext.create("Book");
You can specify a fully qualified class name with a root namespace and package names included as shown below.
Ext.define("DuraSoft.tech.extjs4.Book",{});
In traditional OO languages the new keyword is used to create objects. You can use new to create objects in Ext JS 4 also.
var book1 = new DuraSoft.tech.extjs4.Book();
The Ext.create("classname") method dynamically loads all the JavaScript files that the classname is dependent on before creating an instance, whereas this is not possible when you use the new keyword. You’ll learn about loading dependent files later in this chapter.
We’ll use Ext.create for creating objects in our code examples in this book.
Constructor
Constructor is the first function that’s called when an object is created. You can define constructors in our classes using the special property constructor. The constructor property is wired to a function that gets invoked when an object is created using Ext.create.
Ext.define("DuraSoft.tech.extjs4.Book",{ constructor : function(){
console.log("Book created"); }
});
The second argument of the Ext.define method is an object that has a constructor property.
On creating an object of class DuraSoft.tech.extjs4.Book the constructor gets invoked and you’ll see Book created printed on the console.
You can define properties of the class and initialize them in constructors.
Property
Ext.define("DuraSoft.tech.extjs4.Book",{ title : "",
price : -1,
constructor : function(title,price){ this.title = title;
this.price = price; }
});
The two properties are initialized using the this keyword, which makes them visible to the objects of the class. You can instantiate the Book class and initialize it as shown below.
var xml = Ext.create("DuraSoft.tech.extjs4.Book","XML",12.00); console.log(xml.title);
console.log(xml.price);
You can access title and price properties using the object reference. The above code snippet prints XML and 12.00 in the console.
A class may have a number of attributes. It becomes tedious to define and initialize them one after the other using the constructor. It’ll be better if we can define the attributes with default values and initialize only the required ones.
Config
Ext JS 4 provides a config section for every class where you can list the attributes of the class with default values. The object can be created by initializing the attributes in which you are interested.
Ext.define("DuraSoft.tech.extjs4.Book",{ config : {
title : "", price : -1, authors: [] },
constructor : function(cfg){ this.initConfig(cfg); }
});
In the code snippet above, we’ve defined a Book class with title, price, and authors listed in the config section. The config section is initialized in the constructor by calling the initConfig method. The initConfig method that is present in Ext.Base class initializes the configuration object. You can create an object of the Book class as shown below.
var xml = Ext.create("DuraSoft.tech.extjs4.Book",{ title : "XML for beginners", authors : ["Sam","Kim"] });
console.log(xml.getTitle()); xml.setPrice(12.00);
console.log(xml.getAuthors()[0]);
Note
■
In OO languages the getter and setter methods are usually known as accessor methods. They are used to
access a variable. Ext JS 4 follows the Java convention of generating the getter and setter methods. If you have a variable
called age, the accessor methods for it will be
getAge()and
setAge(age). The getAge method will return the value of
age and the setAge method will modify the value of the age.
You can override the getter/setter methods if you want to take more control of the class. For example, say you want the price of the Book to have a minimum value of 5.00. You can perform this validation in the overridden setPrice method as shown in Listing 3-1.
Listing 3-1. Validating the Book Price
Ext.define("DuraSoft.tech.extjs4.Book", { config: {
title: "", price: 5, authors: [] },
constructor: function (cfg) { this.initConfig(cfg); },
setPrice: function (priceVal) { if (priceVal < 5)
console.log("Invalid value for price " + priceVal); else
this.price = priceVal; }
});
var xml = Ext.create("DuraSoft.tech.extjs4.Book",{ title : "XML", authors : ["Sam","Kim"]
});
xml.setPrice(3);
console.log(xml.getPrice()); xml.setPrice(30);
console.log(xml.getPrice());
In Listing 3-1 the setPrice method has been overridden with the validation check. The output of the code will be
The config generates an apply method for every attribute automatically as well. The apply method is called internally by the setter method. In Listing 3-1, you can override the applyPrice method to implement the validation rule as shown in Listing 3-2.
Listing 3-2. Overriding the applyPrice Method
Ext.define("DuraSoft.tech.extjs4.Book", { config: {
title: "", price: 5, authors: [] },
constructor: function (cfg) { this.initConfig(cfg); },
applyPrice: function (priceVal) { if (priceVal < 5)
console.log("Invalid value for price " + priceVal); else
this.price = priceVal; return this.price;
} });
Methods
You can define custom methods in classes as shown below.
Ext.define("DuraSoft.tech.extjs4.Book",{ config : {
title : "", price: 0 },
constructor : function(cfg){ this.initConfig(cfg); },
read: function(){
console.log("Reading " + this.getTitle()); }
});
The Book class has a read function that can be accessed using the object reference.
var xml = Ext.create("DuraSoft.tech.extjs4.Book",{ title : "XML", price:12.00
});
xml.read(); //Prints Reading XML
Static Members
Ext JS 4 provides a statics property where you can list static variables and methods. The static members can be accessed using the class name, as in OO languages.
Ext.define("DuraSoft.tech.extjs4.Book",{ statics : {
numberOfBooks: 0,
getNumberOfBooks: function(){ return this.numberOfBooks; }
},
constructor : function(){
this.statics().numberOfBooks++; }
});
In the code snippet above, the Book class has two static properties numberOfBooks and getNumberOfBooks which is a function. In the constructor of the class, we can increment the numberOfBooks variable.
We can create an object of this class and access the static members as shown below.
Ext.create("DuraSoft.tech.extjs4.Book"); Ext.create("DuraSoft.tech.extjs4.Book");
console.log(DuraSoft.tech.extjs4.Book.getNumberOfBooks());
You can access the numberOfBooks property also using the class name.
console.log(DuraSoft.tech.extjs4.Book.numberOfBooks);
In OO languages like Java and C#, you have a getClass() or a getType() method to access the underlying class. Ext JS 4 provides a keyword called self similar to that. You can use self on the object to access its class as shown below.
Ext.define("DuraSoft.tech.extjs4.Book",{ statics : {
numberOfBooks: 0,
getNumberOfBooks: function(){ return this.numberOfBooks; }
},
constructor : function(){
console.log("Constructor of " + this.self.getName() + " called"); this.self.numberOfBooks++;
} });
In the constructor we’ve used this.self to access the static member numberOfBooks. You can also notice the call to the getName() function. When a Book instance is created the output of the code will be
Constructor of DuraSoft.tech.extjs4.Book called
Inheritance
We have an extend keyword that can be used to inherit a class in Ext JS 4. Let’s create an Employee class and a Manager class that inherits the Employee class.
Ext.define("Employee",{ config : {
employeeid : "", name : "", salary : 0 },
constructor : function(cfg){ this.initConfig(cfg);
},
work : function(){
console.log(this.getName() + " is working"); }
});
Ext.define("Manager",{ extend : "Employee", config : {
level : 1 }
});
The Manager class inherits the Employee class using the extend keyword. The configuration properties and the work function in the Employee class are available to the Manager class.
We can create a Manager object and invoke the work function as shown below.
var mgr = Ext.create("Manager",{
employeeid:"DS123", name: "Sam", level: 4 });
mgr.work(); //Prints Sam is working
We can override the Employee’s work function in Manager’s class.
Ext.define("Manager",{ extend : "Employee",
//...
work : function(){
console.log(this.getName() + " is in a meeting"); }
We can call the base class work function using this.callParent()
Ext.define("Manager",{ extend : "Employee",
//...
work : function(){ this.callParent();
console.log(this.getName() + " is in a meeting"); }
});
The arguments passed to the Manager’s work function can be supplied to the Employee’s work function by using the arguments keyword in JavaScript as shown below.
this.callParent(arguments);
You can extend a class and override the constructor as shown below. You can invoke the base class constructor using this.callParent method.
Ext.define("Manager",{ extend : "Employee",
constructor : function(cfg){ this.callParent(arguments); }
});
You can override the constructor of the base class whenever you inherit generic classes like Employee, Manager, etc. However, you have to be careful when you inherit UI classes. The constructor of the UI component classes have a set of operations like initializing events, plugins, etc.. Inheriting a UI component class and overriding the constructor is not a recommended practice. The UI component classes provide a method called initComponent(), which is used to initialize the component. This initComponent method is usually invoked from the constructor. The general practice is to override the initComponent method in the derived class. Say you want to create a custom Button, then you can do that as shown below.
Ext.define("MyButton",{
extend : "Ext.button.Button", initComponent : function(){ //Your code goes here }
});
You’ll learn more about creating custom components in Chapter 10.
Multiple inheritance is not supported in Ext JS 4. We have mixins for multiple inheritance similar to interfaces in Java and C#.
Mixins
Let’s create two classes, Aquatic and Terrestrial, with swim and walk functions, respectively.
Ext.define("Aquatic",{ swim : function(){
console.log("Swimming"); }
});
Ext.define("Terrestrial",{ walk : function(){ console.log("Walking"); }
});
We’ll create a class Reptile that can walk as well as swim. The Reptile class is created by mixing Aquatic and Terrestrial together.
Ext.define("Reptile",{
mixins : ["Aquatic","Terrestrial"] });
A Reptile instance can invoke the walk and swim functions.
var reptile = Ext.create("Reptile"); reptile.swim();
reptile.walk();
We have discussed the basic OO concepts in Ext JS 4. Let’s learn few other features in the class system in Ext JS 4.
Alias
You can define an alias name for the classes. The alias name is mainly used when you create custom components. You can use the alias property in the definition of the class as shown below.
Ext.define("DuraSoft.tech.extjs4.Book", { alias : "Book",
});
Ext.create("Book");
There are certain conventions involved in creating these alias names. For example, alias names for custom components begin with the prefix widget, whereas alias names for custom proxy classes begin with proxy. We’ll discuss this in detail later in this chapter.
Singleton
You can configure a class to be singleton by setting the property singleton to be true. When a class in Ext JS 4 is configured as singleton, an instance is automatically created. This kind of behavior, where an instance is automatically created for a singleton class, is not a standard practice in OO languages.
Ext.define("Company", { singleton : true, config: {
title: "Ace Inc.,", },
getNumberOfEmployees: function () { return 154;
} });
console.log(Company.title);
console.log(Company.getNumberOfEmployees());
In the code above, Company class is defined to be singleton, and an instance of the class is automatically created. However, you will access the members of the class using the class name as if they were static members.
If you try to create an instance of the class var c1 = Ext.create("Company");, then you’ll get a class instantiation error.
Note
■
Singleton pattern is a popular design pattern in OO languages that talks about maintaining one and only one
instance of a class. A Singleton class is a class that can be instantiated only once. You can design your class to be
singleton and can create an object of the class.
In Ext JS 4 you actually define a singleton object and not a class. You don’t have to define a singleton class and create an
instance later. You automatically get a singleton instance create when you write
Ext.define("classname",{singleton:true})
Loading Dependencies
Ext JS 4 introduces the concept of dynamic loading of the dependent JavaScript files. You can specify the classes that your code is dependent on and the appropriate class files are loaded dynamically.
The heart of this dynamic loading of dependent JavaScript files is the Ext.Loader class. This class is responsible for loading the dependent files either synchronously or asynchronously. You can specify the classes to be loaded explicity by using Ext.Loader.require method.
Say your class uses the Ext.button.Button class, you can load the Button class explictly by using Ext.Loader. require or the shortcut Ext.require method.
Ext.Loader.require("Ext.button.Button");
(or)
Ext.require("Ext.button.Button");
There’s another way of specifying the loading information by using the requires property in a class, as shown below.
Ext.define("MyPanel",{
requires : ["Ext.button.Button"] });
In the above code the dependent files will be loaded before creating an instance of MyPanel class.
Sometimes you may not mandatorily require the dependent files for creating an object of your class. You can use the uses property in this case, as shown below.
Ext.define("MyPanel",{ uses : ["Ext.button.Button"] });
We’ve discussed various concepts involved in working with classes and objects in Ext JS 4. When you define a class, what’s going on behind the screens? Let’s discuss Ext.Class in detail to understand the details.
Ext.Class
You’ve seen that Ext.define is used for defining a new class. Internally Ext.define calls Ext.ClassManager.create
method. Ext.ClassManager.create creates an instance of Ext.Class. So when you define a new class using Ext.define, you’re actually creating an object of the class, Ext.Class.
The following code where you create a Book class using Ext.Class is equivalent to whatever you’ve been learning using Ext.define method.
var Book = new Ext.Class({ config: {
title: "", price: 5 },
constructor: function (cfg) { this.initConfig(cfg); },
read: function () {
console.log("Reading " + this.getTitle()); }
});
var ajax = Ext.create("Book", { title: "AJAX",price:12.00 }); ajax.read();
We’ve created an instance of Ext.Class and assigned to a variable called Book, which is treated as the class name. You can create the instance of the Book class using the standard Ext.create method.
Ext.Class is also responsible for running what is commonly referred as 'pre' and 'post' processors, such as config, extend, mixings, requires, etc., while creating a class.
The Ext JS 4 API
The Ext JS 4 API (as you will have noticed) is organized into various packages. The package nomenclature is very similar to that of Java.
Table 3-1 shows some of the core packages in Ext JS 4.
Table 3-1. Core Packages in Ext JS 4
Package
Description
Ext.form.field Contains the classes that represent form elements like textbox, checkbox, etc.
Ext.data Contains classes like Store, Model, or Proxy that deal with fetching and playing with data. Ext.layout.container Deals with various layout components like Table, Accordion, Card, Border, etc.
Ext.grid Used for working with data grids Ext.tree Used for displaying tree components
Ext.chart Provides classes to develop charts like Pie, Bar, Line, etc. Ext.menu Contains classes used for creating menus
Ext.toolbar Provides classes for creating toolbars
Ext.dd Contains classes that implement drag and drop
Apart from the core packages, there are a number of utility classes in the Ext namespace. Here is a list of utility classes.
Ext.Ajax
•
Used for sending Ajax requests.
•
Ext.Json
•
Used for encoding and decoding JSON data.
•
Ext.XTemplate
•
Used for creating UI templates that can be applied on data.
•
Ext.Array
•
Contains functions for working with arrays.
•
Ext.ComponentQuery
•
Provides functions to query the UI components.
•
Ext.Date
•
Contains date related functions.
The Ext namespace, which is nothing but a class, provides a number of commonly used functions. Listed below is a set of commonly used functions in Ext class.
onReady()
•
Used to wire up a function that is called after the DOM tree is ready and dependent files
•
are loaded. application()
•
Creates an instance of Ext.app.Application after the DOM is ready. You’ll use it when we
•
discuss MVC architecture. getCmp()
•
Most commonly used method to access the components based on their id.
•
query()
•
Used to query the DOM tree based on selector expressions.
•
apply()
•
Used for copying the configuration data to an object
•
The Ext class also provides properties like is[BrowserType] like isIE6, isChrome, isGecko, etc. for browser-related information.
Summary
In this chapter I discussed the Ext JS 4 API and explained the OO concepts. The Ext JS 4 API is organized into packages and classes similar to Java.Ext is the root object that includes the complete API. You can define classes by using Ext.define method and create objects using Ext.create method. The classes can have properties, config attributes, methods, constructor, and static members. You can inherit a class by using extend attribute. You can inherit more classes by using mixins. Ext.Loader enables dynamic loading of the dependent JavaScript files. I gave you an overview of some of the packages and classes in Ext JS 4.
Controls and Layout
Ext JS 4 provides a suite of UI controls that are used in applications. The UI controls include simple form controls like text boxes, buttons, layout containers like accordion, table, and so on. In this chapter we’ll discuss the UI controls and layout containers.
Just like OO UI frameworks such as Swing for Java and WinForms for .NET, EXT JS 4 provides a well-defined hierarchy of UI components starting with a base class that establishes a common set of properties and functionalities to all the components. Let’s start exploring the UI components in Ext JS 4 by looking at the Ext.Component class.
Ext.Component
The Ext.Component class serves as the base class for all the UI components in Ext JS 4. Ext.Component inherits the
Ext.AbstractComponent class. It provides the common behavior and properties for all the UI components. The common functions include the basic creation, destruction, and rendering of the components. You can instantiate this class as shown below, though you’ll use it very rarely in the raw format.
Ext.create("Ext.Component", { html: "Raw Component", renderTo : Ext.getBody() });
The above code displays a text Raw Component in the page. It generates the following HTML snippet.
<div id="component-1099 class="x-component x-component-default">Raw Component</div>
The Ext.Component generates a <div> tag with an automatically generated id and a default CSS class. You’ll learn about the CSS classes in Theming and Styling chapter.
All the components used in a page can be accessed through a singleton object Ext.ComponentManager. Ext. ComponentManager serves as a registry of all the components. You can access all the components by using the all
property as Ext.ComponentManager.all.
You can access the individual components based on their id by using the get method as Ext.ComponentManager. get("id of the component"). We’ll discuss more about the id attribute later in this section.
Configuration attributes of Ext.Component
Ext.Component class provides a large number of configuration attributes. You can get the complete list of the attributes from http://docs.sencha.com/extjs/4.2.0/#!/api/Ext.Component.
Let’s discuss some of the configuration attributes of the Ext.Component class. These attributes are available to all the UI controls that you’ll use.
id
Every component has an automatically generated unique id assigned to it. You can use Ext.getCmp() method to access the component by specifying the id. You can assign your own id for the component as well.
Ext.create("Ext.Component",{ id : "mycomp1"
});
You can use Ext.getCmp as shown below
Ext.getCmp("mycomp1");
It’s generally not recommended to define your own id, because as the application grows and you start adding components dynamically it may lead to duplication issues.
itemId
You can mark the component with an itemId instead of an id. The component that has itemId assigned to it can be accessed using that itemId through its parent component. Say, you have a Panel that has a component with an itemId. You can access the component using the itemId by invoking the method getComponent() on the Panel.
var panel1 = Ext.create("Ext.panel.Panel",{ // ...
items : [
Ext.create("Ext.Component",{
html : "Raw Component inside panel", itemId : "rawcomp1"
}) ] // ... });
panel1.getComponent("rawcomp1")
autoEl
The autoEl attribute is used to specify a custom HTML element that will encapsulate the the component. This attribute is usually used when we create custom components. You’ll learn this in detail in Chapter 10. Here’s a component that generates a hyperlink element using autoEl attribute.
Ext.create("Ext.Component", { renderTo: Ext.getBody(), autoEl: {
html: "Link", href: "#", tag: "a" }
});
The code snippet will generate the following HTML snippet.
<a class="x-component x-component-default" href="#" id="component-1009">Link</a>
listeners
The listeners attribute is used to wire up the events with their handlers. listeners is a simple object that contains the list of all events along with their event handler functions.
listeners : {
eventname1 : function(...) { ... }, eventname2 : function(...){ ... }, ...
}
renderTo
The component is rendered to the specified HTML element. If a component is added to a container, it’s then the container’s job to render the components. You can use renderTo as shown below.
renderTo : Ext.getBody() //renders to the body element
renderTo : Ext.get("content") //renders to the HTML element with the id "content"
hidden, disabled
The hidden and disabled attributes are used to specify visibility and whether the component is disabled or not, respectively. The default value for these attributes is false.
tpl, data
The components have a tpl property that’s used to configure the UI template for the Component. The data attribute supplies data to be applied to the template. You’ll learn about Templates in detail later in this chapter.
Methods in Ext.Component
up
This method is used to navigate to the ancestors of the component that matches the expression passed as an argument. For example, if you have a component, say cmp1, calling cmp1.up("panel") walks up the container and returns the panel component that’s a parent or grandparent or any ancestor. This method returns the immediate parent if the argument is ignored.
enable, disable
These are two commonly used methods that are used to enable and disable the components. Here’s how you can use them on a component say comp1.
comp1.enable() comp1.disable()
show, hide
These are two commonly used methods that are used to show and hide the components. Here’s how you can use them on a component say comp1.
comp1.hide() comp1.show()
destroy
The destroy method destroys the component. It removes the reference to the element in the DOM tree.
on, un
The listeners attribute is used to statically register the events and handler functions. The on method is used to dynamically do that. The on method accepts the name of the event, the event handler function and the scope or context of the executing handler function as arguments.
comp1.on("eventName",function(){...},scope)
mycombobox1.on("change",function(){...},this)
In the code snippet above, you’ve registered the change event on the combobox object. The scope ‘this’ refers to the context object where the handler function gets executed. The scope is an optional parameter.
The un method is used to remove the event handler for the specified event.
comp1.un("eventName",function(){...},scope)
addEvents, fireEvent
The Component class provides methods addEvents and fireEvent for adding events and firing the event respectively. These two methods are mainly used when you create custom components with custom events. You can call addEvents on a component comp by writing comp.addEvents(‘eventname1’,’eventname2’ ...). You can invoke the fireEvent like comp.fireEvent(‘eventname’).
You’ll learn more about these functions in Chapter 10 when we discuss creating custom components. Now let’s discuss the events in the Component class.
Events in Ext.Component
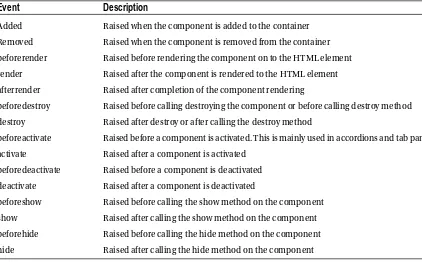
The Component class provides a number of lifecycle events. These are raised when the component is created, activated, rendered, destroyed, and so on. All these events can be handled by registering them using the listeners attribute or using the on method. Most of these lifecycle events are actually defined in the Ext.AbstractComponent class. Table 4-1 describes some of the events.
Table 4-1. Events in a Component
Event
Description
Added Raised when the component is added to the container Removed Raised when the component is removed from the container beforerender Raised before rendering the component on to the HTML element render Raised after the component is rendered to the HTML element afterrender Raised after completion of the component rendering
beforedestroy Raised before calling destroying the component or before calling destroy method destroy Raised after destroy or after calling the destroy method
beforeactivate Raised before a component is activated. This is mainly used in accordions and tab panels. activate Raised after a component is activated
beforedeactivate Raised before a component is deactivated deactivate Raised after a component is deactivated
beforeshow Raised before calling the show method on the component show Raised after calling the show method on the component beforehide Raised before calling the hide method on the component hide Raised after calling the hide method on the component
Listing 4-1. Events in Component
var pnl = Ext.create("Ext.panel.Panel", { items: [
Ext.create("Ext.Component", { html: "Raw Component", itemId : "rawcomp1", listeners: {
activate: function () { console.log("activate") },
added: function () { console.log("added") },
afterrender: function () {
console.log("afterrender") },
beforeactivate: function () {
console.log("beforeactivate") },
beforedeactivate: function () {
console.log("beforedeactivate") },
beforerender: function () {
console.log("beforerender") },
beforeshow: function () {
console.log("beforeshow") },
beforedestroy: function () {
console.log("beforedestroy") },
destroy: function () {
console.log("destroy") },
render: function () {
console.log("render") },
show: function () {
console.log("show") },
beforehide: function () {
console.log("beforehide") },
hide: function () {
console.log("hide") },
enable: function () {
disable: function () {
console.log("disable") },
removed: function () {
console.log("removed") }
} }) ],
renderTo: Ext.getBody() });
console.log("******Calling disable") pnl.getComponent("rawcomp1").disable(); console.log("******Calling enable") pnl.getComponent("rawcomp1").enable(); console.log("******Calling hide") pnl.getComponent("rawcomp1").hide(); console.log("******Calling show") pnl.getComponent("rawcomp1").show(); console.log("******Calling destroy") pnl.getComponent("rawcomp1").destroy();
In Listing 4-1 we’ve registered the events using the listeners block. After rendering the component, we call methods like enable, disable, show, hide, or destroy to understand the event handling sequence. Here’s the output of this code.
added beforerender render afterrender
******Calling disable disable
******Calling enable enable
******Calling hide beforehide
hide
******Calling show beforeshow
show
******Calling destroy beforedestroy
removed
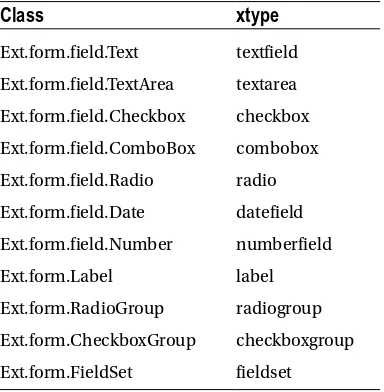
xtype
In Ext JS 4 every UI component class has an alias name or a short name known as ‘xtype.’ Using xtype in our code offers some advantages. Let’s discuss them by creating a Panel with a textbox and a button as shown below.
Ext.create("Ext.panel.Panel",{ items : [
Ext.create("Ext.form.field.Text",{ fieldLabel : "Name"
}),
Ext.create("Ext.Button",{ text : "Submit"
}) ] });
Let’s move the creation of textbox and button out of the Panel as shown below.
var nameText = Ext.create("Ext.form.field.Text",{ fieldLabel : "Name"
});
var submitButton = Ext.create("Ext.Button",{ text : "Submit"
});
The Panel will refer to the nameText and submitButton variables in the items collection.
Ext.create("Ext.Panel",{ items : [
nameText,submitButton ]
});
We’ve stored the textbox and button objects in separate variables and reused them inside the Panel. There are some disadvantages to writing code in this fashion, although it is useful to segregate the container and the individual components.
Ext.create("Ext.form.field.Text") creates a text box and holds it in the DOM tree. It occupies memory even if we don’t render it on to the screen. Suppose we don’t add the nameText variable in the Panel, it would remain in the DOM tree occupying memory. In an application, we want to instantiate UI components only when required and not create them at will. At the same time we want the component creation code maintained separately.
Using the fully qualified class name like Ext.form.field.Text everywhere is a tedious task, particularly when we create custom components. It would be better if we can use the xtype of these UI components. Let’s rewrite the example as shown below.
var nameText = { xtype : "textfield", fieldLabel : "Name" };
Ext.create("Ext.panel.Panel",{ renderTo : Ext.getBody(), items : [
nameText,submitButton ]
});
The nameText and submitButton are plain JavaScript objects. They have an additional xtype property with values textfield and button, respectively. The actual text box and button objects are created when they get added to the Panel and rendered to the body. This not only makes the code simpler but also provides us the lazy instantiation facility, thereby improving the performance.
As we discussed earlier, Ext.Component is inherited by a number of classes. Table 4-2 shows the list of subclasses of Ext.Component.
Table 4-2. Subclasses of Ext.Component
Class
Description
Ext.container.AbstractContainer Base class for the container controls Ext.button.Button The button control
Ext.form.Label The standard label element
Ext.form.field.Base Base class for all the field components like textfield Ext.draw.Component Represents the surface on which you can draw shapes
One of the important subclasses of Ext.Component is Ext.container.AbstractContainer. This class is inherited by Ext.container.Container that serves as the base class for all the container clases like the Panel. Let’s discuss the Ext. container.Container class in detail.
Ext.container.Container
Ext.container.Container class is the base class for all the container-based components in Ext JS 4. It provides the common behavior and properties for all the UI containers. The common functions include the addition, udpation, and removal of the components. You can instantiate this class as shown below, though you’ll use it very rarely in the raw format.
Ext.create("Ext.container.Container", { html : "Raw Container",
renderTo: Ext.getBody() });
In the code snippet above, we’ve created an instance of Container class. This instance is empty as we’ve not added any components to it. The code displays a text Raw Container in the page. It generates the following HTML snippet.
<div id="container-1009" class="x-container x-container-default">Raw Container <div id="container-1009-clearEl" class="x-clear" role="presentation"></div> </div>
Configuration Attributes of Ext.container.Container
Let’s discuss some of the configuration attributes of the Container class.
items
The items attribute refers to the collection of components that you’ll add to the container. A Container class with a textbox and button component added to it using items is shown below.
Ext.create("Ext.container.Container",{ items : [
Ext.create("Ext.form.field.Text",{...}), Ext.create("Ext.button.Button",{...}) ]
});
layout
This attribute is used to configure the layout for the container, so that the components may be arranged in a particular fashion. You’ll learn more about the layout later in this chapter.
defaults
The defaults attribute is used to specify a