Getting Started with Flex™ 4
Jeanette Stallons, Andrew Shorten,
and Vince Genovese
Getting Started with Flex™ 4
by Jeanette Stallons, Andrew Shorten, and Vince Genovese
Copyright © 2010 Adobe Systems Incorporated. All rights reserved. Printed in Canada.
Published by O’Reilly Media, Inc., 1005 Gravenstein Highway North, Sebastopol, CA 95472.
O’Reilly books may be purchased for educational, business, or sales promo-tional use. Online editions are also available for most titles (http://my.safari booksonline.com). For more information, contact our corporate/institutional sales department: (800) 998-9938 or [email protected].
Editor: Mary Treseler
Copyeditor: Amy Thomson
Production Editor: Adam Zaremba
Proofreader: Sada Preisch
Indexer: Angela Howard
Cover Designer: Karen Montgomery
Interior Designer: David Futato
Illustrator: Robert Romano
Printing History:
September 2010: First Edition.
Adobe, the Adobe logo, Flash, Flash Builder, Flex, Flex Builder, and Live-Cycle are either registered trademarks or trademarks of Adobe Systems Incorporated in the United States and/or other countries. ActiveX and Win-dows are either registered trademarks or trademarks of Microsoft Corpora-tion in the United States and/or other countries. Apple and Macintosh are trademarks of Apple Inc., registered in the United States and other countries. Linux is a registered trademark of Linus Torvalds. Microsoft and Windows are either registered trademarks or trademarks of Microsoft Corporation in the United States and/or other countries. Solaris is a registered trademark or trademark of Sun Microsystems, Inc. in the United States and other countries. All other trademarks are the property of their respective owners.
While every precaution has been taken in the preparation of this book, the publisher and authors assume no responsibility for errors or omissions, or for damages resulting from the use of the information contained herein.
ISBN: 978-0-596-80411-4 [TM]
Adobe Developer Library, a copublishing partnership between O’Reilly Media Inc., and Adobe Systems, Inc., is the authoritative resource for developers using Adobe technolo-gies. These comprehensive resources offer learning solutions to help developers create cutting-edge interactive web appli-cations that can reach virtually anyone on any platform.
With top-quality books and innovative online resources cover-ing the latest tools for rich-Internet application development, theAdobe Developer Librarydelivers expert training straight from the source. Topics include ActionScript, Adobe Flex®, Adobe Flash®, and Adobe Acrobat®.
Contents
Preface
vii
Introduction
xiii
Chapter 1:
Build an Application in an Hour
1
Build the User Interface
1
Connect to Data
12
Create Pages
21
Code Your Interactions
32
Chapter 2:
Modify the Database
43
Add Data Using a Form
43
Update Data Using a Form
56
Update Data Using the DataGrid
62
Delete Data
66
Chapter 3:
Test and Debug Your Code
69
Test Server-Side Code
69
Trace Network Traffic
75
Trace Variables
79
Use Breakpoints
83
Chapter 4:
Deploy Your Application to a Web Server
89
Create a Release Version
89
Include Your Application on a Web Page
91
Deploy Service Code
99
Chapter 5:
Change the Appearance of Your Application
109
Use Styling
109
Add Components to Skins
120
Create Skins with New Graphics
127
Chapter 6:
Add Charts and Graphs
133
Add a Pie Chart
133
Add a Column Chart
139
Format Charts
148
Chapter 7:
Resources for Flex Developers
161
Online Resources for Getting Started
161
The Flex Cookbook
162
Community Links and Resources
162
Newsletters
164
Books
165
Preface
If you are curious about Flash Builder and Flex and want to get up to speed in a matter of hours, this book is for you! Hopefully you will be inspired to try Flash Builder and Flex, follow the tutorials to quickly develop an application, and see just how easily you can bring your ideas to life using Flex.
Who Should Read This Book
The short tutorials and sample code in this book are designed to help you evaluate Flash Builder and Flex. Step through the tutorials in sequence and browse the sample code associated with each. The book is designed to be a quick tour of the Flash Builder and Flex world without delving too deeply into any one topic.
The material is targeted at web developers familiar with build-ing applications usbuild-ing PHP, ColdFusion, or Java. If you have a different background or skill set and are interested in learning Flex, check out the “Flex in a Week” video training at www.adobe.com/devnet/flex/videotraining/.
To make up for the lack of depth in every area, we provide a collection of resources in Chapter 7 that will help you dive deeper into Flex and Flash Builder.
How This Book Is Organized
Here is a summary of the chapters in the book and what you can expect from each:
Introduction
This chapter provides a brief introduction to the Flash Platform and showcases some real-world applications and sites that make use of Flex, all of which demonstrate what is possible using Flash Builder and Flex.
Chapter 1, Build an Application in an Hour
This chapter guides you through creating a Flex applica-tion that retrieves, displays, and modifies database records.
Chapter 2, Modify the Database
This chapter teaches you how to modify (add, update, and delete) the data in the database from which you retrieved the data in Chapter 1. You create a new EmployeeAdd state, which has an input form for a user to add a new employee to the database.
Chapter 3, Test and Debug Your Code
In this chapter, you learn to test and debug your Flex application.
Chapter 4, Deploy Your Application to a Web Server
In this chapter, you learn to deploy your Flex application to a web server.
Chapter 5, Change the Appearance of Your Application In this chapter, you learn how to change the appearance of the application you created and deployed using styling and skinning.
Chapter 6, Add Charts and Graphs
Chapter 7, Resources for Flex Developers
This chapter presents numerous resources for Flex devel-opers, including blogs, forums, podcasts, books, and more.
Conventions Used in This Book
The following typographical conventions are used in this book:
Italic
Indicates new terms, URLs, email addresses, filenames, file extensions, pathnames, directories, and Unix utilities. Constant width
Indicates commands, options, switches, variables, attrib-utes, keys, functions, types, classes, namespaces, meth-ods, modules, properties, parameters, values, objects, events, event handlers, XML tags, HTML tags, macros, the contents of files, and the output from commands. Constant width bold
Shows commands or other text that should be typed lit-erally by the user.
Constant width italic
Shows text that should be replaced with user-supplied values.
NOTE
This signifies a tip, suggestion, or general note.
Using Code Examples
This book is here to help you get your job done. In general, you may use the code in this book in your programs and docu-mentation. You do not need to contact us for permission unless you’re reproducing a significant portion of the code. For ex-ample, writing a program that uses several chunks of code from
this book does not require permission. Selling or distributing a CD-ROM of examples from O’Reilly books does require per-mission. Answering a question by citing this book and quoting example code does not require permission. Incorporating a significant amount of example code from this book into your product’s documentation does require permission.
We appreciate, but do not require, attribution. An attribution usually includes the title, author, publisher, and ISBN. For ex-ample: “Getting Started with Flex 4, by Jeanette Stallons et al. Copyright 2010 O’Reilly Media, Inc., 978-0-596-80411-4.” If you feel your use of code examples falls outside fair use or the permission given here, feel free to contact us at [email protected].
How to Contact Us
Please address comments and questions concerning this book to the publisher:
O’Reilly Media, Inc.
1005 Gravenstein Highway North Sebastopol, CA 95472
800-998-9938 (in the United States or Canada) 707-829-0515 (international or local)
707-829-0104 (fax)
We have a web page for this book, where we list errata, exam-ples, and any additional information. You can access this page at:
http://oreilly.com/catalog/9780596804114
To comment or ask technical questions about this book, send email to:
For more information about our books, conferences, Resource Centers, and the O’Reilly Network, see our website at:
http://oreilly.com
Safari® Books Online
Safari Books Online is an on-demand digital li-brary that lets you easily search over 7,500 tech-nology and creative reference books and videos to find the answers you need quickly.
With a subscription, you can read any page and watch any video from our library online. Read books on your cell phone and mobile devices. Access new titles before they are available for print, and get exclusive access to manuscripts in develop-ment and post feedback for the authors. Copy and paste code samples, organize your favorites, download chapters, book-mark key sections, create notes, print out pages, and benefit from tons of other time-saving features.
O’Reilly Media has uploaded this book to the Safari Books Online service. To have full digital access to this book and others on similar topics from O’Reilly and other publishers, sign up for free at http://my.safaribooksonline.com.
Acknowledgments
We’d like to acknowledge the help of the Adobe Developer Center and Platform Learning Resources teams in the design and writing of this book. The learning materials that inspired this book were created by Jeanette Stallons, in collaboration with the Adobe team, as an online resource. You can find this material at www.adobe.com/devnet/flex/testdrive/.
The scope of the materials online is wider than what you’ll find in this book, and we recommend you use both as learning re-sources as you develop your Flex and Flash Builder skills.
Introduction
If you’re curious about Flex and want to get up to speed in a matter of hours, this book is for you!
After providing a brief introduction to the Adobe Flash Plat-form and showcasing some real-world applications that dem-onstrate what is possible using Flex, the following chapters walk through building, debugging, and deploying a complete Flex application. You can proceed with each chapter in order or you can explore only the topics that interest you, take a look at the example code, and apply the techniques to your own applications.
Either way, we hope that you enjoy this taste of Flex and that it inspires you to learn more!
First Things First—What Is Flex?
Flex® is an open source software development toolkit for building rich Internet applications (RIAs) on the Flash Platform.
To build a Flex application, you write object-oriented code us-ing the ActionScript 3, MXML, and CSS languages. These lan-guages are easy to learn for programmers from many different backgrounds, such as Java, PHP, C#, HTML, and JavaScript. Flex supports a component-oriented programming model that allows developers to easily assemble applications from
components and extend base components to create custom interactions.
The Flex SDK includes a compiler, debugger, and hundreds of ready-to-use components and ActionScript classes that accel-erate the development of RIAs. Using these tools from the command line, from build tools such as Ant, or via IDEs from Adobe or third parties, you can compile code into cross-platform applications that run in the browser using Adobe Flash Player or on the desktop with Adobe AIR.
To help software developers rapidly develop applications and content using the Flex framework, Adobe offers an Eclipse-based IDE, Adobe® Flash® Builder™ 4 (formerly Adobe Flex Builder). It includes support for intelligent coding, debugging, and visual design, as well as powerful testing and monitoring tools that speed up development and lead to higher-performing applications. You can find more information on Flash Builder on Adobe’s website (www.adobe.com/products/flashbuilder).
How Does Flex Work?
Flex source code (in MXML, ActionScript, and CSS files) is compiled into Flash bytecode (a SWF file), which is executed at the client side by the ActionScript Virtual Machine in Adobe Flash Player or Adobe AIR.
To access backend databases and other systems, Flex includes numerous networking APIs that support everything from plain XML, JSON, and SOAP web services to optimized protocols such as Action Message Format (AMF) and Real Time Mes-saging Protocol (RTMP) (Figure I-1).
What Can You Do with Flex?
You can use Flex to build anything from multimedia-rich con-sumer experiences to functional line-of-business applications that run behind the firewall. You can use Flex to deliver an entire application experience, or you can embed Flex-based components and widgets within existing HTML websites, in-cluding enterprise portals or social networking sites such as Facebook.
In addition to developing browser-based applications that work consistently across Windows, Mac OS X, and Linux op-erating systems, you can deploy an enhanced, standalone ver-sion of your application that makes use of the capabilities available with Adobe AIR. You will also be able to leverage your knowledge of Flex to build applications that work on mobile phones and other Internet-connected devices.
Next, we provide a quick tour of some real-world applications that illustrate the types of experiences you can build with Flex. To learn more about these applications, visit the Flex Show case.
Figure I-1. How Flex works for browser-based applications
Product Configuration
With an ever-increasing amount of prepurchase product re-search being done online and the phenomenal growth in online transactions, ensuring customers can explore, configure, and personalize products through intuitive and engaging online tools is a key differentiator. This is especially true for complex, high-value products, where thousands, if not millions, of po-tentially different product configurations can be available. Mini USA built a product configuration tool that provides a great example of using Flex to present a huge array of choices and combinations to a potential purchaser through an inviting and fun-to-use interface (Figure I-2).
Try it out at http://miniusa.com/?#/build/configurator/mini-m.
Consumer Applications
European car manufacturer Fiat selected Flex to develop Eco-Drive, a desktop application for existing Fiat customers who want to improve their driving skills and reduce CO2 emissions (Figure I-3).
As a desktop application deployed on Adobe AIR, the appli-cation isn’t constrained by the browser security sandbox. Users can insert a USB key and load car journey data directly into the EcoDrive application, which would be impossible with a browser-based web application.
The application presents the driver with detailed environmen-tal performance of the car, including the CO2 emission level for each trip. It analyzes the driver’s style and then provides tips and recommendations on how to modify that style to ach-ieve CO2 reductions and save money on fuel.
Download the application at www.fiat.com/ecodrive/.
Figure I-3. Fiat EcoDrive application
Media and Publishing
As publishers look to deliver their content to consumers through a variety of different channels, many are leveraging Flex to combine audio, video, images, and text-based infor-mation to create digital versions of existing publications. One such publisher is the New York Times. The Times Reader successfully re-creates the newspaper reading experience in a desktop application. Readers can browse through current and archived news, watch video content, adjust the amount of in-formation displayed on the screen based on their preferences, and even complete the interactive daily crossword (Figure I-4). Download the application at http://timesreader.nytimes.com/ timesreader/index.html.
Education
The ability to seamlessly combine multimedia content in an engaging user experience is also important for online learning applications. New generations of educational tools, which also offer real-time, collaborative multiuser learning, are being built using Flex.
TOTALe is a fully web-based, multiuser language-learning program from Rosetta Stone (Figure I-5). It features online coursework and live sessions with native-language coaches and other students, as well as access to a web-based community with innovative language games. In addition to Flex, this ap-plication uses Adobe LiveCycle Collaboration Service, a suite of hosted real-time, multiuser services to provide integrated Voice over IP (VoIP), streaming video, instant messaging, and multiuser rooms.
You can get more information at www.rosettastone.com/totale.
Figure I-5. Rosetta Stone web-based tool
Social Networking
With the rise of social networking sites, a variety of tools have emerged to help users manage the information that is impor-tant to them.
TweetDeck (Figure I-6) is a great example of a social network-ing application developed usnetwork-ing Flex and deployed on Adobe AIR. TweetDeck is a personal browser for staying in touch with what’s happening now, connecting you with your contacts across Twitter, Facebook, MySpace, and LinkedIn. Tweet-Deck nicely demonstrates how Flex applications can connect to a myriad of servers and services and present a single view of data from disparate systems.
Download TweetDeck at www.tweetdeck.com/desktop/.
Business Productivity
Some of the most impressive Flex applications available today provide lightweight equivalents to traditional desktop soft-ware, such as word processing, presentation authoring, and image manipulation tools.
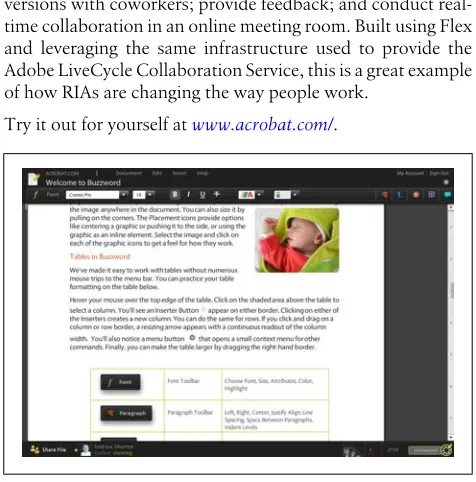
Adobe launched its own online companion to Adobe Acrobat, called Acrobat.com (Figure I-7), which allows users to create documents, presentations, and tables online; share the latest versions with coworkers; provide feedback; and conduct real-time collaboration in an online meeting room. Built using Flex and leveraging the same infrastructure used to provide the Adobe LiveCycle Collaboration Service, this is a great example of how RIAs are changing the way people work.
Try it out for yourself at www.acrobat.com/.
Figure I-7. Adobe Acrobat.com
Data Visualization
Flex includes a comprehensive set of data visualization com-ponents that allow you to create reporting and data analysis applications with ease. Better yet, because the framework is extensible, if Flex doesn’t include the type of chart or compo-nent you require, you can easily create your own.
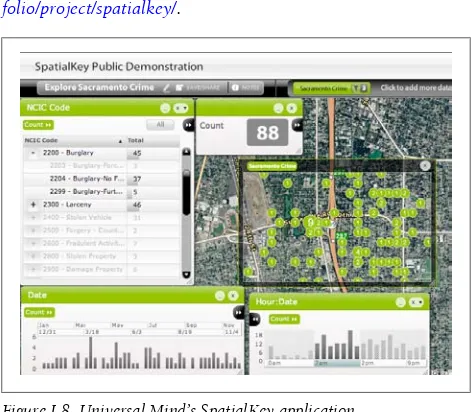
An impressive example of data visualization comes from Uni-versal Mind’s SpatialKey application (Figure I-8), a powerful online location intelligence solution for creating interactive reports and analysis. Flex provides an ideal solution for repre-senting and quickly rendering large amounts of data. For example, hundreds of points on a map can be updated dynam-ically compared with the display of static points provided by traditional geographic information systems (GIS).
You can get more information at www.universalmind.com/port folio/project/spatialkey/.
Financial Services
The financial services sector has produced some of the most sophisticated, high-performance, and data-intensive RIAs in use today. Everything from delivery of real-time market feeds to full-blown stock-trading applications with millisecond re-sponse times have been built with Flex.
NASDAQ Market Replay (Figure I-9) is an extremely powerful replay and analysis tool, allowing users to view the consolida-ted order book and trade data for securities lisconsolida-ted on NASDAQ, NYSE, and other regional exchanges at any point in time. By using Adobe AIR to deliver a desktop-based experience, the developers of NASDAQ Market Replay allow users to request and cache volumes of data that they can then analyze even when they’re offline.
A case study is available at www.adobe.com/products/air/.
Figure I-9. NASDAQ Market Replay tool
Technologies and Terms Related to Flex
Development
There are a host of Flex- and Flash Builder-related technologies and tools that you might want to know about before you start building your Flex application.
Here’s a quick rundown of the tools, technologies, and terms that you’ll encounter as you explore Flex.
Adobe Flash Platform
The Adobe Flash Platform is an entire family of Adobe tech-nologies you can use to create, run, and provide data to RIAs (in the form of SWF files), including client runtimes, tools, frameworks, servers, and cloud services.
Flash Platform Runtimes
At the center of the Flash Platform are the client runtimes: Adobe Flash Player for the browser and Adobe AIR for outside the browser. The runtimes render applications created on the Flash Platform (in the form of SWF files), allowing users to interact with them.
Adobe Flash Player
Adobe AIR
Adobe AIR is a cross-operating-system runtime and set of tools that allow developers to deploy HTML, Ajax, and Flash Plat-form applications (SWF files) to the desktop. An emerging design pattern for applications is to deliver a browser-based version for all users and a desktop version for more active or power users.
Applications created on the Flash Platform for the browser use the Flash Player client runtime. These applications have all the benefits of browser-based applications, including any-where access, easy deployment (no installation necessary), simple updating, and consistency across all operating systems and browsers. They also have all the limitations of browser-based applications, including no offline access and the confines of the browser’s security sandbox, which keeps them from in-teracting with the user’s computer outside the browser win-dow. To get the best of both worlds, Adobe introduced Adobe AIR.
You can use Flash Builder to create both web and desktop ap-plications with Flex. If you create both types of apap-plications, you can also share code from separate code libraries. When you compile a Flex application for the desktop, you get a SWF file and an XML file (called the application descriptor file), which includes information about what the container operat-ing system window should look like, what icon should be used for the application on the client computer, and more. When you are ready to deploy, Flash Builder uses a tool called the AIR Development Tool (ADT) to create a release build con-sisting of an AIR package file, which includes the SWF file, the application descriptor file, assets, and more.
Users must have the Adobe AIR runtime installed to run an AIR application. To provide a more seamless install experience for users, so they can install the application from a web page (instead of having to download and install the AIR runtime and then download and install the AIR application), Adobe pro-vides a default HTML file and badge.swf file, which provides a
template for letting users click a badge (a framed, customized image button) that checks for and installs the runtime if nec-essary and then installs the AIR application.
Flash Platform Tools
Adobe offers many tools for creating SWF files, including Flash Builder (formerly Flex Builder), Flash Catalyst, and Flash Pro-fessional. Each tool caters to different developer and designer skill sets.
Adobe Flash Builder
Adobe Flash Builder is an Eclipse-based development tool tar-geted at developers. With this IDE, you use the Flex framework to create SWF files. Flash Builder accelerates Flex application development by providing intelligent code hinting and gener-ation, refactoring, compile-time error checking, interactive step-through debugging, and visual design for laying out and styling user interfaces.
Adobe Flash Catalyst
Adobe Flash Catalyst is a new professional interaction design tool for rapidly creating expressive interfaces and interactive content without writing code. Designers use Flash Catalyst to create the functional user experience and provide the project file to developers who use Flash Builder to add functionality and integrate with servers and services.
Adobe Flash Professional
Adobe Flash Professional CS5 is the industry standard for in-teractive authoring and delivery of immersive experiences that present consistently across personal computers, mobile devi-ces, and screens of virtually any size and resolution.
Flash Platform Languages
You create Flex applications using two languages: ActionScript and MXML.
ActionScript is an inheritance-based object-oriented scripting language based on the ECMAScript standard. The latest ver-sion, ActionScript 3.0, is based on ECMA-262 4th edition, which was proposed but never approved and published. The syntax and object-oriented features are very similar to Java: you define and extend classes; define and implement interfaces; and use the private, public, protected, and internal (package) namespaces. Unlike Java, in ActionScript you use curly braces inside the package keyword when defining classes, you use the function keyword to declare methods, and you use post-colon data typing instead of the data type prefixes used in Java. Data typing is also optional. You can type everything for IDE code-hinting and compile and runtime type checking, but you can also use dynamic typing when appropriate for flexibility. MXML is a convenience language; it provides an alternate way to generate ActionScript using a declarative tag-based XML syntax. When you compile an application, the MXML is parsed and converted to ActionScript in memory and then the ActionScript is compiled into bytecode (your SWF). Although you never have to use MXML, developers typically use it to define application interfaces (for layouts, the MXML code is usually more succinct and understandable than the corre-sponding ActionScript would be) and use ActionScript to write the application logic. Just as you break up your logic into sep-arate ActionScript classes, you also break up your MXML code into separate reusable MXML components.
Servers and Server-Side Technologies
The Adobe Flash Platform provides a number of technologies for enabling communication between Flex applications and server-side applications.
Flex remote procedure calls
Flex applications can communicate with backend servers using either direct socket connections or, more commonly, through HTTP. You can make HTTP requests (to JSP or XML files, RESTful web services, or other server files that return text over HTTP), web service requests (to web services that return SOAP-formatted text over HTTP), or Flash Remoting requests (to methods of server-side classes that return binary AMF over HTTP). When possible, it is advisable to use Flash Remoting, because its binary data transfer format allows applications to load data up to 10 times faster than with the more verbose, text-based formats such as XML, JSON, or SOAP.
Flash Remoting
Flash Remoting MX is a combination of client- and server-side functionality that together provides a call-and-response model for accessing server-side objects from Flash Platform applica-tions as if they were local objects. It provides transparent data transfer between ActionScript and server-side data types, han-dling the serialization into AMF, deserialization, and data mar-shaling between the client and the server. Flash Remoting MX uses client-side functionality built into Flash Player and server-side functionality that must be installed on the application server.
Flash Remoting MX is built in on some servers (such as Cold-Fusion and Zend), but must be installed on other servers (via BlazeDS or LiveCycle Data Services on Java EE servers, via WebORB or FluorineFx on .NET servers, via the Zend Frame-work or AMFPHP on PHP servers, and more).
BlazeDS
messaging service also allows Flex applications to exchange messages with other nonFlex, JMS-enabled applications. You can use a combination of the remoting and messaging services to create real-time, data-centric applications. When a user changes some data in this type of Flex application, the data is saved in the database on the server and then pushed out to all the other clients currently accessing the data so users always see the most up-to-date data. To create this type of data syn-chronization using BlazeDS or a similar technology, you must typically write quite a bit of code to save the data on the server, push the data out to the other clients, and manage any data conflicts. Alternatively, you can use LiveCycle Data Services, which provides much of this functionality for you (see the fol-lowing section on Adobe LiveCycle Data Services).
You can find more information on BlazeDS at http://opensource .adobe.com/wiki/display/blazeds/BlazeDS.
Adobe LiveCycle Data Services
Adobe LiveCycle Data Services is a superset of BlazeDS that provides a complete data infrastructure for enterprise Flex ap-plications. In addition to providing the remoting and messag-ing services available with BlazeDS, it also provides a data management service that can reduce development and main-tenance costs for real-time, data-centric applications. The data management service automates data synchronization between a Flex application and the middle tier, providing con-flict resolution, paging and lazy loading, management of large collections of data and nested data relationships (such as one-to-one and many-one-to-one associations), integration with Hiber-nate, and offline data access in AIR applications. You can add many of these advanced data management service features to your applications without writing any server-side code using modeling technologies introduced in LiveCycle Data Services ES2.
LiveCycle Data Services also provides advanced deployment options for maximum scalability, streaming with the RTMP,
PDF generation, portal integration, LiveCycle connectivity, ac-cess to developer and enterprise support resources, and more. You can find more information on Adobe LiveCycle Data Serv-ices at www.adobe.com/products/livecycle/dataservices/.
Flash Platform Services
Instead of hosting and managing your own data messaging service, you can also use the Collaboration service, which pro-vides real-time collaboration features, including chat, audio, and video. The Collaboration service is one of the Adobe Flash Platform Services, which also include the Distribution service (for distributing, promoting, tracking, and monetizing appli-cations on social networks, mobile devices, and desktops) and the Social service (for integrating with multiple social net-works, including Facebook, MySpace, Twitter, Yahoo!, Goo-gle, and AOL, using a single ActionScript API).
CHAPTER 1
Build an Application in an
Hour
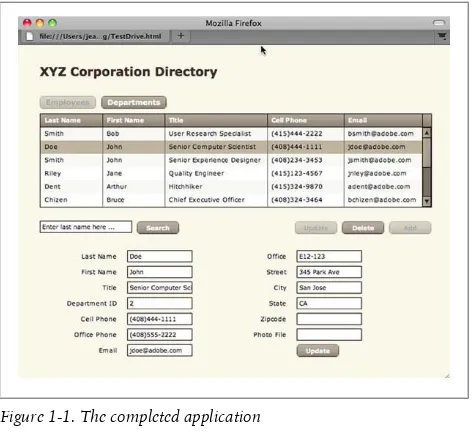
In this chapter, you will create a Flex application that retrieves, displays, and modifies database records. Flex applications do not connect directly to remote databases. Instead, you must connect your application to a data service written in your fa-vorite web language (PHP, ColdFusion, Java, or any other server-side web technology). You will build the frontend Flex application; the database and the server-side code to read, add, edit, and delete database records is provided for you as a PHP class, a ColdFusion component, or Java classes. The completed application is shown in Figure 1-1.
Build the User Interface
In this chapter, you will build a Flex project and a Flex appli-cation that retrieves data from the database and displays it. The application will display Employee data on one “page” in the application and Department data on another.
The first task is to create a new Flex project for your application server and create the user interface. You’ll retrieve data from the server and display it in Chapter 2.
Step 1: Install the Test Drive Server Files
These files include a database and server-side files to manipu-late data in the database. Your Flex application will call meth-ods of one of these server-side files, EmployeeService. Use the following steps to set up PHP:
1. Download and unzip the Test Drive PHP server file from www.adobe.com/devnet/flex/testdrive/assets/test drive_setup_PHP.zip. It contains a database and a Test Drive folder.
2. Create the testdrive_db database on your MySQL in-stallation using the testdrive_db.sql file located in the
Database folder. If you do not have permission to create a database, use the testdrive_table.sql file instead to cre-ate two tables in an existing database. After you crecre-ate the database, set user privileges for it.
3. Move the TestDrive folder, which contains the PHP serv-ice file, to your PHP server.
4. Open /TestDrive/services/EmployeeService.php in an ed-itor and change the username, password, server, port, and databasename properties to the correct values for your setup. This class file contains the methods you will call from your Flex application to retrieve, add, update, and delete data.
Use the following steps to set up ColdFusion:
1. Download and unzip the Test Drive ColdFusion server file from www.adobe.com/devnet/flex/testdrive/assets/ testdrive_setup_CF.zip. It contains a CAR file.
2. In the ColdFusion Administrator, navigate to Packaging & Deployment and deploy the CAR file. In the Deploy Wizard, change the deployment locations to reflect the locations of the db and wwwroot folders on your server. After deploying, check that you have a new data source called testdrive_db and a new folder in wwwroot called
TestDrive.
3. Open /ColdFusion/wwwroot/TestDrive/services/Employ-eeService.cfc in an editor and examine the code. This class file contains the methods you will call from your Flex application to retrieve, add, update, and delete data. The methods have the access argument set to re-mote so that you can call them from a Flex application. 4. Open /ColdFusion9/wwwroot/WEB-INF/flex/services-config.xml in an editor. This file is used when calls are made to the server from your application. Locate the <property-case> tag and change all three values to true, as shown below:
<property-case>
<!-- cfc property names --> <force-cfc-lowercase>true </force-cfc-lowercase> <!-- Query column names --> <force-query-lowercase>true </force-query-lowercase>
<!-- struct keys --> <force-struct-lowercase>true </force-struct-lowercase> </property-case>
NOTE
If you are using an earlier version of ColdFusion, your configuration file may not have these tags and you will need to add them. For details, refer to the documentation on using Flash Remoting with your particular server.
5. Restart the ColdFusion server. Use the following steps to set up Java:
1. Download and unzip the Test Drive Java server file from www.adobe.com/devnet/flex/testdrive/assets/test drive_setup_JAVA.zip. It contains a WAR file for a web application called testdrive.
2. Deploy the WAR file to your web server. It contains the Java classes, an Apache Derby embedded database, and BlazeDS 4 files.
NOTE
BlazeDS 4 is currently in beta. This WAR file contains BlazeDS files from the January 29, 2010, nightly build.
3. Open /{your server webapps folder}
4. Open /WEB-INF/flex/remoting-config.xml in an editor and examine the code. This file is used when calls are made to the server from your application. Notice the definition for the destination called employeeService, which points to the services.EmployeeService class.
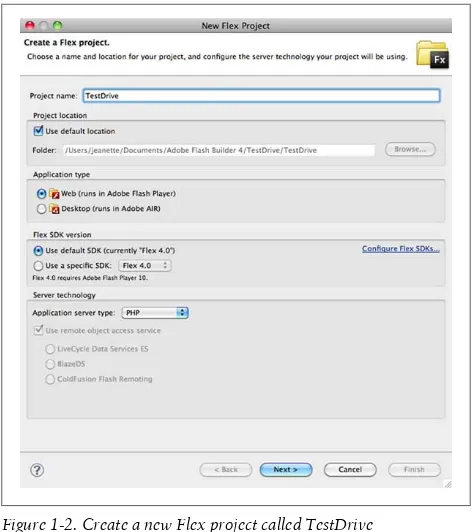
Step 2: Create a New Flex Project
In Flash Builder, select File→New→Flex Project (Figure 1-2). Create a new Flex project called TestDrive and store the project files locally. Be sure to specify your application server type and the appropriate web root and root URL for the web applica-tion, and validate the configuration (Figure 1-3).
NOTE
If you are using the Flash Builder plug-in in an existing Eclipse installation, you may need to first switch to the Flash perspective.
The project location is where the application source files will be stored. The compiled application will be stored on your ap-plication server in the location you specify for the Output
folder. This folder should be a subfolder of the TestDrive (or testdrive) application you set up on your application server in the previous section.
The following are some example project settings: Example project settings for PHP:
• Web root: /usr/local/zend/apache2/htdocs
• Root URL: http://localhost:10088/
• Output folder: /usr/local/zend/apache2/htdocs/TestDrive/ TestDrive-debug
Figure 1-2. Create a new Flex project called TestDrive
Example project settings for ColdFusion; when creating the project, select the ColdFusion Flash Remoting option for re-mote object access:
• ColdFusion root folder: /Applications/ColdFusion9
• Web root: /Applications/ColdFusion9/wwwroot
• Root URL: http://localhost:8500/
Figure 1-3. Configure your application server and validate it
Example project settings for Java; when creating the project, select the BlazeDS option for remote object access:
• Root folder: /Applications/tomcat/webapps/testdrive
• Root URL: http://localhost:8400/testdrive/
• Context root: testdrive
• Output folder: /Applications/tomcat/webapps/testdrive/ TestDrive-debug
When you create a new Flex project, Flash Builder creates an MXML file with the same name as the project, as shown in
Figure 1-4. This is the main application file where you add your code. You create Flex applications using two languages: Ac-tionScript and MXML. Typically, you use MXML and Flex components to create application interfaces, and ActionScript and events to program application logic. MXML tags and Ac-tionScript code can reference each other, similar to HTML tags and JavaScript code.
When you compile an application, a SWF file is created. You reference the SWF file in an HTML page, and the Flash Player (available as a browser plug-in or ActiveX control) will down-load and render the SWF file.
Figure 1-4. Create the TestDrive project
In TestDrive.mxml, the first line of code is the XML declaration for the parser. The next line is the <s:Application> tag, which defines the Application container that must be the root tag for a Flex application. When the application is compiled, a SWF file, an HTML wrapper page that references the SWF file, and other files are placed in the bin-debug folder on your applica-tion server so you can browse to the applicaapplica-tion.
Step 3: Use Design Mode to Add Components and Set
Properties
Switch to Design mode and drag out Label, DataGrid, and Button components from the Components view to create the interface shown in Figure 1-5. Use the Properties view to assign component IDs of empBtn, deptBtn, and empDg, and set other properties.
Figure 1-5. Arrange components as shown here
Switch to Source mode and take a look at the generated code. You will see a new tag for each of the components you added. The order of the tags does not matter, because the Application container uses absolute positioning by default, so component positions are set by their x and y properties.
The <s:Label> tag represents a Label control, a very simple user interface component that displays text. Its text property is set to XYZ Corporation Directory, and its x and y properties are set to the location where it will appear in the interface. The color and fontSize attributes change the style of the font used. In Flex, you can set color styles to a string for any of the 16 colors in the VGA color set (for example, red or blue) or an RGB triplet in hexadecimal format (for example, #FF0000 or #0000FF):
<s:Label x="36" y="36" text="XYZ Corporation Directory" color="maroon" fontSize="20"/>
For each component, you can specify properties and styles. Properties apply only to that particular component instance. Styles can be set inline as done here or using CSS to create style rules to apply to your components.
Step 4: Change Component Attributes in MXML
In this step, use the Flash Builder Content Assist to select and set values for various properties and styles.
When you place your cursor inside a tag and press the space bar or Ctrl-space bar, you get code hinting with the Flash Builder Content Assist. It shows a list of all the attributes you can set for that tag, including properties, styles, events, and more (see Figure 1-6). Different symbols represent different attributes. This is the same list you see in the Alphabetical view of the Design mode Properties view.
Figure 1-6. Use Content Assist to see a list of all possible tag attributes
You can get more complete descriptions for each of the attrib-utes in the component’s API, its application programming interface (Figure 1-7). To navigate to a component’s API doc-umentation, select Help→Dynamic Help, then click a compo-nent tag in your code. You will see a link to that compocompo-nent’s API documentation in the Help view.
Step 5: Browse the Application
Figure 1-7. View a component’s API documentation
Figure 1-8. View the application in a browser
Your application appears in the browser inside a generated HTML wrapper page. You won’t see any data in your appli-cation at this point—you should only see the layout. You’ll be adding data in Chapter 2. Specifically, you will retrieve and display data in the DataGrid, add application pages, and wire up the buttons.
When you finish this exercise, your code should look like the following:
<?xml version="1.0" encoding="utf-8"?>
<s:Application xmlns:fx="http://ns.adobe.com/mxml/2009" xmlns:s="library://ns.adobe.com/flex/spark" xmlns:mx="library://ns.adobe.com/flex/mx" minWidth="955" minHeight="600">
<fx:Declarations>
<!-- Place non-visual elements
(e.g., services, value objects) here --> </fx:Declarations>
<s:Label x="36" y="36" text="XYZ Corporation Directory" color="maroon" fontSize="20" fontWeight="bold"/> <s:Button x="36" y="85" label="Employees" id="empBtn"/> <s:Button x="124" y="85" label="Departments"
id="deptBtn"/>
<mx:DataGrid x="36" y="114" id="empDg"> <mx:columns>
<mx:DataGridColumn headerText="Column 1" dataField="col1"/>
<mx:DataGridColumn headerText="Column 2" dataField="col2"/>
<mx:DataGridColumn headerText="Column 3" dataField="col3"/>
</mx:columns> </mx:DataGrid> </s:Application>
Connect to Data
In this section, you will retrieve data from a database and dis-play it in your DataGrid.
This section shows you how to create a data service that uses Flash Remoting to call methods of a PHP class, a ColdFusion component, or a Java class.
Step 1: Create a Flex Data Service
application server earlier (see Figure 1-9 for a PHP example). For Java, select the “No password required” checkbox, select the employeeService destination, and change the service pack-age to services.employeeservice.
NOTE
For ColdFusion developers: RDS must be enabled on your server for Flash Builder to create a data service. If you have RDS configured to use a password, you will get an Authentication Required dialog box where you must enter the password or the username and password. For Java developers: The testdrive application was configured to use RDS with no password. You are chang-ing your generated service package so it matches that used in the solution files, which you can use with PHP, ColdFusion, or J2EE servers.
Figure 1-9. Create a Flex data service
Flash Builder introspects the server-side class file and creates a corresponding client-side class with the same operations. You can see your new data service in the Data/Services view ( Fig-ure 1-10).
NOTE
For PHP developers: Flash Builder uses the Zend Framework to introspect the service. If this is your first time importing a PHP service, Flash Builder asks you to install the Zend Framework.
For ColdFusion and Java developers: Some of the symbols and data types you see will be different from those shown in Figure 1-10.
Figure 1-10. Locate your new data service in the Data/Services panel
Step 2: Connect the getEmployees() Service Operation
to the DataGrid
NOTE
For Java developers: An array of Employee objects will already be specified as an existing data type.
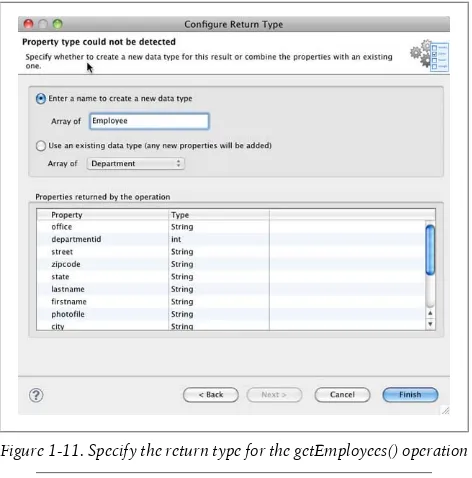
For PHP and ColdFusion developers: Before Flash Builder can bind the results of the operation to a com-ponent, you must specify the action to be taken with the data returned from the operation. You are telling it to create an array of Employee objects, so Flash Builder creates an Employee ActionScript class file with match-ing properties and uses that. You can also write your PHP classes and ColdFusion component methods to re-turn strongly typed objects instead of general objects. Figure 1-11. Specify the return type for the getEmployees() operation
The DataGrid component has also been updated so that it now has a column for each of the properties contained in the return data objects, as shown in Figure 1-12.
Figure 1-12. View the new DataGrid columns
The columns property of the DataGrid object is set equal to an array of DataGridColumn objects where each DataGridCol umnObject has properties to specify what data it should display, how big it should be, what its header text should be, and more. The columns will be displayed in the order in which they are defined:
<mx:columns>
<mx:DataGridColumn headerText="office" dataField="office"/>
<mx:DataGridColumn headerText="departmentid" dataField="departmentid"/>
...
Step 3: Look at the Generated Code in Your MXML File
<mx:DataGrid x="36" y="114" id="empDg"
creationComplete="empDg_creationCompleteHandler(event)" dataProvider="{getEmployeesResult.lastResult}">
An instance of your EmployeeService data service is created inside the Declarations block. You place tags for all nonvisual objects inside the Declaration tag set. The green color of the tag indicates it is a compiler tag associated with compiler in-structions and not an instance of a class:
<employeeservice:EmployeeService id="employeeService"
fault="Alert.show(event.fault.faultString + '\n' + event.fault.faultDetail)" showBusyCursor="true"/>
The empDg_creationCompleteHandler() function inside the Script block calls the getEmployees() method of this data serv-ice. You place all ActionScript code (which can only include property and method declarations) inside the Script compiler tag:
protected function
empDg_creationCompleteHandler(event:FlexEvent):void {
getEmployeesResult.token = employeeService.getEmployees(); }
When this code is executed, Flash Player makes a call to the server. This happens asynchronously in the background; the user can still interact with the application.
When you make a service call, you need to specify what Flash Player should do when it gets a result or error back from the server. You specified a fault handler for the data service itself, and it will display errors returned from calls to any of its op-erations in a pop-up box, an instance of the Alert component:
<employeeservice:EmployeeService id="employeeService"
fault="Alert.show(event.fault.faultString + '\n' + event.fault.faultDetail)" showBusyCursor="true"/>
A CallResponder object handles successful results: <s:CallResponder id="getEmployeesResult"/>
This object has a lastResult property, which is automatically populated with the data when it is returned to Flash Player from the server. Now you need to associate it with the service call.
When a service call is initiated, an instance of the AsyncToken class is created. To associate the CallResponder object with the service call, set the CallResponder’s token property equal to AsyncToken generated at the time the service call is made. Now when data is returned from the server, the CallResponder object handles it. In addition to getting its lastResult property set, CallResponder also has result and fault events for which you can set handlers:
getEmployeesResult.token = employeeService.getEmployees(); Finally, the dataProvider property of the DataGrid is bound to the lastResult property of the CallResponder object. This means that whenever the value of getEmployeesRe sult.lastResult changes at runtime, the DataGrid’s dataProvider property is updated and the DataGrid will repo-pulate itself with the new data:
<mx:DataGrid x="36" y="114" id="empDg"
creationComplete="empDg_creationCompleteHandler(event)" dataProvider="{getEmployeesResult.lastResult}">
Step 4: Configure DataGrid Columns and Run the
Application
Figure 1-13. Customize the DataGrid layout using the Configure Columns wizard
Figure 1-14. Customize the DataGrid to appear as shown here
When you run the application, you should now see data from the database displayed in the DataGrid. Be sure to sort the data and resize and reorder the columns. You can change the width of an individual column using the Configure Columns button.
When you finish this exercise, your code should look like the following:
<?xml version="1.0" encoding="utf-8"?>
<s:Application xmlns:fx="http://ns.adobe.com/mxml/2009" xmlns:s="library://ns.adobe.com/flex/spark" xmlns:mx="library://ns.adobe.com/flex/mx" minWidth="955" minHeight="600" xmlns:employeeservice="services.employeeservice.*"> <fx:Script> <![CDATA[ import mx.controls.Alert; import mx.events.FlexEvent; protected function empDg_creationCompleteHandler(event:FlexEvent):void { getEmployeesResult.token = employeeService.getEmployees(); } ]]> </fx:Script> <fx:Declarations>
<s:CallResponder id="getEmployeesResult" />
<employeeservice:EmployeeService id="employeeService" fault="Alert.show(event.fault.faultString + '\n' + event.fault.faultDetail)"
showBusyCursor="true"/> </fx:Declarations>
<s:Label x="36" y="36" text="XYZ Corporation Directory" color="maroon" fontSize="20" fontWeight="bold"/> <s:Button x="36" y="85" label="Employees" id="empBtn"/> <s:Button x="124" y="85" label="Departments"
id="deptBtn"/>
<mx:DataGrid x="36" y="114" id="empDg"
creationComplete="empDg_creationCompleteHandler(event)" dataProvider="{getEmployeesResult.lastResult}" width="650">
<mx:columns>
<mx:DataGridColumn headerText="Last Name" dataField="lastname"/>
<mx:DataGridColumn headerText="First Name" dataField="firstname"/>
<mx:DataGridColumn headerText="Title" dataField="title" width="170"/>
dataField="cellphone"/>
<mx:DataGridColumn headerText="Email" dataField="email" width="130"/> </mx:columns>
</mx:DataGrid> </s:Application>
This application contains a single page that displays a list of employees. In the next section, you will create additional “pages” to view employee details and a list of departments.
Create Pages
In this section, you will create different pages in your applica-tion. HTML applications use pages as screens, but in Flex, you use a related but different concept called states. As you’ll see, unlike HTML, states do not necessarily appear in separate files. You are going to create three states. The first is the interface you already built that appears when the application starts. The other two states will be Departments and EmployeeDetails, which will appear when a user clicks the Departments button or selects a row in the DataGrid, respectively.
Step 1: Create Employees and Departments States
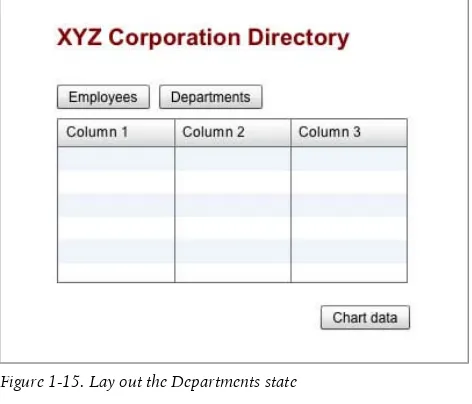
In Design mode, use the States view to create a new state called Departments based on the existing state, <State1>. In Depart-ments, delete the existing DataGrid and add a new DataGrid called deptDg and a Button, as shown in Figure 1-15. Rename <State1> to Employees (Figure 1-16).
Unlike in HTML pages, in Flex applications the same compo-nent can be part of more than one state. The XYZ Label and the Employees and Departments buttons are included in both the Employees and Departments states.
Figure 1-15. Lay out the Departments state
Figure 1-16. Create the Employees and Departments states
Take a look at the generated code. You will see the two states defined; the Application states property is set equal to an array of State objects for which you assign names:
<s:states>
The first DataGrid now has a property, includeIn, set to Employees, the only state for which it should be displayed:
<mx:DataGrid x="36" y="114" id="empDg"
creationComplete="empDg_creationCompleteHandler(event)" dataProvider="{getEmployeesResult.lastResult}"
width="650" includeIn="Employees">
The second DataGrid and the new Button are only included in the Departments state. Components without an includeIn property (or an excludeFrom property) are included in all states. You can specify multiple states using a comma-delimited list.
Step 2: Retrieve and Display Department Data in the
Departments DataGrid
Bind the Departments DataGrid to the getDepartments() serv-ice operation and configure the return type to be an array of new Department objects. Use the Configure Columns wizard to customize the DataGrid (shown in Figure 1-17).
Figure 1-17. Configure the Departments DataGrid
Take a look at the generated code. All the code should look familiar.
Step 3: Change Property Values in Different States
In Design mode, set the Employees Button’s enabled property to false in the Employees state and the Departments Button’s enabled property to false in the Departments state (
Fig-ure 1-18).
Figure 1-18. Disable the Departments button in the Departments state
Switch to Source mode. The enabled property of each Button has been set to false for a single state:
<s:Button x="36" y="85" label="Employees" id="empBtn" enabled.Employees="false"/>
<s:Button x="124" y="85" label="Departments" id="deptBtn" enabled.Departments="false"/>
Step 4: Change a Property or Style Value in All States
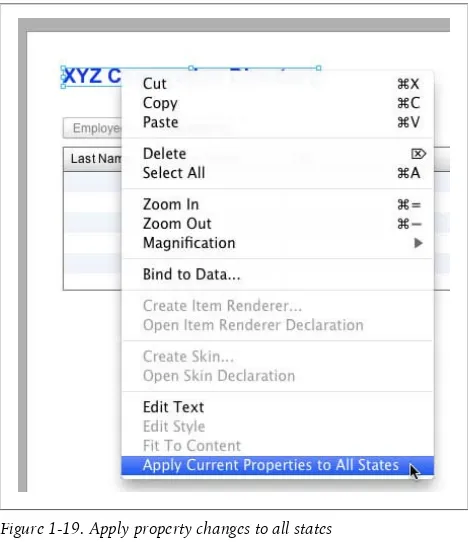
In Design mode, change the color of the Label and then, in the States panel, select the other state; the color is changed for only the selected state. Apply the new color to all states by selecting Apply Current Properties to All States from the Label’s context menu (shown in Figure 1-19).
color=somevalue instead and will be the value for all of the states that you have specified to include this component in.
Step 5: Create a New EmployeeDetails State
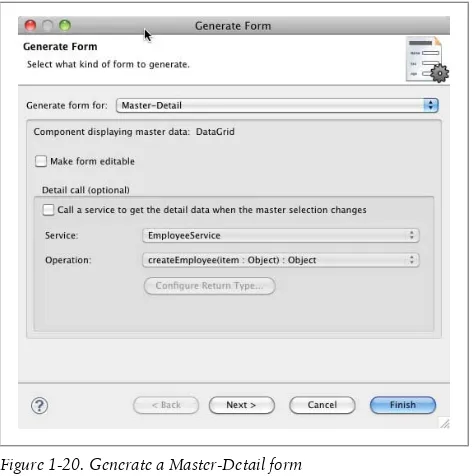
Base the new state on the Employees state. From the Data-Grid’s context menu in the new state, select Generate Details Form. Using the wizard (Figure 1-20), create a noneditable form that does not make a detail call. Arrange the layout as shown in Figure 1-21 by dragging out a second Form container from the Layout section of the Components view and dragging FormItem controls from one Form container to another.
Figure 1-19. Apply property changes to all states
Figure 1-20. Generate a Master-Detail form
In Flex applications, a Form is simply a container that makes it easier to align your controls. Unlike HTML, it does not group data for submitting data to the server.
Figure 1-21. Lay out the EmployeeDetails state
Rename the labels for the Form fields and rearrange the FormItem components as shown in Figure 1-21 by dragging and dropping them to different locations in the Form containers.
Switch to Source mode and look at the generated code. You will see your new EmployeeDetails state defined in the states tag and you will see two new Form tags. Notice that the text property of all the Label controls in the FormItem tags are bound to a property of an employee object:
<mx:Form includeIn="EmployeeDetails" x="63" y="325"> <mx:FormItem label="Last Name">
<s:Label id="lastnameLabel" text="{employee.lastname}"/> </mx:FormItem>
Look in the Declarations section. You will see the employee object defined as an instance of the Employee class:
<valueObjects:Employee id="employee"/>
Below the Declarations section, you will see a new Binding tag, which binds the selectedItem of the empDg DataGrid to this employee variable:
<fx:Binding source="empDg.selectedItem as Employee" destination="employee"/>
The as keyword must be used to cast the selectedItem to an Employee because the selectedItem property is defined as a general object, but the employee must be an Employee object.
Step 6: Add Objects to Specific States
Add four buttons (updateBtn, deleteBtn, addBtn, searchBtn) and a TextInput (searchTxt) to the EmployeeDetails state (see
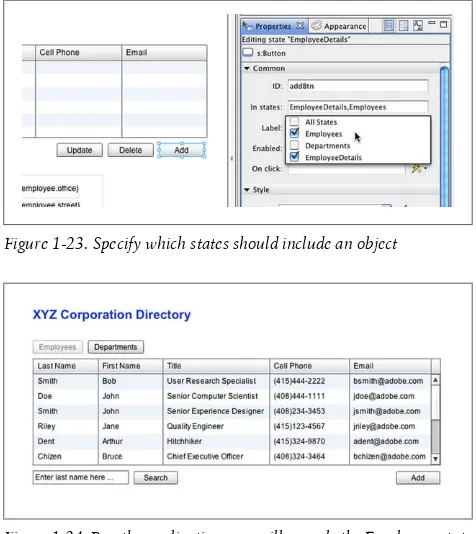
Figure 1-22). Give the TextInput an initial value of “Enter last name here...” Switch to the Employees state; you will not see the new components. Return to the EmployeeDetails state, se-lect the Add Button and, in the Property view, include the But-ton in the Employees state (see Figure 1-23). Repeat for searchTxt and searchBtn and run the application, shown in
Figure 1-24.
Figure 1-23. Specify which states should include an object
Figure 1-24. Run the application; you will see only the Employees state
You have now created three states representing pages in your application. You will write event handlers to switch between the states, populate the details form, and search the employees in Chapter 2. You will also wire up the Update, Delete, and Add Buttons in Chapter 2.
Your code will look like the following at the end of this step (you can download the complete sample code at www.adobe.com/devnet/flex/testdrive/assets/test
drive_build_app.zip):
<?xml version="1.0" encoding="utf-8"?>
<s:Application xmlns:valueObjects="valueObjects.*" ...> <fx:Script>
<![CDATA[ (...) protected function deptDg_creationCompleteHandler(event:FlexEvent):void { getDepartmentsResult.token = employeeService.getDepartments(); } ]]> </fx:Script> <s:states> <s:State name="Employees"/> <s:State name="Departments"/> <s:State name="EmployeeDetails"/> </s:states> <fx:Declarations> (...) <s:CallResponder id="getEmployeesResult"/> <valueObjects:Employee id="employee"/> </fx:Declarations>
<fx:Binding source="empDg.selectedItem as Employee" destination="employee"/>
<s:Label text="XYZ Corporation Directory" color="#1239E3" .../>
<s:Button id="empBtn" enabled.Employees="false" enabled.EmployeeDetails="false" .../>
<s:Button id="deptBtn" enabled.Departments="false" .../> <mx:DataGrid id="empDg"
</mx:columns> </mx:DataGrid>
<s:Button includeIn="Departments" x="609" y="293" label="Chart data"/>
<mx:Form includeIn="EmployeeDetails" x="36" y="325"> <mx:FormItem label="Last Name">
<s:Label id="lastnameLabel" text="{employee.lastname}"/> </mx:FormItem>
<mx:FormItem label="First Name"> <s:Label id="firstnameLabel" text="{employee.firstname}"/> </mx:FormItem> <mx:FormItem label="Title"> <s:Label id="titleLabel" text="{employee.title}"/> </mx:FormItem>
<mx:FormItem label="Department ID"> <s:Label id="departmentidLabel" text="{employee.departmentid}"/> </mx:FormItem>
<mx:FormItem label="Cell Phone"> <s:Label id="cellphoneLabel" text="{employee.cellphone}"/> </mx:FormItem>
<mx:FormItem label="Office Phone"> <s:Label id="officephoneLabel" text="{employee.officephone}"/> </mx:FormItem> <mx:FormItem label="Email"> <s:Label id="emailLabel" text="{employee.email}"/> </mx:FormItem> </mx:Form>
<mx:Form includeIn="EmployeeDetails" x="308" y="325"> <mx:FormItem label="Office"> <s:Label id="officeLabel" text="{employee.office}"/> </mx:FormItem> <mx:FormItem label="Street"> <s:Label id="streetLabel" text="{employee.street}"/> </mx:FormItem> <mx:FormItem label="City"> <s:Label id="cityLabel" text="{employee.city}"/> </mx:FormItem>
<mx:FormItem label="State"> <s:Label id="stateLabel" text="{employee.state}"/> </mx:FormItem> <mx:FormItem label="Zipcode"> <s:Label id="zipcodeLabel" text="{employee.zipcode}"/> </mx:FormItem>
<mx:FormItem label="Photo File"> <s:Label id="photofileLabel" text="{employee.photofile}"/> </mx:FormItem>
</mx:Form>
<s:Button includeIn="EmployeeDetails" x="459" y="293" label="Update" id="updateBtn"/>
<s:Button includeIn="EmployeeDetails,Employees" label="Add " id="addBtn" x="615" y="293"/>
<s:Button includeIn="EmployeeDetails" x="537" y="293" label="Delete " id="deleteBtn"/>
<s:TextInput includeIn="EmployeeDetails,Employees" text="Enter last name here ..." width="153" id="searchTxt" x="36" y="292"/>
<s:Button includeIn="EmployeeDetails,Employees" label="Search" id="searchBtn" x="197" y="293"/> </s:Application>
Code Your Interactions
In Flex, when a user interacts with a component, it broadcasts events such as click, rollOver, or rollOut events. To respond to an event, you specify an event handler function to be called when that event occurs.
In this section, you will write event handlers to switch between the application states when users click buttons, populate the details form when users select DataGrid rows, and search the employees when users click buttons.
Step 1: Generate an Event Handler
Flash Builder automatically switches to Source mode, and you will see the following new function:
protected function
deptBtn_clickHandler(event:MouseEvent):void {
// TODO Auto-generated method stub }
You will also see the following click event attribute in the De-partments Button tag:
<s:Button x="124" y="85" label="Departments" id="deptBtn" enabled.Departments="false"
click.EmployeeDetails="deptBtn_clickHandler(event)"/>
When the user clicks this button in the EmployeeDetails state, that event handler function will be called. Change the click event attribute in the Departments Button tag so that the fol-lowing represents the click handler for all states:
<s:Button x="124" y="85"
label="Departments" id="deptBtn" enabled.Departments="false"
click ="deptBtn_clickHandler(event)"/>
Step 2: Change to the Departments State on a Button
click Event
Inside the function, switch to the Departments state by setting the currentState property of the Application to Departments. Run the application.
The Departments Button click event handler should appear like the following:
protected function
deptBtn_clickHandler(event:MouseEvent):void {
currentState="Departments"; }
When you run the application, you should be able to click the Departments button to switch to the Departments state
(shown in Figure 1-25). Notice that the Employees button is now enabled and the Departments button is disabled.
Figure 1-25. In a browser, switch to the Departments state
Step 3: Change to the Employees State on a Button
click Event
With the Departments state selected in Design mode, generate an event handler for the Employees button and, inside the function, switch to the Employees state.
The Employees button click event handler should appear like the following:
protected function
empBtn_clickHandler(event:MouseEvent):void {
currentState = "Employees"; }
In the Employees Button tag, you can leave the attribute as click.Departments or change it to click. Both will work be-cause this button is only enabled and clickable in the Depart-ments state.
Step 4: Change to the EmployeeDetails State on a
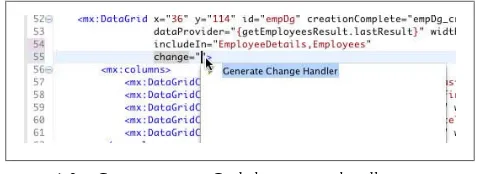
DataGrid change Event
In Source mode, add a change