Abstract—At the previous study of new metal gasket, contact width and contact stress were important design parameter for optimizing metal gasket performance. However, the range of contact stress had not been investigated thoroughly. In this study, we conducted a gasket design optimization based on an elastic and plastic contact stress analysis considering forming effect using FEM. The gasket model was simulated by using two simulation stages which is forming and tightening simulation. The optimum design based on an elastic and plastic contact stress was founded. Final evaluation was determined by helium leak quantity to check leakage performance of both type of gaskets.The helium leak test shows thata gasket based on the plastic contact stress design better than based on elastic stress design.
Keywords—Contact stress, metal gasket, plastic, elastic
I. INTRODUCTION
new 25A size metal gasket, which uses corrugated shape was proposed for asbestos gasket substitution alternative [1]. The gasket has metal spring effect and produces high local contact stress to create sealing line with flanges. The result confirmed that the contact stress and contact width were an important design parameter to optimize the 25A size metal gasket performance. Haruyama, et.all [2] investigated the limits size of contact width as 25A size metal gasket design parameter. In this study, the quantitative evaluation of helium leak rate and contact width of gasket which has no leak by water pressure test had been cleared. From the above matter, contact width can be used as a main parameter to optimize the gasket design. The leakage can be reduced with increasing the contact width. Choiron, et.all [3] provided the contact width validation by using simulation analysis and the result is compared to experimental using pressure sensitive paper. Nurhadiyanto, at.all [4] investigated the optimum 25 A size metal gasket design include forming effect by using simulation analysis. The 25A size metal gasket was optimized by using L18 Taguchi method. Based on contact width as design concept and considering contact stress on contact width including forming effect. According to an elastic condition the optimized gasket was founded.
Doctoral student at Department of Mechanical Engineering, Yamaguchi University, Japan (email: [email protected])
Mechanical Engineering Department, Brawijaya University, Indonesia (email: [email protected])
Graduate School of Innovation and Technology Management, Yamaguchi University, Japan (email: [email protected]
All new 25A size metal gasket model on the previous study use the assumption an elastic contact stress. Whereas, the plastic deformation occurs in the contact area when the local stress has reached. The use of simulation is beneficial in the design of metal forming operations because it is more cost effective than trial and error. The development of hardware and software support the metal forming simulation to define an elastic and plastic contact stress. It is also predict the forces and stresses necessary to execute the forming operation [5]. Press forming is performed to produce gasket shape by a punch forces the initial material to slide into a die. In this study, we will find the optimum design of New 25A-size metal gasket include forming effect according to an elastic and plastic condition respectively derived from FEM analysis. The optimum design of the simulation result was tested using helium leak test. Here will be known the gasket performance based on the elastic and plastic design.
II. MATERIAL AND METHOD
The gasket material was SUS304 due to its effectiveness in high-temperature and high-pressure environment. In order to ensure the properties of the material, SUS304 was initially validated using tensile test carried out based on JISZ2241 [7]. From the tensile test result, the nominal stress (σ) of SUS304 was 398.83 [MPa], the modulus of the elasticity (E) was 210 [GPa] and the tangent modulus was 1900.53 [MPa].
In the previous study [6], the gasket design based on contact status, which is contact and no contact, without considering the distribution of the stress called 0 MPa mode. In the other hand, the gasket design by deleting the contact stress value below of 400 MPa called 400 MPa mode. It was found from the material properties, the yield stress is 398.83 MPa. In this study, the gasket design based on an elastic condition we call 0 MPa mode while it based on a plastic condition is 400 MPa mode.
A. Simulation Analysis
In this study, a gasket model is divided into two simulation stage by using two pressing model which is forming and tightening simulation. The optimized design gasket according to an elastic and plastic condition. Flowchart the stage of simulation and optimization the gasket considering forming effectas shown in Fig.1. Both stages were modeled using finite element method analysis software MSC. Marc [8]. In the first stage, the dies were assumed as rigid body in both sides. Using two-dimensional assumptions, the axis symmetric model was adopting a forming process simulation in axial direction on
Didik Nurhadiyanto , Moch Agus Choiron , Ken Kaminishi , Shigeyuki Haruyama
Optimization of New 25A-size Metal Gasket
Design Based on Contact Width Considering
Forming and Contact Stress Effect
initial gasket material between the top an dies. The second stage is the gasket shape press is continuity compressed in axial tightening of the gasket on the flanges.
The virtual gasket model with various de by using four basic steps. They were the models, automatic meshing, computation o post-processing in batch mode and optim parameter model is built by utilizing the To connect drawing data from Solidwo automatic meshing by using Hypermesh, was built and a NAS file was produced w Then the procedure file was configured to o and running the model on MSCMarc sof user interface (GUI) was not appear an command in the background. After the complete, an output file including analys generated in TXT file. The TXT result file Microsoft excel by using MACRO comman contains the contact status, stress value, an time at every convex position. Calculation versus load on convex position number 1 with several step of MACRO command.
Fig. 1 Flow chart the stage of simulation and o considering forming effec
The optimum design was also determine the clamping load. It could be denote by gradient of the curve of relationship betwee clamping load (Fig. 2). The upper and lowe calculated by adding the value of conv number 1 and 2, 3 and 4 respectively. The increased; it would be reduce the clampin curve was built manually by using trend Microsoft Excel. The process of optim Taguchi was illustrated as a circulating Yes imization. Firstly, 2-D e Solidwork software. work (IGES file) and h, batch command file d with this procedure. to obtain preprocessing software. The graphic and the program run he FEM analysis was lysis results could be file was transformed to and. The output result and body force at each on of the contact width r 1 until 4 is produced nvex contact position he slope of curve was ing load. The slope of end line command in timization using L18 ing loop. Due to the
optimization design based o combined with considering c design was divided as two mo modes. The next circulating assessment. From the simulat defect result. The lack of die increasing the angle of inner r
C. Leak Quality Measureme
The schematic diagram of device, as shown in Fig. 3, w evaluation test of the gaske performance, quantitative me helium gas was undertaken. method which has the highes leak measurement was selecte [9] and JIS Z2331 standard [1 In the test chamber, the hel part of gasket. The content of was measured by the oxyg density in the outer part of ga measurement was performed below 0.2 [%], and helium atmosphere condition. Using 702D1 ULVAC corporation quantity that could be detecte lly the optimized design considering
ieved.
relationship between contact width and mping load
rmed to produce gasket shape by a terial to slide into a die. Therefore, sidered for gasket design modeling lation analysis the lack of die fills cted and utilized based on JIS Z2330
10].
is 1.0E-11 Pa.m3/s, and the maximum one was approximately 1.0E-03 Pa.m3/s. Measurement was taken from 300 to 500 seconds to avoid the influence of leak flow fluctuation at the time of the initial measurement.
Fig. 3 The schematic diagram of the helium leak measurement device
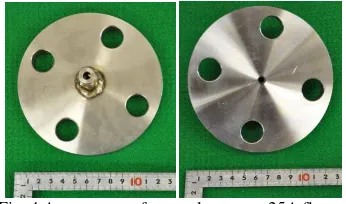
The flange used in this test was a general-purposed flange based on JISB2220 [11] with 20 K pressure and 25A diameter as shown in Fig. 4. The flange and joint was welded carefully to avoid a distortion. To avoid the experiment error due to the leakage from the joint of the flange and pipe, the leak flow quantity of joint part was also calibrated.
Fig. 4 Appearance of general-purpose 25A flange
Clamping load of the flange is caused by the tightening of flange by bolt. Converting tightening torque of bolt into the axial load was general procedure in clamping load evaluation. However, the accurate axial load prediction could not be reached due to various friction coefficient of each bolt and nut in the clamping. Variation of the clamping load due to clamping order of the bolt also contributed to the inaccurate axial load prediction. In this research, axial load measurement was held by embedding strain gauge to the bolts, therefore the axial load could be directly measured (Fig. 5).
Fig. 5 Measurement of clamping load
For the evaluation of the clamping load and the leak quantity, the leak quantity was measured based on the measurement of helium leak flow quantity. The variation of clamping load measured were 10, 15, 20, 25 and 30 kN for each bolt. The axial load of each bolt was monitored in order to adjust the appointed axial load error to below 3%.
III. RESULT AND DISCUSSION
The simulation result of one of the model in upper contact for 0 MPa and 400 MPa modes is shown in the Fig. 6. The graphic shows that for increasing clamping load increase the contact width.
(a)
(b)
Fig. 6 The simulation result of the model number 14: (a) 0MPa and (b) 400MPa modes
The L18 matrix was conducted and the slope of the curve of relationship between contact width and clamping load as observed values (Y) was calculated for all models as shown in the Table I.
TABLE I
THE RESULT OF L18TEST MATRIX
Run# Factor Slope of curve
0 [MPa] 400 [MPa] 1 A1B1C1D1E1F1G1H1 0.00835 0.0077
2 A1B1C2D2E2F2G2H2 0.0089 0.0077
3 A1B1C3D3E3F3G3H3 0.0085 0.0075
4 A1B2C1D1E2F2G3H3 0.008 0.0071
5 A1B2C2D2E3F3G1H1 0.00805 0.00575
6 A1B2C3D3E1F1G2H2 0.0095 0.0057
7 A1B3C1D2E1F3G2H3 0.01165 0.0042
8 A1B3C2D3E2F1G3H1 0.0076 0.00545
9 A1B3C3D1E3F2G1H2 0.00705 0.0059
10 A2B1C1D3E3F2G2H1 0.00675 0.0061
12 A2B1C3D2E2F1G1H3 0.00765 0.0069
13 A2B2C1D2E3F1G3H2 0.00565 0.00475
14 A2B2C2D3E1F2G1H3 0.01075 0.00435
15 A2B2C3D1E2F3G2H1 0.0092 0.007
16 A2B3C1D3E2F3G1H2 0.0096 0.0056
17 A2B3C2D1E3F1G2H3 0.00555 0.0048
18 A2B3C3D2E1F2G3H1 0.0102 0.0045
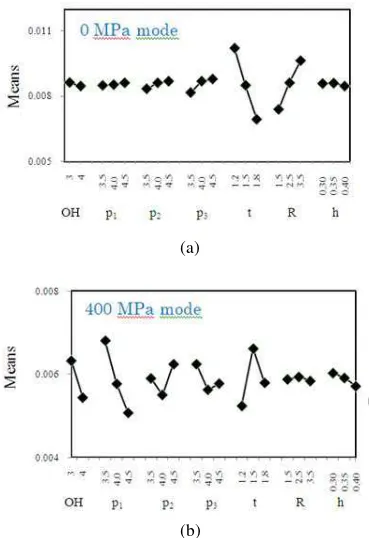
Fig.7 shows the main effects is plotted for a visual inspection of each factor for various level conditions at 0 MPa and 400 MPa modes. The highest value for slope of curve is supposed as the clamping load reducing. The main factor of the design is providing the larger contact width and reducing the clamping load.
(a)
(b)
Fig. 7 The main effects of each factor for various levels at slope of curve: (a) 0 MPa and (b) 400 MPa modes
Although contact width at 400 MPa mode is smaller than contact width at 0 MPa mode, the fact denotes that contact stress distribution by using 400 MPa mode is larger than contact stress distribution by using 0 MPa mode. Dividing the mode 0 and 400 MPa is used based on assumption that the large contact stress creates sealing lines on contact width [12]. Finally, this study suggests the optimum gasket design based on results of each models is shown in Table II.
TABLE II
OPTIMUM DESIGN OF GASKET AT 0MPA AND 400MPA MODES
Factor Forming model
0 MPa mode 400 MPa mode
OH 3.0 mm 3.0 mm
p1 4.5 mm 3.5 mm
p2 4.5 mm 4.5 mm
p3 4.5 mm 3.5 mm
t 1.2 mm 1.5 mm
R 3.5 mm 2.5 mm
h 0.35 mm 0.3 mm
Fig. 8 shows the lack of die fills defect result. The defect is tending occurred on the radius shape of convex contact, both on 0 MPa and 400MPa modes.
Fig. 8 Lack of die fills defect result on one of convex contact
Using MSC Marc Software analysis founded that the lack of die fill defect is decreased with increasing the angle inner radius. The changes in the angle will change the radius and lip height, see Fig. 9. This increased of angle is varied by 0%(θ0%),
5% (θ5%) and 10% (θ10%) from the initial angle, see Fig.10.The
adding 10% of angle showed the best reduction of the lack of die fill defect.
Fig. 9 The changes process of the angle to reduce lack of die fills defect result on one of convex contact
Fig. 10 Gasket simulation to reduce lack of die fills defect
Finally, the optimum dimensions of dies to form a metal gasket is obtained see Fig. 11 and Table III.
θ0% θ5% 10%
No touch
h1
R1
θ
h
Fig. 11 Upper and lower dies design
TABLE III
OPTIMUM DIMENSION OF DIES FOR 0MPA AND 400MPA MODES
Gasket h R h1 R1
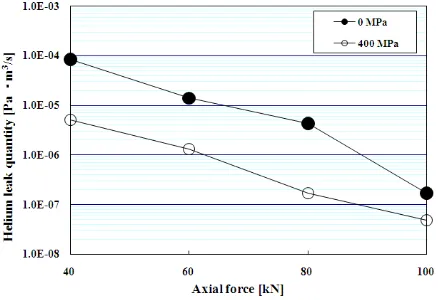
0 MPa Mode 0.35 3.50 0.39 3.20 400 MPa Mode 0.30 2.50 0.33 2.30 In the previous study [3], the qualitative explanation produced by water pressured test is transformed into quantitative value using helium leak test. Therefore, quantitative decision criterion to prevent the leak is determined under the condition of helium leak quantity below the 1.0×10⁻⁶ Pa.m3/s and it is observed that the leak by water pressure test did not occur.
Fig. 12 Leak measurement test result
The leak measurement result of the proposed gasket is shown in Fig. 12. From the figure shows that the gasket 0 MPa mode did not leak on the 100 KN axial load while the gasket 0 MPa mode leak ddi not occur on the 80 KN axial load. Both types of gaskets shows good performance, because it did not leak at certain axial load. The gasket 400 MPa shows better sealing performance than gasket 0 MPa mode. Therefore, the gasket design 400 MPa mode is chosen due to the better sealing performances are desirable because the large contact stress.
IV. CONCLUSION
The optimum design bysimulation based on an elastic and plastic contact stress was founded. Forming process for both metal gaskets mode can be done well. Final evaluation is determined by helium leak quantity to check leakage
performance of both type of gaskets. According to the leaks that occurred, we find that the gasket 400 MPa mode was better sealing performances than 0 MPa mode. Both types of gasket can be used as a seal, because it did not leak in the helium leak test.
ACKNOWLEDGMENT
This project supported by the Strength of Material laboratory, Yamaguchi University, Japan. The first author wish to thank for scholarship support from the Directorate of Higher Education Indonesia cooperated with Yogyakarta State University.
REFERENCES
[1] Saeed, H.A, Izumi, S., Sakai, S., Haruyama, S., Nagawa, M., Noda, H.,
Development of New Metallic Gasket and its Optimum Design for Leakage Performance, Journal of Solid Mechanics and Material Engineering vol. 2, no. 1, 2008, pp. 105-114.
[2] Haruyama S., Choiron M.A, Kaminishi K., A Study of Design Standard and Performance Evaluation on New Metallic Gasket, Proceeding of the 2nd International Symposium on Digital Manufacturing, Wuhan China, September 2009, pp. 107-113.
[3] Choiron M.A, Haruyama S., Kaminishi K., Simulation and Experimentation on the Contact Width of New Metal Gasket for Asbestos Substitution, International Journal of Aerospace and Mechanical Engineering, vol. 5, no. 4, 2010, pp. 283-287.
[4] Nurhadiyanto D., Choiron M.A., Haruyama S.,Kaminishi K., Contact Width Evaluation of New 25A-size Metal Gasket Considering Forming Effect, 8th International Conference on Innovation and Management,
2011.
[5] Santos Abel D., et.all, The Use of the Finite Element Simulation for Optimization of metal Forming and Tool design, Journal of Material Processing Energy 119 (2001) pp. 152-157.
[6] Choiron M.A, Haruyama S., Kaminishi K., Optimum Design of New 25A-size Metal Gasket Considering Plastic Contact Stress, International Journal of Modeling and Optimization, vol. 1, no. 2, June 2011, pp. 146-150.
[7] JIS Z2241, Method of tensile test for metallic materials, Japanese Standards Association, 1998.
[8] MSC Marc 2007. User manual.
[9] JIS Z2330, Standard Recommended Guide for the Selection of Helium Leak Testing, Japanese Standards Association, 1992.
[10] JIS Z2331, Method of Helium Leak Testing, Japanese Standards Association, 2006.
[11] JIS B2220, Steel Pipe Flanges, Japanese Standards Association, 2004. [12] Noda N.A., Nagawa L., Shiraishi F., Inoue A., Sealing Performance of
New Gasketless Flange, Journal of Pressure Vessel Technology, vol. 124, 2002, pp. 239-246.
Upper dies
Lower dies R
R R
R
R1
R1
R1
R1
h1
h1
h1
h1
h
h h
h
+
+
+
+
+
+
+


