Alan Thorn
••
•
• •
•
TECHNOLOGY IN ACTION
™Pro
Unity Game
Development
with
C#
REFINE YOUR UNITY DEVELOPMENT SKILLS
WHILE BUILDING A CROSS-PLATFORM
For your convenience Apress has placed some of the front
matter material after the index. Please use the Bookmarks
iii
Contents at a Glance
About the Author ...
xi
About the Technical Reviewer ...
xiii
Acknowledgments ...
xv
Introduction ...
xvii
Chapter 1: Designing and Preparing
■
...
1
Chapter 2: Getting Started
■
...
37
Chapter 3: Event Handling
■
...
81
Chapter 4: Power-Ups and Singletons
■
...
113
Chapter 5: Player Controller
■
...
147
Chapter 6: Weapons
■
...
179
Chapter 7: Enemies
■
...
217
Chapter 8: Graphical User Interfaces
■
...
255
Chapter 9: Handling Persistent Data
■
...
281
Chapter 10: Refinements and Improvements
■
...
303
xvii
Introduction
One thing I really love about the games industry today is its “openness” compared to many industries. To start out in the games industry you don’t need a degree. All you need is a computer. And an Internet connection. If you log on online right now, you can immediately visit web sites such as Blender, GIMP, Inkscape, and (of course) Unity to get access to professional-grade game development software completely free of charge! The result is that almost anybody in any place on any budget, from any background and at any age, can sit at a computer and be a game developer right now.
Of course, none of that openness guarantees you’ll automatically know how to use the tools, or that you’ll even like the results you get from them. You need to bring a certain something, an understanding, to the tools to fully realize their power and potential in practice. To do that, you’ll need to develop experience and to refine your knowledge, and to learn techniques and workflows using real-world examples, targeting your software of choice directly.
This book focuses on Unity development specifically. And when it comes to Unity development, there’s one area where developers feel troubled or somewhat lacking in power. That area is in C# scripting. The general feel is that so much of the C# tutorials and guides out there today are so abstract and formal that it’s difficult to see how all of it should come together and be applied properly in real-world cases to do what you need to do to give your games that professional edge. You already know about variables, functions, loops, enumerations, and the fundamentals. But what you need is something to take you further, to help you see how all these core features can be combined in creative ways to produce a real-world, working game. The kind of game you can not only play but study and see how it all comes together. This book aims to fill that need so you can become a more powerful game developer.
What Is This Book About?
xviii Introduction
artificial intelligence, state machines, weapon creation, trajectories and paths, and load-and-save functionality, as well as a lot more! We’ll see things not just from a more abstract and theoretical standpoint, but we’ll see how theory is applied in real-world cases to get work done, gradually piecing together a complete game we can play and enjoy, and also extend upon and improve. The aim is to show you some real-world applications of C# scripting that you can take away to use on your own projects, achieving your creative vision more easily and effectively.
There are, of course, many things we won’t cover here. Specifically, we’ll be focusing only on C# scripting, and not on other languages such as JavaScript or Boo. That decision should not be taken as a negative judgment of those languages. Indeed, all of them are powerful and versatile in their own ways. But it simply reflects what most people are seeking (as I see it) when they approach Unity seeking to extend their scripting skills.
Additionally, we won’t be covering C# basics, such as variables, functions, and loops. I’ll assume you already know that stuff. Further, although we’ll cover some level and game-design issues as we start out with our game project in Chapters 1 and 2, we won’t be going too far in depth on that subject, as it’s covered amply elsewhere and because the main focus here is on C# and scripting specifically.
And finally, we won’t be covering every aspect of the C# language or every possible way it can be used. This is for the simple reason that no book could hope to do that, just as no English dictionary can tell you about every possible combination of words or every possible application of them. This book covers a specific set of C# features in a specific set of ways. The idea is that by showing you specific cases and specific applications, you can see how the general techniques apply to your own games.
Who Is This Book For?
Every technical book is written with a target audience in mind. That is, it’s written for a specific “type” of reader. This means that when writing the book, I, the author, must make assumptions about you, the reader. The assumptions are about the book-relevant topics I think you’ll already know, before even starting to read this book. Specifically, I’ll assume you know the following:
How to use the Unity Editor to import assets and build levels n
n
How to create script files and write some basic code in C# n
n
How to use fundamental programming concepts like variables, functions, loops, n
n
and conditional statements
How to debug games using the Unity debugging tools n
n
xix Introduction
How Should This Book Be Read?
This book has been written to be a complete C# scripting course. For this reason, you’ll probably get the most from it by reading it from start to end, chapter by chapter, consulting the source code and project files along the way. Further, it’d be really great if you could read this book while seated at the computer with Unity in front of you, along with the book files, to make comparisons, testing, and checking easier. You can read it on a train or plane or elsewhere and still benefit; but the greatest benefit will come if you can readily switch between the book and your computer, following the steps and instructions, and completing the exercises. There’s a lot to do in this book; it’s not intended to simply be read. It expects you to follow along and join in.
What Are the Companion Files?
As mentioned earlier, this book has a practical focus. That means it encourages you not just to read, but to do things. In each chapter, we’ll be working in software, using the features of Unity and MonoDevelop, and other software, to create a working first-person shooter game. This book has been designed and configured for you to follow along with me, repeating the steps I take, while understanding them too, to build a first-person shooter in parallel. However, the book companion files feature all the assets I’ve used and the projects I’ve made for you to use should you wish to start at specific chapter or start from exactly the same place as me.
1
Chapter
1
Designing and Preparing
Welcome to Chapter 1, the beginning of a comprehensive and “professional” C# programming course for the Unity engine. The core objective of this book is to thoroughly explore the development of a first-person shooter (FPS) game from start to finish. Further, it aims to do so in a way that’ll have strong practical relevance for you and your own projects. This book is intended to be read as a complete course; meaning you should read it on a chapter-by-chapter basis, in sequence from beginning to end, thinking of each chapter as an independent class or lesson. If you follow this book carefully in order, sitting at the computer and working along with me in Unity, then by the end, you should have completed a playable FPS game that runs on desktop platforms and has mobile potential. But much more than this: you’ll have seen and explored many C# coding techniques that have wider relevance and importance than only to the specific game created here. As we progress, considering techniques and ideas, it’s important to see them in their broader context, as tools you can use in your own ways and for your own games. Don’t just think of them as ideas limited to this book and this project— because they’re not.
A further and final quality of this book, which makes it unique among the tutorial literature available today, is its strong “professional” focus. The book title is Pro Unity Game Development with C#, and the word Pro has an important meaning worth clarifying before getting started with development. Pro (short for professional ) and is especially vague in the games industry. This is because it means different things to different people, and there’s little or no consensus about which definition is correct, if any. To some, being a professional simply means your main income stems from making video games. To others, you can also be a professional by making games part-time, or even as a hobby, so long as you sell them for money. For others, being a professional is about having a recognized degree or qualification from an established authority, like a university. And to others, professionalism has nothing to do with money or education, and is about making games of a specific quality and polish.
2 CHAPTER 1: Designing and Preparing
already familiar with the basics, and aims to show how you could use Unity and C# in a practical context, making real-world games—the kind you could seriously think about selling if you wanted. Consequently, reading this book should feel much like putting on a pair of magical glasses that allow you to see new possibilities in familiar surroundings. Its main benefit should be in allowing you to see new and creative ways to use the tools you already know.
Note It’s important to be flexible and open-minded about solutions and approaches in game development. Just because the word professional is used in this book, don’t think the techniques and methods I’ll show you here will always be the best or optimal methods for your own projects in every case. Games are highly
context sensitive. For any game there’ll likely be many roads to the same destination, and choosing the right road often takes careful consideration. So be open to exploring and avoid rigidity. This book offers plenty of food and ideas to help you formulate alternative plans and to see things from new perspectives.
Designing
This is Chapter 1, so we’ll be thinking here about how to get started making a C# Unity game. When most people begin making a game, there’s typically a strong temptation, born from excitement and enthusiasm perhaps, to immediately fire up Unity and MonoDevelop, and to “jump in” and get started in a free-form style. The desire for instant, tangible results like this can be strong indeed. But resist it. Jumping into coding without any prior planning is almost always a recipe for disaster and drift; not to mention wasted time! If you want professional quality results, then invest time ahead simply to think, consider, and plan, and also to write down the results of your thinking, whether that’s in words, pictures, or diagram form—whatever best helps you remember your own thoughts.
Maybe you think you know your own thoughts well and don’t need to write them down. But resist this way of thinking, too. Get into the habit of making written plans. Over time, we typically forget, and our thoughts and ideas get fuzzy. But solid and dependable coding critically requires clarity of mind, and that’s true no matter which programming language we use. Half the solution comes from understanding the problem. The famous philosopher John Searle echoed this when he said, “If you can’t say it clearly, you don’t understand it yourself.” So make written plans and work on the basis of those. With that said, we’ll begin by writing a summary and overview of the game we’ll be making in this book.
Game Overview
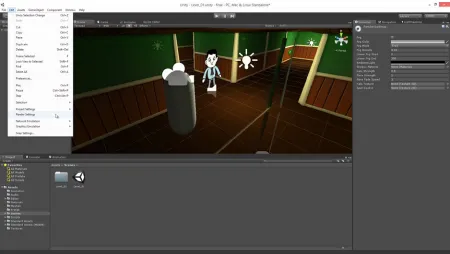
The FPS game we’ll make in this book will be titled Crazy Mad Office Dude ( hereafter referred to as
CMOD), as shown in Figure 1-1. You can also visit my YouTube Channel at www.youtube.com/user/
alanthorngames to see the game in action. CMOD is an action-shooter in a deliberately comic and
3 CHAPTER 1: Designing and Preparing
In this game, the Player must struggle against its tyrannical employer (the Corporation), which, being incredibly evil, is holding back on paying the Player his due salary—many months’ worth of money. So the Player, understandably enraged, must explore the Corporation’s office environment (the Level ), collecting Cash Power-Ups, which are scattered around. The aim is to reclaim the Player’s salary in full, and maybe a bit more besides. The game is won and completed when the Player successfully collects all Cash Power-Ups in the level. To prevent the Player from achieving his goal, the Corporation has (of course!) dispatched evil minions (the Enemies) to attack and eliminate the Player once and for all.
Successful attacks on the Player reduce the Player’s Health, and the Player is destroyed when his Health is reduced below 0. The Player may deal with these slippery enemies using two main strategies: he may cowardly avoid the Enemies altogether, hoping to evade all or most of their attacks. Or, he may resort to Carpe Diem, foolhardily attacking them in combat using up to two different weapons: fists or a pistol. Just as enemy attacks on the Player reduces the Player’s health, Player attacks on the Enemy will reduce the Enemy’s health—meaning that the Player and Enemies may attack and destroy each other. Of course, it goes without saying, the Enemies are quite smart. They don’t just stand around doing nothing all day, twiddling their thumbs and waiting for the Player to appear. They patrol around the environment, intelligently hunting for the Player—making them appear and behave just like rational and sentient beings.
Figure 1-1. The game to be created—Crazy Mad Office Dude
4 CHAPTER 1: Designing and Preparing
Game in Depth
We’ve now established a general overview of the game to be made, CMOD as whole. In writing and thinking about that, we have, however, relied on a range of smaller and dependent concepts. These are constituent ingredients of the game. These concepts include the Player, Enemies, Power-Ups, Weapons, Health, the Level, and more. In this section, we’ll itemize and catalog these, offering an informative description of each. As we progress through the book, each concept will require its own specific implementation in C# and Unity.
The Player. The Player in a first-person shooter usually has no substantial graphical representation in the game world, except for his or her hand holding a weapon at the bottom center of the screen. The Player is the character the gamer controls and moves around during gameplay. It’s how the gamer interacts with the world: such as destroying enemies, opening doors, pressing buttons, and collecting power-ups. In addition, the Player also has a finite amount of Health, a numerical property measuring his well-being. The higher this value, the better for the Player. This value is reduced when Enemies successfully attack the Player. When this value is 0 or below, the Player dies and is removed from the game. Since CMOD will be a single-player game, as opposed to multiplayer, the removal of the Player from the game constitutes Game Over (the end of play).
The Enemies. CMOD features three main Enemy types or species, whose shared aim is to kill the Player through attacks. These Enemies are as follows:
The
Drone (see Figure 1-2), a genetically engineered bureaucrat with a penchant for
long questionnaires and customer surveys. This Enemy is the weakest of the three. He attacks at close range using his bare fists.
Figure 1-2. Enemy Type 1: Drone. Contains three main frame-sets of animation: Standing Still (Neutral), Running, and Attacking
Next is the
Tough Guy (see Figure 1-3), a professional hit man employed by the
5 CHAPTER 1: Designing and Preparing
The final Enemy is
Mr. Big Cheese (see Figure 1-4), the boss of the Corporation.
Because he relies on protection from his Tough Guys, he doesn’t have a range attack; but he’s no lightweight either. When he strikes with his fists, the Player will suffer severe damage.
Figure 1-3. Enemy Type 2: Tough Guy. Contains three main frame-sets of animation: Standing Still (Neutral), Running, and Attacking…
Figure 1-4. Enemy Type 3: Mr. Big Cheese Contains three main frame-sets of animation: Standing Still (Neutral), Running, and Attacking…
All three enemies also have a Health property, which can be reduced when the
Player attacks them with a weapon. If an Enemy’s health is reduced to 0 or below, it is destroyed and permanently removed from the game. In addition to health, all three enemies exhibit intelligence. Having been alerted to the Player’s intrusion into their Corporation headquarters, they’ll all be on patrol, searching for him or her. If they find the Player, they’ll give chase until they enter attacking distance. When they do, they’ll attack with all their mightiness.
Power-Ups. Scattered liberally around the Level are special collectible objects, called Power-Ups. These may be collected only by the Player (not by Enemies) and they’re collected whenever the Player collides (or walks into them). Each and every Power-Up instance may be collected once only (it’s destroyed on collection), and it’ll have some immediate effect on the Player, depending on the Power-Up type. CMOD will feature four Power-Up types:
A
Cash Power-Up (see Figure 1-5), which gives a specified amount of money
6 CHAPTER 1: Designing and Preparing
A
Weapon Power-Up (see Figure 1-6), which upgrades the Player’s default weapon
(Fists) to a range attack (Pistol).
Figure 1-5. Power-Up 1: Cash
Figure 1-6. Power-Up 2: Weapon Upgrade
Figure 1-7. Power-Up 3: Ammo Restore
An
Ammo Power-Up (see Figure 1-7), which restores the ammo for the pistol weapon,
if collected.
A
7 CHAPTER 1: Designing and Preparing
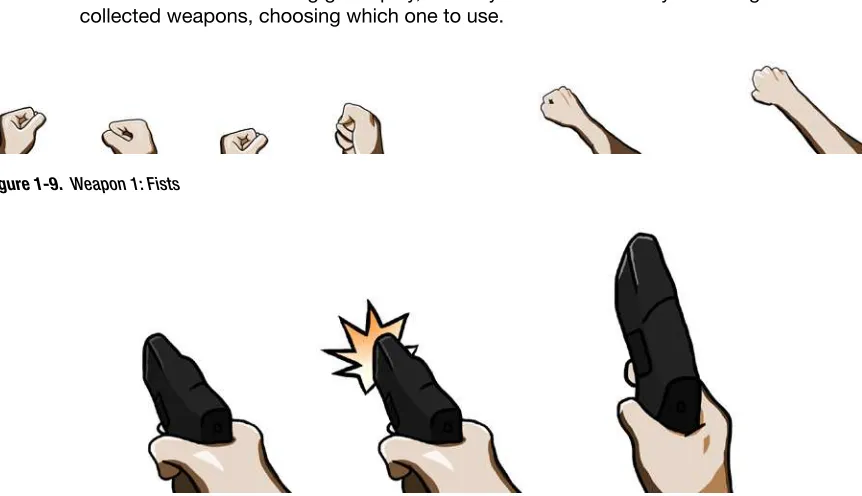
Weapons. If the Player chooses to attack an Enemy, it must be done so with a Weapon. The Player can equip only one weapon at any one time, and there are a total of two weapons in the game, each behaving slightly differently and each dealing different amounts of Damage. At game-start, the Player begins equipped with the default weapon of Fists (see Figure 1-9). This weapon is permanently accessible and never runs out of ammunition because it’s not the kind of weapon to require ammunition. This weapon, however, has the shortest attack range and deals the least damage to Enemies. There is also the Pistol weapon (see Figure 1-10), which offers ranged attack and deals more damage, but must be collected in the Level through a Power-Up. This weapon has limited ammo, which reduces each time the weapon is fired. The ammo can be restored by collecting an Ammo Restore Power-Up. When the ammo expires, the weapon becomes unusable. During game play, the Player will be able to cycle through all collected weapons, choosing which one to use.
Figure 1-8. Power-Up 4: Health Restore
Figure 1-9. Weapon 1: Fists
8 CHAPTER 1: Designing and Preparing
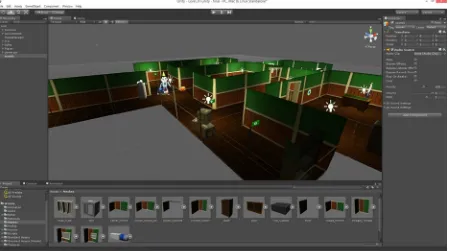
Level. The Level represents the complete game environment, plus everything else inside it. The level architecture, such as the walls and floors, will be composed into integrated wholes from separate and modular mesh pieces, which I’ve modeled beforehand using the free 3D software Blender. Modular means the environment was created in blocks, or modules, which match at the seams. So each module fits together with others and may be recombined, like Lego bricks, to form larger and more complete environments inside the Unity Editor. More on this later. See Figure 1-11 for the game environment, as seen inside the Unity Editor.
Figure 1-11. Game environment for CMOD. Notice the modular mesh pieces inside the meshes folder of the Project panel. These are included in the associated project files (FBX Format), inside the AssetsToImport/Meshes folder
9 CHAPTER 1: Designing and Preparing
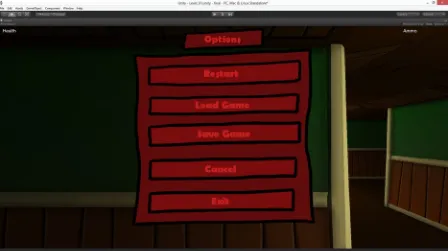
GUI. In addition to all the core or game-critical objects discussed already, such as the Player and Enemies, CMOD will also feature a GUI (graphical user interface). This refers to all the 2D graphics or widgets overlaid on the screen to provide the user with access to game options or information. These elements are divided over two main parts or areas: the HUD (Heads-Up Display) and the main menu. The HUD (as shown in Figure 1-1) refers to all the small displays overlaid onto the screen while the game is being played (such as a cash counter and health information), to keep the player updated in real time on vital game statistics. In contrast, the main menu (as shown in Figure 1-12) is a separate screen or window that is shown to allow the Player access to game-wide features, such as restarting the game, exiting the game, and also loading and saving the game. While the main menu is visible onscreen, all other game events, such as the movement of Enemies and the actions of the Player, should be paused and frozen.
10 CHAPTER 1: Designing and Preparing
Developing the Design: Looking Ahead
The previous sections, taken together in combination with the YouTube gameplay video (URL provided earlier), should offer a strong enough and clear enough vision of CMOD. These resources will constitute our game design document (GDD), a document clearly articulating the vision of the game to make. For most games, the GDD will typically be longer and more comprehensive than ours, but our GDD is sufficient and fit for purpose in our case. The design may initially seem “simple” (or maybe not!), but if it seems so to you, it’s important not to confuse simple with simplicity. The game we’ve planned actually involves a lot of work, especially C# coding work. Each subsequent chapter is dedicated to a specific aspect or subset of development. In this section, we’ll take a sneak glimpse of that future work: a general guided tour through some of the main issues and subjects we’ll visit throughout this book. This work ranges from using the Unity Editor and tools, sometimes in new and creative ways, to heavy coding sessions in C# to create artificial intelligence and pathfinding. Let’s see how these subjects, and our workload in general, are distributed across the book on a chapter-by-chapter roadmap.
Chapter 2 is concerned with establishing the foundations of our game. Game development is a specialization of software engineering, and like most engineering projects, it must begin by laying foundations. This involves lots of work in the Unity Editor—especially level design work—using both the scene and game views for assembling and building a level with modular environment pieces. It’ll also involve lighting and lightmapping with the Beast lightmapper to get an appropriate mood and look for our environment. In addition, we’ll also look at processes for automating asset importing to fix some mesh import issues we’ll encounter. By the end of Chapter 2, we’ll end up with a project that’s ready to start customizing and defining through C# scripting.
Chapter 3 starts our coding adventure! It’s where we add code to our project. It’ll explore event-driven programming in depth, looking at what it is, how it works, and how to integrate it into our project to get efficient results. It’ll also explore why we should start implementing this kind of system before anything else. Practically, every game needs to detect when things happen, such as when the Player dies or collects a power-up, among others (these will all be important events for us). In addition, other objects in the game need to know when those events occur, so they can respond in specific ways. The Enemies, for example, need to know when they’re close enough to the player to launch an attack; otherwise, they’ll never know when to start attacking. These issues concerning events and responses will lead us to develop a streamlined and dedicated Notifications class; one capable of handling almost every kind of event and response we could ever want in a game.
11 CHAPTER 1: Designing and Preparing
chapter we’ll have a clean, empty environment filled with solid and working power-ups we can collect.
Chapter 5 is about refining the Player character and the Player input to work consistently across multiple platforms, from desktop systems to mobile devices. Here we’ll develop a customized First Person Controller based on the default Unity Controller, which works on Windows, Mac, Linux, Android, iOS, and Windows Phone. We’ll also examine mathematical ideas, such as sine waves and curves to program a customizable head-bob effect to the first-person camera. That is, to simulate the natural effect of head movement, we’ll make the camera bob up and down seamlessly as the Player moves around in the world. And we’ll also work with Mecanim to create a death animation in which the camera falls to the ground.
Chapter 6 is where we give the player some fire power. Specifically, we’ll code the ability to attack and inflict damage with Weapons, both the fists and pistol weapons. In this chapter, we’ll look deeper at class inheritance and at concepts like virtual functions and polymorphism. In addition, we’ll also see how to create animated sprites for creating weapon animations (such as gun fire) using timing functions and coroutines.
Chapter 7 throws our three evil enemies into the mix—namely Drones, Tough Guys, and Mr. Big Cheese. Building these guys will lead us into a veritable coding extravaganza. With these, we’ll code enemies that can take and inflict damage, and behave with artificial intelligence that integrates well with the Unity Pathfinding and Navigation system. Here, we’ll explore concepts such as Finite State Machines (FSMs), so enemies can make informed decisions and change their behavior, as well as how to program with NavMeshes and NavMesh Agents, allowing enemies to find their way intelligently about the level, while avoiding physical obstacles along the way.
Chapter 8 delivers us into the troublesome world of GUIs (graphical user interfaces), where we’ll see the limitations of the Unity GUI system and the benefits of coding our own. Further, we’ll consider concepts such as resolution and aspect ratio, as well as anchoring and hierarchies, to code fixed-sized interfaces that look good and act predictably at various screen sizes.
Chapter 9 explains how to code a load-and-save game system, allowing the user to save his or her gaming session to persistent storage, from where it can be restored without data loss at any later time. This chapter will explore XML files, the .NET Framework classes, and data serialization.
12 CHAPTER 1: Designing and Preparing
Game Development Workflows
Before jumping in and getting started with CMOD (reserved for the next chapter), I want to spend the rest of this chapter sharing with you some Unity tips, tricks, and techniques that I frequently find helpful when developing my own games. Making a game can be an intensive and heavy process, so it’s important to develop a general workflow that you feel comfortable following. The advice presented here is not essential in the sense that you need to follow it to work along with this book. But rather, it’s presented as a set of recommendations and suggestions that you may like to integrate into your own workflow, wherever you think it can be improved. Feel free to use it or ignore it until you find a workflow you like.
Tip #1: Interface Layout
The layout and arrangement of the Unity interface is critically important to the smoothness and speed of your working. So much so that even the slightest interface change, perhaps in the alignment of a panel or a dockable window, can have dramatic repercussions for your efficiency and speed in the long term. Consequently, when working in Unity, it’s important to find a layout that supports your workflow and needs from the very beginning to avoid unnecessary setbacks and frustration. Typically, the “ideal” interface layout for you will not be general but will vary depending on the project you’re developing. For games using little or no animation, it’s likely you’ll never need the animation editor or the Mecanim tools—and so you can hide those windows. Similarly, for games that never use Pathfinding or
Navigation, you’ll never need to see the NavMesh tools. For CMOD, however, we’ll need all those things and more—but not necessarily throughout the whole of development. Figure 1-13 shows the layout I’m using for this project, which is based on the Default layout.
13 CHAPTER 1: Designing and Preparing
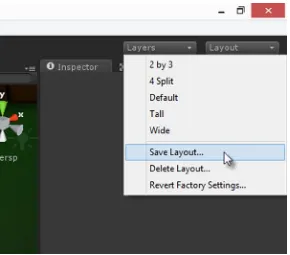
Note To create the CMOD interface layout, I began by selecting the Default layout to restore the UI defaults. To do that, select Layout➤Default from the top-right menu in the Unity Editor. Afterward, additional windows can be opened and docked into the interface as required, using the Window menu. For the CMOD layout specifically, open the following windows: Window➤Animation, Window➤Animator,
Window➤Sprite Editor, Window➤Lightmapping, and Window➤Navigation. To save the completed layout for easy reference, selectLayout➤Save Layout… from the Layout drop-down (see Figure 1-14).
Figure 1-14. Saving a custom interface layout
14 CHAPTER 1: Designing and Preparing
Tip #2: Dual-Monitors
A Dual-Monitor (or Multi-Monitor) configuration is one where two or more displays are connected to the same PC or Mac, and together they show a wider desktop, which reaches across all monitors. This means you get to arrange your windows and panels conveniently over an even wider screen area than usual. If you’re fortunate enough to be using such a setup already, then you can make especially good use of it in Unity. And if you don’t have this setup but your budget allows it, I highly recommend investing in it. In Unity, Dual-Monitors are particularly useful in two contexts: scene editing (as shown in Figure 1-15) and scripting (as shown in Figure 1-16). To jump between these two configurations, it’s sensible to create two separate UI layouts: (DM-Editing) and (DM-Coding) – DM = Dual Monitor.
Figure 1-16. DM-Coding layout keeps a single monitor layout (in left monitor) for scene editing and inspector tools, and MonoDevelop for coding (in right monitor)
Figure 1-15. DM-Editing Layout separates scene editing tools (in left monitor) and property inspection tools and editors (in right monitor)
15 CHAPTER 1: Designing and Preparing
between panels can be conducive to heightened focus and concentration, and its ability to enhance our workflow shouldn’t be underestimated.
DM-Coding. This layout again achieves a functional separation between UI panels, as with the DM-Editing layout. But this time, the separation is between the Unity Editor Interface proper (in the left monitor) and the MonoDevelop IDE (in the right monitor)—or vice versa depending on your preference. With this layout, the left monitor is identical to the single-monitor layout for the Unity Editor (as shown in Figure 1-14), but here we also get separate and full-screen access to a coding window in the right-hand monitor. This makes debugging, visualization, and code reading somewhat easier because we get to read our code alongside Unity, especially when our game is running in Play mode.
Tip #3: Be Organized
Game development in Unity (and more widely) involves working with lots of related resources, including assets (such as meshes and textures) and code (such as C# source files). By “lots” of resources, I mean hundreds and thousands, and sometimes even more! For the sake of simplicity and sanity, therefore, it’s important to be organized from the outset and to remain so throughout development. It’s important to make organization a habit. However, saying that is one thing and achieving it is another. So to stay organized while project managing and coding, keep the following principles in mind:
16 CHAPTER 1: Designing and Preparing
Use meaningful object names. Organization applies not just to assets in the Project panel, but to GameObjects in the scene, too. When building scenes with lots of objects, take a quick pause and scan through the Hierarchy panel and look at the names of your objects. Ask yourself: Are these names meaningful? One way to reach practical judgments about this is to see if you can guess what the object is, what it does, and where it is in the scene, purely from the object name alone, without looking in the Scene tab or Game tab at all. If you encounter names, such as Cube01 or Obj1, and cannot reasonably determine what the objects do, then consider renaming your objects. If a cube mesh is supposed to be an ammo crate, for example, then think about changing its name from Cube01 to meshAmmoCrate_01. Now, applying this kind of organization rigorously across your objects probably doesn’t sound like much fun, especially if your scene has many objects. But it can ultimately save you hours of time when selecting objects.
Figure 1-17. Asset organization in the Project panel for the CMOD project. Make asset organization a habit and development will become a lot simpler
Note Remember that assets are data files and resources used in a project, such as meshes and textures and audio files. GameObjects are specific instances of things, or entities, inside a scene—such as enemies, characters, weapons, and vehicles. GameObjects live in the game world. Prefabs are collections of game objects configured together into a standalone template, which is reusable as though they were one complete entity.
17 CHAPTER 1: Designing and Preparing
Asset labeling lets you index assets in the Project panel by associating meaningful labels or “tags” with them, making it easier to search and find the assets you need according to their type and relevance for your project. For example, consider labeling environment meshes under Architecture, and character meshes under Character, and so on. Labeling an asset (or more than one) is simple. Select all assets to label in the Project panel, and from the preview pane (in the Object Inspector) click the blue Label button in the bottom-right corner (see Figure 1-18). Click a tag from the menu to apply an existing one, or else use the Edit Box to type in a completely new tag for the selected assets. Once labeled, your assets are then completely searchable from the Project panel, using the Search field (as shown in Figure 1-19). To search by Label, click the Label toolbar button and select the Labels to Search For. On selection, the Project panel is immediately filtered to show only matching results.
18 CHAPTER 1: Designing and Preparing
Note Labeling an asset does not affect its file name or the physical folder inside which it’s stored in the Project. These remain unchanged regardless of labeling. Labels are Unity-specific metadata attached to the file for your convenience when searching through assets.
GameObject tagging. In many respects, Tags are to GameObjects what Labels are to Assets. Tags are special identifiers that you may attach to objects in your scenes, to group them and search them, and to perform other kinds of operations to them directly in code. Unlike Labels however, only one tag may be assigned to an object—that is, an object can’t have more than one tag assigned, although many objects can share the same tag. Tags will be used extensively in this book—and we’ll see them at work in some form in almost every subsequent chapter. To create a new tag and assign it to an object, select any object in the scene and click the Tag drop-down list at the top-left corner of the Object Inspector. From the menu that appears, select Add Tag (see Figure 1-20). Doing this displays the Tag Editor, where you can create new and custom tags—as many as you need. Use the Size field to enter the number of tags to create, and then name each tag using the Element fields below (see Figure 1-21). Once created, the tags are added to the Tag list (see Figure 1-20). To assign a tag to one or more objects, select all relevant objects and choose their tag from the Tag list in the Object Inspector.
19 CHAPTER 1: Designing and Preparing
Figure 1-21. Naming new Tags
20 CHAPTER 1: Designing and Preparing
Use concise code comments. The final organization tip to mention concerns code comments: that is, human readable statements that accompany source code and clarify what the code actually does. In C#, code comments are written with the // or /* */ syntax. You can also use a XML commenting style with MonoDevelop (more information is at http://unitypatterns.com/xml-comments/). My advice is: use code comments. They make life much easier—when written concisely! It’s common to hear criticism of code commenting, for various reasons. The following lists two of them, and I provide a reasoned response to illustrate the importance of commenting.
Criticism 1: I don’t need to write code comments because I know what I’m doing. I know what this code does. And besides, nobody else is probably ever going to read my code anyway.
Response: The core assumption here is that code comments are exclusively for the benefit of other people. But this is not true. Code comments can help you write down and clarify your own ideas. They can help you remember what your own code is doing when you return to it weeks or months later. You may know what your own code is doing right now, but it’ll not be so fresh in your mind after weeks and months pass without having seen it. So use code comments as an aid to memory.
Layers. Layers are functionally similar to tags in that they mark or group
GameObjects together by a specific criterion. Tags, however, are typically used to select or identify objects in script, as we’ll see later. In contrast, layers are typically (though not always) used in conjunction with cameras. By assigning a
group of GameObjects onto a layer, you can tell a camera to selectively render or ignore a layer, and thereby all objects on that layer; so layers are especially convenient if you have objects that must be shown or hidden together—like GUI menus and HUD elements. Layers are further considered in Chapter 8.
Note If you’re hungry for more information on Layers right now, you can check out the Unity Layer documentation at http://docs.unity3d.com/Documentation/Components/Layers.html.
Note As we’ll see later, you can access an Object’s tag through the Unity API with the GameObject.tag
property. You can also compare a tag with a String value using the GameObject.CompareTag function.
See http://docs.unity3d.com/Documentation/ScriptReference/GameObject-tag.html and
21 CHAPTER 1: Designing and Preparing
Criticism 2: Code comments are pointless. I don’t want to read a novel. They just get in the way and make things even more confusing. Far from being helpful, they can steer us in the wrong direction. Good code speaks for itself and doesn’t need commenting!
Response: There’s something true in this: code comments should be helpful. But, if they’re poorly written and needlessly lengthy, they do stand to be more of an obstacle than a help. However, this danger needn’t prevent us from using code comments altogether. It just reminds us to be careful and concise in our commenting, keeping them relevant and informative. So keep comments as short as possible and stick to the point.
Note Code commenting need not be restricted to just standard, official comments. Commenting can be extended into your very coding style. By using meaningful function, variable, and class names, you can make your code a lot clearer and easier to work with.
Tip #4: Show Project Wizard on Start-up
At start-up, Unity will, by default, always open the most recently used project if there’s one to open; otherwise, it’ll display the Project Wizard to create a new project. Its decision to open the most recent project first is usually a convenient feature that you’ll leave unchanged. But there are times when this behavior can be problematic. If you’re working in a team and are using Unity in a networked environment, it’s likely you’ve opened a project from a shared network drive. In itself, doing that will not generally cause any major issues. However, Unity expects to open projects on an exclusive basis—meaning that only one instance of the project may be open at a time. Consequently, if you restart Unity and it seeks to reopen the shared project but finds it’s already open by another user on the network, it’ll cancel the open operation altogether and will exit instead of showing the Project Wizard. The result is that you’ll be permanently locked out of Unity until the other user on the network finally decides to close the project, allowing you exclusive access again.
22 CHAPTER 1: Designing and Preparing
Note Using Unity to access projects and assets across networked drives is not recommended. Many developers have experienced slow-downs and crashes in such circumstances.
Figure 1-22. Force Unity to display the Project Wizard on start-up
Tip #5: Use FBX Meshes
Unity officially accepts meshes in an extensive variety of file formats, including Blend, MA, MB, MAX, OBJ and FBX, and others. These formats can be produced by a range of 3D applications, such as Maya, 3DS Max, Lightwave, Blender, Strata, Cinema4D, and more. Among all these file formats, however, two main types may be identified: Proprietary and Exported. Proprietary files are those saved directly from 3D modeling software, using the common File ➤ Save command. Exported formats are those saved using commands such as File ➤ Export. The ultimate purpose of both methods is to serialize or output meshes to a persistent file, which can be opened and read by many applications. However, despite the common aim, there are significant differences between the Proprietary and Exported files, which have implications when working with Unity. The upshot is generally this: Always use meshes from exported
23 CHAPTER 1: Designing and Preparing
Proprietary meshes produce dependencies. To import a Proprietary mesh into Unity (such as MA, MB, MAX, or Blend), you’ll need to have the appropriate 3D software installed on your computer at the time of import. For MA and MB files, you’ll need Maya installed; for MAX files, you’ll need 3DS Max; and for Blend, you’ll need Blender—and so on for other proprietary files. This is because the Unity Mesh Importer exports the Proprietary file to an FBX file behind the scenes. That is, during import, it loads the associated 3D modeling software, uses its internal FBX Exporter, and then accepts the outputted FBX version. Thus for Unity, Proprietary meshes create a dependency on their modeling software; Unity needs that software to import the mesh successfully. If the software isn’t present during import, then the import will necessarily fail—although once imported, the software is not required (unless you need to import again!). Of course, this might not be a problem for you at all if you’re sure that you’ll be the only one using your meshes and you’ll have access to your 3D software for as long as you need. But if you’re sharing meshes between team members who may not have the same software, or if you’re not sure you’ll always be working at a computer with your modeling software installed, then proprietary formats will prove problematic.
24 CHAPTER 1: Designing and Preparing
Proprietary meshes create clutter. As mentioned, when importing a Proprietary mesh, Unity calls upon the mesh’s associated software and uses its FBX
Exporter to create an exported version. In doing this, however, Unity asks you no questions and provides no options. It simply creates an FBX version with default settings applied. In contrast, if you export a mesh manually to FBX using the tools in your 3D software, then you’ll get finer control and options over exactly how the FBX is exported and the kinds of meshes and objects in your scene that should be included in the file. The result is that manually exported FBX files are typically cleaner and more efficient, because they feature only the data you truly need. In contrast, the Unity-generated FBX files from proprietary files generally include plenty of data that you never wanted exported anyway, such as lights, dummy objects, meshes and faces you forgot to delete, and so on.
Proprietary meshes are unstable. The term unstable is used here in a narrow but important sense. By “unstable” I mean that importing a proprietary file into Unity can lead to different results at different times, when different versions of the 3D modeling software are installed. This is due to possible changes or updates made to the FBX Exporter. In short, importing a Proprietary mesh with one version of the 3D software installed will not necessarily produce the same results when a different version is installed.
Note More information on Proprietary vs. Exported meshes for Unity can be found online at
http://docs.unity3d.com/Documentation/Manual/3D-formats.html.
Tip #6: Disable Ambient Lighting
If you build a scene with some meshes but without any lighting, and then play-test it, you’ll see that your scene doesn’t appear completely black as you’d expect it to. In other words, your scene is not in total darkness—even though there are no lights! This base or default illumination is known as Ambient Light. It represents a non-shadow-casting light that is projected outward from the scene origin in all directions infinitely, and it affects every mesh surface with equal intensity. That is completely at odds with how “real world” lighting works, and so Ambient Light rarely produces believable results. But it’s especially useful for lighting a scene during development and early play-testing. It lets you see “what’s going on” before you’ve added any lights at all. But often (after creating your own lighting), you’ll want to disable Ambient Light entirely.
25 CHAPTER 1: Designing and Preparing
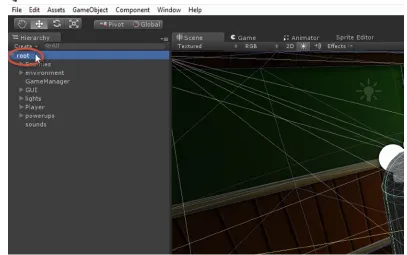
Tip #7: Use Root GameObjects
Every Unity scene is ultimately composed from a hierarchy of GameObjects. GameObjects exist within the scene in relation to each other, and this relationship (as defined by the hierarchy) is critically important to every object’s transformation (position, rotation and scale). Specifically, child objects inherit the transformations of their parents. That is, the child adds its own transform to its parent’s. This feature is useful for making objects move and interact together believably. This hierarchical relationship can be put to good use in many ways and not just at runtime; it can help at design time, too.
If you create an empty game object in your scene by choosing GameObject ➤ Create Empty from the Editor menu, and then make it the ultimate parent of all objects, you’ll immediately have the ability to transform your entire scene, should you ever need to reposition everything in one step while building a level, or even at runtime (see Figure 1-25).
26 CHAPTER 1: Designing and Preparing
Tip #8: Incremental Backups
Making games takes time (sometimes a long time), and time is said to be a wasting resource because once it’s spent and gone, there is no refund. You simply can’t get back time that’s passed. So put a value on your time, give it respect, and invest it wisely when developing. One way you respect your time and effort is by making regular backups of your data to prevent repeating work in the event of data loss. This is to protect you against unforeseen events, such as computer failures, data corruption, virus attacks, and other accidents. For Unity projects, making a backup is really as simple as making a copy of your project folder, and then archiving it onto a separate storage device, such as an external hard drive or cloud-based storage, or both. Don’t make a backup on the same storage as the original, and keep the backup in a different physical location. For example, if the original files are at your office, then keep the backup at home. Be sure also to name your backups appropriately—use a numbering or date-based system—so that it’s easy to quickly identify not just the latest backup, but also to understand the ordering of backups from the earliest to the latest.
Note More information on BroadcastMessage can be found at the Unity documentation at
http://docs.unity3d.com/Documentation/ScriptReference/Component.BroadcastMessage.html.
Figure 1-25. Creating Root GameObjects to control the scene hierarchy
27 CHAPTER 1: Designing and Preparing
Note One way to keep archives—and especially backups of source code—is to use version control systems. The Unity Team license includes a range of options, including Perforce, Plastic SCM, and the Asset Server. Other options include GIT, CVS, Mercurial, LibreSource, and others.
One question that commonly arises is “How often should I make backups?” The answer depends primarily on you and your circumstances. At the end of each work day or work session, ask yourself: “If I lost all my data now, and I had to resort to an earlier backup, how terrible and annoying would that be for me right now? How much work and time would I have to reinvest simply to catch up to where I was?” Think about these questions and be honest with yourself. If thinking about this makes you uncomfortable, and if the idea of losing your data is especially unpleasant, then it’s time to make a backup.
Note The practice of making regular backups might seem to you so obviously important that it hardly requires mentioning at all. It surely goes without saying. If this is how you feel, then splendid! You don’t need me to convince you to make backups. However, despite the lip service often given to the importance of backups, I often find people never making them and then later regretting that decision. So the importance of making regular backups cannot be overstated.
Tip #9: Batch Renaming
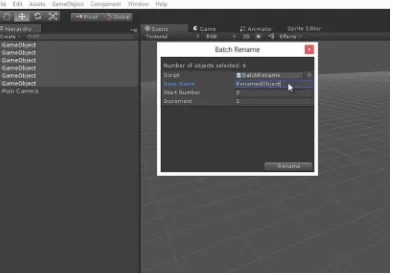
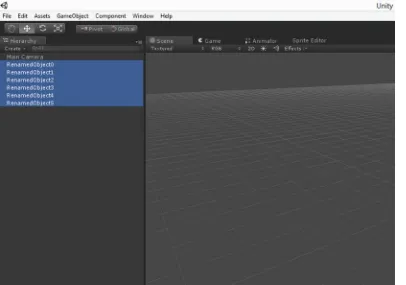
Sometimes you’ll be working with lots of similar game objects in a Unity scene, such as a batch of enemies, or ammo crates, or power-ups, or trees, or rocks, and others. You’ll typically want each object in the batch to have a similar but distinct name from all the others, such as Tree_01, and Tree_02, and Tree_03, and so forth. Now, it can tedious and time-consuming to name each of these objects individually. Unfortunately, Unity (at the time of writing) has no out-of-the-box functionality to automate this process. So often it’s convenient to customize the Unity Editor and create our own Batch Renaming functionality. In this section, therefore, I want to introduce you to a custom-made Batch Rename tool, which is an editor extension that plugs into the Unity interface and offers simple renaming functionality for multiple objects. The source code for this tool is listed in Listing 1-1 for your viewing, and is also included in the Project Files (inside the Chapter01 folder).
Listing 1-1 BatchRename.cs
using UnityEngine; using UnityEditor; using System.Collections;
public class BatchRename : ScriptableWizard {
//Base name
28 CHAPTER 1: Designing and Preparing static void CreateWizard()
{
29 CHAPTER 1: Designing and Preparing
Note The specifics and details of this code are not explained here because it’s not critical to developing CMOD. The Batch Rename tool is simply provided to help improve your general workflow. More details on the implementation of this tool, and others, are covered in the Apress Book Learn Unity for 2D Game Development, available at www.apress.com/9781430262299.
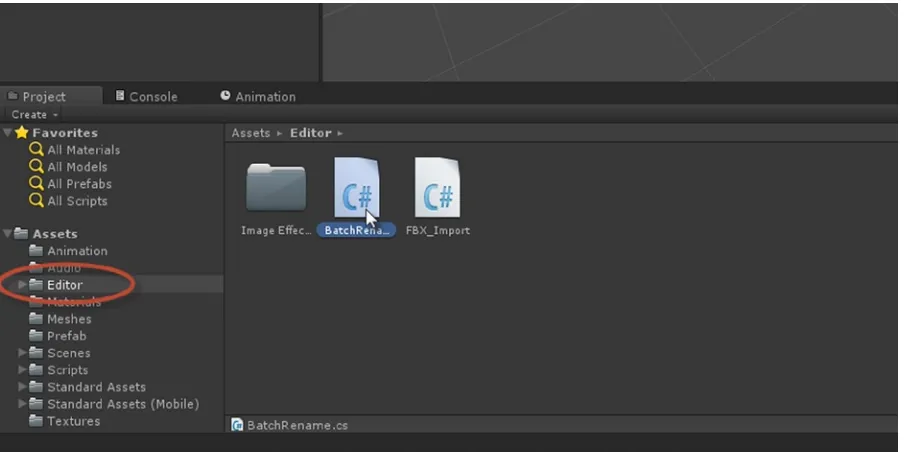
To install the Batch Rename tool into any project in Unity, first create a new folder named Editor in the Project panel (if there’s not already a folder with this name). And then drag and drop the BacthRename.cs source file from Windows Explorer or Mac Finder into the Editor folder in the project. This imports the source file and stores inside the Editor folder (see Figure 1-26).
Figure 1-26. Importing the Batch Rename tool into the Editor folder
Note The Editor folder is a special folder in a Unity project. Source files inside this folder are recognized by the Editor as being Editor Extensions—as defining behavior, customizing how the editor works.
30 CHAPTER 1: Designing and Preparing
Enter a sample name into the BaseName field, which is the name that will be prefixed to any number, such as Tree_01. Leave the Start Number at 0 to begin numbering from, and leave the Increment at 1 so that numbering for the next object is increased by 1, for example Tree_01, Tree_02, and so forth (see Figure 1-28). Once specified, click the Rename button to complete the operation and rename the objects. Congratulations! You now have a Batch Rename tool.
31 CHAPTER 1: Designing and Preparing
Tip #10: Showing Empty Objects in the Editor
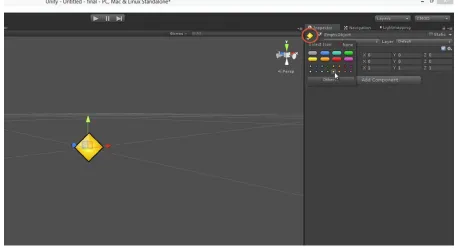
Empty objects are very useful, as we’ll see throughout later chapters. They serve a similar function to Dummies (or Dummy objects) in 3D software. An Empty is simply a GameObject that has no renderable components. There’s nothing about an Empty that allows it to be seen, and so the player never knows that they’re there. That’s part of why they are useful. Their lack of visibility makes them great for marking respawn points in the scene, or for acting as pivot points (a point around which other objects revolve), or marking out regions in the level. However, despite their usefulness in-game, Empty objects come with a drawback for the developer when working with them in the Scene Editor. The problem is that Empty objects are only visible in the scene when they’re selected. When selected, you can see the object’s Transform gizmo (as shown in Figure 1-29). That helps you to know where the object is. But when deselected, you can’t see the object anymore—you can’t even select it again with your mouse because there’s nothing visible to select. To reselect the Empty, you’ll need to click its name in the Hierarchy panel. This can be a tedious workflow. But thankfully, there’s a solution. That is, there’s a way to show an Empty game object in the viewport without also making it visible to the gamer at runtime.
32 CHAPTER 1: Designing and Preparing
To show any Empty GameObject in the viewport (even when deselected), select the Empty, and from the Object Inspector, click the Icon button in the top-left corner (it can be difficult to recognize it as a clickable button). Once clicked, choose the icon to associate with the Empty (see Figure 1-30, where I’ve selected a diamond icon). And that’s it! The Empty will now display as a diamond icon in the viewport—making it possible to see and select at all times.
Figure 1-29. Empty objects are visible in the Scene viewport when selected, but not when deselected. A = selected (gizmo visible); B = deselected (gizmo hidden)
33 CHAPTER 1: Designing and Preparing
Tip #11: Use the Stats Panel
When play-testing and debugging your games inside the editor, be sure to make the Stats panel your friend; it is also known as the Rendering Statistics window. It features lots of helpful information, updated in real time while your game is playing. The Stats panel appears in the top-right corner of the Game tab and offers an overview of how your game is performing in terms of frame rate and resource usage, among others. It’s important to note that the Stats panel is system specific, meaning that it can help you understand how well your game is performing on the current hardware you’re using. For this reason, always be sure to test and benchmark game performance on your target hardware; that is, on the minimum specification for which your game is intended. To show the Stats panel, activate the Game tab and click the Stats button from the viewport toolbar (see Figure 1-31).
Figure 1-31. Accessing the Stats panel
There are many properties shown in this window. The following list details and explains some of them, including FPS, Draw Calls, Saved by Batching, Tris, and VRAM Usage.
34 CHAPTER 1: Designing and Preparing
Draw Calls. This refers to the total number of times per frame that the Unity engine calls on the lower-level rendering functionality to display your scene to the screen. The higher this value, the more complex and expensive your scene is to render. For this reason, lower values are generally preferred. There are two easy ways to reduce draw calls. One is to use batching (we’ll see this later) and the other is to reduce the number of different materials that your objects are using. Each unique material in your scene will cost an additional draw call. For this reason, if you merge textures together into larger atlas textures, and also share and reuse materials across multiple meshes, then you can significantly reduce draw calls and improve performance.
Saved by Batching. This indicates the number of batching operations Unity managed to perform on your objects to reduce the number of draw calls. Typically, each Saved by Batching operation saves us at least one additional call. In most cases, the higher this value, the better.
Tris. This is the total number of triangles being rendered in the current frame, after culling and clipping have been applied. (Thus, it doesn’t refer to the total number of triangles in the scene). Most contemporary graphics hardware on desktop computers and consoles are adept at processing triangles quickly, meaning high tri-counts can, in principle, be achieved. The same cannot always be said of mobiles, however. Consequently, the lower this value, the better it’ll be generally. Of course, don’t be too ruthless in reducing triangles. Reduce only to a level that’s consistent with your artist vision, and target hardware. If we always reduced triangle count to the minimum number possible, then every game we’d make would just be one triangle!
VRAM Usage. Again, the lower this is, the better for performance—keeping within reasonable limits. It tells us how much video memory on the graphics hardware is being used for processing and texture storage.
Note More information on the Stats panel can be found in the online Unity documentation at
http://docs.unity3d.com/Documentation/Manual/RenderingStatistics.html.
Tip #12: Testing Resolution and Aspect Ratio
35 CHAPTER 1: Designing and Preparing
Figure 1-32. Testing the game’s resolution and aspect ratio
Conclusion
This chapter achieved three main purposes. First, it detailed in overview the FPS game to be created throughout this book, Crazy Mad Office Dude (CMOD). Second, it outlined the structure this book will take to achieve that game—specifically, it detailed how the implementation work will be distributed across chapters. And finally, in preparation for that work, it listed a range of practical and relevant guidelines and workflows for using Unity in real-world projects. In short, by now you should be able to do the following:
Understand the game to be created
Understand the elements that compose the game, including enemies, weapons,
guns, power-ups, and more
Appreciate how the implementation work for the game will be structured
Configure the Unity GUI for your comfort
Understand organization principles when working with project assets—storing
assets in folders, using tagging, and naming game objects
Understand the reasons for using FBX meshes
Read the Rendering Statistics window
Be committed to making regular backups of work
Use the Batch Rename tool
Understand the benefits of Root GameObjects
37
Chapter
2
Getting Started
In this chapter, we’ll start developing the FPS game, Crazy Mad Office Dude (CMOD), from the very beginning. This involves a wide breadth of steps; specifically, creating a new Unity project, importing and configuring assets, building Prefabs and levels from modular environment pieces, building lighting and lightmapping, and configuring a NavMesh for pathfinding. By the end of this chapter, we’ll end up with a complete Unity project that’s entirely prepared and ready for C# scripting. This project is also included in the book companion files, in case you want to skip this chapter and concentrate just on C# coding, which begins in the next chapter. But I recommend working through this chapter, too—because it features plenty of helpful tips and advice for Unity projects in general. This chapter makes use of assets included in the book companion files, in Chapter2/AssetsToImport. So let’s fire up Unity, get the project files ready, and get started!
Step 1: Create Folders
38 CHAPTER 2: Getting Started
Step 2: Importing Textures and Meshes
Importing meshes and textures is an interrelated process because meshes typically rely on textures. Consequently, you can make importing run smoother and easier if you import textures before meshes. By importing in this order, Unity detects which textures and materials to autoassign onto your meshes at import time. This means your meshes will automatically show their texture in the preview pane from the Object Inspector, and even on their thumbnails inside the Project panel. However, importing in the reverse order causes meshes to appear a textureless gray, in both the preview pane and Project panel, and usually this won’t change automatically, even after you’ve imported the textures. So, working on this principle, import the texture first from the book project files AssetsToImport/Textures/mainTexture.png into the Textures folder inside the Project panel. For a single file like this, you can import using either the Assets ➤ Import New Asset menu option, or by directly dragging and dropping the files from Explorer or Finder into the Unity Editor. The latter method is preferable when importing multiple assets together. See Figure 2-2 to see the imported texture we’ll be using.
Figure 2-1. Organizing project assets into folders
Note This project will also make use of Standard Asset Packages that ship with Unity. Specifically, Character Controllers and Standard Assets (Mobile). These can be imported from the main menu by selecting Assets ➤
39 CHAPTER 2: Getting Started
The file mainTexture.png is an atlas texture sized at 4096×4096 pixels, the maximum texture size supported by Unity. Atlas textures are essentially created by copying and pasting all your smaller and independent textures together inside a larger one—the larger one being known as the atlas. All meshes and objects inside the game will reference the appropriate texture areas inside the atlas, as opposed to referencing separate files. Doing this allows us to share a single material (or the fewest number of materials) across all objects, leading to improved rendering performance. Remember from Chapter 1, which discussed the Rendering Statistics window, that each unique material rendered to the display increases the draw calls.
40 CHAPTER 2: Getting Started
Step 3: FBX Meshes and Scale Factor
Next, it’s time to import meshes, which are found in the book companion files at AssetsToImport/Meshes. Before doing so, however, there’s an “issue” to discuss relating to FBX files in general. Specifically, Unity applies a default mesh scale factor of 0.01 to every imported FBX file. To see that, import a single FBX file and check out the Scale Factor in the Object Inspector, as shown in Figure 2-3. The result is that every imported FBX, by default, will appear in your scene 100 times smaller than its original size.
Figure 2-3. FBX meshes are imported into Unity with a default scale factor of 0.01. This may not be what you want…
41 CHAPTER 2: Getting Started
To create an editor extension, you’ll need to follow a Unity-established convention. Create a new C# source file inside the Editor folder of the project. It’s really important for the file to be stored here, in the Editor folder (or a subfolder). Nowhere else is acceptable. Once created, name the file
FBX_Import.cs and paste the C# code listed in Listing 2-1 into the file using MonoDevelop or your code editor of choice. Important lines are highlighted in bold.
Listing 2-1. FBX_Import.cs
using UnityEngine;
using UnityEditor;
using System;
//Sets FBX Mesh Scale Factor to 1
public class FBX_Import : AssetPostprocessor {
public const float importScale= 1.0f;
void OnPreprocessModel() {
ModelImporter importer = assetImporter as ModelImporter; importer.globalScale = importScale;
} }
Note Try to keep your meshes sized at nice, round numbers; keeping in mind that 1 Unity unit generally corresponds to 1 meter. Due to floating-point inaccuracy that can result from arithmetical operations, avoid having your meshes very small or very large.
Note In summary, the FBX_Import.InPreprocessModel method will be called once automatically by the Unity Editor for each imported mesh. On each execution, the mesh scale factor (represented by the
globalScale property) will be set to 1.0.
42 CHAPTER 2: Getting Started
Step 4: Configuring Meshes
After importing meshes into the project, there’s usually further configuring to do. First, when importing meshes, Unity autocreates a new material inside a Materials folder, which is further nested inside the Meshes folder—or wherever the meshes were stored. This material is assigned automatically onto all imported meshes. Although we want to keep the material itself, the folder organization is not neatly compatible with our own system and folder structure. So let’s move the material into our original Materials folder at the root of the project, and delete the empty autogenerated Material folder inside the Meshes folder. This leads to a cleaner folder arrangement (see Figure 2-5).
43 CHAPTER 2: Getting Started
Caution Items deleted from a Unity project are sent directly to the Recycle Bin on Windows, or the Trash on Mac. So if you accidentally delete something from your project, you can easily restore it again. Unless you empty the Recycle Bin or Trash!
Figure 2-5. Moving the autocreated material to the Materials folder
44 CHAPTER 2: Getting Started
Note For more information on approximating environment collision data using basic collision primitives, I recommend viewing my 3DMotive three-part video course, “Creating Blender Modular Environments for the Unity Engine,” at https://www.3dmotive.com.
Figure 2-6. Enabling Generate Colliders to add collision data to imported meshes
45 CHAPTER 2: Getting Started
Every mesh in Unity features lightmap UVs in some form, regardless of whether they’re really used in-game. Like regular UVs, lightmapping UVs are a set of mapping coordinates for meshes. Standard UVs define how regular textures, like Diffuse and Bump textures are projected onto the mesh surface in three-dimension. In contrast, lightmap UVs help Unity and the Beast lightmapper understand how to project baked lighting (such as indirect illumination) from lightmap textures onto the mesh surface. If your mesh has only one UV channel (UV1), then Unity, by default, will use that channel also for lightmapping UVs. There are occasions when this choice may not be troublesome: such as when a mesh has no overlapping or tightly packed UVs.
But usually, it’s a good idea to avoid using UV1 for lightmap UVs. It’s usually better practice to leave UV1 reserved for standard mapping, and have UV2 (a second and separate UV channel) for lightmap UVs. To achieve this, however, a mesh needs a second UV channel, and there are two main options available for creating this channel. One method is to create the channel manually in your 3D modeling software—the steps for doing this are software specific. And the second method is to have Unity generate a second lightmap UV channel. This latter approach is achieved by selecting all appropriate meshes in the Project panel, and then by enabling the Generate Lightmap UVs check box from the Object Inspector. For CMOD, lightmap UVs should be generated for all meshes (see Figure 2-7).