100 Things You Need to Know About Microsoft® Windows Vista™
by Eric Geier
Publisher: Que
Pub Date: November 21, 2007 Print ISBN-10: 0-7897-3727-2
Print ISBN-13: 978-0-7897-3727-4 Pages: 216
Table of Contents | Index
Overview
Tired of clawing your way through computer books that start at the beginning of recorded history just to find one tiny nugget of information you need? Tired of wrenching your back to pull that massive Windows tome off your bookshelf? Tired of wishing you could find a simple answer to what should be a simple problem? If you answered yes to any of these questions, then 100
Things You Need to Know about Microsoft® Windows Vista™ is just the book you've been looking for. Chock full of timesaving tips, heady solutions, and expert know-how, this book doesn't break the bank nor does it require a Bowflex body to hoist it around. Inside you'll find step-by-step help for the 100 things every Windows user needs to know when making the big switch between Windows XP and Vista. Even if you're brand new to Windows (meaning Vista is your first-ever
operating system), you'll find the advice here indispensable. In this book, we assume, for instance, that you really don't give a hoot about what TCP/IP is. We're betting you just want to get your Internet connection up and running, and leave the techy muck to the propeller heads.
walk you through, step-by-step, how to manually check if your PC and other hardware and software are supported for use with Windows Vista. We show you how to perform common upgrade tasks, if needed, before you install Vista. In addition, we
provide tips and procedures on backing up your data.
• Having to choose between five different versions (yes, Vista comes in FIVE flavors!) can be confusing! Don't sweat it,
though--we've got you covered. We show you how to decide which flavor of Vista is best suited to you! Then we walk you through installing and setting up Vista for the very first time.
• Next we dig into the new Vista interface, which is quite a change from the old XP! Then we give you a tour of the many new and enhanced features. While you might fancy yourself a wicked-smart Windows user, don't skip this section! We're positive you'll find things you didn't know that will help you make Vista do thy bidding.
• Don't like the slick new Vista interface? (Macintosh,
anyone?) We show you how to harness the power of Vista while keeping the look and feel of your XP. Who says change has to be painful?
• After you have the basics nailed, we then show you some of the cool things you can do with Vista, from customizing its
100 Things You Need to Know About Microsoft® Windows Vista™
by Eric Geier
Publisher: Que
Pub Date: November 21, 2007 Print ISBN-10: 0-7897-3727-2
We Want to Hear from You! Reader Services
Introduction
What's in This Book Who Can Use This Book How to Use This Book Get Ready to Vista!
Chapter 1. Upgrading to Windows Vista
Section 1. Use Windows Vista Upgrade Advisor
Section 2. System Requirements and Recommendations Section 3. Check the Processor (CPU)
Section 4. Check Memory (RAM) Section 5. Verify Hard Drive Space Section 6. Check CD Drive Type
Section 7. Verify Graphics Card Specs Section 8. Verify Audio Card
Section 11. Move to a New PC Preloaded with Windows Vista Chapter 2. Choosing and Installing a Windows Vista Edition
Section 12. Compare Vista Editions Section 13. Full or Upgrade Version?
Section 14. Upgrade In-Place or Clean Install? Section 15. Back Up Your Data
Section 16. Install Windows Vista Chapter 3. Introducing Windows Vista
Section 17. New Look and Functionality Section 18. Parental Controls
Section 19. Windows Defender and Windows Firewall Section 20. Network and Sharing Center
Section 21. Instant Search and Internet Explorer 7 Section 22. Photo Gallery
Section 23. Windows Aero and Windows Flip
Section 24. Windows Mobility Center and Tablet PC Support Section 25. Windows Meeting Space
Section 26. Windows SideShow
Section 27. Windows Automatic Backup
Section 28. Windows Complete PC Backup and Restore Section 29. Windows Media Center
Section 30. Windows DVD Maker Section 31. Games
Section 32. Windows Fax and Scan
Section 33. Remote Desktop Connection Section 34. Shadow Copy
Section 35. Windows BitLocker Drive Encryption Section 36. Language Packs
Chapter 4. Changing the Look and Feel of Vista Section 37. Banish the Welcome Center
Section 40. Add the Main Icons
Section 41. Add the Microsoft Internet Explorer Icon Section 42. Reduce Large Icons
Section 43. Rename the Computer Icon Section 44. Rename the Network Icon
Section 45. Change to the Classic Start Menu
Section 46. Display the Log Off Button on the Start Menu Section 47. Show Thumbnails of Pictures
Section 48. Remove Tabbed Browsing from Internet Explorer 7
Section 49. Display the Menu Bar in Internet Explorer 7 Chapter 5. Finding Your Way Around in Vista
Section 50. Renamed Windows Applications Section 51. My Documents
Section 52. Shared Documents Folder Section 53. View the Folder Path
Section 54. Up Arrow Has Been Removed Section 55. My Network Places
Section 56. Desktop Settings
Section 57. Advanced Performance Settings Section 58. Network Connection Status Details
Section 59. Wireless Network Connection Priorities and Preferences
Section 60. Network Connections Section 61. HyperTerminal
Section 62. Run Prompt Section 63. System Restore Section 64. Web Desktop Items
Section 65. Drag the Shortcut Icon in Microsoft Internet Explorer 7
Section 68. Secure Website Padlock in Internet Explorer 7 Section 69. Volume Control
Section 70. Add/Remove Programs Section 71. Display Properties
Section 72. Filmstrip View Chapter 6. Tips and Tricks
Section 73. Apply the Vista Style to XP Computers
Section 74. Display a Menu of Items on the Start Menu Section 75. Add More Gadgets to Sidebar
Section 76. Change Power Button on Start Menu
Section 77. Set Up Additional Clocks for Other Time Zones Section 78. Use Military Time Format for the Clock
Section 79. Use the Taskbar Address Bar Section 80. Resize Icons with the Mouse Section 81. Search from the Start Menu
Section 82. Use the Show Desktop Shortcut on the Taskbar Menu
Section 83. Create a Shortcut to Network Connections Section 84. Restart the Windows Explorer Shell Without Rebooting Windows
Section 85. View List of Shared Files and Folders Section 86. Select Files Using Check Boxes
Section 87. Use a USB Flash Drive to Improve PC Performance
Section 88. Refresh Your PC with a Nightly Reboot
Section 89. Disable User Account Control Pop-up Alerts Section 90. Disable UAC Pop-up Alerts for Only
Administrators
Section 91. Use Computer Lock for Security When Leaving Section 92. Create a Shortcut to Lock Your Computer
Section 95. Add Providers to Live Search in Internet Explorer 7
Section 96. Change the Home Page of New Tabs in Internet Explorer 7
Section 97. Use Windows Keyboard Shortcuts
Section 98. Use the Snipping Tool to Capture Screenshots Section 99. Adjust Audio Levels per Application
Copyright
100 Things You Need to Know About Microsoft® Windows Vista™
Copyright ® 2008 by Que Publishing
All rights reserved. No part of this book shall be reproduced, stored in a retrieval system, or transmitted by any means, electronic, mechanical, photocopying, recording, or otherwise, without written permission from the publisher. No patent
liability is assumed with respect to the use of the information contained herein. Although every precaution has been taken in the preparation of this book, the publisher and author assume no responsibility for errors or omissions. Nor is any liability assumed for damages resulting from the use of the information contained herein.
ISBN-13: 9780789737274
Library of Congress Cataloging-in-Publication Data:
Geier, Eric,
100 things you need to know about Microsoft Windows Vista / Eric Geier.-- 1st ed.
p. cm.
ISBN 0-7897-3727-2
1. Microsoft Windows (Computer file) 2. Operating systems (Computers) I. Title. II. Title: One hundred things you need to know about Microsoft Windows Vista.
QA76.76.O63G43 2007 005.4'46--dc22
2007036760 Printed in the United States of America
First Printing: November 2007 Associate Publisher
Acquisitions and Development Editor
All terms mentioned in this book that are known to be trademarks or service marks have been appropriately
as affecting the validity of any trademark or service mark.
Warning and Disclaimer
Every effort has been made to make this book as complete and as accurate as possible, but no warranty or fitness is implied. The information provided is on an "as is" basis. The author and the publisher shall have neither liability nor responsibility to any person or entity with respect to any loss or damages arising from the information contained in this book.
Bulk Sales
Que Publishing offers excellent discounts on this book when ordered in quantity for bulk purchases or special sales. For more information, please contact
U.S. Corporate and Government Sales 1-800-382-3419
[email protected] For sales outside of the U.S., please contact
International Sales
Dedication
About the Author
Eric Geier is an author of many computing and wireless
networking books, including Geeks on Call PCs: 5-Minute Fixes, published by John Wiley and Sons and Wi-Fi Hotspots: Setting Up Public Wireless Internet Access, published by Cisco Press. Eric also is a regular contributor of tutorials at Wi-FiPlanet.com, an online resource for wireless network administrators and
users.
Through spending countless days and nights in front of the computer since he could type and working in the Information Technology (IT) field as an adult, Eric has gained expertise in computers and Microsoft Windows.
Acknowledgments
I would like to thank everyone who has worked on this book. Working with Que Publishing and Pearson Education has been a great experience!
Special thanks to my mom, Aylsie Geier, for giving periodic feedback on my work.
Thanks to my agent Carole McClendon, from Waterside
We Want to Hear from You!
As the reader of this book, you are our most important critic and commentator. We value your opinion and want to know what we're doing right, what we could do better, what areas you'd like to see us publish in, and any other words of wisdom you're willing to pass our way.
As an associate publisher for Que Publishing, I welcome your comments. You can email or write me directly to let me know what you did or didn't like about this book—as well as what we can do to make our books better.
Please note that I cannot help you with technical problems related to the topic of this book. We do have a User Services group, however, where I will forward specific technical
questions related to the book.
When you write, please be sure to include this book's title and author as well as your name, email address, and phone number. I will carefully review your comments and share them with the author and editors who worked on the book.
Email: [email protected]
Mail: Greg Wiegand
Associate Publisher Que Publishing
800 East 96th Street
Reader Services
Visit our website and register this book at
Introduction
The purpose of this book is to provide you with information, tips, and tricks about using and transitioning to Windows Vista. Although there are many other books published that discuss Windows Vista, most cover basic tasks (such as printing and opening documents) and are tailored toward those less
experienced in computers. If you have experience with
computers and Microsoft Windows, you'll find that this book offers better value. Basic tasks and information that you will probably figure out on your own are skipped in this book, and items that you typically wouldn't discover using your computing common sense and previous Windows experience are
emphasized.
This book will help you analyze your PC and computer
peripherals for their Vista readiness, and discuss upgrading
components to achieve better performance. Also covered is how to back up or transfer your files and settings when upgrading a PC or when purchasing a new system. You'll also learn about the different editions of Windows Vista to find which will provide the best fit for your personal, family, or business needs.
After the preparations, you'll be stepped through the Windows installation, and then introduced to the redesigned and
enhanced Vista interface and functionality. You'll also learn
about the new Windows applications and features. Furthermore, you'll see how to change Vista back to the classic look and feel, find relocated items, and discover many tips and tricks, using simple step-by-step procedures and bullets.
Overall, this book will improve your entire Windows Vista experience!
What's in This Book
This book contains information and steps useful when
or purchasing a new system loaded with Vista. Here's a chapter-by-chapter summary:
Chapter 1: Upgrading to Windows Vista shows you how to check if your computer and peripherals are compatible with Windows Vista, and gives tips on common hardware upgrades you might perform and on transferring and backing up your data for the transition to Vista.
Chapter 2: Choosing and Installing a Windows Vista Version helps you understand what each Vista edition provides and steps you through the installation and initial setup of Windows Vista.
Chapter 3: Introducing Windows Vista shows you the new interface of Windows Vista and discusses the main features and applications.
Chapter 4: Changing the Look and Feel of Vista shows step-by-step how to convert the new (and sometimes
annoying) Vista desktop and interface to one you'll easily recognize.
Chapter 5: Finding Your Way Around in Vista serves as a reference for finding settings, applications, and features in Vista that have been relocated, or moved from where they resided in Windows XP.
Who Can Use This Book
This book is intended for PC users, at homes and businesses, who are transitioning to Windows Vista.
This book is tailored toward those with moderate (or at least some) PC and Windows XP experience, such as being able to easily navigate to desired applications and files, perform various settings and preference changes, create shortcuts on the
desktop, and uninstall software.
How to Use This Book
I hope that this book is easy enough to read that you don't
need instructions. That said, there are a few elements that bear explaining.
First, there are several special elements in this book, presented in what we in the publishing business call "margin notes." There are different types of margin notes for different types of
information, as you see here. Note
This is a note that presents information of interest, even if it isn't wholly relevant to the discussion in the main text.
Tip
This is a tip that might prove useful for whatever it is you're in the process of doing.
Caution
This is a caution, warning you that something you might accidentally do could have undesirable
results.
www.microsoft.com) for more information on particular topics or to download something. When you see one of these
Get Ready to Vista!
With all these preliminaries out of the way, it's now time to get started. Although I recommend reading the book in consecutive order, it isn't completely necessary. For example, you might want to skip the first two chapters if you already have Windows Vista installed; or, you might decide that you like Vista's new look, and, therefore, pass by Chapter 4.
1. Upgrading to Windows Vista
Want the cool new interface and all the cutting-edge features that Windows Vista offers? Well, before you run out and buy the software for your existing PC, you need to ensure your system will support it!
If you've purchased your PC within the last 2 or 3 years,
chances are that Vista will work for you; however, you should make sure before putting down the cash. Furthermore, if it has been more than a few years since you purchased your PC, you should definitely evaluate your system. It might require
upgrades or enhancements before using Vista, which this chapter helps you accomplish.
This chapter, along with discussing the use of the automated Upgrade Advisor, shows step-by-step how to manually check whether your PC and other hardware and software are
supported for use with Windows Vista. This chapter also gives tips when performing common upgrade tasks—many of which you might need to do before installing Vista.
For those planning to purchase a new PC system preloaded with Vista, rather than upgrading an existing system, you should skip ahead to topics #9 through #11.
1. Use Windows Vista Upgrade Advisor
The first thing to do when thinking about upgrading one of your Windows XP PCs to Windows Vista is to evaluate your PC and its system components to ensure it can be upgraded. Although you can manually review and evaluate your PC against the
requirements and recommendations for Vista, as discussed in the next sections, you can make the whole process easier by simply using the Windows Vista Upgrade Advisor. The Windows Vista Upgrade Advisor is a blessing for beginners.
In addition to using the Upgrade Advisor when upgrading from Windows XP, you can also use it with Windows Vista to evaluate your system for an upgrade to a different flavor of Vista.
In addition to quickly showing any compatibility issues with your PC's hardware or software, the Windows Vista Upgrade Advisor also tries to come up with solutions to any found issues, and gives recommendations on which Vista version would work best with your system and for your computing needs. The
Upgrade Advisor also lets you know if your system will support new, resource-hogging features, such as Vista's Aero interface. Tip
If you find that the location of the Upgrade Advisor has changed from the address given in step 1, you can visit the Microsoft Windows main website
(www.microsoft.com/windows), browse to the Windows Vista section, and find a link to the Upgrade Advisor.
Let's get started by downloading and installing the advisor:
1.Open your web browser and go to the following web page (see
www.microsoft.com/windows/products/windowsvista/buyorupgrade/upgradeadvisor.mspx
Click here to download the Windows Vista Upgrade Advisor.
2.Click the Download Windows Vista Upgrade Advisor link to download the program to your computer. The Download Details page will appear.
3.To begin the download, click the Download button.
4.On the File Download–Security Warning prompt, click Save, as shown in
5.Browse to and select a location to place the file (Figure 1.3 shows the file being saved to the Desktop), and click Save.
Figure 1.3. Saving the Windows Vista Upgrade Advisor files after
downloading.
6.After the download is completed, click Run (see Figure 1.4) to begin the installation of the Windows Vista Upgrade Advisor. Microsoft Internet Explorer should display a warning dialog box, asking you to confirm that you want to run this software. Click Run.
Figure 1.4. Starting the Windows Vista Upgrade Advisor setup.
7.The Windows Vista Upgrade Advisor Setup Wizard will appear. Click Next (see
1.5).
Figure 1.5. The Windows Vista Upgrade Advisor Setup Wizard.
Tip
To get the most out of the Upgrade Advisor, you should make sure all your devices, such as external drives, printers, and scanners, are
plugged in and powered on before running the Windows Vista Upgrade Advisor. This allows the Upgrade Advisor to provide feedback on the compatibility of these devices as well.
8.Complete the installation by following the directions given by the setup wizard.
After the installation is complete, you can run the advisor:
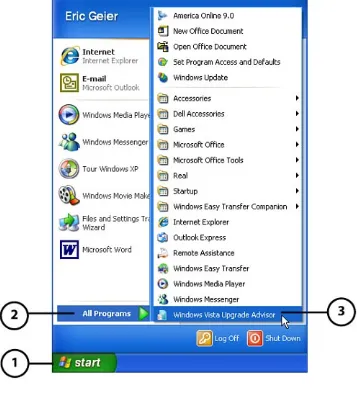
Figure 1.6. Opening Windows Vista Upgrade
Advisor from the Start menu.
Click Start.
Choose All Programs.
2. Click Start Scan.
While waiting for the scan to complete, you can compare each flavor of Vista, as shown in Figure 1.7.
Figure 1.7. Buttons to access information
about Windows Vista.
[View full size image]
3. After the scan is completed, click the See Details button. 4. Now you can review your report. The following pages
provide details on using the Upgrade Advisor.
Tip
ability to support Windows Vista, you can check out PC Pitstop's Vista Readiness Center at
www.pcpitstop.com/vistaready.
The first thing to look for when viewing your report from the Windows Vista Upgrade Advisor is the message at the top, which will give you a quick, in-a-nutshell idea of your system's compatibility with Windows Vista.
Figure 1.8 shows an example of a recommendation explaining that the system in question might not be well suited to Vista without some upgrades first.
Overall advice from Update Advisor
Choose a version of Vista here and...
...read a description of who is best suited for this version.
The middle part of the report is simply an introduction to the different Vista editions, similar to what was shown while the Upgrade Advisor scanned the system. Use the buttons to the left to choose a version of Vista about which you want to know more.
The bottom of the report (see Figure 1.9) is where you can access more details on any issues that were found during the scan.
Advisor categories
Number of issues found in each category
Click to read more about the identified issues.
Clicking on the See Details buttons takes you to the
corresponding section of the Report Details page; Figure 1.10
shows the System section of the Report Details page.
Figure 1.10. Example of the report's details on the System section.
Click tabs to scan through the report categories.
Before closing the report, it's also a good idea to print the task list and save the report, using the buttons in the upper-right corner of the report, so that you can reference the recommendations later.
1. Upgrading to Windows Vista
Want the cool new interface and all the cutting-edge features that Windows Vista offers? Well, before you run out and buy the software for your existing PC, you need to ensure your system will support it!
If you've purchased your PC within the last 2 or 3 years,
chances are that Vista will work for you; however, you should make sure before putting down the cash. Furthermore, if it has been more than a few years since you purchased your PC, you should definitely evaluate your system. It might require
upgrades or enhancements before using Vista, which this chapter helps you accomplish.
This chapter, along with discussing the use of the automated Upgrade Advisor, shows step-by-step how to manually check whether your PC and other hardware and software are
supported for use with Windows Vista. This chapter also gives tips when performing common upgrade tasks—many of which you might need to do before installing Vista.
For those planning to purchase a new PC system preloaded with Vista, rather than upgrading an existing system, you should skip ahead to topics #9 through #11.
1. Use Windows Vista Upgrade Advisor
The first thing to do when thinking about upgrading one of your Windows XP PCs to Windows Vista is to evaluate your PC and its system components to ensure it can be upgraded. Although you can manually review and evaluate your PC against the
requirements and recommendations for Vista, as discussed in the next sections, you can make the whole process easier by simply using the Windows Vista Upgrade Advisor. The Windows Vista Upgrade Advisor is a blessing for beginners.
In addition to using the Upgrade Advisor when upgrading from Windows XP, you can also use it with Windows Vista to evaluate your system for an upgrade to a different flavor of Vista.
In addition to quickly showing any compatibility issues with your PC's hardware or software, the Windows Vista Upgrade Advisor also tries to come up with solutions to any found issues, and gives recommendations on which Vista version would work best with your system and for your computing needs. The
Upgrade Advisor also lets you know if your system will support new, resource-hogging features, such as Vista's Aero interface. Tip
If you find that the location of the Upgrade Advisor has changed from the address given in step 1, you can visit the Microsoft Windows main website
(www.microsoft.com/windows), browse to the Windows Vista section, and find a link to the Upgrade Advisor.
Let's get started by downloading and installing the advisor:
1.Open your web browser and go to the following web page (see
www.microsoft.com/windows/products/windowsvista/buyorupgrade/upgradeadvisor.mspx
Click here to download the Windows Vista Upgrade Advisor.
2.Click the Download Windows Vista Upgrade Advisor link to download the program to your computer. The Download Details page will appear.
3.To begin the download, click the Download button.
4.On the File Download–Security Warning prompt, click Save, as shown in
5.Browse to and select a location to place the file (Figure 1.3 shows the file being saved to the Desktop), and click Save.
Figure 1.3. Saving the Windows Vista Upgrade Advisor files after
downloading.
6.After the download is completed, click Run (see Figure 1.4) to begin the installation of the Windows Vista Upgrade Advisor. Microsoft Internet Explorer should display a warning dialog box, asking you to confirm that you want to run this software. Click Run.
Figure 1.4. Starting the Windows Vista Upgrade Advisor setup.
7.The Windows Vista Upgrade Advisor Setup Wizard will appear. Click Next (see
1.5).
Figure 1.5. The Windows Vista Upgrade Advisor Setup Wizard.
Tip
To get the most out of the Upgrade Advisor, you should make sure all your devices, such as external drives, printers, and scanners, are
plugged in and powered on before running the Windows Vista Upgrade Advisor. This allows the Upgrade Advisor to provide feedback on the compatibility of these devices as well.
8.Complete the installation by following the directions given by the setup wizard.
After the installation is complete, you can run the advisor:
Figure 1.6. Opening Windows Vista Upgrade
Advisor from the Start menu.
Click Start.
Choose All Programs.
2. Click Start Scan.
While waiting for the scan to complete, you can compare each flavor of Vista, as shown in Figure 1.7.
Figure 1.7. Buttons to access information
about Windows Vista.
[View full size image]
3. After the scan is completed, click the See Details button. 4. Now you can review your report. The following pages
provide details on using the Upgrade Advisor.
Tip
ability to support Windows Vista, you can check out PC Pitstop's Vista Readiness Center at
www.pcpitstop.com/vistaready.
The first thing to look for when viewing your report from the Windows Vista Upgrade Advisor is the message at the top, which will give you a quick, in-a-nutshell idea of your system's compatibility with Windows Vista.
Figure 1.8 shows an example of a recommendation explaining that the system in question might not be well suited to Vista without some upgrades first.
Overall advice from Update Advisor
Choose a version of Vista here and...
...read a description of who is best suited for this version.
The middle part of the report is simply an introduction to the different Vista editions, similar to what was shown while the Upgrade Advisor scanned the system. Use the buttons to the left to choose a version of Vista about which you want to know more.
The bottom of the report (see Figure 1.9) is where you can access more details on any issues that were found during the scan.
Advisor categories
Number of issues found in each category
Click to read more about the identified issues.
Clicking on the See Details buttons takes you to the
corresponding section of the Report Details page; Figure 1.10
shows the System section of the Report Details page.
Figure 1.10. Example of the report's details on the System section.
Click tabs to scan through the report categories.
Before closing the report, it's also a good idea to print the task list and save the report, using the buttons in the upper-right corner of the report, so that you can reference the recommendations later.
2. System Requirements and
Recommendations
In case you can't get the Windows Vista Upgrade Advisor to work properly on your PC or you want to take a quick look at what it takes to run Windows Vista, this section covers the system requirements and recommendations. In addition, you can refer to the next several sections on how to manually check the specs of the different system components on your PC.
First, you can take a look at the bare-minimum system requirements to install and run Windows Vista:
800MHz processor
512MB of memory (RAM)
20GB hard drive with at least 15GB of available space Support for Super VGA graphics
CD-ROM drive
It's important to keep in mind that you won't experience very good performance and won't be able to use many of the neat new features of Vista if running on a system just meeting the bare-minimum requirements. Therefore, you might want to only install and use Windows Vista on a system exceeding the
recommended system requirements, as shown in Table 1.1.
Table 1.1. Recommended System Requirements
Home Basic Home
Premium/Business/Ultimate Processor 1GHz (32-bit or 64-bit)
Memory (RAM) 512MB 1GB Hard drive 20GB (15+
Graphics Support for
Support for DirectX 9 graphics with:
128MB of graphics memory (minimum)
32 bits per pixel WDDM Driver
Pixel Shader 2.0 in hardware
CD drive DVD-ROM
Audio output Recommended
Internet
Common Units of Measure
If you are not familiar with the units of measure for hertz and/or bytes, the following list might help you understand the orders of magnitude:
kB (kilobyte) = 1000 bits
MB (megabyte) = 1,000kB (1,000,000 bits) GB (gigabyte) = 1,000MB (1,000,000,000 bits) MHz (megahertz) = 1,000kHz
GHz (gigahertz) = 1,000MHz
For example, 500MB is half of a gigabyte and 3GHz is 3,000 MHz.
This should help when comparing system specifications.
3. Check the Processor (CPU)
The central processor unit (CPU) is the component that's responsible for processing the information and commands
between the different components that make up your PC, which basically makes it the brain of your PC. Therefore, the speed of the processor greatly influences your PC's performance. When considering the upgrade to Windows Vista, you need to ensure your CPU can process quickly enough to support the new
features of Vista. A sample CPU is shown in Figure 1.11.
Here's how to check your processor information in Windows XP:
1. Open the Start menu and click on Control Panel. 2. When in Category View, click the Performance and
Maintenance category.
If in Classic View, simply double-click on the System icon and proceed to step 4.
3. Click on the System icon.
4. Refer to the Computer section, as shown in Figure 1.12.
Figure 1.12. Processor and memory
CPU type and speed are shown here, as well as total RAM.
Tip
4. Check Memory (RAM)
Along with the processor, the amount of random access memory (RAM), or simply memory for short, greatly influences your PC's performance. Rather than a shortage component like a hard drive, RAM (Figure 1.13 shows an example) is used when the information needs to be quickly read or written, such as
temporarily storing information when running software applications.
Figure 1.13. Example of computer memory; courtesy of Micron Technology, Inc.
[View full size image]
You need to make sure your PC is loaded with adequate
memory because Windows Vista requires much more memory than Windows XP. You're probably good to go if you've
Here are a few tips if you want to add more memory:
Check how many untaken and total memory slots are in your PC by peeking inside your computer.
Most PCs have two or three memory slots located on the motherboard in plain sight.
Check the maximum amount of memory supported for your system by referring to your PC's product documentation or manuals.
Find memory that's compatible with your specific system, which is also likely found in your PC's documentation or manuals.
You can use online tools, such as the System Scanner (www.crucial.com/systemscanner), which will scan your system and let you know exactly what memory is
5. Verify Hard Drive Space
As you probably know, all the files and software on your PC take up space on the hard drive (see Figure 1.14), which is the main data storage component in a PC. Hard drives store your email, pictures, movies, music files, letters, work files, and everything else you create, along with thousands of files that comprise the operating system. With each version of the OS, Windows has gotten larger and larger. Vista needs about 10 times more space than Windows XP.
Figure 1.14. Example of a hard drive; courtesy of Western Digital Corporation.
Follow these steps in Windows XP to manually check your available disk space:
1. Open My Computer or Windows Explorer.
2. Right-click on the main hard drive and select Properties;
Figure 1.15 shows an example.
Figure 1.15. Accessing the desktop properties.
[View full size image]
Figure 1.16. Checking the available disk space.
If you're low (or going to run low after the Vista installation) on disk space, here are a few things you can do to make more room:
Organize your personal files and documents and delete any unwanted files.
Run the Disk Cleanup utility (which can be found by navigating to Start, All Programs, Accessories, System Tools) to clear the Recycle Bin and temporary files.
Consider moving or archiving items that take up a great deal of space to another location, such as a USB flash drive, CDs, DVDs, or a secondary hard drive.
If you find that you can't free up enough space, you might have to add another hard drive. Here are some tips to get you
started:
It might be easier to free up room on your existing main hard drive by moving personal files and large applications to the additional hard drive you're installing.
Consider getting an external hard drive for easier installation and mobility.
Investigate your PC's connection types, such as if you have USB (and if it's version 1.1 or 2.0) for external drives or whether you have EIDE or SATA for internal drives. USB 2.0 is the best bet. SATA drives are faster.
You can use online tools, such as InSPECS
(www.powerleap.com), which will scan your system and give hardware recommendations that are compatible with your particular system; using this method eliminates
6. Check CD Drive Type
You should pay close attention to the type of CD drive your PC has because the retail version of Windows Vista only comes packaged with a DVD rather than a plain CD. Fitting everything for Vista on one DVD rather than having to use multiple CDs is beneficial; however, it's not that uncommon for older PCs—even those sold in the past several years—to not include a DVD drive. To see if your drive is DVD capable, just look at the front of the drive door. You should see a DVD logo (such as shown in Figure 1.17) along with others, such as the Compact Disc or CD
writable/rewritable logos.
Figure 1.17. Example of a CD drive with the DVD logos; courtesy of Plextor LLC.
[View full size image]
If your PC doesn't have a DVD drive and you prefer not to upgrade your CD drive, you can order a set of plain CDs from Microsoft for a small fee and shipping costs. For more
information, visit:
www.microsoft.com/windowsvista/1033/ordermedia
If you're not afraid to open up your PC, you could upgrade your CD drive to a DVD drive, which is fairly easy. It would also save you from having to shell out more money to Microsoft and
waiting for the plain CDs in the mail. Here are a few things to consider when switching out your CD drive:
Windows Vista, consider purchasing a drive with DVD writing capabilities in case you want to make DVDs in the future.
Keep in mind the color of the drive if you're concerned about it matching your PC.
7. Verify Graphics Card Specs
If your PC is a few years old (or newer), the graphics card (see
Figure 1.18 for an example) will most likely be compatible with all the Windows Vista editions; however, you should check just to make sure. The only item you should be worried about
looking up (from the Graphics section of Table 1.1, shown earlier) is the amount of graphics memory, as the other items should be up to spec if the memory requirement is satisfied.
Figure 1.18. Example of a graphics card; courtesy of Micron Technology, Inc.
[View full size image]
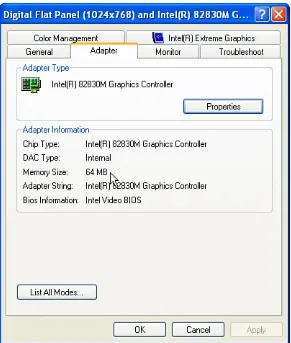
Here's how to check the graphics memory in Windows XP:
1. Right-click on the desktop and select Properties. 2. Select the Settings tab.
3. Click the Advanced button. 4. Select the Adapter tab.
Figure 1.19. Checking the amount of graphics
memory.
If the graphics card isn't up to spec, you can upgrade:
Along with the specifications mentioned earlier in Table 1.1, consider other optional features, such as High-Definition (HD) capabilities, TV in/out, and S-video outputs.
Investigate your PC's connection types, such as if you have AGP, PCI, or PCI Express.
You can use online tools, such as InSPECS
8. Verify Audio Card
Because Microsoft doesn't offer many up-front details on the requirements for the audio component, you can either wait until you install Windows Vista to see if the audio works or you can check ahead of time on the Microsoft list of supported
components at the following website:
http://winqual.microsoft.com/hcl/
9. Check PC Peripherals and Accessories
Whether you are upgrading an existing PC or you're planning to purchase a new system preloaded with Vista, you should check that your accessories and/or peripherals (such as printers,
scanners, network adapters, and music players) will work with Windows Vista.
First, you can check the Microsoft list of supported components at the following website:
http://winqual.microsoft.com/hcl/
10. Verify Software Applications Are
Vista Compatible
Whether you are upgrading an existing PC or you're planning to purchase a new system preloaded with Vista, you should check that your software applications will be supported with Windows Vista.
You can reference the following lists that Microsoft supplies to see if your applications are supported:
Certified for Windows Vista:
https://winqual.microsoft.com/member/softwarelogo/certifiedlist.aspx
Works with Windows Vista:
https://winqual.microsoft.com/member/softwarelogo/workswithlist.aspx
If the application isn't listed, you can also check the
11. Move to a New PC Preloaded with
Windows Vista
Although buying a new PC system loaded with Windows Vista might have saved you time, you'll probably still need to transfer your files and documents from your old PC to the new one and install your desired software applications.
You can manually round up and transfer your personal files and documents using an external separate hard drive, USB flash drive, or network sharing. Another way to transfer files from an XP computer to your new Vista computer is to use Windows Easy Transfer, which automates the transfer.
Windows Easy Transfer also helps transfer other items such as user accounts, email messages, contacts, and other settings that aren't easy or possible to do manually. Moreover, you can also download and use the Windows Easy Transfer Companion, which can transfer many of your software applications. This
saves a great deal of time and the headache of reinstalling all of them.
To download Windows Easy Transfer and Windows Easy Transfer Companion, visit www.microsoft.com/downloads.
After being installed, the Windows Easy Transfer and Windows Easy Transfer Companion utilities can be accessed from the Start menu, as shown in Figure 1.20.
Click here to open Windows Easy Transfer Companion.
Click here to open Windows Easy Transfer.
Follow these basic steps when using Windows Easy Transfer to transfer your files and settings:
1. After you open Windows Easy Transfer, you'll see the
welcome screen that describes its functionality. Click Next to proceed.
2. You then need to choose and configure your desired transfer method by following the directions in the application and referring to the following:
settings in real time. Although you'll need to purchase the cable for around $40, this method provides the
quickest transfer speed, using USB 2.0 at 480Mbps, and is typically the easiest option.
Transfer directly, using a network connection: This method uses a network connection between the PCs, which can be on a (wireless or wired) network or via a computer-to-computer (ad hoc) connection. The transfer can be made directly (in real time) or you can copy the data to another PC or network storage device and then transfer the data to your new computer.
Transferring via a network connection will take longer (around 100Mbps for wired and 25Mbps for wireless) than using the Easy Transfer method. However, if you have an existing network connection between the computers, this method doesn't require any additional investment.
Use a CD, DVD, or other removable media: This method involves copying your data to removable media and then transferring the data to your new computer.
The transfer speeds vary depending upon the type of media you choose; however, they are typically faster than network connections.
3. After you choose and configure the transfer method, you need to specify what to transfer by following the directions in the application and referring to the following:
All User Accounts, Files, and Settings: Of course, this option transfers all user accounts, files, and
outside of user account areas.
My User Account, Files, and Settings Only: This option transfers the user account, files, and settings for the account you're logged into. Again, keep in mind this doesn't include items outside of user account areas.
Advanced Options: This option automatically selects to transfer all user accounts, files, and settings. However, you can modify exactly what is transferred and this option allows you to add other files and folders not in the user account areas.
4. To begin the backup, click Transfer.
Note
User account areas are locations such as My Documents and files and folders located on your desktop. Items not in account areas include files and folders such as on your hard drive's root (for example, C:/folder) or C:/Program Files.
If you used an indirect method of transfer (using removable media or moved data to a networked PC or drive), you'll need to restore your files and settings to your new computer:
1. Copy or move the backup file, by default named SaveData.mig, to your computer.
3. Click Browse to browse to and select the backup file. If you created a password, enter it in the Password field.
4. Click Next.
5. Review the backup contents and click Transfer to begin.
If you prefer, you can also transfer your applications and software using the Windows Easy Transfer Companion:
1. After you open the Windows Easy Transfer Companion, you'll see the welcome screen that describes its functionality. Click Start to proceed.
2. You then need to choose and configure your desired transfer method by following the directions in the application and referring to the following:
Use an Easy Transfer Cable: This method uses a special USB cable (typically 8 feet long), which you connect to each computer, to transfer your files and settings in real time. Although you'll need to purchase the cable for around $40, this method provides the
quickest transfer speed, using USB 2.0 at 480Mbps, and is typically the easiest option.
Transfer directly, using a network connection: This method uses a network connection between the PCs, which can be on a (wireless or wired) network or via a computer-to-computer (ad hoc) connection. Unlike with transferring your files and settings, this utility only
supports direct (real-time) transfers.
than using the Easy Transfer method. However, if you have an existing network connection between the computers, this method doesn't require any additional investment.
2. Choosing and Installing a Windows
Vista Edition
Unlike previous versions of Windows, which came in one or two basic flavors, Vista comes in a whopping five flavors—each
offering different features and an entirely different price tag. As you can imagine, making this choice can be daunting. This
chapter, however, will help you decide which version is right for you. Regardless of whether you are upgrading an existing
computer to Vista or shopping for a new computer with Vista preloaded, this chapter will help you make the best choice.
12. Compare Vista Editions
As you might have already discovered, there are five different editions of Windows Vista you can choose from, which are summarized in the following list:
Home Basic: Includes only the new basic features and is best for light home use on PCs meeting only the minimal system specs.
Home Premium: Allows home/small-office PC users to take advantage of new effects and enhancements to the desktop and special mobility and entertainment features. This edition is best suited for newer PCs that exceed
minimum system specs and for those users who use their computers daily.
entertainment applications.
Enterprise: Includes additional tools and features
specifically for large businesses with complex computer and technology systems. This edition of Vista isn't realistically available to consumers; it's only available to Volume License customers who have PCs covered by Microsoft Software
Assurance.
Tip
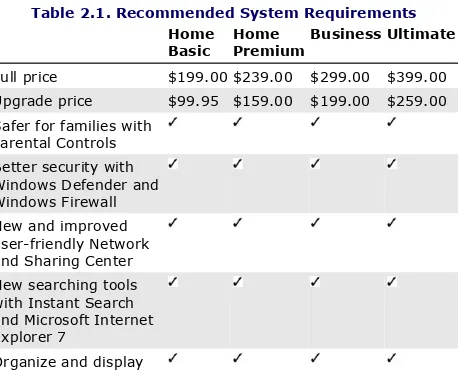
The prices shown in Table 2.1 are the suggested retail prices in US dollars. With some searching on the Internet, you can find much lower prices.
Table 2.1. Recommended System Requirements
Home
Basic HomePremium Business Ultimate Full price $199.00 $239.00 $299.00 $399.00 Upgrade price $99.95 $159.00 $199.00 $259.00 Safer for families with
pictures with Photo Gallery
Enhanced appearance and live thumbnails with Windows Aero and Flip 3D
share with others using Windows Meeting
Space
Support for multiple displays/monitors with Windows SideShow Easy backup of files and data with Windows Automatic Backup
Easy backup of files, data, applications, and operating system with Windows Complete PC Backup and Restore Advanced sharing and display of media with Windows Media Center Create DVDs with
Windows DVD Maker
Windows Movie Maker Have fun with new premium games:
Chess Titans, Mahjong Titans, and Inkball Play poker with a Windows Ultimate on a single PC with Language packs
2. Choosing and Installing a Windows
Vista Edition
Unlike previous versions of Windows, which came in one or two basic flavors, Vista comes in a whopping five flavors—each
offering different features and an entirely different price tag. As you can imagine, making this choice can be daunting. This
chapter, however, will help you decide which version is right for you. Regardless of whether you are upgrading an existing
computer to Vista or shopping for a new computer with Vista preloaded, this chapter will help you make the best choice.
12. Compare Vista Editions
As you might have already discovered, there are five different editions of Windows Vista you can choose from, which are summarized in the following list:
Home Basic: Includes only the new basic features and is best for light home use on PCs meeting only the minimal system specs.
Home Premium: Allows home/small-office PC users to take advantage of new effects and enhancements to the desktop and special mobility and entertainment features. This edition is best suited for newer PCs that exceed
minimum system specs and for those users who use their computers daily.
entertainment applications.
Enterprise: Includes additional tools and features
specifically for large businesses with complex computer and technology systems. This edition of Vista isn't realistically available to consumers; it's only available to Volume License customers who have PCs covered by Microsoft Software
Assurance.
Tip
The prices shown in Table 2.1 are the suggested retail prices in US dollars. With some searching on the Internet, you can find much lower prices.
Table 2.1. Recommended System Requirements
Home
Basic HomePremium Business Ultimate Full price $199.00 $239.00 $299.00 $399.00 Upgrade price $99.95 $159.00 $199.00 $259.00 Safer for families with
pictures with Photo Gallery
Enhanced appearance and live thumbnails with Windows Aero and Flip 3D
share with others using Windows Meeting
Space
Support for multiple displays/monitors with Windows SideShow Easy backup of files and data with Windows Automatic Backup
Easy backup of files, data, applications, and operating system with Windows Complete PC Backup and Restore Advanced sharing and display of media with Windows Media Center Create DVDs with
Windows DVD Maker
Windows Movie Maker Have fun with new premium games:
Chess Titans, Mahjong Titans, and Inkball Play poker with a Windows Ultimate on a single PC with Language packs
13. Full or Upgrade Version?
As shown in Table 2.1, the upgrade versions of the Windows Vista editions are about $100 cheaper than the full versions. You can use the upgrade versions if you're going to install it on a PC currently running Windows 2000 or Windows XP. PCs with other operating systems (such as Windows 95, 98, or Me),
however, don't qualify for an upgrade and a full version of Vista is required.
Tip
If you have more than one PC on which you want to install Windows Vista, you might be able to purchase additional licenses (after buying your first Windows Vista package), which are a bit cheaper than buying another full Windows Vista package.
For more information, visit the Microsoft website at:
14. Upgrade In-Place or Clean Install?
If you're planning to use an upgrade version of Windows Vista (see #13, "Full or Upgrade Version?"), you should determine whether you can perform an upgrade in-place installation or if you have to do a clean install installation. This will help you figure out what type of preparation you need to do before
installing Windows Vista and might also influence which edition you choose.
If using a full version of Windows Vista (see #13), you'll have to do the clean install installation.
An upgrade in-place installation is typically easier and
technically better because it will keep all your existing software applications, files, and settings, whereas the clean install won't. Nevertheless, you may experience problems during the upgrade in-place installation of Windows Vista and loose all your data. You may also have issues down the road because your PC didn't have a fresh start when you installed Vista. Therefore, you
should spend a bit more time thoroughly backing up your data (discussed in the next section) before proceeding with either installation method.
You can reference Table 2.2 to see if you're eligible for the upgrade in-place, based on your current Windows version and your desired Vista edition.
Table 2.2. Determining the Installation Type
Your Current Windows
Version The Version of Vista You'vePurchased Home
Basic HomePremium Business Ultimate Windows XP Home
Windows XP Professional
x64 Clean Clean Clean Clean
Windows 2000 Clean Clean Clean Clean
For example, if your PC is loaded with Windows XP Home Edition, you could do an in-place installation with any of the four Vista upgrade editions.
15. Back Up Your Data
Before installing Windows Vista, you should back up your files, settings, and software applications. This is especially necessary when doing the clean install as it wipes out all your data. As discussed in the previous section, the upgrade in-place
installation will keep your data but you should safeguard your information just in case you have problems.
You can manually round up your personal files and documents and put them on a separate hard drive, USB flash drive, CD, DVD, or other form of removable media. Or, you can use
Windows Easy Transfer to assist in the backup process if you're using Windows 2000 or XP.
Windows Easy Transfer only backs up your files and settings, therefore you'll have to reinstall your applications after the Windows Vista installation. You should round up your
installation disks or the download information and product keys before proceeding with the installation. To download Windows Easy Transfer, visit www.microsoft.com/downloads.
After being installed, the Windows Easy Transfer utility can be accessed from the Start menu, as shown in Figure 2.1.
Choose Start.
Select Windows Easy Transfer.
Follow these basic steps when using Windows Easy Transfer to back up your files and settings:
1. After you open Windows Easy Transfer, you'll see the
welcome screen that describes its functionality. Click Next to proceed.
Use an Easy Transfer Cable: This method isn't
practical for this situation as it transfers the data in real-time.
Transfer directly, using a network connection: This method allows you to back up your data to another PC or network storage device. Then, after you install
Windows Vista you can transfer the data back to the computer.
The transfer speeds vary between the network connection types and your particular equipment and setup; however, you can typically achieve around 100Mbps for wired
connections and 25Mbps for wireless connections.
Use a CD, DVD, or other removable media: This method involves backing up your data to a removable media and then loading the data back onto the
computer after the Windows Vista installation.
The transfer speeds vary depending upon the type of media you choose; however, they are typically faster than network connections.
3. After you choose and configure the transfer method, you need to specify what to back up by following the directions in the application and referring to the following:
All User Accounts, Files, and Settings: Of course, this option transfers all user accounts, files, and
My User Account, Files, and Settings Only: This option transfers the user account, files, and settings for the account you're logged into. Again, keep in mind this doesn't include items outside of user account areas.
Advanced option: This option automatically selects to transfer all user accounts, files, and settings. However, you can modify exactly what is transferred and it allows you to add other files and folders that are not in the user account areas.
4. To begin the backup, click Transfer.
Note
User account areas are locations such as My Documents and files and folders located on your desktop. Items not in account areas would be files and folders such as on your hard drive's root (for example, C:/folder) or C:/Program Files.
After you install Windows Vista, you can restore your files and settings:
1. Copy or move the backup file, by default named SaveData.mig, to your computer.
2. Double-click on the backup file to open it.
4. Click Next.
16. Install Windows Vista
Despite the confusion of all the Vista editions and installation methods, Windows Vista is one of the easiest Windows systems to install (after you get the version you're going to use picked out and your data backed up). Simply inserting the DVD will get you started on the approximate 45-minute installation. The
following will step you through the process:
1. Log on to your current Windows (or other operating system) and insert the Windows Vista DVD (or specially ordered CD). The DVD should be automatically detected and the Install Now screen will appear (see Figure 2.2).
Figure 2.2. Windows Vista installation install
screen.
Click here to learn more about Vista.
Tip
If Windows does not automatically detect the DVD, you need to manually run the setup program: Click Start, click Run, click Browse, find and select the setup.exe file from the DVD, click OK to return to the Run prompt, and then click OK to run the setup program file.
2. Click Install Now. The product key screen (see Figure 2.3) appears.
Enter the product key here (you do not need to include the dashes).
Check this box to automatically activate your copy of Vista the next time you connect to the Internet.
Windows Vista by default must be activated within 30 days (online or by telephone) or it will stop working. The product activation basically informs Microsoft that the particular product key is being used so they can track additional installations and control software piracy.
Checking the Automatically Activate Windows When I'm Online option will configure Windows to automatically try activating itself three days after your first logon, which is useful because you probably won't have to bother with it again.
3. If the updates screen (see Figure 2.4) appears, choose an option to continue.
Click here to launch Windows Update and download updates that have been added since Vista was released.
Click here to skip the updates (though you should update Vista as soon as you get it installed if you skip it here).
Click here to send anonymous information to Microsoft to help Microsoft improve the installation process.
It's best to get the Windows updates now in case you don't remember to do so later. The updates contain fixes and
patches that address found bugs, issues, and security holes.
Tip
To return to the previous window during the setup, you can click the back arrow in the upper-right corner.
4. Type your product key into the field and click Next. The license terms screen appears.
You can actually try out any Vista edition regardless of the one you purchased. Just don't input a product key and click Next. Then, a window appears where you can select the desired edition to install.
Keep in mind that you must activate Vista within 30 days after the installation by inputting a product key matching the installed Vista edition.
5. Review the terms, check the I Accept the License Terms option, and click Next. The installation type screen (see
Figure 2.5) appears.
Choose Upgrade to perform an in-place installation.
Choose Custom (Advanced) to perform a clean install.
6. Choose the appropriate type of installation, considering the recommendations discussed earlier in #14, "Upgrade In-Place or Clean Install?" To perform an in-place installation, select Upgrade. To perform a clean installation, choose Custom (Advanced).
7. If you select Custom (Advanced), you will see a screen on which you are asked to choose which hard disk or partition you want to install Vista (see Figure 2.6).
Drives/partitions on which Vista could be installed (your options will look different depending on the number of drives installed and number of partitions on those drives)
Total size of the drive or partition
Free space on a drive or partition
Type of partition
Select where you want to install Windows Vista (and make any desired changes to your drives and partitions) and click Next.
reformat your hard drive(s) which can help eliminate any current or future disk errors.
To access these drive options, you must start the Windows Vista installation from bootup: Exit the installation and with the installation DVD in the drive, restart the computer, and, if prompted, hit a key after the initial boot to load from CD.
After you're back on the drive and partition screen, click the Drive options (Advanced) link to access the tools. Then, use the buttons to perform the configurations. For example, click on a partition and hit Format to reformat the drive/partition.
8. After you're done choosing and/or setting up partitions, click Next to continue. The installation will begin, as shown in
Figure 2.7.
Figure 2.7. Beginning the Windows Vista
installation.
Tip
Using a password helps protects your user account (and your PC) from unauthorized use by other family members and peers. If you have young children, using a password can also help prevent children from altering parental controls settings or making system changes.
After Windows Vista has been installed, you'll need to do the initial setup:
Figure 2.8. Creating a user account during the
Windows Vista installation.
[View full size image]
2. Next you're prompted (see Figure 2.9) to define the
computer name and desktop background. Type a computer name and, if desired, select a desktop background, and click Next.
Figure 2.9. Defining the computer name and
desktop background during the Windows Vista
installation.
Tip
The computer name is what the PC will be identified by when part of a network, such as when sharing files or printers on your wireless home network.