Rapid Game
Development
Using Cocos2d-JS
An end-to-end guide to 2D game
development using JavaScript
—
Rapid Game
Development Using
Cocos2d-JS
An end-to-end guide to 2D game
development using JavaScript
development using JavaScript
Hemanth Kumar Abdul Rahman
Chennai, Tamil Nadu, India Chennai, Tamil Nadu, India
ISBN-13 (pbk): 978-1-4842-2552-3 ISBN-13 (electronic): 978-1-4842-2553-0 DOI 10.1007/978-1-4842-2553-0
Library of Congress Control Number: 2016961533 Copyright © 2016 by Hemanth Kumar
This work is subject to copyright. All rights are reserved by the Publisher, whether the whole or part of the material is concerned, specifically the rights of translation, reprinting, reuse of illustrations, recitation, broadcasting, reproduction on microfilms or in any other physical way, and transmission or information storage and retrieval, electronic adaptation, computer software, or by similar or dissimilar methodology now known or hereafter developed. Trademarked names, logos, and images may appear in this book. Rather than use a trademark symbol with every occurrence of a trademarked name, logo, or image we use the names, logos, and images only in an editorial fashion and to the benefit of the trademark owner, with no intention of infringement of the trademark.
The use in this publication of trade names, trademarks, service marks, and similar terms, even if they are not identified as such, is not to be taken as an expression of opinion as to whether or not they are subject to proprietary rights.
While the advice and information in this book are believed to be true and accurate at the date of publication, neither the authors nor the editors nor the publisher can accept any legal responsibility for any errors or omissions that may be made. The publisher makes no warranty, express or implied, with respect to the material contained herein.
Managing Director: Welmoed Spahr Lead Editor: Pramila Balan Technical Reviewer: Nakul Verma
Editorial Board: Steve Anglin, Pramila Balan, Laura Berendson, Aaron Black, Louise Corrigan, Jonathan Gennick, Robert Hutchinson, Celestin Suresh John, Nikhil Karkal, James Markham, Susan McDermott, Matthew Moodie, Natalie Pao, Gwenan Spearing
Distributed to the book trade worldwide by Springer Science+Business Media New York, 233 Spring Street, 6th Floor, New York, NY 10013. Phone 1-800-SPRINGER, fax (201) 348-4505, e-mail [email protected], or visit www.springeronline.com. Apress Media, LLC is a California LLC and the sole member (owner) is Springer Science + Business Media Finance Inc (SSBM Finance Inc). SSBM Finance Inc is a Delaware corporation.
For information on translations, please e-mail [email protected], or visit www.apress.com. Apress and friends of ED books may be purchased in bulk for academic, corporate, or promotional use. eBook versions and licenses are also available for most titles. For more information, reference our Special Bulk Sales–eBook Licensing web page at www.apress.com/bulk-sales.
Any source code or other supplementary materials referenced by the author in this text are available to readers at www.apress.com. For detailed information about how to locate your book’s source code, go to www.apress.com/source-code/. Readers can also access source code at SpringerLink in the Supplementary Material section for each chapter.
Contents at a Glance
About the Authors ... xi
About the Technical Reviewer ... xiii
Acknowledgments ... xv
■
Chapter 1: Getting Started ... 1
■
Chapter 2: Architecture Overview ... 13
■
Chapter 3: A Deeper Look at Sprites... 17
■
Chapter 4: Handling Inputs and Events ... 41
■
Chapter 5: Adding a GUI... 49
■
Chapter 6: Fun with Animation ... 59
■
Chapter 7: Adding Physics to Your Game ... 69
■
Chapter 8: Miscellaneous Features ... 109
Contents
About the Authors ... xi
About the Technical Reviewer ... xiii
Acknowledgments ... xv
■
Chapter 1: Getting Started ... 1
1.1
Introduction ... 1
1.2
Environment Setup ... 1
1.2.1
Python Installation ... 1
1.2.2 Cocos Console Setup ... 2
1.3 Creating Your First App ... 2
1.3.1
Folder Structure ... 3
1.3.2 Structure of project.json ... 4
1.3.3
Code ... 5
1.4 Running “Hello World” ... 7
1.5 Example for This Book... 8
1.5.1 Running the Code Examples ... 8
1.6
Native Deployment ... 10
1.6.1
Android Setup ... 10
1.6.2
iOS Setup ... 11
■
Chapter 2: Architecture Overview ... 13
2.1
Engine Architecture ... 13
2.3
Object Hierarchy ... 14
2.4
Deploy Options ... 15
2.4.1 Deploy as Hybrid App ... 15
2.4.2
Deploy using Titanium ... 15
2.4.3
Cocos Console ... 15
■
Chapter 3: A Deeper Look at Sprites... 17
3.1
Introduction ... 17
3.2
Sprite Class ... 17
3.3 Sprite with Single Image ... 18
3.3.1
FPS Display ... 20
3.4 Sprite with Sprite Sheet ... 21
3.5
Sprite Frame Animation ... 23
3.6 Sprite Frame Animation with PList Data ... 26
3.7 TextureCache with Sprites ... 29
3.8 SpriteFrameCache with Sprites ... 30
3.9
Sprite Batching ... 31
3.9.1
SpriteBatchNode ... 31
3.10
Resolution Policies ... 34
3.10.1
Terminology ... 35
3.10.2 Pre-defined Resolution Policies ... 37
3.10.3 How to Use ... 38
3.10.4 Custom Resolution Policies ... 38
3.10.5 Pre-defined Container Strategies ... 38
3.10.6 Pre-defined Content Strategies ... 38
3.10.7 For a Custom Container Strategy ... 39
■
Chapter 4: Handling Inputs and Events ... 41
4.1
Introduction ... 41
4.1.1
Event Trigger ... 42
4.1.2
Event Manager ... 42
4.1.3
Event Listeners ... 42
4.2
Touch Events ... 42
4.2.1
Single Touch ... 42
4.2.2
Multi-Touch... 44
4.3
Mouse Events ... 44
4.4
Keyboard Events ... 46
4.5
Accelerometer Events ... 47
4.6
Custom Events ... 48
■
Chapter 5: Adding a GUI... 49
5.1
Introduction ... 49
5.2
Labels ... 49
5.2.1 Label with True Type Font ... 49
5.2.2 Label with Bitmap Font ... 50
5.2.3
Example ... 50
5.3 Menu and MenuItem ... 54
5.3.1
MenuItemLabel ... 54
5.3.2
MenuItemImage ... 54
5.3.3
Example ... 54
5.4 Other GUI Elements ... 57
■
Chapter 6: Fun with Animation ... 59
6.1
Introduction ... 59
6.2
Actions ... 59
6.3
Available Actions List ... 60
6.3.1
Move ... 60
6.3.2
Jump ... 60
6.3.3
Rotation ... 60
6.3.4
Scale ... 61
6.3.5
Skew... 61
6.3.6
Tint ... 61
6.3.7
Bezier ... 61
6.3.8
Cardinal Spline ... 62
6.4
Easing ... 62
6.5
Sequence ... 64
6.5.1
Reversing Sequence ... 64
6.5.2
Repeating Sequence ... 64
6.5.3 Action End Callback ... 65
6.6
Spawn ... 65
6.7
Stopping an Action ... 65
6.8
Sprite Frame Animation ... 66
6.9 Schedulers and Update ... 66
■
Chapter 7: Adding Physics to Your Game ... 69
7.1
Introduction ... 69
7.2
Chipmunk Overview ... 69
7.3
Chipmunk Space ... 71
7.4
Chipmunk Body ... 72
7.5
Chipmunk StaticBody ... 73
7.6 Physics Debug Node ... 74
7.7
Collision Detection ... 74
7.9
Joints ... 78
7.9.1
Pin Joint ... 80
7.9.2
Slide Joint ... 83
7.9.3
Pivot Joint ... 86
7.9.4
Groove Joint ... 89
7.9.5
Damped Spring ... 93
7.9.6 Damped Rotary Spring ... 96
7.9.7 Rotary Limit Joint ... 99
7.9.8
Simple Motor ... 102
7.9.9
Gear Joint ... 105
7.9.10
Ratchet Joint ... 108
■
Chapter 8: Miscellaneous Features ... 109
8.1 Drawing Primitive Shapes ... 109
8.2 Adding Music and Sound Effects ... 111
8.3 Using Custom Shaders ... 111
8.4
Motion Trail Effect ... 113
8.5 Accessing Local Storage ... 115
8.6 Schedule an Interval Callback ... 118
8.7 Accessing Current Language ... 120
8.8 Accessing System Capabilities ... 121
8.9
Optimization ... 122
8.9.1
Memory Optimization ... 122
8.9.2
Performance Optimization ... 122
8.9.3
JavaScript Level ... 123
8.10
Conclusion ... 123
About the Authors
Hemanth Kumar and Abdul Rahman are a team of full-stack JavaScript experts,
researchers, and mobile game developers with a wide range of experience in Web and game development. They are well versed in Cocos2d-x, Unity3D, and building artificial intelligence for games. They are also experts in doing scalable architecture for high-traffic websites. Their main passion is video game development.
They are well versed in writing complex shaders for games, they published mobile games such as Blocky Pass, Little ninja town, Jumpo Jumpie on both android and ios, they have wrote several unity plugins as well, they are also good in android and ios native apps development and built several successful apps which are now used by millions of users world wide such as learn arabic basics for android and GXP (goals tracker for ios), they are also experts in OpenGL, WebGL, iOS Metal and Vulcan on android.
Hemanth is currently a web developer for a company and he builds games in his free time, listening to music, playing guitar, and watching movies are his hobbies.
About the Technical
Reviewer
Nakul Verma is a professional game developer currently working as a senior unity
developer at Aquimo Sports Pvt Ltd. If you talk about the industry, then he has been in this field for around two years, but if you talk about passion and inclination, then he has been around for a decade. In these two years or so, he has worked on a variety of game genres using multiple technologies along the way. He has worked on a couple of casual puzzle games, an endless runner, an endless casual game, a couple of card games (Rummy on Cocos2d-JS and an African game), and a physics simulation sample, and is currently working independently on his own game that will be hitting the stores soon. The game technologies that he is proficient in are Unity, Cocos 2D-X/JS, Construct, and Allegro. Gaming has always been one of his favorite hobbies, along with sports, music, breakdancing, and a few more. Technology, gadgets, machines, and software have always fascinated him. He has always had the urge to learn more about the things that he likes, be it in the real world or in the virtual world, and to eventually be the best that he can be in them. His favorite game genres are first-person shooters, platformers, and puzzlers. When he is not making or playing games, he is either working out, breakdancing, or messing with some gadget around him.
Acknowledgments
I would like to thank my sister, Priya, and my mom, Indrani, for supporting me in all situations. I also thank my dad, Krishnamurthy. Dad, remembering you is easy—I do it every day; missing you is heartache that never goes away!
—Hemanth Kumar The completion of this undertaking could not have been possible without the
participation and support of the following people
To my friend, Hemanth Kumar, my dad, Salam, my mom, Badrunnisa, my wife, Shameera Sultana, my son, Yusuf Omar, and all my relatives, friends, and mentors for their endless support, either morally, financially, or physically—thank you.
1
© Hemanth Kumar 2016Getting Started
1.1
Introduction
In the early days, games were hard to make, but in recent years lots of 2D and 3D frameworks and tools have evolved that simplify game development and enable developers to produce high-quality games quickly. Cocos is a game engine that is widely used for making 2D games. Over the years, Cocos has established a solid foundation among developers. Many popular games in the market are made using Cocos. In 2010, Cocos2d-x, which is the C++ port of Cocos2D, was introduced. This enabled developers to make cross-platform 2D games. After that, Cocos2d-js, which is the JavaScript port of Cocos2d, was introduced, enabling developers to produce browser-based games as well as cross-platform native games that use JSB.
Cocos2D is the proven standard for making 2D games because of its simplicity and rich sets of features. In the coming sections, we are going to take a deep look at the Cocos2d-js framework and its features. By the end of this book, you will have a solid understanding of the Cocos2D-js framework, best practices, and the rich set of features that will enable you to develop your awesome game quickly.
Let’s begin!
1.2
Environment Setup
1.2.1
Python Installation
Most of the time, you will be dealing with the Cocos console to create, run, compile, and deploy your project. The console uses Python. So, the first thing you need to do is to install Python. You can download it from the official Python site at https://www.python. org/downloads/.
If you are developing on MacOS X, it comes with Python installed by default.
Electronic supplementary material The online version of this chapter
1.2.2 Cocos Console Setup
For Cocos2d-js, the development environment is actually a part of the Cocos console, so you have to download the Cocos2d-x bundle, or you may also go for the HTML5 Lite version if you wish to develop only for the Web.
1.2.2.1
Steps
• Download the cocos2d-x bundle from https://cocos2d-x.org/ download.
• Extract the zip file to your local drive.
• Open the terminal on Mac or the command prompt on Windows and navigate to the extracted folder.
• Run the following command:
1 python setup.py
• This will set up the Cocos console, which uses both Android and iOS environment settings, and update the environment variables.
1.3 Creating Your First App
Create a separate folder of your choice in your favorite location. It is good practice to keep all of your Cocos2d-js projects within one root folder.
Open the terminal and navigate to the created folder path, then execute the following commands:
• Cocos2d-js project:
1 cocos new sampleproject -l js
• Cocos2d-js project with web engine only:
1 cocos new sampleproject -l js --no-native
• Cocos2d-js project in specific directory:
1 cocos new sampleproject -l js -d ./Projects
1.3.1
Folder Structure
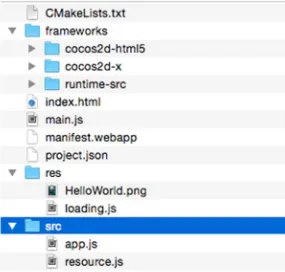
When you create a new project, the Cocos console will create a folder structure like the one seen in Figure 1-1.
Figure 1-1. Project folder structure
• src - folder where you have all the JavaScript files for your game
• res - folder where you have all the images and other resources that are referenced in your game
1.3.2 Structure of project.json
This file has meta information about your Cocos2d-js project. Let’s have a look into the json structure.
1 {
2 "version": "1.0",
3 "name": "sampleproject1", 4 "description": "sampleproject1", 5 "launch_path": "/index.html", 6 "icons": {
13 "default_locale": "en", 14 "installs_allowed_from": [ 15 "*"
16 ],
17 "orientation": "portrait-primary", 18 "fullscreen": "true"
19 }
• version - your application version • name - name of your application
• description - the description of your application
• launch_path - the startup HTML file for Cocos2d-js; used by the Cocos console when deploying/debugging your application as a Web app
• icons - application icons of various sizes; used by the Cocos console during native deployment
• developer - information about the developer of the application • default_locale - default localization setting for your application;
represents which language to use by default
• orientation - orientation profile to support
1.3.3
Code
If you open main.js, you will see the following code.
1 cc.game.onStart = function(){
2 //If referenced loading.js, please remove it
3 if(!cc.sys.isNative && document.getElementById("cocosLoading")) 4
4 13 cc.view.setDesignResolutionSize(800, 450, cc.ResolutionPolicy.
SHOW_ALL);
14 // The game will be resized when browser size changes 15 cc.view.resizeWithBrowserSize(true);
16 //load resources
The Cocos2d-js engine will begin by executing the onStart function, which has code to kickstart your game. There are a few configuration-related things going on in the preceding code that will be explained in later chapters. For now, we will focus on the cc. LoaderScene part.
1 cc.LoaderScene.preload(g_resources, function () {
2 cc.director.runScene(new HelloWorldScene());
3 }, this);
The preceding code loads the “Hello World” scene. cc.director is the single controller instance for your game. The purpose of this director is to guide your game through execution, loading and unloading the scene and getting information about the game-execution environment, such as screen size and so on. In this code, the director uses the runScene function to load the HelloWorldScene, which is loaded inside
Let’s have look at HelloWorldScene and HelloWorldLayer.Open app.js inside src. At the bottom of app.js you will see code like this:
1 var HelloWorldScene = cc.Scene.extend({
2 onEnter:function () {
A scene is told to run by invoking the onEnter function, and HelloWorldLayer is injected as a child of the scene.
We are going to modify HelloWorldLayer to make things simple.
1 var HelloWorldLayer = cc.Layer.extend({
This layer has two children; one is cc.LabelTTF, which has “Hello World” as text, and the other is a HelloWorld_png sprite. Throughout this book, we are going to use portrait screen resolution. So, in main.js, you should change the following line:
1 //This is landscape
to
1 //Swap the width and height so that it can be portrait
2 cc.view.setDesignResolutionSize(450, 800, cc.ResolutionPolicy.SHOW_ALL);
Width and height have been swapped.
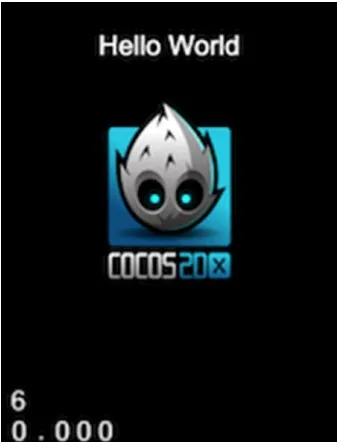
1.4 Running “Hello World”
To make things simple, throughout this book we are going to run all the code in a Web browser. However, deploying it on a device as a native app is your choice. To run this sample type, navigate to the project path in the terminal and type the following command:
1 cocos run -p web
This will launch the app in the browser; however, you can launch the app in Android, iOS, or Windows phone by altering -p param as 'android' or 'ios'. You will see
something like what is shown in Figure 1-2.
1.5 Example for This Book
All the example code for this book is available at https://github.com/nutcrackify/ Rapid_Game_Development_Using_Cocos2d-js.
1.5.1 Running the Code Examples
There are many ways in which you can get the code examples up and running. We found the following steps made it easy to get the example code up and running quickly. Run the following commands in the terminal.
1.5.1.1
Steps
• Create a new Cocos2d-js project:
1 cocos new codeexamples -l js
• Navigate to the project folder in the terminal:
1 cd codeexamples
• Initialize an empty git repository:
1 git init
• Delete all the files and folders in the current folder except the
• Add the remote (code samples repository) to the local git repository using either of the following commands:
1 (if you use ssh)
2 git remote add origin [email protected]:nutcrackify/Rapid_Game_Development_ Using_Co\
3 cos2d-js.git 4
5 (if you use https)
6 git remote add origin https://github.com/nutcrackify/Rapid_Game_ Development_Usin\
7 g_Cocos2d-js.git
• Pull the repository:
1 git pull origin master
• Run the example:
1 cocos run -p web
1.6
Native Deployment
Apart from on the Web, you may also deploy your Cocos2d-js samples to native platforms. The following is the command used for native deployment.
1 cocos deploy [-h] [-s SRC_DIR] [-q] [-p PLATFORM] [-m MODE]
• [-h] is help.
• [-s SRC_DIR] represents the source folder of your Cocos2d-js project.
• [-q] is quite mode.
• [-p PLATFORM] represents the target platform (i.e., Android, iOS, etc.)
• [-m MODE] represents mode of deployment (i.e., release, debug)
1.6.1
Android Setup
You can skip this part if you already have the Android environment or if you don’t want to compile and deploy for Android.
1.6.1.1
Steps
• Install JDK from http://www.oracle.com/technetwork/java/ javase/downloads/index.html.
• Download Android Studio or SDK and NDK from https://developer.android.com/sdk/index.html.
• Extract the SDK if you are not installing Android Studio.
• Extract the NDK and place it in the root of SDK, making sure that SDK and NDK are in same root folder.
• Install Apache ant from https://ant.apache.org/bindownload. cgi.
Run the following command in your local Cocos2d-x installation folder and provide the Android NDK and SDK paths:
1 python python.py
To deploy your project to Android, run the following command from the project folder via the terminal:
1.6.2
iOS Setup
Install XCode from OS X app store. Use the following command for iOS deployment:
1 cocos deploy -p ios -m release
Architecture Overview
2.1
Engine Architecture
Understanding the architecture of Cocos2d-js will give you a solid foundation for understanding the overall framework. This section will not cover the detailed architecture, which is beyond the scope of this book, but we will cover the necessary details that you need to be aware of in order to move forward. Cocos2d-js is a pure JavaScript-based game framework that runs on the browser stack. You can compile it as a Web app and run in on every browser; however, the API’s and object’s hierarchy are the same as for Cocos2d-x. So, with the help of JSB and SpiderMonkey, your JavaScript game code can be deployed as a native app that actually utilizes the core rendering pipeline of OpenGL/DirectX. Let’s have a look at the architecture in Figure 2-1.
As you can see, if your app is browser based, your JavaScript game code will utilize the library from Cocos2d-js and can be run like any other Web app. When you deploy this as native app using the Cocos console, your JavaScript code will be mapped to JavaScript bindings that actually point to native Cocos2d-x. Your JavaScript code will be converted to C by SpiderMonkey. So, Cocos2d-x will actually drive your JavaScript game.
2.2
JSB
As just mentioned, JSB contains mapping between JavaScript and C++ APIs of Cocos2d-x, so when you choose to deploy your game as a native app, all of your API usage is mapped to actual C++ API calls with the help of SpiderMonkey. Note that only documented Cocos2d-js APIs can be mapped to native API calls. If you try to invoke any functions internal to Cocos2d-js that are not documented, the app will work fine out of the box in the browser, but when you deploy it as a native app you may not see the same result. It is always recommended that you follow the documented APIs if you are planning to compile your game to any mobile platform.
2.3
Object Hierarchy
Cocos2d-js is based on object-oriented principles, so all the entities involved are considered classes and objects. Consider Figure 2-2.
Every class in Cocos2d-js, except for a few utilities, is inherited from cc.Node, from Scene and Layer to Sprites, all of which are instances of the Node object. Whenever you deal with any visible elements in Cocos2d-js, the topmost root object is cc.Node. So, most of the time you are dealing with a Node object. The derived objects will have their own behaviors and overrides based on their definitions and needs.
2.4
Deploy Options
As you are working with a pure JavaScript library, there are many more options for deploying your app than just relying on the Cocos console.
2.4.1 Deploy as Hybrid App
This option is subjected to your game’s performance. If your game uses a heavy draw cycle, then this option is not recommended.
2.4.2 Deploy using Titanium
This option will enable you to deploy your app as a native app, but its feasibility may vary based on what you do in your games.
2.4.3
Cocos Console
17
© Hemanth Kumar 2016
A Deeper Look at Sprites
3.1
Introduction
Sprites are the most essential part of any 2D game. You will be dealing with this entity often while developing 2D games. In Cocos2d-js, this entity is defined by a class called
cc.Sprite. In this section, we are going to explore this class in detail, including how it is organized, its usage, how to do frame animations, etc. So, let’s begin.
3.2
Sprite Class
When you look into a sprite, it has two major parts. One is the texture, which represents the image, and the other is the sprite frame, which represents the rect in the texture image that is the current display of the sprite. Texture is represented by cc.Texture and the sprite frame is represented by cc.SpriteFrame. Let’s have a look at a few examples.
3.3 Sprite with Single Image
In the src folder, create a file called spriteimage.js and copy and paste the following code:
1 var SpriteImageLayer = cc.Layer.extend({
2 sprite:null,
3 ctor:function () {
4 this._super();
5
6 var size = cc.winSize;
7
9 this.sprite.attr({
10 x: size.width / 2, 11 y: size.height / 2 12 });
13 this.addChild(this.sprite, 0);
14 return true;
15 } 16 });
In project.json, include this new file, and in app.js, replace the existing layer
instance in the scene with SpriteImageLayer.
1 var HelloWorldScene = cc.Scene.extend({
2 onEnter:function () {
3 this._super();
4 //Replace the layer with SpriteImageLayer.
5 var layer = new SpriteImageLayer();
6 this.addChild(layer);
7 } 8 });
In resources.js, the Sprite_Image property needs to be included; you can use the image of your choice.
1 var res = {
2 ... 3
4 Sprite_Image:"res/sprite_image.png" 5 };
I’ll be using the image seen in Figure 3-2.
Remember these steps of running individual layers, since we will be creating separate layers for each example, and these steps will not be repeated in upcoming examples.
As you can see, the sprite has been initialized with a single image:
1 this.sprite = new cc.Sprite(res.Sprite_Image);
This constructor will create a cc.Texture instance with res.Sprite_Image, and cc. SpriteFrame will be initialized with rect(0,0,spriteWidth,spriteHeight) by default so as to show the full image. So, the output will be as in Figure 3-3.
Figure 3-3. Sprite with single image
3.3.1
FPS Display
The display at the bottom-left corner is called the FPS display, and it has three values:
You can control the visibility of the FPS display using the showFPS flag in project.json.
3.3.1.1
Draw Call
Renderings happen in draw calls, and for every single node in the scene there is an associated draw call. As draw calls increase, delta time and frame rate decrease, and this is directly proportional to the performance of the game.
3.3.1.2
Delta time
The time taken by the previous frame to complete its render.
3.3.1.3
Frame rate
Represents the number of frames rendered in a second.
3.4 Sprite with Sprite Sheet
To reduce the memory being used, you should pack all your assets into a single sprite sheet, which you will use through your game. For an individual sprite, the cc.SpriteFrame
instance will define which portion of the sprite sheet needs to be shown in the display frame of the cc.Sprite instance. I’m going to use the sprite sheet shown in Figure 3-4 for the next example.
In src, create a file called spritesheet.js and copy the following code into it:
1 var SpriteSheetLayer = cc.Layer.extend({
2 sprite:null,
3 ctor:function () {
4
5 this._super();
6
7 var size = cc.winSize;
8
9 this.sprite = new cc.Sprite(res.Sprite_Sheet,
cc.rect(438,93,67,94)); 10 this.sprite.attr({
11 x: size.width / 2, 12 y: size.height / 2 13 });
14 this.addChild(this.sprite, 0);
15
16 return true;
17 } 18 });
Follow the steps in the previous example to include SpriteSheetLayer in
HelloWorldScene. In resource.js, create a Sprite_Sheet variable and specify the sprite sheet’s file name.
As you can see, a sprite is initialized with the sprite sheet as the texture and rect
The rect coordinates correspond to the last image of the first row in the sprite sheet.
3.5
Sprite Frame Animation
As explained before, cc.SpriteFrame is responsible for showing the current display of the image in cc.Sprite. This sprite frame can be changed at any point in time, which enables us to create frame-based animations. Let’s look at an example. I’m going to use the same sprite sheet for this example.
In src, create a file called spriteanimation.js and copy the following code into it:
1 var SpriteAnimationLayer = cc.Layer.extend({
2 sprite:null,
3 ctor:function () {
4 //////////////////////////////
5 // 1. super init first
6 this._super();
7
8 var size = cc.winSize;
22 var frameDatas=[walk01,walk02,walk03,walk04,walk05,
23 walk06,walk07,walk08,walk09,walk10,walk11];
24 var texture = cc.textureCache.addImage(res.Sprite_Sheet);
25
49 this.sprite.runAction(animate.repeatForever());
50
51 return true;
The idea behind the frame animation is that we are going to run through each frame in a specific time interval so that it will look like an animation sequence. In the preceding code, walk01 to walk11 represent frames with rects in the sprite sheet. If we put these frames together and run through it, it will look like a walking animation.
A SpriteFrame instance is created with this frame rect array (see Figure 3-6):
1 var texture = cc.textureCache.addImage(res.Sprite_Sheet);
2 var animFrames=[];
3 for(var index in frameDatas)
4 {
5 var spriteFrame = new cc.SpriteFrame(texture, frameDatas[index]);
6 var animFrame = new cc.AnimationFrame();
7 animFrame.initWithSpriteFrame(spriteFrame, 1, null);
8 animFrames.push(animFrame); 9 }
Figure 3-6. SpriteFrame
In this example, we are manually creating the cc.SpriteFrame instance, so it is going to need a texture instance of the sprite sheet. Thus, we added the sprite sheet to the texture cache, which returns the texture instance, which can be used to create all of the sprite frames.
Finally, the cc.Animation instance, which is used to perform the animation, is created using the list of images from cc.AnimationFrame with a time interval of 0.08 seconds.
The output will be a nice walk animation.
3.6 Sprite Frame Animation with PList Data
We have created the same sprite sheet from an individual image using TexturePack, and we generated the PList file. See Figure 3-7.
Figure 3-7. TexturePack-generated sprite sheet
You can examine the PList data file in the res folder of the sample project available at
https://github.com/nutcrackify/Rapid_-Game_Development_Using_Cocos2d-js.
In src, create a file called plistanimation.js and copy the following code to it:
1 var PListAnimationLayer = cc.Layer.extend({
2 sprite:null,
3 ctor:function () {
4
5 this._super();
6
7 var size = cc.winSize;
8
9 cc.spriteFrameCache.addSpriteFrames(res.Sprite_Sheet1_P, res.
30 this.sprite.runAction(cc.animate(animation).repeatForever());
31
32 return true;
33 } 34 });
In resource.js, include the PList and sprite sheet file with variables Sprite_ Sheet1_P and Sprite_Sheet1; both have been added to the frame cache, as follows:
1 cc.spriteFrameCache.addSpriteFrames(res.Sprite_Sheet1_P, res.Sprite_ Sheet1);
Based on the PList data and sprite sheet, a sprite frame can be created using the
getSpriteFrame function, as follows:
1 var animFrames=[];
2 for(var i=1;i<12;i++)
3 {
4 var str = "p1_walk" + (i < 10 ? ("0" + i) : i) + ".png";
5 var spriteFrame=cc.spriteFrameCache.getSpriteFrame(str);
Now we have list of sprite frames that can be animated using the cc.Animation class:
1 var animation = new cc.Animation(animFrames, 0.08);
2 this.sprite.runAction(cc.animate(animation).repeatForever());
This is the same walk animation that we did using the raw frame data without PList.
3.7 TextureCache with Sprites
Texture caches are an essential part of the sprite construct and are used to cache texture data in memory so that when the same texture is referred to again, it will be loaded from the cache. This improves the overall performance and in-memory optimization for your game. See Figure 3-9.
Figure 3-9. Texture cache sprite
Whenever you create a sprite with an image file, internally the image file gets loaded to TextureCache, and a Texture2D instance will be created with the data from
The preceding figure represents the sprite with a single png file. Once the texture is returned from the resource loader it is cached into the texture cache, and the Texture2D
instance is created from the cache data and used by cc.Sprite. This is the internal implementation of cc.Sprite.
3.8 SpriteFrameCache with Sprites
Similar to TextureCache, SpriteFrameCache is used to cache the SpriteFrame that is used by cc.Sprite. If you have a sprite sheet, individual SpriteFrames can be cached in SpriteFrameCache and used later whenever needed. This has been illustrated in the previous code samples and Figure 3-11.
3.9
Sprite Batching
Sprite batching is a technique that combines multiple sprite renderings using a single draw call, provided that the sprites involved use the same texture or texture sheet.
3.9.1
SpriteBatchNode
cc.SpriteBatchNode is the sprite class used to combine multiple sprites into a single draw call, Let’s have a look at an example.
First, let’s create four individual sprites with the same sprite sheets and different
SpriteFrame rects:
1 this.sprite1 = new cc.Sprite(res.Sprite_Sheet,cc.rect(438,93,67,94));
2 this.sprite1.attr({
3 x: size.width / 2, 4 y: size.height / 1.5 5 });
6
7 this.sprite2 = new cc.Sprite(res.Sprite_Sheet,cc.rect(73,0,72,97));
13 this.sprite3 = new cc.Sprite(res.Sprite_Sheet,cc.rect(219,0,72,97));
14 this.sprite3.attr({
15 x: size.width / 2, 16 y: size.height / 3 17 });
18
19 this.sprite4 = new cc.Sprite(res.Sprite_Sheet,cc.rect(365,0,72,97));
20 this.sprite4.attr({
21 x: size.width / 2, 22 y: size.height / 5 23 });
Now, let’s create an instance of SpriteBatchNode with the same sprite sheet:
1 this.spritebatch=new cc.SpriteBatchNode(res.Sprite_Sheet);
Let’s add sprites to the SpriteBatchNode:
1 this.spritebatch.addChild(this.sprite1, 0);
2 this.spritebatch.addChild(this.sprite2, 0);
3 this.spritebatch.addChild(this.sprite3, 0);
4 this.spritebatch.addChild(this.sprite4, 0);
Finally, let’s add spritebatch to the layer:
1 this.addChild(this.spritebatch);
Now, the full code is supposed to look like this:
1 var SpriteBatchLayer = BaseSampleLayer.extend({
12 y: size.height / 1.5
32 this.spritebatch=new cc.SpriteBatchNode(res.Sprite_Sheet);
33
Note that all the sprites that belong to a single SpriteBatchNode must use the same instance of texture; also, SpriteBatchNode must contain a reference to the same texture. Otherwise, Cocos2d-js will not render the SpriteBatchNode.
However, the native renderer supports auto batching, which means if you are going for native deployment, sprite batching is supported automatically without the
SpriteBatchNode.
3.10
Resolution Policies
Resolution policies are about adapting your game to different screen resolutions and profiles. Cocos2d-js offers sets of resolution policies with which to adapt your games. Without these, you have to manually scale up or down the content of your game based on the screen resolution.
There are two types of resolution policies: pre-defined policies and custom policies. Pre-defined policies are offered by Cocos2d-js and are composed of various combinations of container and content strategies; they are supported in native
deployments as well. With custom policies, you can define your own resolution policies with the combination of available containers and content strategies, but custom policies are supported only in Web deployments. Let’s have a look.
3.10.1
Terminology
You need to aware of certain terms in order to fully understand resolution policies. You may already know that your game is hosted in canvas in your web-based Cocos2d-js game. See Figure 3-13.
Figure 3-13. Terminology used in resolution policies
3.10.1.1
Frame
This represents the container outer to the canvas, usually a body element if you use the default index.html generated by the Cocos console.
3.10.1.2
Container
Cocos2d-js wraps your canvas in an div element, and that wrapped content is then again added to the original container element of canvas.
3.10.1.3
Content
3.10.1.4
Viewport
Viewport represents the world rect of canvas; it is canvas coordinates in pixels.
3.10.1.5
Letter Boxing
When the width of the container matches the frame but the height does not, you get letter boxing (Figure 3-14). It will occur if the w/h ratio does not match with the frame, and is also based on the resolution policy you use.
Figure 3-14. Letter boxing
3.10.1.6
Pillar Boxing
3.10.2 Pre-defined Resolution Policies
There are five predefined policies offered by Cocos2d-js, which we will now discuss.
3.10.2.1
SHOW_ALL
This will scale up the container to the maximum size within the container bounds; all the contents in current scene will be visible.
3.10.2.2
NO_BORDER
This will scale up the container to fill the frame so that there won’t be any visible area in frame while maintaining the proportion of provided width and height.
3.10.2.3
EXACT_FIT
This will scale the container to fit into the frame. Note that the provided width and height ratio won’t be maintained.
3.10.2.4
FIXED_WIDTH
3.10.2.5
FIXED_HEIGHT
This will scale the height of the container to match the frame’s height and scale the width to match the w/h ratio. You may see pillar boxing, if w/h ratio won’t match.
3.10.3 How to Use
In the file main.js, there is a cc.game.onStart callback. You have to use the following line of code to set the resolution profile:
1 cc.view.setDesignResolutionSize(320, 480, cc.RESOLUTION_POLICY.SHOW_ALL);
The first two parameters are width and height, which is the aspect ratio of your game, and the third is the resolution policy.
3.10.4 Custom Resolution Policies
As we seen before, pre-defined policies are a combination of container and content strategy. For example, the SHOW_ALL policy is a combination of PROPORTION_TO_FRAME and
SHOW_ALL, as follows:
1 cc.RESOLUTION_POLICY.SHOW_ALL = new cc.ResolutionPolicy
(cc.ContainerStrategy\
2 .PROPORTION_TO_FRAME, cc.ContentStrategy.SHOW_ALL);
This is the internal implementation of SHOW_ALL. You can define your own policies with a combination of pre-defined container and content strategy.
3.10.5 Pre-defined Container Strategies
• cc.ContainerStrategy.EQUAL_TO_FRAME • cc.ContainerStrategy.PROPORTION_TO_FRAME • cc.ContainerStrategy.ORIGINAL_CONTAINER
3.10.6 Pre-defined Content Strategies
It is possible to create containers and content strategies of your own; all you have to do is use sub-classes cc.ContainerStrategy and cc.ContentStrategy and override the methods shown next.
3.10.7 For a Custom Container Strategy
1 var CustomContainerStrategy = cc.ContainerStrategy.extend({
2 preApply: function (view) {
3.10.8 For Custom Content Strategy
1 var CustomContentStrategy = cc.ContentStrategy.extend({
17 postApply: function (view) {
18 // This function is called after the process of adaptation,
19 // you can remove this function if you don't need
20 } 21 });
41
© Hemanth Kumar 2016Handling Inputs and Events
4.1
Introduction
Handling user input is an essential part of any game. In Cocos2d-js, user input, such as by touch, mouse, or keyboard, is available in the form of events. There are three major parts involved in the event mechanism (see Figure 4-1):.
4.1.1
Event Trigger
An event trigger is the source of any event. When a touch or any other input happens, the Cocos2d-js system will trigger an event in response.
4.1.2
Event Manager
When any event is triggered, event manager will get notified, EventManager is a singleton instance that is part of the Cocos2d-js system; it manages all the events.
4.1.3
Event Listeners
This is where the actual event-handling logic goes. Event manager will dispatch the events to all the event listeners and they will be handled by event listener instances.
4.2
Touch Events
There are two kind of touch events available: single touch ( cc.EventListener.TOUCH_-ONE_BY_ONE) and multi-touch (cc.EventListener.TOUCH_ALL_AT_ONCE)
4.2.1
Single Touch
In the src folder, create a file called touchevents.js and copy the following code there:
21 onTouchBegan: function (touch, event) {
47 cc.eventManager.addListener(listener, this.sprite); 48 return true;
49 } 50 });
In this example, the sprite can be dragged using single touch. The event listener is created using the event name cc.EventListener.TOUCH_ONE_BY_ONE, with
swallowTouches set to true. When multiple event listeners are attached to the same target for the same event name, the first listener with swallowTouches: true will swallow the event, and it will not be passed on to the next listener.
1 cc.eventManager.addListener(listener, this.sprite);
In this case, even though a sprite is the target, a touch event will happen for every tap on the screen. To confirm that a touch has happened inside the sprite, the following code has been written:
1 var target = event.getCurrentTarget();
4 var rect = cc.rect(0, 0, s.width, s.height); 5
6 //Check the click area
7 if (cc.rectContainsPoint(rect, locationInNode)) { 8 cc.log('Touch began: Inside the sprite');
9 //True has been returned to initiate the OnTouchMove 10 return true;
11 }
In onTouchBegan, a condition has been checked as to whether a touch has happened within the sprite or not. If the touch is within the sprite, then true will be returned so that the touch move’s gestures will be directed to the onTouchMoved function; the target position is changed as per the touch move.
4.2.2
Multi-Touch
Multi-touch event listeners can be created using event name cc.EventListener.TOUCH_ ALL_AT_ONCE. Refer to the code snippet that follows:
1 var listener = cc.EventListener.create({ 2 event: cc.EventListener.TOUCH_ALL_AT_ONCE, 3 swallowTouch: true,
So, the callback for multi-touch is different from that for single touch. It has
onTouchesBegan, onTouchesMoved, and onTouchesEnded functions. The touches object will have details about each touch, with touch ID. Mostly, multi-touch can be used in scenarios like map zoom, multi-touch for play control, and so on.
4.3
Mouse Events
As with touch events, mouse events are referred to by event name cc.EventListener.MOUSE. In the src folder, create a file called mouseevents.js and copy the following code into it:
1 var MouseEventsLayer = cc.Layer.extend({ 2 sprite:null,
49 //Added Event Listener To Sprite
50 cc.eventManager.addListener(listener, this.sprite); 51 return true;
52 } 53 });
In this example also, the sprite can be dragged with a mouse click, though there is one major difference between touch and mouse event handling. In touch, the
onTouchBegan function has to return true in order to process onTouchMove. In mouse events, onMouseMove doesn’t depend on the return value of onMouseDown. Both events can be processed simultaneously. To keep track of when a click has been made within the sprite, we have introduced the ismousedown flag. When a mouse down event happens within the sprite, the position will be changed via onMouseMove.
4.4
Keyboard Events
In the src folder, create a file called keyboardevent.js and copy the following code into it:
27 var target = event.getCurrentTarget();
55 cc.eventManager.addListener(listener, this.sprite); 56 return true;
57 } 58 });
In the preceding code, the same sprite drag is performed using UP, DOWN, LEFT, RIGHT key combinations. The onKeyPress function keycode is checked, and if the keycode is any of the arrow keys, the x,y position of the sprite is moved accordingly.
4.5
Accelerometer Events
Accelerometer events are referred to by the event name cc.EventListener.
ACCELERATION. Accelerometer input needs to be enabled via input manager, as follows:
After that, you can create a listener and attach it to the sprite using eventManager:
1 cc.eventManager.addListener({
2 event: cc.EventListener.ACCELERATION, 3 callback: function(acc, event){ 4 // Processing logic here 5 }
6 }, sprite);
4.6
Custom Events
Apart from system-defined events, we can create our own events. See the following code snippet:
1 var listener = cc.EventListener.create({ 2 event: cc.EventListener.CUSTOM, 3 eventName: "my_custom_event", 4 callback: function(event){
5 cc.log("Custom event 1 received, " + event.getUserData() + "times");
6 } 7 });
8 cc.eventManager.addListener(listener, 1);
This custom event has only one callback function, which will be invoked after the event is triggered:
1 var event = new cc.EventCustom("my_custom_event"); 2 event.setUserData(counter.toString());
3 cc.eventManager.dispatchEvent(event);
49
© Hemanth Kumar 2016
Adding a GUI
5.1
Introduction
A GUI is another essential part of any game. It shows the HUD display, score, any
required text, and buttons such as play and pause. Cocos2d-js has pre-defined node types to represent such GUI elements. Let’s look at them one by one.
5.2
Labels
If you want to display any text in your game, then Label objects can be used. There are two types of label offered by Cocos2d-js.
5.2.1 Label with True Type Font
You can define a label such that it uses custom true type fonts. Usually, these fonts have a .ttf file format. In Cocos2d-js, the cc.LabelTTF class can be used to create such a label. Let’s have a look at the syntax:
1 var label= new cc.LabelTTF(text, fontName, fontSize, dimensions, hAlignment, vAl\
2 ignment);
• [string] text - represents the text you want to display
• [string] fontName - represents the loaded .ttf font name
• [Number] fontSize - represents font size
• [cc.Size] dimensions - represents label width and height; if not set, this is calculated automatically
• vAlignment - represents vertical alignment of text inside the label; it can be one of the following values: {cc.VERTICAL_TEXT_ ALIGNMENT_TOP|cc.VERTICAL_TEXT_ALIGN-MENT_CENTER|cc. VERTICAL_TEXT_ALIGNMENT_BOTTOM}
All of these values can be changed dynamically using the appropriate set of functions. Please refer to the documentation for more information on these functions. You will see real examples in an upcoming section.
5.2.2 Label with Bitmap Font
In a bitmap font, each character is represented by an image. All the characters should be located in one png file, and info regarding the font will be present in a (.fnt) file. The cc. LabelBMFont class is used to represent this label type. Let’s have look at its syntax:
1 var label = new cc.LabelBMFont(text, fntFile, width, alignment, imageOffset)
• [string] text - represents the text you want to display
• [fntFile] fntFile - represents the .fnt filename
• [width] width - represents the width of the label
• alignment – represents the horizontal alignment of the image label. Can be one of the following values: {cc.TEXT_ALIGNMENT_ LEFT|cc.TEXT_ALIGNMENT_CENTER|cc.TEXT_-ALIGNMENT_RIGHT}
• [cc.point] imageOffset – represents the x,y offset point where the image center needs to be aligned
5.2.3
Example
In the src folder, create a file called labeldemo.js and copy the following code into it:
12 this.Label1.attr({
As usual, do the steps to run this layer. Let’s see how the label has been used. At first, cc.LayerColor has been included as a child so as to set the background color:
The first label is created using text ‘Default font name’, and fontname is specified as an empty string so that the label falls back to the default font in the system.
The second label is created with a loaded font name; in this case, I have used Abduction.ttf, which is specified in resource.js as follows:
1 var res = { 2 ...
3 Custom_TTF:"res/Abduction.ttf", 4 ...
5 };
So, during the app load, this font will be loaded into memory along with other resources in the res object:
1 this.Label2 = new cc.LabelTTF('Custom Font Label','Abduction', 32); 2 this.Label2.attr({
3 x: size.width / 2, 4 y: size.height / 1.5 5 });
6 this.addChild(this.Label2);
Specifying the font name ‘Abduction’ happens in the second parameter. Specifying the font filename directly in the label will not work.
The third label uses the same custom font ‘Abduction’; the difference is that it enables a stroke on the label:
1 this.Label3.enableStroke(cc.color(0,0,0),10);
The first parameter is the color of the stroke, and the second is size. The fourth label is created with shadow enabled using the following code:
1 this.Label4.enableShadow(cc.color(0,0,0), 50, 50);
Here, the first parameter is the color of the shadow, the second is the shadow offset from the label, and third is shadow size.
Finally, the fifth label is created with a bitmap font:
1 this.Label5 = new cc.LabelBMFont("Bitmap Font", res.BM_Font); 2 this.Label5.attr({
3 x: size.width / 2, 4 y: size.height / 2.9 5 });
As with the second label, I have specified the font filename itself in the second parameter in resource.js BM_Font and BM_Font_Png, as follows:
1 var res = { 2 ....
3 BM_Font:"res/bitmapFontTest.fnt", 4 BM_Font_Png:"res/bitmapFontTest.png", 5 ....
6 };
As you can see, for bitmap fonts the associated .png file needs to be loaded along with a .fnt file. See an example of labels in Figure 5-1.
5.3
Menu and MenuItem
In Cocos2d-js, there is a menu-based GUI that is defined by cc.Menu and cc.MenuItem, where cc.MenuItem should be the child of cc.Menu. CC.MenuItem is an abstract class, and there are three types of menu item available to be inherited from it.
5.3.1
MenuItemLabel
Any cc.Label instance can be used in this menu item type. The following is the syntax:
1 var menuitemLabel = new cc.MenuItemLabel(label,selector,target);
• [cc.Label] label - instance of cc.Label
• [string] selector - callback method name as string
• [object] target - object that has the selector function
5.3.2
MenuItemImage
An image can be used along with this menu item. The following is the syntax:
1 var menuItem = new cc.MenuItemImage(normalImage, selectedImage, disabledImage, s\
2 elector, target);
• [string] normalImage - image file path that represents normal state
• [string] selectedImage - image file path that represents selected state
• [string] disabledImage - image file path that represents disabled state
• [string] selector - callback function name when menu item is clicked
• [object] target - object that has a selector callback function.
Let’s have a look at an example.
5.3.3
Example
In the src folder, create a file called menuitem.js and copy the following code into it:
1 var MenuDemoLayer = cc.Layer.extend({ 2 sprite:null,
4 this._super();
28 temImage_Selected,null,'onMenuClicked',this); 29 this.MenuItem2.attr({
First, an instance of cc.Menu is created and added to the layer in the last statement:
1 this.Menu=new cc.Menu(); 2 ...
3 ...
After that, all the menu item instances are created and added as children to this. Menu. The first menuitem is created using a cc.Label instance, as shown here:
1 var label=new cc.LabelTTF('MenuItem with label',36);
2 this.MenuItem1 = new cc.MenuItemLabel(label,'onMenuClicked',this);
This is later positioned and added as child to this.Menu. The second MenuItemImage is created using two images: normal and selected state images. See here:
1 this.MenuItem2 = new cc.MenuItemImage(res.MenuItemImage_Normal,res. MenuItemImage\
2 _Selected,null,'onMenuClicked',this);
5.4
Other GUI Elements
Apart from menus and labels, there are other GUI elements that are available in an extension module, such as checkbox and button. In order to use extension classes, we need to add the extension module to our project. In project.json, in the modules property, add ‘extension’ to the array list:
1 "modules" : ["cocos2d","extensions"],
These additional user interface elements are available under the parent object ccui. Let’s have a look. In the src folder, create a file called otheruidemo.js and copy the following code into it:
In this, a button instance has been created with normal and selected images:
1 this.uiButton = new ccui.Button(res.ButtonImage,res.ButtonImage_ Selected);
And a checkBox instance has been created, also using normal and selected images:
1 this.uiCheckBox = new ccui.CheckBox(res.CheckBox_Normal,res.CheckBox_ Selected);
If you run the preceding layer, the output will look like Figure 5-3.
59
© Hemanth Kumar 2016Fun with Animation
6.1
Introduction
Animation is essential to any good game, as it makes your game cool and visually appealing, and helps you to acquire more users. A visually appealing game markets itself. Take a moment to look at the top-grossing games in Google Play and App Store. Top games use crisp and detail-rich animations to improve the user experience and to engage users. Take a deep breath, as we are going to look at the details of the animation system in Cocos2d-js. Let’s begin.
6.2
Actions
Actions are the construct that is used in Cocos2d-js to animate a sprite. Actions change the properties of the sprite over time, and that makes the sprite animate in the way we want. There are several types of actions available with which to apply animations on sprites for all the realtime scenarios. Let’s have a look at a simple example:
1 var action = cc.moveBy(2, cc.p(size.width - 40, size.height - 40));
2 this.sprite.runAction(action);
In this example, the action object is created using the cc.moveBy function. Any action can be run on sprites using the runAction method. This method actually belongs to cc.Node, so beyond sprites, we can animate any objects that have cc.Node as a parent or topmost parent (i.e., layers, scenes, etc.) Basically, there are two variations in creating actions.
6.2.1 By and To actions
The preceding code is an example of the By variation. Let’s have a look at the same example with the To variation:
1 var action = cc.moveTo(2, cc.p(size.width - 40, size.height - 40));
The only difference between By and To actions is that To will animate the target property value to the absolute value, and By will animate the target property value to the relative value (Example: If you have a sprite at location (10,10) and you use the moveBy action to animate with value (5,5), after animation the final position of the sprite would be (15,15); in case of a moveTo action the final position would be (5,5)).
6.3
Available Actions List
The following is the list of available actions that you can apply on any nodes. The listed combinations include By and To variations, which you can try with simple sprite images.
6.3.1
Move
This action is used to animate the x,y position of any node instance:
1 var action = cc.moveBy(2, cc.p(size.width - 40, size.height - 40));
2 var action = cc.moveTo(2, cc.p(size.width - 40, size.height - 40));
The first parameter is the duration and the second is the target point value.
6.3.2
Jump
This action is used to animate the node’s x,y position in a parabolic way such that it looks like it is jumping:
1 var action = new cc.JumpBy(2, cc.p(300, 0), 50, 4);
2 var action = new cc.JumpBy(2, 300, 0, 50, 4);
The first parameter is the duration, as it is for all actions. The second parameter is a point or number that represents the target value (either x or (x,y)). If it is a point, then the third parameter is considered as height; if it is a number, then the third parameter is considered as a y value. The next two parameters represent height and number of jumps. So in this case (x,y) and height represent the width and height of the parabola.
6.3.3
Rotation
This action is used to animate the rotation of the node by modifying the rotation attribute over time:
1 var action = new cc.RotateBy(2, 360);
2 var action = new cc.RotateTo(2, 360);