Multiplayer
Games
Andrew Mulholland
and Teijo Hakala
Includes index.
ISBN 1-55622-076-6 (pbk.; companion cd-rom)
1. Computer games--Programming. I. Hakala, Teijo. II. Title. QA76.76.C672M855 2004
794.8'1711—dc22 2003027637
CIP
© 2004, Wordware Publishing, Inc. All Rights Reserved
2320 Los Rios Boulevard Plano, Texas 75074
No part of this book may be reproduced in any form or by any means without permission in writing from Wordware Publishing, Inc.
Printed in the United States of America
ISBN 1-55622-076-6 10 9 8 7 6 5 4 3 2 1 0403
UNIX is a registered trademark of The Open Group in the United States and other countries.
All brand names and product names mentioned in this book are trademarks or service marks of their respective companies. Any omission or misuse (of any kind) of service marks or trademarks should not be regarded as intent to infringe on the property of others. The publisher recognizes and respects all marks used by companies, manufacturers, and developers as a means to distinguish their products.
This book is sold as is, without warranty of any kind, either express or implied, respecting the contents of this book and any disks or programs that may accompany it, including but not limited to implied warranties for the book’s quality, performance, merchantability, or fitness for any particular purpose. Neither Wordware Publishing, Inc. nor its dealers or distributors shall be liable to the purchaser or any other person or entity with respect to any liability, loss, or damage caused or alleged to have been caused directly or indirectly by this book.
All inquiries for volume purchases of this book should be addressed to Wordware Publishing, Inc., at the above address. Telephone inquiries may be made by calling:
About the Authors. . . xiv
Introduction . . . xv
Part I — Theory
Chapter 1 Introduction to Windows Programming . . . 3Introduction . . . 3
Windows Messaging System . . . 3
Creating a Window . . . 4
Sending Information to Your Window . . . 8
Static Link Libraries . . . 9
Creating a Static Link Library . . . 10
Using a Static Link Library. . . 13
Summary . . . 14
Chapter 2 Using Databases . . . 15
Introduction . . . 15
What Is MySQL? . . . 15
Installing MySQL . . . 16
SQL Statements . . . 19
Data Definition Language . . . 19
Creating and Dropping Databases . . . 19
Creating a Database . . . 20
Dropping a Database . . . 21
Column (Field) Types in MySQL . . . 22
Adding, Modifying, and Dropping Tables . . . 24
Creating Tables. . . 24
Modifying Tables . . . 26
Dropping (Removing) Tables . . . 28
Data Manipulation Language (DML) . . . 29
Inserting Data . . . 30
Modifying Data . . . 32
Removing (Deleting) Data . . . 34
Using Select Statements . . . 35
Relational Databases. . . 40
Data Import Methods . . . 44
Importing from a Text File . . . 44
Importing from a Native Source . . . 45
Backing Up and Restoring Data . . . 47
Backing up a Database to a File . . . 47
Restoring a Backed-Up Database . . . 49
MySQL C++ Interface . . . 50
Example 1 — Connecting and Retrieving Data from MySQL . . . . 50
Example 2 — Updating Data in MySQL from an Application . . . . 53
Summary . . . 55
Chapter 3 Creating Web-Based Server Interfaces . . . 57
Introduction . . . 57
Setting Up an Apache 1.3.x Web Server . . . 57
Installing PHP4 for Apache 1.3.x . . . 60
Using PHP: Hypertext Preprocessor . . . 63
The Basics. . . 64
Example 1 — index.php . . . 64
Variables . . . 65
Example 2 — index2.php . . . 65
Operators and Loops . . . 67
Example 3 — index3.php . . . 67
Conditional Statements. . . 68
Example 4 — index4.php . . . 68
Arrays . . . 70
Functions . . . 70
Example 5 — index5.php . . . 70
User Input . . . 71
Example 6a — input.php. . . 71
Example 6b — output.php . . . 72
The “Command” System . . . 73
Example 7a — core.php . . . 74
Example 7b — welcome.php . . . 74
Example 8a — core.php . . . 76
Example 8b — welcome.php . . . 76
Example 8c — page1.php . . . 77
Example 8d — page2.php . . . 77
Accessing MySQL . . . 78
MySQL Example 1 — Connecting and Disconnecting . . . 78
MySQL Example 2 — Storing and Retrieving Data . . . 79
MySQL Example 3 — Updating and Removing Data . . . 84
Using FastTemplate . . . 90
Multiple Templates . . . 93
Converting the Command Parser Example to FastTemplate . . . . 95
Summary . . . 101
Chapter 4 Introduction to TCP/IP. . . 103
Introduction . . . 103
What Is a Protocol? . . . 103
close Function (Unix)/closesocket Function (Win32) . . . 129
shutdown (Unix, Win32) . . . 174
Broadcasting . . . 175
Searching for Servers . . . 175
Broadcast Function . . . 176
Summary . . . 177
Part II — Tutorials
Tutorial 1 Using 2DLIB . . . 181Introduction . . . 181
Configuring Visual Studio . . . 181
Creating a Skeleton Project . . . 182
Creating the Workspace. . . 182
Adding the Static Libraries . . . 183
Adding the Source File . . . 183
Creating a Basic Windowed Application with 2DLIB . . . 184
The WinMain Function . . . 184
The Windows Procedure . . . 185
The Complete Code . . . 187
Using the 2DLIB Graphics Routines . . . 190
2D Positions on the Screen . . . 190
Use of Colors . . . 190
Plotting a Single Pixel. . . 191
Drawing a Line . . . 191
Drawing a Rectangle/Filled Rectangle . . . 191
Drawing a Triangle/Filled Triangle . . . 191
Graphic Loading Functions . . . 192
Graphics Display (Blitting) Function . . . 192
Keyboard Input Method . . . 193
2DLIB Example 1 — Moving Primitives with the Cursor Keys . . . 195
Complete Code Listing for Example 1 . . . 197
2DLIB Example 2 — Loading and Rotating Graphics . . . 200
Complete Code Listing for Example 2 . . . 201
Summary . . . 203
Tutorial 2 Creating Your Network Library . . . 205
Introduction . . . 205
Why Create a Network Library of Our Own? . . . 206
Planning the Structure . . . 206
Planning the Functionality . . . 207
Identifying Hosts . . . 207
Sending Data to Hosts . . . 208
Pinging — Calculating Network Latency . . . 209
Timing Out . . . 209
Building the Library . . . 209
Windows . . . 210
Unix/Linux . . . 211
dreamSock_GetCurrentSystemTime Function . . . 246
dreamSock_Linux_GetCurrentSystemTime Function . . . . 246
dreamSock_Win_GetCurrentSystemTime Function . . . 247
Connect Function . . . 504
Disconnect Function . . . 505
ReadMoveCommand Function . . . 505
ReadDeltaMoveCommand Function . . . 506
BuildDeltaMoveCommand Function. . . 508
RunNetwork Function . . . 509
client.cpp File . . . 511
CArmyWar Constructor and Destructor Functions. . . 525
InitializeEngine Function. . . 526
Shutdown Function . . . 527
DrawMap Function . . . 528
Frame Function . . . 530
CheckVictory Function . . . 531
KillPlayer Function . . . 532
GetClientPointer Function . . . 532
CheckKeys Function . . . 532
CheckPredictionError Function . . . 533
CheckBulletPredictionError Function. . . 534
CalculateVelocity Function . . . 535
CalculateHeading Function. . . 536
PredictMovement Function . . . 537
MoveObjects Function . . . 539
lobby.cpp File . . . 541
RefreshGameList Function. . . 541
RefreshJoinedPlayersList Function . . . 541
Other Unimplemented Functions . . . 542
Summary . . . 542
Index . . . 543
Andrew Mulholland has a BSc (Hons) in
Com-puter Games Technology and is a partner in a
games development company based in Scotland
called Hunted Cow Studios
(www.hunted-cow.com). The company’s current project is an
online gaming web site called CowPlay.com,
which currently offers free multiplayer games.
Teijo Hakala is a software engineer
from Jyväskylä, Finland, who
special-izes in network programming, game
programming, and optimization. He
also has wide work experience with
computer technology.
xiv
Andrew Mulholland
With Internet technology developing rapidly and the use of broadband
Internet services increasingly common, Internet computer gaming has
become ever more popular, while documentation on how to develop
Internet games remains inadequate.
Programming Multiplayer Games
provides in-depth coverage of all the major topics associated with
online game programming, as well as giving the programmer easy to
follow, step-by-step tutorials on how to create a fully functional network
library, back-end MySQL database, and a complete, working online
game.
The book contains two main parts. The first explains practical
the-ory on how to utilize MySQL, PHP4, sockets, and basic Windows
programming. The second part consists of five extensive tutorials,
lead-ing you through the stages of creatlead-ing a worklead-ing online game, which
you can both learn from and expand upon.
After reading this book, you will have a solid knowledge of online
game programming and you will also be able to start making your own
online games. Also note that the companion CD contains all the source
code from the book and a ready-to-use version of the network library
you will create in the tutorial section.
We hope you enjoy reading and learning from this book as much as
we have enjoyed writing it!
Theory
The theory section of this book is full of practical information that will
help you understand how to make functional online games. We
recom-mend that you read through this section thoroughly before attempting
the tutorial section, as there is a lot of knowledge that will benefit you
here.
This section first covers the basics of dialog-based Windows
pro-gramming, which we will utilize in the tutorial section to create our
login and lobby system for the sample online game. Then we cover how
to use MySQL and PHP to create a back-end database for your game,
allowing you to interact with game data directly from a web browser.
We also give an introduction to TCP/IP and sockets, followed by how to
get started with sockets programming. Finally, we learn about different
ways to send data and how to modify the behavior of our sockets.
Introduction to
Windows
Programming
Introduction
The most essential knowledge anyone can have is the basics. If you
already know how to create dialog-based Windows applications, you can
skip this chapter, but if you do not, this chapter will give you a quick
and easy introduction so that you will find the rest of this book more
accessible.
Windows Messaging System
Windows controls everything through the use of its messaging system.
This is a fundamental idea to grasp if you wish to create any
Windows-based applications. Tasks to be processed by the operating system are
stored in a queue. For example, when a user clicks a button in a
win-dow, a message is added to the queue and is then sent to the
appropriate window to inform it that the button has been pressed.
When the operating system creates a window, the window
continu-ally checks for messages being sent to it. If it receives a relevant
message, it will react accordingly; otherwise, it will send it back to the
operating system to be reprocessed.
Each window created is assigned a unique handle that is used to
con-trol and determine which messages are relevant to that window. In
code, this is defined as the HWND, or window handle.
The main reason behind this system is to allow for multitasking and
multithreading. This means that the operating system can run more
than one application in one instance, even though a processor can only
handle one task at a time.
There is a lot more to windows than this, but this should give you a
reasonable overview of how the system works.
Creating a Window
Load up Microsoft Visual Studio and select File, New…
The following dialog box is now visible in the center of the screen.
Select the Projects tab at the top of the dialog and then choose the
Win32 Application option on the main display. Select the location for
your project, enter your project’s name, and click OK.
Next, select the type of project you wish to create. Leave it on the
default option (An empty project) and click the Finish button. A project
information box is now visible; simply click OK in this box.
Now we are working with the Visual Studio main interface.
Cur-rently the ClassView is active, but we are interested in the FileView, so
select this tab.
The FileView is a list of all the C and C++ source and header files that
are active in your project. Currently we do not have any files in our
pro-ject, so we need to add our main C++ source file.
Select File, New… as you did before, but this time we will be using
the Files tab instead of the Projects tab. The following dialog will be
visible.
Select the C++ Source File option as shown in Figure 1-3 and type in
the filename as main.cpp. Now click the OK button to add this empty
file to your project.
You now have your main source file in your project and it is visible in
the Visual Studio editor.
There are two main items required in a standard Windows program:
the entry point to your program, which is named
WinMain
, and the
Windows callback procedure, commonly named
WndProc
, which is
used to keep your Windows application up to date.
For what we require though, it is best to take the dialog approach,
making it even simpler to design and code. First, we need to add our
dialog, so click File, New… again, but this time you want to add a
resource script. Type in the filename as resource and click OK.
Once this is done, you will notice another tab has appeared between
the ClassView and FileView tabs. This tab is called the ResourceView;
it allows you to visually create and edit dialogs for use within your
program.
Figure 1-2
Once you select the ResourceView tab, you will be presented with the
resource editor. Right-click on resource.rc in the main view and then
left-click on the Insert option. You will then be presented with the
fol-lowing dialog box.
Select the Dialog option and click the New button. Now you will see a
sample dialog box in front of you. For now, we will not do much to it
except change the name of the title bar and its identifier, which I
explain in the following code.
Double-click on the sample dialog box that Visual Studio created.
Now a dialog properties box can be seen. All we are interested in here
is the ID, which will probably be set to IDD_DIALOG1, and the
Cap-tion, which should be Dialog. Let’s change the ID to IDD_CLIENT and
the Caption to Window Example.
It’s time to go back and do some code now. We have our dialog
tem-plate that we can call from our code, so let’s do it. Here is the code
required to make your dialog window appear on the screen. The OK
button on the dialog can be pressed but will have no action, whereas
the Cancel button will close the dialog.
// Simple Windows Code #include <windows.h> #include "resource.h"
LRESULT CALLBACK
ClientDlgProc(HWND DialogWindow, UINT Message, WPARAM wParam, LPARAM lParam) {
// Process Messages switch(Message) {
case WM_INITDIALOG: return FALSE;
case WM_COMMAND:
Figure 1-4
switch(wParam) {
case IDCANCEL:
EndDialog(DialogWindow, FALSE); return FALSE;
default: break; }
break;
default: break; }
return FALSE; }
int APIENTRY
WinMain(HINSTANCE hInstance, HINSTANCE hPrevInstance, LPSTR lpCmdLine, int nCmdShow)
{
DialogBox((HINSTANCE) hInstance, MAKEINTRESOURCE(IDD_CLIENT), NULL, (DLGPROC) ClientDlgProc);
return 0; }
NOTE If you get an error that tells you it can’t find afxres.h, you need to install MFC support for Visual Studio, which comes with the Visual Studio package.
If you have never seen Windows code before, the above code may look
complex and a little confusing. Welcome to the world of Windows! Well,
it’s not that bad, honest.
Let’s start with the
WinMain
function. This is simply the point at
which Windows starts executing your code. Do not worry about the
variables that are passed in; they are controlled by Windows and are
beyond the scope of this book.
The main issue here is the
DialogBox
function and the
ClientDlgProc
callback procedure that creates our dialog window
on the screen. The first parameter is the instance of the application that
you simply take from the first parameter of the
WinMain
function.
Next is the identifier that we set when we created the template for our
dialog. The third parameter is of no interest to us so we set it to NULL,
but the final one is. This is a pointer to the update function for the
dia-log. Each dialog you create requires this update function (basically the
same idea as a Windows procedure). In this update function is where
you set the actions for buttons and other useful tools. So we set this
update function to our callback function for the dialog
For example, the identifier for the Cancel button is IDCANCEL. As
you can see in the code, there is a case statement for the Cancel button
so when it is clicked, it will close the dialog window. Other buttons can
be easily added to the template using the toolbox on the template
edi-tor. Just remember that each button must contain a unique ID so you
can reference it from within your code.
Sending Information to Your Window
In addition to being useful for debugging, being able to update
informa-tion to a window is essential knowledge and can be used in many
situations, such as displaying how many players are connected to the
game server.
First you have to add a static text string to the dialog window. To do
this you need to go back to the template editor by selecting the
ResourceView tab as before. Then you simply double-click on the
IDD_CLIENT text as seen in Figure 1-6 to bring up your dialog in the
main area.
Next, select the
Aa
button from the Controls toolbox and place it
somewhere on your dialog as seen in the figure. Now double-click on
the text you added to the dialog box to display its properties.
The following dialog will now be visible on the screen. All we need to
change here is the ID. Change the text IDC_STATIC to IDC_
SERVERSTATUS. This will give it more meaning when it comes to
adding it into the code.
Figure 1-6
Now that we have some text, we want to be able to set it to a value
from within our code. For example, if we want the text to read “Server
Online,” add this line of code after the line that contains “case
WM_INITDIALOG”:
SendDlgItemMessage(DialogWindow,IDC_SERVERSTATUS,
WM_SETTEXT,NULL,(long)"Server Online");
Then when the dialog box is initialized, Windows will send a message
to the dialog box to tell it to update the IDC_SERVERSTATUS text
with the string you supplied in the function. In this case, it would
update the text from “Static” to “Server Online.”
The first parameter is the handle to the dialog, which is the first
variable that is passed into the dialog update procedure. The second is
the identifier for what you want to change or update. Next comes the
command that you wish to send. There are many commands and the
best way to figure out how they work is just to experiment with them.
For now we are using WM_SETTEXT, which tells Windows to change
a static text string in a dialog box. The fourth variable is not used for
the WM_SETTEXT command, so we simply set it to NULL. The final
variable is used to declare the string that we want to update the static
text with, in this case “Server Online.” Also note that the string must
be typecast to a long.
TIP Try experimenting with editable text. It works on the same prin-ciples, and you simply send a WM_GETTEXT message to retrieve what the user entered.
Static Link Libraries
Later when we create our online tutorial game, we will be using static
link libraries to encapsulate all our network and graphics code, which
makes it easier to reuse for future projects. As well as the reusability
factor, static link libraries also protect your source code while allowing
others to use the functionality of your code.
When creating a static link library, a
WinMain
function or a
Win-dows update function (
WndProc
) are not required. This is because we
are not actually creating a program but rather just a collection of
func-tions that we can use from within our programs. The library is created
using standard C/C++ source and header files, but the output is a
library rather than a Windows executable.
was used to create the library (which contains all the external variables,
types, and function prototypes).
The easiest way to use your library is to create Lib and Include
folders for your library and include those directories in the Visual
Stu-dio directory settings that are explained in the sections to follow.
Creating a Static Link Library
When creating a static link library, the best thing to do is to create a
directory structure on your hard drive for the library to be stored in.
From our experience, we recommend the structure shown in Figure
1-8.
n
Examples
— All example programs that display how to use your
library are stored in this folder. This is probably one of the most
useful things that can accompany your library since the source
code is not visible to any other programmer using it.
n
Formats
— This is where you store any file formats specific to
your static link library (i.e., your own 3D model format).
n
Include
— This stores the entire collection of C/C++ header files
that are needed to use your library. This one of the directories that
you must set up in Visual Studio to make your library work.
n
Lib
— This is where you actually store your complete library file.
It is a good idea to include both the release and debug versions of
your library here so that it is easier to debug programs created
with it. This is the other directory required by Visual Studio.
n
Source
— All source code related to your library must be kept in
this folder.
n
Tools
— Any programming tools that are used alongside your
library are stored here (such as file format converters).
Now that we have our structure, we need to create a static link library
project. This is done by selecting File, New… in Visual Studio. The
fol-lowing dialog is now visible.
Select the Win32 Static Library option and enter a name for your
library. Next, select the location and press the OK button.
In the dialog that appears, leave both the Pre-Compiled header and
MFC support options unchecked as we will not be using either in this
book, and then click Finish. A project information box is now visible;
simply click OK.
Next, we need to add our source and header files to the project as
you did when creating the window. Remember, this time we do not
require the
WinMain
or update procedure, just functions that we wish
to reuse. Let’s call the source file library.cpp and the header file
library.h for this example.
If you now press F7, it will build your library and put it in the
Release or Debug folder depending on your project configuration. The
library will have the same name as your project. For example, if your
project is named “GamePhysics” your library will be
“gamephysics.lib.”
It is a good idea to make Visual Studio automatically copy your
header file and library to the correct directories in your structure to
assure that you are always using the latest version. Selecting Project,
Settings from the main menu makes the following dialog visible.
Set the Output file name for your library and choose where you want it
to go relative to the directory your source files are in. This must be
done for both release and debug configurations. In the previous dialog
the Debug settings are currently active.
TIP It is a good idea to have both debug and release versions of your library. Call your release version the correct name (i.e., “GamePhysics.lib”) and add a suffix to the debug version (i.e., “GamePhysicsDebug.lib”) to distinguish them easily.
Now the library file is created in the correct directory in our
struc-ture when the project is built. We also want to copy our header file to
the Include directory of our structure.
As can be seen in Figure 1-11, you simply add a post-build command
that tells the compiler to copy the header file(s) to the Include
directory.
We have now covered the basics on how to create a static link library.
The most important thing to remember is to prototype all functions and
extern all global variables you wish to be accessible outside of your
library. In the next section, we discuss how to set up Visual Studio to
find your library.
Using a Static Link Library
Once you have built your library and it is in the correct directories, you
need to tell Visual Studio where to look for it. Select Tools, Options…
from the main Visual Studio menu to open the Options dialog box.
If the Directories tab is unselected, select it now to display a list of
directories as shown in Figure 1-12. Only the top three should be
visi-ble unless you have previously added other static libraries.
Figure 1-11
You must now add the Include directory of your library for the Include
files and the Lib directory for the Library files. You select which one
you wish to add by changing the top-right drop-down box.
Now Visual Studio is able to find and recognize your static link
library. To use it in a program you have written, you must first load
your project into Visual Studio, then select Project, Settings…
Next, select the Link tab and add your library name before
“kernel32.lib.” Also, remember to include the header file for your
library in your main code.
Summary
This chapter discussed the basics to creating dialog-based applications
in Visual Studio. The best thing to do is experiment by creating dialogs,
adding buttons, and making the buttons set strings to different values
when you press them. Also, learn to use editable text as this is highly
useful and allows the user to give feedback to your program.
If you are interested in learning more, there are entire books written
on Windows programming and there is also an excellent resource
avail-able on the Internet (http://msdn.microsoft.com), but the quick
introduction provided here will give you enough knowledge to
under-stand the concepts used in this book.
Using Databases
Introduction
This chapter covers how to create a stable and fast database system for
your game server.
Although it is possible to store player information on the player’s
local machine, it makes much more sense to store the data on the
server for many reasons. The most important reason is to prevent
play-ers from running “hacks” on their computplay-ers to change their character
data in the game or even back the data up to another file. If the data is
stored on the server, it makes it impossible for the player to run a local
game hack that will modify the character data. Another reason for this
is to allow players to play from different locations and machines without
having to copy their character data to another computer.
In this chapter, we cover how to install and use MySQL and then
look at how to access a database from within a C++ application (aka a
game).
What Is MySQL?
MySQL is an open source relational database management system. Its
purpose is to store and allow easy and fast access to data.
Installing MySQL
Installing MySQL is relatively painless. Firstly, you need the
installa-tion program for MySQL, which is available on the CD that
accompanies this book. Alternatively, you can download the latest
version from http://www.mysql.com.
NOTE If you choose to install MySQL in a folder other than the default (C:\MYSQL) or you wish to start MySQL on NT/Win2000 as a service, you need to create a file named MY.CNF in the root of your C:\ drive with the following information in it (or append the following information to either \Windows\my.ini or \winnt\my.ini, depending on whether you are using Windows 98 or 2000/XP, respectively):
[mysqld]
basedir=E:/installation-path/ datadir=E:/data-path/
After you have installed MySQL, the installation directory will con-tain a file named my-example.cnf. You can use this as a template to create your own my.cnf file.
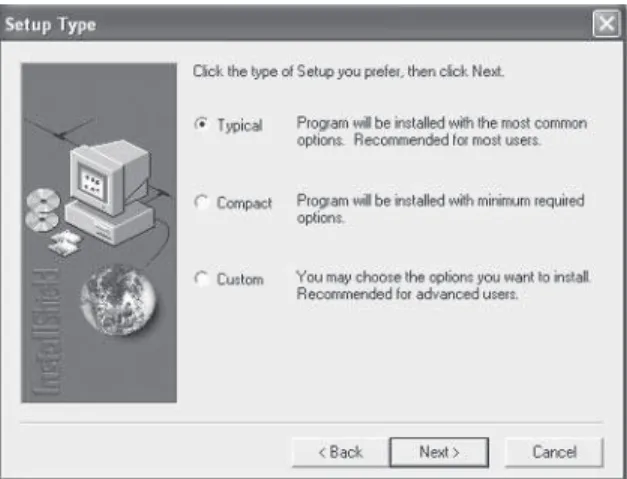
When you start the installation, you will be asked which type of setup
you would prefer: Typical, Compact, or Custom. Here we select the
Typical option, as it will install all the components we require in order
to work with MySQL.
After selecting Typical, simply press the Next button to automatically
complete the installation process.
Now that we have MySQL installed, first we will browse the
direc-tory so we can see what it has installed for us. If we open up the
directory to which we installed MySQL to (typically c:\mysql), we can
see the following directory structure.
All we really have use for here is the bin directory, which contains the
MySQL server and client executables, and the docs directory, which
contains the HTML version of the MySQL manual.
NOTE An Adobe PDF version of the MySQL manual is supplied on the companion CD. We find this easier to read, but you will also require the free program Adobe Acrobat Reader to view this man-ual, which is also on the CD and available to download at http://www.adobe.com/products/acrobat/readermain.html.
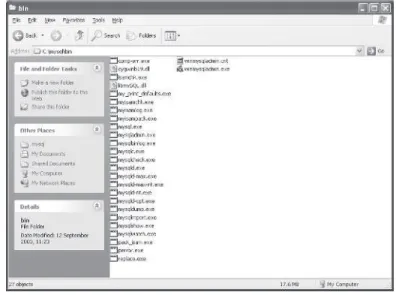
Let’s now take a look in the bin directory and see what is of use to us
there. The contents can be seen in the following image.
As you can see, there are many executables in this directory; some are
daemons (i.e., the MySQL server) and some are console-based clients
for accessing the MySQL server.
NOTE A daemon is simply a program or process that sits idly in the background until it is invoked to perform its task.
The executable mysql.exe is a console-based client, which is used to
interact with the MySQL server using the SQL language. We cover
SQL in great depth later in this chapter.
If we try to run the console client (mysql.exe) now, the following
screen will appear for a couple of seconds and then disappear.
Why? The reason the window appears and promptly disappears is
because there is currently no MySQL server to connect to — i.e., there
is no MySQL daemon running for the client to interact with.
Figure 2-3 The contents of the bin directory
So the obvious thing to do now is to run a MySQL server so we can
access it via the client. The best way to do this is to run the
winmysqladmin.exe file located in the bin directory. The first time this
is run it will ask for a username and password. This isn’t really
impor-tant for testing, so just enter something like admin for the username
and the password. After that, you will see a small traffic light icon
appear in your system tray with the green light indicating the MySQL
server is running. Note that MySQL will now automatically run every
time Windows is booted up.
SQL Statements
Now that we have the MySQL server running, it is time to load up the
MySQL console client. This is done the same way as we loaded it
before (i.e., run the mysql.exe executable that is located in the
c:\mysql\bin\ directory).
In SQL (structured query language), there are two types of
state-ments we can execute. These are DDL (data definition language) and
DML (data manipulation language). DDL is used to affect the structure
of the database, such as adding databases, tables, etc., whereas DML is
used to add and modify data in an existing database and retrieve
infor-mation. The following sections cover these statements.
Data Definition Language
First we take a look at DDL, as we require a database to work with
before we can manipulate any data within it.
Creating and Dropping Databases
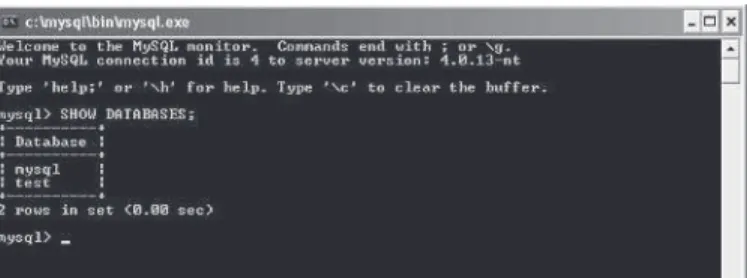
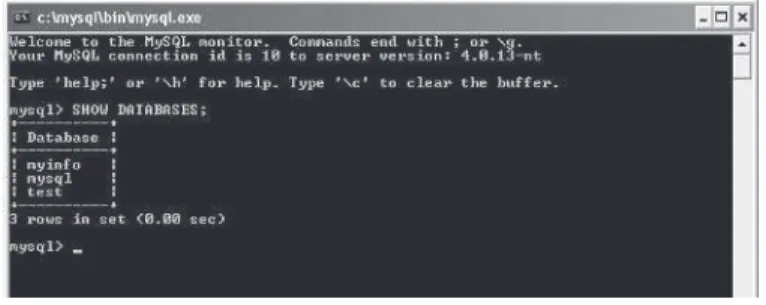
First, let’s see what databases already exist in the MySQL server. We
can view this information by using the SHOW command. Enter the
fol-lowing (except the “mysql>” part) into the MySQL console client,
followed by a Return:
mysql> SHOW DATABASES;
As you can see, there are two databases already created in the MySQL
server. The mysql database contains administration information for the
MySQL server and should not be modified. The other database, test, is
exactly what it is called — a test for the MySQL server. Again it is not a
good idea to remove it.
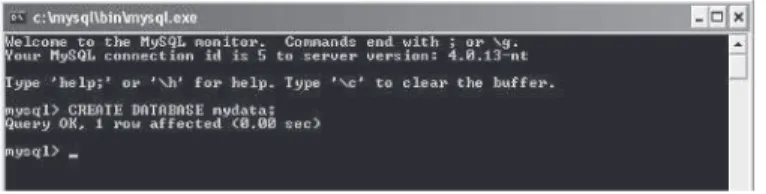
Creating a Database
So how do we add our own database to the MySQL server? By using
the CREATE command. To create a database called mydata, we would
use the following syntax.
mysql> CREATE DATABASE mydata;
Notice that the semicolon is added after every command in the SQL
language. When we press Return after entering this command, the
con-sole informs us that the query was okay. This can be seen in Figure 2-6.
NOTE The following length and character restrictions are imposed on the names of databases, tables, columns, and aliases.
Table 2-1 Naming restrictions
Identifier Max Length Valid Characters
Database 64 All valid directory name characters except “.” and “/”. Table 64 All valid directory name
characters except “.” and “/”. Column 64 All are valid
Alias 255 All are valid
Now that we have created the database, we can ensure it is on the
server by again using the SHOW command as follows:
mysql> SHOW DATABASES;
When we press Return after entering this command, we can see that
our database has been added to the list (note that the list is in
alphabet-ical order, not the order in which they were created).
Dropping a Database
Now we will remove a database from the server. Note that when we do
this all data (if any) will be lost. To remove a database, we “drop” it
from the server by using the DROP command. So to drop our new
mydata database we would use the following command:
mysql> DROP DATABASE mydata;
When we execute this command by pressing Return, the query will be
reported as OK, as shown in the following screenshot.
Let’s again list the databases using the SHOW command:
mysql> SHOW DATABASES;
Figure 2-7 The mydata database has been added to the list.
Notice that our mydata database is no longer visible in the list.
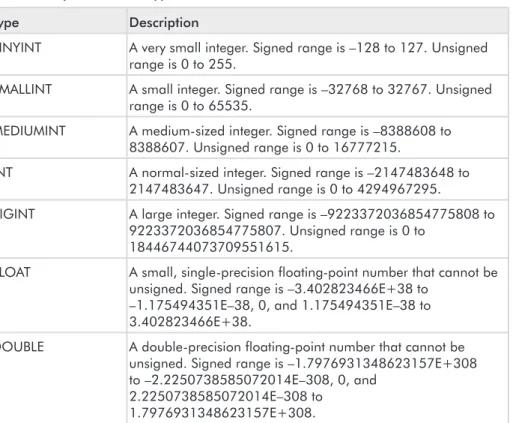
Column (Field) Types in MySQL
Before we discuss the creation of tables within databases, now is a good
time to discuss the different column types we can have in tables.
Each column in a table must be assigned a type that represents the
kind of information that field is going to hold. Table 2-2 lists the
avail-able types you can use.
Table 2-2 MySQL column types
Type Description
TINYINT A very small integer. Signed range is –128 to 127. Unsigned range is 0 to 255.
SMALLINT A small integer. Signed range is –32768 to 32767. Unsigned range is 0 to 65535.
MEDIUMINT A medium-sized integer. Signed range is –8388608 to 8388607. Unsigned range is 0 to 16777215.
INT A normal-sized integer. Signed range is –2147483648 to 2147483647. Unsigned range is 0 to 4294967295.
BIGINT A large integer. Signed range is –9223372036854775808 to 9223372036854775807. Unsigned range is 0 to
18446744073709551615.
FLOAT A small, single-precision floating-point number that cannot be unsigned. Signed range is –3.402823466E+38 to
–1.175494351E–38, 0, and 1.175494351E–38 to 3.402823466E+38.
DOUBLE A double-precision floating-point number that cannot be unsigned. Signed range is –1.7976931348623157E+308 to –2.2250738585072014E–308, 0, and
2.2250738585072014E–308 to 1.7976931348623157E+308.
Type Description
DECIMAL An unpacked floating-point number that cannot be unsigned. Works like a char column in that the number is stored as a string (i.e., each number uses one character in the string). DATE A date. Range is 1000-01-01 to 9999-12-31 and is in the
format YYYY-MM-DD.
TIME A time. Range is –838:59:59 to 838:59:59 and is in the format HH:MM:SS.
DATETIME A combination of date and time. Range is 1000-01-01 00:00:00 to 9999-12-31 23:59:59 and is in the format YYYY-MM-DD HH:MM:SS.
YEAR[(2|4)] A year in two- or four-digit format (default is four-digit). Range is 1901 to 2155 and also 0000.
TIMESTAMP A timestamp. Range is 1970-01-01 00:00:00 to sometime in the year 2037 in the format of YYYYMMDDHHMMSS.
CHAR(length) A fixed-length string that is always right-padded with spaces to the specified length when stored. The range is 1 to 255 characters depending on the length specified.
VARCHAR A variable-length string. TINYBLOB/
TINYTEXT
A tiny binary object with a maximum length of 255 characters. *See Note below table.
BLOB/TEXT A binary object with a maximum length of 65,535 characters. *See Note below table.
MEDIUMBLOB/ MEDIUMTEXT
A medium binary object with a maximum length of 16,777,215 characters. *See Note below table. LONGBLOB/
LONGTEXT
A large binary object with a maximum length of 429,496,295 characters. *See Note below table.
ENUM('val1','val2'...) An enumeration. A list of string values of which only one can be selected. Maximum of 65,535 distinct values.
SET('val1','val2'...) A set. A string object that can have zero or more values, each of which must be chosen from the list (i.e., 'val1', 'val2', etc.). Maximum of 64 members.
NOTE The only difference between theBLOBandTEXTtypes is that for sorting and comparisons, aBLOBis case sensitive whereas the
Adding, Modifying, and Dropping Tables
The following sections discuss how to manipulate tables in databases.
Creating Tables
Now that we know the possible types for the columns in our tables,
let’s look at how we actually go about creating a table.
Let’s say we wish to create a table to hold some user details within a
database. In fact, we will be using a similar table later in the tutorial
section. We want to store the user’s title, first name, last name, age,
email address, and the date they were added to the database. This will
require the following columns:
Title
Firstname
Surname
Age
DateAdded
Before we get into how to actually add the information, let’s first think
about how we are going to store it. Or, more to the point, what types
we require for each of the columns.
For the title, firstname, and surname, we can use the
TEXT
type as
it contains plenty of characters to allow for all possibilities. For age, an
unsigned
TINYINT
would be an obvious choice as these are numerical
and no one has ever been known to live past 255. For email address, we
can again use a
TEXT
type, as it will give us substantial storage space
for the address. And finally, for the date that the user was added to the
table, we can use a
TIMESTAMP
. This is very useful in that the time
and date can be retrieved automatically into the database; this is
dis-cussed later in the chapter.
So now that we know what types we want for our columns, we first
need to create a database to add the table into. This goes back to what
we learned in the previous section. Let’s create a database called
myinfo with the following command:
mysql> CREATE DATABASE myinfo;
When we execute this command, the console should report that the
query was okay. We can now check that our database has been created
by using the following command:
When we execute this command, the following should be visible in the
console:
Now we need to tell MySQL that we wish to perform actions on the
myinfo database. This is accomplished by using the USE command:
mysql> USE myinfo;
After executing this command, any DDL (data definition language) and
DML (data manipulation language) statements that are executed will
affect the database in use, which in this case is our myinfo database.
With the database set up and ready to accept commands, we can
cre-ate our table (which we will call userinfo) with the following stcre-atement:
mysql> CREATE TABLE userinfo ( -> id INT auto_increment, -> title TEXT,
-> firstname TEXT, -> surname TEXT, -> age TINYINT, -> email TEXT,
-> dateadded TIMESTAMP, -> PRIMARY KEY(id));
Let’s break this up a little so we can see what is going on. First, we
declare that we wish to create a table by entering CREATE TABLE.
Next we specify the name we wish to call the table, in this case
userinfo. Then within parentheses we list all of the column names and
types we require. Note how we have added an extra field named id.
This makes it easier to handle data in a relational way, as we discuss
later in this chapter. Finally, note the addition of the primary key as the
last parameter. This is used to determine how the table is optimized
within the database. Again, we discuss the use of keys later in this
chapter.
We can now see if our table was created successfully by executing
the following command:
mysql> SHOW TABLES;
When this is executed, the following output should be visible in the
console:
Note that you can also view the columns in a table by using the
follow-ing command:
mysql> DESCRIBE userinfo;
When you execute this command, the console will display all the details
for each of the columns in the userinfo table, as shown in Figure 2-12.
This information can be useful to ensure the table was created as you
envisioned and to recap the columns a table contains at a later date.
Modifying Tables
Now let’s see how to modify a table. Modifying a table can range from
simply changing the type of one of the columns to adding a complete
new column or removing an existing column.
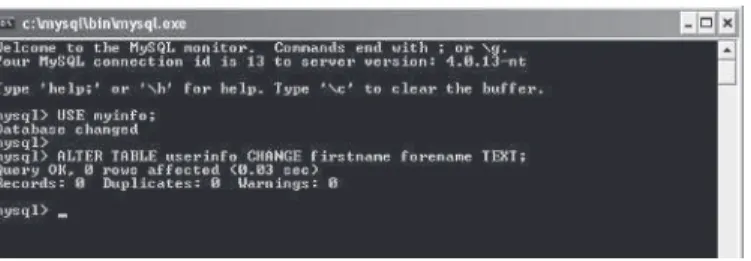
Let’s first look at how we can change the name of an existing
col-umn. In our userinfo table we have a column called firstname, but let’s
now change this to read forename instead.
To make this change we need to use the following syntax:
mysql> ALTER TABLE userinfo CHANGE firstname forename TEXT;
Note how we also must supply the data type for the column as well as
its old and new names. Here is how this should look in the MySQL
con-sole client:
Figure 2-11 Here the userinfo table can be seen as part of our database.
If we now describe the userinfo table with the following command:
mysql> DESCRIBE userinfo;
we can see that the firstname column has been renamed to forename:
We can also change the data types of columns in tables. To change the
age column from a
TINYINT
to an
INT
, we would use the following
command:
mysql> ALTER TABLE userinfo MODIFY age INT;
After executing this command and then using the DESCRIBE
com-mand on this table, we can see the type has changed to
INT
.
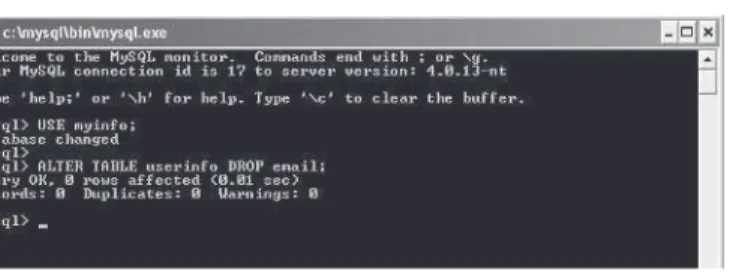
Finally, it is good to know how to remove fields from a table when they
are no longer required. Let’s say we no longer require the email field in
our userinfo table. What we want to do is drop the field from our table,
Figure 2-13 Modifying a column name
Figure 2-14 Description of the updated userinfo table
just as we did earlier in the chapter when we dropped the database.
Here is the syntax for removing the email field:
mysql> ALTER TABLE userinfo DROP email;
Here is how this looks in the MySQL console:
Once this command is executed, if we describe the table with the
fol-lowing command:
mysql> DESCRIBE userinfo;
we can see that the email field has been removed from our userinfo
table.
Dropping (Removing) Tables
Removing tables from a database is very simple, but without careful use
can have disastrous effects. The main thing to note when you drop a
table is that you also lose all the data contained within the table.
There-fore, it is always wise to back up a database before executing any drop
commands. We will look at backing up a database later in this chapter.
Let’s now look at how we drop the userinfo table from our myinfo
database. To do this, we need to execute the following command in the
MySQL console client:
mysql> DROP TABLE userinfo;
Figure 2-16 Dropping a field from a table
Once this command is executed, we can verify that the table has been
removed by using the SHOW command to see what tables are currently
in our myinfo database:
mysql> SHOW TABLES;
As you can see from Figure 2-18, the table no longer exists in the
database.
Data Manipulation Language (DML)
In this section, we look at how to add, modify, and remove data from
tables in the database using DML (data manipulation language).
With-out this knowledge, we would not really have any use for a database; it
would simply be a static entity with no purpose.
Let’s first create a database and table to work with in this section,
using the DDL we learned in the previous section. Our database will be
called dmlexample, so let’s create that with the following statement:
mysql> CREATE DATABASE dmlexample;
We then need to specify that we wish to use the new database by
exe-cuting the following statement:
mysql> USE dmlexample;
The console should now inform us that the database has changed, as
seen in Figure 2-19.
Figure 2-18 After drop-ping the userinfo table, we have an empty data-base.
Now we need to create a table called sampletable. This table will
con-tain the following fields:
Username
Password
Age
DateCreated
This is accomplished using the knowledge we learned in the section on
DDL statements. First we need to specify that we wish to use the
dmlexample database with the following command:
mysql> USE dmlexample;
Once this is done, we can create our table with the following DDL
statement:
mysql> CREATE TABLE sampletable ( -> username TEXT,
-> password TEXT, -> age INT, -> email TEXT,
-> datecreated TIMESTAMP);
Figure 2-20 shows how this should look in the MySQL console client:
Inserting Data
To add rows to the table, we use the INSERT command. Here is how
we would add a single row to our sampletable:
mysql> INSERT INTO sampletable VALUES (‘andrew’, ‘qwerty’, 20, ‘[email protected]’, NULL);
Figure 2-21 shows how this looks when we enter it into the MySQL
console. Notice how the feedback from the console tells us that one
row has been affected. This means we have added one row to our
sampletable table.
We can then use the SELECT command to view the data in the table.
We go into more detail about this command later in this chapter as it is
very important, but for now we just use it without further explanation.
Let’s use SELECT to see what data is in our dmlexample table:
mysql> SELECT * FROM sampletable;
When we execute this statement, the following will be visible in the
MySQL console:
NOTE Notice how the datecreated field reflects the time and date when we added the row to the table. This is because we specified NULL when we added the row; doing this will make aTIMESTAMP
field grab the current date and time from the system by default.
It is also possible to add several rows of data in a single command. Let’s
try this now by adding another three rows to our table in a single
INSERT command, as shown below:
mysql> INSERT INTO sampletable VALUES
-> ('teijo', 'mrt', 21, '[email protected]', NULL), -> ('jim', 'letmein', 23, '[email protected]', NULL), -> ('wes', 'opensesame', 31, '[email protected]', NULL);
Figure 2-21 Inserting a single row of data
When we execute this command, the following can be seen in the
MySQL console client:
As you can see, this time the feedback from the console indicates that
three rows have been affected; thus, we have added three rows to our
table. We can verify this by again using the SELECT command:
mysql> SELECT * FROM sampletable;
When this is executed, you will see that the table contains four rows (or
records, if you like) of information. Figure 2-24 shows the MySQL
con-sole after the SELECT statement has been executed.
Modifying Data
To modify existing data in a table we use the UPDATE command. First
let’s try to change all the passwords in all the rows in the table to
changeme. This can be accomplished with the following statement:
mysql> UPDATE sampletable SET password = ‘changeme’;
When we execute this statement, the console will inform us that four
rows have been affected as we have changed the password for
every
row
in that table. We can see the effect on the table by using the SELECT
command as follows:
myql> SELECT * FROM sampletable;
Figure 2-23 Inserting multiple rows in a single statement
Here is a screenshot of this command being executed in the console:
But what if you only want to update a single row? Let’s say we wish to
change the password for Teijo from changeme back to mrt. We would
use the following statement to do this:
mysql> UPDATE sampletable SET password = ‘mrt’ WHERE username = ‘teijo’;
When we execute this command in the console, it informs us that one
row has been affected. This is because it will only update the password
field if the username field is equal to teijo. If we use the SELECT
com-mand on the table now, we can see that only Teijo’s password has
changed, as shown in Figure 2-26.
We can also use this technique to update only certain fields. For
exam-ple, we could change all the passwords of the people who are 30 years
old or younger. Here is the command to do this:
mysql> UPDATE sampletable SET password = ‘young’ WHERE age <= 30;
When we execute this command, it will inform us that three rows have
been affected, as three of the four records in our table have an age field
that is 30 or less. If we then use the SELECT command we can see the
following output in the console:
Figure 2-25 The password field has been updated in all of the rows.
TIP A useful idea is to update aTIMESTAMPfield with NULL. This will retrieve the latest time from the system the database is running on. A practical use would be to note the last time a player logged in.
Removing (Deleting) Data
Removing data from a table is done very similarly to updating data.
Let’s look at how to delete a single row of data from the database using
the following statement:
mysql> DELETE FROM sampletable WHERE username = ‘teijo’;
When we execute this command, the MySQL console client will inform
us that one row was affected. If we now use the SELECT command on
the table, the following can be seen in the console:
Again, as with the update statements, we can specify conditions to
allow us to delete, for example, everyone who is younger than 30. Let’s
do this now with the following statement:
mysql> DELETE FROM sampletable WHERE age < 30;
Figure 2-27 Conditional updates
When we execute this statement, the client will inform us that two
rows have been affected, or in this case deleted. If we now use the
SELECT command on our table, we will see that only one row is left in
the table.
Finally, it is also possible to delete all the rows from a table in a single
statement. All we need to do for this is not specify any condition, as we
did when we updated all the password fields to changeme earlier. Here
is the statement we require to delete all the rows in a table (i.e., empty
the table):
mysql> DELETE FROM sampletable;
After executing this, if we select all the information in the table using
the SELECT command, the following will be shown in the console:
As you can see in Figure 2-30, the table now contains no information as
it has all been deleted.
Using SELECT Statements
So far we have simply used the following command to show all the data
in our sampletable table:
mysql> SELECT * FROM sampletable;
Figure 2-29 Conditional deleting
What this actually does is it fetches all the fields from the sampletable
and returns them. The * is a wildcard which basically means it
repre-sents anything (or in this case, any field).
Before we discuss the SELECT statement further, let’s add some
data to experiment with to our sampletable table. Use the following
statement to insert some data:
mysql> INSERT INTO sampletable VALUES
-> ('andrew', 'qwerty', 21, '[email protected]’, NULL), -> ('andrew', 'letmein', 27, '[email protected]', NULL), -> ('george', 'paper', 19, '[email protected]', NULL), -> ('jenny', 'jen999', 27, '[email protected]', NULL), -> ('sandra', 'sdra2', 27, '[email protected]', NULL);
Figure 2-31 shows how this should look when we enter it into the
con-sole and execute it.
Now that we have added our data into the table, if we use the SELECT
statement with the wildcard (*) as we were doing before, it will retrieve
and display all of the information from the table to the console. Let’s try
this with the following statement:
mysql> SELECT * FROM sampletable;
Here is a screenshot of the output from the console:
Figure 2-31 Inserting our new data into the sampletable table
As you can see, the statement has retrieved
all
of the information from
the table, that is, all of the rows, and all of the columns contained in
each of the rows.
Let’s say all we want to retrieve is the password field. To get all of
the passwords from the sampletable table, we would use this
statement:
mysql> SELECT password FROM sampletable;
When we execute this statement, we can expect the following output
from the console:
Notice how we simply replace the wildcard (*) with the column we
wish to retrieve. We can also retrieve multiple columns by using a
comma to delimit them. To select both the username column and
pass-word column only, use this statement:
mysql> SELECT username, password FROM sampletable;
When we execute this statement, we can see in the console that only
the username and password fields have been selected from the table, as
shown in Figure 2-34.
We know how to retrieve individual fields from the tables, but how do
we retrieve a single row? We can easily apply a condition to a SELECT
statement, just as we did when we were updating the table and deleting
Figure 2-33 Retrieving only a single column
from the table. Using a conditional SELECT statement, let’s only
dis-play Jenny’s information from the database. Here is the statement to do
this:
mysql> SELECT * FROM sampletable WHERE username = ‘jenny’;
When we execute this statement, only Jenny’s details will be displayed
in the MySQL client console, as shown in Figure 2-35.
We can also select specified fields, such as finding the password that
related to a username. Here is how we would retrieve the password
that belongs to George:
mysql> SELECT password FROM sampletable WHERE username = ‘george’;
When we execute this statement, we can see that only a single field is
displayed — George’s password, as shown in Figure 2-36.
In our sample data, there are two rows with the username andrew. If
we use a conditional statement to get the password for Andrew, we will
in fact get two passwords, one for each andrew entry in the database.
Here is the statement that will give us that result:
mysql> SELECT password FROM sampletable WHERE username = ‘andrew’;
When we execute this statement, we can see that we have two
pass-words showing in the console. Here is a screenshot of this result:
Figure 2-35 Selecting a single row
Later in this chapter we discuss a way around this problem with the
use of relational databases and keys, but let’s not go into that just yet.
Instead, let’s have a look at how the LIKE command can help us find
needed information. Using LIKE is ideal for finding strings in
data-bases, especially if you only have a part of the complete string (i.e., for
a search engine). For example, let’s say we wish to find someone in the
database who has a name starting with the letter “J.” To accomplish
this, we would use the following statement:
mysql> SELECT * FROM sampletable WHERE username LIKE ‘j%’;
When we execute this statement, we can expect the following output
from the MySQL console:
Notice here how Jenny was retrieved, as her username is the only one
to start with a “J.” The % represents a wildcard when used with LIKE,
so if we used the following statement instead:
mysql> SELECT * FROM sampletable WHERE username LIKE ‘%j%’;
it would mean that the letter “J” could appear anywhere in the string.
Also note that you can have more than a single character, such as:
mysql> SELECT * FROM sampletable WHERE username LIKE ‘%nny’;
This would retrieve all of the people who have names that end with the
text “nny.”
Figure 2-37 The two-password problem!
Relational Databases
We have been looking mainly at how to create database structures and
do simple data manipulation within them. However, there are a lot of
ideas and theories that make databases even more useful to us.
Let’s now look at what sort of structure we would want for a
rela-tional database. Think of a database that related players in a game to
one another, for example to determine who was a friend of each player
and, conversely, who was an enemy of each player.
Let’s first create a table to store the data for each of the players,
with the addition of a
primary key
, which optimizes the database for
searches on that particular column. Note also that every row of data in
the primary key must be unique to one another. Here is the statement
required to create our gamedata database and our playerdata table:
mysql> CREATE DATABASE gamedata;
mysql> USE gamedata;
mysql> CREATE TABLE playerdata (
-> username CHAR(255) UNIQUE NOT NULL, -> password CHAR(255),
-> age INT,
-> datecreated TIMESTAMP, -> PRIMARY KEY(username));
Notice here how we set the username column to be UNIQUE and also
NOT NULL. In simple terms, this means that it must contain a value
and that value must not be the same as any other username in any
other record in the table. Note also that we have set the primary key of
the table to be the username field, as we will be mainly searching on
this field.
Additionally, we need some way of storing a player’s friends and
ene-mies. This is done by means of a
link table
. A link table is really just a
normal database table, but its main purpose is to relate data in some
way or another to conserve space and also optimize the way the
data-base accesses the information.
To create two link tables, one for relating friends and one for relating
enemies to each other, use these statements:
mysql> CREATE TABLE relatefriends ( -> player CHAR(255),
-> friend CHAR(255));
And also…
mysql> CREATE TABLE relateenemies ( -> player CHAR(255),
If we show the tables in the database with the following command:
mysql> SHOW TABLES;
we can see from Figure 2-39 that our database now contains three
dif-ferent tables, our playerdata table and the two link tables.
Let’s add some sample data to the playerdata table so we can
experi-ment with the link tables and understand how to use them effectively.
Here is the statement to add our sample data into the playerdata table:
mysql> INSERT INTO playerdata VALUES -> ('Andrew', 'qwerty', 20, NULL), -> ('Henry', 'letmein', 34, NULL), -> ('Sandra', 'dra33', 19, NULL), -> ('John', 'j12d', 23, NULL), -> ('Jenny', 'jen123', 34, NULL);
If we select all the information from the playerdata table now using the
following command:
mysql> SELECT * FROM playerdata
we can see in Figure 2-40 that all of our data is now in the playerdata
table.
Figure 2-39 Our three tables in the gamedata database
Now that we have some sample data, let’s create some relations
between the players in the database. First, add to the relatefriends link
table the fact that Henry is friends with Sandra. Here is the statement
required to add this to the link table:
mysql> INSERT INTO relatefriends VALUES -> ('Henry', 'Sandra');
If we now show all of the data from the relatefriends link table, the
fol-lowing will be visible in the MySQL console:
Let’s add some more sample data into both the relatefriends and
relateenemies link tables and then see how we can manipulate the data.
Here are the two statements required to add the sample data:
mysql> INSERT INTO relatefriends VALUES -> ('Andrew', 'Henry'),
-> ('Andrew', 'John'), -> ('Andrew', 'Jenny'), -> ('Sandra', 'Jenny');
and also…
mysql> INSERT INTO relateenemies VALUES -> ('Andrew', 'Sandra'),
-> ('Henry', 'Jenny'), -> ('Henry', 'John');
Let’s see if we can find out who Andrew is friends with by using the
fol-lowing statement:
mysql> SELECT friend FROM relatefriends WHERE player = ‘Andrew’;
When we execute this statement, the console displays a list of all of the
players with which Andrew is friends, as shown in Figure 2-42.
When we start implementing databases into Java in the next chapter,
we could use this data to find out more information about each of
Andrew’s friends.
Again, we can do exactly the same with the relateenemies link table.
For example, we could find out all of Henry’s enemies with the
follow-ing statement:
mysql> SELECT enemy FROM relateenemies WHERE player = ‘Henry’
When we execute this statement, the following console output can be
expected:
If we then wanted to find out more information about Henry’s enemy
who has a username of Jenny, we would use the following statement:
mysql> SELECT * FROM playerdata WHERE username = ‘Jenny’;
Here is a screenshot of our expected console output:
Figure 2-42 Finding out a player’s friend list
Figure 2-43 Finding out a player’s enemy list
Data Import Methods
Here we learn how to import data into our tables.
Importing from a Text File
Let’s now create a text file that contains several records to be added to
our playerdata table. We do this simply by denoting each column with a
tab and each row by a new line. Figure 2-45 shows five lines of data to
be added to the database in Windows Notepad:
Note how we use \N to specify a field that contains NULL and also that
an extra tab is required after each row of data to signify the end of that
row. We have saved this file in the MySQL bin directory (i.e.,
c:\mysql\bin) with the filename import.txt.
Now go to the MySQL console client and enter the following:
mysql> LOAD DATA LOCAL INFILE 'import.txt' INTO TABLE playerdata;
The console will inform us that five rows have been affected, or in this
case added to our database. This can be seen in the following
screenshot of the console.
Figure 2-45 The data to import in Windows Notepad