Geetesh Bajaj
James Gordon
Microsoft MVPs
5
IN
1
BOOKS
BOOKS
• Introducing Office 2011
• Word 2011
• Excel
®2011
• PowerPoint
®2011
• Outlook
®2011
Office 2011
for Mac
®
A L L - I N - O
N E
Making Everythi
ng Easier!
™
Start with
FREE
Cheat Sheets
Cheat Sheets include
•
Checklists
•
Charts
• Common Instructions
• And Other Good Stuff!
Get Smart at Dummies.com
Dummies.com makes your life easier with 1,000s
of answers on everything from removing wallpaper
to using the latest version of Windows.
Check out our
•
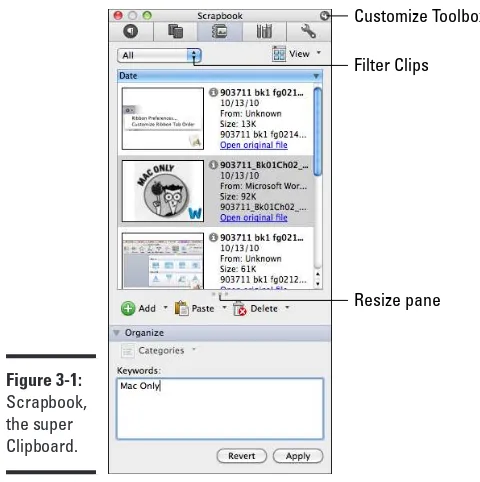
Videos
• Illustrated Articles
• Step-by-Step Instructions
Plus, each month you can win valuable prizes by entering
our Dummies.com sweepstakes. *
Want a weekly dose of Dummies? Sign up for Newsletters on
• Digital Photography
• Microsoft Windows & Office
• Personal Finance & Investing
• Health & Wellness
• Computing, iPods & Cell Phones
•
eBay
•
Internet
• Food, Home & Garden
Find out “HOW” at Dummies.com
*Sweepstakes not currently available in all countries; visit Dummies.com for official rules.
Get More and Do More at Dummies.com
®
To access the Cheat Sheet created specifically for this book, go to
www.dummies.com/cheatsheet/office2011formacaio
by Geetesh Bajaj and James Gordon
Microsoft MVPs
Office 2011
for Mac
®
A L L - I N - O N E
FOR
Offi ce 2011 for Mac® All-in-One For Dummies®
Copyright © 2011 by Wiley Publishing, Inc., Indianapolis, Indiana Published by Wiley Publishing, Inc., Indianapolis, Indiana
Published simultaneously in Canada
No part of this publication may be reproduced, stored in a retrieval system or transmitted in any form or by any means, electronic, mechanical, photocopying, recording, scanning or otherwise, except as permit-ted under Sections 107 or 108 of the 1976 Unipermit-ted States Copyright Act, without either the prior written permission of the Publisher, or authorization through payment of the appropriate per-copy fee to the Copyright Clearance Center, 222 Rosewood Drive, Danvers, MA 01923, (978) 750-8400, fax (978) 646-8600. Requests to the Publisher for permission should be addressed to the Permissions Department, John Wiley
& Sons, Inc., 111 River Street, Hoboken, NJ 07030, (201) 748-6011, fax (201) 748-6008, or online at http://
www.wiley.com/go/permissions.
Trademarks: Wiley, the Wiley Publishing logo, For Dummies, the Dummies Man logo, A Reference for the Rest of Us!, The Dummies Way, Dummies Daily, The Fun and Easy Way, Dummies.com, Making Everything
Easier,and related trade dress are trademarks or registered trademarks of John Wiley & Sons, Inc. and/
or its affi liates in the United States and other countries, and may not be used without written permission. Mac is a registered trademark of Apple, Inc. All other trademarks are the property of their respective owners. Wiley Publishing, Inc., is not associated with any product or vendor mentioned in this book.
LIMIT OF LIABILITY/DISCLAIMER OF WARRANTY: THE PUBLISHER AND THE AUTHOR MAKE NO REPRESENTATIONS OR WARRANTIES WITH RESPECT TO THE ACCURACY OR COMPLETENESS OF THE CONTENTS OF THIS WORK AND SPECIFICALLY DISCLAIM ALL WARRANTIES, INCLUDING WITH-OUT LIMITATION WARRANTIES OF FITNESS FOR A PARTICULAR PURPOSE. NO WARRANTY MAY BE CREATED OR EXTENDED BY SALES OR PROMOTIONAL MATERIALS. THE ADVICE AND STRATEGIES CONTAINED HEREIN MAY NOT BE SUITABLE FOR EVERY SITUATION. THIS WORK IS SOLD WITH THE UNDERSTANDING THAT THE PUBLISHER IS NOT ENGAGED IN RENDERING LEGAL, ACCOUNTING, OR OTHER PROFESSIONAL SERVICES. IF PROFESSIONAL ASSISTANCE IS REQUIRED, THE SERVICES OF A COMPETENT PROFESSIONAL PERSON SHOULD BE SOUGHT. NEITHER THE PUBLISHER NOR THE AUTHOR SHALL BE LIABLE FOR DAMAGES ARISING HEREFROM. THE FACT THAT AN ORGANIZA-TION OR WEBSITE IS REFERRED TO IN THIS WORK AS A CITAORGANIZA-TION AND/OR A POTENTIAL SOURCE OF FURTHER INFORMATION DOES NOT MEAN THAT THE AUTHOR OR THE PUBLISHER ENDORSES THE INFORMATION THE ORGANIZATION OR WEBSITE MAY PROVIDE OR RECOMMENDATIONS IT MAY MAKE. FURTHER, READERS SHOULD BE AWARE THAT INTERNET WEBSITES LISTED IN THIS WORK MAY HAVE CHANGED OR DISAPPEARED BETWEEN WHEN THIS WORK WAS WRITTEN AND WHEN IT IS READ. FULFILLMENT OF EACH COUPON OFFER IS THE SOLE RESPONSIBILITY OF THE OFFEROR.
For general information on our other products and services, please contact our Customer Care Department within the U.S. at 877-762-2974, outside the U.S. at 317-572-3993, or fax 317-572-4002.
For technical support, please visit www.wiley.com/techsupport.
Wiley also publishes its books in a variety of electronic formats. Some content that appears in print may not be available in electronic books.
Library of Congress Control Number: 2011921766 ISBN: 978-0-470-90371-1
About the Authors
Geetesh Bajaj has been creating Microsoft Offi ce documents, presentations, and templates for over a decade now. His activities span three fronts:
✦ Running Indezine.com, a presentation related Web site.
✦ Authoring books on PowerPoint and other Microsoft Offi ce programs.
✦ Training enterprise customers to create and deliver better presentations.
Geetesh has been a Microsoft-awarded Most Valuable Professional (MVP) for over ten years, and he is based out of Secunderabad, India.
James Gordon is a lead programmer/analyst at the University at Buffalo where he also teaches workshops on Microsoft Offi ce and other technolo-gies. For more than ten years, Microsoft has presented its Most Valuable Professional (MVP) award to James for his contributions to technical com-munities.
Dedication
To Steve Jobs, Bill Gates, Mac loyalists, and switchers everywhere.
Authors’ Acknowledgments
We thank the divine, and other mere mortals with divine abilities.
Special thanks to everyone at Wiley for helping us put this book together. Acquisitions editor Kyle Looper and project editor Jean Nelson kept every-thing on track. Thanks go to the editorial team, including copy editor Virginia Sanders and technical editor Echo Swinford. Like Geetesh and James, Echo is a Microsoft PowerPoint MVP.
Thanks also to SharePoint MVP Uday Ethirajulu and Microsoft Messenger MVP Jonathan Kay for graciously co-authoring fi les so we could get screen shots. Thanks go to our families and friends for allowing us to focus on our writing without deserting us. We express our appreciation to them all.
Geetesh wishes to thank his offi ce staff who helped him take the time off to write this book as well as the amazing bunch of other Microsoft MVPs who are too numerous to be listed here.
Jim wishes to extend special thanks to the University at Buffalo Libraries for allowing leave to work on the book. The University at Buffalo is truly one of the best places to work or attend university.
We thank the Macintosh Business Unit of Microsoft, who created the subject matter of the book, and Microsoft Corporation for the awesome MVP pro-gram, without which it is unlikely the authors would been able to meet and collaborate. And we also thank Apple for creating an enriching OS platform.
Publisher’s Acknowledgments
We’re proud of this book; please send us your comments at http://dummies.custhelp.com.
For other comments, please contact our Customer Care Department within the U.S. at 877-762-2974, outside the U.S. at 317-572-3993, or fax 317-572-4002.
Some of the people who helped bring this book to market include the following:
Acquisitions, Editorial, and Media Development
Project Editor: Jean Nelson
Acquisitions Editor: Kyle Looper
Copy Editor: Virginia Sanders
Technical Editor: Echo Swinford
Editorial Manager: Kevin Kirschner
Media Development Project Manager:
Laura Moss-Hollister
Media Development Assistant Project Manager: Jenny Swisher
Media Development Associate Producers:
Josh Frank, Marilyn Hummel, Douglas Kuhn, and Shawn Patrick
Editorial Assistant: Amanda Graham
Sr. Editorial Assistant: Cherie Case
Cartoons: Rich Tennant (www.the5thwave.com)
Composition Services
Project Coordinator: Patrick Redmond
Layout and Graphics: Samantha K. Cherolis, Timothy C. Detrick, Joyce Haughey
Proofreaders: John Greenough, Evelyn C. Wellborn
Indexer: Broccoli Information Management
Publishing and Editorial for Technology Dummies
Richard Swadley, Vice President and Executive Group Publisher
Andy Cummings, Vice President and Publisher
Mary Bednarek, Executive Acquisitions Director
Mary C. Corder, Editorial Director
Publishing for Consumer Dummies
Diane Graves Steele, Vice President and Publisher
Composition Services
Contents at a Glance
Introduction ... 1
Book I: Introducing Office 2011 ... 5
Chapter 1: Going Over the Preliminaries ... 7
Chapter 2: Interfacing with Offi ce ... 21
Chapter 3: Traversing the Toolbox ... 39
Chapter 4: Working with Files ... 51
Chapter 5: Getting SmartArt ... 67
Chapter 6: Selecting and Formatting ... 75
Chapter 7: Formatting Pictures ... 97
Chapter 8: Inserting Media ... 117
Chapter 9: Fancy Text Boxes ... 135
Chapter 10: Common Tools That Make Life Easier ... 143
Chapter 11: Making Great Tables ... 163
Chapter 12: Using VBA ... 171
Book II: Word 2011 ... 193
Chapter 1: Exploring Word’s Interface ... 195
Chapter 2: An Open and Shut Case ... 221
Chapter 3: Formatting and Typography ... 235
Chapter 4: Working with Document Layout ... 255
Chapter 5: Collaborating on and Proofi ng Documents ... 275
Chapter 6: Making Great Tables and Charts ... 299
Chapter 7: Saving Time in Word ... 325
Chapter 8: Advanced Word Stuff ... 345
Chapter 9: Printing for Posterity ... 373
Chapter 10: Managing a Mail Merge ... 383
Book III: Excel 2011 ... 405
Chapter 1: Working Every Day in Excel... 407
Chapter 2: Opening and Saving Files in Excel ... 419
Chapter 3: Getting into Cells and Worksheets ... 427
Chapter 4: Formatting and Conditional Formatting ... 451
Chapter 5: Making, Formatting, and Filtering a Table ... 471
Chapter 6: Making Charts ... 485
Chapter 8: Delving Deeper into Data ... 519
Chapter 9: Sharing and Collaborating ... 529
Chapter 10: Making Forms in Excel ... 543
Chapter 11: Printing in Excel ... 563
Book IV: PowerPoint 2011 ... 575
Chapter 1: Profi ling PowerPoint’s Interface ... 577
Chapter 2: Opening and Saving a Presentation ... 591
Chapter 3: Feeling at Home on the Ribbon ... 599
Chapter 4: Adding Audio and Movies ... 621
Chapter 5: Designing Masters, Slide Layouts, and Themes ... 631
Chapter 6: Applying Animation ... 645
Chapter 7: Delivering Your Presentation ... 665
Chapter 8: Printing, Sharing, and Coauthoring Presentations ... 687
Book V: Outlook 2011 ... 701
Chapter 1: Upgrading to Microsoft Outlook ... 703
Chapter 2: Using Common Outlook Tools ... 723
Chapter 3: Mastering Mail ... 729
Chapter 4: Crafting Your Calendar ... 751
Chapter 5: Keeping Up with Contacts ... 763
Chapter 6: Keeping Track of Your Day ... 771
Table of Contents
Introduction ... 1
Book I: Introducing Office 2011 ... 5
Chapter 1: Going Over the Preliminaries . . . .7
Jumping into Offi ce 2011 ... 7
Upgrading from Previous Versions of Offi ce ... 9
Installing Offi ce, Sweet! ... 11
Soaring with Cloud Computing ... 18
Chapter 2: Interfacing with Offi ce . . . .21
Musing about Menus ... 21
Talking about Toolbars ... 24
Customizing Menus and Toolbars in Word, Excel, and PowerPoint ... 26
Riding the Ribbon ... 34
Chapter 3: Traversing the Toolbox . . . .39
Tinkering in the Toolbox ... 39
Scrapbook: The Clipboard Evolves ... 40
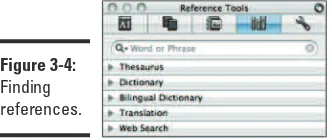
Looking Things Up with Reference Tools ... 44
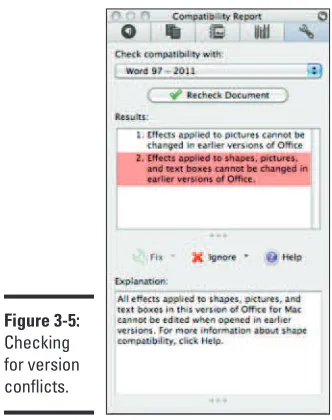
Being Compatible ... 45
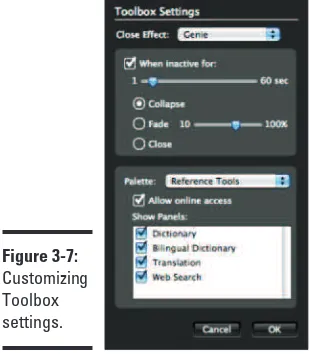
Customizing the Toolbox ... 49
Chapter 4: Working with Files . . . .51
Opening Files ... 51
Searching for Files and Locations ... 53
Saving Files ... 54
Saving and Using Templates ... 56
Sharing and Collaborating with SkyDrive ... 58
Saving to SharePoint ... 64
Sharing via E-Mail ... 65
Chapter 5: Getting SmartArt . . . .67
Smiling with SmartArt ... 67
Making Organization Charts ... 72
Chapter 6: Selecting and Formatting . . . .75
Selecting Objects ... 75
Understanding Formatting Basics ... 77
Formatting with the Ribbon ... 77
Office 2011 for Mac All-in-One For Dummies
x
Chapter 7: Formatting Pictures . . . .97
Formatting Pictures Using the Ribbon ... 97
Applying Picture Styles ... 110
Working in Layers ... 111
Chapter 8: Inserting Media . . . .117
Activating the Media Browser ... 117
Browsing Your Photos ... 118
Browsing Audio ... 119
Browsing Movies ... 121
Browsing Clip Art ... 122
Browsing Symbols ... 127
Browsing Shapes ... 130
Chapter 9: Fancy Text Boxes . . . .135
Making a Text Box ... 135
Formatting Text Boxes with the Ribbon ... 136
Formatting Text Boxes with the Format Text Dialog ... 139
Chapter 10: Common Tools That Make Life Easier. . . .143
Proofi ng Your Spelling and Grammar ... 143
Understanding Themes and Templates ... 145
Sharing Files in Other Formats ... 149
Getting Mathematical with Equations ... 150
Connecting with Messenger and Communicator ... 154
Becoming Undone ... 157
Hyperlinking ... 157
Chapter 11: Making Great Tables . . . .163
Making a Table ... 163
Choosing Table Options ... 166
Formatting with Table Styles ... 168
Chapter 12: Using VBA. . . .171
Discovering VBA ... 171
Displaying the Developer Ribbon ... 172
Using Offi ce Add-Ins ... 173
Installing Add-Ins ... 174
Exploring the Visual Basic Editor ... 175
Displaying Your Macros ... 189
Recording Macros ... 189
Table of Contents
xi
Book II: Word 2011 ... 193
Chapter 1: Exploring Word’s Interface . . . .195
Opening Word for the First Time ... 195
Opening the Word Document Gallery ... 196
Choosing a View ... 198
Working in Print Layout View ... 199
Taking Notes in Notebook Layout View ... 203
Designing in Publishing Layout View ... 208
Making the Most of Toolbars and Menus ... 210
Making Word Behave the Way You Want It To ... 211
Reading and Working in Full Screen View ... 217
Chapter 2: An Open and Shut Case . . . .221
Opening the World in Word ... 221
Saving Word Documents ... 226
Changing Word’s Default Document ... 230
Being Compatible with Others ... 231
Chapter 3: Formatting and Typography. . . .235
Formatting Paragraphs ... 235
Controlling Paragraphs ... 237
Tinkering with Tabs ... 239
Shooting Bullets and Numbing Numbers ... 243
Dropping a Cap ... 250
Turning on Typography ... 251
Chapter 4: Working with Document Layout. . . .255
Adding Pages ... 255
Confi guring Page Setup ... 256
Ruling Margins ... 257
Arranging Text Layout ... 259
Formatting Page Background and Borders ... 260
Activating Gridlines ... 261
Tickling Footers and Watching Your Header ... 262
Getting around with Bookmarks ... 264
Writing with Style ... 265
Using Organizer ... 269
AutoFormat as You Type ... 271
Automatically Numbering Lines ... 273
Chapter 5: Collaborating on and Proofi ng Documents . . . .275
Keeping Track of Changes ... 275
Coauthoring Simultaneously ... 283
Office 2011 for Mac All-in-One For Dummies
xii
Chapter 6: Making Great Tables and Charts . . . .299
Deciding Which Table Tools to Use ... 299
Making a Table ... 300
Basic Table Tips ... 304
Formatting Tables ... 306
Performing Table Manipulations ... 310
Handling Tables from the Web ... 318
Working with Charts ... 319
This Is a Frame-Up! ... 320
Chapter 7: Saving Time in Word . . . .325
Automating with AutoText ... 325
Automating Long Document Chores ... 330
Inserting a Citation ... 341
Chapter 8: Advanced Word Stuff . . . .345
Wrapping Text around Objects ... 345
Positioning and Anchoring an Object ... 348
Flowing Text from One Text Box into Another ... 350
Publishing Newspapers, Newsletters, and Periodicals ... 353
Having a Field Day ... 356
Managing Multiple Open Documents ... 361
Creating an Electronic Form ... 362
Embedding All Kinds of Things ... 370
Chapter 9: Printing for Posterity . . . .373
Sizing Up Things with Page Setup ... 374
Printing Like a Pro! ... 376
Chapter 10: Managing a Mail Merge . . . .383
Making Magic with Mail Merge ... 383
Getting Good Data for Your Mail Merge ... 385
Making a Form Letter ... 389
Merging to Envelopes ... 395
Making Labels ... 398
Book III: Excel 2011 ... 405
Chapter 1: Working Every Day in Excel . . . .407
Opening Excel for the First Time ... 407
Opening the Excel Workbook Gallery ... 408
Choosing a View ... 410
Customizing Keyboard Shortcuts ... 414
Working with Sheet Types ... 415
Table of Contents
xiii
Chapter 2: Opening and Saving Files in Excel . . . .419
Working with Excel Workbook .xlsx Format ... 419
Working with Various File Formats ... 420
Using AutoRecover ... 425
Chapter 3: Getting into Cells and Worksheets . . . .427
Interacting with Excel ... 427
Making Sense of Cursors ... 433
Moving a Row or Column ... 434
Dragging a Series of Text, Numbers, or Dates ... 434
Using the Custom Lists Feature to Fill Cells ... 436
Understanding General Format ... 438
Entering Cell Formulas ... 440
Knowing When to Be Absolute, Relatively Speaking ... 446
Chapter 4: Formatting and Conditional Formatting . . . .451
Formatting Cells ... 451
Formatting Dates and Times ... 457
Conditional Formatting ... 461
Adding a Picture to a Worksheet Background ... 468
Chapter 5: Making, Formatting, and Filtering a Table . . . .471
Listing the Table Rules ... 471
Making a Table ... 472
Choosing Table Options ... 473
Formatting Tables ... 473
Adding or Deleting Rows and Columns ... 476
Sorting and Filtering in Tables and Worksheets ... 476
Calculating Columns ... 479
Managing Tables ... 480
Making a PivotTable ... 481
Chapter 6: Making Charts . . . .485
Making a Chart in Excel ... 485
Customizing a Chart with Ease ... 486
Saving Your Chart as a Template ... 488
Making Sparklines ... 488
Perfecting Your Chart ... 490
Performing Chart Analysis ... 492
Moving to a Chart Sheet ... 496
Adding Charts in Other Applications ... 497
Chapter 7: Controlling Excel. . . .503
Copying and Pasting ... 503
Moving and Copying Entire Sheets ... 507
Office 2011 for Mac All-in-One For Dummies
xiv
Hiding and Unhiding Worksheets, Rows, and Columns ... 510
Calculation Ordering with Nesting and Nest Building ... 511
Troubleshooting Formulas ... 513
Chapter 8: Delving Deeper into Data . . . .519
Simplifying Database Jargon ... 519
Performing a What-If Analysis ... 520
Getting Data from External Sources ... 522
Putting Tools to Work ... 524
Using a Web Query ... 526
Chapter 9: Sharing and Collaborating . . . .529
Simultaneous Workbook Sharing ... 529
Reviewing with the Ribbon ... 533
Commenting ... 534
Tracking Changes ... 537
Chapter 10: Making Forms in Excel . . . .543
Displaying the Developer Tab ... 543
Making More Tools Available ... 544
Protecting Worksheets and Locking and Unlocking Cells ... 545
Making a Form on a Worksheet ... 547
Making a Form on a Dialog Sheet ... 561
Chapter 11: Printing in Excel . . . .563
Setting Up Your Pages ... 563
Choosing View Options ... 564
Printing from Excel ... 565
Working with Headers and Footers ... 567
Making a Watermark ... 570
Adjusting Print Quality ... 571
Book IV: PowerPoint 2011 ... 575
Chapter 1: Profi ling PowerPoint’s Interface . . . .577
Opening the PowerPoint Presentation Gallery ... 577
Choosing a View ... 579
Building and Editing Slides in Normal View ... 580
Organizing Your Presentation in Slide Sorter View ... 582
Transitioning from One Slide to the Next ... 585
Advancing to the Next Slide ... 586
Making a Blank Presentation ... 587
Setting PowerPoint Preferences ... 587
Table of Contents
xv
Chapter 2: Opening and Saving a Presentation . . . .591
Opening Password-Protected Presentations ... 591
Saving in Various Formats ... 591
Saving as a Pile of Pictures ... 597
Chapter 3: Feeling at Home on the Ribbon. . . .599
Starting with a Title Slide ... 599
Choosing a Slide Layout ... 600
Working with Text Placeholders ... 602
Inserting More Content ... 608
Formatting ... 611
Making and Formatting Tables ... 615
Chapter 4: Adding Audio and Movies . . . .621
Adding an Audio Clip ... 621
Adding a Movie ... 626
Dealing with Audio and Movie Odds and Ends ... 630
Chapter 5: Designing Masters, Slide Layouts, and Themes . . . .631
Putting a Slide Master in Charge ... 632
Getting Your Bearings in Slide Master View ... 633
Working with Slide Masters and Layouts ... 635
Taking Note of Your Notes Master ... 638
Handling Handout Masters ... 639
Making a Theme ... 640
Chapter 6: Applying Animation . . . .645
Applying an Animation Effect ... 646
Bringing the Animations Tab of the Ribbon to Life ... 646
Choosing Animation Options ... 647
Animating a Text Placeholder ... 649
Animating a SmartArt Graphic ... 654
Animating an Audio Clip or a Movie ... 658
Animating a Chart ... 660
Moving an Object along a Path ... 661
Chapter 7: Delivering Your Presentation . . . .665
Presenting to a Live Audience ... 665
Playing a Slide Show to Your Audience ... 668
Using Presenter View ... 673
Rehearsing and Recording Your Presentation ... 675
Creating Versions with Custom Shows ... 676
Customizing Your Show’s Setup ... 678
Office 2011 for Mac All-in-One For Dummies
xvi
Chapter 8: Printing, Sharing, and Coauthoring Presentations . . . .687
Printing Your Presentations ... 687
Exploring Sharing Options ... 690
Commenting in a Presentation ... 693
Comparing Presentations ... 694
Coauthoring Presentations Using SkyDrive or SharePoint ... 696
Book V: Outlook 2011 ... 701
Chapter 1: Upgrading to Microsoft Outlook. . . .703
Getting to Know Microsoft Outlook for Mac ... 704
Opening Outlook for the First Time ... 705
Learning Your Identity ... 706
Upgrading from Entourage 2008 or 2004 ... 708
Switching from Windows Outlook to Mac Outlook ... 710
Upgrading from Apple Mail ... 712
Upgrading from Gmail or Yahoo! Mail ... 713
Upgrading from Hotmail ... 714
Importing Contacts from a Text File ... 714
Managing Accounts in an Identity ... 715
Managing Identities ... 720
Chapter 2: Using Common Outlook Tools. . . .723
Opening in Outlook’s Default Mail View ... 723
Moving Around the Menu Bar ... 724
Tailoring the Toolbar for Quick Access ... 725
Ringing in the Ribbon ... 726
Changing Views ... 727
Watching Your Status ... 728
Chapter 3: Mastering Mail . . . .729
Working in Mail View ... 730
Customizing the Reading Pane ... 733
Finding and Setting Mail Preferences ... 733
Reconnoitering the Ribbon ... 737
Reading Mail ... 742
Composing a Message ... 744
Searching and Smart Folders ... 747
Clobbering Junk Mail ... 749
Automating with Rules ... 749
Table of Contents
xvii
Chapter 4: Crafting Your Calendar. . . .751
Taking a Look at the Calendar Interface ... 751
Going on Holiday ... 753
Adding Meetings and Appointments ... 753
Receiving Invitations ... 756
Receiving Acceptances and Rejections ... 757
Organizing Your Calendars ... 758
Searching and Using Smart Folders ... 759
Printing Your Calendar ... 761
Chapter 5: Keeping Up with Contacts. . . .763
Perusing the Contacts Interface ... 763
Meeting Yourself ... 764
Printing Contacts ... 766
Making Contacts Folders ... 767
Finding Contacts ... 767
Grouping Contacts ... 768
Exporting Contacts ... 769
Deleting a Contact ... 770
Chapter 6: Keeping Track of Your Day . . . .771
Flagging for Follow Up ... 771
Touring Your Tasks ... 772
Making a Note for Future Reference ... 775
Making Your Day with My Day ... 777
Office 2011 for Mac All-in-One For Dummies
Introduction
W
elcome to Office 2011 for Mac All-in-One For Dummies. Long-timeMac aficionados as well as recent switchers and newbies alike will discover valuable tips, find advice, and learn from how-to-do-it instructions throughout the pages of this book.
Office 2011 has some dazzling new features. This book explains everything in plain English and is arranged so that you can easily find information about any Office topic. Use it to broaden your knowledge and make your documents, workbooks, e-mails, and presentations better than ever.
We understand that many people have been using Microsoft Office for years but may be new to the Mac. Most of the features in Microsoft Office applica-tions are the same on both the Windows and Macintosh platforms, which makes switching easier.
How to Use This Book
Turn to the Table of Contents or use the Index to locate the page number for the topic you’re interested in. You’ll find basic information as well as in-depth information. Rather than reading this book from front to back, we make it easy for you to look up specific topics and jump right in.
Throughout this book are screen shots, step-by-step instructions, tips, and cautionary warnings to keep you out of trouble so that your experience using Microsoft Office will be pleasant, productive, and sometimes even delightful.
How This Book Is Organized
This book is organized in five self-contained minibooks. Each minibook is described in the following sections.
Book I: Introducing Office 2011
2
Conventions Used in This Book
Book II: Word 2011
In this minibook, we show you how you can use Word’s amazing capabilities to do everything from writing letters to printing envelopes. Along the way, you discover how to mail merge from a database and format your fonts. We also show you how to create newsletters in Word and take notes of your meetings, including audio notes. Have fun!
Book III: Excel 2011
Excel is chock-full of interesting stuff you can do. This minibook covers the basics and then shows you how to do some advanced stuff with step-by-step instructions. We take you on the journey of understanding cells and data val-idation, and we help you with lists, forms, charts, tables, and the new solver.
Book IV: PowerPoint 2011
You can build presentations with pizazz and deliver them with confidence and professionalism with the help of the PowerPoint minibook. Not only do we show you how to effectively use PowerPoint, we’ve included some of the most powerful tips for helping you build and deliver great presentations.
Book V: Outlook 2011
Outlook is your one-stop shop for e-mail, contact management, calendars, notes, and tasks. This minibook helps you improve your office and home productivity with explanations on everything from setting up regular e-mail accounts to using Outlook with Microsoft Exchange and Messenger.
Conventions Used in This Book
The For Dummies books by Wiley are famous for their easy readability and
wonderful consistency. This book follows the same For Dummies format. We
try to make things as simple as possible. Sometimes we ask you to type com-mands and click the mouse in particular sequences. When we do that, we use the following conventions:
✦ When you need to type: We use a bold font to tell you what to type. For
example, if we say, “Type 22 and then press the Return key” we want you to type the number 22 and then press the Return key on the key-board.
✦ When you need to choose a command from a menu: When we give you
a specific sequence of menu commands to use, it looks like this: Choose
File➪Share➪Save to SkyDrive. In this example, click the File menu,
3
Icons Used in This Book
✦ When you need to choose a command from the Ribbon: Sometimes,
you need to use the Ribbon rather than the menu bar. When you choose a command on the Ribbon, we let you know what tab to click (if it isn’t already selected), what group the command is in, and finally what com-mand to click. For example, “Click the Ribbon’s Home tab. In the Font group, click the Bold button to apply bold formatting.”
✦ When you need to press a key combination: Keyboard commands
involve pressing two or more keys at once. Then you let go of all of the
keys. We use a hyphen (-) to chain together the keys to press. (Note:
The Command key, Ô, is the same as the Apple key.) An instruction to
“Press Ô-Shift-3” means to hold the Ô key down along with the Shift key
and press the number 3 to activate the action, and then let go of all the
keys after the action takes place. Incidentally, if you do press Ô-Shift-3, a
picture of your current screen will be saved to your computer’s desktop.
✦ When you need to press a key and click, or you need to right-click: To
show that you need to press a key when you click, we use a hyphen like
in key combinations, such as “Ô-click” or “Shift-click.” If your Mac has a
single-button mouse, when we say right-click, you should Control-click.
If you’re using a laptop, you may need to press the Fn key in addition to the keys we tell you to press.
If you’re switching from Windows to a Mac, Apple has a wonderful table that shows what you used in Windows and the equivalent action on your Mac at
www.apple.com/support/switch101/switcher/2.
Icons Used in This Book
The icons in this book are important visual cues for information you might not want to miss.
This icon indicates special timesaving advice and other helpful suggestions.
This icon alerts you to pay close attention because every once in a while we might discuss a topic that if not followed carefully might cause problems.
4
Where to Go from Here
Not everyone is a true geek, so we’ve identified some topics as a bit on the complex side or that most users might find daunting or uninteresting. Information with this icon isn’t critical to your understanding of the topic.
Several excellent features of Microsoft Office are available only in Macintosh versions. If you’re new to the Mac and are already familiar with Office for Windows, look for this icon to alert you to features that may be new to you. If you work in a cross-platform environment, be alert to the fact that features marked with this icon work only on Macs.
Although we could have put this icon on half of the topics covered in this book, we use the icon to alert you to major new features introduced in Office 2011.
Where to Go from Here
Turn to just about any page or flip through the book. We’re sure you’ll find a lot of useful stuff. The Table of Contents and Index are perfect places to get your feet wet finding specific topics.
The Help system in Office 2011 is another excellent resource. Sometimes we will point to specific topics in Help so that you can see just how good Office Help is. We also refer to resources that are created and maintained by Microsoft MVPs (Most Valuable Professionals).
The MVP program was established by Microsoft to recognize “the best and brightest from technical communities around the world” according to the Microsoft MVP Web site at
http://mvp.support.microsoft. com. MVPs are volunteers and don’t receive compensation from Microsoft and are indepen-dent from Microsoft Corporation.
The authors and this book’s Technical Editor have received MVP awards for many years. We encourage you to participate in user groups and online activities. People who regu-larly contribute high-quality information to the community at large may eventually become candidates to receive MVP distinction.
Book I
Contents at a Glance
Chapter 1: Going Over the Preliminaries . . . .7
Jumping into Offi ce 2011 ... 7 Soaring with Cloud Computing ... 18
Chapter 2: Interfacing with Offi ce . . . .21
Talking about Toolbars ... 24 Customizing Menus and Toolbars ... 26 Riding the Ribbon ... 34
Chapter 3: Traversing the Toolbox . . . .39
Looking Things Up with Reference Tools ... 44 Customizing the Toolbox ... 49
Chapter 4: Working with Files . . . .51
Searching for Files and Locations ... 53 Sharing and Collaborating with SkyDrive ... 58
Chapter 5: Getting SmartArt . . . .67
Smiling with SmartArt ... 67 Making Organization Charts ... 72
Chapter 6: Selecting and Formatting . . . .75
Understanding Formatting Basics ... 77 Formatting with the Format Shapes Dialog ... 83
Chapter 7: Formatting Pictures . . . .97
Formatting Pictures Using the Ribbon ... 97 Applying Picture Styles ... 110
Chapter 8: Inserting Media . . . .117
Activating the Media Browser ... 117 Browsing Clip Art ... 122
Chapter 9: Fancy Text Boxes . . . .135
Making a Text Box ... 135 Formatting Text Boxes with the Format Text Dialog ... 139
Chapter 10: Common Tools That Make Life Easier. . . .143
Proofi ng Your Spelling and Grammar ... 143 Connecting with Messenger and Communicator ... 154
Chapter 11: Making Great Tables . . . .163
Making a Table ... 163 Formatting with Table Styles ... 168
Chapter 12: Using VBA. . . .171
Chapter 1: Going Over the
Preliminaries
In This Chapter
✓ Choosing an Office suite
✓ Migrating and upgrading Office
✓ Installing Office the right way
✓ Using AutoUpdate
✓ Removing Office properly
✓ Discovering additional tools
✓ Storing and sharing documents in the clouds
M
ac users almost always expect to lay their hands on the best, fastest,easiest-to-use, and most reliable hardware and software that “just works.” And because Office 2011 for Mac is clearly a product that has a huge following, we know that expectations from this large base of users is very high! Fortunately, there’s plenty in this new release of Office to address those expectations and to be very happy about. So as we take you through the new features and the consistent, existing options, be prepared to go on a journey of discovery. If there’s just one thing that we want to do through this book, it’s to show you how you can work better with Office 2011 for Mac.
You may or may not have heard about the trend to collaborate, the Ribbon, sharing in “the cloud,” and other new technologies. Don’t worry if all that sounds vague. We do know that you simply want to know the best way to get your everyday work done. We help you overcome any fears you might have about upgrading and then show you around Office 2011.
Jumping into Office 2011
8
Jumping into Office 2011
Next comes the decision about which edition of Office is the right one for you. There’s a free, online-only edition; a Home and Student Edition; and a Home and Business Edition from which to choose. For large organizations, a Volume License Edition is also available. We discuss all these editions in just a bit.
Deciding whether you should upgrade or switch
We think that if you have an Intel processor–based Mac, there’s really no question at all about whether to upgrade or switch. Office 2011 is a must-have upgrade and is by far the best version of Office ever released for the Mac. If you’re switching from a version of Office for Windows, Office 2011 will feel familiar to you regardless of which version of Office you are switch-ing from. Office 2011 introduces the Ribbon to the Mac but doesn’t do away with the older-style toolbars and menus. Speaking of older, if your Mac is PowerPC based, you have to stay with Office 2004 and/or Office 2008 or use the free, online, browser-based SkyDrive version of Microsoft Office.
Choosing the right edition
You can choose among several editions of Office 2011. Each version has a different set of applications and features, as well as a different price. The fol-lowing list helps you pick the edition that’s right for your purposes:
✦ Home and Student Edition: This version comes with complete editions
of Microsoft Word, Excel, PowerPoint, Messenger, Microsoft Query, Visual Basic for Applications (VBA), and Silverlight. In addition, you get some nifty new fonts. Purchasers of Home and Student Edition are entitled to use the free templates, add-ins, sounds, backgrounds, clip art, and other materials from Microsoft’s extensive online offerings. Home and Student Edition users can also store and share documents on Microsoft’s SkyDrive Web site. Product validation is required.
✦ Home and Business Edition: In addition to everything included with
Home and Student Edition, the Home and Business Edition comes with the Microsoft Outlook e-mail and organizer program and the ability to use the SharePoint portal server, a file server often used by large businesses.
✦ Volume License Edition: Purchasers of large quantities of Office 2011
may save considerable amounts of money by purchasing under the volume license program. Many universities, colleges, and schools take advantage of this program to offer free or low cost Office 2011 to employees, faculty, staff, and students.
✦ Limited time trial: This is not a separate version of the product, but
Book I Chapter 1
Going Over the
Preliminaries
9
Upgrading from Previous Versions of Office
know whether you plan to purchase Office 2011. To purchase, all you need is a product key, so you don’t have to reinstall anything if you decide to keep Office 2011. If you decide not to keep the trial version, be sure to follow our instructions for removing Office in the “Using addi-tional tools” sidebar in this chapter.
✦ SkyDrive Edition (free): SkyDrive is the name of a Microsoft Web
site where you can upload, share, and edit documents. On SkyDrive, Microsoft offers lightweight editions of Word, Excel, PowerPoint, and OneNote for free online to compete head-to-head with other free applica-tions such as Google Docs, OpenOffice, and Lotus Symphony. In addi-tion, the SkyDrive versions of Office applications work as a seamless complement to the desktop versions of Office 2011 for Mac.
Being online, SkyDrive requires no installation. There’s no software to download or install other than your Web browser, which may already be installed as part of your Mac OS X. SkyDrive editions of Office appli-cations run equally well in Apple Safari or Mozilla Firefox. We discuss SkyDrive more in Chapter 4 of this minibook.
Choosing a language
The suite of Office for Mac applications is available in several languages. In the United States, you most likely will encounter the English and Spanish lan-guage versions. If you want the entire Office interface in French, for instance, you need to obtain the French localized version. Most major languages are supported, but not right-to-left languages such as Arabic and Hebrew. Microsoft is very aware that there’s a large market for right-to-left language versions of Office for the Mac, and it’s working with Apple on a solution.
Upgrading from Previous Versions of Office
For the most part, you can expect that upgrading from any previous version of Office will be trouble-free on your Mac. Your new Office suite is fully com-patible with your old documents and file formats. However, the Home and Student Edition of Office 2011 doesn’t come with Outlook or any other e-mail client. If you’ve been using Microsoft Entourage, the older e-mail client that has been part of previous Office suites on the Mac, you can continue to use Entourage along with Office 2011 by simply not removing Entourage during your install of Office 2011. (If you accidentally remove Entourage, you can do a custom install from your old Office installer and choose to install just Entourage, and then you can allow the updates to install.)
10
Upgrading from Previous Versions of Office
Migrating from Office for Windows
Because the file formats for Word, Excel, and PowerPoint are identical on both Macs and PCs, no file conversions are needed. With very few excep-tions, after you copy your files from your PC and move them to your Mac, you can simply open your documents and templates in Office 2011. In fact, with Office 2011 on the Mac, and with the newest Office 2010 on Windows, Microsoft has taken rapid strides to make sure that compatibility between Mac and Windows versions is more seamless than it has ever been.
Files that contain properly written add-ins and macros should also work. Macros and add-ins that use Windows platform-specific code don’t work, but you usually can modify them to work in Office 2011.
Migrating Publisher files
Microsoft Publisher files cannot be opened directly in Office 2011 for Mac.
You need to convert these files to Word (.docx) format using Microsoft
Office on a PC. To convert a Publisher document in Office 2010 on Windows, do the following:
1.
Open the document you want to convert using Microsoft Publisher 2010for Windows.
2.
Press Ctrl-A to select all the content.3.
Press Ctrl-C to copy all the content to the Windows Clipboard.4.
Open a new, blank Microsoft Word 2010 document.5.
Press Ctrl-V to paste the Clipboard contents into Word.6.
Click the Save button on the Quick Access Toolbar.The resulting Word (.docx) file can now be moved to your Mac.
When you open the Word file from Windows on your Mac, the result won’t be perfect. You have to re-create the links between the text boxes (we cover how to do this in Book II, Chapter 8), and the layout may need tweaking, but this is the best way we found to migrate Publisher files.
Migrating OneNote files
Microsoft OneNote doesn’t come with Office for Mac. In Office for Mac, simi-lar functionality is provided within Microsoft Word using Notebook Layout view. If you don’t need to modify your OneNote documents, move your files to your SkyDrive, where you can open and edit OneNote files.
Migrating Outlook PST files
If you’re using Microsoft Outlook for Windows, Outlook typically saves all
Book I
We explain how to import your .pst file from Outlook for Windows into
Outlook for Mac in Book V, Chapter 1.
Installing Office, Sweet!
Before you can start using Microsoft Office, you need to install it, of course. To take advantage of the new document collaboration features, you need either a free SkyDrive account and/or an account on a Microsoft SharePoint server. After we show you how to install Office, we explain how to activate a free SkyDrive account in the later section “Soaring with Cloud Computing.”
Enterprise and higher education Information Technology (IT) departments typically support Microsoft SharePoint. Contact your IT department and ask whether SharePoint is available to you. If it is, ask your IT department to have a SharePoint account set up for you.
Preparing your system
As time passes, errors can creep into your computer’s file system. You might also wind up with duplicate or corrupt fonts. We show you how to check your system for errors before installing and how to repair file permissions and check your fonts after installation. This may sound rather technical, but it’s actually quite easy to do these tasks.
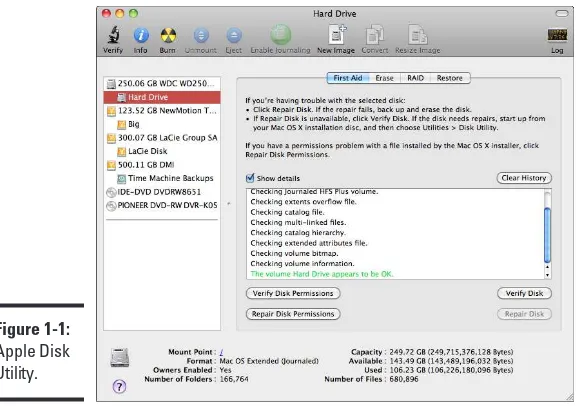
If you have a good disk maintenance and repair utility (such as Alsoft DiskWarrior, TechTools Pro, Drive Genius, or a similar program), be sure to use it on your startup volume and other drives before installing a big prod-uct such as Microsoft Office. Even if you don’t have any of these programs, every Mac includes the Disk Utility program — this program’s icon appears in the margin. At a minimum, make sure your startup disk verifies as OK with Apple’s Disk Utility program. Here’s how to check your hard drive with Disk Utility:
1.
In Finder, choose Applications, choose Utilities, and then open DiskUtility Application (shown in Figure 1-1).
2.
In the panel on the left side, select your startup disk.Your startup disk is the one at the top of the list of volumes. Select either the first or second item in the list as shown in Figure 1-1.
3.
On the First Aid tab, click the Verify Disk button.Progress update messages and a progress bar appear. The bigger your hard drive is and the more files you have, the longer Disk Utility will take.
12
Installing Office, Sweet!
The message you hope to see when Disk Utility is finished is green and
says, “The volume [name] appears to be OK.” Most likely you will get this
go-ahead, and you can proceed directly to installing Office and skip the next steps.
Figure 1-1:
Apple Disk Utility.
If the Disk Utility indicates that your disk needs to be repaired, the Repair Disk button will remain grayed out, and you need to take additional actions. You can find additional instructions by doing the following:
1.
In Disk Utility, choose Help➪Disk Utility Help.The Disk Utility Help window displays.
2.
Choose Repairing a Disk.Follow instructions for repairing your disk(s).
Sometimes Disk Utility can’t repair a disk. If that happens to you, don’t despair. Instead, try using another disk repair utility, such as Alsoft DiskWarrior, TechTools Pro, Drive Genius, or similar programs. They can find and repair more problems than Disk Utility can.
Book I
The installer for Microsoft Office is delivered using a disk image (.dmg) file.
Unlike previous versions of Office, the same disk image is used for Home and Student Edition, Home and Office Edition, and the limited trial. The installer will know what features to make available to you based upon the product key that you enter. You can download the Office install file from the Microsoft
Web site: www.microsoft.com/mac. This offers several advantages:
✦ Purchase from any vendor. The downloaded file needs to be activated.
The product key is what you absolutely need. The download site pro-vides a free trial key and suggests vendors. You purchase a product activation key for the edition you want to purchase from any authorized sales outlet. (You don’t have to use a suggested vendor.) You can pur-chase the boxed physical media if you prefer, and that will have a con-ventional DVD along with your product key(s).
✦ No waiting! All you need is your product key and the download.
✦ No worries about lost or damaged install discs. As long as you have
your product key, you can download a fresh installer anytime from Mactopia. In fact, if you get a copy of the installer from a friend without the product key, you won’t be breaking any laws.
✦ Media drive is not required. MacBook Air users will love this because
the MacBook Air typically doesn’t have a disc drive!
✦ No need to remove the trial version. In previous versions of Office, you
had to run the Remove Office utility to remove a trial version to avoid conflicts with the licensed copy. You don’t do this with Office 2011. The trial version becomes the licensed version when you enter a product key.
Volume License Edition users need a special installer that is customized for them by their IT department. If your employer or school uses a volume license, contact your local support department to get the installer.
Running the installer
Microsoft Office uses the standard Apple installer. When you open the Office
installer disk image (.dmg), just double-click the installer icon to start the
installer. There are no surprises, and you should be able to accept all the defaults unless you’re an advanced user and want to make a customized installation. The installer takes you through six stages:
1.
Introduction. A friendly welcome screen is all you see here.2.
License. This is where you get to read (and if you want, print) the14
Installing Office, Sweet!
3.
Destination select. Normally, you install Office on your startup disk.4.
Installation type. Here you can customize the install options if you feelyou must.
5.
Installation. This is where the installer does the job of placing theMicrosoft Office 2011 folder into your Applications folder. It installs the Office applications, fonts, templates, and the framework to make Office run.
6.
Summary. Click the Finish button to quit the installer. You may beprompted about joining the Customer Experience Program (CEP), which lets Microsoft automatically obtain system information about your com-puter in the event of a software problem. Joining is optional and won’t affect your ability to use Office in any way. It’s possible for personal information from your computer to be transmitted to Microsoft if you join. If you choose to register your copy of Office, you will receive occa-sional newsletters from Microsoft about its products.
When you get to Step 6, the Microsoft AutoUpdate application (see Figure 1-2) opens to check whether there are updates from Microsoft available for your Office software. You should immediately install all updates that are available.
If you’re pressed for time, make sure you install these updates as soon as you can. To access the Microsoft AutoUpdate application at any time, refer to the next section, “Keeping current with AutoUpdate.”
It’s very important to leave your installation of Office exactly as the installer generated it. Don’t move or rename any of the applications, files, or folders of your Microsoft Office installation in the Applications folder, or Office or parts of it probably won’t work. However, it’s okay to make aliases that link to your Office applications.
Keeping current with AutoUpdate
Microsoft AutoUpdate (see Figure 1-2) is the application to use to keep your copy of Microsoft Office up-to-date. Your computer must be connected to the Internet to use AutoUpdate. To launch AutoUpdate from any Office appli-cation, do the following:
1.
Choose Help➪Check for Updates.Microsoft AutoUpdate opens, as shown in Figure 1-2.
2.
Set the frequency with which you want to have AutoUpdate check forupdates.
Book I Chapter 1
Going Over the
Preliminaries
15
Installing Office, Sweet!
3.
Click the Check for Updates button.AutoUpdate checks for updates. If any are available, click the Install button and allow the installer to do its work.
4.
When you’re done installing all updates, or if there are no updates toinstall, quit (Ô-Q) AutoUpdate.
Figure 1-2:
Keeping Office up-to-date.
Keeping Office and Mac OS X up-to-date is a smart thing to do. Bug fixes, security patches, and feature enhancements are delivered with coordination between Apple and Microsoft. This helps both companies deliver the best possible experience for Mac users.
Fixing your fonts
We think everyone who installs Office should examine his or her font collec-tion. Bad fonts can cause applications to crash. Font management is an art,
but we’re not artists. We give you a quick For Dummies way to manage
your fonts.
Mac OS X comes with an application called Font Book, which should be in your Applications folder. We don’t go deeply into Font Book. Instead, we show you only enough to avoid font problems by resolving duplicate fonts first and then dealing with defective fonts.
Resolving duplicate fonts
You can take the following steps to disable any duplicate fonts on your system. Remember, this procedure does not remove any fonts, and you just want to turn off these duplicates so they don’t cause trouble.
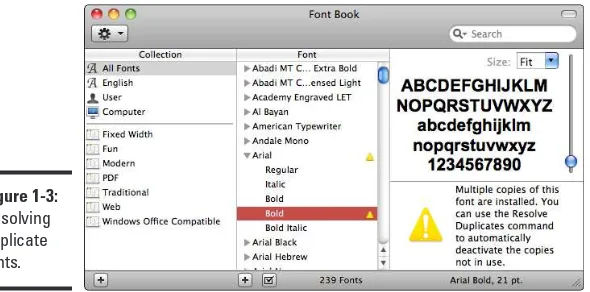
1.
Double-click the icon for Font Book in the Applications folder.16
Installing Office, Sweet!
2.
In the Collection column, click All Fonts.3.
Select any font listed under the Font column.4.
Press Ô-A to select all your fonts.The entire list of font names should be highlighted now.
5.
From the menu bar, choose Edit➪Resolve Duplicates.If Resolve Duplicates is grayed out, good for you! That means your system doesn’t have any duplicate fonts, and you can move on to check-ing for bad fonts in the next section.
Figure 1-3:
Resolving duplicate fonts.
Give Font Book a minute or two to process. You’ll know when it’s done when you no longer see the twirling wait indicator in the lower-right corner of the Font Book window. The more fonts you have and the more duplicates you have, the longer it takes. After completion, all duplicate fonts are disabled and won’t be used by your system. The fonts remain on your hard drive, mostly just wasting space.
Font Book is great for adding new fonts and managing your fonts. For more
information, while running Font Book choose Help➪Font Book Help and then
browse the Help topics.
Checking for bad fonts
You can use Font Book to identify fonts that have problems and help you remove these fonts. Font Book classifies fonts into three categories:
✦ Passed (safe to use)
✦ Minor problems
Book I
The procedure is similar to resolving duplicates (described the preceding section):
1.
Double-click the Font Book application in the Applications folder.Font Book opens, as shown earlier in Figure 1-3.
2.
In the Collection column, click All Fonts.3.
Select any font listed in the Font column.4.
Press Ô-A to select all your fonts.The entire list of font names is highlighted now.
5.
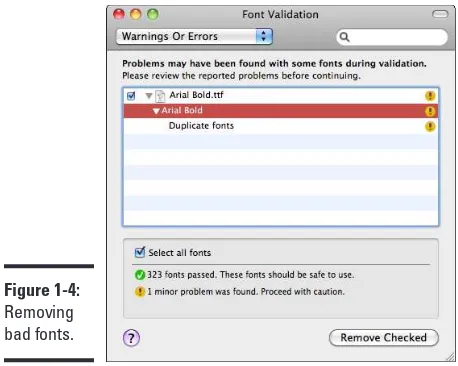
From the menu bar, choose File➪Validate Fonts.The Font Validation window opens. (See Figure 1-4.) Allow the process to complete. It may take a while if you have a lot of fonts that have problems. Font Book puts a green badge next to fonts that are okay. The yellow badges with an exclamation mark and the red badges indicate fonts that have problems.
6.
Click the pop-up menu in the upper-left corner of the Font Validationwindow, and choose Warnings Or Errors, as shown in Figure 1-4.
Font Book filters the list to show only fonts that have problems that need to be resolved. A yellow or red badge appears next to each font that has a problem.
7.
Select each check box next to fonts that appear in the list when you’veturned on the Warnings Or Errors filter.
Each font selected should have a yellow or red badge. Don’t select fonts with green OK badges, which have check marks.
Be certain the Warnings Or Errors filter is applied before selecting the
check boxes. Do not use Select All — that can select all your fonts. You
don’t want to remove your good fonts or system fonts!
8.
In the Font Validation window, click Remove Fonts.Any fonts you’ve selected are moved to the Trash. When you empty the Trash, they are completely removed from your system.
9.
Restart your computer.18
Soaring with Cloud Computing
Figure 1-4:
Removing bad fonts.
Soaring with Cloud Computing
Cloud computing is an exciting expression for a rather dusty-sounding con-cept. Cloud computing means that instead of running applications and stor-ing files on your own computer, you use someone else’s computer (typically a server) via your Internet connection. For Office 2011, it means you have new ways to distribute and share documents with co-workers, classmates, and friends.
Because the Internet is such a changeable place, by the time you read this, things could change. As we write, there are four main cloud computing plat-forms available to you:
✦ Docs.com: This option is a Facebook application that’s owned and
oper-ated by Microsoft. It requires a Facebook account.
✦ SkyDrive.com: This Microsoft site has built-in integration with Office
applications. It requires a Windows Live or Hotmail account.
✦ SharePoint:This option is used by large organizations to provide a
private cloud, one that is not on the Internet. SharePoint offers the most privacy and security, but requires a dedicated server and network.
✦ Google Docs: This application is similar to Docs.com but is owned and
operated by Google.
Book I Chapter 1
Going Over the
Preliminaries
19
Soaring with Cloud Computing
✦ Share files: This refers to the ability to upload, store, download, and set
permissions on files so that you and the people you choose can have a common access point for files.
✦ Co-authoring: Office 2011 lets you and another person make changes to
a single document simultaneously in real time. SkyDrive and SharePoint allow this feature to work.
✦ Web applications: Web applications are lightweight word-processing,
spreadsheet, and presentation software that runs in your Web browser. By no means are any of these even remotely as good as the applications in Office 2011.
✦ File integration: SkyDrive in all editions of Office and SharePoint (in
Home and Business Edition) file systems are integrated into the Office 2011 interface.
✦ Privacy: With all services except SharePoint, you exchange your
con-tact information, content, habits, and screen space for advertising in exchange for the privilege of using cloud services. Although you can specify who gets to share your files, you must let the cloud provider’s computers analyze your content and contacts. SharePoint is the only cloud option we suggest that can be configured to work with informa-tion that must be kept private or confidential.
Table 1-1
Cloud Computing Services Comparison
Cloud Share Files
Co-authoring Online Web
Applications
Office Integration
Privacy
Docs.com Yes Yes No Limited
SkyDrive. live.com
Yes Yes Yes Limited
SharePoint Yes Yes Yes Private
intranet Google
Docs
Yes Yes No Limited
Chapter 2: Interfacing with Office
In This Chapter
✓ Meeting the menus
✓ Tooling around with toolbars
✓ Creating and customizing button icons
✓ Getting wrapped up in the Ribbon
W
ith all the changes in this new version, the Office 2011 interface ismore flexible than ever. New to Office 2011 for Mac is the Ribbon, which is a blend of commands from menus, toolbars, palettes, the Elements Gallery, and more. If you’re used to the older menus, it may take a while to get used to the Ribbon but we think that it’s time well spent. If you aren’t as enthusiastic as we are about the Ribbon, you’ll be glad to hear that the new Ribbon with its tabs does not come at the expense of losing familiar inter-face features such as traditional menus and some toolbars. Put together, all these features provide many convenient ways for you to accomplish your goals within the programs that comprise Microsoft Office.
Within the Ribbon, you can find many commands that were on palettes in previous Office versions. And of course you can also find newer commands that were not available in previous versions!
The main reason to celebrate the existence of the Ribbon is that no longer will overcrowded palettes spill over past the bottom of the screen or obstruct your view of the document, spreadsheet, or the slide that you’re
working on. Like other Office interface features, the Ribbon is context
sensi-tive, meaning that the choices that are available to you based upon where the cursor is and what’s currently selected.
We come back to the Ribbon later in this chapter and show it to you. But before we do that, we take you on an exploration of other familiar interface options.
Musing about Menus
22
Musing about Menus
In every Office application, at the top of your screen you can see the menu bar. (See Figure 2-1.) The menu bar continues to the right edge of the screen, but everything to the right of the Help menu belongs to Mac OS X or other open applications. Of course, you can activate individual menus by clicking corresponding menu items to expose their contents and submenus.
Another way to navigate menus is using arrow keys to navigate and then pressing Return to activate your menu choice. To get to the menu bar using the keyboard, press Fn-Control-F2 (or Control-F2 on keyboards without the Fn key).
Figure 2-1:
The Application menu.
The menu bar has certain default characteristics regardless of which Office application you’re using. Starting from the upper-left corner of your entire screen (or feel free to refer to Figure 2-1) you can find:
✦ Apple menu: Mac OS X, rather than the current application, supplies
this menu.
✦ Application menu: Located immediately to the right of the Apple menu,
this menu offers access to these important options:
• About [Application Name]: Displays a message box that describes the current version of the open application and its installed updates. Include this information when making inquiries about this product, when contacting the manufacturer, or when using online community forums.
• Online Registration: Enter a product key that you’ve purchased to sign up for newsletters from Microsoft.
• Preferences Ô-, (Command-comma): Displays the preferences for the current application. Notice the keyboard shortcut for this is displayed to the right of the command. Some preferences that you access here may influence more than one application. For example, if you make changes for Spelling or AutoCorrect in PowerPoint, then those changes will show up in Word and Excel too.
Book I
option, which opens Mac OS X Services preference panel, where you can turn services on and off.
• Hide [Application Name] Ô-H: This hides the application from view.
Use Ô-Tab or click the application’s Dock icon to return to (unhide)
the application.
• Hide Others Option-Ô-H: The Hide Others command hides all other open applications except the one you’re working on within your Mac OS X desktop. (Yes, this may make former Windows users feel more
at home.) Use Ô-Tab or click another application’s Dock icon to
switch to a different application.
• Show All: This becomes available when you hide one or more appli-cations. Choose Show All to make all hidden applications visible.
• Quit [Application Name] Ô-Q: Closes all open windows of the active application and then completely quits the application itself. If you have files with unsaved changes, the application prompts you to save them before quitting.
✦ File and other menus: These menus offer the array of commands that
are associated with your Office application. The options vary depending upon the Office application that you’re using.
✦ Application Script menu: This menu has a small symbol icon rather
than a menu name, as you can see in Figure 2-1. You will find Sample Automator workflows on this menu. Further to the right, you find an identical Script Menu icon that contains AppleScripts and Automator actions, including Automator actions that you create yourself.
Automator is a small program built within Mac OS X that lets you auto-mate stuff that you do often, and Microsoft Office applications are com-patible with Automator.
✦ Help Menu: Compared with the previous versions, the Help system in
Office 2011 is revamped and interactive. Display the Help menu (see Figure 2-2) by clicking Help on the menu bar.
Figure 2-2:
The Application Help menu.
24
Talking about Toolbars
listed below. Move the mouse over a search result, and the com-mand itself becomes highlighted in the menu, as shown in Figure 2-3. This is fun and can be addictive, so do it when you don’t have a deadline to finish an important task!
Figure 2-3:
Searching for commands.
• [Application Name] Help: This is where you can find help for what-ever application you are using. You can also access Help using the blue help icon on the standard menu bar and some application dialogs.
• Check for Updates: Launches Microsoft AutoUpdate. (See Chapter 1 of this minibook.)
• Visit the Product Web Site: Opens the Microsoft web site for the pro-gram in your default web browser.
• Send Feedback about [Application Name]: Your Web browser takes you to an online suggestion box where you can send comments and make suggestions to Microsoft. You won’t receive a reply to these messages, but do know that folks at Microsoft read each one.
Talking about Toolbars
Standard toolbars in Office 2011 behave like some Web browser toolbars and are incorporated into the document window. By default, you encounter the Standard toolbar beneath the menu bar. Take a look at Figure 2-4 as we point out features of the Standard toolbar in Microsoft Office applications.
The first few controls aren’t really part of the Standard toolbar because they show up even if you hide this toolbar. However, we still cover them here:
✦ Window Controls: The upper-left corner of each window contains the