Mastering Apache Storm
Mastering Apache Storm
Copyright © 2017 Packt Publishing
All rights reserved. No part of this book may be reproduced, stored in a
retrieval system, or transmitted in any form or by any means, without the
prior written permission of the publisher, except in the case of brief
quotations embedded in critical articles or reviews.
Every effort has been made in the preparation of this book to ensure the
accuracy of the information presented. However, the information contained in
this book is sold without warranty, either express or implied. Neither the
author, nor Packt Publishing, and its dealers and distributors will be held
liable for any damages caused or alleged to be caused directly or indirectly by
this book.
Packt Publishing has endeavored to provide trademark information about all
of the companies and products mentioned in this book by the appropriate use
of capitals. However, Packt Publishing cannot guarantee the accuracy of this
information.
First published: August 2017
Published by Packt Publishing Ltd.
Livery Place
35 Livery Street
Birmingham
B3 2PB, UK.
ISBN 978-1-78712-563-6
Credits
Author
Ankit Jain
Copy Editor
Safis Editing
Reviewers
Doug Ortiz
Oleg Okun
Project Coordinator
Nidhi Joshi
Commissioning Editor
Veena Pagare
Proofreader
Acquisition Editor
Divya Poojari
Indexer
Tejal Daruwale Soni
Content Development Editor
Mayur Pawanikar
Graphics
Tania Dutta
Technical Editor
Dinesh Pawar
Production Coordinator
About the Author
Ankit Jain
holds a bachelor's degree in computer science and engineering.
He has 6 years, experience in designing and architecting solutions for the big
data domain and has been involved with several complex engagements. His
technical strengths include Hadoop, Storm, S4, HBase, Hive, Sqoop, Flume,
Elasticsearch, machine learning, Kafka, Spring, Java, and J2EE.
He also shares his thoughts on his personal blog. You can follow him on
Twitter at
@mynameisanky. He spends most of his time reading books and playing
About the Reviewers
Doug Ortiz
is a senior big data artechitect at ByteCubed who has been
architecting, developing and integrating enterprise solutions throughout his
whole career. Organizations that leverage high skillset have been able to
rediscover and reuse their underutilized data via existing and emerging
technologies such as: Microsoft BI Stack, Hadoop, NoSQL Databases,
SharePoint, Hadoop, related toolsets and technologies.
He is the founder of Illustris, LLC and can be reached
at
[email protected].
Interesting aspects of his profession:
He has experience integrating multiple platforms and products
He has big data, data science certifications, R and Python certifications
He helps organizations gain a deeper understanding of, and value, their
current investments in data and existing resources, turning them into
useful sources of information
He has improved, salvaged, and architected projects by utilizing unique
and innovative techniques
His hobbies are yoga and scuba diving.
bioinformatics, online/offline marketing analytics, credit scoring analytics,
and text analytics.
He is interested in all aspects of distributed machine learning and the Internet
of Things. Oleg currently lives and works in Hamburg, Germany.
www.PacktPub.com
For support files and downloads related to your book, please visit
www.PacktPub
.com
. Did you know that Packt offers eBook versions of every book published,
with PDF and ePub files available? You can upgrade to the eBook version at
www.PacktPub.com
, and as a print book customer, you are entitled to a discount
on the eBook copy.
Get in touch with us at
[email protected]for more details. At
www.PacktPub.com
, you can also read a collection of free technical articles, sign
up for a range of free newsletters and receive exclusive discounts and offers
on Packt books and eBooks.
https://www.packtpub.com/mapt
Get the most in-demand software skills with Mapt. Mapt gives you full
Why subscribe?
Fully searchable across every book published by Packt
Copy and paste, print, and bookmark content
Customer Feedback
Thanks for purchasing this Packt book. At Packt, quality is at the heart of our
editorial process. To help us improve, please leave us an honest review on
this book's Amazon page at
https://www.amazon.com/dp/1787125637
.
If you'd like to join our team of regular reviewers, you can e-mail us at
. We award our regular reviewers with free eBooks
Table of Contents
Preface
What this book covers
What you need for this book
Who this book is for
Conventions
Reader feedback
Customer support
Downloading the example code
Downloading the color images of this book
Errata
Piracy
Questions
1.
Real-Time Processing and Storm Introduction
Apache Storm
2.
Storm Deployment, Topology Development, and Topology Options
Storm prerequisites
Installing Java SDK 7
Deployment of the ZooKeeper cluster
Setting up the Storm cluster
Developing the hello world example
The different options of the Storm topology
Kill
Updating the log level from the Storm UI
Updating the log level from the Storm CLI
Summary
3.
Storm Parallelism and Data Partitioning
Parallelism of a topology
Worker process
Executor
Task
Configure parallelism at the code level
Worker process, executor, and task distribution
Rebalance the parallelism of a topology
Rebalance the parallelism of a SampleStormClusterTopology topology
Different types of stream grouping in the Storm cluster
Shuffle grouping
Trident function
Memory usage example
Configuration changes in the supervisor node
Configuration setting at component level
7.
Monitoring of Storm Cluster
Cluster statistics using the Nimbus thrift client
Fetching information with Nimbus thrift
Monitoring the Storm cluster using JMX
Monitoring the Storm cluster using Ganglia
Summary
8.
Integration of Storm and Kafka
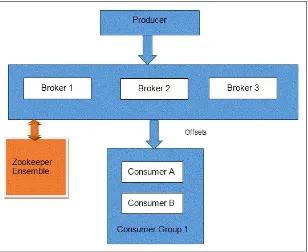
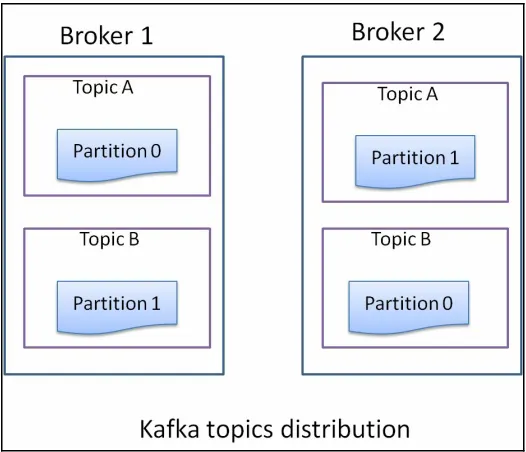
Introduction to Kafka
Setting up a single node Kafka cluster
Setting up a three node Kafka cluster
Multiple Kafka brokers on a single node
Share ZooKeeper between Storm and Kafka
Kafka producers and publishing data into Kafka
Kafka Storm integration
Deploy the Kafka topology on Storm cluster
Summary
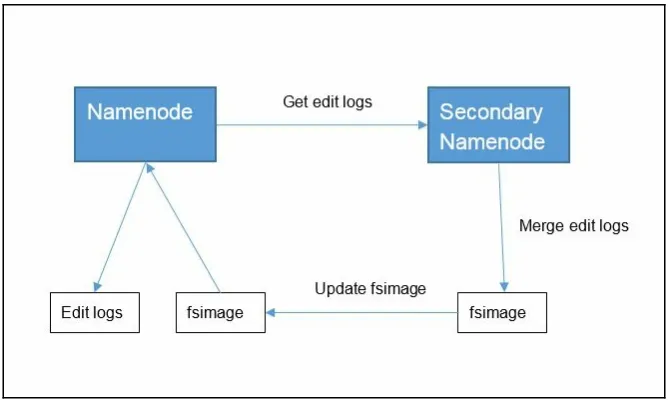
Introduction to Hadoop
Getting the Hadoop bundle and setting up environment variables
Setting up HDFS
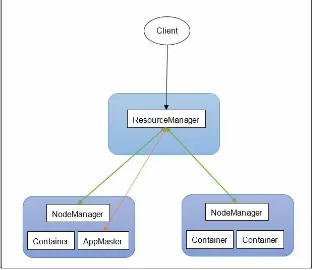
Setting up YARN
Write Storm topology to persist data into HDFS
Integration of Storm with Hadoop
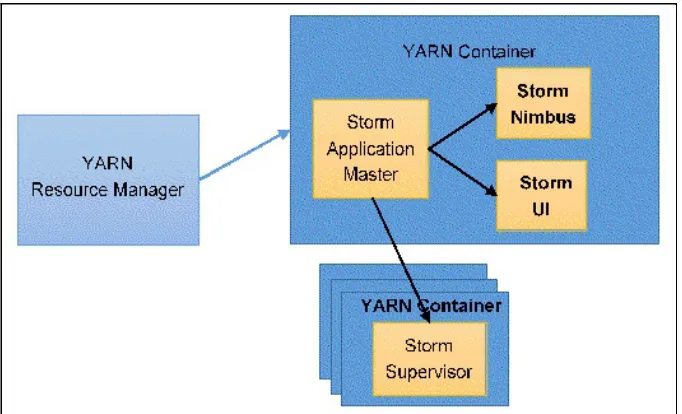
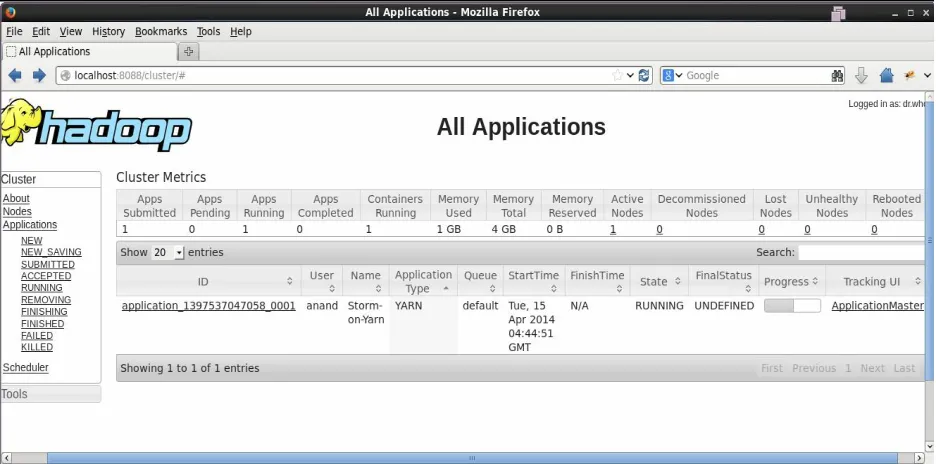
Setting up Storm-YARN
Storm-Starter topologies on Storm-YARN
Summary
10.
Storm Integration with Redis, Elasticsearch, and HBase
Integrating Storm with HBase
Integrating Storm with Redis
Integrating Storm with Elasticsearch
Integrating Storm with Esper
Summary
11.
Apache Log Processing with Storm
Apache log processing elements
Producing Apache log in Kafka using Logstash
Installation of Logstash
What is Logstash?
Why are we using Logstash?
Installation of Logstash
Configuration of Logstash
Identifying country, operating system type, and browser type from the log file
Calculate the search keyword
Persisting the process data
Kafka spout and define topology
Deploy topology
MySQL queries
Calculate the page hit from each country
Calculate the count for each browser
Calculate the count for each operating system
Summary
12.
Twitter Tweet Collection and Machine Learning
Exploring machine learning
Twitter sentiment analysis
Using Kafka producer to store the tweets in a Kafka cluster
Kafka spout, sentiments bolt, and HDFS bolt
Preface
Real-time data processing in no longer a luxury exercised by a few big
companies but has become a necessity for businesses that want to compete,
and Apache Storm is one of the de facto standards for developing real-time
processing pipelines. The key features of Storm are that it is horizontally
scalable, is fault tolerant, and provides guaranteed message processing. Storm
can solve various types of analytic problem: machine learning, log
processing, graph analysis, and so on.
Mastering Storm will serve both as a
getting started
guide to inexperienced
developers and as a reference for implementing advanced use cases with
Storm for experienced developers. In the first two chapters, you will learn the
basics of a Storm topology and various components of a Storm cluster. In the
later chapters, you will learn how to build a Storm application that can
interact with various other big data technologies and how to create
What this book covers
Chapter 1
,
Real-Time Processing and Storm Introduction
, gives an introduction
to Storm and its components.
Chapter 2
,
Storm Deployment, Topology Development, and Topology
Options,
covers deploying Storm into the cluster, deploying the sample topology on a
Storm cluster, how we can monitor the storm pipeline using storm UI, and
how we can dynamically change the log level settings.
Chapter 3
,
Storm Parallelism and Data Partitioning
, covers the parallelism of
topology, how to configure parallelism at the code level, guaranteed message
processing, and Storm internally generated tuples.
Chapter 4
,
Trident Introduction
, covers an introduction to Trident, an
understanding of the Trident data model, and how we can write Trident filters
and functions. This chapter also covers repartitioning and aggregation
operations on Trident tuples.
Chapter 5
,
Trident Topology and Uses
, introduces Trident tuple grouping,
non-transactional topology, and a sample Trident topology. The chapter also
introduces Trident state and distributed RPC.
Chapter 6
,
Storm Scheduler
, covers different types of scheduler available in
Storm: the default scheduler, isolation scheduler, resource-aware scheduler,
and custom scheduler.
Chapter 7
,
Monitoring of the Storm Cluster
, covers monitoring Storm by writing
custom monitoring UIs using the stats published by Nimbus. We explain the
integration of Ganglia with Storm using JMXTrans. This chapter also covers
how we can configure Storm to publish JMX metrics.
Chapter 8
,
Integration of Storm and Kafka
, shows the integration of Storm with
installation of Storm, and ends with the integration of Storm with Kafka to
solve any real-world problem.
Chapter 9
,
Storm and Hadoop Integration
, covers an overview of Hadoop,
writing the Storm topology to publish data into HDFS, an overview of
Storm-YARN, and deploying the Storm topology on YARN.
Chapter 10
,
Storm Integration with Redis, Elasticsearch, and HBase
, teaches
you how to integrate Storm with various other big data technologies.
Chapter 11
,
Apache Log Processing with Storm
, covers a sample log processing
application in which we parse Apache web server logs and generate some
business information from log files.
Chapter 12
,
Twitter Tweets Collection and Machine Learning
, walks you
What you need for this book
All of the code in this book has been tested on CentOS 6.5. It will run on
other variants of Linux and Windows as well with appropriate changes in
commands.
We have tried to keep the chapters self-contained, and the setup and
installation of all the software used in each chapter are included in the chapter
itself. These are the software packages used throughout the book:
CentOS 6.5
Oracle JDK 8
Apache ZooKeeper 3.4.6
Apache Storm 1.0.2
Eclipse or Spring Tool Suite
Elasticsearch 2.4.4
Who this book is for
If you are a Java developer and are keen to enter into the world of real-time
stream processing applications using Apache Storm, then this book is for you.
No previous experience in Storm is required as this book starts from the
Conventions
In this book, you will find a number of text styles that distinguish between
different kinds of information. Here are some examples of these styles and an
explanation of their meaning. Code words in text, database table names,
folder names, filenames, file extensions, pathnames, dummy URLs, user
input, and Twitter handles are shown as follows: "Add the following line in
the
storm.yamlfile of the Nimbus machine to enable JMX on the Nimbus
node."
A block of code is set as follows:
<dependency>
<groupId>org.apache.storm</groupId> <artifactId>storm-core</artifactId> <version>1.0.2</version>
<scope>provided<scope> </dependency>
Any command-line input or output is written as follows:
cd $ZK_HOME/conf touch zoo.cfg
New terms
and
important words
are shown in bold. Words that you see on
the screen, for example, in menus or dialog boxes, appear in the text like this:
"Now, click on the Connect button to view the metrics of the supervisor
node."
Warnings or important notes appear like this.
Reader feedback
Feedback from our readers is always welcome. Let us know what you think
about this book-what you liked or disliked. Reader feedback is important for
us as it helps us develop titles that you will really get the most out of. To send
us general feedback, simply e-mail
[email protected], and mention the
Customer support
Downloading the example code
You can download the example code files for this book from your account at
http://www.packtpub.com
. If you purchased this book elsewhere, you can visit
http://
www.packtpub.com/support
, and register to have the files e-mailed directly to you.
You can download the code files by following these steps:
1. Log in or register to our website using your e-mail address and
password.
2. Hover the mouse pointer on the SUPPORT tab at the top.
3. Click on Code Downloads & Errata.
4. Enter the name of the book in the Search box.
5. Select the book for which you're looking to download the code files.
6. Choose from the drop-down menu where you purchased this book from.
7. Click on Code Download.
Once the file is downloaded, please make sure that you unzip or extract the
folder using the latest version of:
WinRAR / 7-Zip for Windows
Zipeg / iZip / UnRarX for Mac
7-Zip / PeaZip for Linux
The code bundle for the book is also hosted on GitHub at
https://github.com/PacktP
ublishing/Mastering-Apache-Storm
. We also have other code bundles from our rich
catalog of books and videos available at
https://github.com/PacktPublishing/
. Check
Downloading the color images of
this book
We also provide you with a PDF file that has color images of the
Errata
Although we have taken every care to ensure the accuracy of our content,
mistakes do happen. If you find a mistake in one of our books-maybe a
mistake in the text or the code-we would be grateful if you could report this
to us. By doing so, you can save other readers from frustration and help us
improve subsequent versions of this book. If you find any errata, please
report them by visiting
http://www.packtpub.com/submit-errata
, selecting your book,
clicking on the Errata Submission Form link, and entering the details of your
errata. Once your errata are verified, your submission will be accepted and
the errata will be uploaded to our website or added to any list of existing
errata under the Errata section of that title. To view the previously submitted
errata, go to
https://www.packtpub.com/books/content/support
, and enter the name of the
Piracy
Piracy of copyrighted material on the Internet is an ongoing problem across
all media. At Packt, we take the protection of our copyright and licenses very
seriously. If you come across any illegal copies of our works in any form on
the Internet, please provide us with the location address or website name
immediately so that we can pursue a remedy. Please contact us at
with a link to the suspected pirated material. We
Questions
If you have a problem with any aspect of this book, you can contact us at
Real-Time Processing and Storm
Introduction
With the exponential growth in the amount of data being generated and
advanced data-capturing capabilities, enterprises are facing the challenge of
making sense out of this mountain of raw data. On the batch processing front,
Hadoop has emerged as the go-to framework to deal with big data. Until
recently, there has been a void when one looks for frameworks to build
real-time stream processing applications. Such applications have become an
integral part of a lot of businesses as they enable them to respond swiftly to
events and adapt to changing situations. Examples of this are monitoring
social media to analyze public response to any new product that you launch
and predicting the outcome of an election based on the sentiments of
election-related posts.
Organizations are collecting a large volume of data from external sources and
want to evaluate/process the data in real time to get market trends, detect
fraud, identify user behavior, and so on. The need for real-time processing is
increasing day by day and we require a real-time system/platform that should
support the following features:
Scalable
: The platform should be horizontally scalable without any
down time.
Fault tolerance
: The platform should be able to process the data even
after some of the nodes in a cluster go down.
No data lost
: The platform should provide the guaranteed processing of
messages.
High throughput
: The system should be able to support millions of
records per second and also support any size of messages.
Easy to operate
: The system should have easy installation and
operation. Also, the expansion of clusters should be an easy process.
example, a user can write code in Python, Scala, Java, and so on. Also,
we can execute different language code inside the one cluster.
Apache Storm
Apache Storm has emerged as the platform of choice for industry leaders to
develop distributed, real-time, data processing platforms. It provides a set of
primitives that can be used to develop applications that can process a very
large amount of data in real time in a highly scalable manner.
Storm is to real-time processing what Hadoop is to batch processing. It is
open source software, and managed by Apache Software Foundation. It has
been deployed to meet real-time processing needs by companies such as
Twitter, Yahoo!, and Flipboard. Storm was first developed by Nathan Marz
at BackType, a company that provided social search applications. Later,
BackType was acquired by Twitter, and it is a critical part of their
infrastructure. Storm can be used for the following use cases:
Stream processing
: Storm is used to process a stream of data and
update a variety of databases in real time. This processing occurs in real
time and the processing speed needs to match the input data speed.
Continuous computation
: Storm can do continuous computation on
data streams and stream the results to clients in real time. This might
require processing each message as it comes in or creating small batches
over a short time. An example of continuous computation is streaming
trending topics on Twitter into browsers.
Distributed RPC
: Storm can parallelize an intense query so that you
can compute it in real time.
Real-time analytics
: Storm can analyze and respond to data that comes
from different data sources as they happen in real time.
In this chapter, we will cover the following topics:
What is a Storm?
Features of Storm
Features of Storm
The following are some of the features of Storm that make it a perfect
solution to process streams of data in real time:
Fast
: Storm has been reported to process up to 1 million tuples/records
per second per node.
Horizontally scalable
: Being fast is a necessary feature to build a high
volume/velocity data processing platform, but a single node will have an
upper limit on the number of events that it can process per second. A
node represents a single machine in your setup that executes Storm
applications. Storm, being a distributed platform, allows you to add
more nodes to your Storm cluster and increase the processing capacity
of your application. Also, it is linearly scalable, which means that you
can double the processing capacity by doubling the nodes.
Fault tolerant
: Units of work are executed by worker processes in a
Storm cluster. When a worker dies, Storm will restart that worker, and if
the node on which the worker is running dies, Storm will restart that
worker on some other node in the cluster. This feature will be covered in
more detail in
Chapter 3
,
Storm Parallelism and Data Partitioning
.
Guaranteed data processing
: Storm provides strong guarantees that
each message entering a Storm process will be processed at least once.
In the event of failures, Storm will replay the lost tuples/records. Also, it
can be configured so that each message will be processed only once.
Easy to operate
: Storm is simple to deploy and manage. Once the
cluster is deployed, it requires little maintenance.
Storm components
Nimbus
The Nimbus node is the master in a Storm cluster. It is responsible for
distributing the application code across various worker nodes, assigning tasks
to different machines, monitoring tasks for any failures, and restarting them
as and when required.
Nimbus is stateless and stores all of its data in ZooKeeper. There is a single
Nimbus node in a Storm cluster. If the active node goes down, then the
passive node will become an Active node. It is designed to be fail-fast, so
when the active Nimbus dies, the passive node will become an active node, or
the down node can be restarted without having any effect on the tasks already
running on the worker nodes. This is unlike Hadoop, where if the JobTracker
dies, all the running jobs are left in an inconsistent state and need to be
executed again. The Storm workers can work smoothly even if all the
Supervisor nodes
Supervisor nodes are the worker nodes in a Storm cluster. Each supervisor
node runs a supervisor daemon that is responsible for creating, starting, and
stopping worker processes to execute the tasks assigned to that node. Like
Nimbus, a supervisor daemon is also fail-fast and stores all of its states in
ZooKeeper so that it can be restarted without any state loss. A single
The ZooKeeper cluster
In any distributed application, various processes need to coordinate with each
other and share some configuration information. ZooKeeper is an application
that provides all these services in a reliable manner. As a distributed
application, Storm also uses a ZooKeeper cluster to coordinate various
processes. All of the states associated with the cluster and the various tasks
submitted to Storm are stored in ZooKeeper. Nimbus and supervisor nodes
do not communicate directly with each other, but through ZooKeeper. As all
data is stored in ZooKeeper, both Nimbus and the supervisor daemons can be
killed abruptly without adversely affecting the cluster.
The Storm data model
The basic unit of data that can be processed by a Storm application is called a
tuple. Each tuple consists of a predefined list of fields. The value of each field
can be a byte, char, integer, long, float, double, Boolean, or byte array. Storm
also provides an API to define your own datatypes, which can be serialized as
fields in a tuple.
A tuple is dynamically typed, that is, you just need to define the names of the
fields in a tuple and not their datatype. The choice of dynamic typing helps to
simplify the API and makes it easy to use. Also, since a processing unit in
Storm can process multiple types of tuples, it's not practical to declare field
types.
Each of the fields in a tuple can be accessed by its
name,
getValueByField(String), or its positional index,
getValue(int), in the tuple.
Tuples also provide convenient methods such as
getIntegerByField(String)that
save you from typecasting the objects. For example, if you have a
Fraction
(numerator, denominator)
tuple, representing fractional numbers, then you
can get the value of the numerator by either using
getIntegerByField("numerator")or
getInteger(0).
You can see the full set of operations supported by
org.apache.storm.tuple.TupleDefinition of a Storm topology
In Storm terminology, a topology is an abstraction that defines the graph of
the computation. You create a Storm topology and deploy it on a Storm
cluster to process data. A topology can be represented by a direct acyclic
graph, where each node does some kind of processing and forwards it to the
next node(s) in the flow. The following diagram is a sample Storm topology:
The following are the components of a Storm topology:
Tuple
: A single message/record that flows between the different
instances of a topology is called a tuple.
Stream
: The key abstraction in Storm is that of a stream. A stream is an
unbounded sequence of tuples that can be processed in parallel by
Storm. Each stream can be processed by a single or multiple types of
bolts (the processing units in Storm, which are defined later in this
section). Thus, Storm can also be viewed as a platform to transform
streams. In the preceding diagram, streams are represented by arrows.
Each stream in a Storm application is given an ID and the bolts can
produce and consume tuples from these streams on the basis of their ID.
Each stream also has an associated schema for the tuples that will flow
through it.
responsible for reading or listening to data from an external source, for
example, by reading from a log file or listening for new messages in a
queue and publishing them--emitting in Storm terminology into streams.
A spout can emit multiple streams, each of a different schema. For
example, it can read records of 10 fields from a log file and emit them as
different streams of seven-fields tuples and four-fields tuples each.
The
org.apache.storm.spout.ISpoutinterface is the interface used to
define spouts. If you are writing your topology in Java, then you
should use
org.apache.storm.topology.IRichSpoutas it declares methods
to use with the
TopologyBuilderAPI. Whenever a spout emits a tuple,
Storm tracks all the tuples generated while processing this tuple,
and when the execution of all the tuples in the graph of this source
tuple is complete, it will send an acknowledgement back to the
spout. This tracking happens only if a message ID was provided
when emitting the tuple. If null was used as the message ID, this
tracking will not happen.
A tuple processing timeout can also be defined for a topology, and
if a tuple is not processed within the specified timeout, a fail
message will be sent back to the spout. Again, this will happen
only if you define a message ID. A small performance gain can be
extracted out of Storm at the risk of some data loss by disabling
the message acknowledgements, which can be done by skipping
the message ID while emitting tuples.
The important methods of spout are:
nextTuple()
: This method is called by Storm to get the next tuple
from the input source. Inside this method, you will have the logic
of reading data from external sources and emitting them to an
instance of
org.apache.storm.spout.ISpoutOutputCollector. The schema for
streams can be declared by using the
declareStreammethod of
org.apache.storm.topology.OutputFieldsDeclarer.
can declare multiple streams using the
declareStreammethod
and specify a stream ID while emitting the tuple. If there
are no more tuples to emit at the moment, this method will
not be blocked. Also, if this method does not emit a tuple,
then Storm will wait for 1 millisecond before calling it
again. This waiting time can be configured using the
topology.sleep.spout.wait.strategy.time.ms
setting.
ack(Object msgId)
: This method is invoked by Storm when the tuple
with the given message ID is completely processed by the
topology. At this point, the user should mark the message as
processed and do the required cleaning up, such as removing the
message from the message queue so that it does not get processed
again.
fail(Object msgId)
: This method is invoked by Storm when it
identifies that the tuple with the given message ID has not been
processed successfully or has timed out of the configured interval.
In such scenarios, the user should do the required processing so that
the messages can be emitted again by the
nextTuplemethod. A
common way to do this is to put the message back in the incoming
message queue.
open()
: This method is called only once--when the spout is
initialized. If it is required to connect to an external source for the
input data, define the logic to connect to the external source in the
open method, and then keep fetching the data from this external
source in the
nextTuplemethod to emit it further.
Another point to note while writing your spout is that none of
the methods should be blocking, as Storm calls all the methods
in the same thread. Every spout has an internal buffer to keep
track of the status of the tuples emitted so far. The spout will
keep the tuples in this buffer until they are either acknowledged
or failed, calling the
ackor
failmethod, respectively. Storm will
call the
nextTuplemethod only when this buffer is not full.
responsible for transforming a stream. Ideally, each bolt in the topology
should be doing a simple transformation of the tuples, and many such
bolts can coordinate with each other to exhibit a complex
transformation.
The
org.apache.storm.task.IBoltinterface is preferably used to define
bolts, and if a topology is written in Java, you should use the
org.apache.storm.topology.IRichBolt
interface. A bolt can subscribe to
multiple streams of other components--either spouts or other
bolts--in the topology and similarly can emit output to multiple
streams. Output streams can be declared using the
declareStreammethod of
org.apache.storm.topology.OutputFieldsDeclarer.
The important methods of a bolt are:
execute(Tuple input)
: This method is executed for each tuple that
comes through the subscribed input streams. In this method, you
can do whatever processing is required for the tuple and then
produce the output either in the form of emitting more tuples to the
declared output streams, or other things such as persisting the
results in a database.
You are not required to process the tuple as soon as this
method is called, and the tuples can be held until required.
For example, while joining two streams, when a tuple
arrives you can hold it until its counterpart also comes, and
then you can emit the joined tuple.
The metadata associated with the tuple can be retrieved by
the various methods defined in the
Tupleinterface. If a
message ID is associated with a tuple, the execute method
must publish an
ackor
failevent using
OutputCollectorfor
the bolt, or else Storm will not know whether the tuple was
processed successfully. The
org.apache.storm.topology.IBasicBolt
interface is a convenient
after the completion of the execute method. If a fail event
is to be sent, this method should
throw
org.apache.storm.topology.FailedException.
prepare(Map stormConf, TopologyContext context, OutputCollector collector)
:
A bolt can be executed by multiple workers in a Storm topology.
The instance of a bolt is created on the client machine and then
serialized and submitted to Nimbus. When Nimbus creates the
worker instances for the topology, it sends this serialized bolt to the
workers. The work will desterilize the bolt and call the
preparemethod. In this method, you should make sure the bolt is properly
configured to execute tuples. Any state that you want to maintain
can be stored as instance variables for the bolt that can be
Operation modes in Storm
Operation modes indicate how the topology is deployed in Storm. Storm
supports two types of operation modes to execute the Storm topology:
Local mode
: In local mode, Storm topologies run on the local machine
in a single JVM. This mode simulates a Storm cluster in a single JVM
and is used for the testing and debugging of a topology.
Remote mode
: In remote mode, we will use the Storm client to submit
the topology to the master along with all the necessary code required to
execute the topology. Nimbus will then take care of distributing your
code.
Programming languages
Storm was designed from the ground up to be usable with any programming
language. At the core of Storm is a thrift definition for defining and
submitting topologies. Since thrift can be used in any language, topologies
can be defined and submitted in any language.
Similarly, spouts and bolts can be defined in any language. Non-JVM spouts
and bolts communicate with Storm over a JSON-based protocol over
stdin
/
stdout. Adapters that implement this protocol exist for Ruby, Python,
JavaScript, and Perl. You can refer to
https://github.com/apache/storm/tree/master/storm-m
ultilang
to find out about the implementation of these adapters.
Summary
In this chapter, we introduced you to the basics of Storm and the various
components that make up a Storm cluster. We saw a definition of different
deployment/operation modes in which a Storm cluster can operate.
Storm Deployment, Topology
Development, and Topology
Options
In this chapter, we are going to start with deployment of Storm on multiple
node (three Storm and three ZooKeeper) clusters. This chapter is very
important because it focuses on how we can set up the production Storm
cluster and why we need the high availability of both the Storm Supervisor,
Nimbus, and ZooKeeper (as Storm uses ZooKeeper for storing the metadata
of the cluster, topology, and so on)?
The following are the key points that we are going to cover in this chapter:
Deployment of the Storm cluster
Program and deploy the word count example
Different options of the Storm UI--kill, active, inactive, and rebalance
Walkthrough of the Storm UI
Dynamic log level settings
Storm prerequisites
Installing Java SDK 7
Perform the following steps to install the Java SDK 7 on your machine. You
can also go with JDK 1.8:
1. Download the Java SDK 7 RPM from Oracle's site (
http://www.oracle.com/tec
hnetwork/java/javase/downloads/index.html
).
2. Install the Java
jdk-7u<version>-linux-x64.rpmfile on your CentOS machine
using the following command:
sudo rpm -ivh jdk-7u<version>-linux-x64.rpm
3. Add the following environment variable in the
~/.bashrcfile:
export JAVA_HOME=/usr/java/jdk<version>4. Add the path of the
bindirectory of the JDK to the
PATHsystem
environment variable to the
~/.bashrcfile:
export PATH=$JAVA_HOME/bin:$PATH5. Run the following command to reload the
bashrcfile on the current login
terminal:
source ~/.bashrc
6. Check the Java installation as follows:
java -version
The output of the preceding command is as follows:
java version "1.7.0_71"
Java(TM) SE Runtime Environment (build 1.7.0_71-b14)
Deployment of the ZooKeeper
cluster
In any distributed application, various processes need to coordinate with each
other and share configuration information. ZooKeeper is an application that
provides all these services in a reliable manner. Being a distributed
application, Storm also uses a ZooKeeper cluster to coordinate various
processes. All of the states associated with the cluster and the various tasks
submitted to Storm are stored in ZooKeeper. This section describes how you
can set up a ZooKeeper cluster. We will be deploying a ZooKeeper ensemble
of three nodes that will handle one node failure. Following is the deployment
diagram of the three node ZooKeeper ensemble:
It is advised to run an odd number of ZooKeeper nodes, as the ZooKeeper
cluster keeps working as long as the majority (the number of live nodes is
greater than
n/2
, where
n
being the number of deployed nodes) of the nodes
are running. So if we have a cluster of four ZooKeeper nodes (
3 > 4/2
; only
one node can die), then we can handle only one node failure, while if we had
five nodes (
3 > 5/2
; two nodes can die) in the cluster, then we can handle two
node failures.
Steps 1 to 4 need to be performed on each node to deploy the ZooKeeper
ensemble:
1. Download the latest stable ZooKeeper release from the ZooKeeper site (
http://zookeeper.apache.org/releases.html
). At the time of writing, the latest
version is ZooKeeper 3.4.6.
2. Once you have downloaded the latest version, unzip it. Now, we set up
the
ZK_HOMEenvironment variable to make the setup easier.
3. Point the
ZK_HOMEenvironment variable to the unzipped directory. Create
the configuration file,
zoo.cfg, at the
$ZK_HOME/confdirectory using the
following commands:
cd $ZK_HOME/conf touch zoo.cfg
4. Add the following properties to the
zoo.cfgfile:
tickTime=2000The following are the definitions for each of the properties:
tickTime
: This is the basic unit of time in milliseconds used by
ZooKeeper. It is used to send heartbeats, and the minimum session
timeout will be twice the
tickTimevalue.
snapshots and transactional log.
clientPort
: This is the port used to listen to client connections.
initLimit: This is the number of
tickTimevalues needed to allow
followers to connect and sync to a leader node.
syncLimit
: This is the number of
tickTimevalues that a follower can
take to sync with the leader node. If the sync does not happen
within this time, the follower will be dropped from the ensemble.
The last three lines of the
server.id=host:port:portformat specify that
there are three nodes in the ensemble. In an ensemble, each
ZooKeeper node must have a unique ID number between 1 and 255.
This ID is defined by creating a file named
myidin the
dataDirdirectory
of each node. For example, the node with the ID 1
(
server.1=zoo1:2888:3888) will have a
myidfile at directory
/var/zookeeperwith
text 1inside it.
For this cluster, create the
myidfile at three locations, shown as
follows:
At zoo1 /var/zookeeper/myid contains 1 At zoo2 /var/zookeeper/myid contains 2 At zoo3 /var/zookeeper/myid contains 3
5. Run the following command on each machine to start the ZooKeeper
cluster:
bin/zkServer.sh start
Check the status of the ZooKeeper nodes by performing the following steps:
6. Run the following command on the
zoo1node to check the first node's
The first node is running in
followermode.
7. Check the status of the second node by performing the following
command:
The second node is running in
leadermode.
8. Check the status of the third node by performing the following
command:
The third node is running in
followermode.
9. Run the following command on the leader machine to stop the leader
node:
bin/zkServer.sh stop
Now, check the status of the remaining two nodes by performing the
following steps:
10. Check the status of the first node using the following command:
bin/zkServer.sh status
JMX enabled by default
Using config: /home/root/zookeeper-3.4.6/bin/../conf/zoo.cfg Mode: follower
The first node is again running in
followermode.
11. Check the status of the second node using the following command:
bin/zkServer.sh status
The following information is displayed:
JMX enabled by default
Using config: /home/root/zookeeper-3.4.6/bin/../conf/zoo.cfg Mode: leader
The third node is elected as the new leader.
12. Now, restart the third node with the following command:
bin/zkServer.sh status
Setting up the Storm cluster
In this chapter, we will learn how to set up a three nodes Storm cluster, of
which one node will be the active master node (Nimbus) and the other two
will be worker nodes (supervisors).
The following is the deployment diagram of our three node Storm cluster:
The following are the steps that need to be performed to set up a three node
Storm cluster:
1. Install and run the ZooKeeper cluster. The steps for installing
ZooKeeper are mentioned in the previous section.
2. Download the latest stable Storm release from
https://storm.apache.org/download
s.html
; at the time of writing, the latest version is Storm 1.0.2.
3. Once you have downloaded the latest version, copy and unzip it in all
three machines. Now, we will set the
$STORM_HOMEenvironment variable on
each machine to make the setup easier. The
$STORM_HOMEenvironment
STORM_HOME=/home/user/storm-1.0.2
).
4. Go to the
$STORM_HOME/confdirectory in the master nodes and add the
following lines to the
storm.yamlfile:
storm.zookeeper.servers:We are installing two master nodes.
5. Go to the
$STORM_HOME/confdirectory at each worker node and add the
following lines to the
storm.yamlfile:
storm.zookeeper.servers:If you are planning to execute the Nimbus and supervisor on the
same machine, then add the
supervisor.slots.portsproperty to the
Nimbus machine too.
6. Go to the
$STORM_HOMEdirectory at the master nodes and execute the
following command to start the master daemon:
$> bin/storm nimbus &
7. Go to the
$STORM_HOMEdirectory at each worker node (or supervisor node)
and execute the following command to start the worker daemons:
Developing the hello world example
Before starting the development, you should have Eclipse and Maven
installed in your project. The sample topology explained here will cover how
to create a basic Storm project, including a spout and bolt, and how to build,
and execute them.
Create a Maven project by using
com.stormadvanceas
groupIdand
storm-exampleas
artifactId.
Add the following Maven dependencies to the
pom.xmlfile:
<dependency>Make sure the scope of the Storm dependency is provided,
otherwise you will not be able to deploy the topology on the
Storm cluster.
Add the following Maven
buildplugins in the
pom.xmlfile:
<build><plugins> <plugin>
<artifactId>maven-assembly-plugin</artifactId> <version>2.2.1</version>
<configuration> <descriptorRefs>
<goal>single</goal>
Write your first sample spout by creating a
SampleSpoutclass in the
com.stormadvance.storm_examplepackage. The
SampleSpoutclass extends the
serialized
BaseRichSpoutclass. This spout does not connect to an external source
to fetch data, but randomly generates the data and emits a continuous stream
of records. The following is the source code of the
SampleSpoutclass with an
explanation:
public class SampleSpout extends BaseRichSpout { private static final long serialVersionUID = 1L;
private static final Map<Integer, String> map = new HashMap<Integer, String>(); static {
private SpoutOutputCollector spoutOutputCollector;
public void open(Map conf, TopologyContext context, SpoutOutputCollector spoutOutputCollector) { // Open the spout
this.spoutOutputCollector = spoutOutputCollector; }
public void nextTuple() {
// Storm cluster repeatedly calls this method to emita continuous // stream of tuples.
final Random rand = new Random();
// generate the random number from 0 to 4. int randomNumber = rand.nextInt(5);
spoutOutputCollector.emit(new Values(map.get(randomNumber))); try{
Thread.sleep(5000); }catch(Exception e) {
System.out.println("Failed to sleep the thread"); }
}
public void declareOutputFields(OutputFieldsDeclarer declarer) {
// emit the tuple with field "site" declarer.declare(new Fields("site")); }
}
package. The
SampleBoltclass extends the serialized
BaseRichBoltclass. This bolt
will consume the tuples emitted by the
SampleSpoutspout and will print the
value of the field
siteon the console. The following is the source code of the
SampleStormBoltclass with an explanation:
public class SampleBolt extends BaseBasicBolt { private static final long serialVersionUID = 1L;
public void execute(Tuple input, BasicOutputCollector collector) { // fetched the field "site" from input tuple.
String test = input.getStringByField("site"); // print the value of field "site" on console.
System.out.println("######### Name of input site is : " + test); }
public void declareOutputFields(OutputFieldsDeclarer declarer) { }
}
Create a main
SampleStormTopologyclass within the same package. This class
creates an instance of the spout and bolt along with the classes, and chaines
them together using a
TopologyBuilderclass. This class uses
org.apache.storm.LocalCluster
to simulate the Storm cluster. The
LocalClustermode is used for debugging/testing the topology on a developer machine
before deploying it on the Storm cluster. The following is the implementation
of the main class:
public class SampleStormTopology {
public static void main(String[] args) throws AlreadyAliveException, InvalidTopologyException { // create an instance of TopologyBuilder class
TopologyBuilder builder = new TopologyBuilder(); // set the spout class
builder.setSpout("SampleSpout", new SampleSpout(), 2); // set the bolt class
builder.setBolt("SampleBolt", new SampleBolt(), 4).shuffleGrouping("SampleSpout"); Config conf = new Config();
conf.setDebug(true);
// create an instance of LocalCluster class for // executing topology in local mode.
LocalCluster cluster = new LocalCluster();
// SampleStormTopology is the name of submitted topology
cluster.submitTopology("SampleStormTopology", conf, builder.createTopology()); try {
Thread.sleep(100000);
} catch (Exception exception) {
System.out.println("Thread interrupted exception : " + exception); }
// kill the SampleStormTopology
cluster.killTopology("SampleStormTopology"); // shutdown the storm test cluster
}
Go to your project's home directory and run the following commands to
execute the topology in local mode:
$> cd $STORM_EXAMPLE_HOME
$> mvn compile exec:java -Dexec.classpathScope=compile -Dexec.mainClass=com.stormadvance.storm_example.SampleStormTopology
Now create a new topology class for deploying the topology on an actual
Storm cluster. Create a main
SampleStormClusterTopologyclass within the same
package. This class also creates an instance of the spout and bolt along with
the classes, and chains them together using a
TopologyBuilderclass:
public class SampleStormClusterTopology {
public static void main(String[] args) throws AlreadyAliveException, InvalidTopologyException { // create an instance of TopologyBuilder class
TopologyBuilder builder = new TopologyBuilder(); // set the spout class
builder.setSpout("SampleSpout", new SampleSpout(), 2); // set the bolt class
builder.setBolt("SampleBolt", new SampleBolt(), 4).shuffleGrouping("SampleSpout"); Config conf = new Config();
conf.setNumWorkers(3);
// This statement submit the topology on remote // args[0] = name of topology
try {
StormSubmitter.submitTopology(args[0], conf, builder.createTopology()); } catch (AlreadyAliveException alreadyAliveException) {
System.out.println(alreadyAliveException);
} catch (InvalidTopologyException invalidTopologyException) { System.out.println(invalidTopologyException);
} catch (AuthorizationException e) {
Build your Maven project by running the following command on the projects
home directory:
mvn clean install
The output of the preceding command is as follows:
[INFO] Final Memory: 14M/116M
[INFO] ---
We can deploy the topology to the cluster using the following Storm client
command:
bin/storm jar jarName.jar [TopologyMainClass] [Args]
The preceding command runs
TopologyMainClasswith the arguments
arg1and
arg2. The main function of
TopologyMainClassis to define the topology and
submit it to the Nimbus machine. The
storm jarpart takes care of connecting
to the Nimbus machine and uploading the JAR part.
Log in on a Storm Nimbus machine and execute the following commands:
$> cd $STORM_HOME
$> bin/storm jar ~/storm_example-0.0.1-SNAPSHOT-jar-with-dependencies.jar com.stormadvance.storm_example.SampleStormClusterTopology storm_example
In the preceding code
~/storm_example-0.0.1-SNAPSHOT-jar-with-dependencies.jaris
the path of the
SampleStormClusterTopologyJAR that we are deploying on the
Storm cluster.
The following information is displayed:
702 [main] INFO o.a.s.StormSubmitter - Generated ZooKeeper secret payload for MD5-digest: -8367952358273199959:-5050558042400210383 793 [main] INFO o.a.s.s.a.AuthUtils - Got AutoCreds []
856 [main] INFO o.a.s.StormSubmitter - Uploading topology jar /home/USER/storm_example-0.0.1-SNAPSHOT-jar-with-dependencies.jar to assigned location: /tmp/storm-data/nimbus/inbox/stormjar-d3007821-f87d-48af-8364-cff7abf8652d.jar 867 [main] INFO o.a.s.StormSubmitter - Successfully uploaded topology jar to assigned location: /tmp/storm-data/nimbus/inbox/stormjar-d3007821-f87d-48af-8364-cff7abf8652d.jar
868 [main] INFO o.a.s.StormSubmitter - Submitting topology storm_example in distributed mode with conf {"storm.zookeeper.topology.auth.scheme":"digest","storm.zookeeper.topology.auth.payload":"-8367952358273199959:-5050558042400210383","topology.workers":3} 1007 [main] INFO o.a.s.StormSubmitter - Finished submitting topology: storm_example
Run the
jpscommand to see the number of running JVM processes as
In the preceding code, a
workeris the JVM launched for
The different options of the Storm
topology
This section covers the following operations that a user can perform on
the Storm cluster:
Deactivate
Activate
Rebalance
Kill
Deactivate
Storm supports the deactivating a topology. In the deactivated state, spouts
will not emit any new tuples into the pipeline, but the processing of the
already emitted tuples will continue. The following is the command to
deactivate the running topology:
$> bin/storm deactivate topologyName
Deactivate
SampleStormClusterTopologyusing the following command:
bin/storm deactivate SampleStormClusterTopologyThe following information is displayed:
0 [main] INFO backtype.storm.thrift - Connecting to Nimbus at localhost:6627
Activate
Storm also the supports activating a topology. When a topology is activated,
spouts will again start emitting tuples. The following is the command to
activate the topology:
$> bin/storm activate topologyName
Activate
SampleStormClusterTopologyusing the following command:
bin/storm activate SampleStormClusterTopologyThe following information is displayed:
0 [main] INFO backtype.storm.thrift - Connecting to Nimbus at localhost:6627
Rebalance
The process of updating a the topology parallelism at the runtime is called
a
rebalance
. A more detailed information of this operation acn be in
Chapter 3
,
Kill
Storm topologies are never-ending processes. To stop a topology, we need to
kill it. When killed, the topology first enters into the deactivation state,
processes all the tuples already emitted into it, and then stops. Run the
following command to kill
SampleStormClusterTopology:
$> bin/storm kill SampleStormClusterTopology
The following information is displayed:
0 [main] INFO backtype.storm.thrift - Connecting to Nimbus at localhost:6627
80 [main] INFO backtype.storm.command.kill-topology - Killed topology: SampleStormClusterTopology
Now, run the
jpscommand again to see the remaining JVM processes as
follows:
jps
The preceding command's output is:
26530 supervisor 27193 Jps
Dynamic log level settings
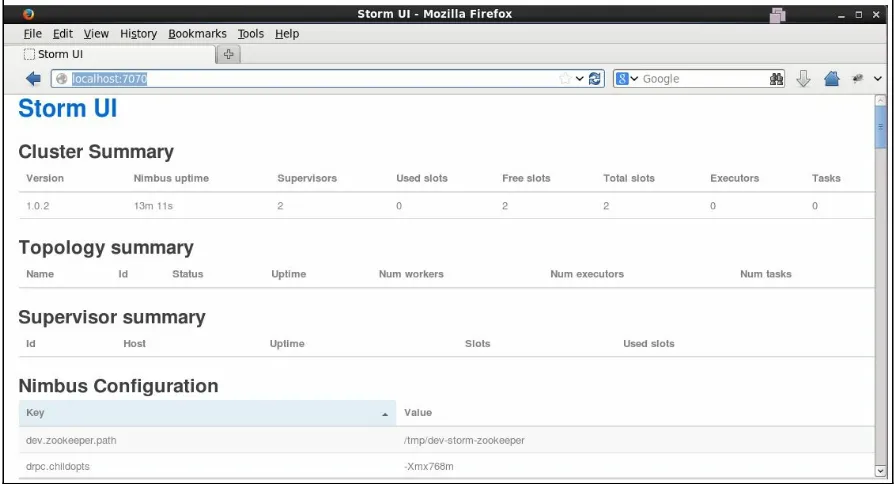
Walkthrough of the Storm UI
This section will show you how we can start the Storm UI daemon. However,
before starting the Storm UI daemon, we assume that you have a running
Storm cluster. The Storm cluster deployment steps are mentioned in the
previous sections of this chapter. Now, go to the Storm home directory (
cd $STORM_HOME) at the leader Nimbus machine and run the following command to
start the Storm UI daemon:
$> cd $STORM_HOME $> bin/storm ui &
By default, the Storm UI starts on the
8080port of the machine where it is
started. Now, we will browse to the
http://nimbus-node:8080page to view the
Storm UI, where Nimbus node is the IP address or hostname of the the
Nimbus machine.
Cluster Summary section
Nimbus Summary section
This portion of the Storm UI shows the number of Nimbus processes that are
running in a Storm cluster. The section also shows the status of the Nimbus
nodes. A node with the status
Leaderis an active master while the node with
Supervisor Summary section
Nimbus Configuration section
This portion of the Storm UI shows the configuration of the Nimbus node.
Some of the important properties are:
supervisor.slots.ports storm.zookeeper.port storm.zookeeper.servers
storm.zookeeper.retry.interval worker.childopts
supervisor.childopts
Topology Summary section
This portion of the Storm UI shows the list of topologies running in the
Storm cluster, along with their ID, the number of workers assigned to the
topology, the number of executors, number of tasks, uptime, and so on.
Let's deploy the sample topology (if it is not running already) in a remote
Storm cluster by running the following command:
$> cd $STORM_HOME
$> bin/storm jar ~/storm_example-0.0.1-SNAPSHOT-jar-with-dependencies.jar com.stormadvance.storm_example.SampleStormClusterTopology storm_example
We have created the
SampleStormClusterTopologytopology by defining three
worker processes, two executors for
SampleSpout, and four executors for
SampleBolt.
After submitting
SampleStormClusterTopologyon the Storm cluster, the user has to
refresh the Storm home page.
The following screenshot shows that the row is added for
SampleStormClusterTopology
in the Topology Summary section. The topology
Let's click on
SampleStormClusterTopologyto view its detailed statistics. There are
two screenshots for this. The first one contains the information about the
number of workers, executors, and tasks assigned to
the
SampleStormClusterTopologytopology:
The next screenshot contains information about the spouts and bolts,
The information shown in the previous screenshots is as follows:
Topology stats: This section will give information about the number of
tuples emitted, transferred, and acknowledged, the capacity latency, and
so on, within the windows of 10 minutes, 3 hours, 1 day, and since the
start of the topology
Spouts (All time): This section shows the statistics of all the spouts
running inside the topology
Bolts (All time): This section shows the statistics of all the bolts running
inside the topology
Topology actions: This section allows us to perform activate, deactivate,
rebalance, kill, and other operations on the topologies directly through
the Storm UI:
Deactivating the topology does not free the Storm resource.
Activate: Click on the Activate button to activate the topology.
Once the topology is activated, the spout again starts emitting
tuples.
Kill: Click on the Kill button to destroy/kill the topology. Once the
topology is killed, it will free all the Storm resources allotted to this
topology. While killing the topology, the Storm will first deactivate
the spouts and wait for the kill time mentioned on the alerts box so
that the bolts have a chance to finish the processing of the tuples
emitted by the spouts before the kill command. The following
screenshot shows how we can kill the topology through the Storm
UI:
Dynamic log level settings
Updating the log level from the
Storm UI
Go through the following steps to update the log level from the Storm UI:
1. Deploy
SampleStormClusterTopologyagain on the Storm cluster if it is not
running.
2. Browse the Storm UI at
http://nimbus-node:8080/.
3. Click on the
storm_exampletopology.
4. Now click on the Change Log Level button to change the
ROOTlogger of
the topology, as shown in the following are the screenshots:
5. Configure the entries mentioned in the following screenshots change the
ROOT