JavaScript
Essentials for SAP
ABAP Developers
A Guide to Mobile and Desktop
Application Development
—
JavaScript Essentials for
SAP ABAP Developers
A Guide to Mobile and Desktop Application
Development
JavaScript Essentials for SAP ABAP Developers: A Guide to Mobile and Desktop Application Development
Rehan Zaidi
Karachi, Pakistan
ISBN-13 (pbk): 978-1-4842-2219-5 ISBN-13 (electronic): 978-1-4842-2220-1 DOI 10.1007/978-1-4842-2220-1
Library of Congress Control Number: 2017945747 Copyright © 2017 by Rehan Zaidi
This work is subject to copyright. All rights are reserved by the Publisher, whether the whole or part of the material is concerned, specifically the rights of translation, reprinting, reuse of illustrations, recitation,
broadcasting, reproduction on microfilms or in any other physical way, and transmission or information storage and retrieval, electronic adaptation, computer software, or by similar or dissimilar methodology now known or hereafter developed.
Trademarked names, logos, and images may appear in this book. Rather than use a trademark symbol with every occurrence of a trademarked name, logo, or image we use the names, logos, and images only in an editorial fashion and to the benefit of the trademark owner, with no intention of infringement of the trademark. The use in this publication of trade names, trademarks, service marks, and similar terms, even if they are not identified as such, is not to be taken as an expression of opinion as to whether or not they are subject to proprietary rights.
While the advice and information in this book are believed to be true and accurate at the date of publication, neither the authors nor the editors nor the publisher can accept any legal responsibility for any errors or omissions that may be made. The publisher makes no warranty, express or implied, with respect to the material contained herein.
Cover image designed by Freepik Managing Director: Welmoed Spahr
Distributed to the book trade worldwide by Springer Science+Business Media New York,
233 Spring Street, 6th Floor, New York, NY 10013. Phone 1-800-SPRINGER, fax (201) 348-4505, e-mail [email protected], or visit www.springeronline.com. Apress Media, LLC is a California LLC and the sole member (owner) is Springer Science + Business Media Finance Inc (SSBM Finance Inc). SSBM Finance Inc is a Delaware corporation.
For information on translations, please e-mail [email protected], or visit http://www.apress.com/ rights-permissions.
Apress titles may be purchased in bulk for academic, corporate, or promotional use. eBook versions and licenses are also available for most titles. For more information, reference our Print and eBook Bulk Sales web page at http://www.apress.com/bulk-sales.
Any source code or other supplementary material referenced by the author in this book is available to readers on GitHub via the book’s product page, located at www.apress.com/9781484222195. For more detailed information, please visit http://www.apress.com/source-code.
v
Contents at a Glance
About the Author ... xiii
About the Technical Reviewer ...xv
Acknowledgments ...xvii
Introduction ...xix
■
Chapter 1: Introduction to JavaScript ... 1
■
Chapter 2: A Step Ahead in JavaScript ... 15
■
Chapter 3: Operators in JavaScript ... 31
■
Chapter 4: Control Structures in JavaScript ... 49
■
Chapter 5: Regular Expressions and String Methods ... 65
■
Chapter 6: Functions ... 83
■
Chapter 7: Doing More with Functions ... 97
■
Chapter 8: Object-Oriented Programming in JavaScript ... 111
■
Chapter 9: Objects ... 127
■
Chapter 10: JavaScript Object Notation (JSON) ... 145
■
Chapter 11: Miscellaneous Topics ... 153
Contents
About the Author ... xiii
About the Technical Reviewer ...xv
Acknowledgments ...xvii
Introduction ...xix
Chapter 1: Introduction to JavaScript ... 1
Brief JavaScript Background ... 1
Inside a JavaScript Program ... 2
Creating a Simple JS Program ... 2
A Quick Look at HTML ... 3
Putting JavaScript in HTML Code ... 5
Writing JS Code Within the <HEAD> and </HEAD> Tags ... 5
Writing JS Code Within the <BODY> and </BODY> Tags ... 6
Creating JS Code in a Separate File ... 6
Variable Declaration in JavaScript ... 7
Using Eclipse ... 8
Summary ... 13
■
Chapter 2: A Step Ahead in JavaScript ... 15
Window Object ... 15
Data Types in JavaScript ... 17
String ... 17
■ CONTENTS
viii
Object ... 21
Boolean ... 23
The typeof Operator ... 24
Method console.log ... 25
Taking Input from the User ... 28
Commonly Used Keywords in JavaScript ... 29
Summary ... 29
■
Chapter 3: Operators in JavaScript ... 31
Arithmetic Operators ... 31
Addition Operator ... 31
Subtraction Operator ... 32
Multiplication Operator ... 32
Division Operator ... 32
Remainder Operator ... 33
Exponentiation Operator ... 33
Increment Operator... 33
Decrement Operator ... 34
Unary Negation Operator ... 34
Comparison Operators ... 34
Greater Than Operator ... 35
Less Than Operator ... 35
Greater Than or Equal To Operator ... 35
Less Than or Equal To Operator ... 35
Equality and Inequality Operators ... 36
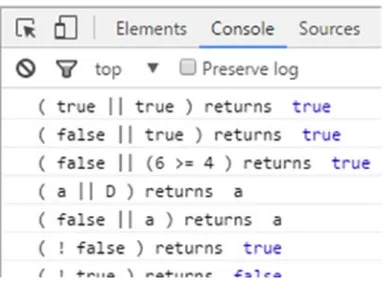
Logical Operators ... 38
Bitwise Operators ... 40
Bitwise AND ... 41
Bitwise OR ... 41
Bitwise XOR ... 42
■ CONTENTS
Bitwise Left Shift ... 43
Bitwise Unsigned Right Shift ... 44
Bitwise Signed Right Shift ... 44
Coding Example ... 44
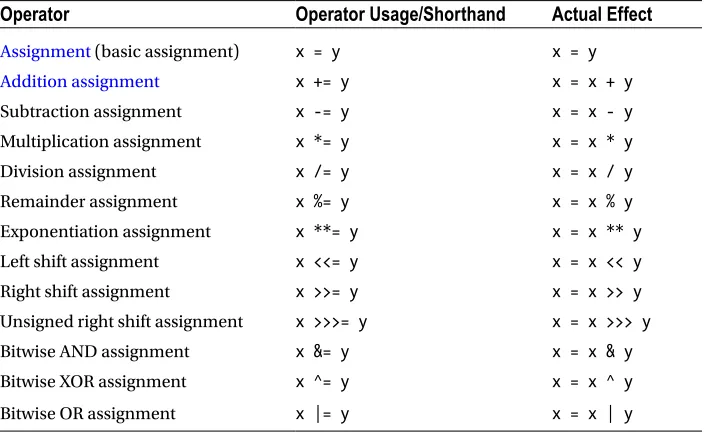
Assignment Operators ... 45
String Operator ... 46
Summary ... 47
■
Chapter 4: Control Structures in JavaScript ... 49
Block Statement ... 49
Conditional Statements ... 50
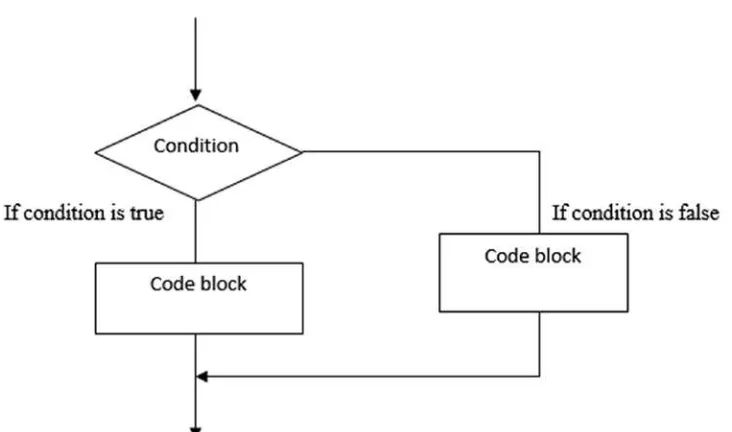
if...else Statement... 50
switch Statement ... 53
Loops in JavaScript ... 56
while Loop ... 56
do...while Loop ... 57
for Loop ... 59
for...in Loop ... 62
Label Statement ... 63
Summary ... 64
■
Chapter 5: Regular Expressions and String Methods ... 65
Regular Expressions: An Overview ... 65
String Methods ... 67
search Method ... 67
replace Method ... 68
match Method... 69
split Method ... 71
Regular Expression Object ... 72
■ CONTENTS
x
■
Chapter 6: Functions ... 83
Functions: An Overview ... 83
Declaring Functions ... 85
Using a Function Expression ... 85
Using a Function Declaration ... 87
Summary Comparison of the Function Declaration and Function Expression ... 88
Function Parameters and Arguments ... 89
Missing Parameters and the undefined Value ... 90
arguments Array ... 90
Simulating Optional Parameter Passing ... 91
return Statement ... 92
Function Call ... 92
Parameter Pass by Value or Pass by Reference? ... 93
Function Naming ... 95
Summary ... 95
■
Chapter 7: Doing More with Functions ... 97
Hoisting in the Context of Functions ... 97
First-Class Citizens... 100
Nested Functions ... 101
Lexical Scoping ... 104
Closures ... 106
Recursive Functions ... 108
Summary ... 110
■
Chapter 8: Object-Oriented Programming in JavaScript ... 111
Object-Oriented Programming in General ... 111
Object Instances and Constructors ... 113
Approach 1: Using an Object Literal ... 114
Approach 2: Using a Constructor Function ... 114
Approach 3: Using the Object() Constructor ... 116
■ CONTENTS
JavaScript: A Prototype-Based Language ... 117
Prototypal Inheritance ... 121
Summary ... 125
■
Chapter 9: Objects ... 127
Objects Revisited ... 127
Array ... 128
Properties of Array Object ... 129
Array Methods ... 131
Boolean ... 133
Boolean Properties ... 134
Boolean Methods ... 134
String ... 135
String Properties ... 135
String Methods ... 136
Date ... 139
Date Properties ... 139
Date Methods ... 140
Summary ... 143
■
Chapter 10: JavaScript Object Notation (JSON) ... 145
JSON: An Overview ... 145
JSON Data Types ... 146
JSON Objects ... 147
JSON Arrays ... 148
JSON parse Method... 149
JSON stringify Method ... 150
Summary ... 151
■
Chapter 11: Miscellaneous Topics ... 153
■ CONTENTS
xii
Code Formatting Tips ... 158
Use a Semicolon at the End of Each Statement ... 158
Usage of Blanks ... 158
Usage of Comparison Operators ... 159
Function Curly Brackets... 159
Correctly Formatted Code Example ... 159
Naming Convention for Variables ... 159
Runtime Error and Exception Handling ... 160
Best Practices in JavaScript ... 162
Avoid Use of Global Variables ... 162
Never Declare Objects for Numbers, Strings, or Booleans ... 163
Use of default Clause in switch Statements ... 163
Assigning Default Values in Parameter ... 164
Use === Comparison ... 164
Avoid Usage of Closures ... 165
Summary ... 165
About the Author
Rehan Zaidi is a consultant for several international SAP clients (both onsite and remotely) on a wide range of SAP technical and functional requirements, and also provides writing and documentation services for their SAP- and ABAP-related products. He started working with SAP in 1999 and writing about his experiences in 2001. Rehan has written several articles for both SAP Professional Journal and HR Expert, and also has a number of popular SAP- and ABAP-related books to his credit.
Rehan is co-founder of IMZ Technologies, which provides SAP consulting to companies and helps clients (both onsite and remotely) with their SAP technical requirements (ABAP, Workflow, Quick development of Fiori apps, and S/4 HANA-related requirements). Rehan also creates documentation and training manuals for a number of companies based in the United States.
Rehan has clients located in a number of countries and continents, including the Middle East
xv
About the Technical Reviewer
Acknowledgments
I am very thankful to both of my parents, in particular my mother (my main source of motivation and strength in life), and all my friends and well-wishers for their best wishes and prayers.
I am grateful to Susan McDermott for providing me the opportunity to write another SAP-related book that will be published from the United States. Many thanks to Rita Fernando for all the help and guidance during the writing and editing process.
I am very grateful to Diego Dora for his technical edits. Despite his personal problems and difficulties, he helped us make this book ready for publishing.
xix
Introduction
Mobile and desktop application development for SAP Fiori is a very important and popular topic for SAP developers. It requires SAP development tools based in JavaScript (JS). A major problem faced by many members of the SAP ABAP community is that they have little to no knowledge of JS. This book addresses that problem. Written as a quick guide for SAP ABAP developers to easily master JavaScript, this book will equip you with the necessary skills to develop mobile and desktop applications.
The primary emphasis of this book is on the parts of the JS language that are useful from the perspective of an ABAP developer. The book starts with a brief introduction to HTML, the basics of JS, and how to create and run a simple JS program. It then dives into the details of the language, showing you how to make simple programs. Next, it covers in detail loops, mathematical operations, and string and regular expression in JS. The book then gives you a taste of functions, followed by objects and object-oriented programming in JavaScript. Code examples and screenshots are provided throughout the book to help you fully understand JS. Finally, this book includes a chapter on miscellaneous topics, including JS best practices and recommendations.
This book is intended for SAP professionals, ABAP users, and university students. A brief overview of the chapters follows:
Chapter 1: Introduction to JavaScript for ABAP. This chapter is an introduction to JavaScript for ABAP developers. It starts with the prerequisite knowledge for ABAP developers learning JavaScript. It next covers the basics of JavaScript, followed by the typical differences between the ABAP and JavaScript languages. Finally, it presents a very simple running JS program and shows you the necessary steps to create it yourself.
Chapter 2: Getting Your Feet Wet with JavaScript Language. This chapter first gives you an overview of the Window object. Next, it describes in detail the data types that JavaScript provides. Then, demo programs will show you how to display data to the user in a dialog box, debug your web page in a web browser console, and receive input from the user via a dialog box. The final section provides a list of reserved words in the JS language. This chapter provides the foundation of the JS language.
Chapter 3: Operators in JavaScript. As with all languages, the operators are very important for JS programmers and developers. This chapter starts with coverage of the arithmetic operators. Next, it introduces the comparison operators and logical operators that are used for formulating conditional checks in JS programs. Finally, the bitwise, assignment, and string operators are discussed.
■ INTRODUCTION
Chapter 5: Regular Expressions. JavaScript provides the option of solving problems using regular expressions, which help fulfill requirements in a small number of code lines. This chapter discusses the RegExp object needed for working with regular expressions in JavaScript. It also covers the method of searching for and replacing patterns within a text stream. Finally, it provides actual problems and coding in JS using regular expressions.
Chapter 6: Functions in JavaScript. Functions play an important role in JS. This chapter begins with an overview of functions in JavaScript and the advantages they provide. You will see the syntax required to create functions, along with a simple program containing a function definition. Separate sections will show you how to create a program that calls a function and how to create a function that calls another function. In addition, you will see typical coding examples and requirements met via functional programming.
Chapter 7: More on Functions. Because functions are a major topic, two chapters are devoted to their coverage. Building on the coverage of the basics in Chapter 6, this chapter focuses on the advanced topics within the functions landscape. First, you will see how to use functions as variables. Then, you will be introduced to the concept of self-executing functions. Next, you will learn about nested functions— functions within functions. The chapter closes, appropriately, with a discussion of the very useful “closure” concept.
Chapter 8: Objects in JavaScript and Programming. As with ABAP, JavaScript allows you to create objects. However, the concepts pertaining to object creation in the two languages are not the same. This chapter is dedicated to object creation, instantiation, and inheritance. It starts with a general overview of object-oriented programming before drilling down to objects in JS and their syntax. It introduces the this operator in detail, then covers the various ways of creating objects, followed by the instantiation steps using the new keyword. Once you have a basic understanding of objects, the chapter moves on to inheritance as implemented in JS using prototypes. The chapter contains real-life examples of objects and subobjects throughout, along with ample code listings demonstrating how to implement them in JavaScript.
Chapter 9: Other Useful Objects in JavaScript. By this point in the book, you will be familiar with quite a few built-in objects in JavaScript. This chapter introduces a number of other useful objects, such as Array, Boolean, Date, and String, and the methods they provide. You will see several programming examples that implement these methods.
Chapter 10: Working with JSON. This chapter covers the important topic of JavaScript Object Notation. To begin, you will be introduced to JSON and see some typical examples. You will then see how the JSON arrays and objects work in JS programs. The chapter then covers two important functions, stringify and parse, used for programming with JS. As in all chapters, ample programming examples will be provided.
1
© Rehan Zaidi 2017
R. Zaidi, JavaScript Essentials for SAP ABAP Developers, DOI 10.1007/978-1-4842-2220-1_1
CHAPTER 1
Introduction to JavaScript
This chapter serves an introduction to JavaScript for ABAP developers. We will start with the prerequisite knowledge for learning JavaScript. Then, we will cover the basics of JavaScript, followed by some of the differences between ABAP and JavaScript. Next, we will look at a very simple program and the necessary steps for you to create it yourself.
Brief JavaScript Background
JavaScript is a high-level, dynamic, untyped language standardized in the ECMAScript language specification. Together with Hypertext Markup Language (HTML) and Cascading Style Sheets (CSS), JavaScript is another important technology that originally powered the Web Applications Architecture. JavaScript (JS) is supported by all modern web browsers, and is used by the majority of websites and web applications today. In the beginning, typical examples for the use of JavaScript included creating interactive effects on web pages and conducting form data validations on websites. Since then, a number of libraries have been written in JS, such as jQuery.
■
Note
There is a common misconception that JavaScript and Java are similar. They are unrelated and have
different semantics. The syntax of JavaScript is derived from the C programming language.
Also, the JS language is used in server-side programming as a runtime engine for several different browser engines such as V8 (Google Chrome) and SpiderMonkey (Firefox). One of the most widely known and used JS runtime environments is called NodeJS.
JavaScript has some syntactical similarities with the C language such as the switch and if statements and the while and do while loops. In JavaScript, types are linked with values, rather than with variables. For example, a variable named myvar could be assigned a string first and subsequently rebound to a number.
JavaScript is a case-sensitive language, meaning any language keywords, variable names, and function names must be written with consistent capitalization. The keyword case, for example, must be written “case” and not “Case” or “CASE.”
CHAPTER 1 ■ INTRODUCTION TO JAVASCRIPT
Inside a JavaScript Program
This section introduces the various different code elements of a JavaScript program in detail.
A JavaScript program is composed of a number of statements. Each statement ends with a semicolon (;). JavaScript differentiates between an expression and a statement. A statement may be composed of literals, variables, and expressions. A given JS statement might span multiple lines. Also, it is possible for more than one statement to be written in a single line.
Comments form an important part of any code. They are disregarded by JavaScript, but they are an essential tool for programmers to document the purpose of their code for later review. There are two types of comments you can add to a JavaScript program. First, you can add a single-line comment as shown here:
var num = 1; // from here comments start
As you can see, single-line comments begin with a double slash (//). All subsequent code/text written on that line is treated as comment text. No ending punctuation is necessary to mark the end of a single-line comment; the end of the line serves that purpose.
JavaScript also allows you to specify multiline comments. These may be enclosed between /* and */, and may comprise one or more lines. Within multiline comments, nesting is not possible. Attempting to nest multiline comments will produce a syntax error. Listing 1-1 shows an example that is not acceptable in JS.
Listing 1-1. Incorrectly Nested Comments
/* this is comment 1 /* this is comment 2 */ */
As you can see, this example attempts to nest comment 2 within comment 1, which is not allowed and will give a syntax error.
Within a JavaScript program, statements are executed line by line (i.e., sequentially). A set of statements may be grouped together to form a block. The start and end of a block are denoted by curly brackets ({ }). These blocks may include code within a function (functions are similar to subroutines in ABAP) or code within if statements or switch statements.
A JS program may include a number of literals. You use literals in JS to denote fixed values (in contrast to variables) to be used within your programs. Some examples of these literals are integers and string literals.
In JavaScript, string literals are enclosed within a set of double quotes (“”) or a set of single quotes (‘’), whereas ABAP strings are enclosed within single quotes only. Some other types of literals are array literals, Boolean literals, and object literals.
Creating a Simple JS Program
Now that you have some basic knowledge of JavaScript, this section shows you how to make a simple program, and then explains the various parts of it.
CHAPTER 1 ■ INTRODUCTION TO JAVASCRIPT
3
The code for this program is shown in Listing 1-2.Listing 1-2. Program for Displaying Text in Pop-up Dialog Box
<html> <body> <script>
alert("First JS program by an ABAP Developer"); </script>
</body> </html>
As you can see, the program uses a string literal (within double quotes) to display the message to the user. Running this example displays a message in a pop-up dialog box, as shown in Figure 1-1.
Figure 1-1. Program output
A Quick Look at HTML
JavaScript code cannot be executed on its own. It relies on the runtime environment to include/import scripts (e.g., HTML <script> elements). So, in order to program JavaScript, you need to know some HTML. A full discussion of HTML is beyond the scope of this book. This section introduces the basics of the HTML language and shows you the usage of an HTML tag and its corresponding browser output.
HTML is the language used to create web pages. Within the web page source code text, you have a number of tags. Simply defined, tags are codes in an HTML document that begin with the symbol < and end with >. Tags mostly appear in pairs, and a pair of tags instructs the browser how to treat the text appearing within the tag pair.
Each tag has a special meaning and has its own effect. The tags are read by the browser and interpreted accordingly. The tags are not displayed by the browser. The browser then renders and displays the web page to the viewer.
■
Note
HTML is not a case-sensitive language: <html>, <HTML>, and <Html> all have the same effect.
CHAPTER 1 ■ INTRODUCTION TO JAVASCRIPT
At this stage, you only need to know the details of HTML that will help you to run the JS code that you will write. A number of elements exist in an HTML document that are represented as tags:
• The HTML tags, <HTML> and </HTML>, mark the beginning and end of the HTML
document. The browser renders the page based on the information contained within the HTML tags. Make sure that no code is written after the </HTML> tag, which marks the end of the HTML document. Within the HTML page, you have a <HEAD> and a <BODY> tag.
• The HEAD tags encompass the general information pertaining to the document,
such as the usage of the page and linkage with other documents and resources. For example, a pair of tags may contain information about the JS file and CSS code relevant to the web page. Within the HEAD are the TITLE tags that are used to specify the title of the document. The title is displayed at the top of window of the browser. The TITLE tags also contain metadata about the document.
• <BODY> and </BODY> encompass information about the page body—the actual
content rendered when the page is loaded by the browser. Some of the elements contained within this pair of tags are the header and footer. Within the body, you may display a number of text lines, tables, forms, and graphics. You may have a number of headings such as <heading1>, <heading2>, and so on. Using the <P> tag, you can also specify where a new paragraph starts. The browser reads the various elements within the body and renders the page accordingly.
Now you are prepared to look at how to write your first HTML code. A simple HTML program without any JavaScript in it is shown in Figure 1-2.
CHAPTER 1 ■ INTRODUCTION TO JAVASCRIPT
5
If there is a syntax error in your HTML code, the browser still produces an output. However, you may not get the desired result. Consider, for example, the same code shown in Figure 1-2 with the </H1> tag in the body wrongly written as <\H1> (i.e., with a backslash). In this case, the entire set of text lines is displayed in the Heading style, as shown in Figure 1-4.Figure 1-3. HTML code output
Figure 1-4. Wrong output of HTML page
The output of the code from Figure 1-2 is shown in Figure 1-3.
Putting JavaScript in HTML Code
This section shows you how to add your JavaScript code from earlier in the chapter to the simple HTML page from the previous section. You can choose any of several approaches to do this. The simplest approaches are to write the entire JS code either in the head or the body of the HTML page. It is also possible to write the JS code as a separate file and include the name of the file in your HTML code. Let’s consider these approaches one by one. Note that they all produce the same output in the browser display.
Writing JS Code Within the <HEAD> and </HEAD> Tags
CHAPTER 1 ■ INTRODUCTION TO JAVASCRIPT
Listing 1-3. HTML Code with JS Code in HEAD
<!DOCTYPE html> <html>
<head>
<title>My first Web Page</title> <script>
alert("First JS program by an ABAP Developer"); </script>
</head> <body> </body> </html>
As you can see, the single-line JS script is written within the HEAD tags. When the browser reaches the <script> tag, it executes the JS script. Once the script execution is complete, the browser returns to the HTML and executes the remaining HTML code after the </script> tag.
Writing JS Code Within the <BODY> and </BODY> Tags
Another approach is to include the JavaScript code within the BODY element, before the </BODY> tag (i.e., the end of the body), as shown in Listing 1-4. From the standpoint of the user, the effect will be the same.
Listing 1-4. Adding JavaScript in the HTML Body
<!DOCTYPE html> <html>
<head>
<title>My first Web Page</title> </head>
<body> <script>
alert("First JS program by an ABAP Developer"); </script>
</body> </html>
As with the previous approach, when the browser reaches the <script> tag, it executes the JS script, after the completion of which it returns to the HTML and executes the remaining HTML code after the </script> tag.
Creating JS Code in a Separate File
CHAPTER 1 ■ INTRODUCTION TO JAVASCRIPT
7
Listing 1-5. Addressing a JS File in HTML Code<!DOCTYPE html> <html>
<head>
<title>My first Web Page</title>
<script src="Code.js"> // JS file name
This example assumes that the JavaScript code is contained in a separate file, in the same directory where the HTML code resides. As you can see, the name of the file that contains the JS code (in this case, Code.js) is specified within the HEAD element. You must make sure that you write the name of the file in the correct case.
Again, once the <script> tag is reached, the browser executes the JS script. After the script execution is complete, the browser returns to the HTML and executes the remaining HTML code after the </script> tag.
Variable Declaration in JavaScript
Variable declaration is an important part of any programming language. Declaring variables enables you to assign symbolic names to values that you use in your programs. A JavaScript variable name must start with one of the following:
• A letter (including uppercase characters A through Z and lowercase characters a
through z)
• An underscore (_) • A dollar sign ($)
The name cannot start with a digit (0-9), but subsequent characters may be digits. Some examples of allowed variable names are Nu_hits, Mytemp13, and _myname.
Variables defined in JavaScript are either global, with a global execution context, or local, specific to a particular function (we will discuss this in the later part of the book). A local variable is visible/accessible only within the function in which it is defined and not outside that function. Global variables are visible/ accessible to the entire JS program.
Variables in JavaScript are declared using the var keyword. Here is the syntax:
var num;
It is also possible to declare a variable and initialize it in the same line of code:
var num = 1;
You may also link two variable declarations in a single line (chaining them together using a comma):
var num1, num2;
It is also possible to initialize either or both of the variables in a single line of code:
CHAPTER 1 ■ INTRODUCTION TO JAVASCRIPT
You do not need to specify the type of the variable. The declaration takes the type from the value that is assigned to it.
■
Note
In contrast to ABAP, JavaScript lets you declare variables and then change their type.
You may also use the same var statement to declare a variable and initialize it with a value, and then assign the variable with its value to another variable:
var num1 = 10; var num2 = num1;
As you can see, variable num1 is declared and initialized with a value of 10. After the second statement, the num2 variable is declared as a number and is assigned the value 10. After the statements, both variables have the value 10.
It is also possible to change the type of the variable later. For example, if you have variable num1 as a number, you can later change it to a string, as shown in this example:
var num1 = 10; num1 = "my string";
In JavaScript, you may also declare a variable after it has been used. In other words, you may use a variable even before its declaration. Consider the following short piece of code:
num1 = 10; var num1;
In this case, we have a variable named num1 to which the value 10 is assigned. Later in the code is the definition of the variable using the var keyword. This feature of JS is known as variable hoisting. When a JS program is loaded and executed, all the var statements that declare variables are processed first (i.e., before the rest of the program code).
As mentioned earlier, JavaScript is a case-sensitive language. That means you can create variables with the same letters but in different cases. For example, consider the following example:
var message = "Second JS Program - Message 1"; var MESSAGE = "Second JS Program - Message 2";
This code defines two separate variables, message and MESSAGE, each of which is assigned a different string value. This practice is discouraged to avoid mix-ups.
Using Eclipse
There is no single editor for creating JavaScript programs. You have a number of options, such as
CHAPTER 1 ■ INTRODUCTION TO JAVASCRIPT
9
In this section and throughout the book, I will demonstrate creating JavaScript programs using my editor of choice, Eclipse IDE. Showing you the entire Eclipse installation process is beyond the scope of this chapter. You should be able to install it fairly easily via the instructions available online at www.eclipse.org, where you can also download Eclipse.Once you have successfully installed Eclipse, double-click the shortcut on your desktop, as shown in Figure 1-5.
Figure 1-5. Eclipse shortcut
■
Note
All the examples and screenshots were tested in Windows.
Alternately, if you are using Windows, you may use the Programs menu to open Eclipse. Both options take you to the start screen of the Eclipse editor, as shown in Figure 1-6.
CHAPTER 1 ■ INTRODUCTION TO JAVASCRIPT
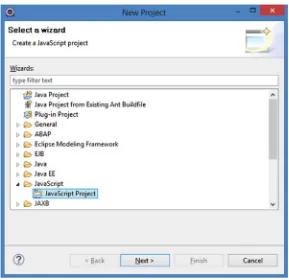
On the wizard screen that appears, enter the name of the project (for purposes of this example, enter First). Do not change any other values on the screen and click the Finish button. The screen now appears as shown in Figure 1-8.
Figure 1-7. Creating a JavaScript project
CHAPTER 1 ■ INTRODUCTION TO JAVASCRIPT
11
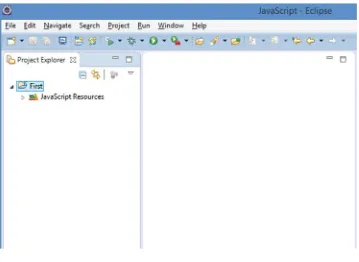
In the left panel, you can see that the project named First initially has no HTML or JavaScript files. You will now add both JavaScript and HTML files to this project. To add JavaScript code, simply right-click the First project node and choose New ➤ JavaScript Source File. In the dialog box that appears, enter the name of the file; for purposes of this example, enter Code.js. Then, click the Finish button.The left pane will appear as shown in Figure 1-9. Figure 1-8. Project “First”
Figure 1-9. Code.js node added
CHAPTER 1 ■ INTRODUCTION TO JAVASCRIPT
Simply add the code in the program as shown in Figure 1-10, and save the code using the key
combination CTRL+S. As you can see, this example uses two variables that have similar names but different case (MESSAGE and message). It also uses two alert statements to output the values to the user.
Next, you need to add an HTML file to your project. Right-click the folder First and choose New ➤ File. In the dialog box that appears, enter a name for the file with an html extension (for this example, First.html). Enter the code of the html in the HTML editor in the right panel (see Figure 1-11).
Figure 1-11. HTML editor Figure 1-10. JavaScript editor
As you can see, this example uses the <script> tag to address the Code.js file that you have made. Next, save your project. You may now test your code within Eclipse. For this, right-click the HTML file node and choose Run ➤ Browser.
CHAPTER 1 ■ INTRODUCTION TO JAVASCRIPT
13
Clicking the OK button of the first dialog box will display the second dialog box.You have successfully created a JavaScript program in Eclipse, giving you a foundation on which to build in subsequent chapters.
Summary
This opening chapter of the book covered the basics of JavaScript. You saw how to define and use variables in your programs, and how to make a simple JS program. In addition, you had a look at the Eclipse IDE for creation of JavaScript programs and HTML code. In the next chapter, you will explore the language in further detail, including the data types supported in the JavaScript language.
CHAPTER 2
A Step Ahead in JavaScript
Having learned the basics of JavaScript and the prerequisites for running a JavaScript (JS) program in Chapter 1, you are ready to move on to details of the JS language. This chapter first gives you an overview of the Window object. Next, it describes in detail the data types that JavaScript provides. Then, demo programs will show you how to display data to the user in a dialog box, debug your web page in the console of a web browser, and take input from the user via a dialog box. The final section of the chapter presents a list of reserved words of the JS language.
Window Object
One important concept within JavaScript is the Window object. The window object represents an open window within a browser. This section describes this object and the properties and methods that it provides.
Within a JS program, all variables declared outside of any function are global in nature. They remain alive during the entire execution of a web page. Global variables are properties of this object. The set of global variables is accessible via the global Window object. Any component of the window object is accessible by using dot notation (.).
To better understand the Window object, consider the following excerpt of a JS program:
var num1 = 10; window.num1 = 20 ; alert (num1);
This syntax declares a variable num1 and assigns to it the value 10. It then uses the window object to access num1 and assigns it the value 20. The short JS program outputs the value as shown in Figure 2-1.
CHAPTER 2 ■ A STEP AHEAD IN JAVASCRIPT
16
As you can see, the value of 20 is displayed rather than 10. This is because the variable num1 resides within the global container accessed via the window object. When you assign the value 20, it refers to the same variable num1.
The Window object contains a number of properties and methods and is supported by all major browsers. Some of the important properties associated with it are listed and briefly described in Table 2-1.
Table 2-1. Important Properties of the Window Object
Property
Purpose
status Sets or returns status bar text at bottom of browser name Sets or returns the name of the window
fullScreen Indicates full-screen display of the window
innerHeight Sets the height of the window content area, including the horizontal scrollbar
innerWidth Sets the width of the window content area
length Sets the number of frames in the window
Table 2-2. Important Methods of the Window Object
Method
Purpose
alert() Shows an alert box to user with message text and OK button prompt() Generates a dialog box for the user to enter input
print() Writes the content of the window in question open() Creates a new window in the browser close() Closes a window
confirm() Shows a dialog with OK and Cancel buttons with appropriate message
createPopup() Creates a pop-up window (this method works in Internet Explorer)
In addition, the Window object has many useful methods. Some of the important methods are listed and briefly described in Table 2-2.
These methods may be called in all parts of a JS program. While calling these methods, you may either use the Window object or call these methods without it. Consider the following example:
Window.alert("Hello"); // incorrect, as Window must be written in lowercase i.e. window window.alert(text); // correct
alert("Hello"); // correct
The preceding two statements have the same effect. It is not necessary to use the call along with the Window object.
CHAPTER 2 ■ A STEP AHEAD IN JAVASCRIPT
Data Types in JavaScript
Chapter 1 briefly introduced the available data types in JS. This section explores the various data types supported in JavaScript in greater depth. In JavaScript, the variable is given the type that is assigned at a given instance.
Overall, there are six data types that exist in JavaScript, as summarized in Table 2-3. The following subsections describe them in more detail and show how to declare them.
Table 2-3. Data Types and Their Purpose
Name of Type
Purpose
string A set of characters
number Whole numbers, negative or positive, or number with various decimals
undefined Variable having this type has been defined but without value
null Intentional or explicit specification for a variable having no value
object Set of properties and property values unordered
Boolean Contains true or false
String
A string is a sequence of characters of various lengths. Typical examples include "John123" and "John is a nice person". Strings must be written within quotation marks. Usually, double quotes are used. However, single quotes may also be used. Consider the following code excerpt:
var person = "John James"; // double quotes var areaName = 'Burj Khalifa'; // Using single quotes
It is also possible to use single quotes within a string that is written within double quotes. Consider the following example:
var text = "It's a rainy day"; // correct
Or you can use the following acceptable form:
var text = "My profession is 'Computer programmer'"; //correct
Likewise, you can use double quotes within a sting written within single quotes:
var text = 'My Profession is "Computer programmer" '; // correct
However the following examples are not acceptable and will generate a syntax error:
CHAPTER 2 ■ A STEP AHEAD IN JAVASCRIPT
18
To make things a little more complicated, these two inadmissible forms may be adjusted slightly to avoid syntax errors. The single quote within the text must be preceded by a backslash. Now consider the same example:
var text = 'My Profession is \'Computer programmer\' ' ; // correct
After execution of the statement, the variable text contains My Profession is 'Computer programmer'.
Likewise, the following statement is also acceptable:
var text = "My Profession is \"Computer programmer\" " ; // correct
After execution, the variable text contains My Profession is "Computer programmer".
A string definition and assignment to a value may be in a single line or a set of lines. When using a string definition on multiple lines, you may use the escaped newline character (\n) like this:
var text = "My Profession is \nComputer programmer" ; alert(text);
After execution of the preceding lines of code, the content of the variable text is displayed in the window as shown in Figure 2-2.
Figure 2-2. String shown in two lines
As shown, the text is composed of two lines. This is achieved by using \n in the string specification. Another operator that you may use in the context of strings is +. Consider the following line of code:
var string1 = 'ABAP' + 'er' ; // string1 contains ABAPer
Adding the + operator results in the concatenation of the two sets of characters. The variable string1 will then contain "ABAPer". Now consider the following example:
var string1 = 1 + '7'; //
CHAPTER 2 ■ A STEP AHEAD IN JAVASCRIPT
Consider another example:
var string1 = 'A' + 1 + 7; // string1 will contain A17
In this case, when the statement is executed, the variable string1 will contain the value "A17" and not "A8". On the contrary, consider the following example:
var string1 = 1 + 7 + 'A' ;
After execution of this statement, the resulting value in string1 is "8A" and not "17A". The reason is that sequentially JavaScript treats 1 and 7 as numbers and performs addition until it encounters letter A. After this point, the computed value so far (8) is concatenated with A and stored in the variable string1. The type of the variable string1 is string.
Number
To represent number values, JavaScript has only one data type: number. The numbers may or may not have decimal places. In addition, they may or may not include unary operators. To clarify the usage of numbers within JS, let’s consider a few examples.
The following line of code represents a whole number containing the value 26:
var num1 = 26;
Now consider another example:
var num2 = -26;
The variable num2 is assigned the value minus 26.
When defining variables in JavaScript, you do not need to specify the number of decimal places. When assigning variables, you must provide the corresponding value. Now let’s consider a few examples of decimal numbers. The following are some examples of positive decimal values:
var num1 = 0.6888 ; var num2 = 122.688; var num3 = 10.0;
And you can also have a number with a minus sign and decimal places:
var num4 = -2.3;
You can also assign a number variable an exponential value. The following are some examples:
var num5 = 28.5e-3 ; //which is equal to .0285 var num6 = 28.5e3 ; //which is equal to 28500
CHAPTER 2 ■ A STEP AHEAD IN JAVASCRIPT
20
Within JS, there are two special numbers: positive infinity (infinity) and negative infinity (-infinity). A positive infinity results due to an arithmetic overflow within a program. On the other hand, a negative infinity occurs if you try to store (in a number variable) a value that is smaller than the allowed minimum value.
■
Note
There are two special values, infinity and -infinity, that a number variable may contain.
Consider the following examples demonstrating that the number type is also used for storing hexadecimal and octal values. Hexadecimals values start with 0x:
var Hexval1 = -0xFFDD; var Hexval2 = 0xFFDD;
Octal values start with a zero:
var Octval = 0628;
Undefined
If a variable has been declared but no value is assigned to it, that variable has the type undefined. Consider the following example:
var mytype ;
As you can see, this example declares the variable mytype, but no value has been assigned to it. The variable mytype has the type undefined.
var mytype ; // mytype has undefined type
It is also possible to set a variable to undefined explicitly:
var mytype = 10; // mytype has type number mytype = undefined; // now mytype has type undefined
Null
The null data type is used in JavaScript to explicitly specify that a variable has no value. You may simply assign null to a variable, as shown in this example:
var mytype = 1 ;
var mytype = null; // mytype has type null
CHAPTER 2 ■ A STEP AHEAD IN JAVASCRIPT
Object
The object data type within JavaScript represents a set of unordered properties and values. The syntax for defining an object within your program is as follows:
var myobj = { property1 : val1 , property2 :val2 ... property : valn };
Object definitions may be written on a single line or on multiple lines. The property and the respective value must be separated by a colon, whereas the property-value pairs are separated by commas. Within a program, an object is also a variable defined via the var keyword. However, an object is composed of a number of properties and values.
Consider this example:
var employee1 = { pernr : '1', empName : "John Wright" , gender : 'M', country : "USA" } ;
This example defines an object named employee1 with properties empName, gender, and country, and assigns values to the various properties.
The same definition and assignment may be done in multiple lines:
var employee1 = { pernr : '1',
empName : "John Wright" , gender : 'M',
country : "USA" } ;
When defining an object, make sure that you use only curly brackets, { }, to enclose the properties and value pairs. Using parentheses to enclose them will generate a syntax error and is not allowed.
To address the various properties, use the dot operator:
alert ( employee1.pernr) ;
The preceding statement will display a dialog box with the value 1.
It is also possible to change the value of a particular property of a given object:
employee1.pernr = 2 ;
Once this is done, in the case of the employee1 object, the value of pernr will be 2. You may assign a given object to another object as shown here:
var employee1 = { pernr : '1', empName : "John Wright" , gender : 'M', country : "USA" } ; var employee2 = employee1;
employee2.pernr = '2';
employee2.empName = 'James Dolman' ;
alert ( employee2.pernr + " " + employee2.empName + " " + employee2.gender + " " + employee2.country ) ;
CHAPTER 2 ■ A STEP AHEAD IN JAVASCRIPT
22
When specifying properties of objects, you may specify undefined or null as the value for a property. An example of specifying null is shown here:
var employee1 = { pernr : null, empName : null , gender : 'M', country : "USA" } ; employee1.pernr = '2' ;
employee1.empName = 'John Reed' ;
In addition to the dot notation, there is another way of addressing the properties of the object in question. This is shown in the following line of code:
employee1["pernr"] = '2' ; correct
This will assign the value '2' to the property pernr of the employee1 object. As you can see, the property name is enclosed in double quotes and square brackets. It is also possible to enclose the property name in single quotes. Consider the following statement, which has the same effect:
employee1['pernr'] = '2'; // correct
You must make sure, however, to use only square brackets with the single or double quotes, as shown in the examples. Using parentheses or curly brackets will produce a syntax error:
employee1('pernr') = '2' ; // Wrong
In addition, omitting the quotes (either single or double), even when used in conjunction with the square brackets, is also problematic, as shown here:
employee1[ pernr ] = '2' ; // Wrong
Objects Within Objects
Thus far you have seen examples of objects containing a set of properties only. Now you’ll see how you can define objects that contain one or more other objects. You can achieve this by slightly modifying the previous employee1 example. Instead of using a property name based on a string, the modified example introduces a new property fullname that is based on an object having properties lastname and firstname. The code for this is as follows:
CHAPTER 2 ■ A STEP AHEAD IN JAVASCRIPT
var employee1 = { pernr : '1',
fullname : { lastname : "John" , firstname : "Wright" } , gender : 'M',
country : "USA" } ;
Here, as in the original example, an object employee1 is defined that has a number of properties. However, employee1 now has a property named fullname, which itself is an object comprising properties lastname and firstname. Note the usage of curly brackets for the employee1 and fullname objects. Within the subobject, colons and commas are used in the same manner as they have been used in the main object specification.
Consider the examples described in the following sections.
■
Note
A special object known as an array exists in JavaScript. An array is an ordered set of values and is
written within square brackets; e.g., [1,2,7,10] or [‘my’, ‘she’]. Arrays will be discussed in detail in Chapter 5
and subsequent chapters.
Boolean
As the name denotes, a variable based on the Boolean data type may have a value of either true or false. Consider the following:
var bool1 = true; // correct var bool2 = false ; // correct
These examples define two Boolean variables, bool1 and bool2, and assign true and false values to them, respectively. Importantly, the assigned values cannot be written in single or double quotes, and must be written in lowercase letters.
■
Note
When you assign
trueand
falseto Boolean variables, make sure that you do not write them in
single or double quotes. Otherwise, they will be treated as strings. Also make sure to use all lowercase.
Consider these examples:
var bool1 = "true"; // wrongly defined as string - not boolean var bool2 = "false" ; // wrongly defined as string - not boolean
Here, both bool1 and bool2 are strings and not Booleans.
Boolean variables are used in conditional evaluation, and may be used to store the result of a conditional evaluation, such as with if and while statements. (The statements are discussed in further detail in the latter part of the book). Consider the following line:
var boolean1 = ( 10 > 1 ) ;
CHAPTER 2 ■ A STEP AHEAD IN JAVASCRIPT
24
The typeof Operator
An important operator in JavaScript is typeof. The typeof operator returns a string that denotes the type of the operand in question. The syntax of the typeof operator is shown here:
typeof (variable) ; typeof variable ;
The variable or operand could belong to any of the types discussed in this chapter. If you use the typeof operator to evaluate a single operand in a single statement, you can omit the brackets that enclose the variable name. You may also use the typeof operator in the alert method or the console.log method (discussed in the next section).
The following example shows how the typeof operator is used:
var text = 'My Profession is "Computer programming" '.
alert (typeof(text)); // string displayed in dialog box
In this example, the typeof operator returns a string, and this is displayed in the dialog box. Consider this code, in which the operator correctly returns the object type:
var employee1 = { pernr : '1',
fullname : { lastname : "John" , firstname : "Wright" } , gender : 'M',
country : "USA" } ;
alert (typeof(employee1) ) ; // object displayed in dialog box
In the following code, variable boolean1 belongs to the Boolean data type. Hence, the typeof operator returns Boolean.
var boolean1 = ( 10 > 1 ) ;
alert (typeof(boolean1)) ; // boolean displayed in dialog box
As mentioned earlier, when a variable is declared but not assigned a value, the type of the variable is undefined. The same undefined type is determined by the typeof operator:
var mytype ; // mytype has undefined type
alert (typeof(mytype)) ; // undefined displayed in dialog box
The typeof operator also works with numbers and gives the correct type (i.e., number):
mytype = 10; // mytype has type number
alert (typeof(mytype)) ; // number displayed in dialog box
Finally, this example shows how the typeof operator behaves when null is involved:
mytype = 1 ;
mytype = null; // mytype has type null
alert(typeof( mytype)) ; // but object displayed in dialog box ----wrongly displayed
CHAPTER 2 ■ A STEP AHEAD IN JAVASCRIPT
■
Caution
The
typeofoperator returns the correct JS type in all cases except type null. In this case, it
wrongly returns “object”.
Method console.log
Thus far in the chapter you have seen the various available data types in JS along with some examples, including how to display information in a dialog box using the alert method. However, for testing and debugging purposes, you may need to display values of certain variables at various points during program execution.
■
Note
The
console.logmethod is not recommended for an actual live environment. However, it must be
used for testing while development of JS programs.
You can use the console.log method to display test values of variables while executing a program. Although coloring and stylizing options may be possible, here we will only cover the basic working of the method. Here’s the syntax of this method:
console.log( obj1, obj2 ....objn );
The console.log method may take as input one or more numbers, strings, Boolean values, or objects. You may also display one or more properties of an object using the console.log method. You can also use console.log in conjunction with the typeof operator. For objects containing further objects, you can drill down into further details of the object.
■
Note
When the values passed to the
console.logmethod involve an operation to be performed, such as
addition or concatenation, the result is first computed and then output.
The following example shows the console.log method in action:
<!DOCTYPE html> <html>
<body>
<h1>Console Log Demo </h1> <script>
console.log(10 + 5); </script>
CHAPTER 2 ■ A STEP AHEAD IN JAVASCRIPT
26
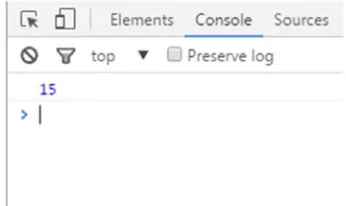
The Console object allows you to access the debugging console of the browser. The output of the console.log method is neither displayed with the rest of the web page content in the browser nor displayed in a pop-up box upon loading of the web page. Rather, it is displayed in the Console tab of the browser debugger. These are the steps to switch on the console display:
1. Open in a browser the web page containing the HTML and JavaScript code. (For purposes of this example, I’m using Google Chrome.)
2. Press Ctrl+Shift+I. This opens the debugger in a separate pane to the right of the web page output, as shown in Figure 2-4.
Figure 2-4. Debugger Console tab
3. Click the Console tab. You will now see the value displayed using the console. log method (in Figure 2-4, 15 is shown as a result of the addition).
■
Note
Make sure that you write
console.login all lowercase letters in the JavaScript code. Writing it as
Console.log will not give the desired result.
Consider the example presented in Listing 2-1.
Listing 2-1. Displaying Object employee1
<script>
var employee1 = { pernr : '1',
empName : "John Wright" , gender : 'M',
country : "USA" } ;
CHAPTER 2 ■ A STEP AHEAD IN JAVASCRIPT
As you see, the object is displayed with the relevant properties and values in a single line.
Now consider an example where object employee1 includes a property fullname (which is another object):
var employee1 = { pernr : '1',
fullname : { lastname : "John" , firstname : "Wright" } , gender : 'M'',
country : "USA" } ; console.log (employee1) ;
For nested objects such as this, the console output appears as shown in Figure 2-6. Figure 2-5. Object employee1 displayed in console
Figure 2-6. Object employee1 displayed in Console
In this case, no values are shown for the fullname property. Rather, only Object is displayed for it. You can expand the Object node to see the full details of employee1, as shown in Figure 2-7.
CHAPTER 2 ■ A STEP AHEAD IN JAVASCRIPT
28
As you can see, in the detailed view within the Chrome console, the properties are listed in alphabetical order.
Taking Input from the User
So far in this chapter, you have seen how to output data to the user in a dialog box and how to debug your web pages in the web browser console. Now you will see how you can take input from the user viewing the web page in which your JavaScript code is embedded.
The prompt method of the Window object is used for this purpose, as shown in the following syntax:
window.prompt ( text , optional default text ) ; prompt ( text , optional default text ) ;
The call of the prompt method takes as input the text that is displayed to the user, as well as an optional default value. A dialog box is displayed on the web page. This is a modal dialog box, meaning it will not allow the user to perform any other activity in the browser until the dialog box is closed. The dialog box is displayed with two buttons, OK and Cancel.
You may assign the text entered by the user to a variable declared in your program. Irrespective of the type of the variable used, after the user enters a value in the dialog box input field and clicks the OK button, the type of the returning variable becomes string.
To better understand, consider the following example:
var value = 0;
value = prompt("Enter a value", "10") ;
alert('You entered ' + value + ' which has type ' + typeof(value) );
This example specifies a number variable value and then calls the prompt method of the window object and assigns the inputted value to the variable. A default text of 10 is specified in the method call. The example then uses an alert method to display the entered value and its type in another dialog box. The input dialog box that this code generates is shown in Figure 2-8.
Figure 2-8. Input dialog box
Figure 2-9. Message displayed
CHAPTER 2 ■ A STEP AHEAD IN JAVASCRIPT
As you can see, the variable value is assigned the value 10 and the type of the value entered is interpreted as a string.
If, on the other hand, the user clicks the Cancel button, the variable value will be assigned null.
Commonly Used Keywords in JavaScript
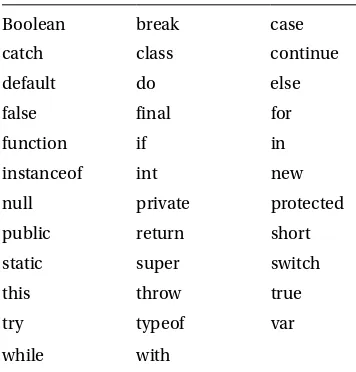
To conclude the chapter, Table 2-4 presents a list of some keywords (reserved words) in the JavaScript language. Please note that you are not allowed to define variables that have the same names as these keywords, which is why they are called reserved.
Table 2-4. Reserved Words
Boolean break case
catch class continue
default do else
false final for
function if in
instanceof int new
null private protected
public return short
static super switch
this throw true
try typeof var
while with
Summary
In this chapter, you were introduced to the Window object and the data types that JavaScript provides. Next, you saw how to display data to the user in a dialog box, debug your web page in the console of the browser, and take input from the user via a dialog box. The end of the chapter listed reserved words of the JS language.
31
© Rehan Zaidi 2017
R. Zaidi, JavaScript Essentials for SAP ABAP Developers, DOI 10.1007/978-1-4842-2220-1_3
CHAPTER 3
Operators in JavaScript
This chapter explains JavaScript operators in detail. It starts with the arithmetic operators and then looks at the comparison operators and logical operators that are used for formulating conditional checks in JS programs. The final section of the chapter covers the assignment and bitwise operators.
Arithmetic Operators
Arithmetic operators take values in the form of literals or variables as operands and return a single value. The standard arithmetic operators supported in JavaScript are listed in Table 3-1. Each is described in turn in the subsections that follow.
Table 3-1. Arithmetic Operators
Operator Description
Operator
Addition +
Subtraction
-Multiplication *
Division /
Remainder (modulo or modulus) %
Exponentiation **
Increment ++
Decrement
--Unary negation
-Addition Operator
The addition operator (+) results in the addition (sum) of numeric operands. For strings, the addition operation results in string concatenation. The syntax of this is shown as follows:
CHAPTER 3 ■ OPERATORS IN JAVASCRIPT
The following are a few examples of the addition operator in action:
2 + 4 // 6 addition performed 10 + "text" // 10text concatenation "text" + "string" // "textstring"
2 + true // results in value 3 1 + false // 1
Subtraction Operator
The subtraction operator (-) performs arithmetic subtraction of the two operands. The syntax is
x - y
In case of numeric operands, the difference between x and y is returned. In case of strings, the value NaN (not a number) is returned. The following are some examples of the subtraction operator in action:
10 - 6 // 4 6 - 10 // -4 "text" - 2 // NaN
Multiplication Operator
The multiplication operator (*) determines the product of the supplied operands. The syntax is
A * B
Examples of the multiplication operator include the following:
52 * 2 // results in 104 -22 * 2 // -44
Infinity * Infinity // Infinity "abc" * 3 // NaN
Division Operator
The division operator (/) results in the quotient of the supplied operands. The syntax is
A / B
Here, the left operand (A) is the dividend and the right operand (B) is the divisor. Some examples of this operator include
CHAPTER 3 ■ OPERATORS IN JAVASCRIPT
33
Remainder Operator
The remainder (or modulo) operator (%) is used for determining the leftover (remainder) when the first operand is divided by the second. The remainder always has the sign of the dividend. The syntax is
A % B
The math of the reminder operator is less straightforward, so several examples of its usage are provided here:
The exponentiation operator (**) is used for raising the first operand to the power of the second. The syntax is
A ** B
The following are some examples of the exponentiation operator:
2 ** 4 // 16 4 ** 4 // 256 10 ** -2 // 0.01
Increment Operator
The increment operator (++) adds one to the value of the operand in question. The increment operator can have either of two forms, postfix or prefix.
The syntax of the postfix form is
A++
In this form, the variable A is first returned and then incremented. The syntax of the prefix form is
++A
In the prefix form, the variable A is first incremented before being returned. The following are examples of both forms of the increment operator:
// Postfix var A = 6;
CHAPTER 3 ■ OPERATORS IN JAVASCRIPT
// Prefix var A = 6;
B = ++A; // after this, A = 6, B = 6
Decrement Operator
The decrement operator (--) decreases its operand value by one (i.e., deducts one from the value). Like the increment operator, the decrement operator can have either of two forms, postfix or prefix.
The syntax of the postfix form is
A--In the postfix form, the variable A is first returned and then decremented. The syntax of the prefix form is
--A
In the prefix form, the variable A is first decremented before being returned. The following are examples of both forms of the decrement operator:
// Postfix var A = 6;
var B = A--; // B = 6, A = 5
// Prefix var A = 6;
var B = --A; // A = 5, B = 5
Unary Negation Operator
The unary negation operator (-) precedes the operand in question, and when used within expressions, negates its value. Consider the following example:
// unary negation var A = 6;
B = -A; // B = -6 A = 6
In this example, after the execution of the statement, the variable B contains the value -6, whereas the value of A still remains 6.