Beginning Illustration
and Storyboarding
for Games
any means, electronic or mechanical, including photocopying, record-ing, or by any information storage or retrieval system without written permission from Thomson Course Technology PTR, except for the inclusion of brief quotations in a review.
The Premier Press and Thomson Course Technology PTR logos and related trade dress are trademarks of Thomson Course Technology PTR and may not be used without written permission.
Corel, CorelDR AW, CorelPHOTO-PAINT, and Corel Painter are trademarks or registered trademarks of Corel Corporation or Corel Corporation Limited. All other trademarks are the property of their respective owners.
Important: Thomson Course Technology PTR cannot provide software support. Please contact the appropriate software manufacturer’s techni-cal support line or Web site for assistance.
Thomson Course Technology PTR and the author have attempted through-out this book to distinguish proprietary trademarks from descriptive terms by following the capitalization style used by the manufacturer.
Information contained in this book has been obtained by Thomson Course Technology PTR from sources believed to be reliable. However, because of the possibility of human or mechanical error by our sources, Thomson Course Technology PTR, or others, the Publisher does not guarantee the accuracy, adequacy, or completeness of any information and is not responsible for any errors or omissions or the results obtained from use of such information. Readers should be particularly aware of the fact that the Internet is an ever-changing entity. Some facts may have changed since this book went to press.
Educational facilities, companies, and organizations interested in multiple copies or licensing of this book should contact the publisher for quantity discount information. Training manuals, CD-ROMs, and portions of this book are also available individually or can be tailored for specifi c needs.
ISBN: 1-59200-495-4
Library of Congress Catalog Card Number: 2004108016 Printed in the United States of America
04 05 06 07 08 BH 10 9 8 7 6 5 4 3 2 1 a division of Thomson Course Technology
To all the art teachers and mentors I have had over the years, I dedicate this book. I have learned from many, some of whom don’t even know that they were
my instructors. Those who have spent time working with me to develop my artistic talents are and always will be great in my eyes.
I also dedicate this book to all the young artists who will make a difference in the time to come. May you always have faith in your work and love for art.
Acknowledgments
T
his book has been an effort of much work, and I thank all those who have helped. Especially, I thank my wife, Kim, for her unfailing faith in her artist husband, and my children, for the time that they let me have to write. I thank my parents, who have always believed in me. I also thank my editor, who has had to put up with an artist’s writing ability.I also thank the many artists and friends who have contributed to the book. I appreciate the contributions in artwork, encouragement, and knowledge.
About the Author
I
n 1987, Les Pardew started his career by creating the animation for Magic Johnson Fast Break Basketball on the Commodore 64. He soon found that he loved working on games and has been in the industry ever since. His work encompasses more than 100 video game titles, including some major titles such as Super Star Wars, NCAA Basketball,Starcraft: Brood War, James Bond 007, Robin Hood: Prince of Thieves, and CyberTiger. He currently serves as President of Alpine Studios, which he founded with Ross Wolfl ey in the fall of 2000. Alpine Studios is a game development company focusing on family-friendly games. Alpine Studios’ products include Kublox, Combat Medic, Motocross Mania 2, and
Ford Truck Mania. Les is also the author of Game Art for Teens.
viii
Introduction . . . xv
Chapter 1 Basic Game Design Art . . . 1
Art Used in Game Designs . . . .1
Game Layout Charts . . . .2
Storyboards . . . .3
Level Layouts . . . .6
Environment Illustrations . . . .7
Character Designs . . . .8
Model Sheets . . . .10
Graphical User Interface Design . . . .11
Other Concept Art . . . .12
Summary . . . .13
Questions . . . .13
Answers . . . .14
Discussion Questions . . . .15
Exercises . . . .15
Chapter 2 Creating Game Layout Charts . . . 17
Designing the Style of the Chart . . . .17
Building the Game Layout Chart . . . .19
Formal . . . .223
Diagonal . . . .224
Staggered . . . .225
Flush . . . .226
Two-Column Flush . . . .227
Two-Column Random . . . .228
Other Styles . . . .229
Special Page-Layout Considerations . . . .229
Summary . . . .229
Questions . . . .229
Answers . . . 230
Discussion Questions . . . .231
Exercises . . . .231
Appendix A Concept Art in 3D . . . 233
Building a Game Board . . . .233
Texturing the Game Board . . . .239
Adding the Game Pieces . . . .250
Rendering the Game Board . . . 254
xv
T
he creative work involved in creating concept art for games is one of the mostrewarding jobs that an artist can have. In fact, it is possibly the most creative job in the entire game industry. Concept artists have the opportunity to visualize things that have never been seen before. They create the visual design of games. It is a huge responsibility and yet one of the most enjoyable experiences an artist can have. When an artist creates a game, there is much more going on than in almost any other type of art anywhere. In a game, the artist is creating a self-contained world in which characters can interact with each other and things can happen. Unlike painting a picture, creating art for a game is about as close to intelligent art creation as an artist can get. It is like creating a world, and it is exciting to think about.
Concept art is the foundation of game creation. Game development relies on the concept art to give direction to the development team. The concept artist supplies the vision for the game. Without the concept art, there is a good chance that there will be miscommunica-tion in the development process. The concept artist is the one who visualizes the game and then gives that vision to the rest of the development team.
This book is about creating game concept art. It covers a vast array of art required in the concep-tual stage of game development. It is a beginning book, so it takes a basic look at creating game concept art. You do not need to have any game art development experience to read this book. This book contains several step-by-step examples for you. These examples are designed to help you understand how the art is created. You are encouraged to follow the examples to get a feel for the project. After trying the examples in the book, you should try a few projects of your own. Creating game concept art is fun. This book should help you on your way to a wonderful experience in creativity.
1
O
ne of the most highly sought after jobs in the game industry is the concept artist.The concept artist is responsible for designing the visual aspects of the game, and works hand-in-hand with the game designer to craft the foundation upon which the game will be created. This foundation is called the game design, and it is the document that defi nes all of the aspects of a game. It is similar in nature to an architect’s blueprint of a complex building. The game design contains detailed descriptions of the characters, settings, story, game play, and technology. It also contains extensive amounts of art. In a game design, graphics are usually the fi rst thing that a publisher or investor sees. The better the design’s graphics, the more likely the publisher or investor will be to have a favor-able impression of the design. Great concept art can often mean the difference between a design being read or ignored.
This book is a hands-on approach for the beginning artist to learn how to create concept art for game designs. It includes many step-by-step examples and a number of samples from game designs. The book is designed as a learning tool to help beginners explore the creation of concept art.
Art Used in Game Designs
Game designs include extensive amounts of art to help the game developers create the fi nal game. Some of the art typically found in a game design includes
■ Character designs ■ Model sheets ■ GUI designs
I will cover each of these areas of the game design in detail in the course of this book. For now, I’ll provide you with a quick look at each one so you will understand what role they have in the game design.
Game Layout Charts
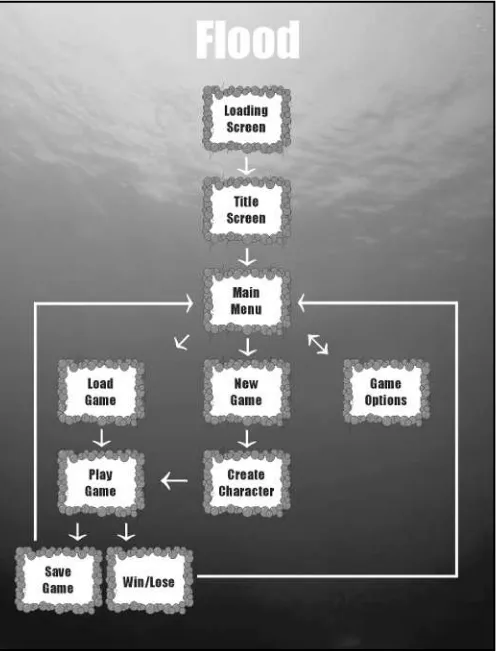
The fi rst task for the concept artist and the game designer is to lay out the game in a game layout chart. This chart is a visual representation of the game, showing how it will be played and all of its components (see Figure 1.1). Although the chart is a simple diagram of the game, it can become very complex.
Figure 1.1
The purpose of the chart is to help the development team understand how the game goes together. This is particularly important when game development involves a large team. As games continue to become more complex, the number of developers per team increases. Sometimes the team members work in different locations. The game layout chart is a simple way for the members of the team to understand the game and how each part will fi t into the fi nished product.
The concept artist typically is not responsible for designing the content of the game layout chart (in other words, what goes into each individual panel). Instead, the artist’s role is to take the information and arrange it into an understandable chart. As with everything in a game design, the chart should refl ect the nature of the game.
The game layout chart is the framework upon which the concept artist will defi ne the visual elements of the game design. Often the game design chart will include miniature versions of the fi nished illustrations linked to the actual pictures.
Storyboards
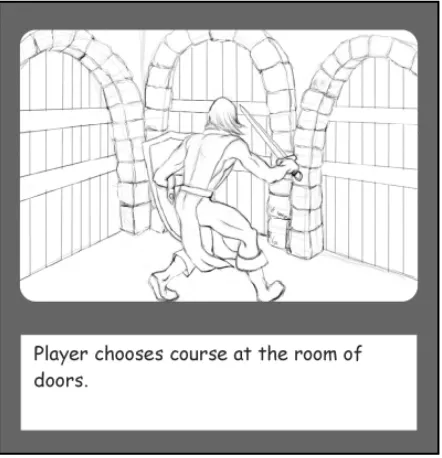
Storyboards are series of sketches that indicate how sequences of events should take place. In a way, they are similar to cartoon panels because they have pictures with captions explaining the scene and any possible dialogue. In games, storyboards are used to show how the game will work (see Figure 1.2).
Figure 1.2
The storyboard shows possible events in a game.
Unlike fi lm and video productions, games are not linear in nature, and seldom do events occur in exactly the same way each time the game is played. Camera angles, character positions, and even outcomes will differ because the player is in control of one or more elements in the game. Therefore, storyboards for games are not used in the same way as storyboards for fi lm and video.
A storyboard in a game design will show a possible sequence of events. The development team will use it as a guide for setting up an event. Sometimes the storyboard will need to include several possible outcomes for an event, depending on how pivotal the event is in the overall scheme of the game (see Figure 1.3).
Storyboards in game designs are also used to show game navigation—the process of moving through the game (see Figure 1.4). Navigation is usually accomplished via a user interface, which includes all the elements that are used to control the game, such as input devices (game controllers or a mouse) and onscreen elements (buttons, menus, windows, and so on). User interfaces also include onscreen information elements, such as score, health, time, or any other important information a player needs to effectively play a game. Because games require player input to progress from one part to another, the design team needs to communicate how this navigation will be accomplished. Storyboards are a great way to show how the navigation system in a game will work.
Storyboards are also used to defi ne cinematic sequences in a game. Often story elements in a game are developed by using short cinematic sequences (see Figure 1.5). These sequences Figure 1.3
are linear video clips, and they are often as sophisticated as any motion picture. They form a vital part of many games. Concept artists work with the game designer to visualize each cinematic sequence. It is the responsibility of the concept artist to create storyboards that show how a cinematic sequence will work in the game. Sometimes the artist will work with a screenwriter to develop the sequences. For cinematic sequences, the storyboards are very similar to those used in motion pictures and television.
Figure 1.4
Storyboards are used to show game navigation.
Figure 1.5
Storyboards are also used for cinematic sequences in games.
Level Layouts
Games are often broken up into levels. The term level has its roots in the beginning of game development, when games were restricted by technology and could have only a limited num-ber of graphics loaded in the game at any one time. Each time the player moved from one area to another, the old graphics had to be eliminated and new graphics had to be loaded. Therefore, games were broken up into areas. Usually they progressed from simple areas to more complex ones as the player learned how to play the game. In this system of game advancement, the play areas became known as levels, referring to the level of diffi culty in each game area. Today, the term has broadened to include any unique area in a game.
Level layouts are drawings created by the concept artist to show all the elements in a game level. These elements include a map of the terrain and all interactive characters or objects within the level (see Figure 1.6). Often these layouts are drawn to scale on grid paper or with the use of a grid in a digital drawing program.
Figure 1.6
Level layouts often look like maps. In reality, they are maps of the game. They show where a player will start in the game area and how he can progress through the area. Sometimes the progression will take a specifi c path with a defi nite beginning and ending position on the layout, but other games use a more open system in which there are multiple entry and exit points to the level.
Environment Illustrations
An important part of a game design is the environment illustration. Environment illustra-tions are full-color illustrations of a game environment as it will be seen in the game. They are usually in the game design document with the level layouts to show the development team how the game should look. The concept artist will select important areas in a game and create illustrations that are then referenced on the level layout.
Environment illustrations help the concept artist communicate to the development team the feeling and mood of an area. They are used to show color schemes, as well as greater detail in critical areas that is not possible in the level layout (see Figure 1.7). Concept art-ists should use care in choosing what areas are illustrated so that each one serves a vital purpose in the development of the game.
Figure 1.7
Environment illustrations show greater detail for a specifi c level location.
Character Designs
One of the most common tasks a concept artist will be called on to accomplish is the cre-ation of a character design. A character design is a sketch of a character that will appear in a game. Characters are people or creatures in a game that are controlled either by the player or through artifi cial intelligence. Some characters play major roles in the game and some play minor ones, but each character needs to be designed (see Figure 1.8).
Figure 1.8
Every character in a game needs to be designed.
The process of designing characters can sometimes be extensive, with the concept artist creating multiple sketches before coming up with just the right design for the game. Once a character design is chosen, the artist will usually create a detailed color rendering of the character. The rendering will become part of the design document and in some instances will be used to promote the game (see Figure 1.9).
public icons. A character’s name and image can be trademarked, and the concept artist’s design is usually submitted to the trademark offi ce for the trademark.
Character designs can sometimes become quite detailed (see Figure 1.10). Of all of the work a concept artist does, character designs tend to be the most widely used for other purposes. Figure 1.9
Character designs are sometimes used to promote the game.
Figure 1.10
Character designs can sometimes become quite detailed.
Model Sheets
Amodel sheet is an orthographic, detailed drawing of a character or object used by the development team to create the character or object. Model sheets are like drafting plans in that they show multiple views of the character. Most include front and back views of a character (see Figure 1.11). Some model sheets also include side and top views, particularly if the character is a quadruped.
Figure 1.11
Most model sheets include front and back views of the character.
Model sheets are often used in the creation of a 3D model of the character (see Figure 1.12). They are loaded as a template for the modeler to use as a guide for creating the geometry of the character.
A game design can include multiple model sheets, one for each character in the game. Sometimes model sheets are created for important objects in a game. These objects are usually items that are critical to progress in the game or to the look of the game. A good rule in game design is to create a model sheet of any object that plays an important role in the game.
Graphical User Interface Design
The GUI (Graphical User Interface) is made up of the onscreen game elements that are used to give the player information or allow him to navigate through the game. Because these game elements are often present throughout the game, they need to be designed carefully. The GUI needs to perform a function and, at the same time, it needs to be cohesive with the design of the game (see Figure 1.13). Sometimes the GUI is as important to the mood and feel of the game as the rest of the game art is.
Figure 1.12
Model sheets are used in the creation of 3D models.
Figure 1.13
The GUI plays an important role in the look and feel of the game.
Some games, such as role-playing games, have very elaborate, complex GUIs. In these games, the player has to manage multiple game elements. The more game elements that a player has to manage, the more complex the GUI can become.
Good GUI design is critical to the game. A good GUI can often mean the difference between whether or not a game is a success. The concept artist needs to remember that while menus and buttons are part of the game, they are not the entire game. If the GUI is cumbersome or detracts from the core of the game play, it needs to be redesigned.
An important part of GUI design is the heads-up display—or HUD, as it is sometimes called. The HUD is comprised of all the onscreen interface elements present during normal game play. This display is primarily used to give the player critical game information, such as health status or the current score. In many games it is on display constantly and is updated in real time. HUDs are tricky to design because they must look nice while remaining unobtrusive to the rest of the game. They usually occupy the edges of the screen to allow the main play action to take center stage (see Figure 1.14).
Figure 1.14
The HUD occupies the areas near the edges of the screen.
Other Concept Art
There is no standard format for game designs because games vary so greatly. The purpose of the game design document is to communicate the nature and extent of the game. It gives the development team and other interested parties, such as the marketing team and the management team, a clear picture of the game. Each design needs to be customized to be as clear and easy to follow as possible. The concept artist plays a critical role in its creation. So much of a game is visual in nature that it would be diffi cult to have a game design without the concept artist.
Summary
This chapter provided a quick overview of the types of art used in a game design. In this chapter, you should have learned the following concepts:
■ Concept art includes many elements, such as game layout charts, storyboards, level
layouts, environment illustrations, character designs, model sheets, and GUI designs.
■ Each type of concept art fulfi lls a vital role in the overall game design. ■ Sometimes specialized art is required for specifi c games.
■ Each game design is a unique document, so rather than following a strict formula,
the design should be adapted to the needs of the game.
This chapter also covered several basic elements of concept art production, including:
■ Game layout charts
■ Graphical user interface designs
Questions
1. What is a concept artist’s role in game development? 2. What is a game design?
3. What are some elements of a game design document?
4. What types of art are generally found in a game design document?
5. What chart is a visual representation of the game showing how the game will be played and all the components of the game?
6. True or false: Because games are not typically linear in nature, storyboards are not used in game development.
7. What type of art is used by concept artists to design a game level? 8. What do level layouts often look like?
9. What can a concept artist do to communicate to a development team the look and mood of an area in a game?
10. True or false: Not all characters in a game need to be designed. 11. What is a sketch of a game character is called?
12. What artwork is used by the development team as a template for creating charac-ters or objects?
13. What is a model sheet?
14. True or false: GUI stands for Graphical User Icon. 15. Do all games have characters?
Answers
1. The person responsible for designing the visual aspects of the game. 2. The document that defi nes all of the aspects of a game.
3. Detailed descriptions of the characters, settings, story, game play, and technology. 4. Game layout charts, storyboards, level layouts, environment illustrations,
character designs, model sheets, and GUI designs. 5. The game layout chart.
11. A character design. 12. Model sheets.
13. An orthographic, detailed drawing of a character or object used by the develop-ment team to create the character or object.
Discussion Questions
1. Why is art needed in a game design?
2. Why do game design documents need to be unique to the game? 3. Should the game industry standardize game designs?
4. What are some important things to consider when you are designing HUDs? 5. Why is it important to have good game design art?
Exercises
1. Create an outline of a game design document indicating the art needed for each part of the document.
2. Find examples of game concept art in game magazines or on the Internet. Select fi ve of your favorite examples of character design and environment illustrations. 3. Take a game that you own and write down the types of concept art that would
be necessary to create a design document for it.
17
T
he game layout chart is the fi rst step in defi ning the art that you will need for a gamedesign. The chart works as a blueprint of the game, defi ning how it will work and what it will be. The chart should be a simple-to-follow diagram showing how the game interface will work, the characters or player-controlled elements, the areas or levels, and any other important information relating to the game.
The advantage of creating a game layout chart is that it forces the designer to fully explore how the game will work. Often as a designer and an artist work together on the chart, game elements will change because the designer and artist are getting a better picture of how the game will work. For this reason, it is important to create the chart in such a way that things can be moved around easily.
The game layout chart will help the concept artist determine the art for the design. Each text block in the chart is there to explain a part of the game. As a general rule, a picture of some kind should accompany the text block so there is a visual explanation as well as a written one.
This chapter will explain how to create a game layout chart. It will give you step-by-step instructions along with an explanation of the purpose of each step.
Designing the Style of the Chart
A game layout chart should be designed to convey to the viewer a feeling of what the game will be just by the way it looks. Technically, all the chart has to be is a bunch of text boxes—boxes containing text information—connected by lines or arrows. A simple box and line chart, however, is not very exciting. The game layout chart will be one of the fi rst pieces of art that a reader of the design will encounter. It should express a positive image of the game.
C
H A P T E R
2
Creating
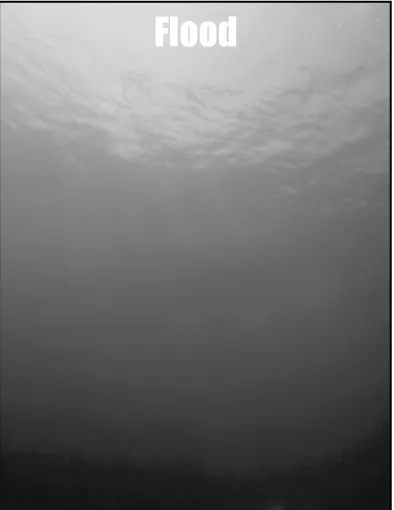
In the example for this book, you will design a fanciful action game for children. The concept of the game is about saving characters from rising fl oodwaters, so a water motif is appropriate as a background. Figure 2.1 shows a nice watery background for the chart. It works well for a background because it has nice organic gradation of color from the top to the bottom.
Figure 2.1
A water motif is appropriate as a background.
hint
The fi st element to add to the chart is the game title—Flood. The word “Flood” is printed across the top of the chart in bold letters, as shown in Figure 2.2.
Figure 2.2
The word “Flood” is printed across the top of the chart in bold letters.
The background motif for the chart is now set. Each page will share this motif to give the chart a consistent look. Most games are too complex for their layout charts to adequately fi t on a single page. Tying the chart together with a single motif helps to defi ne each page as part of the chart.
Building the Game Layout Chart
Now that the background for the chart is set, it is time to start building the chart itself. 1. The fi rst step is to design a frame for the text box. A simple box could work, but
it does not tell you much about the game. A better choice is to create something that fi ts with the background motif. A frame of blue bubbles works better as a design element, as shown in Figure 2.3.
2. The very fi rst item on the chart will be a loading screen. A loading screen is a graphic that appears at the beginning of a game while the game data is being loaded onto the game system from a CD-ROM or other distribution media. The loading screen is the very fi rst graphic to appear in most games. The graphic can be as simple as the word loading, to as complex as a series of opening screens. One important screen at the beginning of every game is the legal screen, which contains legal notifi cations for the game, such as copyright and trademark information. Figure 2.4 shows the Loading Screen text box.
3. Flood is a simple game, so the next screen on the chart is the title screen, which introduces the game to the player. Many games will play an introduction video either before or after the title screen. Videos in games are often referred to as FMVs (Full Motion Videos). Flood does not have an FMV, so only the Title Screen text box is needed for the chart.
4. The next box after the Title Screen box is for the game’s main menu. This is the central navigation page of the game. It is usually the fi rst menu page in a game, and it connects the player to other menu pages if there are any.
Arrows connect the text boxes to show the direction of navigation through the game (see Figure 2.5).
Figure 2.3
Figure 2.4
The fi rst screen in the game is the loading screen.
Figure 2.5
Arrows connect the text boxes.
5. The main menu is the hub of the game. From there, the player can start a new game, continue a saved game or change the game options. Up until now, the chart has been linear, with one screen following the next. Now the chart needs to branch out to several screens. Figure 2.6 shows a branching chart. Notice that the arrow to the Game
Options box goes in both directions. This indicates that the player will be able to go from the main menu to the game options, and then back to the main menu.
Figure 2.6
Three screens branch off of the main menu screen.
The fi rst box branching from the Main Menu box (on the left side) is the Load Game box. The load game feature allows players to continue playing a game they started earlier. Many games are too time-consuming to play in one sitting. Some games might take days (if not weeks) to complete. Allowing a player to save a game so he can resume it later is a common practice in game design. In some games, loading a new game will take the player to a new screen; in others, it will just bring up a window. In either case, it is a separate function and should be designated as such in the game layout chart.
The last text box (on the right side) is the Game Options box. Game options are preferences that the player sets in a game, such as sound levels, graphics quality, animations, and other options. Once preferences are set in the game options screen or window, the player returns to the main menu. Remember, the double-headed arrow indicates that the player can go back and forth from the main menu to the game options.
The next set of text boxes on the chart includes the Play Game box. This box will be expanded on other pages of the chart, but it only occupies one box on this chart. The Play Game box represents the playable part of the game.
To get to the Play Game box, the player either has to load a saved game or create a new game.
Flood is a character-based game, so the player needs to create a new character to start a new game. In Figure 2.7, notice the placement of the Play Game and Create Character text boxes in the chart. The arrows indicate how the player navigates to the Play Game box.
Figure 2.7
The arrows indicate how the player navigates to the Play Game box.
There are only two outcomes of playing the game. Either the player will save and quit the game in progress to resume play later, or the game will end with a win or loss. Figure 2.8 shows the text boxes for these two outcomes.
If the player saves the game, then the game will return to the main menu screen. Figure 2.9 show an arrow going from the Save Game text box to the Main Menu box.
Figure 2.8
The chart shows the outcome of playing the game.
Figure 2.9
After the Win/Lose box, the player will also return to the main menu but will go through one more text box on the way. That box is the High Score box. The high score screen in a game shows the player where his score places among that of other players of the game. Figure 2.10 shows the High Score box added, with an arrow going to the Main Menu box.
Now the fi rst page of the chart is almost fi nished. There is only one more text box that needs to be added, and that is a way for the player to quit the game. The quit game option is usually part of the main menu, so the text box is added so its arrow comes from the Main Menu box, as shown in Figure 2.11.
Figure 2.10
The High Score text box is added to the chart.
Building the Second Page of the Game Layout Chart
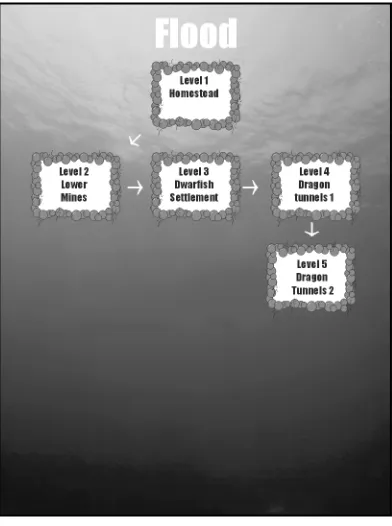
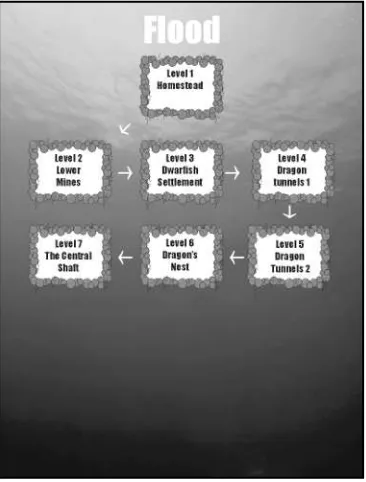
The fi rst page of the game layout chart showed the basic layout of the game navigation, but it did not show the layout of the game levels. The levels are shown on a separate page called the level layout chart. The level layout chart is a one-page (or more) diagram of the levels in the game. The chart starts out the same as the fi rst page, with the fi rst text box being Level 1, as shown in Figure 2.12
Flood has a simple game design in which the player takes each level in sequence. The story is about a young dwarf who lives at the bottom of an ancient dwarfi sh mine. The pumps that keep the lower portion of the mine clear of water have stopped, fl ooding the young dwarf’s homestead. The player has to race against time to reach the upper levels and restart the pumps before the village is completely submerged.
Level 1 is the area around the young dwarf’s home. The player must rush to avoid the rising fl oodwaters. In Level 2, the young dwarf must navigate the lower mines to reach the Level 3 and the dwarfi sh village. Figure 2.13 shows Levels 2 and 3 added to the chart.
Figure 2.11
Figure 2.12
The level layout chart starts with Level 1.
Figure 2.13
Levels 2 and 3 are added to the chart.
Level 3 is where the young dwarf learns about the pumps and the need for a dwarf to reach the surface to restart them. Unfortunately, the only way out is through the central shaft, which is on the other side of where a great dragon lives. The young dwarf must travel through the dragon tunnels to reach the central shaft. Levels 4 and 5 are the dragon tun-nels, as shown in Figure 2.14.
After safely navigating the dragon tunnels, the young dwarf must then somehow get past the great dragon in her nest to reach the central shaft. Figure 2.15 shows the next two levels added to the chart.
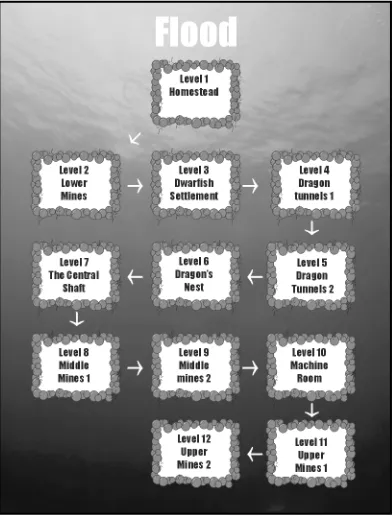
Once past the central shaft, the young dwarf must fi nd his way through the old abandoned middle mines, which take up Levels 8 and 9 of the game, as shown in Figure 2.16.
Figure 2.14
Figure 2.15
The dragon nest and central shaft levels are added to the chart.
Figure 2.16
The abandoned middle mines take up Levels 8 and 9 of the game.
The middle mines are connected to the upper mines via the machine room. In the machine room, the young dwarf fi nds that the great pumps were turned off because the dwarves living in the upper mines didn’t think there were any other dwarves in the mine. Now the young dwarf must travel through the upper mines to fi nd the leader of the upper dwarves and convince her to turn the pumps back on before the lower dwarves are completely fl ooded out. Figure 2.17 shows the upper mine levels added to the chart.
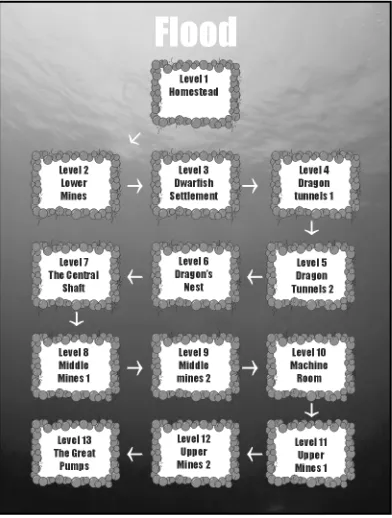
Our young dwarf fi nally reaches the great pumps in the last level and turns them on, saving the lower dwarves. Figure 2.18 shows the completed level layout chart.
Flood is designed in a linear progression format. Each level is taken in succession, one after the other. In a linear progression game, the player has to complete one level before going to the next. Many story-based games have linear progression formats.
Games designed in a linear progression format give the game designer more control over the game experience. The advantage of a linear progression design is that the designer can orchestrate the game experience, similar to a motion picture production. The downside of this method of game design is that there are no unique user experiences. Every player basically experiences the same thing.
Figure 2.17
Other Types of Level Designs
Many games have a more open approach to game design than the linear progression format. In these games, the player has more choices for movement and exploration. The advantage of more choices in game progression is that the player gains a more unique experience. Because different choices lead to different experiences, these games have more replay value.
Replay value is the measure of a player’s desire to replay the game after fi nishing it the fi rst time. This is an important consideration in game design because most players tend to equate replay value with overall value.
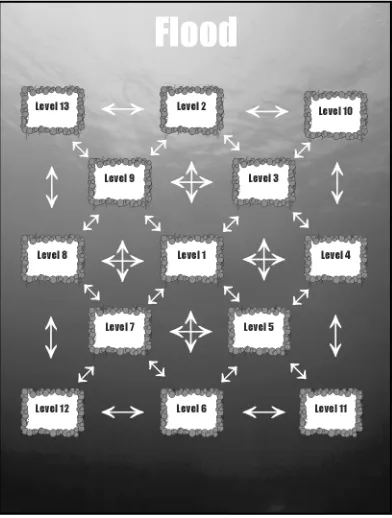
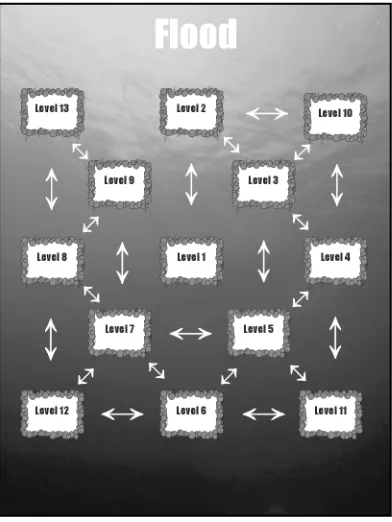
In Figure 2.19, the chart shows a terrain-style open game design. By terrain-style, I mean that you can see each level is connected to all adjacent levels, similar to a terrain map. In many ways, this style of game is really a one-level design broken into smaller sections. The chart shows Level 1 as the central level in the game. From Level 1, the player can go to Levels 2 through 9, but not Levels 10 through 13. Level 1 has the most available choices, while Levels 10 through 13 have the fewest. In this game, the player can move freely from one level to almost any other level. Each time the player plays the game, the experience can be very different, increasing the replay value of the game.
Figure 2.18
The great pumps are the last level of the game.
The danger of an open level design, such as the terrain-style approach, is that you have much less control over the player’s progress through the game. The player might play through the game and completely bypass some levels. The most interesting part of a game might be in a level that the player never sees because he doesn’t happen to go to that level. Variety in a game is an important feature, but it must be balanced with many other important aspects of game design, such as the player’s skill progression, story progression, and production resources. The open terrain-style approach to level design is one extreme, and the linear progression approach is the opposite extreme. By limiting the number of arrows from one level to another, a game designer can create variations on both methods. Figure 2.20 shows how removing some of the arrows changes the completion of the game design.
With the arrows removed, the player has to play through a number of levels to reach Level 13. This approach to level design is called an open path approach. The open path approach to game design gives the player some freedom, while still giving the designer some control over the player’s progression in the game.
Although the open terrain-style approach to level design seems to give the player the most choices, it still isn’t the most open of game designs. The most open approach is one Figure 2.19
in which any level can be accessed from any level. This type of level design is called a full open approach. Figure 2.21 shows a chart for a full open level design. Because every level is accessible from every other level, all of the levels are listed without arrows. Arrows are only needed when the paths between levels are limited.
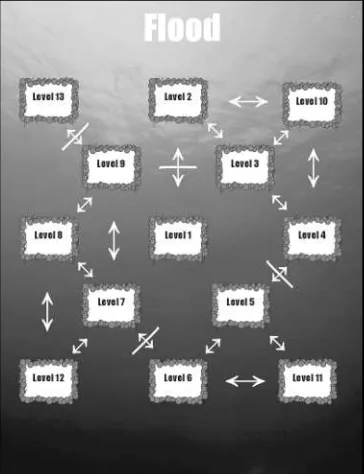
In addition to limiting the path of progression in a game, the designer can also limit access to areas in a game by requiring certain events to take place before a player can progress from one area to another. These events can be almost anything, but the most common event is to have a locked door where the player has to gain access by fi nding a key or some other device that will open the door. Figure 2.22 shows the open terrain-style game with event blocks in place between some of the levels. The line through the arrow indicates that access to the next level requires some event to take place.
By requiring events to happen before a player can move to the next level, the designer gains more control over the progress of the game. The problem with this method of controlling the player’s progress is in how it is implemented. If the event is fi nding an item, the player might become frustrated if he is not able to locate it. Game designers have to be careful that events are not too diffi cult or too easy for the player; otherwise, the player might become frustrated with the game and quit playing before he is fi nished.
Figure 02.20
Some of the arrows are removed to narrow the player’s choices.
Figure 2.21
The full open level design contains no arrows.
Figure 2.22
Charting Complex Games
As you saw in the previous section, charting levels can sometimes become a complex process. The game artist needs to work closely with the designer to determine the correct way to chart the levels in a game. Some games might have more levels than can be charted on a single page. Other games might have events that change the path of the game during the game. There are no set ways to chart a game. The only general rules are that text boxes are used to explain individual parts of a game, and arrows show progress between the text boxes. Beyond that, the artist can be as creative as necessary to show how the game will be put together. However, the artist must balance clarity with aesthetics to come up with an appropriate chart. A beautiful chart is impractical if it is too cluttered to follow easily. On the other hand, a clearly drawn chart might be boring if there is no design.
Some games might require the artist to create multiple pages of level designs. In these charts, it is often best to have one page that shows how each of the other pages connects. This page becomes a chart of the chart.
Some games might have the path change based on player choices. A good method of dealing with this type of complexity in a chart is to color code the possible paths. Each possibility needs to be charted, but by coloring one path blue while the other is red, you make it easier for the reader to follow the course of the game.
Some games might have the player revisit levels he has already explored. In these games, the level will often change to suit the timing of the player’s return. When major changes to a level occur between a player’s visits, the level should be treated as a new level. For example, if Level 4 is a village the player fi rst visits before it is destroyed by an earthquake, and then visits again after the earthquake, the level should be designated in the chart as a new level. For the second visit, the level could be designated as Level 4a to indicate that it is based on an earlier level.
Some games might have nonplayable events, such as FMVs or information screens, between levels. These items should be added to the chart between the levels. If the event happens during a level, the event should be placed beside the level, with a line connecting the level to the event to show that the event is part of the level. Figure 2.23 shows an example of an opening FMV attached to the fi rst level of the game.
Summary
The process of charting a game is a combination of game design and art production. In most cases, unless the artist is also the game designer, it is a team effort involving two or more individuals. The job of the concept artist is to design an aesthetically pleasing chart that expresses the feeling of the game while remaining clear and easy to read.
In this chapter, you should have learned the following concepts:
■ What a game layout chart is
■ How to create backgrounds for game layout charts ■ How text boxes are used in game layout charts ■ How to chart game elements
■ What the different opening game elements are ■ What the purpose of the main menu in a game is ■ How to chart levels
■ How to chart linear progression level layouts ■ How to chart terrain-style level layouts
Figure 2.23
■ How to chart open path level layouts ■ How to chart full open level layouts ■ How to deal with complex level designs
Questions
1. What is a game layout chart? 2. How are game layout charts used?
3. What is the concept artist’s role in creating a game layout chart? 4. How is a text box used in a game layout chart?
5. What are some of the opening screens often found in a game? 6. How is a title screen different than a legal screen?
7. What does FMV stand for?
8. What is the hub of the game navigation called?
9. In the game layout chart titled Flood, what are the four text boxes attached to the main menu?
10. What does a double-headed arrow indicate on a game layout chart? 11. What are the possible outcomes of playing a game?
12. What is a linear progression level design? 13. Is replay value important in game design?
14. Which is a more open level layout, an open path design or a terrain-style design? 15. Why doesn’t a full open design have arrows connecting the levels?
Answers
1. A chart that defi nes the game and how it works.
2. As a quick reference to explain the game to interested parties. 3. To create the chart under the guidance of the designer. 4. To show unique stages of a game.
5. Loading, legal, and title screens.
6. The legal screen gives legal information, while the title screen gives the game’s title. 7. Full Motion Video.
8. Main menu.
9. Load Game, New Game, Game Options, and Quit Game. 10. That the path between the items goes in both directions.
11. Save/quit the game or end the game with a win/loss.
12. A level design in which each successive level must be completed before the player can move on to the next level.
13 Yes.
14. Terrain-style level design.
15. Because the connections between levels are not limited.
Discussion Questions
1. Why is it important for a game layout chart to express the feel of the game? 2. Why is it a good idea to create the game layout chart at the beginning of a game design? 3. How does the game layout chart help the concept artist plan the art for the design? 4. What are the benefi ts of a game layout chart?
5. What are the advantages and disadvantages of linear versus open level designs?
Exercises
1. Create a game layout chart for your own game design. 2. Create a level layout chart for a terrain-style level design.
39
I
t is the job of the concept artist to visualize the game. The artist must be able tosee the game in his mind, and then communicate his vision in art. The fi rst step in getting the vision on paper is to create small, quick sketches, often called thumbnail sketches. A thumbnail sketch is a small drawing no more than three or four inches in any one dimension.
A thumbnail sketch is not a precise drawing; rather, it is a quick, loose sketch of the artist’s ideas. It is in these preliminary sketches that the artist begins to work out his ideas of how the game should look. The advantage of doing quick, loose drawings is that the artist can explore multiple ideas without committing signifi cant time to any one idea.
Thumbnail sketches typically are not part of the game design document; rather, they are used to develop the art that will be in the document. The concept artist might be the only person to ever see the thumbnail sketches for a game.
Drawing
Even though a thumbnail sketch isn’t part of the design document, and it is rarely seen by anyone other than the concept artist, it still requires good drawing skills for it to be useful. When drawing thumbnail sketches, the artist should work out design issues and develop the look of the game. A skillfully drawn thumbnail sketch will contain more useful information than a sloppy one. Much of this book is about drawing, so a brief discussion of basic drawing techniques is appropriate.
Most people understand a drawing as something created with a pencil and a piece of paper. To really understand drawing, the artist must learn about those two important components.
The Thumbnail
Sketch
The Paper
In some ways the paper used in drawing is more important than the instrument used to create the drawing. Figure 3.1 shows a blown-up view of several different paper textures. The texture of the paper can play a big role in how a drawing looks.
Notice that some of the paper textures in the illustration have very pronounced patterns. Paper is made by pressing organic or synthetic fi bers together. The fi bers are called pulp, and they can come from any number of sources. The fi bers are fi rst bleached white, and then pressed together in sheets. The most common source of fi ber for paper is wood pulp. Most paper used in art, however, is made from cotton. Cotton paper can be created without leaving any acid residue in the paper, which keeps the paper from changing color and deteriorating.
The texture of the paper can affect the look of the drawing. In Figure 3.2, a pencil stroke is applied to two different paper surfaces. Notice how the pencil lines react differently to the different surfaces.
Figure 3.1
The paper texture can greatly affect the look of a drawing.
Figure 3.2
Paper textures can be used to create drawing effects. If the artist desires a rough, textured drawing, a highly textured paper—such as a cold, pressed watercolor paper—is the best choice. If the artist wants a smoother surface with less texture, a hot press paper is a good choice. Another important aspect of the paper is its tooth. Tooth is the term artists use to describe the abrasive quality of a drawing surface. The higher the abrasive quality, the more pig-ment is transferred from the pencil to the paper. The paper’s tooth is a combination of the texture and softness of the paper. The smoother the texture and the softer the paper, the less likely it will be to pick up much pigment. The rougher the texture and the harder the fi bers, the more likely the paper will pick up more pigment. A paper that picks up a lot of pigment is said to have a lot of tooth. A paper that picks up little pigment is said to have little or no tooth.
The Pencil
The other half of the drawing equation is the pencil or drawing instrument. There are a number of drawing pencils on the market. Most are adequate, but there are a few things to understand about the type of pencil the artist uses to draw and sketch. Pencils use a sub-stance called graphite that is applied to the paper to create a drawing. Graphite can come in many variations of hardness. The harder the graphite, the less likely it will be transferred to the paper in the drawing process. Soft graphite will transfer much easier than hard graphite. Figure 3.3 shows the differences between pencils with different graphite hardnesses. The harder graphite is on the left, and the softer graphite is on the right. Notice that the pencil marks on the right are much darker than the ones on the left.
In addition to the hardness of the graphite, another important aspect of a drawing pencil is the purity of the graphite. Some cheaper pencils will have impurities in the graphite that will cause the pencil to scratch the drawing surface when the artist uses them. These Figure 3.3
Softer graphite pencils transfer easier to the paper.
small impurities can cause problems when the artist tries to draw because not only do the impurities scratch the surface, they also keep the graphite from transferring. It is usually a good idea to test a few pencils to check for impurities before you settle on the ones you want to use in your drawings.
Drawing Technique
There are almost as many ways to draw as there are artists, so this section of the book will not cover all of them. The most important aspects of drawing thumbnail sketches are speed and clarity. The object here is not to produce a fi nished drawing; rather, it is to quickly express and save an idea for later development.
Drawing styles range from tight to loose. A tight drawing is very precise, with every line or gradation in the drawing. A loose drawing is imprecise and more abstract in nature. A precise drawing is usually called a rendering. Renderings are drawings used to defi ne the elements being drawn in great detail. When rendering, most artists will use reference, which is an artistic term used to designate the source material an artist refers to when he creates a work of art. Reference can be anything the artist looks at while working on the art. Photographs are the most common form of reference, but many artists prefer to look at the actual objects they are trying to depict. Because renderings take time to create, they are usually not used as thumbnail sketches. Figure 3.4 is a rendering of a person. In this picture, great care was taken to be as precise as possible, right down to the eyelashes.
Figure 3.4
Thumbnail sketches tend to be loose because the artist is drawing an idea and often does not have a reference to look at while drawing. Thumbnail sketches do not contain great detail for the same reason. Figures 3.5 and 3.6 are loose drawings more typical of a thumbnail sketch. These sketches were obviously created quickly, with only minimal thought given to the fi ne detail of the subject matter.
Figure 3.6
Often in a thumbnail sketch, detail is merely suggested.
Figure 3.5
Thumbnail sketches are generally loose drawings.
Pencil Strokes
Drawings are made up of pencil strokes, which can be bold, light, fl owing, or smooth. They affect both the look and feeling of a drawing. The type of pencil strokes an artist uses to create a drawing is a personal choice and is as individual as a person’s handwriting. Beginning artists should explore different ways of drawing until they are comfortable with a drawing technique.
Figure 3.7 shows a simple zigzag stroke. This stroke is one of the quickest ways to shade in an area. The drawback of a stroke like this is that although it tends to work well for shading fl at areas, it does not express much about the nature of the surface being shaded.
Figure 3.8 shows a stroke that is similar to the zigzag stroke, but is created with more of a scrubbing motion. This stroke is used for fi ne, smooth gradations in drawings. It is not an expressive stroke; rather, it is a stroke used for smooth shading. When using this kind of stroke, the artist is attempting to hide any evidence of the individual pencil strokes. Figure 3.7
A zigzag stroke is one of the quickest ways to shade an area.
Figure 3.9 shows a directional stroke. Each stroke is a separate line drawn with the pencil. Directional strokes can be used for shading, just like zigzag strokes, but they can be more expressive because they can follow the direction of the shape.
Figure 3.8
A scrubbing motion can create a smooth gradation.
Figure 3.9
A variation on the directional stroke is a weighted directional stroke. In it, the artist applies more pressure to one end of the stroke than the other. Figure 3.10 shows a weighted directional stroke used to draw a lock of hair.
By crossing the direction of the pencil strokes, the artist can create a new shading method called crosshatching. Figure 3.11 shows some stone brick rendered with a crosshatch stroke. Figure 3.10
A lock of hair can be drawn using a weighted directional stroke.
Figure 3.11
Crosshatching is another method of pencil shading.
Sometimes the artist can use pencil strokes to describe an object. In Figure 3.12, pencil strokes are used to create a pine tree, a branch of leaves, and some grass around a rock. These are just a few types of strokes that an artist can use in drawing. There are as many variations as an artist can imagine.
Figure 3.12
Pencil strokes can be used to describe an object.
Creating the Thumbnail Sketch
As stated earlier, thumbnail sketches are quick idea drawings used by artists to develop sev-eral ideas while working out a larger or more detailed drawing. Following is a step-by-step approach to a quick thumbnail sketch. The subject is a subway station. In Figure 3.13, the subway station is quickly roughed out in very light strokes of the pencil. By using very light strokes, the artist is able to explore the drawing without becoming committed to any single line. In this way, changes can be made without the artist worrying about erasing lines. Notice that the light outlines contain multiple lines and look somewhat sloppy. During the early stages of a thumbnail sketch, the artist should not worry about being too precise with the drawing.
In the next stage of the drawing, a straight edge is used to lay out the more mechanical areas of the station. The use of a straight edge for mechanical lines can speed up the draw-ing process and give the artist more control over the drawdraw-ing. Curves can also be used as a guide for the artist, but they are more often used in more detailed rendering. The idea here is to lay out a scene as quickly as possible. Figure 3.14 shows the subway station with most of the basic lines drawn in.
Notice that some of the heavier lines do not follow the original layout. That was why the original layout was drawn in lightly.
Now you can populate the subway station with passengers and a few advertisements, as shown in Figure 3.15.
This is about all you need in a thumbnail sketch. This drawing took only a few minutes to create, and even though it is rough, the artist can get a good idea of how the scene will look from this angle.
Figure 3.13
In Figure 3.16, the artist is trying to work out an angle of view for a scene where a soldier is hiding from a mech. There are three different angles of view. The quick thumbnail sketches, while not very refi ned, still give the artist ample information for investigating different angles.
Each of the thumbnail sketches in Figure 3.16 has a different dynamic feel. The upper-left sketch is somewhat static, with very little tension between the foreground character and the background mech. In the middle and right sketches, the character’s pose is more animated, adding to the drama of the scene. In both of these drawings, the mech is closer and drawn from an angle that makes it more menacing. No matter how much detail is added to the fi rst drawing, it will never have the drama and tension of the other two drawings. Figure 3.14
Heavier lines are used to better defi ne the subway station.
Figure 3.15
Thumbnail sketches are not detailed sketches, so the people and ads are drawn very loosely.
Character Thumbnails
One of the biggest uses of thumbnail sketches is for exploring ideas for characters. Char-acters are the focal point of a game. Having interesting charChar-acters can make a big impact on how players perceive the game. The fi rst step in creating a good game character is to work out the ideas in thumbnail form.
The nice thing about thumbnail sketching of characters is that the artist can follow his imagination. The sketches are fi rst drawn loosely as the artist searches for an idea, and then they are refi ned enough to give the artist a clear picture of the major features of the character. Figure 3.17 is a thumbnail of a cartoon character. The character is much shorter and wider than a normal human.
One way to design a unique character is to exaggerate the character’s features. In Figure 3.17, the woman’s face is very wide with a large nose and glasses that are so powerful that her eyes appear to be twice their normal size.
Another imaginative approach to designing a character is to blend features of different animals or humans. Figure 3.18 is a creature design that borrows features from several different animals. Notice the very light construction lines in the picture.
Figure 3.16
Sometimes it is useful to put the character in a setting to help the artist see him or her in context. A setting will help to defi ne the character and give it scale. The earlier sketches were of a character alone. Figure 3.19 shows a character by a tree. The tree and the owl on the tree branch help to defi ne the character as a person who lives in the forest. The spear further defi nes the character as a warrior.
One trick that is useful in doing thumbnail sketches is to copy the original sketch to experi-ment with different options. In Figure 3.20, the fairy is copied on the paper twice. In the fi rst copy, butterfl y wings are added. In the second copy, bee wings are added. This saves the artist time because the fairy does not have to be redrawn, and the artist can experiment with multiple wing types to fi nd the one that works best for the game.
Figure 3.17
A thumbnail sketch of a cartoon character
Figure 3.18
Features from several animals were used to create this creature.
Design Tool
Many artists will want to jump right in and draw a fi nished drawing right away. The prob-lem with going directly to the fi nished drawing is that there is no plan, and the drawing will suffer because not enough thought was put into the design. It is a much better idea to work out the overall design in a thumbnail sketch. Even just a few quick sketches will help the artist defi ne and plan a good design for a fi nal drawing. Figure 3.21 is a quick sketch of a jungle scene with a safari guy in the foreground. The shapes are roughed in quickly with bold strokes to show where the light and dark areas will be.
Figure 3.19
Sometimes a character will be drawn into a setting.
Figure 3.20
It is easy to change the design of the drawing at the thumbnail level because the drawings are quick and the artist hasn’t made a big time or effort commitment. If the design doesn’t look good in the thumbnail sketch, chances are it will not look good in the fi nished drawing either. The more design elements that an artist can work out in loose thumbnail sketches, the better the fi nished drawing’s design will be.
Summary
This chapter covered the basics of drawing and creating thumbnail sketches. In this chapter, you should have learned the following concepts:
■ Sketching ideas is the fi rst step in creating concept art for games.
■ A thumbnail sketch is a fast and easy way to put an artist’s ideas on paper. ■ Different papers have different textures and react differently to the pencil. ■ Pencils range in hardness.
■ Different types of pencil strokes are used in drawing. ■ There are several steps in creating a thumbnail sketch.
■ Creating multiple views of a scene in thumbnail sketches can lead to more
dynamic designs.
■ Thumbnail sketches are used to design characters.
■ Thumbnails sketches are used to design a drawing before the artist starts the
fi nal version. Figure 3.21
Sometimes a character will be drawn into a setting.
Questions
1. What is another name for a quick idea sketch?
2. True or false: Artists should take a long time to create a thumbnail sketch. 3. What does a paper’s tooth refer to?
4. Which paper will pick up more pigment from a drawing instrument—a paper with a lot of tooth or a paper with little tooth?
5. Is an 8B pencil softer than a 2B pencil?
6. What is the difference between a tight and a loose drawing? 7. Why are thumbnail drawings usually loose drawings? 8. Are thumbnail drawings considered rendering?
9. Should all artists use the same type of pencil strokes when creating a thumbnail sketch? 10. What is a zigzag stroke?
11. When are light pencil lines used to create a thumbnail sketch?
12. True or false: Usually the fi rst sketch is the best, so an artist rarely needs to do more than one or two thumbnail sketches.
13. Are thumbnails sketches used much in character designs?
14. How can copying a thumbnail sketch help an artist experiment with a character design? 15. Should an artist use thumbnail sketches to plan the design of a picture?
Answers
1. A thumbnail sketch. 2. False.
3. The abrasive qualities of the paper. 4. A paper with a lot of tooth.
5. Yes.
6. Tight drawings are precise drawings, while loose drawings are not. 7. They are created quickly and usually without reference.
8. Usually they are not renderings.
9. No. Pencil strokes are unique to the artist’s style of drawing.
10. A pencil stroke made with a back-and-forth motion without taking the pencil from the paper.
13. Yes.
14. The artist can experiment with detail without having to redraw the drawing. 15. Yes.
Discussion Questions
1. How does the paper affect a drawing?
2. How does the softness of the graphite in a pencil affect the drawing? 3. Why shouldn’t an artist spend a lot of time working on a thumbnail sketch? 4. Should an artist put a lot of detail in a thumbnail drawing?
5. Why should an artist plan a drawing by doing a few thumbnail sketches fi rst?
Exercises
1. Do several thumbnail sketches of a game scene. Try to vary the tension and drama of each sketch.
2. Create several thumbnail sketches of a wizard for a game. Try different clothing and genders as well as different creatures to fi nd the best design.
3. Plan a major drawing by using thumbnail sketches to design the major parts of it. Try multiple view angles.
55
S
toryboarding has proven to be one of the most effective ways to plan a video game.There are many reasons to use storyboards in games. The following list highlights just a few of them:
■ Storyboarding saves time and money.
■ Storyboarding helps show sequences that are diffi cult to explain.
■ Storyboarding helps to communicate the game concept to all involved in development. ■ Storyboarding helps the design team work out diffi cult game problems.
Creating Games Takes Time and Money
Creating video games takes a lot of money and effort. It is expensive to create 3D models for game characters and worlds. The cost gets even higher with programming and animation. Trying to create a game without a plan can result in wasted time and money. Storyboard-ing helps the design team to plan the production. By visualizStoryboard-ing the game in storyboard format, the design team can communicate to the development team a consistent vision of the game, reducing the potential for wasted effort.
Games are getting more and more complex. Production budgets are getting higher, and development teams are getting larger. In many instances the development team might be located in separate facilities, sometimes on opposite ends of the planet. All of these factors point to the need for effi cient and effective communication. Because a storyboard is a method of communication, it helps development companies keep their productions on track. Often games have very specifi c release dates. If a game gets bogged down in development, the fi nancial impact on the publisher can be enormous. It is always wiser to spend a little more time creating a clear picture of the game in the planning stages than it is to plunge