© 2008 Course Technology, a part of Cengage Learning. ALL RIGHTS RESERVED. No part of this work covered by the copyright herein may be reproduced, transmitted, stored, or used in any form or by any means graphic, electronic, or mechanical, including but not limited to photocopying, recording, scanning, digitizing, taping, Web distribution, information networks, or information storage and retrieval systems, except as permitted under Section 107 or 108 of the 1976 United States Copyright Act, without the prior written permission of the publisher.
The Games Factory 2 is the property of Clickteam.
Library of Congress Control Number: 2008902388 ISBN-13: 978-1-59863-551-5
ISBN-10: 1-59863-551-4
Course Technology 25 Thomson Place Boston, MA 02210 USA
Cengage Learning is a leading provider of customized learning solutions with office locations around the globe, including Singapore, the United Kingdom, Australia, Mexico, Brazil, and Japan. Locate your local office at: international.cengage.com/region
Cengage Learning products are represented in Canada by Nelson Education, Ltd.
For your lifelong learning solutions, visit courseptr.com Visit our corporate website at cengage.com
Picture Yourself Creating Video Games Jason Darby
Publisher and General Manager, Course Technology PTR: Stacy L. Hiquet
Associate Director of Marketing: Sarah Panella
Manager of Editorial Services: Heather Talbot
Marketing Manager: Jordan Casey
Acquisitions Editor: Heather Hurley
Project Editor: Sandy Doell
Technical Reviewer: Joshua Smith
PTR Editorial Services Coordinator: Erin Johnson
Interior Layout: Shawn Morningstar
Cover Designer: Mike Tanamachi
CD-ROM Producer: Brandon Penticuff
Indexer: Sharon Shock
Proofreader: Andy Saff
For product information and technology assistance, contact us at
Cengage Learning Customer and Sales Support, 1-800-354-9706
For permission to use material from this text or product, submit all requests online at
cengage.com/permissions
Further permissions questions can be emailed to [email protected]
Printed in the United States of America 1 2 3 4 5 6 7 11 10 09 08
Acknowledgments
C
reating a book requires the help of many different people
and resources. There are a number of people without whom this book could not have been completed, and I would like to thank them all.Many thanks go to the team at Course Technology PTR, who, as always, were efficient, friendly, and helpful in getting this project off the ground and doing all of the hard work of editing the book.
Thanks to Yves and Francois, the creators of The Games Factory, who made an easy-to-use product that makes the whole game creation process simple for anyone. I am also grateful for their prompt responses whenever I had a question. Thanks to Jeff Vance, who provided support through this process.
A hello and thanks go to Adam Lobacz, who used his excellent artistic talent to draw the storyboards in Chapter 3.
Thanks to my wife and children, who supported another book project, even though they know how much work is involved. Jared, Kimberley, and Lucas, you are the best kids a dad can have!
J
ason Darby is the Director of Castle Software Ltd,
an indie games and multimedia development company in the heart of the United Kingdom. Jason started on his computer creation business in 1998 when he released an offline web browser program. Since then, he has been working on projects for businesses, including a CD-ROM project for PC Format Magazine(UK), a number of quiz programs for large blue chip companies, educational multimedia programs, and small games.Jason has had several books published in the Games Creation market, including Make Amazing Games in Minutes, Awesome Game Creation, and Game Creation for Teens. He has also published a book for people who want to make their own multimedia programs, called Power User’s Guide to Windows Development.
Over the last few years, Jason has written several magazine articles in leading UK magazines, on game and screensaver creation. He has been published in magazines such as PC Format, PC Gamer, and PC Answers.
Introduction . . . xi
Chapter 1
Starting Out in Video Game Creation . . . 1
Games Creation Software . . . 2
Hardware . . . 3
Personal Computer . . . 3
Printer. . . 4
Scanner. . . 4
Digital Camera . . . 5
Joystick. . . 5
Modem and DSL . . . 5
CD-Based Media . . . 5
Graphics Tablet. . . 6
Dual Monitors. . . 6
Chapter 2
Game Design . . . 9
Product Design and Planning. . . 10
Your Ideas . . . 11
The Story . . . 13
Storyboarding . . . 14
Chapter 3
Getting to Know The Games Factory . . . 17
The Games Factory 2 Program Introduction . . . 18
Launching The Games Factory 2 . . . 19
Introducing The Games Factory 2. . . 20
Menu Bar . . . 21
Shortcut Buttons . . . 21
Workspace Toolbar . . . 21
Properties Window . . . 22
Editors Window . . . 23
Library Toolbar. . . 23
The Games Factory 2 File Basics . . . 25
Creating a New TGF2 Game File . . . 25
Opening an Existing Game File. . . 26
Saving a Game File . . . 26
The Editors . . . 27
Storyboard Editor . . . 27
The Frame Editor . . . 30
The Event Editor. . . 31
The Picture and Animation Editor. . . 33
The Expression Evaluator . . . 34
Getting Help. . . 35
Tutorial Files. . . 36
Running Your Games . . . 37
Chapter 4
Creating the Scene and Using Objects . . . 39
Objects in TGF2 . . . 40
Adding an Object . . . 40
Accessing Object Properties . . . 41
Common Objects. . . 43
Active Objects. . . 43
Backdrop and Quick Backdrop Objects . . . 44
Button Object . . . 46
Hi-Score Object . . . 48
Text-Based Objects . . . 50
Lives . . . 51
Score . . . 52
Chapter 5
Using the Event Editor . . . 55
The Event Editor . . . 56
The System Objects . . . 57
Events. . . 58
Actions . . . 61
Comments . . . 63
Chapter 6
Movement . . . 67
Accessing Movement . . . 68
Bouncing Ball Movement . . . 70
Path Movement . . . 74
Mouse Controlled . . . 77
Eight Directions . . . 78
Race Car. . . 80
Platform. . . 81
Pinball . . . 84
Other Available Movements . . . 85
Multiple Movements . . . 87
Chapter 7
Pictures and Animations . . . 91
The Picture Editor. . . 92
Tools . . . 93
Drawing Area . . . 109
The Color Palette . . . 109
The Animation Editor . . . 110
The Animation List . . . 112
Directions and Direction Tab . . . 113
Frames . . . 115
Chapter 8
Creating a Bat and Ball Game. . . 119
Setting the Scene . . . 120
Preparing Our Game. . . 120
Connecting to the Prebuilt Library . . . 121
Preparing the Main Menu . . . 122
Preparing Level 1 . . . 123
Preparing the End Screen . . . 128
Programming the Main Menu . . . 129
Programming Game Level 1 . . . 133
Programming the End Screen. . . 139
Chapter 9
Adding More Features . . . 143
New Features. . . 144
Adding New Objects . . . 144
Chapter 10
Additional Program Changes . . . 157
Screen Changes. . . 158
Full Screen . . . 158
Removing a Menu . . . 159
Default Menu Options . . . 160
Menu Dialog . . . 161
Menu Walkthrough . . . 164
Programming the Menu. . . 165
Icons . . . 167
Chapter 11
Distribution . . . 169
Creating an Executable File . . . 170
Zipping the File . . . 171
Creating an Installer . . . 174
Web Browser Games . . . 177
Chapter 12
Testing Your Games . . . 181
Lovely Bugs . . . 182
Testing Names . . . 183
The Debugger . . . 185
Starting the Debugger . . . 185
Adding Items to the Debugger . . . 188
Editing Object Properties . . . 191
Appendix A
Keyboard Shortcuts . . . 195
Appendix B
Bibliography . . . 199
Make Amazing Games in Minutes . . . 200
Power User’s Guide to Windows Development . . . 201
Awesome Game Creation: No Programming Required, Third Edition . . . 202
Game Creation for Teens . . . 203
Picture Yourself Creating Video Games . . . 204
Going to War: Creating Computer War Games. . . 205
T
his book is for people who are interested
in creating their own computer games for the Windows platform. Using the easy but powerful The Games Factory 2 software, you will be able to make games quicker and easier than ever before, without any programming knowledge.Game creation is a lot of fun and easier than you might have previously imagined; it really is simple to start making your own games. The Games Factory 2 software that we use in this book allows you to make many different types of games, such as card games, board games, puzzles, platform games, side-scrolling games, shoot ‘em ups, adventure games, and more. If you have always dreamed of making your own games, now is your chance.
Remember to try out different things and experiment with what you have created in each chapter before proceeding on to the next one. You will find this really is a lot of fun, but it’s useful to take your time and learn about the product.
Assumptions
This is a beginner’s book, and it is aimed at developers who want to learn the basics of game creation and how to make their own games. You do not need to know any programming languages, and as long as you have basic PC usage skills (can use the mouse and keyboard and navigate in Windows), you will be fine. Or you may be experienced in games programming or game creation and simply be looking for a book on The Games Factory 2; if so, this book is for you too.
Book Structure
The book is divided into 12 chapters and 2 appendixes. We begin with a straightforward discussion about the equipment you will need to begin making games. We then discuss how to plan your games, creating diagrams of how they will work. We then go through the basics of the program we use in this book, The Games Factory 2. In later chapters, we show you how to build games using the product.
C
reating computer games
has long been considered a difficult but rewarding hobby or career. Knowing where to start, which language to choose, and what hardware and software to buy meant that it was a potential minefield of disappointment and expense. Many people want to make games, but few know where and how they should start. You may have already tried to make a start but have come to an impasse and don’t know what to do next.In this first chapter you will learn which software and hardware you need. You’ll also learn about some equipment that is just nice to have but not essential. You don’t need much to get started, and most of the key items are things you probably already own. Throughout this book, we will use a game development creation program called The Games Factory 2; a trial version of this program is included on the CD-ROM with this book.
More information about The Games Factory 2 can be found at www.clickteam.com.
1
Starting Out in Video
T
he Games Factory 2
is the software that we will be using in this book to make our games. This is the key software needed to begin making your games. The software on the CD-ROM of this book allows you to make and save your games in its own native format. You will not be able to create a Windows-executable file and will need the full version if you want to create games your friends can play.The Games Factory 2 (TGF2) allows anyone with just a basic computer game knowledge to be able to put together a game in a matter of minutes or hours. Rather than using traditional programming methods, where you would type in some text, compile it, check for errors, fix any problems, and then run your code again, TGF2 is an all visual creation program. You create or import your images and drag and drop them
onto an area to create your scene. You then program your game logic using a graphical event system. The event system allows you to code your games using menus and selecting items from a menu.
Even though TGF2 isn’t as powerful as tradition-al programming languages such as C++, it tradition-allows you to get results very quickly and still create commercial-quality games. The Games Factory 2:
씰Allows you to make games without the need to learn a programming language.
씰Is inexpensive (a free trial version is included on the CD-ROM that accompa-nies this book).
씰Is easy to use and easy to learn.
씰Shortens development time and shows your results immediately.
Games Creation Software
Insert Figure 1.1
A high-quality game made in TGF2 by 3dlight-studio.com for Castle Software Ltd.
System Requirements
씰Operating System: Windows 98 Second Edition, Windows 2000, Windows XP, Windows Vista
씰Pentium 4 Processer
씰64MB RAM with Windows 98, 256MB with Windows 2000 and XP, 1GB RAM for Windows Vista
씰Graphics card with 32MB RAM
씰Sound Card
씰150–200MB free hard disk space
Y
ou will need the following
equipment before you can begin making computer games.Personal Computer
To use computer software, you obviously need a PC. The Games Factory 2 program is Windows-based, so you will also need a Windows operating system to run it. Although the Games Factory 2 software runs on relatively low specification computer hardware, the more memory, disk space, and processing power your computer has, the better. You can see the minimum and recommended specifications for installing and running TGF2 in the following lists.
Minimum Requirements for Games Factory 2
씰Operating System: Windows 98 Second Edition, Windows NT4 with Service Pack 3 or above, Windows 2000, Windows XP, Windows Vista
씰Pentium Processer
씰32MB RAM with Windows 9x, 64MB with Windows NT, 128MB with Windows 2000 and Windows XP, 512MB RAM for Windows Vista
씰CD-ROM drive
씰Graphics card with 16MB or more
씰Sound card (optional but recommended)
씰50–100MB free hard disk space
Hardware
About PC Specifications
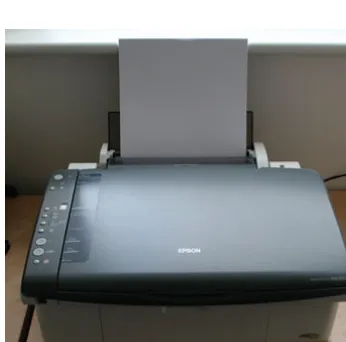
Printer
A printer is a useful piece of equipment for printing out any documentation or information you want to review. There are many different makes and types of printers, some with built-in memory card readers. Others have integrated fax or scanning. You don’t have to have a printer to be able to make games, but when you are doing the planning of your games, you may find it useful to print out your work. Printing out docu-mentation makes it easier to review multiple documents at the same time. Sometimes trying to view several documents onscreen at once can
be distracting or difficult.
Scanner
If you are good at line art or drawing/sketching on paper you may want a scanner to get your drawings into a digital format. You will then be able to load them into a drawing package where you can add color and complete them. There is a great range in the quality of image different scanners can import, but many have a high enough import quality that the quality of your drawings won’t suffer after import. If you already have a printer and scanner combination, this fulfills the requirement to do both while taking up half the space. A scanner is not an essential piece of your game creation kit unless you do drawing.
Figure 1.2
A printer with a built-in scanner.
Paperless Office
Joystick
Many games for the PC platform can be played with a joystick. When making your own games, you may want to have equipment that is likely to be used by people playing your games. The joystick is a perfect example of this. If you have made it possible for a user to play your game with a joystick, then you should test the game yourself with a joystick. Any game you make might play differently with different controllers, so it is a useful exercise to test your game using anything that will be allowed to the player.
Modem and DSL
Access to the Internet is an important aspect of any game creator’s arsenal. You may have a high-speed DSL or a cable connection or still be using the much slower analog telephone system with a 56k modem. Whichever method you use, the Internet is a great way to research game ideas, look at demos for other games, or just obtain knowledge about a particular subject matter.
CD-Based Media
When you are making games, it is a good idea to back up your game files on a regular basis so that if you have any computer hardware problems, particularly hard disk failure, all of your game data will be safe.
In addition to CD-R, there are many different CD-based writing devices, including CD-RW, DVD-R, Dual Layer, and Blu-Ray. It doesn’t really matter which type you have as long as it can save your games. The smallest size drive is around 720MB, which should be a good starting point for backing up your games.
Digital Camera
If you wish to get photo art into your games, you have several options: you could purchase photos online, buy a photo CD, or use a digital camera to take your own photos and then import them. There are many devices that can be used to make images these days: webcams, mobile phones, and the traditional digital cameras, to name a few. Each type has varying scales of quality. Webcams are usually low quality; mobile phones are getting better with each new module, but they lack storage space; and digital cameras are relatively cheap, provide quality images, and can be had for less than $150.
You can make games without a digital camera as long as your games will not involve photo-realistic scenes.
Graphics Tablet
Rather than using a mouse to draw your com-puter graphics, which can be alien to anyone who is accustomed to drawing with a pen and paper, you may want to consider a graphics tablet. The graphics tablet provides a touch-sensitive board where you use a pen that oper-ates in a similar way to a mouse. Many tablets also provide varying degrees of touch sensitivity, so the harder you press down, the more virtual ink will be applied in your paint package.
Dual Monitors
You have at least one monitor with your PC, but you might be wondering what the benefits would be of having two of them in your game creation setup. The reason for having two moni-tors is that when using Windows XP or Vista, you have the ability to place programs on either monitor at the same time. This allows you to view two different programs at any one time, rather than having to switch back and forth between programs.
When using programs like TGF2, you will want to utilize at least one screen for making your games, while you use the other screen for programs such as chat, browsing the Internet, or finding files. Once you have a dual monitor setup you will never want to go back to a single monitor configuration again.
Figure 1.4
Different media for CD and DVD.
CD-R Availability
Dual monitors are very useful for faster and more enjoyable working, but they are not essen-tial for game making, so if you cannot afford another, or just don’t have the space, this is not a problem. You can see a dual monitor setup in Figure 1.5.
Figure 1.5
Dual monitors in use on a single PC.
Dual Monitors and
Graphics Cards
B
efore we begin learning
about the Games Factory 2 software that is included on the CD-ROM, it is a good idea to think about any games that you would like to make. Then document what is going to happen and what is involved in the game before actually getting started on such things as graphics and programming.How you think about your game and document it will ultimately help you in your goal of creating a game. Many people decide to make a game, but some fall into a common trap and try to make the ultimate game as soon as they have installed any software rather than first learning the basics. In some cases, this just leads to disappointment because the game you have always dreamed of making seems even farther away from completion than ever.
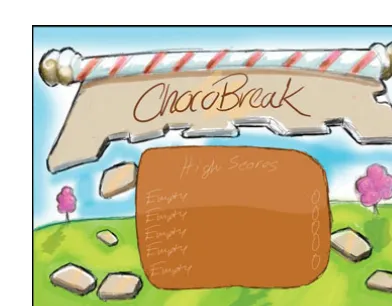
In this chapter, we will look at how to best document your game ideas. We will use the game we will create in Chapter 8 as our inspiration. We will be recreating the tutorial game called ChocoBreak, and using our storyboards and documents as a guide, we will create the game and then add additional levels and features.
So let’s make a start on our game creating journey.
2
Y
ou probably want
to jump right into making your games, and who can blame you? Making games is great fun. But before you start, you should consider docu-menting what you intend to make. This will make your whole game making process a lot easier, and it will allow you to make games faster in the long run.It doesn’t matter if you are going to be making a game for your friends or family or considering a game that you might want to upload to the Internet for many people to try; it is always a good idea to write your game ideas down.
There are no right and wrong answers for creat-ing game design documents for yourself, and any of the following concepts can be tailored to meet your own needs. As long as you are com-fortable with what you are documenting and it is helping you to complete your game, you can pick and choose what you want to use from this chapter in your games.
A basic structure of the order in which you do things can be seen in Figure 2.1.
Product Design and Planning
Small Games
If your game is very small and will only take about 20 minutes to make, you probably don’t need to write anything down; then again, it couldn’t hurt and might make the creation go more smoothly in the long run. You should always use this process when you are making larger games. For smaller
games, just consider it an option. Figure 2.1
Because you probably have lots of ideas floating around in your head, it is best to put them on paper where you can easily keep track of them all. It is easy to forget good game ideas, so by writing them down, you have at least a chance of remembering what they were about. The best way to write your initial ideas down is to put them into a simple list as shown in Table 2.1.
T
he best place to start is
with your game ideas. In fact, it’s most likely that you will have many ideas for games and want to make as many of them as quickly as pos-sible. The fact is you are better off selecting a single game idea as the game you want to make, because if you try to make a number of games at once, you will most likely not finish many of them.Your Ideas
Table 2.1 Organizing Your Game Ideas
Game Type Idea Technology Concept Rating Difficulty
Bat and Ball game You are on a break, a chocolate Bat and Ball game, High Easy break. Time to get eating as much destroy the bricks,
chocolate as possible. Using a player static levels. as a bat and a ball, hit the bricks to
destroy them and score points.
Space game You are the only surviving space Space Shoot-em Medium Medium space pilot from the academy. up game—will include
You now have to fight alone scrolling. to save your planet.
Scrolling Aliens have invaded a small town Scrolling—character- Low Medium in your local area. You cannot stand based game.
Creating the list will allow you to write down every idea you have. Don’t worry about it if you are writing down game ideas that you think might not be very good; they might be the source of inspiration for another, better game months from now. You might be able to use some ideas as items in other games too, so don’t worry if half your list consists of games you will probably never make.
Table 2.1 is split into five columns, explained in the following list:
씰Game Type: Categorize your game into a specific genre or type of game, such as Space, Scrolling, or Platform.
씰Idea: Add a brief idea of what the game is about, or the aim of the player. This doesn’t need to be very detailed, just enough information for you to remember what the object of gameplay is.
씰Technology Concept: What things will the game need to include with regards to technology? Will it be in 2D, a first-person shooter, or require scrolling? Keeping a record of the technology required will allow you to track game ideas that you have the tools and soft-ware available to make now. It will also allow you to figure out which games you will have to put on hold until either your skills are at the right level or you have purchased a specific tool to meet a need of the game.
씰Rating. How interested are you in making the game idea that you have? In your game making ideas, you will have games that you really want to make and those that are just an idea that you have yet to fully develop. Giving the games a rating will allow you to gauge which games you really want to pursue at this time.
씰Difficulty: How difficult is the game idea you want to make? If the game is really complex, this difficultly rating will give you enough information to stay away from certain games until you have the necessary skills.
Smaller Projects
It is a good idea to start making small games before jumping into larger games, as this is a good way to learn the game devel-opment tool. Smaller games are easier to complete than larger games, and if you are attempting to make a portfolio of games for professional use, small games show off your talents just as well as large games.
Multiple Game Ideas
The story to the game that we are making in Chapter 8 is as follows:
You love chocolate. It’s 3:00 p.m. and it’s time for your ChocoBreak. Eat as much chocolate as you can by destroying the chocolate bricks. Try not to let the ball disappear from the bottom of the screen or your break time will be over.
Keeping this short story in mind, we can now expand on what we want in our game. Following is a list of items or rules that we will want in our ChocoBreak game.
씰A selection of bricks. (These could be different flavored.)
씰A number of lives.
씰20 points for each brick destroyed.
씰A menu screen to allow the player to navigate to the game.
씰A high scores table that will display the top 10 scores in the game.
씰An area of the screen (top, left, right) protected so the ball does not fly out in that direction.
씰A ball that will bounce on hitting the top, left, and right objects as well as the player’s bat.
씰Music playing on main screen and high score screen.
씰Different sounds when the ball hits various objects.
씰The player to be controlled by the mouse.
From this list, we can now think about how our game is structured screen-wise and begin to think about our storyboards.
The Story
Once you have selected the game you want to make, you may feel that you need to expand on your story a little more. If the game idea is small, you may not need to. It is impossible to be unique with regards to stories these days because many different ideas and concepts could be claimed as coming from one particular genre or idea. This doesn’t mean that you should be taking other people’s stories and using them in your own games, but it means your general concept isn’t necessarily going to be new. For example, how many films and books can you think of that include zombies? Probably quite a few, but each one has a different plot or story-line.
The key to your story is to find the reason that the player wants to play the game. Is it to rescue someone or find a particular item? Did some-thing happen to the characters to make them want to find or chase someone else?
Simple games don’t need to have a large, com-plicated story. You can explain what the player needs to know in a paragraph. If you look at many of the games hosted on
N
ow that you have an
idea what you want in your game, you can start to draw it out on paper. This is called story-boarding, and the process is used to give you an idea what your game will look like before you start to draw graphics and place your items onscreen.TGF2 works on the basis of frames, where each level and screen is a different frame, which makes the whole process of mapping out our ChocoBreak game very easy.
There are a number of different storyboarding drawings you can do at various levels of your game. Following is a sample of drawings you might make for your storyboard:
씰Game Map: This is the top view of all of your screens and levels. This is a simple and effective way of seeing how all your levels connect together, giving you an overall view of how the user will navi-gate around the screens in your game. You can see an example of a game map in Figure 2.2. This is our structure for the ChocoBreak game, where we will have three screens. You can use several letter-sized pieces of paper stuck together or a single piece to create your map; it all depends on the size of your game.
씰Level or Screen Map: In Figure 2.2 you can see the individual screens but not the actual content that you are hoping to place within them. So at this point, you should break your game down further into additional storyboards for each screen. You can see our three-frame game, ChocoBreak, broken down into further storyboards in Figures 2.3, 2.4, and 2.5.
씰Object Level: It is very common in more complex games to storyboard an indi-vidual object, such as a player character or enemy spaceship. Here you would draw the individual object, and on the same document, detail additional notes about that particular object. So if you were detailing the player character, and he has changeable clothes or armor, you wouldn’t necessarily detail each item. You would just mention what is inter-changeable with the character.
Storyboarding
Paper, Paper, Everywhere
Insert Figure 2.2 The game map for ChocoBreak.
Drawings and Text
Storyboarding doesn’t just involve drawing pictures; the pictures can also have particular text on each drawing to give more detail or make a concept or interaction more clear.
Figure 2.3
Our main menu storyboard for the ChocoBreak game.
Figure 2.4
Our game storyboard for the ChocoBreak game.
Figure 2.5
Our end screen storyboard for the ChocoBreak game.
Storyboards Using Computer
Graphics
Y
ou picture yourself wanting
to be a game creator, either for fun or maybe even as a career of some kind. You have the hardware available. and you have the trial software of The Games Factory 2. You are now ready to make a start on your game making journey.You might have some reservations at this point because game creation could mean getting into programming and difficult-to-learn concepts, but don’t worry. The Games Factory 2 is a straightforward product to learn.
In this chapter, we will learn all about how to navigate the product. We’ll also take some step-by-step walkthroughs of certain functionality that will help you later on when you make your own games. Finally, you will also learn the location of the program editors and what they are used for.
Making games is within your reach, so keep reading and before you know it, you will be creating your first game.
3
Getting to Know
T
he Games Factory 2
is a powerful but easy-to-use programming system that allows anyone, even those with no programming knowledge, to make games and screensavers. As with any creation system or program, you must get to know its interface so that you can get around quickly but also get to feel comfortable using it. TGF2 only has a few screens and editors so once you have gotten acquainted with it, you don’t need to use the program regularly to remember what to do when you come back to it.In The Games Factory 2 program there are three key program creation editors, one picture editor, and a special calculator for entering special information. The editors and programs are as follows:
씰Storyboard Editor: Lets you specify the order of screens or levels within your game. Each level or screen is called a frame. You can create as many frames as you like within your TGF2 program.
씰Frame Editor: Here, you look at a specific frame and place the graphics and objects onto the screen. You could consider this the area where you set the scene of your game.
씰Event Editor: Here is where you create your program login in a spreadsheet-like program. You create events, which tell TGF2 how to react in the game.
씰Picture Editor: The Picture Editor is where you can draw, import, and export images. It has another editor built into it called the Animation Editor. This is so you can create multiple pictures of the same image and animate it, so that it looks like it is moving within your game.
씰Expression Evaluator: When you need to do calculations and comparisons of numbers or text, or obtain information, you will use the Expression Evaluator. It looks like a giant scientific calculator with some extra buttons on it.
The Games Factory 2 Program Introduction
Remembering Traditional
Programming
W
e are now ready to
start up TGF2 and take a look at its interface. The following assumes you have installed the program demo from the CD-ROM included with this book, which is stored in the Demos folder.You can either double left click on The Games Factory 2 icon that will be on the desktop or choose Start > All Programs > The Games Factory 2 > The Games Factory 2. One of two things will happen:
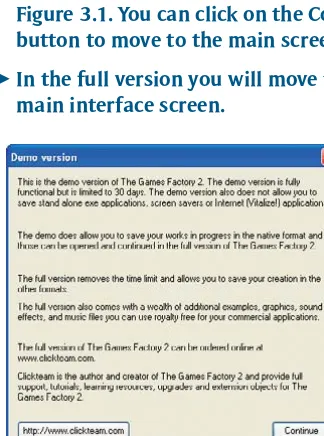
씰In the demo version (included with the CD-ROM in this book), you will see a dialog box which will advise you that it is the demo version, as shown in Figure 3.1. You can click on the Continue button to move to the main screen.
씰In the full version you will move to the main interface screen.
Launching The Games Factory 2
Figure 3.1 The trial version dialog.
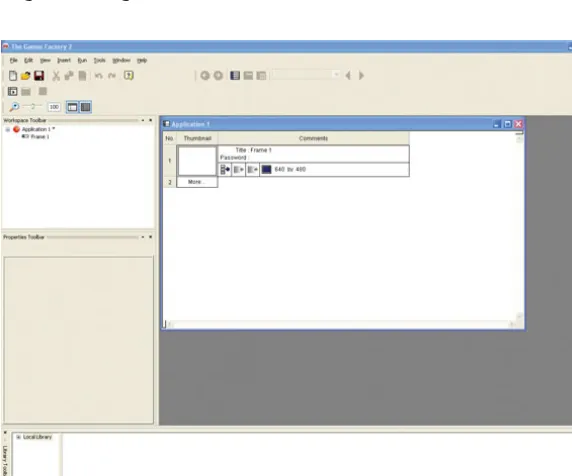
Figure 3.2
The TGF2 interface and an HTML tutorial file. You will now see The Games Factory 2 program screen load, and you will see an HTML help tutorial program open on the right side of the screen, as shown in Figure 3.2.
We will be creating a simple game using the tutorials graphics later on in this book, but for now you can close the Tutorial window by clicking on the Red X in the top right corner.
ChocoBreak Tutorial
T
he main Games
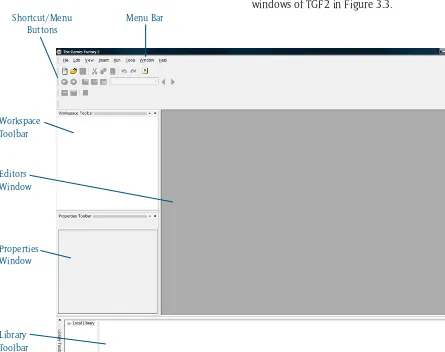
Factory 2 interface allows you to access all of the key compo-nents in one simple interface area. It has different buttons, tabs, and windows to learn.After a short time spent getting to know the basics, these other options and features won’t delay your game creation creativity. As you get more experienced, you will then be able to use these additional shortcuts and features to make your games even quicker. You can see the main windows of TGF2 in Figure 3.3.
Introducing The Games Factory 2
Figure 3.3 The layout of TGF2. Menu Bar
Workspace Toolbar
Library Toolbar Properties Window
Shortcut/Menu Buttons
Shortcut Buttons
The shortcut buttons reside at the top of the application window and are a short list of all the important options available in the program. These buttons will change at different times, depending on what you are doing and which editor is currently displayed. You can see a close-up of the shortcut buttons in Figure 3.5. You will notice that many of the options are grayed out; this means that they are not currently available.
Workspace Toolbar
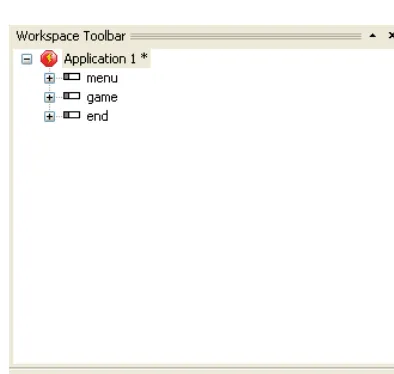
When you create your applications, the Workspace toolbar will display the physical folder and file structure of your game. You can see an example of the structure involved in the Workspace toolbar in Figure 3.6. At the very top of the structure, you will see the application name. Below the application name you will see any frames that are within this game. Within each frame, you will see the objects that you are using for that frame.
Frames are physical separations of your game within the program, so these may be multiple levels or screens where you want to display something. A perfect example of this would be that shown in Figure 3.6. There you see a menu screen that displays a loading screen, which either tells the player a story or displays a waiting screen before the game begins. The second frame is the game screen, where the player will play the game, and the final frame is the end screen, which gives the player the score or end sequence to the game.
Menu Bar
The menu bar is a standard way of accessing specific features within any Windows-based application, and TGF2 is no exception. When you select one of the options from the menu at the top, it will display a popup menu, which displays all of the options under that heading. If you see an arrow next to any of the options in the list, this means that it is a subheading and has more items under it. You can see that the File option has been selected in Figure 3.4.
In some of the options, you will notice keyboard options like Ctrl+N. These are shortcut keys, so you can use the key combination to do the same choice with keys rather than navigating through the menu.
Figure 3.4 The File menu.
Objects are the games assets, such as graphical items, objects to handle the score, lives, and so forth. Without objects, you would not have any-thing displayed onscreen. A perfect example of this is the Active object, which is used for any objects that will move or be animated onscreen. This is used for game objects, such as spaceships or meteorites. In gaming terms, the Active object could be considered a game sprite.
Properties Window
Many items within the TGF2 program can have a set of properties assigned to them. These prop-erties allow for fine-tuning of that part of the program. You can configure many aspects of the program using properties, and you would normally do this before beginning any event programming. You can see an example of the Properties window in use in Figure 3.7.
Figure 3.6
A game loaded into the Workspace toolbar.
Levels and Frames
Even though we have made the distinction of placing one level on each frame, you can make many levels on a single frame. The upside of this is that you only have to place the graphics on a single frame rather than duplicate them over many frames. The downside is that it can get very messy on a single frame if you create 50 or 100 levels with different graphics.
Figure 3.7
Library Toolbar
The Library toolbar is a way of accessing graphic and object content. Clickteam, the maker of TGF2, has provided a large set of game back-grounds, buttons, animations, and characters to use in your games. This means you can use the product straight out of the box rather than hav-ing to draw or import your own content. If you are using the trial version on the CD-ROM that comes with this book, you will be provided with a set of graphics for the tutorial game. We also have provided some additional graphics to get you started making your own fun games. These can be found under the \Content directory on the CD-ROM.
When you are using the Library toolbar, you navigate a number of folders and files and then, once you find something you are interested in, you drag and drop this to your frame. You can see the Library toolbar in use in Figure 3.8. The levels of property configuration are:
씰Application Level Properties: Any changes to the application level of prop-erties will affect the whole application. These can include information, such as the size of the program window,
whether the window will have maximize or minimize buttons, any help file the program will include, and copyright information.
씰Frame Level Properties: Any changes will only affect the frame that they are made on. You can have many frames, and you may want some of them to react differently. You can do things such as sizing frames, fading in and out of a frame, grabbing the desktop, and changing the background color.
씰Object Level Properties: On each of your frames, you drop items called objects, and each of these objects can have a set of properties, such as movement, size, screen location, and any special infor-mation that might be stored in it.
Editors Window
You will notice on Figure 3.3 that there is nothing displayed. This is because at the start of any creation, no editors are open. Within this gray background will appear the editors that we have previously mentioned.
Figure 3.8 The Library toolbar in use.
The Library Toolbar Visibility
Layers Toolbar
The Layers toolbar is not displayed by default and not shown in Figure 3.3. When you want to place graphics at different layers, you can either do so on the frame or via the Layers toolbar. A layer can be thought of as the layers of a cake; some parts are on top of others. You can only see parts of certain layers depending on how much the layer above it covers the layer below it. For example, if you eat half of the top layer of a cake, you will see part of the layer below it revealed. The same applies to layers in a game; you might have a graphic partly covering another, and it will appear in front of the graphic below it. If you use art packages, you will be familiar with layers. You can see the Layers toolbar in Figure 3.9.
Figure 3.9 The Layers toolbar.
Layers Visibility
To create a new file, complete the following steps:
1. Load up TGF2, by double clicking on the icon on the desktop, or by clicking Start > All pro-grams > The Games Factory 2 > The Games Factory 2.
2. Click on the New button, press the Ctrl+N keys, or use the File > New menu option.
Once you have created your new blank application file, your game is ready to be put together. You can see the blank application in Figure 3.10.
B
efore we get deeper
into The Games Factory 2 software, we will need to take a look at the creation of a new application and the loading of a file that has already been worked on. Many of the features of TGF2 will not appear unless there is a game file loaded. Let’s take a quick look at opening, saving, closing, and creating a game file.Creating a New TGF2 Game File
Before you can start making your games, you will first need to create a blank game file. This blank file will contain a basic set of property information and a single game frame for you to begin working on.
The Games Factory 2 File Basics
Application Files
A game, and all its contents, that is made in TGF2 is called an application file.
Figure 3.10
Opening an Existing Game File
If you have a game that you have previously cre-ated or have perhaps downloaded a game from the Internet that you want to open, there are two ways to do this.
씰Browse your machine using Windows Explorer until you have located a file with an MFA extension (this is a file that ends with .mfa). Double left click on it, and it will automatically load into The Games Factory. Even if you don’t have TGF2 already started, it will make it appear and then load the file into it.
씰If you already have TGF2 open and know where the MFA file is located, you can click on the Open button and use the shortcut Ctrl+O or click File > Open on the menu. You will then get a browse dialog box as shown in Figure 3.11. You can then browse for the file, single left click on it to select it, and then click on the Open button to load the file.
Saving a Game File
You have begun to create your game and you want to save the file for reloading later on. You may also want to save the game file to ensure having a backup file just in case of any problems. You should try to back up your game files on a regular basis just in case there is a power loss or computer crash, which could damage the file you are working on.
To save a file, you can do one of the following:
씰If this is the first time you have saved this file, click on the Save button, use Ctrl+S, or use the menu to select File > Save As. A dialog box will appear. Type in the name of the file you wish your application to have. Click on the Save button to save the file.
씰If this isn’t the first time you have saved this file and you wish to stay with the same file name, you can use the Save button, press Ctrl+S, or click on the File > Save option.
Figure 3.11
The browse dialog used to find MFA files.
File Extensions
Storyboard Editor
Most games are composed of several levels, or screens. The Storyboard Editor lets you view all of your frames in a list. This makes it easy for you to see the order of the frames, and you can drag and drop frames above or below others. You also get a visual representation of each frame’s contents in a small thumbnail image so if you don’t remember exactly what a particular frame contains, you might remember from the picture. You can see an example of the Storyboard Editor with a number of frames added in Figure 3.13.
W
e briefly mentioned the
editors that are used in TGF2 earlier in this chapter. We will now be taking a closer look at them and how to access them. These editors are parts of the program that you will use the most and by the end of the book, you will be very familiar with them. There are three main editors for constructing your games: the Storyboard Editor, the Frame Editor, and the Event Editor.You can quickly and easily move among these three editors by using the buttons on the menu. You can see the button graphics for the three editors in Figure 3.12.
The Editors
Figure 3.12
The Storyboard Editor, the Frame Editor, and Event Editor buttons.
The Editor Buttons’ Appearance
Not all editor buttons will be available at all times.
Figure 3.13
Creating Frames
When you make your own games, you will need to create a set of frames that will hold your game’s content, such as the game’s graphics. These frames can be the levels in your game or the different screens the player will visit. You may create as few or as many as you require for your game. To create new frames, you can use one of the following methods:
First Method:
1. Start TGF2.
2. Create a new application by pressing the New button or selecting File>New from the menu. This will create a single frame applica-tion file.
3. Click on the number 2 in the Storyboard Editor. This is the number that is opposite the text More.
4. Adding one will increase the last number, which is opposite the More text. Continue to click the number opposite the text More to continue adding the number of frames you require.
Second Method:
1. Start TGF2.
2. Create a new application.
3. Right click on the application name in the Workspace toolbar. From the popup menu, select New Frame.
4. Continue right clicking and selecting New Frame to create the number of frames you need.
Renaming Frames
You will notice that when you create a frame it will have the name of Frame with a number at the end of it. Every time you create a frame, it will increase this frame number. When creating a large game, you will find this numbering system is not very helpful, especially when you tell TGF2 to jump to a specific frame, and you are required to select that specific frame. This is not such a problem when you only have three frames and you know what each frame does. You might create a game with a large number of frames, and remembering what each does by number would be very difficult or impossible. Renaming them to something more appropriate can help a lot with this, because you could specify that a frame fulfills a particular role within your game, for example, Level 39 or End Screen.
In the same way that there are two ways to create frames, there are also a number of ways to rename a frame.
Storyboard Options
Some other options available in the
The second method to change the frame name is:
1. You need to ensure that the Storyboard Editor is open. Then single left click on the Title text (under the comments) for the particular frame that you want to rename.
2. Type in the name of your frame and press Enter.
3. You can see the before and after results of the name change using this method in Figure 3.15. In the example, you can see that the title of Frame 1 has been changed to Menu.
The first method is:
1. You have your TGF2 program open, with an application created or open.
2. Right click on the frame number text in the Workspace toolbar and select Rename from the popup menu.
3. The frame you choose to rename will now allow you to type in the text of the frame. You can see the before and after results in Figure 3.14. You can see in the example that the Frame 2 text has been changed to Game.
Figure 3.14
Editing and renaming the frame names.
Figure 3.15
The Frame Editor
The Frame editor, as shown in Figure 3.16, is the blank starting slate of your frame. The Frame Editor is where you place your game graphics and the objects that you need to make your game work. The white area in the middle is called the play area. This is the window that will appear when you play the game and is considered the viewable area of the game. The gray area surrounding the play area is where you can place items that you do not want to have initially appear at the start of your game. You could say that the Frame Editor is where you set the scene of your game.
To give you an idea of what the frame could look like in a working game, see Figure 3.17 as an example of a game being set up on the frame.
Figure 3.16
All new frames will appear as a blank white area.
Figure 3.17
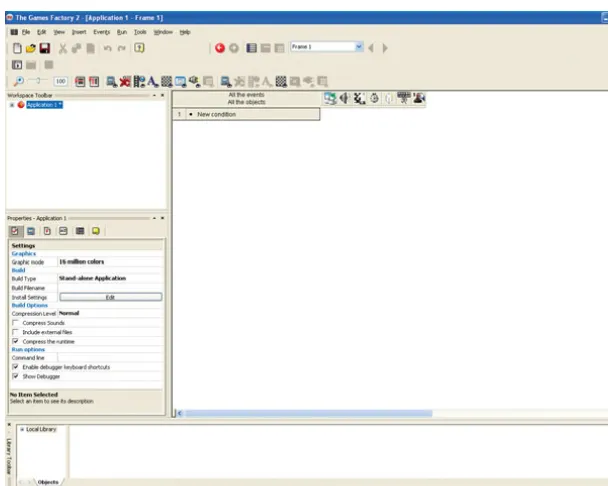
The Event Editor
This is the screen where you build the logic of your game. You could say this is where you do your programming. The programming is based on eventing, which is an English-readable form of programming based on checking for each event for conditions. If the conditions are true, then the appropriate actions occur. There is an Event Editor for each frame of the game, so if you have a three-frame game and you program something for the first frame, you will not see this information in the second or third frames. You can see an example of the blank Event Editor in Figure 3.18 and one with code applied in Figure 3.19.
What Are Events?
Think about your everyday life, and consider what an event is. An event could be going to work, making a cup of tea, and going to bed. An event is not a single item, but a combination of items. For example, making a cup of tea involves filling the kettle with water, switching it on, waiting for it to boil, and so on. In TGF2, an event is a collection of items called conditions.
What Are Conditions?
A condition in TGF2 checks to determine when a specific task is true. If the condition (or conditions) is true, the program will run the actions. If we take making a cup of tea, a condition for this could be “has the kettle finished boiling?” If this is correct, then the condition is true. In TGF2, it works the same way: “Is the score set to a specific amount?” “Is the player’s character at a particular posi-tion on the screen?” “How many lives does the player have?”
What Are Actions?
Figure 3.18 The blank Event Editor.
Figure 3.19
The Picture and
Animation Editor
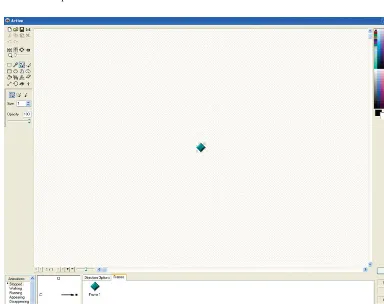
Throughout this book, we will refer to the Picture and Animation Editor as the Picture Editor, although it is actually two editors in one. Whenever you are dealing with objects that are of a graphical nature, you may with to edit them, or you may even want to import graphics of your own. To do this, you will need the Picture Editor. If you wish to animate a graphic, in other words, make it appear to be moving, waving, or rotating, you will need to use the Animation Editor. This editor appears in the bottom half of the Picture Editor. You can see the Picture Editor in Figure 3.20. We will cover more about the Picture Editor in Chapter 6.
Figure 3.20
The Picture Editor with the Animation Editor in the bottom of the screen.
Animation Versus Movement
You may think that animation is the same as movement, but this is not the case.
The Expression Evaluator
When using the Event Editor or the Frame Editor, you may be required to test and compare numbers or text or get information from anoth-er object. The Expression Evaluator looks like a large scientific calculator, and it is used to type in specific data that you want to retrieve from the program or its objects. You will use the Expression Evaluator most when using the Event Editor. You can see an example of the Expression Evaluator with some information entered into it in Figure 3.21.
Objects Contain Information
All objects contain information, for example, their position onscreen or their size. They can also contain additional information, data (called alterable variables), which you can read and write to. This information is all accessible from the Expression Evaluator.
Figure 3.21
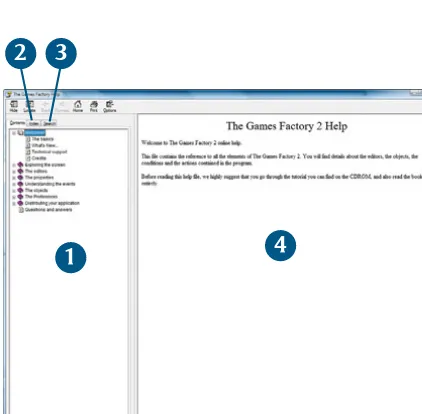
You can see several items in Figure 3.22 that correspond to the following numbered list:
1. By default, you will see the contents list. If you have used the help system before and used a different tab, this will be the default view. The contents show all of the different subject headings of the help system. You can click on the plus (+) sign to expand the contents and the minus (–) sign to collapse them.
2. The Index provides a list of all of the key-words that are used in the TGF2 help system. So, if you are looking for a particular item, you can type in the word and let the help system search for it. If the word you are searching for is a keyword, it will appear in the list in the left window and you will be able to click on an item to display its con-tents in the right window.
3. The Search tab allows you to do a more detailed search than the Index. The Index is only words that have been identified within the help system, while the Search tab will search all of the documents used in the help file and display the available content headings. It will also highlight the word in the contents as you look through them.
4. This is the content window, which displays the help file information.
A
lthough this book
will give you a lot of information on how to make your own games with The Games Factory 2, you will at some point need more help to allow you to understand a specific concept or find out about a particular feature.There are a number of different help options available to you if you have gotten stuck on a particular problem. The first and quickest way to get help is to use the built-in help system. You can access the built-in help by using the menu option Help > Contents. You can see the help system in Figure 3.22.
Getting Help
Figure 3.22 The built-in help system.
2 3
Tutorial Files
Another way of learning how to do something or understanding particular concepts is to look at the various tutorial files that are available. By looking at them and seeing how they are struc-tured and the code that they use, you can learn a great deal. You can also pick the code apart and use similar code in your own programs. Tutorial files are a very easy way of learning new things.
The Internet is also a great source of example files and tutorials. Clickteam’s web site has a number of example files you can download as well as text-based articles, and you can find a lot of different code examples on the forum uploaded by its users. Other users also upload examples to their own web sites that you might find useful.
Tutorial Files
With the trial version of TGF2, the program has a single tutorial file. We have included a number of games so that you can look at the source code to see how they are struc-tured. In the full version of TGF2, there are several games and example files for you to learn from.
Downloading from the
Internet
You can see the Run Application and Run Frame buttons in Figure 3.23.
W
hen making your games
, you will want to test them occasionally to make sure they work correctly or to see how you are getting on with your game. There are two ways to test your game. The first is to run the whole game; this will play the game from the very first screen (called frame) and allow you to play it until the game exits or you decide to close the program. The second method allows you to run the current frame you are on. This is a good way of testing the frame you are working on without needing to skip or play through all the levels that precede it.Running Your Games
Figure 3.23
The Run Application and Run Frame buttons.
Shortcut Keys
I
n Chapter 3, we took a tour
of the TGF2 program and had a look at its toolbars, menus, and editors. You should now be getting an idea of the workflow of TGF2 and how you would go about using it.In this chapter, we will be looking at setting up a scene, placing the graphics and other objects onto our game frame. Setting your game scene is a major aspect of creating your game, and in many cases, you might be setting your scene based on your storyboards.
As well as placing your game graphics, you will also be placing other items called objects on the game frame. These objects are one of the most important aspects of creating your games with regards to setting up your scene and getting it ready to be programmed.
4
Creating the Scene
O
bjects could be considered
the cornerstone of anything you create in TGF2. In fact, they could be considered the single most import thing required for your game. A game is comprised of various compo-nents, for example, a simple spaceship graphic, the graphic of a bullet being fired from an enemy creature, in-game video, onscreen text displaying your name, and an item that displays how many lives you have left. Anything that is added onto the frame is an object. The structure of these objects is already defined using a built-in list of objects that comes with TGF2.The great thing about these objects is that they are pre-programmed, allowing you to get on with the task of making your game and then configuring the object in the way you want it to work. You will then be able to access most objects via the Event Editor, which allows for conditions and actions to be applied to them.
Adding an Object
To view all the available objects in TGF2, first you must be in the process of adding an object. You can only add an object if you are on the Frame Editor screen. You might have 10 frames in your game, and so you must be in the frame you want to add your objects.
Following are the steps to view and add objects to a single frame.
1. Start TGF2, and select File > New from the menu.
2. Double-click on the text “Frame 1” in the Workspace toolbar. This will load the frame into the editor area of the program.
3. You can now view and add an object using two methods: You can select Insert > New object from the menu, or you can right click on the blank white frame area and select Insert Object.
4. You will then see a list of available objects that you can choose from, as shown in Figure 4.1. You are also able to display the objects in a list by clicking on the tick box on the right side below the buttons. Select the object that you want to add by single left clicking on it and then clicking on OK.
5. You will be taken back to the frame, but your cursor will have changed to a cross. Left click on the frame to place the object.
Objects in TGF2
More Objects
You can see the object Properties window shown in Figure 4.2. When accessing object Properties, you will see a set of tabs, which allow certain properties to be grouped together for ease of use. An example of the Properties tabs can be seen in Figure 4.3.
Accessing Object Properties
Every object you add to the frame has a set of properties. These properties can be accessed by single left clicking on the object. These proper-ties might include:
1. The object’s screen location, using two coordinates of X, which is horizontal, and Y, which is vertical.
2. The object’s size or angle on the frame.
3. Whether the object should be resized and if so, whether it should be resized using a speed algorithm or based on quality.
4. Whether the object should be transparent or use any ink effects to change the look of the object when the frame is run.
5. Whether the object should have any move-ment applied to it, and any additional movement configurations, such as speed, bounce, and rotation.
Figure 4.1
The Create new object dialog box.
Figure 4.2
The object Properties of the Active object.
Figure 4.3
The tabs available on the Properties window.
Tabs Available
An example of the types of tabs you will encounter are:
씰Display Options: This provides different options for how the object should appear on the frame.
씰Size/Position: Determines the object’s size and position on the frame. This tab is used a lot to place an object at a specific location on the frame.
씰Movement: Those objects that can have movement are set to static by default. You can specify a different movement type from within this tab.
씰Runtime Options: Determines how the object should react when the program is running. This allows configuration of such things as when an object should be destroyed and if it should use specific collision properties.
씰Values: You can assign different text and number values to an object, which are then available to program in the Event Editor.
씰Events: You can create events that just apply to the object. You access a special event editor just for the objects.
씰About:: Provides information about the object, and a button link to the help file. If you click on the help file button, it will open the help file associated with the object or property you are currently viewing.
Some objects have too much property informa-tion to store in the Properties window and will open a separate window on top of the Frame Editor window. To begin with, many of the properties will be fine for starting out, but later on, you may find that you have to edit these properties to make your game look and feel the way you want it to.
Tab Identification
Active objects are denoted by their icon of a run-ning man in the Create new object dialog box and as a green diamond in the Event Editor. The icons can be seen in Figures 4.4 and 4.5. You can access the Active object graphic by double left clicking on the green diamond. This would take you to the Picture Editor, where you could then make changes to it or import another image. We will cover the Picture Editor in Chapter 6.
W
e will now take a look
at some of the common objects that you will use on a regular basis in your game creation. There are over 40 objects that come included with TGF2, which can do many things from displaying text to creating a quiz program. We will look at the key ones you will need when making simple computer games.Active Objects
Active objects are used as the main graphics for your games and will probably be the most com-mon objects that you will use. These graphic objects could be a spaceship, bullets that fire from a spaceship gun, a walking character, or a player item, such as bonus health or lives. The key reason for picking an Active object is that the graphic will move, rotate, or animate in some way.
Common Objects
Active Objects
That Don’t Move
You can also use active objects for graphics that will be static and not animated. Each type of object has different properties that can be applied to it, and you may find the active object is perfect for a specific task. You may also want to animate a graphic later on in the development of your game. This makes the whole process easier if you change your mind about an object and make it animated.
Figure 4.4 The Active object icon.
Figure 4.5
Backdrop and Quick Backdrop
Objects
Backdrop and Quick Backdrop objects perform a similar function, and that is to provide a back-ground to your games. A Backdrop object is usually constructed by using the Picture Editor to import or draw an image; you could alterna-tively use one of the many backdrops provided on the CD-ROM of the full version of the software.
You use Backdrop objects to create a background for your games; for example, if you were making a space game, you might create a backdrop that has a planet and stars in it. Backdrops will always appear at the back of the frame, and you cannot place them on top of other objects.
You can see the icons for the backdrop and Quick Backdrop in Figure 4.6.
The Backdrop object uses an imported image, using the Picture Editor, but the Quick Backdrop object allows for further configuration to create a background of different types. To take a look at the specific properties of the Quick Backdrop object, we need to add the object onto the frame and then access its properties.
1. Ensure that TGF2 is started, and create a new application by clicking on the New button.
2. Double-click on Frame 1 to display the first Frame Editor. Right click on the frame and select Insert Object.
3. Select the Quick Backdrop object and click on OK.
4. Click on the Frame Editor to place the object.
You will now see the object properties and the tabs that are associated with the Quick Backdrop object. There are two areas of interest for anyone wanting to use this object for backgrounds. The first is under the Settings tab, under the headings of Shape and Type. The Shape allows you to change the general shape of the Backdrop object. The Type is more important as it changes the type of fill that the Quick Backdrop can use; you can see the settings in Figure 4.7.
Figure 4.6
The Backdrop and Quick Backdrop icons.
Figure 4.7