•HTML5CanvasdrawingandanimationsusingEaselJSandTweenJS •LoadingandmanagingassetsusingPreloadJS
•SoundmanagementusingSoundJS
•Coregamedevelopmenttechniquessuchasstatemachinesandobjectpooling •ExtendingEaselJSDisplayObjectsusingobject-orientedJavaScript
•JavaScriptdebugging
For your convenience Apress has placed some of the front
matter material after the index. Please use the Bookmarks
Contents at a Glance
About the Author ...
xvii
About the Technical Reviewer ...
xix
Acknowledgments ...
xxi
Introduction ...
xxiii
Chapter 1: Getting to Know CreateJS
■
...
1
Chapter 2: Making and Animating Graphics
■
...
15
Chapter 3: Capturing User Input
■
...
31
Chapter 4: Game Project: Progressive Break-it
■
...
55
Chapter 5: Using and Managing Bitmap Images
■
...
77
Chapter 6: Sprites and Sprite Sheet Animations
■
...
109
Chapter 7: Game Project: Fakezee
■
...
137
Chapter 8: Extending EaselJS Display Objects
■
...
177
Chapter 9: Sounds and Asset Management
■
...
203
Chapter 10: The State Machine and Scenes
■
...
221
Chapter 11: Game Project: Space Hero
■
...
239
Chapter 12: Building for Mobile Browsers
■
...
279
Chapter 13: Packaging and Compiling with PhoneGap Build
■
...
291
Chapter 14: Game Project: The Villager RPG
■
...
305
Introduction
CreateJS is not a game engine. It was written to create rich, interactive experiences of all kinds by providing tools for HTML5 applications. EaselJS, the library in the suite upon which all games in this book are based, helps manage and control graphics in HTML5 Canvas. Because the very nature of Canvas lends itself nicely to both performance and the technical procedures of classic game development, EaselJS very much feels like it’s meant for games in many ways. Although this is not entirely true, EaselJS, along with the other tools in the CreateJS suite, are a perfect combination of tools to do just that. The low level, heavy lifting of drawing and management of your game graphics are taken care of, which gives you more freedom to concentrate on the game logic itself. Tools for preloading assets, playing and managing audio, and creating complicated tweens are also included in CreateJS, and can also be used extensively to build engaging games.
A large advantage of using CreateJS for games, as opposed to the other game-specific HTML5 libraries out there, is the freedom to create and fine-tune your own game framework. In many popular markets, primarily casual, board, and turn-based games, the overhead of a framework built for tiling, heavy collision, and physics is not necessary. Simply utilizing a tool to draw and sort graphics on the canvas is all that is needed. That’s where this book comes in. It puts you right in the middle between complicated native canvas management and being tied down to a specific framework to build your games. This is not to say these other frameworks are bad. In fact they are quite good, especially Phaser and ImpactJS. Depending on the type of game you are building, they can often be the better choice. The purpose of this book is to not only teach you to write these game development techniques yourself, but to give you the skills to mold your own workflow and frameworks using the CreateJS tools. What’s more, the skills learned in this book will fully prepare you to create endless, rich HTML5 applications that extend far beyond games.
The book itself is split up into two parts. The first half of the book concentrates on learning the APIs of the suite. Game development techniques will be introduced, focusing on how they can be used with EaselJS and TweenJS. The second half of the book will take your new CreateJS skills to the next level by learning more advanced, objected-oriented JavaScript, asset loading and management, and code organization. More advanced game development techniques will also be learned, which will result in performance gains; mobile optimization will be introduced as well.
You’ll find that the libraries in CreateJS are powerful and extremely easy to use. You’ll also learn the best tools and applications used to create the graphical assets needed for your games, and how to best use them in conjunction with EaselJS. There are several small exercises, including four full game project chapters. I hope you find this book both fun and educational, and that it will encourage you to create new and exciting applications using CreateJS.
For support, updates on code APIS, and general discussion on this book, please visit the public forum at
Getting to Know CreateJS
Before you can start building your games, you need to get familiar with the CreateJS suite. I’ll take a look at each library in the suite and give a brief overview on how to use them. A few JavaScript techniques will also be examined in effort to learn best practices when working with CreateJS, and the final code example will show the harmony that can easily be achieved with the entire suite at work.
Getting Started
The best place to get started is to head over to the official web site, http://createjs.com, shown in Figure 1-1.
Here you can gain access to the latest builds of the suite, as well as view official tutorials and a showcase of recent projects using the suite. Be sure to view this showcase to get an idea of the cool things you can do with CreateJS. You’ll also notice the highly-detailed documentation that is available for each library in the suite. Along with being one of the largest JavaScript libraries out there today, CreateJS has amazing documentation to go with it. As you progress in your learning of the suite, these documents will prove to be priceless in extending your skills and optimizing your code.
To acquire the necessary libraries, click the download button on the home page of the site. You’ll be taken to
https://github.com/CreateJS/ where you can download all of the latest builds. For this book you’ll need all four libraries in the toolset.
At the time of writing this book, the following versions were used: TweenJS version 0.5
These four libraries are everything you need to draw and animate graphics, play sound effects and music, and preload your game assets. You’ll be using one or more of these libraries throughout the code examples that you’ll build in this book. Place them in an area where you can easily include them in your documents while following along with the exercises. I suggest creating a project directory and placing these libraries in a folder named lib so that you can easily set up your files for each exercise to match the code listings.
Let’s start by taking a look at the most important tool in the suite when building HTML5 games.
EaselJS
EaselJS is by far the most frequently used tool in the suite when building games. It’s where all graphics and
interactivity are managed and drawn to an HTML5 Canvas element. The API is based on a hierarchal display list that should be very familiar to anyone that has worked with Flash and ActionScript 3.0. Along with a core interaction model and various helper classes, EaselJS makes working with canvas a lot more manageable than going it alone.
Since EaselJS relies entirely on HTML5 Canvas, it’s important to understand what it is and how it works. If you are already familiar with techniques such as blitting and/or working with Flash Stage3D, you already have a pretty good idea of how it works. If not, then you might find the concept a bit complicated at first, but rest assured that EaselJS will smooth out those learning curves almost instantly. In any case, let’s start this section by diving into the basics of what
Canvas is and how to work with it natively.
HTML5 Canvas
Canvas is an HTML5 element that creates a rectangle in your document used for drawing graphics on the fly with JavaScript. It contains very few attributes or applicable styles. It’s quite literally an empty canvas.
Although this programmatically driven graphics environment makes it a powerful tool with many opportunities for rich interactive creation, it’s a low-level system that requires a lot of manual drawing management. You are responsible for both drawing and erasing all pixels, and no graphics on the canvas are directly tied to any properties or objects.
The best analogy I’ve come up with to describe this concept is as follows. Imagine you have a magnet board hanging on the wall, and to the right of it is a dry erase board. The magnet board consists of three butterfly magnets laid out horizontally. The dry erase board has the same three butterflies but are drawn on the board with a marker.
If I were to tell you to change the position of the second butterfly on the magnet board by moving it down two inches, you wouldn’t need much thought on how to accomplish this. You would simply grab the butterfly with your finger and pull it down two inches. You simply changed its position.
In a typical scripting language it may look something like this:
Now imagine I told you to do the same thing on the dry erase board. You might pause for a minute but you’d ultimately come to only one solution. You would need to erase it, and then draw it again at its new desired position. This is precisely how Canvas works. It’s not enough to manage and update the next position of every sprite in your game; you need to manually erase and redraw them as well. These visual graphics are not collectively retainable, but are simply pixels painted on to the canvas with no other reference to what they are or represent.
To demonstrate how this looks in action, let’s look at a simple example of how you would do this in JavaScript using the Canvas API (see Listing 1-1). The result is demonstrated in Figure 1-2.
Listing 1-1. Drawing and Moving Graphics with the Canvas API
var canvas = document.getElementById("canvas"); var ctx = canvas.getContext("2d");
var butterfly = new Image();
butterfly.src = "images/butterfly.png"; butterfly.onload = drawButterflies;
function drawButterflies() {
ctx.drawImage(butterfly, 0, 0, 200, 138, 0, 0, 200, 138); ctx.drawImage(butterfly, 0, 0, 200, 138, 200, 0, 200, 138); ctx.drawImage(butterfly, 0, 0, 200, 138, 400, 0, 200, 138); setTimeout(moveButterfly,1000);
}
function moveButterfly(){
ctx.clearRect(0,0, canvas.width,canvas.height);
At first glance, the initial drawing of the graphics doesn’t seem too complicated. You draw your graphic by passing in a reference to the loaded image plus some coordinates and dimensions that dictate what you grab from the loaded bitmap and where to draw it on the canvas.
Now take a look at the function that moves your second butterfly. You are responsible for not only redrawing your graphics again with newly calculated positions, but clearing all of your previous graphics as well. If you didn’t first clear the canvas before redrawing your butterfly in its new position, you’d end up with four butterflies (see Figure 1-3).
Figure 1-3. Results when not first clearing your canvas before drawing new positions
In this example, you are simply hardcoding the new position of the second butterfly, but as you add more and more sprites to your games, the management of what gets drawn, when you draw, and where you draw it becomes increasingly difficult to maintain.
EaselJS with HTML5 Canvas
Elegant canvas management is where EaselJS comes in. It handles the heavy lifting of managing and drawing graphics so you can concentrate on your game logic, thus making your games as fun and enjoyable as possible. You can rest assured that your sprite objects will be properly drawn and moved appropriately so you can focus on the shelf life and behavior of these game assets while remaining completely decoupled from the rendering process.
Listing 1-2. Drawing and Moving Graphics with EaselJS
stage.addChild(butterfly1,butterfly2,butterfly3); stage.update();
setTimeout(moveButterfly, 1000); }
function moveButterfly(){ butterfly2.y += 200; stage.update(); }
As you can see, the EaselJS API makes your code much more clean and manageable. You can refer to and transform what you see on screen as if they were retainable objects, and not get bogged down with the details of what actually connects your graphics with the logical display objects that are created to represent them. Again, the things you see on the canvas are never the same as an object that holds its properties, but merely a graphical representation of it. But you don’t need to worry about this because EaselJS will manage that for you. If you tell the butterfly to move, it will move. Much nicer!
You’ll also notice that you are adding graphics to and updating an object named stage. This is a reference to
Stage, the root display object in which all graphics are drawn to with EaselJS. I will be covering this in depth before starting the actual exercises, which will begin in the next chapter.
Let’s take one more look at the power of EaselJS before moving on with the rest of the suite. As you can imagine, layers will be playing a large role in your graphics management when it comes to game development. With Canvas, any pixel drawn in the same coordinates of another will completely erase and replace it. By now that should seem clear so its no surprise that controlling graphics that overlay each other can quickly become difficult to manage.
Luckily, EaselJS consists of the concept referred to as the display list. With it you are able to easily add and remove graphics, manipulate the order in which they are drawn, access them by their index in the list, and a whole lot more. I will be covering the display list in more detail later in this section.
Using the previous dry erase board analogy, let’s consider one more scenario. This time, each board consists of two butterflies, each with one butterfly slightly overlapping another. Imagine swapping the depths of the butterflies on the magnet board. Once again you’re able to quickly accomplish this, this time by simply grabbing both butterflies and replacing one’s layer with the other.
Using DOM and jQuery, you might do something like this:
$('#butterfly1').css('z-index',1); $('#butterfly2').css('z-index',2);
It’s no surprise that this can be handled in a much simpler way using the EaselJS API. Since all of your drawing is taken care of, including the depths of those drawings, this is accomplished with one simple line of code.
stage.swapChildren(butterfly1,butterfly2);
This is a fine example of the power we have in graphic management and it’s all due to the concept of a display list, which EaselJS is built upon. Anything in a display list is referred to as a child, and the collective items in that stack are referred to as children. In the examples so far, your butterflies are children of the stage object.
There are several handy methods that let you quickly access, manipulate, and remove these “stacked” children on your stage. The following are a few of these key methods and they will be used in depth throughout the examples and games in this book:
• addChild • removeChild • removeAllChildren • getChildAt • setChildIndex
These are just to name a few but are probably the most used when it comes to game development. A full list of methods used to control the display list can be found at www.createjs.com/Docs/EaselJS/classes/Container.html. Because of this display list and the API to control it, you can completely ignore the tedious tasks of drawing management and concentrate on what, when, and why your graphics should appear or go away. It’s the one key concept that makes EaselJS such a powerful and easy-to-use library for drawing to the canvas.
You’ll see much more EaselJS magic as you progress in the book and start making your games, but let’s look at the rest of the suite. We’ll move on to animation.
TweenJS
TweenJS is a powerful, lightweight tweening engine that helps you easily animate your display objects in Easel.JS. In fact, you can use TweenJS to tween just about anything, including DOM elements and even sounds. Since you are only concerned about EaselJS and how to use it for games, I will only be covering its use with your easel graphics.
Animating with TweenJS
One final time, take a moment to imagine how you would animate your butterfly using only the Canvas API. I’ll spare you the code you’d need to accomplish this, but as a quick reference, you would most likely do something similar to the following.
1. Draw your butterfly image.
2. Create a timer that would execute until a desired increment is reached.
3. At each interval, clear your butterfly graphics.
4. Redraw your butterfly with a new, slightly incremented y value.
5. Check if the number of ticks or desired butterfly y position is reached.
6. Clear your timer.
As you can imagine, with several game graphics and animations, the actual code for this can quickly become convoluted. You’re not even accounting for the extra calculations it would take to simultaneously handle duration and distance, easing formulas, and what you want to do after your animation is finished.
It should be no surprise that TweenJS makes this animation process a lot simpler. You can accomplish the previous example, and much more, within a single line of code. Using the same butterfly, let’s take a quick look at how you would handle this using TweenJS.
createjs.Tween.get(butterfly).to({y:butterfly.y + 20},1000);
That’s all there is to animating graphics with TweenJS. Let’s break this up a bit. First, you access the static class
Tween and call its get method. This method takes one parameter, its target, which is the object you want to animate. Next, you call the to method on the returned target and pass it an object of properties you want to tween. Lastly, in this method you set the desired duration of the animation using milliseconds. In this case, you want the animation to take exactly one second.
It’s really as simple as that. You can optionally pass even more properties to tween by simply adding on to the object. Say you wanted to do a similar animation but also have the butterfly fade out.
createjs.Tween.get(butterfly).to({y:butterfly.y + 20,alpha:0},1000);
Note
■
The above code example demonstrates the practice of combining methods know as
chaining.
Many techniques
used in the CreateJS suite utilize this functionality. It’s a handy technique for creating shorter, more concise code.
Easing
One of the coolest things about tweening engines is the built-in equations for handling several animation types, such as easing in and out, bouncing, curving, and more. To give your animation a more natural feel, a typical animation is an ease-out effect. This gradually slows down your animation speed as the tween progresses. The easing equations used in TweenJS were developed by the well-known programmer Robert Penner. These equations are used in many of the tweening engines today and in a wide variety of languages.
Let’s add some easing to your butterfly, which is now the third argument in your to method:
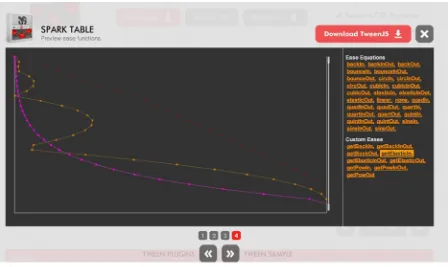
There are several animation effects at your disposal, many of which are quite silly but may come in handy in dramatic situations. Play around with different options to get the effect you are looking for. For more information and examples of the included tween animations, check out the Spark Table that is available from the TweenJS web page (see Figure 1-5).
Figure 1-5. Spark Table with animated samples of Ease equations
There are two more important things you need to look into with TweenJS, the wait and call methods. The wait method allows you to specify a desired time to delay before executing your animation. The following example waits 2 seconds before animating your butterfly:
createjs.Tween.get(butterfly).wait(2000).to({y:butterfly.y + 20},1000);
The call method allows you to call on a function when your animation is complete. This is referred to as a callback, which is simply a function that will be called asynchronously from other executing commands. This is an important feature in game development but can quickly get confusing because of the nature of JavaScript scope.
Callbacks and Scope
Before fully explaining JavaScript callbacks, let’s take one more look at a Tween command that utilizes the call
method.
function butterflyGone(){ stage.removeChild(this); }
Here your butterfly fades out, and when complete, calls a function named butterflyGone, which then removes it from the stage. You can already see how this will be important to your game development. This function might also be used to remove a reference from an object pool, add points to a scoreboard, and/or determine if the user has caught enough to advance to the next level.
Callbacks are common in JavaScript programming. What differentiate them from regular functions is that the time in which they are called is completely independent from other surrounding code that is being executed. In other words it’s out of order, or asynchronous.
An example would be when using AJAX to fetch data from a server. You need a function to process that data and execute other commands when the service is complete. With your butterfly animation, you need to know when that animation is complete so you can handle it while still carrying on with your game logic.
Notice that by default the callback function is scoped to the Tween’s target, butterfly. This may not always be the behavior you want. In the examples so far, you are working directly in the global scope of window, so it’s easy for you to continue referencing any other global variable or function in your application. But as your games progress you won’t be working in this global manner, but instead inside other objects and instances. You’ll often times need to access to an object’s properties and functions within your callbacks, and in many situations you’ll lose sight of them completely.
There a few other helpful arguments you can pass into call to help you manage with scope in asynchronous situations. Take a look at the example shown in Listing 1-3.
Listing 1-3. Setting Callback Scope in Tweeners call Method
var Game = {
createjs.Tween.get(butterfly).to({y:100}, 1000).call(this.butterflyGone, [butterfly],this);
Lastly, and most importantly, you use the third argument to set the scope to call the callback function in. By passing in this (Game), it will remain in scope when the animation is complete. This can be very important in many programming situations.
Note
■
If I’ve lost you, don’t worry. We’ll get back into encapsulating code and scope as you build your games later on
in the book. This approach is an important one when dealing with game programming in JavaScript, so I felt it necessary
to briefly cover it as applied to animations using TweenJS.
You can see how powerful and easy-to-use TweenJS can be. In fact, you could actually get pretty far with EaselJS and TweenJS alone when making games, but there a few more tools you need to check out that will polish your games and help them perform more reliably.
SoundJS
One of the biggest gripes about HTML5 when it comes to games is audio. Browsers all have their own ways of dealing with audio. There is heavy fragmentation when it comes to file types, playback control, volume, and a few other annoyances that make HTML5 games that much more difficult to master. And it all gets worse when you move to mobile.
SoundJS makes an effort to bridge these gaps and it does a pretty good job at doing so. It prevents you from doing endless conditionals each time you want to handle a sound object and provides the concept of ids to reference these loaded audio files for quick access and playback control. A simple demo will show you the ease in working with audio with SoundJS.
createjs.Sound.registerSound("audio/boom.mp3", "boom",5); var boom = createjs.Sound.play("boom");
The first thing you need to do with a sound file is to register it. This is essential for working with any sound asset. This puts a reference to the sound into memory and allows you to assign an id for quick access to it when you need it, regardless of scope in your game. The third parameter is optional and specifies how many concurrently playing instances of the same sound can be played. Once your sound is registered, you can play it by passing in the registered id string to the play method.
Although these two lines are about all you need to play a sound, it is important that your sounds are loaded before attempting to access them. If a sound has even the slightest delay, especially in games, your application will appear off or even broken. You can preload and register all sounds using PreloadJS, which you’ll see in action in the next section. But before you move on, let’s take a look at a few more features of SoundJS.
Events
There are a handful of useful events that will trigger from a SoundJS instance. These can come in handy when you need to know information about the sound in question, such as when it’s loaded, ready to play, finished, and so on. The following is an example of how to listen for when the sound file has finished playing:
mySound.addEventListener ("complete", function(mySound) { alert('sound has finished')
Plugins
Plugins are optional additions to help us deal with known audio problems in today’s browsers. There are currently three official plugins available: HTMLAudio plugin, WebAudio plugin, and Flash plugin. You’ll be learning what these plugins are and how you can use them throughout the book, but let’s take a quick look at the Flash plugin.
When the Flash plugin is registered, it will embed the provided FlashAudioPlugin.swf into your HTML document and will act as a fallback when HTML5 audio is not supported. This is a common practice with many desktop HTML5 games and is often used as the primary source of audio. This ensures that the user has the best audio experience possible when in a browser where Flash is supported.
Here is an example of how to register the Flash plugin:
createjs.FlashPlugin.BASE_PATH = '../plugins';
createjs.Sound.registerPlugins([createjs.FlashPlugin]);
The base path is first assigned and dictates where your swf file is located. Next, you call the registerPlugins
method, which accepts an array of available plugins. In this example, you are only registering one, but you can register as many plugins that you have available by adding to the array.
Note
■
The easing methods you used in the “TweenJS” section are examples of utilizing plugins within CreateJS.
Ease
itself is also referred to as a plugin, although it does not need to be registered.
You’ll be playing a lot more with SoundJS in your final game, and a bit more in the next section. There’s only one more tool to discuss and you’ll see how you can use it to wrap everything up into a complete, working example.
PreloadJS
As you probably guessed, PreloadJS is a tool for preloading all of your assets in your game or application. PreloadJS is by no means exclusively tied to the rest of the suite and can be used in any HTML environment where you need to preload the files used in your project. The implementation of PreloadJS is fairly straightforward so it doesn’t take much to learn. You can easily wait for loading assets and listen to their progress with minimal amounts of code.
PreloadJS is centered around the LoadQueue class, which manages file loading and events. Take a look at the following example shown in Listing 1-4 and then we’ll discuss what’s going on.
Listing 1-4. Using LoadQueue Class to Preload Assets
var queue = new createjs.LoadQueue(); queue.installPlugin(createjs.Sound);
queue.addEventListener("complete", onComplete); queue.loadManifest([
{id: "butterfly", src:"/img/butterfly.png"}, {id: "poof", src:"/snd/poof.mp3"}
]);
After creating an instance of the LoadQueue class, you instantly install the Sound plugin. This is necessary for handling the loading of sound files. Next, you register an event listener so you can tell your application that all files are ready and it’s safe to start. A manifest is next built, as opposed to loading each file independently, by invoking the
loadManifest method and passing it an array of objects.
These objects should include two properties, the path to the file and an id so you can quickly access them when needed. You can use these ids for both playing audio files and accessing image files.
Now that you’ve seen this in action, let’s combine everything you’ve learned in this chapter into a quick butterfly application that will encompass all tools in the CreateJS suite. Before you start writing code to build your games
throughout this book, you’ll first formulate descriptions and simple outlines of what it is you want to accomplish. The next example is extremely simple but this outline will give you an idea of all functionality necessary to complete your goal.
Dancing Butterflies
Dancing butterflies is a simple application that animates three butterflies down the screen in sequential order while playing sound effects as each float down and a final chime sound at the end.
Create three butterfly graphics.
•
Animate each butterfly in sequence, starting at the left.
•
Play a sound effect as each butterfly animates.
•
Remove each butterfly when it has finished animating.
•
Play a sound effect when all butterflies have finished animating.
•
With the exception of the stage setup, the code in Listing 1-5 should all seem familiar to you. It’s a simple example of how all of the tools in CreateJS can nicely work together.
Listing 1-5. Complete Code Example Using All Four CreateJS Libraries
<!DOCTYPE html> <html>
<head>
<title></title>
<script src="lib/easeljs-0.7.1.min.js"></script> <script src="lib/tweenjs-0.5.1.min.js"></script> <script src="lib/soundjs-0.5.2.min.js"></script> <script src="lib/preloadjs-0.4.1.min.js"></script> </head>
<body onload="init()">
<canvas id="canvas" width="1000" height="800" style="border: black solid 1px"></canvas>
queue.addEventListener("complete", loadComplete);
stage = new createjs.Stage(document.getElementById('canvas')); createjs.Ticker.setFPS(60);
createjs.Ticker.addEventListener("tick", function(){ stage.update();
}); }
function buildButterflies() {
var img = queue.getResult("butterfly");
sound = createjs.Sound.play('woosh',createjs.Sound.INTERRUPT_NONE,i * 1000); }
}
function butterflyComplete(){ stage.removeChild(this);
This code calls a function named init when the body loads. This begins your preload process, which will then fire the function loadComplete when everything is loaded and ready to go. Before you can start using your assets, your stage is set up in the setupStage function. This process, along with creating a ticker to constantly update your stage, is an important procedure, and will be the first thing I cover in the next chapter.
Summary
Much information was covered in this introductory chapter. You’ve seen the power of EaselJS by comparing it to the extensive, low-level approach needed with native canvas development; you can now see how the ease of adding animations and sound makes CreateJS an excellent choice for game development. Some programming principles and roadblocks were introduced to prepare you for some of the challenges that lie ahead when managing JavaScript applications. Finally, you managed to squeeze all four toolsets into a short, working example that demonstrates how quickly you can build HTML5 games and applications.
Making and Animating Graphics
As you start building your games, you’ll be loading in several graphical assets prepared externally in other graphics and drawing applications. However, EaselJS comes bundled with a Graphics class that is built up of a drawing API that you can use to create on-the-fly graphics.
In this chapter, we’ll be taking a close look at how you can accomplish these graphics and the kinds of things you can do with them when building your games. But before you start drawing, you need to get a bit more acquainted with what you are drawing them to. In the previous chapter, you saw the use of a stage object in many situations, but you don’t yet know what it is and how to set it up. Let’s do that now.
Stage
Stage is the root level of your EaselJS application. Any display object you add directly to stage becomes a child of the stage’s display list. You’ve seen this in action already with your butterflies.
Setting Up the Stage
Before you can start using EaselJS, you need to set up your stage. This is done by creating an instance of Stage and assigning it to an existing canvas element within your document. The following are some examples of how you set up a stage instance for your games:
stage = new createjs.Stage(document.getElementById('canvas'));
Alternatively, you can simply pass in the id of the canvas element.
stage = new createjs.Stage('canvas');
These examples are really all there is to setting up your stage. You’re now ready to start adding display objects to it and start building your game. But before anything will be rendered to it and displayed, you need to invoke its update
method.
stage.update();
Ticker
The Ticker class provides a main interval that is crucial to games development. Its primary purpose is to be that centralized area that calls your code to update the stage, which will reflect upon all added, deleted, and updated sprites that exist in the game. The frequency in which this occurs is referred to as the game’s frame rate.
A typical desirable frame rate is around 60 frames per second, or 60fps. This means that the stage would need to be updated 60 times every second. This rate can be adjusted accordingly depending on the complexity and speed of your game. You typically want to get away with the smallest fps as you can without visually hampering the look and feel of the gameplay. Just remember that the higher your frame rate is, the more taxing it will be on the memory of your computer or device, which can be detrimental to the performance of your game.
Let’s take a look at Listing 2-1 to see this in action.
Listing 2-1. Setting Up the Stage and Ticker
var stage;
// called when the body is loaded function setupStage() {
stage = new createjs.Stage(document.getElementById('canvas')); createjs.Ticker.setFPS(60);
This is the bare-bones setup that you’ll be using for most of the upcoming examples and games you’ll be building in this book. This Ticker function can also be used to manage what is known as a game loop and can be used for other things such as managing game states. You’ll be getting into those game techniques later in the book, but for now you’ll use this simple approach to assure that your graphics will render appropriately when updating your children in the stage’s display list.
Note
■
When using TweenJS, it is essential that the stage is constantly updated by using this or a similar approach.
Before you finally move on to creating graphics and adding them to the stage, let’s consider one more
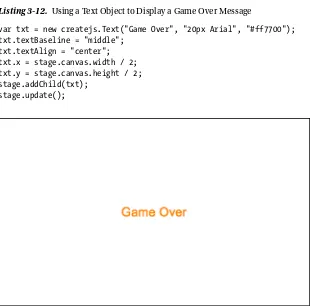
performance technique. As convenient as it may be for you to update the stage at a constant rate, it might not always be necessary. If nothing is changing on the screen, such as a static Game Over screen, why clear and redraw it on every tick? The fact is you really don’t need to. There is no internal management within the Easel framework to prevent redrawing unchanged properties on any existing display objects so you need to manage this yourself. This can easily be achieved by setting the Ticker to paused.
As you can see, this paused property can be accessed via the event passed into the event handler. You simply only update the stage when the Ticker is not set to paused. This is a handy feature to prevent unnecessary rendering in static moments in your game, or when you simply want to pause the level.
You can also retrieve this property directly from the Ticker class.
var paused = createjs.Ticker.getPaused();
Now that you see how the stage is set up you can finally move on to creating fun and exciting things to add on to it. Unlike the main game chapters in this book, many examples will assume that you have a global stage set up and are running its updates. If at any time you try to replicate an example and nothing shows up, there’s a good chance your stage is either not set up correctly or it’s not being updated.
Creating Graphics
Now that you’ve got your stage properly set up, let’s start adding some graphics to it. Graphics in EaselJS are either vector or bitmaps. Vectors can be easily drawn with code and used in many gaming and application scenarios. In this section, you’ll learn how to create and animate vector graphics. You’ll also explore a handy tool that can convert your Illustrator drawings into code, which can then easily be brought into your application.
Graphics
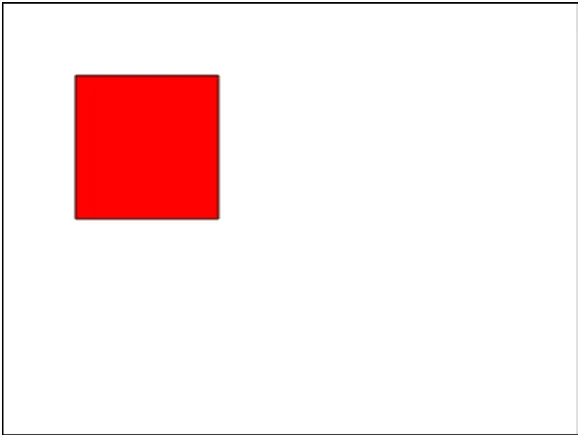
The Graphics class consists of an API for generating vector drawings. It’s extremely easy to use and comes with shape drawing methods as well as path building functionality. The following example shows how easy it is to create a red square with a black stroke:
var g = new createjs.Graphics(); g.beginStroke('#000');
g.beginFill('#FF0000'); g.drawRect(0,0,100,100);
Much like the previous Tween examples, the Graphics methods all return the instance so you can conveniently chain them together.
var g = new createjs.Graphics().beginStroke('#000').beginFill('#FF0000').drawRect(0,0,100,100);
Once you have your graphics constructed, you need to display them. Since Graphics is not a display object, you are not able to simply add it to the stage. The vessel used to hold and display your created graphics is a simple display object called Shape.
Shapes
The Shape class is used to display vector graphics in the display list. Once you’ve created a graphics instance, you can pass it directly into the constructor of Shape. The following code creates a square and passes it in through the constructor of a new Shape object, which then gets added to the stage. Figure 2-1 shows the result.
var g = new createjs.Graphics().beginStroke('#000').beginFill('#FF0000').drawRect(0,0,100,100);
var square = new createjs.Shape(g); square.x = square.y = 100;
Now that your graphic is in a display object, you can add it to the stage and move it around appropriately. Any instance of Shape will have a Graphics instance named graphics, whether you pass one in through its constructor or not.
You can alternatively create graphics and display them via Shape objects by directly accessing its graphics
property, as opposed to passing a new instance into it. The following code demonstrates how you can use this approach by creating a semi-transparent screen that covers the entire stage:
var screen = new createjs.Shape();
screen.graphics.beginFill(createjs.Graphics.getRGB(0, 0, 0, .6)); screen.graphics.drawRect(0, 0, stage.canvas.width, stage.canvas.height); stage.addChild(screen);
Notice that you can control the transparency of any color by using the getRGB static method, allowing you to also specify an alpha property. You’ll also notice that the stage itself doesn’t have any properties specifying its size so you access its width and height via its canvas property, which is a reference to the HTML Canvas element that it is tied to. Let’s take a look at some of the other shapes that you can quickly build via the Graphics class (see Listing 2-2). The shapes are shown in Figure 2-2.
Listing 2-2. Various Shapes Drawn with the EaselJS Graphics Class
//RECTANGLE
var rectangle = new createjs.Shape(); rectangle.graphics.beginStroke('#000'); rectangle.graphics.beginFill('#FF0000'); rectangle.graphics.drawRect(0, 0, 150, 100); rectangle.x = rectangle.y = 20;
stage.addChild(rectangle);
//CIRCLE
var circle = new createjs.Shape(); circle.graphics.beginStroke('#000'); circle.graphics.beginFill('#FFF000'); circle.graphics.drawCircle(0, 0, 50); circle.x = 250;
circle.y = 70;
stage.addChild(circle);
//STAR
var poly = new createjs.Shape(); poly.graphics.beginStroke('#000'); poly.graphics.beginFill('#90ABC2');
poly.graphics.drawPolyStar(0, 0, 60, 6, 0.6); poly.x = 400;
poly.y = 70;
stage.addChild(poly);
//TRIANGLE
var tri = new createjs.Shape(); tri.graphics.beginStroke('#000'); tri.graphics.beginFill('#00FF00'); tri.graphics.moveTo(50, 0)
.lineTo(0, 100) .lineTo(100, 100) .lineTo(50, 0); tri.x = 20; tri.y = 150;
stage.addChild(tri);
//ROUNDED RECTANGLE
var roundedRectangle = new createjs.Shape(); roundedRectangle.graphics.beginStroke('#000'); roundedRectangle.graphics.beginFill('#F7D0D1');
roundedRectangle.graphics.drawRoundRect(0,0,400,100,10); roundedRectangle.x = roundedRectangle.y = 150;
stage.addChild(roundedRectangle);
Some of the shapes in Listing 2-2 are drawn via the built-in shape-drawing methods, but the triangle shows how you can build custom shapes by creating paths. The moveTo method positions your path’s starting point and the lineTo draws the path to the specified x and y positions. Closing a path will use your previously defined fill color to fill it in.
You can essentially draw any shape you can imagine, but manually drawing these path coordinates can be pretty tedious and complicated. If you plan on using some more interesting shapes in your game, you might want to check out this really neat tool that will do the graphics code for you.
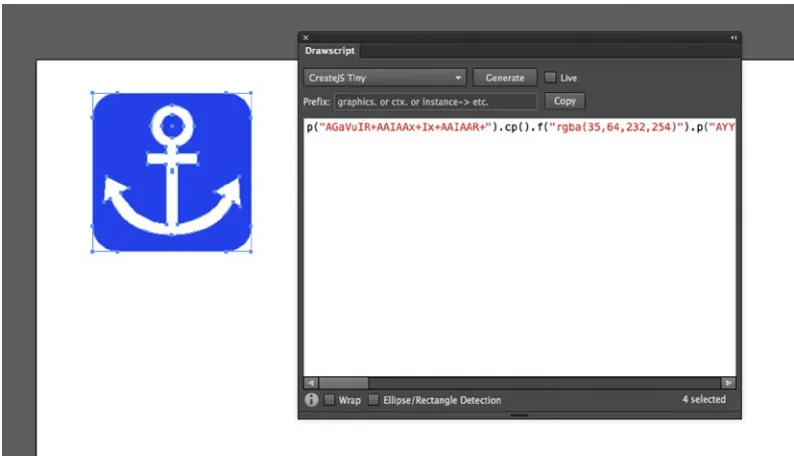
Drawscript
Drawscript is an extension that can be used to export graphics code from vector shapes drawn in Illustrator. It was developed by Adobe gaming evangelist Tom Krcha and can be downloaded for free via the web site drawscri.pt (see Figure 2-3). At the time of writing this book, Drawscript is in beta and is actively being updated with more features.
Figure 2-3. Web site for Drawscript, an Ilustrator extenstion
Drawscript exports code for several platforms, including EaselJS. Because it handles the complex math and code needed for drawing detailed shapes, you aren’t as limited as you might be if you were to write the code yourself.
After you install the extension, open the Drawscript window under Extensions. With it open, make sure you select the shape you’ve drawn and click Generate in the Drawscript window. This will generate the necessary code that you can then copy and bring into your EaselJS project (see Figure 2-4).
Figure 2-4. Drawscript in use in Illustrator
Figure 2-5. Graphics Tiny API cheat sheet
Along with utilizing this tiny API, Drawscript uses the decodePath API also included in Graphics. This dramatically shortens and encodes the code needed for drawing paths. The following example shows the code generated by the anchor shape in Illustrator:
p("AGaVuIR+AAIAAx+Ix+AAIAAR+").p().f("rgba(35,64,232,254)").p("AYYS6YAABkhaBQhkAAIsMAAYhkAAhQhQ AAhkIAAsWYAAhkBQhQBkAAIMMAAYBkAABaBQAABkIAAMW").cp().ef().f("rgba(255,255,255,254)").p("AOsLuIiM AAIAAhQICMAAIAAAAIAAgoYg8gUgyg8AAhGYAAhaBGhGBQAAYBaAABGBGAABaYAABGgyA8hGAUIAAAoIAAAAICWAAIAABQIi WAAIAAAAIAAG4YAAAADmgUBki0Ig8goIC0hkIAKDSIg8geYAAAAhQDwloAAYloAAhQkOAAAAIg8AeIAei+ICgBQIg8AoYAAA ABaDSDwAUIAAm4IAAAA").cp().ef().f("rgba(35,64,232,254)").p("AQuHgYAAAogoAogyAAYgoAAgogoAAgoYAAgy AogeAoAAYAyAAAoAeAAAy").cp().ef();
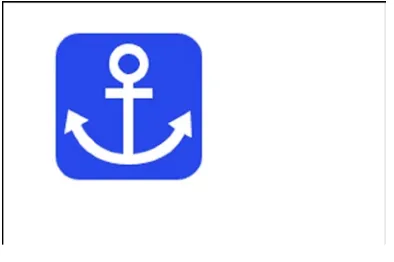
The generated code begins a series of chained methods, which are intended to be called from a Graphics object. You then pass that along to a Shape object and add it to the stage as you would with any other graphics example that you’ve learned so far. Figure 2-6 shows the image after its been exported.
var g = new createjs.Graphics();
g.p("AGaVuIR+AAIAAx+Ix+AAIAAR+").cp().f... .ef(); var s = new createjs.Shape(g);
stage.addChild(s);
Figure 2-6. Anchor shape drawn in Illustrator and exported via Drawscript
The result is a vector shape, completely drawn with code. Because of this, you can scale and manipulate this shape in many ways without pixelating it. Although this approach can be useful in some situations, the overuse of vector shapes can be extremely taxing for your processor. Bitmap graphics, which will be fully explored in Chapter 5, are the preferred format for complex graphics in most gaming environments. Be sure to weigh your options when deciding on the graphics format for your game or application.
Animating Shapes
Listing 2-3. Rotating a Square 360 Degrees Using Tween
var g = new createjs.Graphics();
g.beginStroke('#000').beginFill('#FF0000').drawRect(0, 0, 100, 100); var square = new createjs.Shape(g);
square.x = 150; square.y = 100;
stage.addChild(square);
createjs.Tween.get(square).to({rotation:360},3000);
Figure 2-7. Square rotating on upper left axis
You first draw your square and center it on the stage. You are able to quickly rotate it just fine but there is a clear problem. Your goal is to have your square spin dead center in the middle of the stage. The issue is that the registration point defaults to the upper left corner of the square, which acts as its axis point for the rotation. This can be an undesirable effect on many of your game sprites so it’s best in most situations to have your registration points in the center (see Listing 2-4). This results in a centered rotating shape like the one in Figure 2-8.
Listing 2-4. Rotating a Square with a Centered Registration Point
var g = new createjs.Graphics();
g.beginStroke('#000').beginFill('#FF0000').drawRect(0, 0, 100, 100); var square = new createjs.Shape(g);
square.regX = square.regY = 50; square.x = stage.canvas.width / 2; square.y = stage.canvas.height / 2; stage.addChild(square);
Figure 2-8. Square rotating on center axis
Using regX and regY on your shape object forces the graphics registration point to be where you specify it. In this case, you know that your square is 100 pixels tall and 100 pixels wide, so hard-coding its new registration point is easy to accomplish.
Note
■
When it comes to drawing shapes, you can alternatively accomplish this by offsetting the
x
and
y
position of
where you start drawing your graphics.
This gives you a much better result. You also have a more exact measurement on where you want to position your sprites. Because your 0 x and y values are now in the center, you can easily position the sprite in the center of the stage by factoring in the width and height of the canvas.
You’ve just seen how easy and convenient tweening custom shapes can be but it’s not always an ideal situation when animating game sprites around the stage. For example, imagine that you have several random power pellets bouncing around your level. A tween is great for one-off animations but not for the continual motion needed for many game elements.
A typical technique for animating game sprites is to utilize the game loop by setting up an update/render process. This technique usually first calls some sort of update method that evaluates your sprites’ current positions and sets them up with new properties for rendering to the next desired locations. The render method then simply renders the sprites by using the new temporary properties, typically assigned to each sprite during the update process.
You can use the tick method created by Ticker to call on these two functions. In this example, you have a circle that simply moves across the stage.
function updateCircle () { var nextX = circle.x + 5; circle.nextX = nextX; }
function tick(e) {
This simple game loop example will gradually move the circle across the screen horizontally. The update and
render methods get called on each game tick, followed by the update call on stage to finalize the actual rendering of your graphics.
Note
■
Because of the dynamic nature of JavaScript, you can easily “dynamically inject” properties and methods into
any object. In the previous example,
nextXis a custom property injected into your circle shape. This approach will be
used many times in this book as a way to quickly extend display objects by giving them extra, useful values.
You might be wondering why you didn’t simply change the x position in your update method. The reason you want to keep these calls separated is because you rarely change the sprite’s next position without first evaluating its current locations and/or the game’s current situation. You handle all of your physics logic within these update
methods, separated from the function that ultimately moves them. In an even more complex game loop, you might call on several otherupdate methods from here as well, where sprites or containers might handle calculations within themselves.
Listing 2-5 shows an example of this process in action. Albeit a simple demonstration, it should give you an idea on how the update/render cycle is executed within a game loop.
Listing 2-5. Bouncing a Ball Against the Walls Using a Simple Update/Render Cycle
var stage = new createjs.Stage(document.getElementById('canvas')); if (nextX > stage.canvas.width - circle.radius) { nextX = stage.canvas.width - circle.radius; direction *= -1;
}
nextX = circle.radius; circle.x = circle.nextX; }
Here you have a ball that bounces back and forth between the walls of the stage. In the update function, you first check what the location of the ball will be if you were to change its x position by factoring in the current speed and direction. You set this value to a temporary variable. If this value is beyond the bounds of either side of the stage, you set that value so that it would set the ball directly against the wall in its path; in other words, it won’t let it extend past your boundaries. You then assign your ball a variable that stores what its new location should be the next time it’s rendered. The render function is then called, where you then assign the new x position to the ball.
Drawing UI Elements
Another great way you can use the power of the drawing API is for drawing UI elements in your games and applications. This can be useful when creating screens, modals, buttons, and a lot more.
A common use for drawing graphics on the fly is for building a preloader bar. You’ll need to show some sort of indication that your game is loading as it takes more and more time for your assets to load. PreloadJS provides events that you can use to indicate progress in your load process so drawing a preloader to accompany that process is ideal.
Let’s wrap up this chapter by building a quick prototype of how this might be accomplished. You’ll be building a self-contained, encapsulated preloader object in Chapter 8, but before you learn some of those advanced coding techniques, you can manually call an update function on the preloader. This will allow you to see how this UI component is drawn and how it works.
Preloader Prototype
Preloader Prototype will be built to demonstrate how you can use code-written graphics to create UI elements, and how you can use animation for updating them. This preloader will consist of an outline graphic with a fill, which will animate to simulate a load progress.
Draw a preloader bar with an outline and fill shape to represent load progress.
•
Manually update the bar with a statically incremented value.
•
Remove preloader when load has reached 100%.
•
Listing 2-6. HTML Elements for the Preloader
<canvas id="canvas" width="1024" height="768" style="border: black solid 1px"></canvas> </body>
</html>
Next, open a script block by adding a script element. You will write all of your code here. A few variables are first declared, as shown in Listing 2-7.
Listing 2-7. Variables Declared for the Preloader
<script>
const LOADER_WIDTH = 400;
var stage, loaderBar, loadInterval; var percentLoaded = 0;
A constant is created to hold the size of the preloader. Then the stage reference is declared, along with a few other variables. A final value of 0 is set to percentLoaded so that the bar graphic starts out at a width of 0. The first function that is called is init, which is triggered when the body is finished loading (see Listing 2-8).
Listing 2-8. The init Function, Called when Body is Loaded
function init() { setupStage(); buildLoaderBar(); startLoad(); }
The init function initializes the application by calling a series of functions. The first few are used for preparing the stage and drawing your preloader graphics to it (see Listing 2-9).
Listing 2-9. Setting Up the Stage and Drawing an Empty Loader
function setupStage() {
stage = new createjs.Stage(document.getElementById('canvas')); createjs.Ticker.setFPS(60);
loaderBar.graphics.drawRect(0, 0, LOADER_WIDTH, 40); stage.addChild(loaderBar);
}
The setupStage function does your typical stage setup. The stage variable is set for global reference, and the
Ticker is set to fire 60 times per second, which will update the stage on every tick. The next function, buildLoaderBar, draws an empty loader bar to the stage, which is now just a black stroke with no fill. These graphics will be cleared and redrawn each time you have a progress update. This is done in the updateLoaderBar function, shown in Listing 2-10.
Listing 2-10. Rotating a Square 360 Degrees Using Tween
function updateLoaderBar() { loaderBar.graphics.clear();
loaderBar.graphics.beginFill('#00ff00');
loaderBar.graphics.drawRect(0, 0, LOADER_WIDTH * percentLoaded, 40); loaderBar.graphics.endFill();
loaderBar.graphics.setStrokeStyle(2); loaderBar.graphics.beginStroke("#000");
loaderBar.graphics.drawRect(0, 0, LOADER_WIDTH, 40); loaderBar.graphics.endStroke();
}
The first thing that is done in this function is the clearing of all existing graphics. Next, you start with creating the loader fill by using the current percentLoaded value. This percentage is multiplied against the predetermined width of the preloader. You create the stroke afterwards so it sits nicely on top of the fill.
In this prototype, you are manually updating the load percentage in an interval, which is set up in the final function called in the init function startLoad. This interval will repeatedly update your percentage in the function
updateLoad. Both functions are shown in Listing 2-11.
Listing 2-11. An Interval is Created to Update the Percentange for the Preloader Graphics
function startLoad() {
loadInterval = setInterval(updateLoad, 50); }
function updateLoad() { percentLoaded += .005;
The interval function updateLoad simply updates the percentage by .005 and calls on the updateLoaderBar
This preloader is a nice, practical example of what you can do with graphics in EaselJS. You managed to create a visually rich feature using nothing but a little math and the built-in drawing API. You’ll be wrapping this preloader up nicely in its own reusable object in Chapter 8, but the drawing techniques will remain the same.
Summary
This chapter demonstrates the amount of visual development that you can accomplish without loading a single asset. The drawing API gives you the power to create visuals, from primitive shapes to complex paths and gradients. With a little help from Drawscript, your shapes and colors can get even more detailed by allowing you to draw them inside of Illustrator and pasting the code into your application. We also took a quick look at animations using both TweenJS and more advanced, manual approaches achieved by tapping into the interval fired from the Ticker class.
Lastly, you used your newly learned drawing skills to create a practical UI element that will give visual feedback that can be used with PreloadJS or other situations where the user needs to wait for action.
Now that you have custom graphics added to the stage, the next logical step in game development is making them react to user input, as well as give the user feedback on their progress.
Capturing User Input
Now that you have a solid understanding of how graphics are created and how you can animate them, some player interaction is in order to turn your visuals into playable, interactive content.
I’ll discuss using both mouse and keyboard controls to capture user input, and you’ll view a few practical examples that show how to accomplish some common gaming features. Text will also be introduced to display the necessary messaging to provide feedback to the player.
Mouse Events
EaselJS not only handles your canvas drawing, but also the management of mouse positions and actions, and whether they intersect with any of your display objects. This allows you to mimic mouse interactions. Starting with the utmost basics of all interactivity, we’ll start by handling some clicks on some simple shape objects.
Mouse Clicks
A mouse event is set up and handled like many other typical interactive environments you might already be used to, such as Flash or HMTL DOM. An event listener is applied to the display object for a specific type of mouse interaction, and an event handler is written to accept and handle it.
troll.addEventListener('click',trollAttacked);
function trollAttacked(e){ alert('ouch');
}
In this troll attacking example, you add the event listener directly on your display object, and you write your function to handle it.
Another way to achieve this would be to use an anonymous function as your event handler.
troll.addEventListener('click', function (e) { alert('ouch');
This approach is typical in JavaScript development. Depending on the length and complexity of your function’s code, there will be times when you’ll want to keep your handler function explicitly defined, but anonymous functions can be handy for many reasons. Not only can they simplify the flow of your code for management and readability, but they can also be crucial when managing scope in many situations.
As previously promised, you’ll be diving deep into scope management as your games become more difficult, but for now you can simply take a look at how you can obtain a reference to the object that triggered the event.
troll.addEventListener('click', function (e) { stage.removeChild(e.target);
});
This approach uses the event object passed into the handler. This event object contains many properties that can help you identify what was clicked and where on the stage, or on the object, the mouse pointer was when the event was fired. You are able to kill the appropriate troll by using the target property in the event object, which is a reference to the clicked display object.
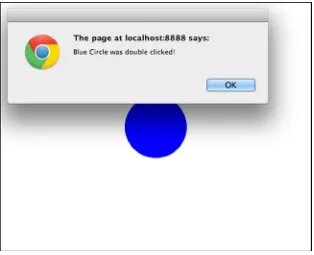
You can similarly use the dblclick event to achieve the same effect for double-clicks. Listing 3-1 is an example that uses this event to alert a message when the circle was double-clicked (see Figure 3-1).
Listing 3-1. Registering for Double-Click Events
var circle = new createjs.Shape();
circle.graphics.beginFill('#0000FF').drawCircle(0, 0, 50); circle.x = stage.canvas.width / 2;
circle.y = stage.canvas.height / 2; circle.name = 'Blue Circle'; stage.addChild(circle); stage.update();
You can also register for rollover and rollout events on display objects. As you can probably imagine, the legwork needed to constantly monitor the mouse location and compare it to the position of any display object can be taxing. Therefore, it should probably be used as sparingly as possible in the Canvas environment. Because of this, EaselJS doesn’t allow this functionality by default. You can turn it on by calling the following method:
stage.enableMouseOver();
After invoking this method on stage, you can now register and properly handle mouseover and mouseout events. Notice that you can also easily change the cursor of the mouse by using any valid CSS style. Figure 3-2 shows your circle’s alpha value decrease when the mouse is hovering it.
circle.cursor = 'pointer';
circle.addEventListener("mouseover", function (e) { circle.alpha = 1;
});
circle.addEventListener("mouseout", function (e) { circle.alpha = .5;
});
Drag and Drop
EaselJS does not come with built-in functionality for dragging and dropping display objects but you can easily set this up with a combination of a few mouse events. Take a look at the code in Listing 3-2, which accomplishes drag-and-drop functionality.
Listing 3-2. Creating Drag-and-Drop Functionality
circle.addEventListener('mousedown',function(e){ stage.addEventListener('stagemousemove',function(e){ circle.x = stage.mouseX;
circle.y = stage.mouseY; });
stage.addEventListener('stagemouseup',function(e){ e.target.removeAllEventListeners();
}); });
First, you register for a mousedown event on your circle. This differs from the click event as it is fired as soon as you click down, where the click event will fire only after quickly releasing your mouse button over the object. Once you press down on the circle, you immediately listen for every update of the mouse position by setting a listener for
stagemousemove, directly on the stage.
In the stagemousemove handler, you change the position of your circle to match that of the mouse, which will give you the illusion of grabbing and dragging that item. In addition to registering for these mouse updates, you also want to listen for when you let go of your circle (i.e., drop it). The stagemouseup will work nicely for this, as it will be triggered as soon as you let go of the mouse button.
Once you do this, you can easily remove both the mousemove and mouseup event listeners on your stage by calling its removeAllEventListeners. Since you are no longer registered for mouse move events, the circle ceases to follow your mouse and is dropped when you let go.
With this drag-and-drop approach with display objects, let’s put together a full example that puts this into action, and then add a little bit of game logic to determine if you are dropping your shapes in the appropriate, predetermined locations.
Note
■
As some of the examples get longer and more complex, I’ll be taking a function-by-function approach to
explaining the code.
Color Drop
Color Drop is a simple color-matching game where the player must drop each game piece in the correct slot by matching their colors.
Four square slots are displayed on the top of the screen.
•
Four blocks are randomly placed on the bottom of the screen, each with a color that matches a
•
slot at the top of the screen.
The player must drag each block into its corresponding slot, which is accomplished by
•
matching their colors.
If a player drops it in the wrong slot, the block will animate back to where it was grabbed.
•
If a player drops it in the correct slot, it should animate to snap in place of the slot.
•
Once the player fills all four slots, alert the user that they have won the game.
•
First, set up the HTML document that includes a Canvas element and the necessary CreateJS file includes (see Listing 3-3). The game code will be written in a separate script (see Listing 3-4), so be sure to create this file and include it in the document.
Listing 3-3. HTML Document for Color Drop
<!DOCTYPE html>
<canvas id="canvas" width="1000" height="800" style="border: black solid 1px"></canvas>
</body>
</html>
Listing 3-4. colorDrop.js - Game Variables and init Function
function init() {
stage = new createjs.Stage("canvas"); buildShapes();
setBlocks(); startGame(); }
First, some variables are declared to hold values that you’ll need throughout your game code. The first is the stage reference and the second two are arrays that will hold the blocks you drag, as well as the slots that you drop them on. Lastly, a score variable is declared to hold the game score.
The init function is called when your body loads and kicks off your game. The Stage object is created and set to the stage variable.
Next is a series of functions that set up and start the game, the first being a function (see Listing 3-5) used to create all of the shape objects that you will be using in the game.
Listing 3-5. colorDrop.js – buildShapes Function
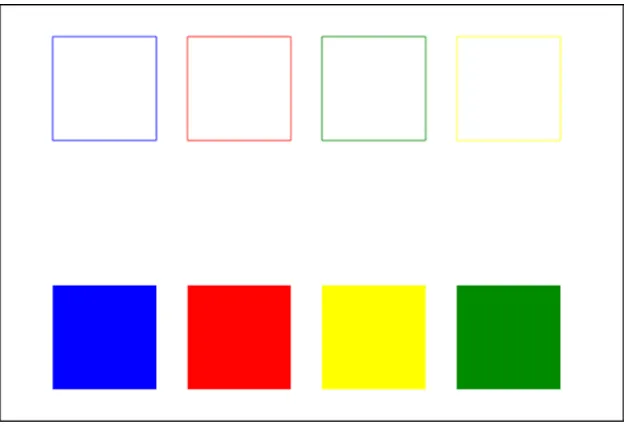
function buildShapes() {
slot.graphics.beginStroke(colors[i]); slot.graphics.beginFill('#FFF'); slot.graphics.drawRect(0, 0, 100, 100); shape.graphics.beginFill(colors[i]); shape.graphics.drawRect(0, 0, 100, 100);
The buildShapes function creates all of the visual assets needed for the game. You start by creating an array that holds the colors used for building the blocks. A series of reusable variables are also declared for loop iterations, as well as the display objects that you’ll create throughout the function.
Note
The rest of the function will consist of one loop that creates the game assets and assigns them their necessary properties, for both display and logic. Using the loop’s iterator value you can both build and position the slots in a horizontal line at the top of the stage. While the slots are actually drawn to the stage in this loop, the blocks are simply instantiated and pushed to an array so you can draw them later at random positions.
A key property is assigned to each slot and block using the iterator value, and can be used later in the game to determine matches when you drop blocks on the slots.
With the slots drawn on the stage and your block objects instantiated, you are ready to draw the blocks in random positions (see Listing 3-6).
Listing 3-6. colorDrop.js – setBlocks Function
function setBlocks() {
shape.addEventListener("mousedown", startDrag); stage.addChild(shape);
shapes.splice(r, 1); }
}
A similar loop is created to position the blocks, this time along the bottom. Each iteration grabs a random index out of the shapes array before placing it on the screen. After you add it, you remove it from the array so you don’t grab the same object again. This makes the array length shorter so it’s imperative that you first declare that initial array length and use it to write your loop. Otherwise, you would get undesired results.
As you randomly choose and draw each block, you also set a few properties to them for reference on where it was initially drawn. This lets you put it back to this position if you incorrectly drop it somewhere else on the stage.
Finally, a mousedown event listener is registered to each shape so you can create its dragging functionality. This handler has a good amount of code so you’ll avoid writing this function anonymously to preserve legibility.
The last function you call from init sets up a simple game loop to continuously update the stage (see Listing 3-7). At this point, your game objects are drawn on the stage and registered to fire a function for handling their drags. Figure 3-3 shows the game elements drawn on the stage and ready for interaction.
Listing 3-7. colorDrop.js – startGame Function