.NET Game Programming
with DirectX 9.0
ALEXANDRE SANTOS LOBÃO AND
Copyright ©2003 by Alexandre Santos Lobão and Ellen Hatton
All rights reserved. No part of this work may be reproduced or transmitted in any form or by any means, electronic or mechanical, including photocopying, recording, or by any information storage or retrieval system, without the prior written permission of the copyright owner and the publisher.
ISBN (pbk): 1-59059-051-1
Printed and bound in the United States of America 12345678910
Trademarked names may appear in this book. Rather than use a trademark symbol with every occurrence of a trademarked name, we use the names only in an editorial fashion and to the benefit of the trademark owner, with no intention of infringement of the trademark. Technical Reviewer: David Jung
Editorial Directors: Dan Appleman, Gary Cornell, Simon Hayes, Karen Watterson, John Zukowski Managing Editor: Grace Wong
Project Manager: Sofia Marchant Copy Editor: Ami Knox
Production Manager: Kari Brooks
Compositor: Diana Van Winkle, Van Winkle Design Group Artist and Cover Designer: Kurt Krames
Indexer: Lynn Armstrong
Manufacturing Manager: Tom Debolski
Distributed to the book trade in the United States by Springer-Verlag New York, Inc., 175 Fifth Avenue, New York, NY, 10010 and outside the United States by Springer-Verlag GmbH & Co. KG, Tiergartenstr. 17, 69112 Heidelberg, Germany.
In the United States, phone 1-800-SPRINGER, email [email protected], or visit http://www.springer-ny.com.
Outside the United States, fax +49 6221 345229, email [email protected], or visit http://www.springer.de.
For information on translations, please contact Apress directly at 2560 9th Street, Suite 219, Berkeley, CA 94710.
Phone 510-549-5930, fax: 510-549-5939, email [email protected], or visit http://www.apress.com.
River Pla.Net:
Tiled Game Fields,
Scrolling, and
DirectAudio
IN THIS CHAPTERwe’ll apply the concepts learned in the pre-vious chapter about Direct3D to implement DirectX gaming classes (such as GameEngine and Sprite), so we’ll easily be able to create high-speed graphics games. We’ll also introduce basic DirectAudio concepts that will allow us to include sound effects and background music in our games.
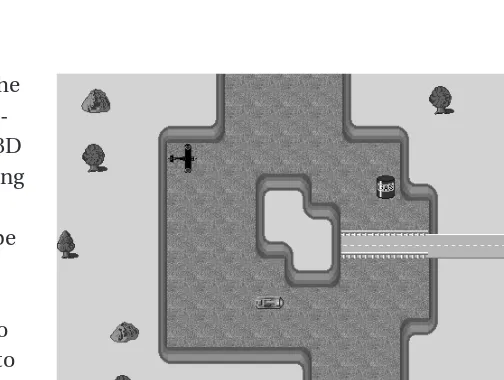
We’ll also examine the concept of tiled game fields and scrolling in games, and start implementing a clone of Activision’s River Raid game, a
popular title for Atari 2600 and VCS. Our sample game, shown in Figure 4-1, will be finished in the next chapter, where we’ll introduce DirectInput and the use of force-feedback joysticks.
Scrolling games and tile-based games have been around since earlier video game consoles and home computers hit the shelves, and we often see games that use both techniques. We’ll discuss some interesting points about each in the next sections.
Scrolling Games
Although the basic concept of scrolling games is very simple, there are many inter-esting variations we must consider when we start creating a new game. We can define scrolling games as the games in which the background moves in a con-tinuous way. It’s a very loose definition, but it’ll suffice for our goals here.
Some of the typical choices we must make when coding scrolling games are discussed next.
Scrolling Direction
All scrolling games are either vertical scrollers, horizontal scrollers,or full scrollers, meaning that the background on these games scroll in a vertical direction, in a horizontal direction, or in any direction. We’ll discuss some variations of these movements in this section.
The most common choice is to implement vertical “up-down” scrollers (as does the sample game for this chapter), where the background moves from the top to the bottom of the screen, and horizontal “right-left” scrollers, where the back-ground moves from right to left. We don’t see many scrolling games using the opposite direction schemes because using these directions makes our games seem more natural to players.
Full scrollers are harder to implement and to play, but when made correctly, they can lead to very interesting gameplay. Just imagine a game in which players can move their character in any direction: This might be an interesting feature, but the player could become disorientated, and the game objective would be less clear.
Parallax Scrolling
Parallax scrollingis an ingenious trick that gives players the feeling of being in a 3-D environment, even with flat images.
This approach creates a more lifelike game, but must be used with care because it can lead to visual clutter and confusion for the player. A good tip is to make distant objects with less vivid colors. This adds to the ambience without distracting the player.
Player or Engine-Controlled Scrolling
When coding the scrolling for our game, we need to decide whether the back-ground will always be moving (except, perhaps, when facing some end-of-level bosses), if it will move depending solely on the player’s input, or if the movement will be a combination of both.
In some scrolling games, the player is always in the same position on the screen (usually the middle), and the background rolls according to the player’s movement: When a player moves the joystick to the right, his or her character walks to the right (moving in a fixed position), while the background moves to the left. Many race games use this approach.
Some games use a similar solution: A player walks freely in a restricted area, and when he or she gets near any border, the background starts to move until the player starts walking back toward the center of the screen.
Some other games use a combination of automatic scrolling with player-controlled scrolling; the player controls scrolling right or left, but is always moving from the top to the bottom of the screen.
One last group of games comprises the auto-scrolling ones, such as the sample we’ll code in this chapter: The background simply goes on scrolling without player intervention, creating a nonstop action game.
Choosing the Scrolling Type
Even a topic as simple as choosing the scroll type we should use in our game may lead to extensive discussion. Of course there’s a lot more we can do when coding scrolling games; don’t be reluctant to try new ideas. For example, we can split the screen and make two areas with different scrolling behaviors, such as in the old arcade game Olympics, where the computer controls a character running in the upper middle of the screen and the player runs in the lower middle; each half-screen scrolls with its own speed.
Technical Tips for Scrolling Implementation
Since there are many ways to implement scrolling—from a “camera” moving over a big image through to the opposite extreme, scrolling based on tiles—there’s no universal solution. However, keep in mind the following rules of thumb as design goals:
• Avoid loading images from disk exactly when they are needed. Although it may not be practical to load all images at the start of the game, try to load the images before they’re needed; never depend on disk response time, or the game will probably lack smoothness.
• On the other hand, loading every image and creating every vertex buffer for the game when it starts is only practical in small game fields. In bigger games memory can run out in a short time; so balance memory use against the loading speed of the images. A simple technique to avoid memory shortage is dividing the game into levels, and loading the images only for the current level. While the user is distracted with a screen with the current score or a short message, the next level can be loaded.
Tile-Based Games
A tile is just a small piece of a graphic with a certain property that reveals its status for the game (a background, an enemy, an obstacle, a ladder, etc.). Creating a tiled game field is simply a matter of putting the tiles together in a logical fashion. We can do this by creating a level-map file with a level designer or even with a text editor; our game, when running, translates the tile codes in the file to graphical tiles on screen.
When coding tile-based games, the first question to ask is, Will our tiles be clearly visible, or will we try to hide the repetitive patterns?
There’s no correct answer—it just depends on the game.
If we’re working with a game that deals with visible blocks or bricks, there’s no special trick to use when creating the tiles: We can simply list the tiles we’ll use and draw them. Drawing some extra tiles can help the game to look more interesting to the user.
Draw the Basic Tile Sets
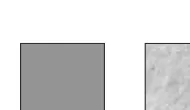
When creating a new tile set, we first draw the basic tiles for each type of terrain: for example, one tile for water, one tile for grass, one tile for sand, etc. An example of a basic set is show in Figure 4-2.
Figure 4-2. A basic set of tiles, comprising two terrain types
With the tiles presented in Figure 4-2 and in other figures in this chapter, we include suggested filenames. Using a logical filenaming scheme for your tiles can help you easily find specific tiles when you need them.
Keeping an eye on our “budget” of memory (how much memory we can use for textures), let’s create some simple variations, such as adding different patterns to a sand tile, or some little bushes or small stones to a grass tile.
We should review our basic set, using the game project as a guide, to be sure that we create a tile for every terrain or object we need. Once we are satisfied with our basic set, we can go on to the next step: creating border tiles.
Create Border Tiles
To create border tiles, we must separate the tiles into groups that will have con-nections with each other, and then create the borders for the tiles in each group. We must do this because usually some tiles won’t need to have borders with some of the others—for example, the tiles that will create internal parts of a building don’t need to have any special border with the outside tiles.
Within every group, create the border tiles between each type of terrain. There are basically three types of borders we can create, as shown in Figure 4-3:
• Border tiles:With this kind of tile, one terrain type occupies almost all of the
area of each tile, leaving just few pixels for the transition to the next terrain.
• Half-to-half tiles:With this kind of tile, each type of terrain occupies half of
the tile; the transition between terrain types can be on the vertical, hori-zontal, or diagonal axis.
Figure 4-3. Example of border tiles
These basic border tiles will suffice to create a continuous-looking terrain, but if we have many of these transition tiles presented to the player on every screen, the set still won’t suffice to create an illusion of a nontiled terrain. That’s why we need to create extra borders between the most-used terrain types.
Include Extra Transition Tiles
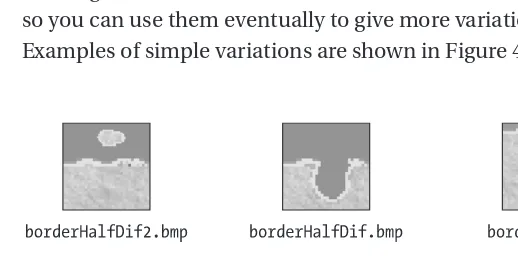
For those transitions that will be presented most of the time to the player, include some different tiles for each transition and for the basic set, which will be used sparingly to break down the feeling of patterns of repetition. For example, when creating tiles between water and land, include some rocks, a bay, or a larger beach, so you can use them eventually to give more variation to the game visual.
Examples of simple variations are shown in Figure 4-4.
To create a better set of tiles, test if the transitions for each tile are seamless in every direction (when we rotate the tiles). An improved game engine can use the same tiles with various rotations to achieve better results. An easy way to do this is to create some tiles with only borders (and a flat color at the middle), and use them as “masks” over other tiles, employing any graphical editor to hide the tran-sitions between the base tiles and the masks. Ensuring that the border pixels are always the same will allow smooth transitions.
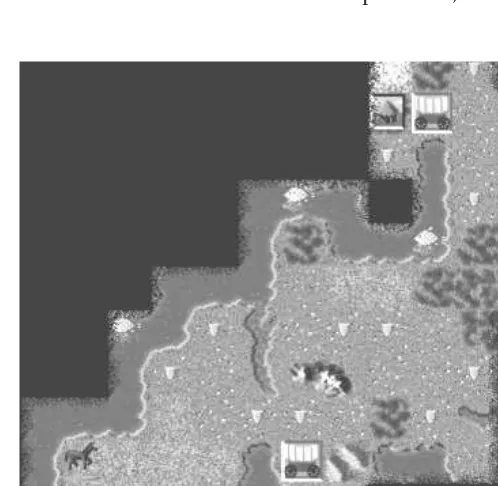
In Figure 4-5 we see part of a screen from Sid Meyer’s Civilization. Although the terrain looks random at first glance, if we pay a little more attention we can see the same tiles used in different compositions, with great results.
Figure 4-5. Civilization: a successful example of a tile-based game
Creating New Game Classes
Looking at the similarities amongst the test programs we did in Chapter 3, we can choose some parts of the code to create DirectX versions for the two basic game classes we created in Chapter 2: a GameEngineclass, which will be responsible for initializing, terminating, and managing the device operations, and a Spriteclass, which will create some vertices and load the images as textures (transparent or otherwise) from image files.
© 2002 Infogrames Interactive, Inc. All Rights Reserved.
NOTE We’ll try to maintain the class interfaces used in Chapter 2, but since
using Direct3D is very different from using GDI+, don’t be surprised if we find new ways to do the same things.
We’ll also extend our game class library by creating a GameMusicclass according to the basic concepts we’ll examine when studying the DirectAudio interface.
The GameEngine Class
To create the new GameEngineclass, we’ll use the lessons learned in Chapters 1 and 2 about game engines, plus the Direct3D concepts discussed in Chapter 3. The fol-lowing sections present the concepts involved in the creation of this class.
The Class Interface
To include all we learned from the previous chapter, the GameEngineclass must have some objects that will store references to Direct3D objects and a reference to the DirectAudio object (which controls the game music and sound effects, as we’ll see). Another common theme we can see in the samples of the previous chapter is the use of flexible vertex formats to define figure vertices when creating a device, as well as the use of a background color when clearing the device.
Looking to the game engines from the samples of Chapters 1 and 2, we can again see some common properties, such as the window handle used for drawing, the width and height of the game field, and some flags to control whether the game is over or paused.
Looking again at the samples in Chapter 3, we can see a repetitive pattern in every Direct3D application. This gives us some clues about possible methods to include in our new GameEngineclass:
1. Initialize the various Direct3D objects.
2. Enter a loop that will call the Renderprocedure between BeginSceneand EndScenemethods.
3. Dispose all Direct3D objects created.
Dim MyGameEngine as clsGameEngine ...
' Initialize Direct3D and DirectAudio objects MyGameEngine.Initialize
' Start the game loop, the procedure will only return when the game is over MyGameEngine.Run
' Dispose the Direct3D and DirectAudio objects MyGameEngine.Finalize
We’ll need a fourth method: an empty Rendermethod that will be called from within a loop on the Runmethod. Each game will create a new class, derived from the generic GameEngineclass, that will implement the Renderprocedure and add any extra features to the Initializeand Finalizemethods.
NOTE For more information on flexible vertices and the objects and the methods mentioned in the preceding text, see Chapter 3.
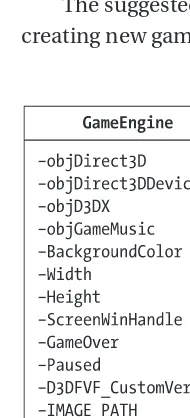
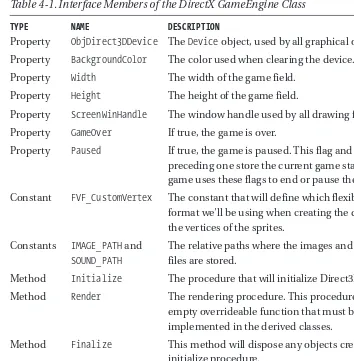
The suggested interface for the GameEngineclass is shown in Figure 4-6; when creating new games, we can improve the class as needed.
The description of the interface members of the GameEngineclass are shown in Table 4-1.
Table 4-1. Interface Members of the DirectX GameEngine Class
TYPE NAME DESCRIPTION
Property ObjDirect3DDevice The Deviceobject, used by all graphical operations. Property BackgroundColor The color used when clearing the device.
Property Width The width of the game field. Property Height The height of the game field.
Property ScreenWinHandle The window handle used by all drawing functions. Property GameOver If true, the game is over.
Property Paused If true, the game is paused. This flag and the preceding one store the current game status. Each game uses these flags to end or pause the game. Constant FVF_CustomVertex The constant that will define which flexible vertex
format we’ll be using when creating the device and the vertices of the sprites.
Constants IMAGE_PATHand The relative paths where the images and the sound
SOUND_PATH files are stored.
Method Initialize The procedure that will initialize Direct3D.
Method Render The rendering procedure. This procedure will be an empty overrideable function that must be
implemented in the derived classes.
Method Finalize This method will dispose any objects created in the initialize procedure.
Method Run This method will simply have a BeginScene-EndScene
The next code listing shows the definition of the GameEngineclass, including the proposed properties, methods, and constants:
Imports Microsoft.DirectX.Direct3D Imports Microsoft.DirectX
Public Class clsGameEngine
Protected Shared objDirect3DDevice As Device = Nothing
' Simple textured vertices constant and structure
Public Const FVF_CUSTOMVERTEX As VertexFormat = VertexFormat.Tex1 Or _ VertexFormat.Xyz
' defines the default background color as black
Public BackgroundColor As Color = Color.FromArgb(255, 0, 0, 0) ' Images path, to be used by the child classes
Protected Const IMAGE_PATH As String = "Images"
Public Structure CUSTOMVERTEX Public X As Single Public Y As Single Public Z As Single Public tu As Single Public tv As Single End Structure
Public Width As Integer = 25 Public Height As Integer = 25
Private ScreenWinHandle As System.IntPtr
' Controls the game end
Public Shared GameOver As Boolean Public Shared Paused As Boolean
Sub Run()
Public Overrideable Sub Render()
Public Function Initialize(Owner As windows.forms.control) As Boolean Protected Overrides Sub Finalize()
The Importsclause used in the beginning of the class is a new feature of Visual Basic .NET, and it allows us to use any of the objects of the imported namespace directly, without needing to inform the full object hierarchy. For example, instead of creating a Microsoft.DirectX. Direct3.D .Device object, we can simply use Device in our variable declarations.
Before writing the code for the class methods, let’s ensure that we understand the scope modifiers used in the GameEngineclass, as explained in the next section.
Understanding the Scope Modifiers
Now is a good time to look at the scope keywords used before variable and method declarations, and used extensively in the GameEngineclass:
• Private: Visible only inside the class
• Protected: Visible only to the class and its derived classes
• Public: Visible to any code outside and inside the class
Other keywords used in this context are
• Shared: Any member declared with this keyword is shared with all the objects created for the class, and can be accessed directly by the class name (we don’t need to create objects). Constants are shared by default, even when we don’t use the shared keyword.
• Overrideable: This keyword indicates that a class member can be overridden by derived classes. In the preceding sample code, the Renderprocedure must be an overrideable function, since the code for it will be supplied by the derived classes, although it will be called by the Runmethod in the base class.
• Shadows: When we want to redefine a function in a derived class, we can use this keyword. In this case, we aren’t overriding a member from the base class, so when the method is called from the derived class, the method of this class will be called, and when a call is made from the base class, the method of the base class is called.
In the next section we’ll examine the code for each method of the GameEngine class.
Coding the Class Methods
There are no new concepts in these methods, so we can simply copy the code from one of the samples in the previous chapter and organize it as methods of the GameEngineclass. As previously explained, we have an Initializemethod to do the initialization (as we saw in Chapter 3) for a full-screen application using an orthogonal view. The Finalizemethod disposes of the objects created, and the Run method has the rendering loop, used in all programs in Chapter 3, that calls the empty Rendermethod for each loop interaction. The Rendermethod will be coded in the derived class, which will include specific features for each game.
Sub Run()
Do While Not GameOver
If (objDirect3DDevice Is Nothing) Then GameOver = True
Exit Sub End If
objDirect3DDevice.Clear(ClearFlags.Target, BackgroundColor, 1.0F, 0) objDirect3DDevice.BeginScene()
' Calls the Render sub, which must be implemented on the derived classes Render()
objDirect3DDevice.EndScene() Try
objDirect3DDevice.Present() Catch
' Some error ocurred, possibly in the Render procedure End Try
Application.DoEvents() Loop
Public Overrideable Sub Render()
' This sub is specific for each game,
' and must be provided by the game engine derived class End Sub
Public Function Initialize(Owner as Windows.Forms.Control) As Boolean Dim WinHandle As IntPtr = Owner.handle
Dim objDirect3Dpp As PresentParameters Initialize = True
Try
DispMode = Manager.Adapters(_
Manager.Adapters.Default.Adapter).CurrentDisplayMode DispMode.Width = 640
DispMode.Height = 480
' Define the presentation parameters objDirect3Dpp = New PresentParameters()
objDirect3Dpp.BackBufferFormat = DispMode.Format objDirect3Dpp.BackBufferWidth = DispMode.Width objDirect3Dpp.BackBufferHeight = DispMode.Height objDirect3Dpp.SwapEffect = SwapEffect.Discard
objDirect3Dpp.Windowed = True 'False ' Create the device
objDirect3DDevice = New Device(_ Manager.Adapters.Default.Adapter, _ DeviceType.Reference, WinHandle, _
CreateFlags.SoftwareVertexProcessing, objDirect3Dpp)
' Tells the device which is the format of our custom vertices objDirect3DDevice.VertexFormat = FVF_CUSTOMVERTEX
' Turn off culling => front and back of the triangles are visible objDirect3DDevice.RenderState.CullMode = Cull.None
' Turn off lighting
objDirect3DDevice.RenderState.Lighting = False
' Turn on alpha blending, for transparent colors in sprites objDirect3DDevice.RenderState.SourceBlend = Blend.SourceAlpha
objDirect3DDevice.RenderState.DestinationBlend = Blend.InvSourceAlpha ' The sprite objects must turn on alpha blending only if needed, ' using the following line:
' Set the Projection Matrix to use a orthogonal view
objDirect3DDevice.Transform.Projection = Matrix.OrthoOffCenterLH(0,_ DispMode.Width, 0, DispMode.Height, 0.0F, 0.0F)
Catch de As DirectXException
MessageBox.Show("Could not initialize Direct3D. Error: " & _
de.ErrorString, "3D Initialization.", MessageBoxButtons.OK, _ MessageBoxIcon.Error)
Initialize = False End Try
' Dispose the used objects DispMode = Nothing
objDirect3Dpp = Nothing End Function
Protected Overrides Sub Finalize()
On Error Resume Next ' We are leaving, ignore any errors
If Not (objDirect3DDevice Is Nothing) Then objDirect3DDevice.Dispose() objDirect3DDevice = Nothing
GC.Collect() MyBase.Finalize() End Sub
In the initialize procedure, we used a set of common parameters for the device creation; we can change it as needed for each application.
In the next section we’ll see the upgraded code for the second game class of our library: the Spriteclass.
The Sprite Class
We can use the basic interface for sprites defined in Chapter 2, with the New, Draw, and Loadmethods, and some simple properties. Looking back at Chapter 3, we can list some suggestions for other interface elements: values for the trans-lation, scaling, and rotation operations in the x and the y axis, and a speed value for both axes (speed is just the counter to be used for the translation in every new frame drawn).
Because a sprite is drawn over a polygon, we’ll need a property to store the vertex buffer and a helper function to create the flexible vertices. Because a sprite is a 2-D image, there’s no need to store z values for the transformations.
TIP An important point of this new Spriteclass is that we’ll never need to
change the vertex coordinates of the sprite to perform any translations or rotations; we can use the matrix transformations as seen in Chapter 3 to do it faster.
The complete interface for a Direct3D sprite is shown in Figure 4-7.
The Spriteclass members are described in Table 4-2.
Table 4-2. Interface Members for the DirectX Sprite Class
TYPE NAME DESCRIPTION
Properties Xand Y The upper-left position of the sprite. Properties SizeXand SizeY The size of the sprite, in the x and y axes. Property IsTransparent If true, the Drawfunction will draw a transparent
sprite, loaded in the Loadfunction. We don’t need to store a color key property to say which color will be transparent; such a color is used only when loading the textures.
Property Direction The current direction the sprite is moving in. This property can be used to choose which image must be drawn.
Constant IMAGE_SIZE The default size for a square sprite.
Property ScaleFactor Same as the GDI+ Spriteclass, it holds a constant used when creating the sprite, indicating whether the x and y values are pixel values or based on
IMAGE_SIZE. Useful for creating tiled game fields. Properties SpeedXand SpeedY The speed (translation increment per frame) of the
sprite on the x and y axes.
Properties TranslationXand The current translation value in each axis, from the
TranslationY initial x,y position.
Properties ScaleXand ScaleY The scale to be applied to the sprite in each axis. Properties RotationXand
RotationY The rotation in each axis.
Property SpriteImage The sprite texture, loaded from an image file. Property VertBuffer The vertex buffer with the vertices of the sprite. Method New Method for creating a new sprite.
Method Load Method for loading the image file from disk; it creates the vertices used to draw the image on the screen.
Method Draw Method that draws the sprite.
Method Dispose Method that disposes of the texture and the vertex buffer used by the sprite.
The interface code for the Spriteclass is shown here:
Imports Microsoft.DirectX.Direct3D Public Class clsSprite
Inherits clsGameEngine
Public IsTransparent As Boolean = False Public Direction As enDirection
Public X As Single Public Y As Single
Public SizeX As Single = IMAGE_SIZE Public SizeY As Single = IMAGE_SIZE
Public Const IMAGE_SIZE As Integer = 32
Public ScaleFactor As enScaleFactor = enScaleFactor.enScaleSprite ' speed used in translation
Public SpeedX As Single = 0 Public SpeedY As Single = 0
' Values used for the operations Public TranslationX As Single = 0 Public TranslationY As Single = 0 Public ScaleX As Single = 1 Public ScaleY As Single = 1 Public RotationX As Single = 0 Public RotationY As Single = 0
Protected SpriteImage As Texture Protected VertBuffer As VertexBuffer Public Enum enScaleFactor
enScalePixel = 1
enScaleSprite = IMAGE_SIZE End Enum
Public Enum enDirection North = 1
Sub New(...)
Function Load(...) As Boolean
Private Function CreateFlexVertex(...) As CUSTOMVERTEX Sub Draw()
Public Sub Dispose() End Class
We must highlight two points in the preceding code: the use of default values for the properties (always use the most common ones), and the use of the inherits clause. The Spriteclass will be closely related to the game engine, and it’ll need to use some of the game engine properties to work properly, so we must create it as a GameEngine-derived class.
Let’s see the code for the methods, starting with the Newmethod. We’ll create two overrides for the function: one for creating opaque sprites, and another for creating transparent sprites. The following code sample depicts the difference between these two overrides:
Sub New(strImageName As String, startPoint As POINT, _
Optional Scale As enScaleFactor = enScaleFactor.enScaleSprite, _ Optional width As Integer = IMAGE_SIZE, _
Optional height As Integer = IMAGE_SIZE) X = startPoint.x
Y = startPoint.y SizeX = width SizeY = height ScaleFactor = Scale
If Not Load(strImageName) Then _
Err.Raise(vbObjectError + 1, "clsSprite", _ "Could not create the sprite textures") End Sub
Sub New( strImageName As String, colorKey As Integer, startPoint As POINT, _ Optional Scale As enScaleFactor = enScaleFactor.enScaleSprite, _ Optional width As Integer = IMAGE_SIZE, _
Optional height As Integer = IMAGE_SIZE) ' When calling the New procedure with a colorKey, ' we want to create a transparent sprite IsTransparent = True
If Not Load(strImageName, colorKey) Then _ Err.Raise(vbObjectError + 1, "clsSprite", _
"Could not create the sprite textures") End Sub
The Loadprocedure will receive an optional colorKeyparameter that will be used to load a transparent texture if the IsTransparentproperty is set to true. Besides loading the texture from an image file, the Loadprocedure must create the vertex buffer used to show the sprite in the draw procedure, using the CreateFlexVertexhelper procedure.
' Default colorKey is magenta
Function Load(strImageName As String, _
Optional colorKey As Integer = &HFFFF00FF) As Boolean Dim vertices As CustomVertex()
Dim i As Integer
Try
If IsTransparent Then
'Load the transparent texture
SpriteImage = TextureLoader.FromFile(objDirect3DDevice, _
Application.StartupPath & "\" & IMAGE_PATH & "\" & strImageName, _ 64, 64, D3DX.Default, 0, Format.Unknown, Pool.Managed, _
Filter.Point, Filter.Point, colorKey) Else
SpriteImage = TextureLoader.FromFile(objDirect3DDevice, _
Application.StartupPath & "\" & IMAGE_PATH & "\" & strImageName) End If
VertBuffer = New VertexBuffer(GetType(CustomVertex), 4, _
objDirect3DDevice, Usage.WriteOnly, FVF_CUSTOMVERTEX, Pool.Default) vertices = VertBuffer.Lock(0, 0)
' CreateFlags a square, composed of 2 triangles in a triangle strip vertices(0) = CreateFlexVertex(X * ScaleFactor, Y * ScaleFactor, 1, 0, 1) vertices(1) = CreateFlexVertex(X * ScaleFactor + SizeX, _
Y * ScaleFactor, 1, 1, 1) vertices(2) = CreateFlexVertex(X * ScaleFactor, _
Y * ScaleFactor + SizeY, 1, 0, 0) vertices(3) = CreateFlexVertex(X * ScaleFactor + SizeX, _
Y * ScaleFactor + SizeY, 1, 1, 0) ' Release the vertex buffer and commits our vertex data
Catch de As DirectXException
MessageBox.Show("Could not load image file " & strImageName & _ ". Error: " & de.ErrorString, "3D Initialization.", _
MessageBoxButtons.OK, MessageBoxIcon.Error) Return False
End Try End Function
Function CreateFlexVertex( X As Single, Y As Single, Z As Single, _ tu As Single, tv As Single) As CUSTOMVERTEX
CreateFlexVertex.X = X CreateFlexVertex.Y = Y CreateFlexVertex.Z = Z CreateFlexVertex.tu = tu CreateFlexVertex.tv = tv End Function
The Drawmethod is very straightforward: It simply sets the texture and draws the rectangle defined by the vertex buffer created in the Loadprocedure, using the concepts shown in the previous chapter.
Sub Draw()
' Turn on alpha blending only if the sprite has transparent colors If IsTransparent Then
objDirect3DDevice.RenderState.AlphaBlendEnable = True End If
Try
objDirect3DDevice.SetTexture(0, SpriteImage) objDirect3DDevice.SetStreamSource(0, VertBuffer, 0)
objDirect3DDevice.DrawPrimitives(PrimitiveType.TriangleStrip, 0, 2) Catch de As DirectXException
MessageBox.Show("Could not draw sprite. Error: " & de.ErrorString, _ "3D Initialization.", MessageBoxButtons.OK, MessageBoxIcon.Error) End Try
' Turn off alpha blending if the sprite has transparent colors If IsTransparent Then
objDirect3DDevice.RenderState.AlphaBlendEnable = False End If
The last method, Dispose, will only dispose of the texture and the vertex buffer created in the Loadprocedure. Calling the Collectmethod of the garbage collector will ensure a faster disposal of memory; and calling the SupressFinalizemethod of this class will prevent errors that can arise if the default finalizer is called before the objects are freed from memory. The Disposemethod is shown in the next code sample:
Public Sub Dispose()
On Error Resume Next ' We are leaving, ignore any errors SpriteImage.Dispose()
VertBuffer.Dispose() GC.Collect()
GC.SuppressFinalize(Me) End Sub
DirectAudio Classes
There are two different sets of components for audio input and output: Direct-Music, for background music playback, and DirectSound, for sound effects. These two sets together are sometimes called DirectAudio, although they are separate things. DirectMusic doesn’t have a managed version, but we can access its features through COM interoperability.
.NET is kind of an evolution from COM architecture; but we still can use COM objects from .NET programs, and more: The .NET programs generate COM wrappers, so COM-based languages (such as the previous version of Visual Basic) can access .NET components too. To use non-managed DirectX features, we must include in our projects a reference to the VBDX8.DLL.
The main distinction between background music and sound effects is related to the file types used by each one. Sound effect files are MIDI or WAV files that store a single piece of sound that is usually played when a specific action occurs in a game (such as a player getting a bonus or dying). Background music can be pro-duced using a MIDI file playing in a loop, but it’s best done with segment (SGT) files. SGT files have a main piece of music and one or more motifs (or waves) that can be played any time, as the program commands, so the music can change subtly from time to time.
NOTE A special music generation program is included with DirectX SDK,
and it allows professional musicians to create segment files by connecting the computer to a music device (like a keyboard), or composing the music directly on the computer using instruments from the predefined libraries or even creating new ones. It’s beyond the scope of this book to enter into details about the creation of segment files, but those who want to get a deeper knowledge of this subject will find many samples in the DirectMusic help feature on the DirectX SDK.
A lot of theory and technical details are connected to DirectAudio, but we’ll stick here to the simplest ways of generating sound for our application.
There aren’t many steps we must follow to play sound, but we’ll enclose these steps in two classes so every application doesn’t need to include these initial-ization details. To play sounds using managed DirectSound, we need to perform the following four steps:
1. Create the DirectSound device object.
2. Create the DirectSound buffer object.
3. Load the WAV sound file into the buffer.
4. Play the sound using the buffer.
As we can see, only two objects are involved in playing sound through DirectSound:
• Device: Responsible for any generic operation regarding the sound device
When playing files through DirectMusic, we’ll have to implement some extra steps and different objects, due to the different nature of the sound files con-trolled. The steps to play any MIDI or SGT file using DirectMusic are as follows:
1. Create the Performanceand Loaderobjects.
2. Initialize the Performanceobject.
3. Set the search directory from which the Loaderobject will load the sound files.
4. Load the file with the sound information of a Segmentobject.
5. If the file is an SGT file, download band and wave information for the file to the Performanceobject.
6. Play the sound from the segment object, choosing the audio path to play it in (primary or secondary).
7. If the file is an SGT file, play any included motifs as needed.
From these steps, we can see that there are three main objects we’ll need to handle when playing sounds though DirectMusic: Performance, Loader, and Segment. These objects are described in more detail in the following list:
• Performance: Responsible for the management of all music playback. This object controls a set of instruments, with their special characteristics, and maps them to specific audio paths. It controls the music tempo, handles messages and events, and sets the music parameters. The performance mixes all sounds from primary and secondary audio paths seamlessly.
• Loader: Loads sound files, including instrument data, styles, bands, and col-lections. When we load a sound file, every related file is loaded too.
• Segment: Stores and plays each music piece as it is loaded from the sound file.
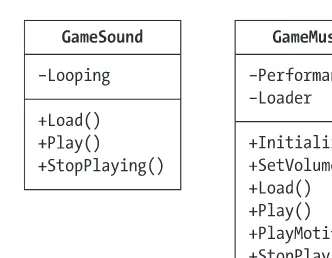
Figure 4-8. The audio classes
We can add new properties and methods as needed when implementing audio management for our games.
In the next sections, we discuss the details for each game audio class.
The GameSound Class
As we can see in our class definition, to play a sound through managed Direct-Sound, we must load the buffer with the sound file and then play the sound. This way of working gives us two choices for playing multiple sounds in our games:
• Create one single GameSoundobject and call Loadand Playmethods for every sound to be played.
• Create a GameSoundobject for each sound to be played, load each sound once, and call the Playmethod for the specific object that holds the sound to be played.
For sounds that are constantly playing throughout the game, the second approach is better, because it won’t waste time reloading the sounds.
The interface for the class will be as follows:
Imports Microsoft.DirectX.DirectSound Public Class ClsGameSound
Public Looping As Boolean = False
Private Shared SoundDevice As Device = Nothing Sub New(WinHandle As Windows.Forms.Control)
Function Load(strFileName As String) As Boolean) As Boolean Sub StopPlaying()
Sub Play() End class
In the next sections, we’ll look at the code and details for each class method.
The New Method
On the Newmethod we must initialize the sound device. Since we only need one device initialization for all the sounds we want to play, we must define the device object as shared(as we already did in the class definition), and include code in the Newmethod to initialize the device only if it’s not already initialized. The code for this method is presented in the following listing:
Sub New(WinHandle As System.Windows.Forms.Control) If SoundDevice Is Nothing Then
SoundDevice = New Device()
SoundDevice.SetCooperativeLevel(WinHandle, CooperativeLevel.Normal) End If
End Sub
Besides creating the device, we can see a specific initialization to inform the device of the appropriate cooperative level—in other words, how the sound device object will interact with other applications that may be using the device. The pos-sible values for the SetCoopLevelenumeration follow:
• Normal: Specifies the device be used in a way that allows the smoothest mul-tithreading and multitasking (multiple application) operation. Using this setting will force us to only use the default buffer and output formats, but this will suffice for our samples.
• Write Only: Specifies that the application plays only on primary buffers. This enumeration member will work only on real hardware devices; if Direct-Sound is emulating the device, the call to SetCooperativeLevelwill fail.
Once we’ve created the device, we can load the sounds into a sound buffer, as described in the next section.
The Load Method
The Loadmethod will be mainly based on the CreateSoundBufferFromFilefunction, which requires the following parameters:
<Buffer object>.CreateSoundBufferFromFile(FilePath, BufferDescription)
The first parameter is the path from which we want to load the sound file. The second is a description of specific properties we’ll need for the buffer, from the capabilities we’ll have (control volume, frequency, etc.) to how the device must act when playing this buffer, when another application gets the focus. In our sample, we’ll only set one flag, GlobalFocus, which tells the device to continue playing the buffer even if other DirectSound applications have the focus.
The full code of the Loadfunction is shown in the following sample:
Function Load(strFileName As String) As Boolean Try
Dim Desc As BufferDesc = New BufferDesc()
Desc.Flags = New BufferCapsFlags() = BufferCapsFlags.GlobalFocus Or _ BufferCapsFlags.LocSoftware
DSoundBuffer = _
SoundDevice.CreateSoundBufferFromFile(Application.StartupPath & _ "\" & SOUND_PATH & "\" & strFileName, Desc) Catch de As Exception
MessageBox.Show("Could not load the sound file. Error: " & de.Message, _ "Music Initialization", MessageBoxButtons.OK, MessageBoxIcon.Error) End Try
Load = True End Function
The Play and StopPlaying Methods
The Playand StopPlayingmethods will use the Playand Stopmethods
belonging to the Bufferobject, as shown in the next code listing. Similarly to the CreateSoundBufferFromFilefunction, the Playmethod will receive a structure with the playing flags; in our sample we’ll use the default settings, and include an extra setting for looping the sound if the Loopingproperty of the class is set.
Sub Play()
Dim PlayFlags As BufferPlayFlags = BufferPlayFlags.Default If Looping Then PlayFlags = BufferPlayFlags.Looping
If Not (DSoundBuffer Is Nothing) Then Try
DSoundBuffer.Play(0, PlayFlags) Catch de As Exception
MessageBox.Show("Error playing sound file. Error: " & de.Message, _ MessageBoxButtons.OK, MessageBoxIcon.Error)
End Try End If End Sub
Sub StopPlaying()
If Not (DSoundBuffer Is Nothing) Then DSoundBuffer.Stop()
DSoundBuffer.SetCurrentPosition(0) End If
End Sub
In the next section we’ll discuss the second DirectAudio class, GameMusic.
The GameMusic Class
Imports DxVBLibA
Public Class clsGameMusic
Private Shared DMusicPerf As DirectMusicPerformance8 = Nothing Private Shared DMusicLoad As DirectMusicLoader8 = Nothing Private DMusicSegment As DirectMusicSegment8 = Nothing
' Background music is looped by default Public looping As Boolean = True
' Default sound files path
Private Const SOUND_PATH As String = "Sounds"
Sub SetVolume(intVolume As Integer)
Function Initialize(WinHandle As IntPtr) As Boolean
Function Load(strFileName As String, bolLooping As Boolean = True) As Boolean Sub Play()
Function PlayMotif(strMotifName As String) As Boolean Sub StopPlaying()
Protected Overrides Sub Finalize() End Class
In this code sample, we can see that DirectMusic defined the Performanceand Loaderobjects as private so they’ll only be accessible to the class. This will prevent us from having to know internal details of the class when playing music from our games.
The Initialize Method
In the Initializefunction, we need to create and initialize the class objects with the most commonly used values. The next code sample shows a possible imple-mentation for this method:
Function Initialize(WinHandle As IntPtr) As Boolean ' CreateFlags our default objects
Dim AudioParams As DMUS_AUDIOPARAMS
Try
' Initialize our performance object to use reverb DMusicPerf.InitAudio(WinHandle.ToInt32, _
CONST_DMUS_AUDIO.DMUS_AUDIOF_ALL, AudioParams, , _ CONST_DMUSIC_STANDARD_AUDIO_PATH.
DMUS_APATH_SHARED_STEREOPLUSREVERB, 128) ' Turn on all auto download
DMusicPerf.SetMasterAutoDownload(True) ' Set our search folder
DMusicLoad.SetSearchDirectory(Application.StartupPath & "\" & SOUND_PATH) Initialize = True
Catch de As Exception
MessageBox.Show("Could not initialize DirectMusic. Error: " & de.Message, _ "Music Initialization.", MessageBoxButtons.OK, MessageBoxIcon.Error) Initialize = False
End Try End Function
Some of the key functions used in the Initializemethod deserve a better explanation. Let’s start by taking a closer look at the InitAudiomethod and its pos-sible values:
<Performance object>.InitAudio(hWnd, Flags, AudioParams, DirectSound, _ DefaultPathType, ChannelCount)
The first parameter, HWnd, receives the window handle. This will usually be the same window used for Direct3D device object creation. If we specify a window handle, we don’t need to specify the DirectSound object, so DirectMusic creates a private one for its personal use, making our code simpler.
The second parameter, Flags, specifies a member of the CONST_DMUS_AUDIO enu-meration that will state the requested features for the performance. Although you can specify different values, such as BUFFERSto fully support audio path buffers, or 3Dfor supporting 3-D sounds, using ALL, as in the sample code, will prepare Performanceto handle any kind of loaded sounds.
The third parameter, AudioParams, allow us to specify the desired control parameters for the sound synthesizer, and to be notified of which requests were granted. We can specify details such as the frequency of the sample and the number of voices used; but since we are using only the simplest features from DirectMusic, we’ll let all flags remain set to their default values.
The next parameter, DefaultPathType, receives a member of the DMUS_APATH enumeration, which specifies the default audio path type, as described in the fol-lowing list:
• DYNAMIC_3D: Indicates the audio path will play to a 3-D buffer (the sounds are distributed on the speakers in order to create the illusion of a 3-D envi-ronment). For more information on 3-D sounds, refer to the DirectX SDK.
• DYNAMIC_MONO: Used for creating an audio path with mono buffering (all music sounds are of equal volume in each speaker).
• DYNAMIC_STEREO: Specifies the sounds be played in a stereo environment (the sounds are distributed on the speakers according to how they were recorded—for example, if the percussion instruments were more to the left, the left speaker will have a louder percussion sound).
• SHARED_STEREOPLUSREVERB: Indicates the buffer created for the audio path has all the features of the stereo buffer, plus an environmental reverb (echo in music).
The ChannelCountparameter specifies the number of performance channels allocated to the audio path. In the code sample, we have 128 performance channels, which means that we can play up to 128 different sounds within the same Performanceobject.
A second function in the preceding sample that deserves a more detailed explanation is SetMasterAutoDownload:
<Performance object>. SetMasterAutoDownload(value)
This method is one of many used to set global parameters for the performance object, passing a single value as a parameter. The following lists a few more of the methods in this category:
• SetMasterVolume: Sets the volume, measured in hundreds of decibels, ranging from +20 (amplification) to –200 (attenuation). Values below –100 or above +10 will result in no audible difference, so the useful values are up to 10 times the default volume to 1/100 of it.
• SetMasterTempo: Represents the “scale factor” for the tempo of the music. The default value is 1, so you can set this to 0.5 and have music playing at half the normal speed, or set this to 2 and double the speed (if you want to hear, say, Lou Reed singing like Madonna). Valid values range from 0.01 to 100.
There are other methods of this type, but these are the ones we’ll most com-monly want to set. We can create new methods for the GameMusicclass to set these parameters, such as a SetVolumemethod to set the current volume for the per-formance object, as in the following code sample:
Sub SetVolume(intVolume As Integer) If Not (DMusicPerf Is Nothing) Then
Try
DMusicPerf.SetMasterVolume(intVolume) Catch de As Exception
MessageBox.Show("Could not set the master volume. Error: " & _ de.Message, MessageBoxButtons.OK, MessageBoxIcon.Error) End Try
End If End Sub
NOTE As you can imagine, there are complementary methods with the GetMasterprefix that are used to retrieve the value of a specific configu-ration parameter from the Performanceobject. It’s beyond the scope of this book to explain every one of them; refer to DirectX SDK help for a comprehensive list.
The last new function we saw in the sample, SetSearchDirectory, simply informs the Loaderobject of the directory from which the sound files will be loaded, so we won’t need to give the path for every sound loaded.
The Load Method
The full code for a first version of the Loadfunction is shown in the following sample:
Function Load(strFileName As String, Optional bolLooping As Boolean = True)_ As Boolean
' Backgound music loops by default looping = bolLooping
' Load the music file Try
DMusicSegment = DMusicLoad.LoadSegment(strFileName) ' If it's a segment file, we have some special treatment If strFileName.EndsWith(".sgt") Then
If Not (DMusicSegment Is Nothing) Then '// Download the segment DMusicSegment.Download(DMusicPerf.GetDefaultAudioPath) End If
Else
If strFileName.EndsWith(".mid") Or strFileName.EndsWith(".rmi") Then DMusicSegment.SetStandardMidiFile()
End If End If
Catch de As Exception DMusicSegment = Nothing
MessageBox.Show("Could not load the sound file. Error: " & de.Message, _ "Music Initialization", MessageBoxButtons.OK, MessageBoxIcon.Error) Load = False
Exit Function End Try
Load = True End Function
Another interesting point about the preceding code is the use of the Try-Catchblock with a specific type of exception. This structured error block, new in Visual Basic .NET, allows the programmer to catch generic errors or errors from a specific set (such as Exception).
We can improve the music played from segment files using styles and motifs that are stored in those files by the music author. In the next section we’ll examine what these are and how to apply them to our audio class.
Styles and Motifs
Styles and motifs are intrinsic parts of a segment file, and they allow us to choose from a set of previously created compositions to play at any time during music execution. Each segment file can have one or more styles recorded within it, and every style can have one or more motifs.
A styleis a collection of instruments and music patterns or motifs(sequences of music values for each instrument present in the style). To read a specific style from a music segment, we use the GetStylemethod. There are various Get methods in the Segmentobject, similar to the GetMastermethods present in the Performanceobject, as we saw before. To retrieve a style, we must pass the style number, from 0 to the number of styles present minus 1. Passing an invalid value will generate an error.
After choosing a specific style, we can retrieve its number of motifs using the GetMotifCountfunction.
Based on these two functions, we can extend our Loadmethod to retrieve the number of styles and the number of motifs, setting new properties that will allow the game to retrieve the information from the GameMusicclass. To do so, we must include the following new properties in the class:
Private DMusicStyle As DirectMusicStyle = Nothing Public MotifCount As Integer = 0
Public StyleCount As Integer = 0
Dim strMotifName As String
Dim bolLoopStyles As Boolean = True Dim bolLoopMotifs As Boolean = True
Do While (bolLoopStyles) ' Count the styles Try
DMusicStyle = DMusicSegment.GetStyle(StyleCount) StyleCount += 1
' Count the motifs of the style bolLoopMotifs = True
MotifCount += DMusicStyle.GetMotifCount Catch
' The GetParam will throw an exception if there are no more styles. bolLoopStyles = False
End Try Loop
' We start counting from zero, so add 1 to have the real Style count value StyleCount += 1
In the next section we’ll discuss the methods for playing and stopping the audio.
The Play and StopPlaying Methods
Once the styles have been read, we can code the Playand StopPlayingmethods, which will use the PlaySegmentExand StopExmethods belonging to the Performance object, as shown in the following code sample. Both methods receive the segment object (created in the Loadmethod) used to play or stop playing.
Sub Play()
If Not (DMusicSegment Is Nothing) Then Try
If Looping Then
DMusicSegment.SetRepeats(CONST_DPNWAITTIME.INFINITE) Else
DMusicSegment.SetRepeats(0) End If
DMusicPerf.PlaySegmentEx(DMusicSegment, 0, 0) Catch de As Exception
End Try End If End Sub
Sub StopPlaying()
If Not (DMusicSegment Is Nothing) Then DMusicPerf.StopEx(DMusicSegment, 0, 0) End If
End Sub
In the next section, we look at how to play motifs, and create two new methods to add this feature to our GameMusicclass.
Playing Motifs
To finish our GameMusicclass, it’ll be interesting to have one function to play a motif from the current music segment. We can use such a function to add some subtle variations to our background music, making it a little more exciting. We can simply do this by using the same PlaySegmentExfunction. Instead of using the entire sound loaded as a segment object as the first parameter, we’ll load the motif from the segment object (using the GetMotiffunction) and pass the motif as a parameter for that function.
We can create an analogous method that receives a number and plays the associated motif; such a method would be useful if we don’t previously know the motif names, but do know how many there are (as calculated in the Loadmethod).
The two overloaded methods are shown in the next listing, and it’s up to each game to choose which one best suits its needs.
Function PlayMotif(strMotifName As String) As Boolean Dim Motif As DirectMusicSegment8
Try
' Get the motif
Motif = DMusicStyle.GetMotif(strMotifName) DMusicPerf.PlaySegmentEx(Motif, _
CONST_DMUS_SEGF_FLAGS.DMUS_SEGF_DEFAULT Or _ CONST_DMUS_SEGF_FLAGS.DMUS_SEGF_SECONDARY, 0) PlayMotif = True
Catch
PlayMotif = False End Try
Function PlayMotif(intMotifIndex As Integer) As Boolean Dim strMotifName As String
Try
' Get the motif
strMotifName = DMusicStyle.GetMotifName(intMotifIndex) ' Call the overloaded method which receives a string PlayMotif = PlayMotif(strMotifName)
Catch
PlayMotif = False End Try
End Function
The GetMotifNamemethod, listed in the previous code sample, receives the motif number (ranging from one to GetMotifCount) and returns the motif name (as informed by the composer when creating the segment) as the second parameter. Calling this function with an invalid index will generate an error.
In the next section we’ll discuss the final method of our class.
The Finalize Method
The last class method, Finalize, simply destroys the audio objects, making sure that the Performanceobject is closed before destroying it, using the CloseDown method.
Protected Overrides Sub Finalize()
' The object is being destroyed, so ignore any errors On Error Resume Next
MyBase.Finalize() 'Clean up DMusicSegment
If Not (DMusicSegment Is Nothing) Then DMusicPerf.StopEx(DMusicSegment, 0, 0) End If
DMusicSegment = Nothing DMusicStyle = Nothing DMusicLoad = Nothing
If Not (DMusicPerf Is Nothing) Then DMusicPerf.CloseDown()
End If
Now that this class is finished, we have a complete set of classes to help us to include audio capabilities in our games. The most important point to note when using this kind of approach is that when coding a game, we need to be concerned with the game goals, not the less important details such as how to load music or initialize a device.
In the next section we’ll discuss the proposal for the sample game used in this chapter and the next, which will allow us to test, in a practical way, our gaming class library.
The Game Proposal
We are going to do an Activision’s River Raid (an old Atari console game) clone, but in this chapter we’ll create only half of the game features. Since not everyone will remember the original River Raid game features (or will have ever played it), let’s introduce the points we’ll want to cover in our first version of the game.
In River Pla.Net the player will control a plane that is flying over a top-to-bottom scrolling river. Even when the player isn’t moving the plane, the ground beneath it will be moving. As far as we know, the river goes on forever, so the main goal of the game is to live for as long as possible.
Here are some more details about the game:
• The plane will be controlled by keyboard arrows.
• There will be some obstacles along the river: ships, planes, and bridges. The ships and planes won’t move in the first version of the game.
• The plane must always be flying over water; if it flies over land or over an obstacle (bridges, planes, or ships), it will be destroyed.
• To make the level design easier, the game map will be a text file, in which each character will represent a different tile when the game field is created.
• There’ll be some gas barrels on the river, which will be collected by the player’s plane when it flies over them. In the first version of the game, we won’t create a fuel counter.
• After being destroyed, the player’s plane will be invincible for a few seconds.
When a team of developers creates a “real” game, the game proposal is nor-mally followed by some drafts showing details about the game (like screen layout and some artwork samples), and must be refined until everyone in the team has a clear understanding of what the game will be. The game proposal goal is to answer the question: What are we doing?
Once everyone agrees about the game proposal, it’s time to answer the next question we need to ask: How will we do it?The game project presents the tech-nical details to answer this question, but both documents aren’t static; they can (in fact, they must) be revised every time a new point of view arises and is agreed upon by the game development team. Care must be taken not to include every suggestion, or the planning stage will simply never end.
The last two important questions in a “real” game development are mainly targeted to commercial games (How long will it take to finish the project? How much will it cost?), and won’t be discussed here.
The Game Project
Looking back at the project proposal, before starting anything else, we need to decide some higher level details for the game. It’s good practice to think about how things will work before writing down any class diagrams or pseudo-code.
In our specific case, maybe the two most important points on the proposal are the following:
• The player will control a plane that is flying over a top-to-bottom scrolling river.
• To make the level design easier, the game map will be a text file, where each character will represent a different tile when creating the game field.
How do we reallymake scrolling games? How can we design a level with Notepad?
Defining the Game Tiles
River Pla.Net is one of those games that allows us to design the whole game field based on tiles. We can create the game field map file with a text editor, using the game program to translate the set of characters in the file to a set of tiles on screen.
Maybe the first thing we must think about when creating a tile-based game is what size our tiles will be. They aren’t required to be square ones, but using squares is the best approach, since we can put the tiles together in any direction, without any problems.
To define the number of tiles, we must first decide the resolution for our game. A higher resolution will allow us to use more tiles, if the tiles are a fixed size, or force us to have larger images. Either approach can lead to a reduction in per-formance because they’ll both use more memory than lower resolutions, so let’s keep our sample to a 640×480 resolution to make it as fast as possible. With this resolution, if we have square tiles that are 32-pixels wide, we can have 15 tiles for the height and 20 tiles for the width.
Looking at the game proposal, we can list a basic set of tiles to fill the game goals:
• Land
• Water
• Ship
• Enemy plane
• Gas barrel
This reduced set of tiles is probably very close to the one used by the original River Raid, but using just these tiles will result in a very “blocky” game. In Figure 4-9 we see a basic set of tiles.
Figure 4-9. A basic set of tiles
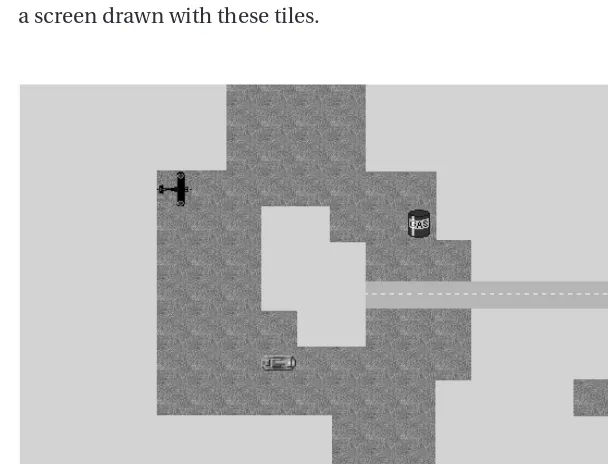
Let’s create a game field using any graphical tool (Microsoft’s Paint will suffice) to cut and paste the tiles shown in Figure 4-9 so we can see a first “visual pro-totype” of our game, giving us a better idea about how it’ll look. Figure 4-10 shows a screen drawn with these tiles.
As we can see in this first screen, using only this set of tiles will result in a flat block game: All river “curves” are straight, and we can barely see the border between land and water. Creating borders is just a matter of drawing a new set of tiles that can be used to generate an island and a lake, and all river curves can be derived from this set. Figure 4-11 shows such a set of tiles.
Figure 4-11. The border tiles
It’s important to adopt tile names that will help us to find them easily. For the border tiles, we suggest giving all tiles the “border” prefix and a direction indicator. For example, for the border where the water meets the land to the north, the name would be “borderN”, and for a Southwest border the name would be “borderSW”. Take a closer look at Figure 4-12 to understand this naming convention and all the border tile names.
Figure 4-12. The names of the border tiles
We can remake the screen from Figure 4-10 to add the borders, resulting in the screen shown in Figure 4-13.
Figure 4-13. A second screen, based on a larger set of tiles
Initially it may seem as though these are the only tiles we’ll ever need, but just imagine if the plane flies over a straight section of the river, with no bridges or opponents: The player would barely see the scrolling movement—the only tip would be the water movement. So we can add some “final touch” tiles, such as trees and mountains (at least two of each, to give some visual variation), and maybe create a bridge tile different from the road one, to give the game a nicer look and feel. Figure 4-14 shows the “final touch” tiles.
Creating a bridge with borders forces us to change the road tile and make it thin, and we have to add two new tiles to use when the road is over the river border. Our final screen, using all tiles, is shown in Figure 4-15.
Figure 4-15. The final screen, using all sets of tiles
Of course, we can go on creating new tiles. For example, a diagonal border for the river would be interesting, so we can break the “blocky” visual that still per-sists. We can add different borderlines, with beaches or little bays; and we can add more “final touch” objects, such as houses, buildings, or even animals or people, to arrange around the screen.
The more tiles we include, the more flexibility the level designer will have to create our groundbreaking levels. But for our purpose here, the tiles we’ve already created will suffice.
Table 4-3. The Tile Codes
CODE TILE CODE TILE CODE TILE
1 borderN 9 borderSW2 G Gas
2 borderNE1 A borderW ( BridgeBorderW 3 borderNE2 B borderNW1 ) BridgeBorderE
4 borderE C borderNW2 - Road
5 borderSE1 T Tree = Bridge
6 borderSE2 M Mountain . Land
7 borderS S Ship _ Water
8 borderSW1 P EnemyPlane --
--We have decided to create one single char for both types of trees and another one for both mountain types, so the game can randomly choose the image to use and have some subtle visual variations every time it’s played.
With these codes, we can look again at our first test screen and create a corre-sponding map of it, as show in the following code listing:
...4____A...T.. .M...4____A..T...M.. ...975____876...M..T .T.4P_______A... ...4___B2__G86..M.T. ...4___AC2___A....T. T..4___864===(---...4____85___A....T. ...4___S_____A.976.. ..M4________B3.4_A.. ...C11112___A..C13.. ..T...4___A... ..M....95___86... ....T..4_____A....TT T..M...4_____A..T... ...4_____A...
Scrolling Games
without having to move every vertex of it, we can use the same idea here: Simply change the Transform.Worldmatrix of the device object to do the translation.
So all we need to do is create the game field and perform small translations on it, for each time frame, to make it scroll. But will we scroll the entire game field? Will moving all the tiles of the game field result in prolonged calculations?
Looking again at the samples in the last chapter, we see that setting the world matrix will only define the transformations to be applied to the vertex buffer when we call the DrawPrimitivesUPfunction; so there’s no performance difference when setting the matrix for a scene with a few dozen vertices or for a scene with several thousand.
So what we want to do is to draw the minimum number of vertices possible. Remember, our game field will be defined by a text file. For performance reasons we must load it only once, when starting the game, converting each char in the text file to a tile that will be in a fixed (x,y) position, depending on the position of the char in the map text file. The tiles will be fixed throughout the game, and we’ll scroll over them, changing the translation value of the world matrix, to “move the camera” over the game field. Just like a plane moving over a real river, the river is fixed on the ground, and we move over it.
So to minimize the vertices drawn, we can store the current line from the bottom of the screen, and draw the 15 next lines—as mentioned in the previous section, our visual game field will be 20 tiles wide and 15 tiles tall. Since we won’t be performing translations on the objects the size of a tile, we’ll need to draw an extra line to avoid the top of the screen not being drawn appropriately. It’s like being in The Matrix(the movie): The world will exist only when we are looking at it.
Another good idea to minimize the number of vertices being drawn is simply remove the Land tile from our set, and draw the other sets over a green back-ground. To make the background green, all we need to do is to use the green color as a parameter of the Clearmethod of the device object.
The Class Diagram
Since we already have all base classes for the game engine, sprite, game music, and sound, all we need to do is to create derived classes that will supply specific characteristics, according to the game’s special needs.
Looking at the game proposal, we can only see two candidates for new classes: Playerand Tile, which will be derived from the Spriteclass. Of course, we’ll need a class derived from the game engine, too (let’s call it the RiverEngineclass), to implement the game code.
The following tables describe the properties and methods for each of the game classes, starting with the Tileclass in Table 4-4.
Table 4-4. The Tile Class
TYPE NAME DESCRIPTION
Property Type A member of an internal enumeration that should store the type of the tile (land, water, enemies, etc.)
Method New An overloaded method for each Newmethod of the