Jens Kühner
Expert
.NET Micro
Framework
Embedded programming of microcontrollers
with C# and Microsoft Visual Studio
Expert .NET
Micro Framework
■ ■ ■
All rights reserved. No part of this work may be reproduced or transmitted in any form or by any means, electronic or mechanical, including photocopying, recording, or by any information storage or retrieval system, without the prior written permission of the copyright owner and the publisher.
ISBN-13: 978-1-59059-973-0 ISBN-10: 1-59059-973-X
ISBN-13 (electronic): 978-1-4302-0608-8 ISBN-10 (electronic): 1-4302-0608-X
Printed and bound in the United States of America 9 8 7 6 5 4 3 2 1
Trademarked names may appear in this book. Rather than use a trademark symbol with every occurrence of a trademarked name, we use the names only in an editorial fashion and to the benefit of the trademark owner, with no intention of infringement of the trademark.
Lead Editor: Dominic Shakeshaft
Technical Reviewer: Fabio Claudio Ferracchiati
Editorial Board: Clay Andres, Steve Anglin, Ewan Buckingham, Tony Campbell, Gary Cornell, Jonathan Gennick, Matthew Moodie, Joseph Ottinger, Jeffrey Pepper, Frank Pohlmann, Ben Renow-Clarke, Dominic Shakeshaft, Matt Wade, Tom Welsh
Project Manager: Richard Dal Porto Copy Editor: Heather Lang
Associate Production Director: Kari Brooks-Copony Production Editor: Liz Berry
Compositor: Susan Glinert Stevens Proofreader: Lisa Hamilton Indexer: Becky Hornyak Artist: April Milne
Cover Designer: Kurt Krames
Manufacturing Director: Tom Debolski
Distributed to the book trade worldwide by Springer-Verlag New York, Inc., 233 Spring Street, 6th Floor, New York, NY 10013. Phone 1-800-SPRINGER, fax 201-348-4505, e-mail [email protected], or visit http://www.springeronline.com.
For information on translations, please contact Apress directly at 2855 Telegraph Avenue, Suite 600, Berkeley, CA 94705. Phone 510-549-5930, fax 510-549-5939, e-mail [email protected], or visit http:// www.apress.com.
Apress and friends of ED books may be purchased in bulk for academic, corporate, or promotional use. eBook versions and licenses are also available for most titles. For more information, reference our Special Bulk Sales—eBook Licensing web page at http://www.apress.com/info/bulksales.
The information in this book is distributed on an “as is” basis, without warranty. Although every precaution has been taken in the preparation of this work, neither the author(s) nor Apress shall have any liability to any person or entity with respect to any loss or damage caused or alleged to be caused directly or indirectly by the information contained in this work.
Contents at a Glance
About the Author . . . xv
About the Technical Reviewer . . . xvii
Acknowledgments . . . xix
Introduction . . . xxi
■
CHAPTER 1
Introducing the .NET Micro Framework
. . . 1■
CHAPTER 2
Devices
. . . 15■
CHAPTER 3
Getting Started
. . . 35■
CHAPTER 4
Introducing the .NET Micro Framework Base Class Library
. . . 47■
CHAPTER 5
Accessing Hardware
. . . 73■
CHAPTER 6
Networking
. . . 117■
CHAPTER 7
Wireless Communication
. . . 173■
CHAPTER 8
Cryptography
. . . 179■
CHAPTER 9
Advanced .NET Micro Framework Programming
. . . 189■
CHAPTER 10
Globalization and Localization
. . . 213■
CHAPTER 11
Graphics and Graphical User Interfaces
. . . 235■
CHAPTER 12
Hardware Emulation
. . . 317■
CHAPTER 13
Emulator Components
. . . 361Contents
About the Author . . . xv
About the Technical Reviewer . . . xvii
Acknowledgments . . . xix
Introduction . . . xxi
■
CHAPTER 1
Introducing the .NET Micro Framework
. . . 1What Is the .NET Micro Framework?
. . . 1.NET Micro Framework History
. . . 1Motivation
. . . 3Embedded Development in the Past. . . 3
A Different Approach
. . . 4Benefits of Managed Code. . . 4
Where the .NET Micro Framework Fits. . . 5
What the Framework Is Not
. . . 6Licensing
. . . 6Benefits of the .NET Micro Framework
. . . 6The .NET Micro Framework and Windows SideShow. . . 7
Technical Overview
. . . 9Introducing the Bootable Runtime Environment . . . 9
Architecture
. . . 10Compiling for the .NET Micro Framework
. . . 11Target platforms
. . . 12Platform Porting
. . . 12Links for Further Information . . . 13
Summary
. . . 13■
CHAPTER 2
Devices
. . . 15Freescale i.MXS Development Kit
. . . 15Device Solutions Meridian and Tahoe
. . . 17Meridian CPU. . . 17
Tahoe Development Kit
. . . 19Digi International’s Embedded Development Products
. . . 19Digi Connect ME
. . . 19SJJ Embedded Micro Solutions Embedded Development Kit . . . 23
Crossbow Imote2.NET Edition
. . . 24Module
. . . 25Multisensor Board. . . 26
Development Kit . . . 26
Adeneo Ports
. . . 27PHYTEC phyCORE-LPC3180
. . . 27Atmel AT91SAM9261
. . . 28GHI Electronics Embedded Master . . . 30
The Embedded Master Module
. . . 30Development Kit . . . 32
emtrion HiCO.ARM9 . . . 33
The HiCO.ARM9-Core Module
. . . 33Development Kit . . . 33
Summary
. . . 34■
CHAPTER 3
Getting Started
. . . 35Getting Your System Ready
. . . 35System Requirements
. . . 35Installing the .NET Micro Framework SDK
. . . 36Using Visual Studio and the .NET Micro Framework
. . . 36Creating a New Project
. . . 36Your First .NET Micro Framework Application
. . . 37The Visual Studio Workspace
. . . 38Setting Project Properties
. . . 39Building, Deploying, Executing, and Debugging . . . 40
The .NET Micro Framework SDK . . . 40
File Structure
. . . 40The Base Class Library Runtime Assemblies
. . . 41The MFDeploy Tool
. . . 41The TFConvert Tool. . . 45
Summary
. . . 46■
CHAPTER 4
Introducing the .NET Micro Framework
Base Class Library
. . . 47Text Output for Diagnostics
. . . 47Pausing Program Execution . . . 49
Setting and Getting the System Time and Time Zone
. . . 50Using Strings . . . 54
The System.String Class
. . . 54Concatenating Strings
. . . 56Encoding Strings
. . . 57Using Arrays
. . . 58Multidimensional Arrays
. . . 58Combining Byte Arrays. . . 58
Extracting Ranges from Arrays . . . 59
Combining and Copying Nonbyte Arrays . . . 59
Integer and Byte Arrays . . . 60
Using Collections
. . . 61Understanding the ArrayList Class
. . . 61Using the ArrayList Class
. . . 62Working with Numbers . . . 63
Real Decimal Numbers. . . 63
Hexadecimal Number Output
. . . 63Parsing Numbers
. . . 64Mathematical Functions . . . 66
Exception Handling
. . . 67Throwing Exceptions
. . . 68Catching an Exception . . . 69
The finally Block . . . 70
Handling Multiple Exception Types. . . 70
Getting Information from an Exception. . . 71
Rethrowing Exceptions. . . 71
Summary
. . . 72■
CHAPTER 5
Accessing Hardware
. . . 73What Are GPIO Ports? . . . 73
Output Ports
. . . 74Input Ports
. . . 77Interrupt Ports
. . . 79Triggering an Edge
. . . 80Triggering to a Level. . . 81
Tristate Ports
. . . 82The RS232 Serial Port
. . . 83The SerialPort Class
. . . 83Sending Data
. . . 85Receiving Data
. . . 86Pin Usage and Reservation
. . . 88Why Reserve Pins?
. . . 88The HardwareProvider Class
. . . 88Custom Hardware Providers . . . 89
The I²C Bus
. . . 91Accessing I²C Devices with the .NET Micro Framework
. . . 9310-Bit Addressing
. . . 95A Managed Driver for the TI TMP100 Temperature Sensor . . . 96
Hardware Providers for I²C
. . . 101The SPI Bus
. . . 101Accessing SPI Devices with the .NET Micro Framework . . . 102
A Managed Driver for the AD124S101 AD Converter
. . . 104Hardware Providers for SPI . . . 108
Other Hardware . . . 108
PWM
. . . 108Mass Storage Devices with a File System
. . . 109USB. . . 109
Obtaining Power Supply and Charging State Information
. . . 109Obtaining Processor Speed Information . . . 113
System Identification . . . 115
Summary
. . . 116■
CHAPTER 6
Networking
. . . 117Sockets
. . . 118The Socket Class
. . . 118TCP
. . . 120UDP. . . 125
Network Configuration
. . . 127Learning More About Sockets
. . . 129Web Services for Devices
. . . 130DPWS Architecture
. . . 130Discovery
. . . 131Description
. . . 146Control . . . 153
Events
. . . 167Learning More About DPWS
. . . 170■
CHAPTER 7
Wireless Communication
. . . 173Wireless LAN
. . . 173Bluetooth . . . 174
ZigBee . . . 175
Z-Wave . . . 176
Comparing Wireless Technologies . . . 177
Links to Bluetooth, ZigBee, and Z-Wave OEM Modules
. . . 178Summary
. . . 178■
CHAPTER 8
Cryptography
. . . 179XTEA: A Symmetric Algorithm
. . . 179Using XTEA
. . . 180XTEA for the Full .NET and .NET Compact Frameworks. . . 181
RSA: An Asymmetric Algorithm
. . . 181Common Key Pair Scenarios
. . . 181Creating Private and Public Keys
. . . 183Encryption and Decryption with RSA
. . . 186Creating and Verifying Signatures
. . . 186Summary
. . . 187■
CHAPTER 9
Advanced .NET Micro Framework Programming
. . . 189Multithreading and Synchronization
. . . 189Using Threads
. . . 190Synchronization. . . 191
Events
. . . 193Weak Delegates
. . . 194Execution Constraints . . . 195
Binary Serialization
. . . 197Usage
. . . 197Storage Format and Configuration
. . . 200Configuring Serialization with Attributes
. . . 202Notes, Hints, and Lessons Learned
. . . 206Exchanging Data with Other Devices
. . . 206Storing Data Permanently in Flash Memory
. . . 207■
CHAPTER 10
Globalization and Localization
. . . 213Resources
. . . 213Creating and Editing Resources
. . . 214Working with Resources
. . . 219Cultures . . . 219
Creating and Installing Custom Cultures . . . 220
Formatting Dates, Times, and Numbers
. . . 225Persisting the Current Culture
. . . 228Multilingual Applications
. . . 228Satellite Assemblies
. . . 228Creating Satellite Assemblies . . . 229
Changing the Language at Runtime
. . . 231Summary
. . . 233■
CHAPTER 11
Graphics and Graphical User Interfaces
. . . 235Drawing on the Display Using the Bitmap class . . . 235
Using Bitmaps
. . . 238Flushing Bitmaps onto the Display
. . . 239Using Colors
. . . 240Drawing Rectangles
. . . 245Drawing Ellipses
. . . 250Drawing Images . . . 250
Drawing Text
. . . 255Creating Complex User Interfaces with Interaction
. . . 261WPF
. . . 261Your First WPF Application. . . 261
The Application Class
. . . 264Display Element Hierarchy
. . . 265Laying Out Elements with a Panel Container. . . 268
Backgrounds for Controls Using Brushes. . . 275
Drawing Borders Around Elements. . . 278
Displaying Shapes
. . . 282The Text Element
. . . 283The TextFlow Element . . . .. . . 284
The ScrollViewer Element
. . . 287List Box Menus . . . 291
Handling User Input and Events
. . . 307Creating Custom UI Elements . . . 311
■
CHAPTER 12
Hardware Emulation
. . . 317Why Use Hardware Emulation?
. . . 317Which Hardware Can Be Emulated?. . . 317
User Interfaces for Emulators . . . 317
The Extensible Emulator
. . . 318Getting Started with the Emulator . . . 318
Emulator Project Templates
. . . 319Emulator Components
. . . 322The EmulatorComponent Class
. . . 323Sharing Reusable Emulator Components. . . 324
Creating a New Library Project for Emulator Components. . . 325
XML Configuration
. . . 326Programmatic vs. XML Configuration. . . 326
Registering Components . . . 328
Deleting or Updating Existing Components . . . 333
Component Properties with Simple Types
. . . 335Parsing Property Values
. . . 337The format Specifier. . . 339
Complex Data Types. . . 339
The type Specifier. . . 341
Array Properties
. . . 343Component Collections
. . . 346More About the Emulator . . . 348
Members of the Emulator Class
. . . 348The Emulator Start-up Process
. . . 350Linked Components . . . 350
Addressing Registered Components. . . 351
Debugging Emulators
. . . 351Command-Line Options
. . . 355The Emulator and the Registry . . . 356
Summary
. . . 359■
CHAPTER 13
Emulator Components
. . . 361GPIO Ports . . . 361
XML Configuration
. . . 361Input Ports
. . . 362Output Ports
. . . 363Synchronizing the Emulator and GUI Thread
. . . 365The Serial Port . . . 368
Communication Between Emulator and Application. . . 369
Routing Data to and from Another Windows Application
. . . 372Exchanging Serial Data with a Real Hardware Component
. . . 375Exchanging Serial Data with HyperTerminal
. . . 378Exchanging Data with Sockets Acting As a Client. . . 381
The I2C bus
. . . 383The I2cDevice Component
. . . 383The I2cBus Component
. . . 385An Emulator Component for the TI TMP100
Temperature Sensor
. . . 385The SPI Bus
. . . 388The SpiDevice Component. . . 389
The SpiBus Class
. . . 390An Emulator Component for the ADC124S101 AD Converter . . . . 391
Emulator Timing . . . 393
Simulating the Processor Speed
. . . 393Continuations
. . . 394Completions. . . 394
Timers
. . . 394An Oscillator Component
. . . 395Memory Management
. . . 398Emulating Persistent Flash Memory
. . . 403Simulating a Battery Cell . . . 405
LCD Displays
. . . 406Summary
. . . 408About the Author
■JENS KÜHNER works as principal software engineer for Vallon GmbH in Germany, a company that develops and manufactures metal detectors and ferrous locators. He creates software for data acquisition and evalu-ation using the .NET Framework and .NET Compact Framework. Since this software must be incorporated closely with the detectors’ hardware, an interest in embedded systems was only natural.
Jens has been involved with the .NET Micro Framework from the very start, when he saw it presented at MEDC Europe. Since then, he’s been an active beta tester of the technology and a regular contributor to the .NET Micro Framework forum.
About the Technical Reviewer
Acknowledgments
W
riting this book was fun and immensely rewarding, but it took a great deal of effort and time to write. I would like to thank a number of individuals for supporting me and making this book possible.First, I want to thank my wife, Iryna, and my son, Marek, who suffered most from my absence, for their love, tolerance, and patience. Iryna took care of so many things in order to make my life frictionless while I was writing. Without her active and emotional support, this project would never have gotten completed.
Thanks a lot to my parents, Bärbel and Helmut, for buying me my first computer. They always supported me and believed in me without knowing where these endless hours in front of the screen would end up, and they shaped me to be the person I am.
I’d like to thank the entire .NET Micro Framework team for developing this great technology and especially Zach Libby, Jonathan Kagle, Jim Mateer, and Lorenzo Tessiore for providing me beta bits as well as their advice, feedback, and support. I was very happy that Microsoft and Digi International provided me modules and development kits. Thanks to Frank Prengel (embedded developer evangelist at Microsoft) for providing me photographs and illustrations.
Next, a special mention goes to my boss at Vallon GmbH for believing in and supporting innovative ideas and for letting me always use the latest tools and technologies.
Introduction
I
t all started at Microsoft’s European Mobile and Embedded Developers Conference (MEDC Europe) 2006 in Nice, France. At this event, I saw the .NET Micro Framework presented for the first time in a session by Jonathan Kagle and Lorenzo Tessiore. As a .NET programmer for desktop and smart device applications, I was very impressed by the idea of being able to program embedded microcontrollers with my everyday development tool and programming language: Microsoft Visual Studio and C#.I got a CD with the not-yet-released .NET Micro Framework SDK 1.0 from Lorenzo after the presentation; the emulator it included was not customizable and was specially built for the Sumo Robot contest that took place at the conference. The contest’s goal was to program a Sumo robot (a small robot supporting the .NET Micro Framework) with Visual Studio and C# so that it was intelligent enough to react to sensor input and push an enemy from the battlefield.
Instead of going to the beach in Nice in the evening, I stayed in my hotel room and tweaked the software development kit’s (SDK’s) emulation mechanism to launch my own emulator. My first emulator just indicated the activity of a general purpose input/output (GPIO) port on the emulator’s user interface using a check box. This allowed me to write my first .NET Micro Frame-work application that toggled a GPIO port and run it on my first emulator.
Since then, I have been an active beta tester of this technology and a regular contributor to the .NET Micro Framework forums. This passion, combined with the lack of good documenta-tion and practical samples and the users’ quesdocumenta-tions in the forum, motivated me to write this book for you.
■ ■ ■
Introducing the .NET
Micro Framework
T
his chapter introduces the .NET Micro Framework; we will discuss its history, motivation, goals, and architecture. We will have a look at where the .NET Micro Framework fits in the story of Microsoft’s offerings for embedded development, and you will learn about the benefits and limitations of the .NET Micro Framework. Finally, the chapter provides a technical overview of the .NET Micro Framework.What Is the .NET Micro Framework?
The Microsoft .NET Micro Framework is a small and efficient .NET runtime environment used to run managed code on devices that are too small and resource constrained for Windows CE and the .NET Compact Framework.
The .NET Micro Framework enables you to write embedded applications for small, connected, embedded devices with Visual Studio and C#. That means you can now use the same develop-ment tools and language that you use to build desktop and smart device (PDA and smartphone) applications to develop applications for microcontrollers. The .NET Micro Framework also provides an extensible hardware emulator for rapid prototyping and debugging.
The .NET Micro Framework requires no underlying operating system. A scaled-down version of the Common Language Runtime (TinyCLR) sits directly on the hardware, so the framework is often called a bootable runtime. The runtime has a small footprint; it uses only a few hundred kilobytes of RAM and does not require the processor to have a memory management unit (MMU). Therefore, the .NET Micro Framework can run on small and inexpensive 32-bit processors without consuming a lot of power.
.NET Micro Framework History
Let’s take a look at the history and versions of the .NET Micro Framework:
• Smart Personal Object Technology (SPOT) started at Microsoft Research in 2001. David Massarenti developed the first proof-of-concept version of a scaled-down and ECMA-compliant CLR, the TinyCLR.
• The .NET Micro Framework 1.0 on Sumo robots (see Figure 1-2), which included a Sumo robot emulator, was presented at the 2006 Mobile and Embedded Developers Confer-ence (MEDC); the conferConfer-ence also featured a Sumo robot contest.
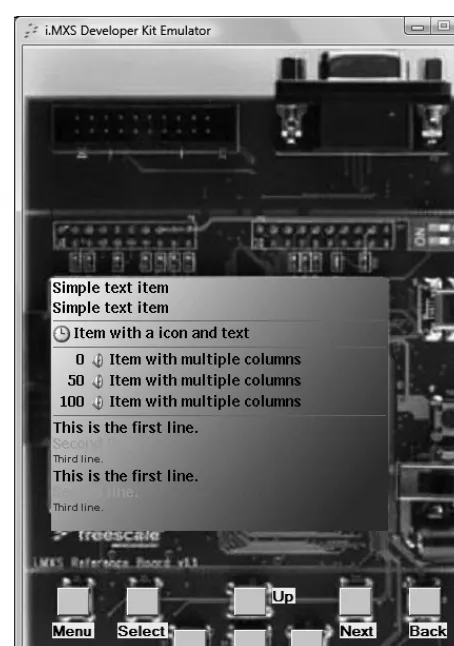
• In February 2007, the .NET Micro Framework 2.0, with a customizable emulator, was released. Some development boards (see Figure 1-3) and devices (see Figure 1-4) were available, and others followed in 2007. You will learn more about the available develop-ment boards and hardware platforms in the next chapter.
• In 2007, Microsoft presented Windows SideShow, which is based on the .NET Micro Framework, and hardware manufacturers started shipping Windows SideShow-capable devices (see Figure 1-5).
• Later in 2007, Service Pack 1 for the .NET Micro Framework 2.0 was released. • In February 2008, Microsoft released the .NET Micro Framework 2.5.
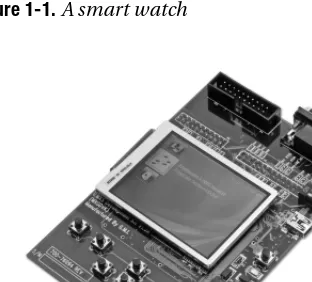
Figure 1-1. A smart watch Figure 1-2. A Sumo robot
Figure 1-4. A .NET Micro Framework network-enabled device
Figure 1-5. A notebook with an integrated display utilizing SideShow
Motivation
This section describes why Microsoft developed the .NET Micro Framework and the benefits of using managed code on devices.
Embedded Development in the Past
not work, even if the CPU core is the same. Every board has different buses, interrupt controllers, memory, and I/O interfaces.
The tools and development environments for embedded development are not very comfort-able and complete even today. Also, every CPU vendor provides its own compiler and development tools, and simulating hardware and debugging embedded applications on your development PC is hard.
A Different Approach
Standard hardware platforms with the .NET Micro Framework already on board provide a different approach. The .NET Micro Framework hardware features ready-to-use single-board computers (see Chapter 2) with common hardware components such as memory, general purpose input/output (GPIO) ports, serial ports, and a display on board. The code to interface with the hardware components is already complete. You just need to write your application, and you can focus on domain-specific problems.
The .NET Micro Framework abstracts hardware access through its base class library and treats hardware components as objects. That enables you to program hardware components in an object-orientated way. Instead of dealing with hardware details and setting bit masks to configure peripheral hardware, you just need to set the properties of an object. This approach is also referred to as managed drivers and will help make your embedded application indepen-dent from a particular platform.
.NET Micro Framework applications can be programmed using Visual Studio and C#. Visual Studio is a widespread and state-of-the-art development tool. If you are already programming .NET applications for the desktop, smartphones, or PDAs, you can continue using your everyday development tool. C# is a modern high-level programming language that allows you to write clear and reusable object-orientated code. With the .NET Micro Framework, every developer familiar with .NET can also be an embedded developer!
Like the full .NET Framework and the .NET Compact Framework, the .NET Micro Framework runs managed code. The C# compiler generates a processor-independent intermediate language that TinyCLR executes on the device. The next section describes the benefits of managed code.
Benefits of Managed Code
As stated earlier, the .NET Micro Framework contains the TinyCLR. Code that targets the CLR is referred to as managed code, whereas code that does not target the CLR is known as unmanaged (native) code. The CLR executes intermediate-language code and provides the following core services and benefits:
• Automatic memory management using a garbage collector • Thread management and synchronization
• Exception handling • Strict type safety
The CLR uses a garbage collector that automatically frees unused memory blocks and manages threads by providing time slices to the individual threads and methods to synchro-nize access to shared resources. Since managed code is executed under the control of the CLR, which takes care of references to objects, you do not have to deal with the unsafe pointers that are common with native programming. With managed code, you can’t access memory blocks once they’ve been disposed of, because the CLR frees objects only when they are not referenced anymore. It also enforces strict type safety, and the TinyCLR prevents execution of unsafe, custom, native code. Together with exception handling, a modern way to handle errors, managed code enables secure and robust applications.
Managed code assemblies contain much information (metadata). Therefore, using managed code also allows you to use static code analysis tools like FxCop to detect and enforce the following to write better code:
• Enforcing consistent naming of classes and methods • Detecting unused code
• Detecting performance issues • Detecting design issues
Where the .NET Micro Framework Fits
Now that we have discussed the benefits of managed code, let’s look at where the .NET Micro Framework fits in the story of Microsoft’s offerings (see Figure 1-6). Windows XP, Windows XP Embedded, and Windows Vista support the full .NET Framework, while Windows CE supports the .NET Compact Framework. There may be an overlap among the offerings, so two systems may fit well and be good choices for one application.
The .NET Micro Framework is the smallest .NET platform to date and provides only a subset of the full .NET Framework and .NET Compact Framework. While Windows CE config-urations supporting managed code with the.NET Compact Framework require at least 12MB of RAM, the .NET Micro Framework running directly on the hardware requires only about 300KB of RAM. The smart watches, for example, came with an ARM7 chipset clocked with 27 MHz and having 384KB RAM and 1MB flash memory (a suggested minimal configuration). The currently available .NET Micro Framework devices start at 55 MHz and require 8MB of RAM and 1MB of flash memory.
The .NET Micro Framework requires a 32-bit processor. Although common embedded programming in assembly language or C still takes place on 16-bit or even 8-bit processors, improved production techniques have reduced the manufacturing costs and power require-ments of 32-bit processors. However, since the .NET Micro Framework does not require an MMU, it can run on less expensive processors than Windows CE can.
What the Framework Is Not
The .NET Micro Framework is not a real-time system. Although it is very fast and suitable for most applications, do not expect real-time deterministic behavior. A timer event may not be triggered exactly after the specified amount of time (varying by some milliseconds), or the runtime environment may take a few milliseconds to react to an interruption by calling the interrupt service routine.
In addition, the garbage collector will run to free unused memory when memory gets low. Garbage collection might block all threads for a few milliseconds.
Also, executing managed code is a bit slower than executing native code. With the .NET Micro Framework, all managed code will be interpreted. There is no just-in-time compiler that compiles managed code parts to native machine code on the first execution as there is for the full .NET Framework and .NET Compact Framework.
Licensing
The .NET Micro Framework SDK is available for download at no cost. To develop for the .NET Micro Framework, you need Visual Studio 2005 Standard Edition or better (not Express Edition). A fee is charged for each device containing the .NET Micro Framework, but the fee is lower than the one for Windows CE. Also, you are not required to pay the fee directly. When you buy ready-to-use prebuilt modules or development boards containing the .NET Micro Framework, the license fee has already been paid to Microsoft.
Benefits of the .NET Micro Framework
For embedded development, the advantages of the .NET Micro Framework can be summarized as follows:
• Not bound to a specific chipset or board vendor • Important part of Microsoft’s embedded strategy
The following features of the .NET Micro Framework allow you to reduce development costs and bring your products to market faster in comparison to other traditional embedded platforms:
• Managed code
• Modern language with Visual C#
• Rich base class library (a subset of common .NET and extensions for embedded development)
• Ability to touch the hardware with managed drivers
• Integration with Visual Studio, a first-class and widespread development tool • Many .NET developers available
• Sharing code with existing solutions
• Rapid prototyping and debugging using the extensible emulator • Live debugging on devices
The .NET Micro Framework and Windows SideShow
You often hear about Microsoft Windows SideShow together with the .NET Micro Framework. SideShow is an environment based on the .NET Micro Framework that runs on devices containing the framework; it can get content from a host computer and display that content on small devices (see Figure 1-7). SideShow-enabled devices can be permanently connected to a computer, or you can use them independently of the host computer that provides the content. For example, a SideShow-enabled auxiliary display on a notebook cover enables you to browse your appoint-ments or read e-mail while your notebook is turned off (see Figure 1-5). The next time the notebook is turned on, the two devices synchronize.
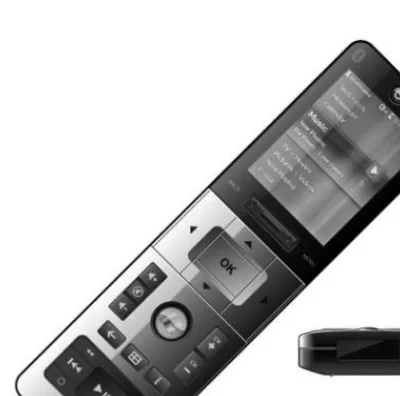
Devices enabled to use SideShow include the following: • An auxiliary display for a PC or notebook (see Figure 1-5) • A remote control with a display (see Figure 1-8)
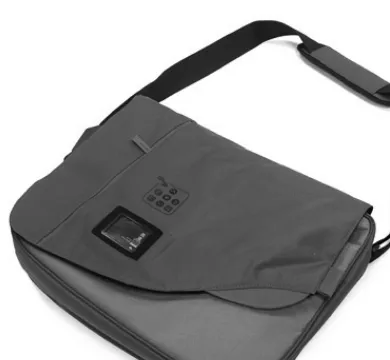
• A designer bag with a built-in display (see Figure 1-9) • A cordless phone
• A picture frame
• A portable media player
You can see more SideShow-enabled devices at www.SideShowDevices.com.
Figure 1-8. A SideShow-capable remote control
The content displayed by SideShow-enabled devices is described in the Simple Content Format (SCF), which is based on XML. You can create a custom gadget application for Side-Show in native or managed code that runs on your Windows host computer and provides SCF content to a connected SideShow-enabled device. The device’s SideShow-enabled environment, which is written with the .NET Micro Framework, shows the SCF content as well as supporting interaction, like menu navigation and responding to other user input.
The SideShow-enabled environment on the devices could theoretically be ported to plat-forms other than the .NET Micro Framework. However, no other port is available now, and the .NET Micro Framework does the job well.
Figure 1-9. Designer bag with a built-in display using SideShow
Figure 1-10. A built-in application using SideShow written with the .NET Micro Framework
Technical Overview
Now that you know why Microsoft developed the .NET Micro Framework, let’s take a look at how it works.
Introducing the Bootable Runtime Environment
The .NET Micro Framework does not require an underlying operating system and can run directly on the hardware. It provides the following services that are usually provided by an operating system:
• Thread management • Memory management • Hardware I/O
However, the .NET Micro Framework is not a full-featured operating system; it’s a bootable runtime environment tailored for embedded development. That’s how the .NET Micro Frame-work can run directly on the hardware without an underlying operating system. However, the .NET Micro Framework can still use an underlying operating system and its services; the extensible emulator running on Windows is an example of that.
Architecture
As I said, the .NET Micro Framework is not a full-featured operating system but a bootable runtime environment tailored for embedded development; it consists of the four layers shown in Figure 1-11.
Figure 1-11. Layered architecture of the .NET Micro Framework
User Code Layer
The topmost layer is the user code layer. This layer consists of your managed application written in C#. Your application may use your reusable class libraries shared with other projects.
Base Class Library Layer
The next layer is the .NET Micro base class library layer, which provides a subset of the common .NET libraries and domain-specific extensions, such as libraries for touching the hardware, simple drawing, complex graphical user interfaces, and networking.
The .NET Micro Framework provides a subset of the full .NET Framework base class library (BCL). Microsoft tried to stay in line with the full .NET Framework class library wherever possible. If the functionality or interface of a class deviates from the full .NET Framework, that class or interface was moved to the new namespace Microsoft.SPOT.
The .NET Micro Framework base class libraries use a mix of managed and native code. The class libraries do not contain native code. The native methods are built into the runtime envi-ronment and are used to perform time-critical tasks or access hardware.
TinyCLR
The TinyCLR layer consists of the following three components:
• Hardware abstraction layer (HAL): The HAL is tightly coupled to the hardware and provides functions to access the hardware and peripherals. When running on an oper-ating system, the HAL provides functionality by using the services of the underlying OS. • Platform abstraction layer (PAL): The PAL provides additional abstractions of the HAL,
such as timers and memory blocks.
• .NET Micro Framework CLR: The CLR consists of the execution engine that manages code at execution time. The managed type system ensures strict type safety. The CLR also contains the garbage collector, which is responsible for automatically freeing unused memory blocks, and the internal native methods called by the base class library. In addi-tion, there is a boot loader that loads and starts the TinyCLR.
Hardware Layer
The hardware layer consists of the actual hardware platform. This is either the target device (microprocessor and peripheral) or the hardware emulator running on a windows PC.
Compiling for the .NET Micro Framework
In .NET, compilers, such as the C# compiler, transform the source code to assemblies—execut-ables (.exe files) and libraries (.dll files)—containing the common intermediate language and metadata for a self-describing code. The CLR then executes the managed code.
The .NET Micro Framework uses a special intermediate language representation optimized for size. A global, shared string table for text and metadata such as type, method, and field names is used to reduce ROM and RAM usage on the devices.
Therefore, the .NET Micro Framework metadata processor tool generates the optimized pe-files to be deployed out of the managed .NET assemblies. Visual Studio and the .NET Micro Framework plug-in hide all these steps from you (see Figure 1-12). You will not see that the metadata processor is used, but you should know that Visual Studio actually deploys special optimized assemblies that the .NET Micro Framework CLR will interpret.
Figure 1-12. Compiling for the .NET Micro Framework
Target platforms
Currently, the .NET Micro Framework runs on ARM7 and ARM9 chipsets. Support has been announced for the Blackfin processor, from Analog Devices. The extensible emulator is another port of the CLR on X86 processors; it uses an underlying operating system, such as Windows XP or Vista.
Platform Porting
The .NET Micro Framework separates all code that interfaces with the hardware in the hard-ware and platform abstraction layers (HAL and PAL). Theoretically, porting to a new platform seems like it ought to be an easy task, but it is complex and requires a complete understanding of the hardware being used. In practice, a full porting effort will be done by hardware platform vendors rather than by individual embedded developers.
Microsoft provides a porting kit and porting workshops. The porting kit includes the source code for a reference HAL and PAL implementation. The porting kit requires a porting agree-ment along with payagree-ment of an associated fee.
The chipset itself is not so important when programming with the .NET Micro Framework, since the code is processor independent. There are several platforms available that provide all the peripheral hardware supported by the .NET Micro Framework. The devices just vary in display and networking support. This is an active area of development, and we will certainly see interesting new platforms in the future. The next chapter presents available modules and development boards supporting the .NET Micro Framework.
C# source
.NET assembly
.NET Micro Framework assembly
Device
C# compiler
Metadata processor
Links for Further Information
For further general information, visit the following web sites:• Official .NET Micro Framework site: The official .NET Micro Framework site at the Microsoft Developer Network (MSDN) contains news such as porting announcements, the down-load link for the latest SDK, and a link to the .NET Micro Framework newsgroups at MSDN:
www.microsoft.com/netmf.
• .NET Micro Framework team blog: The blog of the .NET Micro Framework team can be found here: http://blogs.msdn.com/netmfteam.
• Here are some .NET Micro Framework–related pages and blogs: • Jan Kuera’s web site: www.microframework.eu
• Pavel Bánský’s blog: http://bansky.net/blog
• Sean Liming’s web page: www.seanliming.com/NETMicroFramework.html
• My blog: http://bloggingabout.net/blogs/jens
• Windows SideShow–related pages: For more information on Widows SideShow, visit the following web pages:
• Windows SideShow team blog: http://blogs.msdn.com/sideshow
• Windows SideShow development forum: http://forums.microsoft.com/MSDN/ ShowForum.aspx?ForumID=1296&SiteID=1
• Windows SideShow devices examples: www.SideShowDevices.com
Summary
Now you know what the .NET Micro Framework is. This chapter discussed the history and background of the framework, including the motivation that led to its creation.
This chapter also illustrated how the .NET Micro Framework fits into the story of Microsoft’s offerings for embedded development. We discussed the benefits of the .NET Micro Framework compared to other managed embedded options and to traditional embedded development. You learned about the benefits of managed code in general and the limitations of managed code on devices. This chapter also provided a technical overview of the .NET Micro Frame-work, as well as a description of its architecture.
■ ■ ■
Devices
T
his chapter presents you with some of the available .NET Micro Framework devices and development boards. It will give you a sense of the current possibilities before we dig into concrete programming in later chapters and will help you select the right device for your project.The list of embedded development devices for the .NET Micro Framework is rapidly changing and growing. Therefore, the information provided in this chapter is naturally only a snapshot at the time of this writing. Please see the official .NET Micro Framework and manufacturer pages (provided later in this chapter) to get the latest information.
Freescale i.MXS Development Kit
The Freescale i.MXS Development Kit (see Figure 2-1) enables developers to quickly create applications for the .NET Micro Framework and Windows SideShow, for which it is the refer-ence platform.
The major features of the i.MXS reference board follow: • Freescale i.MXS 100-MHz (ARM920T) processor • 32MB of SDRAM
• 8MB of flash memory
• 2.5-inch QVGA (320 × 240 × 16 bpp) TFT LCD panel • Ten general purpose input/output (GPIO) ports
• One on-board RS232 Universal Asynchronous Receiver Transmitter (UART) serial port • One UART serial port available with an extension card
• A serial peripheral interface (SPI) bus • An inter-integrated circuit (I²C) bus
• One USB port for debugging and deploying applications • 5V input power supply
Figure 2-1. Freescale i.MXS Development Kit (Copyright of Freescale Semiconductor, Inc. 2008, Used by Permission )
The development board includes an on-board LCD display and is available for approxi-mately $500.
Figure 2-2. Emulator for the Freescale i.MXS board
Device Solutions Meridian and Tahoe
This section presents the Meridian CPU and the Tahoe development kit from Device Solutions (which acquired EmbeddedFusion). The Meridian CPU is designed for high production volume and is targeted at devices utilizing the graphics and user interface capabilities of the .NET Micro Framework. Although not supported with the .NET Micro Framework, you can use the built-in pulse width modulation (PWM) with the Meridian module and Tahoe board.
The development kit provides an SDK with lots of samples, extensions (e.g., PWM), and an emulator for the Tahoe development board. You can find further product information and separately download the latest SDK for free from the Device Solutions web site at www. DeviceSolutions.net. In addition, the guys from Device Solutions are frequently present in the .NET Micro Framework newsgroups.
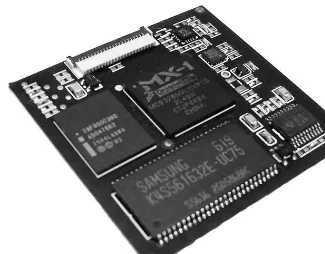
Meridian CPU
Figure 2-3. Meridian CPU
The major features of the Meridian CPU follow: • Freescale i.MXS 100-MHz (ARM920T) processor • 8MB of SDRAM
• 4MB of flash memory
• A connector for a 2.7-inch QVGA (320 × 240 × 16 bpp) TFT LCD panel • 16 to 32 GPIO ports
• Two RS232 UART serial ports • An SPI bus
• An I²C bus
• One PWM channel
• One USB port for debugging and deploying applications • 5V input power supply
• Can be powered by USB
• 3.3-V output capacity for peripherals
Tahoe Development Kit
The Tahoe development kit includes a development board (see Figure 2-4) featuring a Meridian CPU and on-board LCD display. All available peripherals including SPI, I²C, and UART ports, are exposed. It is available for approximately $300.
Figure 2-4. The Tahoe development board
Digi International’s Embedded
Development Products
The following sections highlight the principal .NET Micro Framework–compatible devices from Digi International.
You can find the latest information about Digi Connect’s .NET Micro Framework products at www.digi.com/dotnet.
Digi Connect ME
This section presents the Digi Connect ME module and development kit. Digi Connect ME devices are designed to utilize the network (Ethernet local area network [LAN] and wireless local area network [WLAN]) capabilities of the .NET Micro Framework.
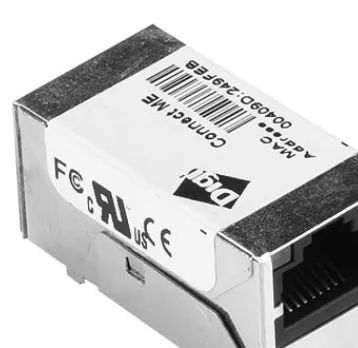
The Digi Connect Module
The Digi Connect ME device was the first .NET Micro Framework device with an Ethernet network adapter and TCP/IP (Transmission Control Protocol/Internet Protocol) stack on board (see Figure 2-5).
The Digi Connect Wi-ME (see Figure 2-6) is the current wireless model supporting 802.11b WLAN. The next-generation product Digi Connect Wi-ME 9210 will support 802.11b/g, and support for .NET Micro Framework is expected in late 2008. The Digi Connect Wi-ME 9210 module is built on a 32-bit ARM9-based Digi NS9210 processor running at 75 MHz with inte-grated 10/100 Mb/s Ethernet interface, on-chip AES accelerator, Flexible Interface Modules (FIMs), and power management capabilities. The module will also support up to ten shared GPIOs, external interrupt requests (IRQs), SPI, and I2C.
the Digi Connect Wi-ME 9210. Support for the .NET Micro Framework is expected in late 2008 as well.
All Digi Connect ME family modules are pin compatible and can be plugged onto a single development board and/or the customer’s carrier board. In addition, there are several Digi Connect EM variants, but these are not shipped with the .NET Micro Framework on board.
Figure 2-5. Digi Connect ME
Figure 2-6. Digi Connect Wi-ME
The key features of the Digi Connect ME module follow: • 55-MHz ARM7 (Digi NS7520) processor
• Five GPIO ports
• One RS232 UART serial port
• An integrated 10/100 Mb/s Ethernet adapter • 3.3V input power supply
Debugging and deploying a .NET Micro Framework application takes place over a network connection, which means a .NET Micro Framework application can use the serial port of a device.
The Digi Connect ME with Ethernet operates in a temperature range from –40 to 85°C. Figure 2-7 illustrates the dimensions of the Digi Connect ME module. Pricing starts at approx-imately $50.
Figure 2-7. Dimensions of the Digi Connect ME
Development Kit
The Digi JumpStart Kit for the Microsoft .NET Micro Framework provides a complete and easy-to-use solution for embedded development. The kit includes a Digi Connect ME embedded module, a development board (see Figure 2-8) with a power supply, sample code, and user documentation. The included Microsoft .NET Micro Framework SDK and the fully functional 90-day trial of Microsoft Visual Studio 2005 allow professional embedded C# development right out of the box. The kit is available for approximately $250.
Digi ConnectCore 9P 9215
The ConnectCore 9P 9215 module (see Figure 2-9) is another embedded device from Digi International, and it delivers a powerful network-enabled core processor solution with a rich set of peripherals and flexibility.
.NET Micro Framework support for the ConnectCore 9P 9215 with Ethernet should be available by June 2008, and support for the wireless variant ConnectCore Wi-9P 9215 is expected toward the end of 2008.
At the heart of the 5-cm × 5-cm ConnectCore 9P 9215 module is a 32-bit ARM-based Digi NS9215 processor running at 150 MHz. The Digi ARM processor on the 9P 9215 family of modules does not provide an on-chip LCD controller. However, as part of the .NET Micro Framework implementation for the ConnectCore 9P 9215 family, the module will fully support an external Epson LCD controller, and customers will be able to tie that controller to the module’s memory bus. The advantage of that specific Epson controller is that a customer has two options for using it: with direct component integration on an existing carrier board (the lowest cost option) or by simply purchasing the pretty cost-effective and widely available off-the-shelf LCD modules for design integration.
Figure 2-9. Digi ConnectCore 9P 9215 module
The ConnectCore 9P 9215 hardware provides the following key features and benefits: • Digi NS9215 150-MHz processor (with an ARM926EJ-S core)
• Up to 16MB of SDRAM (8MB by default) • Up to 16MB of flash memory (4MB by default)
• Up to 64 shared GPIO ports
• Four serial ports (one RS232/422/485, one RS232, and two transistor-transistor level [TTL] ports)
• An I2C bus • An SPI bus
• Support for an external Epson LCD controller • An on-board real-time clock with battery backup • Five PWM channels
• Two DRPIC165x-based, on-chip FIMs
• An eight-channel 12-bit analog-to-digital converter
SJJ Embedded Micro Solutions Embedded
Development Kit
The EDK features a special version of EMAC’s iPac-9302 single-board computer (SBC) that supports the .NET Micro Framework.
The major features of the EDK platform follow: • Cirrus Logic EP9302 ARM9 processor at 200 MHz • 8MB of flash memory
• 8MB of SDRAM • 16 GPIO ports • An SPI bus
• One RS232 serial port for debugging and deploying applications • Internal real-time clock (no battery backup)
• A 10/100 Mb/s Ethernet adapter on-board • Two PWM channels
• A five-channel 12-bit analog-to-digital converter • Two USB 2.0 host ports
• One SD/MMC hot swap card socket • Dimensions of 96 × 90 mm (PC/104 size) • 5V power supply
• A 9-pin ribbon cable and a null modem cable
There is an EDKplus available that has an additional serial port for use with your applica-tions and a battery-backed real-time clock.
The EDK includes an iPac-9302, a CD with a step-by-step development guide, example applications, and utilities. It is available for less than $200.
You can find the web site for the Microsoft .NET Micro Framework EDK at www.sjjmicro.com. The first version of the EDK Step-By-Step Guide is available at no cost at www.sjjmicro.com/ Docs/EDK_Step_By_Step_Guide.pdf, and additional information and white papers can be found at www.seanliming.com/NETMicroFramework.html.
Crossbow Imote2.NET Edition
This section presents the Crossbow Technology Imote2.NET Edition products including the module, sensor board, and development kit. The Imote2 platform brings a new level of perfor-mance and capacity to the processor and radio platform for wireless sensor networks. The Imote2 platform achieves this level of performance by overcoming computational and memory limitations of current platforms to enable low-power operation for battery-powered, data-rich sensor network applications where there is a need for both high performance and high bandwidth.
You can find further information about Crossbow’s wireless sensor network products at
Module
The Imote2.NET Edition is an advanced wireless sensor node platform (see Figure 2-11). It is built around the low-power PXA271 XScale processor and integrates an 802.15.4 radio with a built-in 2.4-GHz antenna. The Imote2.NET Edition is a modular stackable platform and can be expanded with extension boards to customize the system to a specific application. Through extension board connectors, sensor boards can provide specific analog or digital interfaces. System power can be provided by a connected battery board or from a USB port. The module is factory configured to run the .NET Micro Framework and sold as part of the Imote2.Builder kit.
Figure 2-11. The Crossbow Imote2.NET module
The main features and benefits of the Imote2.NET module follow: • A Marvell PXA271 416-MHz XScale processor
• A Marvell Wireless MMX DSP coprocessor • 256KB of SRAM
• 32MB of SDRAM • 32MB of flash memory • GPIO ports
• Three RS232 UART serial ports • Two SPI busses
• An I²C bus
• An SDIO card interface
• An integrated 802.15.4 radio module (Wireless Personal Area Network) • An integrated 2.4-GHz antenna (optional external connector)
Multisensor Board
The Crossbow multisensor board allows developers to start working with actual sensors right from the beginning of the development cycle. It contains digital, calibrated environmental sensors for light, humidity, and temperature. In addition, this board features a low-noise, digital three-axis accelerometer, which can be used for tilt angle and motion detection.
Furthermore, an external connector provides four external 0V to 3V analog channels with 12-bit resolution and an I2C bus for adding digital sensors. This unique and versatile sensor board plugs into the extension board connectors on the Imote2 platform.
The multisensor board features include the following: • Sensirion SHT15 dual temperature and humidity sensor • Texas Instruments TMP175 digital temperature sensor • TAOS TSL265 1ight sensor for visible and infrared light • ST Micro LISL02DQ three-axis accelerometer
• Maxim MAX1363 analog-to-digital converter • An I²C bus interface to connect peripheral hardware
Development Kit
The Imote2.Builder development kit (see Figure 2-12) from Crossbow Technology simplifies and accelerates the design of wireless sensor applications. The development kit is priced at $990.
Figure 2-12. Imote2.Builder
Imote2.Builder includes the following features:
• Three Imote2 modules (IPR2410CA with the .NET Micro Framework on board) • Two Imote2 battery boards (IBB2400)
• Two Imote2 sensor boards (ITS400CA)
The Crossbow SDK for the .NET Micro Framework offers the following software extensions: • Drivers for operating all of the sensors and interfaces on the ITS400 multisensor board • Wireless networking support for a star network topology to enable clusters of Imote2
modules to form an ad-hoc wireless network
• Support for the Imote2 module to serve as a USB-based gateway for pulling rich data from one Imote2 module or clusters of modules, via the 802.15.4 radio, into a PC • Advanced power-management software embedded on the Imote2 to increase battery life
Adeneo Ports
Adeneo is a leading designer of complete hardware and custom software. Adeneo offers a complete turnkey solution for embedded markets including the medical, avionic, transporta-tion, retail, and industrial control markets. With nine years’ experience in Windows Embedded CE, and thanks to its partnerships with both hardware vendors and Microsoft, Adeneo is the key partner for complete hardware and software designs targeting rich-featured high-end products.
Adeneo is the Microsoft porting partner that ported the .NET Micro Framework to support NXP Semiconductors’s popular ARM9-based NXP LPC3180 microcontroller and to the Atmel AT91SAM9261 ARM-9-based processor.
For more information on Adeneo, please visit www.adeneo-embedded.com. From their FTP server, you can download a custom emulator with a sample application for each development board.
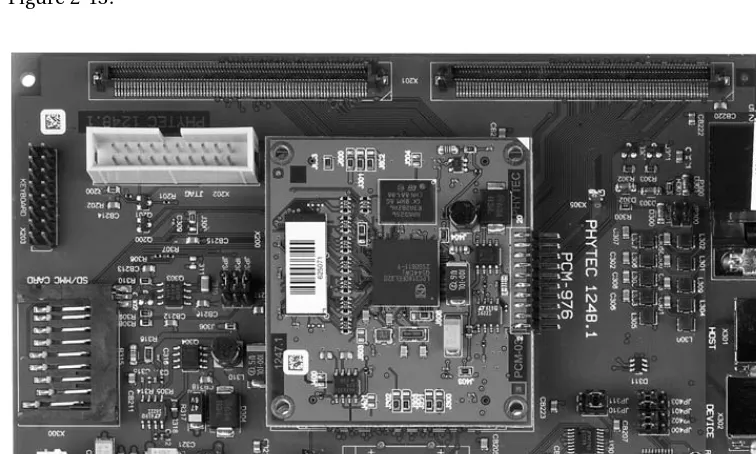
PHYTEC phyCORE-LPC3180
Adeneo has ported the .NET Micro Framework to the phyCORE-LPC3180 hardware that belongs to PHYTEC’s phyCORE single-board computer module family, which integrates all core elements of a microcontroller system on a subminiature board and is designed to ensure easy expansion and embedding in peripheral hardware. The phyCORE-LPC3180 insert-ready single-board computer is populated with the NXP Semiconductors (founded by Philips) LPC3180 micro-controller.
The phyCORE-LPC3180 hardware offers the following key features: • NXP Semiconductors LPC3180 208-MHz ARM9 microcontroller • Up to 128MB of flash memory (32MB by default)
• Up to 128MB of SDRAM
• Subminiature (60 × 53 mm) single-board computer
• Improved interference safety, achieved through multilayer printed circuit board (PCB) technology and dedicated ground pins
• GPIO ports
• Two SPI busses • Two I²C busses
• One 32-KB I²C EEPROM • Two PWM channels
• Keyboard support for up to 64 keys in an 8 × 8 matrix • An SD/MMC card interface
• A USB on-the-go (OTG) interface • One high-speed capture port
PHYTEC offers the development board for the PHYTEC phyCORE-LPC3180 shown in Figure 2-13.
Figure 2-13. Development board for the PHYTEC phyCORE-LPC3180
You can find more product information about the PHYTEC phyCORE-LPC3180 at www. phytec.com.
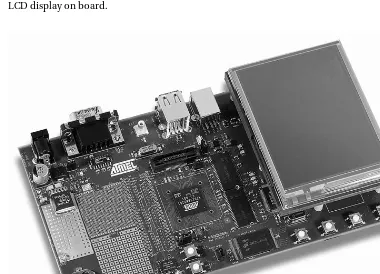
Atmel AT91SAM9261
The AT91SAM9261 hardware’s key features include the following: • 200-MHz ARM9-based ARM926EJ processor
• LCD controller for a QVGA (320 × 240 × 16 bpp) LCD panel • GPIO ports
• Three RS232 USART serial ports • Two SPI busses
• 10/100 Mb/s Ethernet capabilities
• One USB port for debugging and deploying applications • A USB device port
• One PWM channel
• An SD/MMC card interface
Figure 2-14 shows the Atmel development board for the AT91SAM9261 module with the LCD display on board.
You can find more information about the AT91SAM9261 module at www.atmel.com/products/ at91 under the AT91SAM9 series; this page describes only the general hardware. For .NET Micro Framework–related information, please visit Adeneo’s (the porting partner’s) page at
www.adeneo-embedded.com.
GHI Electronics Embedded Master
This section presents the Embedded Master Module and development kit from GHI Electronics. Embedded Master is the first and only device that combines the benefits of the .NET Micro Framework with FAT file system and USB hosting capabilities, as well as providing support for PWM and the controller area network (CAN), which are not supported directly by the .NET Micro Framework.
You can find the latest information about Embedded Master products at www.ghielectronics. com and www.EmbeddedMaster.com, where you can also find the latest firmware with native drivers and the Embedded Master library with the managed wrappers.
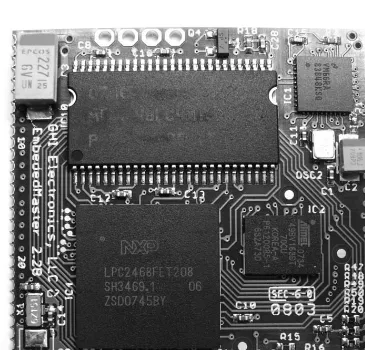
The Embedded Master Module
GHI Electronics Embedded Master implements Microsoft’s .NET Micro Framework on a very small (1.55-inch × 1.55-inch) OEM module (see Figure 2-15). On top of the many benefits that the .NET Micro Framework has, Embedded Master adds many other software and hardware features.
Embedded Master is the first and only .NET Micro Framework OEM device to add FAT file system support (through a subset of System.IO classes) and USB hosting capabilities to allow managed-code access files on SD/MMC cards and on USB memory devices, such as thumb drives and hard drives. Also, with the embedded USB host/device stacks, you can use other USB devices like mice, keyboards, joysticks, printers, and Bluetooth dongles.
Also added natively are other peripherals’ libraries, such as those for analog inputs (analog-to-digital converters), analog outputs ((analog-to-digital-to-analog converters), PWM, CAN bus, and more. All libraries are written below the CLR, in the HAL layer, and none are managed libraries, which lets them run much faster. Above the CLR, managed wrappers allow users to access the unmanaged libraries.
The Embedded Master hardware offers the following key features: • LPC2468 72-MHz ARM7 processor
• Up to 64MB of SDRAM (8MB by default) • 4.5MB of flash memory
• One dedicated SPI port for the graphical LCD • 45 GPIO ports (30 can be used as interrupt ports) • An SPI bus
• An I²C bus
• 4 UART TTL serial ports
• An on-board real-time clock with battery backup • A hardware-based monotone generator (Piezo) • USB host and USB device capable
• Two CAN channels
• A four-channel 10-bit analog-to-digital converter • A 10-bit digital-to-analog converter
• One SD/MMC card interface • Three PWM channels
• A –40° to 85° industrial temperature grade
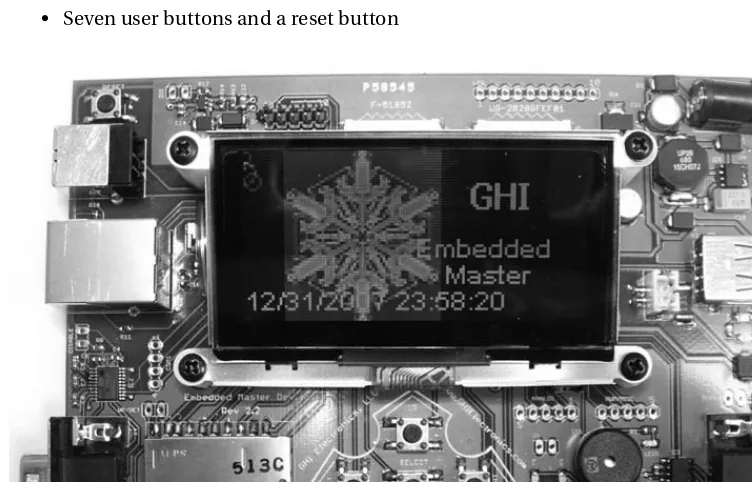
Development Kit
The development system combines an Embedded Master Module with a full-featured mother board (see Figure 2-16). All available peripherals, including SPI, I²C, and UART ports, are exposed.
The key features of the Embedded Master development kit include the following: • Embedded Master Module on board
• On-board 128 × 64 pixel display (displays 16 shades of yellow) • A connector for a 128 × 128 pixel color display
• An on-board 10/100 Mb/s Ethernet adapter • A USB host port
• Two USB device ports (one is used for application debugging and deploying and the other can be accessed as virtual COM1 from the embedded application)
• An RS232 serial port with RTC and CTS • A CAN connector
• An SD/MMC card connector • A Piezo speaker
• Seven user buttons and a reset button
emtrion HiCO.ARM9
This section presents the ARM9-based HiCO.ARM9-Core module and HiCO.ARM9-SBC devel-opment kit from emtrion. For more information, visit www.emtrion.com/hicoarm9_core_en.php.
The HiCO.ARM9-Core Module
emtrion’s HiCO.ARM9-Core module (see Figure 2-17) provides the following major hardware features:
• 180-MHz ATMEL AT91RM9200 ARM9 processor • Up to 64MB of SDRAM
• Up to 32MB of flash memory
• A QVGA (320 × 240 × 16 bpp) TFT LCD panel with touch support • Four UART serial ports (one RS232 and three TTL ports) • GPIO ports
• An SPI bus • An I²C bus
• A 10/100 Mb/s Ethernet adapter on-board • A battery-buffered real-time clock
• Application debugging and deploying using a serial port • USB host and USB device capable
• An SD/MMC card interface • 5V input power supply
Figure 2-17. HiCO.ARM9-Core module
Development Kit
Figure 2-18. HiCO.ARM9-SBC
Summary
Now, you have an idea of the devices that can be used for programming with the .NET Micro Framework and their capabilities. Though you might already have selected (or even ordered) a development board for your application, you can use the .NET Micro Framework without real hardware at all, using the extensible hardware emulator. In any case, knowing the features and capabilities of available devices is a great benefit.
■ ■ ■
Getting Started
I
n this chapter, you’ll get started using the .NET Micro Framework and create your first appli-cation with it. This chapter covers the system requirements for developing with the .NET Micro Framework and introduces Visual Studio, explaining how the .NET Micro Framework exten-sions are integrated and can be used with it. This chapter also gives you an overview of the files and tools in the .NET Micro Framework SDK.Getting Your System Ready
Follow the steps in this section to get your system set up to create your .NET Micro Framework applications.
System Requirements
Developing for the .NET Micro Framework requires the following: • Microsoft Windows XP or Vista
• Microsoft Visual Studio 2005 Standard Edition or better, with Service Pack 1 • .NET Micro Framework SDK version 2 with Service Pack 1 or version 2.5
The free Express editions of Visual Studio cannot be used with the .NET Micro Framework, because they do not allow installing extensions at all. Do not forget to install Visual Studio 2005 Service Pack 1.
Installing the .NET Micro Framework SDK
After you have set up your development PC and installed Visual Studio, you’re ready to install the .NET Micro Framework SDK. You can find a link to the latest SDK on the official MSDN .NET Micro Framework page at www.microsoft.com/netmf.
Using Visual Studio and the .NET
Micro Framework
In this section, you learn to work with Visual Studio in order to build, deploy, execute, and debug your first .NET Micro Framework application.
Creating a New Project
After installing Visual Studio and the .NET Micro Framework SDK, you can start Visual Studio and create a new .NET Micro Framework project. Selecting File ➤ New ➤ Project will open a dialog box in which you can enter project details (see Figure 3-1). This dialog box allows you to enter the project type, name, and location.
The .NET Micro Framework SDK integrates the Micro Framework project type under Visual C#. You can choose among four .NET Micro Framework–related project templates:
• Class Library: For grouping and sharing code
• Console Application: An application with core libraries
• Window Application: An application with a graphical user interface using a special version of Windows Presentation Foundation (WPF)
• Device Emulator: A custom device emulator
Your First .NET Micro Framework Application
Now, it is time to create your first .NET Micro Framework application; we will create a .NET Micro Framework console application, as described in the previous section.
A new console application created with the wizard contains a C# source file (see Listing 3-1) that contains the application’s main entry point. The code in the Program.cs file just prints the text “Hello World!” to the Visual Studio Output window.
Listing 3-1. Default C# Code for a New Console Application
using System;
using Microsoft.SPOT;
namespace MFConsoleApplication1 {
public class Program {
public static void Main() {
Debug.Print(
Resources.GetString(Resources.StringResources.String1)); }
} }
A fresh console application contains references to the core mscorlib.dll and Microsoft. SPOT.dll libraries. You can reference further class libraries with Project ➤ Add Reference.
The Print method of the Debug class accepts text to print to the Output window. You will learn more about this class in the next chapter.
The Visual Studio Workspace
The Visual Studio workspace (see Figure 3-2) contains several child windows, including the following:
• The source code editor window • The Solution Explorer window • The Error List window • The Output window
Figure 3-2. The Visual Studio workspace
Figure 3-2 shows our first .NET Micro Framework project in the Visual Studio Integrated Development Environment (IDE). The Solution Explorer provides a hierarchical view of the files of a project. The References subitem shows all referenced class library assemblies. Right-clicking the References subitem will open the dialog box to add further references (see Figure 3-3).
Figure 3-3. Adding class library references
Setting Project Properties
The .NET Micro Framework SDK installs a new page called Micro Framework within the project settings (see Figure 3-4) that allows you to configure .NET Micro Framework–specific settings such as the deployment. In the Solution Explorer, right-click your project item, and select Properties to show the configuration details.