Adobe
®
Dreamweaver
®
CS6
CLASSROOM IN A BOOK
®
Adobe® Dreamweaver® CS6 Classroom in a Book®
© 2012 Adobe Systems Incorporated and its licensors. All rights reserved.
If this guide is distributed with software that includes an end user license agreement, this guide, as well as the software described in it, is furnished under license and may be used or copied only in accordance with the terms of such license. Except as permitted by any such license, no part of this guide may be reproduced, stored in a retrieval system, or transmitted, in any form or by any means, electronic, mechanical, recording, or otherwise, without the prior written permission of Adobe Systems Incorporated. Please note that the content in this guide is protected under copyright law even if it is not distributed with software that includes an end user license agreement.
The content of this guide is furnished for informational use only, is subject to change without notice, and should not be construed as a commitment by Adobe Systems Incorporated. Adobe Systems Incorporated assumes no responsibility or liability for any errors or inaccuracies that may appear in the informational content contained in this guide.
Please remember that existing artwork or images that you may want to include in your project may be protected under copyright law. The unauthorized incorporation of such material into your new work could be a violation of the rights of the copyright owner. Please be sure to obtain any permission required from the copyright owner. Any references to company names in sample files are for demonstration purposes only and are not intended to refer to any actual organization.
Adobe, the Adobe logo, Classroom in a Book, Dreamweaver, Fireworks, Flash, and Photoshop are either regis-tered trademarks or trademarks of Adobe Systems Incorporated in the United States and/or other countries. Apple, Mac OS, and Macintosh are trademarks of Apple, registered in the U.S. and other countries. Microsoft, Windows, and Windows NT are trademarks of Microsoft Corporation registered in the U.S. and/or other coun-tries. All other trademarks are the property of their respective owners.
Adobe Systems Incorporated, 345 Park Avenue, San Jose, California 95110-2704, USA
Notice to U.S. Government End Users. The Software and Documentation are “Commercial Items,” as that term is defined at 48 C.F.R. §2.101, consisting of “Commercial Computer Software” and “Commercial Computer Software Documentation,” as such terms are used in 48 C.F.R. §12.212 or 48 C.F.R. §227.7202, as applicable. Consistent with 48 C.F.R. §12.212 or 48 C.F.R. §§227.7202-1 through 227.7202-4, as applicable, the Commercial Computer Software and Commercial Computer Software Documentation are being licensed to U.S. Government end users (a) only as Commercial Items and (b) with only those rights as are granted to all other end users pursu-ant to the terms and conditions herein. Unpublished-rights reserved under the copyright laws of the United States. Adobe Systems Incorporated, 345 Park Avenue, San Jose, CA 95110-2704, USA. For U.S. Government End Users, Adobe agrees to comply with all applicable equal opportunity laws including, if appropriate, the provisions of Executive Order 11246, as amended, Section 402 of the Vietnam Era Veterans Readjustment Assistance Act of 1974 (38 USC 4212), and Section 503 of the Rehabilitation Act of 1973, as amended, and the regulations at 41 CFR Parts 60-1 through 60-60, 60-250, and 60-741. The affirmative action clause and regulations contained in the preceding sentence shall be incorporated by reference.
Adobe Press books are published by Peachpit, a division of Pearson Education located in Berkeley, California. For the latest on Adobe Press books, go to www.adobepress.com. To report errors, please send a note to [email protected]. For information on getting permission for reprints and excerpts, contact [email protected].
Writer: James J. Maivald Project Editor: Nancy Peterson Production Editor: Cory Borman Development Editor: Robyn G. Thomas Technical Editors: Clint Funk, Catherine Palmer Copyeditor: Scout Festa
Compositor: Kim Scott, Bumpy Design Indexer: Joy Dean Lee
Media Producer: Eric Geoffroy Cover Design: Eddie Yuen Interior Design: Mimi Heft
Printed and bound in the United States of America ISBN-13: 978-0-321-82245-1
A bonus 2-hour set of Adobe Dreamweaver CS6: Learn by Video tutorials are included, from video2brain and Adobe Press. Learn by Video is one of the most critically acclaimed training products on Adobe software and is the only Adobe-approved video courseware for the Adobe Certified Associate Level certification.
Learn by Video
bonus tutorials
Lesson files
Links to Adobe Community Help, product Help and Support pages, Adobe Press, Adobe certification programs, Adobe TV, and other useful online resources can be found inside a handy HTML file. Just open it in your Web browser and click on the links, including a special link to this book’s product page where you can access updates and bonus material.
© 2012 Adobe Systems Incorporated All rights reserved. Made in the USA.
ISBN-13: 978-0-321-82245-1 ISBN-10: 0-321-82245-5 06/12
Adobe® Dreamweaver® CS6
CLASSROOM IN A BOOK® WINDOWS®/MAC OS®
Peachpit Universal Mask updated 3/11/2011 116 mm print area, 23 mm center hole; fits these manufacturers’ specs:
• CDI • JVC • and all previous vendors
0321822455_ADreamweaverCS6CIB_Disc.indd 1 3/30/12 10:47 AM
Online resources
Throughout this title you will see references to lesson or resource files on a disc. Please note that these files are available to eBook readers via high-speed download. Please click here to go to the last page in this eBook for the download location and instructions.
Adobe Dreamweaver CS6 Classroom in a Book includes the lesson files that you’ll need to complete the exercises in this book, as well as other content to help you learn more about Adobe Dreamweaver CS6 and use it with greater efficiency and ease. The diagram below represents the contents of the lesson files directory, which should help you locate the files you need.
EBOOK READERS: FIND YOUR LESSON FILES
Each lesson has its own folder inside the Lessons folder. You will need to download these lesson folders to your hard drive before you can begin each lesson.
GettInG starteD ix
About Classroom in a Book . . . ix
TinyURLs . . . ix
Prerequisites . . . x
Installing the program . . . x
Copying the Classroom in a Book files . . . x
Recommended lesson order . . . .xi
Jumpstart . . . .xi
Setting up the workspace . . . .xiii
Windows vs. Macintosh instructions . . . .xiii
Finding Dreamweaver information . . . .xiii
Checking for updates . . . .xiv
Additional resources . . . .xiv
Adobe certification . . . xv
1 CustomIzInG Your WorkspaCe 2 Lesson overview . . . 2
Touring the workspace . . . 4
Switching and splitting views . . . 5
Working with panels . . . 7
Selecting a workspace layout . . . 11
Adjusting toolbars . . . 13
Personalizing preferences . . . 13
Creating custom keyboard shortcuts . . . 14
Using the Property inspector . . . 15
2 htmL BasICs 18 Lesson overview . . . 18
What is HTML? . . . 20
Writing your own HTML code . . . 22
Frequently used HTML 4 codes . . . 30
Introducing HTML5 . . . 32
3 Css BasICs 38 Lesson overview . . . 38
What is CSS? . . . 40
HTML vs. CSS formatting . . . 41
HTML defaults . . . 42
CSS box model . . . 45
Formatting text. . . 46
Formatting objects . . . 55
Multiples, classes, and IDs, oh my! . . . 64
CSS3 overview and support . . . 66
4 CreatInG a paGe LaYout 70 Lesson overview . . . 70
Web design basics . . . 72
Working with thumbnails and wireframes . . . 75
Defining a Dreamweaver site . . . 78
Using the Welcome screen . . . 79
Previewing your completed file . . . 80
Modifying an existing CSS layout . . . 81
Adding a background image to the header . . . 84
Inserting new components . . . 87
Changing element alignment . . . 92
Modifying the page width and background color . . . 93
Modifying existing content and formatting . . . 95
Inserting an image placeholder . . . .100
Inserting placeholder text . . . 101
Modifying the footer . . . 101
Checking browser compatibility . . . 102
5 WorkInG WIth CasCaDInG stYLe sheets 104 Lesson overview . . . .104
Previewing the completed file . . . 106
Working with type . . . .110
Using images for graphical effects . . . 113
Creating new CSS rules . . . 115
Creating an interactive menu . . . 122
Modifying hyperlink behavior . . . 125
Creating faux columns . . . .128
Moving rules to an external style sheet . . . .130
Creating style sheets for other media . . . 132
6 WorkInG WIth tempLates 140 Lesson overview . . . .140
Previewing completed files . . . 142
Creating a template from an existing layout . . . 143
Inserting editable regions . . . .144
Producing child pages . . . 146
Updating a template . . . .149
Using library items . . . 152
Using server-side includes . . . 157
7 WorkInG WIth text, LIsts, anD taBLes 166 Lesson overview . . . 166
Previewing the completed file . . . .168
Creating and styling text . . . .170
Creating and styling tables . . . 182
Spell checking webpages . . . 195
Finding and replacing text . . . 197
8 WorkInG WIth ImaGes 202 Lesson overview . . . 202
Reviewing web image basics . . . .204
Previewing the completed file . . . .209
Inserting an image. . . .210
Adjusting image positions with CSS classes . . . 212
Working with the Insert panel . . . 213
Using Adobe Bridge to insert images . . . 215
Inserting non-web file types . . . .218
Copying and pasting images from Photoshop
and Fireworks . . . 223
Inserting images by drag and drop . . . 227
Optimizing images with the Property inspector . . . 227
9 WorkInG WIth naVIGatIon 232 Lesson overview . . . 232
Hyperlink basics . . . .234
Previewing the completed file . . . 235
Creating internal hyperlinks . . . 237
Creating an image-based link . . . .240
Creating an external link . . . 241
Setting up email links . . . 243
Targeting page elements . . . .244
Inserting Spry menu bars . . . .248
Checking your page . . . 265
10 aDDInG InteraCtIVItY 268 Lesson overview . . . .268
Learning about Dreamweaver behaviors . . . .270
Previewing the completed file . . . 272
Working with Dreamweaver behaviors . . . 273
Working with Spry Accordion widgets . . . .279
11 WorkInG WIth WeB anImatIon anD VIDeo 286 Lesson overview . . . 286
Understanding web animation and video . . . .288
Previewing the completed file . . . .289
Adding web animation to a page . . . .290
Adding web video to a page . . . 293
12 WorkInG WIth Forms 300 Lesson overview . . . .300
Previewing the completed file . . . 302
Learning about forms . . . 303
Adding a form to a page . . . 305
Inserting text form elements . . . 306
Creating radio buttons . . . 317
Incorporating text areas . . . .319
Working with lists. . . .320
Adding a Submit button . . . 322
Specifying a form action . . . .324
Emailing form data . . . 325
Styling forms . . . .329
13 WorkInG WIth onLIne Data 334 Lesson overview . . . .334
Working with dynamic content . . . 336
Previewing the completed file . . . 336
Using HTML and XML data . . . .338
Choosing a server model . . . .348
Configuring a local web server . . . .349
Setting up a testing server . . . .350
Building database applications . . . 352
14 BuILDInG DYnamIC paGes WIth Data 360 Lesson overview . . . .360
Building pages with PHP . . . 362
Creating a master/detail page set . . . 372
Creating a detail page. . . .384
15 puBLIshInG to the WeB 388 Lesson overview . . . .388
Defining a remote site . . . .390
Cloaking folders and files . . . 396
Wrapping things up . . . .398
Putting your site online . . . 402
Synchronizing local and remote sites . . . .404
appenDIx: tinyurLs 408
Adobe® Dreamweaver® CS6 is the industry-leading web authoring program. Whether you create websites for a living or plan to create one for your own business, Dreamweaver offers all the tools you need to get professional-quality results.
about
Classroom in a Book
Adobe Dreamweaver CS6 Classroom in a Book® is part of the official train-ing series for graphics and publishtrain-ing software developed with the support of Adobe product experts.
The lessons are designed so that you can learn at your own pace. If you’re new to Dreamweaver, you’ll learn the fundamentals of putting the program to work. If you are an experienced user, you’ll find that Classroom in a Book teaches many advanced features, including tips and techniques for using the latest ver-sion of Dreamweaver.
Although each lesson includes step-by-step instructions for creating a specific project, you’ll have room for exploration and experimentation. You can follow the book from start to finish, or complete only those lessons that correspond to your interests and needs. Each lesson concludes with a Review section con-taining questions and answers on the subjects you’ve covered.
tinyurLs
In several points in the book, we reference external information available on the Internet. The uniform resource locators (URLs) for this information are often long and unwieldy, so we have provided custom TinyURLs in their place for your convenience. Unfortunately, the TinyURLs sometimes expire over time and no longer function. If you find that a TinyURL doesn’t work, look up the actual URL provided in the Appendix.
prerequisites
Before using Adobe Dreamweaver CS6 Classroom in a Book, you should have a working knowledge of your computer and its operating system. Be sure you know how to use the mouse, standard menus and commands, and also how to open, save, and close files. If you need to review these techniques, see the printed or online documentation that was included with your Microsoft Windows or Apple Macintosh operating system.
Installing the program
Before you perform any exercises in this book, verify that your computer system meets the hardware requirements for Dreamweaver CS6, that it’s correctly config-ured, and that all required software is installed.
Adobe Dreamweaver CS6 software must be purchased separately; it is not included with the lesson files that accompany this book. For system requirements, go to www.adobe.com/products/dreamweaver/tech-specs.html.
Install Dreamweaver CS6 onto your hard drive from the Adobe Dreamweaver CS6 application DVD (you cannot run the program from the disc) or from the installa-tion files you downloaded from Adobe. For complete instrucinstalla-tions on installing the software, see the Adobe Dreamweaver CS6 Read Me file on the application DVD or on the web at www.adobe.com/support.
Make sure your serial number is accessible before installing the application.
Copying the
Classroom in a Book
files
The Adobe Dreamweaver CS6 Classroom in a Book DVD includes folders contain-ing all the electronic files for the lessons in the book. Each lesson has its own folder; you must copy the folders to your hard drive to complete the lessons. It is recom-mended that you copy all lesson folders to your hard drive at once, but to conserve space on your hard disk, you can install individual folders for each lesson as you need them. It is vitally important that you store all lesson folders within a single folder on your hard drive. If you follow the recommended lesson order, this master folder will serve as the local site root folder, as described more fully in Lesson 4, “Creating a Page Layout.”
To install the Classroom in a Book files:
1 Insert the Adobe Dreamweaver CS6 Classroom in a Book DVD into your
2 Navigate to the CD/DVD drive on your computer.
3 If you intend to complete all lessons in the book in order, drag the Lessons
folder to your computer hard drive. Otherwise, skip to step 5.
The Lessons folder contains all the individual lesson folders and other assets needed for the training.
4 Rename the Lessons folder DW-CS6.
This folder will be used as the local site root folder.
5 If you desire to perform one or more lessons individually, copy each lesson
folder to your hard drive separately, as needed. Then, proceed to the
“Jumpstart” section for more instructions. Do not copy one lesson folder into any other lesson folder.
The files and folders for each lesson cannot be used interchangeably. For specific instructions, see the following section.
recommended lesson order
The training herein is designed to take you from A to Z in basic to intermediate website design, development, and production. Each new lesson builds on previous exercises, using the files and assets you create to develop an entire website. It is rec-ommended that you perform each lesson in sequential order to achieve a successful result and the most complete understanding of all aspects of web design.
The ideal training scenario will start in Lesson 1 and proceed through the entire book to Lesson 15. Since each lesson builds essential files and content for the next, once you start this scenario you shouldn’t skip any lessons, or even individual exercises. While ideal, this method may not be a practicable scenario for every user. So, if desired, individual lessons can be accomplished using the jumpstart method described in the next section.
Jumpstart
Each lesson folder includes all the files and assets needed to complete the exercises contained within that lesson. Each folder contains finished files, staged files, and customized Template and Library files, but not always a complete set of files that may have been used or completed in other lessons. You may think these folders contain seemingly duplicative materials. But these duplicate files and assets, in most cases, cannot be used interchangeably in other lessons and exercises. Doing so will probably cause you to fail to achieve the goal of the exercise.
The jumpstart method for completing individual lessons treats each folder as a stand-alone website. To jumpstart a lesson, copy the lesson folder to your hard drive and create a new site for that lesson using the Site Setup dialog box. Do not define sites using subfolders of existing sites. Keep your jumpstart sites and assets in their original folders to avoid conflicts. One suggestion is to organize the lesson folders, as well as your own site folders, in a single web or sites master folder near the root of your hard drive. But avoid using the Dreamweaver application folder or any folders that contain a web server, like Apache, ColdFusion, or Internet Information Services (IIS) (which are described more fully in Lessons 13 and 14).
Feel free to use the jumpstart method for all lessons, if you prefer.
To set up a jumpstart site, do the following:
1 Choose Site > New Site.
The Site Setup dialog box appears.
2 In the Site Name field, enter the name of the lesson, such as lesson06.
3 Click the Browse ( ) icon next to the Local Site Folder field. Navigate to the
desired lesson folder you copied from the Adobe Dreamweaver CS6 Classroom in a Book DVD and click Select/Choose.
4 Click the arrow ( ) next to the Advanced Settings category to reveal the tabs
listed there. Select the Local Info category.
5 Click the Browse icon next to the Default Images Folder field. When the dialog
box opens, navigate to the Images folder contained within the lesson folder and click Select/Choose.
6 In the Site Setup dialog box, click Save.
7 The name of the currently active website will appear in the Files panel’s site
pop-up menu. If necessary, press F8/Cmd-Shift-F to display the Files panel, and select the desired website you wish to work on from the Show menu.
setting up the workspace
Dreamweaver includes a number of workspaces to accommodate various computer configurations and individual workflows. For this book the Designer workspace is recommended.
1 In Dreamweaver CS6, locate the Application bar. If necessary, choose Window >
Application Bar to display it.
2 The default workspace is called Designer. If it is not displayed, use the pop-up
menu in the Application bar to choose it.
3 If the default workspace has been modified and certain toolbars and panels are
not visible (as they appear in the figures in the book), you can select Window > Workspace > Reset Designer to restore the default configuration.
Most of the figures in this book show the Designer workspace. When you finish the lessons in this book, experiment with various workspaces to find the one that you prefer.
For a more complete description of the Dreamweaver workspaces, see Lesson 1, “Customizing Your Workspace.”
Windows vs. macintosh instructions
In most cases, Dreamweaver performs identically in both Windows and Mac OS X. Minor differences exist between the two versions, mostly due to platform-specific issues out of the control of the program. Most of these are simply differences in keyboard shortcuts, how dialog boxes are displayed, and how buttons are named. Screen shots may alternate between platforms throughout the book. Where specific commands differ, they are noted within the text. Windows commands are listed first, followed by the Macintosh equivalent, such as Ctrl-C/Cmd-C. Common abbreviations are used for all commands whenever possible, as follows:
W I n D o W s m a C I n to s h
Control = Ctrl Command = Cmd
Alternate = Alt Option = Opt
Finding Dreamweaver information
Adobe Community Help website. These files are cached locally so you can access them even when you are not connected to the Internet. You can also download a PDF version of the Dreamweaver Help files from the Adobe Help application.
For additional information resources, such as tips, techniques, and the latest prod-uct information, visit www.adobe.com/support/dreamweaver to access the Adobe Community Help page.
Checking for updates
Adobe periodically provides software updates. You can obtain these updates using Adobe Updater if you have an active Internet connection.
1 In Dreamweaver, choose Help > Updates. The Adobe Updater automatically
checks for updates for your Adobe software.
2 In the Adobe Updater dialog box, select the updates you want to install, and
then click Download And Install Updates to install them.
For book updates and bonus material, visit the book’s page on the web at www.peachpit.com/dwcs6cib.
additional resources
Adobe Dreamweaver CS6 Classroom in a Book is not meant to replace documen-tation that comes with the program or to be a comprehensive reference for every feature. Only the commands and options used in the lessons are explained in this book. For comprehensive information about program features and tutorials, please refer to these resources:
Adobe Community Help: Community Help brings together active Adobe product
users, Adobe product team members, authors, and experts to give you the most useful, relevant, and up-to-date information about Adobe products.
To Access Community Help: To invoke Help, press F1 or choose Help >
Dreamweaver Help.
Adobe content is updated based on community feedback and contributions. You can add comments to content and forums (including links to web content), publish your own content using Community Publishing, or contribute Cookbook recipes. Find out how to contribute at www.adobe.com/community/publishing/ download.html.
Adobe Dreamweaver CS6 Help and Support: www.adobe.com/support/ dreamweaver is where you can find and browse Help and Support content on adobe.com.
Adobe Forums: forums.adobe.com lets you tap into peer-to-peer discussions,
questions, and answers on Adobe products.
Adobe TV: tv.adobe.com is an online video resource for expert instruction and
inspiration about Adobe products, including a How To channel to get you started with your product.
Adobe Design Center: www.adobe.com/designcenter offers thoughtful articles
on design and design issues, a gallery showcasing the work of top-notch designers, tutorials, and more.
Adobe Developer Connection: www.adobe.com/devnet is your source for
techni-cal articles, code samples, and how-to videos that cover Adobe developer products and technologies.
Resources for educators: www.adobe.com/education offers a treasure trove of
information for instructors who teach classes on Adobe software. Find solutions for education at all levels, including free curricula that use an integrated approach to teaching Adobe software and can be used to prepare for the Adobe Certified Associate exams.
Also check out these useful links:
Adobe Marketplace & Exchange: www.adobe.com/cfusion/exchange is a central
resource for finding tools, services, extensions, code samples, and more to supple-ment and extend your Adobe products.
Adobe DreamweaverCS6 product home page: www.adobe.com/products/
dreamweaver
Adobe Labs: labs.adobe.com gives you access to early builds of cutting-edge
technology, as well as forums where you can interact both with the Adobe develop-ment teams building that technology and with other like-minded members of the community.
adobe certification
The Adobe training and certification programs are designed to help Adobe custom-ers improve and promote their product-proficiency skills. There are four levels of certification:
•
Adobe Certified Associate (ACA)•
Adobe Certified Instructor (ACI)•
Adobe Authorized Training Center (AATC)The Adobe Certified Associate (ACA) credential certifies that individuals have the entry-level skills to plan, design, build, and maintain effective communications using different forms of digital media.
The Adobe Certified Expert program is a way for expert users to upgrade their credentials. You can use Adobe certification as a catalyst for getting a raise, finding a job, or promoting your expertise.
If you are an ACE-level instructor, the Adobe Certified Instructor program takes your skills to the next level and gives you access to a wide range of Adobe resources.
Adobe Authorized Training Centers offer instructor-led courses and training on Adobe products, employing only Adobe Certified Instructors. A directory of AATCs is available at partners.adobe.com.
CustomIzInG Your
WorkspaCe
Lesson overview
In this lesson, you’ll familiarize yourself with the Dreamweaver CS6 (Creative Suite 6) program interface and learn how to do the following:
•
Switch document views•
Work with panels•
Select a workspace layout•
Adjust toolbars•
Personalize preferences•
Create custom keyboard shortcuts•
Use the Property inspectortouring the workspace
Dreamweaver is the industry-leading Hypertext Markup Language (HTML) editor, with good reasons for its popularity. The program offers an incredible array of design and code-editing tools. Dreamweaver offers something for everyone.
Coders love the variety of enhancements built into the Code view environ-ment, and developers enjoy the program’s support for ASP, PHP, ColdFusion, and JavaScript, among other programming languages. Designers marvel at see-ing their text and graphics appear in an accurate What You See Is What You Get (WYSIWYG) depiction as they work, saving hours of time previewing pages in browsers. Novices certainly appreciate the program’s simple-to-use and power-packed interface. No matter what type of user you are, if you use Dreamweaver you don’t have to compromise.
The Dreamweaver interface features a vast array of user-configurable panels and toolbars. Take a moment to familiarize yourself with the names of these components.
A Menu bar
B Application bar
C Workspace menu
D Document tab
E Document toolbar
F Coding toolbar
L Property inspector
M Files panel
You’d think a program with this much to offer would be dense, slow, and unwieldy, but you’d be wrong. Dreamweaver provides much of its power via dockable panels and toolbars you can display or hide and arrange in innumerable combinations to create your ideal workspace.
This lesson introduces you to the Dreamweaver interface and gets you in touch with some of the power hiding under the hood. If you want to follow along on
the tour, choose File > Open. In the lesson01 folder, choose start-here.html.
switching and splitting views
Dreamweaver offers dedicated environments for coders and designers as well as a composite option that blends both together.
Design view
Design view focuses the Dreamweaver workspace on its WYSIWYG editor, which provides a close, but not perfect, depiction of the webpage as it would appear in a browser. To activate Design view, click the Design view button in the Document toolbar.
Code view
Code view focuses the Dreamweaver workspace exclusively on the HTML code and a variety of code-editing productivity tools. To access Code view, click the Code view button in the Document toolbar.
Design view
split view
Split view provides a composite workspace that gives you access to both the design and the code simultaneously. Changes made in either window update in the other instantly. To access Split view, click the Split view button in the Document toolbar. To take advantage of the expanded width of the new flat-panel displays, Dreamweaver splits the workspace vertically, by default.
You can also split the screen horizontally by disabling the vertical split in the view menu. To disable this feature, choose View > Split Vertically.
Split view
Working with panels
Although you can access most commands from the menus, Dreamweaver scatters much of its power in user-selectable panels and toolbars. You can display, hide, arrange, and dock panels at will around the screen. You can even move them to a second or third video display if you desire.
The Window menu lists all the available panels. If you do not see a specific panel on the screen, choose it from the Window menu. A check mark appears in the menu to indicate that the panel is open. Occasionally, one panel may lie behind another on the screen and be difficult to locate. In such situations, simply choose the desired panel in the Window menu and it will rise to the top of the stack.
minimizing
To create room for other panels or to access obscured areas of the workspace, you can minimize or expand individual panels in place. To minimize a panel, double-click the tab containing the panel name. To expand the panel, double-double-click the tab again.
Standard panel grouping
You can also minimize or expand one panel within a stack of panels individually by double-clicking its tab.
To recover more screen real estate, you can minimize panel groups or stacks down to icons by double-clicking the title bar. You can also minimize the panels to icons
by clicking the double arrow ( ) icon in the panel title bar. When panels are
minimized to icons, you access any of the individual panels by clicking its icon or button. The selected panel will appear on the left or right of your layout wherever room permits.
Floating
A panel grouped with other panels can be floated separately. To float a panel, drag it from the group by its tab.
Minimizing one panel in a stack using its tab
Minimizing sequence to icons
Dragging
You can reorder a panel tab by dragging it to the desired position within the group.
To reposition panels, groups, and stacks in the workspace, simply drag them by the title bar.
Grouping, stacking, and docking
You can create custom groups by dragging one panel into another. When you’ve moved the panel to the correct position, Dreamweaver highlights the area, called the drop zone, in blue (as shown in the following figure). Release the mouse button to create the new group.
Dragging a tab to change its position
Dragging a whole panel group or stack to a new position
In some cases, you may want to keep both panels visible simultaneously. To stack panels, drag the desired tab to the top or bottom of another panel. When you see the blue drop zone appear, release the mouse button.
Floating panels can be docked to the right, left, or bottom of the Dreamweaver workspace. To dock a panel, group, or stack, drag its title bar to the edge on which you wish to dock. When you see the blue drop zone appear, release the mouse button.
Creating panel stacks
selecting a workspace layout
A quick way to customize the program environment is to use one of the prebuilt workspaces in Dreamweaver. These workspaces have been optimized by experts to put the tools you need at your fingertips.
Dreamweaver CS6 includes 11 prebuilt workspaces. To access these workspaces, choose them from the Workspace menu located in the Application bar.
Longtime users of Dreamweaver may choose the Classic workspace, which dis-plays the panels and toolbars they’re accustomed to seeing and using in previous Dreamweaver versions.
Workspace menu
The Coder workspace produces a workspace that focuses Dreamweaver on the HTML code and its code-editing tools.
The Designer workspace provides the optimum environment for visual designers. Coder workspace
adjusting toolbars
Some program features are so handy you may want them available all the time in the form of a toolbar. Three of the toolbars—Style Rendering, Document, and Standard—appear horizontally at the top of the document window. The Coding toolbar, however, appears vertically, but only in the Code view window. You will explore the capabilities of these toolbars in later exercises.
Style Rendering
Document
Document (Live view)
Standard
Coding
Display the desired toolbar by selecting it from the View menu.
personalizing preferences
As you continue to work with Dreamweaver, you will devise your own optimal workspace of panels and toolbars for each activity. You can store these configura-tions in a custom workspace of your own naming.
To save a custom workspace, create your desired configuration, choose New Workspace from the Workspace menu in the Application bar, and then give it a custom name.
Creating custom keyboard shortcuts
Another power feature of Dreamweaver is the capability of creating your own key-board shortcuts as well as editing existing ones. Keykey-board shortcuts are loaded and preserved independent of custom workspaces.
Is there a command you can’t live without that doesn’t have a keyboard shortcut? Create it yourself. Try this:
1 Choose Edit > Keyboard Shortcuts/Dreamweaver > Keyboard Shortcuts.
2 Click the Duplicate Set button to create a new set of shortcuts.
3 Enter a name in the Name Of Duplicate Set field. Click OK.
4 Choose Menu commands from the Commands menu.
5 Select Save All from the File command list.
Note that the Save All command does not have an existing shortcut, although you will use this command frequently in Dreamweaver.
6 Insert the cursor in the Press Key field. Press Ctrl-Alt-S/Cmd-Opt-S.
7 Press Ctrl-Alt-Shift-S/Cmd-Ctrl-S.
This combination is not currently being used, so let’s assign it to the Save All command.
8 Click the Change button.
The new shortcut is now assigned to the Save All command.
9 Click OK to save the change.
You have created your own keyboard shortcut—one you will use in upcoming lessons.
using the property inspector
One tool that is vital to your workflow is the Property inspector. This panel typi-cally appears at the bottom of the workspace. The Property inspector is context driven and adapts to the type of element you select.
using the htmL tab
Insert the cursor into any text content on your page, and the Property inspec-tor provides a means to quickly assign some basic HTML codes and formatting. When the HTML button is selected, you can apply heading or paragraph tags, as well as bold, italics, bullets, numbers, and indenting, among other formatting and attributes.
using the Css tab
Click the CSS (cascading style sheet) button to quickly access commands to assign or edit CSS formatting.
Image properties
Select an image in a webpage to access the image-based attributes and formatting control of the Property inspector.
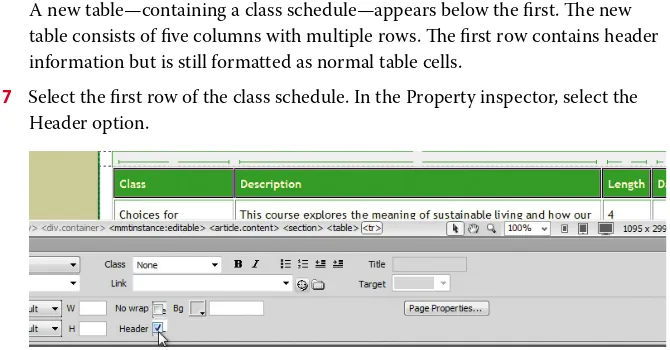
table properties
To access table properties, insert your cursor in a table and then click the table tag selector at the bottom of the document window.
CSS Property inspector
Image Property inspector
review questions
1 Where can you access the command to display or hide any panel?
2 Where can you find the Code, Design, and Split view buttons?
3 What can be saved in a workspace?
4 Do workspaces also load keyboard shortcuts?
5 What happens in the Property inspector when you insert the cursor into various
elements on the webpage?
review answers
1 All panels are listed in the Window menu.
2 These buttons are components of the Document toolbar.
3 Workspaces can save the configuration of the document window, the open panels, and
the panels’ size and position on the screen.
4 No, keyboard shortcuts are loaded and preserved independently of a workspace.
5 The Property inspector adapts to the selected element, displaying pertinent
htmL BasICs
Lesson overview
In this lesson, you’ll familiarize yourself with HTML and learn how to do the following:
•
Write HTML code by hand•
Understand HTML syntax•
Insert code elements•
Format text•
Add HTML structure•
Create HTML with DreamweaverThis lesson will take about 45 minutes to complete. There are no support files for this lesson.
What is htmL?
“What other programs can open a Dreamweaver file?”
This question was asked by a student in a Dreamweaver class; although it might seem obvious to an experienced developer, it illustrates a basic problem in teaching and learning web design. Most people confuse the program with the technology. They assume that the extension .htm or .html belongs to Dreamweaver or Adobe. Print designers are used to working with files ending with .ai, .psd, .indd, and so on. These are proprietary file formats created by programs that have specific capabili-ties and limitations. The goal in most of these cases is to create a final printed piece. The program in which the file was created provides the power to interpret the code that produces the printed page. Designers have learned over time that opening these file formats in a different program may produce unacceptable results or even damage the file.
On the other hand, the goal of the web designer is to create a webpage for display in a browser. The power and functionality of the originating program have little bearing on the resulting browser display, because the display is contingent on the HTML code and how the browser interprets it. Although a program may write good or bad code, it’s the browser that does all the hard work.
The web is based on the HyperText Markup Language (HTML). The language and the file format don’t belong to any individual program or company. In fact, it is a nonproprietary, plain-text language that can be edited in any text editor, in any operating system, and on any computer. Dreamweaver is an HTML editor at its core, although it is much more than this. But to maximize the potential of Dreamweaver, you first need to have a good understanding of what HTML is and what it can and can’t do. This chapter is intended as a concise primer for HTML and its capabilities and as a foundation for understanding Dreamweaver.
Where did htmL begin?
The language that Berners-Lee created over 20 years ago was a much simpler con-struct of what we use now, but HTML is still surprisingly easy to learn and master. At the time of this writing, HTML is at version 4.01, which was officially adopted in
1999. It consists of around 90 tags, such as html, head, body, h1, p, and so on. The
tag is written between angle brackets, as in <p>, <h1>, and <table>. These tags are
used to enclose, or mark up, text and graphics to enable a browser to display them in a particular way. HTML code is considered properly balanced when the markup
contains both an opening tag (<...>) and a closing tag (</...>). When two
matching tags appear this way, they are referred to as an element.
Some elements are used to create page structures, others to format text, and yet others to enable interactivity and programmability. Even though Dreamweaver obviates the need for writing most of the code manually, the ability to read and interpret HTML code is still a recommended skill for any burgeoning web designer. And sometimes, writing the code by hand is the only way to find an error in your webpage.
Here you see the basic structure of a webpage:
<html> <head>
<title>HTML Basics for Fun and Profit</title> </head>
<body>
<h1>Welcome to my first webpage</h1> <hr />
Properly structured, or balanced, HTML markup consists of an opening tag and a closing tag. Tags are enclosed within angle brackets. You create a closing tag by typing a forward slash (/) after the opening bracket and then repeating the original tag. Empty tags, like the horizontal rule, can be written in an abbreviated fashion, as shown above.
Writing your own htmL code
The idea of writing code may sound difficult or at least tedious, but creating a web-page is actually much easier than you think. In the next few exercises, you will learn how HTML works by creating a basic webpage and adding and formatting some simple text content:
1 Launch Notepad (Windows) or TextEdit (Mac).
2 Enter the following code in the empty document window:
<html>
<body>
Welcome to my first webpage
</body>
</html>
3 Save the file to the desktop as firstpage.html.
4 Launch Chrome, Firefox, Internet Explorer, Safari, or another installed web
browser.
5 Choose File > Open. Navigate to the desktop, select firstpage.html, and then
click OK/Open.
Congratulations, you just created your first webpage. As you can see, it doesn’t take much code to create a serviceable webpage.
Text editor Browser
understanding htmL syntax
Next you’ll add content to your new webpage to learn some important aspects of HTML code syntax.
1 Switch back to the text editor, but don’t close the browser.
2 Insert your cursor at the end of the text “Welcome to my first webpage,” and
press Enter/Return to insert a paragraph return.
3 Type Making webpages is fun, then press the spacebar five times to insert five
spaces. Finish by typing and easy! on the same line.
P Note: Feel free to use any text editor for these exercises, but be sure to save your files as plain text.
Tip: In TextEdit, you
may need to choose Format > Format As Plain Text before you can save the file as .html.
4 Save the file.
5 Switch to the browser, and refresh the window to load the updated page.
As you can see, the browser is displaying the new text, but it’s ignoring the para-graph return between the two lines as well as the extra spaces. In fact, you could add hundreds of paragraph returns between the lines and dozens of spaces between each word, and the browser display would be no different. That’s because the browser is programmed to ignore extra white space and honor only HTML code elements. By inserting a tag here and there, you can easily create the desired text display.
Inserting htmL code
In this exercise, you will insert HTML tags to produce the correct text display:
1 Switch back to the text editor.
2 Add the tags to the text as follows:
<p>Making webpages is fun and easy!</p>
To add extra spacing or other special characters within a line of text, HTML provides code elements called entities. Entities are entered into the code differently than tags. For example, the method for inserting a nonbreaking
space is to type the entity.
3 Replace the five spaces in the text with nonbreaking spaces, so that the code
looks like the following sample:
<p>Making webpages is fun and easy!</p>
4 Save the file. Switch to the browser and reload or refresh the page display.
The browser is now showing the paragraph return and desired spacing.
P Note: A good rule of thumb regarding the use of entities is whether you can enter a character using the standard 101-key keyboard. If the character doesn’t appear, you’ll probably have to use an entity.
Formatting text with htmL
Tags often serve multiple purposes. Besides creating paragraph structures and creating white space as demonstrated earlier, they can impart basic text formatting, as well as identify the relative importance of the page content. For example, HTML
provides six heading tags (<h1> to <h6>) you can use to set headings off from
nor-mal paragraphs. The tags not only format the text differently than paragraph text, they also impart additional meaning. Heading tags are automatically formatted in bold and often at a larger relative size. The number of the heading also plays a role:
Using the <h1> tag identifies the heading as being the largest and highest in
impor-tance by default. In this exercise, you will add a heading tag to the first line:
1 Switch back to the text editor.
2 Add the tags to the text as follows:
<h1>Welcome to my first webpage</h1>
3 Save the file. Switch to the browser and reload or refresh the page display.
Note how the text changed. It is now larger and formatted in boldface.
applying inline formatting
So far, all the tags you have used work as paragraph or stand alone elements. These are referred to as block elements. HTML also provides the ability to apply format-ting and structure to content that’s contained within the flow of another tag, or inline. A typical use of inline code would be to apply bold or italic styling to a word or to a portion of a paragraph. In this exercise, you will apply inline formatting:
1 Switch back to the text editor.
2 Add the tags to the text as follows:
<p>Making webpages is fun
<strong><em>and easy!</em></strong></p>
3 Save the file. Switch to the browser and reload or refresh the page display.
Most formatting, both inline and otherwise, is properly applied using cascading
style sheets (CSS). The <strong> and <em> tags are among the few still acceptable
ways to apply inline formatting using strictly HTML code elements. Technically, these elements are more intended to add semantic meaning to text content, but Web designers use
heading tags to identify the importance of specific content and to help improve their site rankings on Google, Yahoo, and other search engines.
P Note: Pay special attention to how the tags are nested so that you close them properly. Notice how
the <em> tag is closed
before the <strong>
the effect is the same: The text still appears by default as bold or italic. There is an industry-supported move to separate the content from its presentation, or format-ting. See Chapter 3, “CSS Basics,” for a full explanation of the strategy and applica-tion of CSS in standards-based web design.
adding structure
Most webpages feature at least three fundamental elements: a root (typically
<html>), <head>, and <body>. These elements create the essential underlying structure of the webpage. The root element contains all the code and content and is used to declare to the browser, and any browser applications, what types of
code elements to expect within the page. The <body> element holds all the visible
content, such as text, tables, images, movies, and so on. The <head> element holds
code that performs vital background tasks, including styling, external links, and other information.
The sample page you created doesn’t have a <head> element. A webpage can exist
without this section, but adding any advanced functionality to this page without
one would be difficult. In this exercise, you will add <head> and <title> elements
to your webpage:
1 Switch back to the text editor.
2 Add the tags and content to the text as follows:
<html>
<head>
<title>HTML Basics for Fun and Profit</title>
</head>
<body>
3 Save the file. Switch to the browser and reload or refresh the page display.
Did you notice what changed? It may not be obvious at first. Look at the title bar of the browser window. The words “HTML Basics for Fun and Profit” now magically
appear above your webpage. By adding the <title> element, you have created this
display. But it’s not just a cool trick; it’s good for your business, too.
The tags <strong> and
<em> are used in place
of the tags <b> (bold)
and <i> (italic) because
Google, Yahoo, and the other search engines catalog the <title> element of each page and use it, among other criteria, to rank webpages. The content of the title is one of the items typically displayed within the results of a search. A well-titled page could be ranked higher than one with a bad title or one with none at all. Keep your titles short but meaningful. For example, the title “ABC Home Page” doesn’t really convey any useful information. A better title might be “Welcome to the Home Page of ABC Corporation.” Check out other websites (especially peers or competitors) to see how they title their own pages.
Writing htmL in Dreamweaver
So the inevitable question is, “If I can write HTML in any text editor, why do I need to use Dreamweaver?” Although a complete answer awaits you in the following 13 chapters, the question begs for a quick demonstration. In this exercise, you will re-create the same webpage using Dreamweaver:
1 Launch Dreamweaver CS6.
2 Choose File > New.
3 In the New Document window, select Blank Page from the first column.
4 Select HTML from the Page Type column and <none> from the Layout column.
Click Create.
A new document window opens in Dreamweaver. The window may default to one of three displays: Code view, Design view, or Split view.
5 If it’s not already selected, click the Code view button in the upper-left corner of
the document window.
The first thing you should notice in the Code view window is that Dreamweaver has provided a huge head start over using the text editor. The basic structure of the page is already in place, including the root, head, body, and title tags, among others. The only thing Dreamweaver makes you do is add the content itself. The content of the
<title> tag will
Code view Split view
Design view
6 Insert the cursor after the opening <body> tag, and type Welcome to my
second page following the tag.
Dreamweaver makes it a simple matter to format the first line as a heading 1.
7 Move the cursor to the beginning of the text “Welcome to my second page,” and
type < to start the <h1> code element.
Note how Dreamweaver automatically opens a drop-down list of compatible code elements. This is Dreamweaver’s code hinting feature. When activated, code hinting provides a drop-down list of applicable HTML, CSS, JavaScript, and other supported coding elements.
8 Type h and observe the Code hint window.
Dreamweaver filters the code hint list to elements that start with “h”.
9 In the code hint list, double-click h1 to insert it in the code. Type > to close the
element.
10 Move the cursor to the end of the text. Type </ at the end of the sentence.
Note how Dreamweaver closes the <h1> element automatically. But most
coders add the tags as they write, in the following way:
11 Press Enter/Return to insert a line break. Type <.
12Type p and press Enter/Return to insert the paragraph element. Type > to close
the tag.
13 Type Making webpages in Dreamweaver is even more fun! Then type </ to
close the <p> element.
Tired of hand-coding yet? Dreamweaver offers multiple ways to format your content.
14 Select the word “more.” In the Property inspector, click the B button, and then
the I button to apply the <strong> and <em> tags to the text.
These tags produce the appearance of bold and italic formatting on the selected text.
something missing?
When you reached for the B and I buttons in step 14, were they missing? When you make changes in Code view, the Property inspector occasionally needs to be refreshed before you can access the formatting commands featured there. Simply click the Refresh button, and the formatting commands will reappear.
Only two more tasks remain before your new page is complete. Note that
Dreamweaver created the <title> element and inserted the text “Untitled
Document” within it. You could select the text within the code window and enter a new title, or you could change it using another built-in feature.
15 Locate the Title field at the top of the document window, and select the
“Untitled Document” text.
17 Press Enter/Return to complete the title.
Note that the new title text appears in the code, replacing the original content. It’s time to save the file and preview it in the browser.
18 Choose File > Save. Navigate to the desktop. Name the file secondpage, and
click Save.
Dreamweaver adds the proper extension (.html) automatically.
19 Choose File > Preview in Browser.
The completed page appears in the browser window.
You have just completed two webpages—one by hand and the other using Dreamweaver. In both cases, you can see how HTML played a central role in the whole process. To learn more about this technology, go to www.w3schools.com or check out any of the books listed in the following sidebar.
recommended books on htmL
HTML, XHTML, and CSS3: Visual QuickStart Guide, Seventh Edition, Elizabeth Castro and Bruce Hyslop (Peachpit Press, 2012) ISBN: 0-321-71961-1
HTML and XHTML Pocket Reference, Jennifer Niederst Robbins (O’Reilly, 2009) ISBN: 978-0-596-80586-9
Frequently used htmL 4 codes
HTML code elements serve specific purposes. Tags can create structures, apply formatting, identify logical content, or generate interactivity. Tags that create stand-alone structures are called block elements; the ones that perform their work within the body of another tag are called inline elements.
htmL tags
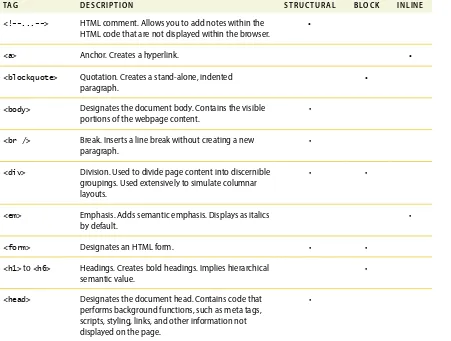
The following table shows some of the most frequently used HTML tags. To get the most out of Dreamweaver and your webpages, it helps to understand the nature of these elements and how they are used. Remember, some tags can serve multiple purposes.
Table 2.1 Frequently used HTML tags
ta G D e s C r I p t I o n s t r u C t u r a L B Lo C k I n L I n e
<!--...--> HTML comment. Allows you to add notes within the
HTML code that are not displayed within the browser.
•
<a> Anchor. Creates a hyperlink. •
<blockquote> Quotation. Creates a stand-alone, indented
paragraph.
•
<body> Designates the document body. Contains the visible
portions of the webpage content.
•
<br /> Break. Inserts a line break without creating a new
paragraph.
•
<div> Division. Used to divide page content into discernible
groupings. Used extensively to simulate columnar layouts.
• •
<em> Emphasis. Adds semantic emphasis. Displays as italics
by default.
•
<form> Designates an HTML form. • •
<h1> to <h6> Headings. Creates bold headings. Implies hierarchical
semantic value.
•
<head> Designates the document head. Contains code that
performs background functions, such as meta tags, scripts, styling, links, and other information not displayed on the page.
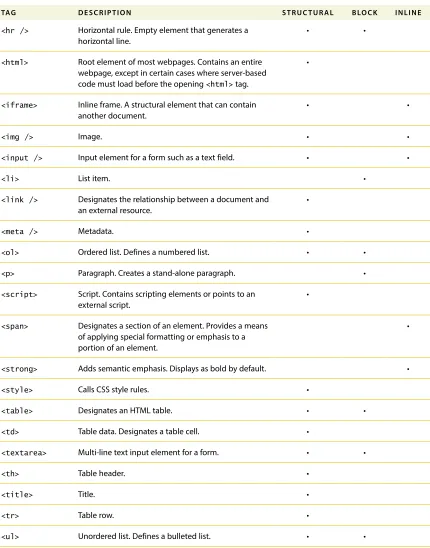
ta G D e s C r I p t I o n s t r u C t u r a L B Lo C k I n L I n e
<hr /> Horizontal rule. Empty element that generates a
horizontal line.
• •
<html> Root element of most webpages. Contains an entire
webpage, except in certain cases where server-based code must load before the opening <html> tag.
•
<iframe> Inline frame. A structural element that can contain
another document.
• •
<img /> Image. • •
<input /> Input element for a form such as a text field. • •
<li> List item. •
<link /> Designates the relationship between a document and
an external resource.
•
<meta /> Metadata. •
<ol> Ordered list. Defines a numbered list. • •
<p> Paragraph. Creates a stand-alone paragraph. •
<script> Script. Contains scripting elements or points to an
external script.
•
<span> Designates a section of an element. Provides a means
of applying special formatting or emphasis to a portion of an element.
•
<strong> Adds semantic emphasis. Displays as bold by default. •
<style> Calls CSS style rules. •
<table> Designates an HTML table. • •
<td> Table data. Designates a table cell. •
<textarea> Multi-line text input element for a form. • •
<th> Table header. •
<title> Title. •
<tr> Table row. •
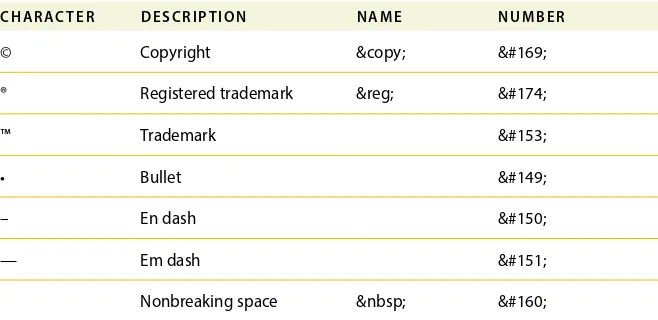
htmL character entities
Entities exist for every letter and character. If a symbol can’t be entered directly from the keyboard, it can be inserted by typing the name or numeric value listed in the following table:
Table 2.2 HTML character entities
C h a r a C t e r D e s C r I p t I o n n a m e n u m B e r
© Copyright © ©
® Registered trademark ® ®
™ Trademark ™
• Bullet •
– En dash –
— Em dash —
Nonbreaking space  
Introducing htmL5
The current version of HTML has been around for over 10 years and has not kept pace with many of the advances in technology, such as cell phones and other mobile devices. The World Wide Web Consortium (W3C), the standards organiza-tion responsible for maintaining and updating HTML and other web standards, has been working diligently on updating the language and released the first working draft of HTML5 in January 2008. The latest update was published in March 2012, but a final version may not be ready for several more years. So, what does that mean for current or up-and-coming web designers? Not much—yet.
What’s new in htmL5
Every new version of HTML has made changes to both the number and the pur-pose of the elements that make up the language. HTML 4.01 consists of approxi-mately 90 elements. Some of these elements have been deprecated or removed altogether, and new ones have been adopted or proposed.
Many of the changes to the list revolve around supporting new technologies or dif-ferent types of content models. Some changes simply reflect customs or techniques that have been popularized within the developer community since the previous version of HTML was adopted. Other changes simplify the way code is created and make it easier to write and faster to disseminate.
htmL5 tags
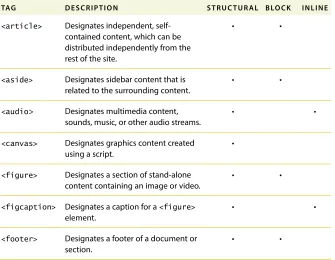
The following table shows some of the important new tags in HTML5, which, at the moment, consists of over 100 tags. Almost 30 old tags have been deprecated, which means HTML5 features nearly 50 new elements in total. The exercises in this book use many of these new HTML5 elements as appropriate and will explain the ele-ments’ intended role on the web. Take a few moments to familiarize yourself with these tags and their descriptions.
Table 2.3 Important new HTML5 tags
ta G D e s C r I p t I o n s t r u C t u r a L B Lo C k I n L I n e
<article> Designates independent,
self-contained content, which can be distributed independently from the rest of the site.
• •
<aside> Designates sidebar content that is
related to the surrounding content.
• •
<audio> Designates multimedia content,
sounds, music, or other audio streams.
• •
<canvas> Designates graphics content created
using a script.
•
<figure> Designates a section of stand-alone
content containing an image or video.
• •
<figcaption> Designates a caption for a <figure>
element.
• •
<footer> Designates a footer of a document or
section.
• •
ta G D e s C r I p t I o n s t r u C t u r a L B Lo C k I n L I n e
<header> Designates the introduction of a
document or section.
• •
<hgroup> Designates a set of <h1> to <h6>
elements when a heading has multiple levels.
•
<nav> Designates a section of navigation. • •
<section> Designates a section in a document,
such as a chapter, a header, a footer, or any other section of the document.
• •
<source> Designates media resources for media
elements. A child element of <video> or <audio> elements. Multiple sources can be defined for browsers that do not support the default resource.
• •
<track> Designates text tracks used in media
players.
•
<video> Designates video content, such as a
movie clip or other video stream.
•
semantic web design
Many of the changes to HTML have been done to support the concept of semantic web design, or designing webpages using elements and structures that provide or possess intrinsic meaning. For example, it has led to the introduction of many new
elements, such as <article>, <section>, <header>, and <footer>. It is a
move-ment that has important ramifications for the future and usability of HTML and for the interoperability of websites on the Internet. At the moment, each webpage stands alone on the web. The content may link to other pages and sites, but there’s really no way to combine or collect the information available on multiple pages or multiple sites in a coherent manner. Search engines do their best to index the content that appears on every site, but much of it is lost because of the nature and structure of old HTML code.
like a list of items you would put in a college research paper: headings, paragraphs, quoted material, tables, numbered and bulleted lists, and so on.
The Internet before HTML looked more like MS DOS or the OS X Terminal appli-cations. There was no formatting, no graphics, and no color. The element list in the first version of HTML basically identified how the content would be displayed. The tags did not convey any intrinsic meaning or significance. For example, using a heading tag displayed a particular line of text in bold, but it didn’t tell you what relationship the heading had to the following text or to the story as a whole. Was it a title or merely a subheading?
HTML5 has added a significant number of new tags to help us add meaning to our
markup. Tags like <header>, <footer>, <article>, and <section> allow you
for the first time to identify specific content without having to resort to additional
attributes, such as <divclass="header">...</div>. The end result is
sim-pler code and less of it. But most of all, the addition of semantic meaning to your code will allow you and other developers to connect the content from one page to another in new and exciting ways—many of which haven’t even been invented yet.
new techniques and technologies
HTML5 has also revisited the basic nature of the language to take back some of the functions that over the years have been increasingly done with third-party plug-ins and external programming. If you are new to web design, this transition will be painless, because you have nothing to relearn and no bad habits to break. If you already have experience building webpages and applications, this book will guide you safely through some of these waters and introduce the new technologies and techniques in a logical and straightforward way. But best of all, semantic web design doesn’t mean you have to trash all of your old sites and rebuild everything from scratch. Valid HTML 4 code will remain valid for the foreseeable future. HTML5 was intended to make your task easier by allowing you to do more, with less work. So let’s get started!
htmL5 references
To learn more about HTML5, check out www.w3.org/TR/2011/WD-html5-20110525/.
To see the complete list of HTML5 elements, check out www.w3schools.com/html5/ html5_reference.asp.
review questions
1 What programs can open HTML files?
2 What does a markup language do?
3 True or false? HTML5 is not very different from HTML 4.
4 What are the three main parts of most webpages?