• No experience? No problem — explore the Word interface, create your first document, and navigate with the mouse and keyboard • Format it — find out how to work with text and paragraph formats
and Microsoft’s preset themes
• Save time — keep formatting consistent with styles and templates, import styles, and automate caption numbering
• Bring it to the table — get the scoop on creating and formatting
tables and inserting and positioning graphics
Includes:
Lois Lowe
e L E A R N I N G
K I T
Word 2013
Microsoft®
•
Full-color book plus online
training course
•
FREE 1-year access to
online self-paced training
via access code
•
11 interactive lessons cover
the essentials of Word 2013
by Lois Lowe
Word
®
2013
Word® 2013 eLearning Kit For Dummies® Published by
John Wiley & Sons, Inc., 111 River Street,
Hoboken, NJ 07030-5774,
www.wiley.com
Copyright © 2014 by John Wiley & Sons, Inc., Hoboken, New Jersey Published simultaneously in Canada
No part of this publication may be reproduced, stored in a retrieval system or transmitted in any form or by any means, electronic, mechanical, photocopying, recording, scanning or otherwise, except as permitted under Sections 107 or 108 of the 1976 United States Copyright Act, without the prior written permission of the Publisher. Requests to the Publisher for permission should be addressed to the Permissions Department, John Wiley & Sons, Inc., 111 River Street, Hoboken, NJ 07030, (201) 748-6011, fax (201) 748-6008, or online at
http://www.wiley.com/go/permissions.
Trademarks: Wiley, For Dummies, the Dummies Man logo, Dummies.com, Making Everything Easier, and related trade dress are trademarks or registered trademarks of John Wiley & Sons, Inc. and may not be used without written permission. Microsoft is a registered trademark of Microsoft Corporation. All other trademarks are the property of their respective owners. John Wiley & Sons, Inc. is not associated with any product or vendor mentioned in this book.
LIMIT OF LIABILITY/DISCLAIMER OF WARRANTY: THE PUBLISHER AND THE AUTHOR MAKE NO REPRESENTATIONS OR WARRANTIES WITH RESPECT TO THE ACCURACY OR COMPLETENESS OF THE CONTENTS OF THIS WORK AND SPECIFICALLY DISCLAIM ALL WARRANTIES, INCLUDING WITHOUT LIMITATION WARRANTIES OF FITNESS FOR A PARTICULAR PURPOSE. NO WARRANTY MAY BE CREATED OR EXTENDED BY SALES OR PROMOTIONAL MATERIALS. THE ADVICE AND STRATEGIES CONTAINED HEREIN MAY NOT BE SUITABLE FOR EVERY SITUATION. THIS WORK IS SOLD WITH THE UNDERSTANDING THAT THE PUBLISHER IS NOT ENGAGED IN RENDERING LEGAL, ACCOUNTING, OR OTHER PROFESSIONAL SERVICES. IF PROFESSIONAL ASSISTANCE IS REQUIRED, THE SERVICES OF A COMPETENT PROFESSIONAL PERSON SHOULD BE SOUGHT. NEITHER THE PUBLISHER NOR THE AUTHOR SHALL BE LIABLE FOR DAMAGES ARISING HEREFROM. THE FACT THAT AN ORGANIZATION OR WEBSITE IS REFERRED TO IN THIS WORK AS A CITATION AND/OR A POTENTIAL SOURCE OF FURTHER INFORMATION DOES NOT MEAN THAT THE AUTHOR OR THE PUBLISHER ENDORSES THE INFORMATION THE ORGANIZATION OR WEBSITE MAY PROVIDE OR RECOMMENDATIONS IT MAY MAKE. FURTHER, READERS SHOULD BE AWARE THAT INTERNET WEBSITES LISTED IN THIS WORK MAY HAVE CHANGED OR DISAPPEARED BETWEEN WHEN THIS WORK WAS WRITTEN AND WHEN IT IS READ.
For general information on our other products and services, please contact our Customer Care Department within the U.S. at 877-762-2974, outside the U.S. at 317-572-3993, or fax 317-572-4002. For technical support, please visit www.wiley.com/techsupport.
Contents at a Glance
Introduction ...1
Chapter 1: Getting to Know Word 2013 ... 7
Chapter 2: Creating a Word Document ... 47
Chapter 3: Formatting Text ... 77
Chapter 4: Formatting Paragraphs ... 103
Chapter 5: Standardizing Formatting with Styles and Templates ... 133
Chapter 6: Shaping Pages and Sections ... 157
Chapter 7: Creating Tables ... 183
Chapter 8: Pepping Up the Page with Graphics ... 197
Chapter 9: Managing Correspondence ... 229
Chapter 10: Preparing Professional Reports ... 251
Chapter 11: Protecting and Sharing a Document... 283
Appendix: Essential SkyDrive Skills ... 305
Table of Contents
Introduction ...1
About This Kit ... 1
Foolish Assumptions ... 3
Icons Used in This Kit ... 3
Accessing the Word 2013 eCourse ... 4
Beyond the Book ... 4
Where to Go from Here ... 5
Chapter 1: Getting to Know Word 2013 . . . .7
Starting Word ... 9
Starting Word in Windows 8 ... 10
Starting Word in Windows 7 ... 12
Exploring the Word Interface ... 12
Exploring the Ribbon and tabs... 13
Understanding the File menu ... 18
Creating Your First Document ... 20
Starting a new blank document... 20
Typing text ... 21
Inserting a picture ... 23
Saving and Opening Documents ... 24
Saving a document for the first time ... 25
Navigating in the Save and Open dialog boxes ... 29
Opening a document ... 34
Recovering lost work ... 36
Moving Around ... 37
Moving with the mouse ... 38
Moving with the keyboard ... 38
Changing the Onscreen View ... 40
Changing views ... 40
Zooming in and out ... 43
Summing Up ... 44
Try-it-yourself lab ... 45
Know this tech talk ... 45
Chapter 2: Creating a Word Document . . . .47
Starting a New Word Document ... 49
Creating a new document using a template ... 50
Setting page margins ... 54
vi
Word 2013 eLearning Kit For Dummies
Editing Text ... 57
Filling text placeholders ... 57
Typing and editing text ... 59
Adding symbols and special characters ... 60
Selecting Text ... 61
Manipulating Text ... 63
Finding text ... 63
Replacing text ... 65
Sorting a list ... 66
Checking Spelling and Grammar ... 67
Sharing Your Document with Others ... 69
E-mailing your document to others ... 69
Sharing your document in other formats ... 71
Printing Your Work ... 72
Summing Up ... 74
Try-it-yourself lab ... 75
Know this tech talk ... 75
Chapter 3: Formatting Text . . . .77
Formatting Text ... 79
Choosing text font, size, and color ... 79
Applying text attributes and WordArt effects ... 82
Working with Themes ... 85
Applying Style Sets ... 88
Copying Formats with Format Painter ... 91
Customizing Characters and Their Spacing ... 92
Adjusting character spacing ... 92
Enabling kerning ... 95
Creating custom superscript and subscript... 97
Controlling OpenType font options... 98
Summing Up ... 100
Try-it-yourself lab ... 101
Know this tech talk ... 101
Chapter 4: Formatting Paragraphs . . . .103
Aligning Paragraphs ... 106
Spacing Lines and Paragraphs ... 108
Indenting a Paragraph ... 112
Applying indents ... 113
vii
Table of Contents
Adding Borders and Shading ... 127
Placing a border around a paragraph ... 128
Shading a paragraph’s background ... 130
Summing Up ... 131
Try-it-yourself lab ... 132
Know this tech talk ... 132
Chapter 5: Standardizing Formatting with Styles and Templates . . .133
Simplifying Formatting with Preset Styles ... 135
Applying a style ... 136
Modifying a style ... 138
Creating a new style ... 140
Importing styles from other documents ... 143
Seeing what styles are applied ... 146
Changing and Creating Templates ... 150
Modifying an existing template ... 150
Creating a new template ... 153
Summing Up ... 155
Try-it-yourself lab ... 155
Know this tech talk ... 156
Chapter 6: Shaping Pages and Sections . . . .157
Formatting Pages ... 159
Adding a page border ... 159
Applying a page background ... 162
Setting a page’s vertical alignment ... 165
Designing Headers and Footers ... 166
Numbering the pages ... 167
Selecting a header or footer preset ... 169
Creating a custom header or footer ... 171
Inserting a watermark ... 173
Working with Multisection Documents ... 176
Viewing section breaks and other hidden characters ... 176
Inserting a section break... 177
Formatting Text in Multiple Columns ... 179
Summing Up ... 181
Try-it-yourself lab ... 182
Know this tech talk ... 182
Chapter 7: Creating Tables . . . .183
Inserting or Drawing a Table ... 185
Converting Text to a Table ... 187
Selecting Rows and Columns ... 188
Resizing Rows and Columns ... 190
viii
Word 2013 eLearning Kit For Dummies
Summing Up ... 196
Try-it-yourself lab ... 196
Know this tech talk ... 196
Chapter 8: Pepping Up the Page with Graphics . . . .197
Inserting Pictures from the Web ... 199
Understanding vector and raster graphics ... 200
Finding and inserting pictures from the web ... 200
Inserting Photos from Files ... 203
Managing Picture Size and Placement ... 204
Changing the text wrap setting for a picture... 205
Moving a picture ... 208
Resizing a picture... 210
Making Basic Edits to a Picture ... 212
Adjusting brightness and contrast ... 212
Adjusting colors ... 214
Applying artistic effects ... 215
Drawing Lines and Shapes ... 217
Drawing shapes ... 217
Choosing a shape outline and shape fill ... 219
Rotating and modifying a shape, and adding text ... 221
Stacking and grouping shapes ... 224
Summing Up ... 225
Try-it-yourself lab ... 226
Know this tech talk ... 226
Chapter 9: Managing Correspondence . . . .229
Creating Envelopes ... 231
Adding an envelope to a document ... 231
Changing the envelope size ... 233
Printing an envelope ... 234
Performing a Mail Merge ... 236
Creating mail-merged letters ... 237
Creating mail-merged labels ... 242
Sorting and Filtering Mail Merge Records ... 245
Sorting a merge data source ... 245
Filtering a merge data source ... 246
Summing Up ... 249
Try-it-yourself lab ... 250
ix
Table of Contents
Updating a TOC ... 257
Working with TOC styles ... 258
Creating an Index ... 260
Marking index entries ... 260
Generating an index ... 262
Captioning and Organizing Figures ... 264
Attaching a caption to a figure ... 265
Connecting text references to figure captions ... 267
Creating a Table of Figures ... 268
Organizing Legal Documents ... 270
Turning on line numbering ... 270
Creating a Table of Authorities ... 272
Creating Footnotes and Endnotes ... 275
Inserting a footnote ... 275
Inserting an endnote ... 276
Converting between footnotes and endnotes ... 279
Formatting footnotes and endnotes ... 280
Summing Up ... 281
Try-it-yourself lab ... 281
Know this tech talk ... 282
Chapter 11: Protecting and Sharing a Document . . . .283
Tracking Document Changes ... 285
Turning on change tracking... 285
Customizing the display of markup ... 287
Accepting or rejecting a revision ... 291
Accepting or rejecting all revisions ... 293
Preventing untracked changes ... 294
Working with Document Comments ... 295
Inserting a comment ... 296
Reviewing comments... 298
Deleting a comment ... 299
Marking a Document as Final ... 300
Using the Compatibility Checker ... 301
Summing Up ... 303
Try-it-yourself lab ... 304
Know this tech talk ... 304
Appendix: Essential SkyDrive Skills . . . .305
Understanding Your SkyDrive Interface Options ... 306
Signing into the SkyDrive web interface ... 306
Installing and using SkyDrive for Windows desktop ... 306
Managing SkyDrive files within Word ... 307
x
Word 2013 eLearning Kit For Dummies
Managing Files on Your SkyDrive ... 308
Uploading a file ... 308
Downloading a file from your SkyDrive ... 309
Renaming a file or folder ... 310
Moving or copying a file or folder... 311
Deleting a file or folder ... 313
Sharing SkyDrive files with others ... 314
I
f you’ve been thinking about taking a class on the Internet (it is all
the rage these days), but you’re concerned about getting lost in the
electronic fray, worry no longer. Word 2013 eLearning Kit For Dummies
is here to help you, providing you with a hands-on learning experience that
includes not only the book you hold in your hands, but also an online course
at
http://learn.dummies.com
. Consider this introduction your
primer.
About This Kit
Whether you follow along with the book, go online for the courses, or some combination of the two, the 11 chapters in Word 2013 eLearning Kit For Dummies walk you through examples and exercises so that you learn how to do the following:
✓ Master the basic features that all Office products have in common, like ribbons, scroll bars, and keyboard shortcuts.
✓ Create and format a basic Word document, whether you start from a blank document or one of the many templates.
✓ Save time and ensure document elements are formatted consistently by creating and customizing styles and templates.
✓ Apply different page-level settings in the same document by creating differ-ent sections within your documdiffer-ent.
✓ Organize information into tables, and illustrate your content or simply decorate the page with graphics.
✓ Automate much of the work involved in handling correspondence and preparing long reports using Word’s advanced document-preparation features.
✓ Protect and share documents using Word’s security and sharing features.
2
Introduction
Each piece of this kit works in conjunction with the others, although you don’t need them all to gain valuable understanding of the key concepts.
This book uses a tutorial approach to explain how to use Word’s features. In each chapter, you’ll find the following elements:
✓ Chapter opener questions: To get you warmed up and ready for the chapter material, the questions quiz you on particular points of interest. If you don’t know the answer, a page number heads you in the right direc-tion to find it.
✓ Tutorial step-by-step instruction with sample data files: Each chapter introduces an important task you can do in Word. You then find step-by- step tutorials that walk you through using the feature or combining skills you’ve learned so far to accomplish a specific goal. Often, you need to download a sample file that goes with the steps. See the “Beyond the Book” section later in this introduction for details on downloading the sample files.
✓ Summing Up: This section appears at the end of each chapter; it briefly reiterates the content you just learned.
✓ Try-it-yourself lab: Test your knowledge of the content just covered by performing an activity from scratch — that is, using general steps only and no sample files.
✓ Know this tech talk: Each chapter contains a brief glossary of related terms.
A few style conventions help you navigate the book piece of this kit efficiently:
✓ Instructions and names of the files needed to follow along with the step lists are italicized.
✓ Website addresses, or URLs, are shown in a special typeface like this.
✓ Numbered steps that you need to follow and characters you need to type are set in bold.
3
Foolish Assumptions
✓ Interactive quizzes and activities: Ample interactive elements enable you to understand how Microsoft Word works and check what you’ve learned. Hands-on activities enable you to try working in Word yourself and receive feedback on what skills you still need to practice.
✓ Resources: Throughout the online course, you’ll find extra resources relevant to what you’re learning.
Foolish Assumptions
For starters, I assume you need to find out how to use Word (and fast!) and want to get a piece of this academic action the fun and easy way with Word 2013 eLearning Kit For Dummies.
I assume you have basic Windows and computer skills, such as starting the computer and using the mouse.
To get the most out of this kit, you need a Windows computer running Word 2013. That way, you can experience the benefit of the tutorial steps in the book and the hands-on instruction in the online course.
Icons Used in This Kit
The familiar and helpful For Dummies icons point you in the direction of really great information that’s sure to help you as you work your way through this kit. Look for these icons throughout the book and online course:
The Tip icon points out helpful information that’s likely to make your job easier.
This icon marks an interesting and useful fact — something that you might want to remember for later.
4
Introduction
Sometimes I might change things up by directing you to repeat a set of steps but with different parameters. If you’re up for the challenge, look for the Practice icon.
Serving as your call to action, this icon sends you online to view web resources, to complete activities, or to find examples.
In addition to the icons, you also find two friendly study aids that bring your attention to certain pieces of information:
✓ Lingo: When you see the Lingo box, look for a definition of a key term or concept.
✓ Extra Info: This box highlights something to pay close attention to in a figure or points out other useful information that’s related to the discussion.
Accessing the Word 2013 eCourse
Your purchase of this eLearning Kit includes access to the online eCourse. If you have purchased an electronic version of this book, please visit www. dummies.com/go/getelearningcode to gain your access code to the online course. If you purchased the paperback book, you find your access code inside the front cover this book.
Dummies eCourses require an HTML5-capable browser. If you use the Firefox or Chrome browser, make sure you have the latest version. Internet Explorer 11 is also HTML5-capable.
After you have your access code, go to http://learn.dummies.com to access the online course.
5
Where to Go from Here
✓ Online articles and extras: If you have questions about Word that you don’t find answered in this kit, check out the free online articles at
Dummies.com. You can also find help with evolving features that are related to Word, but that Microsoft is likely to change independently of Word, such as Microsoft’s cloud storage space (that is, a free service for storing your files online so you can access them from anywhere).
Where to Go from Here
6
Chapter 1
Getting to Know
Word 2013
✓ Moving around in a document enables you to view different parts of the document that may not be onscreen at the moment. You can use scroll bars, arrow keys, and keyboard shortcuts in any combination.
✓ Changing the onscreen view helps you focus on the important parts of the document for the task you want to perform. Each application has its own unique set of views, as well as a Zoom control.
1 .
How do you start Word?Open to page ... 9
2 .
How can you find out what a certain button on the Ribbon is for?Buttons take a bow on page ... 12
3 .
What is Backstage view?Peek through the curtain to page ... 18
4 .
After you save a file, how can you reopen the Save As dialog box so you can save it with a different name?Boxes bounce back on page ... 25
5 .
How can you quickly reopen a recently opened document?Race over to page ... 34
6 .
Is the document area that’s visible onscreen where your typing appears?Make an appearance on page ... 37
7 .
How do you change the magnification of text onscreen?M
icrosoft Word is a word-processing application that can help
you create many kinds of written documents, including reports,
letters, newsletters, and labels. Word excels at any kind of
text-based task.
Word is part of the Microsoft Office suite. A suite is a group of applications that are designed to work together and to have similar user interfaces that cut down on the learning curve for each one.
The time you spend now learning the Word interface will benefit you later if you decide to tackle any of the other Office applications.
Starting Word
The most straightforward way to start Word is to select it from the Windows 8 Start screen (or Windows 7 Start menu). You can browse through the list of programs, or you can start typing the application’s name and then click its name when it appears.
Depending on how your PC is set up, you may also have a shortcut to Word on your desktop and/or on the taskbar.
You can double-click a data file that’s associated with Word, but this method works only after you’ve created or saved a Word document on your computer.
When you’re finished with Word, you can click its Close (X) button in its upper-right corner to exit. If you have any unsaved work, you’re prompted to save it.
LINGO
Technically, a program can be any type of software, including Windows itself, whereas an appli-cation is a specific type of pro-gram that performs a useful user task, such as word processing.
10
Chapter 1
Starting Word in Windows 8
In the following exercise, you practice opening and closing Word. This exercise is for Windows 8 users; if you have Windows 7, use the next exercise instead.
Files needed: None
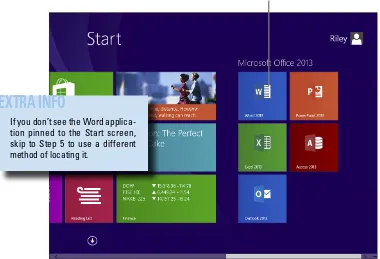
1. In Windows 8, press the Windows key to display the Start screen. 2. Click Word 2013. (Scroll to the right to locate that tile if needed, as in
Figure 1-1.)
The Word application opens.
3. Click the Close (X) button in the upper-right corner of the Word window.
The Word application window closes.
4. Press the Windows key to reopen the Start screen. 5. Type Word.
The Search panel appears, and the Apps list is filtered to show only applications with “Word” in their names. See Figure 1-2.
EXTRA INFO
11
Starting Word
Figure 1-2
6. From the list of applications that appears, click Word 2013.
The Word application opens.
Leave Word open for the next exercise.
Figure 1-1 shows the Start screen for Windows 8.1, which allows you to create named groups for the tiles on the Start screen. In Figure 1-1, a group called Microsoft Office 2013 has been created, and shortcuts to each of the Office applications have been placed in that group. Your screen may look somewhat different depending on whether you have Windows 8.0 or
EXTRA INFO
12
Chapter 1
Starting Word in Windows 7
In the following exercise, you practice opening and closing Word. This exercise is for Windows 7 users; if you have Windows 8, use the preceding exercise instead.
Files needed: None
1. Click the Start button.
The Start menu opens.
2. Click All Programs.
A list of all installed applications appears. Some of the applications are organized into folders.
3. Click the Microsoft Office 2013 folder.
A list of the Microsoft Office 2013 applications appears.
4. Click Word 2013.
The Word application opens.
5. Click the Close (X) button in the upper-right corner of the Word window.
The Word application window closes.
6. Click the Start button. 7. Type Word.
The Start menu is filtered to show applications that contain those letters in their names.
8. From the list of applications that appears, click Word 2013.
The Word application opens.
Leave Word open for the next exercise.
Exploring the Word Interface
EXTRA INFO
13
Exploring the Word Interface
Exploring the Ribbon and tabs
All Office 2013 applications have a common system of navigation called the Ribbon, which is a tabbed bar across the top of the application window. Each tab is like a page of buttons. You click different tabs to access different sets of but-tons and features.
In the following exercise, you practice using the commands on the Ribbon in Microsoft Word.
Files needed: None
1. If Word isn’t already open from the preceding exercise, open it.
2. Press Esc or click Blank docu-ment to start a new docudocu-ment. 3. On the Ribbon, click the Insert
tab.
Buttons for inserting various types of content appear.
The buttons are organized into
groups; the group names appear at the bottom. For example, the Pages group is the leftmost group.
4. In the Symbols group, hover the mouse pointer over the Equation button.
A ScreenTip appears, telling you the but-ton’s name and purpose and showing a keyboard shortcut (Alt+=) that you can optionally use to select that command. See Figure 1-3.
5. Click the Equation button.
A new equation box appears in the docu-ment, and the Equation Tools Design tab appears on the Ribbon. See Figure 1-4.
Figure 1-3
LINGO
The Equation Tools Design tab shown in Figure 1-4 is an example of a contextual tab. Contextual tabs appear only in certain contexts, such as when a particular type of object is active — in this case, an equation box.
EXTRA INFO
14
Chapter 1
Figure 1-4
6. Press Delete to remove the equation box.
The Home tab reappears.
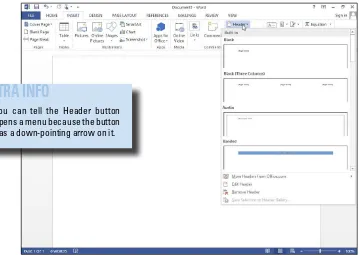
7. Click the Insert tab again, and in the Header & Footer group, click the Header button.
A menu opens. See Figure 1-5.
EXTRA INFO
15
8. Click away from the menu to close it without making a selection. 9. In the Illustrations group, click SmartArt.
The Choose a SmartArt Graphic dialog box opens. See Figure 1-6.
Figure 1-6
10. Click Cancel to close the dialog box without creating a graphic. 11. Click the Home tab, and in the Font group, click the Bold button.
The Bold attribute is toggled on. See Figure 1-7.
Figure 1-7
12. Type your first name.
Your first name appears in bold.
13. Click the Bold button again.
The Bold attribute is toggled off.
14. Press the space bar, and then type your last name.
Your last name does not appear in bold.
In the Paragraph group, notice that the Align Left button is selected.
16
Chapter 1
15. Click the Center button in the Paragraph group.
Your name is centered horizontally on the page. See Figure 1-8.
The paragraph alignment buttons are a
set; when you select one, the previously selected button is deselected.
Figure 1-8
16. Click the Undo button on the Quick Access Toolbar.
See Figure 1-9. The last action is undone, and the paragraph alignment goes back to left alignment.
EXTRA INFO
17
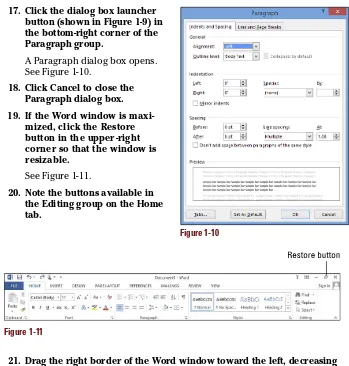
17. Click the dialog box launcher button (shown in Figure 1-9) in the bottom-right corner of the Paragraph group.
A Paragraph dialog box opens. See Figure 1-10.
18. Click Cancel to close the Paragraph dialog box. 19. If the Word window is
maxi-mized, click the Restore button in the upper-right corner so that the window is resizable.
See Figure 1-11.
20. Note the buttons available in the Editing group on the Home tab.
Figure 1-11
21. Drag the right border of the Word window toward the left, decreasing the size of the Word window until the Editing group collapses into a single large button.
See Figure 1-12.
Figure 1-12
Exploring the Word Interface
18
Chapter 1
22. Click the Editing button.
The menu that opens contains the buttons that were previously available from the Editing group. See Figure 1-13.
23. Drag the right border of the Word window toward the right until the Editing group is expanded again. Click the Maximize button (second of the three buttons in the win-dow’s upper-right corner) if you want to maximize the window.
Leave Word open for the next exercise.
Understanding the File menu
Clicking the File tab opens the File menu, also known as Backstage view.
Backstage view provides access to commands that have to do with the data file you’re working with — things like saving, opening, printing, mailing, and checking its properties. To leave Backstage view, click some other tab or press the Esc key.
In the following exercise, you practice using the File menu.
Files needed: None
1. If Word isn’t already open from the preceding exercise, open it, and then press Esc to display a new blank document.
2. Click the File tab on the Ribbon.
The File menu opens. Categories of commands are listed at the left.
The category that appears by default depends on whether any changes have been made to the blank document that opens by default when the application starts.
19
Figure 1-14
4. Click the Info category and examine the commands available.
This category provides commands for permissions, sharing, and ver-sions, as well as basic information about the file itself.
5. Click the Manage Versions button.
This button opens a menu of additional commands. See Figure 1-15.
6. Click away from the menu without choosing a command from it.
The menu closes.
7. Click the New category.
Buttons appear for creating a new document based on a variety of templates.
8. Click the Print category.
Buttons appear for printing the active document.
Figure 1-15
20
Chapter 1
9. Click the Share category.
Buttons appear for saving and distributing the active document in differ-ent formats.
10. Click the Export category.
Options appear for getting help with the application.
11. Click Close.
The active document and Backstage view close. If prompted to save your changes, click Don’t Save. Word remains open.
12. Close the Word Application by clicking the Close (X) button in the upper-right corner of the window.
Creating Your First Document
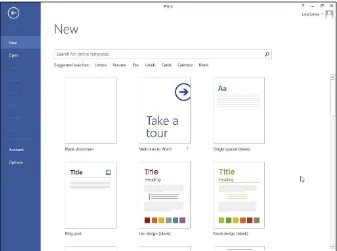
When you start Word, a new blank document appears automatically, as you saw in the section “Starting Word.” Just press Esc at Word’s Start screen to access the new blank document. You can begin creating new content in this document and then save your work when you’re finished. Alternatively, you can open an existing document or start a different type of document using one of Word’s templates.
After starting a new document, you type or insert content into it. Documents can contain text, graphic objects, or a combination of the two. You can use many types of graphic objects, such as photos, clip art, drawings, diagrams, and charts. You learn about these object types in Chapter 8.
Starting a new blank document
In the following exercise, you start two new Word documents using different methods.
Files needed: None
21
Creating Your First Document
Figure 1-16
2. Click Blank document.
A blank document appears.
3. Press Ctrl+N to start another new blank document.
You can tell it is a different blank document because the name in the title bar changes.
4. Choose File➪Close to close one of the blank documents. Leave the other one open.
Leave Word and the blank document open for the next exercise.
Typing text
22
Chapter 1
In the following exercise, you place text into a Word document.
Files needed: None
1. If Word is not already open from the previous exercise, start Word and press Esc to access the new blank document.
2. Type ACME Engineering, press Enter to start a new paragraph, and then type
Making smart engineering decisions since 1962 (see Figure 1-17).
Figure 1-17
3. Press Enter to move the insertion point to the next line, and then press the up-arrow key once to move the insertion point back into the text you typed.
The insertion point appears at the beginning of the word
Making.
4. Press the right-arrow key until the insertion point appears between 6 and 2 (see
Figure 1-18), and then press the Figure 1-18
LINGO
Text that you type appears at the
23
5. Type 7 and then press the left-arrow key once.
The insertion point moves to the left of the 7.
6. Press the Delete key to delete the 7.
If no text is selected, pressing Delete removes the character to the right
of the insertion point.
7. Type 6.
The date once again appears as 1962.
Leave the document open for the next exercise.
The preceding steps walk you through the basics of typing text. In Chapter 2, you explore typing and editing text in more detail.
Inserting a picture
One of the most common graphic types is a
picture from file (a picture that’s saved as a sepa-rate file outside of Word). You can get pictures from the Internet, from friends, or from your own scanner or digital camera.
In the following exercise, you place a graphic into a Word document.
Files needed:01Graphic01.jpg
1. Start with the Word document open from the preceding exercise.
If you didn’t do the preceding exercise, go back and complete it now.
2. Click below the second paragraph to move the insertion point there. 3. Click the Insert tab on the Ribbon and click the Pictures button.
The Insert Picture dialog box opens.
4. Navigate to the folder containing the data files for this chapter and select01Graphic01.jpg.
LINGO
Word supports a wide variety of picture formats. Some of the most common formats include JPEG, TIF, GIF, BMP, and PNG. Those are
file extensions . Most filenames include a period (.) followed by an extension, a code that indicates the file’s type. Extensions are cus-tomarily three characters long, but do not have to be.
24
Chapter 1
Figure 1-19
5. Click the Insert button.
The picture is inserted in the document at the insertion point position.
The picture appears very large — larger than you might want it to be. Chapter 8 covers resizing a picture. In the meantime, you can drag a corner of the picture to resize it.
Leave the document open for the next exercise.
Saving and Opening Documents
25
Saving and Opening Documents
Saving a document for the first time
As you work in Word, the content you create is stored in the computer’s memory. This memory is only temporary storage. When you exit the application or shut down the computer, whatever is stored in memory is flushed away forever — unless you save it.
The first time you save a file, Word prompts you to enter a name for it in the Save As dialog box. You can also choose a different save location and/or file type.
When you resave an already saved file, the Save As dialog box doesn’t reap-pear; the file saves with the most recent settings.
If you want to change the settings (such as the location or file type) or save under a different name, choose File➪Save As to make the Save As dialog box appear.
Word saves its documents in a Word Document (.docx) format, by default, but it can also save in other formats for compatibility with other applications or for special uses. Two of the most common alternative file formats are
✓ Macro-enabled files: If you need to store macros in a Word document, you can save it in Word Macro-Enabled Document (.docm) format.
✓ Word 97–2003: Word includes a file format for backward compatibility with earlier versions of the application (versions 97 through 2003; the file format for Word 2007 and 2010 is identical to that of Word 2013, so you don’t need a special format for back-ward compatibility with those versions). Some minor functionality may be lost when saving in the 97–2003 format. The file exten-sion for it is .doc, and it does not have macro-enabled and non-macro-enabled variants; all are macro-enabled.
LINGO
26
Chapter 1
In this exercise, you save a document in Word several times with different names and file types.
Files needed: None
1. Start in the document you created in the previous exercise, but have not saved yet.
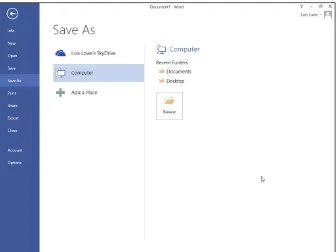
2. Choose File➪Save.
The Save As screen of Backstage view appears. Note that your SkyDrive is the default location selected under the Save As heading. In this exer-cise, however, you will save to your local computer.
3. Click Computer.
A list of recently used folders on your local computer appears. See Figure 1-20.
4. Click Browse.
The Save As dialog box opens, showing the default local location (prob-ably your Documents library).
5. In the File Name box, type 01ACME.
27
Figure 1-21
6. Click Save.
The file is saved. The file’s name appears in Word’s title bar.
Note: If you do not see the .docx extension, Windows may be set up to
hide file extensions. That’s okay; you don’t need to see the file extensions here. If you want to see them anyway, in Windows 8 open a File Explorer window, and on the View tab, mark the File Name Extensions check box. Or, if you have Windows 7, from Windows Explorer open the Tools menu and choose Folder Options. In the dialog box that appears, click the View tab and clear the Hide Extensions for Known File Types check box.
7. In the document, click the picture to select it, and then press the Delete key to remove it.
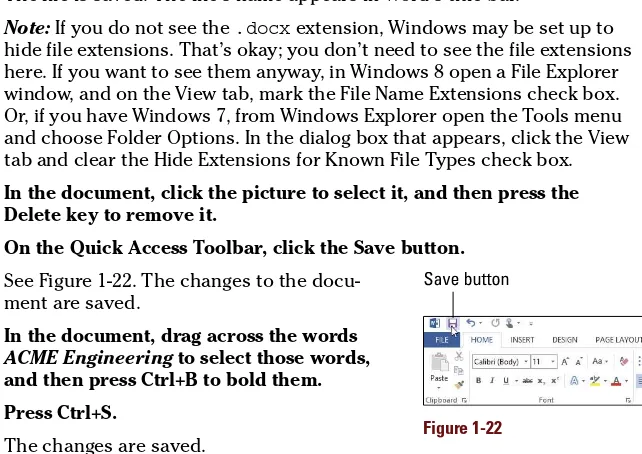
8. On the Quick Access Toolbar, click the Save button.
See Figure 1-22. The changes to the docu-ment are saved.
9. In the document, drag across the words
ACME Engineeringto select those words,
and then press Ctrl+B to bold them. 10. Press Ctrl+S.
The changes are saved.
11. Drag across the last sentence to select it, and then press Ctrl+I to
Figure 1-22
28
Chapter 1
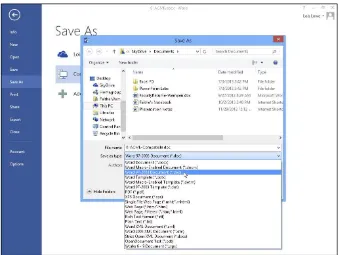
12. Choose File➪Save As, and click the Browse button.
The Save As dialog box opens.
13. In the File Name text box, change the filename to 01ACME-Compatible. 14. Click the drop-down list to the right of Save As Type.
A menu of document types opens.
15. Select the Word 97–2003 Document option.
See Figure 1-23.
16. Click Save.
The document is resaved with a different name and a different file type.
29
Navigating in the Save and Open dialog boxes
Word 2013 uses the current Windows user’s SkyDrive as the default storage location. SkyDrive is a cloud-based online storage area hosted by Microsoft. Anyone who registers for the service, or who logs into Windows 8 with a Microsoft ID, is given a certain amount of free storage space, and can pur-chase more. For more information about SkyDrive, see Appendix A.
You can also save your files locally, where the default location is your Documents library, as it was with Office 2010. In Windows, each user has his own Documents folder (based on who is logged into Windows at the moment).
New in Office 2013 applications, when you choose File➪Save As, a dialog box does not open immediately. Instead, a Save As screen in Backstage view opens, prompting you to choose an overall save location, either your SkyDrive or your Computer or some custom location you might have set up. Only after you make that choice does the Save As dialog box appear.
To understand how to change save locations, you should first understand the concept of a file path. Files are organized into folders, and you can have folders inside folders. For example, you might have
✓ A folder called Work
✓ Within that folder, another folder called Job Search
✓ Within that folder, a Word file called
Resume.docx
The path for such a file would be
C:\Work\Job Search\Resume.docx
When you change the save location, you’re changing to a different path for the file. You do that by navigating through the file system via the Save As dialog box. The Save As dialog box provides several different ways of navigat-ing, so you can pick the one you like best.
In this exercise, you experiment with several ways of changing the save location in the Save As dialog box.
Files needed: None
1. In Word, with the document still open from the previous exercise, choose File➪Save As.
EXTRA INFO
If you want the Save As dialog box to appear immediately when you choose File➪Options, click Save, and mark the Don’t Show the Backstage When Opening or Saving Files check box.
30
Chapter 1
2. ClickYour Name’sSkyDrive or Computer, depending on which loca-tion you want to save your work from the exercises in this book.
See Figure 1-24.
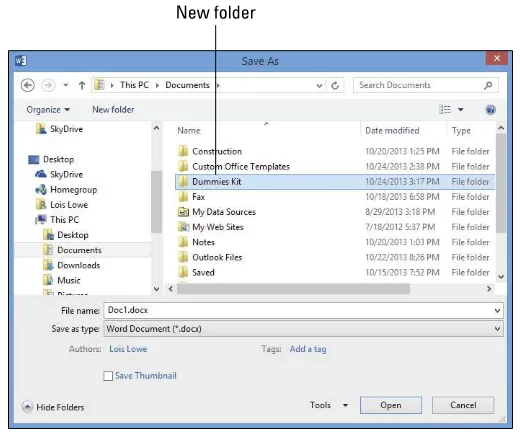
3. Click Browse.
The Save As dialog box opens.
4. Change the Save As Type setting to Word Document (*.docx) if it is something different.
5. Change the filename to 01ACME-Copy.
6. Scroll through the navigation bar to see the available locations for saving files.
See Figure 1-25.
7. In the navigation bar, click This PC (if using Windows 8.1) or Computer (if using Windows 7 or 8.0).
31
Figure 1-25
8. Double-click the C: drive.
A list of folders on the C: drive appears.
9. Scroll in the navigation bar to locate the Documents shortcut and double-click it.
If you don’t see a Documents shortcut, double-click This PC (in Windows 8.1) or Libraries (in Windows 7 and Windows 8.0) and Documents should appear below it.
The Documents folder’s content appears.
10. Right-click an empty spot in right pane of the dialog box, point to New, and click Folder.
A new folder appears, with the name highlighted, ready for you to name it.
11. Type Dummies Kit and press Enter to name the folder.
You’ve just created a folder that you can use to store all the work that you do for this eLearning Kit. See Figure 1-26.
Saving and Opening Documents
EXTRA INFO
32
Chapter 1
Figure 1-26
12. Double-click the Dummies Kit folder to open it.
13. In the Address bar, click the right-pointing arrow to the left of Dummies Kit.
A list of all the other folders in the Documents folder appears.
In the Address bar, the parts of a path are separated by right-pointing tri-angles rather than by slashes. You can click any of the tritri-angles to open a drop-down list containing all the subfolders (that is, the folders within that folder).
14. Click any folder on that list to switch to that folder. 15. In the Address bar, click Documents.
The Documents folder reappears.
33
Note: In Windows 8.1, libraries are available but not shown by default.
To display the Libraries list in the navigation bar in Windows 8.1, right-click an empty area of the navigation bar and choose Show Libraries.
Figure 1-27
17. In the navigation bar, click Desktop.
You can save directly to your desktop by saving to this location.
18. In the navigation bar, click Documents and then double-click Dummies Kit.
The Dummies Kit folder reappears.
19. In the File Name text box, type Chapter 1 Practice.
See Figure 1-28.
20. Click Save.
A message appears that your document will be upgraded to the newest file format. This happens because, in an earlier exercise, you saved this file in Word 97-2003 format, and it is still in that format.
34
Chapter 1
Figure 1-28
21. Click OK to save the file.
22. Choose File➪Close to close the document without exiting Word.
Opening a document
When you open a file, you copy it from your hard drive (or other storage location) into the computer’s memory, where Word can access it for viewing and modifying it.
35
In this exercise, you open a saved file.
Files needed: Any saved Word document, such as the Chapter 1Practice file you save in the previous exercise
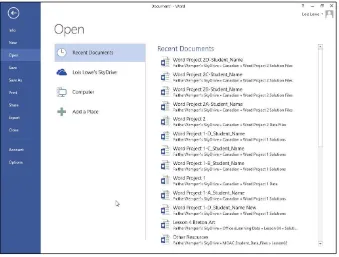
1. In Word, choose File➪Open.
2. Click eitherYour NameSkyDrive or Computer, depending on where you chose to save in the previous exercise.
3. Click Browse.
The Open dialog box appears. The location shown is the Dummies Kit folder because it was the last folder you accessed during this session.
4. Click Chapter 1Practice.
See Figure 1-29.
Figure 1-29
5. Click Open.
The file opens in Word.
6. Choose File➪Close to close the document without exiting Word. 7. Choose File➪Open.
A list of recently opened files appears on the right side of the screen.
36
Chapter 1
8. Click Chapter 1Practice.
That file reopens.
9. Choose File➪Close to close the document again.
Recovering lost work
Computers lock up occasionally, and applications crash in the middle of important projects. When that happens, any work that you haven’t saved is gone.
To minimize the pain of those situations, Word has an AutoRecover feature that silently saves your drafts as you work, once every ten minutes or at some other interval you specify. These drafts are saved in temporary hidden files that are deleted when you close the application successfully (that is, not abruptly because of a lockup, crash, or power outage). If the application crashes, those temporary saved files appear for your perusal when the pro-gram restarts. You can choose to do either of the following:
✓ Save them if their versions are newer than the ones you have on your hard drive.
✓ Discard them if they contain nothing you need.
In this exercise, you change the interval at which Word saves backup drafts for AutoRecover.
Files needed: None
1. In Word, choose File➪Options.
The Word Options dialog box opens.
2. Click the Save category on the left.
3. Make sure that the Save AutoRecover Information Every xx Minutes check box is selected.
4. If desired, change the value in the Minutes box to another number.
For example, to save every five minutes, type 5 there. See Figure 1-30.
37
Moving Around
Figure 1-30
Moving Around
As you work in Word, you may add so much content that you can’t see it all onscreen at once. You might need to scroll through the document to view dif-ferent parts of it. The simplest way to scroll through a document is by using the scroll bars with your mouse.
Scrolling through a document with the scroll bars doesn’t move the insertion point, so what you type or insert doesn’t necessarily appear in the location that shows onscreen.
38
Chapter 1
Moving with the mouse
Here’s a summary of the available mouse movements:
✓ Click a scroll arrow to scroll a small amount in that direction.
✓ Click above or below the scroll box to scroll one full screen in that direc-tion if the document is tall/wide enough that there’s undisplayed content in that direction.
✓ Drag the scroll box to scroll quickly in the direction you’re dragging. Now practice these skills in the following exercise.
In the following exercise, you move around in a Word document via the mouse.
Files needed: Chapter 1Syllabus.docx
1. In Word, open Chapter 1Syllabus and save it as Chapter 1Syllabus Practice.
2. Click the bottom scroll arrow on the verti-cal scroll bar three times.
Each time you click, the display scrolls down a small amount. See Figure 1-31.
3. Click once below the scroll box.
The display scrolls down one screenful.
4. Drag the scroll box up as high as it will go.
The top of the document comes back into view.
5. Click and hold down the mouse button on the top scroll arrow.
The bottom of the document comes into view.
Leave the document open for the next exercise.
Moving with the keyboard
Figure 1-31
EXTRA INFO
39
✓ Press the Page Up or Page Down key to scroll one full screen in that direction.
✓ Press the Home key to move to the left side of the current line.
✓ Press the End key to move to the right side of the current line.
✓ Press Ctrl+Home to move to the beginning of the document.
✓ Press Ctrl+End to move to the end of the document. Now practice those skills in the following exercise.
In the following exercise, you move around in a Word document via the keyboard.
Files needed: Chapter 1Syllabus Practice.docx, open from the preceding exercise
1. In Chapter 1Syllabus Practice, press Ctrl+Home.
The insertion point moves to the beginning of the document.
2. Press the right-arrow key on the keyboard twice.
The insertion point moves two spaces to the right.
3. Press the down-arrow key twice.
The insertion point moves two lines down so that it is in the Description paragraph. See Figure 1-32.
Figure 1-32
4. Hold down the Ctrl key and press the down-arrow key.
The insertion point moves to the beginning of the next paragraph.
5. Hold down the Ctrl key and press the right-arrow key.
The insertion point moves to the next word in the paragraph.
6. Press the Home key.
The cell cursor moves back to the beginning of the paragraph.
40
Chapter 1
7. Press the Page Down key.
The page scrolls down one screenful. (The exact amount depends on your screen size.)
8. Press Ctrl+Home.
The cell cursor moves back to the top of the document.
Leave the document open for the next exercise.
Changing the Onscreen View
Word has multiple viewing modes you can switch among to make it easier to do different kinds of writing and editing. For example, Word’s Outline view is optimal for creating outlines, and Full Screen Reading view works well for reading long documents on a computer monitor.
In addition, Word has Zoom commands that can make the text and graphics appear larger or smaller onscreen while you work.
Zooming has no relationship to the size of the text or graphics when they print; it affects only the onscreen view.
Changing views
The default view in Word is Print Layout; it displays a document very similarly to the way it will print, including all graphics, multicolumn layouts, and page breaks.
The alternatives to Print Layout view are
✓ Read Mode: A view designed to optimize readability onscreen.
41
Changing the Onscreen View
Files needed: Chapter 1Syllabus Practice.docx, open from the preceding exercise
1. In Chapter 1Syllabus Practice, click the View tab.
Buttons for each of the available views appear on the Ribbon. See Figure 1-33.
Figure 1-33
2. Choose View➪Read Mode.
The display changes to show the document in an easy-to-read layout. See Figure 1-34.
42
Chapter 1
3. Click the View command on the menu bar at the top of the screen and click Edit Document on the menu that appears to return to normal viewing.
4. Choose View➪Web Layout.
The display changes to show the docu-ment in a margin-less layout that resem-bles a web page.
5. Choose View➪Draft.
The display changes to show the docu-ment in Draft view.
6. Scroll through the document in Draft view.
Page breaks are indicated by dotted lines, as shown in Figure 1-35.
EXTRA INFO
43
7. Choose View➪Outline.
The display changes to show the document in Outline view. An Outlining tab appears on the Ribbon. This document doesn’t outline very well because no headings have been set up in this document yet.
8. Choose Outlining➪Close Outline View.
The display returns to Print Layout view.
9. Hover the mouse over the Web Layout button on the status bar.
The status bar is the blue bar at the bottom of the Word window. A ScreenTip appears indicating it is the Web Layout button. See Figure 1-36.
10. Hover the mouse over each of the other view buttons on the status bar to see their names.
Leave Word open for the next exercise.
Zooming in and out
Zooming changes the magnification of the data shown onscreen. Zooming doesn’t change the magnification of the application window itself (for exam-ple, the Ribbon), and it doesn’t change the size of the data on printouts.
Zooming in increases the magnification, and zooming out decreases it.
In this exercise, you explore the Zoom feature in Word.
Files needed: Chapter 1Syllabus Practice.docx, open from the preceding exercise
1. In Chapter 1Syllabus Practice, drag the Zoom slider all the way to the right.
The Zoom slider is located in the bottom-right corner of the Word window. The zoom level increases to 500 percent. See Figure 1-37.
Figure 1-36
EXTRA INFO
Several of the views have an equiv-alent button on the status bar for quick view changes, so you don’t have to open the View tab each time you want to change the view.
Figure 1-37
44
Chapter 1
2. Drag the Zoom slider to the left, so that the zoom setting is 50%.
When the zoom magnification decreases to 50%, the docu-ment’s two pages appear side by side.
3. Click the plus sign at the right end of the Zoom slider.
The zoom increases slightly.
4. Click the minus sign at the left end of the Zoom slider.
The zoom decreases slightly.
5. Click the current zoom percent-age (the number to the right of the Zoom slider).
The Zoom dialog box opens. See Figure 1-38.
You can also open the Zoom dialog box by clicking the View tab on the Ribbon and clicking the Zoom button.
6. In the Zoom dialog box, select 100% and then click OK.
The zoom changes back to 100 percent (the default).
7. Close the document. Do not save changes if prompted.
Exit Word.
Summing Up
In this chapter, you explored the Word interface. You learned how to start and exit Word, move around in a document, create and save your work, and adjust the view.
45
✓ To enter text in a document, click where you want to place the text; doing so moves the insertion point to the place where you click. Then type.
✓ To insert a picture, click the Insert tab on the Ribbon and then click the Picture button.
✓ Scroll bars enable you to scroll to different parts of a document. You can also move around by clicking where you want to go or by using the arrow keys to move the insertion point.
✓ To save your work, choose File➪Save, press Ctrl+S, or click the Save button on the Quick Access Toolbar.
✓ To open a file, choose File➪Open. You can also select a recently used file from the Recent section of the File menu’s Open category.
✓ You can switch among views on the View tab.
✓ The Zoom feature increases or decreases the magnification of the data displayed onscreen. Use the Zoom slider and controls in the lower-right corner of the application window.
Try-it-yourself lab
For more practice with the features covered in this chapter, try the following exercise on your own:
1. Start Word and, in the new document that appears, type Grocery List. 2. Press Enter to start a new paragraph and then type a grocery
shop-ping list of at least six items, pressing Enter after each one.
3. Save the file as Chapter 1 Grocery List in the Dummies Kit folder you created earlier and close Word.
Know this tech talk
application: A program that performs a useful user task, such as creating a word-processing document or calculating a number.
Backstage view: The section of Word that appears when the File menu is open. It contains commands for working with files, setting program options, importing, exporting, and printing.
document: A data file in a word-processing program. Can also refer gener-ically to any data file.
file extension: The code following the period at the end of a filename, indicating the file’s type.
46
Chapter 1
folder: An organizing container on a hard drive in which to store files.
insertion point: A flashing vertical line indicating where text will be inserted when you type.
scroll bar: A bar along the right and/or bottom side of a window that can be used to change the viewing area.
Chapter 2
Creating a Word
Document
✓ Starting new documents based on templates can
save time and provide guidance as to what content to insert and where to place it. Many templates are available for free via Office.com.
✓ Selecting text before issuing a command enables you to act on large blocks of text at a time. You can select text with either the keyboard or the mouse.
✓ Finding and replacing text makes editing easier. You can identify all instances of a particular word or phrase and replace them with a different word or phrase.
✓ Check your spelling and grammar to avoid embar-rassing errors in documents you distribute to others. Word can help you check individual words and the entire document easily.
1 .
How do you start a document based on an online template?Guide yourself to page ... 50
2 .
How can you change a document’s margins?There’s space on page ... 54
3 .
How do you set the paper size and page orientation?Find your bearings on page ... 55
4 .
How do you locate all instances of a word in a document?Search for that information on page ... 63
5 .
How do you alphabetize a list?Sort that out on page ... 66
6 .
What does it mean when text has a wavy red underline?There are all kinds of squiggles on page ... 67
7 .
How do you send Word documents via e-mail?M
icrosoft Word is the most popular Office application
because nearly everyone needs to create text documents
of one type or another. With Word, you can create
every-thing from cover sheets to school research papers to family holiday
letters.
In this chapter, I explain how to create, edit, proofread, and share simple documents. By the end of this chapter, you have a good grasp of the entire process of creating documents, from start to finish, including how to share your work with others via print or e-mail. Later chapters then build on this knowledge, adding in the fancier aspects, such as using formatting, styles, graphics, and multiple sections.
Starting a New Word
Document
As you learn in Chapter 1, you can create a blank new document or you can base a new document on a template. Word 2013 uses templates stored on Office.com, and you can access that site directly from within Word, as long as your computer is connected to the Internet. After starting a new document, you can adjust the paper size and orientation if needed.
LINGO
50
Chapter 2
Even when you start a blank document, you still (technically) use a template. The blank document uses a Normal template, and it specifies certain default settings for a new blank document, such as the default fonts (Calibri for body text and Cambria for headings), default font sizes (11 point for body text), and margins (1 inch on all sides).
Creating a new document using a template
You can easily create a new document based on a template. This new docu-ment has all the characteristics of the template, including margins, paper size, default fonts, and any sample content that the template contains.
In the following exercise, you start two new Word documents. One uses a local template, and one uses a template from Office.com.
Files needed: None
1. In Word, choose File➪New.
Thumbnails of templates for creating new documents appear, as shown
EXTRA INFO
When you create a new document by clicking the Blank Document icon or by pressing Ctrl+N, the resulting document is based on the Normal template. If you stick with the default values for the Normal template’s definition, the Normal template doesn’t exist as a separate file; it’s built into Word itself. You won’t find the template if you search your hard drive for it. However, if you make a change to one or more of the Normal template’s settings, Word saves them to a Normal.dotm
file. If Word at any point can’t find Normal.dotm, it reverts to its internally stored copy and goes back to the default values.
51
Starting a New Word Document
52
Chapter 2
4. Click the Create button.
The template is downloaded, and a new document appears based on it. See Figure 2-3.
5. Examine the document to see what types of content the template provides, choose File➪Close to close the docu-ment, and if prompted to save your changes, click Don’t Save.
Figure 2-3
6. Choose File➪New.
The icons reappear for new document types.
7. In the Search for Online Templates box, type Urban Report and
EXTRA INFO
53
Starting a New Word Document
Figure 2-4
9. Click the Create button.
A new document opens based on the selected template.
10. Scroll through the new document and notice the placeholders ready for you to fill in to create your own version of the report.
11. Save the document asChapter 2Practice.
If you see a message about upgrading the document to the newest file format, click OK.
Leave the document open for the next exercise.
54
Chapter 2
Setting page margins
Word provides several easy-to-use presets. You can also individually specify the margins for each side of the page if you prefer.
In the following exercise, you change the page margins in two ways: using a preset and using an exact value.
Files needed: Chapter 2Practice, open from the preceding exercise
1. In the Chapter 2Practice document, choose Page Layout➪Margins➪Narrow (see Figure 2-5).
Presets for narrow margins are applied to the top, bottom, right, and left margins for the document.
LINGO
Margins are the amounts of blank space that Word reserves on each side of the paper. In most cases, you want them to be roughly the same on all sides, or at least the same at both the right/left, so the docu-ment looks symmetrical. In special cases, though, such as when you’re going to bind the document on the left or at the top, you may want to leave more blank space on one particular side.