by Galen Gruman
InDesign
®
CS3
FOR
by Galen Gruman
InDesign
®
CS3
FOR
Copyright © 2007 by Wiley Publishing, Inc., Indianapolis, Indiana Published by Wiley Publishing, Inc., Indianapolis, Indiana Published simultaneously in Canada
No part of this publication may be reproduced, stored in a retrieval system or transmitted in any form or by any means, electronic, mechanical, photocopying, recording, scanning or otherwise, except as permit-ted under Sections 107 or 108 of the 1976 Unipermit-ted States Copyright Act, without either the prior written permission of the Publisher, or authorization through payment of the appropriate per-copy fee to the Copyright Clearance Center, 222 Rosewood Drive, Danvers, MA 01923, (978) 750-8400, fax (978) 646-8600. Requests to the Publisher for permission should be addressed to the Legal Department, Wiley Publishing, Inc., 10475 Crosspoint Blvd., Indianapolis, IN 46256, (317) 572-3447, fax (317) 572-4355, or online at http://www.wiley.com/go/permissions.
Trademarks:Wiley, the Wiley Publishing logo, For Dummies, the Dummies Man logo, A Reference for the Rest of Us!, The Dummies Way, Dummies Daily, The Fun and Easy Way, Dummies.com, and related trade dress are trademarks or registered trademarks of John Wiley & Sons, Inc. and/or its affiliates in the United States and other countries, and may not be used without written permission. InDesign is a registered trademark of Adobe Systems Incorporated in the United States and/or other countries. All other trade-marks are the property of their respective owners. Wiley Publishing, Inc., is not associated with any prod-uct or vendor mentioned in this book.
LIMIT OF LIABILITY/DISCLAIMER OF WARRANTY: THE PUBLISHER AND THE AUTHOR MAKE NO REP-RESENTATIONS OR WARRANTIES WITH RESPECT TO THE ACCURACY OR COMPLETENESS OF THE CONTENTS OF THIS WORK AND SPECIFICALLY DISCLAIM ALL WARRANTIES, INCLUDING WITHOUT LIMITATION WARRANTIES OF FITNESS FOR A PARTICULAR PURPOSE. NO WARRANTY MAY BE CRE-ATED OR EXTENDED BY SALES OR PROMOTIONAL MATERIALS. THE ADVICE AND STRATEGIES CON-TAINED HEREIN MAY NOT BE SUITABLE FOR EVERY SITUATION. THIS WORK IS SOLD WITH THE UNDERSTANDING THAT THE PUBLISHER IS NOT ENGAGED IN RENDERING LEGAL, ACCOUNTING, OR OTHER PROFESSIONAL SERVICES. IF PROFESSIONAL ASSISTANCE IS REQUIRED, THE SERVICES OF A COMPETENT PROFESSIONAL PERSON SHOULD BE SOUGHT. NEITHER THE PUBLISHER NOR THE AUTHOR SHALL BE LIABLE FOR DAMAGES ARISING HEREFROM. THE FACT THAT AN ORGANIZATION OR WEBSITE IS REFERRED TO IN THIS WORK AS A CITATION AND/OR A POTENTIAL SOURCE OF FUR-THER INFORMATION DOES NOT MEAN THAT THE AUTHOR OR THE PUBLISHER ENDORSES THE INFORMATION THE ORGANIZATION OR WEBSITE MAY PROVIDE OR RECOMMENDATIONS IT MAY MAKE. FURTHER, READERS SHOULD BE AWARE THAT INTERNET WEBSITES LISTED IN THIS WORK MAY HAVE CHANGED OR DISAPPEARED BETWEEN WHEN THIS WORK WAS WRITTEN AND WHEN IT IS READ.
For general information on our other products and services, please contact our Customer Care Department within the U.S. at 800-762-2974, outside the U.S. at 317-572-3993, or fax 317-572-4002. For technical support, please visit www.wiley.com/techsupport.
Wiley also publishes its books in a variety of electronic formats. Some content that appears in print may not be available in electronic books.
Library of Congress Control Number: 2007924222 ISBN: 978-0-470-11865-8
About the Author
Galen Gruman is the principal at The Zango Group, an editorial and
marketing consulting firm.Currently a regular contributor to Macworld,
Layers Magazine, CIO, and InfoWorld, he has also been editor of Macworld
and M-Business,executive editor of Upside,West Coast bureau chief of
Computerworld,and vice president of content for ThirdAge.com. He is co-author of 20 other books on desktop publishing. Gruman led one of the first successful conversions of a national magazine to desktop publishing in 1986 and has covered publishing technology since then for several publications, including the trade weekly InfoWorld,for which he began writing in 1986,
Dedication
Acquisitions, Editorial, and Media Development
Project Editor:Linda Morris
Acquisitions Editor:Bob Woerner
Copy Editor:Linda Morris
Technical Editor:Jonathan Woolson
Editorial Manager:Jodi Jensen
Media Development Manager:
Laura VanWinkle
Editorial Assistant:Amanda Foxworth
Sr. Editorial Assistant:Cherie Case
Cartoons:Rich Tennant (www.the5thwave.com)
Composition Services
Project Coordinator: Jennifer Theriot
Layout and Graphics: Joyce Haughey, Stephanie D. Jumper, Barbara Moore, Alicia B. South, Ronald Terry
Proofreaders:Debbye Butler, Susan Moritz
Indexer: Aptara
Anniversary Logo Design:Richard J. Pacifico
Publishing and Editorial for Technology Dummies
Richard Swadley,Vice President and Executive Group Publisher
Andy Cummings,Vice President and Publisher
Mary Bednarek,Executive Acquisitions Director
Mary C. Corder,Editorial Director
Publishing for Consumer Dummies
Diane Graves Steele,Vice President and Publisher
Joyce Pepple,Acquisitions Director
Composition Services
Gerry Fahey,Vice President of Production Services
Contents at a Glance
Introduction ...1
Part I: Before You Begin ...7
Chapter 1: Understanding InDesign Ingredients ...9
Chapter 2: Making It Work Your Way ...35
Part II: Document Essentials...49
Chapter 3: Opening and Saving Your Work ...51
Chapter 4: Discovering How Pages Work ...65
Chapter 5: Layers and Layers ...79
Chapter 6: The Joys of Reuse...89
Chapter 7: Working with Color ...103
Part III: Object Essentials ...119
Chapter 8: Creating Essential Elements...121
Chapter 9: Manipulating Objects...137
Chapter 10: Organizing Objects...155
Chapter 11: Aligning and Arranging Objects...167
Part IV: Text Essentials ...187
Chapter 12: Putting Words on the Page...189
Chapter 13: The Ins and Outs of Text Editing ...211
Chapter 14: The Styles of Text ...225
Chapter 15: Fine-Tuning Paragraph Details ...235
Chapter 16: Finessing Character Details ...249
Chapter 17: Tricks with Text...263
Part V: Graphics Essentials...277
Chapter 18: Importing Graphics ...279
Chapter 23: Publishing Books...339
Part VII: Printing and Output Essentials...347
Chapter 24: Setting Up for Output...349
Chapter 25: Printing and Other Output Techniques...357
Part VIII: The Part of Tens...379
Chapter 26: Top Ten New Features in InDesign CS3 ...381
Chapter 27: Top Ten (Or So) Resources for InDesign Users ...387
Chapter 28: Top Ten Must-Knows for QuarkXPress Refugees ...393
Chapter 29: Top Ten Must-Knows for PageMaker Orphans ...397
Table of Contents
Introduction...1
How to Use This Book ...2
How This Book Is Organized...3
Part I: Before You Begin ...3
Part II: Document Essentials ...3
Part III: Object Essentials ...3
Part IV: Text Essentials ...4
Part V: Graphics Essentials ...4
Part VI: Getting Down to Business ...4
Part VII: Printing and Output Essentials...4
Part VIII: The Part of Tens ...4
Icons Used in This Book...5
Part I: Before You Begin ...7
Chapter 1: Understanding InDesign Ingredients . . . .9
The InDesign Approach...9
The frame-based metaphor...10
The free-form metaphor ...11
Understanding Global and Local Control...11
Choosing the right tools for the job...13
Specifying measurement values ...14
Basic InDesign Vocabulary...14
Discovering the Document Window ...16
Rulers ...18
Zero point ...18
Pasteboard ...19
Pages and guides ...19
Zoom field and pop-up menu...19
Page controls ...20
Opening Multiple Document Windows...20
Tooling around the Tools Panel ...21
Using the Selection tools ...22
Using the Type tool ...24
Using the object-creation tools ...25
Using the navigation tools...26
Working with Panels, Docks, and Workspaces ...28
Working with panels...28
Setting Document Preferences ...36
Type preferences...36
Composition preferences ...40
Measurement preferences...41
Document defaults ...44
Modifying Defaults for Text and Objects...45
Text defaults...46
Object defaults...46
Modifying Defaults for Views...47
Adding Default Colors and Styles...48
Part II: Document Essentials ...49
Chapter 3: Opening and Saving Your Work . . . .51
Setting Up a New Publication ...51
Opening documents ...54
Saving documents ...59
Exporting document content...60
Recovering from Disaster...63
Chapter 4: Discovering How Pages Work . . . .65
Understanding the Pages Panel...65
Adding pages...66
Selecting pages ...68
Copying pages...68
Deleting pages...69
Moving pages within documents...69
Moving pages among documents...70
Starting documents on a left page ...70
Working with Page Numbers...71
Dividing a document into sections ...72
Removing a section start...74
Navigating Documents and Pages...74
Navigating with the Pages panel ...75
Navigating with the menus and shortcuts ...75
Using the Navigator panel ...76
Adjusting Page Layouts and Objects ...76
Chapter 5: Layers and Layers . . . .79
What Layers Can Do for You...79
Layer Basics...80
Working with Layers ...82
Creating a layer...82
Working with Objects on Layers ...84
The active layer ...84
Selecting objects on layers ...85
Placing objects on layers...85
Moving objects to different layers ...86
Manipulating Entire Layers...86
Building and Using Templates ...89
Creating templates ...90
Modifying templates ...90
Creating documents from templates ...91
Building and Using Master Pages...91
Creating a new master page...92
Importing a master page ...94
Deleting a master page ...95
Applying a master page to document pages...95
Changing master items on document pages...96
Building and Using Libraries ...97
Creating a library...97
Putting items into a library ...99
Copying library items onto document pages ...101
Chapter 8: Creating Essential Elements . . . .121
Creating Frames and Shapes ...121
Reshaping Frames and Shapes...123
Creating Lines and Paths...124
Drawing a straight line...124
Understanding paths ...126
Drawing your own paths ...127
Applying Strokes ...131
Setting stroke appearance...132
Creating stroke styles ...134
Chapter 9: Manipulating Objects . . . .137
Selecting Objects...137
Resizing and Scaling Objects ...140
Resizing objects...141
Scaling objects ...141
Moving Objects...142
Deleting Objects ...142
Preventing Objects from Printing ...143
Transforming Objects...143
Rotating objects...144
Shearing objects ...145
Flipping objects ...146
Repeating transformations...146
Replacing Object Attributes ...147
Making Fancy Corners ...149
Using Transparency and Lighting Effects ...150
Basic transparency...150
Using drop shadows and inner shadows ...152
Using feathering and other lighting effects...153
Chapter 10: Organizing Objects . . . .155
Combining Objects into a Group...155
Locking Objects...156
Working with Object Styles...157
Creating object styles ...157
Managing object styles ...160
Applying object styles ...161
Managing object styles ...162
Chapter 11: Aligning and Arranging Objects . . . .167
Precise Positioning with Coordinates ...167
Lining Up Objects with Guidelines and Grids...168
Using ruler guides ...169
Working with column guides...172
Using document grids...172
Using baseline grids ...174
Aligning Objects to Each Other...175
Stacking Objects...177
Creating Inline and Anchored Frames ...178
Working with inline frames ...179
Working with anchored frames...181
Part IV: Text Essentials ...187
Chapter 12: Putting Words on the Page . . . .189
Working with Text Frames ...189
Creating master text frames...190
Creating individual text frames ...191
Making changes to text frames...192
Importing Text ...193
Import options for Microsoft Word and RTF files ...194
Import options for Microsoft Excel files...197
Pasting text into an InDesign document...198
Dragging and dropping text ...199
Threading Text Frames...200
Threading frames manually ...201
Threading frames with the semi-autoflow method ...202
Threading frames and automatically adding pages...203
Breaking and rerouting threads...203
Working with Columns ...204
Specifying columns in master frames ...204
Changing columns in text frames ...205
Wrapping Text around Objects ...205
The Text Wrap panel ...206
Setting text-wrap preferences...209
Using the Story Editor ...213
Replacing text ...215
Replacing formatting...217
Changing special characters...218
Working with saved queries...218
Checking Spelling ...219
Checking spelling as you type ...219
Correcting mistakes on the fly...219
Using the Check Spelling dialog box ...220
Changing the spelling and hyphenation dictionaries ...221
Chapter 14: The Styles of Text . . . .225
Controlling space between lines ...239
Controlling where paragraphs break ...240
Adding Drop Caps ...241
Controlling Hyphenation and Justification ...242
Manual hyphenation ...243
Modifying Font, Type Style, and Size...251
Changing font family and font style ...252
Changing type size ...253
Using Other Character Formats ...253
Horizontal and Vertical Scale options ...255
Skew (false italic) ...256
Capitalization Options ...257
Superscript and Subscript ...257
Underline and Strikethrough ...258
Ligatures ...258
Turning off hyphenation and other breaks ...259
Controlling Space between Characters and Lines ...260
Kerning...260
Tracking...261
Leading ...261
Chapter 17: Tricks with Text . . . .263
Using Bulleted and Numbered Lists ...263
Labeling Paragraphs ...266
Adding Special Type Treatments ...267
Reversing type out of its background...267
Creating sidebars and pull-quotes ...269
Formatting fractions ...269
Optical margin alignment ...272
Custom underline and strikethrough options ...273
Converting Text into Shapes...274
Making Text Follow a Path ...275
Part V: Graphics Essentials ...277
Chapter 18: Importing Graphics . . . .279
Preparing Graphics Files ...279
Importing and Placing Graphics...281
Specifying Import Options ...284
Import options for bitmap graphics ...284
Import options for vector file formats...286
Import options for placed InDesign files ...288
Working with image layers ...288
Using Other Ways to Import Graphics ...289
Chapter 19: Fitting Graphics and Setting Paths . . . .291
Cropping and Repositioning ...291
Figuring out the Fitting Commands ...292
Working with Graphics in Irregular Shapes ...294
Using a graphic’s own clipping path ...295
Creating a clipping path in InDesign ...296
Chapter 20: Working with Tabs and Tables . . . .303
Setting Tabs...303
Setting Up Tables...305
Adjusting tables...307
Formatting tables ...308
Using table and cell styles...311
Modifying and managing table and cell styles...312
Converting Tabs to Tables (and Back) ...313
Chapter 21: Working with Footnotes, Indexes, and TOCs . . . .315
Adding Footnotes...315
Creating Indexes...318
Choosing an indexing style ...318
Inside the Index panel...319
Adding index items via the Index panel ...320
Polishing and generating the index...321
Creating Tables of Contents...323
Chapter 22: Working with Automated Text . . . .327
Automatic Page Numbers ...327
Using Section Markers...328
Using Text Variables ...329
Creating text variables...329
Editing and managing text variables...331
Inserting text variables...332
Using Hyperlinks ...332
Creating hyperlinks ...332
Modifying and deleting hyperlinks...336
Chapter 23: Publishing Books . . . .339
Book Basics...339
Creating a new book...340
Opening and closing a book...340
Adding chapters to books ...340
Working on Chapters ...341
Finding out about chapter status ...342
Taking advantage of style sources ...342
Synchronizing formatting ...342
Printing Chapters and Books...344
Working with Sections in Chapters...344
Numbering pages consecutively ...345
Numbering pages with sections ...345
Part VII: Printing and Output Essentials ...347
Chapter 24: Setting Up for Output . . . .349
Checking Your Document before Printing ...349
Setting Up Booklets...353
Chapter 25: Printing and Other Output Techniques . . . .357
Calibrating Color ...357
Ensuring consistent color ...358
Saving color management preferences...359
Changing document color settings ...360
Calibrating output ...360
Choosing Print Options ...360
Common options ...361
The General pane ...362
The Setup pane ...363
The Marks and Bleed pane...364
The Output pane ...365
Marks and Bleed pane ...373
The Output pane ...374
The Advanced pane ...374
Security pane ...374
The Summary pane ...376
Exporting to the Web...376
Part VIII: The Part of Tens ...379
Lighting effects ...384
Multiple file placement ...384
Text Controls ...385
Text variables...385
Style groups...386
Chapter 27: Top Ten (Or So) Resources for InDesign Users . . . .387
Web Sites ...387
InDesignCentral ...387
The Adobe Web site ...388
InDesign User Group ...389
Creativepro...389
Magazine Resources ...390
InDesign Magazine...390
Layers magazine ...390
Macworld magazine ...390
Recommended Books ...390
Chapter 28: Top Ten Must-Knows for QuarkXPress Refugees . . . . .393
Opening Those Old QuarkXPress Files ...393
Paying Attention to Selection Tool Differences...393
Using Keyboard Shortcuts for Tools ...394
Thinking Panels, Not Dialog Boxes ...395
Using Familiar Measurements ...395
Knowing Differences in Documents...395
Working with Objects, Not Items ...395
Approaching Text from a New Perspective ...396
Starting with the Direct Selection Tool for Graphics...396
Paying Close Attention When Printing ...396
Chapter 29: Top Ten Must-Knows for PageMaker Orphans . . . .397
Open Those Old PageMaker Files ...397
You Now Have Three Selection Tools...398
Switching Your Shortcuts...398
Setting Aside Time to Set Preferences...399
Working with Objects, Not Elements ...399
Don’t Worry Much about Text Differences ...399
Don’t Worry Much about Graphics, Either ...399
A Different Way to Change Pages ...400
Creating Colors Is Different...400
Using the Command Bar...400
Introduction
W
hat is Adobe InDesign and what can it do for you? InDesign is a power-ful publishing application that lets you work the way youwant to work. You can use InDesign as a free-form but manual approach to layout, or as a structured but easily revised approach. The fact that you can choose which way to work is important for both novice and experienced users because there isn’t a single, correct way to lay out pages. Sometimes (for example, if your project is a single-instance publication), creating a layout from scratch — almost as if you were doing it by hand on paper — is the best approach. And sometimes using a highly formatted template that you can modify as needed is the way to go: There’s no need to reinvent the wheel for documents that have a structured and repeatable format.InDesign can handle sophisticated tasks, such as magazine and newspaper page layout, but its simple approach to publishing also makes it a good choice for smaller projects, such as one-off ads and fliers. InDesign is also a good choice for corporate publishing tasks, such as proposals and annual reports. Plug-in software from other vendors adds extra capabilities. But that’s not all. InDesign was designed from the ground up as an electronic
publishing tool. That means that you can easily send documents to service bureaus and printing presses for direct output, which saves you lots of time and money. It also means that you can create documents for electronic distri-bution, particularly using the Adobe Acrobat Portable Document Format (PDF). These electronic files can include interactive features, such as buttons to play sounds or a movie.
After you get the hang of it, InDesign is quite easy to use. At the same time, it’s a powerful publishing program with a strong following among the ranks of professional publishers — and the latest InDesign CS3 version is certain to reinforce that position. Part of its success is due to the fact that its interface is like that of its sister applications, Adobe Illustrator and Adobe Photoshop, which are also components of the Adobe Creative Suite.
How to Use This Book
Although this book has information that any level of publisher needs to know to use InDesign, this book is primarily for those of you who are fairly new to the field, or who are just becoming familiar with the program. I try to take the mystery out of InDesign and give you some guidance on how to create a bunch of different types of documents. Here are some conventions used in this book:
⻬Menu commandsare listed like this: Window➪Pages.
⻬Key combinations:If you’re supposed to press several keys together, I indicate that by placing plus signs (+) between them. Thus, Shift+Ô+A
means press and hold the Shift and Ôkeys, and then press A. After
you’ve pressed the A key, let go of all the keys. I also use the plus sign to join keys to mouse movements. For example, Alt+drag means to hold the Alt key when dragging the mouse.
Note that the Macintosh sequence comes first, followed by the Windows equivalent.
⻬Pointer:The small graphic icon that moves on the screen as you move
your mouse is a pointer (also called a cursor). The pointer takes on dif-ferent shapes depending on the tool you select, the current location of the mouse, and the function you are performing.
⻬Click:This means to quickly press and release the mouse button once.
On most Mac mice, there is only one button, but on some there are two or more. All PC mice have at least two buttons. If you have a multi-button mouse, click the leftmost multi-button when I say to click the mouse.
⻬Double-click:This tells you to quickly press and release the mouse button twice. On some multi-button mice, one of the buttons can func-tion as a double-click. (You click it once, the mouse clicks twice.) If your mouse has this feature, use it; it saves strain on your hand.
⻬Right-click:A Windows feature, this means to click the right-hand mouse button. On a Mac’s one-button mouse, hold the Control key when click-ing the mouse button to do the equivalent of right-clickclick-ing in programs that support it. On multi-button Mac mice, assign one of the buttons to the Control+click combination.
How This Book Is Organized
I’ve divided this book into eight parts, not counting this introduction. Note that the book covers InDesign on both Macintosh and Windows. Because the application is almost identical on both platforms, I only point out platform-specific information when I need to, when I remember to, or both.
I have also included some bonus content on the InDesignCentral Web site (www.InDesignCentral.com).
Part I: Before You Begin
Designing a document is a combination of science and art. The science is in setting up the structure of the page: How many places will hold text, and how many will hold graphics? How wide will the margins be? Where will the page numbers appear? And so on. The art is in coming up with creative ways of fill-ing the structure to please your eyes and the eyes of the people who will be looking at your document.
In this part, I tell you how to navigate your way around InDesign using the program’s menus, dialog boxes, panels, and panes. I also explain how to cus-tomize the preferences to your needs.
Part II: Document Essentials
Good publishing technique is about more than just getting the words down on paper. It’s also about opening, saving, adding, deleting, numbering, and setting layout guidelines for documents. This part shows you how to do all that and a lot more, including tips on setting up master pages that you can use over and over again. You’ll also find out how to create color swatches for easy reuse in your documents.
Part III: Object Essentials
This part of the book shows you how to work with objects:the lines, text frames, graphics frames, and other odds and ends that make up a publication. And you’ll discover how to apply some really neat special effects to them.
Part IV: Text Essentials
When you think about it, text is a big deal when it comes to publishing docu-ments. After all, how many people would want to read a book with nothing but pictures? In this part, I show you how to create and manipulate text, in more ways than you can even imagine.
Part V: Graphics Essentials
Very few people would want to read a book with nothing but text, so this part is where I show you how to handle graphics in InDesign.
Part VI: Getting Down to Business
InDesign — especially with some of the enhancements in its latest version — is really good at handling the many kinds of documents that tend to be used in businesses, such as manuals, annual reports, and catalogs. This part shows you how to create tables, handle footnotes, create indexes, manage page num-bering across multiple chapters in a book, and use text variables to make InDesign update text as needed based on the document’s current context.
Part VII: Printing and Output Essentials
Whether you’re printing a publication or simply creating a PDF file for read-ers to download from a Web site, you still need to undread-erstand the basics of outputting an InDesign document. This part is where I show you how to set up your output files, manage color, and work with service bureaus.
Part VIII: The Part of Tens
Icons Used in This Book
So that you can pick out parts that you really need to pay attention to (or, depending on your taste, to avoid), I’ve used some symbols, or icons, in this book.
When you see this icon, it means I am pointing out a feature that’s new to InDesign CS3.
If you see this icon, it means that I’m mentioning some really nifty point or idea that you may want to keep in mind as you use the program.
This icon lets you know something you’ll want to keep in mind. If you forget it later, that’s fine, but if you remember it, it will make your InDesign life a little easier.
If you skip all the other icons, pay attention to this one. Why? Because ignor-ing it could cause somethignor-ing really, really bad or embarrassignor-ing to happen, like when you were sitting in your second-grade classroom waiting for the teacher to call on you to answer a question, and you noticed that you still had your pajama shirt on. I don’t want that to happen to you!
This icon tells you that I am about to pontificate on some remote technical bit of information that might help explain a feature in InDesign. The technical info will definitely make you sound impressive if you memorize it and recite it to your friends.
Part I
you have come to the right place. Read along and, before you know it, you’ll be sailing smoothly through InDesign. This part of the book gives you a general idea of what InDesign can do. I explain the layout approaches you can take and how to set up InDesign to work the way you work. Along the way, you’ll find out how to navigate the plethora of panels, menus, tools, and shortcuts that can seem overwhelming at first but that soon become second nature as you gain experience using the program.
Chapter 1
Understanding InDesign
Ingredients
In This Chapter
䊳The InDesign approach
䊳Understanding global and local control 䊳Basic InDesign vocabulary
䊳Discovering the document window 䊳Surveying the top tools
䊳Becoming familiar with tools and panels 䊳Surveying the menus
S
tarting to use a new software application is not unlike meeting a new friend for the first time. You take a long look at the person, maybe ask a few questions, and begin the process of becoming acquainted. Just as it’s worthwhile to learn the likes and dislikes of a new friend, it’s also worth your time to wrap your head around InDesign’s unique style and approaches. When you do so, you’ll find it much easier to start using InDesign to get work done. This chapter explains where to look in InDesign for the features and capabilities you need to master. I introduce you to the process that InDesign assumes you use when laying out documents, explain some of the terms you’ll encounter throughout the book, describe the unique interface elements in the document window, survey the most commonly used tools, and explain how InDesign pack-ages much of its functionality through an interface element called a panel.The InDesign Approach
to craft a document is based on assembling page elements as you would if they were placed on a traditional pasteboard until you were ready to use them. This is also called the pasteboard metaphor, which is an imprecise term because software that uses other metaphors can still include a pasteboard. The now-defunct PageMaker is the best-known example of the free-form approach. Other programs approach page layout by using a frame-basedmetaphor, in which frames (or boxes) hold both the page elements and the attributes that control the appearance of those elements. QuarkXPress is the best-known example of the frame-based approach.
InDesign offers the best of both worlds because it incorporates both the free-form and the frame-based metaphors.
The frame-based metaphor
When you work with a frame-based metaphor, you build pages by assembling a variety of frames that will contain your text and graphics. First, you set up the basic framework of the document — the page size and orientation, margins, number of columns, and so on. You then fill that framework with text, graphics, and lines.
These frames and lines need not be straight or square. With InDesign, you can create frames that are shaped by Bézier curves.(In the 1970s, French
engineer Pierre Bézier created the mathematics that make these adjustable curves work.)
Why would you want to use frames? Publishers find several reasons why frames come in handy:
⻬To create a template for documents, such as newsletters and maga-zines, that use the same basic layout elements across many articles.
You create the frames and then add the text and graphics appropriate for each specific article, modifying, adding, and deleting frames as nec-essary for each article.
⻬To get a sense of how you want your elements to be placed and sized before you start working with the actual elements.This is similar to
sketching a rough layout on paper with a pen or pencil before doing a formal layout with InDesign.
structured or partly structured documents, such as newsletters and mag-azines, it is usually easier to set up documents up front so that elements are sized and placed correctly; the less favorable alternative is resizing elements one at a time later on.
Whether you start by creating frames to hold graphics or text or you simply place the text and graphics directly on your page, you’re using frames. When you directly place elements on the page, InDesign creates a frame automati-cally for each element. The frame that InDesign creates is based on the amount of text or the size of the graphic, rather than on your specific frame specifications. Of course, in either case, you can modify the frames and the elements within them.
The free-form metaphor
Working under a free-form metaphor, you draw a page’s content as if you’re working on paper. If you’ve been in the publishing business for a while, you might once have used wax to stick strips of type, camera-ready line drawings, and halftone pictures to a pasteboard. You would then assemble and
reassemble all those pieces until you got the combination that looked right to you. The free-form metaphor encourages a try-as-you-go, experimental layout approach, which is particularly well suited to one-of-a-kind documents such as ads, brochures, annual reports, and some marketing materials.
If you use a frame-based approach to page layout, you can experiment with using the frames as placeholders for actual text and graphics. Visual thinkers like to work with actual objects, which is why the free-form metaphor works much better for them. With InDesign, you pick the metaphor that works for your style, your current situation, and your mood. After all, both approaches can lead to the same great design.
Understanding Global and Local Control
The power of desktop publishing in general, and InDesign in particular, is that it lets you automate time-consuming layout and typesetting tasks while at the same time letting you customize each step of the process according to your needs.
This duality of structure and flexibility — implemented via the dual use of the frame-based and free-form layout metaphors — carries over to all operations, from typography to color. You can use global controls to establish general settings for layout elements, and then use local controls to modify those ele-ments to meet specific publishing requireele-ments. The key to using global and
⻬General preferences and application preferences (see Chapter 2) ⻬Master pages and libraries (see Chapter 6)
⻬Character and paragraph styles (see Chapter 14) ⻬Table and cell styles (see Chapter 20)
⻬Object styles (see Chapter 10)
⻬Sections and page numbers (see Chapter 4) ⻬Color definitions (see Chapter 7)
⻬Hyphenation and justification (see Chapter 15)
Styles and master pages are the two main global settings that you can expect to override locally throughout a document. You shouldn’t be surprised to make such changes often because, although the layout and typographic func-tions that styles and master pages automate are the fundamental compo-nents of any document’s look, they don’t always work for all the specific content within a publication. (If they did, who’d need human designers?!) Local tools include
⻬Frame tools (see Part III, as well as Chapter 17)
⻬Character and paragraph tools (see Chapters 15 and 16) ⻬Graphics tools (see Part V)
Keep your bearings straight
A powerful but confusing capability in InDesignis something called a control point. InDesign lets you work with objects from nine different reference points — any of the four corners, the middle of any of the four sides, or the center — such as when positioning the object precisely or rotating the object. You choose the active ref-erence point, or control point, in the Control panel or Transform panel, using the grid of nine points arranged in a square.
By default, InDesign uses the central reference point as the control point, which is great for rotating an object, but can lead to confusion
when you enter in the X and Y coordinates to place it precisely. That’s because most people use the upper-left corner of an object when specifying its coordinates, not the center of the object. Be sure to change the control point to the upper-left reference point whenever enter-ing X and Y coordinates in the Control or Transform panels.
Choosing the right tools for the job
Depending on what you’re trying to do with InDesign at any given moment, you may or may not immediately know which tool to use. If, for example, you maintain fairly precise layout standards throughout a document, using master pages is the way to keep your work in order. Using styles is the best solution if you want to apply standard character and paragraph formatting throughout a document. When you work with one-of-a-kind documents, on the other hand, it doesn’t make much sense to spend time designing master pages and styles — it’s easier just to format elements as you create them. For example, you can create drop caps(large initial letters set into a para-graph of type, like the drop cap that starts each chapter in this book) as a character option in the Character panel, or you can create a paragraph style
(formatting that you can apply to whole paragraphs, ensuring that the same formatting is applied each time) that contains the drop-cap settings, and then apply that style to the paragraph containing the drop cap. Which method you choose depends on the complexity of your document and how often you need to perform the action. The more often you find yourself taking a set of steps, the more often you should use a global tool (like character and para-graph styles) to accomplish the task.
Fortunately, you don’t need to choose between global and local tools while you’re in the middle of designing a document. You can always create styles from existing formatting later. You can also add elements to a master page if you start to notice that you need them to appear on every page.
13
Chapter 1: Understanding InDesign Ingredients
What to do when you make a mistake
InDesign is a very forgiving program. If youmake a mistake, change your mind, or work yourself into a complete mess, you don’t have to remain in your predicament or save your work. InDesign offers several escape routes. You can
⻬ Undo your last action by choosing Edit➪Undo or pressing Ô+Z or Ctrl+Z.
(Some actions, particularly actions such as scrolling that do not affect any items or the underlying document structure, cannot be undone.) You can undo multiple actions in the reverse order in which they were done
by repeatedly choosing Edit➪Undo or pressing Ô+Z or Ctrl+Z; each time you undo, the previous action is undone.
Specifying measurement values
Another situation in which you can choose between local or global controls is specifying measurement values. Regardless of the default measurement unit
you set (that is, the measurement unit that appears in all dialog boxes and panels), you can use any unit when entering measurements in an InDesign dialog box. For example, if the default measurement is picas, but you’re new to publishing and are more comfortable with working in inches, go ahead and enter measurements in inches.
InDesign accepts any of the following codes for measurement units. Note that the xin the items listed below indicates where you specify the value, such as
2ifor 2 inches. It doesn’t matter whether you put a space between the value
and the code. Typing 2inchand typing 2 inchare the same as far as InDesign is concerned:
⻬xi or xinch or x" (for inches)
⻬xp (for picas)
⻬xpt or 0px(for points)
⻬xc (for ciceros)
⻬xag (for agates)
⻬xcm (for centimeters)
⻬xmm (for millimeters)
The ability to specify measurements in agates is new to InDesign CS3. Agates are typically used in newspaper publishing.
You can enter fractional picas in two ways: in decimal format (as in 8.5p) and
in picas and points (as in 8p6). Either of these settings results in a measure-ment of 81⁄
2picas (there are 12 points in a pica).
Basic InDesign Vocabulary
Not too long ago, only a few publishing professionals knew — or cared about — what the words pica, kerning, crop,and color modelmeant. Today, these words
15
Chapter 1: Understanding InDesign Ingredients
Altered keystrokes: Revised shortcuts
InDesign CS3 has changed a few shortcuts thatusers of previous versions of InDesign should know, so they can adapt accordingly:
⻬ Type➪Paragraph Styles: The new shortcut is
Ô+F11 on the Mac, but the old shortcut of F11
still works (though the Mac OS X’s Exposé program also uses this shortcut and thus may appear instead). In Windows, the shortcut remains F11, but Ctrl+F11 also works.
⻬ Type➪Character Styles: The new shortcut is Shift+Ô+F11 on the Mac, but the old
shortcut of Shift+F11 still works. In Windows, the shortcut remains Shift+F11, but Ctrl+Shift+F11 also works.
⻬ Type➪Paragraph: The new Windows short-cut is now Ctrl+Alt+T, no longer Ctrl+M, to match the Mac’s Option+Ô+T. Adobe let Ctrl+Alt+T work as an alternative in InDesign CS2; now the menu has changed to make Ctrl+Alt+T the official shortcut. But the old Ctrl+M continues to work if you want to still use it.
⻬ View➪Show/Hide Frame Edges: The new shortcut for the Mac only is Control+Ô+H.
The Windows shortcut remains Ctrl+H.
⻬ View➪Display Performance➪Fast Display: The new shortcut is Option+Shift+Ô+Z or
Ctrl+Alt+Z, replacing Shift+Ô+0 or Ctrl+ Shift+0.
⻬ View➪Display Performance➪High Quality Display: The new shortcut, for the Mac only, is Control+Option+Ô+H. The Windows
short-cut remains Ctrl+Alt+H.
⻬ Window➪Effects: The new shortcut to the renamed Transparency panel is Shift+Ô+F10
on the Mac, but the old shortcut of Shift+F10 still works. In Windows, the shortcut remains Shift+F10, but Ctrl+Shift+F10 also works.
⻬ Window➪Pages: The new shortcut is
Ô+F12 on the Mac, but the old shortcut of
F12 still works. In Windows, the shortcut remains F12, but Ctrl+F12 also works.
⻬ Window➪Stroke: The new shortcut is
Ô+F10 on the Mac, but the old shortcut of
F10 still works. In Windows, the shortcut remains F10, but Ctrl+F10 also works.
For consistency, this book uses the new short-cut for both Mac and Windows for the new shortcuts involving the F10, F11, and F12 keys, such as Ô+F10 and Ctrl+F10 for opening the Stroke panel. They changed to accommodate Mac OS X’s Exposé program, which uses the F10, F11, and F12 keys in its shortcuts, causing it to launch when InDesign users entered short-cuts using them. The new InDesign shortshort-cuts don’t step on Exposé’s toes.
New shortcuts include the following:
⻬ Type➪Glyphs: Option+Shift+F11 or Alt+ Shift+F11.
⻬ Type➪Insert Special Character➪Quotation Marks➪Straight Double Quotation Marks: Command+Shift+' or Alt+Shift+'.
⻬ Type➪Insert Special Character➪Quotation Marks➪Straight Single Quotation Mark (Apostrophe): Command+' or Alt+'.
⻬ Notes➪Notes Mode: Ô+F8 or Ctrl+F8.
much of it adopted from other Adobe products. Some general terms to know include the following:
⻬Frame:The container for an object. A frame can hold text, a graphic, or
a color fill.
⻬Link:The connection to a file that you import, or place(defined below),
into an InDesign document. The link contains the file’s location and its last modification date and time. A link can reference any graphics or text file that you have imported into a layout. InDesign can notify you when a source text or graphics file has changed so you can choose whether to update the version in your layout.
⻬Package:The collection of all files needed to deliver a layout for printing.
⻬PDF:The Adobe Portable Document Format, which has become the
stan-dard for sharing electronic documents. No matter what kind of computer it is viewed on (Windows, Macintosh, Palm, or Unix), a PDF document displays the original document’s typography, graphics representation, and layout. With InDesign, you can place PDF files as if they were graph-ics, and you can also export its InDesign pages to PDF format.
⻬Place:To import a graphics or text file.
⻬Plug-in:A piece of software that loads into, and becomes part of,
InDesign to add capabilities to the program.
⻬Stroke:The outline of an object (whether a graphic, line, or individual text characters) or frame.
⻬Thread:The connections between text frames that let a story flow from one frame to another.
Discovering the Document Window
In InDesign, you spend lots of time working in document windows — the “containers” for your documents. Each document, regardless of its size, is contained within its own document window.
The best way to get familiar with the InDesign document window is by open-ing a blank document. Simply choosopen-ing File➪New➪Document, or pressing
Ô+N or Ctrl+N, and clicking OK opens a new document window. Don’t worry
about the settings for now — just explore.
The Version Cue pop-up menu lets you see the current status of a document in a shared workgroup setup. This is an expert feature you can ignore.
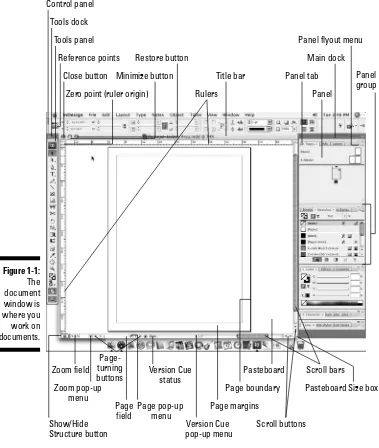
Control panel
Rulers
Document windows display a horizontal ruler across the top and a vertical ruler down the left side. As shown in Figure 1-1, the horizontal ruler measures from the top-left corner of the page across the entire spread, and the vertical ruler measures from the top to the bottom of the current page. These rulers are handy for judging the size and placement of objects on a page. Even expe-rienced designers often use the rulers while they experiment with a design. Both rulers display increments in picas unless you change the measurement system for each ruler in the Units & Increments pane of the Preferences dialog box. Choose InDesign➪Preferences➪Units & Increments or press Ô+K on the
Mac, or choose Edit➪Preferences➪Units & Increments or press Ctrl+K in
Windows, to open the Preferences dialog box. Your choices include inches, picas, points, decimal inches, ciceros, agates, millimeters, and centimeters. If you change the ruler measurement system when no documents are open, the rulers in all new documents will use the measurement system you selected. If a document is open when you make the change, the rulers are changed only in that document.
You can also create your own measurement system by choosing Custom. Most people should ignore this option, but sometimes it can make sense, such as setting the ruler to match the line spacing, so you can measure number of lines in your ruler.
If your computer has a small monitor and the rulers start to get in your way, you can hide them by choosing View➪Hide Rulers or by pressing Ô+R or
Ctrl+R.
Zero point
The point where the rulers intersect in the upper-left corner of the page is called thezero point.This is the starting place for all horizontal and vertical
measurements. If you need to place items in relation to another spot on the page (for example, from the center of a spread rather than from the left-hand page), you can move the zero point by clicking and dragging it to a new loca-tion. Notice that the X: and Y: values in the Control panel update as you drag the zero point so you can place it precisely. If you change the zero point, it changes for all pages or spreads in the document. You can reset the zero point to the upper-left corner of the left-most page by double-clicking the intersection of the rulers in the upper-left corner.
You can lock the ruler origin (the zero point), making it more difficult to acci-dentally change it. Control+click or right-click the ruler origin and choose Lock Zero Point from the menu that appears. (The Unlock Zero Point com-mand is right there as well, so you can just as easily unlock it.) Locking the zero point is a good idea because it will remind anyone working on your doc-ument that you prefer that they not fiddle with the zero point.
Pasteboard
The white area that surrounds the page is called the pasteboard.It is a work-space for temporarily storing objects. Above and below each page or spread is about an inch of pasteboard, and on the left and right a pasteboard space as wide as a page. For example, a spread of two 8-inch-wide pages will have 8 inches of pasteboard to the left and 8 inches of pasteboard to the right.
Pages and guides
Pages,which you can see onscreen surrounded by black outlines, reflect the
page size you set up in the New Document dialog box (File➪New➪Document,
or Ô+N or Ctrl+N). If it looks like two or more pages are touching, you’re
look-ing at a spread.
InDesign uses nonprinting guides, lines that show you the position of margins and that help you position objects on the page. Margins are the spaces at the
outside of the page, whereas columns are vertical spaces where text is sup-posed to go by default. Magenta lines across the top and bottom of each page show the document’s top and bottom margins. Violet lines show left and right columns (for single-page documents) or inside and outside columns (for spreads).
You can change the location of margin and column guides by choosing Layout➪Margins and Columns. You can create additional guides — such as
to help you visually align objects — by holding down your mouse button on the horizontal or vertical ruler and then dragging a guide into the position you want.
Zoom field and pop-up menu
At the lower-left corner of the document window dwells the Zoom field, which shows the current zoom percentage. You can type in a new value any time. Immediately to its right is the Zoom pop-up menu, which also lets you change the document’s view. The view can be between 5 percent and 4,000
Option+ +5 or Ctrl+Alt+5, enter a new zoom value, and press Return or Enter. Or press Ô+= or Ctrl+= to zoom in, or Ô+– or Ctrl+– to zoom out.
Page controls
If you feel like flipping through pages of the document you are creating, InDesign makes it easy with page-turning buttons and the Page field and pop-up menu. Controls for entering prefixes for the page numbers of sections, and for indicating absolute page numbers in a document that contains multiple sections, are also handy. (An absolute page number indicates a page’s posi-tion in the document, such as +1 for the first page, +2 for the second page, and so on.)
Next to the Zoom pop-up menu is a combined page-number field and pop-up menu encased by two sets of arrows. These arrows are page-turning buttons that take you to, from left to right, the first page, the previous page, the next page, and the last page. Just click an arrow to get where you want to go. You can also jump directly to a specific page or master page. To jump to a spe-cific page, highlight the current number in the page number field (by selecting it with your cursor, or by pressing Ô+J or Ctrl+J), enter a new page number,
and press Return or Enter. (To jump to a master page, select the Page Number field and enter the first few characters of the master page’s name.)
Opening Multiple Document Windows
If you like to work on more than one project at once, you’ve come to the right program. InDesign lets you open several documents at once. It also lets you open multiple windows simultaneously for individual documents. A large monitor (or having multiple monitors connected) makes this multi-window feature even more useful. By opening multiple windows, you can
⻬Display two (or more) different pages or spreads at once.You still have to work on the documents one at a time, but no navigation is required — you have only to click within the appropriate window.
⻬Display multiple magnifications of the same page.For example, you can work on a detail at high magnification in one window and display the entire page — and see the results of your detail work — at actual size in another window.
⻬Display a master page in one window and a document page based on that master page in another window.When you change the master
To open a new window for the active document, choose Window➪Arrange➪
New Window. The new window is displayed in front of the original window. To show both windows at once, choose Window➪Arrange➪Tile. When you
choose the Tile command, all open windows are resized and displayed side by side. (If you choose Window➪Arrange➪Cascade, all open windows are
dis-played stacked and staggered on top of each other. The front-most document window is visible; the title bars of the other windows are visible above the front-most document.)
When multiple windows are open, you activate a window by clicking on a window’s title bar or anywhere within the window. Also, the names of all open documents are displayed at the bottom of the Window menu. Choosing a document name from the Window menu brings that document to the front. If multiple windows are open for a particular document, each window is dis-played (they’re disdis-played in the order in which you created them) in the Window menu.
To close all windows for the currently displayed document, press Shift+Ô+W
or Ctrl+Shift+W. To close all windows for all open documents, press Option+Shift+Ô+W or Ctrl+Alt+Shift+W.
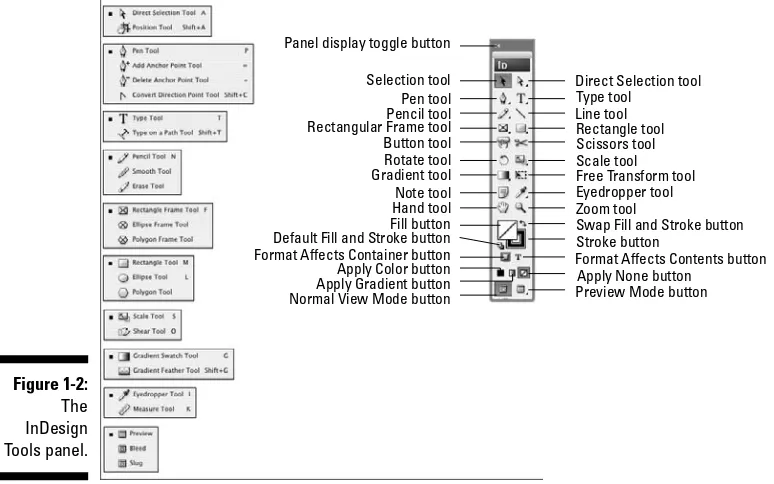
Tooling around the Tools Panel
You can move the InDesign Tools panel — the control center for 32 of InDesign’s 33 tools, as well as for 13 additional functions — by clicking and dragging it into position. The Tools panel usually appears to the left of a doc-ument (see Figure 1-2).
The one tool not directly accessible from the Tools panel is the Marker tool. But you can switch to it from the Eyedropper tool by holding Option or Alt. (Chapter 7 explains its use.)
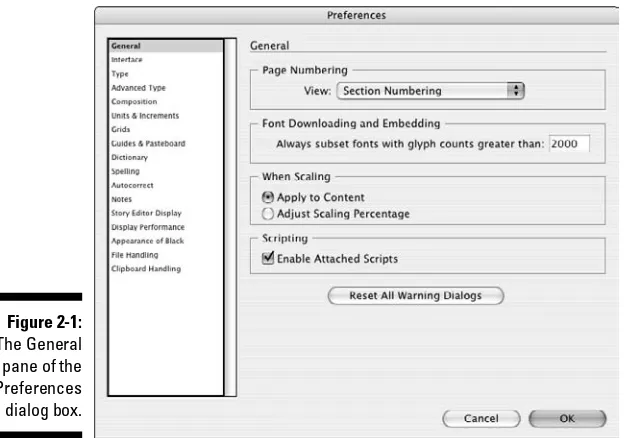
To discover each tool’s “official” name, hover the mouse pointer over a tool for a few seconds, and a Tool Tip will appear, telling you the name of that tool. If the Tool Tips do not display, make sure that the Tool Tips pop-up menu is set to Normal or Fast in the Interface pane of the Preferences dialog box (choose InDesign➪Preferences➪Interface or press Ô+K on the Mac, or
choose Edit➪Preferences➪Interface or press Ctrl+K in Windows).
The Interface pane is new to InDesign CS3. In previous versions, the Tool Tips control was in the General pane of the Preferences dialog box.
InDesign gives you one — and only one — tool for each specific job. The Tools panel includes tools for creating and manipulating the objects that make up your designs. The tools in the Tools panel are similar to those in
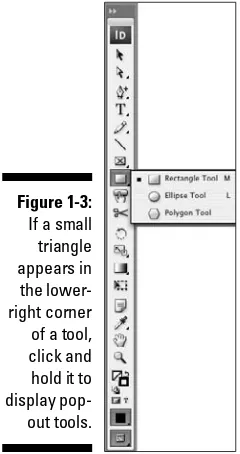
The small arrow in its lower-right corner of some tools is a pop-out menu indicator. A tool that displays this arrow is hiding one or more similar tools. To access these “hidden” tools, click and hold a tool that has the pop-out menu indicator, as shown in Figure 1-3. When the pop-out displays, click one of the new tools. (Figure 1-2 shows all the pop-out tools.)
You don’t need to worry about all the tools, so I highlight just those that you’ll need to know to start using InDesign. You’ll likely come across the others as you work on specific tasks, so I cover those in the chapters that introduce those functions.
Using the Selection tools
To work with objects, you have to select them. InDesign provides three tools to do that, letting you select different aspects of objects.
Selection tool
This is perhaps the most-used tool in InDesign. With the Selection tool, you can select objects on the page and move or resize them. You might want to think of this tool as the Mover tool because it’s the only tool that lets you drag objects around on-screen. Apply Gradient button Normal View Mode button
Direct Selection tool
Preview Mode button
Figure 1-2:
After you’ve selected the Selection tool, here’s how it works:
⻬To select any object on a document page,click it. If you can’t seem to
select it, the object might be placed by a master page (a preformatted page used to format pages automatically), or the object might be behind another object.
⻬To select an object placed by a master page,press Shift+Ôor Ctrl+Shift
while you click.
⻬To select an object that is completely behind another object,Ô+click it or Ctrl+click it.
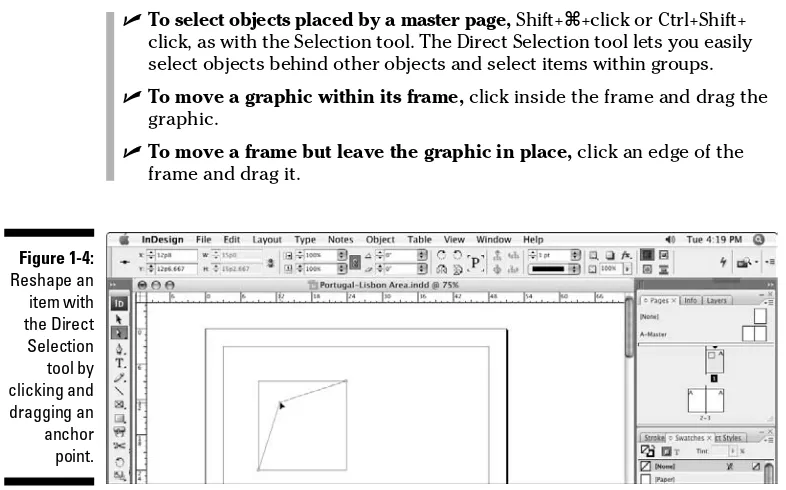
Direct Selection tool
The Direct Selection tool is what you use to work on the contents of a frame, not the frame itself. For example, you can use the Direct Selection tool to select individual handles on objects to reshape them, or to move graphics within their frames.
Here’s how the Direct Selection tool works:
⻬To select an object to reshape it,click the object to display anchor points on the edges (the anchor points are hollow handles that you can select individually, as shown in Figure 1-4). You can drag the anchor points to reshape the object.
Figure 1-3:
If a small triangle appears in the lower-right corner of a tool, click and hold it to display pop-out tools.
click, as with the Selection tool. The Direct Selection tool lets you easily select objects behind other objects and select items within groups.
⻬To move a graphic within its frame,click inside the frame and drag the graphic.
⻬To move a frame but leave the graphic in place,click an edge of the frame and drag it.
Position tool
Meant to mimic PageMaker’s Crop tool to help former PageMaker users adjust to InDesign, the Position tool, which you access from the pop-out menu in the Direct Selection tool, combines some aspects of the Selection tool with some aspects of the Direct Selection tool:
⻬As with the Selection tool, you can resize an object’s frame by dragging
its handles.
⻬As with the Direct Selection tool, you can click a graphic and reposition
it within the frame by dragging — and that has the effect of cropping the graphic.
Using the Type tool
A very frequently used tool, the Type tool lets you enter, edit, and format text. The Type tool also lets you create rectangular text frames.
Here’s how the Type tool works:
⻬To create a rectangular text frame,click and drag; hold the Shift key to create a perfect square.
Figure 1-4:
⻬To begin typing or editing text,click in a text frame or in any empty
frame and type away.
I explain stories and threaded text frames in Chapter 12.
Using the object-creation tools
InDesign has a bunch of tools for creating shapes. Part V covers them in more depth, but you should know about a few of them now because they create objects that can contain either text or graphics. Plus, you can also use them to draw your own shapes that you then color or otherwise embellish in your layout.
Pen tool
With the Pen tool, you can create simple illustrations. You use the Pen tool, which is modeled after the pen tools in Illustrator and Photoshop, to create paths (both open, such as lines, and closed, such as shapes) consisting of straight and curved segments. Give it a try — it’s fun!
Here’s how the Pen tool works:
⻬To create straight lines,click to establish an anchor point, and then move the mouse to the next location, click again, and so on. To move an anchor point after clicking, press the spacebar and drag the anchor point.
⻬To create curved lines,click and drag, and then release the mouse
button to end the segment.
⻬To close a path and create a frame,click the first anchor point created (the hollow one).
⻬To leave a path open and create a line,Ô+click or Ctrl+click away from the path or select another tool.
Type tool
The Type tool lets you draw rectangular text frames, as well as type text inside them.
Line tool
The Line tool lets you draw freestanding lines (paths) on your page. After selecting this tool, simply click and drag the mouse to draw the line. Holding the Shift key while you click and drag constrains the line angle to 45-degree increments, which is useful for creating straight horizontal and vertical lines.
InDesign has three frame tools — Rectangle Frame, Ellipse Frame, and Polygon Frame — and three shape tools — Rectangle, Ellipse, and Polygon. The frame and shape tools are redundant because both frames and shapes can hold text or graphics or be empty.
Because the frame and shape tools really do the same thing, you might use the frame tool when creating frames that will have their content added later. Why? Because they display with a big X through them, making them easier to spot when looking for frames to fill. The shape tools create frames without that X, so it’s easier to overlook them.
To create a rectangle or ellipse, choose the appropriate tool, click somewhere in the document window, and drag the mouse to another location. The rec-tangle or ellipse fills the area. But creating a polygon works differently:
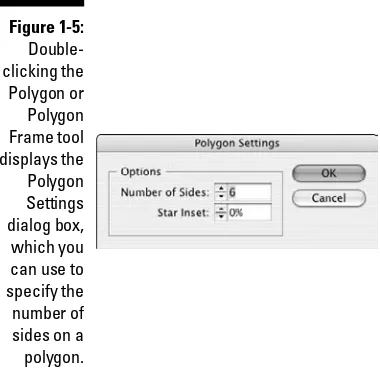
1. Double-click the Polygon or Polygon Frame tool to display the Polygon Settings dialog box, shown in Figure 1-5.
2. Enter a value between 3 and 100 in the Number of Sides field to spec-ify the number of sides on your polygon.
3. To create a star shape, use the Star Inset field to specify the size of the spikes.
The percent value specifies the distance between the polygon’s bound-ing box and the insides of the spikes (for example, enterbound-ing 50%creates spikes that are halfway between the bounding box and the center of the polygon).
4. Click OK to close the Polygon Settings dialog box.
The settings are saved with the active document for the next time you use the Polygon or Polygon Frame tool.
5. Click and drag to create the polygon, using the rulers or the Transform panel or Control panel to judge the size and placement.
To create a symmetrical polygon in which all the sides are the same size, press the Shift key while you click and drag the Polygon or Polygon Frame tool.
Using the navigation tools
Hand tool
The Hand tool lets you move a page around to view different portions of it or another page entirely. After selecting the Hand tool, click and drag in any direction. You can access the Hand tool temporarily without actually switch-ing tools by pressswitch-ing Option+spacebar or Alt+Spacebar.
Zoom tool
With the Zoom tool, you increase and decrease the document view scale. You can highlight a specific area on a page to change its view or you can click on-screen to change the view scale within InDesign’s preset increments, which is the same as pressing Ô+= or Ctrl+= to zoom in.
View buttons
The very bottom of the Tools panel has two view buttons: Normal View Mode and Preview Mode. The first shows the document’s pasteboard, margins, and guidelines; the second hides those so you can get a better idea of how the document will look when it’s printed or saved as a PDF.
A pop-up menu in the Preview Mode button has two preview options: Bleed mode and Slug mode. Bleed mode shows any objects that bleed (extend) beyond the page boundaries, whereas Slug mode shows the space reserved for information such as crop marks and color separation names used in final output. You can read more about these in Chapter 3. You set these options when you create new documents or by choosing File➪Document Setup.
Figure 1-5:
Double-clicking the Polygon or Polygon Frame tool displays the Polygon Settings dialog box, which you can use to specify the number of sides on a polygon.
Working with Panels, Docks,
and Workspaces
InDesign has so many controls and features that its designers have long ago stopped relying on menu commands to access them all. Instead, most of InDesign’s features are presented as sort of miniature dialog boxes, called
panels, that are “windows” of readily accessible options to consider when working in InDesign.
Working with panels
Panels provide an interactive method of working with features, one that lets you access the controls quickly. In many cases, panels offer the only method for performing many tasks. Figure 1-1 shows the panels that appear on-screen by default. Note that you can access all panels — except Quick Apply and Tabs — via the Window menu, whether or not the panel is displayed on-screen at the moment.
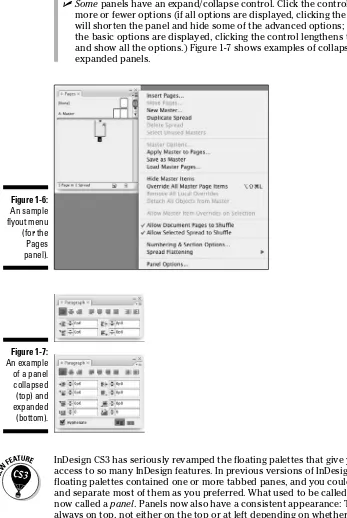
Panels typically have two — but sometimes three — controls:
⻬All panels but the Tools, Attributes, Script Label, and Command Bar
panels have a flyout menu (formerly called the palette menu), which provides a pop-up menu of controls relevant to that panel. Figure 1-6 shows an example of a flyout menu.
⻬Any active panel — meaning it is displayed in front of any others in its
panel group, so you can actually modify its settings — has a close con-trol to remove the panel from the panel group. This is not a way to switch to another panel in that panel group — to do that, just click the tab of the panel you want to work with. (If you remove a panel by mis-take, go to the Window menu to open it again.)
Using contextual menus
InDesign’s contextual menu interface elementis very useful. By Ctrl+clicking or right-clicking the document, an object, elements listed in a panel (such as a list of files or styles), the rulers, and so on, you can display a menu of options for
⻬Somepanels have an expand/collapse control. Click the control to show
more or fewer options (if all options are displayed, clicking the control will shorten the panel and hide some of the advanced options; if only the basic options are displayed, clicking the control lengthens the panel and show all the options.) Figure 1-7 shows examples of collapsed and expanded panels.
InDesign CS3 has seriously revamped the floating palettes that give you quick access to so many InDesign features. In previous versions of InDesign, these floating palettes contained one or more tabbed panes, and you could group and separate most of them as you preferred. What used to be called a pane is now called a panel. Panels now also have a consistent appearance: The tab is
always on top, not either on the top or at left depending on whether it was
Figure 1-7:
An example of a panel collapsed (top) and expanded (bottom).
Figure 1-6:
An sample flyout menu (for the Pages panel).
InDesign CS3 comes with two docks, one that holds only the Tools panel, and one that holds all the other panels, which I call the main dock. (Well, almost. The Control panel also displays separately, though it’s not in a dock, just by itself at the top of the screen unless you move it.) Note that the main dock cannot be moved from the right side of the screen.
To better suit your working style, you can drag panels by their tabs to move them from one panel group to another, drag them out of a dock so they are free-floating, or drag them into a dock so they are no longer free-floating. The new dock feature lets you keep panel groups in one contained area, which helps keep the interface from getting too cluttered. But you’re not forced to work this way: You can still drag panels outside the main dock so they are free-floating on screen.
Not all panels display in the main dock; less-used panels such as Data Merge will show up in a free-floating panel group when you open it via the Window menu. Of course, you can always add such panels to the main dock if you use them a lot.
All but four panels have a tab, which contains its name, to help you select the desired panel without having to go to the Window menu. To quickly select a panel, just click its tab. The four special panels (without tabs) are the Tools, Control, Command Toolbar, and Quick Apply panels. Unlike the rest of InDesign’s panels, they can’t be grouped with other panels, so there’s no need for a tab to select them. (And for some reason, the Tools panel resides in a dock of its own, whereas the other three do not.)
When a panel is active, its controls have the following characteristics:
⻬To display and select an option,click a pop-up menu or an iconic button; the changes take effect immediately.
⻬To place a new value in a field,highlight the value that’s already in the field and enter the new value. Note that fields accept values in all sup-ported measurement systems, as described earlier in this chapter. To implement the new value, press Shift+Return or Shift+Enter. To get out of a field you’ve modified, leaving the object unchanged, press Esc.
⻬To increase or decrease the value in the field,use the clickable up and down arrows where available.
⻬To use math to perform changes,enter calculations in the field. You can add, subtract, multiply, and divide values in fields by using the following operators: +, –, * (multiply), and / (divide). For example, to reduce the width of a frame by half, type /2after the current value in the Width