•Create,manage,andterminateWindowsserversinthecloud •Managestorageoptionsincludingbackupandrecovery •Configureavirtualnetworkincludingsubnetsandroutetables •Secureyourserversusingsecuritygroupsandaccesscontrollists •UseAutoScalingtorespondtochangingconditions
•DeploySQLServerusingRelationalDatabaseService
For your convenience Apress has placed some of the front
matter material after the index. Please use the Bookmarks
Contents at a Glance
About the Author ...xiii
About the Technical Reviewers ...
xv
Acknowledgments ...
xvii
Introduction ...
xix
Chapter 1: AWS Architecture Overview
■
...1
Chapter 2: Getting Started
■
...7
Chapter 3: Basic Instance Management
■
...27
Chapter 4: Elastic Block Storage
■
...49
Chapter 5: Virtual Private Cloud
■
...67
Chapter 6: Advanced Instance Management
■
...89
Chapter 7: Amazon Machine Images
■
...115
Chapter 8: Monitoring and High Availability
■
...135
Chapter 9: Relational Database Service
■
...
155
Chapter 10: Simple Storage Service
■
...179
Chapter 11: Identity and Access Management
■
...
193
Appendix A: Glossary of Terms
■
...215
Appendix B: Metadata URL Structure
■
...219
Appendix D: List of API Methods by Command
■
...247
Appendix E: CloudWatch Metrics and Dimensions
■
...273
Appendix F: SQL Server RDS Parameters
■
...
279
Introduction
According to a survey by Forbes Magazine in July 2013, 59% of the CIOs surveyed say that enabling cloud
infrastructure is their number one priority (http://www.forbes.com/sites/louiscolumbus/2013/07/01/cios-on- cloud-adoption-conquer-complexity-and-help-us-grow/). While cloud has been popular in the open source community for years, enterprises are only just begining to make the transition. This book will prepare you for the transition using the tools you are already familiar with.
Amazon Web Services (AWS) has been the leader in Infrastructure as a Service (IaaS) for years. According to Gartner’s 2013 Magic Quadrant, which evaluated the top 15 IaaS vendors, AWS is 5 times the size of the next 14 cloud vendors combined (https://www.gartner.com/doc/2575815). If you are going to take the time to learn about cloud, there is no better place to start.
Who Should Read This Book?
Pro PowerShell for Amazon Web Services is for the Windows professional who is ready to make the leap to the cloud. While Cloud Computing has been around for a while now, enterprise adoption is just beginning. This book is written specifically for Windows professionals who already know PowerShell, and want to learn to host Windows workloads in the Amazon Cloud.
Windows professionals find themselves under pressure to move workloads to the cloud, but few books have been written for Windows users, and none include examples in PowerShell. While there are many books on AWS, most are written for the open source community. Pro PowerShell for Amazon Web Services will introduce you to Amazon Web Services using a language you already know: Microsoft PowerShell.
This book assumes you have experience with Microsoft PowerShell. It will not teach you how to write PowerShell scripts. There are numerous excellent books on the market already. As an example, Apress offers a book titled Pro Windows PowerShell by Hristo Deshev.
On the other hand, I do not expect you to have any experience with AWS. We will start with the basics and build on that foundation. By the time you get to the end of the book you will know everything you need to run Windows workloads.
What Does This Book Cover?
Amazon offers a wide selection of cloud services, enough to fill many books. This book focuses on running Windows workloads on Elastic Compute Cloud (EC2), which is Amazon’s virtual machine offering. In addition, we will discuss Virtual Private Cloud (VPC), Simple Storage Service (S3), Identity and Access Management (IAM), Simple Notification Services (SNS), Cloud Watch, Auto Scaling, and Elastic Load Balancing (ELB).
In the early chapters I begin by showing you how to use the Web Console, and then introduce the various commands available in the PowerShell API. As the chapters progress and you get more comfortable with AWS, I will focus less on the Web Console and more on PowerShell. By the end of the book you will be using PowerShell exclusively.
How Much Will This Cost?
How much is this going to cost? In short, not much. AWS offers the “free tier,” which allows you to use some resources for free each month. The free tier covers 30GB of storage and 750 hours of micro instance usage each month for the first year of your account. Micro instances are small, single core servers, with 650MB of memory. These are too small to run a production workload, but more than enough to launch a few servers and get comfortable with the platform. The free tier does not cover everything, but if you use micro instances and are diligent about cleaning up after each exercise, your bill should be very small. Over the roughly six months I was writing this book, I spent a grand total of about $25. You should be able to complete the examples for much less.
A Note on the Code Examples
PowerShell is a complicated language with many tricks and shortcuts. Many developers, myself included, pride themselves on being able to accomplish as much as possible with a single line of code. I have done my best to focus on readability and avoid complicated syntax. For example, the following code:
$VPCFilter = New-Object Amazon.EC2.Model.Filter $VPCFilter.Name = 'vpc-id'
$VPCFilter.Value = 'vpc-12345678' Get-EC2SecurityGroup -Filter $VPCFilter
could have been written in one line like this:
Get-EC2SecurityGroup –Filter @{ Name='vpc'; Value='vpc-12345678' }
While I think the first version is easier to understand, don’t assume that the AWS toolkit does not support advanced syntax features. You are free to use pipelining, splatting, etc.
In addition, I want to point out that the examples in this book are riddled with resource IDs. For instance, in the example above, 'vpc-12345678' is the ID of a Virtual Private Cloud (VPC). Your VPC would have a different ID. Every time you create a resource it is assigned a new ID. As you are reading the book be sure to replace the IDs with IDs specific to your resources.
PowerShell and AWS Tools for Windows
The examples in this book require PowerShell 3.0 or greater and the AWS Tools for Windows 2.0. Cloud Computing is cutting edge technology and the things are changing fast. The examples in this book were tested using PowerShell 3.0 and AWS Tools for Windows 2.0. All the examples have also been tested in PowerShell 4.0, but as of this writing, AWS does not officially support PowerShell 4.0.
For example, this book often uses the RunningInstances attribute of the EC2 Reservation object. In version 2.0 the PowerShell team changed the RunningInstances attribute to simply Instance. Thankfully, they maintained backward compatibility and most code written for version 1.0 continues to work. While you may see some discrepancies with the latest documentation, rest assured that all examples in the book have been tested with version 2.0.
Using the Accompanying Source Code
The complete source code for the book is available for download at the book’s companion web site. Visit
AWS Architecture Overview
Introduction
If you are anything like me, you cannot wait to get started and launch an application in the cloud. But, before we dive in and start launching servers, let’s take a step back and look at the big picture. Amazon Web Services (AWS) is a global platform with data centers around the globe. A little time spent on the architecture will help you understand why, and not just what, we are doing with AWS.
In this chapter, we will discuss the AWS global infrastructure, including regions and availability zones, and how to use them to design a robust application in the cloud. We will also introduce all of the services we are going to discuss throughout the book. Before we do, let’s begin by defining Cloud Computing.
What Is Cloud Computing?
It seems that every company has a different definition of Cloud Computing. Amazon describes cloud computing as “the on-demand delivery of IT resources via the Internet with pay-as-you-go pricing”
(http://aws.amazon.com/what-is-cloud-computing/).
Cloud computing is about leasing servers and storage from a provider like Amazon. But, it’s also about so much more. The cloud offers information technology workers significant cost savings and unimaginable agility. Tasks that traditionally took weeks of work, costing thousands of dollars, can be completed in minutes for fractions of a penny.
In addition, cloud computing offers inconceivable scalability. With a single line of code, you can provision thousands of servers. Most important, you pay only for what you need and give the equipment back when you’re done. Furthermore, because you are paying by the hour, running one server for a thousand hours costs the same amount as running a thousand servers for one hour. This is unthinkable in a traditional data center.
Finally, cloud computing is often used in concert with automation. When we combine scalability with
automation, we have the ability to build an application that responds to load. In Chapter 8, we will build a self-healing web application that automatically reconfigures itself in response to changes in load. That’s what cloud computing is all about.
Regions
AWS is organized into multiple regions around the globe. Each region is designed to be independent of the others. This isolation allows us to design highly available applications that span the globe and ensure low-latency response times to our users.
All of the examples in this book were completed in Northern Virginia (us-east-1), but you can use the region closest to you. In fact this is the whole idea. By selecting a region closest to your users, you can deliver the best experience by minimizing latency.
Imagine you run an e-commerce site for a U.S.-based clothing company. Most of your users are also in the United States, but recently you have had a small following in Australia. These users are complaining about the web site. They say it is slow and transactions often time out. Before the cloud, you would have to build another data center in Australia.
But using AWS, you can launch a few servers in Amazon’s data center. Remember that you are only paying for what you use, so if you only need three or four servers in Australia, that’s all you pay for. And it might cost just $1-2 an hour. This is one of the advantages of cloud computing.
Even more important, it may turn out that we are wrong. Maybe the users in Australia were just an anomaly. Within a month, all of the Australian users have moved on. We simply shut done the site in Australia and immediately stop paying. Cloud computing allows us to “fail fast,” which lets the company try new things that would have been too expensive in the past.
Notice that there are only eight regions listed in Table 1-1. Earlier, I mentioned there were nine. The ninth region is called GovCloud and is a region specifically designed to store data for the U.S. government. It is located in the Northwestern United States. If you are doing work for the U.S. government, GovCloud may be an option for you. Regions allow you to deliver your application from the location closest to your users and build redundant applications served from multiple regions. While this is great, Amazon also offers another layer of redundancy called availability zones.
Availability Zones
Each region is further organized into two or more availability zones (AZs). You can think of each AZ as a separate data center. The AZs within a region are isolated from failures but connected with high-speed, low-latency links.
Each AZ has separate power, cooling, and Internet access. In addition, their locations are chosen so they are never in the same flood plain, etc. This allows you to architect highly available applications that span multiple data centers.
Imagine we are deploying an application in a region with two availability zones (see Figure 1-2). We could deploy two servers, one in each AZ, and use an elastic load balancer (ELB) to balance traffic between them. If one of the AZs suffered an outage, the ELB would automatically send all of the traffic to the other AZ. If we are using a relational database service (RDS), we could also enable the multi-AZ option, and AWS will automatically replicate data between availability zones. (We will discuss ELB in Chapter 8 and RDS in Chapter 9.)
Table 1-1. List of Regions and Locations
Region
Location
ap-northeast-1 Asia Pacific (Tokyo)
ap-southeast-1 Asia Pacific (Singapore)
ap-southeast-2 Asia Pacific (Sydney)
eu-west-1 EU (Ireland)
sa-east-1 South America (Sao Paulo)
us-east-1 U.S. East (Northern Virginia)
us-west-1 U.S. West (Northern California)
us-west-2 U.S. West (Oregon)
Region Availability
Zone A
Availability Zone B
Regions and availability zones allow you to build a highly available, low-latency application that you could never dream of building in your own data center. Only a handful of companies around the globe have the resources to match this functionality in their own data centers. Before we wrap up, let’s look quickly at the services available.
Services
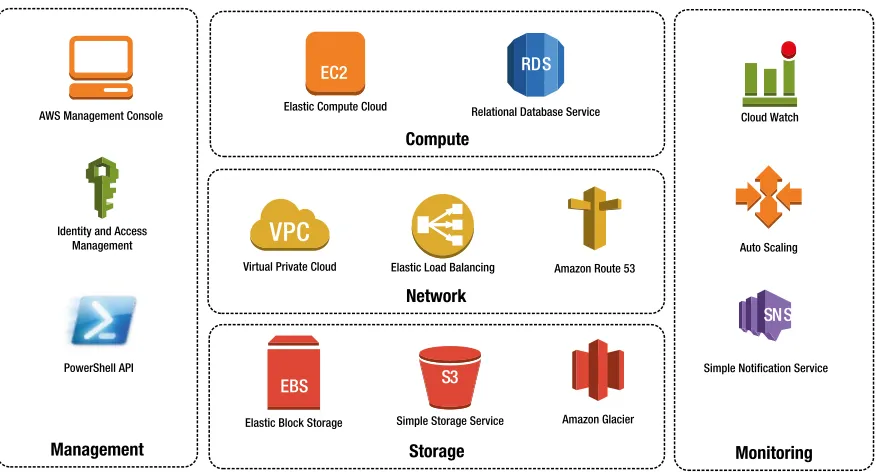
AWS offers a lot of services and they are adding new services every day. This book is focused on Microsoft Windows, and I discuss only those services that are relevant to building Microsoft applications. Figure 1-3 provides an overview of the services we are going to use in this book.
Let’s spend a minute discussing these options:
Management
The services in the management category are used to access and configure AWS.
• AWS Management Console - The console is the web GUI for configuring AWS. You can configure almost anything using the console, but this is a book on PowerShell. In the early chapters I will show you how to get started using the console, but once we get comfortable we will be using PowerShell almost exclusively.
• Identity and Access Management (IAM) - IAM allows you to control access to your account. You can create users and groups and write policies to control access to resources. (We will discuss IAM briefly in Chapter 2 and in detail in Chapter 11.)
Storage
• PowerShell API - PowerShell gives you full control over all services. You can do things in PowerShell that you cannot do in the AWS Management Console. AWS supports many scripting languages, but with the exception of a single exercise in Chapter 7, this book will focus on PowerShell.
Storage
Starting at the bottom of Figure 1-3 and working up, we have multiple storage options.
• Elastic Block Storage (EBS) - EBS is a storage area network we use to create disks for our instances. EBS is a network-based solution similar to iSCSI. You can create volumes from 1GB to 1TB. You can also manage IO operations per second (IOPS). We will use EBS throughout the book, and focus on it in Chapter 4.
• Simple Storage Service (S3) - S3 is highly durable object storage in the cloud. You can use S3 to store an unlimited number of files up to 5GB each. S3 uses HTTP/S to read and write objects. Most important, you get 99.999999999% durability. (We will focus on S3 in Chapter 10.)
• Amazon Glacier - Glacier is a low cost, cold storage solution. Glacier offers the same high durability as S3 for about 1/10 the cost, but stores data offline and requires advanced notice to access your data. This is a great alternative to tape backup. (We will discuss Glacier in Chapter 10.)
Network
Moving up the stack in Figure 1-3, we have multiple network services that work together.
• Virtual Private Cloud (VPC) - VPC allows us to create a private network to isolate your instances from those of other AWS tenants. You can create a custom network topology and control network security. (We will use VPC throughout the book, but focus on it in Chapters 4 and 5.)
• Elastic Load Balancers (ELB) - ELB is a managed load balancing solution. You can balance traffic between multiple servers across availability zones. You can create public ELBs on the Internet or use a private ELB to balance traffic between layers of a multitier application. (We will discuss ELB in Chapter 8.)
• Route 53 - Route 53 is Amazon’s managed DNS solution. If you use Route 53 you can balance traffic between multiple regions, and AWS will determine which region is closest to the user and route them automatically. (We will discuss Route 53 briefly in Chapter 8.)
Compute
At the top of the stack there are two compute services we will discuss.
• Elastic Compute Cloud (EC2) - EC2 is Amazon’s virtual server service. This is how we launch servers, called instances, in the cloud. EC2 offers thousands of images and hardware configurations for every imaginable use case. This is the focus of the book, and we will use EC2 throughout.
Monitoring
Finally, we have a collection of monitoring services.
• CloudWatch - CloudWatch is used to monitor the environment. CloudWatch allows you to create custom alarms and defines what actions to take when an issue arises. For example, you might raise an alarm when CPU utilization is above 80% for an extended period of time. (We will use CloudWatch to monitor instances in Chapter 8.)
• Auto Scaling - Auto Scaling, combined with CloudWatch, allows you to automatically respond to changing conditions. In Chapter 8 we will create an application that automatically launches new instances when the application is under high load.
• Simple Notification Service (SNS) - SNS is Amazon’s notification system. CloudWatch can publish messages to SNS whenever an alarm occurs. You can use SNS to subscribe to events using e-mail, SMS text messages, and many other options. (We will use SNS in Chapters 8 and 9.)
Summary
Getting Started
In the previous chapter, we described cloud computing and then discussed the benefits of scripting your AWS configuration. Before we get started writing these scripts, we need to create an AWS account and prepare our PowerShell environment.
We will begin by creating a new AWS account and credentials for PowerShell. Then we will install the AWS Toolkit and configure a few default values. Although this might not be the most exciting chapter, it is an important one because the examples in the rest of the book assume that you have followed the steps in this chapter.
Creating an AWS Account
If you don’t already have an Amazon Web Services (AWS) account, go to http://aws.amazon.com and click Sign Up to get started. If you already have one, skip ahead to the next section.
To create an AWS account, you will have to sign in using an Amazon.com account (see Figure 2-1). This can be the same account you use to shop on Amazon.com. If you are creating an AWS account for work, you might want to create a separate Amazon account using your work e-mail rather than using your personal account. If you want to create a new account, or have been living under a rock and don’t have an Amazon account already, you can create one now.
If this is the first time you are using AWS, Amazon will ask you to confirm your phone number. Then an automated system will call your phone and ask you to enter a verification code.
Next, you will have to pick a support plan (see Figure 2-2). I am using the free plan. Basically, this means that there is no support. With the free plan, you will have access to the user forums, but there are no guarantees.
After you choose your support plan, you will need to confirm your selections to complete the wizard. Then it’s time to create a user account, which is discussed next.
Creating a User Account
Now that you have an AWS account, you will need to create a new IAM user. (IAM stands for identity and access management.) AWS has two types of users: Account Credentials and IAM Users. The e-mail address you used to create the AWS account is called an “AWS Account Credential.” You should not use your account credentials for day-to-day activities on AWS. Save your AWS account credentials to change account options and access your bills. Create an IAM user for day-to-day activities instead.
IAM allows you to create multiple user accounts and configure the permissions of each user. If you already have an IAM User with administrator privileges, you can skip to the next section.
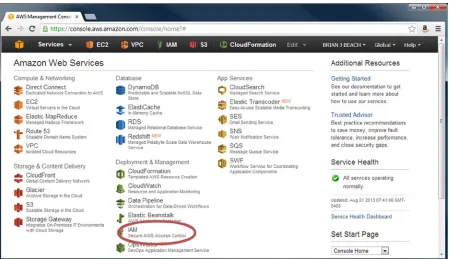
Open http://console.aws.amazon.com. If you are not already signed in, use your AWS Account Credential (i.e., the e-mail address used to create the account) to sign in. You will be taken to the AWS Management Console. Click the IAM link at the bottom of the second column (see Figure 2-3).
From the IAM dashboard, click the Create a New Group of Users button (see Figure 2-4).
Create a new group called Admins (see Figure 2-5) and then click Continue. Members of the group will have full control over AWS.
Figure 2-3. AWS Web Console dashboard
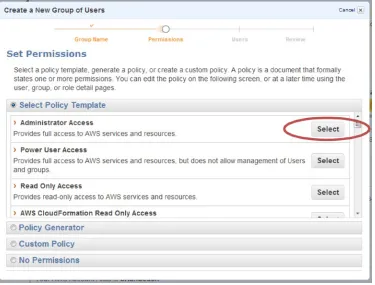
Next, choose the Administrator Access Policy Template (see Figure 2-6). A policy template is a set of common permissions. You can also create custom policies, which we will do in a later chapter. For now, use the template. Figure 2-5. Creating a new IAM group
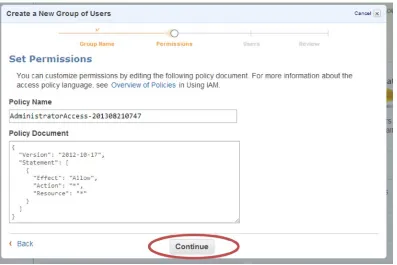
You now have a chance to edit the policy. For now, just leave the default settings and click Continue (see Figure 2-7).
Now add a new user named admin to the Admins group (see Figure 2-8). Make sure that the Generate an access key for each User check box is selected. Click Continue.
Review the options and click Continue to confirm (see Figure 2-9). Figure 2-8. Creating a new IAM user
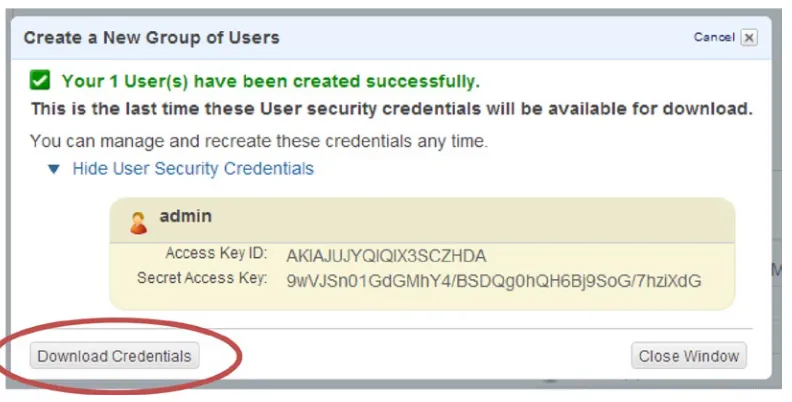
On the next screen, make sure you download the admin credentials and remember where you saved them (see Figure 2-10). You will use these keys to run PowerShell scripts. You will also need to enter your keys again in Chapter 7.
Caution
■
Note that AWS does not store your secret key. If you lose your credentials, you will not be able to get another
copy and will have to generate a new set.
Note that you have not yet chosen a password. In fact, not all users have a password. See the “Types of Credentials” sidebar for a description of the various credential types and when to use each.
TYPES OF CREDENTIALS
IAM users have three types of credentials, and each one is used for a different purpose:
Username and Password:
The username and password are used to access the web console. In addition to the
password, you can also opt for Multi Factor Authentication (MFA). MFA uses an authentication code for extra
security. MFA requires an authentication device or smartphone application like Google Authenticator.
Access Key ID and Secret Key:
The Access Key ID and Secret Key are used to access the REST API. Both
PowerShell and the AWS Command Line Interface (CLI) use the REST API. Therefore, you need to download keys
to use PowerShell.
Signing Certificates:
Signing Certificates are used for the SOAP web services. The SOAP service is being
deprecated, so I will not discuss it in this book.
Note that not all users will have all types of credentials. An administrator that does not use the API may only have
a username and password, for example, while a developer that does not have access to the web console may
only have an Access Key ID and Secret Key.
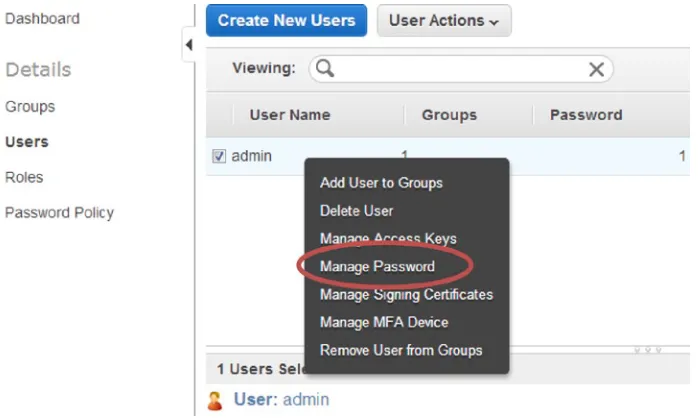
From the IAM dashboard, click on Users to display the IAM users in your account. Right-click the admin user and choose Manage Password (see Figure 2-11).
Choose the Assign a custom password option, enter the password twice, and click Apply (see Figure 2-12).
The last thing we need to do is get the custom sign-in URL for your new account. In order to sign in using your IAM username and password, you must visit the account sign-in URL. Each account has a unique sign-in URL, but the default URL is very difficult to remember; let’s change it to something we can remember.
To change the sign-in URL, return to the IAM dashboard and scroll down to the bottom to the AWS Account Alias section (see Figure 2-13). Click the button to specify a friendly account alias.
At this point you should sign out using the menu at the top right of the screen (see Figure 2-14).
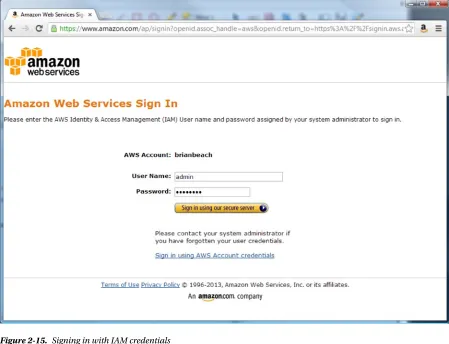
Finally, navigate to the custom sign-in link and sign on as admin (see Figure 2-15). Figure 2-13. Setting an account alias
Note that you are now logged in as an IAM User. Compare the IAM user listed in the top right corner (see Figure 2-16) to the Account Credential in Figure 2.14. Note the IAM user includes the “@ alias.”
Figure 2-16. Signed In as an IAM User Figure 2-15. Signing in with IAM credentials
Configuring PowerShell
AWS Tools for Windows PowerShell requires Windows XP or later and PowerShell 3.0 or later. PowerShell 3.0 is the default for Windows 8 and Server 2012. You can also install PowerShell 3.0 on Server 2008R2 SP1 with the .Net framework 4.0.
You can download the AWS tools from http://aws.amazon.com/powershell/. If you are running your script on an AWS instance (e.g., a server running in the AWS Cloud), the tools are already installed. If you want to run the tools on your own machine, download the installer from the site above. Note that the examples in this book were tested using version 2.0 of AWS tools.
I usually write scripts using the PowerShell Integrated Script Environment (ISE) because it supports IntelliSense and debugging. The PowerShell ISE is a Windows Feature. If it is not already enabled, you may need to enable the feature from Windows Server Explorer. This feature is enabled by default on AWS instances.
Once you have the AWS tools installed, you need to import the AWS PowerShell Module. This Module includes all of the PowerShell commands to manage AWS. Simply type Import-Module and include the path where you installed the AWS Tools.
On a 32-bit OS, type:
Import-Module "C:\Program Files\AWS Tools\PowerShell\AWSPowerShell\AWSPowerShell.psd1"
On a 64-bit OS, type:
Import-Module "C:\Program Files (x86)\AWS Tools\PowerShell\AWSPowerShell\AWSPowerShell.psd1"
You will need to import this module each time you start a new PowerShell session.
Tip
■
If you are going to be working with AWS often, you may prefer to add the AWS Module to your profile. Your profile
is simply a script that runs each time PowerShell starts. Just open it in Notepad and add the Import-Module line.
The profile invoked when you start a PowerShell command prompt can be found at:
Documents\WindowsPowerShell\Profile.ps1
The profile invoked when you start the PowerShell ISE can be found at:
Documents\WindowsPowerShell\Microsoft.PowerShellISE_profile.ps1
Note
■
If you have never customized your profile, the file may not exist. Just create the folder and file as needed.
Let’s check if the AWS tools are working. Type Get-AWSRegion at the PowerShell command prompt and press Enter, as shown here.
Get-AWSRegion will list all of the AWS regions (described in Chapter 1) around the globe, as shown in the following code output:
Region Name --
----us-east-1 US East (Virginia) ... us-west-1 US West (N. California) ... us-west-2 US West (Oregon) ... eu-west-1 EU West (Ireland) ... ap-northeast-1 Asia Pacific (Tokyo) ... ap-southeast-1 Asia Pacific (Singapore) ... ap-southeast-2 Asia Pacific (Sydney) ... sa-east-1 South America (Sao Paulo) ...
If the command succeeds, your PowerShell environment is set up correctly. Notice that we did not use the credentials we downloaded earlier. The Get-AWSRegion method does not require authentication. Before you can do anything exciting, you are going to have to supply your credentials. Let’s see how to do this in the next section.
Specifying Credentials and Region
Now that we have the AWS tools installed and PowerShell configured, let’s try something more complicated. Type the
Get-EC2Instance command to list all of the instances deployed in the Cloud. Remember that an instance is Amazon’s term for a server.
PS> Get-EC2Instance
Note that you have not deployed any instances yet, so this command is not expected to return anything. But when we run the command we get the following error:
Get-EC2Instance : No credentials specified or obtained ...
Before you can use AWS, you need to log in. Remember that PowerShell uses the REST API. Therefore, you will need an access key and secret key in order to use PowerShell.
All of the AWS commands support the AccessKey and SecretKey parameters. You must include the keys you downloaded in the last section. For example, type:
PS> Get-EC2Instance -AccessKey AKIA...ZHDA -SecretKey 9wVJ...iXdG
Note, however, that we still get an error:
Get-EC2Instance : No region specified or obtained ...
The credential error is gone, but now we have a new error—we also need to specify a region. Each AWS region is independent. You need to tell AWS which region you want to list the instances in. Note that you cannot list the instances in all regions in a single command. Let’s list your instances in the Northern Virginia region. Type the following:
This code produces the following results:
ReservationId : r-12345678 OwnerId : 123456789012 RequesterId :
GroupId : {} GroupName : {}
RunningInstance : {ip-10-1-1-5.brianbeach.com}
At this point, you should receive a list of your instances deployed in the specified region. If you just created a new account, you probably don’t have any instances yet. As long as you don’t get an error, it’s working correctly. This is everything you need to execute the scripts in this book, but there are still a few things we can do make life easier. For example, it would be nice to save the default credentials and region so we don’t have to add them to every command.
Setting Defaults
It can get cumbersome including the keys on every line of every script. Life would be easier if you had to specify the keys only once. Luckily, Amazon thought of this and included the Set-AWSCredentials and Set-DefaultAWSRegion
commands.
Note
■
I am no longer including the command prompt (
PS>) in my examples. From here on, most examples will be
multiline scripts. I am using the PowerShell ISE to edit and run my scripts as a batch.
Just type the script into the top window and click the play button (or press the F5 key). If you prefer, you can enter these commands, one at time, at the command prompt. Personally, I prefer the IDE.
Set-DefaultAWSRegion us-east-1
Set-AWSCredentials -AccessKey ACCESS_KEY -SecretKey SECRET_KEY Get-EC2Instance
This script results in the following:
ReservationId : r-12345678 ...
Notice that once I set a default region and credentials, I can run the Get-EC2Instance command without any parameters. This is so much easier. I can simply include these two lines at the top of the script, and I don’t have to worry about it again.
If you want to clear the defaults, you can use the Clear-AWSCredentials and Clear-DefaultAWSRegion
commands. For example:
Clear-AWSCredentials Clear-DefaultAWSRegion
Persisting Defaults
The Initialize-AWSDefaults command will persist the credentials and region between sessions. PowerShell will remember your defaults when you restart PowerShell or reboot your computer. Once you persist the credentials, you no longer need to specify them in your script. This makes the script portable between developers and AWS accounts. Note that unlike the PowerShell profiles, persisted defaults set in the ISE also affect the command line. Type the following:
Set-DefaultAWSRegion us-east-1
Set-AWSCredentials -AccessKey ACCESS_KEY -SecretKey SECRET_KEY Initialize-AWSDefaults
Notice the results:
Credentials retrieved from Session Region retrieved from Session
Credentials and region will be saved in this session
When you start a new PowerShell session, the default values will be loaded automatically. For example:
Get-EC2Instance
Now, if the defaults were not already loaded, they will be loaded as needed. This command now produces the following results:
Default credentials for this shell initialized from stored default profile Default region for this shell initialized from stored default profile ReservationId : r-12345678...
If you want to clear the defaults, you can use the Clear-AWSDefaults command:
Clear-AWSDefaults
We are almost done discussing defaults, but there is one more option I want to mention: stored credentials. Stored credentials allow you to store multiple credentials and switch between them quickly.
Using Stored Credentials
You may find that you have more than one set of credentials to manage. Maybe you have separate AWS accounts for development and production servers; in my opinion, this is a really good idea. (And I hope you’re not running these examples in the same account that you use to host production workloads.)
You can use the Set-AWSCredentials command we discussed earlier to create named profiles and quickly switch between them. To create a named profile, use the StoreAs attribute. For example:
Now we can use the stored credentials as an attribute to any command. For example, if you want to list the servers in the production environment, type:
Get-EC2Instance -StoredCredentials Production
Here is the result:
ReservationId : r-12345678...
And, if you want to list the servers in the development environment, type:
Get-EC2Instance -StoredCredentials Development
The preceding script produces this result:
ReservationId : r-87654321...
If you want to swap the default credentials between the development and production profiles, you can use the Set-AWSCredentials command with the StoredCredentials attribute. All subsequent commands will use the production credentials.
Set-AWSCredentials -StoredCredentials Production
You can list the various credentials you have stored using Get-AWSCredentials. For example, type:
Get-AWSCredentials –ListStoredCredentials
To get this result:
Development Production
Finally, you can remove credentials using the Clear-AWSCredentials command:
Clear-AWSCredentials -StoredCredentials Development
At this point your PowerShell environment is ready. In the next chapter, we are going to launch a few instances. Before you do that, however, you are going to need an EC2 key pair.
Using Key Pairs
Before we move on to creating instances, you will need a key pair. This key pair is used to encrypt the Windows Password for a new instance. AWS keeps the public key, and you keep the private key. When you create a Windows instance, AWS creates a local administrator account and generates a random password. It then encrypts the random password with the public key and stores the encrypted copy.
You can retrieve the password any time and decrypt it with your private key. Note that AWS does not keep the plain-text password. Therefore, only you can decrypt the password.
Caution
To create a key pair, log in using your IAM admin user and choose a region. I will be using Northern Virginia (see Figure 2-17), but you can select the location nearest you.
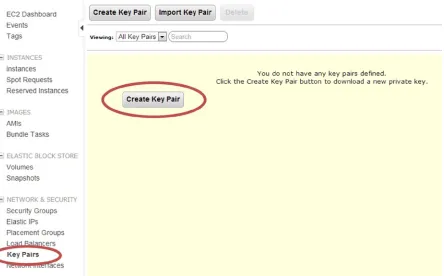
From the AWS home page, select EC2. Then choose Key Pairs from the menu and click Create Key Pair (see Figure 2-18).
Figure 2-17. Choosing an AWS region
Name the key pair and click Create (see Figure 2-19). Your browser will download the private key. Make sure you save it. Note that the examples in this book assume your key is stored in c:\aws\mykey.pem.
You can also create a new key pair using the New-EC2KeyPair command. This command generates a new key pair and returns the private key. You can save the private key to a file using the Out-File command. Note that you must specify the encoding as ASCII. For example:
$KeyPair = New-EC2KeyPair -KeyName MyKey
$KeyPair.KeyMaterial | Out-File -FilePath 'c:\aws\MyKey.pem' -Encoding ASCII
That’s everything you need to complete the exercises in this book. If you cannot wait any longer to launch an instance, feel free to move on to Chapter 3. But, if you have the patience, I would like to tell you about one more feature: IAM roles.
Using IAM Roles
We have covered a lot of material already in this chapter, but there is one more feature I want to discuss. It is a bad idea to have your production scripts running as an individual user. What happens if that user leaves the company? If you delete her account, all of your scripts will stop working.
You could create an additional IAM user just for running production scripts. But, how do you keep those keys secret? How do you keep a disgruntled administrator you fired from using the keys to terminate all your servers? Luckily, AWS provides a solution for this, too: IAM roles.
An IAM role allows you to grant permission to an EC2 instance. This way, you don’t need keys to run PowerShell scripts. In other words, if you assign an IAM role to an instance, the instance has permission to run scripts rather than a user. Any scripts that are run on that instance are implicitly granted the permissions defined to the IAM role. Therefore, you don’t have to bother with keys at all. Although you don’t have to set credentials, you still need to set the region.
Of course this only works for instances running in AWS. You cannot use IAM roles for machines running in your data center. In addition, you have to assign the role when you create the instance; you cannot assign it later.
To create an IAM role, open the AWS Management Console and navigate to the IAM console. (I assume you know how to do this by now. If not, go back to the “Creating a User Account” section at the beginning of this chapter.) Choose Roles from the left navigation. Then, click the New Role button and name your new role (see Figure 2-20). I will use the name AdminRole for the scripts in this book.
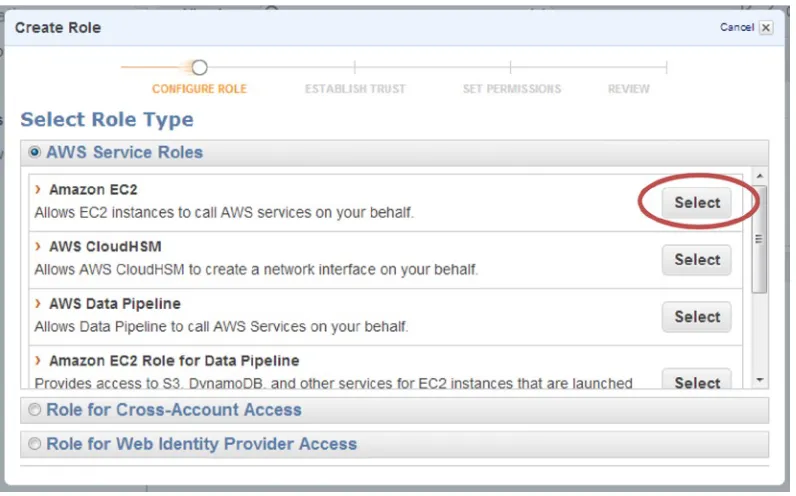
There are many types of roles available. We want to create an “Amazon EC2” role. Click the Select button next to Amazon EC2 (see Figure 2-21).
Let’s grant this role administrator permission (see Figure 2-22), even though in a real-life scenario you would want to restrict the role. With administrator permissions assigned to an EC2 instance, anyone who runs a script on that instance will have full control over your account. For the purposes of this book, this is fine, but please be more restrictive in real life.
Figure 2-20. Creating an IAM role
On the next screen, leave the default policy and click the Continue button. Then, on the Review screen, click the Create Role button.
We will use this role in the second exercise of Chapter 3.
Summary
In this chapter we created an AWS account and IAM user. Then we installed the AWS Tools for PowerShell and configured our PowerShell scripting environment with a default region and credentials. Finally, we created an EC2 key pair and an IAM role. We now have everything in place to begin using the cloud. In the next chapter, we will launch a few basic instances.
Basic Instance Management
Great! You’re done configuring your environment. I know the last chapter was a bit dull, but this chapter is where it gets exciting. You’ll jump right in and get started by creating an instance. An EC2 instance is, simply, a server running in the cloud. With a few quick clicks, you will have your first server up and running.
In this chapter we will focus on EC2 Classic instances. These are the instances that have been around since the beginning. Amazon recently, however, introduced Virtual Private Cloud (VPC). VPC adds a lot of new and exciting capabilities, which we will discuss in Chapter 6.
It’s important to note that Amazon is beginning to phase out EC2 Classic in favor of VPC—eventually, EC2 Classic will no longer exist. This is an exciting time to be working with cloud technologies. The industry is moving very fast, and while this can be fun, it also causes some inevitable headaches.
As of this writing, for example, AWS has deprecated EC2 Classic in the Oregon region. Lucky for us, they have created a default VPC, which acts very much like EC2 Classic. Other than a few very minor UI changes, all of the examples in this chapter will run in regions where EC2 Classic has been deprecated.
In this chapter you will learn to create new instances and connect them. Then we will discuss how to start, stop, and terminate instances. We will learn various ways to access metadata and add custom metadata tags. In the exercises at the end of the chapter, we will build a PowerShell script to automate the launch process and customize the configuration of an instance.
Creating Instances
Let’s get started by creating a new instance. In this section we’ll launch a Windows Server 2012 instance. I’ll begin by using AWS Management Console. The Console will give you a good overview of all the options available. Then, I’ll show you how to do the same thing with a single line using PowerShell.
Launching an Instance with the Web Console
For this first exercise—launching an instance with the Web Console—I am going to include step-by-step instructions with figures. I want to note that the Web Console changes often. Don’t be surprised if your console screens look a bit different from my figures.
If you are not already signed in to the Web Console, sign in using the URL and IAM account you created in Chapter 2. Do not use the e-mail address you used to create the account.
On the EC2 dashboard, make sure the region in the top right corner is the same one you used to create your key pair in the last chapter (e.g., Northern Virginia), as shown in Figure 3-2. Then click the Launch Instance button to start the wizard. Figure 3-1. The home page
The first page of the wizard lists the Amazon Machine Images (AMI). An AMI is a template used to create a new instance. The quick start tab includes the most common images. There are additional images available from the other tabs, currently more than 20,000. For now, we just need a basic version of Windows to get our feet wet. Find “Microsoft Windows Server 2012 Base” and click the Select button (see Figure 3-3).
Figure 3-3. Choosing an AMI
On the instance details page, ensure that the Instance Type is set to T1 Micro and click the button that says “Next: Configure Instance Details” (see Figure 3-4). The Instance Type is the virtual hardware we want to use. There are numerous combinations of processors, memory, etc. Only the micro instance is eligible for the free tier. You can read more about the free tier on the AWS web site. (An up-to-date description of the Instance types is available here: http://docs.aws.amazon.com/AWSEC2/latest/UserGuide/instance-types.html.)
Skip the next two pages by clicking the button that says “Next:...”. We will review all of these advanced options in future chapters. On the Tag Instance page, assign a name to the instance and click the button that says
“Next: Configure Security Group” (see Figure 3-5).
Figure 3-5. Tagging the Instance
Figure 3-6. Configure Security Group
On the Configure Security Group screen, select the default group from the list of existing security groups (see Figure 3-6) and click the button that says “Review and Launch.” Security groups act like a firewall within AWS. You can use security groups to control what traffic is allowed to flow to and from the instance. (We will spend time looking at security groups in Chapter 6.)
You just launched your first server in the cloud. Click the “View Instances” button, and you wil be taken to the EC2 Instances page. You should see your new instance in the list with a state of “pending.”
It will take about 10 minutes for the instance to launch. While we are waiting, let’s discuss how we can do the same thing in PowerShell using a single line of code.
Launching an Instance with PowerShell
In PowerShell, we use the New-EC2Instance command to create instances. This is a really rich command that can do everything the wizard can do. For now we will focus on the basics of the New-EC2Instance command.
In the following example, I have specified only the required parameters.
$AMI = Get-EC2ImageByName -Name 'WINDOWS_2012_BASE'
New-EC2Instance -ImageId $AMI[0].ImageId -KeyName 'MyKey' -InstanceType 't1.micro' -MinCount 1 -MaxCount 1
Let’s look at each parameter in turn, most of which are the same ones we saw when using the wizard in the preceding section:
• ImageId specifies which AMI to use. An AMI is the image you want to launch. The image IDs are different in each region; therefore, my examples will use Get-EC2ImageByName to look up the correct ID in the current region. (We will discuss the Get-EC2ImageByName command in Chapter 7.)
• MinCount and MaxCount specify how many instances to launch. See the sidebar on reservations for details.
• KeyName is the name of the key pair we created in the last chapter. It is used to encrypt the administrator password. Technically, this parameter is optional, but without it you will not be able to retrieve the admin password.
• InstanceType describes the hardware we wish to use. This parameter is also optional. But, remember that only the “t1.micro” instance is eligible for the free tier. If you don’t specify the InstanceType, Amazon will launch a “small” instance.
RESERVATIONS
Let’s spend a minute talking about the
MinCountand
MaxCountparameters.
New-EC2Instancealways creates
instances in batches called
reservations
. We are going to be using the reservation object in many of the scripts
later in this chapter.
A reservation is a batch of instances launched at the same time. Even if you only want a single instance, you
create a batch of size one. That’s what I did.
Even Amazon has a finite number of instances available. AWS will try to launch the number of instances specified
in
MaxCount. If it cannot, Amazon will launch the largest possible number above
MinCount. If
MinCountis more
than Amazon EC2 can launch, no instances are launched.
Despite the name,
New-EC2Instanceactually returns a reservation object rather than an instance. If you want to
check the individual instances, the reservation includes a list called
RunningInstance. You can use a zero-based
array syntax to read the individual instances. For example:
$AMI = Get-EC2ImageByName -Name 'WINDOWS_2012_BASE'
$Reservation = New-EC2Instance –ImageId $AMI[0].ImageId -KeyName 'MyKey' -InstanceType 't1.micro' -MinCount 2 -MaxCount 2
$Reservation.RunningInstance[0].InstanceId $Reservation.RunningInstance[1].InstanceId
Produces the following output:
i-36d1455c i-38d14552
By the way, I should mention that although the attribute is called
RunningInstance, it also contains instances
that are in a stopped state.
You may have noticed that I did not specify the security group (i.e., Firewall.) Unlike the Web Console wizard, the API will use the “Default” group if you don’t specify one.
There are numerous additional parameters to the New-EC2Instance command. These correspond to the options we skipped in the wizard. Don’t worry. We will talk about them all in later chapters.
Windows instances take about 10 minutes to launch regardless of how we create them. The instance(s) you launched with PowerShell are probably still launching, but the one we launched with the AWS Management Console is probably ready; let’s go check it now.
Connecting to an Instance
Returning to the Web Console, let’s check on that instance we launched earlier.
Now, click the “Choose File” button (see Figure 3-9) and locate the private key you created in Chapter 2. Then click the “Decrypt Password” button.
Figure 3-8. Connect to Your Instance
Figure 3-9. Decrypting the password
Great! Now you know how to create and connect to an instance using the web console.
Note
■
Depending on which region you are running in, you may need to add a rule to the security group to allow
Remote Desktop Protocol (RDP). Follow the instructions below. We will discuss Security Groups in detail in Chapter 6.
From the EC2 Web Console, choose Security Groups.
•
Select the group named “default” and choose the Inbound tab.
•
Choose RDP from the “create a new rule” dropdown, and click the “Add Rule” button.
•
Finally, click the “Apply Rule Changes” button.
•
You can, of course, retrieve the password using PowerShell. The PowerShell command is Get-EC2PasswordData
command. Get-EC2PasswordData takes an instance ID and the path to the private key and returns the password. Note that your instance ID will be different from mine. Each instance has a different ID. You can get the ID from the instances page of the AWS Management Console.
Get-EC2PasswordData -InstanceId 'i-2143eb59' –PemFile 'c:\aws\MyKey.pem'
The preceding code will return an error if the password is not available yet. Remember, it takes about 10 minutes to launch a new instance. We will discuss how to test for password availability in the first exercise at the end of this chapter. Now that you know how to launch and connect to an instance, let’s talk about starting, stopping, rebooting, and terminating instances.
Managing the Instance Life Cycle
Now that you have a few instances created, you will want to be able to manage them. You can Start, Stop, Reboot, and Terminate (i.e., Delete) an instance by right-clicking it in the AWS Management Console. Figure 3-11 shows the relevant portion of the context menu.
Figure 3-10. Downloading the shortcut file
The equivalent PowerShell commands are all pretty simple. They each have a parameter called Instance, which is the id of the instance you want to start, stop, etc.
To start an instance, you use Start-EC2Instance:
Start-Ec2Instance -Instance i-38d14552
To reboot an instance, you use Restart-EC2Instance:
Restart-Ec2Instance -Instance i-38d14552
To stop an instance, you use Stop-EC2Instance:
Stop-Ec2Instance -Instance i-38d14552
To terminate an instance, you use Stop-EC2Instance command with an additional attribute, Terminate. You will be asked to confirm the terminate command. You can add the force attribute to suppress the prompt.
Stop-Ec2Instance -Instance i-38d14552 -Terminate -Force
Listing Instances and Metadata
You have already seen the list of instances in the Web Console. You can use the Get-EC2Instance to list instances in PowerShell. The primary purpose of Get-EC2Instance is to return a list of all the instances in your account. In addition, you will use the Get-EC2Instance command to get metadata about the instance. Metadata includes information such as the IP address, drive configuration, and type of instance.
Get-EC2Instance
The preceding command returns the following results:
ReservationId : r-2143eb59 OwnerId : 123456789012 RequesterId :
GroupId : {} GroupName : {}
RunningInstance : {ec2-54-226-246-207.compute-1.amazonaws.com} ...
Of course, you can use any of the standard PowerShell commands with the AWS commands. For example, we can format our list of instances as a table.
Get-EC2Instance | Format-Table
The preceding command returns the following results:
If you want a specific instance, use the Instance parameter. For example:
Get-EC2Instance -Instance i-2143eb59
This command returns the following results:
ReservationId : r-12345678 OwnerId : 123456789012 RequesterId :
GroupId : {} GroupName : {}
RunningInstance : {ec2-54-226-246-207.compute-1.amazonaws.com}
If you have been paying attention, you probably noticed that Get-EC2Instance returns a reservation object. Remember that New-EC2Instance always creates a batch called a reservation. When you call Get-EC2Instance, AWS returns the reservation that includes that instance. The RunningInstance attribute includes the specific instance you requested.
To access the instance metadata, you need to read the first instance in the RunningInstance list. For example:
(Get-EC2Instance -Instance i-2143eb59).RunningInstance[0]
This command returns the following results:
InstanceId : i-2143eb59 ImageId : ami-12121212
InstanceState : Amazon.EC2.Model.InstanceState PrivateDnsName :
PublicDnsName : ec2-54-226-246-207.compute-1.amazonaws.com
InstanceLifecycle : SpotInstanceRequestId : License : VirtualizationType : hvm ClientToken : Tag : {} NetworkInterfaceSet : {} EbsOptimized : False InstanceProfile :
This will give you a great deal of information about the instance including storage, network, and other details. We will use this information throughout the rest of the book. But before we get into that, let’s look at one other way to access the metadata: the metadata URL.
Using the Metadata URL
Get-EC2Instance is a great way to get information about an instance, but there is another way: the metadata URL. The metadata URL returns much of the same information as Get-EC2Instance, but always returns information about the current instance.
The metadata URL is a web service that returns metadata about the current instance. The URL is
http://169.254.169.254/latest/meta-data. Note the metadata service is only available from a script running on the EC2 instance. You cannot use the API from a machine outside the AWS data center. Nor can you use the metadata service to get information about another instance.
Opening the metadata URL in Internet Explorer lists all of the options available (see Figure 3-12).
Navigating to any of the sub-URLs will return useful information about the instance. For example, navigating to http://169.254.169.254/latest/meta-data/instance-type will return the type of hardware you are running on (see Figure 3-13).
Figure 3-13. Using the metadata URL to get the instance type
Of course, you can also access metadata from PowerShell using the Invoke-RestMethod command and passing the metadata URL. The following script is equivalent to the earlier example:
Invoke-RestMethod 'http://169.254.169.254/latest/meta-data/instance-type'
The preceding script results in the following:
t1.micro
A common use of the metadata URL is to discover the id of the current instance and then use it call the AWS API. This way, we can write a generic script that will run on any EC2 instance. The following script uses the metadata API to discover the instance id and then calls Get-EC2Instance on it. Note that the instance id was not known ahead of time. Instead, it was discovered by the script.
Using User Data
One of the options we skipped over in the section on launching new instances was user data. User data is similar to metadata, but it allows you to include any custom data you want. The user data is available via a web service call, just like the metadata in the prior section.
One common use of user data is to include information needed to “bootstrap” the instance, or configure it after launch. We will do this in the second exercise at the end of this chapter.
To include user data, simply type whatever you want into the text box at the bottom of the third page of the Request Instances Wizard (see Figure 3-14). It is common, but not required, to use XML in the User Data section. Using XML makes it easier to parse the data later. In the example in Figure 3-14, I am using a combination of free-form text and XML-formatted data.
Figure 3-14. Setting user data
Once the instance launches, you can retrieve the data using the user-data URL, http://169.254.169.254/latest/user-data (see Figure 3-15).
Similar to the metadata URL, this URL will always return the user data for the running instance. Each instance has its own unique user data.
You can also include user data when calling New-Instance from PowerShell using the UserData parameter. AWS anticipates that the user data will include XML. Remember that the API call is also a web service that may be formatted as XML. Therefore, to avoid confusion, you must base 64 encode the user-data section. For example, the following code is equivalent to the console example shown earlier:
$UserData = @' This is a Test!!!
<TestValue>42</TestValue> '@
$UserData = [System.Convert]::ToBase64String([System.Text.Encoding]::ASCII.GetBytes($UserData))
$AMI = Get-EC2ImageByName -Name 'WINDOWS_2012_BASE'
$Reservation = New-EC2Instance -ImageId $AMI[0].ImageId -KeyName 'MyKey' -InstanceType 't1.micro' -MinCount 1 -MaxCount 1 -UserData $UserData
Note
■
If you are not familiar with the
@'...'@syntax, this is just a convenient way to include a multiline string
in PowerShell.
You can also use the Invoke-RestMethod command that we used in the previous section to retrieve the user data from PowerShell. For example:
$Invoke-RestMethod 'http://169.254.169.254/latest/user-data'
Results in the following output:
This is a Test!!!
<TestValue>42</TestValue>
You can change the user data after launching an instance, but the instance must be stopped. From the Web Console, right-click an instance and choose View/Change User Data. Let’s stop our instance and try replacing the user data with well-formed XML. For example:
<documentation> <document>
<name>GettingStarted</name>
<url>http://awsdocs.s3.amazonaws.com/EC2/latest/ec2-gsg.pdf</url> </document>
<document>
<name>UserGuide</name>
<url>http://awsdocs.s3.amazonaws.com/EC2/latest/ec2-ug.pdf</url> </document>
<document>
<name>APIReference</name>
<url>http://awsdocs.s3.amazonaws.com/EC2/latest/ec2-api.pdf</url> </document>
The benefit of using XML is that the Invoke-RestMethod command will parse the response. This means that you can interact with the response like any other object in PowerShell and you get IntelliSense in the IDE as well. Note how we can navigate the object hierarchy and format the response:
$Response = Invoke-RestMethod 'http://169.254.169.254/latest/user-data' $Response.documentation.document | Format-Table
The preceding code results in the following output:
name url -
---GettingStarted http://awsdocs.s3.amazonaws.com/EC2/latest/ec2-gsg.pdf
UserGuide http://awsdocs.s3.amazonaws.com/EC2/latest/ec2-ug.pdf
APIReference http://awsdocs.s3.amazonaws.com/EC2/latest/ec2-api.pdf
There is one other really cool feature of user ddata. You can include scripts that you want to run when the instance boots the first time. You can include Windows command shell scripts inside <script>...</script> or PowerShell scripts inside <powershell>...</powershell> tags. We will do this in the second exercise at the end of this chapter.
Working with Tags
Every object in AWS supports tags. Tags are a great way to keep track of all your instances and other objects. A tag is simply a key/value pair used to describe the object. For example, you can use a tag to record the name of an instance or which department owns it. You can use tags to record any additional information you need.
Each object can have up to 10 tags. The key can be up to 128 characters, and the value can be up to 256 characters long. Note that you can access tags on the Web Console using the Tags tab (see Figure 3-16). And, you can edit the tags using the “Add/Edit Tags” button.
In Powershell we can read the tags from the tag collection of any object. To get the tags for an instance, just get a reference to the instance and read the Tag property:
$Reservation = Get-EC2Instance -Instance i-1c242570 $Instance = $Reservation.RunningInstance[0]
If you want to retrieve a specific tag, use the Where-Object command to find it:
$Reservation = Get-EC2Instance -Instance i-38d14552 $Instance = $Reservation.RunningInstance[0]
$Tag = $Instance.Tag | Where-Object { $_.Key -eq "Name"} $Tag.Value
Creating tags is a bit harder. A tag is a .Net object. There is no PowerShell command to create an EC2 tag. Instead, we use the generic New-Object command to create a .Net object of type Amazon.EC2.Model.Tag. Once we have the new tag, we simply set the Key and Value properties.
Let’s use the New-EC2Instance command to create a new instance and add a few descriptive tags:
$AMI = Get-EC2ImageByName -Name 'WINDOWS_2012_BASE'
$Reservation = New-EC2Instance -ImageId $AMI[0].ImageId -KeyName 'MyKey' -InstanceType 't1.micro' -MinCount 1 -MaxCount 1
$InstanceId = $Reservation.RunningInstance[0].InstanceId $Tag = New-Object Amazon.EC2.Model.Tag
$Tag.Key ='Name' $Tag.Value = 'MyServer'
New-EC2Tag -ResourceId $Instance.InstanceId -Tag $Tag
As I mentioned, you can add a tag to anything. When you have only a few instances, it is relatively simple to keep track of everything. Once you launch 10 or more, it quickly gets very confusing.
One trick I have learned is to tag everything. Each instance has at least one volume and one network interface attached. Therefore, whenever I create a machine, I tag the instance and all of the attached resources.
AWS makes it easy to tag multiple objects at once. You simply pass all the IDs to New-EC2Tag as an array. There is no need to tell AWS what type of object each is. It can figure that out on its own.
$AMI = Get-EC2ImageByName -Name 'WINDOWS_2012_BASE'
$Reservation = New-EC2Instance -ImageId $AMI[0].ImageId -KeyName 'MyKey' -InstanceType 't1.micro' -MinCount 1 -MaxCount 1
$InstanceId = $Reservation.RunningInstance[0].InstanceId Start-Sleep -s 60 #Wait for drives to be mounted, etc. $Reservation = Get-EC2Instance -Instance $InstanceId
$VolumeId = $Reservation.RunningInstance[0].BlockDeviceMapping[0].EBS.VolumeId
$Tag = New-Object Amazon.EC2.Model.Tag $Tag.Key = 'Name'
$Tag.Value = 'MyServer'
New-EC2Tag -ResourceId $InstanceId, $VolumeId, $NetworkInterfaceId -Tag $Tag
Did you notice that Start-Sleep in the previous command? This is another little trick I have learned. When you create a new instance, the command may return before all of the resources have been allocated. Therefore, you may find that a volume or network interface is null.
To get around this, I have my script sleep for a few seconds. Then I query AWS for an updated copy of the instance metadata. This gives AWS enough time to allocate resources.
Working with Filters
In the previous section, we used the Where-Object command to filter a collection and find a specific tag. This same method could be applied to other objects—for example, to find all of the instances owned by a given department.
AWS provides a better solution: filters. A filter allows you to specify search criteria to be executed on the server. This way you don’t have to download metadata from hundreds of instances when you are only interested in a handful.
The “Get” methods usually include a filter parameter. The filter allows you to return only those resources with a specific value for a given attribute.
For example, if you want to return a list of instances that are currently running, you can use the instance-state-code
filter. A value of 16 is running. The filter names and values are not intuitive. They use the AWS CLI syntax, which may be foreign to a user of the PowerShell API. I have included a list of filters and values with each “Get” command in Appendix C.
Once again, you have to use the generic New-Object to create the filter. For example:
$Filter = New-Object Amazon.EC2.Model.Filter $Filter.Name = 'instance-state-code'
$Filter.Value = 16
Get-EC2Instance -Filter $Filter
You can also use filters to search for custom tags. For example, assume you record the department that owns each instance. If you wanted to retrieve all of the instances that belong to the marketing department, you could use a filter that specifies Department = Marketing. For example:
$Filter = New-Object Amazon.EC2.Model.Filter $Filter.Name = 'tag:Department'
$Filter.Value = 'Marketing' Get-EC2Instance -Filter $filter
Note that when you filter on tags, you use the format tag: followed by the key. Remember that keys are case sensitive. If you are creating keys manually using the Web Console, be consistent.
EXERCISE 3.1: WAITING FOR AN INSTANCE TO LAUNCH
For this exercise let’s assume that you often receive requests to create new instances from developers in your
organization and those developers don’t have access to the AWS Web Console. As AWS adoption has grown, this
has become very time consuming. It would be nice to script the build in PowerShell.
One way to determine whether the server is finished is to poll the instance to check if the password is available.
We can call the
Get-EC2PasswordDatacommand to check if a password exists. This provides a convenient way
to check for password availability.
Let’s start by creating a new method, called
GetPasswordWhenReady. This method checks once every minute until
the password is ready and then returns it. The method takes three parameters. The first is the id of the instance
to wait on. The second is the location of the private key used to decrypt the password. The third is the munber
of minutes to wait for the password, after which the script will give up. Note that it writes a period to the screen
each minute to let the user know that it is still working.
Function GetPasswordWhenReady() {
Param(
[string][Parameter(Mandatory=$True)] $InstanceId, [string][Parameter(Mandatory=$True)] $PemFile, [Int] $TimeOut = 30
)
$RetryCount = $TimeOut
Write-Host "Waiting for password" -NoNewline
While($RetryCount -gt 1) { Try {
$Password = Get-EC2PasswordData -InstanceId $InstanceId -PemFile $PemFile Write-Host ""
All we need now is a method that sends e-mails. This method will take three parameters: recipient, instance
name, and password. Note that I have hard-coded the from address and SMTP server name in my script. You will
need to change them.
Function SendInstanceReadyEmail() {
Param(
[string][Parameter(Mandatory=$True)] $Recipient, [string][Parameter(Mandatory=$True)] $InstanceName, [string][Parameter(Mandatory=$True)] $Password )
$Message = "You can access the instance at $InstanceName. The administrator password is $Password."
#Create the message