Wikipedia: The Missing Manual
Wikipedia: The Missing Manual by John Broughton
Copyright © 2008 O’Reilly Media. All rights reserved. Printed in the United States of America.
Published by O’Reilly Media, Inc., 1005 Gravenstein Highway North, Sebastopol, CA 95472
O’Reilly books may be purchased for educational, business, or sales promotional use. Online editions are also available for most titles (http://safari.oreilly.com). For more information, contact our corporate/ institutional sales department: (800) 998-9938 or [email protected].
Editors: Nan Barber and Peter Meyers Copy Editor: Sohaila Abdulali and Jill Steinberg Production Editor: Nellie McKesson
Proofreader: Nellie McKesson
Indexer: Dawn Frausto Cover Designer: David Freedman
Illustrators: Robert Romano and Jessamyn Read
Printing History:
January 2008: First Edition
Nutshell Handbook, the Nutshell Handbook logo, and the O’Reilly logo are registered trademarks of O’Reilly Media, Inc. Wikipedia: The Missing Manual, The Missing Manual logo, Pogue Press, and the Pogue Press logo and related trade dress are trademarks of O’Reilly Media, Inc.
Many of the designations uses by manufacturers and sellers to distinguish their products are claimed as trademarks. Where those designations appear in this book, and O’Reilly Media, Inc. was aware of a trademark claim, the designations have been printed in caps or initial caps
While every precaution has been taken in the preparation of this book, the publisher and author assume no responsibility for errors or omissions, or for damages resulting from the use of the information con-tained herein.
TM
This book uses RepKover™, a durable and flexible lay-flat binding.
Table of Contents
The Missing Credits . . . xi
Introduction . . . xv
Part I. Editing, Creating, and Maintaining Articles
1.
Editing for the First Time . . . 3
The Wikipedia Way of Editing 3
Practicing in the Sandbox 4
Starting, Previewing, and Saving Your Edit 5
Dealing with an Edit Conflict 11
Wiki Markup: From Edit Box to Screen 14
Editing Article Sections 18
Editing the Lead Section 20
Editing for Real 21
2.
Documenting Your Sources . . . 25
Documentation Guidelines 25
Adding an External Link 30
Citing Sources 31
Creating Footnotes 33
Advanced Citation Techniques 40
3.
Setting Up Your Account and Personal Workspace . . . 45
Why Register? 45
Picking a User Name 48
Registering 50
Setting Up Your User Page 53
4.
Creating a New Article . . . 61
What Makes a Good Article 62
What Articles Don’t Belong on Wikipedia 67
Tutorial: Creating a New Article 69
Ideas for New Articles 78
Resources for Writing Articles 78
5.
Who Did What: Page Histories and Reverting . . . 81
Understanding Page Histories 81
Reverting Edits 90
Advanced Techniques 96
6.
Monitoring Changes . . . 99
The User Contributions Page 99
Wikipedia’s Standard Watchlist 101
Multiple Watchlists 115
Real-Time Monitoring Alternatives 117
7.
Dealing with Vandalism and Spam . . . 121
Lines of Defense 122
Reverting Vandalism and Spam 122
Issuing Warnings 130
Requesting Assistance of Administrators 133
Don’t Get into a Revert War 138
Part II. Collaborating with Other Editors
8.
Communicating with Your Fellow Editors . . . 143
Identifying Yourself 143
Article Talk (Discussion) Pages 145
User Talk Page Postings 156
Communicating via Email and IRC 162
9.
WikiProjects and Other Group Efforts . . . 165
WikiProjects 165
Collaborations 175
Less Formal Working Groups 177
10. Resolving Content Disputes . . . 179
Why Editors Disagree 179
Reviewing Content Changes: A General Plan of Action 184
Resolving Content Disputes Informally 188
Resolving Disputes with Assistance 191
11. Handling Incivility and Personal Attacks . . . 195
Enforcing Norms of Conduct 195
Dealing with Incivility and Personal Attacks 200
When You Get Irritated (or Worse) 210
12. Lending Other Editors a Hand . . . 213
Answering Questions 213
Showing Appreciation for Other Editors 218
Reviewing Articles and Images 219
Coaching Other Editors 223
Helping Resolve Disputes 223
For Experienced Editors 227
Choosing Where You Want to Help 228
Part III. Formatting and Illustrating Articles
13. Article Sections and Tables of Contents . . . 233
Getting Sections Right 233
Getting Headings Right 242
Improving the Table of Contents 245
14. Creating Lists and Tables . . . 253
Creating and Editing Lists 253
Editing and Creating Tables 262
15. Adding Images . . . 271
Uploading Images 271
Finding Images 284
Placing an Image in an Article 284
Questions or Problems with Images 287
Uploading a Non-free Image 288
Part IV. Building a Stronger Encyclopedia
16. Getting Readers to the Right Article: Naming, Redirects, and Disambiguation . . . 295
Naming and Renaming 295
For Multiple Meanings: Disambiguation 313
Categories, Lists, and Series Boxes 336
18. Better Articles: A Systematic Approach . . . 339
Avoid Surprises 339
Don’t Suppress or Separate Controversy 342
Reorganize and Edit Existing Content 343
Don’t Take Article Scope as a Given 346
Improve the Citation of Sources 348
Build the Web 351
Look for Guidance and Examples 352
Add Sourced Content 353
Remove Cruft and Duplication 355
Get the Wording Right 356
Make the Article Look Appealing 357
19. Deleting Existing Articles . . . 359
Responding to Problem Articles 359
Alternatives to Deletion 362
Three Ways to Delete an Article 363
After an Article is Deleted 379
Part V. Customizing Wikipedia
Gadgets 399
21. Easier Editing with JavaScript . . . 401
Setting Up Your Browser 401 Adding and Deleting Scripts 402 Fixing Problems 409 Resources 410
Part VI. Appendixes
A.
A Tour of the Wikipedia Page . . . 413
B.
Reader’s Guide to Wikipedia . . . 427
C.
Learning More . . . 447
The Missing Credits
About the Author
John Broughton John Broughton has been a registered editor at Wi-kipedia since August 2005, with more than 15,000 edits by the time
he wrote this book. His biggest Wikipedia endeavor has been the
Ed-itor’s index to Wikipedia (just type that in the “search” box at the left of any Wikipedia page). This index lists every important reference page on Wikipedia, as well as hundreds of off-Wikipedia Web pages with useful information and tools for Wikipedia editors.
John’s first experience with programming computers was in a 1969 National Science Foundation program. Since then, he’s held various computer-related management po-sitions in the headquarters of a U.S. Army Reserve division, worked in internal audit departments as a Certified Information Systems Auditor, and was the Campus Y2K Coordinator at U.C. Berkeley.
A Certified Management Accountant, John has B.S. in Mathematical Sciences from Johns Hopkins University; an M.B.A. from Golden Gate University; an M.S. in Edu-cation from the University of Southern California; and a Masters in Public Policy from the University of California at Berkeley.
About the Creative Team
Nan Barber (editor) has worked with the Missing Manual series since its inception. She lives in Massachusetts with her husband and G4 Macintosh. Email: [email protected].
Dawn Frausto (editor) is assistant editor for the Missing Manual series. When not
working, she rock climbs, plays soccer, and causes trouble. Email: [email protected].
Nellie McKesson (production editor) is a graduate of St. John's College in Santa Fe, New Mexico. She currently lives in Cambridge, MA, where her favorite places to eat
Sohaila Abdulali (copy editor) is a freelance writer and editor. She has published a novel, several children's books, and numerous short stories and articles. She recently finished an ethnography of an aboriginal Indian woman. She lives in New York City with her husband Tom and their small but larger-than-life daughter, Samara. She can
be reached through her Web site at http://www.sohailaink.com.
Jill Steinberg (copy editor) is a freelance writer and editor based in Seattle, and has produced content for O'Reilly, Intel, Microsoft, and the University of Washington. When she's not working with words, Jill takes Italian classes, practices opera singing,
and helps create urban parks. Email: [email protected].
Daniel Mocsny (tech reviewer) discovered Wikipedia editing in April, 2006. He edits as an ordinary user, and as of late 2007 had the second-highest edit count on the Wi-kipedia Help desk. In addition, he is an administrator on two other public wikis and three corporate wikis, with a real-life involvement in software development, docu-menting, and technical support. You can contact Daniel via his Wikipedia user talk
page: http://en.wikipedia.org/wiki/User_talk:Teratornis.
Godmund Schick (technical reviewer) is an avid coffee drinker who periodically spends time baking, quilting, running, reading, and experiencing new things. Email: [email protected].
Acknowledgements
This book would not have been possible without the encouragement, support, and assistance of my wife Joan. I want to thank Pete Meyers, who responded so positively to my proposal for the book; Nan Barber, my editor, whose help and patience made the writing process much easier and the words in this book so much better; and the technical reviewers, Daniel Mocsny and Godmund Schick, whose comments on the first draft I found invaluable.
—John Broughton
The Missing Manual Series
Missing Manuals are witty, superbly written guides to computer products that don’t come with printed manuals (which is just about all of them). Each book features a handcrafted index; cross-references to specific pages (not just chapters); and RepKover, a detached-spine binding that lets the book lie perfectly flat without the assistance of weights or cinder blocks. Recent and upcoming titles include:
Access 2007: The Missing Manual by Matthew MacDonald AppleScript: The Missing Manual by Adam Goldstein
CSS: The Missing Manual by David Sawyer McFarland
Creating Web Sites: The Missing Manual by Matthew MacDonald
Digital Photography: The Missing Manual by Chris Grover and Barbara Brundage Dreamweaver 8: The Missing Manual by David Sawyer McFarland
Dreamweaver CS3: The Missing Manual by David Sawyer McFarland eBay: The Missing Manual by Nancy Conner
Excel 2003: The Missing Manual by Matthew MacDonald Excel 2007: The Missing Manual by Matthew MacDonald Facebook: The Missing Manual by E.A. Vander Veer
FileMaker Pro 8: The Missing Manual by Geoff Coffey and Susan Prosser FileMaker Pro 9: The Missing Manual by Geoff Coffey and Susan Prosser Flash 8: The Missing Manual by E.A. Vander Veer
Flash CS3: The Missing Manual by E.A. Vander Veer and Chris Grover FrontPage 2003: The Missing Manual by Jessica Mantaro
GarageBand 2: The Missing Manual by David Pogue
Google: The Missing Manual, Second Edition by Sarah Milstein, J.D. Biersdorfer, and Matthew MacDonald
The Internet: The Missing Manual by David Pogue and J.D. Biersdorfer iMovie 6 & iDVD: The Missing Manual by David Pogue
iMovie ’08 & iDVD: The Missing Manual by David Pogue iPhone: The Missing Manual by David Pogue
iPhoto 6: The Missing Manual by David Pogue iPhoto ’08: The Missing Manual by David Pogue
iPod: The Missing Manual, Sixth Edition by J.D. Biersdorfer JavaScript: The Missing Manual by David Sawyer McFarland Mac OS X: The Missing Manual, Tiger Edition by David Pogue Mac OS X: The Missing Manual, Leopard Edition by David Pogue Microsoft Project 2007: The Missing Manual by Bonnie Biafore
Office 2004 for Macintosh: The Missing Manual by Mark H. Walker and Franklin Tessler
Office 2008 for Macintosh: The Missing Manual by Jim Elferdink PCs: The Missing Manual by Andy Rathbone
Photoshop Elements 6: The Missing Manual by Barbara Brundage PowerPoint 2007: The Missing Manual by E.A. Vander Veer QuickBase: The Missing Manual by Nancy Conner
QuickBooks 2008: The Missing Manual by Bonnie Biafore Quicken 2008: The Missing Manual by Bonnie Biafore
Switching to the Mac: The Missing Manual, Leopard Edition by David Pogue
Switching to the Mac: The Missing Manual, Tiger Edition by David Pogue and Adam Goldstein
Windows 2000 Pro: The Missing Manual by Sharon Crawford
Windows XP Home Edition: The Missing Manual, Second Edition by David Pogue Windows Vista: The Missing Manual by David Pogue
Windows XP Pro: The Missing Manual, Second Edition by David Pogue, Craig Zacker, and Linda Zacker
Word 2007: The Missing Manual by Chris Grover
The “For Starters” books contain only the most essential information from their larger counterparts—in larger type, with a more spacious layout, and none of the more ad-vanced sidebars. Recent titles include:
Introduction
Wikipedia formally began in January 2001, as a project to produce a free content en-cyclopedia to which anyone can contribute. Seven years later, Wikipedia pages seem to turn up near the top of almost every Google search. Wikipedia has become the first place millions of people go to get a quick fact or to launch extensive research. Editions of Wikipedia exist in more than 250 languages, with a combined total of more than nine million articles. All the editions use the same underlying software, Media-Wiki. All are owned and supported by the Wikimedia Foundation, a nonprofit organization that also operates a number of other online collaborative projects, in-cluding Wiktionary, Wikiquote, Wikibooks, Wikisource, Wikispecies, Wikinews, and Wikiversity.
Each language edition of Wikipedia operates separately, almost entirely through the efforts of tens of thousands of unpaid volunteers. The Foundation has only about a dozen employees, including a couple of programmers. It buys hardware, designs and implements the core software, and pays for the network bandwidth that makes Wiki-pedia and its sister projects possible, but it doesn’t have the resources to do any of the writing for those projects. All the writing and editing are done by people who get no money for their efforts, although plenty of intrinsic satisfaction.
Wikipedia has never lacked skeptics. Why expect quality articles if everyone—the uni-versity professor and the 12-year-old middle school student—has equal editing rights? Won’t cultists and fringe theorists and partisans take control of controversial articles? Won’t vandalism become rampant, driving away good editors? How can tens of thou-sands of people work together when there is no hierarchy to provide direction and resolve disputes?
These questions point out the inevitable disadvantages of the “anyone can edit” ap-proach to creating an online encyclopedia. Wikipedia will always be a work in progress, not a finished product. What the skeptics overlook, however, is that letting anyone edit
has proved to be an incredible strength. In a world where a billion or so people have
access to the Internet, millions of people have contributed to Wikipedia, and their numbers are increasing every day.
domain is among the most visited on the Internet, because there’s no free alternative for most of the information in Wikipedia. The critics’ predictions that Wikipedia’s limitations will cripple it have not come true.
What makes Wikipedia so successful? Here are some of the reasons it works:
• An overwhelming percentage of the edits to Wikipedia are done in good faith—
that is, by people trying to improve articles, not vandalize them. When vandalism occurs, it tends to remain very briefly, because there are so many constructive editors around to fix it.
• Wikipedia has a large number of rules about its process that encourage collabora-tion and build consensus around what informacollabora-tion goes into articles. When people follow these rules, quality articles are the result.
• An overwhelming percentage of editors do follow the rules, and when others point out their mistakes, they’re willing to self-correct. Those editors who do find Wi-kipedia rules to be problematical typically leave on their own.
• Finally, there are a few editors with special authority to enforce the rules. This authority is granted by the community of users, through agreed-upon processes. So far, the enforcers have been adequate for the job, helped by increasing auto-mation of many routine administrative tasks.
As Wikipedia grows and the number of editors, edits per day, and total articles increa-ses, its focus has changed, and will continue to change. Wikipedia already has articles
about the most important topics, so the focus is shifting away from quantity and
to-wards quality—improving articles rather than creating new ones. As the definition for
success shifts, Wikipedia’s processes will adjust as well. The consensus approach has proven flexible enough, so far, to deal with problems as they arise. Emphasizing quality —in ways that affect most editors’ everyday editing—will be one of Wikipedia’s biggest challenges.
About This Book
This book is about the English edition of Wikipedia—the oldest, largest, and most complicated edition of Wikipedia, but not (since March 2001) the only edition. In other words, this book is about the en.wikipedia.org domain, not the entire Wikipedia.org
domain. For simplicity, when you see the term “Wikipedia,” it refers to the English
edition of Wikipedia. Just remember that other language versions exist.
Why do you need a book about editing Wikipedia? Wikipedia certainly doesn’t lack
for pages that document policies, technical matters, instructions, and agreed-on pro-cesses. Wikipedia depends on volunteer editors to write and update virtually all the documentation for Wikipedia and its underlying software, and plenty of editors enjoy doing this valuable work. If printed out, Wikipedia’s online reference pages would
want to tell million of volunteers from around the world about how to write an encyclo-pedia, together, including how to organize and govern themselves, and how to change the software that underlies the encyclopedia, avoid legal pitfalls, and enjoy themselves. What’s missing, however, is structured guidance for people who want to learn the “core curriculum,” the information you absolutely need to avoid running afoul of the rules, and a structured process for learning all about editing, including all the tips and tools that can make editing easier. Wikipedia doesn’t offer anything that charts the path from novice to expert, with step by step illustrations for every topic along the way.
For example, there are dozens of pages in Wikipedia that describe the three different processes for getting an article deleted. There are no designated pages for novices and experienced editors, and there’s no editorial board responsible for maintaining con-sistency and deciding how much duplication is appropriate. Newcomers to Wikipedia often find the large collection of massively hyperlinked online reference pages intimi-dating. With so many entry points, it’s hard to know where to start.
This book provides a clear path to all the essentials, with numerous additions to choose among. Tens of thousands of Wikipedians have gotten off to rough starts, yet persev-ered, going on to become solid contributors. This book helps you learn from those mistakes without having to personally live through them.
Wikipedia: The Missing Manual is designed to accommodate editors at every level of experience. If you’re just starting out, that’s fine: The early chapters will make your editing experience more productive as well as enjoyable. Nor do you have to be a com-puter whiz. The really great editors are good at one or more of several things, including research, editing and writing, organizing, and working with other editors; technical matters are simply one realm of specializing as a Wikipedia editor.
If you’ve already done quite a bit of editing of Wikipedia, and learned—by trial and error as well as reading documentation—what to do and not to do, even the earlier chapters are likely to offer you useful tips and tricks. In the later chapters, you’ll learn about things you’ve never run across before, simply because you’ve never had time to read through all the Wikipedia documentation. Check out the table of contents to spot unfamiliar aspects of Wikipedia, so you can turn immediately to the parts of the book most likely to help you work better and faster.
About the Outline
Wikipedia: The Missing Manual is divided into five parts, each containing several chap-ters.
• Part 1, Editing, Creating, and Maintaining Articles, covers the basics. These
chapters explain the right way to edit, why you want to be a registered editor, how
• Part 2, Collaborating with Other Editors, discusses the rules of engagement, how normal conversations occur, the standard Wikipedia processes for disagree-ments over content, and dealing with incivility and personal attacks. This section
also covers what Wikipedia calls WikiProjects—groups of editors working on
ar-ticles of common interest, plus the wide range of activities that go into expanding and maintaining a huge encyclopedia: answering questions, tutoring and mentor-ing, joint reviews of articles, and more.
• Part 3, Formatting and Illustrating Articles, introduces you to some parts of articles that aren’t text or links: the table of contents, lists and tables, and images and other media. Much of this can be confusing when you first encounter it, but each topic has a logic that makes it easy to understand once you’ve worked with that it for a bit. (And you always have this book as a reference!)
• Part 4, Building a Stronger Encyclopedia, looks at the larger picture. It shows you that an article isn’t locked in stone—you can rename it, split it up, merge it with other articles, or even ask for it to be deleted. Naming and merging are ways of getting readers to the information that they want. Another way, covered in this part, is Wikipedia’s system of categories, one of several ways to find and navigate between articles.
• Part 5, Customizing Wikipedia, discusses every option that you have to cus-tomize Wikipedia to suit yourself, using choices you find when you click My Preferences. You’ll also learn how to implement JavaScript user scripts (which you’ll see mentioned in the “Power Users’ Clinic” boxes in this book).
• Part 6, Appendixes, provides you with resources to make the most of Wikipedia, as a reader, editor, and member of the Wikipedia community. Appendix A is an explanation of every link and tab for standard Wikipedia pages (in both reading and editing mode). Appendix B, Reader’s Guide to Wikipedia, provides some in-sider tips for those who simply want to read Wikipedia, and want to know what’s available besides Wikipedia’s search feature and following links in articles. Ap-pendix C, Leaning More, provides good starting points to get you as an editor to exactly the reference page you’re looking for, lists the places in Wikipedia where you can get personalized help, and shows you where you can find out about Wi-kipedia as a community.
The Very Basics
You’ll find very little jargon or nerd terminology in this book. You will, however, en-counter a few terms and concepts that you’ll enen-counter frequently in your computing life:
• Clicking. This book gives you two kinds of instructions that require you to use
your computer’s mouse or trackpad. To click means to point the arrow cursor at
release the clicker button on the mouse (or laptop trackpad). To double-click, of course, means to click twice in rapid succession, again without moving the cursor at all.
• Wikipedia doesn’t use menus. On Wikipedia pages, links to pages, and links that trigger a particular action (such as opening an article for editing) are found along the top and left of the screen, not in menus. These can change; what you see de-pends on the type of Wikipedia page, and whether or not you’re logged in. In addition, the content of a page may have links, typically to content on other Wi-kipedia pages. Appendix A covers every single link and action at the top and left of your screen.
• The search box on the left side of the screen is the primary way to go to any
page for which you can’t see a link. For example, entering elephant and clicking
Go (or pressing Enter) sends you to the Wikipedia article titled Elephant. If you
use this book a lot, you’ll probably use the search box a lot—you may find it’s worth memorizing the keyboard shortcut to get to it (page 426).
• Most of the reference pages that discuss policy, guidelines, how-to, and so on, have an abbreviation (“shortcut”) that you can use to quickly get to that
page. For example, rather than type Wikipedia:Verifiability (23 characters; note
that there’s no space after the colon), you can just type the shortcut WP:V (only
four characters), and then press Enter or click Go. In the early chapters, the search box will be explicitly mentioned; in later chapters, the book will normally just mention the shortcut name, assuming you’re familiar with using the search box to get to a specified page.
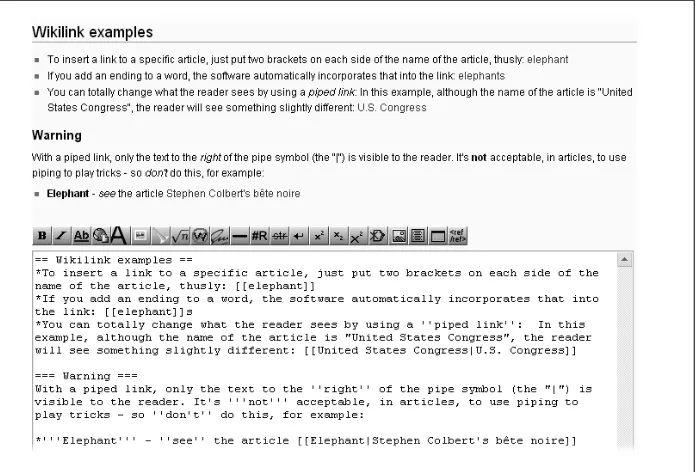
• Wikipedia uses special markup text in its MediaWiki software. For example, to set up a link that points to another page within Wikipedia, you put paired square
brackets around a word in editing—thus [[elephant]], for example, entered in
ed-iting mode, would be “elephant” as a link once an edit has been saved. Chap-ter 1 on basic editing explains markup text.
• Articles and pages are different things. Readers are interested in article pages and, to a lesser extent, category pages and portal pages. Wikipedia has many other types of pages: template, image, and user pages, for example—and talk pages (page 145) for every type of page.
Mac OS, Windows, Browsers, and Keyboard Shortcuts
Wikipedia works in all modern Web browsers on both Windows and Macintosh com-puters. The screen may look slightly different from the illustrations in this book, depending on your browser. The screenshots in this book were taken while using Fire-fox and Opera, on a computer running Windows XP.
vs. Firefox 2.0 vs. Opera, for example, in their Windows versions). If you like using shortcut keys, see the details in Appendix A (page 426) on how to learn them.
About
→
These
→
Arrows
In this book, and throughout the Missing Manual series, you’ll find sentences like this one: “Go to Tools→Preferences→Advanced tab.” That’s shorthand for a much longer instruction that directs you to navigate through menu commands and dialog boxes, like so: “Click to open the Tools menu; choose Preferences. In the Preferences dialog box, click the Advanced tab.” This kind of arrow shorthand helps to simplify the busi-ness of choosing commands in menus, as shown in Figure 1.
Late-Breaking News
Wikipedia changes all the time. Policies and guidelines and other reference pages get reworded, merged, expanded, renamed, and updated by editors whenever editors feel that they can be improved, assuming the general Wikipedia community agrees. Devel-opers fix bugs and add features, putting out changes every week. Administrators tweak the standard messages that all editors see, striving for clarity. Processes change because a regular editor, or the Wikimedia Foundation, or someone in between initiates a change. In short, Wikipedia today is different from what it was a month ago, and will be different a month from now.
published. You will see mentions in a number of places in the book about where change may be just around the corner (a WYSISYG edit box, threaded discussions on talk pages, single sign-in across all Foundation projects, and more). These changes could happen just as you’re reading this book, or not for a year or two.
Nevertheless, you’ll find the core of Wikipedia changes very slowly—after all, it does have an established base of active editors, and a history of success that makes editors reluctant to change processes that aren’t considered broken. So the changes that aren’t covered by this book won’t prevent you from gaining great Wikipedia editing skills. And if you find something about Wikipedia that’s not in this book and should be, let us know. We’ll add it to the next edition.
About MissingManuals.com
At the missingmanuals.com (http://missingmanuals.com) Web site, you’ll find articles,
tips, and updates to the book. In fact, you’re invited and encouraged to submit such corrections and updates yourself. In an effort to keep the book as up-to-date and ac-curate as possible, each time we print more copies of this book, we’ll make any confirmed corrections you’ve suggested. We’ll also note such changes on the Web site, so that you can mark important corrections into your own copy of the book, if you like. (Click the book’s name, and then click the Errata link, to see the changes.)
In the meantime, we’d love to hear your own suggestions for new books in the Missing Manual line. There’s a place for that on the Web site, too, as well as a place to sign up for free email notification of new titles in the series.
While you’re online, you can also register this book at http://www.oreilly.com (you can
jump directly to the registration page by going here: http://tinyurl/yo82k3). Registering means we can send you updates about this book, and you’ll be eligible for special offers
like discounts on future editions of Wikipedia: The Missing Manual.
Safari® Books Online
When you see a Safari® Books Online icon on the cover of your favorite technology book, that means the book is available online through the O’Reilly Network Safari Bookshelf.
CHAPTER 1
Editing for the First Time
Anyone can edit Wikipedia—including you. That’s right. There’s no fee, and you don’t have to register. You don’t even have to have an email account (but if you’re reading this book, you probably do). As the Introduction explains, all Wikipedia articles are collaborative efforts. You can jump right in and add your own knowledge with just a few clicks and some typing.
This chapter explains what you see when you look at an article in Wikipedia’s editing window and how to practice, preview, and save your edits. You’ll also learn a few more basic editing skills—how to create a link from one article to another, and how to edit a section of an article rather than the whole article. Once you’ve got these skills under your belt, you’re ready for the first step in for-real Wikipedia editing: identifying an article in need of an edit.
TIP
You can dive right in and start editing without setting up a Wikipedia account (that is, getting a user name). However, there are advantages to having a user name— increased privacy and the ability to create new articles and a personal user page, to name two. So you have an option: You can follow the chapters in the order they appear, or you can skip to Chapter 3 and get a user name first, and then read this chapter and Chapter 2.
The Wikipedia Way of Editing
Experienced Wikipedia editors understand one thing above all else: Wikipedia is a collaboration. There’s no need to be intimidated, because you’ve got the support of an entire community of researchers, fact-checkers, and proofreaders. Keeping the follow-ing points in mind will get you into the right mindset for effective editfollow-ing:
disclaimers, foreign language characters, headings, indentation, links, lists,
neu-trality, pronunciation, quotations, tags, and templates, to name just a few. If you
don’t get something exactly right, don’t worry—no one else gets everything right every time, either.
• You don’t need to know everything about your subject to edit an article. If you add something that’s constructive and 90-percent right, that’s far better than not doing an edit at all. As in sports, you don’t need to hit a home run or score a
goal on every play to be a valuable contributor. If you don’t get something exactly
right, someone else is likely to come along and help by fixing or finishing it.
• You can contribute without editing at all. If you see a problem in an article, but you don’t (yet) know how to fix it, or you do know how to fix it, but you can’t edit the article (some articles are fully protected, typically for short periods of time), you can still help by posting a constructive comment on the article’s talk
(discus-sion) page. (Chapter 8 discusses talk pages in detail.) If you don’t want to or can’t
edit an article directly, you can still help to improve it.
Practicing in the Sandbox
Even if you’ve done a lot of writing and editing with various types of software in the past, you’ll need some practice with Wikipedia’s tools. Fortunately, Wikipedia has a
page called the sandbox, where editors can practice without worrying about damaging
anything. In this chapter, you’ll do your work in the sandbox, rather than editing actual articles.
Remember as you go through the book (or whenever you’re editing), if you encounter a feature that you don’t fully understand, you can always go to the sandbox and do some testing there. You won’t break anything, and you can experiment as much as you want until you figure out exactly how things work. You can even practice duplicating the actual edits that are shown throughout this book.
From any page in Wikipedia, you can get to the sandbox in one of two ways:
• In the “search” box on the left side of the screen, type WP:SAND, and press Return.
Make sure to type it with all capital letters and no space after the colon.
TIP
• Click the “edit this page” tab at the top of any page to go directly into edit mode. You’ll see, toward the bottom of the screen (scroll down if necessary), “Your changes will be visible immediately.” Immediately below, it says “For testing,
please use the sandbox instead.” The word “sandbox” is a bolded link—just
click it.
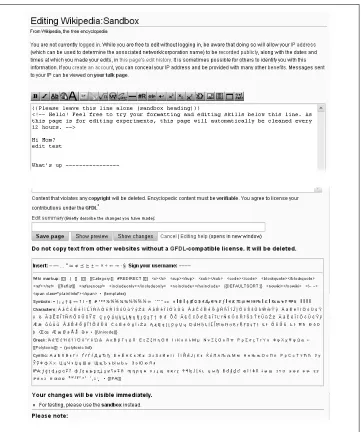
Both ways get you to the sandbox quickly. Just use whichever method you find easier to remember. Figure 1-1 shows the sandbox before editing starts.
Starting, Previewing, and Saving Your Edit
Editing in Wikipedia is much like using a very basic text editor, with a few word-processing tools thrown in. You type text into the edit box (less commonly written editbox), and then click buttons to preview and finally save your work.
Adding Text
You edit Wikipedia articles in a big, white text box in the middle of the window. To get to that box, you must go into edit mode.
1. In the search box on the left side of the screen, type WP:SAND, and press Return
to go to the sandbox.
You’ll do all your work in this chapter in the sandbox, so you won’t actually change any Wikipedia articles.
NOTE
If the bottom of Figure 1-2 looks intimidating, don’t worry: There are only about two dozen items that editors actually use, except in exceedingly rare circumstances. If you’re curious, Appendix A provides a complete cross-reference to everything on the bottom of Figure 1-2, as well as all the icons on the edit toolbar.
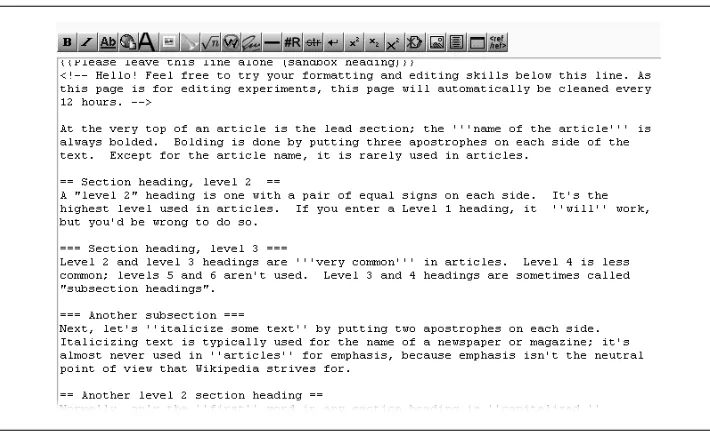
3. Delete everything but the first three lines, which are instructions.
The edit box contents should look like Figure 1-3. In this box, you’ll type some text that includes bold and italic formatting, and section headings.
NOTE
If someone else has deleted part or all of the top three instructional lines in Fig-ure 1-3, don’t worry—the steps on these page will work just fine without them. But you may want to add them back to help others using the sandbox.
If you compare Figure 1-1 to Figure 1-3, you may be puzzled about a couple things: What is the purpose of the curly brackets (the first line in the edit box in Fig-ure 1-3), and why is the text in FigFig-ure 1-1 (“Welcome to the Wikipedia Sandbox! This page allows you to carry out experiments”) not the same as the underlying text in Figure 1-3?
The answer to both questions is essentially the same: The curly brackets indicate a template, and the purpose of templates, generally, is to add standard text to a page. Because templates are so important—you’ll find them everywhere at Wiki-pedia—there’s a separate section on them later in this chapter (see page 17). 4. Type the text shown in Figure 1-4 (except the first three lines at the top, which
should already be there) into the edit box.
For this example, you don’t have to type all the text if you don’t want to. You can
even type some text of your own invention, as long as it includes each of the fol-lowing:
• Section headings. Type two equal signs at the beginning and two more at the end of a line of text. (If you create at least four headings, Wikipedia automati-cally creates a table of contents, as you’ll see in a moment.)
• Boldface. Type three apostrophes (') before and after the text you want to bold. • Italic. Type two apostrophes (') before and after the text you want to italicize.
NOTE
Never put a blank space at the beginning of a line unless you want that line of text to stand out (which you never want in an article). With a blank space at the beginning, Wikipedia displays a line of text in a box with a light blue background. If it’s a long line of text, the text goes off the screen to the right, requiring the reader to scroll to see it all.
Previewing
One of the most important things after doing an edit is to preview it—to see how it’s
going to look. For edits involving formatting, previewing is absolutely essential. But even if you’ve added only plain text, you should still preview it because you want to get in the habit previewing every time.
Before you click the “Show preview” button, however, you should do one more thing
—provide a summary of the edit you just made. You should do this now, rather than
later, because previewing will also show you what the edit summary will look like. Think of the edit summary as a way for you to explain your edit to other editors. The explanation can be very brief (“typo,” “revert vandalism”) or it can be lengthy (up to 200 characters). Keep it as short as you can, and make it as long as you need to.
1. In the “Edit summary” box (Figure 1-5), type a few words to describe the purpose of your edit.
In other words, follow the instructions in fine print: “Briefly describe the changes
you have made.” For example, in this case you might type Test edit – first time using
the Sandbox. (See the box below for information about edit summaries.) Once you’ve added an edit summary, it’s time to check your work.
U P T O S P E E D
In Summary
Filling in the “Edit summary” box, to explain your edit, takes only a few seconds but can save other editors lots of time. These summaries show up on each article’s “history” tab (see page 82), on the page that lists a given editor’s contributions (see page 99), and pretty much everywhere else that a list of edits appears within Wikipedia: They’re important.
Edit summaries should be meaningful to all editors. If you encounter an abbreviation or other text you don’t understand, check the page Wikipedia:Edit summary legend (shortcut: WP:ESL), which has a pretty comprehensive list.
Here are some common edit summaries:
• “Copyediting”
• “Removed duplicate text in section”
• “Splitting section in two with subheadings, adding new information and sources” • “Added material, changed section heading”
If you start editing articles regularly, here’s another advantage to creating your own Wikipedia account: Once you’ve created an account, as described in Chapter 3, you can change a setting so that you get a reminder to add an edit summary, if you’ve forgotten one. When logged in, click the My Preferences link (in the upper-right area of the screen), then click the “editing” tab, and at the bottom of the list of options, turn on the “Prompt me when entering a blank edit summary” checkbox. Click Save. Once you’ve done that, you’ll never have to worry about inadvertently forgetting to fill in the “Edit summary” field.
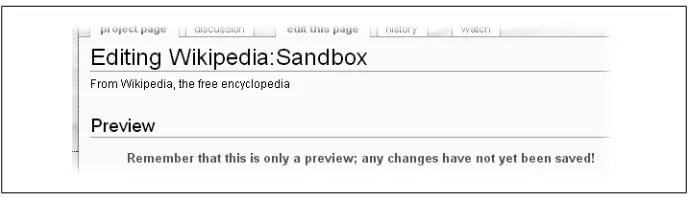
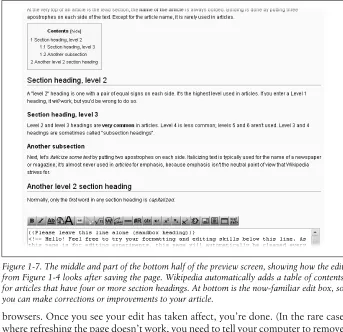
2. Click the “Show preview” button just below the edit window (the button is shown in Figure 1-5) to see what the Wikipedia page will look like after you save your edit. A Wikipedia preview screen has three parts. The very top of the screen (Fig-ure 1-6) shows a warning that you’re not looking at a saved version of the page. The middle and bottom of the screen (Figure 1-7) show both what the page will look like after you save it (if you don’t change it further) and the edit box and related tools.
3. Now’s your chance to fix mistakes before anyone else can see them. Just make any changes you want in the edit box, and click “Show preview” again.
When you’re satisfied with what the preview shows, it’s time to save the edit, which will change the version that readers see when they come to the page.
Saving
Click the “Save page” button (see Figure 1-5 for the location of this button, if you need to). At this point, one of three things happens:
• Most of the time, the page changes, incorporating your edit. That is, the page looks like what it did when you looked at it in preview mode, except now there is no preview warning on top. Your edit is complete; you’re done.
• You might see a cached version of the page. You’ll see a version of the page that
browsers. Once you see your edit has taken affect, you’re done. (In the rare case where refreshing the page doesn’t work, you need to tell your computer to remove
old copies of everything. See the page Wikipedia:Purge; shortcut WP:PURGE.)
• The worst case scenario is that Wikipedia refuses to make the change because someone else changed the page while you were editing it. Figure 1-8 shows what the page will look like in case of an edit conflict.
Dealing with an Edit Conflict
Some articles are very (temporarily or permanently) popular with editors—perhaps the article is about a current event (say, a hurricane) or a person suddenly in the news. Such articles may be edited as frequently as once every minute or two. For such an article, if you as an editor take a while to do an edit—say, you begin editing, then do something else for five minutes, then come back to editing—your chances of an edit conflict are quite high when you attempt to save your edit.
If there is an edit conflict, the Wikipedia screen has four parts:
• The warning at the top (Figure 1-8).
• A text box with the text for the current version of the page. It’s Wikipedia saying
“Here’s what you can edit—the current version,” plus all the other editing stuff
(edit summary box, buttons, wiki markup symbols, and so on.)
• A Differences section that shows how your version (the one you saw in “show
preview”) now differs from the existing page (the one revised by someone else while
you were working on your revision).
• At the very bottom, an additional text edit box, with your edit in it (Figure 1-9).
The best way to handle an edit conflict depends on the circumstances. Here are two common approaches:
• If you were adding information, then you should copy that information from the
lower text box to another place (a word processing document, Windows Notepad, or similar.). Once you have the information in a safe place, go back to the page (in reading mode) and review whether what you were adding still needs to be added. Figure 1-8. The top of a page when there’s an edit conflict. If you’re logged in, you see only the top paragraph of information.
If so, edit the section or page again (this time more quickly, if possible), do a quick preview, and save the edit.
• If you were doing a small amount of copyediting, just go back to the page (in
reading mode), go into edit mode, and do your edit again (more quickly). Of course, before you go into edit mode, you should check that what you were trying to fix still needs to be fixed.
Basically, you haven’t lost any text that you added (you can simply copy it), but if you did a lot of copyediting, you may have to do that over again, because the alternative is to overwrite what another editor or other editors just did. You abso-lutely don’t want to do that, assuming that the other editor(s) improved the article. Of course, the best way to settle a conflict is to avoid it in the first place. You can avoid edit conflicts entirely by using the following techniques:
• Edit a section of an article, not the entire article (editing of sections is discussed on page 18).
• Click the “history” tab to see if an article is getting a lot of edits; if so, do a series of small (quick) edits rather than trying to do a lot of changes within a single edit. • Prepare lengthy additions offline, in a word processing document or Windows Notepad or something similar, or on a subpage (see page 57). After the text is ready, you can then go into edit mode for the article, copy and paste the text into the edit window, preview, and save, all in a short amount of time.
TIP
There’s also a way to tip off other editors that you’re working on an article. That way, they can make the choice of whether to start editing and risk an edit conflict. It’s an advanced technique, explained in the box below.
P O W E R U S E R S ' C L I N I C
Locking Out Other Editors
In Figure 1-3, you can see (in the top line) an example of a template used to display a message on a page. You can add the {{inuse}} template to the top of an article to tell other editors that you are in the process of making a large edit. It asks that other editors not edit for a while; the Wikipedia page on edit lock recommends using this template for no more than three hours.
hours, someone’s hogging the article; if so, you have every right to delete the template so other editors can feel free to make changes.
Wiki Markup: From Edit Box to Screen
Earlier in this chapter, you learned how to create section headers, and to format text as bold or italic (see Figure 1-4). Such formatting is called wiki markup. As you continue through this book, you’ll learn about every type of markup you’re likely to encounter. As a new editor, though, you need to learn three things right away: to recognize the types of markup, how templates are used, and how to create links between articles.
Types of Markup
Besides headings, bold, and italic text, you’ll encounter the following types of markup as you edit articles:
• {{pagename}} or {{pagename | info1 | info2 }} or {{pagename | this= info 1 | that= info2}}.The double curly brackets indicate a template. An example of a template appeared in Figure 1-3 and was discussed immediately thereafter (see page 7). Templates are discussed in more detail later in this chapter (page 17). • [[Article name]] or [[Article name| other name]]. Double square brackets
cre-ate internal links (wikilinks), which are hyperlinks between pages in Wikipedia. They’re described in the next section.
• [http:url] or [http:url some text]. Single square brackets around a URL create external links. This formatting is discussed in Chapter 2, “Documenting Your Sources” (pages 25 to 43).
• <ref> text possibly with a URL </ref> and <references />. These are foot-note tags—the text between the tags is the footfoot-note itself—plus the instruction to Wikipedia as to where to display the footnotes. Footnotes are also described in detail in Chapter 2 (page 33).
• <blockquote> text </blockquote> and <math> numbers and symbols</ math>. In articles, you’ll find a few other types of paired tags besides the <ref> tags for footnotes; blockquote and math tags are among the more common. Tags
normally come in pairs, and the ending tag must have a slash character (“/”) as its
second character if it is to work properly.
TIP
• <!-- Your comment text goes here -->. This markup turns the text inside into an invisible comment; an example appears in Figure 1-3. “Invisible” means that the text doesn’t display in normal viewing mode; you can see it only in edit mode. • {| bunch of stuff with lots of vertical lines |}. This formatting creates a table.
Chapter 14 goes into the details.
• One or more rows starting with an “*” or a “#”. These characters create lists within an article (the “#” numbers the list, while the “*” just puts a bullet at the beginning of a line). Chapter 14 goes into the details.
• [[Category:Name]]. This markup looks like a wikilink, and it is, in a way, but it puts a category link at the bottom of a page. Chapter 19 goes into the details.
How to Create Internal Links
Linking one article to another is very easy—with good reason. Links to other articles can add a lot of value to an article because readers can follow the links whenever they come across a word they don’t know a lot about. Good places to add internal links include the lead sections of articles and at the beginning of new sections within articles. A reader should always be able to get to important, related articles via a link.
In the edit box, just place paired square brackets around the name of the article you
want to link to, for example: [[Winston Churchill]]. Figure 1-10 shows the sandbox
again, in preview mode with some internal links sprinkled in.
Another kind of internal link—a piped link—is extremely useful for situations where naming varies by country. For example, you’ve typed the following sentence in your article: “San Francisco has an extensive public transportation system,” and you want to link the words “public transportation” to the relevant article. Trouble is, there’s no article in Wikipedia named “public transportation.” There is, however, an article named “public transport,” which was probably written by someone who speaks British English. You don’t care what it’s called, you just want your readers to be able to go to that article. Here’s how to create the link while having the article read “public trans-portation”: San Francisco has an extensive [[public transport|public transportation]] system.
U P T O S P E E D
To Link or Not to Link
As helpful as links are, it’s counterproductive to create internal links for a large per-centage of words or phrases in an article—Wikipedians call that overlinking. You don’t want your readers to spend more time hopping around to other articles than reading the one they came for.
To help decide whether you need to insert a link into an article, think of a link as a cross-reference in a book: "see such-and-such.” If you wouldn’t ask readers to turn to another page to read about something, don’t provide a link for it either. Here’s a case of excessive cross-referencing:
Mahatma Gandhi was a major (see “major”) political (see “political”) and spiritual (see “spiritual”) leader (see “leader”) of India (see “India”) and the Indian independence movement (see “Indian independence movement”).
Here are some general guidelines:
• Don’t link plain English words or phrases; do link technical terms.
• Don’t link the same word or phrase multiple times, at least not in the same section of an article.
• Avoid linking two words that are next to each other, because these will look to the reader as if they are a single link (if necessary, reword the sentence).
Understanding and Using Templates
As mentioned on page 7, if you go into edit mode and see some text surrounded by two
curly brackets, like this: {{pagename}}, you’re looking at a template. A template tells
the software to get text and formatting instructions from another place and insert that formatted text into the article when the article is displayed.
Here’s a common example: If you see the {{fact}} template in the edit box when you’re
editing an article, it’s telling the software to go to the page [[Template:Fact]], get the text there (including formatting), and insert that text into the article when the article is displayed for readers. The {{fact}} template, displays the following text: [citation needed].
Templates are widespread for a number of reasons:
• Consistency. Every cleanup template looks the same, each type of infobox (page xx) looks the same, and so on. Editors don’t have to constantly figure out how to present a particular type of information in an article.
• Time savings. You don’t have to type out standard information, and you don’t have to know how to format information in standard ways (such as superscript or message boxes). You just have to find out the name of the template and put it in double curly brackets. The software does the rest.
• Automatic updating. If the Wikipedia community decides to change a template, changing just one page—the template page itself—automatically changes what’s displayed on every other page that uses the template. (High-use templates are pro-tected from being changed by normal editors, to prevent easily-done extensive vandalism.)
• Categorization. Templates can include text that puts a page into a category (see Chapter 18). Then you and other editors can go to the category page to find, for example, all articles that have been categorized as needing copyediting.
Templates are everywhere in Wikipedia. In this book, you’ll find discussions about templates in a number of chapters, for example:
• Formatting footnotes (smaller font size, multiple columns) (Chapter 2, page 34) • Putting information about yourself, using userboxes, on your user page
(Chap-ter 3, page 56)
• Marking a new article as needing categories (Chapter 4, page 77)
• Posting warnings to users about vandalism and spam, and reporting vandalism (Chapter 7, pages 130 and 135)
• Using an archive box to neatly organize links to archived talk pages (Chapter 8, page 160)
• Marking text as needing a source, and notifying the editor who posted the un-sourced information about her mistake (Chapter 10, page 186 and page 187) • Posting warnings about personal attacks (Chapter 11, page 198)
That’s a lot of uses of templates, and that’s just in the first 11 chapters. At the moment, you just need to know these two main principles of templates:
• Templates add text and formatting, which are stored on another page. To add a template to an article, you type its name between double curly brackets, at the place in the wikitext where you want the template to appear.
• If the template contains parameters, you can edit the text that has been added to those parameters just like you can edit other text in the article, without under-standing any of the complexities of templates. For example, take a look at Figure 1-11, which shows a template with a lot of parameters:
In Figure 1-11, each parameter has a name that ends with an equal sign. The infobox will display only the text that follows the equal signs. You can edit text that appears after the equal signs, including adding text, but don’t mess around with a parameter name. Also, be careful not to delete or add a parameter separator (the vertical bar symbol “|”), which marks the beginning of each parameter.
Editing Article Sections
Inexperienced editors often work on entire articles in edit mode even though they’re
making changes only to one section of that article. Not only does this make it more
difficult for other editors to understand what an editor did, but it also significantly increases the chances of an edit conflict (see page 11, above). So, an important rule of editing is: Don’t edit an entire page if you’re changing only one section of the page.
Editing One Section
You’ll know an article has sections if you see a table of contents near the top of the article. Even if there is no table of contents, if you see headings within an article, then the article has sections that can be edited. Figure 1-12 shows an article with no table of contents but with three headings that indicate sections that can be edited.
If you click one of the three “edit” links in Figure 1-12, then the edit box shows only
TIP
Sometimes editing an entire article at once is necessary—for example, if you’re mov-ing sections around, or movmov-ing text from one section to another. But often when you plan to edit two or three sections of an article, you can efficiently do these as separate edits of individual sections, rather than editing the entire article. If nothing else, it makes previewing much easier (but the preview shows only part of the article, not the entire article).
Editing the Lead Section
From the previous section, you know the importance of editing only a section rather
than an entire article, whenever possible. But you may have noticed that in Fig-ure 1-12 there was no [edit] link for the first sentence in the article, what Wikipedia calls the lead section. So, it appears that if you want to edit that section, you have to click the “edit this page” tab, just as if you wanted to edit the entire article.
In fact, it is possible to edit only the lead section of an article, though most editors don’t know how. There are actually three different options:
URL to “0”. (The lead section of an article is always numbered section “0”.) Press Enter, and you’re then editing the lead section.
• The most complicated way is to add JavaScript code to your personal JavaScript page (page 402), to give you either a special tab (the “0” tab) or an “edit” link. You
can find these scripts in the “Navigating to Edit page” section of the page
Wikipe-dia:WikiProject User scripts/Scripts (shortcut: WP:JS). (Note: To do so, you must be a registered editor; see page 45.)
• The easiest way is to click the “my preferences” link on the upper right of the page (which you won’t see unless you have a registered account and are logged in), go to the “Gadgets” tab. Select “Add an [edit] link for the introduction section of a page”, and then click Save button. Thereafter, whenever you’re editing an article, you’ll see something similar to Figure 1-13.
Editing for Real
Now that you’ve read about the basics of editing, and (hopefully) followed the step-by-step instructions for doing a sandbox edit, you’re almost ready to start editing actual articles. Before you do so, you need to understand a bit more about the rules of Wiki-pedia. Then you’ll be prepared to find some articles that you can improve.
Wordsmithing Versus Adding Information
Taken to an extreme, there are basically two kinds of edits (other than removing van-dalism, spam, and other problematic material):
• You can change the wording and/or formatting of an article, leaving the informa-tion in the article more or less intact.
• You can add new information.
But before you start adding new information, you should read Chapter 2, “Document-ing Your Sources.” If you want to jump right into wordsmith“Document-ing, read on.
A Few Words about Content
Wikipedia has three core policies for content. Two of them, no original research and
verifiability, are discussed in the next chapter. The third, neutral point of view, is worth mentioning now, because wordsmithing is often about a point of view.
Consider, for a moment, the goal of the people doing public relations or in a marketing department: to write about organizations, products and services, and leaders in a way that casts them in the best possible light. Or consider the wording of a press release by a political party, which tries to make the opposition look as bad as possible. In both of these situations, the writers have what Wikipedians call an extreme point of view (POV). By contrast, Wikipedia’s policies require editors to follow these principles:
• Present significant viewpoints in proportion to the (published) prominence of
each. Fringe theories, for example, deserve much less space (word count) in an article than mainstream/conventional theories.
• Represent fairly any differing views about a topic. Fairly means presenting the best case for each view, while avoiding extreme rhetoric from either side.
• Write without bias. The best way to do this is to write about facts, not about
opinions. For example, instead of saying “X murdered Y,” which is an opinion (was it self defense?), write “X was convicted of murdering Y,” a documentable fact. Wikipedia has much, much more detail that you can read about this policy (type the
shortcut WP:NPOV in the search box on the left of the screen). Many (probably most,
maybe even all) editors at Wikipedia have very strong opinions about one thing or another—cultural values, religion, politics, science, whatever. Good editors avoid problems by either focusing on making articles as factual as possible or working on articles where their potential biases aren’t triggered. So if you’re absolutely, positively sure you’re right about a topic where many, and possibly most, other editors at Wiki-pedia wouldn’t agree with you, it’s a good idea to work on the other two million (or so) articles in Wikipedia that aren’t about that topic. (Keep in mind that there are lots of places on the Web—blogs, personal pages, wikis other than Wikipedia, and more
—where proactive opinions are welcome.)
Selecting a Random Page
Ready to edit? If so, you’ll want to find articles that you can improve with copyediting. One way is to click the “Random article” link on the left side of the screen (see Fig-ure 1-14).
just click the “Random article” link again. (Do this twenty or so times, and you get a reasonable sense of the variety in the almost two million articles in Wikipedia.)
TIP
If you encounter vandalism, you might want to look at Chapter 7 to learn your options for fixing it. Or, if you’re very new at editing, there’s nothing wrong with leaving the vandalism for a more experienced editor to fix.
Working on a Known Problem
An alternative to using the “Random article” link is to go to articles that other editors have identified as problematic. Several good places to find such articles are:
• Wikipedia:Pages needing attention (shortcut: WP:PNA)
• Wikipedia:Requests for expansion (shortcut: WP:RFE)
• Category:Wikipedia articles in need of updating (shortcut: CAT:UP)
• Category:Wikipedia maintenance (shortcut: CAT:M)
When you see the name of an article that seems interesting, just click the article name to go to it and start editing as described earlier in this chapter.
W O R D T O T H E W I S E
Spelling Doesn’t (Always) Count
If you find what looks like a spelling mistake, don’t leap into edit mode and correct it. What you think is an error may be a perfectly legitimate spelling in context. For ex-ample, you may have stumbled upon a national variant of a word: What is “analyse” in the United Kingdom is “analyze” in the United States; neither is wrong.
CHAPTER 2
Documenting Your Sources
Back in high school English, you probably learned how to add footnotes and endnotes to essays and papers. If you didn’t add information about your sources, your paper would get a very low grade.
Wikipedia’s equivalent of a failing grade is to have another editor reverse your edit, putting the article back to exactly as it was before you changed it. If you want to add new information to articles and have it stay there, you need to understand Wikipedia’s rules. This chapter explains those rules. If you follow them, you’ll help ensure the accuracy and credibility of Wikipedia articles.
To add a source (what Wikipedia calls citing a source), you also need to learn some
technical matters—how Wikipedia software handles external links, and how it creates footnotes. This chapter includes two tutorials that show you how to create links and footnotes that would make your English teacher proud.
Documentation Guidelines
Wikipedia is not the place to document the previously undocumented, to report new discoveries, to publish new theories, or to record personally observed events that may be considered newsworthy. Such content may well be true, but as far as Wikipedia’s
policies are concerned, true isn’t enough. Information must be verifiable, which means
it must be backed by a published source outside Wikipedia. Simply put, Wikipedia must never be the first place that news appears. If a tree falls in a forest and it’s not reported elsewhere, then Wikipedia isn’t going to report it either.
NOTE
Some places on the Web welcome original writing and reporting. You’ll find a list at the page Wikipedia:Alternative outlets. Some, such as Wikinews, are sister projects.
• What you know is true (or, more accurately, what you think is true) isn’t a criterion
for what you can assert on Wikipedia. Information must come from a published,
reliable source.
• Ideally, always cite your source when you add new information to Wikipedia. If
you add a quotation, or if you add something that is likely to be challenged, you
absolutely must cite a published, reliable source.
Wikipedia has three core policies for content. Chapter 1 discussed one of them—
Neu-tral point of view (page 22). The other two policies are mostly about new content: No original research and Verifiability. You can (and probably should) read those two
pol-icies yourself. The shortcuts are WP:NOR and WP:V; on any Wikipedia page, just type
one of those into the search box on the left, and then click Go. Misunderstandings of these policies abound. The rest of this section is devoted to clearing up some of the biggest.
Not All Sources Are Created Equal
Only reliable sources hold up to the scrutiny of the Wikipedia community. But what
makes a source reliable? To quote from Wikipedia’s Reliable sources guideline
(short-cut: WP:RS): “Articles should rely on reliable, third-party published sources with a
reputation for fact-checking and accuracy.” Most international and national newspa-pers, magazines, and scientific journals put significant resources into avoiding mis-takes, to maintain their credibility and readership (and their survival in the face of libel and other lawsuits). On the other hand, an anonymous blogger can feel pretty free to post anything on the Web without worrying about the consequences. The general rule is: “Self-published books, personal Web sites, and blogs are largely not acceptable as sources.” (Wikipedia:Verifiability)
F R E Q U E N T L Y A S K E D Q U E S T I O N