Android Cookbook
Android Community Experts
Android Cookbook
by Android Community Experts
Copyright © 2011 Ian Darwin and Contributors. All rights reserved. Printed in the United States of America.
Published by O’Reilly Media, Inc., 1005 Gravenstein Highway North, Sebastopol, CA 95472. O’Reilly books may be purchased for educational, business, or sales promotional use. Online editions are also available for most titles (http://safari.oreilly.com). For more information, contact our corporate/ institutional sales department: (800) 998-9938 or [email protected].
Editor:
Ian F. DarwinProduction Editor:
Copyeditor:
Proofreader:
Indexer:
Cover Designer:
Interior Designer:
Illustrators:
andNovember 2011: First Edition.
Revision History for the First Edition:
See http://oreilly.com/catalog/errata.csp?isbn=9781449388416 for release details.
Android is a trademark of Google, Inc. for their open-source operating environment for mobile devices. Linux is a trademark of Linus Torvalds. Java is a trademark of Oracle America Corporation (formerly Sun Microsystems).
Nutshell Handbook, the Nutshell Handbook logo, and the O’Reilly logo are registered trademarks of O’Reilly Media, Inc. !!FILL THIS IN!! and related trade dress are trademarks of O’Reilly Media, Inc. Many of the designations uses by manufacturers and sellers to distinguish their products are claimed as trademarks. Where those designations appear in this book, and O’Reilly Media, Inc. was aware of a trademark claim, the designations have been printed in caps or initial caps
While every precaution has been taken in the preparation of this book, the publisher and authors assume no responsibility for errors or omissions, or for damages resulting from the use of the information con-tained herein.
ISBN: 978-1-449-38841-6 [?]
Table of Contents
Preface . . . xiii
1. Getting Started . . . 1
1.1 Introduction: Getting Started
1
1.2 Learning the Java Language
1
1.3 Hello World - Command Line
3
1.4 Hello World - Eclipse Version
5
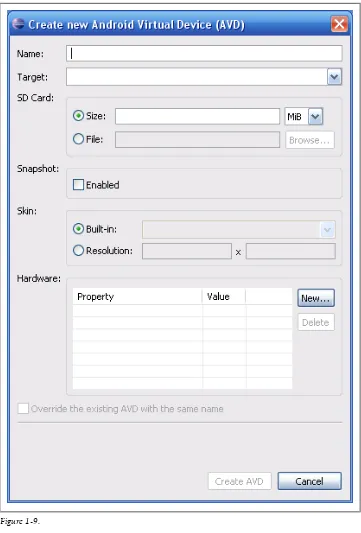
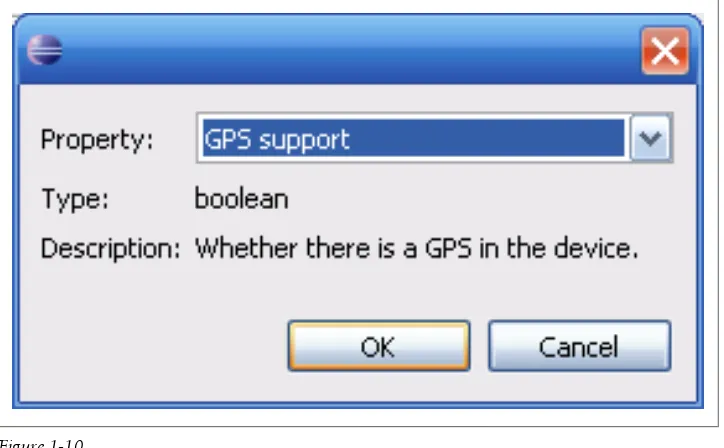
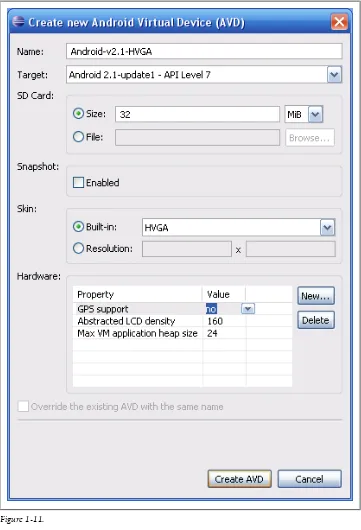
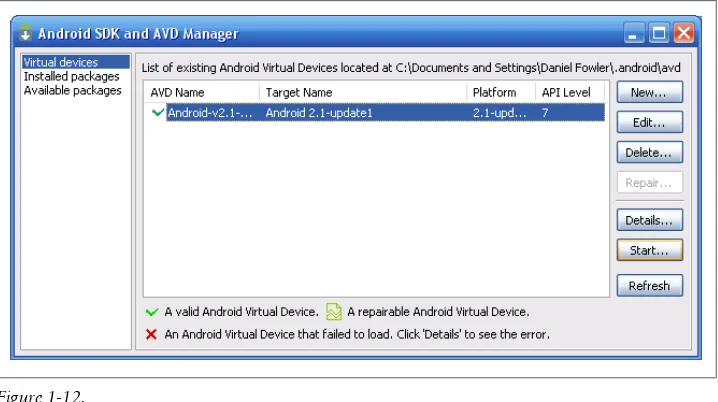
1.5 Set Up an Android Virtual Device for Apps Testing
10
1.6 Set Up an IDE on Windows to Develop for Android
23
1.7 Android Lifecycle
32
1.8 Opening a Web Page, Phone Number or anything else with an Intent 33
1.9 Email Text From a View
35
1.10 Sending an email with attachments
38
1.11 Installing .apk files on the emulator
40
1.12 Installing apps onto an Android Emulator
40
1.13 Android Epoch HTML/Javascript Calendar
43
1.14 Sharing Java classes from another Eclipse Project
48
1.15 Referencing libraries to implement external functionality
49
1.16 Use SDK Samples to Help Avoid Head Scratching
50
1.17 Keeping the Android SDK Updated
55
1.18 Five Ways to Wire Up an Event Listener
61
1.19 Taking a Screenshot from the Emulator/Android Device
69
1.20 Program: A Simple CountDownTimer example
70
1.21 Program: Tipster, a tip calculator for the Android OS
73
2. Designing a successful Application . . . 91
2.1 Introduction: Designing a Successful Android application
91
2.2 Keeping a Service running while other apps are on display
95
2.3 Starting a service after phone reboot
97
2.4 Exception Handling
98
2.5 Sending/Receive broadcast message
100
2.6 Android's Application Object as a "Singleton"
101
2.7 Keeping data when the user rotates the device
103
2.8 Creating a Responsive Application using Threads
105
2.9 Eating Too Much CPU Time In The UI Causes A Nasty Result
107
2.10 AsyncTask: Do background tasks and modify the GUI
113
2.11 Monitoring the Battery Level of your Android Device
114
2.12 Splash Screens in Android: Method 1
115
2.13 Splash Screens in Android: Method 2
117
2.14 Designing a Conference/*Camp/Hackathon App
123
2.15 Implementing Autocompletion in Android.
124
2.16 Using Google Analytics in Android Application
126
2.17 Using AsyncTask to do background processing
128
2.18 A Simple Torch Light
134
2.19 Adapting Android Phone Application to Tablet
136
2.20 First Run preferences
138
2.21 Formatting the time and date display
139
2.22 Controlling Input with KeyListeners
142
2.23 Android Application Data Backup
145
2.24 Making password fields
151
2.25 Working Without Tooltips: Use Hints Instead
152
3. Testing . . . 157
3.1 Introduction: Testing
157
3.2 How to TDD(test driven development) Android App
157
3.3 How to troubleshoot "The application has stopped unexpectedly.
Please try again"
158
3.4 Debugging using Log.d and LogCat
161
3.5 Keep Your App Snappy With StrictMode
163
3.6 Barrel of Monkeys
164
3.7 Sending text messages and placing calls between AVDs
165
3.8 Activity LifeCycle Scenarios for Testing
166
4. Content Providers . . . 175
4.1 Introduction: Content Providers
175
4.2 Retrieving Data from a Content Provider
175
4.3 Writing a Content Provider
177
4.4 Android Remote Service
179
5. Graphics . . . 185
5.1 Introduction: Graphics
185
5.2 Getting Screenshots
185
5.3 Using a Custom Font
186
5.4 Draw a spinning cube with OpenGL ES
191
5.5 Adding control to the OpenGL spinning cube
196
5.6 Taking a Picture Using an Intent
199
5.7 Taking a Picture Using android.media.Camera
201
5.8 Using AndroidPlot to display charts and graphs in your Android
application.
205
5.9 Use Inkscape to Create an Android Launcher Icon
207
5.10 Easy Launcher Icons from OpenClipArt.org using Paint.NET
216
5.11 Android HTML5 RGraph Charting
228
5.12 Simple Raster Animation
232
6. Graphical User Interface . . . 239
6.1 Introduction: GUI
239
6.2 User Interface Guidelines (placeholder)
240
6.3 SlidingDrawer Overlapping other UI components
240
6.4 Android 3.0 Photo Gallery
244
6.5 Building a UI using Fragments API of Android 3.0 in Android 2.2
246
6.6 Haptic Feedback
250
6.7 Handling Configuration Changes by Decoupling View from Model 254
6.8 Let Them See Stars: Using RatingBar
257
6.9 Invoke an action handler when a Button is pressed
260
6.10 Creating an Alert Dialog.
263
6.11 Customize the SlidingDrawer component to animate/transition
from the top down.
264
6.12 Use a Timepicker widget
266
6.13 Formatting with Correct Plurals
268
6.14 Feed AutoCompleteTextView using a SQLite database query
272
6.15 Change The Enter Key to "Next" on the Soft Keyboard
273
6.16 How to Create a Simple Widget
277
6.17 Make a View Shake
280
6.18 Using CheckBoxes and RadioButtons
281
6.19 Creating a Notification in the Status Bar
286
6.20 Autocompletion with Icons/Images
288
6.21 Creating your own Custom Title Bar
295
6.22 iPhone-like wheel picker for selection
298
6.23 Simple Calendar
302
6.24 Formatting Numbers
310
6.25 Start a Second Screen from the First
314
6.26 Creating a Tabbed Dialog
322
6.27 Creating a Custom Dialog with buttons, images and text
326
6.28 Create a Custom Menu
328
6.29 Loading Screen in between two Activities
330
6.30 Implementing reactions on click of items in a Custom Menu.
333
6.31 Navigate different activities within a TabView
336
6.32 Drop-down Chooser via the Spinner Class
338
6.33 Effective UI design using Image Buttons
340
6.34 Pinch to zoom
343
6.35 Add a Border with Rounded Corners to a Layout
346
6.36 Creating a ProgressDialog in Android.
347
6.37 Creating a Submenu.
349
6.38 Processing key press events in an Activity.
351
6.39 Constrain EditText Values with Attributes and the TextWatcher
Interface
352
6.40 Gesture Detection in Android
355
6.41 Customizing the Look of a Toast
362
6.42 Using SlidingDrawer to Overlap Other Components
363
7. GUI: ListView . . . 367
7.1 Introduction: ListView
367
7.2 Building list-based applications with ListView
367
7.3 'No data' View for Lists
372
7.4 Advanced ListView: populating a list with images and text
373
7.5 ListView with Icons/images
379
7.6 Sectioned Headers in ListViews
386
7.7 Making Lists Behave Nicely
392
7.8 Writing A Custom List Adapter
393
7.9 Orientation Changes : From ListView data values to Landscape
Charting
396
8. Multimedia . . . 407
8.1 Introduction: Multimedia
407
8.2 Play a Youtube Video
407
8.3 Using Gallery with ImageSwitcher
408
8.4 Grabbing a video using MediaRecorder
411
8.5 Android Face Detection
414
8.6 Playing audio from a file
417
8.7 Playing Audio without Interaction
420
8.8 Using Speech to Text
421
8.9 Making the Device Speak with TTS
423
9. Data Persistence . . . 427
9.1 Listing a Directory
427
9.2 Default shared preferences consistency check
429
9.3 Advanced text search
431
9.4 How to push string-values using Intent.putExtra()
437
9.5 Retrieving data from a Sub-Activity back to your Main Activity
439
9.6 Getting total and free space on the SD card
442
9.7 Creating a SQLite database in an Android application.
442
9.8 Retrieving data from a SQLite database.
444
9.9 Inserting values into a SQLite database.
445
9.10 Work With Dates in SQLite
445
9.11 Parsing JSON using the Jackson Parser
448
9.12 Parsing an XML document using the DOM API
451
9.13 Parsing an XML document using an XmlPullParser
453
9.14 Accessing data from a file shipped with the App rather than in the
filesystem
456
9.15 Adding a Contact
457
9.16 Reading Contact Data
461
9.17 Parsing JSON using JSONObject
463
10. Telephone Applications . . . 467
10.1 Introduction: Telephone Applications
467
10.2 Do something when the phone rings
467
10.3 Process outgoing calls
471
10.4 Dialing the phone
475
10.5 Sending single or multipart SMS messages
476
10.6 Receiving an SMS in an Android Application.
478
10.7 Using Emulator Controls to send SMS to the Emulator.
480
10.8 Android TelephonyManager.
480
11. Networked Applications . . . 491
11.1 Introduction: Networking
491
11.2 Using a RESTful Web Service
491
11.3 Extracting Information from Unstructured Text using Regular
Expressions
494
11.4 Parsing RSS/ATOM feeds parsing with ROME
496
11.5 Using MD5 to Digest Free Text
500
11.6 Converting text into hyperlinks
502
11.7 Accessing a web page through your Android application
503
11.8 Customizing a WebView
505
12. Gaming and Animation . . . 507
12.1 Introduction: Gaming and Animation
507
12.2 Android Game Programming - Introduction to Flixel-Android
508
12.3 Introduction to Game Programming using AndEngine
(Android-Engine)
510
13. Social Networking . . . 517
13.1 Facebook Integration
517
13.2 Social Networking Integration using Http
525
13.3 Loading a user's Twitter timeline (using JSON)
528
14. Location and Map Applications . . . 533
14.1 Introduction: Location-Aware Applications
533
14.2 Getting Location Information
533
14.3 Access GPS information anywhere in your application
535
14.4 Mocking GPS Coordinates On A Device
537
14.5 Geocoding and Reverse Geocoding
539
14.6 Getting ready for Google Maps development
540
14.7 Using Google Maps in your Android App
547
14.8 How to show your current location in a map
548
14.9 To Add Device's current location to Google Maps
549
14.10 Draw a location marker on a Google MapView
550
14.11 Drawing multiple location markers on a MapView
556
14.12 Creating Overlays for a Google MapView
560
14.13 Changing Views of a MapView.
561
14.14 Draw overlay icon without using Drawable
562
14.15 Location search on Google maps
567
14.16 MapView inside TabView
568
14.17 Handling longpress in a map
572
14.18 Using OpenStreetMap
575
14.19 Creating overlays in OpenStreetMaps
576
14.20 Using a scale on an OpenStreetMap
579
14.21 Handling touch events on an OpenStreetMap Overlay
582
14.22 Getting location updates with OpenStreetMaps
584
15. Accellerometer . . . 593
15.1 Using the accelerometer to detect shaking of the device
593
15.2 Introduction: Sensors
596
15.3 Checking for device facing up or facing down based on screen
orientation using Accelerometer.
597
15.4 Finding the orientation of an Android device using Orientation
sensor.
598
15.5 Checking for the Presence or Absence of a Sensor
600
15.6 Reading the Temperature Sensor
601
16. Bluetooth . . . 603
16.1 Introduction: Bluetooth
603
16.2 Connecting to Bluetooth enabled device
603
16.3 Enabling Bluetooth and making the device Discoverable.
606
16.4 Listening for Bluetooth Connection Requests.
607
16.5 Bluetooth Device discovery
609
17. System and Device Control . . . 611
17.1 Phone network/connectivity information
611
17.2 Changing incoming call notification to Silent, Vibrate, or normal
612
17.3 Rebooting the Device
614
17.4 Running shell commands from your application
616
17.5 Copying text and getting text from the Clipboard
617
17.6 Making LED based notifications
619
17.7 Making the Device Vibrate.
620
17.8 Determining Whether a Given Application is Running
621
18. Other Programming Languages . . . 623
18.1 Run external/native Linux command
623
18.2 Running Adobe Air/Flex on Android
624
18.3 Getting Started with ''Scripting Layer for Android'' (formerly
Android Scripting Environment)
625
18.4 Running Native Code with JNI on the NDK
627
18.5 Introduction: Other Programming Languages
632
18.6 Intro to Flex 4.5 Android Programming
634
18.7 Sharing your scripts (ASE) using QR codes
636
18.8 Using native handset functionality from webview using Javascript 638
19. Internationalization . . . 641
19.1 Introduction: Internationalization
641
19.2 Internationalizing Application Text
642
20. Packaging, deploying and selling . . . 647
20.1 Signing Your Application
647
20.2 How to integrate Admob into your app
648
20.3 Distributing Your Application via the Android Market
652
20.4 Creating a Signing Certificate
654
20.5 Obfuscating and Optimizing with ProGuard
657
20.6 Provide a Link to other Published Apps in the Market
660
21. Other . . . 663
21.1 Introduction: Everything Else
663
21.2 Sending messages between threads using activity thread queue and
Handler class
663
21.3 Intercommunication amongst Applications
665
22. Contributors . . . 667
22.1 Names
667
Preface
Preface
Ian Darwin
Android is "the open source revolution" applied to cellular telephony. At least, part of
it. There are many other attempts to provide open source cell phones, ranging from the
mostly-defunct
Openmoko Freerunner
through QT Embedded, Moblin, LiMo, Debian
Mobile, Maemo to the
recently-open-sourced
Symbian OS
. Not to mention the
estab-lished non-open-source stalwarts: Blackberry OS, Apple's iPhone, and Microsoft
Win-dows Mobile (these have developer toolkits, but their OS is not available as open
source).
"Nobody's armchair is a good predictor of the future", though, as Mike O'Dell once
said. Does Android have a place in the sun alongside these other players? We think it
does. This book is here to help the Android developer community share the knowledge
that will make it happen. Those who contribute knowledge here are helping make
Android development easier for those who come after.
About Android
Android
is a mobile technology platform that provides cell phones, tablets and other
hand-held and mobile devices (even netbooks) with the power and portability of the
Linux operating system and the reliability and portability of a standard high-level
lan-guage and API. Android apps are written in the Java lanlan-guage, using tools such as
Eclipse, compiled against the Android API, and translated into bytecode for the Dalvik
VM.
Android is thus related by OS family to Openmoko, QT Embedded, MeeGo (the 2010
merger of Nokia's Maemo and Intel's MobLin
), OPhone, LiMo and other Linux-based
cell phone projects. Android is also related by programming language to Blackberry
and JavaME phones, and to Java and the wider realm of Java Enterprise applications.
Android sales have continued to climb; there is a report from NPD that
first-quarter
2010 sales of all Android devices exceeded sales of the iPhone
, moving it into second
place (although still well behind the Blackberry platform). Surely it was due in part to
major carrier Verizon's 2-for-1 sale, but that doesn't account for all of it...
Who This Book Is From
This book was written by several dozens of Android developers from the Android
community at large. Development occurred in the open, on the web site
Android-Cookbook.com
, which I wrote to allow people to contribute, view, review and
com-ment upon, the recipes that would make up this book. A complete list can be found in
Chapter 22
. I am deeply grateful to all the contributors, who have helped moved this
book from a dream to the reality that you have in your hands (or on-screen if you are
reading the eBook format). Thank you all!
Who This Book Is For
We assume you know the basics of the Java language. If not, see
“Pref-ace” on page xiii
. We also assume you know the basics of the Java Standard Edition
API (since this forms the basis of Android's runtime libraries) as well as the basics of
Android. The terms "activity", "intent", and "content provider", while not necessarily
being what you dream about at night, should at least be familiar to you.
What's in this Book?
Chapter 1,
Getting Started
, takes you through the steps of setting up the Android
de-velopment environment and building several simple applications of the well-known
"Hello World" type pioneered by Brian Kernighan.
Chapter 2,
Designing a successful Application
, covers some of the differences in mobile
computing that will hit developers coming from desktop and enterprise software
en-vironments, and talks about how mobile design (in particular Android design) differs
from those other environments.
Testing is often an afterthought for some developers, so we put this early on, in
Chap-ter 3,
Testing.
Not so you'll skip it, but so you'll read and heed. We talk about unit
testing individual components as well as testing out your entire application in a
well-controlled way.
In
Chapter 4,
Content Providers
, we show you how to make an application that can be
used by other applications through something as simple but ubiquitous (in Android)
as the URL.
Chapter 5,
Graphics
, covers a range of topics related to graphics, including use of the
graphical drawing and compositing facilities in Android as well as using desktop tools
to develop graphical images, textures, icons, and so on that will be incorporated into
your finished application.
Every mobile app needs a GUI, so
Chapter 6,
Graphical User Interface
, covers all the
ins and outs of GUI development for Android. Examples are given both in XML and
in hard-coded GUI development.
Chapter 7,
GUI: ListView
, focuses on one of the most important Graphical User
Inter-faces in Android, the
ListView
.
Android is rich in multimedia capabilities.
Chapter 8,
Multimedia
, shows how.
Chapter 9,
Data Persistence
, shows how to save data into files, databases and so on.
And how to retreive it later, of course.
Android started out as an operating system for mobile telephones.
Chapter 10,
Tele-phone Applications
, shows how to control and react to the telephone device that is in
most mobile devices nowadays.
Mobile devices are, for the most part, always-on and always-connected. This has a
major impact on how people use them and think about them.
Chapter 11,
Networked
Applications
, shows the coding for traditional networked applications. This is followed
by
Chapter 12,
Gaming and Animation
, and
Chapter 13,
Social Networking
.
The now-ubiquitous Global Positioning System has also had major implications on
how mobile applications work.
Chapter 14,
Location and Map Applications
, discusses
how to find your location, how to get map data from Google and OpenStreetMap, and
how applications can be location-aware in ways that are just now being explored.
Chapter 15,
Accellerometer
, talks about the sensors built into most Android devices
and how to use them.
There may be a
Chapter 16,
Bluetooth
, if there's enough to say about it, going way
beyond connecting your Bluetooth(TM) headset to your phone. This is followed by
Chapter 17,
System and Device Control
.
In
Chapter 18,
Other Programming Languages
, we explore the use of other
program-ming languages to write all or part of your Android application. Examples include C,
Perl, Python, Lisp, and other languages.
While this book is in English, and English remains the #1 language worldwide, it is far
from the only one. And most end users would much rather have an application that
has its text in their language and its icons in a form that is culturally correct for them.
Chapter 19,
Internationalization
, goes over the issues of language and culture and how
it relates to Android.
Most Android developers hope that their applications will be used by other people. But
this won't happen unless users can find your application.
Chapter 20,
Packaging,
de-ploying and selling
, shows how to prepare your application for distribution via the
An-droid Market, and to use that as well as other markets to get your application out to
the people that will use it.
Finally,
Chapter 21,
Other
, covers a few miscellaneous topics that don't quite fit
any-where else.
Other Books You May Like
Java Books
T.B.A.
Android Books
T.B.A.
Programming and Design Books
T.B.A.
Conventions Used in This Book
The following typographical conventions are used in this book:
Italic
Indicates new terms, URLs, email addresses, filenames, and file extensions.
Constant width
Used for program listings, as well as within paragraphs to refer to program elements
such as variable or function names, databases, data types, environment variables,
statements, and keywords.
Constant width bold
Shows commands or other text that should be typed literally by the user.
Constant width italic
Shows text that should be replaced with user-supplied values or by values
deter-mined by context.
This icon signifies a tip, suggestion, or general note.
This icon indicates a warning or caution.
Using Code Examples
This book is here to help you get your job done. In general, you may use the code in
this book in your programs and documentation. You do not need to contact us for
permission unless you’re reproducing a significant portion of the code. For example,
writing a program that uses several chunks of code from this book does not require
permission. Selling or distributing a CD-ROM of examples from O'Reilly books does
require permission. Answering a question by citing this book and quoting example
code does not require permission. Incorporating a significant amount of example code
from this book into your product’s documentation does require permission.
We appreciate, but do not require, attribution. An attribution usually includes the title,
author, publisher, and ISBN. For example: "
Book Title
by Some Author. Copyright
2008 O'Reilly Media, Inc., 978-0-596-xxxx-x."
If you feel your use of code examples falls outside fair use or the permission given above,
feel free to contact us at
[email protected]
.
Safari® Books Online
Safari Books Online is an on-demand digital library that lets you easily
search over 7,500 technology and creative reference books and videos to
find the answers you need quickly.
With a subscription, you can read any page and watch any video from our library online.
Read books on your cell phone and mobile devices. Access new titles before they are
available for print, and get exclusive access to manuscripts in development and post
feedback for the authors. Copy and paste code samples, organize your favorites,
down-load chapters, bookmark key sections, create notes, print out pages, and benefit from
tons of other time-saving features.
O'Reilly Media has uploaded this book to the Safari Books Online service. To have full
digital access to this book and others on similar topics from O'Reilly and other
pub-lishers, sign up for free at
http://my.safaribooksonline.com
.
How to Contact Us
Please address comments and questions concerning this book to the publisher:
O'Reilly Media, Inc.
1005 Gravenstein Highway North
Sebastopol, CA 95472
800-998-9938 (in the United States or Canada)
707-829-0515 (international or local)
707-829-0104 (fax)
We have a web page for this book, where we list errata, examples, and any additional
information. You can access this page at:
http://www.oreilly.com/catalog/9781449388416
To comment or ask technical questions about this book, send email to:
[email protected]
For more information about our books, conferences, Resource Centers, and the
O'Reil-ly Network, see our website at:
http://www.oreilly.com
CHAPTER 1
Getting Started
1.1 Introduction: Getting Started
Ian Darwin
Discussion
The famous "Hello, World" pattern came about when Kernighan and Plaugher wanted
to write a "Recipe" on how to get started in any new programming language and
envi-ronment. This chapter is affectionately dedicated to these fine gentlemen, and to
ev-eryone who has ever struggled to
get started
in a new programming paradigm.
1.2 Learning the Java Language
Ian Darwin
Problem
Android apps are written in the Java(tm) programming language before they are
con-verted into Android's own class file format, DEX. If you don't know how to program
in Java you will find it hard to write Android apps.
Solution
There are lots of resources available to learn Java. Most of them will teach you what
you need, but will also teach some API classes that are not available.
Avoid
any sections
in any book that talk about topics in the left-hand column:
Table 1-1. Parts of Java API to Ignore
Java API
Android Equivalent
Swing, Applets
Android's GUI, see [[Introduction: GUI]]
application entry point main()
See [[Android Lifecycle]]
Java API
Android Equivalent
J2ME/JavaME
Most of android.* replaces JavaME API
Servlets/JSP, J2EE/JavaEE
Designed for server-side use
Discussion
Here are some books and resources:
• O'Reilly's
Java in a Nutshell
is a good introduction for programmers, particularly
those immigrating from C/C++. This book has grown from an acorn to a coconut
in size, to keep up with the growth of Java SE over its lifetime.
•
Head First Java
provides a great visual-learner-oriented introduction to the
lan-guage. O'Reilly.
•
Thinking In Java
(4th edition) by Bruce Eckel, Prentice-Hall.
•
Learning Java
Formerly titled
Exploring Java
, O'Reilly.
•
Great Java videos
provides a visual introduction to the language.
•
Java: The Good Parts
From the book's web site: "What if you could condense Java
down to its very best features and build better applications with that simpler
ver-sion? In this book, veteran Sun Labs engineer Jim Waldo reveals which parts of
Java are most useful, and why those features make Java among the best
program-ming languages available..."
•
Java Cookbook
(disclosure: I wrote this book) is regarded as a good second book
for Java developers. It has entire chapters on Strings, Regular Expressions,
Num-bers, Dates & Time, Structuring Data, I/O and Directories, Internationalization,
Threading and Networking, all of which apply to Android. It has a number of
chapters that are specific to Swing and to some EE-based technologies.
What's needed is for somebody to write a book on
Android for non-Java
Program-mers
that would include just exactly the right parts of standard Java language and API
along with all the Android stuff. Available now in three volumes, ships in its own cool
retro wooden case... :-).
See Also
This book's editor maintains a list of Java resources online at
http://www.darwinsys
.com/java/
.
O'Reilly has many of the best Java books around; there's a complete list at
http://oreilly
.com/pub/topic/java
.
1.3 Hello World - Command Line
Ian Darwin
Problem
You want to create a new Android project without using the Eclipse ADT plug-in.
Solution
Use the Android Development Kit tool
android
with the
create project
argument and
some additional arguments to configure your project.
Discussion
In addition to being the name of the platform, Android is also the name of a
command-line tool for creating, updating and managing projects. You can either navigate into the
android-sdk-xxx directory, or you can set your PATH variable to include its tools
sub-directory.
Then, to create a new project, give the command "android create project" with some
arguments. Here is an example run under MS-DOS:
Example 1-1.
C:\Documents and Settings\Ian\My Documents>PATH=%PATH%;"C:\Documents and Settings\Ian\My Documents\android-sdk-windows\tools"
C:\Documents and Settings\Ian\My Documents>android create project --target 1 --package com.example.foo --name Foo --activity FooActivity --path .\MyAndroid Created project directory: C:\Documents and Settings\Ian\My Documents\MyAndroid
Created directory C:\Documents and Settings\Ian\My Documents\MyAndroid\src\com\example\foo
Added file C:\Documents and Settings\Ian\My Documents\MyAndroid\src\com\example\foo\FooActivity.java Created directory C:\Documents and Settings\Ian\My Documents\MyAndroid\res
Created directory C:\Documents and Settings\Ian\My Documents\MyAndroid\bin Created directory C:\Documents and Settings\Ian\My Documents\MyAndroid\libs Created directory C:\Documents and Settings\Ian\My Documents\MyAndroid\res\values Added file C:\Documents and Settings\Ian\My Documents\MyAndroid\res\values\strings.xml Created directory C:\Documents and Settings\Ian\My Documents\MyAndroid\res\layout Added file C:\Documents and Settings\Ian\My Documents\MyAndroid\res\layout\main.xml Added file C:\Documents and Settings\Ian\My Documents\MyAndroid\AndroidManifest.xml Added file C:\Documents and Settings\Ian\My Documents\MyAndroid\build.xml
C:\Documents and Settings\Ian\My Documents>
The list of arguments for the
create project
code follows:
Table 1-2. List of Create Project Arguments
Name
Meaning
Example
--activity
Name of your "main class" and default name for the
generated .apk file
--target HelloActivity
--name
Name of the project and the generated .apk file
--name MyProject
--package
Name of Java package for your classes
--package com.example.hello
Name
Meaning
Example
--path
Path to create the project in (does not create a
subdir-ectory under this)
--path /home/ian/workspace/MyProject (see above for
Windows example)
--target
Level of the Android platform to target
--target 1
It it cannot complete the requested operation the
android
command presents a
volu-minous "command usage" message listing all the operations it can do and the arguments
for them. If successful, the
android create project
command creates the following files
and directories.
Table 1-3. Artifacts Created by Create Project
Name
Meaning
AndroidManifest.xml
Config file that tells Android about your project
bin
generated binaries (compiled class files)
build.properties
Editable properties file
build.xml
Standard Ant build control file
default.properties
gen
Generated stuff
libs
Libraries, of course
res
important resource files (strings.xml, layouts, etc.)
src
source code for your application
src/packagename/ActivytName.java
source of "main" starting activity
test
copies of most of the above
It is normal and recommended Android practice to create your user interface in XML
using the layout file created under
res/layout
, but it is certainly possible to write all
the code in Java. To keep this example self-contained, we'll do it the "wrong" way for
now. Use your favorite text editor to replace the contents of the file HelloWorld.java
with the following contents:
Example 1-2.
public class Hello extends Activity {
/**
* This method gets invoked when the activity is instantiated in * response to e.g., you clicked on the app's Icon in the Home Screen. */
@Override
public void onCreate(Bundle savedInstanceState) { super.onCreate(savedInstanceState);
// Create a TextView for the current Activity TextView view = new TextView(this);
// Make it say something
view.setText("Hello World");
// Put this newly-created view into the Activity // sort of like JFrame.setContentPane()
setContentView(tv); }
}
Assuming you have the Apache Software Foundation
Ant Build Tool
installed, you can
now (in a command-line window) change directory into the project directory (
...MyDo
cuments\MyAndroid
in the above example) and issue the command:
ant debugThis will create an archive file named e.g., MyAndroid.apk (apk standing for Android
Package) in the
bin
directory.
Assuming you have either the Emulator running, or your device plugged in and
recog-nized via USB, you can then do
adb -e install -r bin/MyAndroid.apk
The -e flag is for the emulator; use -d for a real device.
If you are handy with shell scripts or batch files, you'll want to create one called, say,
download, to avoid typing the
adb
invocation on every build cycle.
You will probably find it most convenient to create an icon for your app on the home
screen of the device or emulator; this icon will survive multiple "install -r" cycles so it's
the easiest way to test running your application.
See Also
Recipe 1.4
. The blog
"a little madness" has a more detailed formulation
. The
official
Android reference site has a page on developing without Eclipse
.
1.4 Hello World - Eclipse Version
Ian Darwin
Problem
You want to use Eclipse to develop your Android application.
Solution
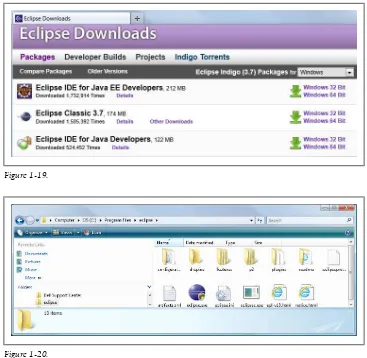
Install
Eclipse
, the
Android SDK
and the
ADT plug-in
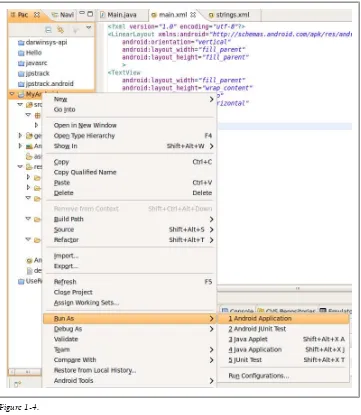
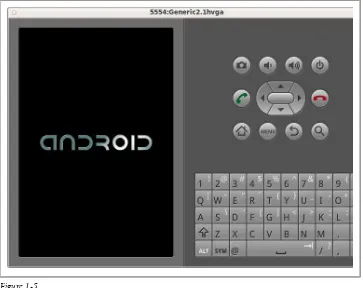
. Create your project and start
writing your app. Build it, and test it under the Emulator, from within Eclipse.
Discussion
Once you have these items installed, you are ready to begin:
•
Eclipse IDE
• The
Android SDK
• The
ADT plug-in
To get started, create a new project from the
File
->
New
menu.
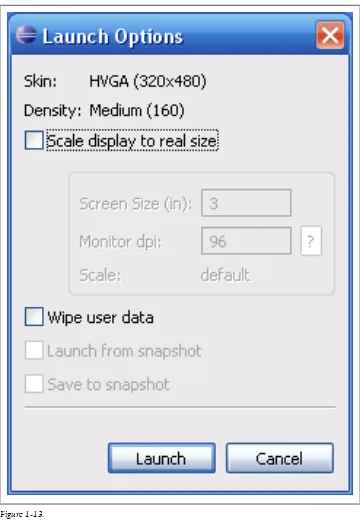
Click Next. Give your new project a name, and select an SDK version to target. 1.5
gives you almost all the devices in use today; 2.1 or 2.2 gives you the latest features.
You decide.
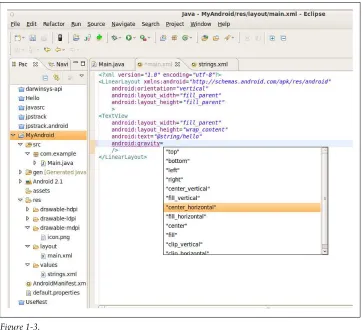
This figure shows the project structure expanded in the Project Panel at the right. It
also shows the extent to which you can use Eclipse Autocompletion within Android
-I added the 'gravity' attribute for the label, and Eclipse is offering a full list of possible
attribute values. I chose center-horizontal, so the label should be centered when we get
the application running.
Figure 1-1.
In fact, if you set gravity to
center_vertical
on the
LinearLayout
and
set it to
cen
ter_horizontal
on the TextView, the text will be centered both vertically and
horizon-tally. Here's the version of the layout file
main.xml
which achieves this:
Example 1-3.
<?xml version="1.0" encoding="utf-8"?>
<LinearLayout xmlns:android="http://schemas.android.com/apk/res/android" android:orientation="vertical"
android:layout_width="fill_parent" android:layout_height="fill_parent" android:gravity="center_vertical" >
<TextView
android:layout_width="fill_parent" android:layout_height="wrap_content" android:text="@string/hello"
android:gravity="center_horizontal"
Figure 1-3.
/>
</LinearLayout>