Book resources can be found on the CD-ROM and at www.guide2elements.com
Adobe
Photoshop
Elements 6
A visual introduction
to digital photography
Philip Andrews
ii ADOBE PHOTOSHOP ELEMENTS 6
Book resources can be found on the CD-ROM and at www.guide2elements.com Focal Press is an imprint of Elsevier
Linacre House, Jordan Hill, Oxford OX2 8DP, UK
30 Corporate Drive, Suite 400, Burlington, MA 01803, USA
First edition 2008
Copyright © 2008, Philip Andrews. Published by Elsevier Ltd. All rights reserved
The right of Philip Andrews to be identified as the author of this work has been asserted in accordance with the Copyright, Designs and Patents Act 1988
No part of this publication may be reproduced, stored in a retrieval system or transmitted in any form or by any means electronic, mechanical, photocopying, recording or otherwise without the prior written permission of the publisher
Permissions may be sought directly from Elsevier’s Science & Technology Rights Department in Oxford, UK: phone (+44) (0) 1865 843830; fax (+44) (0) 1865 853333; email: [email protected]. Alternatively you can submit your request online by visiting the Elsevier web site at http://elsevier.com/locate/permissions, and selecting Obtaining permission to use Elsevier material
Notice
No responsibility is assumed by the publisher for any injury and/or damage to persons or property as a matter of products liability, negligence or otherwise, or from any use or operation of any methods, products, instructions or ideas contained in the material herein. Because of rapid advances in the medical sciences, in particular, independent verification of diagnoses and drug dosages should be made
British Library Cataloguing in Publication Data
A catalogue record for this book is available from the British Library
Library of Congress Cataloging-in-Publication Data
A catalog record for this book is available from the Library of Congress
ISBN: 978-0-240-52099-5
For information on all Focal Press publications visit our website at www.focalpress.com
Printed and bound in Canada
Layout and design by Karen and Philip Andrews in Adobe InDesign CS3
Picture credits
With thanks to the great guys at www.ablestock.com for their generous support in supplying the cover picture and the tutorial images for this text. Copyright © 2008 Hamera and its licensors. All rights reserved. All other images and illustrations by Karen and Philip Andrews © 2008. All rights reserved.
CONTENTS
Contents
Foreword vii Introduction ix Acknowledgements x
1
The Buzz of Digital Photography
1
The beginning – the digital photograph 3
Making the digital image 5
Quality factors in a digital image 5
The steps in the digital process 8
Where does Photoshop Elements fit into the process? 9
Photoshop Elements 6 10
2
Introducing Photoshop Elements 6
11
Adobe Photoshop Elements 6 – new tools and features 12
The Photoshop Elements 6 workflow 13
The interface 18
The change continues 19
New tools and features 19
The Quick editor (previously Quick Fix editor) 29 The Organizer workspace (Photo Browser or Date View) 30 Photo Creations become Create and Share options 32
3
First Steps
35
The Welcome screen 37
Step 1: Getting your pictures into Elements 38 Organizer: File > Get Photos and Videos > From Camera or
Card Reader 38
Organizer: File > Get Photos and Videos > From Scanner 41 Ensuring enough pixels for the job 43 Editor: Image > Divide Scanned Photos 44
Step-by-Step to better scanning 45
Organizer: File > Get Photos and Videos > From Files
and Folders 46
How to multi-select the files to import 47 Organizer: File > Get Photos and Videos > From Mobile
Phone 47
Organizer: File > Get Photos and Videos > By Searching 48 Other options for getting your photos into Elements 49
Opening raw files 51
Creating new documents 53
Editor: File > New > Blank File 53 Editor: File > New > Image from Clipboard 53
New Photomerge options 54
Editor/Organizer: File > New > Photomerge Group Shot 54 Editor/Organizer: File > New > Photomerge Faces 55 Editor/Organizer: File > New > Photomerge Panorama 55
Editor: File > Import > Frame From Video 56
Step 2: Viewing your pictures 57
Organizer: Display > View Photos in Full Screen (F11) 58 First stop – View Photos in Full Screen 58 Organizer: Display > Compare Photos Side by Side (F12) 58
Comparing apples with apples 59
Editor: View > Zoom In and Zoom Out 59
Editor: Window > Navigator 60
Step 3: Image rotating 61
Step 4: Cropping and straightening 62
Cropping 62
Other rotation controls 65
Step 5: Automatic corrections 65
First some background 65
Organizer: Fix panel > Auto options 66
Version Sets 68
Step 8: Organizing your pictures 75
Keyword Tags 75
Albums 76
Smart Albums 76
Stacks and Auto Stacks 77
Step 9: Backing up your files 78
Organizer: File > Backup 78
Multi Disk Backups 78
4
Simple Image Changes
79
Now four levels of editing 80
Setting up your screen for Elements 82
Popularity can be a problem 83
Before you start 83
Windows XP 83
Windows Vista 84
Brightness and contrast changes 85
Editor: Enhance > Adjust Lighting > Brightness/Contrast 86
Underexposed 86 The Quick Fix editor – ‘quick change central’ 89
Altering a few tones only 90
Editor: Enhance > Adjust Lighting > Shadows/Highlights 91
Dodge and Burn tools 92
Color corrections 95
Editor: Enhance > Auto Color Correction 96 Editor: Enhance > Adjust Color > Remove Color Cast 96 Editor: Enhance > Adjust Color > Color Variations 97
The Red Eye Removal tool 99
CONTENTS
Using filters and effects 100
Editor: Filters menu 100
Editor: Filter > Filter Gallery 101
Editor: Window > Effects 102
Editor: Filter > Blur > Motion Blur 106 Editor: Filter > Sketch > Chalk & Charcoal 107 Editor: Filter > Distort > Liquify 108 Editor: Filter > Sketch > Graphic Pen 109 Editor: Filter > Stylize > Emboss 110
Third party filters 111
The new Guided editing mode 112
Getting help with Elements 115
Hints 115
Help 115
5
Hands on Techniques
117
Better digital capture 118
So what is in a raw file? 119
Processing with Photoshop Elements and Adobe Camera Raw
(ACR) 122
Opening 122
Rotate, Crop and Straighten 123
Adjusting white balance 123
Tonal control 124
Color strength adjustments 126
Sharpness/Smoothness and Noise Reduction 127
Output options 128
Save, Open or Done 128
Raw file queue 130
Applying changes across rated raw files 130 Applying changes across multiple raw files 131 Color depth or ‘What do you mean 8 bits per channel?’ 132
Manual tonal control 136
Editor: Window > Histogram 137
Editor: Enhance > Adjust Lighting > Levels 138
Specialized color control 141
Editor: Enhance > Auto Color Correction 142 Editor: Enhance > Adjust Color > Adjust Hue/Saturation 143 Editor: Enhance > Adjust Color > Color Variations 145 Editor: Enhance > Adjust Color > Adjust Color Curves 146
Sponge 148
Editor: Filter > Adjustments > Posterize 148 Editor: Filter > Adjustments > Invert 149 Editor: Filter > Adjustments > Photo Filter 150 High quality sharpening techniques 151 Editor: Enhance > Auto Sharpen 151 Editor: Enhance > Unsharp Mask 152 Editor: Enhance > Adjust Sharpness 154
Elements’ sharpening tools 155
Retouching techniques 156
Editor: Filter > Noise > Dust & Scratches 157
Clone Stamp 158
Spot Healing Brush 159
Healing Brush tool 160
Editor: Filter > Noise > Reduce Noise 161
Adding texture to an image 163
Editor: Filter > Noise > Add Noise 163
Editor: Filter > Texture > Grain 165 Editor: Filter > Texture > Texturizer 167 Changing the size of your images 170 Editor: Image > Resize > Image Size 170 Editor: Image > Resize > Canvas Size 173 Increasing the canvas size with the Crop tool 174
6
Using Selections and Layers
175
Selection basics 176
Drawing selection tools (see Figures 6.3 and 6.4) 177 Drawing selection tool summaries 181
Color selection tools 182
Modifying drawn and color-based selections 183 The Quick Selection Tool (previously the Magic Selection
Brush) 185
Select > Refine Edge 187
The Magic Extractor feature 189
Selections in action 191
Advanced dodging and burning 191
Artificial depth of field 193
Filtering a selection 194
Selective saturation changes 194
Layers and their origins 196
Organizing layers 207
Quick guide to Layer shortcuts 208
7
Combining Text with Your Images 209
Creating simple type 212
Creating paragraph Text 212
Basic text changes 213
Creating and using type masks 213
Reducing the ‘jaggies’ 214
Warping type 215
Applying styles to type layers 215
New text alternatives 219
Debunking some type terms 221
Font size 221
Font family and style 221
Alignment and justification 222
Leading 222
8
Using Elements’ Painting and
Drawing Tools
223
Cookie Cutter tool 225
Painting tools 225
Paint Brush 225
The More Options palette 226
Airbrush 227
CONTENTS
Paint Bucket 228
Choosing my paint colors 230
Painting tools summary 230
The Impressionist Brush tool 230
Color Replacement tool 231
Erasing 232
Smart erasing 234
Better with a tablet 234
Painting tools in action 235
Hand coloring black and white photos 235
Drawing tools 236
Even more shapes 237
Cookie Cutter tool 238
Shapes and graphics in the new Effects palette 239
9
Creating Albums and Scrapbooks 241
Five steps to creating an Elements Photo Book 244 Step 1: Select the images to include 244
Step 2: Create a title page 244
Step 3: Adjusting the look of the book pages 245
Step 4: Create the Photo Book 246
Step 5: Save the Photo Book 247
Edit an existing design 248
Adjusting the Frame and Picture 248
Adding, replacing and removing photos 250 Adding, moving and deleting pages 252
The Artwork panels 255
Create > Artwork > Content 256 Create > Artwork > Effects 258 Create > Artwork > Favorites 258
Bringing it all together 258
10
Photomerge Stitching
261
Photomerge Group Shot 262
Photomerge Faces 263
Photomerge Panorama 264
Photomerge Group Shot 265
Photomerge Faces 267
Photomerge Panorama 268
Taking images with Photomerge in mind 269
Image overlap 270
Keep the camera level 270
Maintain focal length 270
Pivot around the lens 271
Maintain exposure 272
Keep white balance consistent 273
Watch the edges 273
Producing your panorama 274
New Photomerge Panorama stitching modes 274 Editor: File > New > Photomerge Panorama 277 Interactive Layout Step-by-Step 278 Photomerge Panorama from the Photo Browser 278 Photo Browser: File > New > Photomerge Panorama 278
Photomerge Panorama in action 279
Vertical stitches 279
Document stitches 279
Making panoramas that spin 280
Fixing panorama problems 281
11
Preparing Images for the Web or
283
Getting the balance right 287
Web compression formats side by side 289
Making your own web gallery 291
Multi-select pictures to include 293
Built for speed 294
Going live 294
Step-by-step Online Gallery creation 295
Sharing alternatives 298
Sending images as e-mail attachments 299
E-mail Attachments 299
Photo Mail 300
Making simple web animations with Elements 301
Traditional animation 301
Animation – the Elements’ method 302
Animation advice 303
Flipbooks – a new way to animate 303
Creating your own slide shows 304
Creating slide shows 304
Version 6 slide shows in action 305
Editing the slide photos 307
12
Preparing Images for Printing 309
Printing the Elements way 311
Printing from the Organizer workspace 313 The link between paper type and quality prints 313
Making your first print 314
Making multiple prints 316
Contact sheets 316
Picture packages 318
Picture labels 320
Individual Prints 321
Balancing image size and picture quality 322
Getting to know your printer 323
Typical printing problems and their solutions 326
Web-Based Printing 327
Making your first online prints 328
Options for web printing 329
13
Photo Projects
331
Photo projects 332
Photo Projects Workflow 334
Photo Book and Photo Collage 334
CONTENTS
CD and DVD Jackets 338
CD/DVD Label 340
Slide shows on your computer or TV 342
Slide shows in PDF format 343
Slide Show editor 343
Share task pane 343
VCD/DVD with Menu 344
Archiving files direct to CD/DVD 345
Online Gallery 346
Flipbook 348
Sharing photos as E-mail Attachments 350
Sending images as a Photo Mail 351
Sharing online 352
14
Managing Your Files
353
Organizing your photos with Photoshop Elements 354
It starts in-camera 354
And continues when downloading 354 Organizing and searching features 356
Tagging your photos 357
Creating new keyword tags 357
New Face Tagging technology 358
Albums – the Elements way to group alike photos 359
Adding photos to an Album 359
Introducing Smart Albums 360
Creating a new Smart Album 361
Using Find to make Smart Albums 361 Converting Keyword Tags to Smart Albums 362 Album and Keyword Tagging strategies: 362
Using Album Groups 362
Locating files 363
Finding tagged photos or those contained in an Album 363
Find by details (metadata) 364
Attaching a Map Reference 365
Protecting your assets 365
Making your first back up 366
Multi-disk Back up 367
Multi-session Back up 367
Online Back up 367
Back up glossary: 368
Back up hardware: 368
Back up regularly 368
Store the duplicates securely 368
Versioning your edits 369
Versions and Photoshop Elements 369
Elements’ image stacks 370
Auto Stacking 371
Automating editing tasks 373
Multi-selection editing 374
15
Theory into Practice
375
The Project – ‘A Family History’ 376
1. Capturing the source files 378
2. Importing, tagging and creating Albums 379
3. Crop, Straighten, Trim 380
4. Brightness, Contrast, Color 381
5. Removing backgrounds 382
6. Restore and retouch 384
7. Convert to gray and tint 386
8. Creating a Photo Book 387
9. Add extra elements and fine-tune 389
10. Output to print 392
Appendices
393
Jargon buster 394
Keyboard shortcuts 402
Elements/Photoshop feature equivalents 405
Index
406
FOREWORD
Foreword
In the mid-eighties a group of professional photographers, including myself, were invited to attend an early demonstration of the Quantel Graphics Paintbox system in action at a digital retouching house in Covent Garden, London. We all sat spellbound as we saw our scanned images instantly transformed by the magic of this new computer system. This was my fi rst glimpse of the future of photography in a digital age. From that day forward I always wanted to have my own computer retouching system and take control of the magic pen myself. However, I was soon brought back down to earth when I was told how much one of these systems would cost. Back in those days digital retouching services were the preserve of an elite number of businesses such as advertising agency clients, as these were the only people who could afford to pay the equivalent of a good week’s salary for an hour of electronic retouching time.
A few years later, Photoshop made its fi rst appearance – an image-editing program that was designed to run on a desktop computer. From these humble beginnings Adobe Photoshop has grown to become the leading image-editing computer program used by graphic designers, artists, web designers and photographers from all around the world. Millions of people are now able to scan, capture and retouch their own photographs on desktop computers both at home and at work – in fact, I have heard all sorts of people from the bank manager to my hairdresser describe the amazing things they have been able to do to their pictures using a computer.
FOREWORD
Photoshop Elements is essentially a cut-down version of Photoshop, yet it contains nearly all the image manipulation power of the parent program, but in an easy-to-use interface. Although Adobe have limited the range of some of the more advanced Photoshop features and functions, they have included a host of cool features such as the File Browser in the Organizer workspace and the Photomerge feature. Adobe Photoshop Elements is therefore an exciting program in its own right, and is fun to use as well, but it is also a powerful tool, capable of handling a number of professional tasks.
Philip Andrews is a skilled and enthusiastic teacher and here he has produced a very well-writ-ten book that will help you, the reader, to quickly get to grips with all aspects of the program. The book is clearly illustrated throughout and you will find that Philip has thoughtfully includ-ed a number of practical tips on how to capture better photographs. On top of this, he shows you more than how to operate the program – he also demonstrates how to use Photoshop Elements with examples of practical assignments. In my experience I have found that readers always find it much easier to understand a program when they are provided with project examples that have a logical purpose to them. Philip’s book is in every respect refreshingly direct and easy to under-stand.
Whatever your interest, I am sure that you are going to get a lot of interesting use out of Photo-shop Elements. Whether you are into manipulating photographs, wishing to build better websites or producing better looking prints, this book will help you to master all the necessary tools contained in the program.
The learning curve has just got shallower!
Martin Evening
INTRODUCTION
Introduction
Here at Adobe, we believe that we make great software but, just as a car manufacturer would never consider publishing a street index, we rely on gifted authors to provide our users with directions and guidelines on how to make the most of our products.
This task is not a simple one. It requires a good understanding of the product, the digital imaging environment and, most of all, the user. Philip Andrews is unique in that he is an author who possesses all these qualities. He has an ongoing professional photographic practice, lectures at universities and colleges, holds a position as an Adobe Ambassador in Australia and has authored over 300 articles and 30 books worldwide.
With these credentials you would imagine that his texts are informative but a little stuffy and academic – not true! In this, the sixth edition of his best selling Photoshop® Elements book, he again uses a very comfortable and easy-to-understand style that leads the reader carefully through the basics and then onto the more advanced techniques needed to edit and enhance their digital images. He not only provides ‘must have’ information about Photoshop Elements and how to use it, but also introduces the reader to important general digital concepts that puts the package firmly in the context of current imaging technology.
The book is dotted with great illustrations and pictures and, via the video tutorial and resources download section of the associated website and accompanying CD–ROM, readers have the opportunity to follow the step-by-step techniques using many of these same images that are featured in the text. In addition, the chapter dealing with putting ‘Theory into Practice’ shows how you can use Photoshop Elements to enhance your digital photography projects in the context of a real life application.
I believe that with Philip providing you with such a good ‘street index’ to our Photoshop Elements 6 software, you will be creating fantastic digital images in next to no time at all.
Good luck and have fun with your image making.
Jane Brady
A
CKNOWLEDGEMENTS
Acknowledgements
Always for Kassy-Lee, but with special thanks to Adrian and Ellena for putting up with a ‘would-be author’ for a father for the last few months. Yes it is over…till next time at least!
Thanks also to the enthusiastic and very supportive staff at Focal Press whose belief in quality book production has given life to my humble ideas – yet again! Special thanks to Marie Hooper, Margaret Denley, Valerie Geary and Ben Denne for as everyone knows, but doesn’t acknowledge nearly enough, ‘good book production is definitely a team effort’.
My appreciation goes to Jane Brady for her support and kind introduction, and cheers also to Martin Evening, the ‘Guru of GUI’, and Don Day and Richard Coencas for their technical and ‘pixel-based’ guidance.
And thanks once more to Adobe for bringing image enhancement and editing to us all through their innovative and industry-leading products, and the other hardware and software manufacturers whose help is an essential part of writing any book of this nature. In particular I wish to thank technical and marketing staff at Adobe, Microsoft, Sony, Canon, Nikon and Epson.
And finally my thanks to all the readers who continue to inspire and encourage me with their generous praise and great images. Keep e-mailing me to let me know how your imaging is going.
THE BUZZ OF DIGIT
AL PHO
TOGRAPHY
The Buzz of
Digital
Photography
1
The beginning – the digital photograph
Making the digital image
Quality factors in a digital image
The steps in the digital process
Where does Photoshop Elements fit
into the process?
THE BUZZ OF DIGIT
AL PHO
TOGRAPHY
A
part from the initial years of the invention of photography, I can’t think of a more exciting time to be involved in making pictures. In fact, I believe that Fox Talbot, as one of the fathers of the medium, would have little diffi culty in agreeing that over the last few years the world of imaging has changed forever. Digital photography has become the two buzz-words on everyone’s lips. Increasing levels of technology coupled with comparatively affordable equipment have meant that sophisticated imaging jobs that were once the closely guarded domain of industry professionals are now being handled daily by home and business users.
This book introduces you to the techniques of the professionals and, more importantly, shows you how to use these skills to produce high quality images for yourself and your business. With the text centered on Adobe’s Photoshop Elements package and completely revised to cover the new features in version 6 as well as the tools common to the previous versions of the program, you will learn the basics of good digital production from the point of capturing the picture, through simple manipulation techniques, to outputting your images for print and web. To help reinforce your understanding, you can practise with many of the same images that I have used in the step-by-step demonstrations by downloading them from the accompanying CD-ROM. A good selection of video tutorials can also be found on the disk, giving me the chance to guide you through your skills building tasks. There is also a website for the book containing more information and important links to other Elements sites (www. guide2elements.com). See Figure 1.1. Also, you will fi nd a real life project in Chapter 15 showing you how to use your new-found skills to enhance your own images and create a professional looking photo book. Source fi les and comprehensive video tutorials for this project can also be found on the CD-ROM, giving you the opportunity to practise your skills on a real world task. See Figure 1.2.
Figure 1.1 The book’s associated website and CD-ROM contain practice images as well as video tutorials that are designed to build your skills and knowledge. Look for the ‘On the CD-ROM’ icon through out the text. This indicates that there are either associated practice images, or a video tutorial available on the book’s CD-ROM, for the technique.
O
N
TH
E
C
D
-R
THE BUZZ OF DIGIT
AL PHO
TOGRAPHY
Figure 1.2 Digital imaging skills can be used to manipulate and enhance images so that they can be used in a variety of personal and business publications and products. (1) Presentation folder. (2) Framed print. (3) Web page. (4) CD artwork.
The beginning – the digital photograph
THE BUZZ OF DIGIT
AL PHO
TOGRAPHY
Figure 1.3 Continuous tone images have to be converted to digital form before they can be manipulated by computers.
THE BUZZ OF DIGIT
AL PHO
TOGRAPHY
Digital SLR camera
Digital sensor
Scanners work in a similar way, except that these devices use rows of CCD sensors that move slowly over the original, sampling the picture as they go. Generally, different scanners are needed for converting film and print originals; however, some companies are now making products that can be used for both. See Figure 1.6.
Quality factors in a digital image
The quality of the digital file is largely determined by two factors – the number of pixels and the number and accuracy of the colors that make up the image. The number of pixels in a picture is represented in two ways – the dimensions, i.e. ‘the image is 900 × 1200 pixels’, or the total pixels contained in the image, i.e. ‘it is a 3.4 megapixel picture’.
Generally, a file with a large number of pixels will produce a better quality image overall and provide the basis for making larger prints than a picture that contains few pixels. See Figure 1.7. The second quality consideration is the total number of colors that can be recorded in the file. This value is usually referred to as the ‘color or bit depth’ of the image. The current standard is known as 24-bit color or 8 bits per Red, Green and Blue channel. A picture with this depth is made up of a selection of a possible 16.7 million colors. In practice this is the minimum number
Making the digital image
Digital files can be created by taking pictures with a digital camera or by using a scanner to convert existing prints or negatives into pixel form. Most digital cameras have a grid of sensors, called charge-coupled devices (CCDs), in the place where traditional cameras would have film. Each sensor measures the brightness and color of the light that hits it. When the values from all sensors are collected and collated, a digital picture results. See Figure 1.5.
THE BUZZ OF DIGIT
AL PHO
TOGRAPHY
Flatbed or print scanner
Dedicated film scanner Hybrid or
combination film and print scanner
Figure 1.6 Photographs and negatives, or slides, are converted to digital pictures using either film or flatbed scanners.
THE BUZZ OF DIGIT
AL PHO
TOGRAPHY
Figure 1.7 The size of a digital image is measured in pixels. Images with large pixel dimensions are capable of producing big prints and are generally better quality.
THE BUZZ OF DIGIT
AL PHO
TOGRAPHY
The steps in the digital process
The digital imaging process contains three separate steps – capture, manipulate and output. See Figure 1.9. Capturing the image in a digital form is the fi rst step. It is at this point that the color, quality and detail of your image will be determined. Careful manipulation of either the camera or scanner settings will help ensure that your images contain as much of the original’s information as possible. In particular, you should ensure that delicate highlight and shadow details are evident in the fi nal image.
If you notice that some ‘clipping’, or loss of detail, is occurring in your scans, try reducing the contrast settings. If your camera pictures are too dark, or light, adjust the exposure manually to compensate. It is easier to capture the information accurately at this point in the process than try to recreate it later.
Manipulation is where the true power of the digital process becomes evident. It is here that you can enhance and change your images in ways that are far easier than ever before. Altering the color, contrast or brightness of an image is as simple as a couple of button clicks. Changing the size or shape of a picture can be achieved in a few seconds and complex manipulations like combining two or more images together can be completed in minutes rather than the hours, or even days, needed with traditional techniques. See Figure 1.10. Manipulation gives digital illustrators the power to take a base image and alter it many times so that it can be used in a variety of situations and settings. Once changed, it is possible to output this same image in many ways. It can be printed, used as an illustration in a business report, become part of a website, be sent to friends on the other side of the world as an e-mail attachment, or projected onto a large screen as a segment in a professional presentation.
THE BUZZ OF DIGIT
AL PHO
TOGRAPHY
Figure 1.10 An image-editing program can enhance, manipulate and change a base file in many different ways.
(1) Original picture. (2) Black and white. (3) Add noise.
(4) Change color saturation. (5) Twirled.
(6) Crystallized. (7) Reflected. (8) Convert to ink pen.
Where does Photoshop Elements fit into the process?
THE BUZZ OF DIGIT
AL PHO
TOGRAPHY
Photoshop Elements 6
Rather than sitting back and basking in the refl ected glory of the success of the fi rst few releases of Elements (versions 1.0, 2.0, 3.0, 4.0 and 5.0), Adobe has been hard at work improving what was already a great product. Version 6, just like the releases before it, is a state-of-the-art image-editing program full of the features and functions that digital photographers and desktop image makers desire the most. Far from being overshadowed by the power and dominance of its bigger brother Photoshop CS3, Elements has quickly become the editing and enhancement ‘weapon of choice’ by many who count picture making as their passion. Completely revised to cover all versions of the program, this book will help you learn about the core technology and functions that are shared by Photoshop and Elements, and will also introduce you to the great range of features that are unique to Elements.
Figure 1.12 Elements is the center of the imaging process, providing the ability to import, manipulate and output digital pictures.
INTRODUCING PHO
TOSHOP ELEMENTS 6
Introducing
Photoshop
Elements 6
2
Adobe Photoshop Elements 6 – new
tools and features
The Photoshop Elements 6 workflow
INTRODUCING PHO
TOSHOP ELEMENTS 6
P
hotoshop Elements is the type of software tool that photographers, designers and illustrators use daily to enhance and change their photos. There are many companies who make programs designed for this purpose and in this fi eld Adobe has a substantial advantage over most of its competitors because it also produces the fl agship for the industry – Photoshop. Now in its tenth version, this product, more than any other, has forged the direction for image-editing and enhancement software worldwide. In fact, the tools, functions and interface that are now standard to graphics packages everywhere owe a lot to earlier versions of Photoshop.With the release of Elements, Adobe recognized that not all digital imaging consumers are the same. Professionals do require a vast array of tools and functions to facilitate almost any type of image manipulation, but there is a signifi cant and growing number of users that want the robustness of Photoshop but don’t require all the ‘bells and whistles’. This makes Elements sound like a cut-down version of Photoshop, and to some extent it is, but there is a lot more to this package than a mere subset of Photoshop’s features. Adobe has taken the time to listen to its customers, and has designed and included in Elements a host of extra tools and features that are not available in Photoshop. It’s this combination of proven strength and new functions that makes Elements the perfect imaging tool for digital camera and scanner owners who need to produce professional-level graphics economically.
Adobe Photoshop Elements 6 – new tools and features
The release of version 6 of the program builds upon the fi rm foundation and user following that the previous editions secured. The revision contains a variety of new tools and features that I predict will fast become regularly used favorites. At the time of going to press this release is a Windows-only version and builds extensively on the extra organization and management features that were added in 3.0 and were originally part of the Photoshop Album package. Some of the new or upgraded features can also be found in Photoshop CS3, others are only available in Elements. Table 2.1 details some of the changes that are ‘New for 6’ and compares them with features found in previous versions of Photoshop and Elements.
The new or revised features are also highlighted throughout the book with the ‘New for 6’ symbol. Video tutorials detailing how to use these new features are also located on the book’s CD-ROM. Unlike some of the previous versions of the program, version 6 is a Windows-only release and so this text contains no Macintosh equivalents.
Apart from the inclusion of a host of new and revamped features like the Quick Selection tool, a host of auto adjustment options now available in the Organizer workspace, and the dedicated Photo Book and Photo Collage production options, the program continues to improve the picture management features that have made Elements a favorite with digital shooters. Throughout the program’s development, Adobe has been gradually increasing the power of Elements to create albums (previously collections), add keyword tags, rate, back up and search for your photos. In version 6 this work continues and is coupled with brand new ways of editing, enhancing and
INTRODUCING PHO
TOSHOP ELEMENTS 6
using your pictures. For the fi rst time Elements now includes a Project panel along with the Artwork (Artwork and Effects palette in 5.0) designed to help create the many photo creations possible in Photoshop Elements. The Artwork panel continues to house the very popular graphics, shapes, frames options and even more matched graphical elements grouped into project themes are now available. The new Photo Collage feature provides a free form workspace for arranging and presenting your pictures, giving the user more control over the fi nal results than ever before. See Figure 2.1.
The Photoshop Elements 6 workfl ow
Elements 6 provides a workfl ow solution from the moment you download your fi les from camera, scanner or the Net, through organization and manipulation phases and then onto printing (photos, books, calendars) or sharing the pictures electronically (online gallery, slide shows, e-mail attachments). Understanding how the various components in the system fi t together will help you make the most of the software and its powerful new features. See Figure 2.2.
1
2
PHOTOSHOP ELEMENTS PHOTOSHOP
Feature v6 v5.0 v4.0 v3.0 v2.0 v1.0 CS3 CS2 CS
s¬Artwork panel (previously
Artwork and Effects palette)
9
9
8
8
8
8
8
8
8
Organize, Edit, Create, Share
s¬
workfl ow modules
9
8
8
8
8
8
8
8
8
Three levels of editing – Full, Quick
s¬
and Guided
9
8
8
8
8
8
8
8
8
Share web galleries, images and
s¬
videos with Photoshop Showcase
9
8
8
8
8
8
8
8
8
Guided Edit interactive techniques¬
tutorials
9
8
8
8
8
8
8
8
8
New auto enhance options
s¬
s¬Multi-session DVD/CD ROM
writing
9
9
8
8
8
8
8
8
8
Shared media collections with Viiv
s¬
PHOTOSHOP ELEMENTS PHOTOSHOP
Feature v6 v5.0 v4.0 v3.0 v2.0 v1.0 CS3 CS2 CS
Create Desktop wallpaper from
s¬
photos
9
9
9
8
8
8
8
8
8
s¬Convert or remove ICC profi les
9
9
9
8
8
8
9
9
9
s¬View slide shows from inside Elements on TV via Windows
Media Center
9
9
9
8
8
8
8
8
8
s¬2EVAMPED¬3LIDE¬3HOW¬EDITOR
9
9
9
8
8
8
8
8
8
s¬Find by metadata or Version Set
9
9
9
8
8
8
9
9
9
Preview pictures in Full Screens¬
16 bit per channel fi le support
s¬
9
9
9
9
8
8
9
9
9
s¬3HADOW(IGHLIGHTS¬CONTROL
9
9
9
9
8
8
9
9
9
s¬Cookie Cutter cropping tool
9
9
9
9
8
8
8
8
8
s¬Quick Fix editor
9
9
9
9
8
8
8
8
8
Auto Smart fi x enhance feature
s¬
9
9
9
9
8
8
8
8
8
Picture Package for multiple prints
s¬
9
9
9
9
9
9
9
9
9
s¬7EBBASED¬PHOTO¬PRINTING
9
9
9
9
9
9
9
9
9
s¬Save as JPEG 2000
9
9
9
9
9
8
8
9
9
1. START-UP
3. ORGANIZE
The Welcome screen is the fi rst dialog box that the user sees when opening Element 6. From this screen you can choose to organize, edit, create or share your pictures. These four options correlate to different parts of the photographer’s workfl ow and so with new images you will start with organization and work your way through the editing and creating phases before sharing your masterpieces with family and friends.
The Organizer workspace of Elements 6 works like a ‘super’ fi le browser, allowing you to manage, search, tag and back up all the photos in your picture catalog. You can view the photographs via the Photo Browser window or using the Date View. Pictures can be grouped into Albums (collections) and you can fi nd specifi c images via the unique ‘keyword tags’ that you attach to the fi les.
Selecting the Get Photosand Videos option opens the Adobe Photo Downloader feature (APD) which allows you to preview, select and transfer fi les from a range of sources. APD is a sophisticated photo transfer utility for use with card readers and connected cameras as well as fi les and folders.
You can also choose to start Elements in the Editor or Organizer workspaces rather than at the Welcome screen.
The Adobe Photo Downloader utility has two modes – Standard (1) and Advanced (2).
2. GET PHOTOS
Figure 2.2 The Photoshop Elements workfl ow moves from download through editing and enhancing to output.
1
2
In Date View images are grouped and displayed based on the date they were taken.
Building on the success of the Photo Creation projects in version 5.0, the newly named Create options, have been revised and streamlined for 6. Via these features Elements provides users with a multitude of ways to use your favorite images to produce items such as Photo Books, online galleries and slide shows. Rather than being a completely separate workspace, as was the case in the previous versions, users can make a variety of creations directly inside the Editor workspaces.
In Photoshop Elements 6 the creation and sharing components of the program have been broken into two sections. Though some areas, like producing your own web galleries, fall neatly into both camps, there are other options such as sending images by e-mail or ordering prints online that are only available in the new Share task pane.
4. EDIT
5. CREATE
6. SHARE
Version 6 contains three editing workspaces – Full (1), Quick (2) and Guided (3). Switching between the edit modes is as simple as clicking the tab in the top right of the workspace.
As well as being able to output to a desktop printer, you can print online, place an order for your Photo Book to be published, or even create wall calendars or Photostamps. full control over the manipulation and fi ne-tuning of your pictures. You can also add text, play with layers, create
INTRODUCING PHO
TOSHOP ELEMENTS 6
Project Bin – for easily switching to the active document from those open in the Editor workspace and displaying fi les selected in the Organizer or Albums.
Image window – displays the open picture in Elements; can be maximized, minimized and cancelled using the corner buttons
Task pane – for storing panel options, palettes, similar to the Palette Well/Bin in previous versions
Tool bar – displays icons of the tools available; can also be displayed in two-column view
Options bar – displays the options for the currently selected tool
Task modes – click to access the new task modes
The interface
The program interface is the link between the user and the software. Most graphics packages work with a system that includes a series of menus, tools, palettes and dialog boxes. These devices give the user access to the features of the program. The images themselves are contained in windows that can be sized and zoomed. In this regard Elements is no different. Version 6 of the program sees a new look and feel to the workspace with a darker gray surround to most windows and a special Task pane that sits on the right of both Organizer and Editor workspaces. Clicking any of these ‘task’ headings will set up the workspace for the desired action (creating, sharing, editing, etc.) and listing a range of options in the pane itself. See Figure 2.3.
Photoshop Elements 6 now contains three different editing workspaces – Full, Quick, and Guided. For many editing and enhancement tasks you will be using the Full editor, so over the
Figure 2.3 The interface for the Windows-only release of Elements 6 Full edit workspace.
INTRODUCING PHO
TOSHOP ELEMENTS 6
next few pages we will look at the various parts of this screen and how they are used to allow you to interact with and change your pictures. Later on in the chapter we will also examine the interface of other parts of the Elements system such as the Organizer, Quick, Guided editor and Create, Share options.
At the time of publication Photoshop Elements 6 is supplied as a Windows-only package, whereas previous editions of the program have been released in two forms to suit both the Macintosh and Windows platforms.
The change continues
One of the most striking and immediately obvious changes to Elements 6 is the look of the interface. Adobe has been hard at work over the last few revisions redesigning and then refi ning the interface of the workspaces. Now the overall look is more modern, complete with dark gray surrounds and colorful 3-D icons. In keeping with the workfl ow options listed in the Welcome screen (Organize, Edit, Create, and Share) the Organize and Edit workspaces now have brightly colored Task buttons on the right of the screen. Clicking a Task button automatically sets up the workspace and lists the options and tools for the activity. Features like the Project Bin and
Task pane neatly retract to the side or bottom of the screen when they are not in use and most creation and share project steps are now housed within the workspace rather than in a series of separate wizard windows. The Artwork and Effects palette, fi rst introduced in version 5.0, has been separated into the Artwork palette and the Effects palette in Elements 6.So for most of us who are migrating from 5.0, you will feel right at home in the 6 workspace.
New tools and features
As well as reinforcing the existing cosmetic changes initiated in previous versions, Adobe has also chosen to include a range of new tools and features in release 6. These include great new productivity tools such as:
t5IFGuided edit workspace providing interactive step-by-step tutorials that include editing controls within the instructions themselves. This is a great new way to learn how to use Photoshop Elements. See Figure 2.4.
tSmart Albums, as part of the revamped Albums
feature (previously called Collections). These new intelligent collections automatically add photos that match specifi c search criteria to the Album each time the entry is selected.
t5IFQuick Selection tool, also found in Photoshop CS3, now replaces the Magic Selection Brush of previous editions. This tool is similar to the Selection
Figure 2.4 The new Guided edit workspace provides not just step-by-step instructions for using Elements tools and features but includes the controls inside the tutorials.
INTRODUCING PHO
TOSHOP ELEMENTS 6
Brush in that you paint over the areas to include in the selection; where it differs though, is that the tool analyses the picture parts that you want to include, and then builds the selection for you. Cool!
t"MTPCPSSPXFEGSPNMBUFTUSFMFBTFPG1IPUPTIPQJTB
slimline version of the Refi ne Edge feature (Select > Refi ne Edge) to help customize the edge of selections. Using the special dialog you can interactively adjust how smooth or feathered the selection edge is. There is also the option to contract or expand the selection and to preview with or without the ruby mask overlaying the photo. See Figure 2.5.
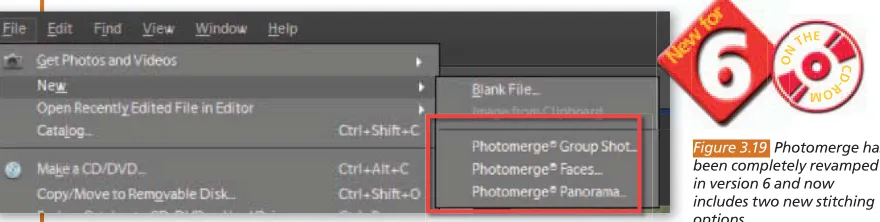
t5IFPhotomerge feature has been completely revised for Photoshop Elements 6. Like the version of the stitching utility released in Photoshop CS3, Photomerge now has four auto layout and blend modes as well as the interactive option that was available the last time round. See Figure 2.6. In 6 Photomerge works more effectively with less need for the user to play with the resultant image in order to obtain a great result. As well as the auto modes, the utility now includes two new options –
Photomerge Group Shot and Photomerge Faces. Both features are designed to help stitch two or more images together to form a unique composite photo as a result.
tPhotomerge Group Shot combines the best parts of multiple photos of a group to create a single photo.
tPhotomerge Faces uses a similar approach to blend facial elements from several images and then produces a single photo displaying the combination.
t*NBHFTEJTQMBZFEJOUIF&MFNFOUT0SHBOJ[FSXPSLTQBDF
can now be written directly to CD or DVD disc with a new Share option. This feature is different to the Backup function which works with whole libraries of images and should prove useful when the user needs to copy several photos quickly to disk. See Figure 2.7.
t *OUIFCJHHFTUDIBOHFUP&MFNFOUTXPSLnPXGPSZFBST
the program now includes a Task pane (right side of the workspace) and fi ve different Task Modes – Organize and
Fix which are only available in the Organizer workspace, and Create,Share and Edit (only available in the Full
Figure 2.6 Photomerge now includes four auto layout and blend options alongside the interactive dialog that was present in Photoshop Elements 5.0.
Figure 2.5 The Refi ne Edge option allows the user to interactively adjust the quality of selection edges and then preview the results using the preview mode.
Figure 2.7 The CD/DVD option in the Share pane provides the ability to write copies of Elements’ fi les directly to disk.
INTRODUCING PHO
TOSHOP ELEMENTS 6
Edit workspace). Breaking the photographic process into these distinct sections will help users manage the processing of their images. See Figure 2.8.
t /FXBVUPFOIBODFPQUJPOTBSFBWBJMBCMFJOUIF'JY
pane of the Organizer workspace. Where in previous editions the type of editing available directly in the Photo Browser was limited to Auto Smart Fix and Auto Red Eye Fix features, now the Fix pane groups all the auto options together and includes Auto Color,
Auto Levels,Auto Contrast,Auto Sharpen and
Crop plus ‘jump to’ buttons to transfer the selected image or images directly to the edit workspaces (Full, Quick or Guided). See Figure 2.9.
t 5IFProject Bin (previously called the Photo Bin) has been completely overhauled. Now in addition to showing open fi les (as was the case in 5.0), it also displays any fi les currently select in the Organizer, or lists all Albums.
t"OFXBin Actions menu has also been included to the feature. From here you can apply various operations currently displayed in the bin: Print Bin Files, Share, Create and Save Bin as an Album.
Revamped favorites
In addition to these new features version 6 also showcases improved versions of many of the program’s existing tools and functions that have proven to be fi rm favorites with image makers worldwide.
Revamped features include:
t Changes to the popular Adjust Color Curves and
Convert to Black and White features introduced in version 5.0.
t*NQSPWFEPMEGBWPSJUFTTVDIBTUIFBrightness/ Contrast feature which now is less damaging when applied to photos.
t 4NPPUIFSDSFBUJPOPGQIPUPQSPKFDUTTVDIBTPhoto Books,Photo Collage,Online Galleries,CD/ DVD Jackets and CD/DVD Labels with step-by-step wizards and settings housed in the Task pane area. See Figure 2.10.
Figure 2.8 The new Task Modes on the right side of both the Editor (1) and Organizer (2) workspaces provide a workfl ow-based way to process your images.
Figure 2.9 Grouped under the new Fix task pane are a bunch of new auto enhance options that were previously only available in the Edit workspaces. Now features such as Auto Levels can be applied directly to selected images in the Photo Browser.
Figure 2.10 Project settings are now grouped in a central location in the Create task pane.
INTRODUCING PHO
TOSHOP ELEMENTS 6
Menus
Most image-editing programs contain a menu bar with a range of choices for program activities. In addition to the standard File, Edit, View, Window and Help menus, Elements contains fi ve other specialist headings designed specifi cally for working with digital pictures. See Figure 2.11.
The Image menu contains features that change the shape, size, mode and orientation of the
picture. Grouped under the Enhance heading is a range of options for altering the color, contrast and brightness of images, as well as the new Auto Sharpen, Adjust Sharpness and Convert to Black and White features. All functions concerning image layers and selections are contained under the Layer and Select menus. The special effects that can be applied to images and layers are listed under the Filter menu and in this latest release the Unsharp Mask fi lter has been moved to the Enhance menu.
Selecting a menu item is as simple as moving your mouse over the menu, clicking to show the list of items, and then moving the mouse pointer over the heading you wish to use. With some selections a second menu (sub-menu) appears, from which you can make further selections. See Figure 2.11.
Some menu items can also be selected using a combination of keyboard strokes called shortcuts. The key combinations for these features are also listed next to the item in the menu list. For example, the Free Transform can be selected using the menu selections Image > Transform > Free Transform or with the key combination of Ctrl + T (the Control key and the letter ‘T’).
Because Photoshop Elements 6 has several different workspaces or modes that you can work within, I will indicate the workspace fi rst before the menu sequence required to select a feature. For instance, to select the Free Transform feature (as pictured in Figure 2.11) from inside the Standard Editor space the notation would be Editor: Image > Transform > Free Transform.
1
2
3
INTRODUCING PHO
Red Eye Removal tool (Y)
Clone Stamp tool (S) contains a set of tools that are used directly on the picture surface. Keystrokes for selecting tools are indicated in brackets. When dragged away from the side of the workspace the tool bar switches to two-column mode (1).
INTRODUCING PHO
TOSHOP ELEMENTS 6
Tools
Unlike menu items, tools interact directly with the image and require the user to manipulate the mouse to defi ne the area or extent of the tool’s effect. Over the years the number and types of tools found in digital photography packages have been distilled to a common few that fi nd their way into the toolbox of most programs. Amongst these familiar items are the Magnifying Glass or Zoom tool, the Brush, the Magic Wand, the Lasso and the Cropping tool. See Figure 2.12 on page 23. In addition to these few, each company produces a specialized set of customized tools that are designed to make particular jobs easier. Of these, Elements users will fi nd the Red Eye Removal tool, Custom Shape, the Selection Brush, Cookie Cutter, Straighten, Healing Brush and the Quick Selection tool particularly useful.
Some tools contain extra or hidden options which can be viewed by clicking and holding the mouse key over the small triangle in the bottom right-hand corner of the Tool button. Alternatively the sub-menu may list a variety of tools related to the one currently selected. Selecting a new option from those listed will replace the current icon in the toolbox with your new choice. To switch back simply reselect the original tool or repeatedly press the tool’s hotkey. See Figure 2.13.
Tool types
The many tools available in Photoshop Elements can be broken into several different groups based on their function or the task that they perform.
Selection tools
Selection tools are designed to highlight or isolate parts of an image for editing. This can be achieved by drawing around a section of the picture using either the Marquee or Lasso tools or by using the Magic Wand tool to defi ne an area by its color. The Selection Brush tool allows the user to select an area by painting the selection with a special brush tool. Careful selection is one of the key skills of the digital imaging worker. Often, the difference between good quality enhancement and a job that is coarse
Figure 2.13 Click and hold the triangle in the bottom right of the tool icon to reveal the tool’s other options or related tool choices.
INTRODUCING PHO
TOSHOP ELEMENTS 6
Figure 2.15 Painting and drawing tools are used to add details to existing images or even create whole pictures from scratch.
and obvious is based on the skill taken at the selection stage. Also included in this group is the new Quick Selection tool that selects picture parts interactively as you drag the brush over the image sureface. See Figure 2.14.
Painting/drawing tools
Although many photographers and designers will employ Elements to enhance images captured using a digital camera or scanner, some users make pictures from scratch using the program’s drawing tools. Illustrators, in particular, generate their images with the aid of tools such as the Paint Bucket, Airbrush and Pencil. However. it is possible to use drawing or painting tools on digital photographs. In fact, the judicious use of tools like the Brush can enhance detail and provide a sense of drama in your images. Also included in this grouping are the Eraser tool, which comes in handy for cleaning up drawn illustrations and photographs alike, the Gradient tool used for fi lling areas with a blend from one color to another, and the Custom Shape tool. Unlike the other tools in this group the Custom Shape tool creates vector-based or sharp-edged graphics. This tool is especially good for producing regularly shaped areas of color that can be used as backgrounds for text. See Figure 2.15.
Enhancement tools
These tools are designed specifi cally for use on existing pictures. Areas of the image can be sharpened or blurred, darkened or lightened and smudged using features like the Burn or Dodge tool. The Red Eye Brush is great for removing the ‘devil’-like eyes from fl ash photographs and the Clone Stamp tool is essential for removing dust marks, as well as any other unwanted picture details. The Spot Healing tool works like an advanced version of the Clone Stamp. See Figure 2.16.
INTRODUCING PHO
TOSHOP ELEMENTS 6
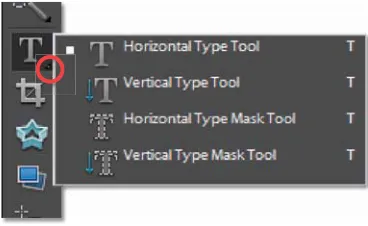
Figure 2.18 The Text tool is used to add type and type masks to images.
Figure 2.17 The (AND¬TOOL¬IS¬USED¬TO¬NAVIGATE¬
around enlarged pictures, whereas the Zoom tool alters the magnifi cation of the image on screen.
Figure 2.19 The Crop and Cookie Cutter tools are used for changing the shape of your pictures and removing unwanted edge sections.
Move and view tools
The Hand tool helps users navigate their way around images. This is especially helpful when the image has been ‘zoomed’ beyond the confi nes of the screen. When a picture is enlarged to this extent it is not possible to view the whole image at one time; using the Hand tool the user can drag the photograph around within the window frame. The Zoom tool allows you to get closer to, or further away from, the picture you are working on and the Move tool is used to select, and move, individual picture parts within the picture itself. See Figure 2.17.
Text tools
Combining text with images is an activity that is used a lot in business applications. Elements provides the option to apply text horizontally across the page, or vertically down the page. It is also possible to drag the cursor on the image to create Paragraph text. In addition, since version 2.0, two special text masking options have been included that can be used in conjunction with images to produce spectacular effects. See Figure 2.18.
Cropping and straightening tools
INTRODUCING PHO
TOSHOP ELEMENTS 6
Figure 2.20 The options bar contains all the settings for the currently selected tool. The way that a tool behaves is based on the values found here.
The Straighten tool is used to correct pictures that are slightly crooked by click-dragging a line along the edge of objects that are meant to be horizontal. After letting the mouse go, Elements rotates the photo so that the marked line becomes horizontal. Using the Control (Ctrl) key while drawing also allows you to straighten vertically.
Options bar
Each tool and its use can be customized by changing the values in the options bar. See Figure 2.20. It is located below the shortcuts bar at the top of the screen. The default settings are displayed automatically when you select the tool. Changing these values will alter the way that the tool interacts with your image. For complex tools, like the Brush, more settings can be found by selecting the More button located to the extreme right of the bar.
1
2
3
Palettes, panels and panes
Palettes are small windows that help the user enhance their pictures by providing extra information about images or by listing a variety of modifi cation options. See Figure 2.21. Palettes can be docked in the Palette Bin (Palette Well for versions 1.0 and 2.0) or dragged and dropped onto the main editing area. Commonly used functions can be grouped by dragging
Figure 2.21 Palettes (1) and Panel (2) listings provide a visual summary of image enhancement tools and features. Panel contents remain fi xed in the pane area of the workspace whereas palettes are able to be dragged from here to the main workspace where they become stand-alone entities (3).
ON
THE
C
D
INTRODUCING PHO
TOSHOP ELEMENTS 6
Figure 2.22 The Guided edit workspace combines step-by-step instruction with embedded enhancement or edit controls.
each palette by their tab onto a single palette window. To save space only have open those palettes that you need for the editing or enhancing job at hand. Close the remaining palettes by clicking the Close button in the top of the palette window or drag them to the retractable Palette Bin so that they are out of the way.
In addition to palettes Photoshop Elements 6 also contains panels. These are essentially the same as palettes in that they list settings or controls, but they differ because they can’t be dragged onto the main workspace. Most panels are associated with the new Task Modes (Create, Share, etc.), whereas palettes are used in the Full edit workspace and owe their heritage to Photoshop.
Guided edits
The Guided edit workspace is new for Photoshop Elements 6 and combines the step-by-step instructions that used to be found in the How To feature with the direct enhancement control of the Quick edit space. Selecting the Guided tab from the Edit task pane displays a list of the tutorials that ship with Elements. See Figure 2.22. Clicking a tutorial heading will reveal subheadings for specifi c topics. Selecting a heading topic will display a set of instructions together with associated buttons and controls. For instance, in the example here, two Rotate buttons (rotate left and rotate right) are displayed in the panel. Clicking either of these buttons will perform the same action as selecting the same options from the Image > Rotate menu.
Guided edit is best used for learning how to use new tools and techniques or, as is the case with the new Photomerge Faces and Group Shot options, as a way to step through complex techniques.
The Guided Activities > Guide for Editing a Photo entry contains a collection of guided edits that are useful when correcting images. These include crop, lighten, darken, touch up and sharpen.
INTRODUCING PHO
Figure 2.23 The Quick editor brings together all your most commonly used tools and adjustment features into one easy- and quick-to-use workspace.
The Quick editor (previously Quick Fix editor)
The Quick editor (Enhance > Quick Fix), which was introduced in version 2.0 of Elements, cleverly combined a variety of commonly used enhancement and correction tools into a single image control center. With this feature the user no longer needed to access each individual tool or menu item in turn – rather all the options are available in one place. The feature proved so popular that in Elements 3.0 a completely new editing option, called the Quick editor, was introduced. The component is accessed from the Welcome (or start-up) screen, or via the Quick Fix shortcut button in the Standard editor workspace or the Edit shortcut key and menu in the Organizer. The Quick edit workspace has the same before and after layout as the original Elements 2.0 dialog and contains a reduced tool and feature set designed to facilitate the fast application of the most frequent of all enhancement activities undertaken by the digital photographer. See Figure 2.23.
INTRODUCING PHO
TOSHOP ELEMENTS 6
Figure 2.24 The Photo Browser or Organizer shortcuts and options bar provide controls and button-based access to a range of organizing, editing and sharing options for selected thumbnail images.
The Zoom, Hand, Crop, Quick Selection tool (and the nested Selection Brush) and Red Eye Removal tools located in a small tool bar to the left of the screen are available for standard image-editing changes and the fi xed Palette Bin, to the right, contains the necessary features to alter and correct the lighting, color, orientation ( Rotate), red eye (automatically) and the sharpness of your pictures.
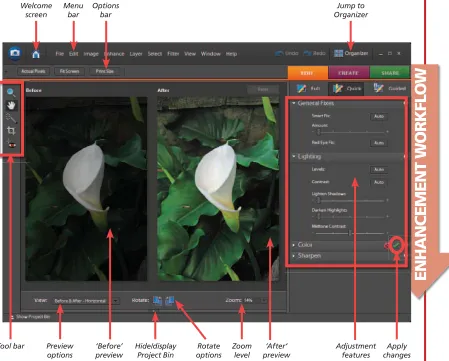
One of the best aspects of the Quick editing option is the fact that the user can choose to apply each image change automatically, via the Auto button, or manually using the supplied sliders. This approach provides both convenience and speed when needed, with the option of a manual override for those diffi cult editing tasks. The adjustment features are arranged in a fashion that provides a model enhancement workfl ow to follow – simply move from the top to the bottom of the tools starting with picture rotation, working through lighting and color alterations and, lastly, applying sharpening.
The Organizer workspace (Photo Browser or Date View)
Along with the Quick editor, Elements 3.0 also introduced a new sophisticated fi le browsing and management workspace called the Organizer. Previous to this Elements incorporated an older style File Browser feature which provided a quick way to visually locate your images but didn’t contain the range of search, tag and display options that the Organizer workspace boasts. See Figures 2.24 and 2.25.
Once the picture fi les have been imported (Organizer: File > Get Photos and Videos) into Elements they can be viewed by date taken, their associated tags and even their folder location. Pairs of pictures can be viewed side by side with the Organizer: Display > Compare Photos Side by Side feature to help choose the best shot from a series of images taken of the same subject. Instant slide
Thumbnail size
Display photo details Display
options
Jump to edit workspaces
Task modules
Display order Rotate